



このチュートリアルでは、新しいReactアプリを始めます。 React app and transition to native mobile development using Capacitor. You can also add Capgo Native Navigation and Transitions for a native mobile feel, and use tailwind-capacitor for safe areas.
Capacitor allows you to easily convert your React web application into a native mobile app without significant modifications or learning a new skill like React Native.
Reactアプリをモバイルアプリに変換するには、数ステップで済みます。
このチュートリアルでは、Reactアプリの新しいプロジェクトから始めて、Capacitorを使用してネイティブモバイルアプリに進むプロセスをガイドします。Capgo Native Navigation、Transitions、tailwind-capacitorを使用して安全なエリアも可能です。
Capacitorについて
CapacitorJSはゲームチェンジャーです!あなたはあらゆるWebプロジェクトに__CAPGO_KEEP_0__を容易に組み込むことができ、Webビューにアプリケーションをwrapし、ネイティブのXcodeとAndroid Studioプロジェクトを生成します。また、プラグインはJSブリッジを使用してカメラなどのネイティブデバイス機能にアクセスできます。
Capacitorを使用すると、複雑なセットアップや急な学習曲線なしで素晴らしいネイティブモバイルアプリを取得できます。APIがスリムで機能性がstreamlinedなので、プロジェクトに簡単に組み込むことができます。私に聞いてください、あなたはCapacitorを使用して完全に機能するネイティブアプリを実現することに驚くでしょう!
Reactアプリを準備する
このチュートリアルでは、Reactアプリケーションを開始する方法は多数ありますが、簡単な方法を使用します。
npx create-react-app my-appプロジェクトのエクスポート プロジェクトのエクスポート package.jsonに含める簡単なスクリプトを追加して、Reactプロジェクトをビルドしてエクスポートすることができます。 実行可能なスクリプト 実行可能なスクリプト
{
  "scripts": {
    "start": "react-scripts start",
    "build": "react-scripts build",
    "test": "react-scripts test",
    "eject": "react-scripts eject"
  }
}
実行可能なスクリプト npm run build 無事を期せず、プロジェクトのルートにある新しいフォルダを発見することができなければなりません。
This folder will be used by Capacitor later on, but for now, we must set it up correctly.
Adding Capacitor to Your React App
任意の Web アプリをネイティブモバイルコンテナにパッケージ化するには、最初の数ステップを実行する必要がありますが、その後は単に 1 つのコマンドを実行するだけです。 sync command.
次に、iOSおよびAndroidプラットフォームの関連パッケージとコアパッケージをインストールする必要があります。 Capacitor CLI この時点で、新しい ios フォルダを観察することができなければなりません。
__CAPGO_KEEP_0__
Finally, we can add the platforms, and Capacitor will create folders for each platform at the root of our project:
# Install the Capacitor CLI locally
npm install -D @capacitor/cli

# Initialize Capacitor in your React project
npx cap init

# Install the required packages
npm install @capacitor/core @capacitor/ios @capacitor/android

# Add the native platforms
npx cap add ios
npx cap add android
Capacitor Capacitor と Android プロジェクトのフォルダ
実際のネイティブプロジェクトです!
Androidプロジェクトにアクセスするには後で、Android Studioをインストールする必要があります。 Android StudioiOSの場合、Macが必要で、Xcodeをインストールする必要があります。 Xcode.
さらに、プロジェクトのフォルダに capacitor.config.ts ファイルがあります。このファイルには、Syncの際に使用される基本的なCapacitor設定が含まれています。webDirという設定だけに注意してください。 webDir、これは現在不正確です。
この問題を解決するには、 capacitor.config.json ファイルを開いて webDir:
{
  "appId": "com.example.app",
  "appName": "my-app",
  "webDir": "out",
  "bundledWebRuntime": false
}
を更新してください。
npm run build
npx cap sync
コンテキスト: HTMLテキストのフラグメント (親キー `solutions_cordova_to_capacitor_ai_step2_body`。ページ/エリア: Capgoのソリューションズマーケティングページ。ロール: ウェブサイトのコピー文。見つける場所: ソリューションズ/コルダボアイトカピタロイ.astro。メッセージキー `solutions_cordova_to_capacitor_ai_step2_body` (ソリューションズコルダボアイトカピタロイステップ2ボディ)。 npm run build 以下のコマンドを実行してみてください。
最初のコマンド npx cap sync ウェブの code はすべて、ネイティブプラットフォームの適切な場所に同期されるため、アプリ内で表示される。
2番目のコマンド は、ウェブCapacitorをすべてのネイティブプラットフォームの適切な場所にSyncします。ウェブCapacitorが表示されるアプリに表示されるようにします。 時はもう実行する npx cap sync だ。
気づかずに、実際には完了しているので、デバイスでアプリを確認してみましょう。
ネイティブアプリをビルドしてデプロイする
iOSアプリを開発するには、 Xcode がインストールされている必要があります。また、Androidアプリを開発するには、 Android Studio がインストールされている必要があります。さらに、アプリをアプリストアで配布する場合、iOSではApple Developer Programに登録し、AndroidではGoogle Play Consoleに登録する必要があります。
ネイティブモバイル開発に慣れていない場合は、以下のCapacitor CLIを使用して、両方のネイティブプロジェクトを簡単に開くことができます:
npx cap open ios
npx cap open android
ネイティブプロジェクトを設定した後、デバイスにアプリをデプロイするのは簡単です。Android Studioでは、設定を変更することなく、デバイスにアプリをデプロイできます。以下が例です:
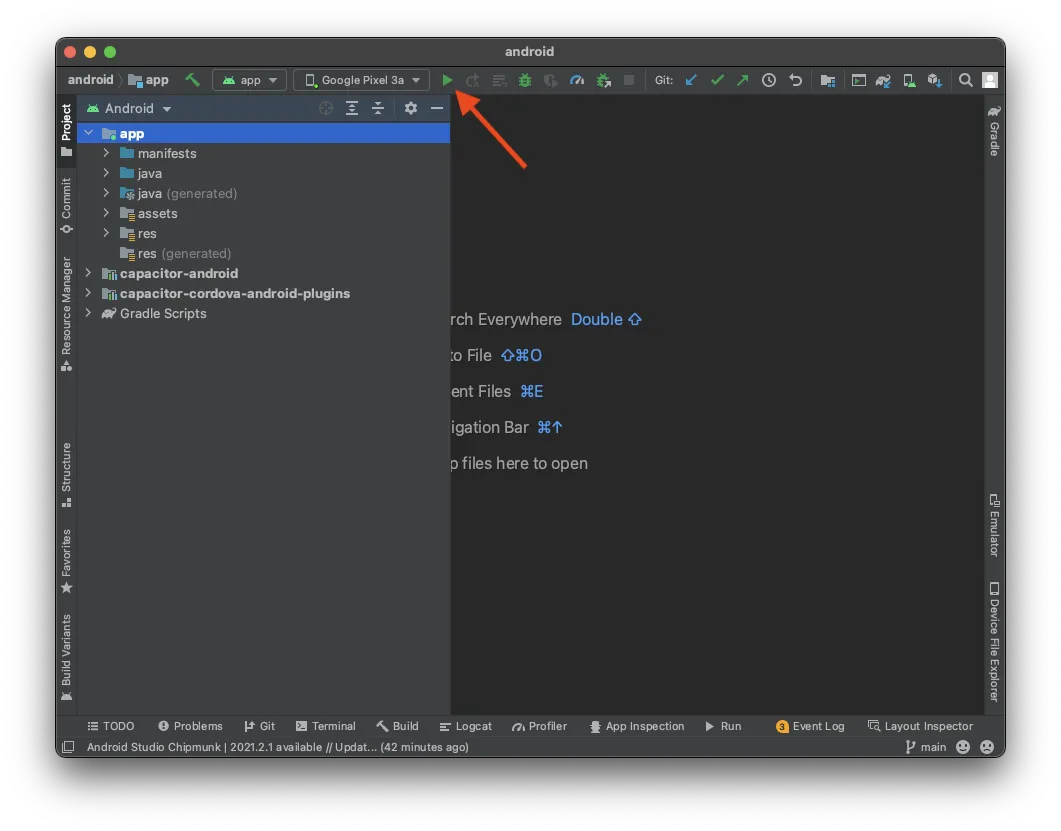
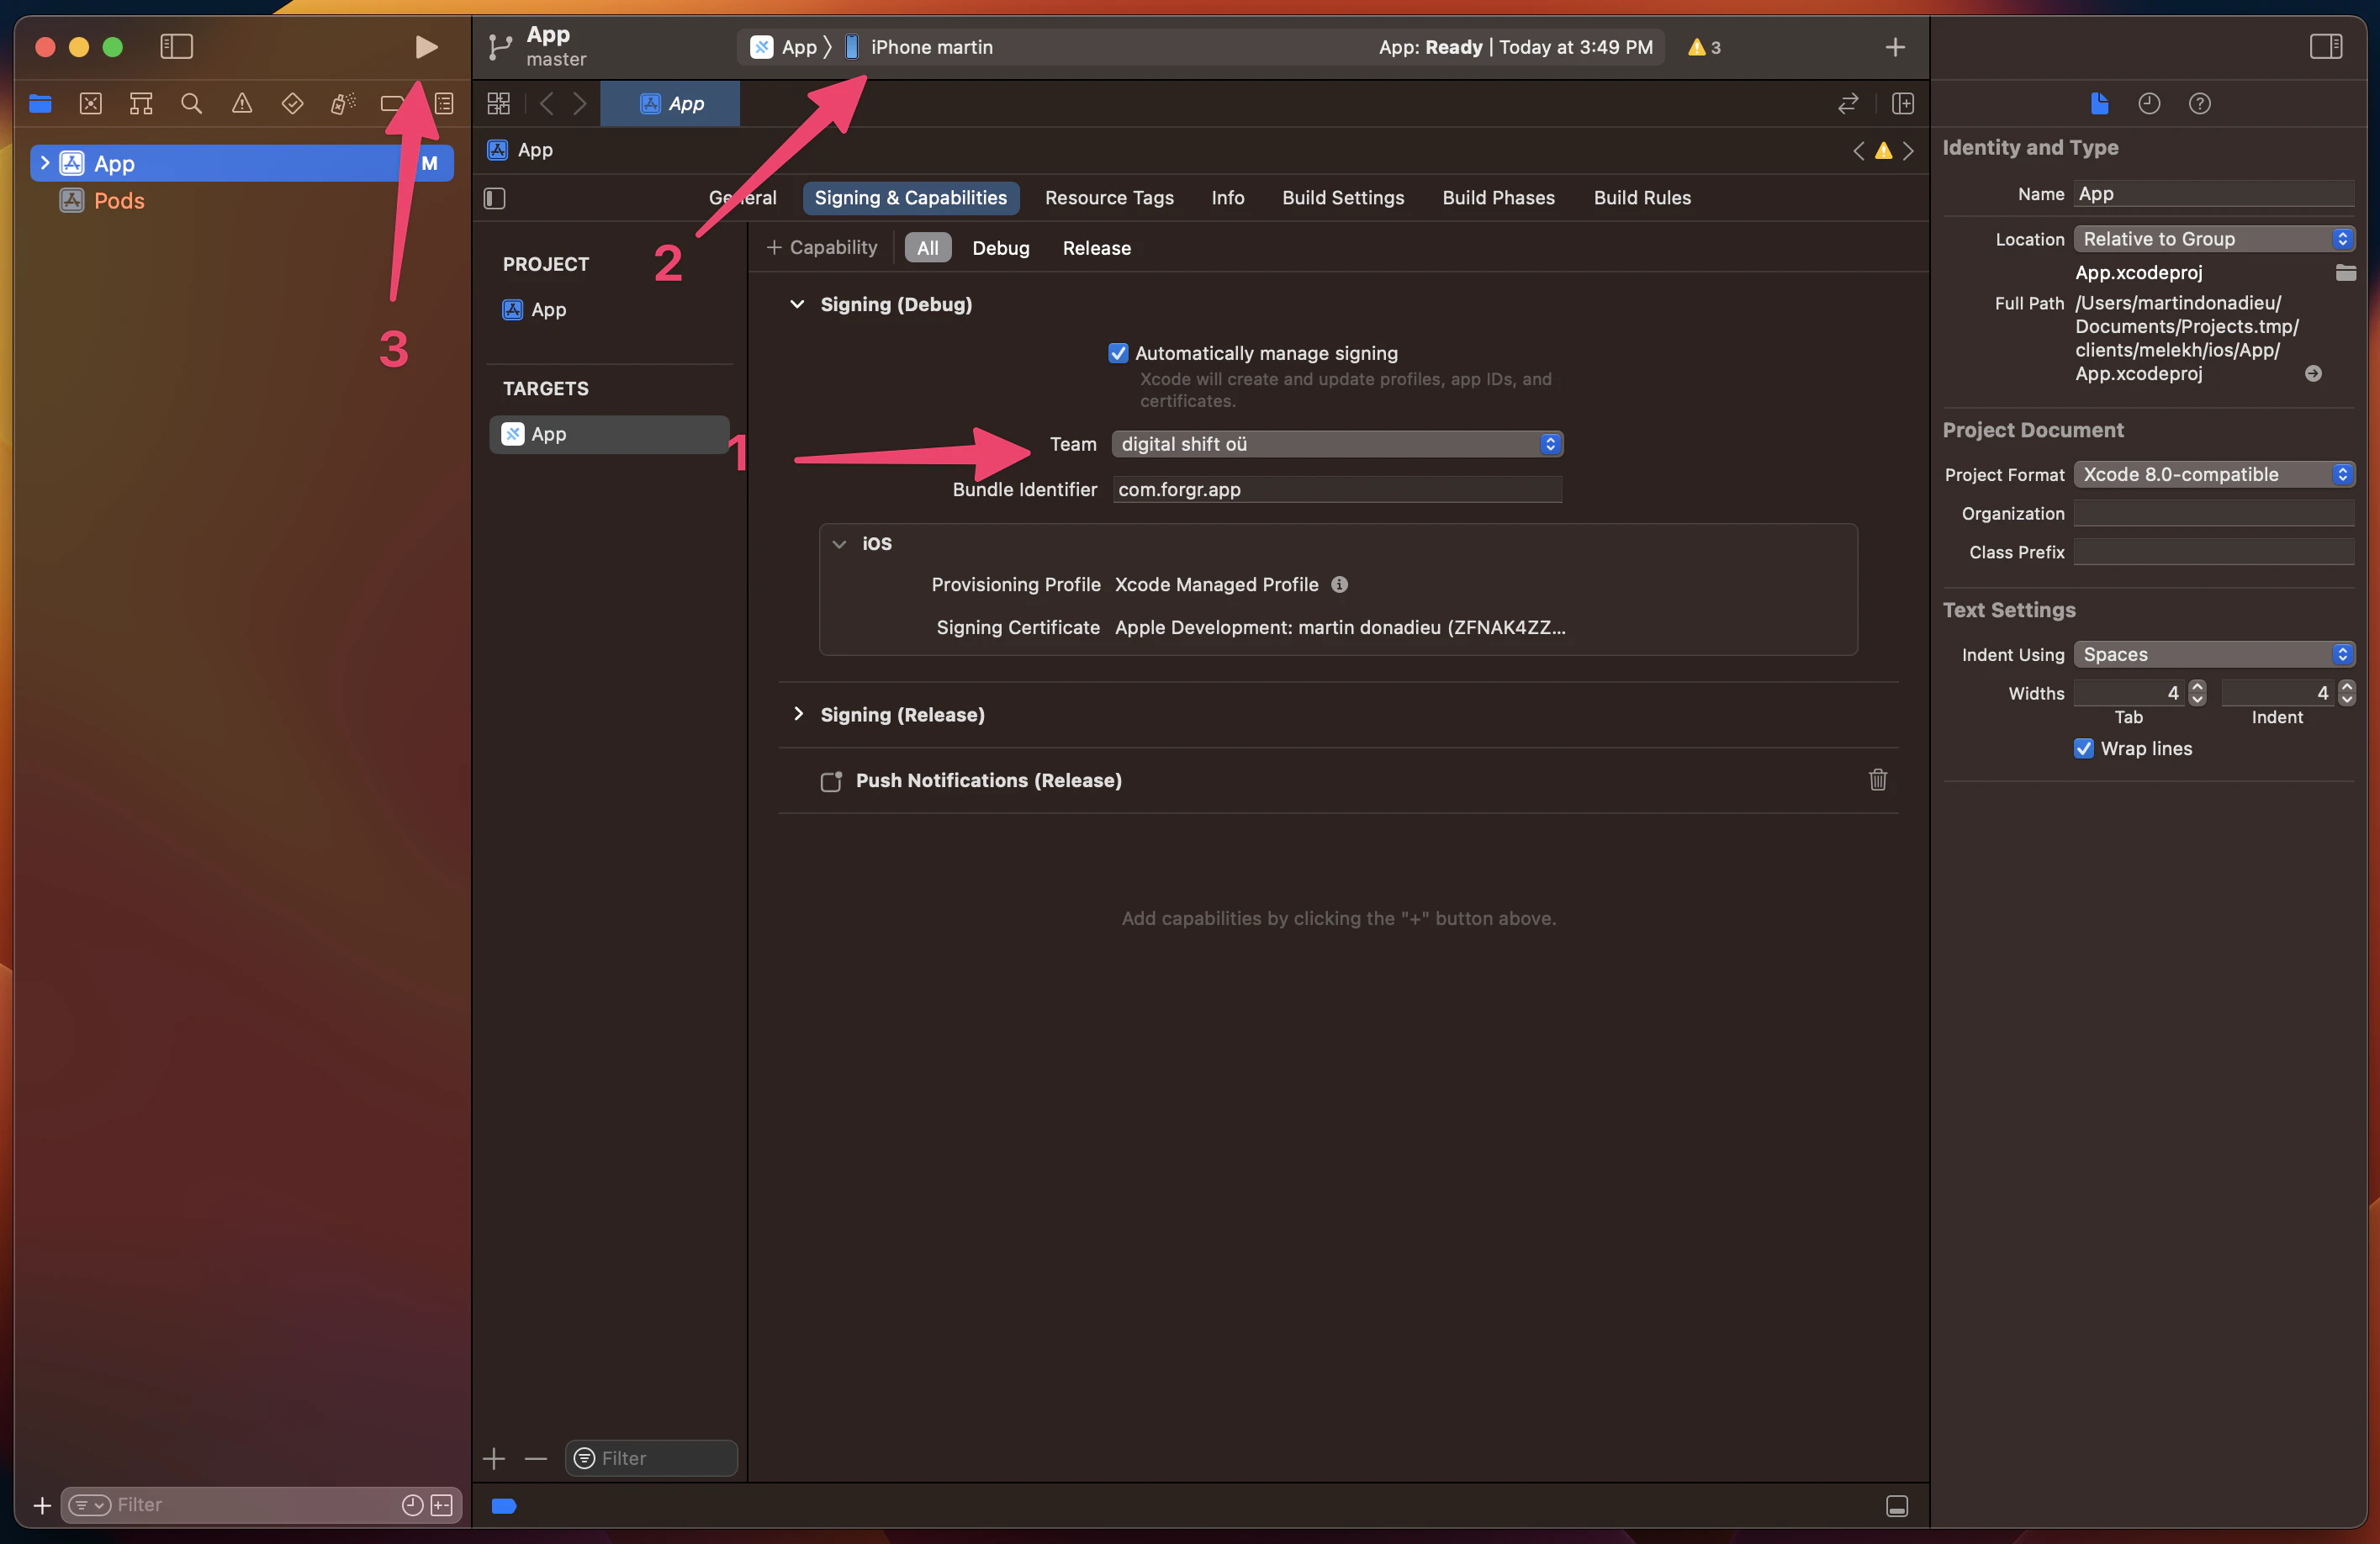
In Xcode、実機にアプリをデプロイするには、サインインアカウントを設定する必要があります。シミュレーター以外に実機にアプリをデプロイするには、Xcodeはプロセスをガイドしますが、再び、開発者プログラムに登録する必要があります。 その後、実機に接続したデバイスでアプリを実行するには、上部でデバイスを選択し、単に再生ボタンをクリックするだけです。 ここでは例を示します。
成功しました! React Webアプリをモバイルデバイスにデプロイしました。 ここでは例を示します。
しかし、開発中にこのプロセスをより速く実行する方法もあります…
Capacitor ライブ リロード
ここまで来たら、すべてのモダンフレームワークでホットリロードができることが慣れました。 そして、良いニュースは、ホットリロードの機能をモバイルデバイスでも実現できることです。 モバイルデバイスでもホットリロード モバイルデバイスでローカルにホストされているアプリにアクセスするには、ネットワーク上でライブリロードを有効にする必要があります。
__CAPGO_KEEP_0__ アプリは、特定のURLからコンテンツを読み込むように設定する必要があります。 __CAPGO_KEEP_0__ Live Update Capacitor app
ローカルIPアドレスを確認する第一歩は、IPアドレスを調べることです。Macを使用している場合、ターミナルで以下のコマンドを実行してみましょう。
ipconfig getifaddr en0Windowsの場合、コマンドを実行してください。
ipconfig次に、IPv4アドレスを探してみましょう。
Capacitorにアプリを直接サーバーから読み込ませるように指示するには、ファイルに別のエントリを追加する必要があります。 capacitor.config.ts file:
import { CapacitorConfig } from '@capacitor/cli';

const config: CapacitorConfig = {
  appId: 'com.example.app',
  appName: 'my-app',
  webDir: 'out',
  bundledWebRuntime: false,
  server: {
    url: 'http://192.168.x.xx:3000',
    cleartext: true
  }
};

export default config;
これらの変更を適用するには、コピーしてnativeプロジェクトに適用してください。 コマンドは、コマンドと似ていますが、サーバーからアプリを読み込むように指示するため、サーバーからアプリを読み込むように指示するコマンドと異なります。コマンドは、コマンドと似ていますが、サーバーからアプリを読み込むように指示するため、サーバーからアプリを読み込むように指示するコマンドと異なります。
コマンドは、コマンドと似ていますが、サーバーからアプリを読み込むように指示するため、サーバーからアプリを読み込むように指示するコマンドと異なります。
npx cap copyThe copy コマンドは、コマンドと似ていますが、サーバーからアプリを読み込むように指示するため、サーバーからアプリを読み込むように指示するコマンドと異なります。 syncコマンドは、コマンドと似ていますが、サーバーからアプリを読み込むように指示するため、サーバーからアプリを読み込むように指示するコマンドと異なります。 変更をウェブフォルダにコピーする と設定を、ネイティブプロジェクトを更新せずに
Android StudioまたはXcodeを使用して、もう一度アプリをデプロイできます。 その後、もしReactアプリに何か変更が加わった場合 アプリは自動的に再読み込みされ 変更が表示されます!
注意してください 新しいプラグインをインストールした場合、カメラなどは、ネイティブプロジェクトを再構築する必要があります。 これは、ネイティブファイルが変更されたため、オンザフライで行うことはできません。
Note that you should use the correct IP and port in your configuration. The code block above shows the default React port for demonstration purposes.
正しいIPアドレスとポート番号を使用する必要があります。 Capacitor ブロックは、デモ用にデフォルトのReactポートを示しています。
Capacitor プラグインの使用
npm i @capacitor/shareプラグインの使用方法をご紹介します。 これは、前にも何度か言及したプラグインです。 これを行うには、次のコマンドを実行して、比較的シンプルなプラグインをインストールできます。 Shareプラグインは何も特別なものではありませんですが、native shareダイアログが表示されます! share() このため、パッケージをインポートし、関数を呼び出すだけです。 src/App.js を次のように変更します。
import React from 'react';
import { Share } from '@capacitor/share';

function App() {
  const share = async () => {
    await Share.share({
      title: 'Open Youtube',
      text: 'Check new video on youtube',
      url: 'https://www.youtube.com',
      dialogTitle: 'Share with friends'
    });
  };

  return (
    <div>
      <h1>Welcome to React and Capacitor!</h1>
      <p>
        <h2>Cool channel</h2>
        <button onClick={() => share()}>Share now!</button>
      </p>
    </div>
  );
}

export default App;
前述のように、新しいプラグインをインストールする際には、sync操作を実行し、再度アプリをデバイスにデプロイする必要があります。以下のコマンドを実行してください。
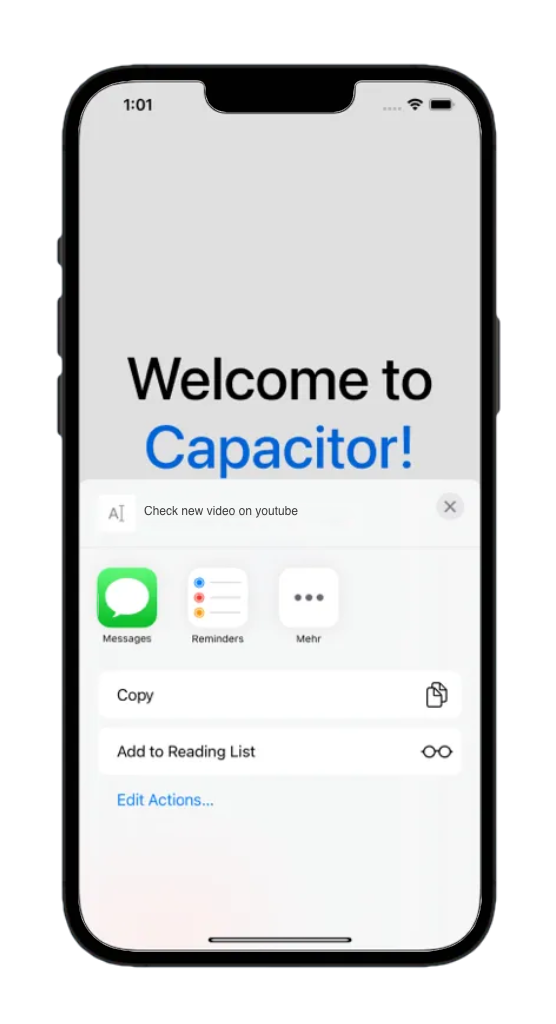
npx cap syncボタンを押すと、native shareダイアログが素晴らしい動作を示します!
次に、iOSとAndroidでアプリがよりnativeな感じになるように、Capgoナビゲーションとトランジションを実装し、水平オーバーフローまたは安全エリアがカットされたiOSの一般的なレイアウト問題を解決できます。
iOSとAndroidでnativeなUIを実現するCapgoNative Navigation and Transitions
数年間、 Ionic を使用してクロスプラットフォームアプリケーションを構築してきましたが、Reactと統合することはハック的で、すでにReactを持っている場合にはほとんど価値がありません。 Tailwind CSS.
For a native mobile feel in a React + Capacitor app, use Capgo plugins instead of web-only UI kits like Konsta UI:
- @capgo/capacitor-native-ナビゲーション —ネイティブのナビゲーションバー、iOSのLiquid Glassタブバー、Androidのブレードタブバー
- @capgo/capacitor-transitions —Ionicスタイルのページ遷移とiOSのエッジスワイプバック、WebViewレイヤー内で、Ionic UIを採用することなく。
両方をインストールします。
bun add @capgo/capacitor-native-navigation @capgo/capacitor-transitions
bunx cap sync
ネイティブのナビゲーションをCSSのインセットモードで設定して、Webコンテンツがネイティブのバーを尊重するようにします。
import { NativeNavigation } from '@capgo/capacitor-native-navigation';

await NativeNavigation.configure({
  contentInsetMode: 'css',
  animationDuration: 360,
  glass: {
    effect: 'liquidGlass',
  },
});
リキッドグラススタブバーをレンダリングします。(iOSはシステムが所有するレンダリングを使用し、AndroidはブレードされたWebViewのバックグラウンドを使用します)。
await NativeNavigation.setTabbar({
  selectedId: 'home',
  labelVisibilityMode: 'labeled',
  icons: true,
  colors: { dynamic: true },
  tabs: [
    { id: 'home', title: 'Home', icon: { svg: '...' } },
    { id: 'settings', title: 'Settings', icon: { svg: '...' } },
  ],
});

await NativeNavigation.addListener('tabSelect', ({ id }) => {
  navigate(`/${id}`);
});
ネイティブのページ遷移をアプリシェルに追加します。
import { useEffect, useRef } from 'react';
import { useNavigate } from 'react-router-dom';
import '@capgo/capacitor-transitions';
import { initTransitions, setDirection, setupRouterOutlet } from '@capgo/capacitor-transitions/react';

initTransitions({ platform: 'auto' });

export function AppShell() {
  const navigate = useNavigate();
  const outletRef = useRef<HTMLElement>(null);

  useEffect(() => {
    if (outletRef.current) {
      setupRouterOutlet(outletRef.current, { platform: 'auto', swipeGesture: 'auto' });
    }
  }, []);

  const openSettings = () => {
    setDirection('forward');
    navigate('/settings');
  };

  return <cap-router-outlet ref={outletRef}>{/* routes */}</cap-router-outlet>;
}
ルーティングされたページをwrapします。 cap-router-outlet, cap-page, cap-content、そして呼び出し setDirection('forward') または setDirection('back') Capacitorライブアップデートの代替
Capacitorライブアップデートの代替 Using @capgo/capacitor-native-navigation and Using @capgo/capacitor-transitions.
Capacitorライブアップデートの代替
Capacitorライブアップデートの代替 @capgo/Tailwind-capacitor Capacitorライブアップデートの代替 tailwind-capacitor on npm). It provides safe-areas Capacitorのフレンドリーなユーティリティとその他のTailwindプラグイン:
bun add -D tailwind-capacitorIn src/index.css:
@import 'tailwindcss';
@plugin "@capgo/tailwind-capacitor/platform";
@plugin "@capgo/tailwind-capacitor/safe-areas";
使用するユーティリティとして pt-safe, pb-safe, そして px-safe 手動で散らかすのではなく env(safe-area-inset-*) プロジェクトは活発に開発されています — React設定用に欠けているものがあれば、__CAPGO_KEEP_0__にPRを送信してください open a PR on GitHub.
iOSでコンテンツが切り取られた、ずれた、または水平方向にスクロールできるようになっている場合、ビューポートタグを追加したり修正したりするだけでは通常解決しません。次の順序でこれらのチェックを実行してください。
ビューポートメタタグが正しく適用されていることを確認してください overflow-x: hidden ビューポートメタタグを追加してください
__CAPGO_KEEP_0__
__CAPGO_KEEP_0__ index.html inside <head>:
<meta name="viewport" content="width=device-width, initial-scale=1, viewport-fit=cover" />iOSのセーフエリアを1つのルートラッパーからのみ管理する
1つのアプリシェルを作成し、その中にセーフエリアのパディングを適用する
html,
body,
#root {
  width: 100%;
  min-height: 100%;
  margin: 0;
  padding: 0;
  overflow-x: hidden;
}

* {
  box-sizing: border-box;
}

.app-shell {
  min-height: 100dvh;
  width: 100%;
  padding-top: env(safe-area-inset-top);
  padding-right: env(safe-area-inset-right);
  padding-bottom: env(safe-area-inset-bottom);
  padding-left: env(safe-area-inset-left);
}
すべてのページコンテンツを .app-shell. 複数のネストされたコンポーネントにセーフエリアのパディングを複数回適用すると、UIが切り取られたり大きすぎるように見えることがある。
Live Update @capgo/tailwind-capacitorを使用すると、同じパディングを1つのシェルに適用できます。 pt-safe pb-safe px-safe __CAPGO_KEEP_0__ iOS
Set Capacitor iOS contentInset to never 最初
In capacitor.config.ts, nativeのインセットを無効にしてCSS (またはNative Navigationの) contentInsetMode: 'css') が安全エリアを管理するようにします:
const config: CapacitorConfig = {
  appId: 'com.example.myapp',
  appName: 'my-app',
  webDir: 'dist',
  ios: {
    contentInset: 'never',
  },
};
Capacitorの自動コンテンツインセットとCSSのパディングを組み合わせると、一般的なダブルスペースの原因となります。 env(safe-area-inset-*) 実際にオーバーフローしている要素を探します。
通常の原因は、
, Tailwind 100vw, 固定ピクセル幅、または大きい w-screenSafari Web Inspectorで実行します: min-width.
Tailwindの場合、
[...document.querySelectorAll('*')]
  .filter(el => el.scrollWidth > document.documentElement.clientWidth)
  .map(el => ({
    el,
    tag: el.tagName,
    class: el.className,
    scrollWidth: el.scrollWidth,
    clientWidth: document.documentElement.clientWidth,
  }));
に置き換えます w-screen with w-full 可能の場合。多くの水平オーバーフロー問題は、安全エリアの重複パディングや固定幅のコンテナからではなく、ビューポートメタタグ自体から生じることがありません。 100vw / w-screen結論
Conclusion
Capacitor is an excellent option for building native applications based on an existing web project, offering a simple way to share code and maintain a consistent UI.
__CAPGO_KEEP_0__ Capgoさらに、ライブアップデートを簡単に追加できます。ユーザーは常に最新の機能とバグ修正にアクセスできます。
If you would like to learn how to add Capgo to your React app, take a look at the next article:
Keep going from Building Mobile Apps with React and Capacitor
Capacitorを使用している場合は、 Building Mobile Apps with React and Capacitor CI/CDの自動化を計画する場合、Capacitorを接続してください。 Capgo CI/CD Capgo製品ワークフロー向けのCapgo CI/CD Capgo ネイティブビルド Capgo製品ワークフロー向けのCapgo ネイティブビルド Capgo インテグレーション Capgo製品ワークフロー向けのCapgo インテグレーション CI/CD統合 Capgoビルダー/ネイティブクラウドビルド製品ページ GitHub アクション統合 GitHub アクション統合





