This is the full developer documentation for capgo
# Selamat datang di Capgo
> Capgo는 Capacitor와 모바일 개발팀을 위한 오픈 소스 실시간 업데이트 플랫폼으로, 사용자에게 수일이 아닌 수분 만에 실시간 업데이트를 제공할 수 있게 해줍니다
Die Kraft des Live-Updates
Liefern Sie nahtlos Live-App-Updates, kritische Fehlerbehebungen, Inhaltsänderungen, Beta-Funktionen und mehr, um Ihren Nutzern das bestmögliche Erlebnis zu bieten
Einfach zu integrieren
Das Plugin benötigt 3 Schritte zur Integration in Ihren Codebase und ermöglicht es Ihnen, Updates in Minuten statt Tagen an Ihre Nutzer zu senden!
Installation
Führen Sie `npx @capgo/cli@latest init [APIKEY]` aus, um zu beginnen
Umfangreiche Dokumentation
Lernen Sie in der [Dokumentation](/docs/getting-started/quickstart/), wie Sie das Plugin in 5 Minuten mit unserem Einführungsvideo meistern
# Befehle
> Capgo CLI-Dokumentation
### Verwendung
Alle Befehle sollten in Ihrem App-Ordner mit ordnungsgemäß initialisiertem Capacitor-Projekt ausgeführt werden
[Capacitor plattformübergreifende native Laufzeit für Web-Apps ](https://capacitorjs.com/docs/getting-started/)
### **Init**
`npx @capgo/cli@latest init [apikey]`
Diese Methode führt Sie Schritt für Schritt durch den Onboarding-Prozess
Sie fügt Ihre App zu Capgo hinzu Sie fügt den Code zur Validierung des Updates in Ihre App ein Ebenso wird sie Ihre App erstellen Außerdem wird sie Ihre App zu Capgo hochladen Und sie hilft Ihnen zu überprüfen, ob das Update funktioniert
### **Login**
`npx @capgo/cli login [apikey]`
Diese Methode speichert den `apikey` für Sie
Note
verwenden Sie `--apikey=********` in jedem Befehl, um ihn zu überschreiben
**Optional können Sie angeben:**
`--local` Dies speichert Ihren **apikey** im lokalen Repository und ignoriert ihn in Git
## **Doctor**
`npx @capgo/cli doctor`
Befehl zur Überprüfung, ob Sie mit den Capgo-Paketen auf dem neuesten Stand sind
Dieser Befehl ist auch für Fehlerberichte nützlich
## App
### **Add**
`npx @capgo/cli app add [appId]`
`[appId]` Ihre App-ID, das Format `comtestapp` wird [hier](https://capacitorjs.com/docs/cli/commands/init/) erklärt
> 💡 Alle Optionen werden aus Ihrer Konfiguration erraten, wenn nicht angegeben
Optional können Sie angeben:
* `--icon [/path/to/my/icon]` für ein benutzerdefiniertes Icon in der Capgo Web-App
* `--name [test]` für einen benutzerdefinierten Namen in der Liste
* `--apikey [key]` API-Schlüssel zur Verknüpfung mit Ihrem Konto
* `--retention [retention]` Aufbewahrungszeitraum des App-Bundles in Tagen, 0 standardmäßig = unendlich
Beispiel einer `capacitorconfigjson` für appId und AppName, das Icon wird im resources-Ordner gesucht
```json
{
"appId": "eeforgrcapacitor_go",
"appName": "Capgo",
"webDir": "dist"
}
```
### **Set**
`npx @capgo/cli app set [appId]`
`[appId]` ist Ihre App-ID, das Format wird [hier](https://capacitorjs.com/docs/cli/commands/init/) erklärt
Optional können Sie angeben:
* `--icon [/path/to/my/icon]` für ein benutzerdefiniertes Icon in der Capgo Web-App
* `--name [test]` für einen benutzerdefinierten Namen in der Liste
* `--retention [retention]` Aufbewahrungszeitraum des App-Bundles in Tagen, 0 standardmäßig = unendlich
* `--apikey [key]` API-Schlüssel zur Verknüpfung mit Ihrem Konto
### **List**
`npx @capgo/cli app list [appId]`
`[appId]` Ihre App-ID, das Format `comtestapp` wird [hier](https://capacitorjs.com/docs/cli/commands/init/) erklärt
Optional können Sie angeben:
* `--apikey [key]` API-Schlüssel zur Verknüpfung mit Ihrem Konto
### **Delete**
`npx @capgo/cli app delete [appId]`
`[appId]` Ihre App-ID, das Format `comtestapp` wird [hier](https://capacitorjs.com/docs/cli/commands/init/) erklärt
Optional können Sie angeben:
* `--apikey [key]` API-Schlüssel zur Verknüpfung mit Ihrem Konto
* `--bundle` mit der Versionsnummer löscht nur diese Version
### Debug
`npx @capgo/cli app debug [appId]`
`[appId]` Ihre App-ID, das Format `comtestapp` wird [hier](https://capacitorjs.com/docs/cli/commands/init/) erklärt
Optional können Sie angeben:
* `--apikey [key]` API-Schlüssel zur Verknüpfung mit Ihrem Konto
* `--device` mit dem spezifischen Gerät, das Sie debuggen möchten
### Setting
`npx @capgo/cli app setting [path]`
Bearbeiten der Capacitor-Konfiguration
`[path]` - Pfad der Einstellung, die Sie ändern möchten Zum Beispiel, um die `appId` zu ändern, geben Sie `appId` an Wenn Sie das automatische Update in `capacitor-updater` deaktivieren möchten, geben Sie `pluginsCapacitorUpdaterautoUpdate` an
Sie MÜSSEN entweder `--string` oder `--bool` angeben!
Optionen:
* `--string ` - setzt die Einstellung auf einen String
* `--bool ` - setzt die Einstellung auf einen Boolean
## Bundle
### Upload
`npx @capgo/cli bundle upload [appId]`
`[appId]` ist Ihre App-ID, das Format wird [hier](https://capacitorjs.com/docs/cli/commands/init/) erklärt
Optional können Sie angeben:
* `--apikey ` API-Schlüssel zur Verknüpfung mit Ihrem Konto
* `--path ` Pfad des hochzuladenden Ordners
* `--channel ` Zu verknüpfender Kanal
* `--external ` Link zu externer URL anstelle des Uploads zur Capgo Cloud
* `--iv-session-key ` IV und Sitzungsschlüssel für externe Bundle-URL festlegen
* `--s3-endpoint ` URL des S3-Endpunkts Funktioniert nicht mit partiellem Upload oder externer Option
* `--s3-region ` Region für Ihren S3-Bucket
* `--s3-apikey ` API-Schlüssel für Ihren S3-Endpunkt
* `--s3-apisecret ` API-Geheimnis für Ihren S3-Endpunkt
* `--s3-bucket-name ` Name für Ihren AWS S3-Bucket
* `--s3-port ` Port für Ihren S3-Endpunkt
* `--no-s3-ssl` SSL für S3-Upload deaktivieren
* `--key ` Benutzerdefinierter Pfad für öffentlichen Signierungsschlüssel (v1-System)
* `--key-data ` Öffentlicher Signierungsschlüssel (v1-System)
* `--key-v2 ` Benutzerdefinierter Pfad für privaten Signierungsschlüssel (v2-System)
* `--key-data-v2 ` Privater Signierungsschlüssel (v2-System)
* `--bundle-url` Gibt Bundle-URL in stdout aus
* `--no-key` Signierungsschlüssel ignorieren und klares Update senden
* `--no-code-check` Überprüfung ignorieren, ob notifyAppReady() im Quellcode aufgerufen wird und Index im Stammverzeichnis vorhanden ist
* `--display-iv-session` IV und Sitzungsschlüssel in der Konsole anzeigen, die zur Verschlüsselung des Updates verwendet werden
* `--bundle ` Bundleversion der hochzuladenden Version
* `--min-update-version ` Minimale Version, die für ein Update auf diese Version erforderlich ist Wird nur verwendet, wenn auto update auf metadata im Kanal gesetzt ist
* `--auto-min-update-version` Minimale Update-Version basierend auf nativen Paketen festlegen
* `--ignore-metadata-check` Ignoriert die Metadaten-Prüfung (node\_modules) beim Hochladen
* `--ignore-checksum-check` Ignoriert die Prüfsummen-Prüfung beim Hochladen
* `--timeout ` Timeout für den Upload-Prozess in Sekunden
* `--partial` Lädt keine partiellen Dateien zur Capgo-Cloud hoch
* `--tus` Lädt das Bundle mit dem tus-Protokoll hoch
* `--multipart` Verwendet das Multipart-Protokoll zum Hochladen von Daten zu S3, Veraltet, verwenden Sie stattdessen TUS
* `--encrypted-checksum ` Eine verschlüsselte Prüfsumme (Signatur) Wird nur beim Hochladen eines externen Bundles verwendet
* `--package-json ` Ein Pfad zu packagejson Nützlich für Monorepos
* `--auto-set-bundle` Bundle in capacitorconfigjson setzen
* `--node-modules ` Eine Liste von Pfaden zu node\_modules Nützlich für Monorepos (kommagetrennt z.B.: //node\_modules,/node\_modules)
> ⭐️ Die externe Option hilft zwei Fälle zu lösen: Unternehmen mit Datenschutzbedenken, die keinen Code an Dritte senden möchten und Apps größer als 200 MB Mit dieser Einstellung speichert Capgo nur den Link zur ZIP-Datei und sendet den Link an alle Apps
> 👀 Capgo Cloud schaut nie, was sich im Link (für externe Option) oder im Code befindet, wenn gespeichert
> 🔑 Sie können eine zweite Sicherheitsebene durch Verschlüsselung hinzufügen, dann kann Capgo nichts einsehen oder modifizieren, es wird “vertrauenslos”
Beispiel einer `packagejson` für Version
```json
{
"version": "102"
}
```
> ⛔ Version sollte größer als “000” sein
> 💡 Vergessen Sie nicht, die Versionsnummer bei jedem Senden zu aktualisieren, Versionsnummern können aus Sicherheitsgründen nicht überschrieben oder nach dem Löschen wiederverwendet werden
### **List**
`npx @capgo/cli bundle list [appId]`
`[appId]` Ihre App-ID, das Format `comtestapp` wird [hier](https://capacitorjs.com/docs/cli/commands/init/) erklärt
Optional können Sie angeben:
* `--apikey [key]` API-Schlüssel zur Verknüpfung mit Ihrem Konto
### **Delete**
`npx @capgo/cli bundle delete [appId]`
`[appId]` Ihre App-ID, das Format `comtestapp` wird [hier](https://capacitorjs.com/docs/cli/commands/init/) erklärt
Optional können Sie angeben:
* `--apikey [key]` API-Schlüssel zur Verknüpfung mit Ihrem Konto
* `--bundle` mit der Versionsnummer löscht nur diese Version
### Cleanup
in einem SemVer-Bereich für eine Hauptversion in der Cloud
`npx @capgo/cli bundle cleanup [appId] --bundle=[majorVersion] --keep=[numberToKeep]`
`[appId]` Ihre App-ID, das Format `comtestapp` wird [hier](https://capacitorjs.com/docs/cli/commands/init/) erklärt
Optional können Sie angeben:
* `--apikey [key]` API-Schlüssel zur Verknüpfung mit Ihrem Konto
* `--bundle [majorVersion]` eine Version, für die Sie vorherige Pakete entfernen möchten, es wird die letzte Version + `numberToKeep` behalten\* `--keep [numberToKeep]` die Anzahl der Pakete, die Sie behalten möchten (Standard 4)
Zum Beispiel: Wenn Sie 10 Versionen von 1001 bis 10011 haben und Sie `npx @capgo/cli cleanup [appId] --bundle=1000` verwenden, werden 1001 bis 1006 entfernt, 1007 bis 10011 werden behalten
Wenn Sie insgesamt 20 Versionen haben und keine Bundlenummer angeben, wie hier: `npx @capgo/cli cleanup [appId] --keep=2`, werden 18 Versionen entfernt und die letzten 2 behalten
> Dieser Befehl wird um Bestätigung bitten und zeigt eine Tabelle mit den zu behaltenden und zu entfernenden Versionen
Note
Dieser Befehl ignoriert Bundles, die derzeit in einem Kanal verwendet werden
### **Encrypt**
> **Warnung**: Dieser Befehl ist veraltet und wird in der nächsten Hauptversion entfernt. Bitte verwenden Sie das neue Verschlüsselungssystem `npx @capgo/cli bundle encrypt [path/to/zip]`
Dieser Befehl wird verwendet, wenn Sie externe Quellen zum Speichern Ihres Codes verwenden oder zu Testzwecken
Optional können Sie angeben:
`--key [/path/to/my/private_key]` der Pfad zu Ihrem privaten Schlüssel `--key-data [privateKey]` die privaten Schlüsseldaten, wenn Sie sie inline verwenden möchten Der Befehl gibt Ihren `ivSessionKey` aus und generiert eine verschlüsselte ZIP-Datei zur Verwendung mit dem Upload- oder Decrypt-Befehl
### **Encrypt V2**
`npx @capgo/cli bundle encryptV2 [path/to/zip] [checksum]`
Dieser Befehl wird verwendet, wenn Sie externe Quellen zum Speichern Ihres Codes verwenden oder zu Testzwecken Die Prüfsumme ist der SHA256-Hash des Bundles (generiert durch —key-v2) und wird verwendet, um die Integrität der Datei nach der Entschlüsselung zu überprüfen Sie wird mit dem privaten Schlüssel verschlüsselt und zusammen mit dem Bundle gesendet In Verschlüsselung v2 wird die Prüfsumme zu einer “Signatur” des Bundles aufgewertet
Optional können Sie angeben:
`--key [/path/to/my/private_key]` der Pfad zu Ihrem privaten Schlüssel `--key-data [privateKey]` die privaten Schlüsseldaten, wenn Sie sie inline verwenden möchten `--json` um Informationen als JSON auszugeben Der Befehl gibt Ihren `ivSessionKey` aus und generiert eine verschlüsselte ZIP-Datei zur Verwendung mit dem Upload- oder Decrypt-Befehl
### **Decrypt**
`npx @capgo/cli bundle decrypt [path/to/zip] [ivSessionKey]`
Optional können Sie angeben:
`--key [/path/to/my/private_key]` der Pfad zu Ihrem privaten Schlüssel
`--key-data [privateKey]` die privaten Schlüsseldaten, wenn Sie sie inline verwenden möchten Dieser Befehl wird hauptsächlich zu Testzwecken verwendet, er entschlüsselt die ZIP-Datei und gibt den base64-decodierten Sitzungsschlüssel in der Konsole aus
### **Decrypt V2**
`npx @capgo/cli bundle decryptV2 [path/to/zip] [ivSessionKey]`
Optional können Sie angeben:
`--key [/path/to/my/private_key]` der Pfad zu Ihrem privaten Schlüssel `--key-data [privateKey]` die privaten Schlüsseldaten, wenn Sie sie inline verwenden möchten Dieser Befehl wird hauptsächlich zu Testzwecken verwendet, er entschlüsselt die ZIP-Datei und gibt den base64-decodierten Sitzungsschlüssel in der Konsole aus `--checksum [checksum]` die Prüfsumme der Datei, sie wird nach der Entschlüsselung überprüft
### **Zip**
`npx @capgo/cli bundle zip [appId]`
`[appId]` ist Ihre App-ID, das Format wird [hier](https://capacitorjs.com/docs/cli/commands/init/) erklärt
Optional können Sie angeben:
* `--path [/path/to/my/bundle]` um einen bestimmten Ordner hochzuladen
* `--bundle [100]` um die Bundle-Versionsnummer des Dateinamens festzulegen
* `--name [myapp]` um den Dateinamen zu überschreiben
* `--json` um Informationen als JSON auszugeben
* `--no-code-check` um die Code-Prüfung zu ignorieren und das Bundle trotzdem zu senden
* `--key-v2` um das neue Verschlüsselungssystem zu verwenden Dies ist erforderlich, da das neue Verschlüsselungssystem bessere Prüfsummen zur Überprüfung der Dateiintegrität verwendet
### **Compatibility**
`npx @capgo/cli bundle compatibility [appId] -c [channelId]`
`[appId]` ist Ihre App-ID, das Format wird [hier](https://capacitorjs.com/docs/cli/commands/init/) erklärt `[channelId]` der Name Ihres neuen Kanals
Optional können Sie angeben:
* `--apikey [key]` API-Schlüssel zur Verknüpfung mit Ihrem Konto
* `--text` Text statt Emojis in der Tabelle verwenden
* `--channel [channel]` der Kanal, dessen Kompatibilität überprüft werden soll
* `--package-json ` Ein Pfad zur package.json Nützlich für Monorepos
* `--node-modules ` Eine Liste von Pfaden zu node\_modules Nützlich für Monorepos (kommagetrennt z.B.: //node\_modules,/node\_modules)
## Channel
### **Add**
`npx @capgo/cli channel add [channelId] [appId]`
`[channelId]` der Name Ihres neuen Kanals `[appId]` Ihre App-ID, das Format `comtestapp` wird [hier](https://capacitorjs.com/docs/cli/commands/init/) erklärt
### **Delete**
`npx @capgo/cli channel delete [channelId] [appId]`
`[channelId]` der Name des Kanals, den Sie löschen möchten `[appId]` Ihre App-ID, das Format `comtestapp` wird [hier](https://capacitorjs.com/docs/cli/commands/init/) erklärt
### **List**
`npx @capgo/cli channel list [appId]`
`[appId]` Ihre App-ID, das Format `comtestapp` wird [hier](https://capacitorjs.com/docs/cli/commands/init/) erklärt
Optional können Sie angeben:
* `--apikey [key]` API-Schlüssel zur Verknüpfung mit Ihrem Konto
### **Set**
`npx @capgo/cli channel set [channelId] [appId]`
`[appId]` ist Ihre App-ID, das Format wird [hier](https://capacitorjs.com/docs/cli/commands/init/) erklärt
Optional können Sie angeben:
* `--bundle [123]` Ihr bereits in die Cloud gesendetes App-Bundle, um es mit einem Kanal zu verknüpfen
* `--latest` holt die Bundle-Version aus `packagejson:version`, kann nicht mit `--bundle` verwendet werden
* `--state [ normal | default ]` setzt den Kanalstatus, kann `normal` oder `default` sein Ein Kanal muss `default` sein
* `--downgrade` erlaubt dem Kanal, Downgrade-Versionen an Geräte zu senden
* `--no-downgrade` verbietet dem Kanal, Downgrade-Versionen an Geräte zu senden
* `--upgrade` erlaubt dem Kanal, Upgrade (Major) Versionen an Geräte zu senden
* `--no-upgrade` verbietet dem Kanal, Upgrade (Major) Versionen an Geräte zu senden
* `--ios` erlaubt dem Kanal, Versionen an iOS-Geräte zu senden
* `--no-ios` verbietet dem Kanal, Versionen an iOS-Geräte zu senden
* `--android` erlaubt dem Kanal, Versionen an Android-Geräte zu senden
* `--no-android` verbietet dem Kanal, Versionen an Android-Geräte zu senden
* `--self-assign` erlaubt Geräten, sich selbst diesem Kanal zuzuweisen
* `--no-self-assign` verbietet Geräten, sich selbst diesem Kanal zuzuweisen
* `--disable-auto-update STRATEGY` Deaktiviert die Auto-Update-Strategie für diesen Kanal Die möglichen Optionen sind: major, minor, metadata, none
* `--apikey [key]` API-Schlüssel zur Verknüpfung mit Ihrem Konto
## Deaktivieren der Update-Strategien
Es gibt mehrere Möglichkeiten, Updates für zu alte Versionen zu deaktivieren\
Capgo kann nativen Code nicht aktualisieren, daher sollte ein Update von einer Version mit altem nativen Code auf eine Version mit aktualisiertem nativen Code nicht möglich sein Es gibt mehrere Möglichkeiten, dies zu erreichen
Erstens die `major` Strategie Sie verhindert ein Update von `000` -> `100` Die Hauptversion ist die hervorgehobene Nummer (**1**00 und **0**00)\
Zweitens die `minor` Strategie Sie verhindert ein Update von `000` -> `110` oder ein Update von `110` auf `120` **ACHTUNG** diese Strategie verhindert nicht ein Update von `010` -> `110`
Drittens die `patch` Strategie Sie wurde als sehr strenger Modus in Capgo eingeführt Es wird nicht empfohlen, sie zu verwenden, es sei denn, Sie verstehen vollständig, wie sie funktioniert Damit ein Update akzeptiert wird, müssen folgende Bedingungen erfüllt sein:
* Die Hauptversion ist zwischen der neuen und alten Version gleich
* Die Nebenversion ist zwischen der neuen und alten Version gleich
* Die Patch-Version der neuen Version ist größer als die Patch-Version der alten Version
Hier ein Beispiel, welche Szenarien für Updates erlaubt oder abgelehnt werden:
* 00311 -> 00314 ✅
* 000 -> 00314 ✅
* 00316 -> 00314 ❌
* 01312 -> 00314 ❌
* 10312 -> 00314 ❌
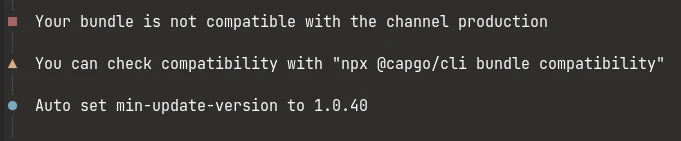
Zuletzt die komplizierteste Strategie Die `metadata` Strategie\
Zuerst müssen Sie wissen, dass die Updates anfangs **FEHLSCHLAGEN** werden, da dem Kanal die erforderlichen Metadaten fehlen\
Wenn dem Kanal Metadaten fehlen, sehen Sie eine Nachricht wie diese:

Wenn Sie so etwas sehen, wissen Sie, dass Sie zum aktuellen Bundle für den fehlschlagenden Kanal gehen und die Metadaten setzen müssen\
Ermitteln Sie zunächst, welcher Kanal fehlschlägt Sie können das in der Spalte `misconfigured` sehen

Gehen Sie dann zum fehlerhaften Kanal und klicken Sie auf `Bundle number`. Dies sollte Sie zur Bundle-Seite führen.
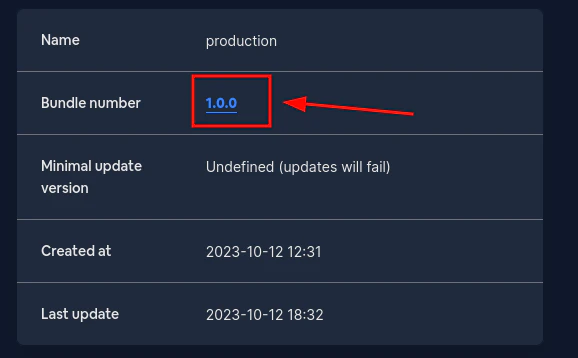
Füllen Sie dort das Feld `Minimal update version` aus. Dies sollte ein [semver](https://devhints.io/semver/) sein.\
Wenn der eingegebene Wert kein semver ist, erhalten Sie eine Fehlermeldung. Bei korrekter Eingabe sollten Sie etwa Folgendes sehen:
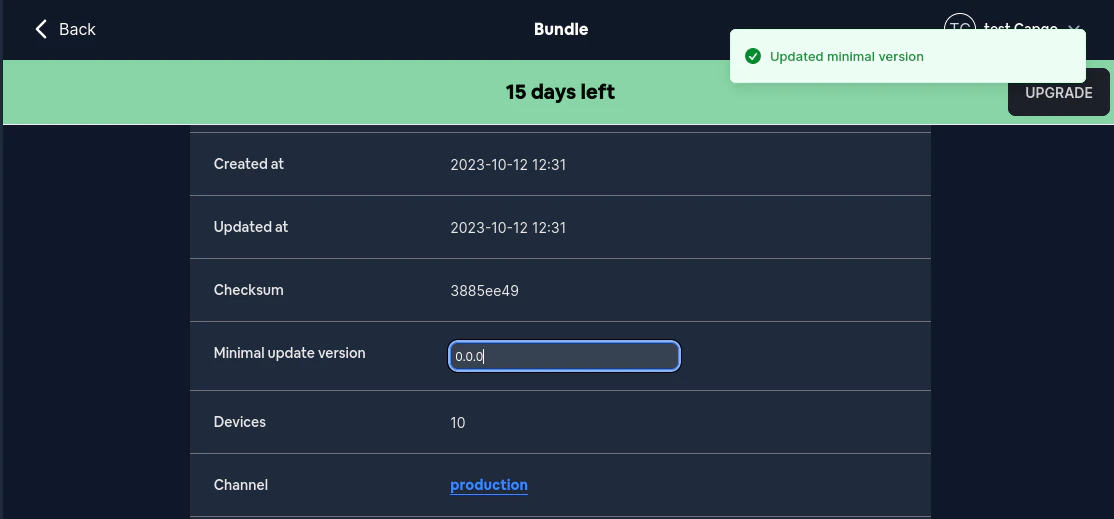
Sie möchten diese Daten wahrscheinlich nicht bei jedem Update manuell festlegen. Glücklicherweise verhindert die CLI das Senden eines Updates ohne diese Metadaten.
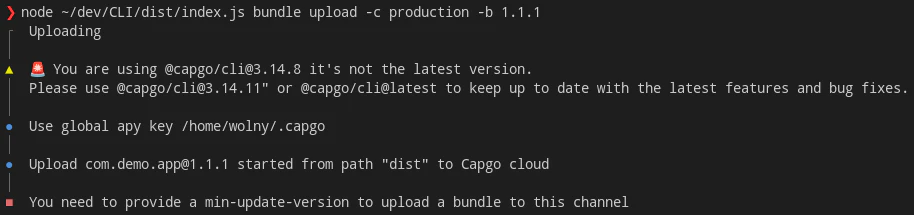
Um ein Bundle mit der Option `metadata` korrekt hochzuladen, müssen Sie `--min-update-version` mit einem gültigen semver übergeben. Etwa so:
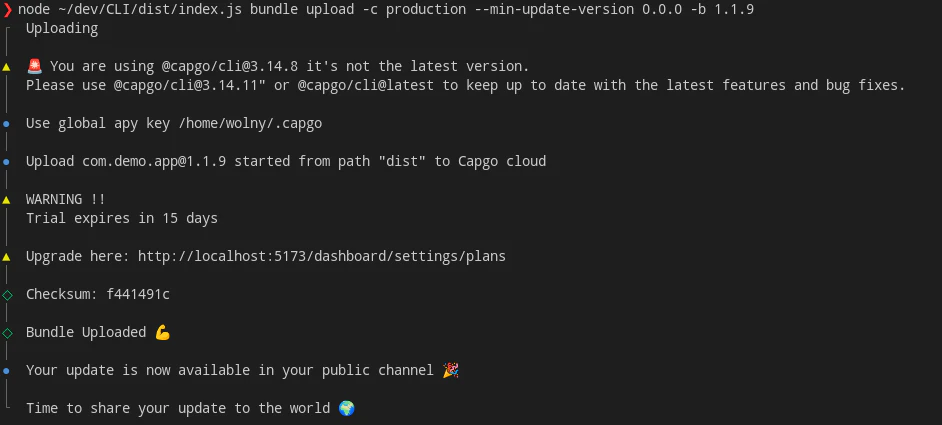
Die `--min-update-version` ist nicht der EINZIGE Weg für Kompatibilität. Es gibt auch `--auto-min-update-version`. So funktioniert es:
1. Es prüft die aktuell im Kanal hochgeladene Version und überprüft die Kompatibilität wie der Befehl `bundle compatibility`.
2. Wenn die neue Version 100% kompatibel ist, wird die `min_update_version` der neuesten Version im Kanal wiederverwendet. Wenn nicht, wird die `min_update_version` auf die Bundle-Nummer der neu hochgeladenen Version gesetzt.
Sie erhalten bei Verwendung dieser Option immer eine Information über die `min_update_version`. Es wird etwa so aussehen:

Wenn die neue Version nicht kompatibel ist, sollte es etwa so aussehen:
## Ende-zu-Ende-Verschlüsselung (Trustless)
Capgo unterstützt Ende-zu-Ende-Verschlüsselung, das bedeutet, dass Ihr Bundle (Code) vor dem Senden in die Cloud verschlüsselt und auf dem Gerät entschlüsselt wird. Dafür müssen Sie ein RSA-Schlüsselpaar generieren, Sie können den folgenden Befehl verwenden, um es zu generieren.
Das Verschlüsselungssystem ist eine Kombination aus RSA und AES, der RSA-Schlüssel wird verwendet, um den AES-Schlüssel zu verschlüsseln, und der AES-Schlüssel wird verwendet, um die Datei zu verschlüsseln.
Weitere Informationen zum Verschlüsselungssystem finden Sie unten
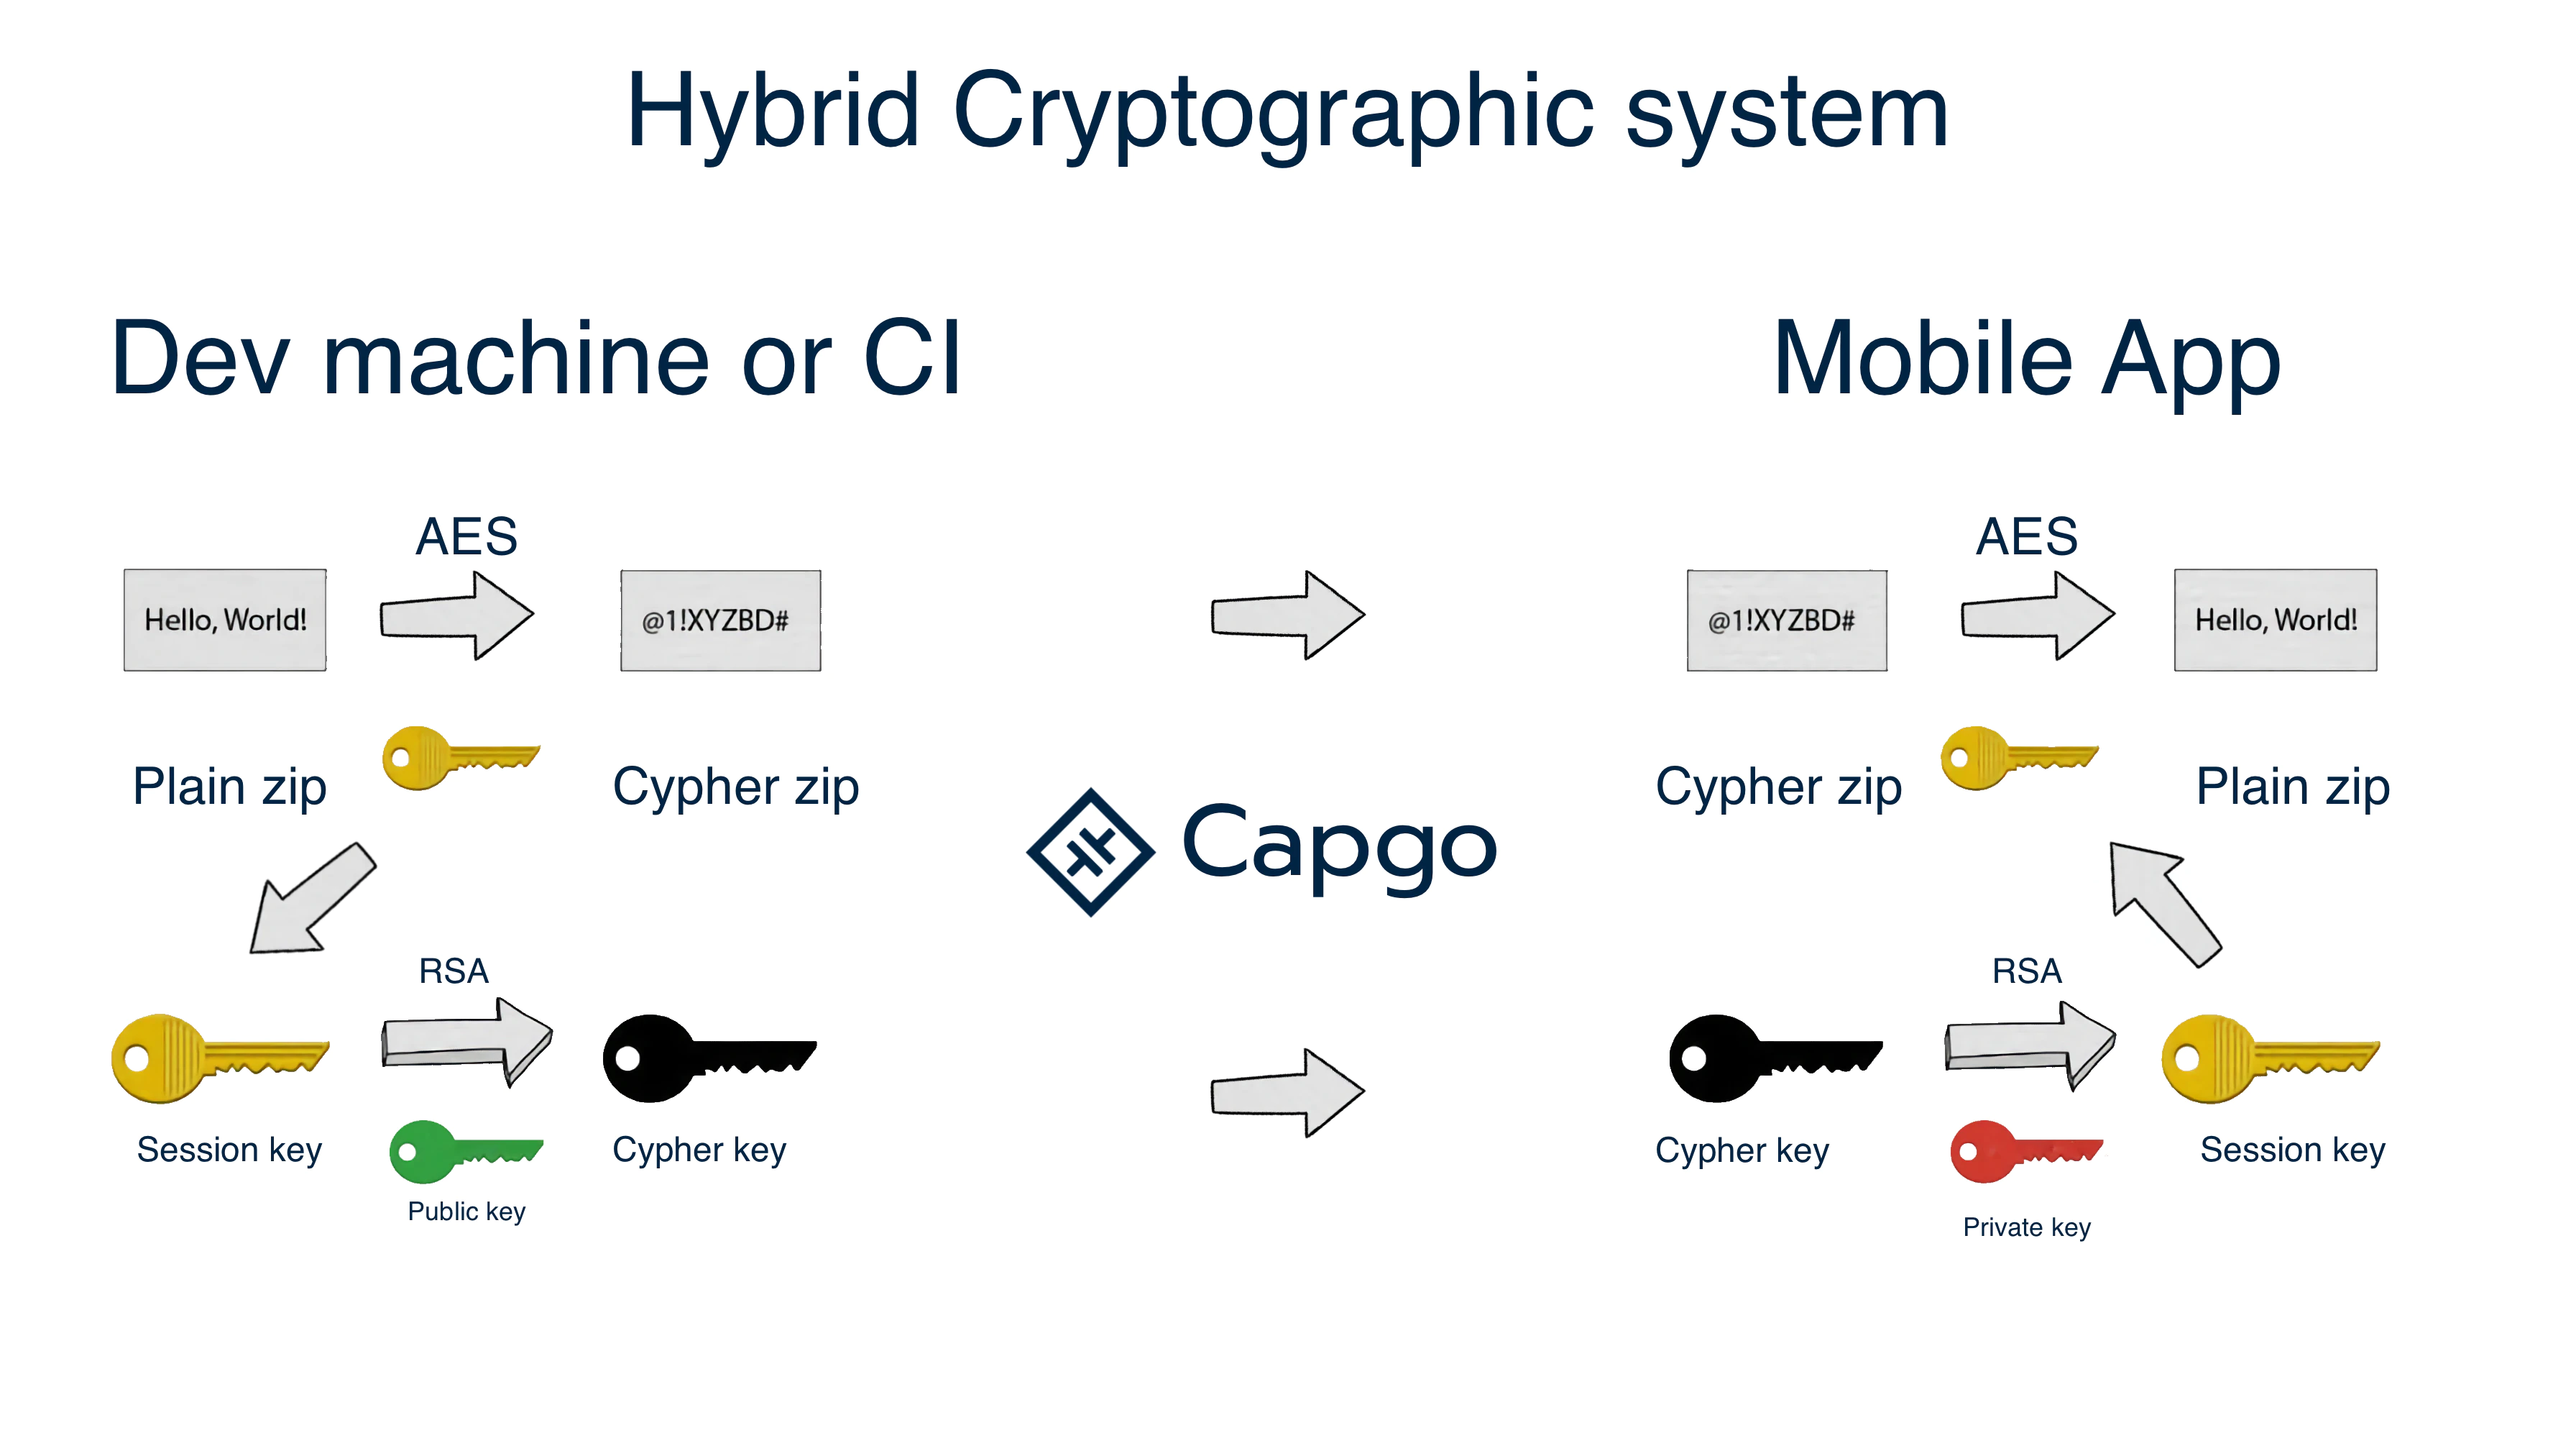
Verschlüsselungsschema
### Schlüssel für Ihre App erstellen
`npx @capgo/cli key create`
Optional können Sie `--force` verwenden, um den vorhandenen Schlüssel zu überschreiben. Dieser Befehl erstellt ein Schlüsselpaar in Ihrer App und fordert Sie auf, den privaten Schlüssel an einem sicheren Ort zu speichern. Es wird empfohlen, den privaten Schlüssel nicht in Git zu committen und mit niemandem zu teilen.
> Nach Ihrem lokalen Test entfernen Sie den Schlüssel aus der Konfigurationsdatei und fügen Sie ihn im CI-Schritt mit `key save` hinzu.
### Schlüssel in Ihrer App-Konfiguration speichern
`npx @capgo/cli key save`
Optional können Sie angeben:
`--key [/path/to/my/private_key]` der Pfad zu Ihrem privaten Schlüssel
`--key-data [privateKey]` die privaten Schlüsseldaten, wenn Sie sie inline verwenden möchten. Dieser Befehl ist nützlich, wenn Sie der Empfehlung gefolgt sind und den Schlüssel nicht in Ihrer App und in der Konfiguration committet haben.
## CI-Integration
Um Ihre Arbeit zu automatisieren, empfehle ich Ihnen, GitHub Actions die Aufgabe des Pushens zu unserem Server zu überlassen.
[GitHub Action Tutorial](https://capgo.app/blog/automatic-build-and-release-with-github-actions/)
## Unsere Demo-App
[GitHub - Cap-go/demo-app](https://github.com/Cap-go/demo-app/)
Vergessen Sie nicht, die CI-Umgebungsvariable mit Ihrem API-Schlüssel zu konfigurieren.
# CLI de 0.x a 1.x
> Upgrade-Anleitung von 0.x auf 1.x
Es gibt keine wesentlichen Änderungen in der CLI
Die wichtigste Änderung ist die Umbenennung des Arguments `--version` zu `--bundle`, um Konflikte zu vermeiden und der neuen Namensgebung überall zu folgen
# Verschlüsselung
> So verschlüsseln Sie Ihre Daten mit neuer Verschlüsselung
Diese Dokumentation erklärt, wie Sie Ihre Daten mit dem neuen Verschlüsselungssystem verschlüsseln und das alte entfernen können
Erfahren Sie mehr über das neue Verschlüsselungssystem im [Blog-Beitrag](/blog/introducing-end-to-end-security-to-capacitor-updater-with-code-signing)
***
Erstellen Sie zunächst ein neues Schlüsselpaar mit folgendem Befehl:
```bash
npx @capgo/cli key create
```
Dieser Befehl erstellt ein neues Schlüsselpaar in Ihrer App; es ist zwingend erforderlich, den privaten Schlüssel an einem sicheren Ort aufzubewahren. Der private Schlüssel darf niemals in die Versionskontrolle übernommen oder mit nicht vertrauenswürdigen Parteien geteilt werden
Dieser Befehl entfernt auch den alten Schlüssel aus Ihrer Capacitor-Konfiguration, entfernt jedoch nicht die alten Schlüsseldateien. Die CLI behält diese bei, damit Sie weiterhin Live-Updates für Apps senden können, die noch kein App-Store-Update erhalten haben und das alte Plugin verwenden. Dies erleichtert die Migration
Wenn Sie bei der Migration gefragt werden: “Möchten Sie die Verschlüsselung mit dem neuen Kanal einrichten, um alte Apps zu unterstützen und die Migration zu erleichtern?”, stimmen Sie bitte zu. Dies fügt eine neue “defaultChannel”-Option zu Ihrer Capacitor-Konfiguration hinzu. Dadurch verwendet Ihre App den Kanal “encryption\_v2”. Dies stellt sicher, dass die neue Verschlüsselung nur von Apps verwendet wird, die sie unterstützen. Apps, die noch kein App-Store-Update erhalten haben, verwenden weiterhin den vorherigen Standardkanal
***
Nun müssen Sie Ihr JS-Bundle erstellen und es in den neuen Kanal hochladen. Führen Sie dazu folgenden Befehl aus:
```bash
npx @capgo/cli bundle upload --channel encryption_v2
```
***
Führen Sie dann diesen Befehl aus, um Apps zu erlauben, sich selbst dem Kanal “encryption\_v2” zuzuweisen:
Caution
Dies ist notwendig, damit die neue “defaultChannel”-Option funktioniert
```bash
npx @capgo/cli channel set encryption_v2 --self-assign
```
***
Sie können die App jetzt ausführen; sie wird das neue Verschlüsselungssystem verwenden
Um das neue JS-Bundle in den alten Kanal hochzuladen, müssen Sie nur folgenden Befehl ausführen:
```bash
npx @capgo/cli bundle upload --channel production
```
***
Sie müssen sich keine Sorgen um die Capacitor-Konfiguration machen, sie wird nie zu Capgo hochgeladen
Wenn alle Benutzer ihre Apps aktualisiert haben (dies kann bis zu 3/4 Monate dauern), können Sie “defaultChannel” aus Ihrer Capacitor-Konfiguration entfernen
Dann können Sie den alten Kanal mit folgendem Befehl entfernen:
```bash
npx @capgo/cli channel delete encryption_v2
```
***
Nach dem Löschen des “encryption\_v2”-Kanals werden alle Apps, die ihn als Standard verwenden, beginnen, den “production”-Kanal zu verwenden
# Übersicht
Nutzen Sie Capgos Live-Updates-Funktion, um die JavaScript-Bundles Ihrer App aus der Ferne in Echtzeit zu aktualisieren. Senden Sie JS-Updates direkt an Ihre Nutzer, ohne den App-Store-Überprüfungsprozess zu durchlaufen, um sofort Fehler zu beheben und neue Funktionen bereitzustellen.
Note
Live-Updates sind auf JavaScript-Bundle-Änderungen beschränkt. Wenn Sie nativen Code aktualisieren müssen, wie das Hinzufügen oder Entfernen eines Plugins oder das Ändern der nativen Projektkonfiguration, müssen Sie einen neuen nativen Binary-Build an die App Stores übermitteln.
## Wie Live-Updates funktionieren
Das Live-Update-System von Capgo hat zwei Schlüsselkomponenten:
1. Das Capgo SDK, das Sie in Ihrer App installieren. Das SDK prüft auf verfügbare Updates und lädt sie im Hintergrund herunter.
2. Kanäle, mit denen Sie Updates für bestimmte Benutzergruppen bereitstellen können. Sie können Kanäle verwenden, um verschiedene Release-Tracks wie `Production`, `Staging` und `Dev` zu verwalten.
Wenn Sie ein neues JS-Bundle auf Capgo hochladen und einem Kanal zuweisen, erkennt das Capgo SDK in Apps, die für diesen Kanal konfiguriert sind, das Update und lädt es herunter. Beim nächsten Neustart der App wird das neue Bundle geladen.
## Erste Schritte
Folgen Sie diesen Schritten, um mit Live-Updates zu beginnen:
1. Schließen Sie den [Capgo Quickstart](/docs/getting-started/quickstart) ab, um Ihre App in Capgo einzurichten und das Capgo SDK zu installieren.
2. Rufen Sie in Ihrem App-Code `CapacitorUpdaternotifyAppReady()` auf, nachdem Ihre App initialisiert wurde. Dies teilt dem Capgo SDK mit, dass Ihre App bereit ist, Updates zu empfangen.
3. Erstellen Sie Ihr JS-Bundle und laden Sie es auf Capgo hoch:
```shell
npm run build
npx @capgo/cli@latest bundle upload --channel=Production
```
4. Öffnen Sie Ihre App und warten Sie, bis das Update heruntergeladen ist. Sie können den Status überprüfen mit:
```shell
npx @capgo/cli@latest app debug
```
5. Sobald das Update heruntergeladen ist, schließen und öffnen Sie Ihre App erneut, um das neue Bundle zu laden.
Weitere Details finden Sie im [Leitfaden für Live-Updates-Bereitstellung](/docs/getting-started/deploy).
## Die Capgo CLI
Die Capgo CLI ist ein leistungsstarkes Tool, das Entwicklern ermöglicht, mit Capgos Diensten aus ihren eigenen CI/CD-Pipelines zu interagieren. Mit der CLI haben Sie detaillierte Kontrolle darüber, wann Builds erstellt und bereitgestellt werden, sodass Sie Capgo in Ihre bestehenden Enterprise-Workflows integrieren können.
### Wofür ist die Capgo CLI gedacht?
Die Capgo CLI ist für Entwickler und Teams konzipiert, die mehr Kontrolle und Flexibilität in ihren Live-Update-Workflows benötigen. Durch die Verwendung der CLI in Ihren CI/CD-Pipelines können Sie:
* Genau festlegen, wann Updates erstellt und bereitgestellt werden sollen, anstatt sich auf Capgos integrierte Automatisierung zu verlassen
* Eigene Prozesse wie Code-Signierung, QA-Tests oder Manager-Genehmigungen zwischen den Build- und Bereitstellungsschritten einfügen
* Capgo in Ihre bestehenden DevOps-Tools und -Workflows integrieren
### Authentifizierung
Um die Capgo CLI zu nutzen, müssen Sie sich mit Ihrem API-Schlüssel authentifizieren. Sie können einen API-Schlüssel in Ihren Capgo-Kontoeinstellungen generieren.
Um sich anzumelden und Ihren API-Schlüssel sicher zu speichern, führen Sie aus:
```shell
npx @capgo/cli@latest login [API_KEY]
```
Dieser Befehl wird dann für zukünftige Verwendungen gespeichert. Nach der Anmeldung müssen Sie Ihren API-Schlüssel nicht bei jedem Befehl erneut angeben.
### Wichtige Unterschiede zu anderen CLI-Tools
Wenn Sie mit anderen Live-Update-CLI-Tools vertraut sind, gibt es einige wichtige Besonderheiten der Capgo CLI zu beachten:
* Capgo verwendet eine einzige CLI sowohl für Entwicklungs- als auch für CI/CD-Anwendungsfälle, da Capgo sich ausschließlich auf Live-Update-Funktionen konzentriert
* Die Capgo CLI erfordert keinen separaten Installationsschritt. Sie ist im `@capgo/cli`-Paket enthalten und kann direkt mit `npx` ausgeführt werden
* Die Capgo CLI ist speziell für den Live-Update-Workflow konzipiert und enthält möglicherweise nicht alle Funktionen oder Befehle, die in allgemeineren CLI-Tools zu finden sind
## Nächste Schritte
[ Kanäle](/docs/live-updates/channels/)
[Erfahren Sie, wie Sie Kanäle verwenden, um verschiedene Release-Tracks zu verwalten und Updates für bestimmte Benutzer bereitzustellen](/docs/live-updates/channels/)
[ Rollbacks](/docs/live-updates/rollbacks/)
[Entdecken Sie, wie Sie zu einer vorherigen JS-Bundle-Version zurückkehren können, wenn ein Update Probleme verursacht](/docs/live-updates/rollbacks/)
[ Update-Verhalten](/docs/live-updates/update-behavior/)
[Passen Sie an, wie und wann Updates in Ihrer App heruntergeladen und angewendet werden](/docs/live-updates/update-behavior/)
[ Schnelle Updates](/docs/live-updates/differentials/)
[Erfahren Sie, wie Sie schnelle Updates verwenden können, um den Update-Prozess zu beschleunigen](/docs/live-updates/differentials/)
# Übersicht
> Detaillierte Dokumentation für Capgo CLI-Befehle
Die Capgo CLI stellt eine Reihe von Befehlen zur Verwaltung Ihrer Capgo-Apps und Deployments bereit. Diese Referenz bietet detaillierte Informationen zu jedem verfügbaren Befehl, einschließlich seiner Optionen und Anwendungsbeispiele.
## Befehle
[ init](/docs/cli/reference/init/)
[Eine neue Capgo-App initialisieren](/docs/cli/reference/init/)
[ login](./login/)
[Mit dem Capgo-Service authentifizieren](./login/)
[ doctor](/docs/cli/reference/doctor/)
[Überprüfen Sie Ihre Capgo-Einrichtung auf mögliche Probleme](/docs/cli/reference/doctor/)
[ app](./app/)
[Verwalten Sie Ihre Capgo-Apps](./app/)
[ bundle](/docs/cli/reference/bundle/)
[Verwalten Sie Ihre App-Bundles](/docs/cli/reference/bundle/)
[ channel](/docs/cli/reference/channel/)
[Verwalten Sie Ihre Release-Kanäle](/docs/cli/reference/channel/)
[ key](/docs/cli/reference/key/)
[Verwalten Sie Ihre App-Signierungsschlüssel](/docs/cli/reference/key/)
## CI-Integration
Um Ihre Arbeit zu automatisieren, empfehlen wir die Verwendung von GitHub Actions, um Ihre Updates an Capgo zu übertragen. Weitere Informationen finden Sie in unserem [GitHub Actions Tutorial](https://capgo.app/blog/automatic-build-and-release-with-github-actions/)
Vergessen Sie nicht, Ihre CI-Umgebungsvariablen mit Ihrem Capgo API-Schlüssel zu konfigurieren.
## Demo-App
Ein vollständiges Beispiel einer Capgo-App mit CI-Integration finden Sie in unserer [Demo-App auf GitHub](https://github.com/Cap-go/demo-app/)
# Konto
Der `account`-Befehl ermöglicht die Verwaltung Ihres Capgo-Kontos
### id
`npx @capgo/cli account id`
Ruft Ihre Konto-ID ab
Optionen:
* `-a, --apikey `: API-Schlüssel zur Verknüpfung mit Ihrem Konto
# App
Der `app`-Befehl ermöglicht die Verwaltung Ihrer Capgo-Apps
### add
`npx @capgo/cli app add [appId]`
Fügt eine neue App zu Ihrem Capgo-Konto hinzu
`[appId]` ist Ihre App-ID im Format `com.example.app`. Weitere Informationen finden Sie in der [Capacitor-Dokumentation](https://capacitorjs.com/docs/cli/commands/init/)
> 💡 Alle Optionen werden aus Ihrer `capacitor.config.json` ermittelt, wenn sie nicht angegeben werden
Optionen:
* `--icon [path]`: Pfad zu einem benutzerdefinierten Symbol, das in der Capgo-Webanwendung angezeigt wird
* `--name [name]`: Benutzerdefinierter Name, der in der App-Liste angezeigt wird
* `--apikey [key]`: API-Schlüssel zur Verknüpfung mit Ihrem Konto
* `--retention [days]`: Aufbewahrungszeitraum für App-Bundles in Tagen (Standard: 0 = unbegrenzt)
### set
`npx @capgo/cli app set [appId]`
Aktualisiert eine bestehende App in Ihrem Capgo-Konto
Optionen:
* `--icon [path]`: Pfad zu einem benutzerdefinierten Symbol, das in der Capgo-Webanwendung angezeigt wird
* `--name [name]`: Benutzerdefinierter Name, der in der App-Liste angezeigt wird
* `--retention [days]`: Aufbewahrungszeitraum für App-Bundles in Tagen (Standard: 0 = unbegrenzt)
* `--apikey [key]`: API-Schlüssel zur Verknüpfung mit Ihrem Konto
### list
`npx @capgo/cli app list [appId]`
Listet alle Apps in Ihrem Capgo-Konto auf
Optionen:
* `--apikey [key]`: API-Schlüssel zur Verknüpfung mit Ihrem Konto
### delete
`npx @capgo/cli app delete [appId]`
Löscht eine App aus Ihrem Capgo-Konto
Optionen:
* `--apikey [key]`: API-Schlüssel zur Verknüpfung mit Ihrem Konto
* `--bundle`: Löscht nur eine bestimmte Bundle-Version
### debug
`npx @capgo/cli app debug [appId]`
Zeigt Debug-Informationen für eine App an
Optionen:
* `--apikey [key]`: API-Schlüssel zur Verknüpfung mit Ihrem Konto
* `--device`: Debug eines bestimmten Geräts
### setting
`npx @capgo/cli app setting [path]`
Bearbeitet die Capacitor-Konfiguration für eine App
`[path]` ist der Pfad zur Einstellung, die Sie ändern möchten (z.B. `appId` oder `plugins.CapacitorUpdater.autoUpdate`)
Sie müssen entweder `--string` oder `--bool` angeben:
* `--string `: Setzt die Einstellung auf einen String-Wert
* `--bool `: Setzt die Einstellung auf einen Boolean-Wert
# Bündel
Der `bundle`-Befehl ermöglicht die Verwaltung Ihrer App-Bundles
### upload
`npx @capgo/cli bundle upload [appId]`
Lädt ein neues Bundle für eine App hoch
Optionen:
* `-a, --apikey `: API-Schlüssel zur Verknüpfung mit Ihrem Konto
* `-p, --path `: Pfad zum hochzuladenden Ordner (standardmäßig das `webDir` in `capacitorconfig`)
* `-c, --channel `: Channel, mit dem das Bundle verknüpft werden soll
* `-e, --external `: Link zu einer externen URL statt Upload zu Capgo Cloud
* `--iv-session-key `: IV und Session-Schlüssel für externe Bundle-URL festlegen
* `--s3-region `: Region für Ihren S3-Bucket
* `--s3-apikey `: API-Schlüssel für Ihren S3-Endpunkt
* `--s3-apisecret `: API-Secret für Ihren S3-Endpunkt
* `--s3-endpoint `: URL des S3-Endpunkts
* `--s3-bucket-name `: Name Ihres S3-Buckets
* `--s3-port `: Port für Ihren S3-Endpunkt
* `--no-s3-ssl`: SSL für S3-Uploads deaktivieren
* `--key `: Benutzerdefinierter Pfad für den öffentlichen Signaturschlüssel (v1-System)
* `--key-data `: Öffentliche Signaturschlüsseldaten (v1-System)
* `--key-v2 `: Benutzerdefinierter Pfad für den privaten Signaturschlüssel (v2-System)
* `--key-data-v2 `: Private Signaturschlüsseldaten (v2-System)
* `--bundle-url`: Bundle-URL in stdout ausgeben
* `--no-key`: Signaturschlüssel ignorieren und unsigniertes Update senden
* `--no-code-check`: Überprüfung auf `notifyAppReady()` im Quellcode und `indexhtml` im Root-Verzeichnis überspringen
* `--display-iv-session`: IV und Session-Schlüssel zur Verschlüsselung des Updates anzeigen
* `-b, --bundle `: Hochzuladende Bundle-Versionsnummer
* `--min-update-version `: Mindestversion der App für dieses Update (nur verwendet wenn Auto-Update über Metadaten deaktiviert ist)
* `--auto-min-update-version`: Automatische Festlegung der Mindest-Update-Version basierend auf nativen Paketversionen
* `--ignore-metadata-check`: Metadaten-Prüfung (node\_modules) beim Hochladen ignorieren
* `--ignore-checksum-check`: Prüfsummen-Prüfung beim Hochladen ignorieren
* `--timeout `: Timeout für den Upload-Prozess in Sekunden
* `--multipart`: Multipart-Protokoll für S3-Upload verwenden (veraltet, nutzen Sie stattdessen `--tus`)
* `--tus`: Bundle mit dem tus-Protokoll hochladen
* `--tus-chunk-size `: Chunk-Größe für den tus-Upload
* `--partial`: Nur geänderte Dateien zu Capgo Cloud hochladen
* `--partial-only`: Nur partielle Dateien zu Capgo Cloud hochladen, ZIP-Datei überspringen (nützlich für große Bundles)
* `--encrypted-checksum `: Verschlüsselte Prüfsumme (Signatur) für externes Bundle
* `--auto-set-bundle`: Bundle-Version automatisch in `capacitorconfigjson` setzen
* `--dry-upload`: Testlauf des Upload-Prozesses ohne tatsächlichen Upload (nützlich zum Testen)
* `--package-json `: Kommagetrennte Liste von Pfaden zu `packagejson`-Dateien (nützlich für Monorepos)
* `--node-modules `: Kommagetrennte Liste von Pfaden zu `node_modules`-Verzeichnissen (nützlich für Monorepos)
* `--encrypt-partial`: Partielle Update-Dateien verschlüsseln
* `--delete-linked-bundle-on-upload`: Aktuell verknüpftes Bundle im Ziel-Channel vor dem Upload löschen
### compatibility
`npx @capgo/cli bundle compatibility [appId]`
Prüft die Kompatibilität eines Bundles mit einem bestimmten Channel
Optionen:
* `-a, --apikey `: API-Schlüssel zur Verknüpfung mit Ihrem Konto
* `-c, --channel `: Zu prüfender Channel
* `--text`: Ergebnisse als Text statt Emoji ausgeben
* `--package-json `: Kommagetrennte Liste von Pfaden zu `packagejson`-Dateien (nützlich für Monorepos)
* `--node-modules `: Kommagetrennte Liste von Pfaden zu `node_modules`-Verzeichnissen (nützlich für Monorepos)
### delete
`npx @capgo/cli bundle delete [bundleId] [appId]`
Löscht ein Bundle aus einer App
Optionen:
* `-a, --apikey `: API-Schlüssel zur Verknüpfung mit Ihrem Konto
### list
`npx @capgo/cli bundle list [appId]`
Listet alle Bundles einer App auf
Optionen:
* `-a, --apikey `: API-Schlüssel zur Verknüpfung mit Ihrem Konto
### cleanup
`npx @capgo/cli bundle cleanup [appId]`
Bereinigt alte Bundles einer Hauptversion und behält die angegebene Anzahl der neuesten Bundles
Optionen:
* `-b, --bundle `: Zu bereinigende Hauptversionsnummer
* `-a, --apikey `: API-Schlüssel zur Verknüpfung mit Ihrem Konto
* `-k, --keep `: Anzahl der zu behaltenden Bundles (Standard: 4)
* `-f, --force`: Erzwungenes Entfernen ohne Bestätigung
### decrypt
`npx @capgo/cli bundle decrypt [zipPath] [sessionKey]`
Entschlüsselt ein signiertes ZIP-Bundle
Optionen:
* `--key `: Benutzerdefinierter Pfad für den privaten Signaturschlüssel
* `--key-data `: Private Signaturschlüsseldaten
### encrypt
`npx @capgo/cli bundle encrypt [zipPath]`
Verschlüsselt ein ZIP-Bundle
Optionen:
* `--key `: Benutzerdefinierter Pfad für den privaten Signaturschlüssel
* `--key-data `: Private Signaturschlüsseldaten
### encryptV2
`npx @capgo/cli bundle encryptV2 [zipPath] [checksum]`
Verschlüsselt ein ZIP-Bundle mit der neuen Verschlüsselungsmethode
Optionen:
* `--key `: Benutzerdefinierter Pfad für den privaten Signaturschlüssel
* `--key-data `: Private Signaturschlüsseldaten
* `-j, --json`: Ergebnisse als JSON ausgeben
### decryptV2
`npx @capgo/cli bundle decryptV2 [zipPath] [checksum]`
Entschlüsselt ein ZIP-Bundle mit der neuen Verschlüsselungsmethode
Optionen:
* `--key `: Benutzerdefinierter Pfad für den privaten Signaturschlüssel
* `--key-data `: Private Signaturschlüsseldaten
* `--checksum `: Prüfsumme des Bundles zur Integritätsprüfung
### zip
`npx @capgo/cli bundle zip [appId]`
Erstellt eine ZIP-Datei für ein Bundle
Optionen:
* `-p, --path `: Pfad zum zu zippenden Ordner (standardmäßig das `webDir` in `capacitorconfig`)
* `-b, --bundle `: Bundle-Versionsnummer für den Dateinamen
* `-n, --name `: Benutzerdefinierter Dateiname für die ZIP-Datei
* `-j, --json`: Ergebnisse als JSON ausgeben
* `--no-code-check`: Überprüfung auf `notifyAppReady()` im Quellcode und `indexhtml` im Root-Verzeichnis überspringen
* `--key-v2`: Neue Verschlüsselungsmethode (v2) verwenden
* `--package-json `: Kommagetrennte Liste von Pfaden zu `packagejson`-Dateien (nützlich für Monorepos)
# Kanal
Der `channel`-Befehl ermöglicht die Verwaltung Ihrer Release-Kanäle
### add
`npx @capgo/cli channel add [channelId] [appId]`
Erstellt einen neuen Kanal für eine App
Optionen:
* `-d, --default`: Setzt den neuen Kanal als Standardkanal
* `-a, --apikey `: API-Schlüssel zur Verknüpfung mit Ihrem Konto
### delete
`npx @capgo/cli channel delete [channelId] [appId]`
Löscht einen Kanal aus einer App
Optionen:
* `-a, --apikey `: API-Schlüssel zur Verknüpfung mit Ihrem Konto
* `--delete-bundle`: Löscht das mit dem Kanal verbundene Bundle
### list
`npx @capgo/cli channel list [appId]`
Listet alle Kanäle einer App auf
Optionen:
* `-a, --apikey `: API-Schlüssel zur Verknüpfung mit Ihrem Konto
### currentBundle
`npx @capgo/cli channel currentBundle [channel] [appId]`
Ruft das aktuelle Bundle für einen bestimmten Kanal ab
Optionen:
* `-c, --channel `: Kanal, von dem das aktuelle Bundle abgerufen werden soll
* `-a, --apikey `: API-Schlüssel zur Verknüpfung mit Ihrem Konto
* `--quiet`: Gibt nur die Bundle-Version aus
### set
`npx @capgo/cli channel set [channelId] [appId]`
Legt die Eigenschaften eines Kanals fest
Optionen:
* `-a, --apikey `: API-Schlüssel zur Verknüpfung mit Ihrem Konto
* `-b, --bundle `: Bundle-Versionsnummer für den Kanal festlegen
* `-s, --state `: Setzt den Status des Kanals (`default` oder `normal`)
* `--latest`: Verwendet die neueste Version aus `packagejson` als Bundle-Version
* `--downgrade`: Erlaubt Downgrades auf Versionen unter der nativen Version
* `--no-downgrade`: Deaktiviert Downgrades auf Versionen unter der nativen Version
* `--upgrade`: Erlaubt Upgrades auf Versionen über der nativen Version
* `--no-upgrade`: Deaktiviert Upgrades auf Versionen über der nativen Version
* `--ios`: Erlaubt das Senden von Updates an iOS-Geräte
* `--no-ios`: Deaktiviert das Senden von Updates an iOS-Geräte
* `--android`: Erlaubt das Senden von Updates an Android-Geräte
* `--no-android`: Deaktiviert das Senden von Updates an Android-Geräte
* `--self-assign`: Erlaubt Geräten die Selbstzuweisung zu diesem Kanal
* `--no-self-assign`: Deaktiviert die Selbstzuweisung von Geräten zu diesem Kanal
* `--disable-auto-update `: Deaktiviert die Auto-Update-Strategie für diesen Kanal (Optionen: `major`, `minor`, `metadata`, `patch`, `none`)
* `--dev`: Erlaubt das Senden von Updates an Entwicklungsgeräte
* `--no-dev`: Deaktiviert das Senden von Updates an Entwicklungsgeräte
* `--emulator`: Erlaubt das Senden von Updates an Emulator-Geräte
* `--no-emulator`: Deaktiviert das Senden von Updates an Emulator-Geräte
* `--package-json `: Kommagetrennte Liste von Pfaden zu `packagejson`-Dateien (nützlich für Monorepos)
# Arzt
`npx @capgo/cli doctor`
Dieser Befehl überprüft, ob Sie die neueste Version der Capgo-Pakete verwenden
Er ist auch nützlich für die Meldung von Fehlern
# initialisieren
`npx @capgo/cli@latest init [apikey]`
Dieser Befehl führt Sie Schritt für Schritt durch:
* Hinzufügen Ihrer App zu Capgo
* Hinzufügen des Codes zu Ihrer App zur Validierung des Updates
* Erstellen Ihrer App
* Hochladen Ihrer App zu Capgo
* Hilft Ihnen zu überprüfen, ob das Update funktioniert
# Schlüssel
Mit dem Befehl `key` können Sie Ihre App-Signierungsschlüssel verwalten
### save
`npx @capgo/cli key save`
Speichert einen Base64-codierten Verschlüsselungsschlüssel in der Capacitor-Konfiguration (nützlich für CI)
Options:
* `-f, --force`: Erzwingt die Generierung eines neuen Schlüssels
* `--key`: Pfad zur Schlüsseldatei, die in der Capacitor-Konfiguration gespeichert werden soll
* `--key-data`: Schlüsseldaten, die direkt in der Capacitor-Konfiguration gespeichert werden sollen
### create
`npx @capgo/cli key create`
Erstellt einen neuen Verschlüsselungsschlüssel
Options:
* `-f, --force`: Erzwingt die Generierung eines neuen Schlüssels
### delete\_old
`npx @capgo/cli key delete_old`
Löscht den alten Verschlüsselungsschlüssel
# Login
`npx @capgo/cli login [apikey]`
Dieser Befehl speichert Ihren Capgo API-Schlüssel für die zukünftige Verwendung
Note
Sie können den gespeicherten API-Schlüssel überschreiben, indem Sie `--apikey=` zu einem beliebigen Befehl hinzufügen
Optionen:
* `--local`: Speichert den API-Schlüssel im lokalen Repository und fügt ihn zur `gitignore` hinzu
# Häufig gestellte Fragen
> Häufig gestellte Fragen zu Capgo
Wenn Sie hier nicht beantwortete Fragen haben, fragen Sie bitte! Sowohl das Erstellen eines Issues als auch das Fragen auf [Discord](https://discordcom/invite/VnYRvBfgA6) funktionieren.
### Was ist “Code Push”?
Code Push, auch bekannt als “Over the Air Updates” (OTA), ist ein Cloud-Service, der es Capacitor-Entwicklern ermöglicht, Updates für ihre Apps in der Produktion bereitzustellen. Capgo funktioniert derzeit auf Android und iOS und wird letztendlich überall dort funktionieren, wo Capacitor funktioniert.
“Code Push” ist eine Referenz auf den Namen einer Deploy-Funktion, die von der React Native Community von [Microsoft](https://appcenterms/) und [Expo](https://expodev/) verwendet wird, die beide Capacitor nicht unterstützen.
### Was ist der Unterschied zwischen einem Bundle und einem Release?
Wir verwenden den Begriff “Release” für die Vorbereitung einer Binärdatei für die App Stores. Um später ein Bundle generieren zu können, muss Capgo die exakte Binärdatei kennen, die an die App Stores gesendet wurde.
Wir verwenden den Begriff “Bundle” für ein Patch, das auf ein Release angewendet werden kann, um es mit neuem Code zu aktualisieren. Der Befehl `npx @capgo/cli app update` wird verwendet, um aus Ihrem neuen lokalen Code ein Bundle zu generieren, das dann an Ihre Nutzer ausgeliefert wird.
### Wie sieht die Roadmap aus?
Unsere Projekt-Boards sind öffentlich und zu finden unter: [https://github.com/orgs/Cap-go/projects](https://github.com/orgs/Cap-go/projects/)
Unser Team arbeitet auch öffentlich, sodass Sie jederzeit sehen können, woran wir arbeiten. Wir beantworten gerne Ihre Fragen zu unserer Roadmap oder Prioritäten über Github Issues oder [Discord](https://discordcom/invite/VnYRvBfgA6).
### Kann ich Capgo mit meinem Team nutzen?
Ja! Alle Pläne unterstützen unbegrenzte Entwickler. Wir beschränken nur App-Metriken (MAU, Speicher und Bandbreite) für jede Organisation.
Weitere Informationen finden Sie unter [Teams](https://capgo.app/pricing/).
### Speichert Capgo meinen Quellcode?
Nein. Capgo-Server sehen niemals Ihren Quellcode. Wenn Sie `npx @capgo/cli app update` ausführen, lädt das `npx @capgo/cli`-Tool nur den kompilierten Code hoch, den Sie auch an die App Stores senden. Wenn Sie zusätzliche Sicherheit wünschen, können Sie Ende-zu-Ende-Verschlüsselung verwenden, um Ihr Bundle vor dem Upload auf Capgo-Server zu verschlüsseln.
Siehe auch unsere Datenschutzrichtlinie: [https://capgo.app/privacy](https://capgo.app/privacy/)
### Kann ich Capgo von meinem CI-System aus nutzen?
Ja. Capgo ist für die Verwendung in CI-Systemen gedacht. Wir haben eine Anleitung für [Android und Github Actions](https://capgo.app/blog/automatic-capacitor-android-build-github-action/) und [IOS](https://capgo.app/blog/automatic-capacitor-ios-build-github-action/) sowie für [Gitlab](https://capgo.app/blog/setup-ci-and-cd-gitlab/) veröffentlicht, andere CI-Systeme sollten ähnlich sein.
Zögern Sie nicht, sich bei Problemen über GitHub Issues oder Discord zu melden.
### Wie verhält sich das zu Firebase Remote Config oder Launch Darkly?
Code Push ermöglicht das Hinzufügen neuen Codes/Ersetzen von Code auf dem Gerät. Firebase Remote Config und Launch Darkly sind beides Konfigurationssysteme. Sie ermöglichen es Ihnen, die Konfiguration Ihrer App zu ändern, ohne eine neue Version ausliefern zu müssen. Sie sind nicht dafür gedacht, Code zu ersetzen.
### Wie groß ist der Dependency-Footprint?
Ich habe es kürzlich nicht gemessen, aber ich erwarte, dass die Code-Push-Bibliothek weniger als ein Megabyte zu Capacitor-Apps hinzufügt. Wir kennen Möglichkeiten, dies kleiner zu machen, wenn es Priorität wird. Wenn die Größe ein Blocker für Sie ist, lassen Sie es uns wissen!
### Funktioniert Code Push mit großen Anwendungen?
Ja. Es gibt keine Begrenzung für die Größe der Anwendung, die mit Code Push aktualisiert werden kann. Wie [unten](https://capgo.app/docs/faq/#what-types-of-changes-does-capgo-code-push-support) erwähnt, kann Capgo jeden JS-Code in Ihrer Anwendung ändern, unabhängig von der Größe.
Zu beachten: Eine größere Größe erschwert es Benutzern, Updates herunterzuladen. Wir empfehlen, Ihre App so klein wie möglich zu halten.
### Wofür kann ich Capgo Code Push verwenden?
Wir haben verschiedene Anwendungsfälle gesehen, darunter:
* Notfall-Fixes für Produktions-Apps
* Auslieferung von Fehlerbehebungen an Benutzer älterer Versionen Ihrer App
* Kontinuierliche Auslieferung (z.B. stündlich)
Beachten Sie, dass die meisten App Stores das Ausliefern von Code verbieten, der das Verhalten der App wesentlich ändert. Weitere Informationen finden Sie [unten](https://capgo.app/docs/faq/#how-does-this-relate-to-the-appplay-store-review-process-or-policies).
### Was zählt als “MAU” für Capgo?
Ein MAU ist ein “Monthly Active User”. Wir zählen einen MAU als jedes Gerät, das in den letzten 30 Tagen unsere Server kontaktiert hat. Wir zählen keine Geräte, die unsere Server in den letzten 30 Tagen nicht kontaktiert haben.
Jedes Mal, wenn ein Gerät Ihre App neu installiert, wird ein neuer MAU gezählt, dies geschieht aufgrund von Apple Store-Einschränkungen bezüglich der Privatsphäre. Wir können dasselbe Gerät nicht verfolgen, wenn der Benutzer die App neu installiert.
Während der Entwicklung wird bei jeder Neuinstallation der App ein neuer MAU gezählt.
Dasselbe gilt für Testflight-Downloads oder Kanalwechsel in Android. Das Aktualisieren der App erstellt keine neue Geräte-ID.
> Wir empfehlen nach dem ersten Setup, Entwicklungsgeräte und Emulatoren zu deaktivieren, um die Anzahl doppelter Geräte zu reduzieren.
### Wofür können wir Capgo Code Push nicht verwenden?
Wie oben erwähnt, sollte Capgo nicht verwendet werden, um gegen App Store-Richtlinien zu verstoßen. Weitere Informationen finden Sie [unten](https://capgo.app/docs/faq/#does-capgo-comply-with-play-store-guidelines).
Außerdem unterstützt Capgo keine Änderungen am nativen Code (z.B. Java/Kotlin auf Android oder Objective-C/Swift auf iOS). Das Tool warnt Sie während eines Aktualisierungsversuchs, wenn Sie nativen Code geändert haben.
### Reicht Capgo die Apps für mich bei den Stores ein?
Capgo unterstützt derzeit nicht das Einreichen bei den App Stores in Ihrem Namen. Wir planen, dies in Zukunft hinzuzufügen, aber vorerst müssen Sie weiterhin Ihre bestehenden Prozesse für die Einreichung bei den App Stores verwenden.
Sie können unseren [CI-Leitfaden für Android](https://capgo.app/blog/automatic-capacitor-android-build-github-action/) und [CI-Leitfaden für iOS](https://capgo.app/blog/automatic-capacitor-ios-build-github-action/) verwenden, um diesen Prozess zu automatisieren.
### Was speichert Capgo auf der Festplatte und wo?
Der Capgo-Updater (der in Ihrer Anwendung enthalten ist, wenn Sie Ihre App erstellen) speichert das zuletzt heruntergeladene Bundle im einzigen Verzeichnis, das Capacitor zum Laden von Code erlaubt. Auf Android befindet sich dies in `/data/user/0/comexampleapp/code_cache/capgo_updater`, wobei der Basispfad vom Android-System bereitgestellt wird und sich zur Laufzeit dynamisch ändern kann. Auf iOS-Geräten werden Daten unter `Library/Application Support/capgo` gespeichert.
Die Capgo-Kommandozeilentools (z.B.`npx @capgo/cli app update`) werden auf der Festplatte in npm-Caches installiert, Ihre Anmeldedaten werden in Ihrem Home-Verzeichnis in `~/capgo` gespeichert
### Wie verhält sich das zum Capacitor Hot Reload?
Capacitor Hot Reload ist ein Feature ausschließlich für die Entwicklungszeit. Code Push ist für die Produktion.
Hot Reload ist eine Funktion von Capacitor, die es ermöglicht, Code während der Entwicklung auf dem Gerät zu ändern. Dies erfordert das Erstellen der Capacitor-App mit einem Proxy zur Verbindung mit Ihrem lokalen Rechner.
Code Push ist eine Funktion, die es ermöglicht, Code auf dem Gerät in der Produktion zu ändern. Wir verwenden verschiedene Techniken, um dies je nach Plattform zu ermöglichen.
### Welche Arten von Änderungen unterstützt Capgo Code Push?
Capgo kann jeden JS-Code in Ihrer Anwendung ändern. Dies umfasst App-Code und generierten Code. Sie können auch Abhängigkeiten in `package.json` aktualisieren, solange diese keine nativen Code-Änderungen erfordern.
Wir haben nicht vor, Änderungen am nativen Code zu unterstützen (z.B. Java/Kotlin auf Android oder Objective-C/Swift auf iOS), und das Tool wird Sie warnen, wenn es erkennt, dass Sie nativen Code geändert haben, da dieser nicht im Bundle enthalten sein wird.
### Unterstützt dies Web?
Code Push wird für Web nicht benötigt, da Web bereits so funktioniert. Wenn ein Benutzer eine Web-App öffnet, lädt sie bei Bedarf die neueste Version vom Server herunter.
Wenn Sie einen Anwendungsfall für Code Push mit Web haben, würden wir das gerne wissen!
### Wird dies auf iOS, Android, Mac, Windows, Linux usw. funktionieren?
Ja.
Bisher haben wir uns auf die Android- und iOS-Unterstützung konzentriert, aber Code Push wird letztendlich überall funktionieren, wo Capacitor funktioniert. Wir stellen sicher, dass wir zuerst die gesamte Infrastruktur aufbauen, die benötigt wird, um Code Push zuverlässig und sicher bereitzustellen, bevor wir auf weitere Plattformen expandieren.
### Welche Betriebssystemversionen unterstützt Capgo?
Capgo unterstützt die gleichen Android-Versionen, die auch Capacitor unterstützt.
Capacitor unterstützt derzeit Android API Level 22+ und iOS 13.0+: [https://capacitorjs.com/docs/main/reference/support-policy](https://capacitorjs.com/docs/main/reference/support-policy/)
### Welche Versionen von Capacitor unterstützt Capgo?
Capgo unterstützt derzeit nur aktuelle stabile Versionen von Capacitor. Wir könnten auch ältere Versionen von Capacitor unterstützen, haben aber noch nicht die nötige Infrastruktur aufgebaut, um diese über die Zeit zu pflegen. Wir beabsichtigen, in Zukunft mehr Versionen von Capacitor zu unterstützen, einschließlich jeder Version für unsere Enterprise-Kunden [https://github.com/Cap-go/capgo/issues/1100](https://github.com/Cap-go/capgo/issues/1100/)
Capgo verfolgt die stabilen Versionen und aktualisiert in der Regel innerhalb weniger Stunden nach einer stabilen Veröffentlichung. Unser System für diese Aktualisierungen ist automatisiert und benötigt nur wenige Minuten. Danach führen wir einen zusätzlichen manuellen Verifizierungsschritt durch, bevor wir auf unsere Server veröffentlichen.
### Wie verhält sich dies zum App/Play Store Überprüfungsprozess oder deren Richtlinien?
Entwickler sind an ihre Vereinbarungen mit Store-Anbietern gebunden, wenn sie diese Stores nutzen. Code Push ist so konzipiert, dass Entwickler ihre Apps aktualisieren und dabei die Store-Richtlinien auf iOS und Android einhalten können. Ähnlich wie bei den verschiedenen kommerziellen Produkten, die für React Native verfügbar sind (z.B. [Microsoft](https://appcenter.ms/), [Expo](https://expo.dev/))
Microsoft veröffentlicht auch einen Leitfaden darüber, wie ihre Lösung die App Store-Richtlinien erfüllt: [https://github.com/microsoft/react-native-code-push#store-guideline-compliance](https://github.com/microsoft/react-native-code-push/#store-guideline-compliance)
Code Push ist eine weit verbreitete Technik in den App Stores. Alle großen Apps, die ich kenne, verwenden Code Push. Die wichtigste Richtlinie ist, das Verhalten der App nicht wesentlich zu ändern. Weitere Informationen finden Sie [unten](https://capgo.app/docs/faq/#does-capgo-comply-with-play-store-guidelines).
### Erfüllt Capgo die Play Store-Richtlinien?
Ja.
Der Play Store bietet zwei Einschränkungen in Bezug auf Update-Tools:
1. Updates müssen einen Interpreter oder eine virtuelle Maschine verwenden (Capgo verwendet die Dart Virtual Machine) [https://support.google.com/googleplay/android-developer/answer/9888379?hl=en](https://support.google.com/googleplay/android-developer/answer/9888379/?hl=en)
```plaintext
Eine über Google Play verteilte App darf sich nicht selbst modifizieren, ersetzen oder aktualisieren
mit anderen Methoden als dem Update-Mechanismus von Google Play. Ebenso darf eine App
keinen ausführbaren Code (wie dex-, JAR-, .so-Dateien) von einer
anderen Quelle als Google Play herunterladen. *Diese Einschränkung gilt nicht für Code,
der in einer virtuellen Maschine oder einem Interpreter läuft*, wo entweder
indirekten Zugriff auf Android-APIs bietet (wie JavaScript in einer WebView oder
Browser)
Apps oder Drittanbieter-Code, wie SDKs, mit interpretierten Sprachen (JavaScript,
Python, Lua, etc.), die zur Laufzeit geladen werden (zum Beispiel nicht mit der
App gebündelt), dürfen keine potenziellen Verstöße gegen Google Play-Richtlinien ermöglichen
```
2. Änderungen an der App dürfen nicht täuschend sein (z.B. Ändern des Zwecks der App durch ein Update) [https://support.google.com/googleplay/android-developer/answer/9888077](https://support.google.com/googleplay/android-developer/answer/9888077/) Bitte seien Sie transparent gegenüber Ihren Benutzern bezüglich dessen, was Sie mit Ihrer Anwendung bereitstellen, und verletzen Sie nicht ihre Erwartungen durch wesentliche Verhaltensänderungen durch die Verwendung von Capgo.
Capgo ist so konzipiert, dass es mit den Play Store-Richtlinien kompatibel ist. Allerdings ist Capgo ein Werkzeug und kann wie jedes Werkzeug missbraucht werden. Die absichtliche missbräuchliche Verwendung von Capgo zur Verletzung der Play Store-Richtlinien verstößt gegen die Capgo [Nutzungsbedingungen](https://capgo.app/tos/) und kann zur Kündigung Ihres Kontos führen.
Schließlich werden Code Push-Dienste in der Branche weit verbreitet eingesetzt (alle großen Apps, die ich kenne, verwenden sie) und es gibt mehrere andere öffentlich verfügbare Code Push-Dienste (z.B. expo.dev & appcenter.ms). Dies ist ein gut ausgetretener Pfad.
Microsoft veröffentlicht auch einen Leitfaden darüber, wie ihre React Native “codepush”-Bibliothek die App Store-Richtlinien erfüllt: [https://github.com/microsoft/react-native-code-push#store-guideline-compliance](https://github.com/microsoft/react-native-code-push/#store-guideline-compliance)
### Erfüllt Capgo die App Store-Richtlinien?
Ja.
Ähnlich wie der Play Store bietet der App Store sowohl technische als auch Richtlinien-Einschränkungen.
```plaintext
3.2.2
interpretierter Code kann in eine Anwendung heruntergeladen werden, jedoch nur solange
dieser Code:
(a) den primären Zweck der Anwendung nicht durch Bereitstellung von
Funktionen oder Funktionalität ändert, die nicht mit dem beabsichtigten und
beworbenen Zweck der Anwendung, wie sie im App Store eingereicht wurde, übereinstimmen,
(b) keinen Store oder Storefront für anderen Code oder Anwendungen erstellt, und
(c) keine Signierung, Sandbox oder andere Sicherheitsfunktionen des Betriebssystems umgeht
Capgo verwendet einen benutzerdefinierten Dart-Interpreter, um die Interpreter-Only-Beschränkung für Updates auf iOS einzuhalten. Solange Ihre Anwendung kein täuschendes Verhalten durch Updates zeigt (z.B. Änderung des App-Zwecks durch Update), ist das Aktualisieren über Capgo (oder eine andere Code-Push-Lösung) gängige Branchenpraxis und entspricht den App Store-Richtlinien.
Der absichtliche Missbrauch von Capgo zur Verletzung der App Store-Richtlinien verstößt gegen die [Nutzungsbedingungen](https://capgo.app/tos/) von Capgo und kann zur Kündigung Ihres Kontos führen.
Microsoft veröffentlicht auch einen Leitfaden, wie ihre React Native "CodePush"-Bibliothek die App Store-Richtlinien einhält: [https://github.com/microsoft/react-native-code-push#store-guideline-compliance](https://github.com/microsoft/react-native-code-push/#store-guideline-compliance)
### Kann ich Capgo in meinem Land nutzen?[](https://capgo.app/docs/faq/#can-i-use-capgo-in-my-country "Direct link to Can I use Capgo in my country?")
Wir haben den Zugriff auf Capgo aus keinem Land eingeschränkt.
Wir erkennen an, dass einige Länder Einschränkungen haben, welche URLs innerhalb des Landes aufgerufen werden können. Capgo verwendet derzeit Cloudflare Cloud für das Hosting, einschließlich R2 Storage und Cloudflare Workers.
Folgende URLs werden von Capgo verwendet:
- [https://apicapgo.app](https://apicapgo.app/) -- verwendet von den `npx @capgo/cli` Command Line Tools für die Interaktion mit den Capgo-Servern sowie vom Capgo-Updater auf den Geräten der Benutzer zur Überprüfung von Updates
- [https://*r2cloudflarestoragecom](https://*r2cloudflarestoragecom/) -- verwendet vom `npx @capgo/cli` Command Line Tool zum Hoch- und Herunterladen von Bundles
Wenn all diese URLs aus Ihrem Land erreichbar sind, sollte Capgo funktionieren.
Wenn Ihre Region den Zugriff auf eine dieser URLs blockieren muss, lassen Sie es uns wissen und wir können mit Ihnen an einer Lösung arbeiten. Proxy-Server sind eine Option.
### Kann ich Capgo selbst hosten?[](https://capgo.app/docs/faq/#can-i-self-host-capgo "Direct link to Can I self-host Capgo?")
Ja, Sie können Capgo selbst hosten. Die Anleitung ist noch nicht geschrieben, aber der Code ist Open Source und verfügbar unter [https://github.com/cap-go/capgo](https://github.com/cap-go/capgo/)
### Benötigt Code Push Internet zum Funktionieren?[](https://capgo.app/docs/faq/#does-code-push-require-the-internet-to-work "Direct link to Does code push require the internet to work?")
Ja. Man könnte sich vorstellen, einen Server zu betreiben, um die Updates getrennt vom allgemeinen Internet zu verteilen, aber irgendeine Form von Netzwerkverbindung ist erforderlich, um Updates auf die Geräte zu übertragen.
### Wie wird Capgo von fehlender Netzwerkverbindung beeinflusst?[](https://capgo.app/docs/faq/#how-is-capgo-affected-by-lack-of-network-connectivity "Direct link to How is Capgo affected by lack of network connectivity?")
Der Capgo-Updater (der in Ihrer Anwendung enthalten ist, wenn Sie Ihre App mit Capgo erstellen) ist darauf ausgelegt, resistent gegen Netzwerkverbindungsprobleme zu sein.
Im Standard-Update-Verhalten benachrichtigt die Anwendung beim Start den Capgo-Updater, der einen separaten Thread startet, um eine Netzwerkanfrage an die Capgo-Server zu stellen und nach einem Update zu fragen. Wir verwenden absichtlich einen separaten Thread, um andere Aktivitäten der Anwendung nicht zu blockieren. Wenn die Netzwerkanfrage fehlschlägt oder eine Zeitüberschreitung auftritt, wird der Updater beim nächsten Start der Anwendung erneut prüfen.
Capgo Command Line Tools (z.B. `npx @capgo/cli app update`) benötigen eine Netzwerkverbindung zum Funktionieren. Wenn Sie Capgo zur Verteilung Ihrer App verwenden, sollten Sie sicherstellen, dass Ihr CI-System eine Netzwerkverbindung hat.
### Was passiert, wenn ein Benutzer lange Zeit nicht aktualisiert und ein Update verpasst?[](https://capgo.app/docs/faq/#what-happens-if-a-user-doesnt-update-for-a-long-time-and-misses-an-update "Direct link to What happens if a user doesn't update for a long time and misses an update?")
Unsere Implementierung sendet immer ein speziell auf das anfragende Gerät zugeschnittenes Update, das den Anfrager immer auf die neueste verfügbare Version aktualisiert. Wenn ein Benutzer also eine Weile nicht aktualisiert, wird er Zwischenupdates "verpassen".
Der Update-Server könnte geändert werden, um je nach Bedarf Ihrer Anwendung entweder die nächste inkrementelle Version oder die neueste Version zu unterstützen. Bitte lassen Sie uns wissen, wenn alternative Update-Verhaltensweisen für Sie wichtig sind.
### Wie verhält sich Capgo zu Capacitor?[](https://capgo.app/docs/faq/#how-does-capgo-relate-to-capacitor "Direct link to How does Capgo relate to Capacitor?")
Capgo ist ein Plugin für Capacitor, das Code Push hinzufügt. Capgo ist kein Ersatz für Capacitor. Sie können weiterhin die Capacitor-Tools verwenden, die Sie bereits kennen und schätzen.
Wir verfolgen die neueste stabile Version von Capacitor und aktualisieren unser Code Push Plugin entsprechend.
### Wann finden Updates statt?[](https://capgo.app/docs/faq/#when-do-updates-happen "Direct link to When do updates happen?")
Standardmäßig prüft der Capgo-Updater beim App-Start auf Updates. Er läuft in einem Hintergrund-Thread und blockiert nicht den UI-Thread. Updates werden installiert, während der Benutzer die App verwendet, und beim nächsten Neustart der App angewendet.
Es ist auch möglich, den Capgo-Updater manuell mit [package:capgo_code_push](https://pubdev/packages/capgo_code_push/) auszuführen, wodurch Updates jederzeit ausgelöst werden können, auch über Push-Benachrichtigungen.
Der Capgo-Updater ist so konzipiert, dass die App normal weiterläuft, wenn das Netzwerk nicht verfügbar ist oder der Server nicht erreichbar ist. Sollten Sie sich jemals entscheiden, ein Update von unseren Servern zu löschen, werden alle Ihre Clients normal weiterlaufen.
Wir haben die Möglichkeit hinzugefügt, Patches zurückzurollen. Am einfachsten ist es, einfach ein vorheriges Bundle an Ihren Kanal anzuhängen, um dies rückgängig zu machen.
### Muss ich meine app_id geheim halten?[](https://capgo.app/docs/faq/#do-i-need-to-keep-my-app_id-secret "Direct link to Do I need to keep my app_id secret?")
Nein. Die `app_id` ist in Ihrer App enthalten und kann öffentlich sein. Sie können sie in die Versionskontrolle einchecken (auch öffentlich) und müssen sich keine Sorgen machen, dass jemand anderes darauf zugreift.
Jemand mit Ihrer `app_id` kann die neueste Version Ihrer App von Capgo-Servern abrufen, kann aber keine Updates für Ihre App pushen oder auf andere Aspekte Ihres Capgo-Kontos zugreifen.
### Welche Informationen werden an Capgo-Server gesendet?[](https://capgo.app/docs/faq/#what-information-is-sent-to-capgo-servers "Direct link to What information is sent to Capgo servers?")
Obwohl Capgo sich mit dem Netzwerk verbindet, werden keine personenbezogenen Daten gesendet. Das Einbinden von Capgo sollte Ihre Erklärungen für den Play Store oder App Store nicht beeinflussen.
Anfragen, die von der App an Capgo-Server gesendet werden, enthalten:
- app_id (angegeben in `capacitorconfigjson`)
- channel (optional in `capacitorconfigjson`)
- release_version (versionName aus AndroidManifestxml oder CFBundleShortVersionString aus Infoplist oder `capacitorconfigjson` wenn in [`CapacitorUpdaterversion`](/docs/plugin/settings/#version) gesetzt)
- version_number (generiert als Teil von `npx @capgo/cli app update`)
- os_version (z.B. '1121')
- platform (z.B. 'android', notwendig um den richtigen Patch zu senden) Das wars. Der Code dafür ist in `updater/library/src/networkrs`
- device_id (beim ersten Start auf dem Gerät generiert, wird verwendet um Geräte-spezifische Installationen zu deduplizieren und ermöglicht uns die Abrechnung basierend auf installierten Benutzern)monatlich aktive Nutzer), anstatt der Gesamtanzahl der Patches oder Patch-Installationen)
- custom_id (optional, zur Laufzeit vom Entwickler festgelegt, um ein Gerät mit einem Benutzer in Ihrem System zu verknüpfen)
### Welche Plattformen unterstützt Capgo?[](https://capgo.app/docs/faq/#what-platforms-does-capgo-support "Direct link to What platforms does Capgo support?")
Derzeit unterstützt Capgo iOS und Android. Beide sind produktionsreif.
Die Nutzung von Capgo für iOS oder Android kann unabhängig voneinander entschieden werden. Sie können in Ihrem Kanal festlegen, ob Sie an Android oder eine in den App Store gebaute IPA ausliefern möchten oder umgekehrt.
Capgo kann (relativ einfach) für Desktop- oder Embedded-Ziele erweitert werden. Wenn diese für Sie wichtig sind, lassen Sie es uns bitte wissen.
### Wie interagiert Capgo mit Play Testing Tracks oder Apple TestFlight?[](https://capgo.app/docs/faq/#how-does-capgo-interact-with-play-testing-tracks-or-apple-testflight "Direct link to How does Capgo interact with Play Testing Tracks or Apple TestFlight?")
Jeder App Store hat eigene Mechanismen zur Verteilung von Apps an begrenzte Benutzergruppen (z.B. "internes Testen", "geschlossene Beta" usw.). Dies sind alles Mechanismen zur Segmentierung Ihrer Benutzer in Gruppen und zur Verteilung spezifischer App-Versionen.
Leider erlauben nicht alle diese Mechanismen Drittanbietern zu erkennen, wenn Apps in einem bestimmten Test Track oder über TestFlight installiert sind. Daher haben wir keine zuverlässige Einsicht in die Zusammensetzung dieser Gruppen und können den Zugriff auf Capgo-Patches nicht zuverlässig auf Basis dieser Gruppen steuern. [https://stackoverflow.com/questions/53291007/can-an-android-application-identify-the-test-track-within-google-play](https://stackoverflow.com/questions/53291007/can-an-android-application-identify-the-test-track-within-google-play/) [https://stackoverflow.com/questions/26081543/how-to-tell-at-runtime-whether-an-ios-app-is-running-through-a-testflight-beta-i](https://stackoverflow.com/questions/26081543/how-to-tell-at-runtime-whether-an-ios-app-is-running-through-a-testflight-beta-i/)
Wenn Sie die Verfügbarkeit von Capgo-Bundles segmentieren möchten, gibt es 4 mögliche Optionen:
1. Verwenden Sie separate Kanäle für jede Gruppe. Dies ist der einfachste Ansatz, erfordert aber die Verwaltung mehrerer Kanäle. Möglicherweise haben Sie bereits Dev-Kanäle und Prod-Kanäle mit unterschiedlicher Verfügbarkeit. Sie können also Ihre Dev-Kanäle aktualisieren, überprüfen und dann separat Ihre Prod-Kanäle aktualisieren. Wir empfehlen die Verwendung von Branches/Tags in Ihrer Versionskontrolle, um den Überblick über die Quellen der einzelnen Releases zu behalten.
2. Verfolgen Sie Ihre eigene Liste von Opt-in-Benutzern, deaktivieren Sie automatische Updates und lösen Sie Updates nur für bestimmte Benutzer über package:capgo_code_push aus. Dies funktioniert heute, erfordert aber die Verwaltung Ihrer eigenen Opt-in-Liste.
3. Capgo ermöglicht einen eigenen Opt-in-Mechanismus auf Geräteebene (ähnlich wie Test Tracks oder TestFlight, nur plattformunabhängig). Dies ermöglicht Ihrem QA-Team, sich für Bundles anzumelden, bevor sie der Öffentlichkeit zur Verfügung gestellt werden.
4. Capgo hat prozentbasierte Rollouts. Dies lässt Sie zwar nicht auswählen, an welche Geräte gesendet wird, kann aber helfen, inkrementell auszurollen und bei Problemen zurückzurollen.
## Abrechnung[](https://capgo.app/docs/faq/#billing "Direct link to Billing")
### Wie kann ich meinen Plan upgraden oder downgraden?[](https://capgo.app/docs/faq/#how-do-i-upgrade-or-downgrade-my-plan "Direct link to How do I upgrade or downgrade my plan?")
Sie können Ihren Plan jederzeit in Ihrem Dashboard upgraden oder downgraden: [https://web.capgo.app/dashboard/settings/plans](https://web.capgo.app/dashboard/settings/plans/)
### Wann wird meine Abrechnungsperiode zurückgesetzt?[](https://capgo.app/docs/faq/#when-does-my-billing-period-reset "Direct link to When does my billing period reset?")
Abrechnungsperioden werden automatisch jeden Monat am Tag Ihrer ersten Capgo-Anmeldung zurückgesetzt. Wenn Sie sich zum Beispiel am 15. des Monats angemeldet haben, wird Ihre Abrechnungsperiode am 15. jedes Monats zurückgesetzt.
### Wie kann ich mein Abonnement kündigen?[](https://capgo.app/docs/faq/#how-do-i-cancel-my-subscription "Direct link to How do I cancel my subscription?")
Sie können Ihr Abonnement jederzeit in Ihrem Dashboard kündigen: [https://web.capgo.app/dashboard/settings/plans](https://web.capgo.app/dashboard/settings/plans/)
### Kann ich für ein Jahr im Voraus bezahlen?[](https://capgo.app/docs/faq/#can-i-pay-for-a-year-in-advance "Direct link to Can I pay for a year in advance?")
Ja, Sie können jederzeit in Ihrem Dashboard für ein Jahr im Voraus bezahlen: [https://web.capgo.app/dashboard/settings/plans](https://web.capgo.app/dashboard/settings/plans/)
### Statistiken und Analysen[](https://capgo.app/docs/faq/#stats-and-analytics "Direct link to Stats and analytics")
Die Statistiken in Ihrem Dashboard werden jeden Tag um Mitternacht UTC aktualisiert.
Die Statistiken basieren auf der Anzahl der [MAU](https://capgo.app/docs/faq/#what-is-the-difference-between-a-bundle-and-a-release "Direct link to What is the difference between a bundle and a release?"), die auf Ihren Geräten installiert wurden.
# Wie wird die Geräte-ID generiert[](https://capgo.app/docs/faq/#how-device-id-is-generated "Direct link to How device ID is generated")
Die Geräte-ID wird beim ersten Start auf dem Gerät generiert und wird verwendet, um Installationen pro Gerät zu deduplizieren und uns zu ermöglichen, basierend auf installierten Benutzern (z.B. monatlich aktive Nutzer) abzurechnen, anstatt der Gesamtanzahl der Patches oder Patch-Installationen.
MAU ist eine bessere Lösung als die Anzahl der Installationen für die Preisgestaltung von Capgo, da es genauer ist und die tatsächlichen Kosten von Capgo pro Gerät widerspiegelt.
Aus Datenschutzgründen können wir dasselbe Gerät nicht verfolgen, wenn der Benutzer die App neu installiert.
Die Datenschutzregeln werden von Apple und Google durchgesetzt und nicht von Capgo.
Geräte-IDs werden erst in Ihrer Geräteliste angezeigt, wenn sie ihren ersten Patch installiert haben.
# Warum unterscheidet sich meine Geräteanzahl von meinen MAU?[](https://capgo.app/docs/faq/#why-my-device-number-is-different-than-my-mau "Direct link to Why my device number is different than my MAU?")
Derzeit wird die Geräteliste nicht so häufig aktualisiert wie die MAU.
Die Geräteliste wird nur aktualisiert, wenn ein Gerät ein Update installiert.
Die MAU wird bei jedem App-Start aktualisiert. Dies ist eine aktuelle Einschränkung der Plattform. Unsere Analyseplattform unterstützt keine Raw-Updates, daher verwenden wir konventionelle Datenbanken für die Geräteliste.
Um die Anzahl der Datenbankabfragen zu begrenzen, aktualisieren wir Zeilen nur bei App-Updates.
Diese Einschränkung wird in Zukunft behoben.
# Wie kann ich verschiedene Updates pro Plattform haben?[](https://capgo.app/docs/faq/#how-to-have-different-update-by-platform "Direct link to How to have different update by platform?")
Sie können einen Kanal für jede Plattform erstellen und plattformspezifische Updates in jedem Kanal deaktivieren.
Im iOS-Kanal Android-Updates deaktivieren und im Android-Kanal iOS-Updates deaktivieren.
Dann laden Sie ein Bundle in jeden Kanal hoch, um verschiedene Updates für jede Plattform zu haben.
Wenn Sie dasselbe Update für beide Plattformen benötigen, können Sie ein Bundle mit mehreren Kanälen verknüpfen. Das Bundle muss nicht dupliziert werden.
```
# Tech Support für Capgo
> So erhalten Sie Hilfe für Capgo
## Support über Discord
Capgo hat einen offiziellen [Discord Server](https://discordcom/invite/VnYRvBfgA6). Dort technischen Support zu erhalten ist wahrscheinlich einer der schnellsten Wege, eine Antwort zu bekommen.
Hier ist eine Kurzanleitung:
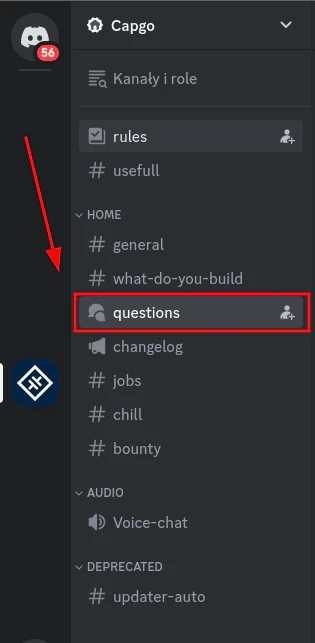
1. Gehe zum `questions` Kanal
2. Erstelle deinen Thread
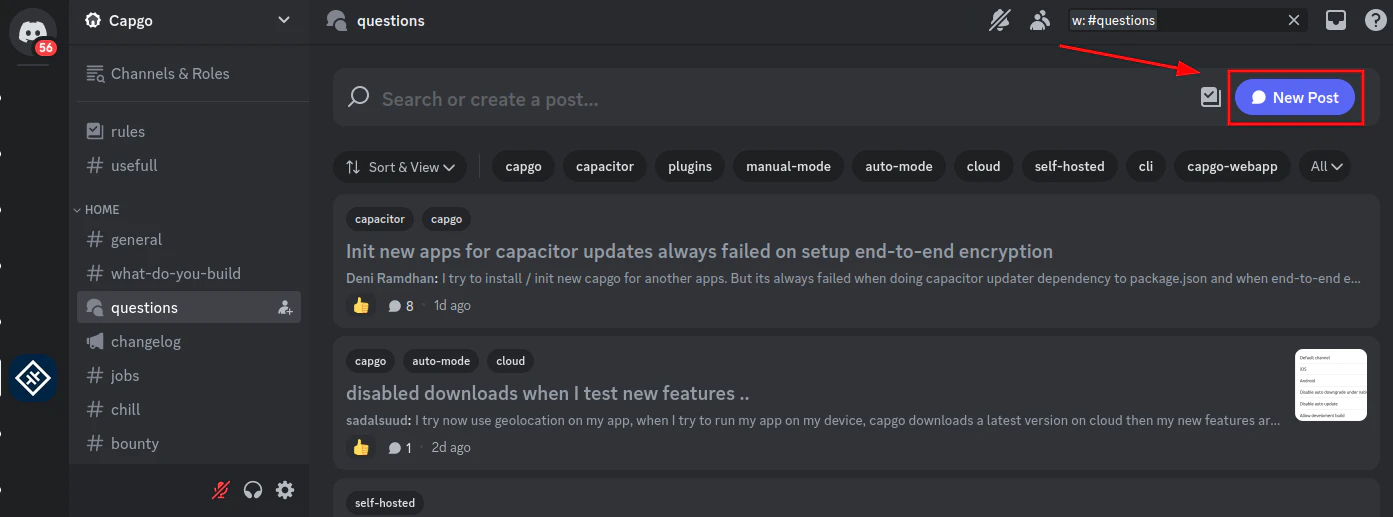
3. Beschreibe dein Problem und wähle die relevanten Tags aus
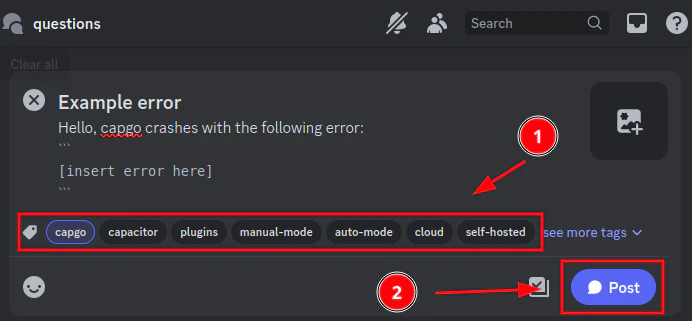
4. Teile deine sichere Konto-ID (optional)
Dies ermöglicht es dem Capgo-Team, einen Blick auf dein Konto zu werfen. Das Teilen dieser ID ist sicher, da sie dafür entwickelt wurde, öffentlich geteilt zu werden.
Um dies zu teilen, gehe bitte zu den [Capgo-Einstellungen](https://web.capgo.app/dashboard/settings/account/). Klicke dort bitte auf `copy account id`.
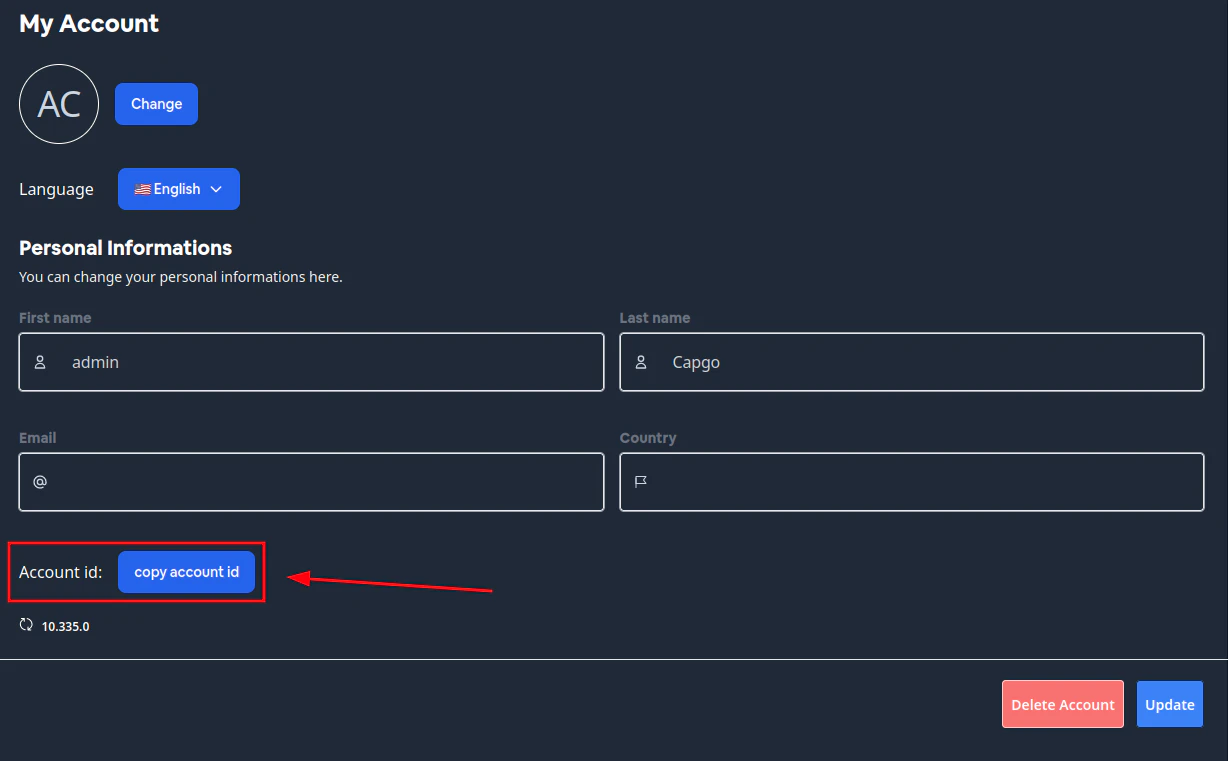
Dies kopiert die sichere Konto-ID in die Zwischenablage. Bitte füge diese in deinen Discord-Beitrag ein.
## Support per E-Mail
Dies ist der langsamste Weg, Support zu erhalten. Bitte nutze zuerst den Discord-Server.
Wenn du uns per E-Mail kontaktieren musst, sende bitte eine E-Mail an
# App hinzufügen
> Fügen Sie eine App zu Ihrem Capgo-Account hinzu und installieren Sie das Plugin in Ihrer App
## Einführung in Capgo
[Play](https://youtube.com/watch?v=NzXXKoyhTIo)
## Live-Updates sind 3 Schritte entfernt
### Geführtes Setup
1. Erstellen Sie Ihr Konto unter 
2. Verwenden Sie die Init-Befehle, um zu beginnen
```bash
npx @capgo/cli@latest init [APIKEY]
```
Es werden Ihnen eine Reihe von Fragen gestellt. Beantworten Sie diese, um das automatische Setup abzuschließen
Tip
Wenn Sie diese Schritte befolgen, sind Sie in kürzester Zeit einsatzbereit. Falls Sie während des Prozesses weitere Unterstützung benötigen, ist unser Support-Team [hier um zu helfen](https://support.capgo.app). Viel Spaß beim Onboarding!
3. Deployment eines Live-Updates
[Deploy a live update ](/docs/getting-started/deploy/)Erfahren Sie, wie Sie ein Live-Update für Ihre App bereitstellen
### Manuelles Setup
Falls der Init-Befehl für Sie nicht funktioniert, können Sie eine App manuell hinzufügen
1. Verbinden Sie die CLI mit Ihrem Konto:
```bash
npx @capgo/cli@latest login [APIKEY]
```
2. Fügen Sie die App mit diesem Befehl zu Ihrem Konto hinzu:
```bash
npx @capgo/cli@latest app add [APP_NAME]
```
3. Installieren Sie das Plugin in Ihrer App:
```json
{
"plugins": {
CapacitorUpdater: {
"appId": "Your appID",
"autoUpdate": true,
"version": "1.0.0"
}
}
}
```
4. Rufen Sie die Init-Methode so früh wie möglich in Ihrer App auf:
```typescript
import { CapacitorUpdater } from '@capgo/capacitor-updater';
CapacitorUpdater.notifyAppReady();
```
5. Deployment eines Live-Updates
[Deploy a live update ](/docs/getting-started/deploy/)Erfahren Sie, wie Sie ein Live-Update für Ihre App bereitstellen
# CI/CD-Integration
Die Integration von Capgo in Ihre CI/CD-Pipeline ermöglicht es Ihnen, den Prozess des Erstellens und Bereitstellens von Updates für Ihre App vollständig zu automatisieren. Durch die Nutzung der Capgo CLI und semantic-release können Sie konsistente, zuverlässige Bereitstellungen sicherstellen und schnelle Iterationen ermöglichen.
## Vorteile der CI/CD-Integration
* **Automatisierung**: Keine manuellen Schritte mehr oder Raum für menschliche Fehler. Ihr gesamter Build-, Test- und Bereitstellungsprozess kann von Anfang bis Ende automatisiert werden.
* **Konsistenz**: Jede Bereitstellung folgt den gleichen Schritten und gewährleistet einen vorhersehbaren und wiederholbaren Prozess. Dies ist besonders wertvoll, wenn mehrere Teammitglieder Code beisteuern.
* **Schnellere Iterationen**: Mit automatisierten Bereitstellungen können Sie Updates häufiger und mit Zuversicht ausliefern. Kein Warten mehr auf manuelle QA oder Freigabegenehmigungen.
## Capgo CLI
Die Capgo CLI ist der Schlüssel zur Integration von Capgo in Ihren CI/CD-Workflow. Sie bietet Befehle zum Pushen neuer Bundle-Versionen, Verwalten von Kanälen und mehr.
Der wichtigste Befehl für die CI/CD-Integration ist `upload`:
```shell
npx @capgo/cli@latest bundle upload --channel=Production --apikey YOUR_API_KEY
```
Dieser Befehl lädt den aktuellen Web-Build in den angegebenen Kanal hoch. Sie führen dies typischerweise als letzten Schritt in Ihrer CI/CD-Pipeline aus, nachdem Ihr Web-Build erfolgreich abgeschlossen wurde.
## Einrichtung von Capgo in Ihrer CI/CD-Pipeline
Während die genauen Schritte je nach CI/CD-Tool variieren, sieht der allgemeine Prozess für die Integration von Capgo wie folgt aus:
1. **API-Schlüssel generieren**: Melden Sie sich beim Capgo-Dashboard an und erstellen Sie einen neuen API-Schlüssel. Dieser Schlüssel wird zur Authentifizierung der CLI in Ihrer CI/CD-Umgebung verwendet. Halten Sie ihn geheim und committen Sie ihn niemals in Ihr Repository!
2. **Konfigurieren Sie den `upload`-Befehl**: Fügen Sie Ihrer CI/CD-Konfiguration einen Schritt hinzu, der den `upload`-Befehl mit den entsprechenden Argumenten ausführt:
upload.yml
```yaml
- run: npx @capgo/cli@latest bundle upload --channel=Production --apikey=${{ secrets.CAPGO_API_KEY }}
```
\n Ersetzen Sie `Production` mit dem Kanal, in den Sie deployen möchten, und `${{ secrets.CAPGO_API_KEY }}` mit der Umgebungsvariable, die Ihren API-Schlüssel enthält.
3. **Fügen Sie den `upload`-Schritt nach Ihrem Web-Build hinzu**: Stellen Sie sicher, dass der `upload`-Schritt nach erfolgreichem Abschluss Ihres Web-Builds erfolgt. Dies stellt sicher, dass Sie immer Ihren neuesten Code bereitstellen.\n Hier ist ein Beispiel für die Konfiguration für GitHub Actions:\n
upload.yml
```yaml
name: Deploy to Capgo
on:
push:
branches: [main]
jobs:
deploy:
runs-on: ubuntu-latest
steps:
- uses: actions/checkout@v3
- uses: actions/setup-node@v4
with:
node-version: 18
- run: npm ci
- run: npm run build
- run: npm install -g @capgo/cli
- run: npx @capgo/cli@latest bundle upload --channel=Production --apikey=${{ secrets.CAPGO_API_KEY }}
```
## Semantic-release Integration
Semantic-release ist ein leistungsstarkes Tool zur Automatisierung der Versionsverwaltung und Generierung von Release Notes. Durch die Integration von semantic-release mit Capgo können Sie automatisch Ihre App-Version inkrementieren und Changelogs mit jeder Bereitstellung generieren.
Hier ist eine Beispiel-`releaserc`-Konfigurationsdatei für semantic-release:
```json
{
"branches": [
"main",
{
"name": "beta",
"prerelease": true
}
],
"plugins": [
"@semantic-release/commit-analyzer",
"@semantic-release/release-notes-generator",
"@semantic-release/changelog",
[
"@semantic-release/exec",
{
"publishCmd": "npx @capgo/cli@latest bundle upload --channel=${nextRelease.channel} --apikey YOUR_API_KEY --partial"
}
],
[
"@semantic-release/git",
{
"assets": ["CHANGELOG.md", "package.json"],
"message": "chore(release): ${nextRelease.version} [skip ci]\n\n${nextRelease.notes}"
}
]
]
}
```
Diese Konfiguration führt Folgendes aus:
1. Analysiert Commit-Nachrichten, um die nächste Versionsnummer nach der Conventional Commits-Spezifikation zu bestimmen
2. Generiert Release Notes basierend auf den Commits seit dem letzten Release
3. Aktualisiert die `CHANGELOG.md`-Datei mit den neuen Release Notes
4. Führt den Capgo CLI `upload`-Befehl aus und übergibt die neue Versionsnummer mit dem `--partial`-Flag für differentielle Updates
5. Committet die aktualisierte `CHANGELOG.md`, `package.json` und alle anderen geänderten Dateien zurück ins Repository
Um semantic-release mit Capgo zu verwenden, fügen Sie einfach einen Schritt zu Ihrer CI/CD-Konfiguration hinzu, der `npx semantic-release` ausführt. Stellen Sie sicher, dass dieser Schritt nach Ihrem Web-Build und vor dem Capgo `upload`-Schritt erfolgt.
## Fehlerbehebung
Wenn Sie Probleme mit Ihrer Capgo CI/CD-Integration haben, hier einige Dinge, die Sie überprüfen sollten:
* **API-Schlüssel**: Stellen Sie sicher, dass Ihr API-Schlüssel gültig ist und die erforderlichen Berechtigungen hat. Wenn Sie eine Umgebungsvariable verwenden, überprüfen Sie, ob sie korrekt gesetzt ist.
* **CLI-Version**: Stellen Sie sicher, dass Sie die neueste Version der Capgo CLI verwenden. Ältere Versionen können Kompatibilitätsprobleme haben oder bestimmte Funktionen fehlen.
* **Build-Artefakte**: Bestätigen Sie, dass Ihr Web-Build die erwarteten Ausgabedateien generiert. Die Capgo CLI benötigt einen gültigen Web-Build, um ein Bundle zu erstellen.
* **Netzwerkverbindung**: Überprüfen Sie, ob Ihre CI/CD-Umgebung Netzwerkzugriff auf die Capgo-Server hat. Firewall- oder Proxy-Probleme können manchmal den `upload`-Befehl stören.
Wenn Sie immer noch Probleme haben, wenden Sie sich an den Capgo-Support. Sie können bei der Fehlerbehebung für Ihre spezifische Einrichtung helfen.
## Fazit
Die Integration von Capgo in Ihre CI/CD-Pipeline und die Nutzung von semantic-release für die Versionsverwaltung kann Ihren Entwicklungsworkflow erheblich vereinfachen. Durch die Automatisierung Ihrer Bereitstellungen und Versionierung können Sie Updates schneller und mit mehr Zuversicht ausliefern.
Die Capgo CLI und semantic-release bieten eine leistungsstarke Kombination für vollständig automatisierte End-to-End-Releases. Mit etwas Konfiguration können Sie einen robusten und zuverlässigen Bereitstellungsprozess haben, der es Ihnen ermöglicht, sich auf das Entwickeln großartiger Funktionen zu konzentrieren, anstatt sich über manuelle Release-Schritte Gedanken zu machen.
Weitere Details zu den Capgo CLI-Befehlen und Optionen finden Sie in der [CLI-Referenz](/docs/cli/overview). Und für einen tieferen Einblick in die semantic-release-Konfiguration, siehe die [semantic-release Dokumentation](https://github.com/semantic-release/semantic-release).
Viel Spaß beim Bereitstellen!
# Live Update bereitstellen
Nutzen Sie die Live-Updates-Funktion von Capgo, um die Benutzeroberfläche und Geschäftslogik Ihrer App aus der Ferne in Echtzeit zu aktualisieren. Übertragen Sie JS-Bundle-Updates direkt an Ihre Nutzer, ohne den App Store zu durchlaufen, um sofort Fehler zu beheben und neue Funktionen bereitzustellen.
Diese Anleitung setzt voraus, dass Sie den [Capgo Quickstart](/docs/getting-started/quickstart) abgeschlossen haben und bereits:
1. Das `@capgo/capacitor-updater` SDK in Ihrer Capacitor-App installiert haben
2. Ihre App-ID und den Update-Kanal in `capacitor.config.ts` konfiguriert haben
3. Die `CapacitorUpdater.notifyAppReady()` Methode in Ihren Code eingefügt haben
Wenn Sie diese Schritte noch nicht ausgeführt haben, gehen Sie bitte zurück und schließen Sie zuerst den Quickstart ab
[App hinzufügen ](/docs/getting-started/add-an-app/)Fügen Sie eine App zu Ihrem Capgo-Konto hinzu und installieren Sie das Plugin in Ihrer App
## Bundle hochladen
Mit dem installierten und konfigurierten Capgo SDK können Sie Ihr erstes Live-Update-Bundle hochladen:
1. Web-Assets erstellen:
```shell
npm run build
```
2. Bundle zu Capgo hochladen:
* Console
```shell
npx @capgo/cli@latest bundle upload --channel=Production
```
* Github Actions
github/workflows/build\_and\_deploy.yml
```yml
name: Build source code and send to Capgo
concurrency:
group: ${{ github.workflow }}-${{ github.ref }}
cancel-in-progress: true
on:
push:
branches:
- main
jobs:
deploy_to_capgo:
runs-on: ubuntu-latest
steps:
- name: Checkout
uses: actions/checkout@v5
- uses: actions/setup-node@v4
with:
node-version: 18
- name: Install dependencies
run: npm install
- name: Build
run: npm run build
- name: Deploy to Capgo
run: bunx @capgo/cli@latest bundle upload -a ${{ secrets.CAPGO_TOKEN }} --channel ${{ env.CHANNEL }}
env:
CAPGO_TOKEN: ${{ secrets.CAPGO_TOKEN }}
```
* Gitlab
gitlab-ci.yml
```yml
stages:
- build
build:
stage: build
image: node:18
cache:
- key:
files:
- package-lock.json
paths:
- node_modules/
script:
- npm install
- npm run build
- npx @capgo/cli@latest bundle upload -a $CAPGO_TOKEN --channel $CAPGO_CHANNEL
artifacts:
paths:
- node_modules/
- dist/
only:
- master
```
Dies lädt eine neue Bundle-Version in den im Befehl angegebenen Kanal hoch
### Fehlerbehebung beim Hochladen
Wenn das Hochladen fehlschlägt, überprüfen Sie:
* Ihre App-ID in `capacitor.config.ts` stimmt mit Ihrer App im Capgo-Dashboard überein
* Sie führen den Upload-Befehl vom Root-Verzeichnis Ihres Capacitor-Projekts aus
* Ihre Web-Assets sind erstellt und aktuell
Wenn Sie immer noch Probleme haben, gehen Sie zum Abschnitt [Fehlerbehebung](/docs/getting-started/troubleshooting/)
## Update auf einem Gerät empfangen
Sobald Ihr Bundle hochgeladen ist, können Sie das Live-Update auf einem Gerät testen:
1. Synchronisieren Sie Ihre App mit dem Gerät:
```shell
npx cap sync ios
```
2. Öffnen Sie ein weiteres Terminal und führen Sie den folgenden Befehl aus, um den Update-Status zu überprüfen:
```shell
npx @capgo/cli@latest app debug
```
3. Führen Sie Ihre App lokal aus:
```shell
npx cap run ios
```
Oder öffnen Sie das iOS/Android-Projekt in Xcode/Android Studio und führen Sie einen nativen Start durch
4. Lassen Sie die App etwa 30 Sekunden geöffnet, damit das Update im Hintergrund heruntergeladen werden kann
5. Die Logs brauchen einige Sekunden, um sich zu aktualisieren und den Update-Status anzuzeigen
6. Schließen und öffnen Sie die App erneut. Sie sollten Ihr Live-Update angewendet sehen!
Schauen Sie im [Capgo Quickstart](/docs/getting-started/quickstart#receiving-a-live-update-on-a-device) nach, um weitere Details zum Testen von Live-Updates zu erhalten
## Nächste Schritte
Herzlichen Glückwunsch zum Bereitstellen Ihres ersten Live-Updates mit Capgo! 🎉
Um mehr zu erfahren, lesen Sie den Rest der [Capgo Live-Updates-Dokumentation](/docs/live-updates). Einige wichtige Themen, die Sie als Nächstes überprüfen sollten:
* [Updates mit Kanälen zielgerichtet einsetzen](/docs/live-updates/channels)
* [Update-Verhalten anpassen](/docs/live-updates/update-behavior)
* [Live-Update-Rollbacks](/docs/live-updates/rollbacks)
# Überblick
Das Quickstart-Tutorial führt Sie durch die wichtigsten Konzepte von Capgo! Zu den behandelten Konzepten gehören:
1. Hinzufügen einer App zu Ihrem Capgo-Konto
2. Integration von Capgo in Ihre CI/CD
3. Auslösen des Bundle-Uploads auf Capgo durch Pushen von Commits
4. Konfiguration und Anpassung der Capgo Bundle-Veröffentlichung
5. Einrichten Ihrer App für Live-Updates über Capgo
6. Bereitstellung von Live-Updates für Ihre App von Capgo aus
Folgen Sie einfach der Anleitung Schritt für Schritt oder navigieren Sie direkt zur Dokumentation der Komponente, die Sie interessiert
[ Tutorial starten](/docs/getting-started/add-an-app/)
[Folgen Sie dem Quickstart-Tutorial und nutzen Sie Capgo in kürzester Zeit!](/docs/getting-started/add-an-app/)
[ Einfach zu integrieren](/docs/getting-started/deploy/)
[Integrieren Sie Capgo in Ihre CI/CD und lösen Sie Bundle-Uploads auf Capgo durch Pushen von Commits aus](/docs/getting-started/deploy/)
[ Live Update Dokumentation](/docs/live-updates/)
[Aktualisieren Sie Ihre App aus der Ferne in Echtzeit ohne App Store Verzögerungen](/docs/live-updates/)
[ Fehlerbehebung](/docs/getting-started/troubleshooting)
[Häufige Probleme und deren Lösungen](/docs/getting-started/troubleshooting)
Tip
Die Over-the-Air (OTA) Update-Funktion gilt nur für Änderungen an HTML-, CSS- und JavaScript-Dateien
Wenn Sie Änderungen am nativen Code vornehmen, wie z.B. Updates von Capacitor-Plugins, müssen Sie die Anwendung erneut zur Genehmigung im App Store einreichen
## Discord Community beitreten
[Treten Sie dem Capacitor-updater Discord Server bei!](https://discordcom/invite/VnYRvBfgA6)
## Wartung
| Plugin-Version | Capacitor-Kompatibilität | Gewartet |
| -------------- | ------------------------ | ------------------------------------------------------------------------- |
| v6\*\* | v6\*\* | ✅ |
| v5\*\* | v5\*\* | Nur kritische Fehler |
| v4\*\* | v4\*\* | ⚠️ Veraltet |
| v3\*\* | v3\*\* | ⚠️ Veraltet |
| > 7 | v4\*\* | ⚠️ Veraltet, unsere CI ist durchgedreht und hat zu viele Versionen erhöht |
## Einhaltung der Store-Richtlinien
Der Android Google Play und der iOS App Store haben entsprechende Richtlinien mit Regeln, die Sie kennen sollten, bevor Sie die Capacitor-updater-Lösung in Ihre Anwendung integrieren
### Google Play
Der dritte Absatz zum Thema [Geräte- und Netzwerkmissbrauch](https://supportgooglecom/googleplay/android-developer/answer/9888379/?hl=en) beschreibt, dass die Aktualisierung von Quellcode durch andere Methoden als den Update-Mechanismus von Google Play eingeschränkt ist. Diese Einschränkung gilt jedoch nicht für die Aktualisierung von JavaScript-Bundles
> Diese Einschränkung gilt nicht für Code, der in einer virtuellen Maschine ausgeführt wird und eingeschränkten Zugriff auf Android-APIs hat (wie JavaScript in einer Webview oder einem Browser)
Das erlaubt Capacitor-updater vollständig, da es nur die JS-Bundles aktualisiert und keinen nativen Code ändert
### App Store
Absatz **332** des [Apple Developer Program License Agreement](https://developer.apple.com/programs/ios/information/) erlaubt seit 2015 vollständig Over-the-Air-Updates von JavaScript und Assets - und in der neuesten Version (20170605) [hier herunterladbar](https://developer.apple.com/terms/) ist diese Regelung sogar noch umfassender:
> Interpretierter Code kann in eine Anwendung heruntergeladen werden, solange dieser Code: (a) den primären Zweck der Anwendung nicht durch Funktionen oder Funktionalitäten ändert, die mit dem beabsichtigten und beworbenen Zweck der Anwendung, wie sie im App Store eingereicht wurde, nicht übereinstimmen, (b) keinen Store oder Storefront für anderen Code oder Anwendungen erstellt, und (c) keine Signierung, Sandbox oder andere Sicherheitsfunktionen des Betriebssystems umgeht
Capacitor-updater ermöglicht es Ihnen, diese Regeln vollständig einzuhalten, solange das Update, das Sie pushen, nicht wesentlich von der ursprünglichen, vom App Store genehmigten Absicht Ihres Produkts abweicht
Um weiterhin die Apple-Richtlinien einzuhalten, empfehlen wir, dass im App Store vertriebene Apps das Szenario ‘Erzwungenes Update’ nicht aktivieren, da in den [App Store Review Guidelines](https://developer.apple.com/app-store/review/guidelines/) steht:
> Apps dürfen Benutzer nicht zwingen, die App zu bewerten, die App zu überprüfen, andere Apps herunterzuladen oder ähnliche Aktionen durchzuführen, um auf Funktionen, Inhalte oder die Nutzung der App zugreifen zu können
Dies ist kein Problem für das Standardverhalten des Hintergrund-Updates, da es den Benutzer nicht zwingt, die neue Version anzuwenden, bis er die App das nächste Mal schließt, aber Sie sollten sich dieser Rolle bewusst sein, wenn Sie sich entscheiden, sie anzuzeigen
## Open Source
Das Plugin steht unter der LGPL-3.0 Lizenz und das Backend unter der AGPL-3.0 Lizenz
> 💡 LGPL-3.0 bedeutet, wenn jemand den Code des Plugins modifiziert, ist es verpflichtend, ihn als Open Source mit der gleichen Lizenzierung zu veröffentlichen. Wenn Sie den Code ohne Modifikation verwenden, betrifft Sie das nicht. Weitere Details finden Sie im Issue unten, siehe Link 👇
[Lizenzierung? ](https://github.com/Cap-go/capacitor-updater/issues/7)
[Probieren Sie GPTS Capgo aus, um Hilfe zu erhalten, anstatt die Dokumentation zu lesen ](https://chatopenaicom/g/g-3dMwHbF2w-capgo-doc-gpt)
> Sie können es ohne Bedenken in Ihre App einbinden
## Abschließende Bemerkungen
Wenn Sie selbst hosten und dieses Tool nützlich finden, erwägen Sie bitte, meine Arbeit zu unterstützen, indem Sie [GitHub Sponsor](https://github.com/sponsors/riderx/) werden
Ich habe mich entschieden, den gesamten Code, den ich hier entwickelt habe, als Open Source zur Verfügung zu stellen, anstatt ihn hinter einer Bezahlschranke zu verstecken. Ich glaube, dass wir durch Öffnung statt Kampf und Verstecken die Welt zu einem besseren Ort machen können
Um dies zu ermöglichen, müssen wir alle unseren Teil beitragen, auch Sie 🥹 Wenn Capgo Cloud Ihre Bedürfnisse nicht erfüllt, können Sie einen bootstrapped Maker [hier](https://github.com/sponsors/riderx/) zu Ihren eigenen Bedingungen unterstützen
## Einfache Rechnung
Der Preis des Basic-Plans: 14€\*12 = 168€ pro Jahr Während durchschnittliche Entwicklerkosten/Stunde = 60€ Das bedeutet, dass 3 verschwendete Entwicklerstunden beim Self-Hosting es Ihnen ermöglichen, ein ganzes Jahr zu bezahlen. Wenn Sie mehr als 3 Stunden aufwenden, verlieren Sie Geld ^^
# Fehlerbehebung
Hier sind einige häufige Probleme, auf die Sie bei der Verwendung von Capgo stoßen könnten, und wie Sie diese lösen können
🚀 Benötigen Sie Experten-Hilfe?
Stecken Sie bei einem komplexen Problem fest? Unser Expertenteam ist hier, um zu helfen! Erhalten Sie persönlichen Support, Code-Reviews und maßgeschneiderte Lösungen für Ihre spezifischen Bedürfnisse.
[Professionellen Support erhalten](/de/consulting/)
### Upload-Fehler
Wenn Ihr Bundle-Upload fehlschlägt, überprüfen Sie:
* Ihre App-ID in `capacitorconfigts` stimmt mit Ihrer App im Capgo Dashboard überein
* Sie führen den Upload-Befehl vom Root-Verzeichnis Ihres Capacitor-Projekts aus
* Ihre Web-Assets sind gebaut und aktuell
#### Erweiterte Upload-Optionen
Die Capgo CLI bietet einige zusätzliche Flags zur Lösung häufiger Upload-Probleme:
* `--tus`: Verwendet das [tus resumable upload protocol](https://tusio/) für zuverlässigere Uploads von großen Bundles oder bei schlechten Netzwerkverbindungen. Wenn Ihr Bundle über 10MB groß ist oder Sie eine instabile Verbindung haben, erwägen Sie die Verwendung von `--tus`:
```shell
npx @capgo/cli@latest bundle upload --tus
```
* `--package-json` und `--node-modules`: Teilt Capgo mit, wo Ihre root `packagejson` und `node_modules` zu finden sind, wenn Ihre App eine nicht-standardmäßige Struktur wie ein Monorepo oder npm Workspace verwendet. Übergeben Sie den Pfad zur root `packagejson` und den `--node-modules` Pfad:
```shell
npx @capgo/cli@latest bundle upload --package-json=path/to/packagejson --node-modules=path/to/node_modules
```
Capgo benötigt diese Informationen, um die Abhängigkeiten Ihrer App korrekt zu bündeln
Sie können diese Flags mit anderen Optionen wie `--channel` nach Bedarf kombinieren. Siehe die [Capgo CLI Dokumentation](/docs/cli/overview/) für vollständige Details zu den verfügbaren Upload-Optionen
Wenn Sie immer noch Probleme mit Uploads haben, wenden Sie sich an den [Capgo Support](https://support.capgo.app) für weitere Unterstützung
### Updates debuggen
Wenn Sie Probleme mit Live-Updates haben, ist der Capgo Debug-Befehl ein hilfreiches Tool zur Fehlerbehebung. So verwenden Sie es:
1. Führen Sie den folgenden Befehl in Ihrem Projektverzeichnis aus:
```shell
npx @capgo/cli@latest app debug
```
2. Starten Sie Ihre App auf einem Gerät oder Emulator und führen Sie die Aktion aus, die ein Update auslösen sollte (z.B. die App nach dem Hochladen eines neuen Bundles neu öffnen)
3. Beobachten Sie die Ausgabe des Debug-Befehls. Er protokolliert Informationen über den Update-Prozess, einschließlich:
* Wann die App nach einem Update sucht
* Ob ein Update gefunden wurde und welche Version es ist
* Download- und Installationsfortschritt für das Update
* Alle Fehler, die während des Update-Prozesses auftreten
4. Verwenden Sie die Debug-Logs, um zu identifizieren, wo das Problem auftritt. Zum Beispiel:
* Wenn kein Update gefunden wird, überprüfen Sie, ob Ihr Bundle erfolgreich hochgeladen wurde und die App für den richtigen Kanal konfiguriert ist
* Wenn das Update heruntergeladen, aber nicht installiert wird, stellen Sie sicher, dass Sie `CapacitorUpdater.notifyAppReady()` aufgerufen haben und die App vollständig geschlossen und neu geöffnet wurde
* Wenn Sie eine Fehlermeldung sehen, suchen Sie nach diesem spezifischen Fehler in der Capgo-Dokumentation oder wenden Sie sich an den Support
Der Debug-Befehl ist besonders nützlich, um Probleme mit dem Update-Download und Installationsprozess zu identifizieren. Wenn die Logs zeigen, dass die erwartete Update-Version gefunden, aber nicht letztendlich angewendet wurde, konzentrieren Sie Ihre Fehlerbehebung auf die Schritte nach dem Download
### Debugging mit nativen Logs
Zusätzlich zum Capgo Debug-Befehl können die nativen Logs auf Android und iOS wertvolle Fehlerbehebungsinformationen liefern, besonders für Probleme auf der nativen Seite des Update-Prozesses
#### Android Logs
So greifen Sie auf die Android-Logs zu:
1. Verbinden Sie Ihr Gerät oder starten Sie Ihren Emulator
2. Öffnen Sie Android Studio und wählen Sie “View > Tool Windows > Logcat”
3. Im Logcat-Fenster filtern Sie die Logs auf den Prozess Ihrer App, indem Sie ihn aus dem Dropdown-Menü oben auswählen
4. Suchen Sie nach Zeilen, die `Capgo` enthalten, um die SDK-Logs zu finden
Alternativ können Sie den `adb logcat` Befehl verwenden und nach `Capgo` grep’en, um die Logs zu filtern
Das Capgo SDK protokolliert wichtige Ereignisse während des Update-Prozesses, wie zum Beispiel:
* Wann eine Update-Prüfung initiiert wird
* Ob ein Update gefunden wurde und welche Version es ist
* Wann der Update-Download startet und abgeschlossen ist
* Wann die Update-Installation ausgelöst wird
* Alle Fehler, die während der nativen Update-Schritte auftreten
Häufige Android-spezifische Probleme, die Sie in den Logs sehen könnten, sind:
* Netzwerkverbindungsprobleme, die den Update-Download verhindern
* Dateiberechtigungsfehler beim Speichern oder Lesen des Update-Bundles
* Nicht genügend Speicherplatz für das Update-Bundle
* Fehler beim Neustart der App nach der Update-Installation
#### iOS Logs
So greifen Sie auf die iOS-Logs zu:
1. Verbinden Sie Ihr Gerät oder starten Sie Ihren Simulator
2. Öffnen Sie Xcode und gehen Sie zu “Window > Devices and Simulators”
3. Wählen Sie Ihr Gerät und klicken Sie auf “Open Console”
4. Suchen Sie in der Konsolenausgabe nach Zeilen, die `Capgo` enthalten, um die SDK-Logs zu finden
Sie können auch den `log stream` Befehl im Terminal verwenden und nach `Capgo` grep’en, um die Logs zu filtern
Ähnlich wie bei Android protokolliert das Capgo SDK wichtige iOS-seitige Ereignisse:
* Update-Prüfung Initiierung und Ergebnis
* Download-Start, Fortschritt und Abschluss
* Installations-Trigger und Ergebnis
* Alle Fehler während des nativen Update-Prozesses
iOS-spezifische Probleme, die Sie in den Logs identifizieren könnten, sind:
* SSL-Zertifikatsprobleme beim Herunterladen des Updates
* App Transport Security blockiert den Update-Download
* Unzureichender Speicherplatz für das Update-Bundle
* Fehler beim korrekten Extrahieren oder Anwenden des Update-Bundles
Auf beiden Plattformen bieten die nativen Logs einen tieferen Einblick in den Update-Prozess mit mehr Details zur nativen Implementierung. Sie sind besonders nützlich für die Identifizierung von Problemen, die außerhalb der Capgo JavaScript-Schicht auftreten
Bei der Fehlerbehebung eines kniffligen Live-Update-Problems ist es eine gute Idee, sowohl die Capgo Debug-Logs als auch die nativen Logs für ein umfassendes Bild der Situation zu erfassen. Die beiden Logs zusammen geben Ihnen die beste Chance, das Problem zu identifizieren und zu lösen
### Updates werden nicht angewendet
Wenn Sie ein Bundle hochgeladen haben, aber die Änderungen auf Ihrem Gerät nicht sehen:
* Stellen Sie sicher, dass Sie `CapacitorUpdater.notifyAppReady()` in Ihrem App-Code aufgerufen haben, wie im [Quickstart](/docs/getting-started/quickstart) gezeigt
* Prüfen Sie, ob Ihr Gerät mit dem Internet verbunden ist und die Capgo Debug-Logs zeigen, dass das Update heruntergeladen wurde
* Versuchen Sie, die App vollständig zu schließen und neu zu öffnen, da Updates nur bei einem Neustart angewendet werden
* Suchen Sie in den nativen Logs nach Fehlern, die auf ein Problem beim Anwenden des Updates hinweisen könnten
Weitere Details zum Update-Prozess finden Sie im [Live-Updates Deployment Guide](/docs/getting-started/deploy). Wenn Sie immer noch Probleme haben, verwenden Sie den `npx @capgo/cli@latest app debug` Befehl und native Logs, um mehr Einblick in das Geschehen zu bekommen
## SDK-Installation
Wenn Sie Probleme bei der Installation des Capgo SDK haben, stellen Sie sicher:
* Ihre App verwendet eine unterstützte Version von Capacitor (4.0 oder neuer)
* Sie sind den [Quickstart](/docs/getting-started/quickstart) Schritten in der richtigen Reihenfolge gefolgt, einschließlich der Synchronisierung Ihrer App nach der Installation des SDK
## CI/CD-Integration
Bei Problemen mit dem Auslösen von Capgo-Uploads aus Ihrer CI/CD-Pipeline:
* Überprüfen Sie, ob Ihr Capgo-Authentifizierungstoken korrekt eingerichtet ist
* Stellen Sie sicher, dass Sie den Upload-Befehl nach dem Build Ihrer Web-Assets ausführen
* Prüfen Sie, ob der Upload-Befehl den richtigen Kanalnamen für Ihre Zielumgebung verwendet
Weitere Fehlerbehebungstipps finden Sie in der [CI/CD-Integration](/docs/getting-started/cicd-integration) Dokumentation. Sie können auch den `npx @capgo/cli@latest app debug` Befehl verwenden, um zu bestätigen, ob Ihre CI/CD-ausgelösten Updates von der App empfangen werden
# So geht's
> So verwenden Sie Capgo, Tutorials, Tipps und Tricks
[Wie Versionierung in Capgo funktioniert ](https://capgo.app/blog/how-version-work-in-capgo/)capgo.app
[Wie man Major Versionen in Capgo veröffentlicht ](https://capgo.app/blog/how-to-release-major-version-in-capgo/)capgo.app
[Wie man spezifische Updates an einen Benutzer oder eine Gruppe sendet ](https://capgo.app/blog/how-to-send-specific-version-to-users/)capgo.app
## CI / CD
[Automatischer Build und Release mit GitHub Actions ](https://capgo.app/blog/how-version-work-in-capgo/)capgo.app
[Verwaltung von Entwicklungs- und Produktionsbuilds mit GitHub Actions ](https://capgo.app/blog/automatic-build-and-release-with-github-actions/)capgo.app
## Mitwirken
[Beitragen zu Capgo Open Source ](https://github.com/Cap-go/capgo/blob/main/CONTRIBUTINGmd)githubcom
# Übersicht
Nutzen Sie Capgos Live Updates-Funktion, um die JavaScript-Bundles Ihrer App remote in Echtzeit zu aktualisieren. Pushen Sie JS-Updates direkt an Ihre Nutzer, ohne den App Store-Überprüfungsprozess zu durchlaufen, um sofort Fehler zu beheben und neue Funktionen bereitzustellen.
Note
Live Updates sind auf JavaScript-Bundle-Änderungen beschränkt. Wenn Sie nativen Code aktualisieren müssen, wie das Hinzufügen oder Entfernen eines Plugins oder das Ändern der nativen Projektkonfiguration, müssen Sie einen neuen nativen Binary-Build an die App Stores übermitteln.
## Wie Live Updates funktionieren
Das Live Update-System von Capgo hat zwei Schlüsselkomponenten:
1. Das Capgo SDK, das Sie in Ihrer App installieren. Das SDK prüft auf verfügbare Updates und lädt diese im Hintergrund herunter.
2. Kanäle, mit denen Sie Updates an bestimmte Benutzergruppen richten können. Sie können Kanäle verwenden, um verschiedene Release-Tracks wie `Production`, `Staging` und `Dev` zu verwalten.
Wenn Sie ein neues JS-Bundle zu Capgo hochladen und es einem Kanal zuweisen, erkennt das Capgo SDK in Apps, die für diesen Kanal konfiguriert sind, das Update und lädt es herunter. Beim nächsten Neustart der App wird das neue Bundle geladen.
## Erste Schritte
Folgen Sie diesen Schritten, um Live Updates zu verwenden:
1. Schließen Sie den [Capgo Quickstart](/docs/getting-started/quickstart) ab, um Ihre App in Capgo einzurichten und das Capgo SDK zu installieren.
2. Rufen Sie in Ihrem App-Code `CapacitorUpdaternotifyAppReady()` auf, nachdem Ihre App initialisiert wurde. Dies teilt dem Capgo SDK mit, dass Ihre App bereit ist, Updates zu empfangen.
3. Erstellen Sie Ihr JS-Bundle und laden Sie es zu Capgo hoch:
```shell
npm run build
npx @capgo/cli@latest bundle upload --channel=Production
```
4. Öffnen Sie Ihre App und warten Sie, bis das Update heruntergeladen ist. Sie können den Status überprüfen mit:
```shell
npx @capgo/cli@latest app debug
```
5. Sobald das Update heruntergeladen wurde, schließen und öffnen Sie die App erneut, um das neue Bundle zu laden.
Weitere Details finden Sie im [Leitfaden zum Bereitstellen von Live Updates](/docs/getting-started/deploy).
## Nächste Schritte
[ Kanäle](/docs/live-updates/channels/)
[Erfahren Sie, wie Sie Kanäle verwenden, um verschiedene Release-Tracks zu verwalten und Updates an bestimmte Benutzer zu richten](/docs/live-updates/channels/)
[ Rollbacks](/docs/live-updates/rollbacks/)
[Entdecken Sie, wie Sie zu einer vorherigen JS-Bundle-Version zurückkehren können, wenn ein Update Probleme verursacht](/docs/live-updates/rollbacks/)
[ Update-Verhalten](/docs/live-updates/update-behavior/)
[Passen Sie an, wie und wann Updates in Ihrer App heruntergeladen und angewendet werden](/docs/live-updates/update-behavior/)
[ Schnelle Updates](/docs/live-updates/differentials/)
[Erfahren Sie, wie Sie schnelle Updates verwenden können, um den Update-Prozess zu beschleunigen](/docs/live-updates/differentials/)
# Kanäle
Ein Live-Update-Kanal verweist auf einen bestimmten JS-Bundle-Build Ihrer App, der mit allen Geräten geteilt wird, die für Updates auf diesen Kanal eingestellt sind. Wenn Sie das [Capgo Live Updates SDK](/docs/getting-started/quickstart/) in Ihrer App installieren, prüft jede native Binary, die für diesen Kanal konfiguriert ist, beim App-Start auf verfügbare Updates. Sie können den Build, auf den ein Kanal verweist, jederzeit ändern und bei Bedarf auch auf vorherige Builds zurücksetzen.
## Einrichten eines Kanals
Jede App wird mit einem Standardkanal namens “Production” ausgeliefert, der nicht gelöscht werden kann. So fügen Sie neue Kanäle hinzu:
1. Gehen Sie zum Bereich “Channels” im Capgo Dashboard
2. Klicken Sie auf den Button “New Channel”
3. Geben Sie einen Namen für den Kanal ein und klicken Sie auf “Create”
Kanalnamen können frei gewählt werden. Eine gängige Strategie ist es, Kanäle Ihren Entwicklungsphasen zuzuordnen, zum Beispiel:
* `Development` - zum Testen von Live-Updates auf lokalen Geräten oder Emulatoren
* `QA` - für Ihr QA-Team zur Überprüfung von Updates vor der breiten Veröffentlichung
* `Staging` - für finale Tests in einer produktionsähnlichen Umgebung
* `Production` - für die Version Ihrer App, die Endbenutzer aus den App Stores erhalten
## Konfigurieren des Kanals in Ihrer App
Nachdem Sie Ihre Kanäle erstellt haben, müssen Sie Ihre App so konfigurieren, dass sie auf den entsprechenden Kanal hört. In diesem Beispiel verwenden wir den `Development`-Kanal.
Öffnen Sie Ihre `capacitor.config.ts` (oder `capacitor.config.json`) Datei. Setzen Sie unter dem `plugins`-Abschnitt die `channel`-Eigenschaft des `CapacitorUpdater`-Plugins auf den Namen Ihres gewünschten Kanals:
```ts
import { CapacitorConfig } from '@capacitor/cli';
const config: CapacitorConfig = {
plugins: {
CapacitorUpdater: {
defaultChannel: 'Development',
},
},
};
```
Bauen Sie anschließend Ihre Web-App und führen Sie `npx cap sync` aus, um die aktualisierte Konfigurationsdatei in Ihre iOS- und Android-Projekte zu kopieren. Wenn Sie diesen Sync-Schritt überspringen, verwenden Ihre nativen Projekte weiterhin den Kanal, für den sie zuvor konfiguriert waren.
Caution
Die `defaultChannel`-Eigenschaft überschreibt immer den Cloud-Standardkanal. Sie können jedoch die deviceId weiterhin in der Cloud einem Kanal zuweisen.
## Zuweisen eines Bundles zu einem Kanal
Um ein Live-Update bereitzustellen, müssen Sie einen neuen JS-Bundle-Build hochladen und einem Kanal zuweisen. Sie können dies in einem Schritt mit der Capgo CLI tun:
```shell
npx @capgo/cli@latest bundle upload --channel=Development
```
Dies lädt Ihre gebauten Web-Assets hoch und setzt den neuen Bundle als aktiven Build für den `Development`-Kanal. Alle Apps, die für diesen Kanal konfiguriert sind, erhalten das Update beim nächsten Überprüfen.
Sie können Builds auch über den “Bundles”-Bereich des Capgo Dashboards Kanälen zuweisen. Klicken Sie auf das Menü-Symbol neben einem Build und wählen Sie “Assign to Channel”, um den Kanal für diesen Build auszuwählen.
## Bundle-Versionierung und Kanäle
Es ist wichtig zu beachten, dass Bundles in Capgo global für Ihre App sind und nicht spezifisch für einzelne Kanäle. Dasselbe Bundle kann mehreren Kanälen zugewiesen werden.
Bei der Versionierung Ihrer Bundles empfehlen wir die Verwendung von Semantic Versioning [semver](https://semver.org/) mit Pre-Release-Kennungen für kanalspezifische Builds. Ein Beta-Release könnte beispielsweise als `1.2.3-beta.1` versioniert sein.
Dieser Ansatz hat mehrere Vorteile:
* Er kommuniziert die Beziehung zwischen Builds klar: `1.2.3-beta.1` ist offensichtlich eine Vorabversion von `1.2.3`
* Er ermöglicht die Wiederverwendung von Versionsnummern über Kanäle hinweg und reduziert Verwirrung
* Er ermöglicht klare Rollback-Pfade. Wenn Sie von `1.2.3` zurückrollen müssen, wissen Sie, dass `1.2.2` die vorherige stabile Version ist
Hier ist ein Beispiel, wie Sie Ihre Bundle-Versionen mit einem typischen Kanal-Setup abstimmen könnten:
* `Development`-Kanal: `1.2.3-dev.1`, `1.2.3-dev.2`, etc.
* `QA`-Kanal: `1.2.3-qa.1`, `1.2.3-qa.2`, etc.
* `Staging`-Kanal: `1.2.3-rc.1`, `1.2.3-rc.2`, etc.
* `Production`-Kanal: `1.2.3`, `1.2.4`, etc.
## Zurücksetzen eines Live-Updates
Wenn Sie ein Live-Update bereitstellen, das einen Fehler einführt oder aus anderen Gründen zurückgesetzt werden muss, können Sie einfach zu einem vorherigen Build zurückkehren. Vom “Channels”-Bereich des Dashboards aus:
1. Klicken Sie auf den Namen des Kanals, den Sie zurücksetzen möchten
2. Finden Sie den Build, zu dem Sie zurückkehren möchten, und klicken Sie auf das Kronen-Symbol 
3. Bestätigen Sie die Aktion
Der ausgewählte Build wird sofort wieder zum aktiven Build für diesen Kanal. Apps erhalten die zurückgesetzte Version beim nächsten Update-Check.
## Automatisierung von Deployments
Für fortgeschrittenere Workflows können Sie Ihre Live-Update-Deployments als Teil Ihrer CI/CD-Pipeline automatisieren. Durch die Integration von Capgo in Ihren Build-Prozess können Sie automatisch neue Bundles hochladen und Kanälen zuweisen, wenn Sie zu bestimmten Branches pushen oder neue Releases erstellen.
Schauen Sie sich die [CI/CD Integration](/docs/getting-started/cicd-integration/) Dokumentation an, um mehr über die Automatisierung von Capgo Live-Updates zu erfahren.
## Bereitstellung auf einem Gerät
Nachdem Sie die Kanäle verstanden haben, können Sie mit der Bereitstellung von Live-Updates auf echten Geräten beginnen. Der grundlegende Prozess ist:
1. Installieren Sie das Capgo SDK in Ihrer App
2. Konfigurieren Sie die App, um auf Ihren gewünschten Kanal zu hören
3. Laden Sie einen Build hoch und weisen Sie ihn diesem Kanal zu
4. Starten Sie die App und warten Sie auf das Update!
Eine detailliertere Anleitung finden Sie im [Deploying Live Updates](/docs/getting-started/deploy/) Guide. Viel Spaß beim Aktualisieren!
# Schnelle Aktualisierungen
Capgos Live-Update-System kann Updates schneller und effizienter bereitstellen, indem nur die geänderten Dateien und nicht das gesamte JS-Bundle gesendet werden
Dies ist besonders vorteilhaft für Benutzer mit langsameren oder getakteten Netzwerkverbindungen, da die Menge der herunterzuladenden Daten minimiert wird
Ein zweiter Vorteil ist, wenn die App große Assets enthält, die sich selten ändern, wie Bilder oder Videos - im Vergleich zu gezippten JS-Dateien werden diese nur einmal heruntergeladen
## Wie Differenzielle Updates funktionieren
Differenzielle Updates in Capgo werden durch das in Ihrer App installierte Capgo-Plugin verarbeitet. Wenn Sie eine neue Version Ihrer App mit der Flag `--partial` hochladen, führt Capgo Folgendes aus:
1. Jede Datei in Ihrem Build wird einzeln hochgeladen
2. Für jede Datei werden Prüfsummen generiert
3. Ein neues JSON-Manifest wird erstellt, das alle Dateien und ihre Prüfsummen auflistet
4. Dieses Manifest wird in die Capgo-Datenbank hochgeladen
Wenn ein Gerät, auf dem Ihre App läuft, nach Updates sucht, erhält das Capgo-Plugin das neue Manifest vom Server. Es vergleicht dieses Manifest mit dem aktuellen und identifiziert anhand der Prüfsummen und Dateipfade, welche Dateien sich geändert haben
Das Plugin lädt dann nur die geänderten Dateien herunter, anstatt das gesamte JS-Bundle. Es rekonstruiert die neue Version der App, indem es diese heruntergeladenen Dateien mit den unveränderten Dateien kombiniert
Manifest
Bei differenziellen Updates speichert das Gerät alle heruntergeladenen Dateien in einem gemeinsamen Cache. Capgo wird diesen nie bereinigen, aber das Betriebssystem kann dies jederzeit tun
## Aktivierung von Differenziellen Updates
Um differenzielle Updates für Ihre Capgo-App zu aktivieren, verwenden Sie einfach die Flag `--partial` beim Hochladen einer neuen Version:
## Erzwingen von Differenziellen Updates
Wenn Sie sicherstellen möchten, dass alle Uploads differenzielle Updates sind und versehentliche vollständige Bundle-Uploads verhindert werden, können Sie die Flag `--partial-only` verwenden:
```shell
npx @capgo/cli@latest bundle upload --partial-only
```
Wenn `--partial-only` verwendet wird, lädt Capgo nur einzelne Dateien hoch und generiert ein Manifest. Geräte, die keine partiellen Updates unterstützen, können das Update nicht herunterladen
Sie möchten `--partial-only` möglicherweise verwenden, wenn:
* Sie immer differenzielle Updates verwenden und nie vollständige Bundle-Uploads zulassen möchten
* Sie eine CI/CD-Pipeline einrichten und sicherstellen möchten, dass alle automatisierten Uploads differenziell sind
* Ihre App groß ist und die Bandbreite begrenzt ist, sodass Sie Upload-/Download-Größen minimieren müssen
Wenn Sie einen vollständigen Bundle-Upload durchführen müssen, während `--partial-only` gesetzt ist, führen Sie den Upload-Befehl einfach ohne `--partial-only` aus. Dies überschreibt die Einstellung für diesen einzelnen Upload und ermöglicht es Ihnen, ein vollständiges Bundle zu pushen, wenn nötig
## Fehlerbehebung
Wenn differenzielle Updates nicht zu funktionieren scheinen (d.h. Geräte laden immer das vollständige JS-Bundle herunter, auch bei kleinen Änderungen), überprüfen Sie Folgendes:
* Sie verwenden die Flag `--partial` bei jedem Upload einer neuen Version
* Bei Verwendung von `--partial-only` stellen Sie sicher, dass Sie die Flag `--partial` nicht versehentlich weggelassen haben
* Ihr Gerät läuft mit der neuesten Version des Capgo-Plugins
* Ihr Gerät hat eine stabile Netzwerkverbindung und kann die Capgo-Server erreichen
Sie können auch die Capgo-Webapp verwenden, um die Details Ihres letzten Uploads zu überprüfen:
1. Gehen Sie zur [Webapp](https://app.capgo.io)
2. Klicken Sie auf Ihre App
3. Klicken Sie auf die Bundles-Nummer in der Statistikleiste
4. Wählen Sie das letzte Bundle
5. Überprüfen Sie das `Partial`-Feld 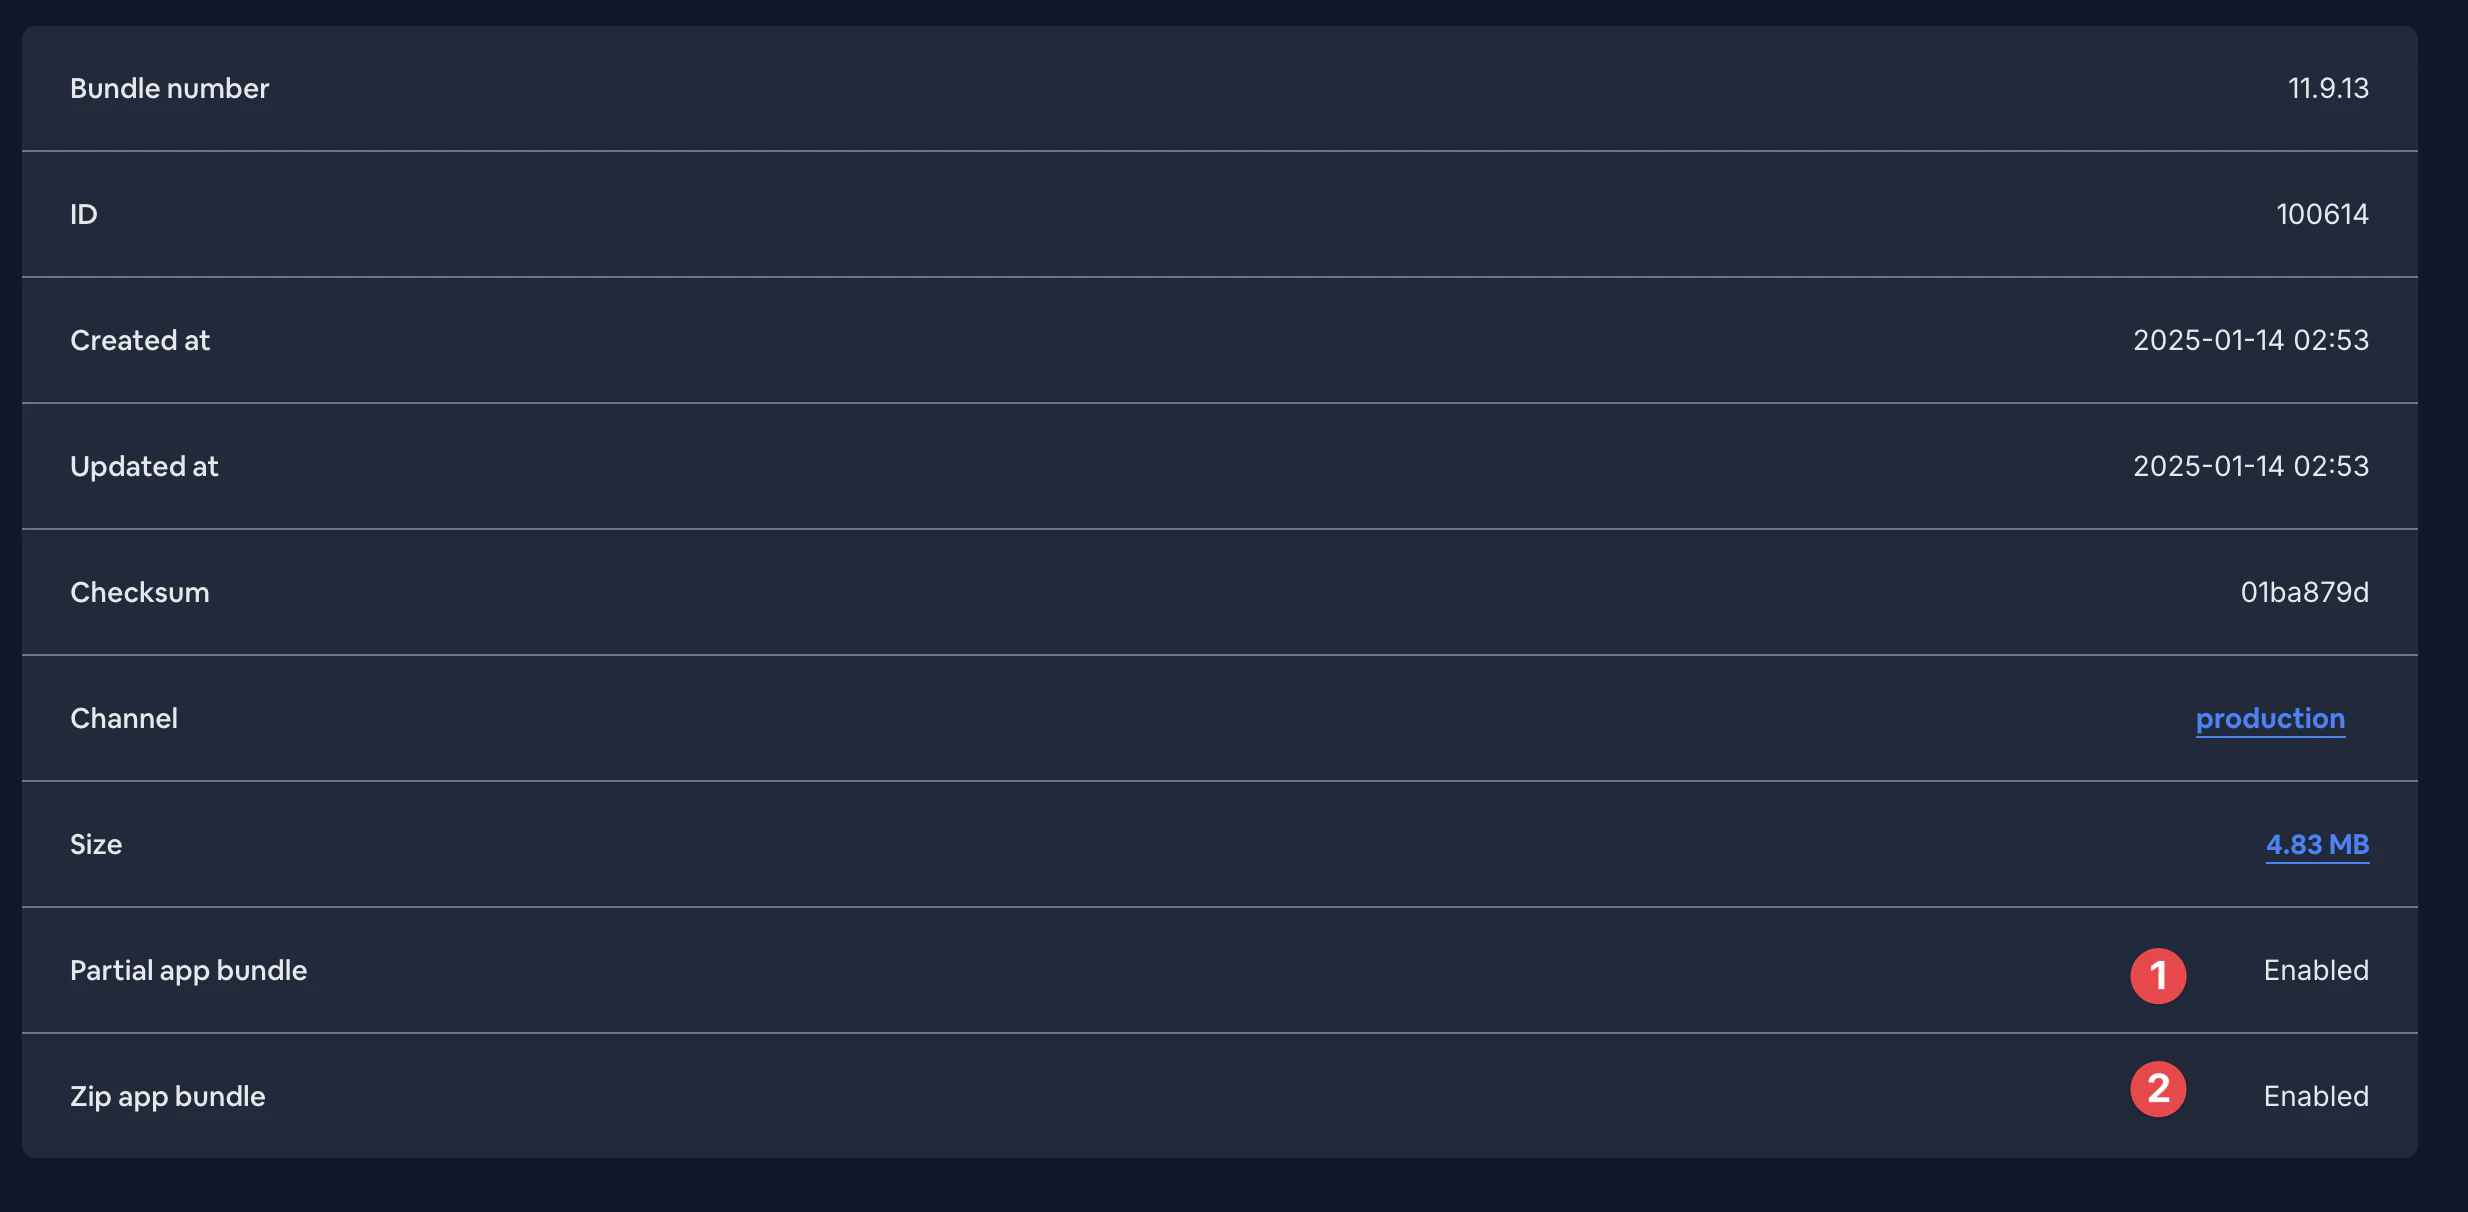
Wenn Sie weiterhin Probleme haben, wenden Sie sich bitte an den Capgo-Support für weitere Unterstützung. Sie können die Server-Logs überprüfen, um zu bestätigen, dass Ihre partiellen Uploads korrekt verarbeitet werden und die Geräte die aktualisierten Manifeste erhalten
Das war’s! Die Flag `--partial` weist Capgo an, die einzelnen Datei-Uploads und Manifest-Generierung durchzuführen, die für differenzielle Updates benötigt werden
Beachten Sie, dass Sie `--partial` jedes Mal verwenden müssen, wenn Sie eine neue Version hochladen, die als differenzielles Update bereitgestellt werden soll. Wenn Sie die Flag weglassen, lädt Capgo das gesamte JS-Bundle als einzelne Datei hoch, und Geräte werden das gesamte Bundle herunterladen, auch wenn sich nur ein kleiner Teil geändert hat
# Rollbacks
Während die Live-Updates von Capgo es Ihnen ermöglichen, schnell Verbesserungen und Fehlerbehebungen an Ihre Nutzer zu liefern, kann es Situationen geben, in denen Sie zu einer vorherigen Version Ihrer App zurückkehren müssen. Vielleicht hat ein neues Update ein unerwartetes kritisches Problem eingeführt, oder Sie möchten eine bestimmte Änderung rückgängig machen, während Sie an einer Lösung arbeiten.
Capgo bietet verschiedene Möglichkeiten, die Builds eines Kanals zu verwalten und die Version Ihrer App zu kontrollieren, die Benutzer erhalten.
## Zurücksetzen auf ein vorheriges Bundle
Jedes Mal, wenn Sie einen neuen Build hochladen und einem Kanal zuweisen, behält Capgo einen Verlauf dieser Builds bei. Wenn Sie ein bestimmtes Update rückgängig machen müssen, können Sie einen dieser vorherigen Builds auswählen, um ihn erneut im Kanal bereitzustellen.
Um zu einem vorherigen Build zurückzukehren:
1. Melden Sie sich beim [Capgo Dashboard](https://app.capgo.io) an
2. Navigieren Sie zum Bereich “Channels”
3. Klicken Sie auf den Namen des Kanals, den Sie zurücksetzen möchten
4. Suchen Sie den Build, zu dem Sie zurückkehren möchten, in der Build-Historie des Kanals
5. Klicken Sie auf das Kronen-Symbol neben diesem Build, um ihn zum aktiven Build für den Kanal zu machen 
6. Bestätigen Sie, dass Sie zu diesem Build zurückkehren möchten
Note
Das Zurücksetzen auf einen vorherigen Build betrifft nur den ausgewählten Kanal. Wenn Sie mehrere Kanäle haben (z.B. Produktion, Staging, etc.), müssen Sie den Rollback-Prozess für jeden betroffenen Kanal wiederholen.
Nach dem Zurücksetzen erhalten Geräte, die für den aktualisierten Kanal konfiguriert sind, beim nächsten Update-Check den vorherigen Build. Der zurückgesetzte Build wird als neues Update behandelt, sodass der übliche Update-Ablauf und die Bedingungen gelten.
## Trennen eines Kanals
Wenn Sie Updates auf einem Kanal vorübergehend anhalten möchten, während Sie ein Problem untersuchen, können Sie den Kanal von seinem aktuellen Build trennen.
Um einen Kanal zu trennen:
1. Navigieren Sie zum Kanal im Capgo Dashboard
2. Klicken Sie auf die Schaltfläche “Unlink” neben dem aktuellen Build
3. Bestätigen Sie, dass Sie den Kanal trennen möchten
Sobald ein Kanal getrennt ist, werden keine neuen Updates mehr verteilt. Geräte, die für diesen Kanal konfiguriert sind, bleiben bei ihrem aktuellen Build, bis der Kanal wieder mit einem Build verknüpft wird.
Dies ist nützlich, wenn Sie ein Problem mit einem Update identifiziert haben, aber noch nicht sicher sind, zu welchem Build Sie zurückkehren möchten. Das Trennen des Kanals gibt Ihnen Zeit zur Untersuchung, ohne weitere Updates zu verteilen.
## Erzwingen des eingebauten Bundles
In schwerwiegenderen Situationen möchten Sie möglicherweise alle Geräte eines Kanals auf den Web-Build zurücksetzen, der ursprünglich mit dem nativen Binary Ihrer App gepackt wurde. Dies ist als “eingebautes Bundle” bekannt.
Um das eingebaute Bundle auf einem Kanal zu erzwingen:
1. Navigieren Sie zum Kanal im Capgo Dashboard
2. Klicken Sie auf die Schaltfläche “Built-in Bundle”
3. Bestätigen Sie, dass Sie das eingebaute Bundle erzwingen möchten
Wenn Sie das eingebaute Bundle erzwingen, kehren alle Geräte, die für diesen Kanal konfiguriert sind, bei ihrer nächsten Update-Prüfung zum ursprünglich gepackten Web-Build zurück. Dies geschieht unabhängig davon, welchen Build sie derzeit verwenden.
Dies ist eine aggressivere Rollback-Option als das Zurücksetzen auf einen bestimmten vorherigen Build, da es alle Live-Updates verwirft, die seit der letzten Veröffentlichung der App in den App Stores freigegeben wurden.
Caution
Seien Sie vorsichtig beim Erzwingen des eingebauten Bundles, da es alle Geräte im Kanal betrifft. Stellen Sie sicher, dass Sie die Auswirkungen bedacht und einen Plan für das weitere Vorgehen haben, bevor Sie diese Aktion durchführen.
## Überwachung und Reaktion auf Probleme
Um Probleme schnell zu erkennen und die Auswirkungen problematischer Updates zu minimieren, ist es wichtig, einen Plan für die Überwachung Ihrer Releases und die Reaktion auf Probleme zu haben.
Einige Strategien umfassen:
* Überwachung von Absturzberichten und Benutzer-Feedback unmittelbar nach der Veröffentlichung eines Updates
* Verwendung von stufenweisen Rollouts oder einem mehrstufigen Kanalsystem, um Updates an einer kleineren Gruppe zu testen, bevor sie breit veröffentlicht werden
* Einen klaren Entscheidungsprozess haben, wann zurückgesetzt, getrennt oder das eingebaute Bundle erzwungen werden soll, und wer dazu berechtigt ist
* Gegebenenfalls Kommunikation mit den Benutzern über das Problem und die Lösung
Durch die Kombination sorgfältiger Überwachung mit der Möglichkeit, problematische Updates schnell zu verwalten, können Sie eine kontinuierlich verbesserte App-Erfahrung bieten und gleichzeitig Störungen für Ihre Benutzer minimieren.
# Aktualisierungsverhalten
Wenn Sie ein Update für Ihre Capgo-App veröffentlichen, möchten Sie wahrscheinlich, dass Ihre Nutzer dieses Update so schnell wie möglich erhalten. Allerdings möchten Sie deren Nutzungserfahrung nicht stören, indem Sie sie zwingen, mitten in einer Sitzung auf einen Download zu warten oder die App neu zu starten.
Das Update-Verhalten von Capgo wurde entwickelt, um eine Balance zwischen schneller Update-Bereitstellung und minimaler Störung der Nutzer zu finden.
## Standard Update-Ablauf
Standardmäßig behandelt Capgo App-Updates wie folgt:
1. Beim App-Start prüft das Capgo-Plugin, ob ein neues Update verfügbar ist
2. Wenn ein Update gefunden wird, wird es im Hintergrund heruntergeladen, während der Nutzer die aktuelle Version der App weiter verwendet
3. Sobald der Download abgeschlossen ist, wartet Capgo darauf, dass der Nutzer die App entweder in den Hintergrund verschiebt oder vollständig beendet
4. Wenn der Nutzer die App das nächste Mal startet, wird die aktualisierte Version ausgeführt
Dieser Ablauf stellt sicher, dass Nutzer immer die neueste Version Ihrer App verwenden, ohne jemals durch Update-Benachrichtigungen unterbrochen oder zum Warten auf Downloads gezwungen zu werden.
Tip
Capgo prüft auch auf Updates, wenn die App aus dem Hintergrund fortgesetzt wird. So erhalten Nutzer Updates auch dann, wenn sie die App nicht vollständig beenden.
## Warum dieser Ansatz?
Das Anwenden von Updates bei Hintergrund- oder Beendigungsereignissen hat einige wichtige Vorteile für die Benutzererfahrung:
* Nutzer werden nicht durch Update-Aufforderungen unterbrochen oder müssen mitten in einer Sitzung auf Downloads warten
* Updates werden nahtlos zwischen den Sitzungen angewendet, sodass das Starten der App immer ein frisches Erlebnis ist
* Sie können häufig Updates bereitstellen, ohne sich Sorgen machen zu müssen, aktive Nutzer zu stören
Der Hauptnachteil ist, dass wenn ein Nutzer die App in den Hintergrund verschiebt und schnell wieder aufruft, könnte nicht gespeicherter Status verloren gehen, da das Update zwischen diesen Aktionen angewendet wurde.
Um dies zu vermeiden, empfehlen wir:
* Status häufig zu speichern und ihn beim Fortsetzen der App korrekt wiederherzustellen
* Sehr häufige Updates zu vermeiden, die große Teile des App-Status verändern
* Die Anpassung des Update-Verhaltens für sensible Abläufe in Erwägung zu ziehen (siehe unten)
## Anpassen wann Updates angewendet werden
In manchen Fällen möchten Sie möglicherweise mehr Kontrolle darüber haben, wann genau ein Update angewendet wird. Zum Beispiel möchten Sie vielleicht sicherstellen, dass ein Nutzer einen laufenden Prozess abschließt, bevor das Update installiert wird, oder ein App-Update mit einer serverseitigen Änderung koordinieren.
Capgo bietet eine `setDelay`-Funktion, mit der Sie Bedingungen festlegen können, die erfüllt sein müssen, bevor ein Update installiert wird:
```typescript
import { CapacitorUpdater } from '@capgo/capacitor-updater';
await CapacitorUpdater.setMultiDelay({
delayConditions: [
{
kind: 'date',
value: '2023-06-01T00:00:00.000Z',
},
{
kind: 'background',
value: '60000',
},
],
});
```
Dieses Beispiel würde die Installation eines Updates verzögern, bis nach dem 1. Juni 2023 UND die App mindestens 60 Sekunden im Hintergrund war.
Die verfügbaren Verzögerungsbedingungen sind:
* `date`: Warten bis nach einem bestimmten Datum/Uhrzeit, um das Update anzuwenden
* `background`: Nach einer Mindestdauer warten, nachdem die App in den Hintergrund verschoben wurde
* `nativeVersion`: Warten auf die Installation einer nativen Binary mit einer Mindestversion
* `kill`: Warten bis zum nächsten App-Beendigungsereignis
Sie können diese Bedingungen kombinieren, um präzise zu steuern, wann ein Update installiert wird.
Danger
Beachten Sie, dass die `kill`-Bedingung das Update derzeit nach dem ersten Beendigungsereignis auslöst, nicht nach dem nächsten Hintergrundereignis wie die anderen Bedingungen. Diese Inkonsistenz wird in einer zukünftigen Version behoben.
## Sofortiges Anwenden von Updates
Für kritische Updates oder Apps mit sehr einfachem Status möchten Sie möglicherweise ein Update sofort nach dem Download anwenden, ohne auf ein Hintergrund- oder Beendigungsereignis zu warten. Capgo unterstützt dies über die `directUpdate`-Konfigurationsoption.
`directUpdate` wird in Ihrer `capacitor.config.ts`-Datei gesetzt, nicht im JavaScript-Code:
```typescript
import { CapacitorConfig } from '@capacitor/cli';
const config: CapacitorConfig = {
plugins: {
CapacitorUpdater: {
autoUpdate: true,
directUpdate: true,
keepUrlPathAfterReload: true,
},
},
};
export default config;
```
Mit aktiviertem `directUpdate` wird Capgo ein Update sofort anwenden, sobald der Download abgeschlossen ist, auch wenn der Nutzer die App aktiv verwendet.
Beachten Sie, dass `directUpdate` als native Konfiguration zusätzliche Behandlung in Ihrem JavaScript-Code erfordert.
Bei Verwendung von `directUpdate` müssen Sie auf das `appReady`-Event hören und den Splash-Screen Ihrer App entsprechend ausblenden:
```js
import { CapacitorUpdater } from '@capgo/capacitor-updater';
import { SplashScreen } from '@capacitor/splash-screen';
CapacitorUpdater.addListener('appReady', () => {
// Splash Screen ausblenden
SplashScreen.hide();
});
CapacitorUpdater.notifyAppReady();
```
Das `appReady`-Event wird ausgelöst, sobald die App die Initialisierung abgeschlossen und alle ausstehenden Updates angewendet hat. Ab diesem Zeitpunkt ist es sicher, die Benutzeroberfläche Ihrer App anzuzeigen, da sichergestellt ist, dass der Nutzer die neueste Version sieht.
Zusätzlich zur Behandlung des `appReady`-Events empfehlen wir, die Konfigurationsoption `keepUrlPathAfterReload` auf `true` zu setzen, wenn Sie `directUpdate` verwenden. Dies bewahrt den aktuellen URL-Pfad, wenn die App aufgrund eines Updates neu geladen wird, und hilft dabei, den Standort des Nutzers in der App beizubehalten und Desorientierung zu reduzieren.
Wenn Sie das `appReady`-Event nicht behandeln und `keepUrlPathAfterReload` nicht setzen, wenn Sie `directUpdate` verwenden, könnte der Nutzer kurzzeitig eine veraltete Version der App sehen, zur Ausgangsroute zurückgeführt werden oder ein Flackern sehen, während das Update angewendet wird.
Die Verwendung von `directUpdate` kann nützlich sein, um kritische Fehlerbehebungen oder Sicherheitspatches bereitzustellen, bringt aber einige Kompromisse mit sich:
* Der Nutzer könnte ein kurzes Flackern oder einen Ladezustand sehen, während das Update angewendet wird, wenn Sie das `appReady`-Event nicht richtig behandeln
* Wenn das Update den App-Status oder die Benutzeroberfläche ändert, könnte der Nutzer eine störende Änderung mitten in einer Sitzung sehen
* Der Standort des Nutzers in der App könnte verloren gehen, wenn `keepUrlPathAfterReload` nicht gesetzt ist, was möglicherweise desorientierend wirkt
* Sie müssen sorgfältig das Speichern und Wiederherstellen des Status handhaben, um einen reibungslosen Übergang zu gewährleisten
Wenn Sie `directUpdate` aktivieren, empfehlen wir:
* Behandlung des `appReady`-Events zur Kontrolle, wann die Benutzeroberfläche Ihrer App angezeigt wird
* Setzen von `keepUrlPathAfterReload` auf `true`, um den Standort des Nutzers in der App zu bewahren
* Speichern und Wiederherstellen des App-Status nach Bedarf, um Nutzerffortschritt nicht zu verlieren
* Gründliches Testen des Update-Verhaltens Ihrer App, um sicherzustellen, dass es keine störenden Übergänge, verlorenen Status oder desorientierenden Standortänderungen gibt
In den meisten Fällen bietet das Standard-Update-Verhalten die beste Balance zwischen schneller Update-Bereitstellung und minimaler Störung. Aber für Apps mit spezifischen Anforderungen bietet Capgo die Flexibilität, anzupassen, wann und wie Updates angewendet werden.
# Funktionen und Einstellungen
> Alle verfügbaren Methoden und Einstellungen des Plugins
# Updater Plugin Konfiguration
Siehe Github [Readme](https://github.com/Cap-go/capacitor-updater) für weitere Informationen
CapacitorUpdater kann mit diesen Optionen konfiguriert werden:
| Eigenschaft | Typ | Beschreibung | Standard | Seit |
| ---------------------------- | --------- | ----------------------------------------------------------------------------------------------------------------------------------------------------------------------------------------------- | --------------------------------------- | ------- |
| **`appReadyTimeout`** | `number` | Konfiguriert die Anzahl der Millisekunden, die das native Plugin warten soll, bevor ein Update als ‘fehlgeschlagen’ gilt. Nur verfügbar für Android und iOS | `10000 // (10 Sekunden)` | |
| **`responseTimeout`** | `number` | Konfiguriert die Anzahl der Millisekunden, die das native Plugin warten soll, bevor API-Timeout eintritt. Nur verfügbar für Android und iOS | `20 // (20 Sekunden)` | |
| **`autoDeleteFailed`** | `boolean` | Konfiguriert, ob das Plugin fehlgeschlagene Bundles automatisch löschen soll. Nur verfügbar für Android und iOS | `true` | |
| **`autoDeletePrevious`** | `boolean` | Konfiguriert, ob das Plugin vorherige Bundles nach einem erfolgreichen Update automatisch löschen soll. Nur verfügbar für Android und iOS | `true` | |
| **`autoUpdate`** | `boolean` | Konfiguriert, ob das Plugin Auto-Update über einen Update-Server verwenden soll. Nur verfügbar für Android und iOS | `true` | |
| **`resetWhenUpdate`** | `boolean` | Löscht automatisch zuvor heruntergeladene Bundles, wenn ein neueres natives App-Bundle auf dem Gerät installiert wird. Nur verfügbar für Android und iOS | `true` | |
| **`updateUrl`** | `string` | Konfiguriert die URL / den Endpunkt, an den Update-Prüfungen gesendet werden. Nur verfügbar für Android und iOS | `https://plugin.capgo.app/updates` | |
| **`channelUrl`** | `string` | Konfiguriert die URL / den Endpunkt für Kanal-Operationen. Nur verfügbar für Android und iOS | `https://plugin.capgo.app/channel_self` | |
| **`statsUrl`** | `string` | Konfiguriert die URL / den Endpunkt, an den Update-Statistiken gesendet werden. Nur verfügbar für Android und iOS. Auf "" setzen, um Statistik-Reporting zu deaktivieren | `https://plugin.capgo.app/stats` | |
| **`privateKey`** | `string` | Konfiguriert den privaten Schlüssel für Ende-zu-Ende Live-Update-Verschlüsselung. Nur verfügbar für Android und iOS. Veraltet in Version 6.2.0, wird in Version 7.0.0 entfernt | `undefined` | |
| **`publicKey`** | `string` | Konfiguriert den öffentlichen Schlüssel für Ende-zu-Ende Live-Update-Verschlüsselung Version 2. Nur verfügbar für Android und iOS | `undefined` | 6.2.0 |
| **`version`** | `string` | Konfiguriert die aktuelle Version der App. Wird für die erste Update-Anfrage verwendet. Wenn nicht gesetzt, holt das Plugin die Version aus dem nativen Code. Nur verfügbar für Android und iOS | `undefined` | 4.17.48 |
| **`directUpdate`** | `boolean` | Lässt das Plugin Updates direkt installieren, wenn die App gerade aktualisiert/installiert wurde. Nur für autoUpdate-Modus. Nur verfügbar für Android und iOS | `undefined` | 5.1.0 |
| **`periodCheckDelay`** | `number` | Konfiguriert die Verzögerungsperiode für periodische Update-Prüfungen in Sekunden. Nur verfügbar für Android und iOS. Kann nicht weniger als 600 Sekunden (10 Minuten) sein | `600 // (10 Minuten)` | |
| **`localS3`** | `boolean` | Konfiguriert die CLI zur Verwendung eines lokalen Servers für Tests oder selbst-gehosteten Update-Server | `undefined` | 4.17.48 |
| **`localHost`** | `string` | Konfiguriert die CLI zur Verwendung eines lokalen Servers für Tests oder selbst-gehosteten Update-Server | `undefined` | 4.17.48 |
| **`localWebHost`** | `string` | Konfiguriert die CLI zur Verwendung eines lokalen Servers für Tests oder selbst-gehosteten Update-Server | `undefined` | 4.17.48 |
| **`localSupa`** | `string` | Konfiguriert die CLI zur Verwendung eines lokalen Servers für Tests oder selbst-gehosteten Update-Server | `undefined` | 4.17.48 |
| **`localSupaAnon`** | `string` | Konfiguriert die CLI zur Verwendung eines lokalen Servers für Tests | `undefined` | 4.17.48 |
| **`localApi`** | `string` | Konfiguriert die CLI zur Verwendung einer lokalen API für Tests | `undefined` | 6.3.3 |
| **`localApiFiles`** | `string` | Konfiguriert die CLI zur Verwendung einer lokalen Datei-API für Tests | `undefined` | 6.3.3 |
| **`allowModifyUrl`** | `boolean` | Erlaubt dem Plugin, updateUrl, statsUrl und channelUrl dynamisch von der JavaScript-Seite zu ändern | `false` | 5.4.0 |
| **`defaultChannel`** | `string` | Setzt den Standard-Kanal für die App in der Konfiguration | `undefined` | 4.17.48 |
| **`appId`** | `string` | App-ID in der Konfiguration für die App konfigurieren | `undefined` | 600 |
| **`keepUrlPathAfterReload`** | `boolean` | Plugin so konfigurieren, dass der URL-Pfad nach einem Reload erhalten bleibt WARNUNG: Wenn ein Reload ausgelöst wird, wird ‘windowhistory’ gelöscht | `false` | 680 |
## Beispiele
In `capacitorconfigjson`:
```json
{
"plugins": {
"CapacitorUpdater": {
"appReadyTimeout": 1000 // (1 Sekunde),
"responseTimeout": 10 // (10 Sekunden),
"autoDeleteFailed": false,
"autoDeletePrevious": false,
"autoUpdate": false,
"resetWhenUpdate": false,
"updateUrl": https://examplecom/api/auto_update,
"channelUrl": https://examplecom/api/channel,
"statsUrl": https://examplecom/api/stats,
"privateKey": undefined,
"publicKey": undefined,
"version": undefined,
"directUpdate": undefined,
"periodCheckDelay": undefined,
"localS3": undefined,
"localHost": undefined,
"localWebHost": undefined,
"localSupa": undefined,
"localSupaAnon": undefined,
"localApi": undefined,
"localApiFiles": undefined,
"allowModifyUrl": undefined,
"defaultChannel": undefined,
"appId": undefined,
"keepUrlPathAfterReload": undefined
}
}
}
```
In `capacitorconfigts`:
```ts
///
import { CapacitorConfig } from '@capacitor/cli';
const config: CapacitorConfig = {
plugins: {
CapacitorUpdater: {
appReadyTimeout: 1000 // (1 Sekunde),
responseTimeout: 10 // (10 Sekunden),
autoDeleteFailed: false,
autoDeletePrevious: false,
autoUpdate: false,
resetWhenUpdate: false,
updateUrl: https://examplecom/api/auto_update,
channelUrl: https://examplecom/api/channel,
statsUrl: https://examplecom/api/stats,
privateKey: undefined,
publicKey: undefined,
version: undefined,
directUpdate: undefined,
periodCheckDelay: undefined,
localS3: undefined,
localHost: undefined,
localWebHost: undefined,
localSupa: undefined,
localSupaAnon: undefined,
localApi: undefined,
localApiFiles: undefined,
allowModifyUrl: undefined,
defaultChannel: undefined,
appId: undefined,
keepUrlPathAfterReload: undefined,
},
},
};
export default config;
```
* [`notifyAppReady()`](#notifyappready)
* [`setUpdateUrl()`](#setupdateurl)
* [`setStatsUrl()`](#setstatsurl)
* [`setChannelUrl()`](#setchannelurl)
* [`download()`](#download)
* [`next()`](#next)
* [`set()`](#set)
* [`delete()`](#delete)
* [`list()`](#list)
* [`reset()`](#reset)
* [`current()`](#current)
* [`reload()`](#reload)
* [`setMultiDelay()`](#setmultidelay)
* [`cancelDelay()`](#canceldelay)
* [`getLatest()`](#getlatest)
* [`setChannel()`](#setchannel)
* [`unsetChannel()`](#unsetchannel)
* [`getChannel()`](#getchannel)
* [`setCustomId()`](#setcustomid)
* [`getBuiltinVersion()`](#getbuiltinversion)
* [`getDeviceId()`](#getdeviceid)
* [`getPluginVersion()`](#getpluginversion)
* [`isAutoUpdateEnabled()`](#isautoupdateenabled)
* [`removeAllListeners()`](#removealllisteners)
* [`addListener('download', )`](#addlistenerdownload-)
* [`addListener('noNeedUpdate', )`](#addlistenernoneedupdate-)
* [`addListener('updateAvailable', )`](#addlistenerupdateavailable-)
* [`addListener('downloadComplete', )`](#addlistenerdownloadcomplete-)
* [`addListener('majorAvailable', )`](#addlistenermajoravailable-)
* [`addListener('updateFailed', )`](#addlistenerupdatefailed-)
* [`addListener('downloadFailed', )`](#addlistenerdownloadfailed-)
* [`addListener('appReloaded', )`](#addlistenerappreloaded-)
* [`addListener('appReady', )`](#addlistenerappready-)
* [`isAutoUpdateAvailable()`](#isautoupdateavailable)
* [`getNextBundle()`](#getnextbundle)
* [Schnittstellen](#interfaces)
* [Typalias](#type-aliases)
# Methoden
## notifyAppReady()
```typescript
notifyAppReady() => Promise
```
Benachrichtigt Capacitor Updater, dass das aktuelle Bundle funktioniert (ein Rollback erfolgt, wenn diese Methode nicht bei jedem App-Start aufgerufen wird) Standardmäßig sollte diese Methode innerhalb der ersten 10 Sekunden nach dem App-Start aufgerufen werden, andernfalls erfolgt ein Rollback Dieses Verhalten kann mit {@link appReadyTimeout} geändert werden
**Returns:** `Promise`
***
## setUpdateUrl()
```typescript
setUpdateUrl(options: UpdateUrl) => Promise
```
Legt die updateUrl für die App fest, diese wird zum Prüfen auf Updates verwendet
| Param | Type | Description |
| ------------- | ----------- | ------------------------------------------------------ |
| **`options`** | `UpdateUrl` | enthält die URL, die für Update-Prüfungen genutzt wird |
**Seit:** 540
***
## setStatsUrl()
```typescript
setStatsUrl(options: StatsUrl) => Promise
```
Legt die statsUrl für die App fest, diese wird zum Senden von Statistiken verwendet. Wenn ein leerer String übergeben wird, wird die Erfassung von Statistiken deaktiviert
| Param | Type | Description |
| ------------- | ---------- | ------------------------------------------------------------------ |
| **`options`** | `StatsUrl` | enthält die URL, die für das Senden von Statistiken verwendet wird |
**Seit:** 540
***
## setChannelUrl()
```typescript
setChannelUrl(options: ChannelUrl) => Promise
```
Legt die channelUrl für die App fest, diese wird zum Setzen des Kanals verwendet
| Param | Type | Description |
| ------------- | ------------ | ------------------------------------------------------------- |
| **`options`** | `ChannelUrl` | enthält die URL, die für das Setzen des Kanals verwendet wird |
**Seit:** 540
***
## download()
```typescript
download(options: DownloadOptions) => Promise
```
Lädt ein neues Bundle von der angegebenen URL herunter, es sollte eine ZIP-Datei sein, mit Dateien innerhalb oder mit einer eindeutigen ID innerhalb mit all Ihren Dateien
| Param | Type | Description |
| ------------- | ----------------- | --------------------------------------------------------------------------------------------- |
| **`options`** | `DownloadOptions` | Die {@link [DownloadOptions](#downloadoptions)} für das Herunterladen eines neuen Bundle-ZIPs |
**Returns:** `Promise`
***
## next()
```typescript
next(options: BundleId) => Promise
```
Legt das nächste Bundle fest, das verwendet werden soll, wenn die App neu geladen wird| Param | Type | Beschreibung | | ------------- | --------------------------------------------- | ---------------------------------------------------------------------------------------------- | | **`options`** | `BundleId` | Enthält die ID des nächsten Bundles, das beim nächsten App-Start gesetzt wird {@link [BundleInfoid](#bundleinfo)} |
**Returns:** `Promise`
***
## set()
```typescript
set(options: BundleId) => Promise
```
Setzt das aktuelle Bundle und lädt die App sofort neu
| Param | Type | Beschreibung |
| ------------- | ---------- | ------------------------------------------------------------------------ |
| **`options`** | `BundleId` | Ein {@link [BundleId](#bundleid)} Objekt, das die neue Bundle-ID enthält |
***
## delete()
```typescript
delete(options: BundleId) => Promise
```
Löscht das angegebene Bundle aus dem nativen App-Speicher. Verwenden Sie {@link list} um die gespeicherten Bundle-IDs zu erhalten
| Param | Type | Beschreibung |
| ------------- | ---------- | ------------------------------------------------------------------------------------------------------------------------------------------------ |
| **`options`** | `BundleId` | Ein {@link [BundleId](#bundleid)} Objekt, das die ID des zu löschenden Bundles enthält (Hinweis: dies ist die Bundle-ID, NICHT der Versionsname) |
***
## list()
```typescript
list(options?: ListOptions | undefined) => Promise
```
Alle lokal heruntergeladenen Bundles in Ihrer App abrufen
| Param | Type | Beschreibung |
| ------------- | ------------- | --------------------------------------------------------------------- |
| **`options`** | `ListOptions` | Die {@link [ListOptions](#listoptions)} für das Auflisten von Bundles |
**Returns:** `Promise`
***
## reset()
```typescript
reset(options?: ResetOptions | undefined) => Promise
```
Setzt die App auf das ‘builtin’ Bundle (das an den Apple App Store / Google Play Store gesendet wurde) oder das zuletzt erfolgreich geladene Bundle zurück
| Param | Type | Beschreibung |
| ------------- | -------------- | ------------------------------------------------------------------------------------------------------------------------------------------------------------------------------ |
| **`options`** | `ResetOptions` | Enthält {@link [ResetOptionstoLastSuccessful](#resetoptions)}, `true` setzt auf das builtin Bundle zurück und `false` setzt auf das zuletzt erfolgreich geladene Bundle zurück |
***
## current()
```typescript
current() => Promise
```
Ruft das aktuelle Bundle ab, wenn keines gesetzt ist, wird ‘builtin’ zurückgegeben. currentNative ist das ursprünglich auf dem Gerät installierte Bundle
**Returns:** `Promise`
***
## reload()
```typescript
reload() => Promise
```
Die Ansicht neu laden
***
## setMultiDelay()
```typescript
setMultiDelay(options: MultiDelayConditions) => Promise
```
Setzt ein {@link [DelayCondition](#delaycondition)} Array mit Bedingungen, die das Plugin verwendet, um das Update zu verzögern Nachdem alle Bedingungen erfüllt sind, wird der Update-Prozess wie gewohnt neu gestartet, sodass das Update nach dem Hintergrundsetzen oder Beenden der App installiert wird Für die Art ‘date’ sollte der Wert ein iso8601-Datums-String sein Für die Art ‘background’ sollte der Wert eine Zahl in Millisekunden sein Für die Art ‘nativeVersion’ sollte der Wert die Versionsnummer sein Für die Art ‘kill’ wird der Wert nicht verwendet Die Funktion hat inkonsistentes Verhalten: Die Option kill löst das Update nach dem ersten Beenden aus und nicht nach dem nächsten Hintergrundsetzen wie andere Optionen. Dies wird in einem zukünftigen Major Release behoben
| Param | Type | Beschreibung |
| ------------- | ---------------------- | --------------------------------------------------------------------------------------- |
| **`options`** | `MultiDelayConditions` | Enthält das {@link [MultiDelayConditions](#multidelayconditions)} Array von Bedingungen |
**Seit:** 430
***
## cancelDelay()
```typescript
cancelDelay() => Promise
```
Bricht eine {@link [DelayCondition](#delaycondition)} ab, um ein Update sofort zu verarbeiten
**Seit:** 400
***
## getLatest()
```typescript
getLatest(options?: GetLatestOptions | undefined) => Promise
```
Neuestes verfügbares Bundle von der Update-URL abrufen
| Param | Type |
| ------------- | ------------------ |
| **`options`** | `GetLatestOptions` |
**Returns:** `Promise`
**Seit:** 400
***
## setChannel()
```typescript
setChannel(options: SetChannelOptions) => Promise
```
Setzt den Kanal für dieses Gerät. Der Kanal muss Selbstzuweisung erlauben, damit dies funktioniert Verwenden Sie diese Methode nicht, um den Kanal beim Start zu setzen, wenn `autoUpdate` in der {@link PluginsConfig} aktiviert ist Diese Methode dient dazu, den Kanal zu setzen, nachdem die App bereit ist Diese Methode sendet eine Anfrage an den Capgo-Backend, um die Geräte-ID mit dem Kanal zu verknüpfen. Capgo kann dies je nach den Einstellungen Ihres Kanals akzeptieren oder ablehnen
| Param | Type | Beschreibung |
| ------------- | ------------------- | ----------------------------------------------------------------------- |
| **`options`** | `SetChannelOptions` | Ist die {@link [SetChannelOptions](#setchanneloptions)} Kanal zu setzen |
**Returns:** `Promise`
**Seit:** 470
***
## unsetChannel()
```typescript
unsetChannel(options: UnsetChannelOptions) => Promise
```
Hebt die Einstellung des Kanals für dieses Gerät aufDas Gerät kehrt dann zum Standardkanal zurück
| Param | Type |
| ------------- | --------------------- |
| **`options`** | `UnsetChannelOptions` |
**Seit:** 470
***
## getChannel()
```typescript
getChannel() => Promise
```
Rufe den Kanal für dieses Gerät ab
**Returns:** `Promise`
**Seit:** 480
***
## setCustomId()
```typescript
setCustomId(options: SetCustomIdOptions) => Promise
```
Lege eine benutzerdefinierte ID für dieses Gerät fest
| Param | Type | Description |
| ------------- | -------------------- | ----------------------------------------------------------------------------- |
| **`options`** | `SetCustomIdOptions` | ist die {@link [SetCustomIdOptions](#setcustomidoptions)} customId zum Setzen |
**Seit:** 490
***
## getBuiltinVersion()
```typescript
getBuiltinVersion() => Promise
```
Rufe die native App-Version oder die in der Konfiguration festgelegte Builtin-Version ab
**Returns:** `Promise`
**Seit:** 520
***
## getDeviceId()
```typescript
getDeviceId() => Promise
```
Rufe eindeutige ID ab, die zur Identifizierung des Geräts verwendet wird (wird an den Auto-Update-Server gesendet)
**Returns:** `Promise`
***
## getPluginVersion()
```typescript
getPluginVersion() => Promise
```
Rufe die native Capacitor Updater Plugin-Version ab (wird an den Auto-Update-Server gesendet)
**Returns:** `Promise`
***
## isAutoUpdateEnabled()
```typescript
isAutoUpdateEnabled() => Promise
```
Rufe den Status der Auto-Update-Konfiguration ab
**Returns:** `Promise`
***
## removeAllListeners()
```typescript
removeAllListeners() => Promise
```
Entferne alle Listener für dieses Plugin
**Seit:** 100
***
## addListener(‘download’, )
```typescript
addListener(eventName: 'download', listenerFunc: (state: DownloadEvent) => void) => Promise
```
Höre auf Bundle-Download-Events in der App. Wird ausgelöst, wenn ein Download startet, während des Downloads und wenn er abgeschlossen ist
| Param | Type |
| ------------------ | -------------------------------- |
| **`eventName`** | `’download’` |
| **`listenerFunc`** | `(state: DownloadEvent) => void` |
**Returns:** `Promise`
**Seit:** 2011
***
## addListener(‘noNeedUpdate’, )
```typescript
addListener(eventName: 'noNeedUpdate', listenerFunc: (state: NoNeedEvent) => void) => Promise
```
Höre auf Events, wenn kein Update benötigt wird. Nützlich, wenn bei jedem App-Start eine Überprüfung erzwungen werden soll
| Param | Type |
| ------------------ | ------------------------------ |
| **`eventName`** | `’noNeedUpdate’` |
| **`listenerFunc`** | `(state: NoNeedEvent) => void` |
**Returns:** `Promise`
**Seit:** 400
***
## addListener(‘updateAvailable’, )
```typescript
addListener(eventName: 'updateAvailable', listenerFunc: (state: UpdateAvailableEvent) => void) => Promise
```
Höre auf verfügbare Update-Events. Nützlich, wenn bei jedem App-Start eine Überprüfung erzwungen werden soll
| Param | Type |
| ------------------ | --------------------------------------- |
| **`eventName`** | `’updateAvailable’` |
| **`listenerFunc`** | `(state: UpdateAvailableEvent) => void` |
**Returns:** `Promise`
**Seit:** 400
***
## addListener(‘downloadComplete’, )
```typescript
addListener(eventName: 'downloadComplete', listenerFunc: (state: DownloadCompleteEvent) => void) => Promise
```
Höre auf downloadComplete Events
| Param | Type |
| ------------------ | ---------------------------------------- |
| **`eventName`** | `’downloadComplete’` |
| **`listenerFunc`** | `(state: DownloadCompleteEvent) => void` |
**Returns:** `Promise`
**Seit:** 400
***
## addListener(‘majorAvailable’, )
```typescript
addListener(eventName: 'majorAvailable', listenerFunc: (state: MajorAvailableEvent) => void) => Promise
```
Höre auf Major-Update-Events in der App. Informiert dich, wenn ein Major-Update durch die Einstellung disableAutoUpdateBreaking blockiert wird
| Param | Type |
| ------------------ | -------------------------------------- |
| **`eventName`** | `’majorAvailable’` |
| **`listenerFunc`** | `(state: MajorAvailableEvent) => void` |
**Returns:** `Promise`
**Seit:** 230
***
## addListener(‘updateFailed’, )
```typescript
addListener(eventName: 'updateFailed', listenerFunc: (state: UpdateFailedEvent) => void) => Promise
```
Höre auf Update-Fehlschlag-Events in der App. Informiert dich, wenn ein Update beim nächsten App-Start nicht installiert werden konnte
| Param | Type |
| ------------------ | ------------------------------------ |
| **`eventName`** | `’updateFailed’` |
| **`listenerFunc`** | `(state: UpdateFailedEvent) => void` |
**Returns:** `Promise`
**Seit:** 230
***
## addListener(‘downloadFailed’,\`\`\`typescript
addListener(eventName: ‘downloadFailed’, listenerFunc: (state: DownloadFailedEvent) => void) => Promise
````plaintext
Lauschen Sie auf das Download-Fehlerereignis in der App, das Sie darüber informiert, wenn ein Bundle-Download fehlgeschlagen ist
| Param | Typ |
|--------------|----------------------------------------------------------------------------------------|
| **`eventName`** | 'downloadFailed' |
| **`listenerFunc`** | (state: DownloadFailedEvent) => void |
**Gibt zurück:** Promise<PluginListenerHandle>
**Seit:** 400
--------------------
## addListener('appReloaded', )
```typescript
addListener(eventName: 'appReloaded', listenerFunc: () => void) => Promise
````
Lauschen Sie auf das Neuladen-Ereignis in der App, das Sie darüber informiert, wenn ein Neuladen stattgefunden hat
| Param | Typ |
| ------------------ | --------------- |
| **`eventName`** | `’appReloaded’` |
| **`listenerFunc`** | `() => void` |
**Gibt zurück:** `Promise`
**Seit:** 430
***
## addListener(‘appReady’, )
```typescript
addListener(eventName: 'appReady', listenerFunc: (state: AppReadyEvent) => void) => Promise
```
Lauschen Sie auf das App-Bereit-Ereignis in der App, das Sie darüber informiert, wenn die App einsatzbereit ist
| Param | Typ |
| ------------------ | -------------------------------- |
| **`eventName`** | `’appReady’` |
| **`listenerFunc`** | `(state: AppReadyEvent) => void` |
**Gibt zurück:** `Promise`
**Seit:** 510
***
## isAutoUpdateAvailable()
```typescript
isAutoUpdateAvailable() => Promise
```
Prüfen Sie, ob automatische Aktualisierung verfügbar ist (nicht durch serverUrl deaktiviert)
**Gibt zurück:** `Promise`
***
## getNextBundle()
```typescript
getNextBundle() => Promise
```
Ruft das nächste Bundle ab, das beim Neuladen der App verwendet wird Gibt null zurück, wenn kein nächstes Bundle festgelegt ist
**Gibt zurück:** `Promise`
**Seit:** 680
***
## Interfaces
### AppReadyResult
| Eigenschaft | Typ |
| ------------ | ------------ |
| **`bundle`** | `BundleInfo` |
### BundleInfo
| Eigenschaft | Typ |
| ---------------- | -------------- |
| **`id`** | `string` |
| **`version`** | `string` |
| **`downloaded`** | `string` |
| **`checksum`** | `string` |
| **`status`** | `BundleStatus` |
### UpdateUrl
| Eigenschaft | Typ |
| ----------- | -------- |
| **`url`** | `string` |
### StatsUrl
| Eigenschaft | Typ |
| ----------- | -------- |
| **`url`** | `string` |
### ChannelUrl
| Eigenschaft | Typ |
| ----------- | -------- |
| **`url`** | `string` |
### DownloadOptions
| Eigenschaft | Typ | Beschreibung | Standard | Seit |
| ---------------- | -------- | ----------------------------------------------------------------------------------------------------------------------------------------------------------------------------------------------------------- | ----------- | ---- |
| **`url`** | `string` | Die URL der Bundle-ZIP-Datei (z.B. distzip), die heruntergeladen werden soll (Dies kann eine beliebige URL sein, z.B. Amazon S3, ein GitHub-Tag oder ein anderer Ort, an dem Sie Ihr Bundle gehostet haben) | | |
| **`version`** | `string` | Der Versions-Code/Name dieses Bundles/dieser Version | | |
| **`sessionKey`** | `string` | Der Sitzungsschlüssel für das Update | `undefined` | 400 |
| **`checksum`** | `string` | Die Prüfsumme für das Update | `undefined` | 400 |
### BundleId
| Eigenschaft | Typ |
| ----------- | -------- |
| **`id`** | `string` |
### BundleListResult
| Eigenschaft | Typ |
| ------------- | -------------- |
| **`bundles`** | `BundleInfo[]` |
### ListOptions
| Eigenschaft | Typ | Beschreibung | Standard | Seit |
| ----------- | --------- | ---------------------------------------------------------------------------------------------------------------------------------------------------------------------- | -------- | ---- |
| **`raw`** | `boolean` | Ob die rohe Bundle-Liste oder das Manifest zurückgegeben werden soll. Wenn true, wird versucht, die interne Datenbank anstelle von Dateien auf der Festplatte zu lesen | `false` | 6140 |
### ResetOptions
| Eigenschaft | Typ |
| ---------------------- | --------- |
| **`toLastSuccessful`** | `boolean` |
### CurrentBundleResult
| Eigenschaft | Typ |
| ------------ | ------------ |
| **`bundle`** | `BundleInfo` |
| **`native`** | `string` |
### MultiDelayConditions
| Eigenschaft | Typ |
| --------------------- | ------------------ |
| **`delayConditions`** | `DelayCondition[]` |
### DelayCondition
| Eigenschaft | Typ | Beschreibung |
| ----------- | ---------------- | --------------------------------------------------- |
| **`kind`** | `DelayUntilNext` | Verzögerungsbedingungen in setMultiDelay einrichten |
| **`value`** | `string` | |
### LatestVersion
| Eigenschaft | Typ | Beschreibung | Seit |
| ---------------- | ----------------- | ------------------------------ | ---- |
| **`version`** | `string` | Ergebnis der getLatest-Methode | 400 |
| **`checksum`** | `string` | | 6 |
| **`major`** | `boolean` | | |
| **`message`** | `string` | | |
| **`sessionKey`** | `string` | | |
| **`error`** | `string` | | |
| **`old`** | `string` | | |
| **`url`** | `string` | | |
| **`manifest`** | `ManifestEntry[]` | | 61 |
### ManifestEntry
| Eigenschaft | Typ |
| ------------------ | ---------------- |
| **`file_name`** | `string \| null` |
| **`file_hash`** | `string \| null` |
| **`download_url`** | `string \| null` |
### GetLatestOptions
| Eigenschaft | Typ | Beschreibung | Standard | Seit |
| ------------- | -------- | --------------------------------------------------------------------------------------------------------------------------- | ----------- | ---- |
| **`channel`** | `string` | Der Kanal, für den die neueste Version abgerufen werden soll. Der Kanal muss ‘self\_assign’ für die Funktionalität erlauben | `undefined` | 680 |
### ChannelRes
| Eigenschaft | Typ | Beschreibung | Seit |
| ------------- | -------- | --------------------------- | ---- |
| **`status`** | `string` | Aktueller Status des Kanals | 470 |
| **`error`** | `string` | | |
| **`message`** | `string` | | |
### SetChannelOptions
| Eigenschaft | Typ |
| ----------------------- | --------- |
| **`channel`** | `string` |
| **`triggerAutoUpdate`** | `boolean` |
### UnsetChannelOptions
| Eigenschaft | Typ |
| ----------------------- | --------- |
| **`triggerAutoUpdate`** | `boolean` |
### GetChannelRes
| Eigenschaft | Typ | Beschreibung | Seit |
| -------------- | --------- | --------------------------- | ---- |
| **`channel`** | `string` | Aktueller Status des Kanals | 480 |
| **`error`** | `string` | | |
| **`message`** | `string` | | |
| **`status`** | `string` | | |
| **`allowSet`** | `boolean` | | |
### SetCustomIdOptions
| Eigenschaft | Typ |
| -------------- | -------- |
| **`customId`** | `string` |
### BuiltinVersion
| Eigenschaft | Typ |
| ------------- | -------- |
| **`version`** | `string` |
### DeviceId
| Eigenschaft | Typ |
| -------------- | -------- |
| **`deviceId`** | `string` |
### PluginVersion
| Eigenschaft | Typ |
| ------------- | -------- |
| **`version`** | `string` |
### AutoUpdateEnabled
| Eigenschaft | Typ |
| ------------- | --------- |
| **`enabled`** | `boolean` |
### PluginListenerHandle
| Eigenschaft | Typ |
| ------------ | --------------------- |
| **`remove`** | `() => Promise` |
### DownloadEvent
| Eigenschaft | Typ | Beschreibung | Seit |
| ------------- | ------------ | --------------------------------------------- | ---- |
| **`percent`** | `number` | Aktueller Download-Status, zwischen 0 und 100 | 400 |
| **`bundle`** | `BundleInfo` | | |
### NoNeedEvent
| Eigenschaft | Typ | Beschreibung | Seit |
| ------------ | ------------ | --------------------------------------------- | ---- |
| **`bundle`** | `BundleInfo` | Aktueller Download-Status, zwischen 0 und 100 | 400 |
### UpdateAvailableEvent
| Eigenschaft | Typ | Beschreibung | Seit |
| ------------ | ------------ | --------------------------------------------- | ---- |
| **`bundle`** | `BundleInfo` | Aktueller Download-Status, zwischen 0 und 100 | 400 |
### DownloadCompleteEvent
| Eigenschaft | Typ | Beschreibung | Seit |
| ------------ | ------------ | --------------------------------------------- | ---- |
| **`bundle`** | `BundleInfo` | Wird ausgelöst, wenn ein Update verfügbar ist | 400 |
### MajorAvailableEvent
| Eigenschaft | Typ | Beschreibung | Seit |
| ------------- | -------- | --------------------------------------------------- | ---- |
| **`version`** | `string` | Wird ausgelöst, wenn ein Major-Update verfügbar ist | 400 |
### UpdateFailedEvent
| Eigenschaft | Typ | Beschreibung | Seit |
| ------------ | ------------ | -------------------------------------------------- | ---- |
| **`bundle`** | `BundleInfo` | Wird ausgelöst, wenn ein Update fehlgeschlagen ist | 400 |
### DownloadFailedEvent
| Eigenschaft | Typ | Beschreibung | Seit |
| ------------- | -------- | --------------------------------------------- | ---- |
| **`version`** | `string` | Wird ausgelöst, wenn ein Download fehlschlägt | 400 |
### AppReadyEvent
| Eigenschaft | Typ | Beschreibung | Seit |
| ------------ | ------------ | --------------------------------------- | ---- |
| **`bundle`** | `BundleInfo` | Wird ausgelöst, wenn die App bereit ist | 520 |
| **`status`** | `string` | | |
### AutoUpdateAvailable
| Eigenschaft | Typ |
| --------------- | --------- |
| **`available`** | `boolean` |
## Type Aliases
### BundleStatus
`‘success’ | ‘error’ | ‘pending’ | ‘downloading’`
### DelayUntilNext
`‘background’ | ‘kill’ | ‘nativeVersion’ | ‘date’`
# Auto actualización
> So verwenden Sie die automatische Aktualisierung mit capacitor-updater
Here’s the German translation:
Dieser Modus ermöglicht Entwicklern die Verwendung von capacitor-updater im Auto-Update-Modus und das Pushen von Updates über Capgo-Kanäle oder Äquivalente.
### Voraussetzungen
Stellen Sie sicher, dass Ihre App-Version verwendet, bevor Sie Capgo Auto-Update nutzen.
Dies ist die Konvention, die verwendet wird, um Versionen in Capgo zu verwalten.
Es gibt zwei Möglichkeiten, die Version in Ihrer App festzulegen:
Neue Methode: Verwenden Sie das `version`-Feld in Ihrer `capacitorconfigjson`-Datei
```json
{
"plugins": {
"CapacitorUpdater": {
"autoUpdate": true, // Auto-Update aktivieren, standardmäßig true
"appId": "comexampleapp", // Wird zur Identifizierung der App auf dem Server verwendet
"version": "100" // Wird zur Überprüfung auf Updates verwendet
}
}
}
```
Diese Optionen werden vom Plugin zur Überprüfung auf Updates und von der CLI zum Hochladen der Version verwendet.
Alte Methode: In 3 Dateien in Ihrem Projekt:
* `packagejson` in **version**
* `android/app/buildgradle` in **versionName**
* `ios/App/Appxcodeproj/projectpbxproj` in **CURRENT\_PROJECT\_VERSION**
### Tutorials
Richten Sie Ihre App in 5 Minuten ein
[Aktualisieren Sie Ihre Capacitor-Apps nahtlos mit Capacitor Updater](https://capgo.app/blog/update-your-capacitor-apps-seamlessly-using-capacitor-updater)
Richten Sie Ihre CI in 5 Minuten ein
[Automatischer Build und Release mit GitHub Actions](https://capgo.app/blog/automatic-build-and-release-with-github-actions)
### Installation
```bash
npm install @capgo/capacitor-updater
npx cap sync
```
### Einführung
Klicken Sie auf [Registrieren](https://capgo.app), um Ihr Konto zu erstellen
Der Server ermöglicht es Ihnen, Kanäle und Versionen und vieles mehr zu verwalten
`autoUpdate` verwendet Daten aus `capacitorconfig`, um den Capgo-Server zu identifizieren
Note
Sie können Capgo Cloud weiterhin nutzen, ohne Ihren Code an unseren Server zu senden, falls dies von Ihrem Unternehmen nicht erlaubt ist
#### Version validieren
Wenn Auto-Update eingerichtet ist, müssen Sie von JavaScript aus mitteilen, dass Ihre App aktiv und bereit ist
Dies kann durch den Aufruf von `notifyAppReady` in Ihrer App erfolgen
Tun Sie dies so früh wie möglich
```ts
import { CapacitorUpdater } from '@capgo/capacitor-updater'
CapacitorUpdaternotifyAppReady()
```
#### Benutzer-Ablauf
* Benutzer öffnet die App, die App ruft den Server ab, um nach Updates zu suchen, wenn Updates gefunden werden, werden sie im Hintergrund heruntergeladen
* Benutzer verlässt die App, die neue Version wird als aktiv gesetzt
* Benutzer öffnet die App erneut, wir laden die neue aktive Version und setzen sie als Standard
* Wenn `notifyAppReady()` aufgerufen wird, wird die vorherige Version gelöscht, wenn der Benutzer die App verlässt
* Benutzer setzt den normalen App-Ablauf fort bis zum nächsten Update-Zyklus
Danger
⚠️ Wenn Sie `notifyAppReady()` nicht in Ihrer App aufrufen, wird die aktuelle Version als ungültig markiert und auf das vorherige gültige Bundle oder die Standardversion zurückgesetzt
#### Entwickler-Ablauf
Wenn Sie neue Funktionen entwickeln, stellen Sie sicher, dass Sie `autoUpdate` blockieren, da Capgo sonst ständig Ihre Arbeit mit dem neuesten Update-Bundle überschreibt Setzen Sie `autoUpdate` in Ihrer Konfiguration auf false Falls Sie aus irgendeinem Grund bei einem Update festhängen, können Sie die App löschen und neu installieren Stellen Sie sicher, dass Sie `autoUpdate` in Ihrer Konfiguration auf false setzen, bevor Sie dies tun Und bauen Sie sie dann erneut mit Xcode oder Android Studio
Um die Version bei jedem Commit hochzuladen, richten Sie CI/CD mit dieser Anleitung ein
[Automatischer Build und Release mit GitHub Actions](https://capgo.app/blog/automatic-build-and-release-with-github-actions)
#### Major Available Event
Wenn `disableAutoUpdateBreaking` auf true gesetzt ist, können Sie auf das Event hören, um zu erfahren, wann die App sich weigert, ein Major Breaking Update durchzuführen
```jsx
import { CapacitorUpdater } from '@capgo/capacitor-updater'
CapacitorUpdateraddListener('majorAvailable', (info: any) => {
consolelog('majorAvailable wurde ausgelöst', infoversion)
})
```
# Kanalsystem
> Wie man das Kanal-System mit capacitor-updater verwendet
Capgo und capacitor-updater verfügen über ein leistungsstarkes Kanalsystem
## Was Sie mit Kanälen machen können:
* Geräte einem Kanal für Entwicklung und Beta-Tests zuordnen
* Einen Kanal pro Entwicklungszweig verwenden und Ihr Team sich selbst vom Telefon aus zuweisen lassen
## Geräte einem Kanal zuweisen:
* Den Kanal als Standard festlegen, jedes Mal wenn ein neues Gerät Capgo nach einem Update fragt, wird dieser Kanal antworten
* Die **deviceId** (mit der [**getDeviceId**](/docs/plugin/api#getdeviceid) Methode) an Ihr Backend senden und sie über die Capgo Public API zuweisen
* Den Kanal selbst zuweisbar machen (mit der [**setChannel**](/docs/plugin/api#setchannel) Methode) und das Gerät den Kanal abonnieren lassen (mit oder ohne Benutzerinteraktion) mit der `setChannel` Methode des Plugins
* Die Option `defaultChannel` in der [Konfiguration](/docs/plugin/settings#defaultchannel) verwenden, um den Standardkanal für alle Geräte mit dieser Plugin-Konfiguration festzulegen
Note
Sie können ein Gerät auch direkt einem Bundle zuweisen
## Kanal-Optionen
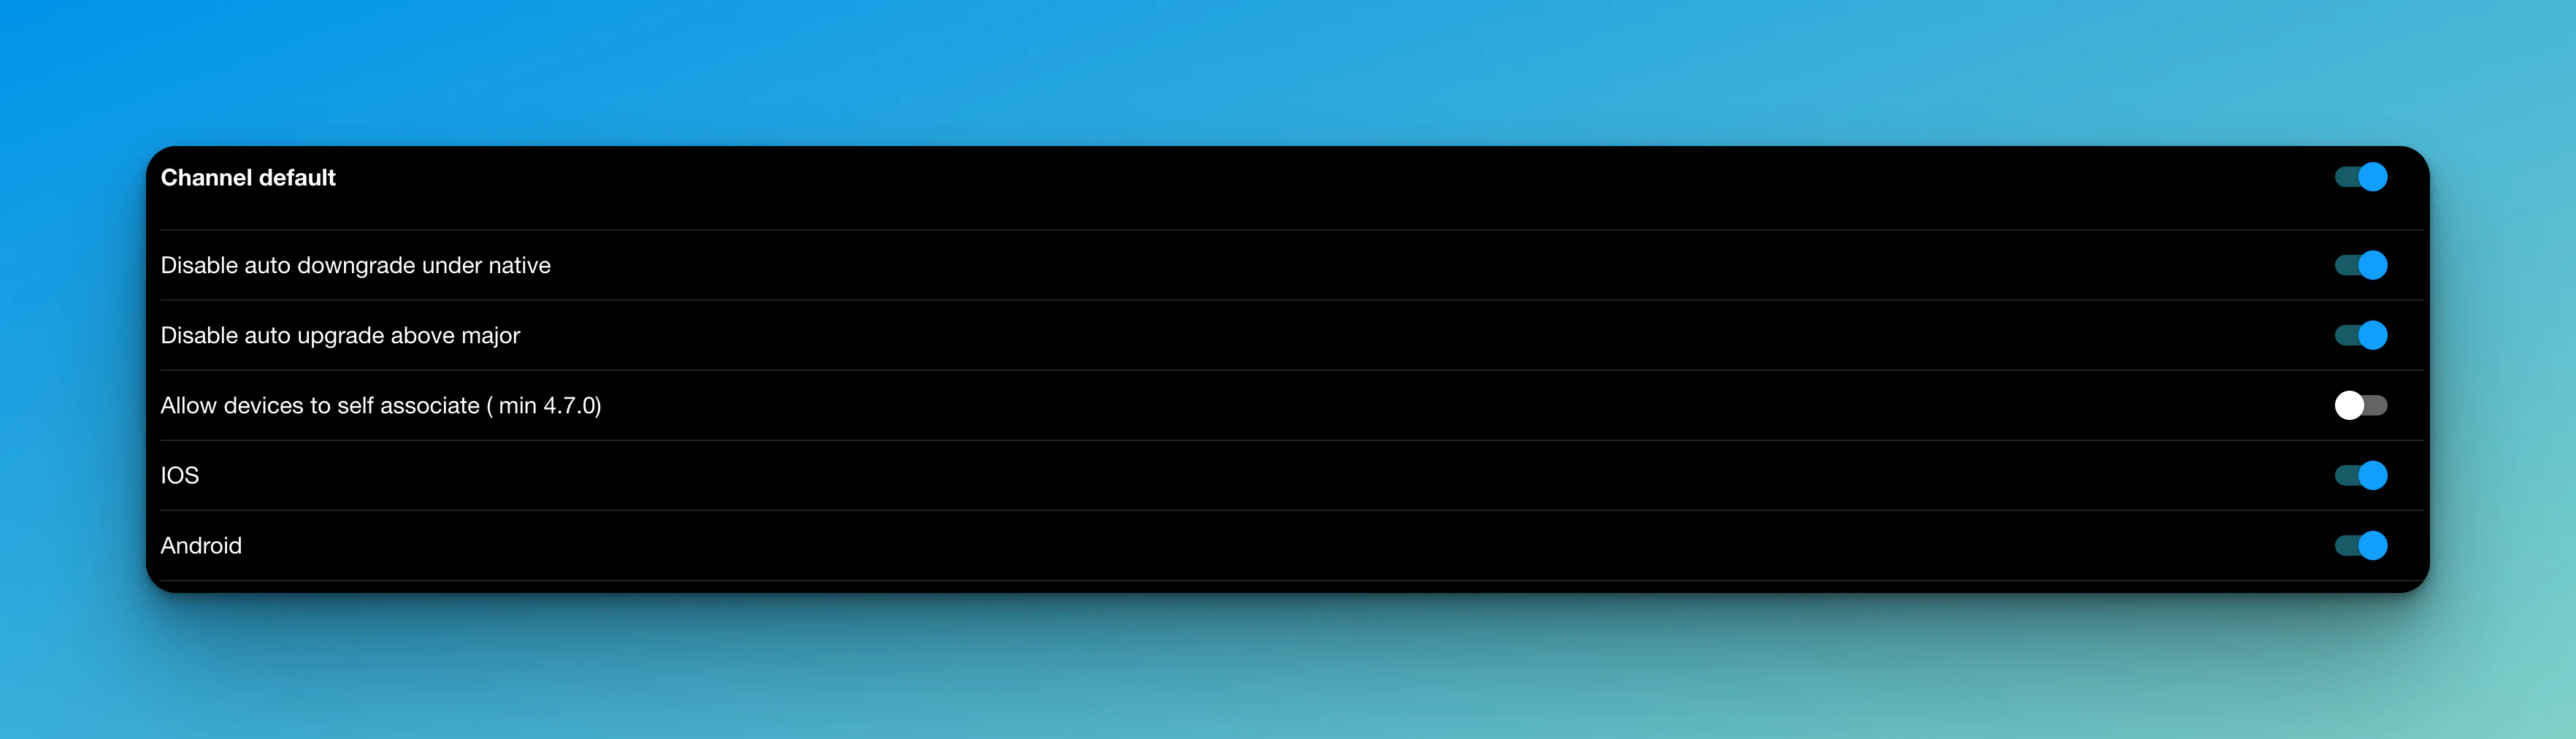
Details zu jeder Option:
| Option | Beschreibung |
| ----------------------------------------------------- | ---------------------------------------------------------------------------------------------------------- |
| **Automatisches Downgrade unter Native deaktivieren** | Kein Update senden, wenn die native Version der App größer ist als die Kanalversion |
| **Automatisches Upgrade über Major deaktivieren** | Kein Update senden, wenn die native Version der App niedriger ist als ein Major (**1**23) der Kanalversion |
| **Automatisches Upgrade über Minor deaktivieren** | Kein Update senden, wenn die native Version der App niedriger ist als ein Minor (1**2**3) der Kanalversion |
| **Gerät darf sich selbst zuweisen** | Ein Gerät darf die `setChannel` Methode für diesen Kanal verwenden |
| **iOS** | iOS-Geräten erlauben, Updates von diesem Kanal herunterzuladen |
| **Android** | Android-Geräten erlauben, Updates von diesem Kanal herunterzuladen |
| **Emulator erlauben** | Emulatoren erlauben, Updates von diesem Kanal zu empfangen |
| **Entwicklungs-Build erlauben** | Entwicklungs-Builds erlauben, Updates von diesem Kanal zu empfangen |
Note
Capgo führt automatisch einige Filterungen für Sie durch. Wenn Sie eine CI/CD konfiguriert haben, die Ihre Version an Google Play sendet, wird Google Play Ihre App jedes Mal auf über 20 echten Geräten ausführen. Während der ersten 4 Stunden eines neuen Bundles blockieren wir Google-Datencenter-IPs, um zu verhindern, dass diese in Ihren Statistiken gezählt werden
Note
Capgo zählt Emulatoren und Entwicklungs-Builds **nicht** in Ihrer Nutzung, aber beachten Sie, dass Sie nicht mehr als 3% davon haben können, sonst wird Ihr Konto gesperrt, bis Sie dies beheben
# Erste Schritte
> Installiere das Plugin in deiner App
## Einführung in Capgo
[Play](https://youtube.com/watch?v=NzXXKoyhTIo)
## Live-Updates sind 3 Schritte entfernt
### Konto erstellen
Besuchen Sie unsere Registrierungsseite unter

### Installieren Sie Capgo mit der CLI
Verwenden Sie die magischen Befehle, um loszulegen
```bash
npx @capgo/cli@latest init [APIKEY]
```
Dieser Befehl führt Sie durch den Einrichtungsprozess
### Folgen Sie einfach den Anweisungen
In der CLI werden Ihnen eine Reihe von Fragen gestellt. Beantworten Sie die notwendigen Fragen, um die automatische Einrichtung abzuschließen
Tip
Wenn Sie diese Schritte befolgen, sind Sie im Handumdrehen einsatzbereit. Falls Sie während des Prozesses weitere Unterstützung benötigen, steht Ihnen unser Support-Team zur Verfügung. Viel Spaß beim Onboarding!
### Genießen Sie die Magie von Capgo!
Testen Sie Ihre App und lernen Sie später, wie Sie die Power-Features von Capgo nutzen können
# Mise à jour hybride
> Update-Methoden für automatische Updates
Beim Pushen von Updates an Ihre Benutzer haben Sie mehrere Möglichkeiten, den Update-Zyklus nach Ihren Vorstellungen zu handhaben, bevor Sie sie anwenden
* Stilles Update
* Auf `updateAvailable` Event hören
* Modalfenster anzeigen oder Updates verzögern
## Stilles Update
Sie können einen Update-Zyklus bei jedem App-Start erzwingen, indem Sie `directUpdate` auf `true` setzen. Dies löst den Update-Zyklus wie gewohnt ohne Benutzerinteraktion aus
```tsx
// capacitorconfigjson
{
"appId": "*******",
"appName": "Name",
"plugins": {
"CapacitorUpdater": {
"directUpdate": true,
},
"SplashScreen": {
"launchAutoHide": false,
}
}
}
```
In Ihrer App sollten Sie dann den Splash Screen ausblenden, wenn Sie das Event `appReady` empfangen:
```js
import { CapacitorUpdater } from '@capgo/capacitor-updater'
import { SplashScreen } from '@capacitor/splash-screen'
CapacitorUpdateraddListener('appReady', () => {
// Hide splash
SplashScreenhide()
})
CapacitorUpdaternotifyAppReady()
```
## Erzwungenes Update
Fügen Sie einen Listener für das Event `updateAvailable` hinzu und zeigen Sie dann eine Benachrichtigung an, um den Benutzer über das Update zu informieren:
```js
import { CapacitorUpdater } from '@capgo/capacitor-updater'
import { Dialog } from '@capacitor/dialog'
CapacitorUpdateraddListener('updateAvailable', async (res) => {
try {
await Dialogalert({
title: 'Update verfügbar',
message: `Version ${resbundleversion} ist verfügbar. Die App wird jetzt aktualisiert`,
})
CapacitorUpdaterset(resbundle)
}
catch (error) {
consolelog(error)
}
})
CapacitorUpdaternotifyAppReady()
```
## Modal Update
Sie können den Benutzer auch entscheiden lassen, indem Sie einen Dialog anzeigen, der nach dem Update fragt:
```js
import { CapacitorUpdater } from '@capgo/capacitor-updater'
import { Dialog } from '@capacitor/dialog'
CapacitorUpdateraddListener('updateAvailable', async (res) => {
try {
const { value } = await Dialogconfirm({
title: 'Update verfügbar',
message: `Version ${resbundleversion} ist verfügbar. Möchten Sie jetzt aktualisieren?`,
})
if (value)
CapacitorUpdaterset(resbundle)
}
catch (error) {
consolelog(error)
}
})
CapacitorUpdaternotifyAppReady()
```
# 手動更新
> Wie Sie ein Update selbst durchführen
Wenn Sie selbst steuern möchten, wann Updates angewendet werden, verwenden Sie den manuellen Modus mit Capgo Cloud
Hier ist, was Sie tun müssen: Richten Sie Ihr Konto ein, wie in Erste Schritte erklärt
[Erste Schritte ](/docs/getting-started/quickstart/)
#### Konfiguration
Deaktivieren Sie das automatische Update in Ihrer `capacitor.config.json`
```tsx
// capacitor.config.json
{
"appId": "*******",
"appName": "Name",
"plugins": {
"CapacitorUpdater": {
"autoUpdate": false
}
}
}
```
Fügen Sie dann die Logik hinzu, um Updates selbst zu verwalten\
Hier ist ein Beispiel, wie Sie das machen können:
```typescript
import { CapacitorUpdater } from '@capgo/capacitor-updater'
import type { BundleInfo } from '@capgo/capacitor-updater'
import { SplashScreen } from '@capacitor/splash-screen'
import { App } from '@capacitor/app'
CapacitorUpdater.notifyAppReady()
let data: BundleInfo | null = null
App.addListener('appStateChange', async (state: any) => {
console.log('appStateChange', state)
if (state.isActive) {
console.log('getLatest')
// Führen Sie den Download durch, während die App aktiv genutzt wird, um fehlgeschlagene Downloads zu vermeiden
const latest = await CapacitorUpdater.getLatest()
console.log('latest', latest)
if (latest.url) {
data = await CapacitorUpdater.download(latest)
console.log('download', data)
}
}
if (!state.isActive && data) {
console.log('set')
// Führen Sie den Wechsel durch, wenn der Benutzer die App verlässt oder wenn Sie es möchten
SplashScreen.show()
try {
await CapacitorUpdater.set({ id: data.id })
}
catch (err) {
console.log(err)
SplashScreen.hide() // falls das Setzen fehlschlägt, andernfalls muss die neue App es ausblenden
}
}
})
```
Dokumentation aller verfügbaren APIs im Plugin:
[Methoden ](/docs/plugin/api/)
Es gibt einige Anwendungsfälle, bei denen Sie Benutzern erlauben können, Kanäle zu abonnieren und verschiedene Versionen zu testen:\
# Cordova
> Wird capacitor-updater auf Cordova verfügbar sein?
Sie haben sich gefragt, ob dieses Plugin jemals für Cordova verfügbar sein wird
Ich habe ein F\&E-Repository dafür begonnen, aber es ist eine enorme Arbeitsmenge
## Probleme
Ich weiß, dass ich es kann, aber dafür muss ich den gesamten Code der Cordova-Codebasis lesen, wie ich es für Capacitor getan habe, um zu verstehen, wie ich es zum Laufen bringe
Die Android-Version ist einfacher zu erstellen, da beide Java verwenden, aber iOS benötigt eine komplette Neuschreibung, da Swift in Cordova noch nicht gut unterstützt wird
## Lösung
In der Zwischenzeit können Sie Folgendes tun:
* [Unterstützen Sie mich](https://github.com/sponsors/riderx) auf GitHub und ich kann das priorisieren. Dies wird mindestens 1 Monat Arbeit benötigen
* Engagieren Sie mich als Berater, ich habe früher großen Unternehmen bei der Migration zu Capacitor geholfen, es dauert normalerweise \~10-20 Tage und der [Nutzen](https://ionicio/resources/articles/capacitor-vs-cordova-modern-hybrid-app-development) ist enorm für das Team
# Debugging
> So debuggen Sie Ihre App
## Cloud-Logs verstehen:
### Vom Backend gesendet
| Code | Beschreibung |
| -------------------------------------------- | --------------------------------------------------------------------------------------------------------------------------------------------------------------------------------------- |
| **InvalidIp** | Der Benutzer befindet sich in einem Google-Rechenzentrum und das Update ist weniger als 4 Stunden alt. Dies verhindert, dass Google-Bot-Geräte als Geräte in Ihrem Konto gezählt werden |
| **needPlanUpgrade** (früher **needUpgrade**) | Zeigt an, dass Sie das Limit Ihres Plans erreicht haben und das Gerät keine Updates erhält, bis Sie upgraden oder bis zum nächsten Monat |
| **noNew** | Das Gerät hat die neueste verfügbare Version |
| **disablePlatformIos** | Das Gerät läuft auf der iOS-Plattform, aber diese ist in den Kanaleinstellungen deaktiviert |
| **disablePlatformAndroid** | Das Gerät läuft auf der Android-Plattform, aber diese ist in den Kanaleinstellungen deaktiviert |
| **disableAutoUpdate** | ”major" |
| **disableAutoUpdateUnderNative** | Das Gerät hat Version (`123`), und der Kanal hat ein Update (`122`) unter der Geräteversion zum Senden, aber dies ist in den Kanaleinstellungen deaktiviert |
| **disableDevBuild** | Das Gerät hat einen Dev-Build, aber dies ist in den Kanaleinstellungen deaktiviert |
| **disableEmulator** | Das Gerät ist ein Emulator, aber dies ist in den Kanaleinstellungen deaktiviert |
### Vom Gerät gesendet
| Code | Beschreibung |
| ------------------------- | ------------------------------------------------------------------------------------------- |
| **get** | Informationen zum Herunterladen der neuen Version wurden an das Gerät gesendet |
| **delete** | Ein Bundle wurde auf dem Gerät gelöscht |
| **set** | Ein Bundle wurde auf dem Gerät eingerichtet |
| **set\_fail** | Das Bundle konnte nicht eingerichtet werden |
| **reset** | Das Gerät wurde auf das `builtin`-Bundle zurückgesetzt |
| **download\_XX** | Ein neues Bundle wurde heruntergeladen - Fortschritt angezeigt durch XX% (in 10%-Schritten) |
| **download\_complete** | Das neue Bundle wurde vollständig heruntergeladen |
| **download\_fail** | Das neue Bundle konnte nicht heruntergeladen werden |
| **update\_fail** | Das neue Bundle wurde installiert, konnte aber `notifyAppReady` nicht aufrufen |
| **checksum\_fail** | Das neue Bundle konnte die Prüfsumme nicht validieren |
| **windows\_path\_fail** | Die ZIP-Datei enthält unzulässige Windows-Pfade |
| **canonical\_path\_fail** | Der Pfad der Dateien ist nicht kanonisch |
| **directory\_path\_fail** | Es gibt einen Fehler im Pfad der ZIP-Dateien |
| **unzip\_fail** | Entpacken fehlgeschlagen |
| **low\_mem\_fail** | Download aufgrund von niedrigem Gerätespeicher fehlgeschlagen |
### Bundle-Status
* `SUCCESS`: Bundle-Installation abgeschlossen
* `ERROR`: Installation oder Download fehlgeschlagen
* `PENDING`: Download abgeschlossen, wartet auf Freigabe
* `DELETED`: Bundle gelöscht, wird noch für Statistiken angezeigt
* `DOWNLOADING`: Bundle wird gerade heruntergeladen
## Geräte-Logs verstehen:
### Debug-Befehl:
Es gibt einen Debug-Befehl für Capgo Cloud-Benutzer
```bash
npx @capgo/cli@latest app debug
```
Damit können Sie alle Ereignisse in der App überprüfen und eine Lösung finden, wenn Updates nicht funktionieren
### iOS
So finden Sie Ihre Logs in Xcode
[Getting the Device Log in Xcode ](https://intercomhelp/deploygate/en/articles/4682692-getting-the-device-log-in-xcode)
### Android:
So finden Sie Ihre Logs in Android Studio
[View logs with Logcat ](https://developerandroidcom/studio/debug/am-logcat)
### Erklärungen zu den Logs
* `Failed to download from` **=>** gleich wie **download\_fail**
* `notifyAppReady was not called, roll back current bundle` => gleich wie **update\_fail**
## Heruntergeladenes Bundle auf Ihrem Gerät finden
### iOS
Zum Debuggen unter iOS müssen Sie die App auf Ihren Computer exportieren. Das geht so:
Xcode hat eine eingebaute Funktion zur Überprüfung des Dateisystems von Entwickler-installierten Apps auf einem iOS-Gerät
So gehen Sie vor:
1. Verbinden Sie Ihr Gerät mit dem Mac und wählen Sie Fenster > Geräte in der Xcode-Menüleiste
2. Wählen Sie Ihr Gerät im linken Bereich unter Geräte aus
3. Dies zeigt eine Liste der entwicklerinstallierten Apps für dieses Gerät
4. Wählen Sie die App aus, die Sie überprüfen möchten, und klicken Sie auf das Zahnrad-Symbol unten im Bildschirm
5. Hier können Sie das aktuelle Dateisystem durch Auswahl von Container anzeigen oder einen Snapshot davon herunterladen
Wenn Sie Container herunterladen wählen, wird ein Snapshot des Dateisystems als xcappdata-Datei heruntergeladen, die Sie durchsuchen können
Klicken Sie mit der rechten Maustaste auf diese Datei und wählen Sie Paketinhalt anzeigen, um den Ordner zu öffnen
Öffnen Sie den App Data-Ordner, und Sie sollten nun einige Ordner wie Documents, Library, tmp usw. sehen
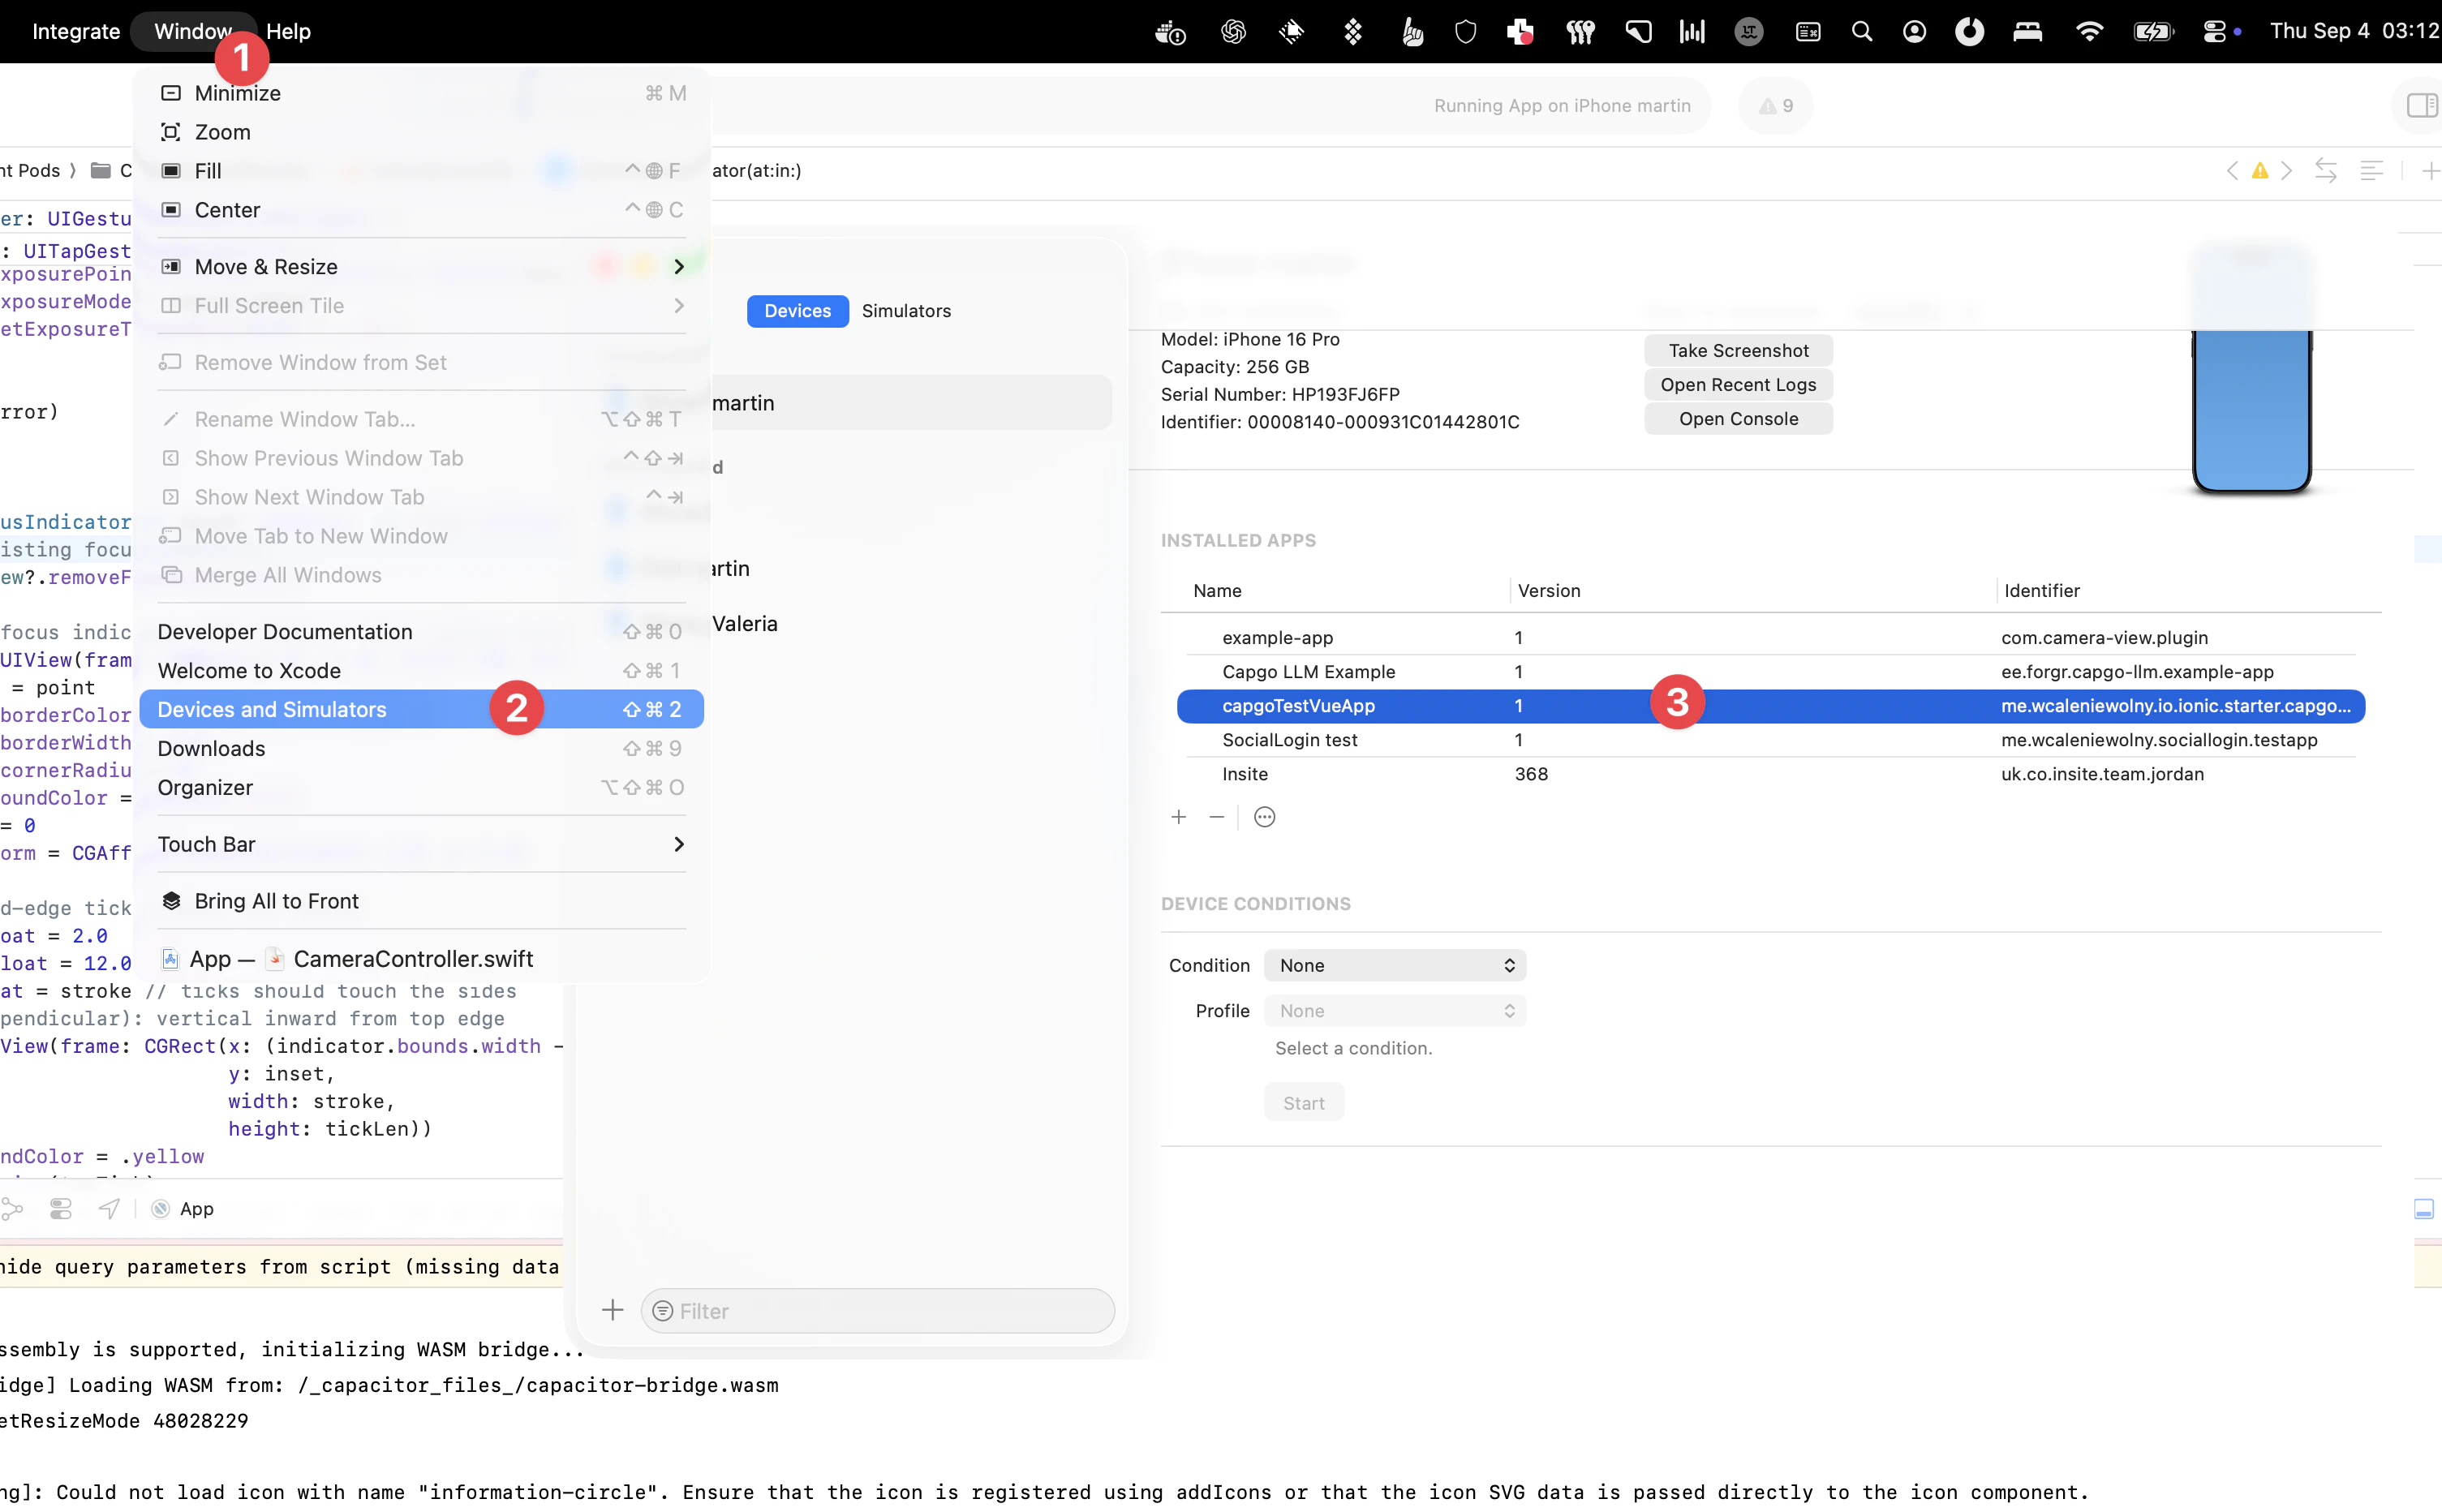
Dann finden Sie eine Version in 2 Ordnern:
`library/NoCloud/ionic_built_snapshots` wird nach dem App-Neustart benötigt
und `documents/versions` für Hot Reload
### Android
Zum Debuggen unter Android müssen Sie über Android Studio auf das Gerät zugreifen:
1. Klicken Sie auf Ansicht > Werkzeugfenster > Gerätedatei-Explorer oder klicken Sie auf die Schaltfläche Gerätedatei-Explorer in der Werkzeugleiste
2. Wählen Sie ein Gerät aus der Dropdown-Liste
3. Öffnen Sie den Pfad **data/data/APP\_NAME/** wobei **APP\_NAME Ihre App-ID ist**
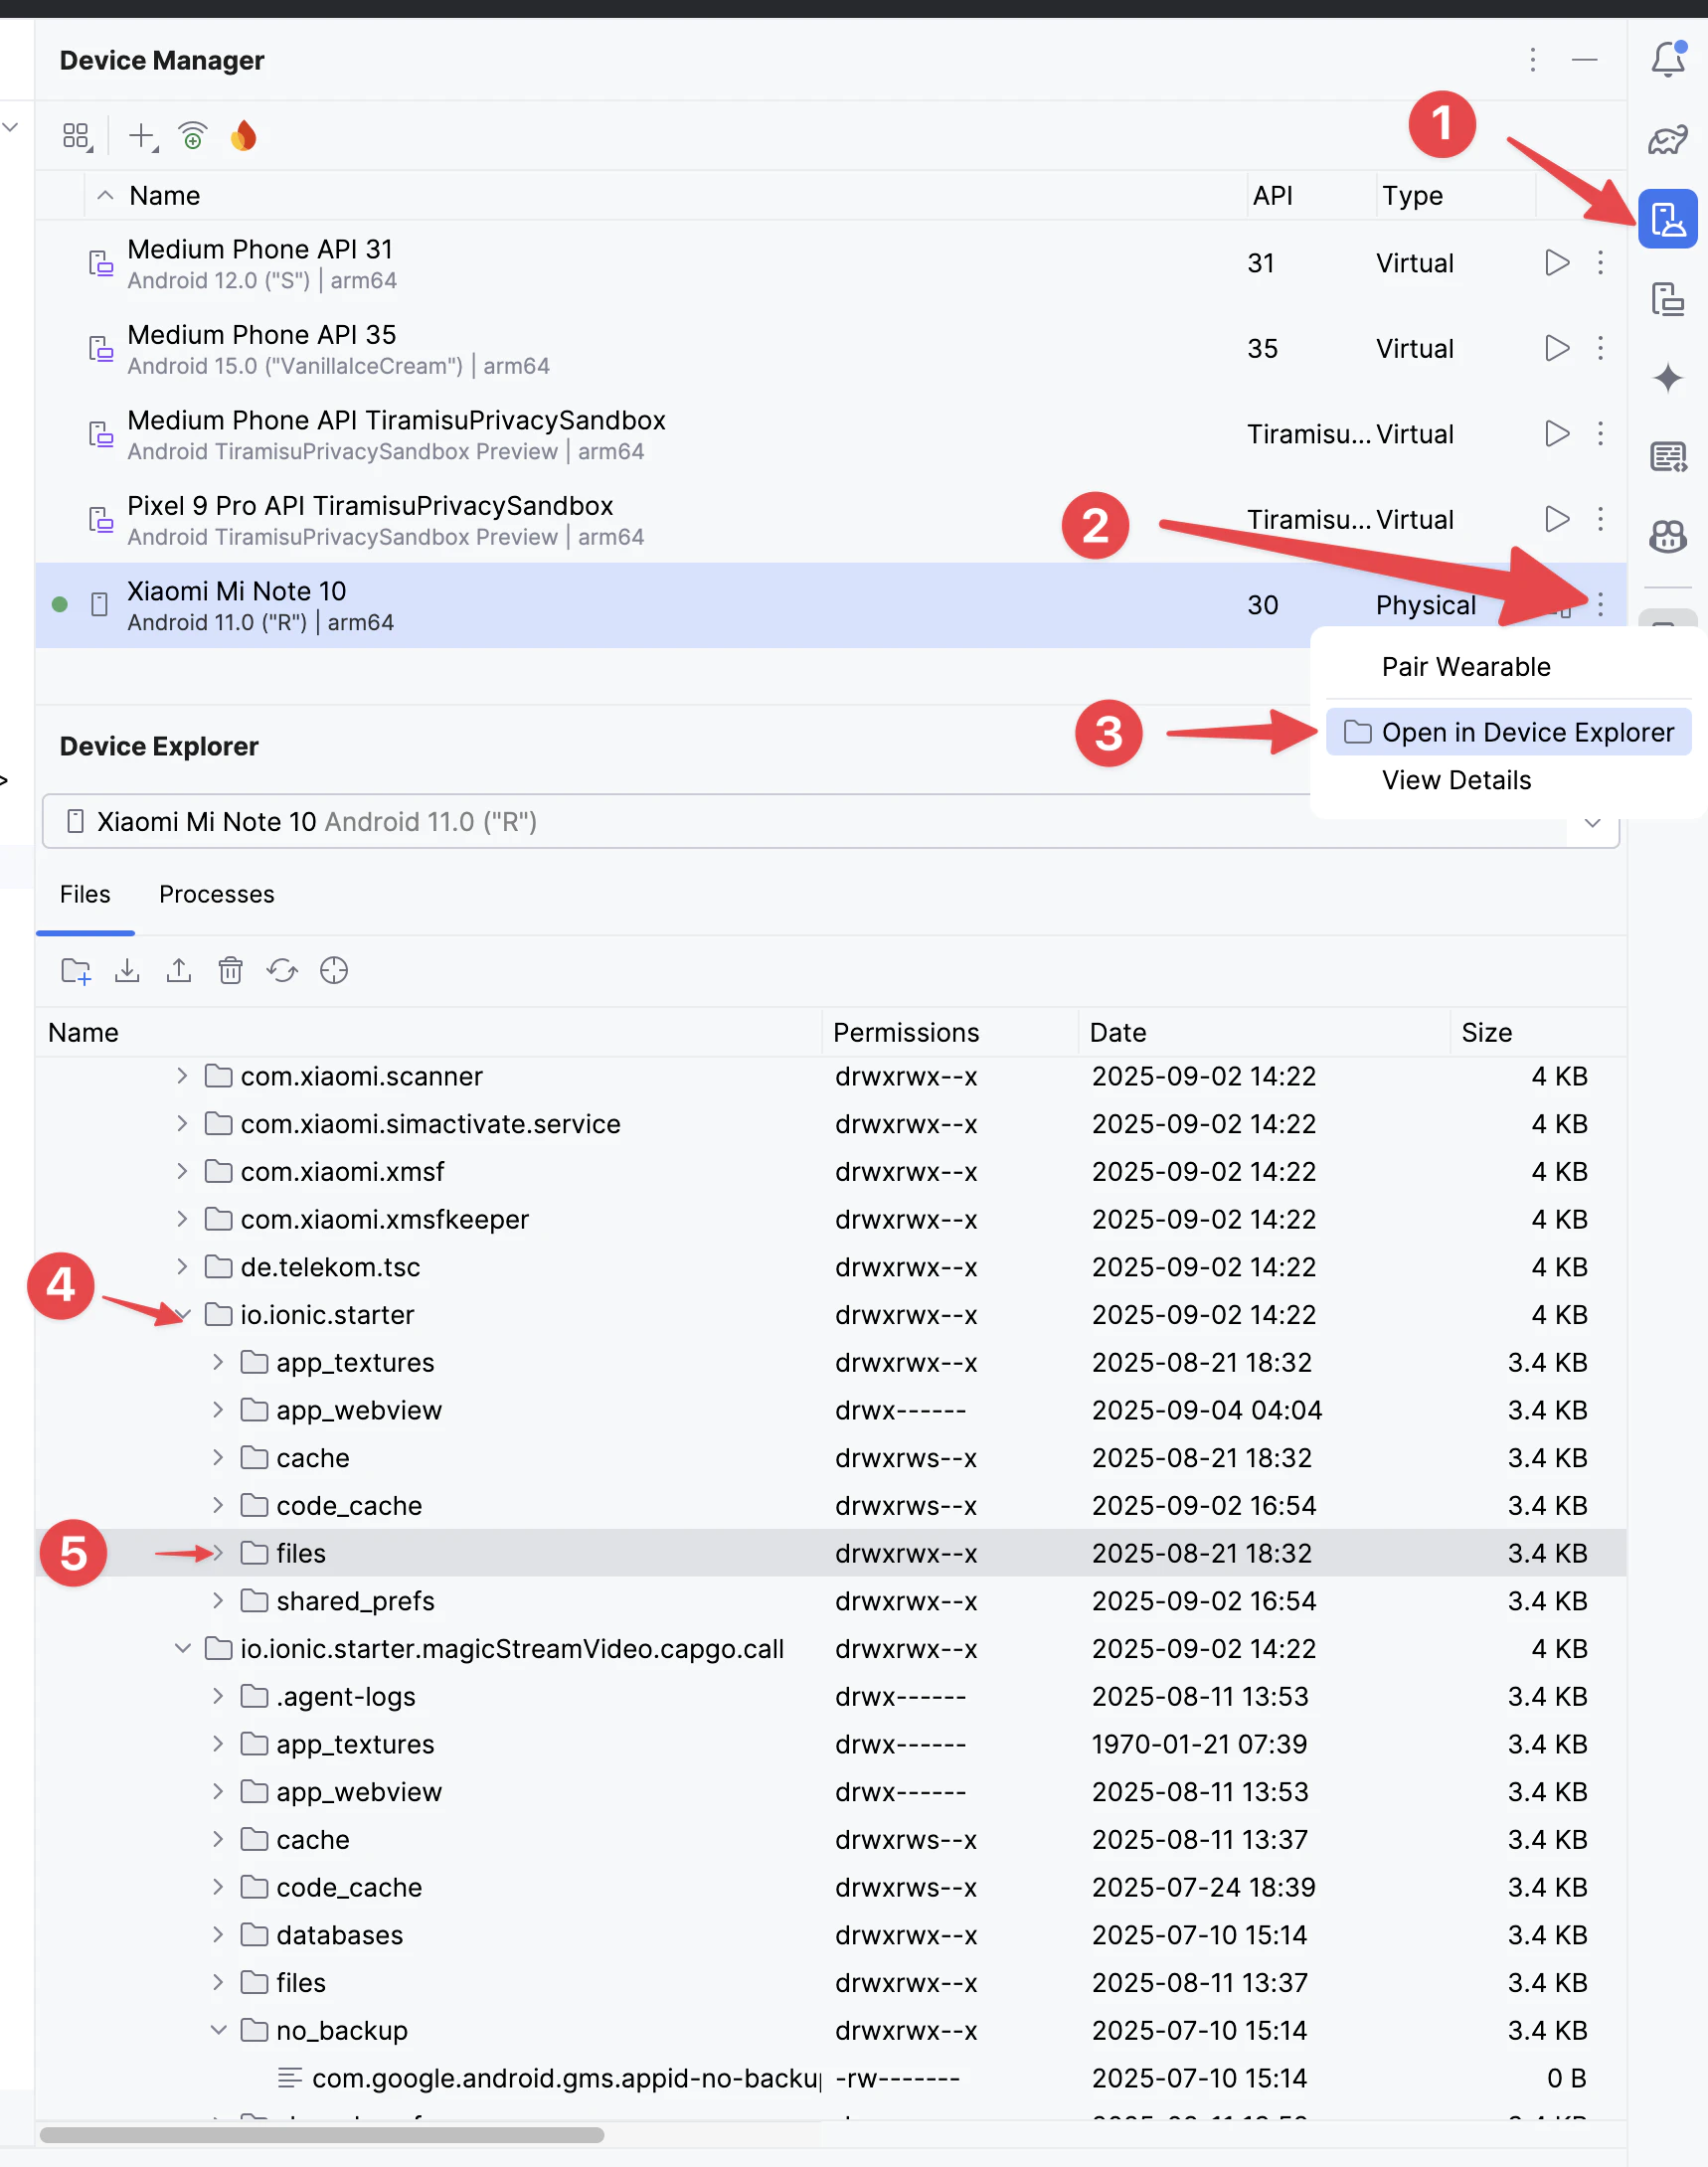
Dann finden Sie den Ordner `versions`, um alle Versionen zu sehen
Wussten Sie?
Unter Android werden alle Versionen in einem Ordner gespeichert, anders als bei iOS, wo sie an zwei Stellen dupliziert werden müssen
## iOS Produktions-Absturzprotokolle verstehen
[How to review your app's crash logs ](https://developer.apple.com/news/?id=nra79npr)
# Nuxt 2
> So installierst du das Plugin in Nuxt 2
# Installation in Nuxt 2
Erstelle eine Plugin-Datei `capacitor-updaterjs` im `plugins` Verzeichnis
```js
import { CapacitorUpdater } from '@capgo/capacitor-updater'
export default ({ app }) => {
if (processclient) {
windowonNuxtReady(() => {
CapacitorUpdaternotifyAppReady()
})
}
}
```
Dies lädt das Plugin auf der Client-Seite und benachrichtigt die App, dass sie bereit ist, Updates zu empfangen
# Bekannte Probleme
> Bekannte Probleme mit Capacitor und CapGo
## Ionic Live-Reload
* Wenn Sie während der Entwicklung die Ionic Live-Reload-Funktion der CLI verwenden, überschreibt diese das Plugin, sodass Sie Ihre Aktualisierungen nicht sehen werden
## Quasar Live-Reload
* Es verwendet intern das gleiche System wie Ionic, daher werden Sie Ihre Aktualisierungen nicht sehen
## Fehlgeschlagene Updates
* Dies passiert üblicherweise bei großen Updates (> 20MB), ein großer Prozentsatz der Nutzer erhält dann nicht die letzte Version\
Früher mussten Nutzer die App geöffnet halten, bis der Download abgeschlossen war. Jetzt verwenden wir Hintergrund-Downloads, aber diese sind immer noch auf wenige Sekunden begrenzt
## Android
### Download nicht möglich
Wir haben einige Probleme mit Geräten in Indien festgestellt und konnten mit Nutzern telefonisch verschiedene DNS-Server testen, was das Problem löste
Wenn Sie also Probleme haben, versuchen Sie einen anderen DNS-Server wie Cloudflare oder Google DNS zu verwenden
Cloudflare: 1111 und 1001
Google DNS: 8888 und 8844 oder dnsgoogle
[How to setup a preferred DNS server on Android? ](https://wwwandroidpolicecom/use-preferred-dns-server-android-tutorial/)
### Self Hosted
Wenn Sie ein selbst gehostetes Update bereitstellen, beachten Sie, dass Sie keinen “HTTP”-Endpunkt verwenden können, da dies gegen die Sicherheitsrichtlinien von Android-Apps verstößt. Wenn Sie es trotzdem tun möchten, folgen Sie dieser Anleitung:
[How to allow all Network connection types HTTP and HTTPS in Android (9) Pie? ](https://stackoverflow.com/a/51902630/5511370)
### Unzip
Unzip-Problem: DEFLATED-Einträge können EXT-Deskriptor haben
Wenn Sie Ihr Bundle mit etwas anderem als der CLI gepackt haben, könnte das Format Ihrer ZIP-Datei falsch sein. Bitte verwenden Sie den CLI-Befehl `npx @capgo/cli zip BUNDLE_FOLDER`
Dies ist ein bekanntes Problem von Java:
[Unzip issue: DEFLATED entries can have EXT descriptor ](https://bugsopenjdkorg/browse/JDK-8143613)
### Cleartext-Problem
* Wenn Sie Probleme mit usesCleartextTraffic haben, liegt das daran, dass das Plugin den von Sonar Cloud empfohlenen Best Practices folgt. In 90% der Fälle funktioniert dies einwandfrei, aber bei einigen Plugins kann es zu Problemen führen
Um dies zu beheben, fügen Sie in `android/app/src/main/AndroidManifestxml` im ``-Schlüssel folgendes hinzu:
```xml
tools:replace="android:usesCleartextTraffic"
xmlns:tools="http://schemasandroidcom/tools"
```
## iOS
### Privacy Manifest
Fügen Sie den Dictionary-Schlüssel `NSPrivacyAccessedAPICategoryUserDefaults` zu Ihrem [Privacy Manifest](https://capacitorjs.com/docs/ios/privacy-manifest) hinzu (normalerweise `ios/App/PrivacyInfoxcprivacy`):
```xml
NSPrivacyAccessedAPITypes
NSPrivacyAccessedAPIType
NSPrivacyAccessedAPICategoryUserDefaults
NSPrivacyAccessedAPITypeReasons
CA921
```
Wir empfehlen, [`CA921`](https://developer.apple.com/documentation/bundleresources/privacy_manifest_files/describing_use_of_required_reason_api#4278401) als Grund für den Zugriff auf die [`UserDefaults`](https://developer.apple.com/documentation/foundation/userdefaults) API anzugeben
### Netzwerkberechtigungen
Bei der Verwendung eines lokalen Servers zum Testen von Updates wird die App nach Netzwerkberechtigungen fragen. Dies ist ein normales Verhalten und tritt nicht auf, wenn Sie einen Remote-Server verwenden
## Beide Betriebssysteme
Bei manuellen Update-Modi sind einige Events nicht einfach abzufangen. Zum Beispiel wird der Update-Fehler kurz bevor Ihr JS-Code neu geladen wird ausgelöst, sodass Sie ihn nicht abfangen können
Eine Alternative ist es, die Bundles aufzulisten und die Fehlerstatistiken zu überprüfen, um zu erfahren, ob das Update fehlgeschlagen ist
Wir müssen in Zukunft einen besseren Weg finden, dies zu handhaben, aber es hat keine Priorität, da der Auto-Modus die empfohlene Update-Methode ist
PRs zur Verbesserung sind willkommen
## CLI
Wenn Ihre CLI Probleme bei der Ausführung hat,
Prüfen Sie, ob **appId** und **appName** in Ihrer **capacitorconfigts** vorhanden sind
Folgen Sie der Anleitung der offiziellen Dokumentation:
[Capacitor Configuration ](https://capacitorjs.com/docs/config)
# Übersicht
> Erläuterung der beiden unterschiedlichen Ansätze
### Cloud Mode (Empfohlen)
Der Cloud-Modus ist unsere empfohlene Wahl für eine problemlose Update-Verwaltung. Das Backend von Capgo übernimmt die gesamte Update-Logik und trifft Entscheidungen über Updates serverseitig für bessere Sicherheit und Kontrolle. Dieser Modus steht für Benutzerfreundlichkeit: Einmal eingerichtet, läuft er reibungslos von selbst und bietet erweiterte Funktionen wie Statistiken und Kanäle. Er kann auch in einem manuellen Modus eingerichtet werden, der Ihnen mehr Kontrolle gibt und es Ihnen ermöglicht, mit Ihrem JavaScript-Code zu entscheiden, wann aktualisiert werden soll. Das Backend verwaltet weiterhin, was aktualisiert wird. Dieser Modus teilt viele Vorteile mit dem Auto-Modus, insbesondere bei Sicherheit und erweiterten Funktionen, fügt aber die Flexibilität hinzu, Updates selbst zu terminieren.
### Self Hosted Mode
Der Self-Hosted Auto-Modus ist für diejenigen gedacht, die die gesamte Update-Logik auf ihrem Server verwalten möchten. Er bietet vollständige Autonomie, erfordert aber einen separaten Server und mehr Aufwand bei der Verwaltung von Updates und Serveranforderungen.
Der Self-Hosted Manual-Modus verbindet Kontrolle und Autonomie. Sie entscheiden über JavaScript, wann aktualisiert wird, aber Ihr Server verwaltet, was aktualisiert wird. Es ist etwas komplex, da Sie Update-Code in die Updates einbinden.
Note
Wenn Sie sich für das Self-Hosting entscheiden, entgehen Ihnen alle großartigen Funktionen, die Capgo Cloud zu bieten hat, wie z.B.: automatische Rücksetzungen, E-Mail-Benachrichtigungen, Kanäle, Statistiken, Verschlüsselung und mehr.
Danger
Wenn Sie ein fehlerhaftes Update an Ihre Benutzer senden, können und werden Sie deren App beschädigen.
# Pembaruan Otomatis
> So verwenden Sie das automatische Update-Plugin im selbst gehosteten Modus
Diese Dokumentation erklärt, wie Sie Ihren Auto-Update-Server ausführen können
## Bundle bereitstellen
Stellen Sie sicher, dass Ihr Bundle über HTTPS bereitgestellt wird und der Server die richtigen CORS-Header hat, damit die App das Update herunterladen kann z.B. `https://myservercom/app/updates/updatesjson`
Wenn Sie mit der Bereitstellung eines Bundles nicht vertraut sind, empfehlen wir Ihnen, Capgo Cloud zu verwenden oder hier ein Beispiel anzusehen:
[Bundle bereitstellen ](/docs/self-hosted/auto-update/update-endpoint)
## Konfiguration
Fügen Sie eine `updateUrl` zu Ihrer `capacitorconfigjson` hinzu
```json
{
"plugins": {
"CapacitorUpdater": {
"updateUrl": "https://myservercom/app/updates/updatesjson",
}
}
}
```
Caution
Wenn Sie ein selbst gehostetes Update durchführen, beachten Sie, dass Sie keinen “HTTP”-Endpunkt verwenden können, da dies gegen die Sicherheitsrichtlinien von Android-Apps verstößt. Zu Testzwecken können Sie es [erlauben](https://stackoverflow.com/questions/45940861/android-8-cleartext-http-traffic-not-permitted)
## Update API
Das Plugin führt bei jedem Öffnen der App einen POST-Aufruf an Ihre API durch, mit diesem Body:
```typescript
interface AppInfos {
"platform": "ios" | "android",
"device_id": "UUID_of_device_unique_by_install",
"app_id": "APPID_FROM_CAPACITOR_CONFIG",
"custom_id": "your_custom_id_set_on_runtime",
"plugin_version": "PLUGIN_VERSION",
"version_build": "VERSION_NUMBER_FROM_NATIVE_CODE",
"version_code": "VERSION_CODE_FROM_NATIVE_CODE",
"version_name": "LAST_DOWNLOADER_VERSION" | "builtin"
"version_os": "VERSION_OF_SYSYEM_OS",
"is_emulator": boolean,
"is_prod": boolean,
}
```
Die Server-API sollte in JSON dem Capacitor-Updater-Plugin mit diesen Daten antworten, wenn ein Update erforderlich ist:
```json
{
"version": "123",
"url": "https://myservercom/app/updates/my-new-app-200zip"
}
```
Im Auto-Update-Modus sollte der Server die Versionen vergleichen und die richtige zurückgeben. Wenn der URL-Schlüssel vorhanden ist, startet das Plugin den Download-Prozess
Wenn Sie die Schlüssel “message” und “error” hinzufügen, wird die Version nicht gesetzt, und die Nachricht wird stattdessen in den Logs angezeigt
Der `version`-Schlüssel sollte im [`semver`](https://semverorg/)-Format sein
Die ZIP-Datei sollte `indexhtml` als Datei im Stammverzeichnis haben oder nur einen Ordner im Stammverzeichnis mit `indexhtml` darin
Sie können den Befehl der CLI verwenden, um Ihr Bundle zu zippen:
Erstellen Sie ein Bundle mit Ihren Dateien zur Bereitstellung von Ihrem Server
```bash
npx @capgo/cli bundle zip --path [/path/to/my/bundle]
```
# Contributing
> Beitrag zu capgo Open-Source-Projekten
## Warum beitragen?
Zunächst einmal vielen Dank, dass Sie einen Beitrag zu den Open-Source-Projekten von capgo in Erwägung ziehen! Es sind Menschen wie Sie, die capgo Open-Source-Projekte zu so großartigen Werkzeugen machen.
Hier sind einige Gründe, warum Sie einen Beitrag leisten sollten:
* Die Mitarbeit an capgo Open-Source-Projekten ist eine großartige Möglichkeit, Geld durch die [zahlreichen Bounties](https://console.algora.io/org/Capgo) zu verdienen, die vom capgo-Team angeboten werden
* Die Mitarbeit an capgo Open-Source-Projekten ist eine großartige Möglichkeit, eine Funktion hinzuzufügen, die Sie gerne sehen würden
* Die Mitarbeit an capgo Open-Source-Projekten ist eine großartige Möglichkeit, einen Bug zu beheben, auf den Sie gestoßen sind
* Die [Hauptlizenz von Capgo](https://github.com/Cap-go/capgo/blob/main/LICENSE) verlangt, dass Sie alle Änderungen, die Sie daran vornehmen, als Open Source zur Verfügung stellen. Durch Ihren Codebeitrag können Sie Ihre Änderungen als Open Source behalten und anderen die Nutzung ermöglichen
## Wie man beiträgt
* Zunächst müssen Sie das Repository forken, zu dem Sie beitragen möchten
* Als Zweites müssen Sie Ihre Änderungen in dieses Repository übertragen und pushen
* Zuletzt müssen Sie einen Pull Request erstellen
* Das war’s! Jetzt müssen Sie nur noch warten, bis das capgo-Team Ihren PR überprüft
## Weitere zu lesende Dokumente
* Capgos [CONTRIBUTING.MD](https://github.com/Cap-go/capgo/blob/main/CONTRIBUTING.md)
* Capgos [BOUNTY.md](https://github.com/Cap-go/capgo/blob/main/BOUNTY.md)
# Verschlüsselte Bundles
> So verwenden Sie das manuelle Update-Plugin im Self-Hosted-Modus
## Ende-zu-Ende-Verschlüsselung
Ab Version 4150 ermöglicht das Plugin das Senden verschlüsselter Updates. Beginnen Sie mit der Erstellung eines privaten Schlüssels
Create a private key
```bash
npx @capgo/cli key create
```
Dann verschlüsseln Sie Ihre ZIP-Datei
Encrypt bundled zip
```bash
npx @capgo/cli encrypt [path/to/zip]
```
Der Befehl gibt Ihnen einen `ivSessionKey` aus, der mit Ihrem Update-Payload im Schlüssel `session_key` gesendet werden muss
```json
{
"version": "123",
"url": "https://myservercom/app/updates/my-new-app-200zip",
"session_key": "encrypted_session_key",
}
```
Dann kann Ihre App den privaten Schlüssel verwenden, um den `session_key` zu entschlüsseln und den entschlüsselten `session_key` verwenden, um das Update zu entschlüsseln
Erfahren Sie mehr darüber hier:
[Self-hosted Live Updates ](https://capgo.app/blog/self-hosted-live-updates/)
# Erste Schritte
> Selbst-Update-Server ausführen
Diese Dokumentation erklärt, wie Sie Ihren eigenen Auto-Update-Server betreiben können
## Einführung
Wenn Sie diese Arbeit hilfreich finden, erwägen Sie bitte, meine Arbeit durch eine [Github-Sponsorschaft](https://github.com/sponsors/riderx) zu unterstützen
Ich habe mich entschieden, den gesamten hier entwickelten Code Open Source zu machen, anstatt ihn hinter einer Bezahlschranke zu verstecken. Ich glaube, dass wir die Welt zu einem besseren Ort machen können, wenn wir offen sind, anstatt zu kämpfen und uns zu verstecken
Darüber hinaus möchte ich mich auf Capgo-Tools konzentrieren und daraus ein offenes und transparentes Unternehmen machen
Aber um dies zu ermöglichen, ist es notwendig, dass wir alle unseren Teil dazu beitragen, auch Sie 🥹
Wenn Capgo nicht zu Ihnen passt, dann zahlen Sie Ihren eigenen Preis und [unterstützen Sie einen bootstrapped Maker](https://github.com/sponsors/riderx) zu Ihren Bedingungen
[Erwägen Sie einen Beitrag ](/docs/plugin/self-hosted/contributing/)
## Funktionsparität
Wenn Sie sich für Ihren eigenen Server entscheiden, verlieren Sie den 5-Minuten-Einrichtungsablauf\
Sie müssen alle diese Funktionen selbst implementieren
| Funktionen | Capgo | Selbst gehostet |
| ---------------------------- | ----- | --------------- |
| Updates | ✅ | 🚧 |
| Auto-Rücksetzung | ✅ | 🚧 |
| E-Mail-Warnungen bei Fehlern | ✅ | 🚧 |
| Kanäle | ✅ | 🚧 |
| Kanal-Überschreibungen | ✅ | 🚧 |
| Geräte-Überschreibungen | ✅ | 🚧 |
| Kanal-Einstellungen | ✅ | 🚧 |
| Geräte-Einstellungen | ✅ | 🚧 |
| Benutzerdefinierte ID | ✅ | 🚧 |
| Auto-Set-Kanäle | ✅ | 🚧 |
| API-Kanäle | ✅ | 🚧 |
| Update-Statistiken | ✅ | 🚧 |
| Download-Fehlerstatistiken | ✅ | 🚧 |
| App-Nutzungsstatistiken | ✅ | 🚧 |
| Update-Verschlüsselung | ✅ | 🚧 |
Danger
Wenn Sie ein fehlerhaftes Update an Ihre Benutzer senden, können und werden Sie deren App beschädigen
> Beachten Sie, dass Sie nicht gleichzeitig die Capgo-Cloud und Ihren eigenen Server verwenden können
Danger
Die Over-the-Air (OTA) Update-Funktion gilt nur für Änderungen an HTML-, CSS- und JavaScript-Dateien
Wenn Sie Änderungen am nativen Code vornehmen, wie z.B. Updates von Capacitor-Plugins, müssen Sie die Anwendung erneut im App Store zur Genehmigung einreichen
## Wählen Sie zwischen Auto und Manuell
Im Auto-Modus wird ein Teil der Logik vom nativen Code verarbeitet, Updates werden serverseitig entschieden, dies ist sicherer und ermöglicht feinkörnige Updates, teilweise Bereitstellung auf einem Gerät oder einer Gruppe und mehr
Im manuellen Modus wird die gesamte Logik von JS verarbeitet
[Auto Update ](/docs/plugin/self-hosted/auto-update/)
[Manuell ](/docs/plugin/self-hosted/manual-update/)
## Capacitor Updater installieren
Installieren Sie den Capacitor Updater
```bash
npm install @capgo/capacitor-updater
npx cap sync
```
## Bereiten Sie Ihr Bundle vor
Um Updates an Ihre App zu senden, müssen Sie sie zippen Der beste Weg, um sicherzustellen, dass Ihr Zip gut ist, ist die Verwendung der Capgo CLI zum Zippen
Erstellen Sie ein Bundle mit Ihren Dateien, die von Ihrem Server bereitgestellt werden sollen
```bash
npx @capgo/cli@latest bundle zip
```
Sie müssen diese Zip-Datei selbst von Ihrem Server bereitstellen
[Auto Update ](/docs/plugin/self-hosted/auto-update/)
[Manuell ](/docs/plugin/self-hosted/manual-update/)
Note
Wenn Ihnen das zu viel Arbeit erscheint, probieren Sie die Capgo Cloud Testversion aus
# Umgang mit Statistiken
> Eigenen Statistik-Endpoint erstellen
Hier ist ein Beispiel für JavaScript-Code zum Speichern der Plugin-Statistiken
```typescript
interface AppInfos {
version_name: string
action: 'delete' |
'reset' |
'set' |
'set_fail' |
'update_fail' |
'windows_path_fail' |
'canonical_path_fail' |
'directory_path_fail' |
'unzip_fail' |
'low_mem_fail' |
'download_fail' |
'update_fail' |
'download_10' |
'download_20' |
'download_30' |
'download_40' |
'download_50' |
'download_60' |
'download_70' |
'download_80' |
'download_90' |
'download_complete'
version_build: string
version_code: string
version_os: string
plugin_version: string
platform: string
app_id: string
device_id: string
custom_id?: string
is_prod?: boolean
is_emulator?: boolean
}
export const handler: Handler = async (event) => {
const body = JSONparse(eventbody || '{}') as AppInfos
const {
platform,
app_id,
action,
version_code,
version_os,
device_id,
version_name,
version_build,
plugin_version,
} = body
consolelog('update asked', platform,
app_id,
action,
version_os,
version_code,
device_id,
version_name,
version_build,
plugin_version)
// Speichern Sie es in Ihrer Datenbank
return { status: 'ok' }
}
```
Dieser Endpunkt sollte ein JSON zurückgeben:
```json
{ "status": "ok" }
```
## Aktionen:
* **delete**: wenn ein Bundle lokal gelöscht wird
* **reset**: wenn die App zum eingebauten Bundle zurückkehrt
* **set**: wenn die App ein neues Bundle einstellt
* **set\_fail**: wenn die App die ID des eingestellten Bundles nicht finden konnte
* **update\_fail**: wird nach der Verzögerung gesendet und `notifyAppReady` wurde nie aufgerufen
* **download\_fail**: wenn der Download nie abgeschlossen wurde
* **download\_complete:** Wenn der Download abgeschlossen ist
* **download\_xx:** Wird alle 10% des Downloads gesendet, z.B.: download\_20, download\_70
* **update\_fail:** wenn das Bundle `notifyAppReady` nicht im vorgegebenen Zeitrahmen ausführt
# Updates handhaben
> Verwendung des Auto Update Plugins im Self-Hosted Modus
Hier ist ein Beispiel für JavaScript-Code zum Senden eines Updates an das Plugin
```typescript
interface AppInfos {
version_name: string
version_build: string
version_os: string
custom_id?: string
is_prod?: boolean
is_emulator?: boolean
plugin_version: string
platform: string
app_id: string
device_id: string
}
export const handler: Handler = async (event) => {
const body = JSONparse(eventbody || '{}') as AppInfos
const {
platform,
app_id,
version_os,
device_id,
version_name,
version_build,
plugin_version,
} = body
consolelog('update asked', platform,
app_id,
version_os,
device_id,
version_name,
version_build,
plugin_version)
if (version_name === '100') {
return {
version: '101',
url: 'https://apiurlcom/mybuild_101zip',
}
}
else if (version_name === '101') {
return {
version: '102',
url: 'https://apiurlcom/mybuild_102zip',
}
}
else {
return {
message: 'Error version not found'
version: '',
url: '',
}
}
}
```
Dieser Endpunkt sollte ein JSON zurückgeben:
```json
{
"version": "102",
"url": "https://apiurlcom/mybuild_102zip"
}
```
Und wenn kein Update oder Fehler vorliegt, fügen Sie den Schlüssel `message` und optional einen `error` hinzu
```json
{
"message": "Version not found",
"error": "The backend crashed",
"version": "102",
"url": "https://apiurlcom/mybuild_102zip"
}
```
# Manuelle Aktualisierung
> Manuelles Update-Plugin im Self-Hosted-Modus verwenden
## Konfiguration
Fügen Sie dies zu Ihrer `capacitorconfigjson` hinzu, um Auto-Update zu deaktivieren
```tsx
// capacitorconfigjson
{
"appId": "*******",
"appName": "Name",
"plugins": {
"CapacitorUpdater": {
"autoUpdate": false,
}
}
}
```
## Verwendung
Sie können dieses Beispiel verwenden oder die Logik in Ihrer App nachbilden
Caution
Wir zwingen den Benutzer dazu, die App mit einer im Code deklarierten statischen Version zu aktualisieren. Dies wird nicht empfohlen, Sie sollten eine dynamische Version von Ihrem Server verwenden
Danger
In diesem Beispiel führen wir keine Versionsüberprüfung, Entschlüsselung oder Prüfsummenvalidierung durch. Dies sollten Sie selbst implementieren
```tsx
import { CapacitorUpdater } from '@capgo/capacitor-updater'
import { SplashScreen } from '@capacitor/splash-screen'
import { App } from '@capacitor/app'
let data = {version: ""}
CapacitorUpdaternotifyAppReady()
AppaddListener('appStateChange', async(state) => {
if (stateisActive) {
// Do the download during user active app time to prevent failed download
data = await CapacitorUpdaterdownload({
version: '004',
url: 'https://github.com/Cap-go/demo-app/releases/download/004/distzip',
})
}
if (!stateisActive && dataversion !== "") {
// Do the switch when user leave app
SplashScreenshow()
try {
await CapacitorUpdaterset(data)
} catch (err) {
consolelog(err)
SplashScreenhide() // in case the set fail, otherwise the new app will have to hide it
}
}
})
```
Note
Wenn Ihnen das zu viel Arbeit erscheint, erwägen Sie [Capgo trial](https://capgo.app/register/) auszuprobieren. Es wird all dies für Sie erledigen
# 설정
> Alle verfügbaren Einstellungen für Capacitor Updater
Um eine detailliertere Kontrolle über das Update-System zu haben, können Sie es mit diesen Einstellungen konfigurieren:
## `appReadyTimeout`
> Konfigurieren Sie die Anzahl der Millisekunden, die das native Plugin warten soll, bevor ein Update als ‘fehlgeschlagen’ eingestuft wird
Nur verfügbar für Android und iOS
Standard: `10000` (10 Sekunden)
```json
// capacitorconfigjson
{
"plugins": {
"CapacitorUpdater": {
"appReadyTimeout": 1000
}
}
}
```
## `responseTimeout`
> Konfigurieren Sie die Anzahl der Millisekunden, die das native Plugin warten soll, bevor ein API-Timeout eintritt
Nur verfügbar für Android und iOS
Standard: `20` (20 Sekunden)
```json
// capacitorconfigjson
{
"plugins": {
"CapacitorUpdater": {
"responseTimeout": 1000
}
}
}
```
## `autoDeleteFailed`
> Konfigurieren Sie, ob das Plugin fehlgeschlagene Bundles automatisch löschen soll
Nur verfügbar für Android und iOS
Standard: `true`
```json
// capacitorconfigjson
{
"plugins": {
"CapacitorUpdater": {
"autoDeleteFailed": false
}
}
}
```
## `autoDeletePrevious`
> Konfigurieren Sie, ob das Plugin vorherige Bundles nach einem erfolgreichen Update automatisch löschen soll
Nur verfügbar für Android und iOS
Standard: `true`
```json
// capacitorconfigjson
{
"plugins": {
"CapacitorUpdater": {
"autoDeletePrevious": false
}
}
}
```
## `autoUpdate`
> Konfigurieren Sie, ob das Plugin Auto-Update über einen Update-Server verwenden soll
Nur verfügbar für Android und iOS
Standard: `true`
```json
// capacitorconfigjson
{
"plugins": {
"CapacitorUpdater": {
"autoUpdate": false
}
}
}
```
## `updateUrl`
> Konfigurieren Sie die URL / den Endpunkt, an den Update-Überprüfungen gesendet werden
Nur verfügbar für Android und iOS
Standard: `https://apicapgo.app/updates`
```json
// capacitorconfigjson
{
"plugins": {
"CapacitorUpdater": {
"updateUrl": "https://examplecom/api/updates"
}
}
}
```
## `statsUrl`
> Konfigurieren Sie die URL / den Endpunkt, an den Update-Statistiken gesendet werden
Nur verfügbar für Android und iOS. Setzen Sie auf "" um die Statistikberichterstattung zu deaktivieren
Standard: `https://apicapgo.app/stats`
```json
// capacitorconfigjson
{
"plugins": {
"CapacitorUpdater": {
"statsUrl": "https://examplecom/api/stats"
}
}
}
```
## `privateKey`
> Konfigurieren Sie den privaten Schlüssel für die Ende-zu-Ende-Verschlüsselung von Live-Updates
Nur verfügbar für Android und iOS
Erstellen Sie den privaten Schlüssel mit dem Befehl `npx @capgo/cli key create`
Standard: `undefined`
```json
// capacitorconfigjson
{
"plugins": {
"CapacitorUpdater": {
"privateKey": "YOUR_KEY"
}
}
}
```
## `directUpdate`
> Lässt das Plugin das Update direkt installieren, wenn die App gerade aktualisiert/installiert wurde. Nur im autoUpdate-Modus anwendbar
Nur verfügbar für Android und iOS
Standard: `undefined`
```json
// capacitorconfigjson
{
"plugins": {
"CapacitorUpdater": {
"autoUpdate": true,
"directUpdate": true
}
}
}
```
## `resetWhenUpdate`
Note
Wenn ein Store-Update erfolgt, deaktivieren Sie das erzwungene Zurücksetzen auf die native Version
Es gibt noch viele weitere Einstellungen, die nur in der [Web-App](https://web.capgo.app/login) verfügbar sind
Um das Plugin zu konfigurieren, verwenden Sie diese Einstellungen:
```json
// capacitorconfigjson
{
"plugins": {
"CapacitorUpdater": {
"autoUpdate": true,
"resetWhenUpdate": false
}
}
}
```
## `directUpdate`
Lässt das Plugin das Update direkt installieren, wenn die App gerade aktualisiert/installiert wurde. Nur im autoUpdate-Modus anwendbar
Caution
Diese Einstellung erfordert, dass Sie die App vor dem Benutzer verbergen, während das Update installiert wird. Andernfalls wird die App zurückgesetzt, wenn der Benutzer navigiert
```json
// capacitorconfigjson
{
"plugins": {
"CapacitorUpdater": {
"autoUpdate": true,
"directUpdate": true
}
}
}
```
## `defaultChannel`
Legt den Standard-Kanal für die App fest. Dies überschreibt jeden anderen in Capgo eingestellten Kanal, wenn der Kanal das Überschreiben erlaubt
```json
// capacitorconfigjson
{
"plugins": {
"CapacitorUpdater": {
"defaultChannel": "production"
}
}
}
```
## `appId`
Legt die appId für die App fest. Dies überschreibt alle anderen Wege, die appId zu erhalten. Dies ist nützlich, wenn Sie eine andere appId in Capgo und in Ihrem nativen Code haben möchten
Note
Dies ist der neue Weg, die appId festzulegen. Der alte Weg wird weiterhin unterstützt
```json
// capacitorconfigjson
{
"plugins": {
"CapacitorUpdater": {
"AppId": "comexampleapp"
}
}
}
```
## `version`
Legt die Version für die App fest. Dies überschreibt alle anderen Wege, die Version zu erhalten. Dies ist nützlich, wenn Sie eine andere Version in Capgo und in Ihrem nativen Code haben möchten
Note
Dies ist der neue Weg, die Version festzulegen. Der alte Weg wird weiterhin unterstützt
```json
// capacitorconfigjson
{
"plugins": {
"CapacitorUpdater": {
"version": "123"
}
}
}
```
# 統計情報 API
> Wie man das automatische Update-Plugin im selbstgehosteten Modus verwendet
## Statistik-API
Ab Version 130 kann das Update-System Statistiken senden!
Standardmäßig werden alle Statistiken an unseren Server gesendet, um die Nutzung zu verstehen und zu erforschen
Note
Es werden keine privaten Daten für Statistiken gesendet, nur zufällige UUID, Versions-Update, Version der nativen App, Plattform, Aktion und App-ID
Wenn Sie diese Daten stattdessen an Ihren Server senden möchten, ändern Sie die Konfiguration wie folgt:
```tsx
// capacitorconfigjson
{
"appId": "*******",
"appName": "Name",
"plugins": {
"CapacitorUpdater": {
"statsUrl": "IHRE_URL"
}
}
}
```
Ihr Server wird Folgendes empfangen:
```tsx
interface AppInfosStats {
"action": "set", // kann set, delete, set_fail, reset, revert sein
// Dann sind es die gleichen Informationen wie beim Update
"app_id": "*******", // App-Identifikator im Store
"device_id": "*******", // eindeutige ID pro App-Installation
"platform": "ios", // oder android
"custom_id": "user_1", // repräsentiert Ihren Benutzer
"version_name": "123", // Version des Web-Builds
"version_build": "120", // Version des nativen Builds
"version_code": "120", // Build-Nummer des nativen Builds
"version_os": "16", // OS-Version des Geräts
"plugin_version": "400"// damit sich Ihre API bei verschiedenen Plugins unterschiedlich verhält
"is_emulator": false,
"is_prod": false,
}
```
Sie können es auch vollständig deaktivieren, mit einem leeren String. Bedenken Sie, dass die Statistiken datenschutzfreundlich gestaltet sind und mir helfen zu verstehen, wie Menschen das Plugin nutzen, um Probleme zu lösen und es zu verbessern
[Updates verwalten ](/docs/plugin/self-hosted/handling-updates/)
# Migration von AppFlow zu Capgo
> Vollständiger Leitfaden zur Migration Ihrer App von Ionic AppFlow zu Capgo
## AppFlow-Konfigurationsreferenz
Notieren Sie vor der Migration Ihre aktuelle AppFlow-Konfiguration in `capacitor.config.ts`:
```typescript
import { CapacitorConfig } from '@capacitor/cli';
const config: CapacitorConfig = {
plugins: {
LiveUpdates: {
appId: 'your-app-id',
channel: 'Production',
autoUpdateMethod: 'background', // oder 'always latest', 'force update'
maxVersions: 2
}
}
};
```
Diese Konfiguration hilft Ihnen, AppFlow-Funktionen den Capgo-Äquivalenten zuzuordnen.
## Warum zu Capgo migrieren?
Mit der Ankündigung der Einstellung von Ionic AppFlow bietet die Migration zu Capgo einen nahtlosen Übergang für Ihren Mobile-App-Entwicklungsworkflow. Capgo bietet verbesserte Funktionen, bessere Leistung und erhebliche Kosteneinsparungen bei Beibehaltung aller wichtigen Funktionalitäten.
### Hauptvorteile
* Schnellere Update-Bereitstellung (< 1 Minute vs. 10 Minuten)
* Günstigere Preisgestaltung (14$/Monat vs. 499$/Monat)
* Ende-zu-Ende-Verschlüsselung in allen Plänen enthalten
* Verbesserte Kontrolle über Update-Kanäle
* Umfassende CI/CD-Integrationsoptionen
## Migrationsschritte
### 1. Live-Updates Migration
#### Vorherige Abhängigkeiten entfernen
```bash
npm uninstall @ionic/appflow
```
#### Capgo installieren
```bash
npm install @capgo/capacitor-updater
npx cap sync
```
#### Konfiguration aktualisieren
Fügen Sie die Capgo-Konfiguration zu Ihrer `capacitor.config.json` hinzu:
```json
{
"plugins": {
"CapacitorUpdater": {
"autoUpdate": true
}
}
}
```
### 2. CI/CD Migration
Capgo bietet flexible CI/CD-Optionen:
#### Option 1: Bestehende CI/CD verwenden
Folgen Sie unseren detaillierten Tutorials zur Einrichtung von CI/CD mit beliebten Plattformen:
* [iOS Build-Einrichtung](https://capgo.app/blog/automatic-capacitor-ios-build-github-action/)
* [Android Build-Einrichtung](https://capgo.app/blog/automatic-capacitor-android-build-github-action/)
* [GitHub Actions Integration](https://capgo.app/blog/automatic-capacitor-ios-build-github-action/)
#### Option 2: CI/CD als Service
Lassen Sie uns Ihre CI/CD-Einrichtung mit unserem [verwalteten Service](https://cal.com/team/capgo/mobile-ci-cd-done-for-you) übernehmen.
### 3. Kanal-Einrichtung
1. Kanäle im Capgo-Dashboard erstellen:
```bash
npx @capgo/cli channel create production
npx @capgo/cli channel create staging
```
2. Kanal-Einstellungen konfigurieren:
```bash
# Produktionskanal einrichten
npx @capgo/cli channel update production --no-downgrade --no-upgrade
# Staging-Kanal einrichten
npx @capgo/cli channel update staging
```
### 4. Migration testen
1. **Live-Updates testen**
```bash
# Test-Bundle erstellen und hochladen
npx @capgo/cli bundle create --channel staging
```
2. **Update-Empfang überprüfen**
* App auf Testgerät installieren
* Überprüfen, ob Updates korrekt empfangen werden
* Update-Installationsprozess verifizieren
* Wiederherstellungsfunktion testen
## Fehlerbehebung
### Häufige Probleme
#### Updates werden nicht empfangen
* Kanal-Konfiguration überprüfen
* Geräte-Logs überprüfen
* Netzwerkverbindung sicherstellen
* Bundle-Versionsformat validieren
## Nächste Schritte
1. [Capgo-Konto erstellen](/register/)
2. [Schnellstart-Anleitung](/docs/getting-started/quickstart/) befolgen
3. [CI/CD-Integration](/docs/getting-started/cicd-integration/) einrichten
4. [Live-Updates](/docs/live-updates/) konfigurieren
Für Unternehmensteams, die während der Migration dedizierten Support benötigen, [vereinbaren Sie einen Termin mit unserem Team](https://cal.com/team/capgo/capgo-enterprise-inquiry).
# Von V2 auf V3
> So aktualisieren Sie von V2 auf V3
Diese Dokumentation erklärt, wie Sie auf Version 3 von auto-update aktualisieren können
## Zuerst migrieren Sie zu den aktuellsten Tools:
```bash
npm remove -g capgo
npm remove capacitor-updater
npm i @capgo/cli
npm i @capgo/capacitor-updater@3
npx cap sync
```
## Entfernen Sie alle Ihre vorherigen Konfigurationen:
```json
{
CapacitorUpdater: {
autoUpdateURL: "https",
},
}
```
um nur dies übrig zu lassen:
```json
{
"CapacitorUpdater": {
"autoUpdate": true
}
}
```
> ⚠️ Wenn Sie Ihren eigenen Server mit `autoUpdateURL` verwendet haben, werde ich diesen Leitfaden bald für Sie aktualisieren. Schauen Sie sich in der Zwischenzeit die neue Upload-Option `external` an, mit der Sie nur den Link Ihrer ZIP-Datei senden können, nicht den Code in der Capgo-Cloud. Dies wurde für Unternehmen mit strengen Datenschutzrichtlinien entwickelt. Im externen Modus wird der Code niemals auf dem Capgo-Server landen, wir speichern nur die URL und senden sie an das Gerät, das sie direkt herunterlädt. Auf die standardmäßige Art wird der Code gezippt und auf unserem Server gespeichert, aber wir werden ihn niemals öffnen oder anderweitig verwenden
## Was sich ändert
Alle Konfigurationen werden serverseitig für auto-update, um Ihnen mehr Kontrolle darüber zu geben, wie Sie ein Update an Benutzer senden
Dies ermöglicht uns das Zurücksetzen und sogar das Bereitstellen für nur einen Benutzer mit Kanälen! Diese Einstellungen werden der Weboberfläche hinzugefügt:
* Deaktivieren der Zurücksetzung unter der nativen Version
* Deaktivieren von Updates über Major-Versionen
> ⚠️ Diese werden standardmäßig für alle Kanäle aktiviert
Dies wird auch die Notwendigkeit häufiger Plugin-Updates beseitigen, die meisten Updates werden serverseitig durchgeführt, und Sie erhalten sie ohne Änderungen auf Ihrer Seite
> ⚠️ Zurücksetzen, wenn ein Update zum Standard wird. Wenn Sie es vorziehen, nicht alle heruntergeladenen Versionen beim Update aus dem Store zu entfernen, tun Sie dies:
```json
{
"CapacitorUpdater": {
"autoUpdate": true,
"resetWhenUpdate": false
}
}
```
## Aktualisieren Sie Ihren Code
Aktualisieren Sie zuletzt alle Ihre Imports in JS von:
```plaintext
import { CapacitorUpdater } from 'capacitor-updater'
```
zu
```plaintext
import { CapacitorUpdater } from '@capgo/capacitor-updater'
```
Dann bauen Sie Ihren Code erneut `npm run build` und kopieren Sie die Assets noch einmal `npx cap copy`
Sie sollten jetzt in der Lage sein, das neueste auto-update System zu testen
Senden Sie Ihre Version mit:
```plaintext
npx @capgo/cli@latest bundle upload
```
anstelle von
```plaintext
npx capgo upload
```
## Zukünftige Entwicklung
Derzeit wird nur der erste öffentliche Kanal verwendet, in Zukunft wird public sich für mehrere öffentliche Kanäle ändern, wenn mehr als einer eingerichtet ist
## Häufige Probleme:
* Build-Problem nach dem Upgrade: Wenn Sie den Quellcode des Plugins bereits in Android Studio oder Xcode geöffnet haben, entfernt die Synchronisierung diese manchmal nicht, das ist die Ursache des Problems. Öffnen Sie die native IDE und entfernen Sie `capacitor-updater` manuell und führen Sie `npx cap sync` aus, das sollte das Problem lösen
# Von V3 zu V4
> So aktualisieren Sie von V3 auf V4
## Warum dieses Upgrade
Nach vielen Gesprächen mit Ihnen in der Discord-Community habe ich festgestellt, dass der manuelle Modus zu manuell und nicht sicher in der Anwendung war. Zum Beispiel war ein automatisches Zurücksetzen nicht möglich, sodass bei einem fehlgeschlagenen Update der Benutzer die App entfernen und neu installieren musste, was eine sehr schlechte Nutzererfahrung darstellt.
In der Zwischenzeit habe ich dies als Gelegenheit genutzt, Ihnen mehr Freiheit zu geben und den gesamten schlechten Code zu entfernen.
## Installation
`npm i @capgo/capacitor-updater@4`
## Auto-Update Cloud
Wenn Sie das Grundbeispiel in Ihrer App verwenden, können Sie sicher auf die neue Version migrieren. Viel Spaß!
## Auto-Update Self-Hosted
Für Sie ist es weiterhin einfach, die Änderungen sind:
* Der Name der Einstellung von `autoUpdateUrl` zu `updateUrl`
* Die Endpoint-Methode wurde von `GET` zu `POST` geändert
## Manuelle Benutzer
Für Sie ist dies die bedeutendste Änderung, aber zum Besten! Sie erhalten viele Verbesserungen, lesen Sie sorgfältig.
## Änderungen
* `autoUpdateUrl` wird zu `updateUrl`, da diese Einstellung jetzt auch im manuellen Modus verwendet werden kann
* Löschung von `cancelDelay` und `delayUpdate` zugunsten von `setDelay`
* Kein `versionName` mehr in set
* Änderung des `version`-Schlüssels, der in den meisten Funktionen zum Objekt `BundleInfo` zurückgegeben wurde
```typescript
interface BundleInfo {
id: string;
version: string;
downloaded: string;
status: 'success' | 'error' | 'pending' | 'downloading'
}
```
* Umbenennung irreführender Namen (auch wenn die Erklärung nicht klar sein kann, ist die Verwendung der neuen Namen einfach zu verstehen):
* was als `version` bezeichnet wurde, wird jetzt als `bundle` bezeichnet
* `id` bezieht sich auf die alte `version`, die eine zufällige Zeichenfolge von 10 Zeichen war, diese `id` ist die einzige vertrauenswürdige und eindeutige Möglichkeit, auf Ihre Bundles zuzugreifen, Beispiel `7Dfcd2RedN`
* `version` bezieht sich jetzt auf den `versionName`, den Sie für ein Bundle wählen, Beispiel `100`
* `updateUrl` wechselt von `get` zu `post`, da benutzerdefinierte Header für einige von Ihnen ein Problem darstellten und post logischer ist, alle vorherigen Header gehen in den Body und das Präfix `cap_` verschwindet
* `versionName`-Methode wird gelöscht, zugunsten von `getId`
* list gibt jetzt eine Liste von `BundleInfo` zurück
* Umbenennung von `getId` in `getDeviceId`
* `autoUpdate` wird standardmäßig auf true gesetzt, wenn Sie den manuellen Modus verwenden, setzen Sie es auf false
## Neuheiten
* Methode `getLatest`, diese Methode ermöglicht es Ihnen, von Ihrem mit `updateUrl` eingestellten Server die letzte verfügbare Version zu erhalten
* Methode `setDelay`, die `{kind: "background" | "kill" | "nativeVersion" | "date", value?: string}` als Argument nimmt, um Verzögerungen für verschiedene Modi einzustellen
* Methode `next`, um die Version beim nächsten Hintergrundprozess festzulegen, im Gegensatz zu `set`, das es sofort ausführt
* Methode `isAutoUpdateEnabled`, um zu erfahren, ob Sie sich im Auto-Update-Kontext befinden
* Event `downloadComplete`, wenn der Download 100% erreicht
* Hinzugefügtes Pflichtfeld `version` in der Download-Methode
* `notifyAppReady` wird auch im manuellen Modus obligatorisch, wenn nicht nach 10 Sekunden aufgerufen, kehrt die App zur vorherigen Version zurück
## Mitwirkende
[@lincolnthree](https://github.com/lincolnthree/) Vielen Dank für den Start dieser Arbeit, es wäre unmöglich gewesen, dieses Update ohne Sie zum Laufen zu bringen
# Von V4 zu V5
> So aktualisieren Sie von V4 auf V5
## Warum dieses Upgrade
Diese Major-Version folgt der Capacitor Major-Version
Befolgen Sie zunächst die Migrationsanleitung von Capacitor:
[https://capacitorjs.com/docs/updating/5-0](https://capacitorjs.com/docs/updating/5-0/)
## Installation
`npm i @capgo/capacitor-updater@5`
`Dann synchronisieren Sie den nativen Code-Update:`
`npx cap sync`
Das war’s! Ziemlich einfach!
## Manueller Modus
Wenn Sie selbst das Update mit getLatest geholt haben, gibt es eine kleine Änderung Wenn Sie bereits auf dem neuesten Stand sind, wird es in den catch-Block gehen Jede Antwort, die sich von verfügbaren Updates unterscheidet, wird dies tun
# Von V5 auf V6
> So aktualisieren Sie von V5 auf V6
## Warum dieses Upgrade
Diese Major-Version folgt der Capacitor Major-Version
Befolgen Sie zunächst die Migrationsanleitung von Capacitor:
[https://capacitorjs.com/docs/updating/6-0](https://capacitorjs.com/docs/updating/6-0/)
## Installation
`npm i @capgo/capacitor-updater@6`
`Dann synchronisieren Sie das native Code-Update:`
`npx cap sync`
Das war’s! Ganz einfach!
# Introduzione
> Einführung in die Cagpo Webapp
## Was ist das?
Cagpo verfügt über eine umfangreiche Webapp zur Verwaltung Ihrer Projekte. Diese Webapp wurde mit Vuejs entwickelt und ist Open Source. Den Quellcode finden Sie auf [GitHub](https://github.com/Cap-go/capgo/tree/main/src/)\
Die Webapp ist [hier](https://web.capgo.app/) verfügbar\
Mit dieser Webapp können Sie [Kanäle verwalten](/docs/webapp/channels/), [Versionen verwalten](/docs/webapp/bundles/), [Geräte verwalten](/docs/webapp/devices/), [Protokolle einsehen](/docs/webapp/logs/), [Abrechnung verwalten](/docs/webapp/settings/) und [Ihr Konto verwalten](/docs/webapp/settings/)
## Wie benutze ich es?
Zunächst müssen Sie ein Konto erstellen oder sich anmelden. Dies ist relativ einfach und kann durch Klicken auf die Schaltfläche `Anmelden` in der Bildschirmmitte erfolgen. Nach der Anmeldung werden Sie zum Dashboard weitergeleitet. Dies ist die Hauptseite der Webapp. Von hier aus können Sie zu allen anderen Seiten navigieren.
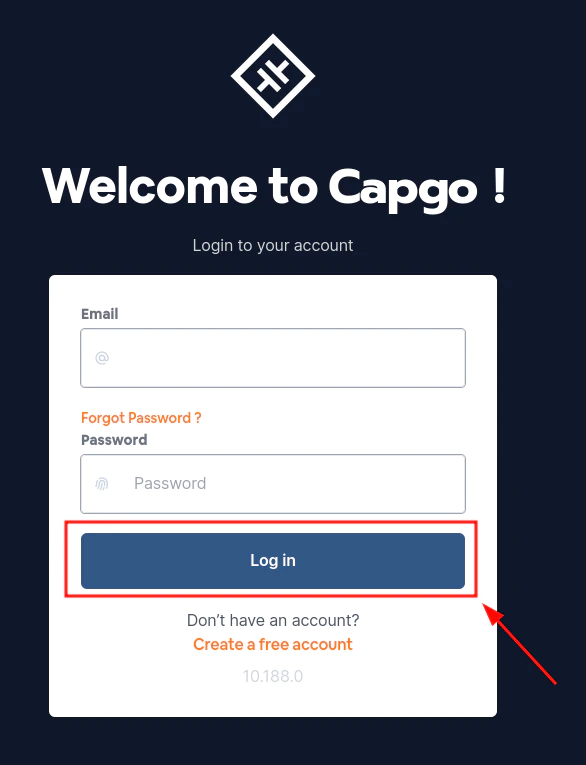
## Ein Konto erstellen
Sie müssen auf `Kostenloses Konto erstellen` im unteren Teil des Anmeldeformulars klicken. Von da an ist es so einfach wie das Ausfüllen eines Formulars und das Befolgen der Anweisungen.
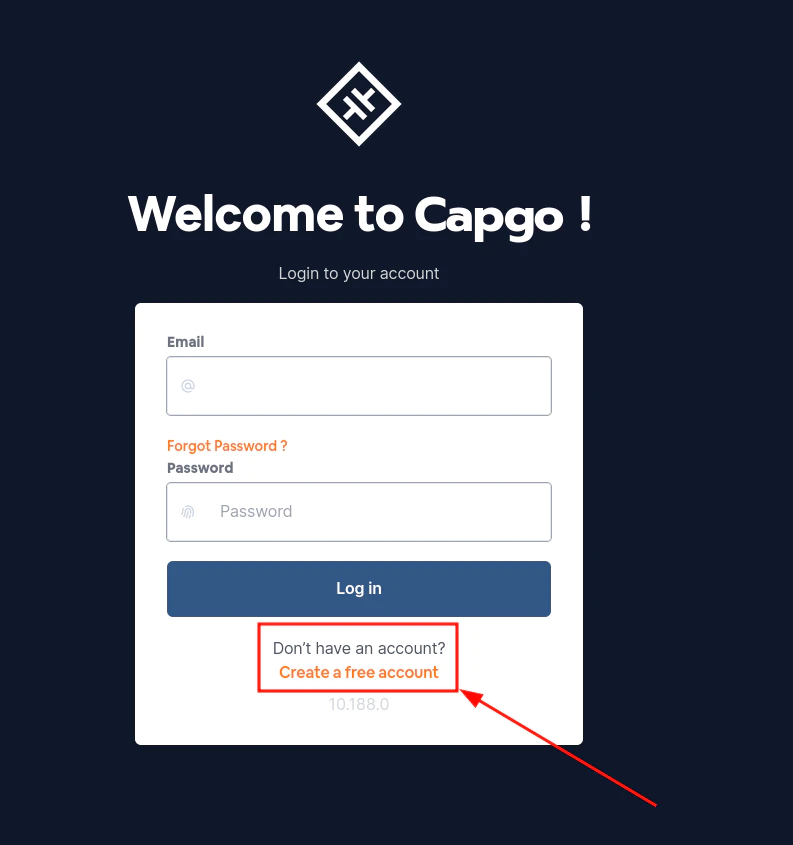
# API-Schlüssel verwalten
> API-Schlüssel verwalten
## Was kann ich mit den API-Schlüsseln tun?
Ein API-Schlüssel kann neu generiert, entfernt oder ein neuer hinzugefügt werden
## Wie kann ich alle API-Schlüssel sehen?
Sie müssen zur [API-Schlüssel-Seite](https://web.capgo.app/dashboard/apikeys/) gehen und dort sehen Sie alle Ihre API-Schlüssel
## Wie füge ich einen neuen API-Schlüssel hinzu?
Um einen neuen API-Schlüssel hinzuzufügen, klicken Sie auf den kleinen Plus-Button
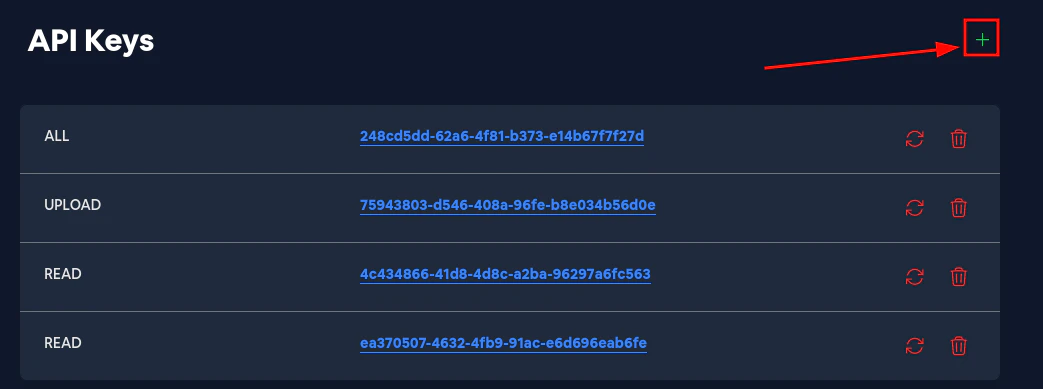
und wählen Sie dann die Berechtigungen aus, die Sie dem neuen API-Schlüssel geben möchten. Sie können auswählen:
* Lesen - der API-Schlüssel kann alle Daten lesen
* Upload - der API-Schlüssel kann neue Versionen über die CLI hochladen und lesen
* Alles - der API-Schlüssel kann alles tun
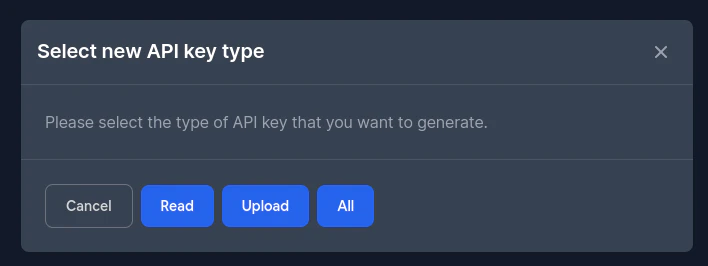
## Wie entferne ich einen API-Schlüssel?
Um einen API-Schlüssel zu entfernen, klicken Sie auf den kleinen Papierkorb-Button

Und bestätigen Sie dann das Entfernen des API-Schlüssels
## Wie generiere ich einen API-Schlüssel neu?
Um einen API-Schlüssel neu zu generieren, klicken Sie auf den kleinen Aktualisieren-Button
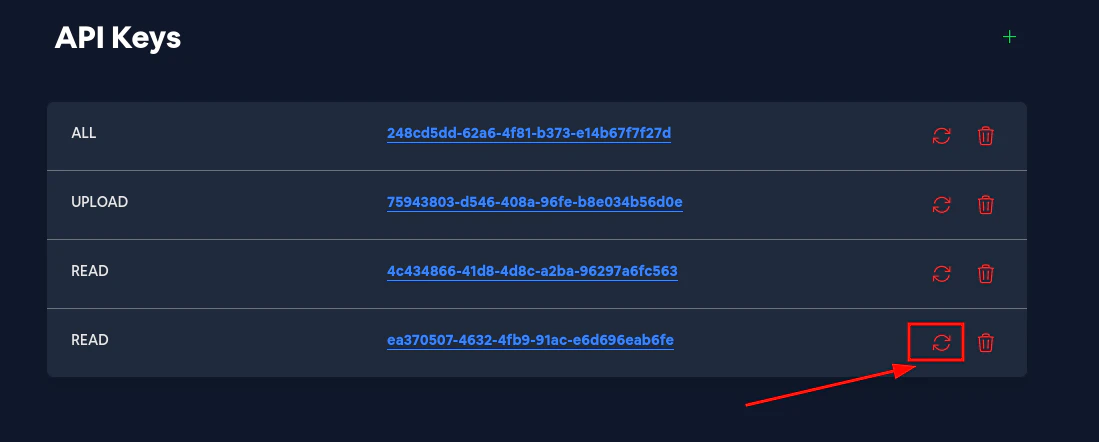
Und bestätigen Sie dann die Neugenerierung des API-Schlüssels
# Bundle
> Entdecken Sie, wie man Bundles verwaltet
## Alle Bundles anzeigen
Schauen wir uns zunächst die Bundles-Seite an. Sie können darauf zugreifen, indem Sie [auf Ihre App klicken](/docs/webapp/main-page) und dann [auf den Bundles-Tab klicken](/docs/webapp/main-app-page)
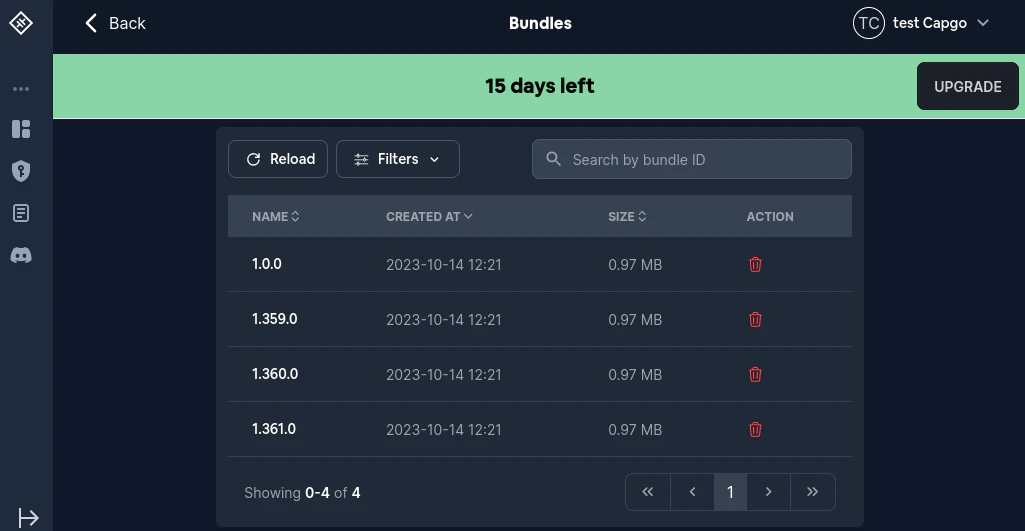
## Ein Bundle löschen
Es gibt zwei Möglichkeiten, ein Bundle zu löschen:
* Normal
* Unsicher
Die unsichere Möglichkeit zum Löschen eines Bundles wurde am 12. August 2024 zu Capgo hinzugefügt
Der Unterschied zwischen den beiden Methoden liegt in der Möglichkeit, die Versionsnummer nach dem Löschen wiederzuverwenden
Wenn Sie zum Beispiel eine Version `100` auf normale Weise löschen und später versuchen, eine Version `100` hochzuladen, wird dies fehlschlagen Wenn Sie diese Version über das unsichere Löschen entfernen, können Sie eine Version `100` hochladen
Danger
Das unsichere Löschen einer Version und erneutes Hochladen ist WIRKLICH gefährlich Es kann alle Arten von Fehlern und unvorhersehbarem Verhalten im Plugin verursachen Es sollte NIEMALS für Bundles verwendet werden, die in einem öffentlichen Kanal verwendet wurden Aus diesem Grund erfordert das unsichere Löschen einer Version “super\_admin”-Berechtigungen
## Ein bestimmtes Bundle verwalten
Sobald Sie die Liste aller Bundles sehen, klicken Sie auf das Bundle, das Sie verwalten möchten. Danach sollten Sie etwa Folgendes sehen:
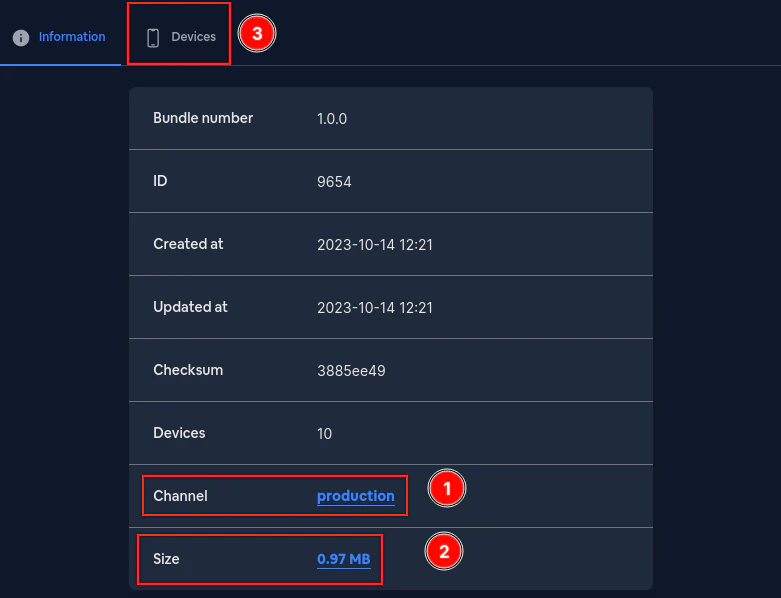
Gehen wir alle Elemente auf dieser Seite durch
***
Zuerst sehen Sie einen `Channel`. Dieser zeigt Ihnen an, für welchen Kanal dieses Bundle bestimmt ist. Sie können den Kanal durch Anklicken ändern Nach dem Klicken sollten Sie etwa Folgendes sehen:
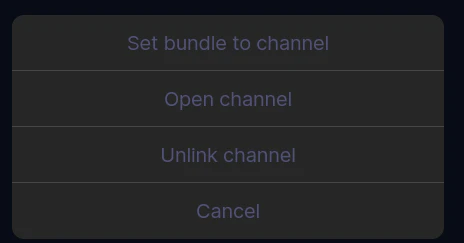
`Set bundle to channel` ermöglicht es Ihnen, dieses Bundle als Standard für jeden Kanal zu verknüpfen\
`Open channel` öffnet die Kanalseite für den Kanal, für den dieses Bundle bestimmt ist\
`Unlink bundle from channel` trennt die Verknüpfung dieses Bundles vom zugehörigen Kanal (**WARNUNG**: Wenn das Bundle mit mehr als einem Kanal verknüpft ist, haben Sie keine Auswahlmöglichkeit, welcher Kanal getrennt werden soll)
***
Als Nächstes sehen Sie die `Size`. Wenn Sie darauf klicken, können Sie dieses Bundle herunterladen Es sollte etwa so aussehen:
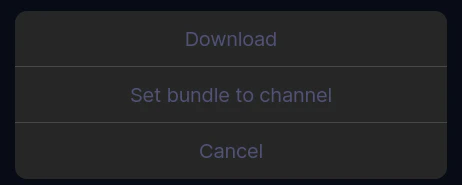
***
Zuletzt gibt es den Bereich `Devices`. Hier können Sie alle Geräte sehen, die diese Version verwenden
# 채널
> Kanäle sind eine Möglichkeit, die Updates deiner App zu verwalten. Du kannst mehrere Kanäle haben und jeder Kanal kann mehrere Versionen enthalten. Dies ermöglicht es dir, mehrere Versionen deiner App gleichzeitig in Produktion zu haben.
## Kanäle verwalten
Schauen wir uns zunächst die Kanäle-Seite an. Sie können darauf zugreifen, indem Sie [auf Ihre App klicken](/docs/webapp/main-page) und dann [auf den Kanäle-Tab klicken](/docs/webapp/main-app-page)
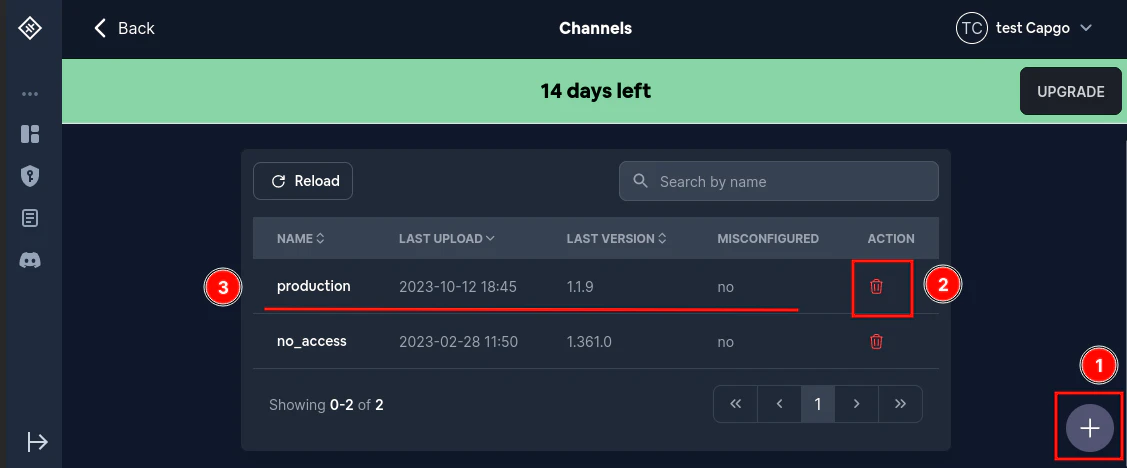
## Einen Kanal erstellen
Wie Sie sehen können, gibt es einen Plus-Button in der unteren rechten Ecke (`1` im Bild). Wenn Sie darauf klicken, öffnet sich ein Modal, in dem Sie einen neuen Kanal erstellen können.
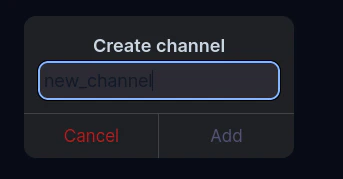
Nachdem Sie auf `Hinzufügen` geklickt haben, sollte ein neuer Kanal in der Liste erscheinen.
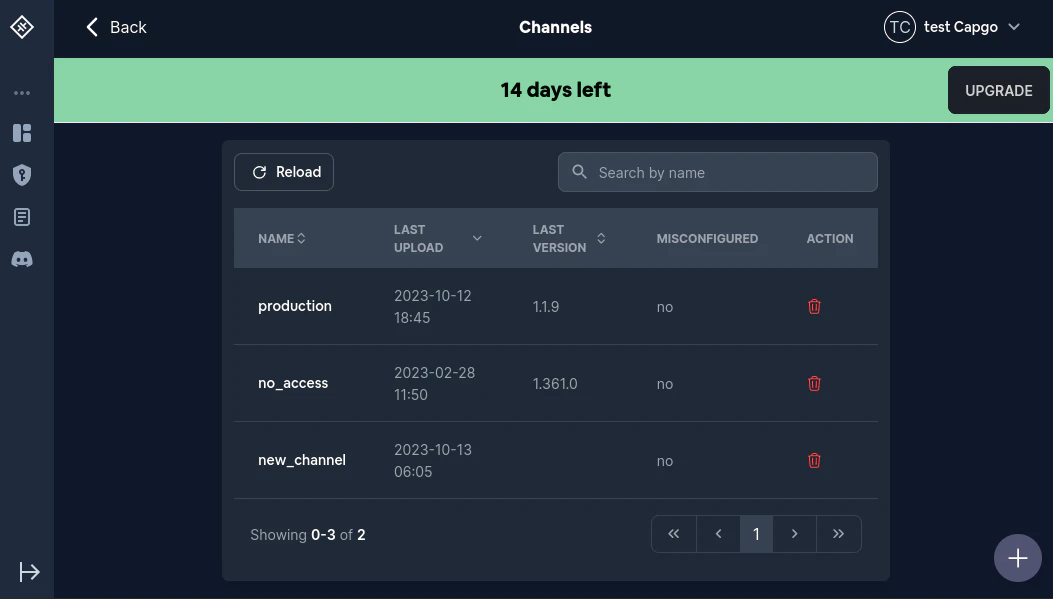
## Was bedeutet fehlkonfiguriert?
Manchmal ist die Konfiguration eines Kanals nicht gültig. In diesem Fall erhalten Sie eine große Warnung und die Spalte `Fehlkonfiguriert` zeigt `Ja` für einen oder mehrere Kanäle an. Mehr dazu erfahren Sie [hier](/docs/cli/commands/#disable-updates-strategy)
## Einen Kanal löschen
Das Löschen eines Kanals ist unkompliziert. Klicken Sie einfach auf das Papierkorb-Symbol und bestätigen Sie die Löschung (`2` im Bild)
## Einen Kanal verwalten
Wenn Sie auf den Kanalnamen klicken, öffnet sich ein Modal, in dem Sie den Kanal verwalten können (`3` im Bild). Diese Seite sollte etwa so aussehen:
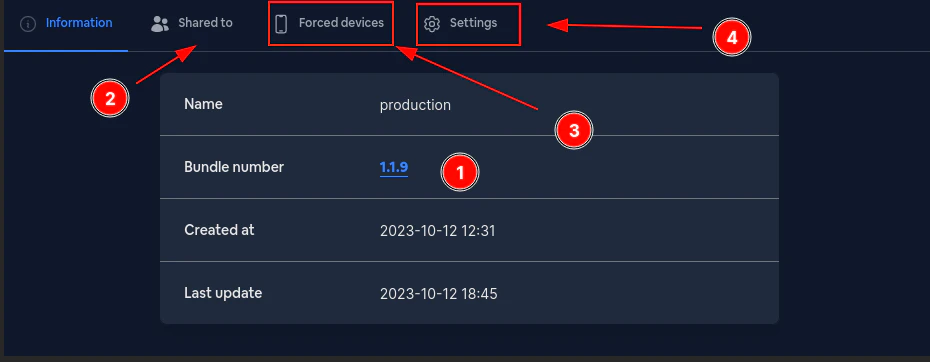
Gehen wir die verschiedenen Abschnitte durch:
Zuerst die `Bundle-Nummer` (`1` im Bild). Dies ist die aktuelle Version für diesen Kanal. Wenn nach einem Update gefragt wird, wird dieser Kanal immer versuchen, mit dieser Version zu antworten\* \[^1] Ein Klick darauf sollte Sie zur [Bundle](/docs/webapp/bundles/)-Seite führen.
Zweitens die `Geteilt mit`-Seite (`2` im Bild). Ich rate davon ab, dies jemals zu verwenden. Ein neues und besseres System ist in Arbeit.
Nun die erzwungenen Geräte (`3` im Bild). Dies ist eine Liste von Geräten, die immer Updates von diesem Kanal erhalten werden. Dies ist nützlich für Testzwecke. Sie können ein Gerät von der [Geräte](/docs/webapp/devices/)-Seite aus zu einem Kanal zwingen.
Zuletzt die Einstellungen (`4` im Bild). Hier können Sie verwalten, wie sich die Kanäle verhalten. Nachdem Sie darauf geklickt haben, sollten Sie etwa Folgendes sehen:
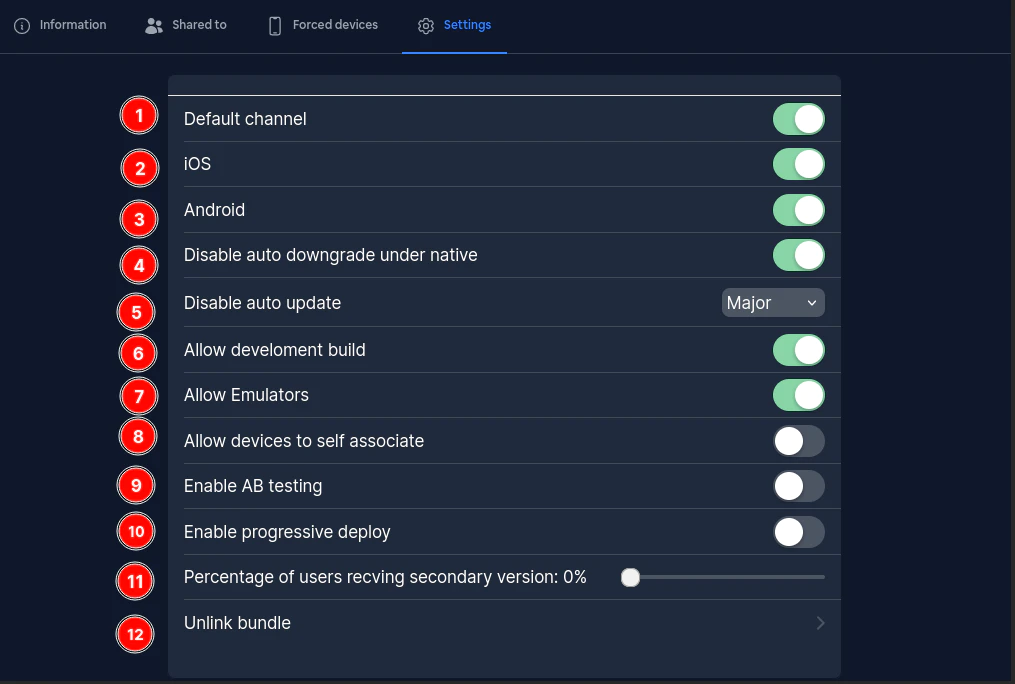
Die Liste der Einstellungen ist lang, aber ich werde mein Bestes geben, sie alle zu erklären:
***
Erstens der `Standardkanal` **DIES IST WAHRSCHEINLICH DER WICHTIGSTE**\
Wenn ein Kanal als Standard markiert ist, wird er als Standardkanal für alle neuen Geräte verwendet.\
Anders ausgedrückt: Wenn Sie einen neuen Benutzer haben, wird Capgo versuchen, ihm die neueste Version dieses Standardkanals zu liefern. Nur 1 Kanal kann gleichzeitig als Standard festgelegt werden. Wenn Sie versuchen, diese Regel zu brechen, werden Sie gebeten, Ihre Aktion zu bestätigen.
Nach der Bestätigung wird der alte Standardkanal nicht mehr als Standard markiert und der neue wird als Standard markiert.
***
Zweitens die `iOS`-Einstellung. Dies ist relativ einfach. Wenn dies falsch ist, dürfen iOS-Geräte keine Updates von diesem Kanal herunterladen.
Drittens ist die `Android`-Einstellung. Dies ist ähnlich wie `iOS`. Wenn dies falsch ist, dürfen Android-Geräte keine Updates von diesem Kanal herunterladen.
Viertens ist die Einstellung `Auto-Downgrade unter Native deaktivieren`. Wenn dies wahr ist, wird es unmöglich sein, von einer nativen Version herabzustufen. Das bedeutet, wenn Sie eine Version `120` im App Store oder Play Store hochgeladen haben und versuchen, die Kanalversion auf `110` zu setzen, wird das Update (Downgrade) fehlschlagen.
Fünftens ist `Auto-Update deaktivieren`. Diese Einstellung ist ziemlich komplex, und Sie können mehr darüber [hier](/docs/cli/commands/#disable-updates-strategy) erfahren.
Was `Entwicklungs-Build erlauben` betrifft: Wenn dies wahr ist, dürfen Entwicklungs-Builds Updates von diesem Kanal herunterladen. Wenn nicht, wird jede Update-Anfrage, bei der `prod` auf false gesetzt ist, abgelehnt. Dies ist hauptsächlich für Testzwecke nützlich.
Siebens ist `Emulatoren erlauben`. Wenn dies falsch ist, wird Capgo jede Update-Anfrage ablehnen, die von einem Emulator kommt. Dies ist hauptsächlich für Testzwecke nützlich.
Achtens ist `Geräten erlauben, sich selbst zuzuordnen`. Wenn dies wahr ist, wird die [setChannel](/docs/plugin/api/#setchannel)-Methode verfügbar sein. Wenn dies auf falsch gesetzt ist und Sie versuchen, die [setChannel](/docs/plugin/api/#setchannel)-Methode mit diesem Kanal aufzurufen, wird der Aufruf fehlschlagen.
# Geräte
> Verwendung der Device-Seite
## Liste aller Geräte anzeigen
Schauen wir uns zunächst die Geräteseite an. Sie können darauf zugreifen, indem Sie [auf Ihre App klicken](/docs/webapp/main-page) und dann [auf den Geräte-Tab klicken](/docs/webapp/main-app-page)
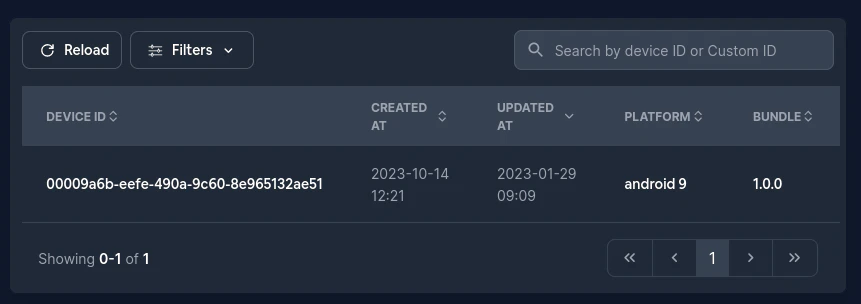
## Nur Entwicklergeräte anzeigen
Möglicherweise möchten Sie nur die überschriebenen Geräte anzeigen (Geräte, die einen [benutzerdefinierten Kanal](/docs/plugin/api/#setchannel) oder eine benutzerdefinierte Version haben). Klicken Sie dazu auf `Filter` und dann auf `Überschreiben`. Es sollte etwa so aussehen:

## Ein Gerät konfigurieren
Um ein bestimmtes Gerät zu konfigurieren, klicken Sie in der Tabelle darauf. Sie sollten dann etwa Folgendes sehen:
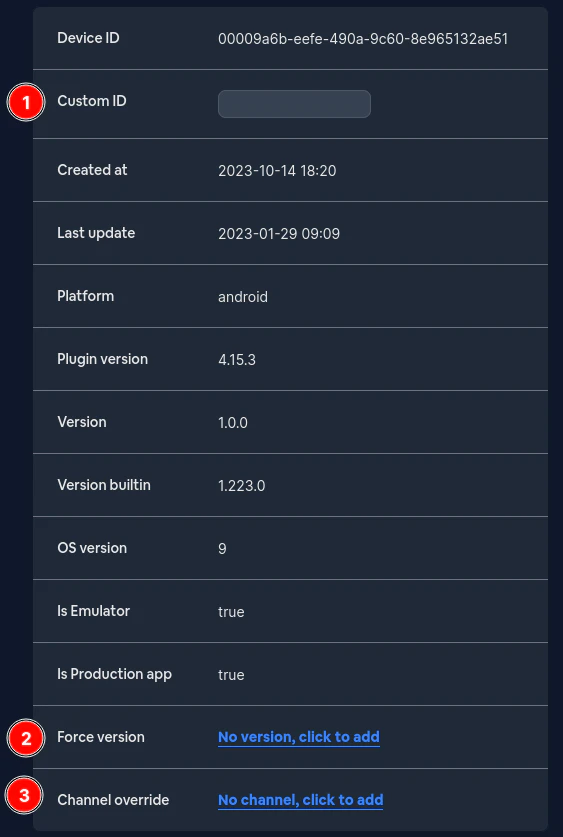
Zunächst die `Benutzerdefinierte ID`. Diese ist nicht wirklich nützlich und macht derzeit nichts. Sie können sie ignorieren.
Als Nächstes die erzwungene Version. Wenn diese eingestellt ist, wird dieses Gerät **IMMER** diese Version erhalten. Sie hat Vorrang vor dem Kanal.
Zuletzt der benutzerdefinierte Kanal. Wenn dieser eingestellt ist, wird dieses Gerät sich nicht um den öffentlichen (Standard-) Kanal kümmern und stattdessen diesen verwenden.
# Protokolle
> So lernen Sie die Protokollseite kennen
## Alle Logs anzeigen
Schauen wir uns zunächst die Logs-Seite an. Sie können darauf zugreifen, indem Sie [auf Ihre App klicken](/docs/webapp/main-page) und dann [auf den Updates-Tab klicken](/docs/webapp/main-app-page) Von dort aus sollten Sie eine Seite wie diese sehen:
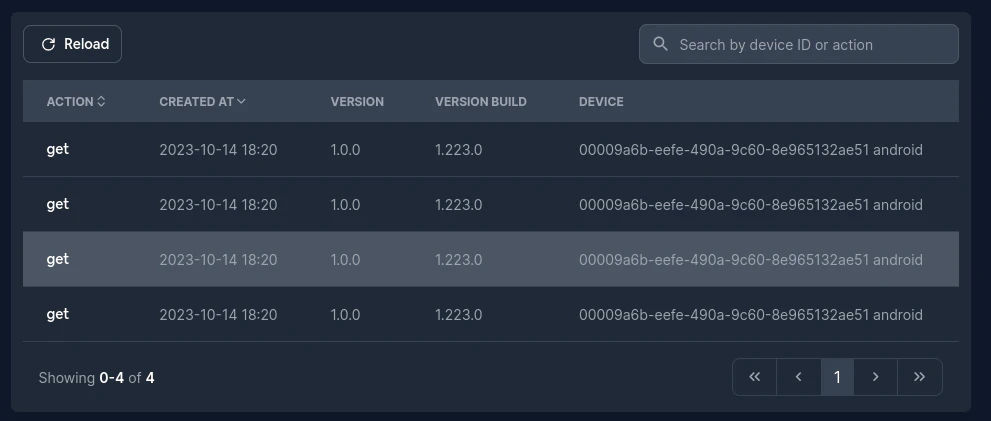
## Weitere Details zu einem Log erhalten
Wenn Sie auf ein Log klicken, gelangen Sie zur [Geräte-Seite](/docs/webapp/devices/)
# Hauptseite der App
> Was zeigt die Hauptseite an?
## Was zeigt die Hauptseite an?
Schauen wir uns zunächst die Hauptseite der App an:
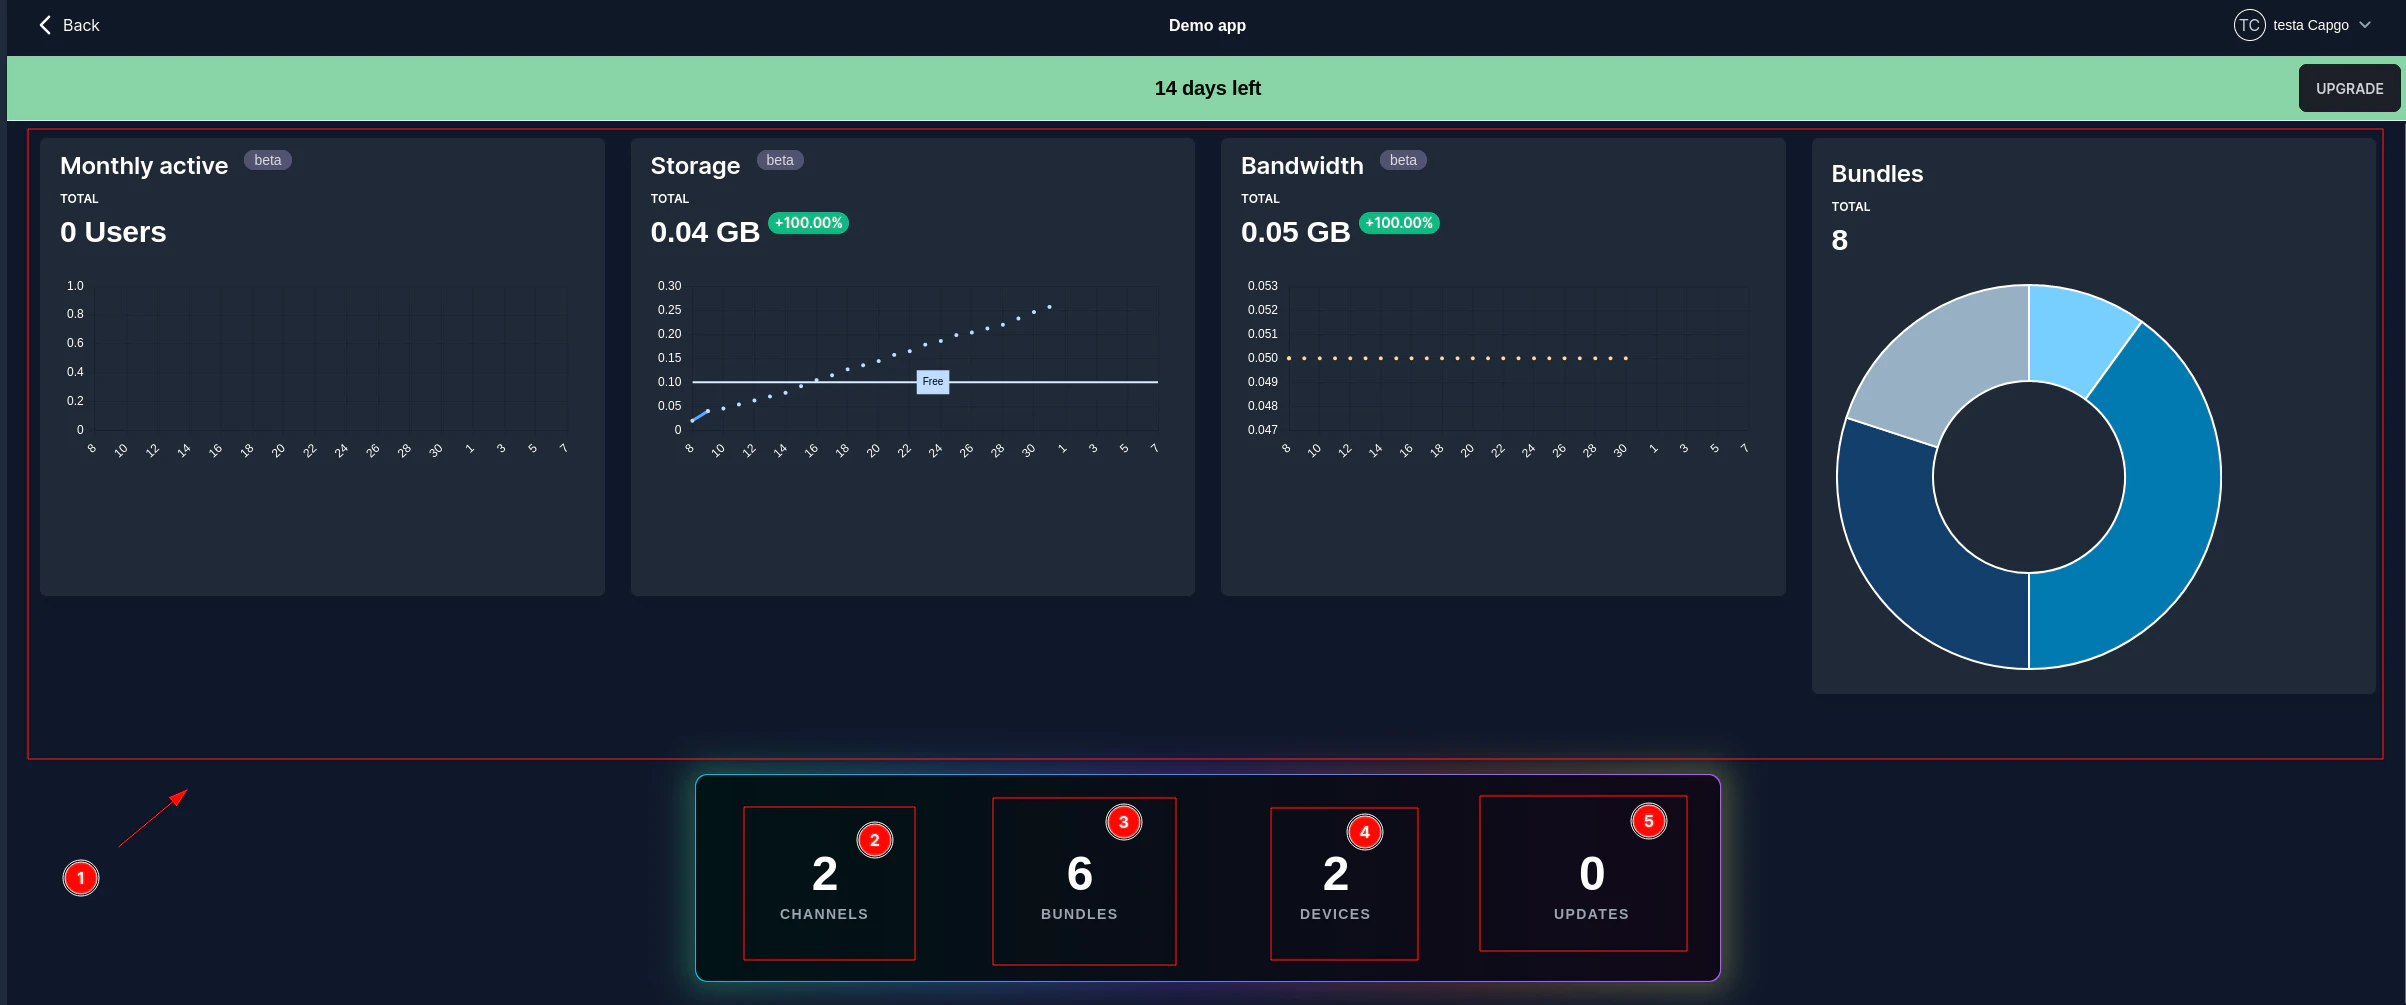
Lass uns dies genauer betrachten
Zuerst die Statistiken. Die Statistiken werden derzeit überarbeitet, daher können sie zu diesem Zeitpunkt nicht dokumentiert werden. Wir werden einen Statistik-Abschnitt hinzufügen, sobald sie vollständig funktionsfähig sind.
Zweitens, schauen wir uns alle verfügbaren Menüs und ihre Funktionen an
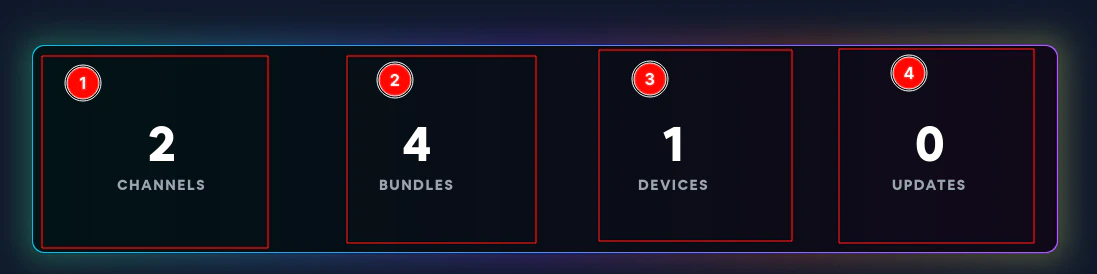
Die erste Schaltfläche führt Sie zur [channels](/docs/webapp/channels/) Seite. Dort können Sie die Kanäle der App erstellen/löschen/konfigurieren\
Die zweite Schaltfläche führt Sie zur [bundles](/docs/webapp/bundles/) Seite. Dort können Sie alle Versionen der App sehen Die zweite Schaltfläche führt Sie zur [device](/docs/webapp/devices/) Seite. Dort können Sie alle Geräte sehen. Sie können dort auch gerätespezifische Überschreibungen festlegen Die zweite Schaltfläche führt Sie zur [updates](/docs/webapp/logs/) Seite. Dort können Sie die detaillierten Statistiken (Logs) und Fehler sehen, die Ihre App erfährt
# Page principale
> Diese Seite erklärt die Hauptseite der Webanwendung
## Was zeigt die Hauptseite an?
Schauen wir uns zunächst die Hauptseite an:
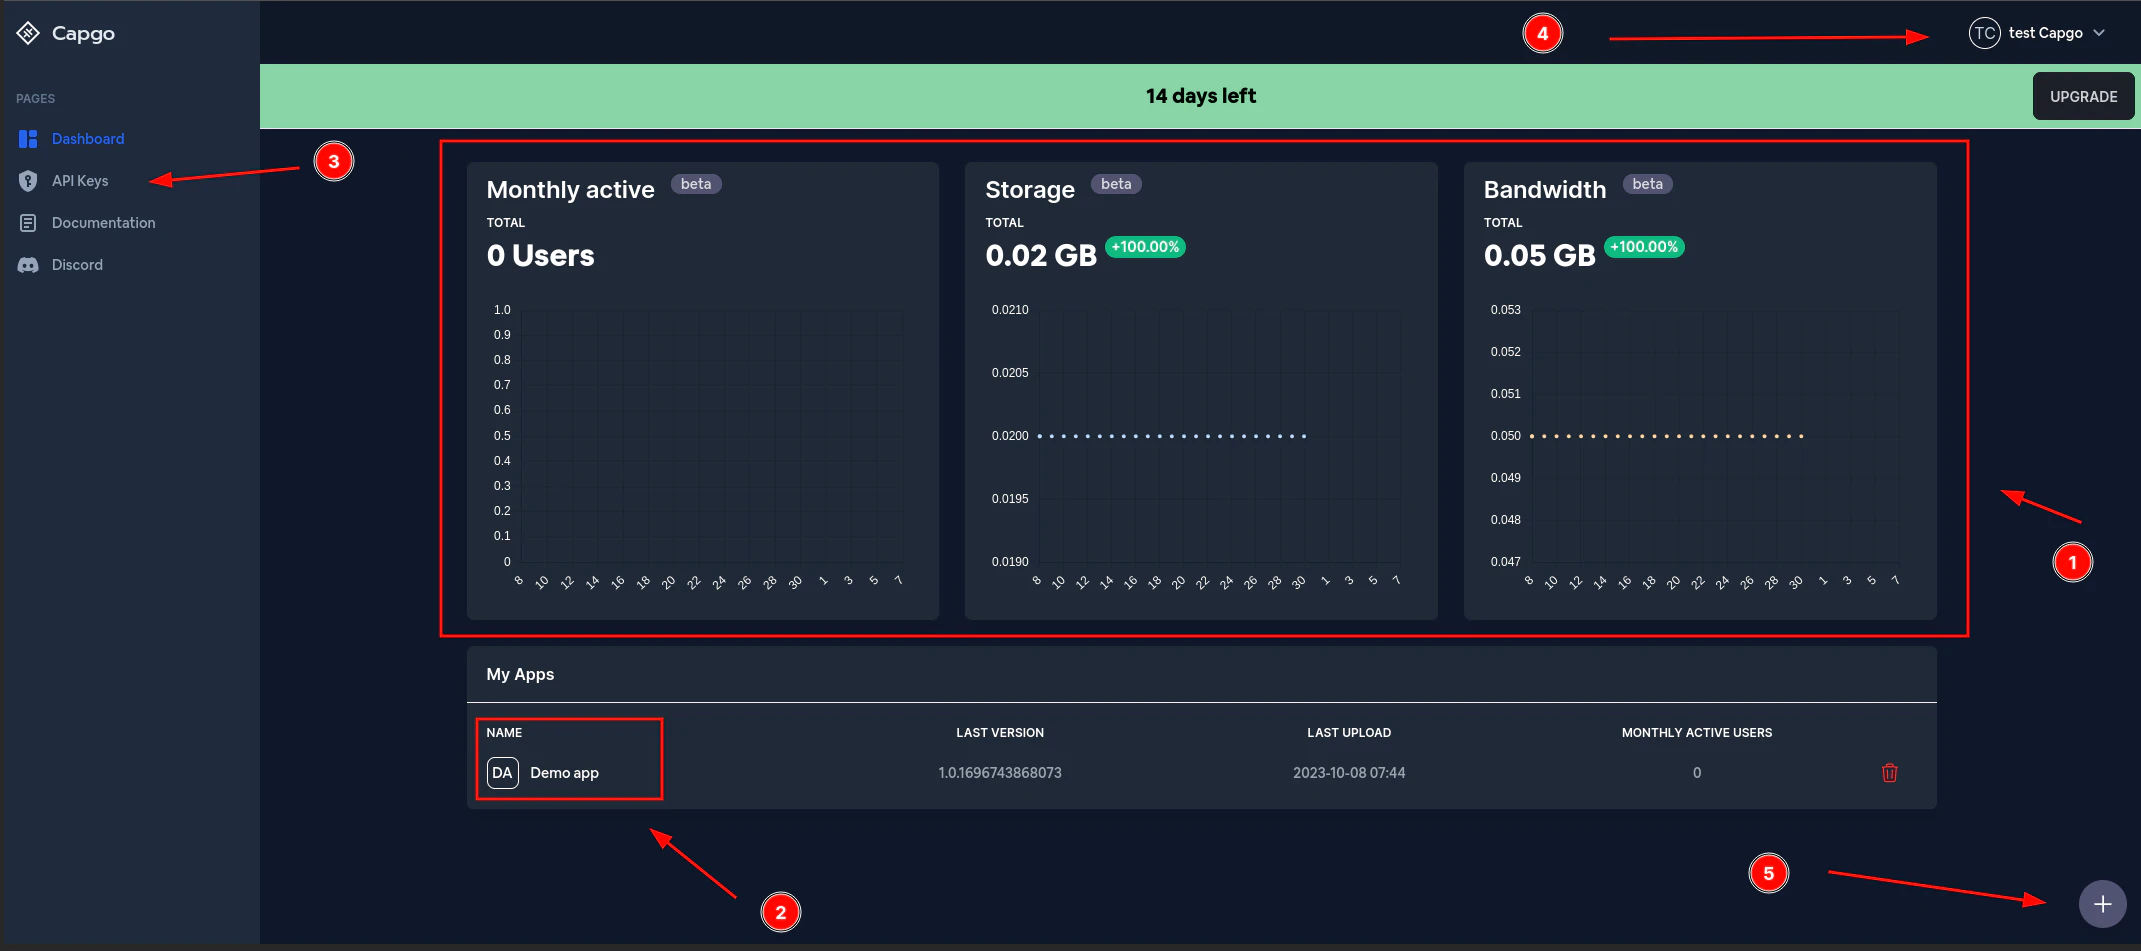
Beginnen wir von vorne. Das Erste, was Sie sehen, sind die **Statistiken**. Diese enthalten app-spezifische Statistiken. Diese Aktualisierungen hängen von der Nutzung der App ab.
Das Zweite, was Sie sehen, ist die Liste aller verfügbaren Apps. Diese ändert sich je nachdem, wie viele Apps Sie erstellt haben. Sie können auf jede App klicken, um weitere Details darüber zu sehen.
Das Dritte, was Sie sehen, ist die Schaltfläche **API-Schlüssel**. Diese Schaltfläche führt Sie zur [API-Schlüssel](/docs/webapp/api-keys/) Seite.
Als Nächstes sehen Sie die Schaltfläche **Capgo testen**. Diese Schaltfläche ändert sich je nach Ihrem Vor- und Nachnamen und führt Sie zur [Einstellungen](/docs/webapp/settings/) oder Support-Seite.
Zuletzt sehen Sie eine Schaltfläche zum Hinzufügen einer weiteren App. Diese Schaltfläche führt Sie zu einer Seite, auf der Sie eine neue App zu Capgo hinzufügen können.
# 二要素認証
> Verwalten Sie die Zwei-Faktor-Authentifizierung, um Ihr Capgo-Konto besser zu schützen.
## Was ist 2FA?
2FA ist eine Sicherheitsmaßnahme, die verhindert, dass ein böswilliger Akteur Ihr Capgo-Konto übernehmen kann\
Dies wird erreicht, indem ein zusätzlicher Code erforderlich ist. Dieser Code wird auf Ihrem Mobiltelefon oder einem Hardware-2FA-Schlüssel gespeichert. Er ändert sich alle 30 Sekunden, was es unmöglich macht, ihn zu erraten.
## Voraussetzungen für diese Anleitung
* Ein Android- oder iOS-Telefon
* Internetverbindung
## Was behandelt diese Anleitung?
Diese Anleitung zeigt, wie man 2FA mit `Google Authenticator` einrichtet. Es gibt auch andere Apps für ähnliche Zwecke, aber ich kann in dieser Anleitung nicht das gesamte Thema 2FA abdecken.
## Wie richtet man 2FA ein?
Laden Sie zunächst die `Google Authenticator`-App herunter. Wenn Sie Android nutzen, können Sie sie aus dem [Play Store](https://play.google.com/store/apps/details/?id=comgoogleandroidappsauthenticator2) herunterladen. Auf iOS können Sie sie aus dem [App Store](https://appsapplecom/us/app/google-authenticator/id388497605/) herunterladen.
Gehen Sie als Nächstes zu den [Capgo-Kontoeinstellungen](https://web.capgo.app/dashboard/settings/account/). Dort sollten Sie einen grünen Button sehen, der so aussieht:
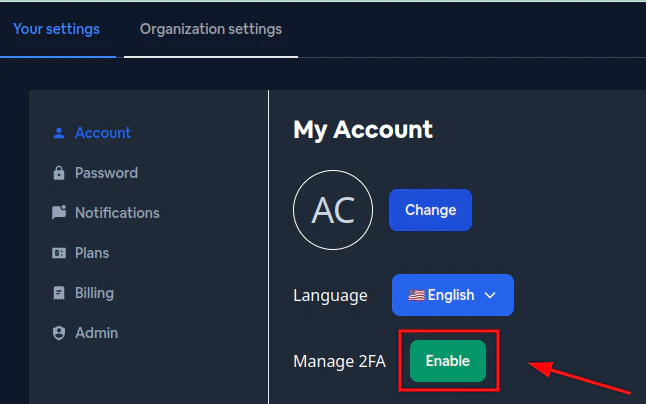
Klicken Sie darauf, und es sollte ein QR-Code erscheinen.
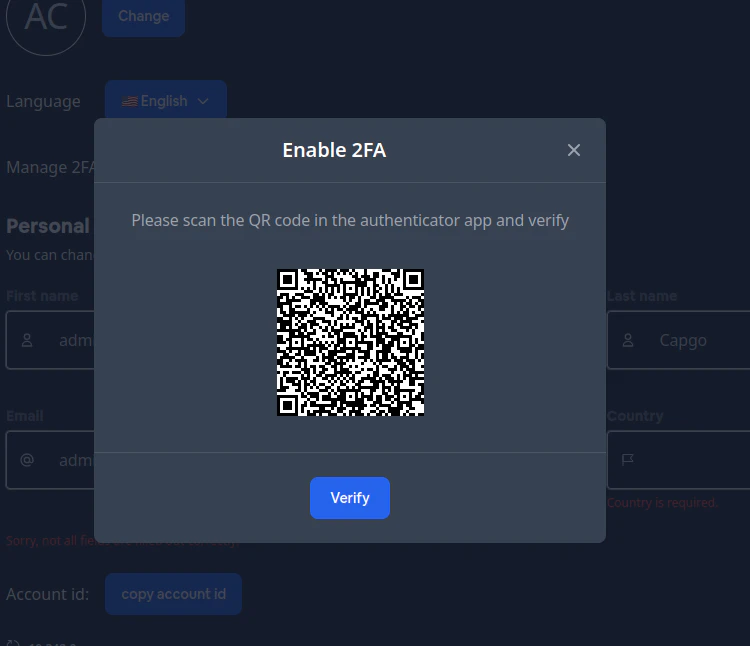
Danger
⚠️ Wichtiger Hinweis:\
Teilen Sie diesen QR-Code niemals mit anderen, sonst könnten Sie aus Ihrem Konto ausgeloggt werden
Öffnen Sie als Nächstes den `Google Authenticator` auf Ihrem Telefon. Folgen Sie dann diesen Schritten:
Klicken Sie auf den Plus-Button
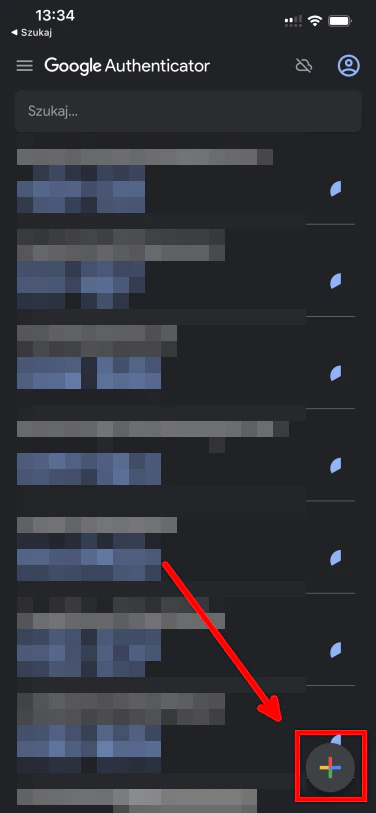
Klicken Sie danach auf den Kamera-Button
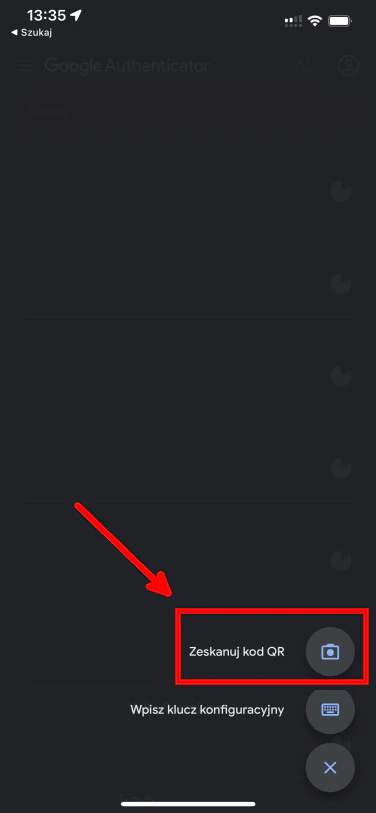
Dadurch wird die Kameravorschau geöffnet. Scannen Sie den QR-Code, der auf Ihrem PC angezeigt wird. Danach sollten Sie so etwas sehen:
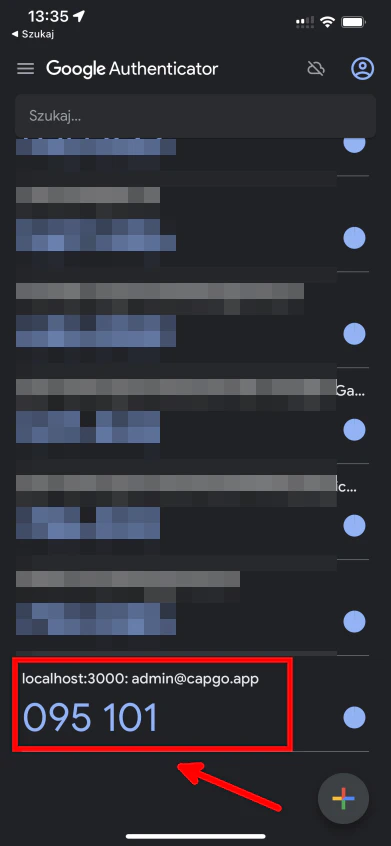
Gehen Sie dann zurück zum PC und klicken Sie auf den Verifizieren-Button
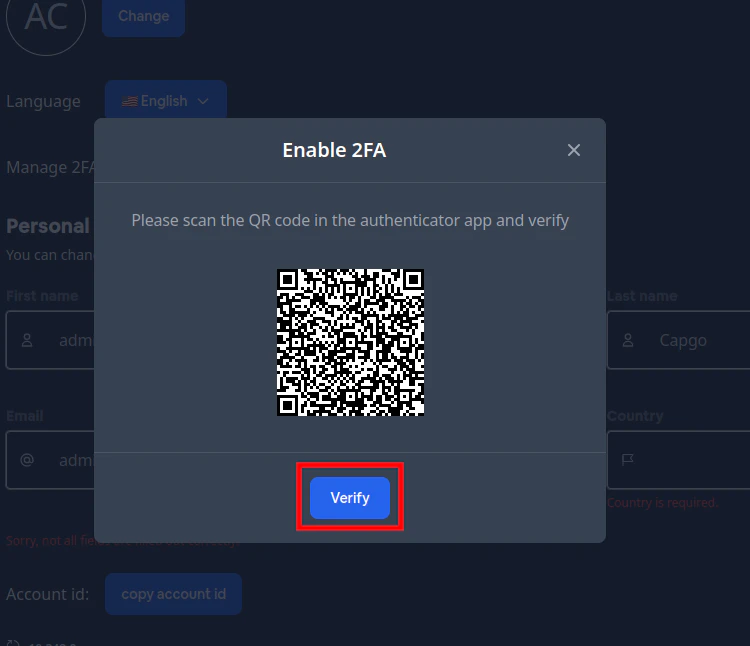
Dadurch öffnet sich ein Fenster zum Eingeben des 2FA-Codes. In meinem Fall ist dieser Code `095101`, aber er wird bei Ihnen anders sein\
Nachdem Sie diesen Code eingegeben haben, klicken Sie bitte auf den `verify`-Button
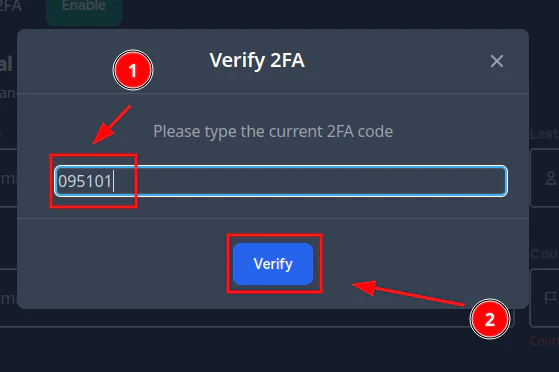
Wenn Sie den richtigen Code eingegeben und auf `verify` geklickt haben, sollten Sie ein Pop-up wie dieses sehen
Glückwunsch!\
Sie haben die 2FA-Authentifizierung aktiviert 🎉
## Wie man sich mit 2FA einloggt
Beim nächsten Login in Ihr Konto sehen Sie ein Fenster wie dieses
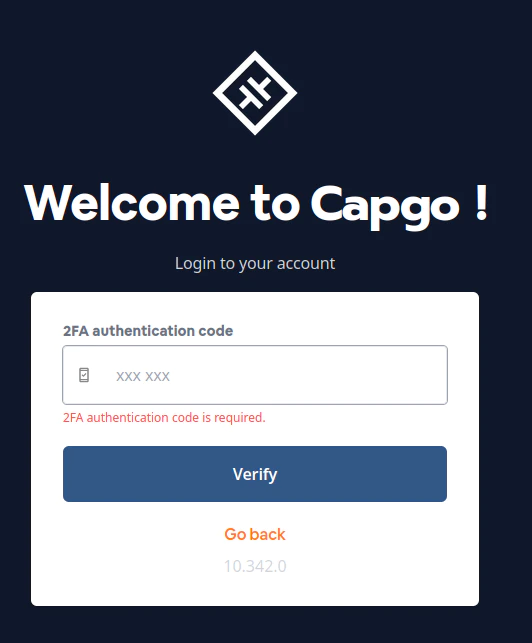
Öffnen Sie den Authenticator und kopieren Sie Ihren Authentifizierungscode
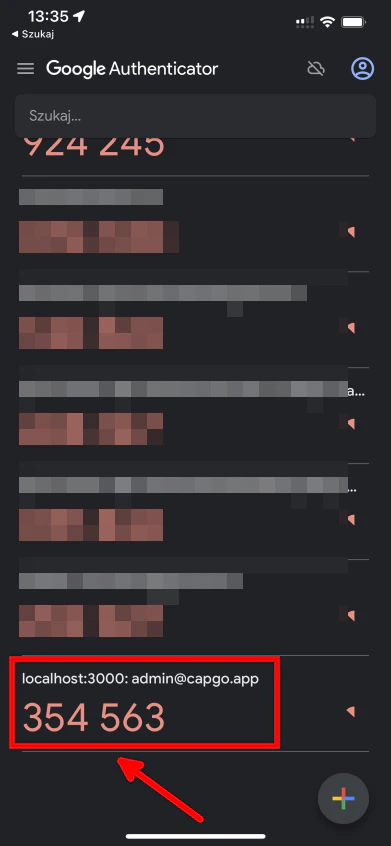
Danger
⚠️ Wichtiger Hinweis:\
Drücken Sie `verify`, bevor sich der Code aktualisiert, sonst ändert sich der Code und der alte ist nicht mehr gültig
Geben Sie dann den Code in das Login-Formular ein und drücken Sie auf `verify`

Wenn Sie den richtigen Code eingegeben haben, sollten Sie das Capgo-Dashboard sehen
## Wie man 2FA deaktiviert
Um 2FA zu deaktivieren, gehen Sie bitte zu den [Capgo-Kontoeinstellungen](https://web.capgo.app/dashboard/settings/account/). Dort sollten Sie einen roten Button sehen, der so aussieht:
Klicken Sie darauf und Sie sollten einen Bildschirm wie diesen sehen
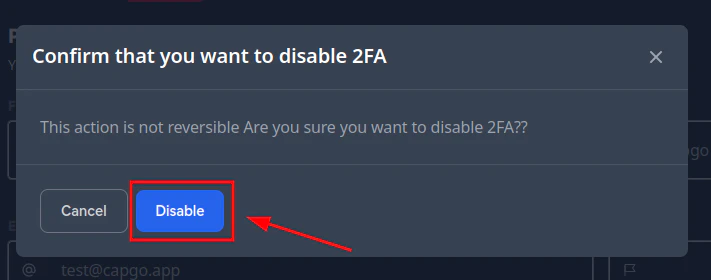
Drücken Sie einfach den `disable`-Button und das war’s
# Organisationssystem
> Organisation in deinem Capgo Account verwalten
## Was ist das Organisationssystem?
Das Organisationssystem ist ein System in Capgo, das es Ihnen ermöglicht, Ihre Apps sicher mit Mitgliedern Ihres Teams zu teilen.
### F: Wie kann ich auf die Informationen meiner Organisation zugreifen?
Um auf die Informationen Ihrer Organisation zuzugreifen, gehen Sie bitte zu [Einstellungen](/docs/webapp/settings/#how-to-get-to-the-settings-page) und klicken Sie dann auf `Organisationseinstellungen`
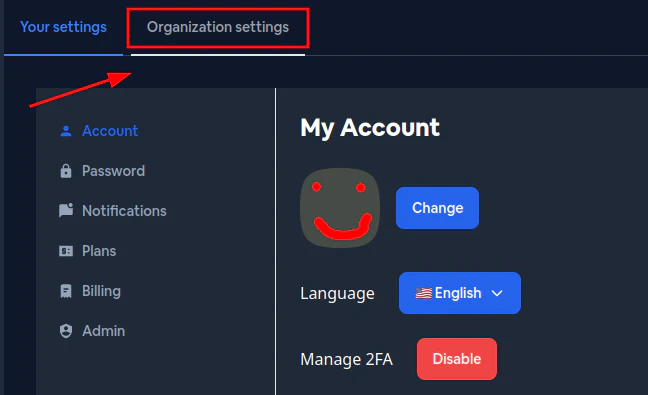
### F: Wie kann ich die Organisation wechseln, die ich gerade ansehe?
Um die Einstellungen einer anderen Organisation anzusehen, klicken Sie bitte auf den Organisationsauswähler neben Ihrem Namen
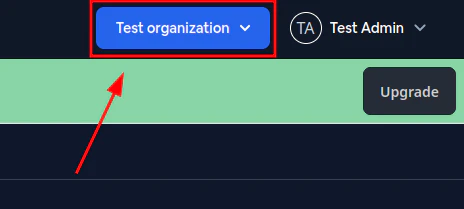
Wenn Sie dies nicht sehen können, befinden Sie sich wahrscheinlich nicht auf der Einstellungsseite
### F: Wie kann ich die Mitglieder meiner Organisation sehen?
Bitte klicken Sie auf `Mitglieder`
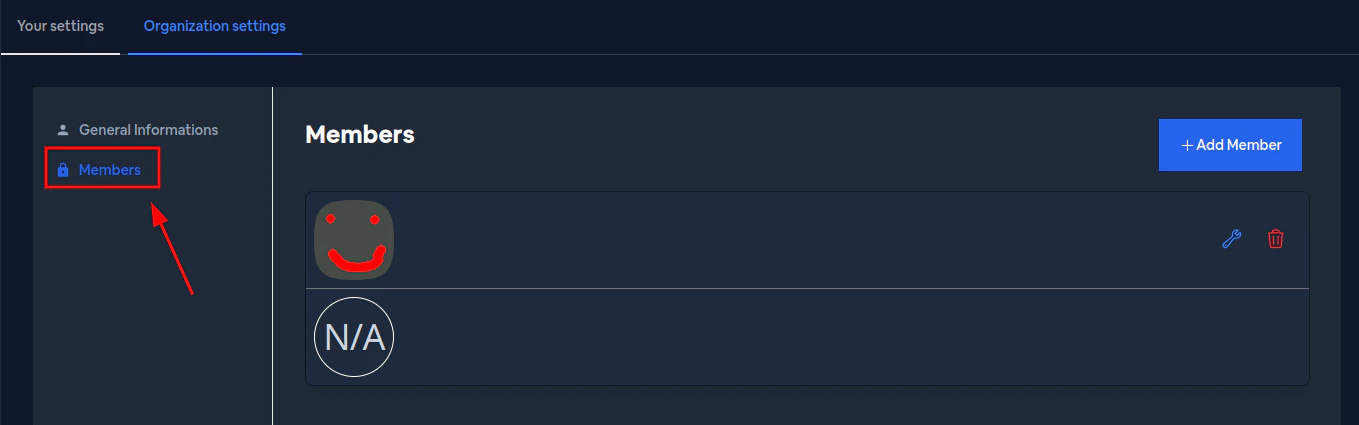
### F: Wie kann ich einen Benutzer zu einer Organisation einladen?
Bitte klicken Sie auf `Mitglied hinzufügen`
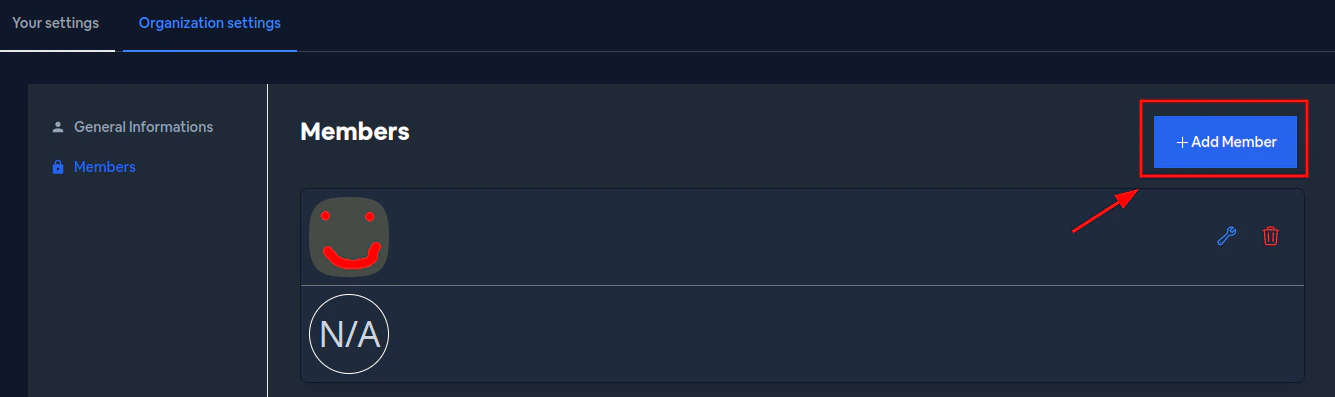
Dann erscheint ein Popup - bitte geben Sie die E-Mail-Adresse des Benutzers ein
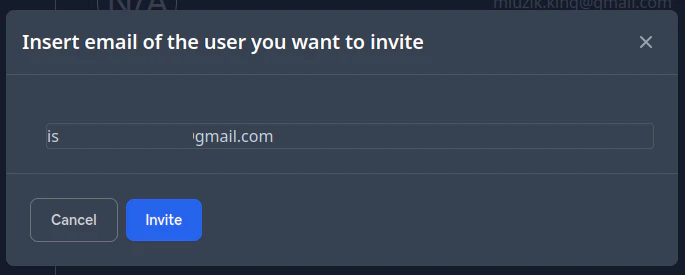
Klicken Sie dann auf `Einladen`. Ein weiteres Popup erscheint, das Sie nach den Berechtigungen fragt, die der eingeladene Benutzer haben soll
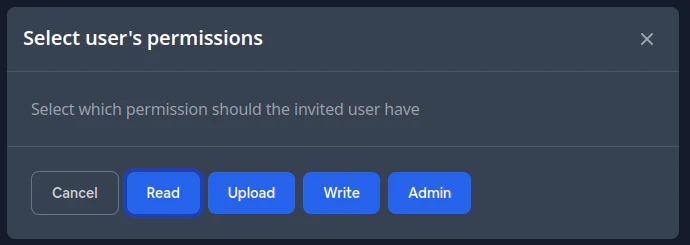
Hier ist eine Übersicht aller Berechtigungen:
| Berechtigung | Lesen | Upload | Schreiben | Admin | Super Admin |
| ---------------------------------- | ----- | ------ | --------- | ----- | ----------- |
| App-Statistiken anzeigen | ✅ | ✅ | ✅ | ✅ | ✅ |
| App-Kanäle anzeigen | ✅ | ✅ | ✅ | ✅ | ✅ |
| Geräte anzeigen | ✅ | ✅ | ✅ | ✅ | ✅ |
| Logs anzeigen | ✅ | ✅ | ✅ | ✅ | ✅ |
| Bundles anzeigen | ✅ | ✅ | ✅ | ✅ | ✅ |
| App löschen | ❌ | ❌ | ❌ | ❌ | ✅ |
| Kanal löschen | ❌ | ❌ | ❌ | ✅ | ✅ |
| Version löschen | ❌ | ❌ | ✅ | ✅ | ✅ |
| Org-Einstellungen ändern | ❌ | ❌ | ❌ | ✅ | ✅ |
| Org-Benutzer verwalten | ❌ | ❌ | ❌ | ✅ | ✅ |
| Kanaleinstellungen ändern | ❌ | ❌ | ✅ | ✅ | ✅ |
| Neue Version hochladen | ❌ | ✅ | ✅ | ✅ | ✅ |
| Geräte ändern | ❌ | ❌ | ✅ | ✅ | ✅ |
| Aktuelle Version des Kanals ändern | ❌ | ❌ | ✅ | ✅ | ✅ |
| Neuen Kanal erstellen | ❌ | ❌ | ❌ | ✅ | ✅ |
| Version ändern (Metadaten) | ❌ | ❌ | ✅ | ✅ | ✅ |
| Abrechnung verwalten | ❌ | ❌ | ❌ | ❌ | ✅ |
| Version unsicher löschen | ❌ | ❌ | ❌ | ❌ | ✅ |
### F: Wie funktioniert die Abrechnung innerhalb von Organisationen?
Jeder mit einer **Super Admin**-Berechtigung kann die Abrechnung für eine bestimmte Organisation verwalten. Pläne sind mit einer Organisation und nicht mit Ihrem persönlichen Konto verknüpft.
Danger
⚠️ Der Kauf eines Plans wirkt sich NUR auf die Organisation aus, die Sie aktuell ausgewählt haben
### F: Kann ich mehr als eine Organisation erstellen?
Nein, noch nicht
# Zahlungssystem
> Zahlungsverwaltung in Ihrem Capgo-Konto.
## Worum geht es?
Diese Seite beantwortet einige Fragen zum Zahlungssystem in capgo
#### F: Wie kann ich meinen capgo-Plan upgraden?
A: Sie können Ihren capgo-Plan upgraden, indem Sie zu [den Einstellungen](/docs/webapp/settings/#how-to-get-to-the-settings-page) gehen und auf die Schaltfläche **Pläne** klicken
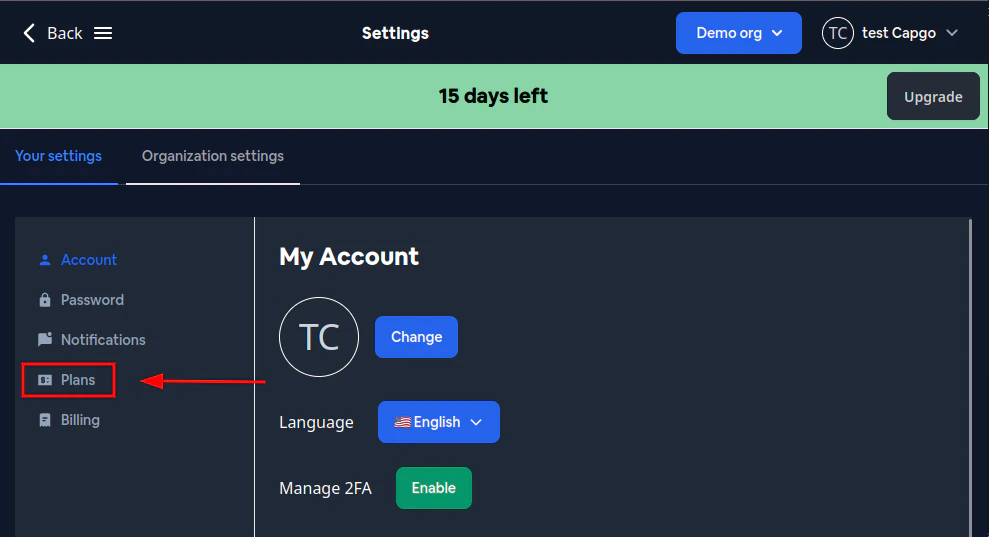
Dann können Sie den Plan auswählen, der am besten zu Ihren Bedürfnissen passt, und auf **Abonnieren** klicken
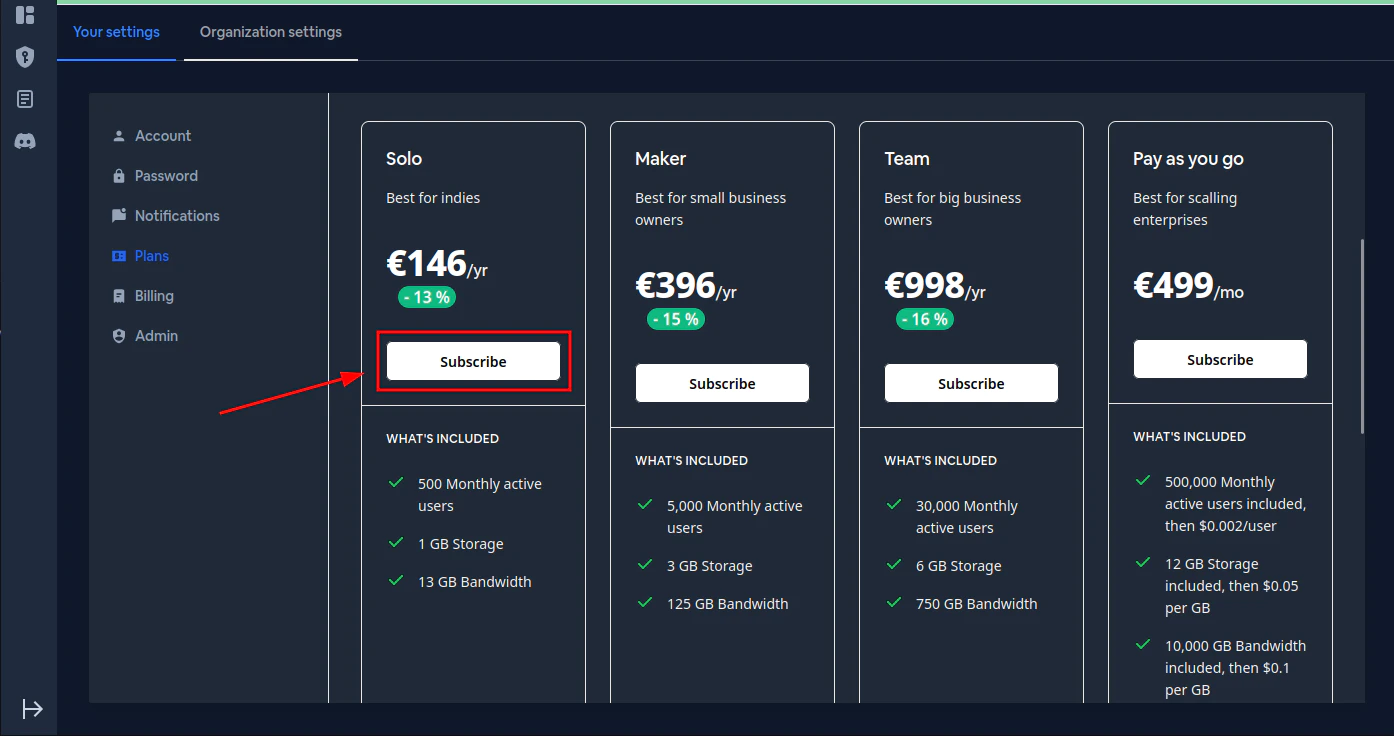
Danach öffnet sich eine Stripe-Seite. Dort können Sie Ihre Zahlungsinformationen eingeben
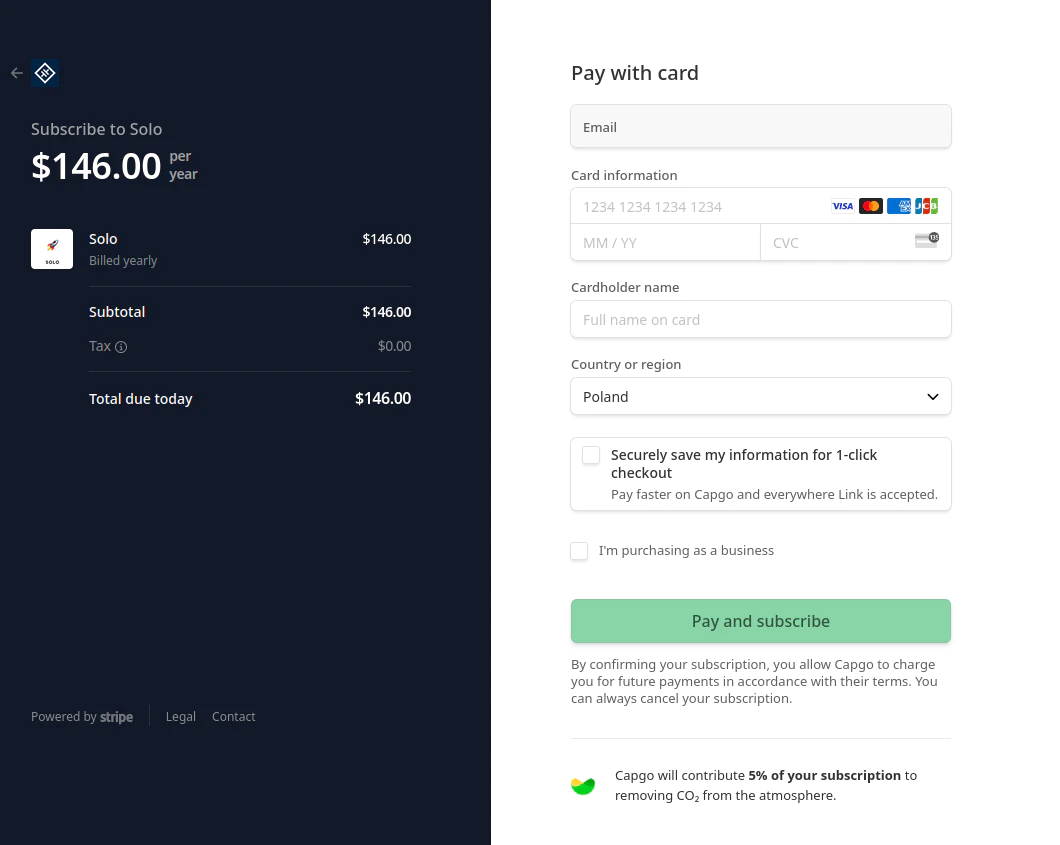
#### F: Sind die Zahlungen sicher?
A: Ja, Zahlungen werden vollständig von Stripe verwaltet. Capgo erhält niemals Zugriff auf Ihre Kreditkartendaten. Stripe nimmt Sicherheit sehr ernst. [Mehr über Stripes Sicherheitsrichtlinien erfahren](https://stripecom/docs/security/)
#### F: Wird capgo meinen Plan automatisch upgraden, wenn ich das Limit überschreite?
A: Nein, capgo wird niemals Ihren Plan ändern
#### F: Wird capgo mir eine E-Mail senden, wenn mein Plan seine Grenzen erreicht?
A: Ja, capgo wird Ihnen eine E-Mail mit Informationen über die Nutzung senden
#### F: Wird der von mir gekaufte Plan die Organisationen beeinflussen, zu denen ich eingeladen wurde?
A: Nein, der Plan wird nur die Organisation beeinflussen, die Sie aktuell ausgewählt haben Bitte beachten Sie [die Organisations-Dokumentation](/docs/webapp/organization-system/#q-how-is-billing-done-within-orgs)
#### F: Was, wenn ich einen maßgeschneiderten Plan benötige?
A: [Bitte kontaktieren Sie den capgo-Support direkt](/docs/getting-help#support-by-chat)
#### F: Wie sieht die Rückerstattungsrichtlinie für capgo aus?
A: Eine Rückerstattungsrichtlinie finden Sie [hier](https://capgo.app/return/)
# Impostazioni
> So ändern Sie die Benutzereinstellungen
## So gelangen Sie zur Einstellungsseite
Klicken Sie zuerst auf **VORNAME NACHNAME**. In meinem Fall ist das **test Capgo**. In Ihrem Fall wird das Ihr Vorname und dann Ihr Nachname sein. Klicken Sie dann auf **Einstellungen**
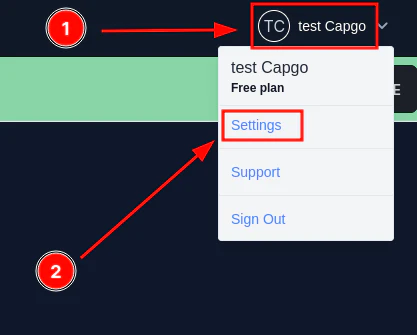
## Benutzereinstellungen ändern
Um Benutzereinstellungen zu ändern, füllen Sie einfach das Formular im Konto aus und klicken Sie dann auf **Aktualisieren**
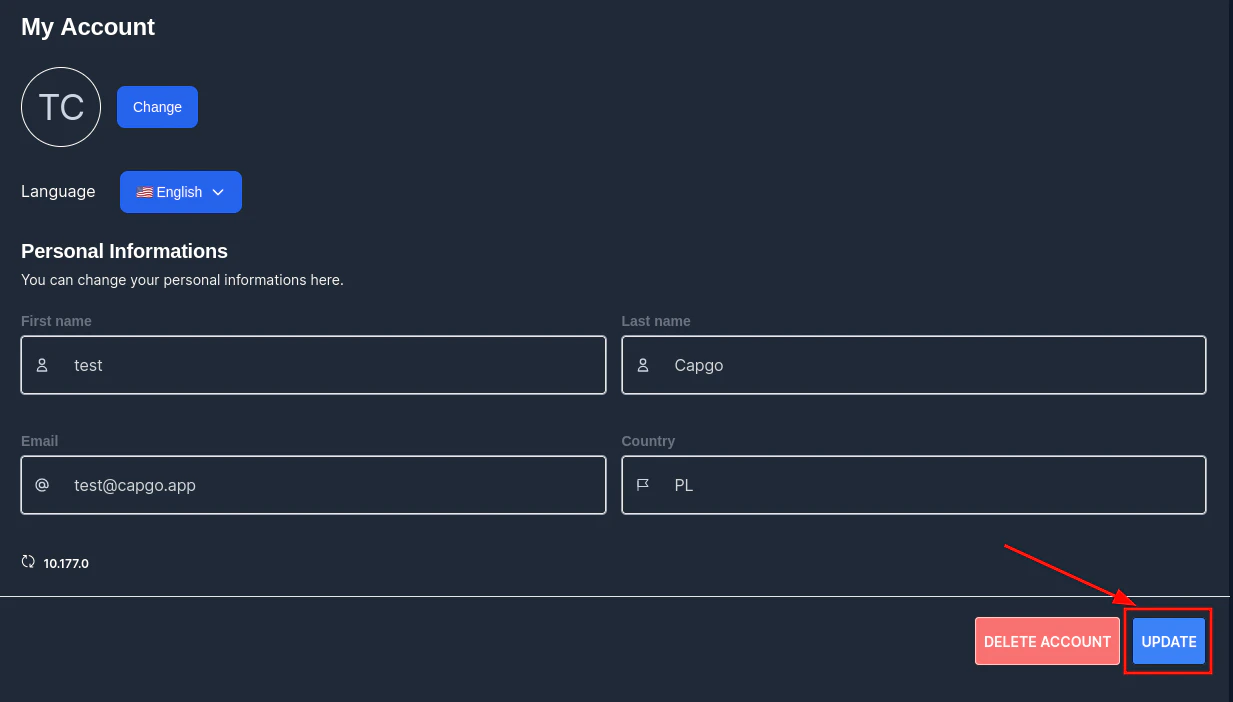
Dann sollte eine Bestätigung erscheinen
## Passwort ändern
Um das Passwort zu ändern, gehen Sie zur Einstellungsseite und klicken Sie auf **Passwort**. Füllen Sie dann das Formular aus und klicken Sie auf **Aktualisieren**

Wenn das Passwort nicht den Capgo-Passwort-Sicherheitsregeln entspricht, erhalten Sie eine Fehlermeldung

# Welcome to Capgo Documentation
> Master Capgo Cloud for instant app updates and explore our comprehensive collection of Capacitor plugins to enhance your mobile development
## 🚀 Capgo Cloud - Live Updates Made Simple
Instant Updates
Deploy JavaScript, HTML, and CSS updates directly to users without app store delays. Fix bugs and ship features in minutes, not days.
3-Step Integration
Get started with just `npx @capgo/cli@latest init [APIKEY]` and start pushing updates immediately with our simple integration.
Advanced Features
Channels for A/B testing, automatic rollbacks, update analytics, encrypted bundles, and enterprise-grade security features.
Complete Guide
Learn everything from [quick setup](/docs/getting-started/quickstart/) to advanced deployment strategies in our comprehensive documentation.
## 📚 What’s in This Documentation
[Capgo Cloud Setup ](/docs/getting-started/quickstart/)Complete guides for integrating live updates, managing channels, CI/CD integration, and monitoring your deployments.
[20+ Capacitor Plugins ](/docs/plugins/)Explore our collection of production-ready plugins for biometrics, purchases, camera, storage, and more native features.
[CLI & Public API ](/docs/cli/overview/)Automate your workflow with our CLI tools and integrate Capgo into your existing systems with our REST API.
[Enterprise Solutions ](/enterprise/)Dedicated support, SLAs, custom features, and advanced security options for teams that need more.
## 🎯 Quick Links
* **First time?** Start with the [5-minute quickstart](/docs/getting-started/quickstart/)
* **Need a plugin?** Browse our [plugin collection](/docs/plugins/) or request [custom development](/consulting/)
* **Having issues?** Check the [FAQ](/docs/faq/) or join our [Discord](https://discord.capgo.app)
* **Enterprise needs?** Check our [enterprise solutions](/enterprise/) or [contact us](mailto:support@capgo.app)
# Commands
> Capgo CLI documentation, how to use it and what is used for
### Usage
All command should be run in your app folder with capacitor project ignited properly.
[Capacitor Cross-platform native runtime for web apps ](https://capacitorjs.com/docs/getting-started/)
### **Init**
`npx @capgo/cli@latest init [apikey]`
This method is here to onboard you step by step.
It will add your app to Capgo. It will add the code to your app to validate the update. Likewise, it will build your app. Furthermore, it will upload your app to Capgo. And it will help you to check if the update works.
### **Login**
`npx @capgo/cli login [apikey]`
This method is here to remember the `apikey` for you.
Note
use `--apikey=********` in any command to override it
**Optionaly you can give:**
`--local` This will store your **apikey** in the local repo and git ignore it.
## **Doctor**
`npx @capgo/cli doctor`
Command to check if you are up-to-date with Capgo packages.
This command will also be useful for bug report.
## App
### **Add**
`npx @capgo/cli app add [appId]`
`[appId]` your app ID the format `com.test.app` is explained [here](https://capacitorjs.com/docs/cli/commands/init/).
> 💡 All option will be guessed in your config if not provided.
Optionally, you can give:
* `--icon [/path/to/my/icon]` to have a custom icon display in Capgo web app.
* `--name [test]` to have a custom name in the list.
* `--apikey [key]` API key to link to your account.
* `--retention [retention]` retention period of app bundle in days, 0 by default = infinite.
Example of `capacitor.config.json` for appId and AppName, the icon is guess in the resources folder
```json
{
"appId": "ee.forgr.capacitor_go",
"appName": "Capgo",
"webDir": "dist"
}
```
### **Set**
`npx @capgo/cli app set [appId]`
`[appId]` is your app ID, the format is explained [here](https://capacitorjs.com/docs/cli/commands/init/).
Optionally, you can give:
* `--icon [/path/to/my/icon]` to have a custom icon display in Capgo web app.
* `--name [test]` to have a custom name in the list.
* `--retention [retention]` retention period of app bundle in days, 0 by default = infinite.
* `--apikey [key]` API key to link to your account.
### **List**
`npx @capgo/cli app list [appId]`
`[appId]` your app ID the format `com.test.app` is explained [here](https://capacitorjs.com/docs/cli/commands/init/).
Optionally, you can give:
* `--apikey [key]` API key to link to your account.
### **Delete**
`npx @capgo/cli app delete [appId]`
`[appId]` your app ID the format `com.test.app` is explained [here](https://capacitorjs.com/docs/cli/commands/init/).
Optionally, you can give:
* `--apikey [key]` API key to link to your account.
* `--bundle` with the version number will only delete this version.
### Debug
`npx @capgo/cli app debug [appId]`
`[appId]` your app ID the format `com.test.app` is explained [here](https://capacitorjs.com/docs/cli/commands/init/).
Optionally, you can give:
* `--apikey [key]` API key to link to your account.
* `--device` with the specific device you want to debug
### Setting
`npx @capgo/cli app setting [path]`
Edit the Capacitor config.
`[path]` - path of the setting that you would like to change. For example, to change the `appId`, provide `appId`. If you wish to disable auto update in the `capacitor-updater` provide `plugins.CapacitorUpdater.autoUpdate`
You MUST provide either `--string` or `--bool`!
Options:
* `--string ` - sets the setting to a string
* `--bool ` - sets the setting to a boolean
## Bundle
### Upload
`npx @capgo/cli bundle upload [appId]`
`[appId]` is your app ID, the format is explained [here](https://capacitorjs.com/docs/cli/commands/init/).
Optionally, you can give:
* `--apikey ` API key to link to your account.
* `--path ` Path of the folder to upload.
* `--channel ` Channel to link to.
* `--external ` Link to external URL instead of uploading to Capgo Cloud.
* `--iv-session-key ` Set the IV and session key for bundle URL external.
* `--s3-endpoint ` URL of S3 endpoint. Do not work with Partial upload, or external option.
* `--s3-region ` Region for your S3 bucket.
* `--s3-apikey ` API key for your S3 endpoint.
* `--s3-apisecret ` API secret for your S3 endpoint.
* `--s3-bucket-name ` Name for your AWS S3 bucket.
* `--s3-port ` Port for your S3 endpoint.
* `--no-s3-ssl` Disable SSL for S3 upload.
* `--key ` Custom path for public signing key (v1 system).
* `--key-data ` Public signing key (v1 system).
* `--key-v2 ` Custom path for private signing key (v2 system).
* `--key-data-v2 ` Private signing key (v2 system).
* `--bundle-url` Prints bundle URL into stdout.
* `--no-key` Ignore signing key and send clear update.
* `--no-code-check` Ignore checking if notifyAppReady() is called in source code and index present in root folder.
* `--display-iv-session` Show in the console the IV and session key used to encrypt the update.
* `--bundle ` Bundle version number of the bundle to upload.
* `--min-update-version ` Minimal version required to update to this version. Used only if the disable auto update is set to metadata in channel.
* `--auto-min-update-version` Set the min update version based on native packages.
* `--ignore-metadata-check` Ignores the metadata (node\_modules) check when uploading.
* `--ignore-checksum-check` Ignores the checksum check when uploading.
* `--timeout ` Timeout for the upload process in seconds.
* `--delta` Uploads delta files alongside the full bundle (legacy flag – identical to `--partial`).
* `--tus` Upload the bundle using tus protocol.
* `--multipart` Uses multipart protocol to upload data to S3, Deprecated, use TUS instead.
* `--encrypted-checksum ` An encrypted checksum (signature). Used only when uploading an external bundle.
* `--package-json ` A path to package.json. Usefull for monorepos.
* `--auto-set-bundle` Set the bundle in capacitor.config.json.
* `--node-modules ` A list of path to node\_modules. Usefull for monorepos (comma separated ex: ../../node\_modules,./node\_modules)
> ⭐️ External option helps to unlock 2 cases: corporate with privacy concern, don’t send the code to a third part and app bigger than 200 MB. With this setting, Capgo store only the link to the zip and sends the link to all apps.
> 👀 Capgo cloud never looks at what is in the link (for external option), or in the code when stored.
> 🔑 You can add a second layer of security by using encryption, then Capgo will not be able to look or modify anything, it becomes “trustless”.
Example of `package.json` for version
```json
{
"version": "1.0.2"
}
```
> ⛔ Version should be greater than “0.0.0”.
> 💡 Don’t forget to update the version number each time you send one, version number cannot be overridden, or reused after deletion for security reason.
### **List**
`npx @capgo/cli bundle list [appId]`
`[appId]` your app ID the format `com.test.app` is explained [here](https://capacitorjs.com/docs/cli/commands/init/).
Optionally, you can give:
* `--apikey [key]` API key to link to your account.
### **Delete**
`npx @capgo/cli bundle delete [appId]`
`[appId]` your app ID the format `com.test.app` is explained [here](https://capacitorjs.com/docs/cli/commands/init/).
Optionally, you can give:
* `--apikey [key]` API key to link to your account.
* `--bundle` with the version number will only delete this version.
### Cleanup
in a SemVer range for a major version to Cloud
`npx @capgo/cli bundle cleanup [appId] --bundle=[majorVersion] --keep=[numberToKeep]`
`[appId]` your app ID the format `com.test.app` is explained [here](https://capacitorjs.com/docs/cli/commands/init/).
Optionally, you can give:
* `--apikey [key]` API key to link to your account.
* `--bundle [majorVersion]` a version you wish to remove previous packages for, it will keep the last one + `numberToKeep`.
* `--keep [numberToKeep]` the number of packages you wish to keep (default 4).
For example: If you have 10 versions from 10.0.1 to 10.0.11, and you use `npx @capgo/cli cleanup [appId] --bundle=10.0.0` it will remove 10.0.1 to 10.0.6. 10.0.7 until 10.0.11 will be kept.
If you have 20 versions in total, and you don’t provide a bundle number like this: `npx @capgo/cli cleanup [appId] --keep=2` It will remove 18 versions, and keep the last 2.
> This command will ask for confirmation, it shows a table of what it will be keeping and removing.
Note
This command will ignore bundles which are currently in use in any channel.
### **Encrypt**
> **Warning**: This command is deprecated and will be removed in the next major release. Please use the new encryption system. `npx @capgo/cli bundle encrypt [path/to/zip]`
This command is used when you use external source to store your code or for test purpose.
Optionally, you can give:
`--key [/path/to/my/private_key]` the path of your private key. `--key-data [privateKey]` the private key data, if you want to use inline. The command will print your `ivSessionKey`y and generate an encrypted zip, to use it with the upload command or decryt command.
### **Encrypt V2**
`npx @capgo/cli bundle encrypt [path/to/zip] [checksum]`
This command is used when you use external source to store your code or for test purpose. The checksum is the sha256 of the bundle (generated by —key-v2), it is used to verify the integrity of the file after decryption. It will be enncrypted with the private key and sent along with the bundle. In encryption v2 the checksum is upgraded to become a “signature” of the bundle.
Optionally, you can give:
`--key [/path/to/my/private_key]` the path of your private key. `--key-data [privateKey]` the private key data, if you want to use inline. `--json` to output info as json. The command will print your `ivSessionKey`y and generate an encrypted zip, to use it with the upload command or decryt command.
### **Decrypt**
`npx @capgo/cli bundle decrypt [path/to/zip] [ivSessionKey]`
Optionally, you can give:
`--key [/path/to/my/private_key]` the path of your private key.
`--key-data [privateKey]` the private key data, if you want to use inline. This command is mainly used for test purpose, it will decrypt the zip and print the base64 decrypted session key in the console.
### **Decrypt V2**
`npx @capgo/cli bundle decryptV2 [path/to/zip] [ivSessionKey]`
Optionally, you can give:
`--key [/path/to/my/private_key]` the path of your private key. `--key-data [privateKey]` the private key data, if you want to use inline. This command is mainly used for test purpose, it will decrypt the zip and print the base64 decrypted session key in the console. `--checksum [checksum]` the checksum of the file, it will verify the checksum after decryption.
### **Zip**
`npx @capgo/cli bundle zip [appId]`
`[appId]` is your app ID, the format is explained [here](https://capacitorjs.com/docs/cli/commands/init/).
Optionally, you can give:
* `--path [/path/to/my/bundle]` to upload a specific folder.
* `--bundle [1.0.0]` to set the bundle version number of the filename.
* `--name [myapp]` to override the filename.
* `--json` to output info as json.
* `--no-code-check` to ignore the code check and send the bundle anyway.
* `--key-v2` to use the new encryption system. This is required as new encryption system use better checksums to verify the integrity of the file.
### **Compatibility**
`npx @capgo/cli bundle compatibility [appId] -c [channelId]`
`[appId]` is your app ID, the format is explained [here](https://capacitorjs.com/docs/cli/commands/init/). `[channelId]` the name of your new channel.
Optionally, you can give:
* `--apikey [key]` API key to link to your account.
* `--text` use text instead of emojis in the table
* `--channel [channel]` the channel to check the compatibility with.
* `--package-json ` A path to package.json. Usefull for monorepos
* `--node-modules ` A list of path to node\_modules. Usefull for monorepos (comma separated ex: ../../node\_modules,./node\_modules)
## Channel
### **Add**
`npx @capgo/cli channel add [channelId] [appId]`
`[channelId]` the name of your new channel. `[appId]` your app ID the format `com.test.app` is explained [here](https://capacitorjs.com/docs/cli/commands/init/).
### **Delete**
`npx @capgo/cli channel delete [channelId] [appId]`
`[channelId]` the name of your channel you want to delete. `[appId]` your app ID the format `com.test.app` is explained [here](https://capacitorjs.com/docs/cli/commands/init/).
### **List**
`npx @capgo/cli channel list [appId]`
`[appId]` your app ID the format `com.test.app` is explained [here](https://capacitorjs.com/docs/cli/commands/init/).
Optionally, you can give:
* `--apikey [key]` API key to link to your account.
### **Set**
`npx @capgo/cli channel set [channelId] [appId]`
`[appId]` is your app ID, the format is explained [here](https://capacitorjs.com/docs/cli/commands/init/).
Optionally, you can give:
* `--bundle [1.2.3]` your app bundle already sent to the cloud, to link it to a channel.
* `--latest` get the bundle version from `package.json:version`, cannot be used with `--bundle`.
* `--state [ normal | default ]` set the channel state, can be `normal` or `default`. One channel needs to be `default`.
* `--downgrade` allows the channel to send downgrade version to devices.
* `--no-downgrade` disallows the channel to send downgrade version to devices.
* `--upgrade` allows the channel to send upgrade (major) version to devices.
* `--no-upgrade` disallow the channel to send upgrade (major) version to devices.
* `--ios` allows the channel to send version to iOS devices.
* `--no-ios` disallows the channel to send version to iOS devices.
* `--android` allows the channel to send version to android devices.
* `--no-android` disallows the channel to send version to android devices.
* `--self-assign` allows devices to self assign to this channel.
* `--no-self-assign` disallows devices to self assign to this channel.
* `--disable-auto-update STRATEGY` Disable auto update strategy for this channel. The possible options are: major, minor, metadata, none.
* `--apikey [key]` API key to link to your account.
## Disable updates strategy
There are a few ways to handle disabling updates for too old versions.\
Capgo cannot update native code thus an update from a version with the old native code to a version with the updated native code should not be possible. There are a couple of ways to achieve that.
First, the `major` strategy. It prevents an update from `0.0.0` -> `1.0.0`. The major is the highlighted number (**1**.0.0 and **0**.0.0).\
Second is the `minor` strategy. It prevents an update from `0.0.0` -> `1.1.0` or an update from `1.1.0` to `1.2.0`. **BE AWARE** this strategy does not prevent an update from `0.1.0` -> `1.1.0`
Third, the `patch` strategy. It was added into capgo as a very strict mode. It’s not recomended to be used unless you fully understand how it works. In order for it to accept a update the following conditions must be meet:
* The major is the same between the new and the old version
* The minor is the same between the new and the old version
* The patch of the new version if greater then the patch of the old version
Here is an example of which scenarios the update is allowed or denied
* 0.0.311 -> 0.0.314 ✅
* 0.0.0 -> 0.0.314 ✅
* 0.0.316 -> 0.0.314 ❌
* 0.1.312 -> 0.0.314 ❌
* 1.0.312 -> 0.0.314 ❌
Lastly the most complicated strategy. The `metadata` strategy.\
First you need to know that initially after you enable it the updates **WILL** fail as the channel is lacking the required metadata.\
If the channel is lacking metadata you will see a message like this:

If you see something like this you know that you have to go to the current bundle for the failing channel and set the metadata.\
First, figure out what channel is failing. You can do that by looking at the `misconfigured` column

Then go to the failing channel and click on `Bundle number`. This should take you to the bundle page.

Once there fill the `Minimal update version` field. This should be a [semver](https://devhints.io/semver/).\
If the value you pass is not a semver you will get an error, but if everything goes correctly you should see something like this:

Now, you likely do not want to set this data manually every time you update. Fortunately, the CLI will prevent you from sending an update without this metadata

To properly upload a bundle when using the `metadata` option you need to pass the `--min-update-version` with the valid semver. Something like this:

The `--min-update-version` is not the ONLY way to do compatibility. There also exists the `--auto-min-update-version`. Here is how it works.
First, it takes a look at the version curently uploaded to the channel. It checks compatibility same as `bundle compatibility` command would. Second, if the new version is 100% compatible it reuses the `min_update_version` from the latest version in the channel. If not, then it sets the `min_update_version` to the bundle number of the newly uploaded version.
You will always get an information what is the `min_update_version` when using this option. It will look something like this:

If the new version is not compatible it should look something like this

## End-to-End encryption (Trustless)
Capgo supports end-to-end encryption, this means that your bundle(code) is encrypted before sent to the cloud and decrypted on the device. For that, you need to generate an RSA key pair, you can use the following command to generate it.
The encryption system is a combination of RSA and AES, the RSA key is used to encrypt the AES key, and the AES key is used to encrypt the file.
See below for more information about the encryption system.

Ecryption schema
### Create key for your app
`npx @capgo/cli key create`
Optionally, you can give: `--force` to overwrite the existing key. This command will create for you a key pair in your app, and will ask you to save the private key in a safe place. It’s recommended to not git commit the private key, and to not share it with anyone.
> After your local test, remove the key from the config file and add it on the CI step with `key save`
### Save key in your app config
`npx @capgo/cli key save`
Optionally, you can give:
`--key [/path/to/my/public_key]` the path of your public key file.
`--key-data [publicKey]` the public key data, if you want to use inline. This command is useful if you followed the recommendation and didn’t commit the key in your app config.
## Ci integration
To automate your work, I recommend you make GitHub action do the job of pushing to our server
[GitHub action tutorial](https://capgo.app/blog/automatic-build-and-release-with-github-actions/)
## Our demo app
[GitHub - Cap-go/demo-app](https://github.com/Cap-go/demo-app/)
Don’t forget to configure CI env variable with your API key
# CLI From 0.x to 1.x
> How to upgrade from 0.x to 1.x, of the updater of Capgo, learn what are the breaking changes and how to handle them
There are no significant changes in the CLI.
The breaking change is mainly the rename of the argument `--version` to `--bundle` to avoid conflict, and follow the new naming everywhere.
# Encryption
> How to encrypt your data with encryption v2, secure your app and ensure only you can update your users with your updates
This documentation explains how to migrate to the encryption v2 system. Learn more about the encryption v2 system in the [blog post](/blog/introducing-end-to-end-security-to-capacitor-updater-with-code-signing).
## 1. Create Key Pair
```bash
npx @capgo/cli key create
```
Store the private key securely. Never commit it to source control or share it with untrusted parties.
This command:
* Creates a new key pair in your app
* Removes the old key from your Capacitor config
* Keeps old key files for backward compatibility
## 2. Update Capacitor Config
When prompted “Do you want to setup encryption with the new channel in order to support old apps and facilitate the migration?”, select yes. This adds a new `defaultChannel` option to your Capacitor config.
capacitor.config.ts
```ts
import { CapacitorConfig } from '@capacitor/cli';
const config: CapacitorConfig = {
appId: 'com.example.app',
appName: 'Example App',
plugins: {
CapacitorUpdater: {
// ... other options
defaultChannel: 'encryption_v2' // New apps will use this channel
}
}
};
export default config;
```
## 3. Upload Bundle to New Channel
```bash
npx @capgo/cli bundle upload --channel encryption_v2
```
## 4. Enable Self-Assignment
Caution
Required for the `defaultChannel` option to work
```bash
npx @capgo/cli channel set encryption_v2 --self-assign
```
## 5. Upload to Old Channel
```bash
npx @capgo/cli bundle upload --channel production
```
Tip
Capacitor config is never uploaded to Capgo
## 6. Cleanup (After 3-4 Months)
Once all users have updated their apps:
1. Remove `defaultChannel` from your Capacitor config
2. Delete the old channel:
```bash
npx @capgo/cli channel delete encryption_v2
```
Note
Apps using `encryption_v2` as default will switch to `production` channel after deletion
# Overview
> This document provides a comprehensive overview of the Capgo CLI, how it can be utilized to enhance your app development process by enabling seamless live updates
Use Capgo’s Live Updates feature to update the JavaScript bundles of your app remotely, in real-time. Push JS updates directly to your users without going through the app store review process to instantly fix bugs and ship new features.
Note
Live Updates are limited to JavaScript bundle changes. If you need to update native code, such as adding or removing a plugin or changing native project configuration, you’ll need to submit a new native binary build to the app stores.
## How Live Updates Work
Capgo’s Live Update system has two key components:
1. The Capgo SDK, which you install in your app. The SDK checks for available updates and downloads them in the background.
2. Channels, which let you target updates to specific groups of users. You can use channels to manage different release tracks, such as `Production`, `Staging`, and `Dev`.
When you upload a new JS bundle to Capgo and assign it to a channel, the Capgo SDK in apps configured for that channel will detect the update and download it. The next time the app restarts, the new bundle will be loaded.
## Getting Started
To start using Live Updates, follow these steps:
1. Complete the [Capgo Quickstart](/docs/getting-started/quickstart) to set up your app in Capgo and install the Capgo SDK.
2. In your app code, call `CapacitorUpdater.notifyAppReady()` after your app has finished initializing. This tells the Capgo SDK that your app is ready to receive updates.
3. Build your JS bundle and upload it to Capgo:
```shell
npm run build
npx @capgo/cli@latest bundle upload --channel=Production
```
4. Open your app and wait for the update to download. You can check the status with:
```shell
npx @capgo/cli@latest app debug
```
5. Once the update is downloaded, close and reopen your app to load the new bundle.
See the [Deploying Live Updates](/docs/getting-started/deploy) guide for more details.
## The Capgo CLI
The Capgo CLI is a powerful tool that allows developers to interact with Capgo’s services from their own CI/CD pipelines. With the CLI, you have granular control over when builds are produced and deployed, enabling you to integrate Capgo into your existing enterprise workflows.
### What is the Capgo CLI for?
The Capgo CLI is designed for developers and teams who need more control and flexibility in their live update workflows. By using the CLI in your CI/CD pipelines, you can:
* Decide exactly when to build and deploy updates, rather than relying on Capgo’s built-in automation
* Insert your own processes, such as code signing, QA testing, or manager approvals, between the build and deploy steps
* Integrate Capgo into your existing DevOps tooling and workflows
### Authentication
To use the Capgo CLI, you’ll need to authenticate with your API key. You can generate an API key in your Capgo account settings.
To log in and securely store your API key, run:
```shell
npx @capgo/cli@latest login [API_KEY]
```
This command will then be saved for future use. You won’t need to provide your API key with each command after logging in.
### Key Differences from Other CLI Tools
If you’re familiar with other live update CLI tools, there are a few key things to note about Capgo’s CLI:
* Capgo uses a single CLI for both development and CI/CD use cases, as Capgo is focused solely on the live update feature set.
* The Capgo CLI doesn’t require a separate installation step. It’s bundled with the `@capgo/cli` package and can be run directly using `npx`.
* Capgo’s CLI is designed specifically for the live update workflow, so it may not include some features or commands found in more general-purpose CLI tools.
## Next Steps
[ Channels](/docs/live-updates/channels/)
[Learn how to use channels to manage different release tracks and target updates to specific users.](/docs/live-updates/channels/)
[ Rollbacks](/docs/live-updates/rollbacks/)
[Discover how to roll back to a previous JS bundle version if an update causes issues.](/docs/live-updates/rollbacks/)
[ Update Behavior](/docs/live-updates/update-behavior/)
[Customize how and when updates are downloaded and applied in your app.](/docs/live-updates/update-behavior/)
[ Fast Updates](/docs/live-updates/differentials/)
[Learn how to use fast updates to speed up the update process.](/docs/live-updates/differentials/)
# Overview
> Detailed documentation for the Capgo CLI commands
The Capgo CLI provides a set of commands for managing your Capgo apps and deployments. This reference provides detailed information about each available command, including its options and usage examples.
## Commands
[ init](/docs/cli/reference/init/)
[Initialize a new Capgo app](/docs/cli/reference/init/)
[ bundle](/docs/cli/reference/bundle/)
[Manage your app bundles](/docs/cli/reference/bundle/)
[ login](./login/)
[Authenticate with the Capgo service](./login/)
[ doctor](/docs/cli/reference/doctor/)
[Check your Capgo setup for potential issues](/docs/cli/reference/doctor/)
[ app](./app/)
[Manage your Capgo apps](./app/)
[ channel](/docs/cli/reference/channel/)
[Manage your release channels](/docs/cli/reference/channel/)
[ key](/docs/cli/reference/key/)
[Manage your app signing keys](/docs/cli/reference/key/)
## CI Integration
To automate your work, we recommend using GitHub Actions to push your updates to Capgo. Check out our [GitHub Actions tutorial](https://capgo.app/blog/automatic-build-and-release-with-github-actions/) for more information.
Don’t forget to configure your CI environment variables with your Capgo API key.
## Demo App
For a complete example of a Capgo app with CI integration, check out our [demo app on GitHub](https://github.com/Cap-go/demo-app/).
# 👤 account
> 👤 Manage your Capgo account details and retrieve information for support or collaboration.
👤 Manage your Capgo account details and retrieve information for support or collaboration.
### []()🔹 **Id**
```bash
npx @capgo/cli@latest account id
```
🪪 Retrieve your account ID, safe to share for collaboration or support purposes in Discord or other platforms.
**Example:**
```bash
npx @capgo/cli@latest account id
```
**Options:**
| Param | Type | Description |
| ------- | -------- | ------------------------------- |
| **-a,** | `string` | API key to link to your account |
# 📱 app
> 📱 Manage your Capgo app settings and configurations in Capgo Cloud.
📱 Manage your Capgo app settings and configurations in Capgo Cloud.
### []()➕ **Add**
**Alias:** `a`
```bash
npx @capgo/cli@latest app add
```
➕ Add a new app to Capgo Cloud with a unique app ID in the format com.test.app. All options can be guessed from config if not provided.
**Example:**
```bash
npx @capgo/cli@latest app add com.example.app --name "My App" --icon ./icon.png
```
**Options:**
| Param | Type | Description |
| -------------- | -------- | ---------------------------------------------------------------- |
| **-n,** | `string` | App name for display in Capgo Cloud |
| **-i,** | `string` | App icon path for display in Capgo Cloud |
| **-a,** | `string` | API key to link to your account |
| **—supa-host** | `string` | Custom Supabase host URL (for self-hosting or Capgo development) |
| **—supa-anon** | `string` | Custom Supabase anon key (for self-hosting) |
### []()🗑️ **Delete**
```bash
npx @capgo/cli@latest app delete
```
🗑️ Delete an app from Capgo Cloud, optionally specifying a version to delete only that bundle.
**Example:**
```bash
npx @capgo/cli@latest app delete com.example.app
```
**Options:**
| Param | Type | Description |
| -------------- | -------- | ---------------------------------------------------------------- |
| **-a,** | `string` | API key to link to your account |
| **—supa-host** | `string` | Custom Supabase host URL (for self-hosting or Capgo development) |
| **—supa-anon** | `string` | Custom Supabase anon key (for self-hosting) |
### []()📋 **List**
**Alias:** `l`
```bash
npx @capgo/cli@latest app list
```
📋 List all apps registered under your account in Capgo Cloud.
**Example:**
```bash
npx @capgo/cli@latest app list
```
**Options:**
| Param | Type | Description |
| -------------- | -------- | ---------------------------------------------------------------- |
| **-a,** | `string` | API key to link to your account |
| **—supa-host** | `string` | Custom Supabase host URL (for self-hosting or Capgo development) |
| **—supa-anon** | `string` | Custom Supabase anon key (for self-hosting) |
### []()🐞 **Debug**
```bash
npx @capgo/cli@latest app debug
```
🐞 Listen for live update events in Capgo Cloud to debug your app. Optionally target a specific device for detailed diagnostics.
**Example:**
```bash
npx @capgo/cli@latest app debug com.example.app --device DEVICE_ID
```
**Options:**
| Param | Type | Description |
| -------------- | -------- | ---------------------------------------------------------------- |
| **-a,** | `string` | API key to link to your account |
| **-d,** | `string` | The specific device ID to debug |
| **—supa-host** | `string` | Custom Supabase host URL (for self-hosting or Capgo development) |
| **—supa-anon** | `string` | Custom Supabase anon key (for self-hosting) |
### []()⚙️ **Setting**
```bash
npx @capgo/cli@latest app setting
```
⚙️ Modify Capacitor configuration programmatically. Specify setting path (e.g., plugins.CapacitorUpdater.defaultChannel) with —string or —bool.
**Example:**
```bash
npx @capgo/cli@latest app setting plugins.CapacitorUpdater.defaultChannel --string "Production"
```
**Options:**
| Param | Type | Description |
| ----------- | -------- | ----------------------------------------------------------------------- |
| **—bool** | `string` | A value for the setting to modify as a boolean, ex: —bool true |
| **—string** | `string` | A value for the setting to modify as a string, ex: —string “Production” |
### []()⚙️ **Set**
**Alias:** `s`
```bash
npx @capgo/cli@latest app set
```
⚙️ Update settings for an existing app in Capgo Cloud, such as name, icon, or retention period for bundles. Retention of 0 means infinite storage.
**Example:**
```bash
npx @capgo/cli@latest app set com.example.app --name "Updated App" --retention 30
```
**Options:**
| Param | Type | Description |
| -------------- | -------- | ---------------------------------------------------------------- |
| **-n,** | `string` | App name for display in Capgo Cloud |
| **-i,** | `string` | App icon path for display in Capgo Cloud |
| **-a,** | `string` | API key to link to your account |
| **-r,** | `string` | Days to keep old bundles (0 = infinite, default: 0) |
| **—supa-host** | `string` | Custom Supabase host URL (for self-hosting or Capgo development) |
| **—supa-anon** | `string` | Custom Supabase anon key (for self-hosting) |
# 📦 bundle
> 📦 Manage app bundles for deployment in Capgo Cloud, including upload, compatibility checks, and encryption.
📦 Manage app bundles for deployment in Capgo Cloud, including upload, compatibility checks, and encryption.
### []()⬆️ **Upload**
**Alias:** `u`
```bash
npx @capgo/cli@latest bundle upload
```
⬆️ Upload a new app bundle to Capgo Cloud for distribution. Version must be > 0.0.0 and unique. Deleted versions cannot be reused for security. External option: Store only a URL link (useful for apps >200MB or privacy requirements). Capgo never inspects external content. Add encryption for trustless security.
**Example:**
```bash
npx @capgo/cli@latest bundle upload com.example.app --path ./dist --channel production
```
**Options:**
| Param | Type | Description |
| ----------------------------------- | --------- | --------------------------------------------------------------------------------------------------------------------------------- |
| **-a,** | `string` | API key to link to your account |
| **-p,** | `string` | Path of the folder to upload, if not provided it will use the webDir set in capacitor.config |
| **-c,** | `string` | Channel to link to |
| **-e,** | `string` | Link to external URL instead of upload to Capgo Cloud |
| **—iv-session-key** | `string` | Set the IV and session key for bundle URL external |
| **—s3-region** | `string` | Region for your S3 bucket |
| **—s3-apikey** | `string` | API key for your S3 endpoint |
| **—s3-apisecret** | `string` | API secret for your S3 endpoint |
| **—s3-endpoint** | `string` | URL of S3 endpoint |
| **—s3-bucket-name** | `string` | Name for your AWS S3 bucket |
| **—s3-port** | `string` | Port for your S3 endpoint |
| **—no-s3-ssl** | `boolean` | Disable SSL for S3 upload |
| **—key-v2** | `string` | Custom path for private signing key (v2 system) |
| **—key-data-v2** | `string` | Private signing key (v2 system) |
| **—bundle-url** | `boolean` | Prints bundle URL into stdout |
| **—no-key** | `boolean` | Ignore signing key and send clear update |
| **—no-code-check** | `boolean` | Ignore checking if notifyAppReady() is called in source code and index present in root folder |
| **—display-iv-session** | `boolean` | Show in the console the IV and session key used to encrypt the update |
| **-b,** | `string` | Bundle version number of the bundle to upload |
| **—link** | `string` | Link to external resource (e.g. GitHub release) |
| **—comment** | `string` | Comment about this version, could be a release note, a commit hash, a commit message, etc. |
| **—min-update-version** | `string` | Minimal version required to update to this version. Used only if the disable auto update is set to metadata in channel |
| **—auto-min-update-version** | `boolean` | Set the min update version based on native packages |
| **—ignore-metadata-check** | `boolean` | Ignores the metadata (node\_modules) check when uploading |
| **—ignore-checksum-check** | `boolean` | Ignores the checksum check when uploading |
| **—timeout** | `string` | Timeout for the upload process in seconds |
| **—multipart** | `boolean` | \[DEPRECATED] Use —tus instead. Uses multipart protocol for S3 uploads |
| **—zip** | `boolean` | Upload the bundle using zip to Capgo cloud (legacy) |
| **—tus** | `boolean` | Upload the bundle using TUS to Capgo cloud |
| **—tus-chunk-size** | `string` | Chunk size in bytes for TUS resumable uploads (default: auto) |
| **—partial** | `boolean` | \[DEPRECATED] Use —delta instead. Upload incremental updates |
| **—partial-only** | `boolean` | \[DEPRECATED] Use —delta-only instead. Upload only incremental updates, skip full bundle |
| **—delta** | `boolean` | Upload incremental/differential updates to reduce bandwidth |
| **—delta-only** | `boolean` | Upload only delta updates without full bundle (useful for large apps) |
| **—encrypted-checksum** | `string` | An encrypted checksum (signature). Used only when uploading an external bundle. |
| **—auto-set-bundle** | `boolean` | Set the bundle in capacitor.config.json |
| **—dry-upload** | `boolean` | Dry upload the bundle process, mean it will not upload the files but add the row in database (Used by Capgo for internal testing) |
| **—package-json** | `string` | Paths to package.json files for monorepos (comma-separated) |
| **—node-modules** | `string` | Paths to node\_modules directories for monorepos (comma-separated) |
| **—encrypt-partial** | `boolean` | Encrypt delta update files (auto-enabled for updater > 6.14.4) |
| **—delete-linked-bundle-on-upload** | `boolean` | Locates the currently linked bundle in the channel you are trying to upload to, and deletes it |
| **—no-brotli-patterns** | `string` | Files to exclude from Brotli compression (comma-separated globs, e.g., “*.jpg,*.png”) |
| **—disable-brotli** | `boolean` | Completely disable brotli compression even if updater version supports it |
| **—version-exists-ok** | `boolean` | Exit successfully if bundle version already exists, useful for CI/CD workflows with monorepos |
| **—self-assign** | `boolean` | Allow devices to auto-join this channel (updates channel setting) |
| **—supa-host** | `string` | Custom Supabase host URL (for self-hosting or Capgo development) |
| **—supa-anon** | `string` | Custom Supabase anon key (for self-hosting) |
### []()🧪 **Compatibility**
```bash
npx @capgo/cli@latest bundle compatibility
```
🧪 Check compatibility of a bundle with a specific channel in Capgo Cloud to ensure updates are safe.
**Example:**
```bash
npx @capgo/cli@latest bundle compatibility com.example.app --channel production
```
**Options:**
| Param | Type | Description |
| ----------------- | --------- | ------------------------------------------------------------------ |
| **-a,** | `string` | API key to link to your account |
| **-c,** | `string` | Channel to check the compatibility with |
| **—text** | `boolean` | Output text instead of emojis |
| **—package-json** | `string` | Paths to package.json files for monorepos (comma-separated) |
| **—node-modules** | `string` | Paths to node\_modules directories for monorepos (comma-separated) |
| **—supa-host** | `string` | Custom Supabase host URL (for self-hosting or Capgo development) |
| **—supa-anon** | `string` | Custom Supabase anon key (for self-hosting) |
### []()🗑️ **Delete**
**Alias:** `d`
```bash
npx @capgo/cli@latest bundle delete
```
🗑️ Delete a specific bundle from Capgo Cloud, optionally targeting a single version.
**Example:**
```bash
npx @capgo/cli@latest bundle delete BUNDLE_ID com.example.app
```
**Options:**
| Param | Type | Description |
| -------------- | -------- | ---------------------------------------------------------------- |
| **-a,** | `string` | API key to link to your account |
| **—supa-host** | `string` | Custom Supabase host URL (for self-hosting or Capgo development) |
| **—supa-anon** | `string` | Custom Supabase anon key (for self-hosting) |
### []()📋 **List**
**Alias:** `l`
```bash
npx @capgo/cli@latest bundle list
```
📋 List all bundles uploaded for an app in Capgo Cloud.
**Example:**
```bash
npx @capgo/cli@latest bundle list com.example.app
```
**Options:**
| Param | Type | Description |
| -------------- | -------- | ---------------------------------------------------------------- |
| **-a,** | `string` | API key to link to your account |
| **—supa-host** | `string` | Custom Supabase host URL (for self-hosting or Capgo development) |
| **—supa-anon** | `string` | Custom Supabase anon key (for self-hosting) |
### []()🧹 **Cleanup**
**Alias:** `c`
```bash
npx @capgo/cli@latest bundle cleanup
```
🧹 Delete old bundles in Capgo Cloud, keeping specified number of recent versions. Bundles linked to channels are preserved unless —ignore-channel is used.
**Example:**
```bash
npx @capgo/cli@latest bundle cleanup com.example.app --bundle=1.0 --keep=3
```
**Options:**
| Param | Type | Description |
| ------------------- | --------- | ------------------------------------------------------------------------- |
| **-b,** | `string` | Bundle version number of the app to delete |
| **-a,** | `string` | API key to link to your account |
| **-k,** | `string` | Number of versions to keep |
| **-f,** | `string` | Force removal |
| **—ignore-channel** | `boolean` | Delete bundles even if linked to channels (WARNING: deletes channels too) |
| **—supa-host** | `string` | Custom Supabase host URL (for self-hosting or Capgo development) |
| **—supa-anon** | `string` | Custom Supabase anon key (for self-hosting) |
### []()🔒 **Encrypt**
```bash
npx @capgo/cli@latest bundle encrypt
```
🔒 Encrypt a zip bundle for secure external storage. Returns ivSessionKey for upload/decryption. Get checksum using ‘bundle zip —json’.
**Example:**
```bash
npx @capgo/cli@latest bundle encrypt ./myapp.zip CHECKSUM
```
**Options:**
| Param | Type | Description |
| ------------- | -------- | ----------------------------------- |
| **—key** | `string` | Custom path for private signing key |
| **—key-data** | `string` | Private signing key |
| **-j,** | `string` | Output in JSON |
### []()🔓 **Decrypt**
```bash
npx @capgo/cli@latest bundle decrypt
```
🔓 Decrypt an encrypted bundle (mainly for testing). Prints base64 session key for verification.
**Example:**
```bash
npx @capgo/cli@latest bundle decrypt ./myapp_encrypted.zip CHECKSUM
```
**Options:**
| Param | Type | Description |
| ------------- | -------- | ------------------------------------------------------------- |
| **—key** | `string` | Custom path for private signing key |
| **—key-data** | `string` | Private signing key |
| **—checksum** | `string` | Checksum of the bundle, to verify the integrity of the bundle |
### []()🔹 **Zip**
```bash
npx @capgo/cli@latest bundle zip
```
🗜️ Create a zip file of your app bundle. Returns checksum for use with encryption. Use —json for machine-readable output.
**Example:**
```bash
npx @capgo/cli@latest bundle zip com.example.app --path ./dist
```
**Options:**
| Param | Type | Description |
| ------------------ | --------- | --------------------------------------------------------------------------------------------- |
| **-p,** | `string` | Path of the folder to upload, if not provided it will use the webDir set in capacitor.config |
| **-b,** | `string` | Bundle version number to name the zip file |
| **-n,** | `string` | Name of the zip file |
| **-j,** | `string` | Output in JSON |
| **—no-code-check** | `boolean` | Ignore checking if notifyAppReady() is called in source code and index present in root folder |
| **—key-v2** | `boolean` | Use encryption v2 |
| **—package-json** | `string` | Paths to package.json files for monorepos (comma-separated) |
# 📢 channel
> 📢 Manage distribution channels for app updates in Capgo Cloud, controlling how updates are delivered to devices.
📢 Manage distribution channels for app updates in Capgo Cloud, controlling how updates are delivered to devices.
### []()➕ **Add**
**Alias:** `a`
```bash
npx @capgo/cli@latest channel add
```
➕ Create a new channel for app distribution in Capgo Cloud to manage update delivery.
**Example:**
```bash
npx @capgo/cli@latest channel add production com.example.app --default
```
**Options:**
| Param | Type | Description |
| ---------------- | --------- | ---------------------------------------------------------------- |
| **-d,** | `string` | Set the channel as default |
| **—self-assign** | `boolean` | Allow device to self-assign to this channel |
| **-a,** | `string` | API key to link to your account |
| **—supa-host** | `string` | Custom Supabase host URL (for self-hosting or Capgo development) |
| **—supa-anon** | `string` | Custom Supabase anon key (for self-hosting) |
### []()🗑️ **Delete**
**Alias:** `d`
```bash
npx @capgo/cli@latest channel delete
```
🗑️ Delete a channel from Capgo Cloud, optionally removing associated bundles to free up resources.
**Example:**
```bash
npx @capgo/cli@latest channel delete production com.example.app
```
**Options:**
| Param | Type | Description |
| ------------------------- | --------- | ---------------------------------------------------------------- |
| **-a,** | `string` | API key to link to your account |
| **—delete-bundle** | `boolean` | Delete the bundle associated with the channel |
| **—success-if-not-found** | `boolean` | Success if the channel is not found |
| **—supa-host** | `string` | Custom Supabase host URL (for self-hosting or Capgo development) |
| **—supa-anon** | `string` | Custom Supabase anon key (for self-hosting) |
### []()📋 **List**
**Alias:** `l`
```bash
npx @capgo/cli@latest channel list
```
📋 List all channels configured for an app in Capgo Cloud to review distribution settings.
**Example:**
```bash
npx @capgo/cli@latest channel list com.example.app
```
**Options:**
| Param | Type | Description |
| -------------- | -------- | ---------------------------------------------------------------- |
| **-a,** | `string` | API key to link to your account |
| **—supa-host** | `string` | Custom Supabase host URL (for self-hosting or Capgo development) |
| **—supa-anon** | `string` | Custom Supabase anon key (for self-hosting) |
### []()📦 **CurrentBundle**
```bash
npx @capgo/cli@latest channel currentBundle
```
📦 Get the current bundle linked to a specific channel in Capgo Cloud for update tracking.
**Example:**
```bash
npx @capgo/cli@latest channel currentBundle production com.example.app
```
**Options:**
| Param | Type | Description |
| -------------- | --------- | ---------------------------------------------------------------- |
| **-c,** | `string` | Channel to get the current bundle from |
| **-a,** | `string` | API key to link to your account |
| **—quiet** | `boolean` | Only print the bundle version |
| **—supa-host** | `string` | Custom Supabase host URL (for self-hosting or Capgo development) |
| **—supa-anon** | `string` | Custom Supabase anon key (for self-hosting) |
### []()⚙️ **Set**
**Alias:** `s`
```bash
npx @capgo/cli@latest channel set
```
⚙️ Configure settings for a channel, such as linking a bundle, setting update strategies (major, minor, metadata, patch, none), or device targeting (iOS, Android, dev, emulator). One channel must be default.
**Example:**
```bash
npx @capgo/cli@latest channel set production com.example.app --bundle 1.0.0 --state default
```
**Options:**
| Param | Type | Description |
| -------------------------- | --------- | -------------------------------------------------------------------------- |
| **-a,** | `string` | API key to link to your account |
| **-b,** | `string` | Bundle version number of the file to set |
| **-s,** | `string` | Set the state of the channel, default or normal |
| **—latest-remote** | `boolean` | Get the latest bundle uploaded in capgo cloud and set it to the channel |
| **—latest** | `boolean` | Get the latest version key in the package.json to set it to the channel |
| **—downgrade** | `boolean` | Allow to downgrade to version under native one |
| **—no-downgrade** | `boolean` | Disable downgrade to version under native one |
| **—ios** | `boolean` | Allow sending update to iOS devices |
| **—no-ios** | `boolean` | Disable sending update to iOS devices |
| **—android** | `boolean` | Allow sending update to Android devices |
| **—no-android** | `boolean` | Disable sending update to Android devices |
| **—self-assign** | `boolean` | Allow device to self-assign to this channel |
| **—no-self-assign** | `boolean` | Disable devices to self-assign to this channel |
| **—disable-auto-update** | `string` | Block updates by type: major, minor, metadata, patch, or none (allows all) |
| **—dev** | `boolean` | Allow sending update to development devices |
| **—no-dev** | `boolean` | Disable sending update to development devices |
| **—emulator** | `boolean` | Allow sending update to emulator devices |
| **—no-emulator** | `boolean` | Disable sending update to emulator devices |
| **—package-json** | `string` | Paths to package.json files for monorepos (comma-separated) |
| **—ignore-metadata-check** | `boolean` | Ignore checking node\_modules compatibility if present in the bundle |
| **—supa-host** | `string` | Custom Supabase host URL (for self-hosting or Capgo development) |
| **—supa-anon** | `string` | Custom Supabase anon key (for self-hosting) |
# 👨⚕️ doctor
> 👨⚕️ Check if your Capgo app installation is up-to-date and gather information useful for bug reports.
👨⚕️ Check if your Capgo app installation is up-to-date and gather information useful for bug reports.
```bash
npx @capgo/cli@latest doctor
```
This command helps diagnose issues with your setup.
**Example:**
```bash
npx @capgo/cli@latest doctor
```
## []()Options
| Param | Type | Description |
| ----------------- | -------- | ----------------------------------------------------------- |
| **—package-json** | `string` | Paths to package.json files for monorepos (comma-separated) |
# 🚀 init
> 🚀 Initialize a new app in Capgo Cloud with step-by-step guidance.
🚀 Initialize a new app in Capgo Cloud with step-by-step guidance.
**Alias:** `i`
```bash
npx @capgo/cli@latest init
```
This includes adding code for updates, building, uploading your app, and verifying update functionality.
**Example:**
```bash
npx @capgo/cli@latest init YOUR_API_KEY com.example.app
```
## []()Options
| Param | Type | Description |
| -------------- | -------- | ---------------------------------------------------------------- |
| **-n,** | `string` | App name for display in Capgo Cloud |
| **-i,** | `string` | App icon path for display in Capgo Cloud |
| **—supa-host** | `string` | Custom Supabase host URL (for self-hosting or Capgo development) |
| **—supa-anon** | `string` | Custom Supabase anon key (for self-hosting) |
# 🔐 key
> 🔐 Manage encryption keys for secure bundle distribution in Capgo Cloud, supporting end-to-end encryption with RSA and AES combination.
🔐 Manage encryption keys for secure bundle distribution in Capgo Cloud, supporting end-to-end encryption with RSA and AES combination.
### []()🔹 **Save**
```bash
npx @capgo/cli@latest key save
```
💾 Save the public key in the Capacitor config, useful for CI environments. Recommended not to commit the key for security.
**Example:**
```bash
npx @capgo/cli@latest key save --key ./path/to/key.pub
```
**Options:**
| Param | Type | Description |
| ------------- | -------- | ------------------------------------ |
| **-f,** | `string` | Force generate a new one |
| **—key** | `string` | Key path to save in Capacitor config |
| **—key-data** | `string` | Key data to save in Capacitor config |
### []()🔨 **Create**
```bash
npx @capgo/cli@latest key create
```
🔨 Create RSA key pair for end-to-end encryption. Creates .capgo\_key\_v2 (private) and .capgo\_key\_v2.pub (public) in project root. Public key is saved to capacitor.config for mobile app decryption. NEVER commit the private key - store it securely!
**Example:**
```bash
npx @capgo/cli@latest key create
```
**Options:**
| Param | Type | Description |
| ------- | -------- | ------------------------ |
| **-f,** | `string` | Force generate a new one |
### []()🗑️ **Delete\_old**
```bash
npx @capgo/cli@latest key delete_old
```
🧹 Delete the old encryption key from the Capacitor config to ensure only the current key is used.
**Example:**
```bash
npx @capgo/cli@latest key delete_old
```
# 🔑 login
> 🔑 Save your Capgo API key to your machine or local folder for easier access to Capgo Cloud services.
🔑 Save your Capgo API key to your machine or local folder for easier access to Capgo Cloud services.
**Alias:** `l`
```bash
npx @capgo/cli@latest login
```
Use —apikey=\*\*\*\*\*\*\*\* in any command to override it.
**Example:**
```bash
npx @capgo/cli@latest login YOUR_API_KEY
```
## []()Options
| Param | Type | Description |
| -------------- | --------- | ---------------------------------------------------------------- |
| **—local** | `boolean` | Only save in local folder, git ignored for security. |
| **—supa-host** | `string` | Custom Supabase host URL (for self-hosting or Capgo development) |
| **—supa-anon** | `string` | Custom Supabase anon key (for self-hosting) |
# 🔹 organisation
> 🏢 Manage your organizations in Capgo Cloud for team collaboration and app management.
🏢 Manage your organizations in Capgo Cloud for team collaboration and app management.
### []()📋 **List**
**Alias:** `l`
```bash
npx @capgo/cli@latest organisation list
```
📋 List all organizations you have access to in Capgo Cloud.
**Example:**
```bash
npx @capgo/cli@latest organisation list
```
**Options:**
| Param | Type | Description |
| -------------- | -------- | ---------------------------------------------------------------- |
| **-a,** | `string` | API key to link to your account |
| **—supa-host** | `string` | Custom Supabase host URL (for self-hosting or Capgo development) |
| **—supa-anon** | `string` | Custom Supabase anon key (for self-hosting) |
### []()➕ **Add**
**Alias:** `a`
```bash
npx @capgo/cli@latest organisation add
```
➕ Create a new organization in Capgo Cloud for team collaboration.
**Example:**
```bash
npx @capgo/cli@latest organisation add --name "My Company" --email admin@mycompany.com
```
**Options:**
| Param | Type | Description |
| -------------- | -------- | ---------------------------------------------------------------- |
| **-n,** | `string` | Organization name |
| **-e,** | `string` | Management email for the organization |
| **-a,** | `string` | API key to link to your account |
| **—supa-host** | `string` | Custom Supabase host URL (for self-hosting or Capgo development) |
| **—supa-anon** | `string` | Custom Supabase anon key (for self-hosting) |
### []()⚙️ **Set**
**Alias:** `s`
```bash
npx @capgo/cli@latest organisation set
```
⚙️ Update organization settings such as name and management email.
**Example:**
```bash
npx @capgo/cli@latest organisation set ORG_ID --name "Updated Company Name"
```
**Options:**
| Param | Type | Description |
| -------------- | -------- | ---------------------------------------------------------------- |
| **-n,** | `string` | Organization name |
| **-e,** | `string` | Management email for the organization |
| **-a,** | `string` | API key to link to your account |
| **—supa-host** | `string` | Custom Supabase host URL (for self-hosting or Capgo development) |
| **—supa-anon** | `string` | Custom Supabase anon key (for self-hosting) |
### []()🗑️ **Delete**
**Alias:** `d`
```bash
npx @capgo/cli@latest organisation delete
```
🗑️ Delete an organization from Capgo Cloud. This action cannot be undone. Only organization owners can delete organizations.
**Example:**
```bash
npx @capgo/cli@latest organisation delete ORG_ID
```
**Options:**
| Param | Type | Description |
| -------------- | -------- | ---------------------------------------------------------------- |
| **-a,** | `string` | API key to link to your account |
| **—supa-host** | `string` | Custom Supabase host URL (for self-hosting or Capgo development) |
| **—supa-anon** | `string` | Custom Supabase anon key (for self-hosting) |
# FAQ
> Frequently asked questions about Capgo, how to solve the most common issue in Capgo or with the Updater, what is OTA and how to manage them
If you have questions not answered here, please ask! Both filing an issue or asking on [Discord](https://discord.capgo.app) work.
### What is “code push”?[](https://capgo.app/docs/#what-is-code-push "Direct link to What is \"code push\"?")
Code push, also referred to as “over the air updates” (OTA) is a cloud service enabling Capacitor developers to deploy updates to their apps in production. Capgo currently works on Android and iOS and will eventually work everywhere Capacitor works.
“Code Push” is a reference to the name of a deploy feature used by the React Native community from [Microsoft](https://appcenter.ms/) and [Expo](https://expo.dev/), neither of which support Capacitor.
### What is the difference between a bundle and a release?[](https://capgo.app/docs/faq/#what-is-the-difference-between-a-bundle-and-a-release "Direct link to What is the difference between a bundle and a release?")
We use the term “release” to mean preparing a binary for the app stores. In order to later generate a bundle Capgo needs to know the exact binary that was shipped to the app stores.
We use the term “bundle” to mean a patch that can be applied to a release to update it to new code. The `npx @capgo/cli@latest bundle upload` command is used to generate a bundle from your new local code which is then shipped to your users.
### What is the roadmap?[](https://capgo.app/docs/faq/#what-is-the-roadmap "Direct link to What is the roadmap?")
Our project boards are also public and found at: [https://github.com/orgs/Cap-go/projects](https://github.com/orgs/Cap-go/projects/)
Our team also operates in the public, so you can see what we’re working on at any time. We’re happy to answer any questions you have about our roadmap or priorities via Github issues or [Discord](https://discord.capgo.app).
### Can I use Capgo with my team?[](https://capgo.app/docs/faq/#can-i-use-capgo-with-my-team "Direct link to Can I use Capgo with my team?")
Yes! All plans support unlimited developers. We only limit app metrics (MAU, storage and bandwidth) to each organization.
See [Teams](https://capgo.app/pricing/) for more information.
### Does Capgo store my source code?[](https://capgo.app/docs/faq/#does-capgo-store-my-source-code "Direct link to Does Capgo store my source code?")
No. Capgo servers never see your source code. When you run `npx @capgo/cli@latest bundle upload`, Capgo stores a zip file of the minified/compiled code - the same code that a browser would receive, not your source code.
For additional security, you have two options:
* **End-to-End Encryption**: Encrypt your bundle before uploading, making it impossible for Capgo to read or modify the contents
* **External URL Upload**: Store the bundle on your own server and only provide Capgo with the download link with the option `--external `
See also our privacy policy: [https://capgo.app/privacy](https://capgo.app/privacy/)
### Can I use Capgo from my CI system?[](https://capgo.app/docs/faq/#can-i-use-capgo-from-my-ci-system "Direct link to Can I use Capgo from my CI system?")
Yes. Capgo is intended to be used from CI systems. We’ve published a guide for [Android and Github Actions](https://capgo.app/blog/automatic-capacitor-android-build-github-action/) and [iOS](https://capgo.app/blog/automatic-capacitor-ios-build-github-action/), and for [GitLab](https://capgo.app/blog/setup-ci-and-cd-gitlab/). Other CI systems should be similar.
Please don’t hesitate to reach out over GitHub issues or Discord if you encounter any issues.
### How does this relate to Firebase Remote Config or Launch Darkly?[](https://capgo.app/docs/faq/#how-does-this-relate-to-firebase-remote-config-or-launch-darkly "Direct link to How does this relate to Firebase Remote Config or Launch Darkly?")
Code push allows adding new code / replacing code on the device. Firebase Remote Config and Launch Darkly are both configuration systems. They allow you to change the configuration of your app without having to ship a new version. They are not intended to replace code.
### How big of a dependency footprint does this add?[](https://capgo.app/docs/faq/#how-big-of-a-dependency-footprint-does-this-add "Direct link to How big of a dependency footprint does this add?")
I haven’t measured recently, but I expect the code push library to add less than one megabyte to Capacitor apps. We know of ways we can make this smaller when that becomes a priority. If size is a blocker for you, please let us know!
### Does Capgo work on the iOS 18.4 Simulator?[](https://capgo.app/docs/faq/#does-capgo-work-on-the-ios-18-4-simulator "Direct link to Does Capgo work on the iOS 18.4 Simulator?")
No. Due to an upstream issue affecting the iOS 18.4 Simulator, Capgo does not run reliably there. Please test on a real device or use a different iOS simulator version.
See details in the React Native issue: [facebook/react-native#50510](https://github.com/facebook/react-native/issues/50510)
### Does code push work with large applications?[](https://capgo.app/docs/faq/#does-code-push-work-with-large-applications "Direct link to Does code push work with large applications?")
Yes. There is no limit on the size of the application that can be updated with code push. As noted [below](https://capgo.app/docs/faq/#what-types-of-changes-does-capgo-code-push-support), Capgo can change any JS code in your application regardless of size.
To note: A bigger size make it harder for users to download updates. We recommend keeping your app as small as possible.
### What can I use Capgo code push for?[](https://capgo.app/docs/faq/#what-can-i-use-capgo-code-push-for "Direct link to What can I use Capgo code push for?")
We’ve seen a variety of uses, including:
* Emergency fixes to production apps.
* Shipping bug fixes to users on older versions of your app.
* Shipping constantly (e.g. every hour).
Note that most app stores prohibit shipping code that changes the behavior of the app in a significant way. Please see [below](https://capgo.app/docs/faq/#how-does-this-relate-to-the-appplay-store-review-process-or-policies) for more information.
### What counts as a “MAU” for Capgo?[](https://capgo.app/docs/faq/#what-counts-as-a-mau-for-capgo "Direct link to What counts as a \"MAU\" for Capgo?")
A MAU is a “Monthly Active User”. In Capgo’s context, this actually refers to a Monthly Active Device. We count a MAU as any device that has contacted our servers in the last 30 days. We do not count devices that have not contacted our servers in the last 30 days.
Each time a device installs your app again, a new MAU is counted, this happen because Apple store limitation about privacy. We cannot track the same device if the user reinstall the app.
During development, each time you reinstall the app, a new MAU is counted.
Same for testflight download or switch channel in Android. Updating the app do not create a new Device ID.
> We recommend after first setup, to disable dev devices and emulators to reduce the amount of duplicated devices.
### What can’t we use Capgo code push for?[](https://capgo.app/docs/faq/#what-cant-we-use-capgo-code-push-for "Direct link to What can't we use Capgo code push for?")
As above, Capgo should not be used to violate app store polices. Please see [below](https://capgo.app/docs/faq/#does-capgo-comply-with-play-store-guidelines) for more information.
Also Capgo does not support changing native code (e.g. Java/Kotlin on Android or Objective-C/Swift on iOS). The tool will warn you during an attempted update if you have changed native code.
### Does Capgo submit to the stores for me?[](https://capgo.app/docs/faq/#does-capgo-submit-to-the-stores-for-me "Direct link to Does Capgo submit to the stores for me?")
Capgo does not currently support submitting to the app stores on your behalf. We have plans to add this in the future, but for now you will need to continue to use your existing processes to submit to the app stores.
You can use our [CI guide Android](https://capgo.app/blog/automatic-capacitor-android-build-github-action/) to automate this process and [CI guide iOS](https://capgo.app/blog/automatic-capacitor-ios-build-github-action/).
### What does Capgo store on disk and where?[](https://capgo.app/docs/faq/#what-does-capgo-store-on-disk-and-where "Direct link to What does Capgo store on disk and where?")
The Capgo updater (included in your application when you build your app) caches the latest downloaded bundle in the only directory that capacitor allow to load code. On Android, this is located in `/data/user/0/com.example.app/code_cache/capgo_updater` although the base of that path is provided by the Android system and can change dynamically at runtime. On iOS devices, data is stored under `Library/Application Support/capgo`.
The Capgo command line tools (e.g. `npx @capgo/cli@latest bundle upload`) are installed on disk in npm caches, your logins are stored in your home directory in `~/.capgo`.
### How does this relate to Capacitor Hot Reload?[](https://capgo.app/docs/faq/#how-does-this-relate-to-capacitor-hot-reload "Direct link to How does this relate to Capacitor Hot Reload?")
Capacitor’s Hot reload is a development-time-only feature. Code push is for production.
Hot reload is a feature of Capacitor that allows you to change code on the device during development. It requires building the Capacitor app with a proxy to connect to your local machine.
Code push is a feature that allows you to change code on the device in production. We will use a variety of different techniques to make this possible depending on the platform.
### What types of changes does Capgo code push support?[](https://capgo.app/docs/faq/#what-types-of-changes-does-capgo-code-push-support "Direct link to What types of changes does Capgo code push support?")
Capgo can change any JS code in your application. This includes app code and generated code. You can also update dependencies in `package.json` as long as they don’t require native code changes.
We do not have plans to support changing native code (e.g. Java/Kotlin on Android or Objective-C/Swift on iOS), and the tool will warn you if it detects that you have changed native code as it will not be included in the bundle.
### Does this support Web?[](https://capgo.app/docs/faq/#does-this-support-web "Direct link to Does this support Web?")
Code push isn’t needed for web as the web already works this way. When a user opens a web app it downloads the latest version from the server if needed.
If you have a use case for code push with web, we’d love to know!
### Will this work on iOS, Android, Mac, Windows, Linux, etc?[](https://capgo.app/docs/faq/#will-this-work-on-ios-android-mac-windows-linux-etc "Direct link to Will this work on iOS, Android, Mac, Windows, Linux, etc?")
Yes.
So far we’ve focused on Android and iOS support, but code push will eventually work everywhere Capacitor works. We’re ensuring we’ve built all the infrastructure needed to provide code push reliably and safely before expanding to more platforms.
### What OS versions does Capgo support?[](https://capgo.app/docs/faq/#what-os-versions-does-capgo-support "Direct link to What OS versions does Capgo support?")
Capgo supports the same versions of Android that Capacitor supports.
Capacitor currently supports Android API level 22+ and iOS 13.0+: [https://capacitorjs.com/docs/main/reference/support-policy](https://capacitorjs.com/docs/main/reference/support-policy/)
### What versions of Capacitor does Capgo support?[](https://capgo.app/docs/faq/#what-versions-of-capacitor-does-capgo-support "Direct link to What versions of Capacitor does Capgo support?")
Capgo currently supports only recent stable releases of Capacitor. We could support older versions of Capacitor as well, we just haven’t built out the infrastructure necessary to maintain such over time. We intend to support more versions of Capacitor in the future, including any version for our enterprise customers. [https://github.com/Cap-go/capgo/issues/1100](https://github.com/Cap-go/capgo/issues/1100/)
Capgo tracks Capacitor stable and generally updates within a few hours of any stable release. Our system for doing these updates is automated takes a few minutes to run. We then do an extra manual verification step before publishing to our servers.
### How does this relate to the App/Play Store review process or policies?[](https://capgo.app/docs/faq/#how-does-this-relate-to-the-appplay-store-review-process-or-policies "Direct link to How does this relate to the App/Play Store review process or policies?")
Developers are bound by their agreements with store providers when they choose to use those stores. Code push is designed to allow developers to update their apps and still comply with store policies on iOS and Android. Similar to the variety of commercial products available to do so with React Native (e.g. [Microsoft](https://appcenter.ms/), [Expo](https://expo.dev/)).
Microsoft also publishes a guide on how their solution complies with the app stores: [https://github.com/microsoft/react-native-code-push#store-guideline-compliance](https://github.com/microsoft/react-native-code-push/#store-guideline-compliance)
Code push is a widely used technique throughout the app stores. All of the large apps I’m aware of use code push. The major policy to be aware of is not to change the behavior of the app in a significant way. Please see [below](https://capgo.app/docs/faq/#does-capgo-comply-with-play-store-guidelines) for more information.
### Does Capgo comply with Play Store guidelines?[](https://capgo.app/docs/faq/#does-capgo-comply-with-play-store-guidelines "Direct link to Does Capgo comply with Play Store guidelines?")
Yes.
The Play Store offers two restrictions relating to update tools.
1. Updates must use an interpreter or virtual machine (Capgo uses JavaScript in a WebView). [https://support.google.com/googleplay/android-developer/answer/9888379?hl=en](https://support.google.com/googleplay/android-developer/answer/9888379/?hl=en)
```plaintext
An app distributed via Google Play may not modify, replace, or update itself
using any method other than Google Play's update mechanism. Likewise, an app
may not download executable code (such as dex, JAR, .so files) from a
source other than Google Play. *This restriction does not apply to code
that runs in a virtual machine or an interpreter* where either provides
indirect access to Android APIs (such as JavaScript in a webview or
browser).
Apps or third-party code, like SDKs, with interpreted languages (JavaScript,
Python, Lua, etc.) loaded at run time (for example, not packaged with the
app) must not allow potential violations of Google Play policies.
```
2. Changes to the app must not be deceptive (e.g. changing the purpose of the app via update). [https://support.google.com/googleplay/android-developer/answer/9888077](https://support.google.com/googleplay/android-developer/answer/9888077/) Please be clear with your users about what you are providing with your application and do not violate their expectations with significant behavioral changes through the use of Capgo.
Capgo is designed to be compatible with the Play Store guidelines. However Capgo is a tool, and as with any tool, can be abused. Deliberately abusing Capgo to violate Play Store guidelines is in violation of the Capgo [Terms of Service](https://capgo.app/tos/) and can result in termination of your account.
Finally, code push services are widely used in the industry (all of the large apps I’m aware of use them) and there are multiple other code push services publicly available (e.g. expo.dev & appcenter.ms). This is a well trodden path.
Microsoft also publishes a guide on how their react native “codepush” library complies with the app stores: [https://github.com/microsoft/react-native-code-push#store-guideline-compliance](https://github.com/microsoft/react-native-code-push/#store-guideline-compliance)
### Does Capgo comply with App Store guidelines?[](https://capgo.app/docs/faq/#does-capgo-comply-with-app-store-guidelines "Direct link to Does Capgo comply with App Store guidelines?")
Yes.
Similar to the Play Store, the App Store offers both technical and policy restrictions.
```plaintext
3.2.2
... interpreted code may be downloaded to an Application but only so long as
such code:
(a) does not change the primary purpose of the Application by providing
features or functionality that are inconsistent with the intended and
advertised purpose of the Application as submitted to the App Store,
(b) does not create a store or storefront for other code or applications, and
(c) does not bypass signing, sandbox, or other security features of the OS.
```
Capgo uses JavaScript in a WebView to comply with the interpreter-only restriction for updates on iOS. So long as your application is not engaging in deceptive behavior via updates (e.g. changing the purpose of the app via update), updating via Capgo (or any other code push solution) is standard industry practice and compliant with App Store guidelines.
Deliberately abusing Capgo to violate App Store guidelines is in violation of the Capgo [Terms of Service](https://capgo.app/tos/) and can result in termination of your account.
Microsoft also publishes a guide on how their react native “codepush” library complies with the app stores: [https://github.com/microsoft/react-native-code-push#store-guideline-compliance](https://github.com/microsoft/react-native-code-push/#store-guideline-compliance)
### Can I use Capgo in my country?[](https://capgo.app/docs/faq/#can-i-use-capgo-in-my-country "Direct link to Can I use Capgo in my country?")
We have not attempted to restrict access to Capgo from any country.
We recognize that some countries have restrictions on what urls can be accessed from within the country. Capgo currently uses Cloudflare Cloud for hosting, including R2 Storage and Cloudflare workers.
The following URLs are used by Capgo:
* [https://api.capgo.app](https://api.capgo.app/) — used by the `npx @capgo/cli` command line tools to interact with the Capgo servers as well as the Capgo updater on users’ devices to check for updates.
* [https://\*.r2.cloudflarestorage.com](https://*.r2.cloudflarestorage.com/) — used by the `npx @capgo/cli` command line tool to upload and download bundle
If all of those URLs are accessible from your country, then Capgo should work.
If your region requires blocking access to any of those URLs, please let us know and we can work with you to find a solution. Proxy servers are one option.
### Can I self-host Capgo?[](https://capgo.app/docs/faq/#can-i-self-host-capgo "Direct link to Can I self-host Capgo?")
Yes, you can self-host Capgo. The guide is not yet written, but the code is open source and available at [https://github.com/cap-go/capgo](https://github.com/cap-go/capgo/)
### Does code push require the internet to work?[](https://capgo.app/docs/faq/#does-code-push-require-the-internet-to-work "Direct link to Does code push require the internet to work?")
Yes. One could imagine running a server to distribute the updates separately from the general internet, but some form of network connectivity is required to transport updates to the devices.
### How is Capgo affected by lack of network connectivity?[](https://capgo.app/docs/faq/#how-is-capgo-affected-by-lack-of-network-connectivity "Direct link to How is Capgo affected by lack of network connectivity?")
Capgo updater (included in your application when you build your app with Capgo) is designed to be resilient to network connectivity issues.
In the default update behavior, when the application launches it alerts the Capgo updater, which spawns a separate thread to make a network request to Capgo’s servers and ask for an update. We intentionally use a separate thread to avoid affecting blocking anything else the application might be doing. If the network request fails or times out, the updater will simply try to check again next time the application launches.
Capgo command line tools (e.g. `npx @capgo/cli@latest bundle upload`) require network connectivity to function. If you are using Capgo to distribute your app, you should ensure that your CI system has network connectivity.
### What happens if a user doesn’t update for a long time and misses an update?[](https://capgo.app/docs/faq/#what-happens-if-a-user-doesnt-update-for-a-long-time-and-misses-an-update "Direct link to What happens if a user doesn't update for a long time and misses an update?")
Our implementation always sends an update specifically tailored for the device that is requesting it updating the requestor always to the latest version available. Thus if a user doesn’t update for a while they will “miss” intermediate updates.
The update server could be changed to support responding with either the next incremental version or the latest version depending on your application’s needs. Please let us know if alternative update behaviors are important to you.
### How does Capgo relate to Capacitor?[](https://capgo.app/docs/faq/#how-does-capgo-relate-to-capacitor "Direct link to How does Capgo relate to Capacitor?")
Capgo is a plugin for Capacitor that adds code push. Capgo is not a replacement for Capacitor. You can continue to use the Capacitor tooling you already know and love.
We track the latest stable release of Capacitor and update our code push plugin to work with it.
### When do updates happen?[](https://capgo.app/docs/faq/#when-do-updates-happen "Direct link to When do updates happen?")
By default, the Capgo updater checks for updates on app startup. It runs on a background thread and does not block the UI thread. Any updates will be installed while the user is using the app and will be applied the next time the app is restarted.
It is also possible to run the Capgo updater manually using the `@capgo/capacitor-updater` package, through which it is possible to trigger updates at any time, including via a push notification.
The Capgo updater is designed such that when the network is not available, or the server is down or otherwise unreachable, the app will continue to run as normal. Should you ever choose to delete an update from our servers, all your clients will continue to run as normal.
We have added the ability to rollback patches. The simplest thing is to simply attach a previous bundle to your channel to undo.
### Do I need to keep my app\_id secret?[](https://capgo.app/docs/faq/#do-i-need-to-keep-my-app_id-secret "Direct link to Do I need to keep my app_id secret?")
No. The `app_id` is included in your app and is safe to be public. You can check it into version control (even publicly) and not worry about someone else accessing it.
Someone who has your `app_id` can fetch the latest version of your app from Capgo servers, but they cannot push updates to your app or access any other aspect of your Capgo account.
### What information is sent to Capgo servers?[](https://capgo.app/docs/faq/#what-information-is-sent-to-capgo-servers "Direct link to What information is sent to Capgo servers?")
Although Capgo connects to the network, it does not send any personally identifiable information. Including Capgo should not affect your declarations for the Play Store or App Store.
Requests sent from the app to Capgo servers include:
* app\_id (specified `capacitor.config.json`)
* channel (optional in `capacitor.config.json`)
* release\_version (versionName from AndroidManifest.xml or CFBundleShortVersionString from Info.plist or `capacitor.config.json` if set in [`CapacitorUpdater.version`](/docs/plugin/settings/#version) )
* version\_number (generated as part of `npx @capgo/cli@latest bundle upload`)
* os\_version (e.g. ‘11.2.1’)
* platform (e.g. ‘android’, needed to send down the right patch) That’s it. The code for this is in `updater/library/src/network.rs`
* device\_id (generated on the device on first run, used to de-duplicate per-device installs and allow us to charge based on users installed to (e.g. monthly active users), rather than total patches or total patch installs)
* custom\_id ( optional, set at runtime by the developer, used for you to link a device to a user in your system)
### What platforms does Capgo support?[](https://capgo.app/docs/faq/#what-platforms-does-capgo-support "Direct link to What platforms does Capgo support?")
Currently, Capgo supports iOS and Android. Both are production ready.
Use of Capgo for iOS or Android can be independent decisions. You can set in your channel to ship to Android and an ipa built to the App Store or vice versa.
Capgo can (relatively easily) be made to support desktop or embedded targets. If those are important to you, please let us know.
### How does Capgo interact with Play Testing Tracks or Apple TestFlight?[](https://capgo.app/docs/faq/#how-does-capgo-interact-with-play-testing-tracks-or-apple-testflight "Direct link to How does Capgo interact with Play Testing Tracks or Apple TestFlight?")
Each of the app stores have separate mechanisms for distributing apps to limited groups of users (e.g. “internal testing”, “closed beta”, etc.). These are all mechanisms for segmenting your users into groups and distributing specific versions of your apps to each.
Unfortunately, these not all of these mechanisms allow 3rd parties to detect when apps are installed in any specific Test Track or via TestFlight. Thus, we do not have reliable visibility into composition of these groups, and cannot reliably gate access to Capgo patches based on these groups. [https://stackoverflow.com/questions/53291007/can-an-android-application-identify-the-test-track-within-google-play](https://stackoverflow.com/questions/53291007/can-an-android-application-identify-the-test-track-within-google-play/) [https://stackoverflow.com/questions/26081543/how-to-tell-at-runtime-whether-an-ios-app-is-running-through-a-testflight-beta-i](https://stackoverflow.com/questions/26081543/how-to-tell-at-runtime-whether-an-ios-app-is-running-through-a-testflight-beta-i/)
If you’d like to segment availability of Capgo bundle, there are 4 potential options:
1. Use separate channel for each group. This is the most straightforward approach, but requires you to manage multiple channels. You may already have a dev channels and prod channels with different availability. You can thus update your dev channels, verify it and then separately update your prod channels. We recommend using branches / tags in your version control to help keep track of the sources associated with each release.
2. Track your own set of opt-in users, disable automatic updates, and trigger updates only for certain users via the `@capgo/capacitor-updater` package. This works today, but requires you to manage your own opt-in list.
3. Capgo allow creare its own opt-in mechanism on a per-device basis (similar to Test Tracks or TestFlight, just platform agnostic). This allow your QA team to opt-in to bundle before they’re promoted to the general public.
4. Capgo have percentage based rollouts. This does not let you choose which devices to send to, but can help you roll out incrementally and roll-back on sight of any problems.
## Billing[](https://capgo.app/docs/faq/#billing "Direct link to Billing")
### How do I upgrade or downgrade my plan?[](https://capgo.app/docs/faq/#how-do-i-upgrade-or-downgrade-my-plan "Direct link to How do I upgrade or downgrade my plan?")
You can upgrade or downgrade your plan at any time in your dashboard: [https://web.capgo.app/dashboard/settings/plans](https://web.capgo.app/dashboard/settings/plans/)
### When does my billing period reset?[](https://capgo.app/docs/faq/#when-does-my-billing-period-reset "Direct link to When does my billing period reset?")
Billing periods are reset automatically every month on the month you first subscribed to Capgo. For example, if you subscribed on the 15th of the month, your billing period will reset on the 15th of every month.
### How do I cancel my subscription?[](https://capgo.app/docs/faq/#how-do-i-cancel-my-subscription "Direct link to How do I cancel my subscription?")
You can cancel your subscription at any time in your dashboard: [https://web.capgo.app/dashboard/settings/plans](https://web.capgo.app/dashboard/settings/plans/)
### Can I pay for a year in advance?[](https://capgo.app/docs/faq/#can-i-pay-for-a-year-in-advance "Direct link to Can I pay for a year in advance?")
Yes you can can at any time in your dashboard: [https://web.capgo.app/dashboard/settings/plans](https://web.capgo.app/dashboard/settings/plans/)
### Stats and analytics[](https://capgo.app/docs/faq/#stats-and-analytics "Direct link to Stats and analytics")
The stats in your dashboard are updated every midnight UTC. The stats are calculated based on the number of [MAU](https://capgo.app/docs/faq/#what-is-the-difference-between-a-bundle-and-a-release "Direct link to What is the difference between a bundle and a release?") that have been installed on your devices.
## How device ID is generated[](https://capgo.app/docs/faq/#how-device-id-is-generated "Direct link to How device ID is generated")
The device ID is generated on the device on first run, and is used to de-duplicate per-device installs and allow us to charge based on users installed to (e.g. monthly active users), rather than total patches or total patch installs.
MAU is a better solution than number of installs to price Capgo, as it is more accurate and reflects the actual cost of Capgo per device.
For privacy reasons, we cannot track the same device if the user reinstall the app.
The privacy rules are enforced by Apple and Google, and are not enforced by Capgo.
Device ID will not be listed in your device list until they get they first patch installed.
## Why my device number is different than my MAU?[](https://capgo.app/docs/faq/#why-my-device-number-is-different-than-my-mau "Direct link to Why my device number is different than my MAU?")
Currently, the device list is not updated as often as the MAU.
The device list is updated only when a device installs an update.
While the MAU is updated at every app launch. This is a current limitation of the platform. Our Analytics platform do not support raw updates so we use conventional database for Devices list.
To limit the number of database queries, we do update row only on app update.
This limitation will be removed in the future.
## How to have different update by platform?[](https://capgo.app/docs/faq/#how-to-have-different-update-by-platform "Direct link to How to have different update by platform?")
You can create a channel for each platform. and disable platform specific updates in each channel.
On ios channel disable android updates and on android channel disable ios updates.
Then upload a bundle to each channel to have different update for each platform.
If you need to have the same update for both platform, you can link one bundle to multiple channels. No need to duplicate the bundle.
# Tech support for Capgo
> How to get tech support for Capgo and our updater, please follow this guide to get help when the doc and our articles are not enough
## Support by discord
Capgo has an official [discord server](https://discord.capgo.app). Getting tech support there is likely one of the fastest ways to get a response.
Here is a crash course:
Step 1 - go to the `questions` channel

Step 2 - create your thread

Step 3 - Describe your problem and select the relevant tags

Step 4 - Share your secure account id (optional)
This will allow the capgo staff to take a look at your account. Sharing this id is safe, as it was designed to be shared publicly.
To share this, please go to [capgo’s settings](https://web.capgo.app/dashboard/settings/account/). There please click on `copy account id`.

This will copy the secure account id to the clipboard. Please include that in your discord post.
## Support by email
This is the slowest way to get support. Please use the discord server first.
If you need to contact us by email, please send an email to .
# Add an App
> Add an app to your Capgo account, and install the plugin in your app
## Requirements
Before getting started with Capgo, make sure you have:
* A Capacitor app installed and configured. [Learn how to set up Capacitor](https://capacitorjs.com/docs/getting-started/)
* Node.js 18 or later installed
## Introduction to Capgo
[Play](https://youtube.com/watch?v=NzXXKoyhTIo)
## Live updates are 3 step away
### Guided setup
1. Create your account at . 
2. Use the Init commands to get started
```bash
npx @capgo/cli@latest init [APIKEY]
```
You will be presented with a series of questions. Provide the necessary answers to complete the automated setup.
Tip
By following these steps, you’ll be up and running in no time. If you need any further assistance during the process, our support team is [here to help](https://support.capgo.app). Happy onboarding!
3. Deploy a live update
[Deploy a live update ](/docs/getting-started/deploy/)Learn how to deploy a live update to your app
### Manual setup
In case the init command doesn’t work for you, you can manually add an app.
1. Connect the CLI to your account:
```bash
npx @capgo/cli@latest login [APIKEY]
```
2. Add the app to your account with this command:
```bash
npx @capgo/cli@latest app add [APP_NAME]
```
3. Install the plugin in your app:
```bash
npm i @capgo/capacitor-updater
```
4. Configure the plugin in your `capacitor.config`
```json
{
"plugins": {
CapacitorUpdater: {
"appId": "Your appID",
"autoUpdate": true,
"version": "1.0.0"
}
}
}
```
[See all option available](/docs/plugin/settings/). This informations will be infer if not provided.
5. Call the init method as early as possible in your app:
```typescript
import { CapacitorUpdater } from '@capgo/capacitor-updater';
CapacitorUpdater.notifyAppReady();
```
6. Deploy a live update
[Deploy a live update ](/docs/getting-started/deploy/)Learn how to deploy a live update to your app
# CI/CD Integration
> Integrating Capgo into your CI/CD pipeline allows you to fully automate the process of building and deploying updates to your app. By leveraging the Capgo CLI and semantic-release, you can ensure consistent, reliable deployments and enable rapid iteration.
Integrating Capgo into your CI/CD pipeline allows you to fully automate the process of building and deploying updates to your app. By leveraging the Capgo CLI and semantic-release, you can ensure consistent, reliable deployments and enable rapid iteration.
## Benefits of CI/CD Integration
* **Automation**: No more manual steps or room for human error. Your entire build, test, and deployment process can be automated from end to end.
* **Consistency**: Every deployment follows the same set of steps, ensuring a predictable and repeatable process. This is especially valuable when you have multiple team members contributing code.
* **Faster iterations**: With automated deployments, you can ship updates more frequently and with confidence. No more waiting for manual QA or release approvals.
## Capgo CLI
The Capgo CLI is the key to integrating Capgo into your CI/CD workflow. It provides commands for pushing new bundle versions, managing channels, and more.
The most important command for CI/CD integration is `bundle upload`:
```shell
npx @capgo/cli@latest bundle upload --channel Production --apikey YOUR_API_KEY
```
If you use encryption you should provide it from one of these ways:
**Using a private key file path:**
```shell
npx @capgo/cli@latest bundle upload --channel Production --apikey YOUR_API_KEY --key-v2 PRIVATE_KEY_PATH
```
**Using the private key content directly (recommended for CI/CD):**
```shell
npx @capgo/cli@latest bundle upload --channel Production --apikey YOUR_API_KEY --key-data-v2 PRIVATE_KEY_CONTENT
```
**Using environment variables (best practice for CI/CD):**
```shell
npx @capgo/cli@latest bundle upload --channel Production --apikey YOUR_API_KEY --key-data-v2 "$CAPGO_PRIVATE_KEY"
```
### Setting up Environment Variables for Encryption
For CI/CD environments, it’s recommended to store your private key as an environment variable rather than a file. Here’s how to set it up:
1. **Get your private key content:**
```shell
cat .capgo_key_v2 | pbcopy
```
This copies the key content to your clipboard.
2. **Add it to your CI/CD environment:**
* **GitHub Actions**: Add `CAPGO_PRIVATE_KEY` to your repository secrets
* **GitLab CI**: Add it as a masked variable in your project settings
* **CircleCI**: Add it as an environment variable in your project settings
* **Jenkins**: Add it as a secret text credential
3. **Use it in your pipeline:**
```yaml
- run: npx @capgo/cli@latest bundle upload --channel=Production --apikey=${{ secrets.CAPGO_API_KEY }} --key-data-v2 "${{ secrets.CAPGO_PRIVATE_KEY }}"
```
**Note**: The `--key-data-v2` flag allows you to pass the private key content directly as a string, making it perfect for environment variables in CI/CD pipelines where you don’t want to create temporary files.
This command uploads the current web build to the specified channel. You’ll typically run this as the last step in your CI/CD pipeline, after your web build has completed successfully.
## Setting up Capgo in your CI/CD Pipeline
While the exact steps will vary depending on your CI/CD tool of choice, the general process for integrating Capgo looks like this:
1. **Generate an API key**: Log in to the Capgo dashboard and create a new API key. This key will be used to authenticate the CLI in your CI/CD environment. Keep it secret and never commit it to your repository!
2. **Configure the `bundle upload` command**: Add a step to your CI/CD configuration that runs the `bundle upload` command with the appropriate arguments:
upload.yml
```yaml
- run: npx @capgo/cli@latest bundle upload --channel=Production --apikey=${{ secrets.CAPGO_API_KEY }}
```
\n Replace `Production` with the channel you want to deploy to, `${{ secrets.CAPGO_API_KEY }}` with the environment variable holding your API key, and add `--key-data-v2 "${{ secrets.CAPGO_PRIVATE_KEY }}"` if using encryption.
3. **Add the `upload` step after your web build**: Ensure that the `upload` step comes after your web build has completed successfully. This ensures you’re always deploying your latest code.\n Here’s an example configuration for GitHub Actions:\n
upload.yml
```yaml
name: Deploy to Capgo
on:
push:
branches: [main]
jobs:
deploy:
runs-on: ubuntu-latest
steps:
- uses: actions/checkout@v3
- uses: actions/setup-node@v4
with:
node-version: 18
- run: npm ci
- run: npm run build
- run: npm install -g @capgo/cli
- run: npx @capgo/cli@latest bundle upload --channel=Production --apikey=${{ secrets.CAPGO_API_KEY }} --key-data-v2 "${{ secrets.CAPGO_PRIVATE_KEY }}"
```
## Version Management with Semantic-release
The recommended way to handle versioning with Capgo is to set the version in your `capacitor.config.ts` file by importing it from `package.json`:
```ts
import pkg from './package.json'
const config: CapacitorConfig = {
// ... other config
plugins: {
CapacitorUpdater: {
version: pkg.version,
}
}
}
```
This approach allows you to:
1. Use semantic-release (or any other tool) to update the `package.json` version
2. Build your app with the updated version automatically included
3. Upload the bundle with the correct version
Your CI/CD workflow would look like this:
```yaml
- run: npm ci
- run: npx semantic-release # Updates package.json version
- run: npm run build # Builds with new version from capacitor.config
- run: npx @capgo/cli@latest bundle upload --channel=Production --apikey=${{ secrets.CAPGO_API_KEY }}
```
Here’s a sample `.releaserc` configuration file for semantic-release:
```json
{
"branches": [
"main",
{
"name": "beta",
"prerelease": true
}
],
"plugins": [
"@semantic-release/commit-analyzer",
"@semantic-release/release-notes-generator",
"@semantic-release/changelog",
[
"@semantic-release/git",
{
"assets": ["CHANGELOG.md", "package.json"],
"message": "chore(release): ${nextRelease.version} [skip ci]\n\n${nextRelease.notes}"
}
]
]
}
```
This configuration does the following:
1. Analyzes commit messages to determine the next version number, following the Conventional Commits spec.
2. Generates release notes based on the commits since the last release.
3. Updates the `CHANGELOG.md` file with the new release notes.
4. Updates the `package.json` version, which will be picked up by your capacitor.config.
5. Commits the updated `CHANGELOG.md`, `package.json`, and any other changed files back to the repository.
Make sure to run semantic-release before building your app so that the updated version from `package.json` is included in your build through the capacitor.config.
## Troubleshooting
If you encounter issues with your Capgo CI/CD integration, here are a few things to check:
* **API key**: Ensure your API key is valid and has the necessary permissions. If using an environment variable, double check that it’s set correctly.
* **CLI version**: Make sure you’re using the latest version of the Capgo CLI. Older versions may have compatibility issues or lack certain features.
* **Build artifacts**: Confirm that your web build is generating the expected output files. The Capgo CLI needs a valid web build to create a bundle.
* **Network connectivity**: Check that your CI/CD environment has network access to the Capgo servers. Firewall or proxy issues can sometimes interfere with the `upload` command.
If you’re still having trouble, reach out to Capgo support for assistance. They can help troubleshoot any issues with your specific setup.
## Conclusion
Integrating Capgo into your CI/CD pipeline with proper version management can greatly streamline your development workflow. By automating your deployments and versioning through the capacitor.config approach, you can ship updates faster and with more confidence.
The recommended approach of setting the version in your `capacitor.config.ts` file and using semantic-release to update `package.json` provides a robust and reliable deployment process that allows you to focus on building great features rather than worrying about manual release steps.
For more details on the Capgo CLI commands and options, check out the [CLI reference](/docs/cli/overview). And for a deeper dive into semantic-release configuration, see the [semantic-release docs](https://github.com/semantic-release/semantic-release).
Happy deploying!
# Deploy a Live Update
> Learn how to deploy a live update to your app using Capgo's Live Updates feature, enabling real-time UI and logic updates without app store resubmission.
Use Capgo’s Live Updates feature to update the UI and business logic of your app remotely, in real-time. Push JS bundle updates directly to your users without going through the app store to instantly fix bugs and ship new features.
This guide assumes you’ve completed the [Capgo Quickstart](/docs/getting-started/quickstart) and have already:
1. Installed the `@capgo/capacitor-updater` SDK in your Capacitor app
2. Configured your app ID and update channel in `capacitor.config.ts`
3. Added in your code the `CapacitorUpdater.notifyAppReady()` method
If you haven’t done those steps yet, please go back and complete the quickstart first.
[Add an app ](/docs/getting-started/add-an-app/)Add an app to your Capgo account, and install the plugin in your app
## Uploading a Bundle
With the Capgo SDK installed and configured, you’re ready to upload your first live update bundle:
1. Build your web assets:
```shell
npm run build
```
2. Upload the bundle to Capgo:
* Console
```shell
npx @capgo/cli@latest bundle upload --channel=Production
```
* Github Actions
.github/workflows/build\_and\_deploy.yml
```yml
name: Build source code and send to Capgo
concurrency:
group: ${{ github.workflow }}-${{ github.ref }}
cancel-in-progress: true
on:
push:
branches:
- main
jobs:
deploy_to_capgo:
runs-on: ubuntu-latest
steps:
- name: Checkout
uses: actions/checkout@v5
- uses: actions/setup-node@v4
with:
node-version: 18
- name: Install dependencies
run: npm install
- name: Build
run: npm run build
- name: Deploy to Capgo
run: npx @capgo/cli@latest bundle upload -a ${{ secrets.CAPGO_TOKEN }} --channel ${{ env.CHANNEL }}
env:
CAPGO_TOKEN: ${{ secrets.CAPGO_TOKEN }}
```
* Gitlab
.gitlab-ci.yml
```yml
stages:
- build
build:
stage: build
image: node:18
cache:
- key:
files:
- package-lock.json
paths:
- .node_modules/
script:
- npm install
- npm run build
- npx @capgo/cli@latest bundle upload -a $CAPGO_TOKEN --channel $CAPGO_CHANNEL
artifacts:
paths:
- node_modules/
- dist/
only:
- master
```
This will upload a new bundle version to the channel specified in the command.
### Troubleshooting Uploads
If your upload fails, double check:
* Your app ID in `capacitor.config.ts` matches your app in the Capgo dashboard
* You’re running the upload command from the root of your Capacitor project
* Your web assets are built and up to date
If you’re still having trouble, go to the [Troubleshooting](/docs/getting-started/troubleshooting/) section.
## Receiving an Update on a Device
Once your bundle is uploaded, you can test the live update on a device:
1. Sync your app to the device:
```shell
npx cap sync ios
```
2. Open another terminal and run the following command to check the update status:
```shell
npx @capgo/cli@latest app debug
```
3. Run your app locally:
```shell
npx cap run ios
```
Or open the iOS/Android project in Xcode/Android Studio and do a native run.
4. Keep the app open for about 30 seconds to allow the update to download in the background.
5. The logs will take a few seconds to update and show the update status.
6. Close and reopen the app. You should see your live update applied!
Refer back to the [Capgo Quickstart](/docs/getting-started/quickstart#receiving-a-live-update-on-a-device) for more details on testing live updates.
## Next Steps
Congrats on deploying your first live update with Capgo! 🎉
To learn more, review the rest of the [Capgo Live Updates documentation](/docs/live-updates). Some key topics to check out next:
* [Targeting Updates with Channels](/docs/live-updates/channels)
* [Customizing Update Behavior](/docs/live-updates/update-behavior)
* [Live Update Rollbacks](/docs/live-updates/rollbacks)
# Overview
> Get started with Capgo by learning the key concepts and steps to integrate and deploy live updates to your app.
The quickstart tutorial will walk you through the key concepts of Capgo! Concepts that will be explored include:
1. Adding an app to your Capgo account
2. Integrating Capgo with your CI/CD
3. Triggering bundle upload on Capgo by pushing commits
4. Configuring and customizing the Capgo bundle publishing
5. Setting up your app to enable live updates via Capgo
6. Deploying live updates to your app from Capgo
Simply follow the guide step-by-step, or navigate directly to the documentation for the component that interests you.
[ Start the Tutorial](/docs/getting-started/add-an-app/)
[Follow the quickstart tutorial and get up and running with Capgo in no time!](/docs/getting-started/add-an-app/)
[ Ship updates](/docs/getting-started/deploy/)
[Ship updates to your app from the Capgo dashboard.](/docs/getting-started/deploy/)
[ Automate updates](/docs/getting-started/cicd-integration/)
[Integrate Capgo with your CI/CD and trigger bundle uploads on Capgo by pushing commits.](/docs/getting-started/cicd-integration/)
[ Trouble Shooting](/docs/getting-started/troubleshooting/)
[Common issues and how to solve them.](/docs/getting-started/troubleshooting/)
[ Wrap Up](/docs/getting-started/wrapping-up/)
[Wrap up the tutorial and get a quick overview of what you’ve learned.](/docs/getting-started/wrapping-up/)
Tip
The Over-the-Air (OTA) update feature is applicable only for modifications made to HTML, CSS, and JavaScript files.
If you make any changes to the native code, such as updates to Capacitor plugins, it is mandatory to resubmit the application to the app store for approval.
## Join Discord Community
[Join the Capgo Discord Server!](https://discord.capgo.app)
## Maintenance
| Plugin version | Capacitor compatibility | Maintained |
| -------------- | ----------------------- | -------------------------------------------------------- |
| v7.\*.\* | v7.\*.\* | ✅ |
| v6.\*.\* | v6.\*.\* | Critical bug only |
| v5.\*.\* | v5.\*.\* | ⚠️ Deprecated |
| v4.\*.\* | v4.\*.\* | ⚠️ Deprecated |
| v3.\*.\* | v3.\*.\* | ⚠️ Deprecated |
| >= 8 | v4.\*.\* | ⚠️ Deprecated due to versioning issues in our CI process |
## Store Guideline Compliance
Android Google Play and iOS App Store have corresponding guidelines that have rules you should be aware of before integrating the Capacitor-updater solution within your application.
### Google play
Third paragraph of [Device and Network Abuse](https://support.google.com/googleplay/android-developer/answer/9888379/?hl=en) topic describe that updating source code by any method other than Google Play’s update mechanism is restricted. But this restriction does not apply to updating javascript bundles.
> This restriction does not apply to code that runs in a virtual machine and has limited access to Android APIs (such as JavaScript in a webview or browser).
That fully allows Capacitor-updater as it updates just the JS bundles and won’t update native code.
### App Store
Paragraph **3.3.2**, since back in 2015’s [Apple Developer Program License Agreement](https://developer.apple.com/programs/ios/information/) fully allows performing over-the-air updates of JavaScript and assets - and in its latest version (20170605) [downloadable here](https://developer.apple.com/terms/) this ruling is even broader:
> Interpreted code may be downloaded to an Application but only so long as such code: (a) does not change the primary purpose of the Application by providing features or functionality that are inconsistent with the intended and advertised purpose of the Application as submitted to the App Store, (b) does not create a store or storefront for other code or applications, and (c) does not bypass signing, sandbox, or other security features of the OS.
Capacitor Updater allows you to follow these rules in full compliance so long as the update you push does not significantly deviate your product from its original App Store approved intent.
To further remain in compliance with Apple’s guidelines we suggest that App Store-distributed apps do not enable the `Force update` scenario, since in the [App Store Review Guidelines](https://developer.apple.com/app-store/review/guidelines/) state that:
> Apps must not force users to rate the app, review the app, download other apps, or other similar actions in order to access functionality, content, or use of the app.
This is not a problem for the default behavior of background update, since it won’t force the user to apply the new version until next time they close the app, but at least you should be aware of that role if you decide to show it.
## Open source
The plugin is under the LGPL-3.0 License and the back-end is AGPL-3.0 License.
> 💡 LGPL-3.0 means if someone modifies the code of the plugin, it’s mandatory to publish it, in open-source with the same licensing. If you use the code without modification, that doesn’t concern you. See the issue below for more details check the link 👇
[Licensing? ](https://github.com/Cap-go/capacitor-updater/issues/7)
[Try GPTS Capgo to Get help instead of reading the docs ](https://chat.openai.com/g/g-3dMwHbF2w-capgo-doc-gpt)
> You can include it in your app without worrying
## Final Notes
If you self-host and find this tool useful, please consider supporting my work by becoming a [GitHub sponsor](https://github.com/sponsors/riderx/).
I made a bet to open-source all the code I built here instead of paywalling it. By opening it up instead of fighting and hiding, I believe we can make the world a better place.
To make this possible, it’s necessary for all of us to do our part, including you 🥹. If Capgo cloud doesn’t meet your needs, you can back a bootstrapped Maker [here](https://github.com/sponsors/riderx/) on your own terms.
## Simple Maths
The price of the basic plan: $14\*12 = $168 a year. While average dev/hour = $60. That means that 3 hours wasted of dev time on self-host allows you to pay for a whole year, if you spent more than 3 hours you’re losing money ^^
# Troubleshooting
> Resolve common issues encountered while using Capgo with detailed troubleshooting steps and advanced options for upload and debugging.
Here are some common issues you might encounter while using Capgo and how to resolve them.
🚀 Need Expert Help?
Stuck with a complex issue? Our expert team is here to help! Get personalized support, code reviews, and custom solutions tailored to your specific needs.
[Get Professional Support](/consulting/)
### Upload failures
If your bundle upload fails, double check:
* Your app ID in `capacitor.config.ts` matches your app in the Capgo dashboard
* You’re running the upload command from the root of your Capacitor project
* Your web assets are built and up to date
#### Advanced upload options
The Capgo CLI provides some additional flags to help with common upload issues:
* `--tus`: Uses the [tus resumable upload protocol](https://tus.io/) for more reliable uploads of large bundles or on poor network connections. If your bundle is over 10MB or you’re on a spotty connection, consider using `--tus`:
```shell
npx @capgo/cli@latest bundle upload --tus
```
* `--package-json` and `--node-modules`: Tells Capgo where to find your root `package.json` and `node_modules` if your app uses a non-standard structure like a monorepo or npm workspace. Pass the path to the root `package.json` and the `--node_modules` path:
```shell
npx @capgo/cli@latest bundle upload --package-json=path/to/package.json --node_modules=path/to/node_modules
```
Capgo needs this information to correctly bundle your app’s dependencies.
You can combine these flags with other options like `--channel` as needed. See the [Capgo CLI docs](/docs/cli/overview/) for full details on the available upload options.
If you’re still having trouble with uploads, reach out to [Capgo support](https://support.capgo.app) for further assistance.
### Debugging Updates
If you’re encountering issues with live updates, the Capgo debug command is a helpful tool for troubleshooting. To use it:
1. Run the following command in your project directory:
```shell
npx @capgo/cli@latest app debug
```
2. Launch your app on a device or emulator and perform the action that should trigger an update (e.g. reopening the app after uploading a new bundle).
3. Watch the output of the debug command. It will log information about the update process, including:
* When the app checks for an update
* If an update is found and what version it is
* Download and installation progress for the update
* Any errors that occur during the update process
4. Use the debug logs to identify where the issue is occurring. For example:
* If no update is found, double check that your bundle was uploaded successfully and the app is configured to use the correct channel.
* If the update downloads but doesn’t install, make sure you’ve called `CapacitorUpdater.notifyAppReady()` and that the app was fully closed and reopened.
* If you see an error message, look up that specific error in the Capgo docs or reach out to support for help.
The debug command is especially useful for identifying issues with the update download and installation process. If the logs show the expected update version was found but not ultimately applied, focus your troubleshooting on the steps after the download.
### Debugging with Native Logs
In addition to the Capgo debug command, the native logs on Android and iOS can provide valuable troubleshooting information, especially for issues on the native side of the update process.
#### Android Logs
To access the Android logs:
1. Connect your device or start your emulator
2. Open Android Studio and select “View > Tool Windows > Logcat”
3. In the Logcat window, filter the logs to just your app’s process by selecting it from the dropdown at the top
4. Look for any lines that include `Capgo` to find the SDK logs
Alternatively, you can use the `adb logcat` command and grep for `Capgo` to filter the logs.
The Capgo SDK will log key events during the update process, such as:
* When an update check is initiated
* If an update is found and what version it is
* When the update download starts and completes
* When the update installation is triggered
* Any errors that occur during the native update steps
Common Android-specific issues you might see in the logs include:
* Network connectivity problems preventing the update download
* File permissions errors when saving or reading the update bundle
* Out of storage space for the update bundle
* Failure to restart the app after the update is installed
#### iOS Logs
To access the iOS logs:
1. Connect your device or start your simulator
2. Open Xcode and go to “Window > Devices and Simulators”
3. Select your device and click on “Open Console”
4. In the console output, look for any lines that include `Capgo` to find the SDK logs
You can also use the `log stream` command in the terminal and grep for `Capgo` to filter the logs.
Similar to Android, the Capgo SDK will log key iOS-side events:
* Update check initiation and result
* Download start, progress, and completion
* Installation trigger and result
* Any errors during the native update process
iOS-specific issues you might identify in the logs include:
* SSL certificate problems when downloading the update
* App transport security blocking the update download
* Insufficient storage space for the update bundle
* Failure to properly extract or apply the update bundle
On both platforms, the native logs provide a lower-level view into the update process, with more details on the native implementation. They are especially useful for identifying issues that occur outside of the Capgo JavaScript layer.
When troubleshooting a tricky live update problem, it’s a good idea to capture both the Capgo debug logs and the native logs for a comprehensive picture of what’s happening. The two logs together will give you the best chance of identifying and resolving the issue.
### Updates not applying
If you’ve uploaded a bundle but aren’t seeing the changes on your device:
* Make sure you’ve called `CapacitorUpdater.notifyAppReady()` in your app code as shown in the [quickstart](/docs/getting-started/quickstart)
* Check that your device is connected to the internet and the Capgo debug logs show the update was downloaded
* Try fully closing and reopening the app, as updates are only applied on a fresh launch
* Look for any errors in the native logs that might indicate a problem applying the update
Refer to the [deploying live updates](/docs/getting-started/deploy) guide for more details on the update process. If you’re still stuck, use the `npx @capgo/cli@latest app debug` command and native logs to get more visibility into what’s happening.
## SDK Installation
If you’re having trouble installing the Capgo SDK, make sure:
* Your app is using a supported version of Capacitor (4.0 or newer)
* You’ve followed the [quickstart](/docs/getting-started/quickstart) steps in order, including syncing your app after installing the SDK
## CI/CD Integration
For issues with triggering Capgo uploads from your CI/CD pipeline:
* Double check your Capgo authentication token is set up correctly
* Make sure you’re running the upload command after your web assets are built
* Check that the upload command is using the correct channel name for your target environment
See the [CI/CD integration](/docs/getting-started/cicd-integration/) docs for more troubleshooting tips. You can also use the `npx @capgo/cli@latest app debug` command to confirm if your CI/CD-triggered updates are being received by the app.
# Wrapping up
> Wrap up your Capgo journey with a concise overview of key concepts and next steps, ensuring a solid foundation for future exploration and mastery.
Now that you have completed the quickstart guide, you should have a basic understanding of the key concepts of Capgo! The key concepts you have learned in this guide are:
1. Adding an app to your Capgo account
2. Integrating Capgo with your CI/CD pipeline
3. Triggering bundle uploads to Capgo on new commits
4. Configuring your app to enable live updates with the Capgo SDK
5. Deploying live updates to your app from the Capgo dashboard
But there’s still more to learn about Capgo! Continue exploring the docs or check out some of these key topics:
[ CI/CD Integration](/docs/getting-started/cicd-integration/)
[Already have a CI/CD pipeline? Learn how to incorporate Capgo into your existing workflow.](/docs/getting-started/cicd-integration/)
[ Live Updates](/docs/live-updates/)
[Dive deeper into Capgo’s live update features and best practices.](/docs/live-updates/)
[ FAQ](/docs/faq/)
[Find answers to common questions about Capgo.](/docs/faq/)
[ Troubleshooting](/docs/getting-started/troubleshooting/)
[Get help with common issues that can come up while using Capgo.](/docs/getting-started/troubleshooting/)
# How to
> A comprehensive guide to Capgo, offering detailed tutorials, insightful tips, and advanced techniques to enhance your effective usage of the platform
[How version works in Capgo ](https://capgo.app/blog/how-version-work-in-capgo/)capgo.app
[How to release major version in Capgo ](https://capgo.app/blog/how-to-release-major-version-in-capgo/)capgo.app
[How to send specific update to one user or a group ](https://capgo.app/blog/how-to-send-specific-version-to-users/)capgo.app
## CI / CD
[Automatic build and release with GitHub Actions ](https://capgo.app/blog/automatic-build-and-release-with-github-actions/)capgo.app
[Manage development and production build with GitHub Actions ](https://capgo.app/blog/automatic-build-and-release-with-github-actions/)capgo.app
## Contributing
[Contributing to Capgo open source ](https://github.com/Cap-go/capgo/blob/main/CONTRIBUTING.md)github.com
# Overview
> Discover how Capgo's Live Updates enable seamless JavaScript bundle updates, allowing you to push changes directly to users without app store delays.
Use Capgo’s Live Updates feature to update the JavaScript bundles of your app remotely, in real-time. Push JS updates directly to your users without going through the app store review process to instantly fix bugs and ship new features.
Note
Live Updates are limited to JavaScript bundle changes. If you need to update native code, such as adding or removing a plugin or changing native project configuration, you’ll need to submit a new native binary build to the app stores.
## How Live Updates Work
Capgo’s Live Update system has two key components:
1. The Capgo SDK, which you install in your app. The SDK checks for available updates and downloads them in the background.
2. Channels, which let you target updates to specific groups of users. You can use channels to manage different release tracks, such as `Production`, `Staging`, and `Dev`.
When you upload a new JS bundle to Capgo and assign it to a channel, the Capgo SDK in apps configured for that channel will detect the update and download it. The next time the app restarts, the new bundle will be loaded.
## Getting Started
To start using Live Updates, follow these steps:
1. Complete the [Capgo Quickstart](/docs/getting-started/quickstart) to set up your app in Capgo and install the Capgo SDK.
2. In your app code, call `CapacitorUpdater.notifyAppReady()` after your app has finished initializing. This tells the Capgo SDK that your app is ready to receive updates.
3. Build your JS bundle and upload it to Capgo:
```shell
npm run build
npx @capgo/cli@latest bundle upload --channel=Production
```
4. Open your app and wait for the update to download. You can check the status with:
```shell
npx @capgo/cli@latest app debug
```
5. Once the update is downloaded, close and reopen your app to load the new bundle.
See the [Deploying Live Updates](/docs/getting-started/deploy) guide for more details.
## Next Steps
[ Channels](/docs/live-updates/channels/)
[Learn how to use channels to manage different release tracks and target updates to specific users.](/docs/live-updates/channels/)
[ Rollbacks](/docs/live-updates/rollbacks/)
[Discover how to roll back to a previous JS bundle version if an update causes issues.](/docs/live-updates/rollbacks/)
[ Update Behavior](/docs/live-updates/update-behavior/)
[Customize how and when updates are downloaded and applied in your app.](/docs/live-updates/update-behavior/)
[ Fast Updates](/docs/live-updates/differentials/)
[Learn how to use fast updates to speed up the update process.](/docs/live-updates/differentials/)
# Breaking Changes
> How to handle breaking changes with versioned channels
This documentation explains how to handle breaking changes in your app using versioned channels. This approach allows you to maintain different versions of your app while ensuring users receive compatible updates.
## Example Scenario
Let’s say you have:
* App version 1.2.3 (old version) - uses production channel
* App version 2.0.0 (new version with breaking changes) - uses v2 channel
* Live update 1.2.4 (compatible with 1.2.3)
* Live update 2.0.1 (compatible with 2.0.0)
## Strategy: Always Use defaultChannel for Major Versions
**Recommended approach:** Set a `defaultChannel` for every major version. This ensures you can always push updates to specific user groups without relying on dynamic channel assignment.
```ts
// Version 1.x releases
defaultChannel: 'v1'
// Version 2.x releases
defaultChannel: 'v2'
// Version 3.x releases (future)
defaultChannel: 'v3'
```
Tip
**Benefits of this approach:**
* **Always have control** over which users receive updates
* **No dynamic channel switching** needed in your app code
* **Clear separation** between different app versions
* **Flexibility** to push updates to any specific version group
## 1. Create Channel for New Version
```bash
# Create channel for version 2.x
npx @capgo/cli channel create v2
```
## 2. Update Capacitor Config for Version 2.0.0
Update your Capacitor config before building version 2.0.0 for the app store:
capacitor.config.ts
```ts
import { CapacitorConfig } from '@capacitor/cli';
const config: CapacitorConfig = {
appId: 'com.example.app',
appName: 'Example App',
plugins: {
CapacitorUpdater: {
// ... other options
defaultChannel: 'v2' // All 2.0.0 users will use v2 channel
}
}
};
export default config;
```
Note
**For version 1.x:** If you didn’t set a `defaultChannel` initially, version 1.x users are on the `production` channel. For future major versions, always set a specific channel like `v3`, `v4`, etc.
## 3. Manage Separate Code Branches
Create separate git branches to maintain compatibility between app versions:
```bash
# Create and maintain a branch for version 1.x updates
git checkout -b v1-maintenance
git push origin v1-maintenance
# Your main branch continues with version 2.x development
git checkout main
```
**Critical:** Never push JavaScript bundles to older apps that expect native code/APIs they don’t have. Always build updates from the appropriate branch:
* **v1-maintenance branch**: For updates to 1.x apps (production channel)
* **main branch**: For updates to 2.x apps (v2 channel)
## 4. Upload Bundles to Respective Channels
```bash
# For 1.x updates: Build from v1-maintenance branch
git checkout v1-maintenance
# Make your 1.x compatible changes here
npx @capgo/cli bundle upload --channel production
# For 2.x updates: Build from main branch
git checkout main
# Make your 2.x changes here
npx @capgo/cli bundle upload --channel v2
```
## 5. Enable Self-Assignment
```bash
# Allow apps to self-assign to v2 channel
npx @capgo/cli channel set v2 --self-assign
```
## 6. Deploy to App Store
Build and deploy version 2.0.0 to the app store. All users who download this version (whether new users or existing users upgrading) will automatically use the v2 channel because it’s configured in the app bundle.
Note
**No code changes needed!** Since `defaultChannel: 'v2'` is bundled with the app store version, all users downloading version 2.0.0 will automatically use the correct channel.
## Scaling to Future Versions
When you release version 3.0.0 with more breaking changes:
```bash
# Create channel for version 3.x
npx @capgo/cli channel create v3
```
```ts
// capacitor.config.ts for version 3.0.0
const config: CapacitorConfig = {
// ...
plugins: {
CapacitorUpdater: {
defaultChannel: 'v3' // Version 3.x users
}
}
};
```
Now you can push updates to any version:
* `production` channel → Version 1.x users
* `v2` channel → Version 2.x users
* `v3` channel → Version 3.x users
## 7. Cleanup (After Migration)
Once all users have migrated to version 2.x (count 3-4 months):
1. Remove `defaultChannel` from your Capacitor config
2. Delete the v2 channel:
```bash
npx @capgo/cli channel delete v2
```
3. Delete the v1-maintenance branch:
```bash
git branch -d v1-maintenance
git push origin --delete v1-maintenance
```
Tip
This approach ensures users only receive updates compatible with their app version
Always test updates thoroughly in each channel before deployment
Note
You can safely delete the v2 channel in Capgo even if some users still have the channel override. They will automatically receive updates from the production channel instead.
## Maintaining Version 1.x Updates
To send updates compatible with version 1.x:
1. Switch to the v1-maintenance branch:
```bash
git checkout v1-maintenance
```
2. Make your changes and commit:
```bash
# Make 1.x compatible changes
git add .
git commit -m "Fix for v1.x"
git push origin v1-maintenance
```
3. Build and upload to production channel:
```bash
npx @capgo/cli bundle upload --channel production
```
Tip
Keep your v1-maintenance branch up to date with bug fixes that are compatible with version 1.x, but never merge breaking changes from main
# Channels
> Learn how to manage and configure Live Update channels in Capgo, enabling seamless app updates by directing specific JS bundle builds to devices configured for those channels.
A Live Update channel points to a specific JS bundle build of your app that will be shared with any devices configured to listen to that channel for updates. When you [install the Capgo Live Updates SDK](/docs/getting-started/quickstart/) in your app, any native binary configured to that channel will check for available updates whenever the app is launched. You can change the build a channel points to at any time and can also roll back to previous builds if needed.
## How a device picks a channel (precedence)
When a device checks for an update, Capgo decides which channel to use in this strict order (highest priority first):
1. **Forced device mapping (Dashboard)** – Manually pin a specific device ID to a channel. Use for urgent debugging or controlled testing with a single real user. This always wins.
2. **Cloud override (per‑device) via `setChannel()` or Dashboard** – Created when your app calls `setChannel()` (often exposed in a QA/debug menu) or you change the device’s channel in the dashboard. Use for QA users switching between feature / PR channels or to reproduce a user issue. Reinstalling the binary does not clear it; deleting the device entry does.
3. **Capacitor config `defaultChannel` (test build default)** – If present in `capacitor.config.*` and no force/override exists, the app starts on this channel (e.g. `beta`, `qa`, `pr-123`). Intended for TestFlight / internal builds so testers land on a pre‑release channel automatically. Production builds typically leave this unset.
4. **Cloud Default Channel (primary path \~99% of users)** – If you mark a default channel in the dashboard, all normal end‑users (no force, no override, no config defaultChannel) attach here. Change it to roll out or roll back instantly—no new binary. If you have platform-specific defaults (one iOS-only, one Android-only), each device lands on the default matching its platform. Leaving the cloud default unset is allowed; in that case the device must match on steps 1–3 to receive updates.
Best practice:
* Treat 1–3 as exception / testing layers; when you set a cloud default, real users should flow into it. If you choose not to set one, be deliberate about how users attach (typically via `defaultChannel` in config or per-device overrides).
* Only configure `defaultChannel` in binaries you explicitly ship to testers. Leaving it unset keeps production logic centralized in the dashboard.
* Use `setChannel()` sparingly in production—mainly for QA or targeted diagnostics.
If a channel is disabled for the platform (iOS/Android toggles) when it would otherwise be chosen, the selection process skips it and continues down the list.
> Summary: Force > Override > Config `defaultChannel` > Cloud Default.
## Default Channel Behavior
Setting a cloud default is optional, but it usually serves as the catch-all path for new devices. Without one, only devices that match on forced mappings, overrides, or a `defaultChannel` in the Capacitor config will receive updates. When you do choose to mark defaults, keep these patterns in mind:
* **Single default (most common)** – If the channel has both iOS and Android enabled, it becomes the lone default; any device without overrides will attach here.
* **Platform-specific defaults** – If you split channels by platform (for example, `ios-production` with only iOS enabled and `android-production` with only Android enabled), mark each one as the default for its platform. iOS devices go to the iOS default, Android devices go to the Android default.
Remember that the cloud default and `defaultChannel` in `capacitor.config.*` both occupy the same decision layer. If you set a cloud default, you don’t need to duplicate the value in your Capacitor config—leave `defaultChannel` empty for production builds. Reserve `defaultChannel` for binaries you intentionally ship to testers or QA when you want them to start on a non-production channel even if the cloud default is different.
You can change defaults at any time in the dashboard. When you swap a default, new devices obey the new routing immediately and existing devices follow the normal precedence rules the next time they check in.
## Setting up a Channel
During onboarding you create the first channel (most teams name it “Production”), but nothing is locked—you can rename or delete any channel at any time. To add additional channels later:
1. Go to the “Channels” section of the Capgo dashboard
2. Click the “New Channel” button
3. Enter a name for the channel and click “Create”
Channel names can be anything you’d like. A common strategy is to match channels to your development stages, such as:
* `Development` - for testing live updates on local devices or emulators
* `QA` - for your QA team to verify updates before wider release
* `Staging` - for final testing in a production-like environment
* `Production` - for the version of your app that end users receive from the app stores
## Configuring the Channel in Your App
With your channels created, you need to configure your app to listen to the appropriate channel. In this example, we’ll use the `Development` channel.
Open your `capacitor.config.ts` (or `capacitor.config.json`) file. Under the `plugins` section, optionally set `defaultChannel` for **test builds** (internal / QA). For production builds, prefer omitting it so devices use the Cloud Default unless explicitly overridden.
```ts
import { CapacitorConfig } from '@capacitor/cli';
const config: CapacitorConfig = {
plugins: {
CapacitorUpdater: {
// For a QA/TestFlight build – testers start on the Development channel automatically.
defaultChannel: 'Development',
// Production builds usually omit this so users attach to the Cloud Default channel.
},
},
};
```
Next, build your web app and run `npx cap sync` to copy the updated config file to your iOS and Android projects. If you skip this sync step, your native projects will continue to use whichever channel they were previously configured for.
Caution
Channel selection order: Force > Override (`setChannel` / dashboard) > Config `defaultChannel` > Cloud Default.
Use `defaultChannel` only in test/internal builds; leave it out for production so users follow the Cloud Default (when set) instead of duplicating the routing in native config.
You can still force (pin) a device or apply an override later—those immediately supersede the config value.
> Channel names are case sensitive.
## Channel Options and Strategies
Channels have several options that control who can receive updates and how updates are delivered. The most important ones are below. You can configure these from the web app, the CLI, or the Public API.
* Default channel: Optionally mark the channel or platform-specific channels that new devices attach to. See “Default Channel Behavior” for routing scenarios.
* Platform filters: Enable or disable delivery to `iOS` and/or `Android` devices per channel.
* Disable auto downgrade under native: Prevents sending an update when the device’s native app version is newer than the channel’s bundle (for example, device on 1.2.3 while channel has 1.2.2).
* Allow development builds: Permit updates to development builds (useful for testing).
* Allow emulator devices: Permit updates to emulators/simulators (useful for testing).
* Allow device self‑assignment: Lets the app switch to this channel at runtime using `setChannel`. If disabled, `setChannel` will fail for this channel.
### Disable Auto Update strategies
Use this to restrict which kinds of updates the channel will automatically deliver. Options:
* major: Block cross‑major updates (0.0.0 → 1.0.0). Minor and patch updates still allowed.
* minor: Block cross‑minor updates (e.g., 1.1.0 → 1.2.0) and majors. Patch updates still allowed. Note: does not block 0.1.0 → 1.1.0.
* patch: Very strict. Allows only increasing patch versions within the same major and minor. Examples: 0.0.311 → 0.0.314 ✅, 0.1.312 → 0.0.314 ❌, 1.0.312 → 0.0.314 ❌.
* metadata: Require a minimum update version metadata on each bundle. Configure via CLI using `--min-update-version` or `--auto-min-update-version`. If missing, the channel is marked misconfigured and updates will be rejected until set.
* none: Allow all updates according to semver compatibility.
Learn more details and examples in Disable updates strategy at /docs/cli/commands/#disable-updates-strategy.
Example (CLI):
```bash
# Block major updates on the Production channel
npx @capgo/cli@latest channel set production com.example.app \
--disable-auto-update major
# Allow devices to self-assign to the Beta channel
npx @capgo/cli@latest channel set beta com.example.app --self-assign
```
## Assigning a Bundle to a Channel
To deploy a live update, you need to upload a new JS bundle build and assign it to a channel. You can do this in one step with the Capgo CLI:
```shell
npx @capgo/cli@latest bundle upload --channel=Development
```
This will upload your built web assets and set the new bundle as the active build for the `Development` channel. Any apps configured to listen to that channel will receive the update the next time they check for one.
You can also assign builds to channels from the “Bundles” section of the Capgo dashboard. Click the menu icon next to a build and select “Assign to Channel” to choose the channel for that build.
## Bundle Versioning and Channels
It’s important to note that bundles in Capgo are global to your app, not specific to individual channels. The same bundle can be assigned to multiple channels.
When versioning your bundles, we recommend using semantic versioning [semver](https://semver.org/) with pre-release identifiers for channel-specific builds. For example, a beta release might be versioned as `1.2.3-beta.1`.
This approach has several benefits:
* It clearly communicates the relationship between builds. `1.2.3-beta.1` is obviously a pre-release of `1.2.3`.
* It allows for reusing version numbers across channels, reducing confusion.
* It enables clear rollback paths. If you need to roll back from `1.2.3`, you know `1.2.2` is the previous stable release.
Here’s an example of how you might align your bundle versions with a typical channel setup:
* `Development` channel: `1.2.3-dev.1`, `1.2.3-dev.2`, etc.
* `QA` channel: `1.2.3-qa.1`, `1.2.3-qa.2`, etc.
* `Staging` channel: `1.2.3-rc.1`, `1.2.3-rc.2`, etc.
* `Production` channel: `1.2.3`, `1.2.4`, etc.
Using semver with pre-release identifiers is a recommended approach, but not strictly required. The key is to find a versioning scheme that clearly communicates the relationships between your builds and aligns with your team’s development process.
## Rolling Back a Live Update
If you deploy a live update that introduces a bug or otherwise needs to be reverted, you can easily roll back to a previous build. From the “Channels” section of the dashboard:
1. Click the name of the channel you want to roll back
2. Find the build you want to revert to and click the crown icon 
3. Confirm the action
The selected build will immediately become the active build for that channel again. Apps will receive the rolled back version the next time they check for an update.
## Automating Deployments
For more advanced workflows, you can automate your live update deployments as part of your CI/CD pipeline. By integrating Capgo into your build process, you can automatically upload new bundles and assign them to channels whenever you push to certain branches or create new releases.
Check out the [CI/CD Integration](/docs/getting-started/cicd-integration/) docs to learn more about automating Capgo live updates.
## Deploying to a Device
Now that you understand channels, you’re ready to start deploying live updates to real devices. The basic process is:
1. Install the Capgo SDK in your app
2. Configure the app to listen to your desired channel
3. Upload a build and assign it to that channel
4. Launch the app and wait for the update!
For a more detailed walkthrough, see the [Deploying Live Updates](/docs/getting-started/deploy/) guide. Happy updating!
## Advanced Channel Usage: User Segmentation
Channels can be used for more than just development stages. They’re a powerful tool for user segmentation, enabling features like:
* Feature flags for different user tiers
* A/B testing
* Gradual feature rollouts
* Beta testing programs
Learn how to implement these advanced use cases in our guide: [How to Segment Users by Plan and Channels for Feature Flags and A/B Testing](/blog/how-to-segment-users-by-plan-and-channels/).
# Compliance
> Learn about Capgo's privacy practices, data collection, security compliance, and how we protect your users' information during live updates.
Capgo is designed with privacy, security, and compliance in mind. This document explains what data is collected, how it’s used, and what measures are in place to protect your users’ privacy and ensure regulatory compliance when using Capgo’s live update service.
## Data Collection Overview
Capgo collects minimal data necessary to provide the live update service effectively. The data collection is focused on operational requirements rather than user tracking or analytics.
### What Data is Collected
Capgo collects only the data that is necessary to provide the live updates feature. When your app checks for updates or downloads new bundles, the following information is collected:
* **App ID**: A unique identifier for your app that is used to associate the app with the correct account
* **App Version Code**: The version code of the app that is used to determine which updates are compatible with the app
* **App Version Name**: The version name of the app that is used for display purposes
* **Platform**: The platform (iOS, Android) of the app that is used to determine which updates are compatible with the app
* **Device ID**: A unique identifier for the device that is used to deliver updates to a specific device and for billing purposes. This identifier is a random string that is created when the app is started for the first time and is reset with every app installation to comply with app store guidelines
* **Bundle ID**: The unique identifier for the bundle that is currently installed on the device
* **Channel Name**: The name of the channel that is selected to receive updates
* **OS Version**: The version of the operating system that is used to determine which updates are compatible with the device
* **Plugin Version**: The version of the @capgo/capacitor-updater plugin that is used to deliver updates to the device
**Additional Technical Data:**
* Update check timestamps
* Download success/failure status
* Bundle installation status
* Rollback events and reasons
* IP address (for geolocation and CDN optimization)
Note
You can verify the data that is collected by inspecting the source code of the @capgo/capacitor-updater plugin, which is open-source and available on [GitHub](https://github.com/Cap-go/capacitor-updater). Capgo does not collect personally identifiable information (PII) such as names, email addresses, phone numbers, or persistent device identifiers that can be used to track individual users across apps.
### What Data is NOT Collected
Capgo explicitly does not collect:
* Personal user information or credentials
* App usage analytics or user behavior data
* Content from your app or user-generated data
* Location data beyond general geographic region
* Persistent device identifiers for tracking
* Biometric or sensitive personal data
## Data Usage and Purpose
The data collected by Capgo is used exclusively for:
### Service Operation
* Determining which updates are available for specific app versions
* Optimizing content delivery through geographic CDN selection
* Ensuring compatibility between updates and device capabilities
* Managing update rollouts and channel assignments
### Service Improvement
* Monitoring update success rates and identifying issues
* Optimizing download performance and reliability
* Improving the overall update delivery system
* Debugging and troubleshooting update failures
### Security and Integrity
* Preventing abuse and ensuring service availability
* Validating update authenticity and integrity
* Protecting against malicious or corrupted updates
* Maintaining service security and stability
## Data Storage and Retention
### Storage Location
* Update bundles and metadata are stored on secure cloud infrastructure
* Data is distributed across multiple geographic regions for performance
* All data transmission is encrypted using industry-standard protocols (HTTPS/TLS)
### Data Retention
* Update check logs are retained for operational purposes (typically 30-90 days)
* Bundle files are retained as long as they’re assigned to active channels
* Aggregated, non-personal metrics may be retained longer for service improvement
* Personal data, if any, is deleted according to applicable data protection laws
### Data Security
* All data is encrypted in transit and at rest
* Access to data is restricted to authorized personnel only
* Regular security audits and monitoring are performed
* Industry-standard security practices are followed
* **SOC 2 Certification**: Capgo is currently SOC 2 Type II certified, ensuring the highest standards of security, availability, and confidentiality. View our compliance status at [trust.capgo.app](https://trust.capgo.app)
* **Continuous Code Auditing**: Every commit is automatically audited by [SonarCloud](https://sonarcloud.io/summary/overall?id=Cap-go_capacitor-updater\&branch=main) for the [plugin](https://sonarcloud.io/summary/overall?id=Cap-go_capgo\&branch=main) and [backend](https://sonarcloud.io/summary/overall?id=Cap-go_capgo\&branch=main), ensuring code quality, security vulnerabilities detection, and maintainability
* **Vulnerability Scanning**: Additional security scanning is performed by [Snyk](https://snyk.io/test/github/Cap-go/capgo) to detect and remediate security vulnerabilities in dependencies
* **Infrastructure Security**: Our hosting infrastructure is continuously monitored and verified through [hosting security checks](https://hosting-checker.net/websites/api.capgo.app)
* **AI-Powered Code Review**: Every pull request is reviewed by CodeRabbit AI to catch potential issues, security concerns, and maintain code quality standards
## Privacy Controls
### For App Developers
As a Capgo user, you have control over:
* **Channel Management**: Control which updates are distributed to which users
* **Data Minimization**: Configure what device information is shared
* **Geographic Controls**: Manage where your updates are distributed
* **Retention Settings**: Control how long update data is retained
### For End Users
Your app users benefit from:
* **Minimal Data Collection**: Only essential data for update delivery is collected
* **No Tracking**: No cross-app or persistent user tracking
* **Transparency**: This privacy policy explains exactly what data is collected
* **Security**: All data transmission is encrypted and secure
## Compliance and Legal
### Data Protection Regulations
Capgo is designed to comply with major data protection regulations including:
* **GDPR** (General Data Protection Regulation)
* **CCPA** (California Consumer Privacy Act)
* **COPPA** (Children’s Online Privacy Protection Act)
* Other applicable regional privacy laws
### App Store Compliance
Capgo strictly adheres to app store guidelines and policies:
* **Apple App Store**: Complies with [App Store Review Guidelines](https://developer.apple.com/app-store/review/guidelines/) section 3.3.2, ensuring that live updates only modify the app’s behavior in ways that are consistent with the submitted app
* **Google Play Store**: Follows [Google Play Developer Policy](https://play.google.com/about/developer-content-policy/) requirements for dynamic code loading and app updates
* **Content Restrictions**: Live updates cannot introduce functionality that wasn’t present in the original app submission or violate platform-specific content policies
* **Security Requirements**: All updates maintain the same security posture and permissions as the original app
### Your Responsibilities
As an app developer using Capgo, you should:
* Include appropriate privacy disclosures in your app’s privacy policy
* Inform users about the use of live update services
* Ensure compliance with applicable laws in your jurisdiction
* Implement appropriate consent mechanisms if required
Tip
**No Additional Privacy Implementation Required**: Capgo is designed to be privacy-compliant by default. You don’t need to implement any additional privacy controls or data handling mechanisms in your app code. The minimal data collection and privacy-by-design approach means that integrating Capgo typically doesn’t require changes to your existing privacy declarations or policies.
## Privacy by Design
Capgo follows privacy-by-design principles:
### Data Minimization
* Only collect data that is absolutely necessary for service operation
* Avoid collecting personal or sensitive information
* Use aggregated and anonymized data where possible
### Purpose Limitation
* Use collected data only for the stated purposes
* Do not repurpose data for unrelated activities
* Maintain clear boundaries on data usage
### Transparency
* Provide clear information about data collection and usage
* Make privacy practices easily accessible and understandable
* Regularly update privacy documentation
## Contact and Questions
If you have questions about Capgo’s privacy practices or need to report a privacy concern:
* Review our full Privacy Policy at [capgo.app/privacy](https://capgo.app/privacy)
* View our security and compliance status at [capgo.app/trust](https://capgo.app/trust)
* Contact our privacy team through the support channels
* Report any privacy-related issues through our security contact
Tip
Remember to update your own app’s privacy policy to reflect the use of Capgo’s live update service and any data collection that may occur as part of the update process.
## Best Practices for Privacy
When implementing Capgo in your app:
1. **Be Transparent**: Inform users about the live update functionality
2. **Minimize Data**: Only enable data collection features you actually need
3. **Secure Implementation**: Follow security best practices in your integration
4. **Regular Reviews**: Periodically review your privacy practices and update policies
5. **User Control**: Consider providing users with options to control update behavior
By following these practices and understanding Capgo’s privacy approach, you can provide your users with a secure, privacy-respecting live update experience.
# Custom Storage
> Learn how to use custom storage solutions with Capgo Live Updates, including external URLs, S3 integration, and bundle encryption for secure deployments.
Capgo supports custom storage solutions for your app bundles, allowing you to host your updates on your own infrastructure or third-party storage services. This is particularly useful for organizations with specific security requirements, compliance needs, or existing storage infrastructure.
## Overview
Custom storage in Capgo works by uploading your bundle to an external location and providing Capgo with the URL to access it. The Capgo SDK will then download updates directly from your custom storage location instead of Capgo’s default cloud storage.
Tip
Custom storage is ideal for:
* Organizations with strict data residency requirements
* Teams with existing CDN or storage infrastructure
* Applications requiring additional security layers
* Cost optimization for large bundle sizes
## External URL Upload
The simplest way to use custom storage is by uploading your bundle to any publicly accessible URL and providing that URL to Capgo.
### Basic External URL Upload
```shell
npx @capgo/cli@latest bundle upload --external https://your-domain.com/bundles/v1.2.3.zip
```
This command tells Capgo to reference the bundle at the specified URL instead of uploading it to Capgo’s cloud storage.
### With Encryption
For secure external storage, you can encrypt your bundle and provide the decryption keys:
```shell
npx @capgo/cli@latest bundle upload --external https://your-domain.com/bundles/v1.2.3.zip --iv-session-key YOUR_IV_SESSION_KEY
```
## S3 Integration
Capgo provides built-in support for Amazon S3 and S3-compatible storage services. The CLI can automatically upload your bundle to S3 and configure Capgo to use the S3 URL.
### S3 Upload Options
```shell
npx @capgo/cli@latest bundle upload \
--s3-region us-east-1 \
--s3-apikey YOUR_ACCESS_KEY \
--s3-apisecret YOUR_SECRET_KEY \
--s3-bucket-name your-bucket-name
```
### Complete S3 Configuration
For S3-compatible services or custom endpoints:
```shell
npx @capgo/cli@latest bundle upload \
--s3-region us-east-1 \
--s3-apikey YOUR_ACCESS_KEY \
--s3-apisecret YOUR_SECRET_KEY \
--s3-endpoint https://s3.your-provider.com \
--s3-bucket-name your-bucket-name \
--s3-port 443 \
--no-s3-ssl # Only if your endpoint doesn't support SSL
```
### S3 Configuration Parameters
| Parameter | Description | Required |
| ------------------ | ----------------------------- | -------- |
| `--s3-region` | AWS region for your S3 bucket | Yes |
| `--s3-apikey` | S3 access key ID | Yes |
| `--s3-apisecret` | S3 secret access key | Yes |
| `--s3-bucket-name` | Name of your S3 bucket | Yes |
| `--s3-endpoint` | Custom S3 endpoint URL | No |
| `--s3-port` | Port for S3 endpoint | No |
| `--no-s3-ssl` | Disable SSL for S3 upload | No |
## Bundle Preparation and Encryption
When using custom storage, especially with encryption, you need to prepare your bundles properly. This involves creating a zip file and optionally encrypting it.
### Step 1: Create a Zip Bundle
First, create a zip file of your app bundle:
```shell
npx @capgo/cli@latest bundle zip com.example.app --path ./dist
```
The zip command will return the checksum of the zip file. You can use this checksum to encrypt the zip file if needed. Use the `--json` option to get structured output including the checksum.
#### Zip Command Options
```shell
npx @capgo/cli@latest bundle zip [appId] \
--path ./dist \
--bundle 1.2.3 \
--name myapp-v1.2.3 \
--json \
--no-code-check \
--key-v2 \
--package-json ../../package.json,./package.json
```
| Option | Description |
| ----------------- | -------------------------------------------------------------------- |
| `--path` | Path to the folder to zip (defaults to webDir from capacitor.config) |
| `--bundle` | Bundle version number to name the zip file |
| `--name` | Custom name for the zip file |
| `--json` | Output results in JSON format (includes checksum) |
| `--no-code-check` | Skip checking for notifyAppReady() call and index file |
| `--key-v2` | Use encryption v2 |
| `--package-json` | Paths to package.json files for monorepos (comma separated) |
### Step 2: Encrypt the Bundle (Optional)
For enhanced security, encrypt your zip bundle before uploading:
```shell
# Using default local key
npx @capgo/cli@latest bundle encrypt ./myapp.zip CHECKSUM
# Using custom key file
npx @capgo/cli@latest bundle encrypt ./myapp.zip CHECKSUM --key ./path/to/.capgo_key_v2
# Using key data directly
npx @capgo/cli@latest bundle encrypt ./myapp.zip CHECKSUM --key-data "PRIVATE_KEY_CONTENT"
```
The `CHECKSUM` parameter is required and should be the checksum of your zip file. You can get the checksum from the zip command output (use `--json` option for structured output).
By default, the encrypt command will use your local private signing key. You can specify a custom key using the `--key` or `--key-data` options.
The encrypt command will return the `ivSessionKey` needed for upload or decryption.
#### Encryption Command Options
| Option | Description |
| ------------ | ------------------------------------------------------------------------- |
| `zipPath` | Path to the zip file to encrypt (required) |
| `checksum` | Checksum of the zip file (required) - get it from zip command |
| `--key` | Custom path for private signing key (optional, uses local key by default) |
| `--key-data` | Private signing key data directly (optional) |
| `--json` | Output results in JSON format |
Caution
The encrypt command will output an `ivSessionKey` that you’ll need to provide when uploading with the `--iv-session-key` option.
## Complete Workflow Examples
### Example 1: External URL with Encryption
1. **Build your app:**
```shell
npm run build
```
2. **Create a zip bundle:**
```shell
npx @capgo/cli@latest bundle zip com.example.app --path ./dist --bundle 1.2.3
```
Note the checksum returned by this command.
3. **Encrypt the bundle:**
```shell
npx @capgo/cli@latest bundle encrypt ./com.example.app-1.2.3.zip CHECKSUM_FROM_STEP_2
```
Note the `ivSessionKey` from the output.
4. **Upload to your storage:** Upload the encrypted zip file to your hosting service.
5. **Register with Capgo:**
```shell
npx @capgo/cli@latest bundle upload \
--external https://your-cdn.com/bundles/com.example.app-1.2.3.zip \
--iv-session-key IV_SESSION_KEY_FROM_STEP_3
```
### Example 2: Direct S3 Upload
1. **Build your app:**
```shell
npm run build
```
2. **Upload directly to S3:**
```shell
npx @capgo/cli@latest bundle upload \
--s3-region us-west-2 \
--s3-apikey YOUR_ACCESS_KEY \
--s3-apisecret YOUR_SECRET_KEY \
--s3-bucket-name your-app-bundles \
--channel Production
```
### Example 3: S3 with Encryption
1. **Build and zip:**
```shell
npm run build
npx @capgo/cli@latest bundle zip com.example.app --path ./dist --key-v2
```
2. **Encrypt the bundle:**
```shell
npx @capgo/cli@latest bundle encrypt ./com.example.app.zip CHECKSUM
```
3. **Upload to S3 with encryption:**
```shell
npx @capgo/cli@latest bundle upload \
--s3-region us-west-2 \
--s3-apikey YOUR_ACCESS_KEY \
--s3-apisecret YOUR_SECRET_KEY \
--s3-bucket-name your-app-bundles \
--iv-session-key IV_SESSION_KEY_FROM_STEP_2 \
--channel Production
```
## Security Considerations
When using custom storage, consider these security best practices:
### Access Control
* Ensure your storage URLs are accessible to your app users but not publicly discoverable
* Use signed URLs or token-based authentication when possible
* Implement proper CORS headers for web-based apps
### Encryption
* Always encrypt sensitive bundles using the Capgo encryption tools
* Store encryption keys securely and rotate them regularly
* Use HTTPS for all bundle URLs (required for iOS and Android)
### Monitoring
* Monitor access logs to detect unusual download patterns
* Set up alerts for failed bundle downloads
* Regularly audit your storage permissions
## Troubleshooting
### Common Issues
**Bundle not downloading:**
* Verify the URL is publicly accessible and uses HTTPS (required for iOS and Android)
* Check CORS headers for web apps
* Ensure the bundle format is correct
**Encryption errors:**
* Verify the `ivSessionKey` matches the encrypted bundle
* Check that the bundle was encrypted with the correct key
* Ensure encryption v2 is used for new bundles
**S3 upload failures:**
* Verify your S3 credentials and permissions
* Check bucket policies and CORS configuration
* Ensure the specified region is correct
### Debug Commands
Check bundle status:
```shell
npx @capgo/cli@latest app debug
```
Verify bundle integrity:
```shell
npx @capgo/cli@latest bundle list
```
## Next Steps
* Learn about [Channels](/docs/live-updates/channels/) to manage different deployment environments
* Explore [Update Behavior](/docs/live-updates/update-behavior/) to customize how updates are applied
* Set up [CI/CD Integration](/docs/getting-started/cicd-integration/) to automate your custom storage workflow
# Delta updates
> Learn how Capgo's differential updates optimize data transfer by only sending changed files, enhancing performance on slower networks.
Capgo’s Live Update system can deliver updates faster and more efficiently by only sending the changed files, rather than the entire JS bundle.
This is especially beneficial for users on slower or metered network connections, as it minimizes the amount of data that needs to be downloaded.
A second benefit is when the app have large assets who change rarely, like images or videos, compare to zipped JS files it will be downloaded only once.
## How Differential Updates Work
Differential updates in Capgo are handled by the Capgo plugin installed in your app. When you upload a new version of your app using the `--partial` flag, Capgo does the following:
1. Each file in your build is uploaded individually
2. Checksums are generated for each file
3. A new json manifest is created, listing all files and their checksums
4. This manifest is uploaded to the Capgo database
When a device running your app checks for an update, the Capgo plugin receives the new manifest from the server. It compares this manifest to the one it currently has, identifying which files have changed based on the checksums and files path.
The plugin then downloads only the changed files, rather than the entire JS bundle. It reconstructs the new version of the app by combining these downloaded files with the unchanged files it already has.
Manifest
In case of differential updates, the device stores all downloaded files in a common cache, Capgo will never clean it but the OS can at any time.
## Enabling Differential Updates
To enable differential updates for your Capgo app, simply use the `--partial` flag when uploading a new version:
## Enforcing Differential Updates
If you want to ensure that all uploads are differential updates and prevent any accidental full bundle uploads, you can use the `--partial-only` flag:
```shell
npx @capgo/cli@latest bundle upload --partial-only
```
When `--partial-only` is used, Capgo will only upload individual files and generate a manifest. Any device who do not support partial will not be able to download the update.
You might want to use `--partial-only` if:
* You always want to use differential updates and never want to allow full bundle uploads
* You’re setting up a CI/CD pipeline and want to ensure all automated uploads are differential
* Your app is large and bandwidth is constrained, so you need to minimize upload/download sizes
If you need to do a full bundle upload while `--partial-only` is set, simply run the upload command without `--partial-only`. This will override the setting for that single upload, allowing you to push a complete bundle when needed.
## Troubleshooting
If differential updates don’t seem to be working (i.e. devices are always downloading the full JS bundle even for small changes), double check that:
* You’re using the `--partial` flag every time you upload a new version
* If using `--partial-only`, make sure you haven’t accidentally omitted the `--partial` flag
* Your device is running the latest version of the Capgo plugin
* Your device has a stable network connection and can reach the Capgo servers
You can also use the Capgo webapp to check the details of your last upload:
1. Go to the [webapp](https://app.capgo.io)
2. Click on your app
3. Click on the bunldes number of the stats bar.
4. Select the last bundle
5. Check the `Partial` field 
If you continue to have trouble, please reach out to Capgo support for further assistance. They can check the server logs to confirm that your partial uploads are being processed correctly and that devices are receiving the updated manifests.
That’s it! The `--partial` flag tells Capgo to perform the individual file uploads and manifest generation needed for differential updates.
Note that you need to use `--partial` every time you upload a new version that you want to be delivered as a differential update. If you omit the flag, Capgo will upload the entire JS bundle as a single file, and devices will download the whole bundle even if only a small part has changed.
# Encryption
> Learn how Capgo's end-to-end encryption secures your app bundles during transmission and storage, protecting your code and user data.
Capgo provides robust end-to-end encryption for your app bundles, ensuring that your JavaScript code and assets are protected during transmission and storage. This encryption system is designed to give you complete control over your app’s security while maintaining the convenience of live updates.
## Overview
Capgo’s encryption system uses industry-standard cryptographic methods to protect your bundles from unauthorized access. When encryption is enabled, your bundles are encrypted before leaving your development environment and remain encrypted until they’re decrypted by your app on the user’s device.
**True End-to-End Encryption**: Unlike other OTA update platforms that only sign updates (leaving the code publicly readable), Capgo provides true end-to-end encryption. This means only your users can decrypt your updates - no one else, including Capgo itself. Your bundle content remains completely private and unreadable throughout the entire delivery process.
Tip
Encryption is particularly important for:
* Apps handling sensitive data or business logic
* Enterprise applications with compliance requirements
* Apps deployed in regulated industries
* Organizations with strict security policies
## How Encryption Works
Capgo uses a hybrid encryption approach that combines RSA and AES encryption for optimal security and performance:
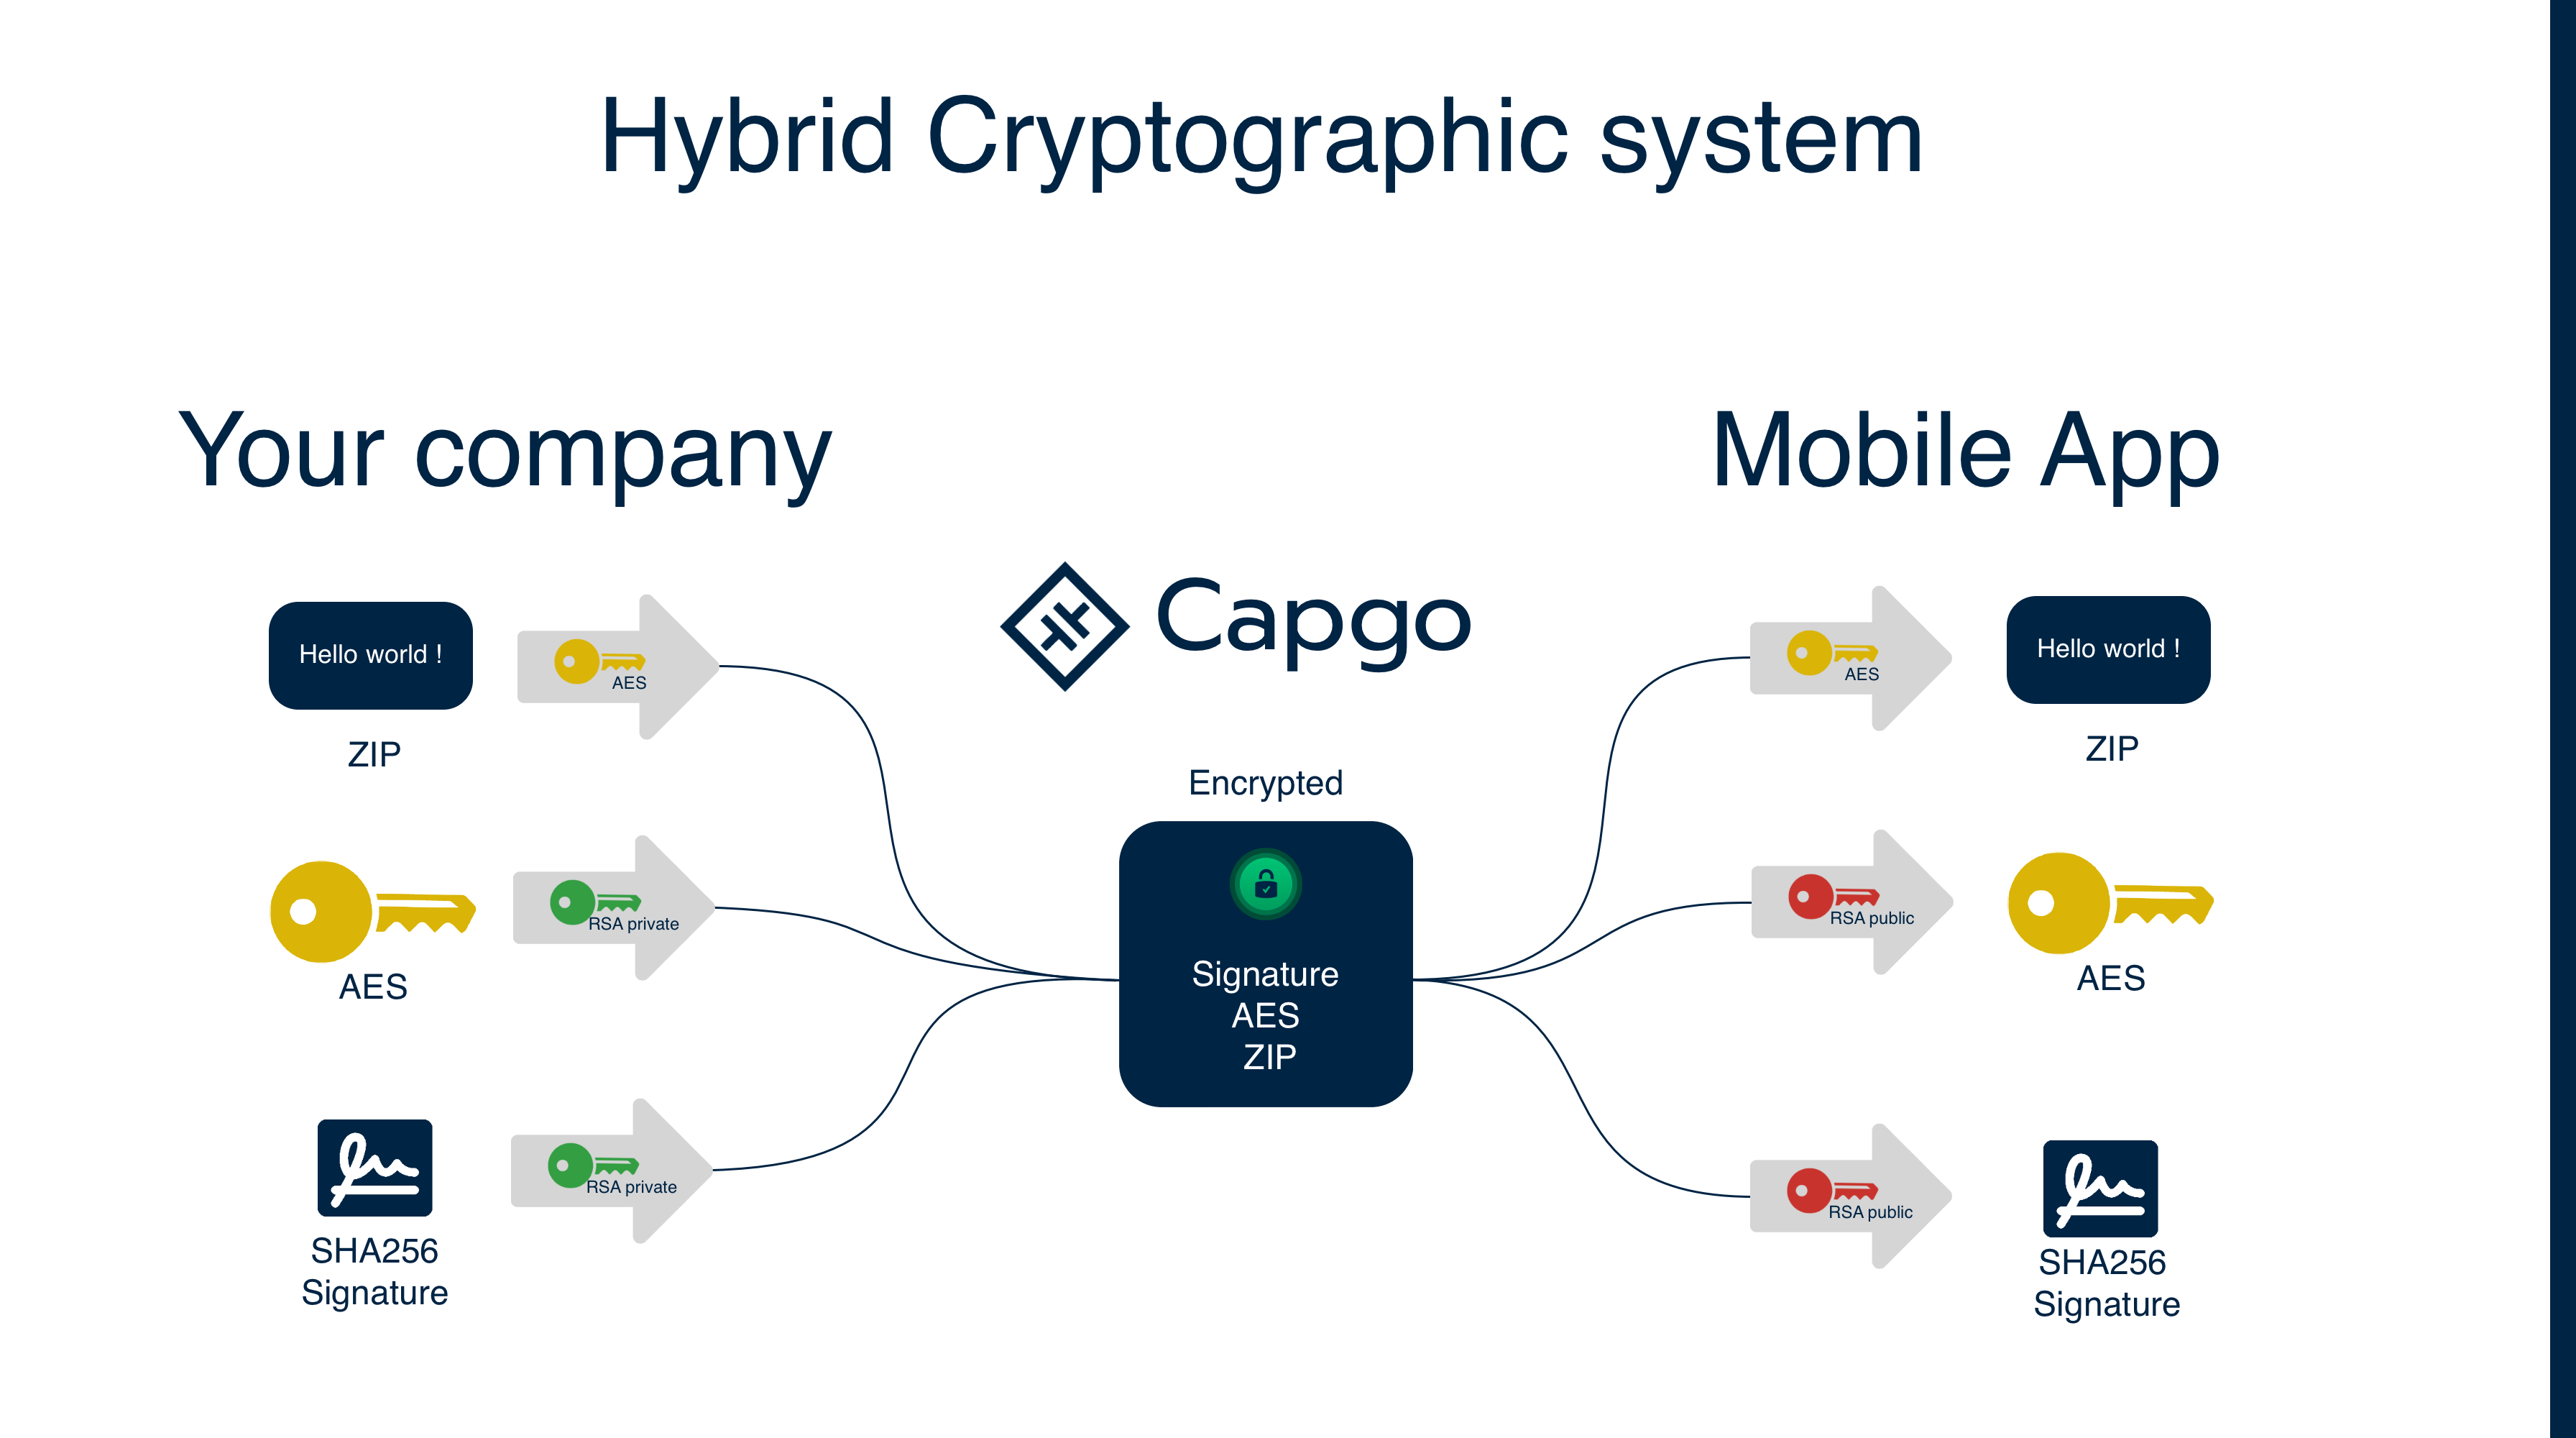
### 1. Key Generation
* **Private Key**: Generated and stored securely in your development environment (used for encryption)
* **Public Key**: Derived from your private key and stored in your app’s Capacitor config (used for decryption)
* **Session Keys**: Random AES keys generated for each bundle upload
### 2. Encryption Process
1. A random AES session key is generated for each bundle upload
2. Your bundle is encrypted using the AES session key
3. The bundle checksum is calculated
4. Both the AES session key and checksum are encrypted together using your RSA private key (creating the “signature”)
5. The encrypted bundle and encrypted signature are stored
The checksum is encrypted alongside the AES key to prevent tampering. Since only your RSA private key can create this signature, and only the corresponding public key can decrypt it, this ensures that both the AES session key and the expected checksum are authentic and haven’t been modified by an attacker.
### 3. Decryption Process
1. Your app downloads the encrypted bundle and encrypted signature
2. The Capgo SDK uses your RSA public key (stored in the app) to decrypt the signature
3. This reveals the AES session key and the original checksum
4. The AES session key is used to decrypt the bundle
5. A checksum of the decrypted bundle is calculated and compared with the original checksum for integrity verification
This process ensures that even if an attacker intercepts the encrypted bundle, they cannot modify the AES session key or provide a fake checksum, because they would need your private key to create a valid signature that the public key can decrypt.
Tip
RSA cannot encrypt large amounts of data efficiently, so AES is used for the actual bundle encryption while RSA secures the AES key and provides integrity verification through checksum signing.
## Capgo vs Other Platforms
| Feature | Capgo | Other OTA Platforms |
| ------------------- | ------------------------------------------------ | ----------------------------- |
| **Bundle Content** | Fully encrypted (unreadable) | Publicly readable |
| **Security Method** | True end-to-end encryption | Code signing only |
| **Privacy Level** | Zero-knowledge (even Capgo can’t read your code) | Platform can access your code |
| **Protection** | Content + integrity + authenticity | Integrity + authenticity only |
**Why This Matters:**
* **Code signing** only verifies that updates haven’t been tampered with and come from the right source
* **End-to-end encryption** ensures that your actual code content remains private and unreadable during transmission and storage
* With Capgo’s true end-to-end encryption, only your users can decrypt updates - no one else, including Capgo itself
## Encryption Methods
Capgo uses Encryption V2 as the standard encryption method:
### Encryption V2 (Current Standard)
* Uses RSA-4096 for enhanced security
* AES-256-GCM for authenticated encryption
* Provides integrity verification
* Better performance and security
### Encryption V1 (Deprecated)
* Uses RSA-2048 for key encryption
* AES-256-CBC for bundle encryption
* **No longer available in the current CLI**
* Legacy apps using V1 must migrate to V2
Danger
Encryption V1 is no longer supported in the current Capgo CLI. If you’re using V1 encryption, you must migrate to V2. See the [migration guide](/docs/upgrade/encryption-v1-to-v2/) for detailed instructions.
## Setting Up Encryption
### Step 1: Generate Encryption Keys
First, generate your encryption keys using the Capgo CLI:
```shell
# Generate new encryption keys (creates files in current directory)
npx @capgo/cli@latest key create
```
This creates:
* `.capgo_key_v2`: Your private key (keep this secure!)
* `.capgo_key_v2.pub`: Your public key (used by your app)
These files are created in the current directory where you run the command.
Caution
**Important Storage Notes:**
* **Private Key (`.capgo_key_v2`)**: Never commit this to version control. This file should be kept secure and used only for encryption during bundle uploads.
* **Public Key (`.capgo_key_v2.pub`)**: This is safe to commit to version control as it’s a backup of your public key.
* **File Location**: Keys are created in the current directory where you run the `key create` command.
* **Public Key in Config**: You must run `key save` to store the public key in your Capacitor config for the mobile app to use.
For production use, store the private key securely (environment variables, key management services) and remove it from your local project after setup.
### Step 2: Save Your Public Key to Capacitor Config (Required)
You **must** save your public key to the Capacitor config so your mobile app can decrypt bundles:
```shell
# Save public key from file to Capacitor config (required)
npx @capgo/cli@latest key save --key ./.capgo_key_v2.pub
# Or save public key data directly
npx @capgo/cli@latest key save --key-data "$CAPGO_PUBLIC_KEY"
```
### Step 3: Sync Capacitor Platform (Required)
After saving the public key, you **must** sync the Capacitor platform to copy the updated config to the native layer:
```shell
# Sync the platform to copy config to native
npx cap sync
```
Caution
**Required Steps**:
1. The `key save` command stores the public key in your Capacitor config
2. `npx cap sync` copies this config to the native layer where the mobile app can access it
3. Without both steps, your app won’t be able to decrypt encrypted updates
## Encrypting Bundles
### Method 1: Encrypt During Upload
The simplest way is to encrypt during the upload process:
```shell
# Upload with automatic encryption
npx @capgo/cli@latest bundle upload --key-v2
# For external storage, you must encrypt first (see Manual Encryption Workflow below)
```
### Method 2: Manual Encryption Workflow
For more control, you can manually encrypt bundles:
1. **Create a zip bundle:**
```shell
npx @capgo/cli@latest bundle zip com.example.app --path ./dist --key-v2
```
2. **Encrypt the bundle:**
```shell
npx @capgo/cli@latest bundle encrypt ./com.example.app.zip CHECKSUM_FROM_STEP_1
```
3. **Upload to your storage (e.g., S3) and register with Capgo:**
```shell
# First upload the encrypted bundle to your storage (e.g., AWS S3)
aws s3 cp ./encrypted-bundle.zip s3://your-bucket/encrypted-bundle.zip
# Then register with Capgo using the external URL
npx @capgo/cli@latest bundle upload --external https://your-storage.com/encrypted-bundle.zip --iv-session-key IV_SESSION_KEY_FROM_STEP_2
```
## Key Management
### Storing Keys Securely
**Private Key Options:**
1. **File-based (local development):**
```shell
# Key stored as .capgo_key_v2 file in project root
npx @capgo/cli@latest bundle upload --key-v2
```
2. **Environment variable (CI/CD):**
```shell
# Store in environment variable for CI
export CAPGO_PRIVATE_KEY="$(cat .capgo_key_v2)"
npx @capgo/cli@latest bundle upload --key-data-v2 "$CAPGO_PRIVATE_KEY"
```
**Public Key Setup (Required):**
```shell
# Must save public key to Capacitor config for mobile app
npx @capgo/cli@latest key save --key ./.capgo_key_v2.pub
```
**Production Environment:**
* Store private keys in secure key management services (AWS KMS, Azure Key Vault, etc.)
* Use CI/CD secret management for private keys
* Never commit private keys to version control
**Key Usage:**
* **Private Key**: Used by CLI for encryption during bundle upload (keep secure)
* **Public Key**: Stored in app configuration for decryption on device (safe to commit)
### Key Rotation
Regularly rotate your encryption keys for enhanced security:
1. **Generate new keys:**
```shell
# Navigate to desired directory first, then create keys
mkdir ./new-keys && cd ./new-keys
npx @capgo/cli@latest key create
```
2. **Save the new public key to Capacitor config:**
```shell
npx @capgo/cli@latest key save --key ./new-keys/.capgo_key_v2.pub
```
3. **Update your app configuration** with the new public key
4. **Deploy the updated app** before uploading encrypted bundles with the new key
## Security Best Practices
### Key Security
* **Never share private keys** between environments or team members
* **Use different keys** for different environments (dev, staging, production)
* **Rotate keys regularly** (recommended: every 6-12 months)
* **Store keys securely** using proper key management systems
### Bundle Security
* **Always verify** bundle integrity after decryption
* **Monitor** for unusual download patterns or failures
* **Use HTTPS** for all bundle URLs (required for mobile apps)
* **Implement** proper error handling for decryption failures
### Access Control
* **Limit access** to encryption keys to authorized personnel only
* **Use role-based access** for key management operations
* **Audit** key usage and access regularly
* **Implement** proper backup and recovery procedures
## Troubleshooting Encryption
### Common Issues
**Decryption failures:**
* Verify the private key matches the public key used for encryption
* Check that the `ivSessionKey` is correct
* Ensure you’re using Encryption V2 (V1 is no longer supported)
**Key-related errors:**
* Confirm the private key format is correct (PEM format)
* Verify the key hasn’t been corrupted during storage/transfer
* Check that the key has proper permissions in your app configuration
**Performance issues:**
* Large bundles may take longer to encrypt/decrypt
* Consider using differential updates to reduce bundle sizes
* Monitor device performance during decryption
### Debug Commands
Check encryption status:
```shell
npx @capgo/cli@latest app debug
```
Test encryption/decryption workflow:
```shell
# Test the complete workflow: zip → encrypt → decrypt → unzip
npx @capgo/cli@latest bundle zip com.example.app --key-v2
npx @capgo/cli@latest bundle encrypt ./com.example.app.zip CHECKSUM --json
npx @capgo/cli@latest bundle decrypt ./encrypted-bundle.zip IV_SESSION_KEY
```
## Compliance and Standards
Capgo’s encryption implementation follows industry standards:
* **AES-256**: FIPS 140-2 approved encryption algorithm
* **RSA-4096**: Strong asymmetric encryption for key protection
* **GCM Mode**: Provides both confidentiality and authenticity
* **Secure Random**: Cryptographically secure random number generation
This makes Capgo suitable for applications requiring compliance with:
* GDPR (General Data Protection Regulation)
* HIPAA (Health Insurance Portability and Accountability Act)
* SOC 2 (Service Organization Control 2)
* ISO 27001 (Information Security Management)
## Performance Considerations
### Encryption Overhead
* **Bundle size**: Encrypted bundles are slightly larger (\~1-2% overhead)
* **Processing time**: Encryption/decryption adds minimal latency
* **Memory usage**: Temporary increase during encryption/decryption operations
### Optimization Tips
* Use differential updates to minimize encrypted data transfer
* Optimize your bundle size by converting images to WebP format
* Minimize JavaScript and CSS files before bundling
* Remove unused dependencies and code
* Monitor device performance on older/slower devices
## Next Steps
* Learn about [Custom Storage](/docs/live-updates/custom-storage/) to use encryption with your own infrastructure
* Explore [Channels](/docs/live-updates/channels/) to manage encrypted bundles across environments
* Set up [CI/CD Integration](/docs/getting-started/cicd-integration/) to automate encrypted deployments
# CI/CD Integrations
> Integrate Capgo Live Updates with your favorite CI/CD platform for automated deployment workflows.
Automate your Capgo Live Updates deployment process by integrating with popular CI/CD platforms. These integrations allow you to automatically deploy app updates whenever you push code changes, test feature branches, and manage multiple deployment environments.
## Available Integrations
Choose your CI/CD platform to get started with automated deployments:
[Azure DevOps ](/docs/live-updates/integrations/azure-devops/)Integrate with Azure DevOps Pipelines for automated builds, testing, and deployment workflows.
[GitLab CI/CD ](/docs/live-updates/integrations/gitlab-ci/)Set up GitLab CI/CD pipelines to automatically deploy your app updates with comprehensive environment management.
[GitHub Actions ](/docs/live-updates/integrations/github-actions/)Use GitHub Actions for powerful automation with multi-channel deployments and environment protection.
[Bitbucket Pipelines ](/docs/live-updates/integrations/bitbucket-pipeline/)Deploy with Bitbucket Pipelines using simple or advanced configurations for multiple environments.
## What You’ll Get
All integration guides include:
* **Simple Setup**: Basic configuration to get started quickly
* **Advanced Workflows**: Multi-environment deployments with staging and production
* **Feature Branch Testing**: Automatic deployment of feature branches to test channels
* **Security Best Practices**: Secure secret management and environment protection
* **Monitoring**: Notifications and logging for deployment status
Tip
**New to CI/CD?** Start with the simple configuration for your platform, then gradually add more advanced features like multi-channel deployments and automated testing as your needs grow.
## Common Features
Each integration supports:
* **Automated Builds**: Trigger deployments on code changes
* **Multi-Channel Support**: Deploy to different channels (development, staging, production)
* **Pull Request/Merge Request Testing**: Test changes in isolated environments
* **Encryption Support**: Secure deployments with Capgo’s encryption feature
* **Environment Protection**: Manual approvals and restricted access for production
* **Notifications**: Slack, email, and other notification integrations
## Prerequisites
Before setting up any integration, ensure you have:
* A Capgo account with an app configured
* Your app’s source code in a Git repository
* A Capgo API token from [web.capgo.app/apikeys](https://web.capgo.app/apikeys)
* Node.js and npm/yarn configured in your project
## Related Documentation
* [Channels](/docs/live-updates/channels/) - Learn how to manage different deployment environments
* [Encryption](/docs/live-updates/encryption/) - Secure your deployments with end-to-end encryption
* [Update Behavior](/docs/live-updates/update-behavior/) - Customize how updates are applied to your apps
Choose your CI/CD platform above to start automating your Capgo deployments!
# Azure DevOps Integration
> Learn how to integrate Capgo Live Updates with Azure DevOps Pipelines for automated deployment of your app updates.
Integrate Capgo Live Updates with Azure DevOps Pipelines to automatically deploy your app updates whenever you push code changes. This guide covers setting up automated builds, testing, and deployment workflows.
## Prerequisites
Before setting up Azure DevOps integration, ensure you have:
* An Azure DevOps organization and project
* A Capgo account with an app configured
* Your app’s source code in an Azure Repos Git repository
* Node.js and npm/yarn configured in your project
## Setting Up Azure DevOps Pipeline
### Step 1: Create Pipeline Variables
First, set up the necessary variables in your Azure DevOps project:
1. Navigate to your Azure DevOps project
2. Go to **Pipelines** → **Library** → **Variable groups**
3. Create a new variable group named `Capgo-Variables`
4. Add the following variables:
| Variable Name | Value | Secure |
| ------------- | -------------------- | ------ |
| `CAPGO_TOKEN` | Your Capgo API token | ✅ Yes |
Tip
Get your Capgo API token from [web.capgo.app/apikeys](https://web.capgo.app/apikeys). Your app ID is already configured in your `capacitor.config.ts` file.
## Simple
Basic configuration that deploys to production on every push to the main branch:
```yaml
# Simple Azure DevOps Pipeline for Capgo Live Updates
trigger:
branches:
include:
- main
variables:
- group: Capgo-Variables
jobs:
- job: BuildAndDeploy
displayName: 'Build and Deploy to Capgo'
pool:
vmImage: 'ubuntu-latest'
steps:
- task: NodeTool@0
displayName: 'Setup Node.js'
inputs:
versionSpec: '22.x'
- script: |
npm ci
npm run test
npm run build
displayName: 'Install, test and build'
- script: |
npm install -g @capgo/cli
npx @capgo/cli bundle upload --apikey $(CAPGO_TOKEN) --channel production
displayName: 'Deploy to Capgo'
```
## Advanced
### Feature Branch Deployments
Deploy feature branches to test channels for review and testing:
```yaml
# Feature branch deployment
trigger:
branches:
include:
- feature/*
variables:
- group: Capgo-Variables
jobs:
- job: DeployFeature
displayName: 'Deploy Feature Branch'
pool:
vmImage: 'ubuntu-latest'
condition: startsWith(variables['Build.SourceBranch'], 'refs/heads/feature/')
steps:
- task: NodeTool@0
inputs:
versionSpec: '22.x'
- script: |
npm ci
npm run test
npm run build
displayName: 'Install, test and build'
- script: |
BRANCH_NAME=$(echo "$(Build.SourceBranchName)" | sed 's/[^a-zA-Z0-9-]/-/g')
CHANNEL_NAME="feature-$BRANCH_NAME"
npm install -g @capgo/cli
npx @capgo/cli channel create $CHANNEL_NAME --apikey $(CAPGO_TOKEN) || true
npx @capgo/cli bundle upload --apikey $(CAPGO_TOKEN) --channel $CHANNEL_NAME
displayName: 'Deploy to Feature Channel'
```
Tip
**Testing with Channels**: After deploying to a feature channel, you can test the update in your app by configuring it to use that specific channel. Learn more about [configuring channels in your app](/docs/live-updates/channels/#configuring-the-channel-in-your-app).
### Using Encryption
If you’re using [Capgo’s encryption feature](/docs/live-updates/encryption/), you’ll need to store your private key securely in your CI/CD environment.
After [setting up encryption keys](/docs/live-updates/encryption/#setting-up-encryption) locally, add your private key to Azure DevOps variables:
```shell
# Display your private key content (copy this output)
cat .capgo_key_v2
```
Add this content as `CAPGO_PRIVATE_KEY` in your Azure DevOps variable group (mark as secret), then use it in pipelines:
```yaml
# Deploy with encryption
- script: |
npm install -g @capgo/cli
npx @capgo/cli bundle upload --apikey $(CAPGO_TOKEN) --key-data-v2 "$(CAPGO_PRIVATE_KEY)" --channel production
displayName: 'Deploy to Capgo with Encryption'
```
Caution
**Security Best Practices:**
* Never commit the `.capgo_key_v2` file to version control
* Store the private key only in secure CI/CD secret management
* Use different keys for different environments
### Multi-Channel Configuration
For comprehensive information about setting up and managing multiple deployment channels, see the [Channels documentation](/docs/live-updates/channels/).
Complete configuration with multiple environments and pull request deployments:
```yaml
# Advanced Azure DevOps Pipeline with Multiple Channels
trigger:
branches:
include:
- main
- develop
pr:
branches:
include:
- main
- develop
variables:
- group: Capgo-Variables
stages:
# Build stage
- stage: Build
jobs:
- job: BuildApp
pool:
vmImage: 'ubuntu-latest'
steps:
- task: NodeTool@0
inputs:
versionSpec: '22.x'
- script: |
npm ci
npm run test
npm run build
displayName: 'Install, test and build'
- task: PublishBuildArtifacts@1
inputs:
pathToPublish: 'dist'
artifactName: 'app-build'
# Deploy to development
- stage: DeployDev
condition: and(succeeded(), eq(variables['Build.SourceBranch'], 'refs/heads/develop'))
jobs:
- deployment: DeployDevelopment
environment: development
pool:
vmImage: 'ubuntu-latest'
strategy:
runOnce:
deploy:
steps:
- task: NodeTool@0
inputs:
versionSpec: '22.x'
- task: DownloadBuildArtifacts@0
inputs:
artifactName: 'app-build'
downloadPath: '$(Pipeline.Workspace)'
- script: |
npm install -g @capgo/cli
npx @capgo/cli bundle upload --apikey $(CAPGO_TOKEN) --channel development --path $(Pipeline.Workspace)/app-build
displayName: 'Deploy to Development'
# Deploy PR to test channel
- stage: DeployPR
condition: and(succeeded(), eq(variables['Build.Reason'], 'PullRequest'))
jobs:
- job: DeployPRChannel
pool:
vmImage: 'ubuntu-latest'
steps:
- task: NodeTool@0
inputs:
versionSpec: '22.x'
- task: DownloadBuildArtifacts@0
inputs:
artifactName: 'app-build'
downloadPath: '$(Pipeline.Workspace)'
- script: |
CHANNEL_NAME="pr-$(System.PullRequest.PullRequestNumber)"
npm install -g @capgo/cli
npx @capgo/cli channel create $CHANNEL_NAME --apikey $(CAPGO_TOKEN) || true
npx @capgo/cli bundle upload --apikey $(CAPGO_TOKEN) --channel $CHANNEL_NAME --path $(Pipeline.Workspace)/app-build
displayName: 'Deploy to PR Channel'
# Deploy to production
- stage: DeployProd
condition: and(succeeded(), eq(variables['Build.SourceBranch'], 'refs/heads/main'))
jobs:
- deployment: DeployProduction
environment: production
pool:
vmImage: 'ubuntu-latest'
strategy:
runOnce:
deploy:
steps:
- task: NodeTool@0
inputs:
versionSpec: '22.x'
- task: DownloadBuildArtifacts@0
inputs:
artifactName: 'app-build'
downloadPath: '$(Pipeline.Workspace)'
- script: |
npm install -g @capgo/cli
npx @capgo/cli bundle upload --apikey $(CAPGO_TOKEN) --channel production --path $(Pipeline.Workspace)/app-build
displayName: 'Deploy to Production'
```
### Multi-Environment Deployment
For complex scenarios with multiple environments:
```yaml
# Extended pipeline with multiple environments
parameters:
- name: deployEnvironment
displayName: 'Deploy Environment'
type: string
default: 'staging'
values:
- staging
- production
variables:
- group: Capgo-Variables
- name: channelName
${{ if eq(parameters.deployEnvironment, 'production') }}:
value: 'production'
${{ else }}:
value: 'staging'
stages:
# Build stage
- stage: Build
jobs:
- job: BuildApp
pool:
vmImage: 'ubuntu-latest'
steps:
- task: NodeTool@0
inputs:
versionSpec: '22.x'
- script: |
npm ci
npm run test
npm run build
displayName: 'Install, test and build'
- task: PublishBuildArtifacts@1
inputs:
pathToPublish: 'dist'
artifactName: 'app-build'
- stage: DeployStaging
displayName: 'Deploy to Staging'
dependsOn: Build
condition: and(succeeded(), eq('${{ parameters.deployEnvironment }}', 'staging'))
jobs:
- deployment: DeployStaging
displayName: 'Deploy to Staging Channel'
pool:
vmImage: 'ubuntu-latest'
environment: 'staging'
strategy:
runOnce:
deploy:
steps:
- template: deploy-steps.yml
parameters:
channel: 'staging'
- stage: DeployProduction
displayName: 'Deploy to Production'
dependsOn: Build
condition: and(succeeded(), eq('${{ parameters.deployEnvironment }}', 'production'))
jobs:
- deployment: DeployProduction
displayName: 'Deploy to Production Channel'
pool:
vmImage: 'ubuntu-latest'
environment: 'production'
strategy:
runOnce:
deploy:
steps:
- template: deploy-steps.yml
parameters:
channel: 'production'
```
### Deployment Template (deploy-steps.yml)
Create a reusable template file `deploy-steps.yml`:
deploy-steps.yml
```yaml
parameters:
- name: channel
type: string
steps:
- task: NodeTool@0
displayName: 'Install Node.js'
inputs:
versionSpec: '22.x'
- task: DownloadBuildArtifacts@0
displayName: 'Download build artifacts'
inputs:
artifactName: 'app-build'
downloadPath: '$(System.ArtifactsDirectory)'
- script: |
npm install -g @capgo/cli
displayName: 'Install Capgo CLI'
- script: |
npx @capgo/cli bundle upload \
--apikey $(CAPGO_TOKEN) \
--channel ${{ parameters.channel }} \
--path $(System.ArtifactsDirectory)/app-build
displayName: 'Upload to Capgo (${{ parameters.channel }})'
```
### Branch-Based Deployment Strategy
Configure different deployment strategies based on Git branches:
```yaml
trigger:
branches:
include:
- main
- develop
- feature/*
variables:
- group: Capgo-Variables
- name: targetChannel
${{ if eq(variables['Build.SourceBranch'], 'refs/heads/main') }}:
value: 'production'
${{ elseif eq(variables['Build.SourceBranch'], 'refs/heads/develop') }}:
value: 'staging'
${{ else }}:
value: 'development'
stages:
- stage: Build
jobs:
- job: BuildApp
pool:
vmImage: 'ubuntu-latest'
steps:
- task: NodeTool@0
inputs:
versionSpec: '22.x'
- script: |
npm ci
npm run test
npm run build
displayName: 'Install, test and build'
- task: PublishBuildArtifacts@1
inputs:
pathToPublish: 'dist'
artifactName: 'app-build'
- stage: Deploy
displayName: 'Deploy to $(targetChannel)'
dependsOn: Build
condition: succeeded()
jobs:
- deployment: DeployJob
displayName: 'Deploy to $(targetChannel) Channel'
pool:
vmImage: 'ubuntu-latest'
environment: '$(targetChannel)'
strategy:
runOnce:
deploy:
steps:
- template: deploy-steps.yml
parameters:
channel: '$(targetChannel)'
```
## Security Best Practices
### Secure Variable Management
1. **Use Variable Groups**: Store sensitive data in Azure DevOps variable groups
2. **Mark as Secret**: Always mark API tokens and keys as secret variables
3. **Scope Access**: Limit variable group access to specific pipelines and users
4. **Rotate Keys**: Regularly rotate your Capgo API tokens
## Monitoring and Notifications
### Teams Integration
Add Microsoft Teams notifications to your pipeline:
```yaml
- task: ms-teams-deploy-card@1.4.1
displayName: 'Notify Teams on Success'
condition: succeeded()
inputs:
webhookUri: '$(TEAMS_WEBHOOK_URL)'
title: 'Capgo Deployment Successful'
text: 'App deployed to $(targetChannel) channel'
themeColor: '00FF00'
- task: ms-teams-deploy-card@1.4.1
displayName: 'Notify Teams on Failure'
condition: failed()
inputs:
webhookUri: '$(TEAMS_WEBHOOK_URL)'
title: 'Capgo Deployment Failed'
text: 'Deployment to $(targetChannel) failed'
themeColor: 'FF0000'
```
### Email Notifications
Configure email notifications for deployment status:
```yaml
- task: EmailReport@1
displayName: 'Send Email Report'
condition: always()
inputs:
sendMailConditionConfig: 'Always'
subject: 'Capgo Deployment Report - $(Build.BuildNumber)'
to: 'team@yourcompany.com'
body: |
Deployment Status: $(Agent.JobStatus)
Channel: $(targetChannel)
Build: $(Build.BuildNumber)
Commit: $(Build.SourceVersion)
```
## Troubleshooting
### Common Issues
**Pipeline fails with “Capgo CLI not found”:**
```yaml
# Ensure global installation
- script: |
npm install -g @capgo/cli
which capgo || echo "Capgo CLI not found in PATH"
displayName: 'Install and verify Capgo CLI'
```
**Authentication errors:**
```yaml
# Verify token is correctly set
- script: |
echo "Token length: ${#CAPGO_TOKEN}"
if [ -z "$CAPGO_TOKEN" ]; then
echo "CAPGO_TOKEN is not set"
exit 1
fi
displayName: 'Verify Capgo token'
env:
CAPGO_TOKEN: $(CAPGO_TOKEN)
```
**Build artifacts not found:**
```yaml
# List available artifacts for debugging
- script: |
ls -la $(System.ArtifactsDirectory)
find $(System.ArtifactsDirectory) -name "*.js" -o -name "*.html"
displayName: 'Debug artifacts'
```
### Debug Pipeline
Add debugging steps to troubleshoot issues:
```yaml
- script: |
echo "Build.SourceBranch: $(Build.SourceBranch)"
echo "Build.BuildNumber: $(Build.BuildNumber)"
echo "Target Channel: $(targetChannel)"
displayName: 'Debug Pipeline Variables'
- script: |
npx @capgo/cli app debug --apikey $(CAPGO_TOKEN)
displayName: 'Debug Capgo App Status'
```
## Next Steps
* Learn about [Channels](/docs/live-updates/channels/) to manage different deployment environments
* Explore [Custom Storage](/docs/live-updates/custom-storage/) for advanced deployment scenarios
* Set up [Encryption](/docs/live-updates/encryption/) for secure deployments
* Configure [Update Behavior](/docs/live-updates/update-behavior/) to customize how updates are applied
With Azure DevOps integration, you can automate your Capgo deployments and ensure consistent, reliable updates to your mobile app users.
# Bitbucket Pipelines Integration
> Learn how to integrate Capgo Live Updates with Bitbucket Pipelines for automated deployment of your app updates.
Integrate Capgo Live Updates with Bitbucket Pipelines to automatically deploy your app updates whenever you push code changes. This guide covers setting up automated builds, testing, and deployment workflows.
## Prerequisites
Before setting up Bitbucket Pipelines integration, ensure you have:
* A Bitbucket account with a repository
* A Capgo account with an app configured
* Node.js and npm/yarn configured in your project
## Setting Up Bitbucket Pipelines
### Step 1: Configure Repository Variables
First, set up the necessary variables in your Bitbucket repository:
1. Navigate to your Bitbucket repository
2. Go to **Repository settings** → **Pipelines** → **Repository variables**
3. Add the following variables:
| Variable Name | Value | Secured |
| ------------- | -------------------- | ------- |
| `CAPGO_TOKEN` | Your Capgo API token | ✅ Yes |
Tip
Get your Capgo API token from [web.capgo.app/apikeys](https://web.capgo.app/apikeys). Your app ID is already configured in your `capacitor.config.ts` file.
## Simple
Basic configuration that deploys to production on every push to the main branch:
```yaml
# bitbucket-pipelines.yml - Simple Configuration
image: node:22
pipelines:
branches:
main:
- step:
name: Build and Deploy to Production
script:
- npm ci
- npm run test
- npm run build
- npm install -g @capgo/cli
- npx @capgo/cli bundle upload --apikey $CAPGO_TOKEN --channel production
artifacts:
- dist/**
```
## Advanced
### Feature Branch Deployments
Deploy feature branches to test channels for review and testing:
```yaml
# Feature branch deployment
pipelines:
branches:
feature/*:
- step:
name: Deploy Feature Branch
script:
- npm ci
- npm run test
- npm run build
- BRANCH_NAME=$(echo $BITBUCKET_BRANCH | sed 's/[^a-zA-Z0-9-]/-/g')
- CHANNEL_NAME="feature-$BRANCH_NAME"
- npm install -g @capgo/cli
- npx @capgo/cli channel create $CHANNEL_NAME --apikey $CAPGO_TOKEN || true
- npx @capgo/cli bundle upload --apikey $CAPGO_TOKEN --channel $CHANNEL_NAME
artifacts:
- dist/**
```
Tip
**Testing with Channels**: After deploying to a feature channel, you can test the update in your app by configuring it to use that specific channel. Learn more about [configuring channels in your app](/docs/live-updates/channels/#configuring-the-channel-in-your-app).
### Using Encryption
If you’re using [Capgo’s encryption feature](/docs/live-updates/encryption/), you’ll need to store your private key securely in your CI/CD environment.
After [setting up encryption keys](/docs/live-updates/encryption/#setting-up-encryption) locally, add your private key to Bitbucket variables:
```shell
# Display your private key content (copy this output)
cat .capgo_key_v2
```
Add this content as `CAPGO_PRIVATE_KEY` in your Bitbucket repository variables (mark as secured), then use it in pipelines:
```yaml
# Deploy with encryption
- step:
name: Deploy to Capgo with Encryption
script:
- npm install -g @capgo/cli
- npx @capgo/cli bundle upload --apikey $CAPGO_TOKEN --key-data-v2 "$CAPGO_PRIVATE_KEY" --channel production
```
Caution
**Security Best Practices:**
* Never commit the `.capgo_key_v2` file to version control
* Store the private key only in secure CI/CD secret management
* Use different keys for different environments
### Multi-Channel Configuration
For comprehensive information about setting up and managing multiple deployment channels, see the [Channels documentation](/docs/live-updates/channels/).
Complete configuration with multiple environments and pull request deployments:
```yaml
# bitbucket-pipelines.yml - Advanced Multi-Channel Configuration
image: node:22
definitions:
steps:
- step: &build-step
name: Build Application
script:
- npm ci
- npm run test
- npm run build
artifacts:
- dist/**
- step: &deploy-step
name: Deploy to Capgo
script:
- npm install -g @capgo/cli
- npx @capgo/cli bundle upload --apikey $CAPGO_TOKEN --channel $CHANNEL_NAME
pipelines:
branches:
main:
- step:
<<: *build-step
- step:
<<: *deploy-step
name: Deploy to Production
deployment: production
trigger: manual
script:
- export CHANNEL_NAME=production
- npm install -g @capgo/cli
- npx @capgo/cli bundle upload --apikey $CAPGO_TOKEN --channel $CHANNEL_NAME
develop:
- step:
<<: *build-step
- step:
<<: *deploy-step
name: Deploy to Development
deployment: development
script:
- export CHANNEL_NAME=development
- npm install -g @capgo/cli
- npx @capgo/cli bundle upload --apikey $CAPGO_TOKEN --channel $CHANNEL_NAME
pull-requests:
'**':
- step:
<<: *build-step
- step:
name: Deploy PR to Test Channel
script:
- CHANNEL_NAME="pr-$BITBUCKET_PR_ID"
- npm install -g @capgo/cli
- npx @capgo/cli channel create $CHANNEL_NAME --apikey $CAPGO_TOKEN || true
- npx @capgo/cli bundle upload --apikey $CAPGO_TOKEN --channel $CHANNEL_NAME
artifacts:
- dist/**
```
### Multi-Environment Pipeline
For complex deployment scenarios with staging and production environments:
```yaml
# Multi-environment pipeline
image: node:22
pipelines:
branches:
main:
- step:
name: Build
script:
- npm ci
- npm run test
- npm run build
artifacts:
- dist/**
- step:
name: Deploy to Staging
deployment: staging
script:
- npm install -g @capgo/cli
- npx @capgo/cli bundle upload --apikey $CAPGO_TOKEN --channel staging
- step:
name: Deploy to Production
deployment: production
trigger: manual
script:
- npm install -g @capgo/cli
- npx @capgo/cli bundle upload --apikey $CAPGO_TOKEN --channel production
develop:
- step:
name: Build and Deploy to Development
script:
- npm ci
- npm run test
- npm run build
- npm install -g @capgo/cli
- npx @capgo/cli bundle upload --apikey $CAPGO_TOKEN --channel development
artifacts:
- dist/**
```
### Branch-Based Deployment Strategy
Automatically deploy different branches to appropriate channels:
```yaml
# Dynamic channel deployment
image: node:22
definitions:
scripts:
- script: &determine-channel |
if [ "$BITBUCKET_BRANCH" = "main" ]; then
export CHANNEL_NAME="production"
elif [ "$BITBUCKET_BRANCH" = "develop" ]; then
export CHANNEL_NAME="staging"
else
export CHANNEL_NAME="development"
fi
echo "Deploying to channel: $CHANNEL_NAME"
pipelines:
default:
- step:
name: Build and Deploy
script:
- npm ci
- npm run test
- npm run build
- *determine-channel
- npm install -g @capgo/cli
- npx @capgo/cli bundle upload --apikey $CAPGO_TOKEN --channel $CHANNEL_NAME
artifacts:
- dist/**
```
### Parallel Pipeline Execution
Optimize build times with parallel steps:
```yaml
# Parallel execution pipeline
image: node:22
pipelines:
branches:
main:
- parallel:
- step:
name: Run Tests
script:
- npm ci
- npm run test
- step:
name: Lint Code
script:
- npm ci
- npm run lint
- step:
name: Build Application
script:
- npm ci
- npm run build
artifacts:
- dist/**
- step:
name: Deploy to Production
deployment: production
script:
- npm install -g @capgo/cli
- npx @capgo/cli bundle upload --apikey $CAPGO_TOKEN --channel production
```
## Security Best Practices
### Repository Variables
1. **Secured Variables**: Always mark API tokens as secured
2. **Environment Variables**: Use deployment-specific variables when needed
3. **Access Control**: Limit repository access to authorized team members
4. **Token Rotation**: Regularly rotate your Capgo API tokens
### Deployment Environments
Configure deployment environments for better security:
```yaml
# Deployment with environment restrictions
pipelines:
branches:
main:
- step:
name: Deploy to Production
deployment: production
trigger: manual
script:
- npm install -g @capgo/cli
- npx @capgo/cli bundle upload --apikey $CAPGO_TOKEN --channel production
```
## Monitoring and Notifications
### Slack Integration
Add Slack notifications to your pipeline:
```yaml
# Pipeline with Slack notifications
pipelines:
branches:
main:
- step:
name: Build and Deploy
script:
- npm ci
- npm run test
- npm run build
- npm install -g @capgo/cli
- npx @capgo/cli bundle upload --apikey $CAPGO_TOKEN --channel production
after-script:
- |
if [ $BITBUCKET_EXIT_CODE -eq 0 ]; then
curl -X POST -H 'Content-type: application/json' \
--data '{"text":"✅ Capgo deployment successful for '$BITBUCKET_BRANCH'"}' \
$SLACK_WEBHOOK_URL
else
curl -X POST -H 'Content-type: application/json' \
--data '{"text":"❌ Capgo deployment failed for '$BITBUCKET_BRANCH'"}' \
$SLACK_WEBHOOK_URL
fi
```
### Email Notifications
Configure email notifications through Bitbucket’s built-in features or using external services:
```yaml
# Email notification step
- step:
name: Send Notification
script:
- |
curl -X POST \
-H "Content-Type: application/json" \
-d '{
"to": "team@yourcompany.com",
"subject": "Capgo Deployment Status",
"body": "Deployment of '$BITBUCKET_BRANCH' completed with status: '$BITBUCKET_EXIT_CODE'"
}' \
$EMAIL_SERVICE_URL
condition:
result: [successful, failed]
```
## Troubleshooting
### Common Issues
**Pipeline fails with “Capgo CLI not found”:**
```yaml
# Debug CLI installation
- step:
name: Debug CLI
script:
- npm install -g @capgo/cli
- which capgo || echo "Capgo CLI not found"
- npx @capgo/cli --version
```
**Authentication errors:**
```yaml
# Verify token configuration
- step:
name: Debug Auth
script:
- |
if [ -z "$CAPGO_TOKEN" ]; then
echo "CAPGO_TOKEN is not set"
exit 1
fi
echo "Token length: ${#CAPGO_TOKEN}"
```
**Build artifacts not found:**
```yaml
# List build outputs
- step:
name: Debug Build
script:
- ls -la dist/
- find dist/ -type f -name "*.js" -o -name "*.html"
```
### Debug Pipeline
Add debugging information to troubleshoot issues:
```yaml
# Debug pipeline
pipelines:
branches:
main:
- step:
name: Debug Information
script:
- echo "Branch: $BITBUCKET_BRANCH"
- echo "Commit: $BITBUCKET_COMMIT"
- echo "Build: $BITBUCKET_BUILD_NUMBER"
- env | grep BITBUCKET_ | sort
- step:
name: Build and Deploy
script:
- npm ci
- npm run test
- npm run build
- npm install -g @capgo/cli
- npx @capgo/cli bundle upload --apikey $CAPGO_TOKEN --channel production
```
### Pipeline Validation
Enable pipeline validation to catch configuration errors:
```yaml
# Enable pipeline validation
options:
docker: true
size: 2x
pipelines:
branches:
main:
- step:
name: Validate Pipeline
script:
- echo "Pipeline validation successful"
- step:
name: Build and Deploy
script:
# ... deployment steps
```
## Next Steps
* Learn about [Channels](/docs/live-updates/channels/) to manage different deployment environments
* Explore [Custom Storage](/docs/live-updates/custom-storage/) for advanced deployment scenarios
* Set up [Encryption](/docs/live-updates/encryption/) for secure deployments
* Configure [Update Behavior](/docs/live-updates/update-behavior/) to customize how updates are applied
With Bitbucket Pipelines integration, you can automate your Capgo deployments and ensure consistent, reliable updates to your mobile app users.
# GitHub Actions Integration
> Learn how to integrate Capgo Live Updates with GitHub Actions for automated deployment of your app updates.
Integrate Capgo Live Updates with GitHub Actions to automatically deploy your app updates whenever you push code changes. This guide covers setting up automated builds, testing, and deployment workflows using GitHub’s powerful CI/CD platform.
## Prerequisites
Before setting up GitHub Actions integration, ensure you have:
* A GitHub repository with your app’s source code
* A Capgo account with an app configured
* Node.js and npm/yarn configured in your project
* GitHub Actions enabled for your repository
## Setting Up GitHub Secrets
### Step 1: Configure Repository Secrets
Set up the necessary secrets in your GitHub repository:
1. Navigate to your GitHub repository
2. Go to **Settings** → **Secrets and variables** → **Actions**
3. Click **New repository secret** and add the following:
| Secret Name | Value |
| ------------- | -------------------- |
| `CAPGO_TOKEN` | Your Capgo API token |
Tip
Get your Capgo API token from [web.capgo.app/apikeys](https://web.capgo.app/apikeys). Your app ID is already configured in your `capacitor.config.ts` file.
## Simple Production Deployment
Start with this basic configuration that deploys to production on every push to the main branch:
```yaml
# Simple GitHub Actions Workflow for Capgo Live Updates
name: Deploy to Capgo
on:
push:
branches:
- main
jobs:
deploy:
runs-on: ubuntu-latest
steps:
- name: Checkout
uses: actions/checkout@v5
- name: Setup Node.js
uses: actions/setup-node@v4
with:
node-version: '22'
cache: 'npm'
- name: Install, test and build
run: |
npm ci
npm run test
npm run build
- name: Deploy to Capgo
run: |
npm install -g @capgo/cli
npx @capgo/cli bundle upload --apikey ${{ secrets.CAPGO_TOKEN }} --channel production
# For encrypted uploads, add: --key-data-v2 "${{ secrets.CAPGO_PRIVATE_KEY }}"
```
## Advanced Multi-Channel Configuration
### Feature Branch Deployments
Deploy feature branches to temporary channels for testing:
```yaml
# Feature branch deployment
name: Deploy Feature Branch to Capgo
on:
push:
branches:
- 'feature/**'
jobs:
deploy-feature:
runs-on: ubuntu-latest
steps:
- uses: actions/checkout@v5
- uses: actions/setup-node@v4
with:
node-version: '22'
cache: 'npm'
- run: |
npm ci
npm run test
npm run build
- name: Deploy to feature channel
run: |
CHANNEL_NAME=$(echo "${{ github.ref_name }}" | sed 's/[^a-zA-Z0-9]/-/g' | tr '[:upper:]' '[:lower:]')
npm install -g @capgo/cli
npx @capgo/cli channel create $CHANNEL_NAME --apikey ${{ secrets.CAPGO_TOKEN }} || true
npx @capgo/cli bundle upload --apikey ${{ secrets.CAPGO_TOKEN }} --channel $CHANNEL_NAME
```
### Using Encryption
If you’re using [Capgo’s encryption feature](/docs/live-updates/encryption/), you’ll need to store your private key securely in your CI/CD environment.
After [setting up encryption keys](/docs/live-updates/encryption/#setting-up-encryption) locally, add your private key to GitHub secrets:
```shell
# Display your private key content (copy this output)
cat .capgo_key_v2
```
Add this content as `CAPGO_PRIVATE_KEY` in your GitHub repository secrets, then use it in workflows:
```yaml
# Deploy with encryption
- name: Deploy to Capgo with Encryption
run: |
npm install -g @capgo/cli
npx @capgo/cli bundle upload --apikey ${{ secrets.CAPGO_TOKEN }} --key-data-v2 "${{ secrets.CAPGO_PRIVATE_KEY }}" --channel production
```
Caution
**Security Best Practices:**
* Never commit the `.capgo_key_v2` file to version control
* Store the private key only in secure CI/CD secret management
* Use different keys for different environments
### Multi-Channel Configuration
For comprehensive information about setting up and managing multiple deployment channels, see the [Channels documentation](/docs/live-updates/channels/).
Complete workflow with development, pull requests, and production deployments:
```yaml
# Complete multi-environment workflow
name: Deploy to Capgo
on:
push:
branches: [main, develop]
pull_request:
branches: [main, develop]
jobs:
build:
runs-on: ubuntu-latest
steps:
- uses: actions/checkout@v5
- uses: actions/setup-node@v4
with:
node-version: '22'
cache: 'npm'
- run: |
npm ci
npm run test
npm run build
- uses: actions/upload-artifact@v4
with:
name: dist
path: dist/
deploy-development:
if: github.ref == 'refs/heads/develop'
needs: build
runs-on: ubuntu-latest
environment: development
steps:
- uses: actions/setup-node@v4
with:
node-version: '22'
- uses: actions/download-artifact@v4
with:
name: dist
path: dist/
- run: |
npm install -g @capgo/cli
npx @capgo/cli bundle upload --apikey ${{ secrets.CAPGO_TOKEN }} --channel development
deploy-pr:
if: github.event_name == 'pull_request'
needs: build
runs-on: ubuntu-latest
steps:
- uses: actions/setup-node@v4
with:
node-version: '22'
- uses: actions/download-artifact@v4
with:
name: dist
path: dist/
- name: Deploy to PR channel
run: |
CHANNEL_NAME="pr-${{ github.event.number }}"
npm install -g @capgo/cli
npx @capgo/cli channel create $CHANNEL_NAME --apikey ${{ secrets.CAPGO_TOKEN }} || true
npx @capgo/cli bundle upload --apikey ${{ secrets.CAPGO_TOKEN }} --channel $CHANNEL_NAME
- name: Comment PR
uses: actions/github-script@v7
with:
script: |
github.rest.issues.createComment({
issue_number: context.issue.number,
owner: context.repo.owner,
repo: context.repo.repo,
body: `🚀 This PR has been deployed to Capgo channel: \`pr-${{ github.event.number }}\`\n\nTo test this update in your app, configure it to use this channel. [Learn how to configure channels →](/docs/live-updates/channels/#configuring-the-channel-in-your-app)`
})
deploy-production:
if: github.ref == 'refs/heads/main'
needs: build
runs-on: ubuntu-latest
environment: production
steps:
- uses: actions/setup-node@v4
with:
node-version: '22'
- uses: actions/download-artifact@v4
with:
name: dist
path: dist/
- run: |
npm install -g @capgo/cli
npx @capgo/cli bundle upload --apikey ${{ secrets.CAPGO_TOKEN }} --channel production
```
Tip
**Testing with Channels**: After deploying to a PR or development channel, you can test the update in your app by configuring it to use that specific channel. Learn more about [configuring channels in your app](/docs/live-updates/channels/#configuring-the-channel-in-your-app).
### Cleanup Feature Channels
Automatically clean up feature channels when branches are deleted:
```yaml
name: Cleanup Feature Channels
on:
delete:
jobs:
cleanup:
runs-on: ubuntu-latest
if: github.event.ref_type == 'branch' && startsWith(github.event.ref, 'feature/')
steps:
- uses: actions/setup-node@v4
with:
node-version: '22'
- name: Delete Capgo channel
run: |
CHANNEL_NAME=$(echo "${{ github.event.ref }}" | sed 's/[^a-zA-Z0-9]/-/g' | tr '[:upper:]' '[:lower:]')
npm install -g @capgo/cli
npx @capgo/cli channel delete $CHANNEL_NAME --apikey ${{ secrets.CAPGO_TOKEN }} || true
```
## Security and Best Practices
### Environment Protection Rules
Set up environment protection rules in GitHub:
1. Go to **Settings** → **Environments** in your repository
2. Create environments: `development`, `staging`, `production`
3. For production environment, add:
* **Required reviewers**: Add team members who must approve deployments
* **Wait timer**: Add a delay before deployment (optional)
* **Deployment branches**: Restrict to `main` branch only
### Secure Secrets Management
Use environment-specific secrets:
```yaml
# Use different secrets per environment
deploy-production:
environment: production
steps:
- name: Deploy to Production
run: |
npx @capgo/cli bundle upload \
--apikey ${{ secrets.CAPGO_PROD_TOKEN }} \
--app ${{ secrets.CAPGO_PROD_APP_ID }} \
--channel production
```
## Monitoring and Notifications
### Slack Integration
Add Slack notifications to your workflow:
```yaml
name: Deploy with Notifications
jobs:
deploy:
runs-on: ubuntu-latest
steps:
# ... deployment steps
- name: Notify Slack on Success
if: success()
uses: 8398a7/action-slack@v3
with:
status: success
text: '✅ Capgo deployment successful!'
fields: repo,message,commit,author,action,eventName,ref,workflow
env:
SLACK_WEBHOOK_URL: ${{ secrets.SLACK_WEBHOOK_URL }}
- name: Notify Slack on Failure
if: failure()
uses: 8398a7/action-slack@v3
with:
status: failure
text: '❌ Capgo deployment failed!'
fields: repo,message,commit,author,action,eventName,ref,workflow
env:
SLACK_WEBHOOK_URL: ${{ secrets.SLACK_WEBHOOK_URL }}
```
### Discord Integration
Send notifications to Discord:
```yaml
- name: Discord notification
if: always()
uses: Ilshidur/action-discord@master
with:
args: |
Capgo deployment ${{ job.status }}!
App: ${{ secrets.CAPGO_APP_ID }}
Channel: ${{ github.ref_name }}
Commit: ${{ github.sha }}
env:
DISCORD_WEBHOOK: ${{ secrets.DISCORD_WEBHOOK }}
```
### Email Notifications
Configure email notifications:
```yaml
- name: Send email notification
if: failure()
uses: dawidd6/action-send-mail@v3
with:
server_address: smtp.gmail.com
server_port: 465
username: ${{ secrets.EMAIL_USERNAME }}
password: ${{ secrets.EMAIL_PASSWORD }}
subject: 'Capgo Deployment Failed - ${{ github.repository }}'
to: team@yourcompany.com
from: ci-cd@yourcompany.com
body: |
Deployment failed for ${{ github.repository }}
Branch: ${{ github.ref_name }}
Commit: ${{ github.sha }}
Workflow: ${{ github.workflow }}
```
## Troubleshooting
### Debug Workflow
Add debugging steps to troubleshoot issues:
```yaml
- name: Debug environment
run: |
echo "Node version: $(node --version)"
echo "NPM version: $(npm --version)"
echo "Working directory: $(pwd)"
echo "Files in dist/: $(ls -la dist/ || echo 'No dist directory')"
echo "Environment variables:"
env | grep -E "(GITHUB_|CAPGO_)" | sort
- name: Test Capgo CLI
run: |
npx @capgo/cli --version
npx @capgo/cli app debug --apikey ${{ secrets.CAPGO_TOKEN }} --app ${{ secrets.CAPGO_APP_ID }}
```
### Common Issues and Solutions
**Workflow fails with “CAPGO\_TOKEN not found”:**
```yaml
- name: Verify secrets
run: |
if [ -z "${{ secrets.CAPGO_TOKEN }}" ]; then
echo "ERROR: CAPGO_TOKEN secret is not set"
exit 1
fi
echo "CAPGO_TOKEN is set (length: ${#CAPGO_TOKEN})"
env:
CAPGO_TOKEN: ${{ secrets.CAPGO_TOKEN }}
```
**Build artifacts not found:**
```yaml
- name: Debug artifacts
run: |
echo "Checking for build artifacts..."
ls -la dist/ || echo "No dist directory found"
find . -name "*.js" -o -name "*.html" | head -10
```
**Network connectivity issues:**
```yaml
- name: Test connectivity
run: |
ping -c 3 api.capgo.io || echo "Ping failed"
curl -I https://api.capgo.io/health || echo "Health check failed"
```
## Reusable Workflows
Create reusable workflows for consistency across projects:
.github/workflows/reusable-capgo-deploy.yml
```yaml
name: Reusable Capgo Deploy
on:
workflow_call:
inputs:
environment:
required: true
type: string
channel:
required: true
type: string
secrets:
CAPGO_TOKEN:
required: true
CAPGO_APP_ID:
required: true
jobs:
deploy:
runs-on: ubuntu-latest
environment: ${{ inputs.environment }}
steps:
- uses: actions/checkout@v5
- name: Setup Node.js
uses: actions/setup-node@v4
with:
node-version: '22'
cache: 'npm'
- name: Install and build
run: |
npm ci
npm run build
- name: Deploy to Capgo
run: |
npm install -g @capgo/cli
npx @capgo/cli bundle upload \
--apikey ${{ secrets.CAPGO_TOKEN }} \
--app ${{ secrets.CAPGO_APP_ID }} \
--channel ${{ inputs.channel }}
```
Use the reusable workflow:
.github/workflows/deploy.yml
```yaml
name: Deploy App
on:
push:
branches: [main, develop]
jobs:
deploy-dev:
if: github.ref == 'refs/heads/develop'
uses: ./.github/workflows/reusable-capgo-deploy.yml
with:
environment: development
channel: development
secrets:
CAPGO_TOKEN: ${{ secrets.CAPGO_TOKEN }}
CAPGO_APP_ID: ${{ secrets.CAPGO_APP_ID }}
deploy-prod:
if: github.ref == 'refs/heads/main'
uses: ./.github/workflows/reusable-capgo-deploy.yml
with:
environment: production
channel: production
secrets:
CAPGO_TOKEN: ${{ secrets.CAPGO_TOKEN }}
CAPGO_APP_ID: ${{ secrets.CAPGO_APP_ID }}
```
## Next Steps
* Learn about [Channels](/docs/live-updates/channels/) to manage different deployment environments
* Explore [Custom Storage](/docs/live-updates/custom-storage/) for advanced deployment scenarios
* Set up [Encryption](/docs/live-updates/encryption/) for secure deployments
* Configure [Update Behavior](/docs/live-updates/update-behavior/) to customize how updates are applied
With GitHub Actions integration, you can leverage GitHub’s powerful CI/CD platform to create sophisticated deployment workflows with built-in security, monitoring, and collaboration features for your Capgo Live Updates.
# GitLab CI/CD Integration
> Learn how to integrate Capgo Live Updates with GitLab CI/CD for automated deployment of your app updates.
Integrate Capgo Live Updates with GitLab CI/CD to automatically deploy your app updates whenever you push code changes. This guide covers setting up automated builds, testing, and deployment workflows.
## Prerequisites
Before setting up GitLab CI/CD integration, ensure you have:
* A GitLab account with a project repository
* A Capgo account with an app configured
* Node.js and npm/yarn configured in your project
## Setting Up GitLab CI/CD
### Step 1: Configure Environment Variables
First, set up the necessary variables in your GitLab project:
1. Navigate to your GitLab project
2. Go to **Settings** → **CI/CD** → **Variables**
3. Add the following variables:
| Variable Name | Value | Protected | Masked |
| ------------- | -------------------- | --------- | ------ |
| `CAPGO_TOKEN` | Your Capgo API token | ✅ Yes | ✅ Yes |
Tip
Get your Capgo API token from [web.capgo.app/apikeys](https://web.capgo.app/apikeys). Your app ID is already configured in your `capacitor.config.ts` file.
## Simple
Basic configuration that deploys to production on every push to the main branch:
```yaml
# .gitlab-ci.yml - Simple Configuration
image: node:22
stages:
- build
- deploy
variables:
npm_config_cache: "$CI_PROJECT_DIR/.npm"
build:
stage: build
script:
- npm ci
- npm run test
- npm run build
artifacts:
paths:
- dist/
expire_in: 1 hour
only:
- main
deploy_production:
stage: deploy
script:
- npm install -g @capgo/cli
- npx @capgo/cli bundle upload --apikey $CAPGO_TOKEN --channel production
# For encrypted uploads, add: --key-data-v2 "$CAPGO_PRIVATE_KEY"
dependencies:
- build
only:
- main
```
## Advanced
### Feature Branch Deployments
Deploy feature branches to test channels for review and testing:
```yaml
# Feature branch deployment
deploy_feature:
stage: deploy
script:
- npm install -g @capgo/cli
- CHANNEL_NAME="feature-$(echo $CI_COMMIT_REF_NAME | sed 's/[^a-zA-Z0-9-]/-/g')"
- npx @capgo/cli channel create $CHANNEL_NAME --apikey $CAPGO_TOKEN || true
- npx @capgo/cli bundle upload --apikey $CAPGO_TOKEN --channel $CHANNEL_NAME
dependencies:
- build
only:
- /^feature\/.*$/
environment:
name: feature/$CI_COMMIT_REF_NAME
url: https://your-app.com/channels/$CHANNEL_NAME
```
Tip
**Testing with Channels**: After deploying to a feature channel, you can test the update in your app by configuring it to use that specific channel. Learn more about [configuring channels in your app](/docs/live-updates/channels/#configuring-the-channel-in-your-app).
### Using Encryption
If you’re using [Capgo’s encryption feature](/docs/live-updates/encryption/), you’ll need to store your private key securely in your CI/CD environment.
After [setting up encryption keys](/docs/live-updates/encryption/#setting-up-encryption) locally, add your private key to GitLab variables:
```shell
# Display your private key content (copy this output)
cat .capgo_key_v2
```
Add this content as `CAPGO_PRIVATE_KEY` in your GitLab project variables (mark as protected and masked), then use it in pipelines:
```yaml
# Deploy with encryption
deploy_production:
script:
- npm install -g @capgo/cli
- npx @capgo/cli bundle upload --apikey $CAPGO_TOKEN --key-data-v2 "$CAPGO_PRIVATE_KEY" --channel production
```
Caution
**Security Best Practices:**
* Never commit the `.capgo_key_v2` file to version control
* Store the private key only in secure CI/CD secret management
* Use different keys for different environments
### Multi-Channel Configuration
For comprehensive information about setting up and managing multiple deployment channels, see the [Channels documentation](/docs/live-updates/channels/).
Complete configuration with multiple environments and merge request deployments:
```yaml
# .gitlab-ci.yml - Advanced Multi-Channel Configuration
image: node:22
stages:
- build
- deploy
variables:
npm_config_cache: "$CI_PROJECT_DIR/.npm"
# Build stage
build:
stage: build
script:
- npm ci
- npm run test
- npm run build
artifacts:
paths:
- dist/
expire_in: 24 hours
# Deploy to development channel
deploy_development:
stage: deploy
script:
- npm install -g @capgo/cli
- npx @capgo/cli bundle upload --apikey $CAPGO_TOKEN --channel development
dependencies:
- build
only:
- develop
environment:
name: development
# Deploy merge requests to test channels
deploy_mr:
stage: deploy
script:
- npm install -g @capgo/cli
- CHANNEL_NAME="mr-$CI_MERGE_REQUEST_IID"
- npx @capgo/cli channel create $CHANNEL_NAME --apikey $CAPGO_TOKEN || true
- npx @capgo/cli bundle upload --apikey $CAPGO_TOKEN --channel $CHANNEL_NAME
dependencies:
- build
only:
- merge_requests
environment:
name: review/$CI_MERGE_REQUEST_IID
url: https://your-app.com/channels/mr-$CI_MERGE_REQUEST_IID
on_stop: cleanup_mr
# Cleanup MR channels when MR is closed
cleanup_mr:
stage: deploy
script:
- npm install -g @capgo/cli
- npx @capgo/cli channel delete mr-$CI_MERGE_REQUEST_IID --apikey $CAPGO_TOKEN || true
when: manual
environment:
name: review/$CI_MERGE_REQUEST_IID
action: stop
only:
- merge_requests
# Deploy to staging
deploy_staging:
stage: deploy
script:
- npm install -g @capgo/cli
- npx @capgo/cli bundle upload --apikey $CAPGO_TOKEN --channel staging
dependencies:
- build
only:
- develop
environment:
name: staging
# Deploy to production
deploy_production:
stage: deploy
script:
- npm install -g @capgo/cli
- npx @capgo/cli bundle upload --apikey $CAPGO_TOKEN --channel production
dependencies:
- build
only:
- main
environment:
name: production
```
### Multi-Environment with Manual Approval
For production deployments requiring manual approval:
```yaml
deploy_production:
stage: deploy
script:
- npm install -g @capgo/cli
- npx @capgo/cli bundle upload --apikey $CAPGO_TOKEN --channel production
dependencies:
- build
only:
- main
when: manual
environment:
name: production
```
### Branch-Based Deployment Strategy
Deploy different branches to appropriate channels automatically:
```yaml
# Dynamic channel deployment based on branch
deploy:
stage: deploy
script:
- npm install -g @capgo/cli
- |
if [ "$CI_COMMIT_REF_NAME" = "main" ]; then
CHANNEL="production"
elif [ "$CI_COMMIT_REF_NAME" = "develop" ]; then
CHANNEL="staging"
else
CHANNEL="development"
fi
- npx @capgo/cli bundle upload --apikey $CAPGO_TOKEN --channel $CHANNEL
dependencies:
- build
environment:
name: $CHANNEL
```
## Security Best Practices
### Protected Variables
1. **Mark Sensitive Variables**: Always mark API tokens as protected and masked
2. **Branch Protection**: Use protected variables for production deployments
3. **Access Control**: Limit variable access to maintainers only
4. **Regular Rotation**: Rotate API tokens regularly
### Secure Pipeline Configuration
```yaml
# Use protected variables for production
deploy_production:
stage: deploy
script:
- npm install -g @capgo/cli
- npx @capgo/cli bundle upload --apikey $CAPGO_TOKEN --channel production
only:
refs:
- main
variables:
- $CI_COMMIT_REF_PROTECTED == "true"
```
## Monitoring and Notifications
### Slack Integration
Add Slack notifications to your pipeline:
```yaml
notify_success:
stage: .post
image: alpine:latest
before_script:
- apk add --no-cache curl
script:
- |
curl -X POST -H 'Content-type: application/json' \
--data '{"text":"✅ Capgo deployment successful for '"$CI_COMMIT_REF_NAME"'"}' \
$SLACK_WEBHOOK_URL
when: on_success
notify_failure:
stage: .post
image: alpine:latest
before_script:
- apk add --no-cache curl
script:
- |
curl -X POST -H 'Content-type: application/json' \
--data '{"text":"❌ Capgo deployment failed for '"$CI_COMMIT_REF_NAME"'"}' \
$SLACK_WEBHOOK_URL
when: on_failure
```
### Email Notifications
Configure email notifications in your GitLab project settings or use the API:
```yaml
notify_email:
stage: .post
script:
- |
curl --request POST \
--header "PRIVATE-TOKEN: $GITLAB_API_TOKEN" \
--form "to=team@yourcompany.com" \
--form "subject=Capgo Deployment Status" \
--form "body=Deployment of $CI_COMMIT_REF_NAME completed with status: $CI_JOB_STATUS" \
"https://gitlab.com/api/v4/projects/$CI_PROJECT_ID/emails"
when: always
```
## Troubleshooting
### Common Issues
**Pipeline fails with “Capgo CLI not found”:**
```yaml
# Debug CLI installation
debug_cli:
script:
- npm install -g @capgo/cli
- which capgo || echo "Capgo CLI not found"
- npx @capgo/cli --version
```
**Authentication errors:**
```yaml
# Verify token configuration
debug_auth:
script:
- |
if [ -z "$CAPGO_TOKEN" ]; then
echo "CAPGO_TOKEN is not set"
exit 1
fi
echo "Token length: ${#CAPGO_TOKEN}"
```
**Build artifacts not found:**
```yaml
# List build outputs
debug_build:
script:
- ls -la dist/
- find dist/ -type f -name "*.js" -o -name "*.html"
```
### Debug Pipeline
Add debugging information to troubleshoot issues:
```yaml
debug:
stage: build
script:
- echo "Branch: $CI_COMMIT_REF_NAME"
- echo "Commit: $CI_COMMIT_SHA"
- echo "Build: $CI_PIPELINE_ID"
- env | grep CI_ | sort
only:
- branches
```
## Next Steps
* Learn about [Channels](/docs/live-updates/channels/) to manage different deployment environments
* Explore [Custom Storage](/docs/live-updates/custom-storage/) for advanced deployment scenarios
* Set up [Encryption](/docs/live-updates/encryption/) for secure deployments
* Configure [Update Behavior](/docs/live-updates/update-behavior/) to customize how updates are applied
With GitLab CI/CD integration, you can automate your Capgo deployments and ensure consistent, reliable updates to your mobile app users.
# Rollbacks
> Learn how to manage rollbacks in Capgo, allowing you to revert to previous app versions seamlessly when needed.
While Capgo’s live updates allow you to quickly deliver improvements and fixes to your users, there may be situations where you need to roll back to a previous version of your app. Perhaps a new update introduced an unexpected critical issue, or maybe you want to revert a specific change while you work on a fix.
Capgo provides several ways to manage a channel’s builds and control the version of your app that users receive, including both manual rollback options and automatic safety mechanisms.
## Automatic Rollback Protection
Capgo includes a built-in safety mechanism to protect your users from broken updates. If a JavaScript error occurs before the `notifyAppReady()` method is called, the plugin will automatically roll back to the previous working version.
### How Automatic Rollback Works
When a new update is downloaded and applied, Capgo expects your app to call `notifyAppReady()` within a configurable timeframe to confirm that the update loaded successfully. This method signals that:
* The JavaScript bundle loaded without critical errors
* Your app’s core functionality is working
* The update is safe to keep
If `notifyAppReady()` is not called due to a JavaScript crash or critical error, Capgo will:
1. Detect that the update failed to initialize properly
2. Automatically revert to the previous working bundle
3. Mark the problematic update as failed to prevent it from being applied again
Tip
Make sure to call `notifyAppReady()` in your app’s initialization code after your core components have loaded successfully. This ensures the automatic rollback protection works as intended.
```javascript
import { CapacitorUpdater } from '@capgo/capacitor-updater'
// Call this after your app has successfully initialized
await CapacitorUpdater.notifyAppReady()
```
This automatic protection helps ensure that even if you accidentally push a broken update, your users won’t be stuck with a non-functional app.
### Configuring the Timeout
You can configure how long Capgo waits for `notifyAppReady()` to be called by setting the `appReadyTimeout` in your Capacitor configuration:
```json
{
"plugins": {
"CapacitorUpdater": {
"appReadyTimeout": 10000
}
}
}
```
The `appReadyTimeout` value is specified in milliseconds. The default timeout is typically 10 seconds, but you can adjust this based on your app’s initialization requirements. If your app takes longer to load due to complex initialization processes, you may want to increase this value.
## Rolling Back to a Previous Bundle
Every time you upload a new build and assign it to a channel, Capgo keeps a history of those builds. If you need to revert a specific update, you can select one of these previous builds to redeploy to the channel.

The primary way to roll back is through the rollback interface, which is located in the 4th tab (History) when viewing a channel in the Capgo Dashboard. This tab provides a comprehensive view of all available builds for the channel, allowing you to easily select and revert to any previous version.
To roll back using the History tab:
1. Log in to the [Capgo Dashboard](https://app.capgo.io).
2. Navigate to the “Channels” section.
3. Click the name of the channel you want to roll back.
4. Go to the 4th tab (History) in the channel view.
5. Find the build you want to revert to in the build history.
6. Select that build to make it the active build for the channel.
7. Confirm that you want to roll back to this build.
### Alternative Method: Using the Crown Icon
As a second way, you can also roll back directly from the first tab by clicking the crown icon next to any build in the channel’s build history:
1. In the first tab of the channel view, find the build you want to revert to.
2. Click the crown icon next to that build to make it the active build for the channel. 
3. Confirm that you want to roll back to this build.
Note
Rolling back to a previous build only affects the selected channel. If you have multiple channels (e.g. Production, Staging, etc.), you’ll need to repeat the rollback process for each affected channel.
After rolling back, devices configured to listen to the updated channel will receive the previous build the next time they check for an update. The rolled-back build will be treated as a new update, so the usual update flow and conditions apply.
## Unlinking a Channel
If you want to temporarily halt updates on a channel while you investigate an issue, you can unlink the channel from its current build.
To unlink a channel:
1. Navigate to the channel in the Capgo Dashboard.
2. Click the “Unlink” button next to the current build.
3. Confirm that you want to unlink the channel.
Once a channel is unlinked, it will not distribute any new updates. Devices configured to that channel will stay on their current build until the channel is linked to a build again.
This is useful if you’ve identified a problem with an update but aren’t yet sure which build you want to roll back to. Unlinking the channel gives you time to investigate without pushing out further updates.
## Forcing the Built-In Bundle
In more severe situations, you may want to revert all devices on a channel back to the web build that was originally packaged with your app’s native binary. This is known as the “built-in bundle”.
To force the built-in bundle on a channel:
1. Navigate to the channel in the Capgo Dashboard.
2. Click the “Built-in Bundle” button.
3. Confirm that you want to force the built-in bundle.
When you force the built-in bundle, all devices configured to that channel will revert back to the original packaged web build on their next update check. This happens regardless of what build they’re currently on.
This is a more aggressive rollback option than reverting to a specific previous build, as it discards all live updates released since the app was last published to the app stores.
Caution
Be cautious when forcing the built-in bundle, as it will affect all devices on the channel. Make sure you’ve considered the impact and have a plan to move forward before taking this action.
## Monitoring and Responding to Issues
To catch issues quickly and minimize the impact of problematic updates, it’s important to have a plan for monitoring your releases and responding to problems.
Some strategies include:
* Monitoring crash reports and user feedback immediately after releasing an update
* Using phased rollouts or a staged channel system to test updates on a smaller group before wide release
* Having a clear decision process for when to roll back, unlink, or force the built-in bundle, and who has the authority to do so
* Communicating to users about the issue and the resolution, if appropriate
By combining careful monitoring with the ability to quickly manage problematic updates, you can deliver a continuously improving app experience while minimizing disruptions for your users.
# Update Behavior
> Explore the comprehensive update behavior of Capgo, designed to deliver seamless updates to your app users without interrupting their experience.
When you release an update to your Capgo app, you probably want your users to receive that update as soon as possible. But you also don’t want to disrupt their experience by forcing them to wait for a download or restart the app in the middle of a session.
Capgo’s update behavior is designed to strike a balance between delivering updates quickly and minimizing disruption to your users.
## Default Update Flow
By default, here’s how Capgo handles app updates:
1. On app launch, the Capgo plugin checks to see if a new update is available.
2. If an update is found, it’s downloaded in the background while the user continues using the current version of the app.
3. Once the download completes, Capgo waits for the user to either background the app or kill it entirely.
4. When the user next launches the app, they’ll be running the updated version.
This flow ensures that users are always running the latest version of your app, without ever being interrupted by update prompts or forced to wait for downloads.
Tip
Capgo also checks for updates when the app resumes from the background, so users will receive updates even if they don’t fully quit the app.
## Why This Approach?
Applying updates on a background or kill event has a few key benefits for user experience:
* Users aren’t interrupted by update prompts or forced to wait for downloads in the middle of a session.
* Updates are applied seamlessly in between sessions, so the experience of launching the app is always fresh.
* You can deliver updates frequently without worrying about disrupting active users.
The main downside is that if a user backgrounds and quickly resumes your app, they may lose any unsaved state since the update was applied in between those actions.
To mitigate this, we recommend:
* Saving state frequently and restoring it gracefully when the app resumes.
* Avoiding very frequent updates that modify large parts of the app state.
* Considering customizing the update behavior for sensitive flows (see below).
## Customizing When Updates Are Applied
In some cases, you may want more control over exactly when an update is applied. For example, you might want to ensure a user completes an in-progress flow before updating, or coordinate an app update with a server-side change.
Capgo provides a `setDelay` function that lets you specify conditions that must be met before an update is installed:
```typescript
import { CapacitorUpdater } from '@capgo/capacitor-updater';
await CapacitorUpdater.setMultiDelay({
delayConditions: [
{
kind: 'date',
value: '2023-06-01T00:00:00.000Z',
},
{
kind: 'background',
value: '60000',
},
],
});
```
This example would delay installing an update until after June 1, 2023 AND the app has been backgrounded for at least 60 seconds.
The available delay conditions are:
* `date`: Wait until after a specific date/time to apply the update.
* `background`: Wait a minimum duration after the app is backgrounded to apply the update.
* `nativeVersion`: Wait for a native binary with a minimum version to be installed before applying the update.
* `kill`: Wait until the next app kill event to apply the update.
You can mix and match these conditions to precisely control when an update is installed.
Danger
Note that the `kill` condition currently triggers the update after the first kill event, not the next background event like the other conditions. This inconsistency will be fixed in a future release.
## Applying Updates Immediately
For critical updates or apps with very simple state, you may want to apply an update as soon as it’s downloaded, without waiting for a background or kill event. Capgo supports this via the `directUpdate` configuration option.
`directUpdate` is set in your `capacitor.config.ts` file, not in JavaScript code. It supports three values:
* `false` (default): Never do direct updates, use normal background update behavior
* `'atInstall'`: Direct update only when the app is installed or updated from the store, otherwise use normal behavior
* `'always'`: Always do direct updates immediately when available
* `true` (deprecated): Same as `'always'` for backward compatibility
```typescript
import { CapacitorConfig } from '@capacitor/cli';
const config: CapacitorConfig = {
plugins: {
CapacitorUpdater: {
autoUpdate: true,
directUpdate: 'always', // or 'atInstall' for updates only on app install/update
autoSplashscreen: true, // NEW: Automatically handle splashscreen
keepUrlPathAfterReload: true,
},
SplashScreen: {
launchAutoHide: false, // Still required when using directUpdate
},
},
};
export default config;
```
Note
**Important**: `directUpdate` only applies updates when the app actually checks for them. By default, this happens only at app startup or when resuming from background. Note that `periodCheckDelay` is not compatible with `directUpdate`.
With `directUpdate` enabled, Capgo will immediately apply an update as soon as the download completes during an update check, even if the user is actively using the app. Without periodic checking enabled, this means updates will only be applied when the app starts or resumes from background.
Note that because `directUpdate` is a native configuration, it requires some additional handling in your JavaScript code.
Caution
When using `directUpdate`, you must set `launchAutoHide: false` in the SplashScreen configuration (as shown above) to prevent the splash screen from hiding automatically. This ensures you have full control over when the splash screen is hidden after the update process completes.
## Automatic Splashscreen Handling
To make `directUpdate` easier to use, Capgo provides an `autoSplashscreen` option that automatically handles hiding the splashscreen for you (available since version 7.6.0):
```typescript
const config: CapacitorConfig = {
plugins: {
CapacitorUpdater: {
autoUpdate: true,
directUpdate: 'always', // or 'atInstall'
autoSplashscreen: true, // Automatically hide splashscreen
keepUrlPathAfterReload: true,
},
SplashScreen: {
launchAutoHide: false,
},
},
};
```
When `autoSplashscreen` is enabled:
* The plugin automatically hides the splashscreen when an update is applied
* The plugin automatically hides the splashscreen when no update is needed
* You don’t need to manually listen for `appReady` events or call `SplashScreen.hide()`
### Manual Splashscreen Handling
If you prefer manual control or need custom logic, you can disable `autoSplashscreen` and handle it yourself:
```js
import { CapacitorUpdater } from '@capgo/capacitor-updater';
import { SplashScreen } from '@capacitor/splash-screen';
CapacitorUpdater.addListener('appReady', () => {
// Hide splash screen
SplashScreen.hide();
});
CapacitorUpdater.notifyAppReady();
```
The `appReady` event fires once the app has finished initializing and applying any pending updates. This is the point at which it’s safe to show your app’s UI, as it ensures the user will see the latest version.
In addition to handling the `appReady` event, we recommend setting the `keepUrlPathAfterReload` configuration option to `true` when using `directUpdate`. This preserves the current URL path when the app is reloaded due to an update, helping maintain the user’s location in the app and reducing disorientation.
If you don’t handle the `appReady` event and set `keepUrlPathAfterReload` when using `directUpdate`, the user may briefly see a stale version of the app, be taken back to the initial route, or see a flicker as the update is applied.
Using `directUpdate` can be useful for delivering critical bug fixes or security patches, but it comes with some tradeoffs:
* The user may see a brief flicker or loading state as the update is applied if you don’t properly handle the splashscreen (either with `autoSplashscreen` or manual `appReady` event handling).
* If the update modifies the app state or UI, the user may see a disruptive change in the middle of a session.
* The user’s location in the app may be lost if `keepUrlPathAfterReload` is not set, potentially disorienting them.
* You’ll need to carefully handle saving and restoring state to ensure a smooth transition.
If you do enable `directUpdate`, we recommend:
* Using `autoSplashscreen: true` for the simplest setup, or manually handling the `appReady` event if you need custom logic.
* Setting `keepUrlPathAfterReload` to `true` to preserve the user’s location in the app.
* Saving and restoring the app state as needed to avoid losing user progress.
* Thoroughly testing your app’s update behavior to ensure there are no jarring transitions, lost state, or disorienting location changes.
In most cases, the default update behavior provides the best balance of delivering updates quickly and minimizing disruption. But for apps with specific needs, Capgo provides the flexibility to customize when and how updates are applied.
# Functions and settings
> All available method and settings of the plugin
# Updater Plugin Config
CapacitorUpdater can be configured with these options:
| Prop | Type | Description | Default | Since |
| ---------------------------- | --------- | ------------------------------------------------------------------------------------------------------------------------------------------------------------------------------------------------------------------------------------------------------------------------------------------------------------------------------------------------------------------------------------------------------------------------------------------------------------------------------------------------------------------------------------------------------------ | ------------------------------------------------------------------ | -------------------------------------------------------------------------------------------------------------------------------------------------------------------------------------------------------------------------------------------------------------------------------------------------------------------------------------------------------------------------------------------------------------------------------------------------------------------------------------------------------------------------------------------------------------------------------- |
| **`appReadyTimeout`** | `number` | Configure the number of milliseconds the native plugin should wait before considering an update ‘failed’. Only available for Android and iOS. | `10000 // (10 seconds)` | |
| **`responseTimeout`** | `number` | Configure the number of seconds the native plugin should wait before considering API timeout. Only available for Android and iOS. | `20 // (20 second)` | |
| **`autoDeleteFailed`** | `boolean` | Configure whether the plugin should use automatically delete failed bundles. Only available for Android and iOS. | `true` | |
| **`autoDeletePrevious`** | `boolean` | Configure whether the plugin should use automatically delete previous bundles after a successful update. Only available for Android and iOS. | `true` | |
| **`autoUpdate`** | `boolean` | Configure whether the plugin should use Auto Update via an update server. Only available for Android and iOS. | `true` | |
| **`resetWhenUpdate`** | `boolean` | Automatically delete previous downloaded bundles when a newer native app bundle is installed to the device. Only available for Android and iOS. | `true` | |
| **`updateUrl`** | `string` | Configure the URL / endpoint to which update checks are sent. Only available for Android and iOS. | `https://plugin.capgo.app/updates` | |
| **`channelUrl`** | `string` | Configure the URL / endpoint for channel operations. Only available for Android and iOS. | `https://plugin.capgo.app/channel_self` | |
| **`statsUrl`** | `string` | Configure the URL / endpoint to which update statistics are sent. Only available for Android and iOS. Set to "" to disable stats reporting. | `https://plugin.capgo.app/stats` | |
| **`publicKey`** | `string` | Configure the public key for end to end live update encryption Version 2 Only available for Android and iOS. | `undefined` | 6.2.0 |
| **`version`** | `string` | Configure the current version of the app. This will be used for the first update request. If not set, the plugin will get the version from the native code. Only available for Android and iOS. | `undefined` | 4.17.48 |
| **`directUpdate`** | \`boolean | ’always' | 'atInstall’\` | Configure when the plugin should direct install updates. Only for autoUpdate mode. Works well for apps less than 10MB and with uploads done using —partial flag. Zip or apps more than 10MB will be relatively slow for users to update. - false: Never do direct updates (default behavior) - atInstall: Direct update only when app is installed/updated from store, otherwise use normal background update - always: Always do direct updates immediately when available - true: (deprecated) Same as “always” for backward compatibility Only available for Android and iOS. |
| **`autoSplashscreen`** | `boolean` | Automatically handle splashscreen hiding when using directUpdate. When enabled, the plugin will automatically hide the splashscreen after updates are applied or when no update is needed. This removes the need to manually listen for appReady events and call SplashScreen.hide(). Only works when directUpdate is set to “atInstall”, “always”, or true. Requires the @capacitor/splash-screen plugin to be installed and configured with launchAutoHide: false. Requires autoUpdate and directUpdate to be enabled. Only available for Android and iOS. | `false` | 7.6.0 |
| **`periodCheckDelay`** | `number` | Configure the delay period for period update check. the unit is in seconds. Only available for Android and iOS. Cannot be less than 600 seconds (10 minutes). | `0 (disabled)` | |
| **`localS3`** | `boolean` | Configure the CLI to use a local server for testing or self-hosted update server. | `undefined` | 4.17.48 |
| **`localHost`** | `string` | Configure the CLI to use a local server for testing or self-hosted update server. | `undefined` | 4.17.48 |
| **`localWebHost`** | `string` | Configure the CLI to use a local server for testing or self-hosted update server. | `undefined` | 4.17.48 |
| **`localSupa`** | `string` | Configure the CLI to use a local server for testing or self-hosted update server. | `undefined` | 4.17.48 |
| **`localSupaAnon`** | `string` | Configure the CLI to use a local server for testing. | `undefined` | 4.17.48 |
| **`localApi`** | `string` | Configure the CLI to use a local api for testing. | `undefined` | 6.3.3 |
| **`localApiFiles`** | `string` | Configure the CLI to use a local file api for testing. | `undefined` | 6.3.3 |
| **`allowModifyUrl`** | `boolean` | Allow the plugin to modify the updateUrl, statsUrl and channelUrl dynamically from the JavaScript side. | `false` | 5.4.0 |
| **`allowModifyAppId`** | `boolean` | Allow the plugin to modify the appId dynamically from the JavaScript side. | `false` | 7.14.0 |
| **`persistCustomId`** | `boolean` | Persist the customId set through {@link CapacitorUpdaterPlugin.setCustomId} across app restarts. Only available for Android and iOS. | `false (will be true by default in a future major release v8.x.x)` | 7.17.3 |
| **`defaultChannel`** | `string` | Set the default channel for the app in the config. Case sensitive. This will setting will override the default channel set in the cloud, but will still respect overrides made in the cloud. This requires the channel to allow devices to self dissociate/associate in the channel settings. | `undefined` | 5.5.0 |
| **`appId`** | `string` | Configure the app id for the app in the config. | `undefined` | 6.0.0 |
| **`keepUrlPathAfterReload`** | `boolean` | Configure the plugin to keep the URL path after a reload. WARNING: When a reload is triggered, ‘window\.history’ will be cleared. | `false` | 6.8.0 |
| **`disableJSLogging`** | `boolean` | Disable the JavaScript logging of the plugin. if true, the plugin will not log to the JavaScript console. only the native log will be done | `false` | 7.3.0 |
| **`shakeMenu`** | `boolean` | Enable shake gesture to show update menu for debugging/testing purposes | `false` | 7.5.0 |
## API Reference
* [`notifyAppReady`](#notifyappready)
* [`setUpdateUrl`](#setupdateurl)
* [`setStatsUrl`](#setstatsurl)
* [`setChannelUrl`](#setchannelurl)
* [`download`](#download)
* [`next`](#next)
* [`set`](#set)
* [`delete`](#delete)
* [`list`](#list)
* [`reset`](#reset)
* [`current`](#current)
* [`reload`](#reload)
* [`setMultiDelay`](#setmultidelay)
* [`cancelDelay`](#canceldelay)
* [`getLatest`](#getlatest)
* [`setChannel`](#setchannel)
* [`unsetChannel`](#unsetchannel)
* [`getChannel`](#getchannel)
* [`listChannels`](#listchannels)
* [`setCustomId`](#setcustomid)
* [`getBuiltinVersion`](#getbuiltinversion)
* [`getDeviceId`](#getdeviceid)
* [`getPluginVersion`](#getpluginversion)
* [`isAutoUpdateEnabled`](#isautoupdateenabled)
* [`removeAllListeners`](#removealllisteners)
* [`addListener('download')`](#addlistenerdownload-)
* [`addListener('noNeedUpdate')`](#addlistenernoneedupdate-)
* [`addListener('updateAvailable')`](#addlistenerupdateavailable-)
* [`addListener('downloadComplete')`](#addlistenerdownloadcomplete-)
* [`addListener('majorAvailable')`](#addlistenermajoravailable-)
* [`addListener('updateFailed')`](#addlistenerupdatefailed-)
* [`addListener('downloadFailed')`](#addlistenerdownloadfailed-)
* [`addListener('appReloaded')`](#addlistenerappreloaded-)
* [`addListener('appReady')`](#addlistenerappready-)
* [`isAutoUpdateAvailable`](#isautoupdateavailable)
* [`getNextBundle`](#getnextbundle)
* [`setShakeMenu`](#setshakemenu)
* [`isShakeMenuEnabled`](#isshakemenuenabled)
* [`getAppId`](#getappid)
* [`setAppId`](#setappid)
### notifyAppReady
```typescript
notifyAppReady() => Promise
```
Notify Capacitor Updater that the current bundle is working (a rollback will occur if this method is not called on every app launch) By default this method should be called in the first 10 sec after app launch, otherwise a rollback will occur. Change this behaviour with {@link appReadyTimeout}
**Returns**
`Promise` — an Promise resolved directly
**Throws:** {Error}
***
### setUpdateUrl
```typescript
setUpdateUrl(options: UpdateUrl) => Promise
```
Set the updateUrl for the app, this will be used to check for updates.
**Parameters**
| Name | Type | Description |
| --------- | ----------- | ------------------------------------------------- |
| `options` | `UpdateUrl` | contains the URL to use for checking for updates. |
**Returns**
`Promise`
**Since:** 5.4.0
**Throws:** {Error}
***
### setStatsUrl
```typescript
setStatsUrl(options: StatsUrl) => Promise
```
Set the statsUrl for the app, this will be used to send statistics. Passing an empty string will disable statistics gathering.
**Parameters**
| Name | Type | Description |
| --------- | ---------- | ----------------------------------------------- |
| `options` | `StatsUrl` | contains the URL to use for sending statistics. |
**Returns**
`Promise`
**Since:** 5.4.0
**Throws:** {Error}
***
### setChannelUrl
```typescript
setChannelUrl(options: ChannelUrl) => Promise
```
Set the channelUrl for the app, this will be used to set the channel.
**Parameters**
| Name | Type | Description |
| --------- | ------------ | ------------------------------------------------ |
| `options` | `ChannelUrl` | contains the URL to use for setting the channel. |
**Returns**
`Promise`
**Since:** 5.4.0
**Throws:** {Error}
***
### download
```typescript
download(options: DownloadOptions) => Promise
```
Download a new bundle from the provided URL, it should be a zip file, with files inside or with a unique id inside with all your files
**Parameters**
| Name | Type | Description |
| --------- | ----------------- | ------------------------------------------------------------- |
| `options` | `DownloadOptions` | The {@link DownloadOptions} for downloading a new bundle zip. |
**Returns**
`Promise` — The {@link BundleInfo} for the specified bundle.
**Example**
```ts
const bundle = await CapacitorUpdater.download({ url: `https://example.com/versions/${version}/dist.zip`, version });
```
***
### next
```typescript
next(options: BundleId) => Promise
```
Set the next bundle to be used when the app is reloaded.
**Parameters**
| Name | Type | Description |
| --------- | ---------- | ----------------------------------------------------------------------------------- |
| `options` | `BundleId` | Contains the ID of the next Bundle to set on next app launch. {@link BundleInfo.id} |
**Returns**
`Promise` — The {@link BundleInfo} for the specified bundle id.
**Throws:** {Error} When there is no index.html file inside the bundle folder.
***
### set
```typescript
set(options: BundleId) => Promise
```
Set the current bundle and immediately reloads the app.
**Parameters**
| Name | Type | Description |
| --------- | ---------- | ------------------------------------------------------------------------- |
| `options` | `BundleId` | A {@link BundleId} object containing the new bundle id to set as current. |
**Returns**
`Promise`
**Throws:** {Error} When there are is no index.html file inside the bundle folder.
***
### delete
```typescript
delete(options: BundleId) => Promise
```
Deletes the specified bundle from the native app storage. Use with {@link list} to get the stored Bundle IDs.
**Parameters**
| Name | Type | Description |
| --------- | ---------- | --------------------------------------------------------------------------------------------------------------------- |
| `options` | `BundleId` | A {@link BundleId} object containing the ID of a bundle to delete (note, this is the bundle id, NOT the version name) |
**Returns**
`Promise` — When the bundle is deleted
**Throws:** {Error}
***
### list
```typescript
list(options?: ListOptions | undefined) => Promise
```
Get all locally downloaded bundles in your app
**Parameters**
| Name | Type | Description |
| --------- | ------------- | ----------- |
| `options` | \`ListOptions | undefined\` |
**Returns**
`Promise` — A Promise containing the {@link BundleListResult.bundles}
**Throws:** {Error}
***
### reset
```typescript
reset(options?: ResetOptions | undefined) => Promise
```
Reset the app to the `builtin` bundle (the one sent to Apple App Store / Google Play Store ) or the last successfully loaded bundle.
**Parameters**
| Name | Type | Description |
| --------- | -------------- | ----------- |
| `options` | \`ResetOptions | undefined\` |
**Returns**
`Promise`
**Throws:** {Error}
***
### current
```typescript
current() => Promise
```
Get the current bundle, if none are set it returns `builtin`. currentNative is the original bundle installed on the device
**Returns**
`Promise` — A Promise evaluating to the {@link CurrentBundleResult}
**Throws:** {Error}
***
### reload
```typescript
reload() => Promise
```
Reload the view
**Returns**
`Promise` — A Promise which is resolved when the view is reloaded
**Throws:** {Error}
***
### setMultiDelay
```typescript
setMultiDelay(options: MultiDelayConditions) => Promise
```
Sets a {@link DelayCondition} array containing conditions that the Plugin will use to delay the update. After all conditions are met, the update process will run start again as usual, so update will be installed after a backgrounding or killing the app. For the `date` kind, the value should be an iso8601 date string. For the `background` kind, the value should be a number in milliseconds. For the `nativeVersion` kind, the value should be the version number. For the `kill` kind, the value is not used. The function has unconsistent behavior the option kill do trigger the update after the first kill and not after the next background like other options. This will be fixed in a future major release.
**Parameters**
| Name | Type | Description |
| --------- | ---------------------- | ---------------------------------------------------------------------- |
| `options` | `MultiDelayConditions` | Containing the {@link MultiDelayConditions} array of conditions to set |
**Returns**
`Promise`
**Since:** 4.3.0
**Throws:** {Error}
**Example**
```ts
// Delay the update after the user kills the app or after a background of 300000 ms (5 minutes)
await CapacitorUpdater.setMultiDelay({ delayConditions: [{ kind: 'kill' }, { kind: 'background', value: '300000' }] })
```
**Example**
```ts
// Delay the update after the specific iso8601 date is expired
await CapacitorUpdater.setMultiDelay({ delayConditions: [{ kind: 'date', value: '2022-09-14T06:14:11.920Z' }] })
```
**Example**
```ts
// Delay the update after the first background (default behaviour without setting delay)
await CapacitorUpdater.setMultiDelay({ delayConditions: [{ kind: 'background' }] })
```
***
### cancelDelay
```typescript
cancelDelay() => Promise
```
Cancels a {@link DelayCondition} to process an update immediately.
**Returns**
`Promise`
**Since:** 4.0.0
**Throws:** {Error}
***
### getLatest
```typescript
getLatest(options?: GetLatestOptions | undefined) => Promise
```
Get Latest bundle available from update Url
**Parameters**
| Name | Type | Description |
| --------- | ------------------ | ----------- |
| `options` | \`GetLatestOptions | undefined\` |
**Returns**
`Promise` — A Promise resolved when url is loaded
**Since:** 4.0.0
**Throws:** {Error}
***
### setChannel
```typescript
setChannel(options: SetChannelOptions) => Promise
```
Sets the channel for this device. The channel has to allow for self assignment for this to work. Do not use this method to set the channel at boot. This method is to set the channel after the app is ready, and user interacted. If you want to set the channel at boot, use the {@link PluginsConfig} to set the default channel. This methods send to Capgo backend a request to link the device ID to the channel. Capgo can accept or refuse depending of the setting of your channel.
**Parameters**
| Name | Type | Description |
| --------- | ------------------- | ----------------------------------------------- |
| `options` | `SetChannelOptions` | Is the {@link SetChannelOptions} channel to set |
**Returns**
`Promise` — A Promise which is resolved when the new channel is set
**Since:** 4.7.0
**Throws:** {Error}
***
### unsetChannel
```typescript
unsetChannel(options: UnsetChannelOptions) => Promise
```
Unset the channel for this device. The device will then return to the default channel
**Parameters**
| Name | Type | Description |
| --------- | --------------------- | ----------- |
| `options` | `UnsetChannelOptions` | |
**Returns**
`Promise` — A Promise resolved when channel is set
**Since:** 4.7.0
**Throws:** {Error}
***
### getChannel
```typescript
getChannel() => Promise
```
Get the channel for this device
**Returns**
`Promise` — A Promise that resolves with the channel info
**Since:** 4.8.0
**Throws:** {Error}
***
### listChannels
```typescript
listChannels() => Promise
```
List all channels available for this device that allow self-assignment
**Returns**
`Promise` — A Promise that resolves with the available channels
**Since:** 7.5.0
**Throws:** {Error}
***
### setCustomId
```typescript
setCustomId(options: SetCustomIdOptions) => Promise
```
Set a custom ID for this device
When {@link PluginsConfig.CapacitorUpdater.persistCustomId} is true, the value will be stored natively and restored on the next app launch. Pass an empty string to remove any previously stored customId.
**Parameters**
| Name | Type | Description |
| --------- | -------------------- | ------------------------------------------------- |
| `options` | `SetCustomIdOptions` | is the {@link SetCustomIdOptions} customId to set |
**Returns**
`Promise` — an Promise resolved instantly
**Since:** 4.9.0
**Throws:** {Error}
***
### getBuiltinVersion
```typescript
getBuiltinVersion() => Promise
```
Get the native app version or the builtin version if set in config
**Returns**
`Promise` — A Promise with version for this device
**Since:** 5.2.0
***
### getDeviceId
```typescript
getDeviceId() => Promise
```
Get unique ID used to identify device (sent to auto update server)
**Returns**
`Promise` — A Promise with id for this device
**Throws:** {Error}
***
### getPluginVersion
```typescript
getPluginVersion() => Promise
```
Get the native Capacitor Updater plugin version (sent to auto update server)
**Returns**
`Promise` — A Promise with Plugin version
**Throws:** {Error}
***
### isAutoUpdateEnabled
```typescript
isAutoUpdateEnabled() => Promise
```
Get the state of auto update config.
**Returns**
`Promise` — The status for auto update. Evaluates to `false` in manual mode.
**Throws:** {Error}
***
### removeAllListeners
```typescript
removeAllListeners() => Promise
```
Remove all listeners for this plugin.
**Returns**
`Promise`
**Since:** 1.0.0
***
### addListener(‘download’)
```typescript
addListener(eventName: 'download', listenerFunc: (state: DownloadEvent) => void) => Promise
```
Listen for bundle download event in the App. Fires once a download has started, during downloading and when finished. This will return you all download percent during the download
**Parameters**
| Name | Type | Description |
| -------------- | -------------------------------- | ----------- |
| `eventName` | `'download'` | |
| `listenerFunc` | `(state: DownloadEvent) => void` | |
**Returns**
`Promise`
**Since:** 2.0.11
***
### addListener(‘noNeedUpdate’)
```typescript
addListener(eventName: 'noNeedUpdate', listenerFunc: (state: NoNeedEvent) => void) => Promise
```
Listen for no need to update event, useful when you want force check every time the app is launched
**Parameters**
| Name | Type | Description |
| -------------- | ------------------------------ | ----------- |
| `eventName` | `'noNeedUpdate'` | |
| `listenerFunc` | `(state: NoNeedEvent) => void` | |
**Returns**
`Promise`
**Since:** 4.0.0
***
### addListener(‘updateAvailable’)
```typescript
addListener(eventName: 'updateAvailable', listenerFunc: (state: UpdateAvailableEvent) => void) => Promise
```
Listen for available update event, useful when you want to force check every time the app is launched
**Parameters**
| Name | Type | Description |
| -------------- | --------------------------------------- | ----------- |
| `eventName` | `'updateAvailable'` | |
| `listenerFunc` | `(state: UpdateAvailableEvent) => void` | |
**Returns**
`Promise`
**Since:** 4.0.0
***
### addListener(‘downloadComplete’)
```typescript
addListener(eventName: 'downloadComplete', listenerFunc: (state: DownloadCompleteEvent) => void) => Promise
```
Listen for downloadComplete events.
**Parameters**
| Name | Type | Description |
| -------------- | ---------------------------------------- | ----------- |
| `eventName` | `'downloadComplete'` | |
| `listenerFunc` | `(state: DownloadCompleteEvent) => void` | |
**Returns**
`Promise`
**Since:** 4.0.0
***
### addListener(‘majorAvailable’)
```typescript
addListener(eventName: 'majorAvailable', listenerFunc: (state: MajorAvailableEvent) => void) => Promise
```
Listen for Major update event in the App, let you know when major update is blocked by setting disableAutoUpdateBreaking
**Parameters**
| Name | Type | Description |
| -------------- | -------------------------------------- | ----------- |
| `eventName` | `'majorAvailable'` | |
| `listenerFunc` | `(state: MajorAvailableEvent) => void` | |
**Returns**
`Promise`
**Since:** 2.3.0
***
### addListener(‘updateFailed’)
```typescript
addListener(eventName: 'updateFailed', listenerFunc: (state: UpdateFailedEvent) => void) => Promise
```
Listen for update fail event in the App, let you know when update has fail to install at next app start
**Parameters**
| Name | Type | Description |
| -------------- | ------------------------------------ | ----------- |
| `eventName` | `'updateFailed'` | |
| `listenerFunc` | `(state: UpdateFailedEvent) => void` | |
**Returns**
`Promise`
**Since:** 2.3.0
***
### addListener(‘downloadFailed’)
```typescript
addListener(eventName: 'downloadFailed', listenerFunc: (state: DownloadFailedEvent) => void) => Promise
```
Listen for download fail event in the App, let you know when a bundle download has failed
**Parameters**
| Name | Type | Description |
| -------------- | -------------------------------------- | ----------- |
| `eventName` | `'downloadFailed'` | |
| `listenerFunc` | `(state: DownloadFailedEvent) => void` | |
**Returns**
`Promise`
**Since:** 4.0.0
***
### addListener(‘appReloaded’)
```typescript
addListener(eventName: 'appReloaded', listenerFunc: () => void) => Promise
```
Listen for reload event in the App, let you know when reload has happened
**Parameters**
| Name | Type | Description |
| -------------- | --------------- | ----------- |
| `eventName` | `'appReloaded'` | |
| `listenerFunc` | `() => void` | |
**Returns**
`Promise`
**Since:** 4.3.0
***
### addListener(‘appReady’)
```typescript
addListener(eventName: 'appReady', listenerFunc: (state: AppReadyEvent) => void) => Promise
```
Listen for app ready event in the App, let you know when app is ready to use, this event is retain till consumed.
**Parameters**
| Name | Type | Description |
| -------------- | -------------------------------- | ----------- |
| `eventName` | `'appReady'` | |
| `listenerFunc` | `(state: AppReadyEvent) => void` | |
**Returns**
`Promise`
**Since:** 5.1.0
***
### isAutoUpdateAvailable
```typescript
isAutoUpdateAvailable() => Promise
```
Get if auto update is available (not disabled by serverUrl).
**Returns**
`Promise` — The availability status for auto update. Evaluates to `false` when serverUrl is set.
**Throws:** {Error}
***
### getNextBundle
```typescript
getNextBundle() => Promise
```
Get the next bundle that will be used when the app reloads. Returns null if no next bundle is set.
**Returns**
`Promise` — A Promise that resolves with the next bundle information or null
**Since:** 6.8.0
**Throws:** {Error}
***
### setShakeMenu
```typescript
setShakeMenu(options: SetShakeMenuOptions) => Promise
```
Enable or disable the shake menu for debugging/testing purposes
**Parameters**
| Name | Type | Description |
| --------- | --------------------- | -------------------------------------------------------- |
| `options` | `SetShakeMenuOptions` | Contains enabled boolean to enable or disable shake menu |
**Returns**
`Promise`
**Since:** 7.5.0
**Throws:** {Error}
***
### isShakeMenuEnabled
```typescript
isShakeMenuEnabled() => Promise
```
Get the current state of the shake menu
**Returns**
`Promise` — The current state of shake menu
**Since:** 7.5.0
**Throws:** {Error}
***
### getAppId
```typescript
getAppId() => Promise
```
Get the configured App ID
**Returns**
`Promise` — The current App ID
**Since:** 7.14.0
**Throws:** {Error}
***
### setAppId
```typescript
setAppId(options: SetAppIdOptions) => Promise
```
Set the App ID for the app (requires allowModifyAppId to be true in config)
**Parameters**
| Name | Type | Description |
| --------- | ----------------- | --------------------- |
| `options` | `SetAppIdOptions` | The new App ID to set |
**Returns**
`Promise`
**Since:** 7.14.0
**Throws:** {Error} If allowModifyAppId is false or if the operation fails
***
# Capacitor Plugins by Capgo
> Explore our comprehensive collection of Capacitor plugins to extend your app's native capabilities with powerful features.
Welcome to the Capgo Capacitor Plugins collection! We maintain a suite of high-quality, well-documented plugins to help you build amazing native experiences in your Capacitor apps.
## ⭐ Capgo Cloud - Live Updates
[Capacitor Updater ](/docs/plugins/updater/)The core plugin powering Capgo Cloud - deliver instant updates to your Capacitor apps without app store delays. Push fixes and features directly to your users.
The Updater plugin is the foundation of Capgo Cloud, enabling you to:
* 🚀 Deploy updates instantly without app store reviews
* 📱 Update your app’s JavaScript, HTML, CSS, and assets
* 🎯 Target specific user segments with channels
* 📊 Monitor update success with built-in analytics
* 🔒 Secure updates with encryption and code signing
## 🚀 Featured Plugins
[Social Login ](/docs/plugins/social-login/)Seamless authentication with Google, Apple, and Facebook. One plugin for all major social providers.
[Native Purchases ](/docs/plugins/native-purchases/)Implement in-app purchases and subscriptions with a unified API for iOS and Android.
[Camera Preview ](/docs/plugins/camera-preview/)Display real-time camera feed in your app with full control over capture and settings.
[Data Storage SQLite ](/docs/plugins/data-storage-sqlite/)Fast and secure key-value storage powered by SQLite with optional encryption.
## 📱 Device & System Plugins
[Native Market ](/docs/plugins/native-market/)Link to app stores for ratings, reviews, and app updates.
[Native Biometric ](/docs/plugins/native-biometric/)Access biometric authentication APIs for secure app access.
[Shake ](/docs/plugins/shake/)Detect shake gestures for interactive features and debug menus.
[Navigation Bar ](/docs/plugins/navigation-bar/)Customize Android navigation bar color to match your app theme.
[Home Indicator ](/docs/plugins/home-indicator/)Control iOS home indicator visibility for immersive experiences.
## 🎥 Media & Camera Plugins
[Screen Recorder ](/docs/plugins/screen-recorder/)Record your device screen for tutorials, demos, or user feedback.
[IVS Player ](/docs/plugins/ivs-player/)Amazon IVS integration for ultra-low latency live streaming.
[Native Audio ](/docs/plugins/native-audio/)High-performance native audio engine for games and apps.
[Mute ](/docs/plugins/mute/)Detect if the device mute switch is enabled or disabled.
## 🛠️ Utility Plugins
[Uploader ](/docs/plugins/uploader/)Background file upload with progress tracking and resumable uploads.
[Flash ](/docs/plugins/flash/)Control device flashlight/torch for utility and camera features.
[Native Geocoder ](/docs/plugins/nativegeocoder/)Forward and reverse geocoding using native platform APIs.
[InAppBrowser ](/docs/plugins/inappbrowser/)Open web content in a customizable in-app browser.
[Crisp ](/docs/plugins/crisp/)Integrate Crisp chat support directly into your mobile app.
## 🤖 AI & Advanced Media
[LLM ](/docs/plugins/llm/)Run Large Language Models locally with Apple Intelligence support.
[StreamCall ](/docs/plugins/streamcall/)Enable high-quality video streaming and calling capabilities.
[JW Player ](/docs/plugins/jw-player/)Professional video player with advanced streaming features.
[Ricoh 360 Camera ](/docs/plugins/ricoh360-camera/)Control and capture from Ricoh 360 degree cameras.
## 📍 Location & Background Services
[Background Geolocation ](/docs/plugins/background-geolocation/)Track device location in background with battery optimization.
[Alarm ](/docs/plugins/alarm/)Schedule native alarms and notifications even when app is closed.
## 📞 Communication & Analytics
[Twilio Voice ](/docs/plugins/twilio-voice/)Make and receive phone calls using Twilio Voice API.
[GTM ](/docs/plugins/gtm/)Google Tag Manager integration for analytics and tracking.
## 🔐 Security & System
[Is Root ](/docs/plugins/is-root/)Detect if device is rooted or jailbroken for security.
[Persistent Account ](/docs/plugins/persistent-account/)Maintain user accounts across app reinstalls.
[Autofill Save Password ](/docs/plugins/autofill-save-password/)Enable password autofill and save functionality.
## 📊 Android-Specific Features
[Android Usage Stats ](/docs/plugins/android-usagestatsmanager/)Access Android app usage statistics and screen time data.
[Android Inline Install ](/docs/plugins/android-inline-install/)Enable inline app installation on Android devices.
## 📥 Download & Navigation
[Downloader ](/docs/plugins/downloader/)Background file downloads with progress tracking.
[Launch Navigator ](/docs/plugins/launch-navigator/)Launch navigation apps with addresses and coordinates.
## 🎯 Why Choose Capgo Plugins?
**Well Maintained**: Regular updates and compatibility with latest Capacitor versions
**Comprehensive Docs**: Detailed documentation with examples for every plugin
**Easy Integration**: Simple APIs that follow Capacitor best practices
**TypeScript Support**: Full TypeScript definitions for better development experience
## 🚀 Getting Started
Each plugin follows a similar installation pattern:
1. **Install the plugin** using your preferred package manager
2. **Sync your project** with `npx cap sync`
3. **Configure platform-specific settings** if needed
4. **Start using the plugin** in your code
Visit each plugin’s documentation for detailed setup instructions and API references.
## 💡 Need Help?
* 📖 Check the individual plugin documentation
* 💬 Join our [Discord community](https://discord.capgo.app)
* 🐛 Report issues on the plugin’s GitHub repository
* 📧 Contact support for enterprise inquiries
## 🛠️ Need a Custom Plugin?
Can’t find the exact functionality you need? We can help!
[Custom Plugin Development ](/consulting/)Our team specializes in building custom Capacitor plugins tailored to your specific requirements. From complex native integrations to unique device features, we've got you covered.
Whether you need:
* 🔧 A completely new plugin built from scratch
* 🔄 Modifications to existing plugins
* 🤝 Expert consulting on native development
* 📱 Platform-specific implementations
[Get in touch with our team](/consulting/) to discuss your custom plugin needs.
## 🤝 Contributing
We welcome contributions! Each plugin is open source and available on GitHub. Feel free to:
* Report bugs and request features
* Submit pull requests
* Improve documentation
* Share your use cases
***
**Built with ❤️ by the Capgo team**
# @capgo/capacitor-alarm
> Manage native alarm Capacitor plugin
# @capgo/capacitor-alarm
Manage native alarm Capacitor plugin
## Installation
* npm
```bash
npm install @capgo/capacitor-alarm
npx cap sync
```
* yarn
```bash
yarn add @capgo/capacitor-alarm
npx cap sync
```
* pnpm
```bash
pnpm add @capgo/capacitor-alarm
npx cap sync
```
* bun
```bash
bun add @capgo/capacitor-alarm
npx cap sync
```
## Requirements
* **iOS**: iOS 26+ only. This plugin relies on `AlarmKit` APIs and will report unsupported on earlier versions or when the framework is unavailable.
* **Android**: Uses `AlarmClock` intents; behavior depends on the default Clock app and OEM policies.
Note: This plugin only exposes native alarm actions (create/open). It does not implement any custom in-app alarm scheduling/CRUD.
## API
### createAlarm(…)
```typescript
createAlarm(options: NativeAlarmCreateOptions) => Promise