GitHub Actions를 이용한 iOS 자동 빌드 인증서 설정
Capacitor 앱의 CI/CD 설정은 복잡하고 시간이 많이 소요될 수 있습니다. 알아야 할 내용은 다음과 같습니다:
사전 요구사항
시작하기 전에 다음이 필요합니다:
- 관리자 권한이 있는 GitHub 계정
- iOS 개발자 프로그램 멤버십
- 적절한 권한이 있는 App Store Connect API 접근
- GitHub Actions 워크플로우 이해
- Fastlane 설정 지식
- 파이프라인 유지보수 및 디버깅 시간
- 적절한 인증서와 프로비저닝 프로파일
Capgo의 전문 CI/CD 설정
복잡성을 건너뛰고 Capgo가 선호하는 플랫폼에서 직접 CI/CD 파이프라인을 구성합니다:
- 플랫폼 독립성: GitHub Actions, GitLab CI 등에서 작동
- 원활한 통합: 플랫폼 전환이 필요 없으며 현재 프로세스와 함께 작동
- 맞춤형 구성: 프로젝트 요구사항에 맞는 맞춤 설정
- 전문가 가이드: 이미 50개 이상의 앱에 대해 CI/CD를 설정했습니다
가격
- 일회성 설정 비용: $2,600
- 운영 비용: ~$300/년
- 다른 독점 솔루션과 비교: $6,000/년
- 5년 동안 $26,100 절약
수동 설정 가이드
직접 모든 것을 설정하고 싶다면, 다음과 같이 해야 합니다:
Fastlane과 GitHub Actions 및 인증서를 사용한 iOS 지속적 배포
사전 요구사항
튜토리얼을 계속하기 전에:
- 개발 머신에 Fastlane이 설치되어 있는지 확인하세요
- iOS 개발자 프로그램 멤버십에 속해 있는지 확인하세요
가격에 대한 중요 정보
https://githubcom/features/actions
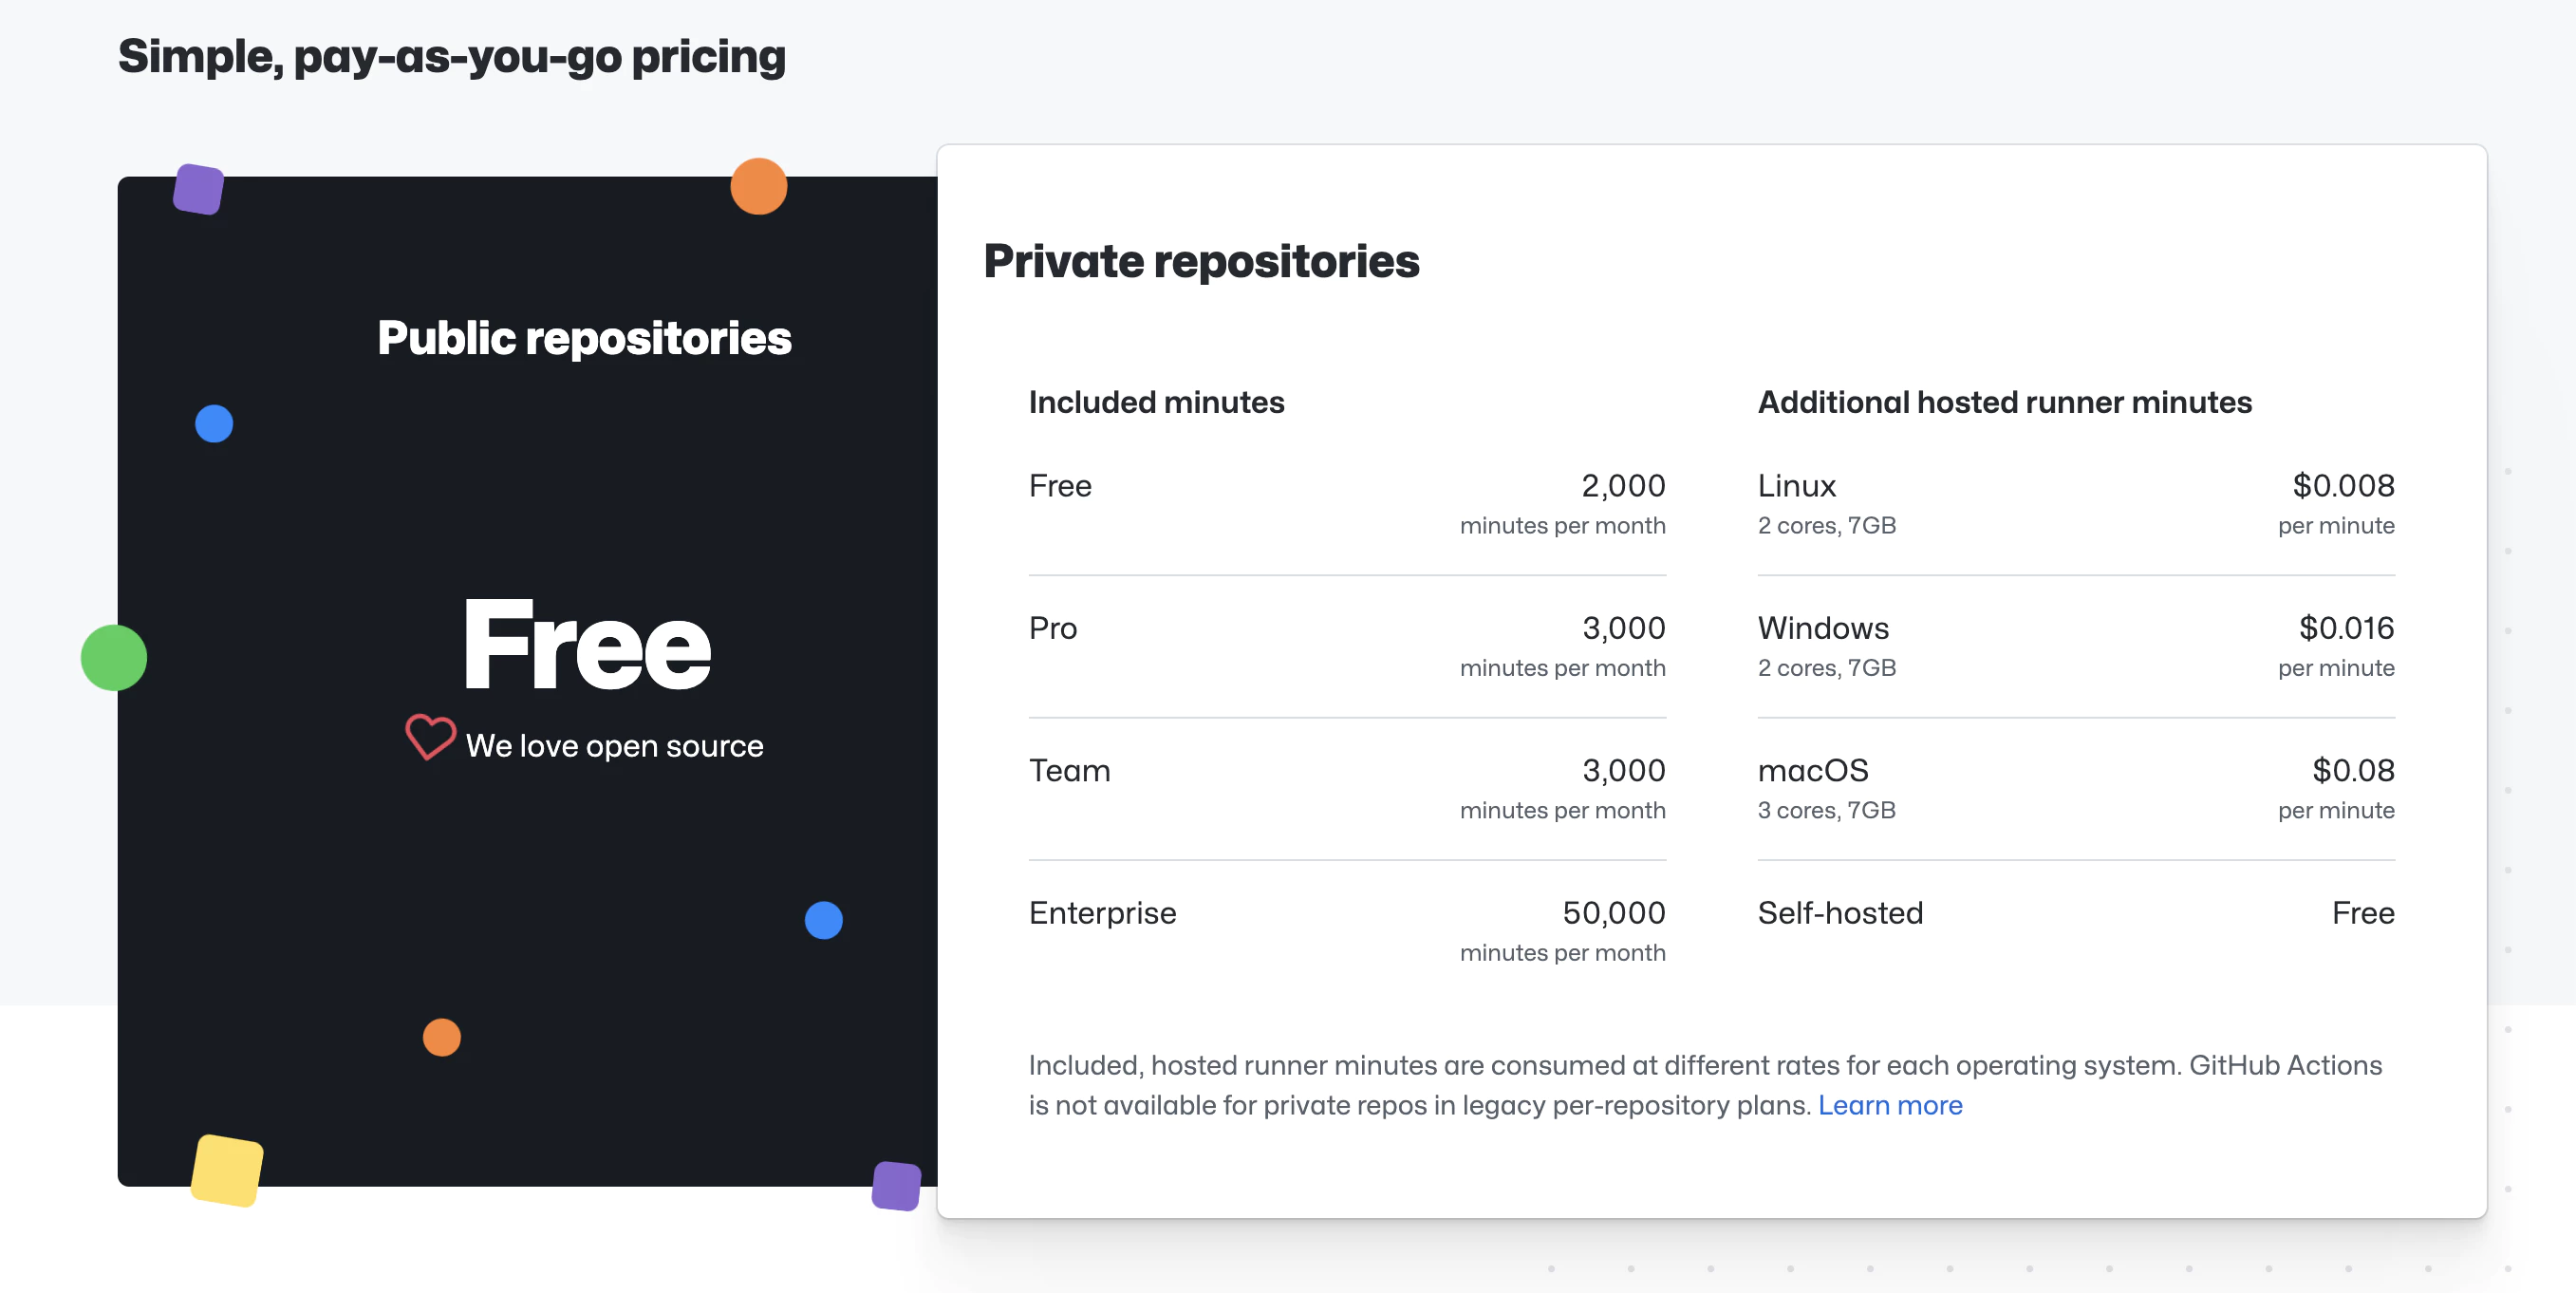
이 서비스는 선택한 머신에 따라 제한까지 ‘무료’입니다
우리는 macOS 머신을 사용할 것이며, 스크린샷에서 가격과 제한을 볼 수 있습니다 (튜토리얼 작성 시점의 가격이며, 향후 변경될 수 있습니다)
요구사항과 가격에 대해 안내했으니, 계속 진행하겠습니다
참고: 이 포스트에서는 App Store Connect에 앱이 생성되어 있다고 가정합니다. 중요한 정보는 Fastlane이 복사할 것입니다!
이 튜토리얼에서 배울 내용
포스트에서 따라야 할 단계
- Fastlane과 함께 App Store Connect API 사용하기
- 요구사항:
- App Store Connect API 키 생성
- App Store Connect API 키 사용
- 요구사항:
- Fastlane 파일 복사
- GitHub Actions 구성
1. Fastlane과 함께 App Store Connect API 사용하기
2021년 2월부터 App Store Connect에 로그인하려면 2단계 인증 또는 2단계 확인이 필요합니다. Apple ID에 대한 이 추가 보안 계층은 계정에 접근할 수 있는 유일한 사람이 귀하임을 보장합니다.
Apple Support 참조
요구사항
Fastlane이 App Store Connect API를 사용하여 앱을 업로드하려면 다음 세 가지가 필요합니다:
- 발급자 ID
- 키 ID
- 키 파일 또는 키 내용
App Store Connect API 키 획득하기
키를 생성하려면 App Store Connect에서 관리자 권한이 있어야 합니다. 해당 권한이 없다면 관련 담당자에게 이 문서를 안내할 수 있습니다.
-
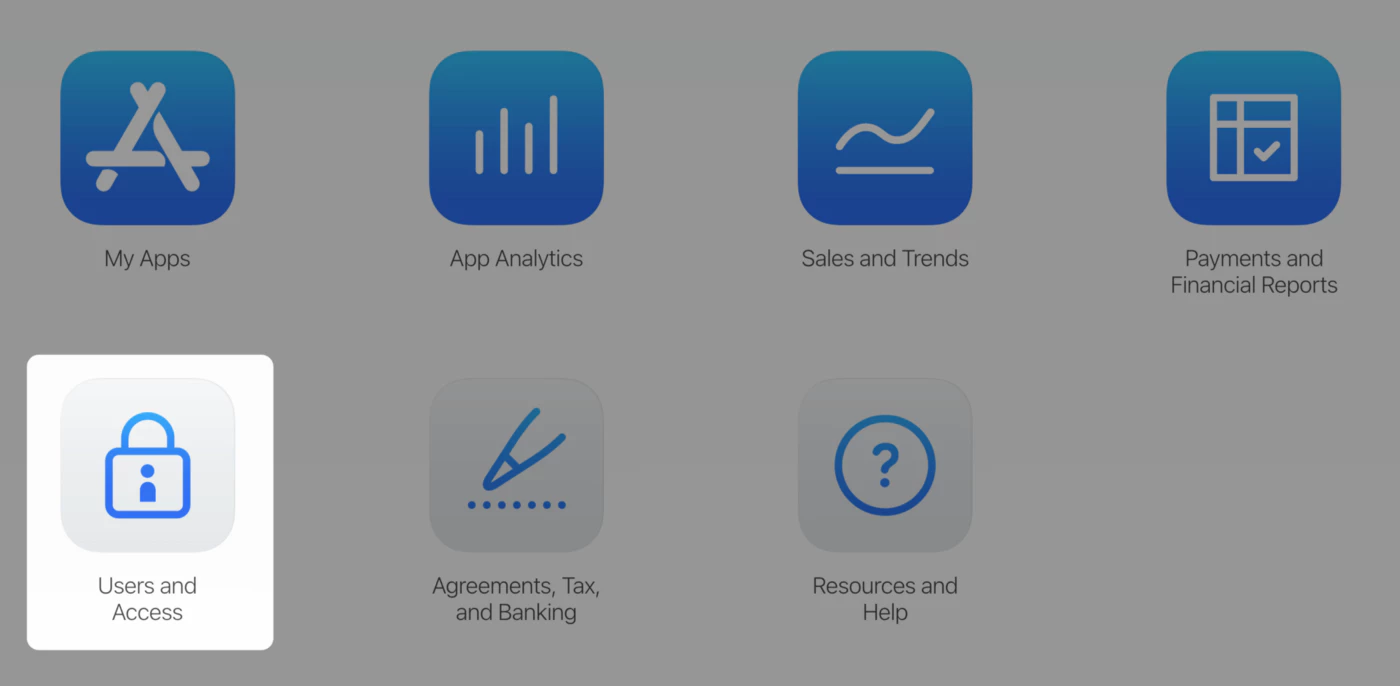
App Store Connect에 로그인
-
사용자 및 액세스 선택
- 통합 탭 선택
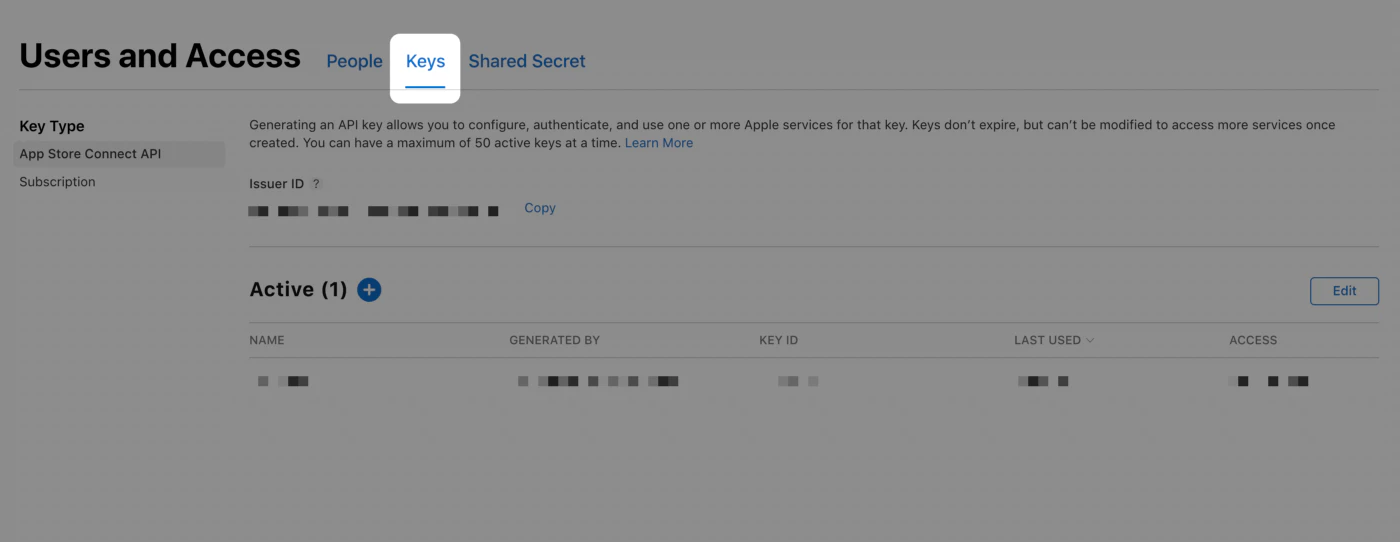
- API 키 생성 또는 추가(+) 버튼 클릭
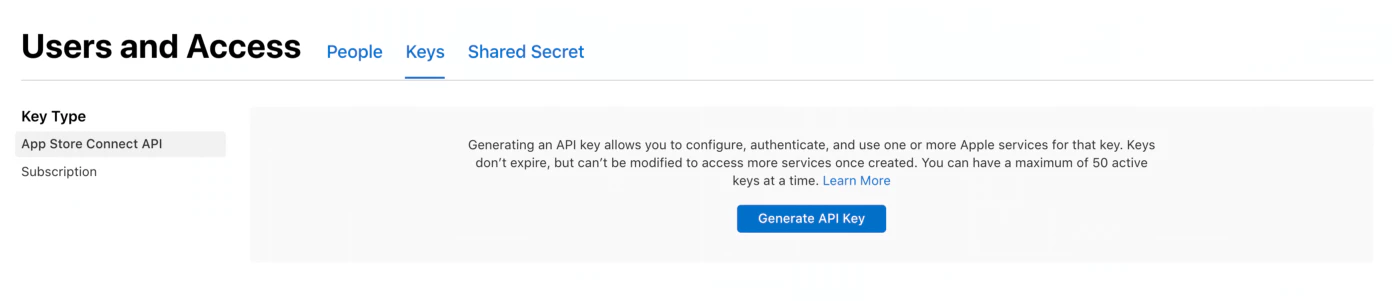
- 키의 이름을 입력합니다. 이름은 참조용이며 키 자체의 일부가 아닙니다
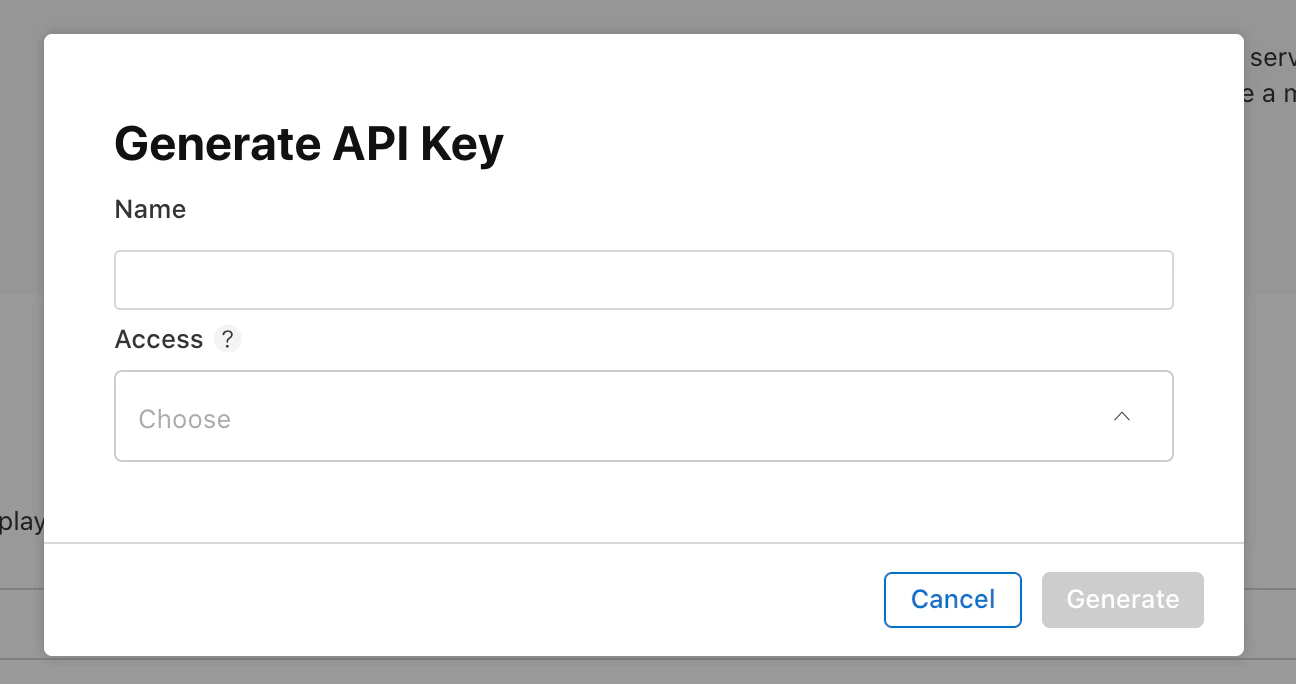
-
액세스에서 키의 역할 선택귀하의 팀의 사용자에게 적용되는 역할과 동일한 역할이 키에 적용됩니다. 역할 권한을 참조하세요. App manager를 선택하는 것을 권장합니다.
-
Generate를 클릭하세요.
API 키의 접근은 특정 앱으로 제한할 수 없습니다
새 키의 이름, 키 ID, 다운로드 링크 및 기타 정보가 페이지에 나타납니다.
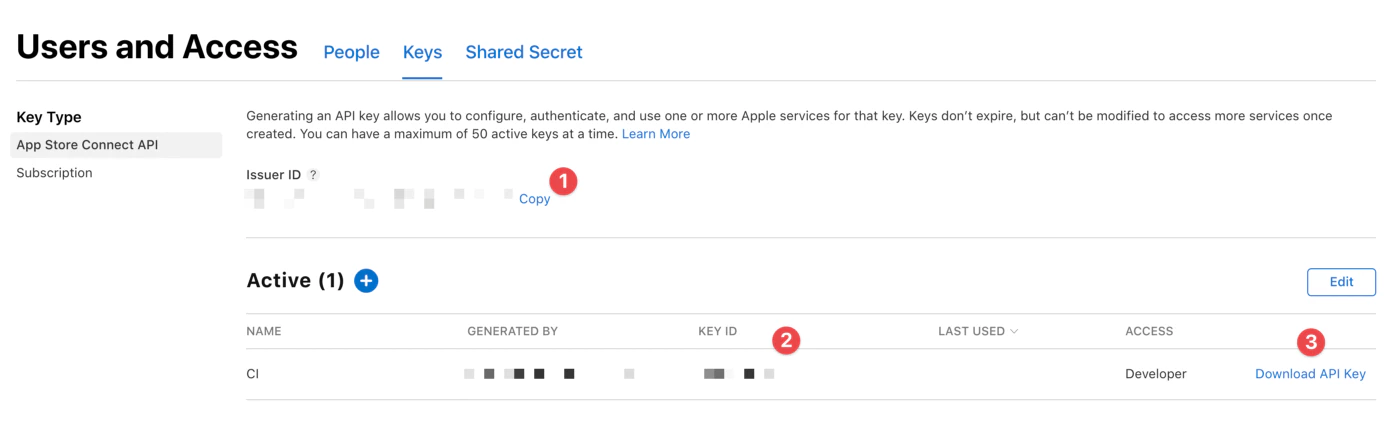
여기서 필요한 세 가지 정보를 모두 얻을 수 있습니다:
- Issue ID (
APPLE_ISSUER_ID시크릿) - Key ID (
APPLE_KEY_ID시크릿) - “Download API Key”를 클릭하여 API 프라이빗 키를 다운로드하세요. 다운로드 링크는 프라이빗 키가 아직 다운로드되지 않은 경우에만 나타납니다. Apple은 프라이빗 키의 복사본을 보관하지 않습니다. 따라서 한 번만 다운로드할 수 있습니다.
🔴 프라이빗 키를 안전한 곳에 보관하세요. 키를 공유하거나, 코드 저장소에 저장하거나, 클라이언트 측 코드에 포함해서는 안 됩니다.
App Store Connect API 키 사용하기
JWT 토큰 인증을 생성하기 위해서는 API 키 파일(다운로드한 p8 파일), 키 ID, 발급자 ID가 필요합니다. 이 정보를 Fastlane에 전달하는 방법은 여러 가지가 있습니다. 저는 Fastlane의 새로운 액션인 app_store_connect_api_key를 사용하기로 했습니다. 다른 방법은 Fastlane 문서에서 확인할 수 있습니다. 이 방법을 보여드리는 이유는 대부분의 CI에서 환경 변수를 설정할 수 있어 가장 쉬운 방법이라고 생각하기 때문입니다.
다운로드한 p8 파일을 Base64로 변환하여 시크릿(APPLE_KEY_CONTENT)으로 저장해 주세요.
base64 -i APPLE_KEY_CONTENT.p8 | pbcopy이제 API 키를 사용하여 Fastlane으로 App Store Connect를 관리할 수 있습니다. 좋습니다!
2. 인증서
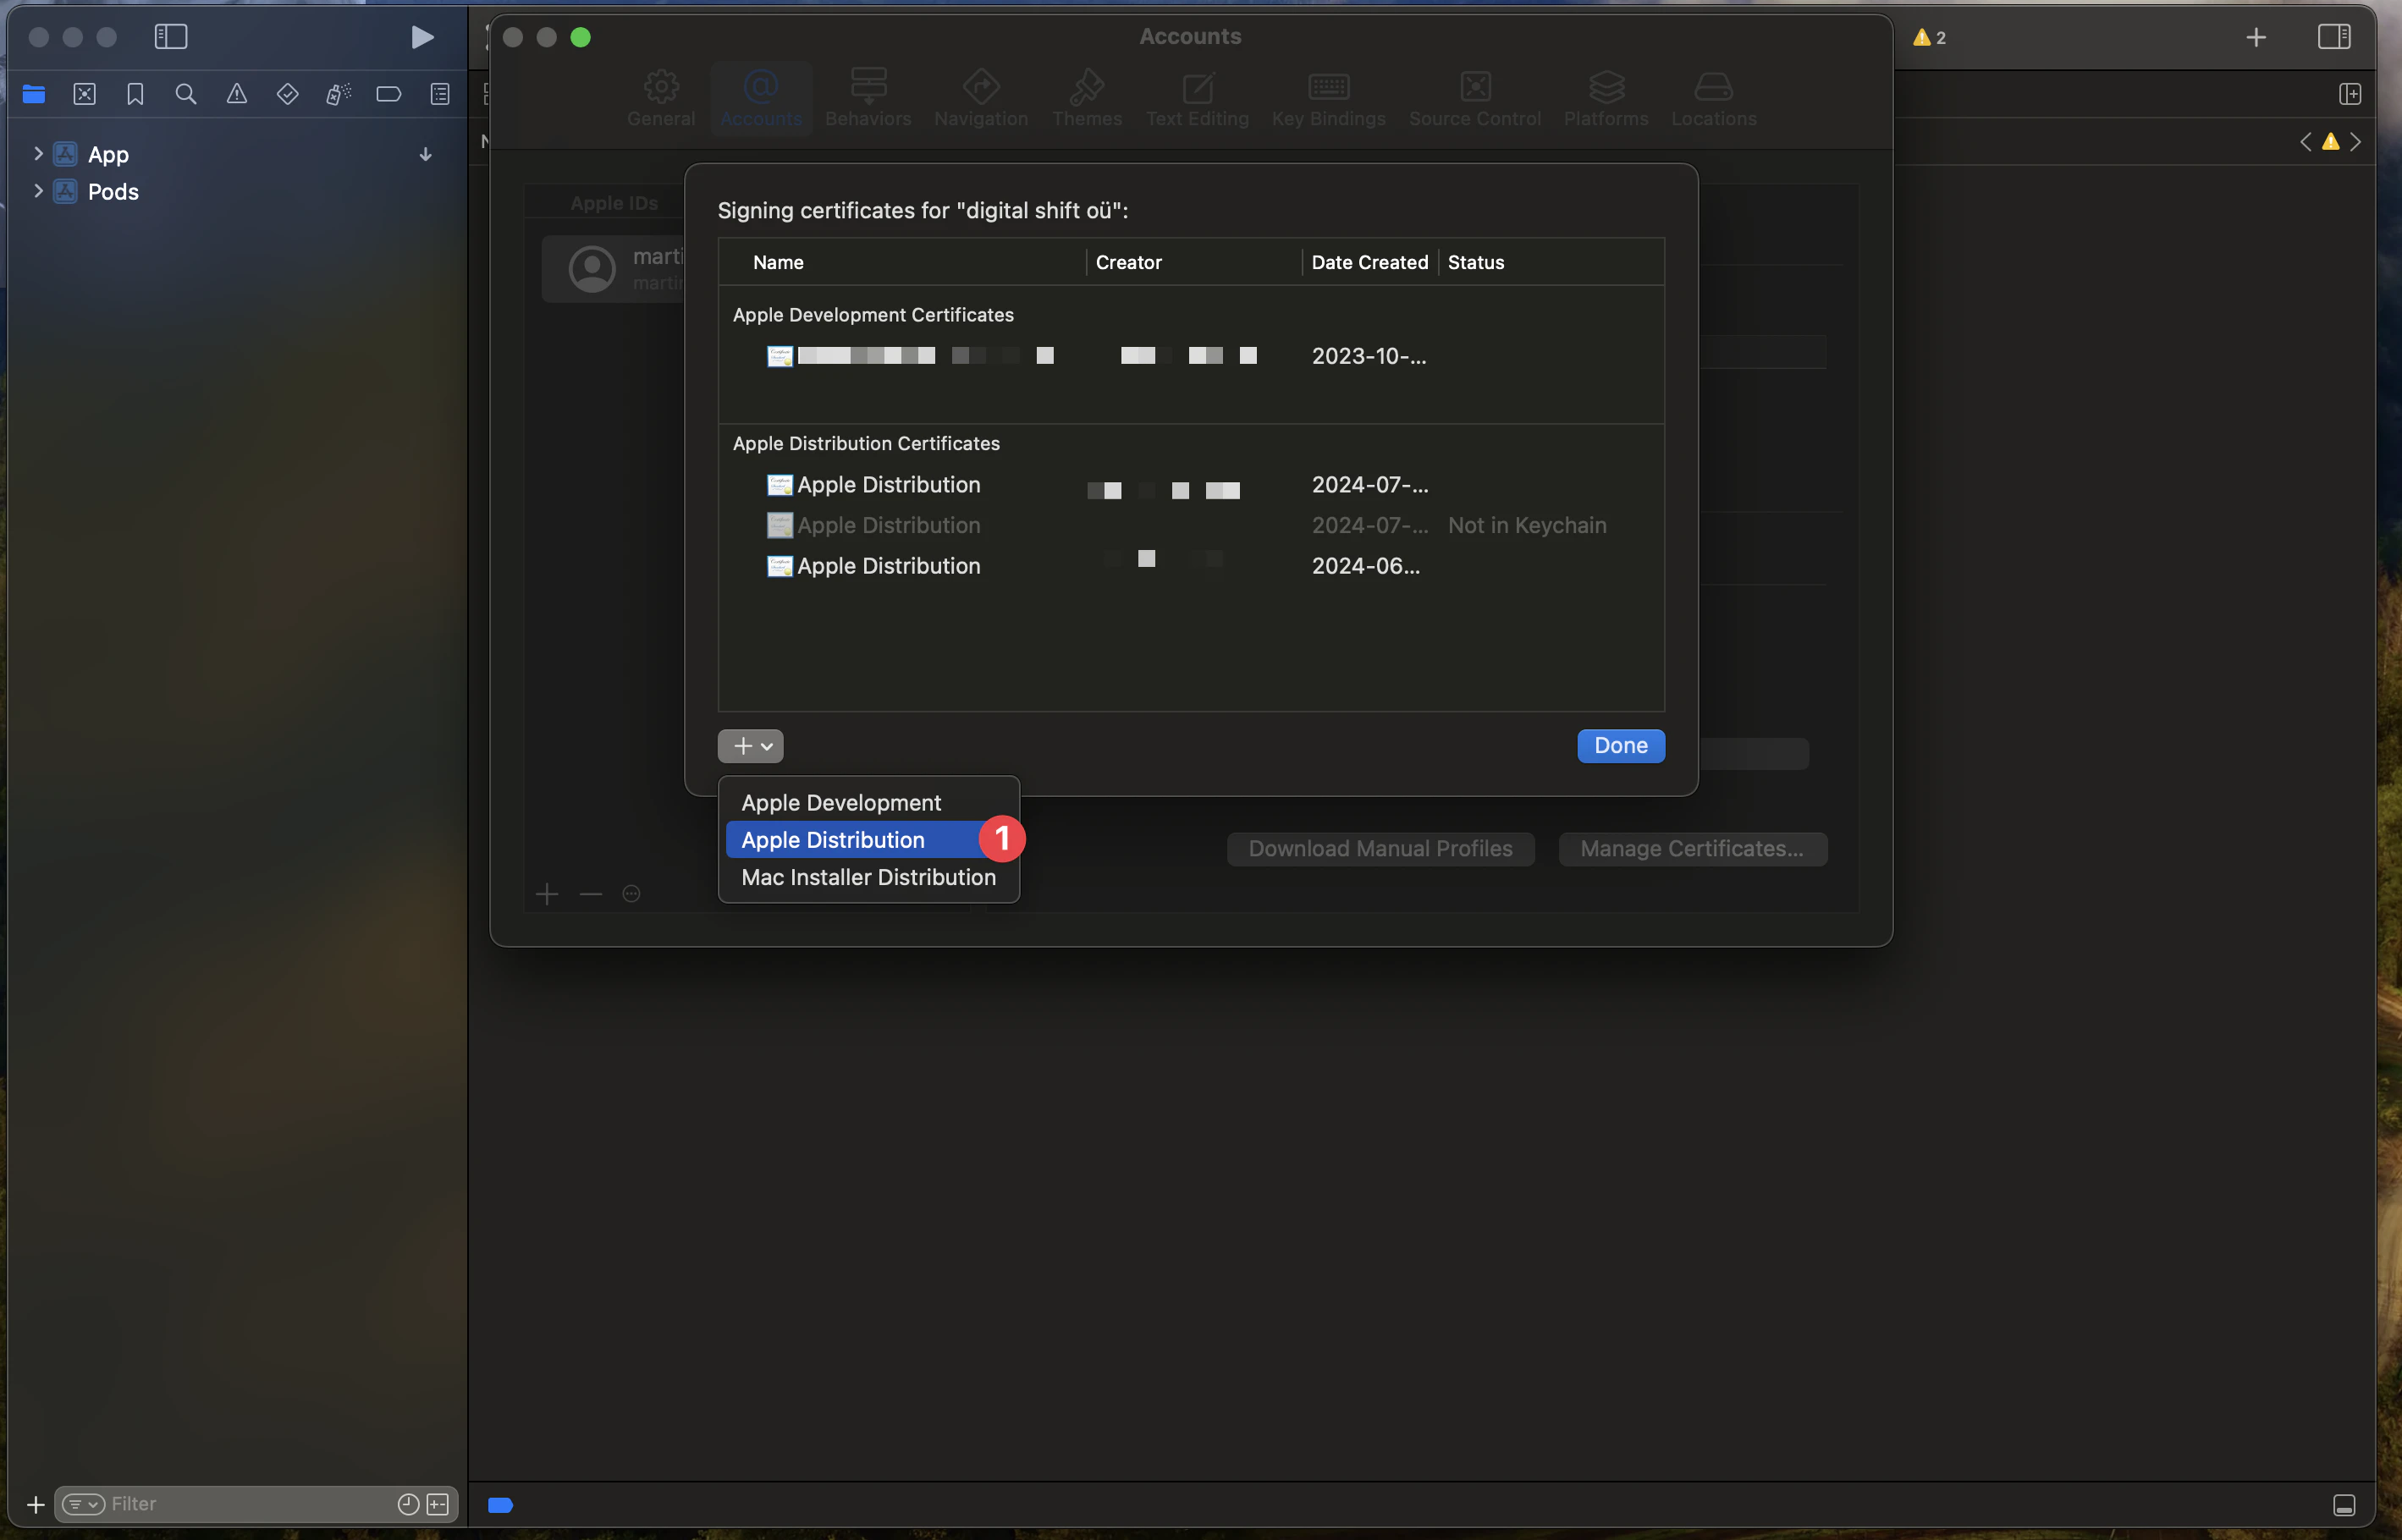
XCode를 열고 설정 > 계정 > Apple ID > 팀으로 이동하여 귀하의 팀을 선택하세요.
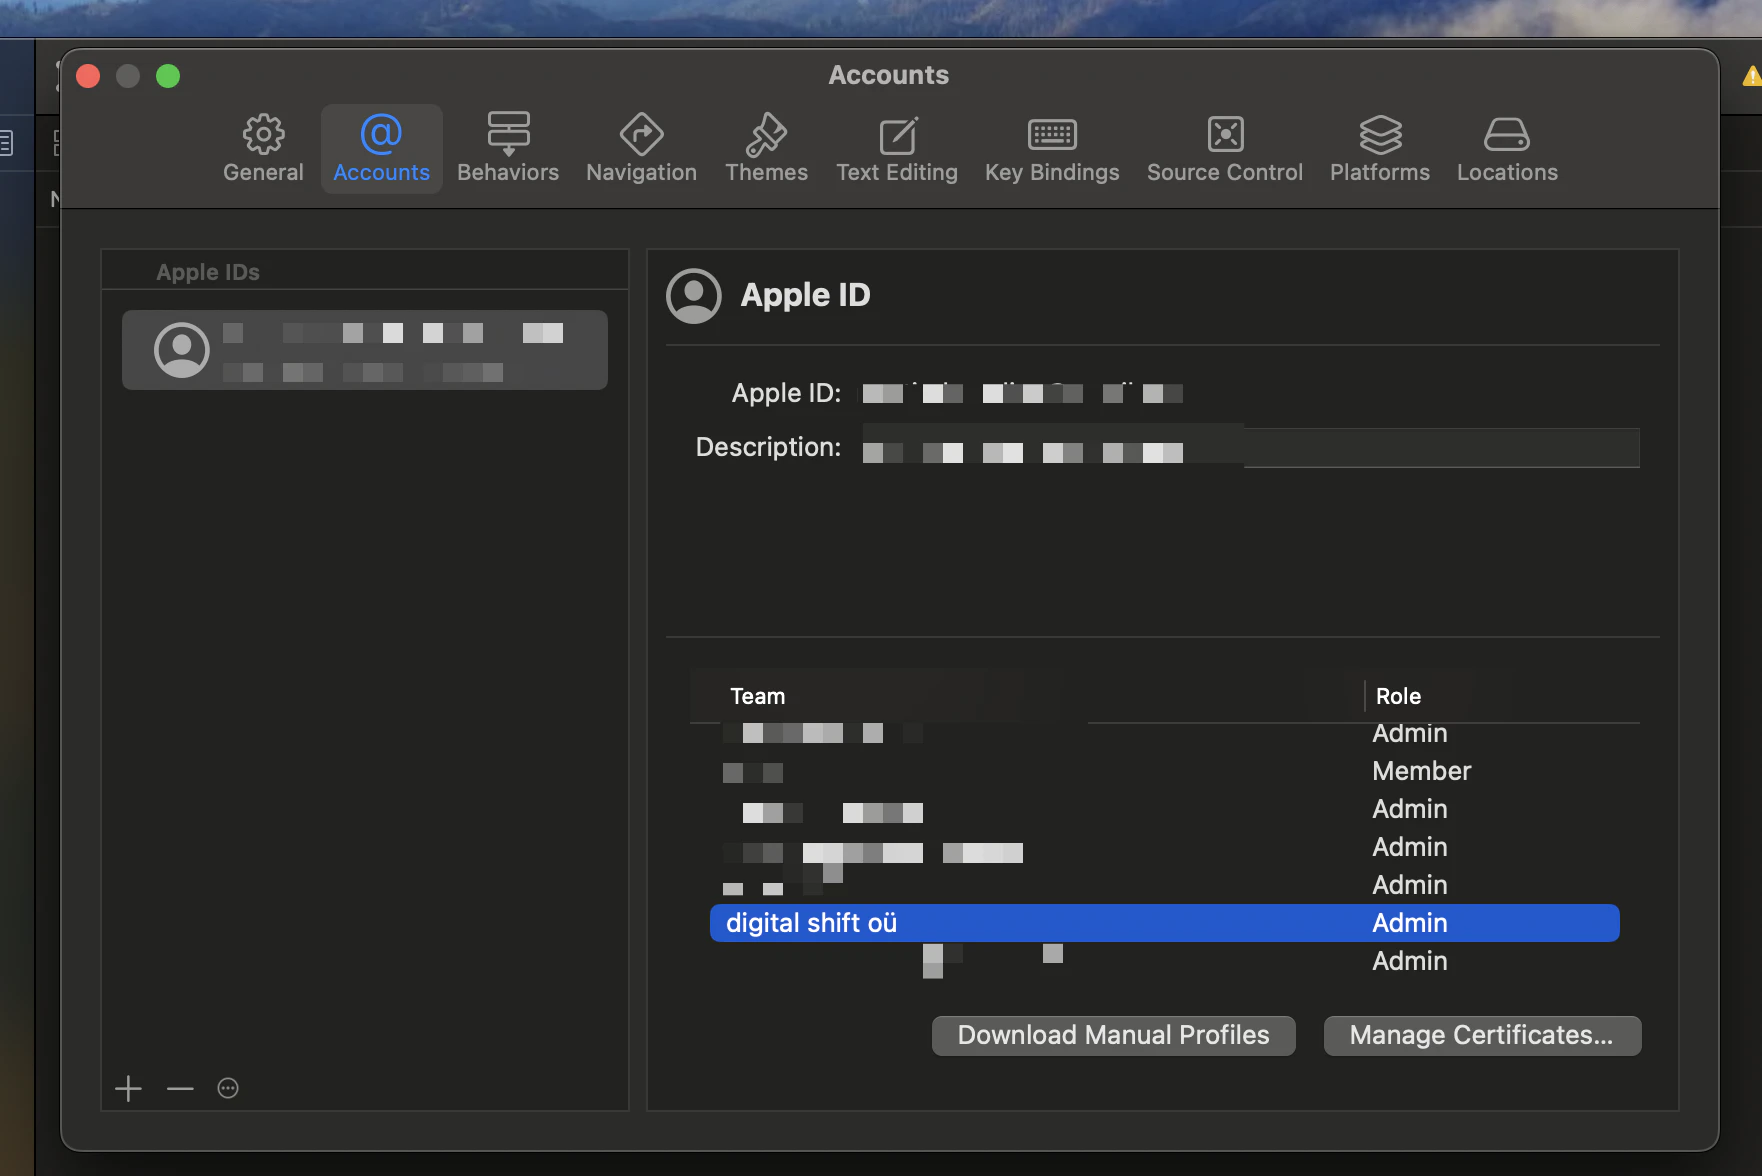
인증서 관리를 클릭하세요.
아직 인증서를 생성하지 않았다면, 새 인증서를 생성할 수 있습니다.
**+**를 클릭하고 Apple Distribution을 선택하세요.
그런 다음 키체인에서 인증서를 p12 파일로 다운로드해야 합니다.
이를 위해 키체인으로 이동하여 로그인 키체인으로 전환한 다음 내 인증서 탭으로 이동해야 합니다.

그런 다음 다운로드하려는 인증서를 선택할 수 있습니다(인증서의 날짜를 확인하세요).
그리고 인증서의 개인 키를 마우스 오른쪽 버튼으로 클릭하고 내보내기를 선택하세요.
파일 형식으로 **개인 정보 교환(.p12)**을 선택하세요.
그러면 인증서가 p12 파일로 다운로드됩니다.
터미널에서 파일을 열고 다음 명령을 사용하여 Base64로 변환하세요:
base64 -i BUILD_CERTIFICATE.p12 | pbcopy이것이 BUILD_CERTIFICATE_BASE64 시크릿이 됩니다. 또한 요청 시 인증서의 비밀번호를 제공해 주세요. 이 비밀번호가 P12_PASSWORD 시크릿이 됩니다.
3. 프로비저닝 프로필
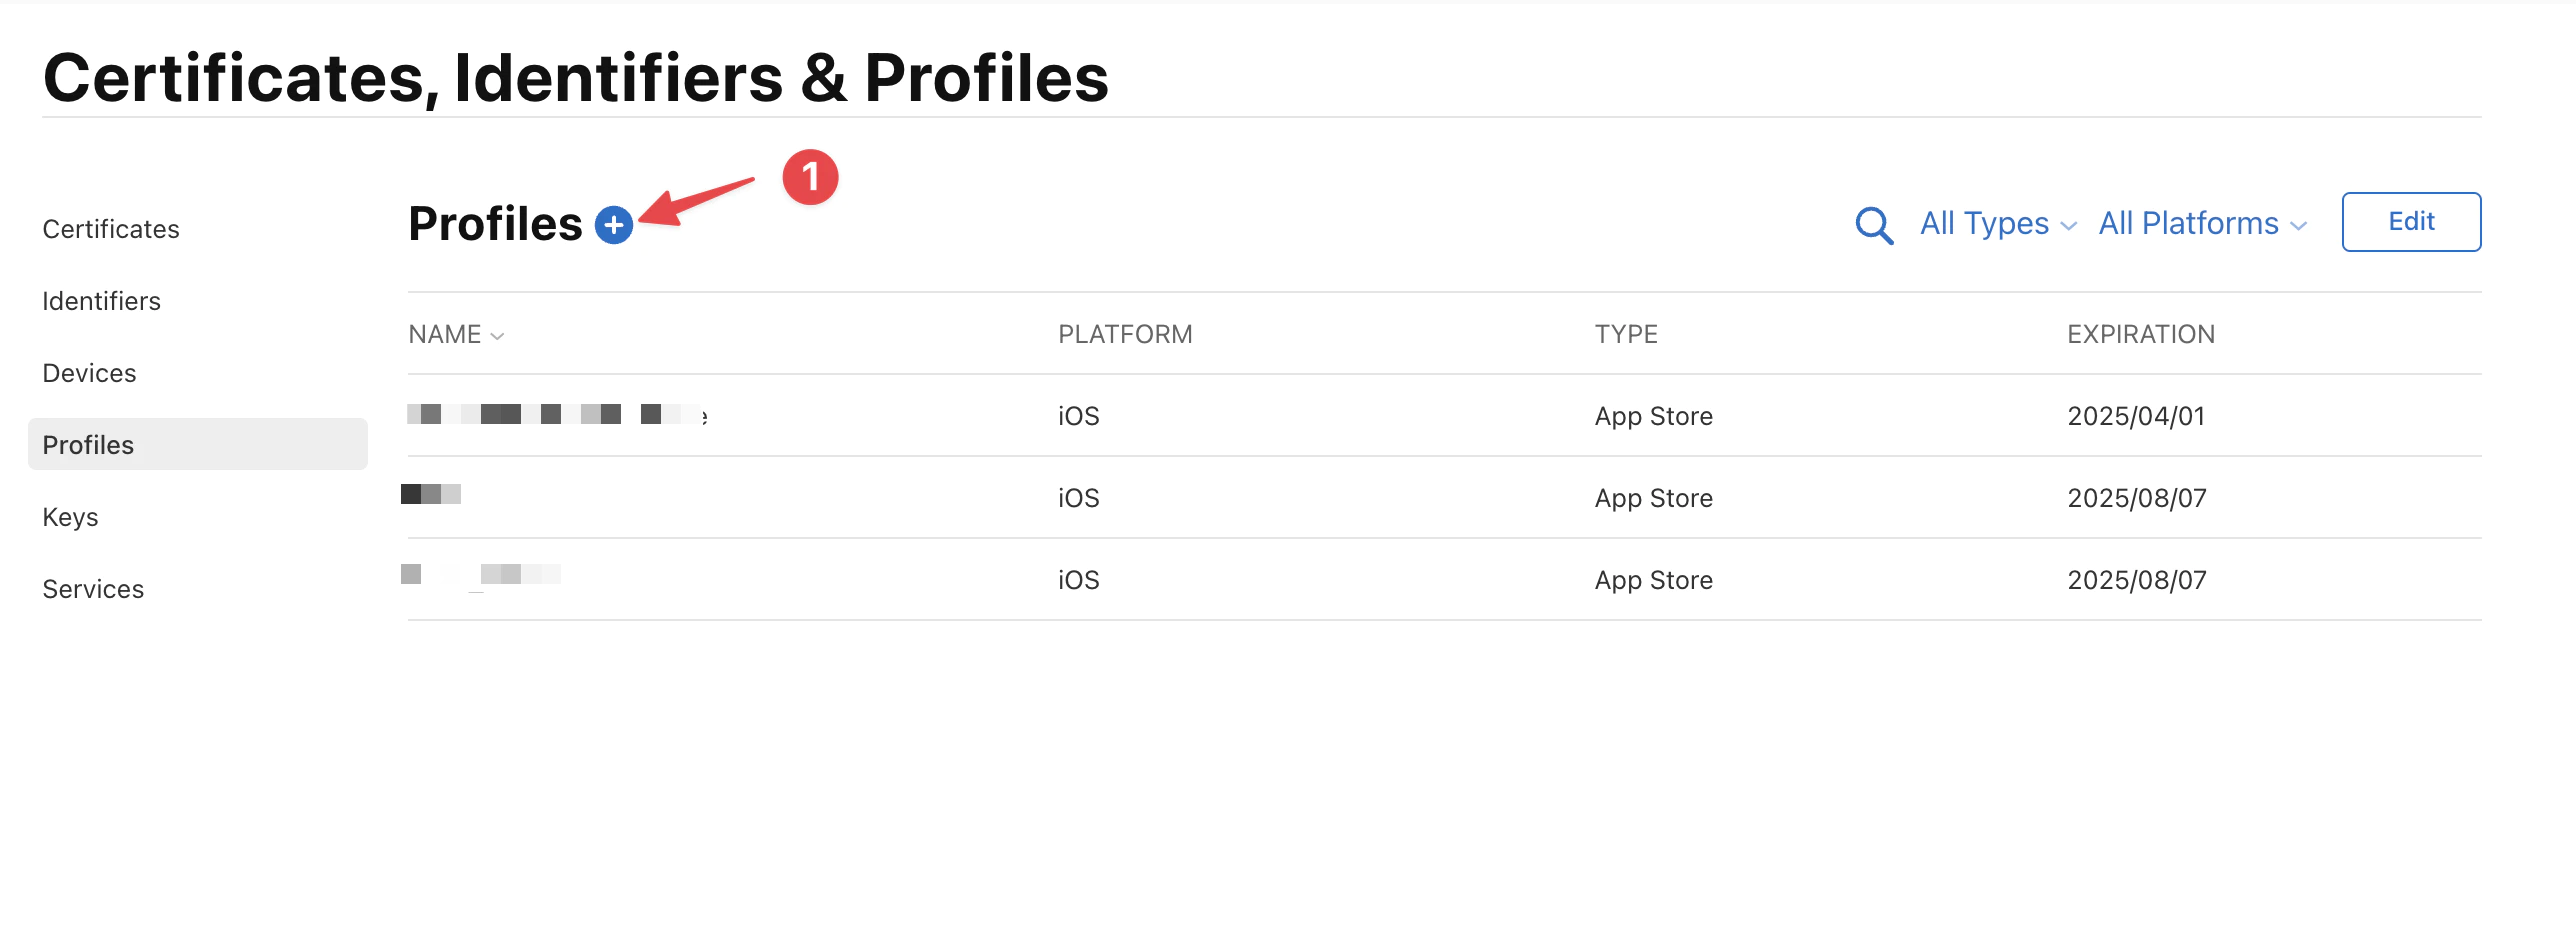
Apple Developer를 열고 올바른 팀을 선택하세요.
그런 다음 **+**를 클릭하여 새 프로필을 생성하세요.
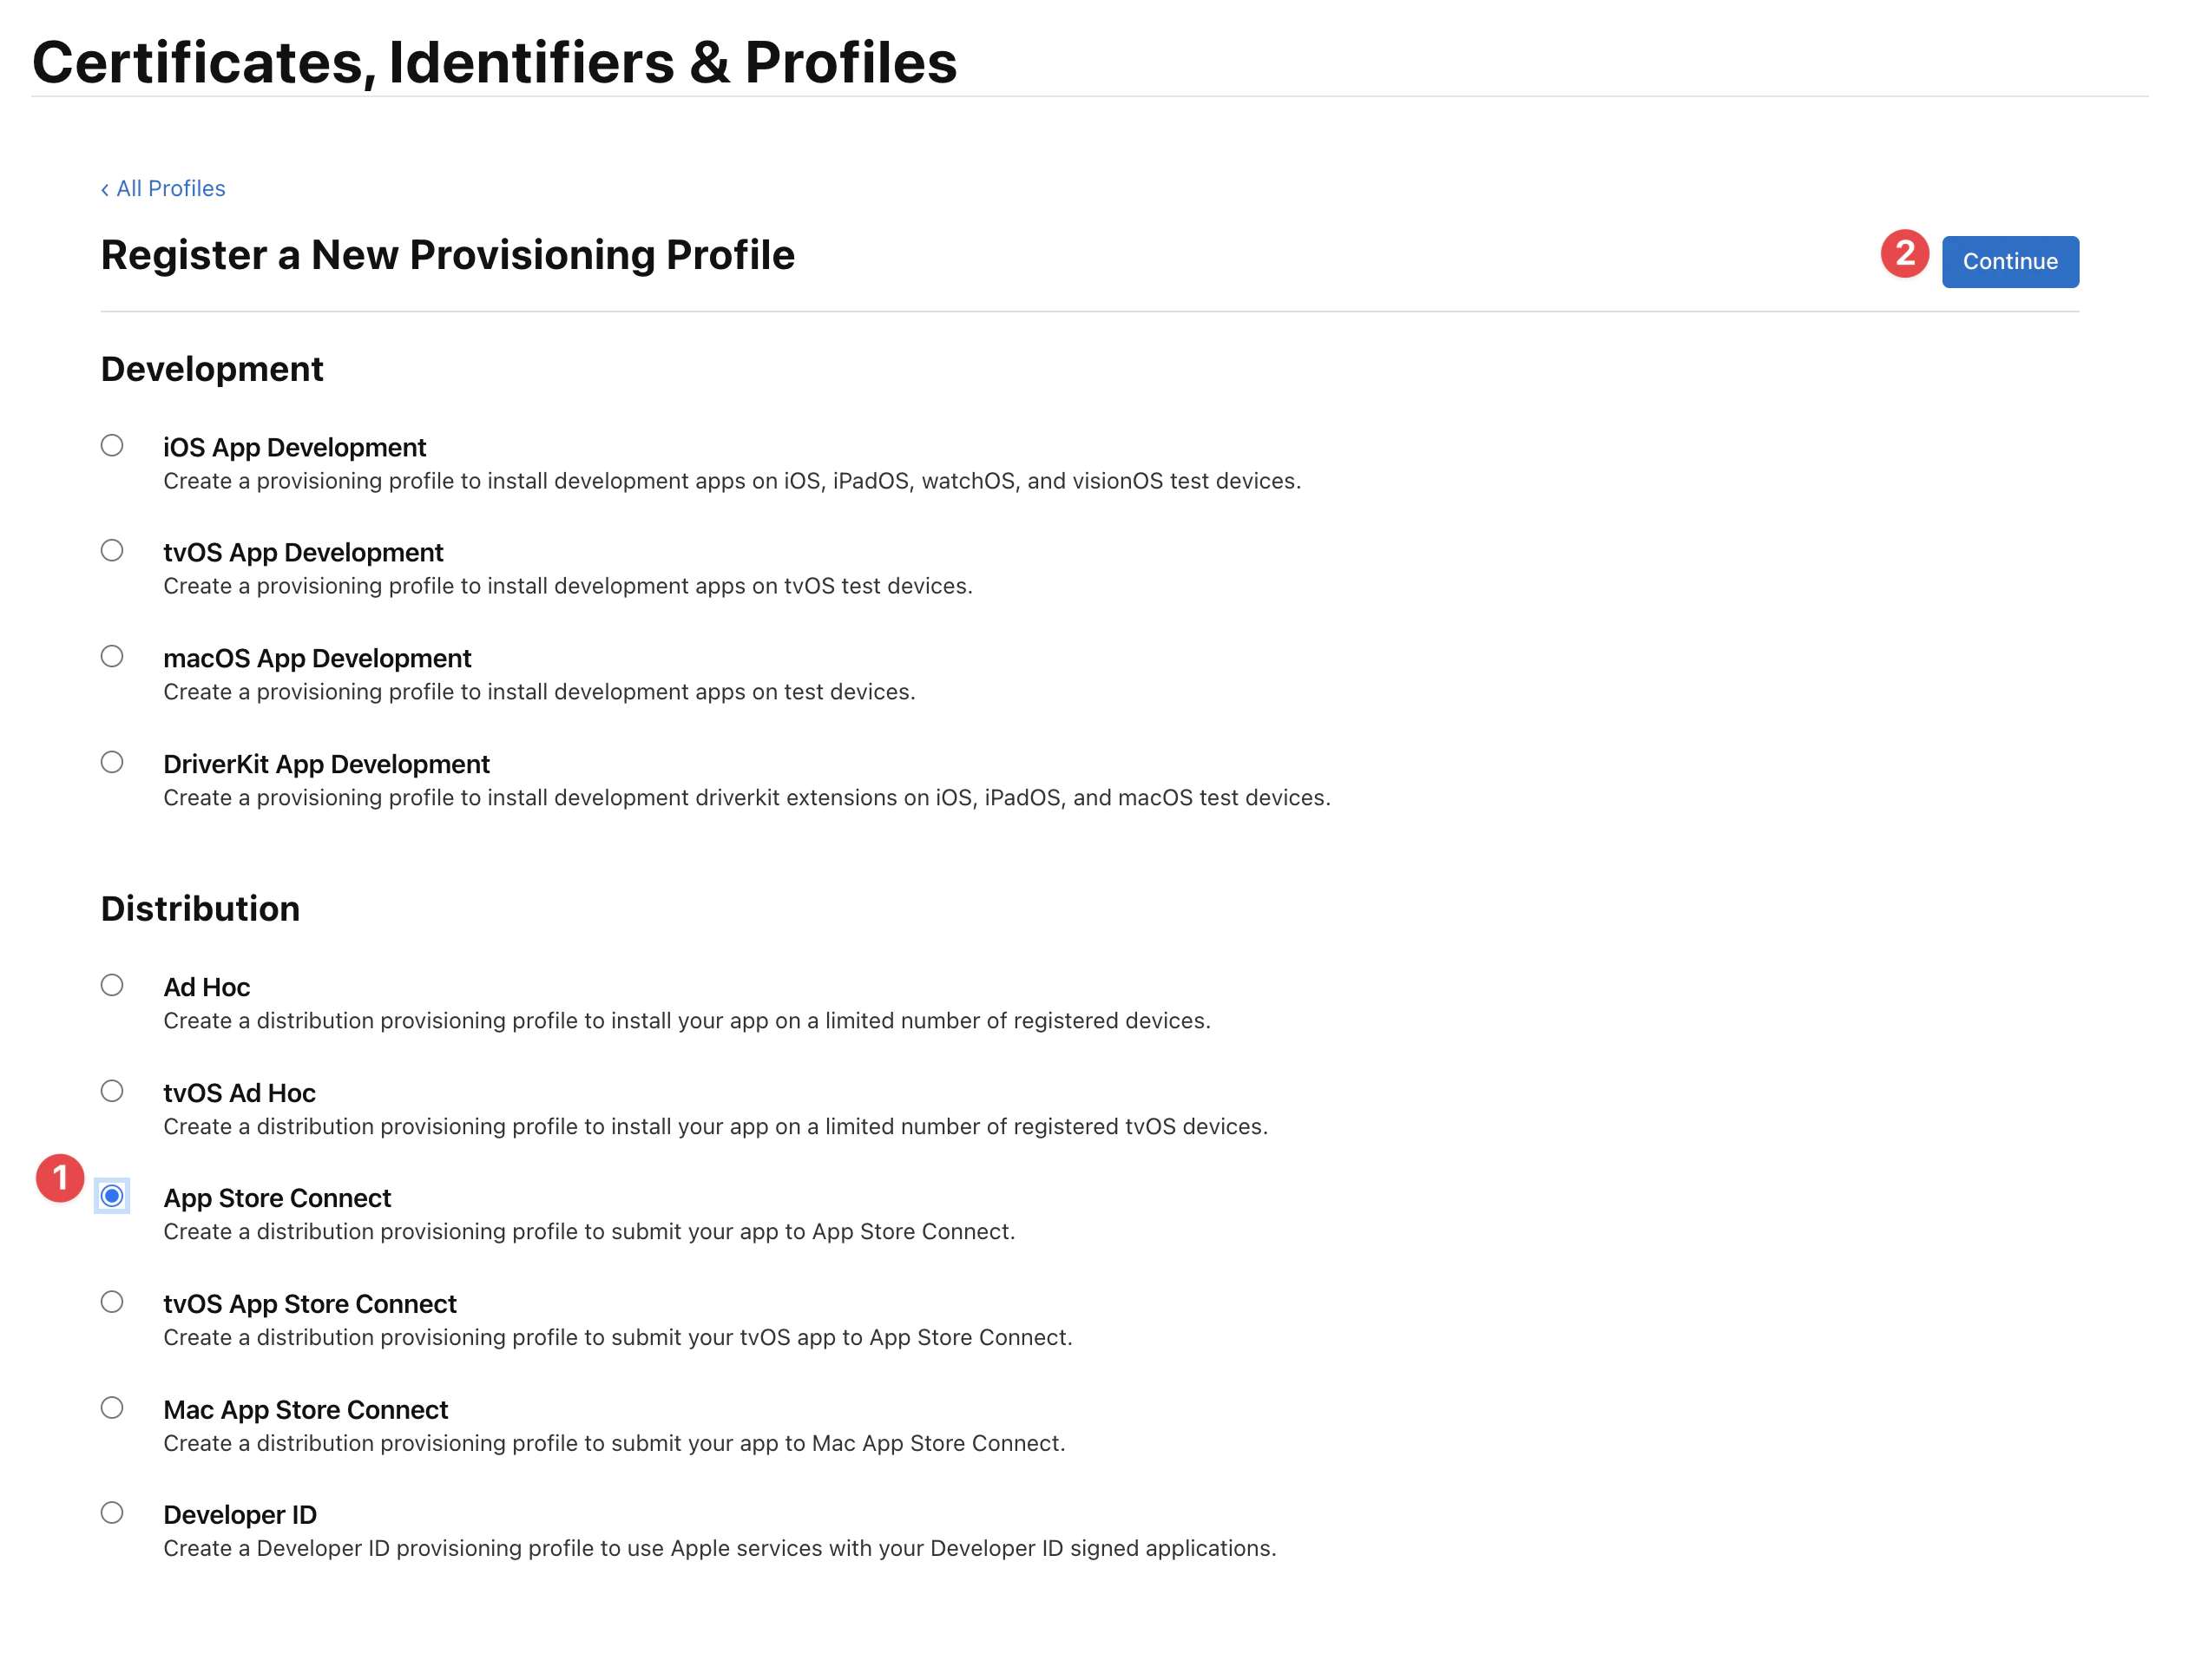
그리고 App Store Connect를 선택하세요.
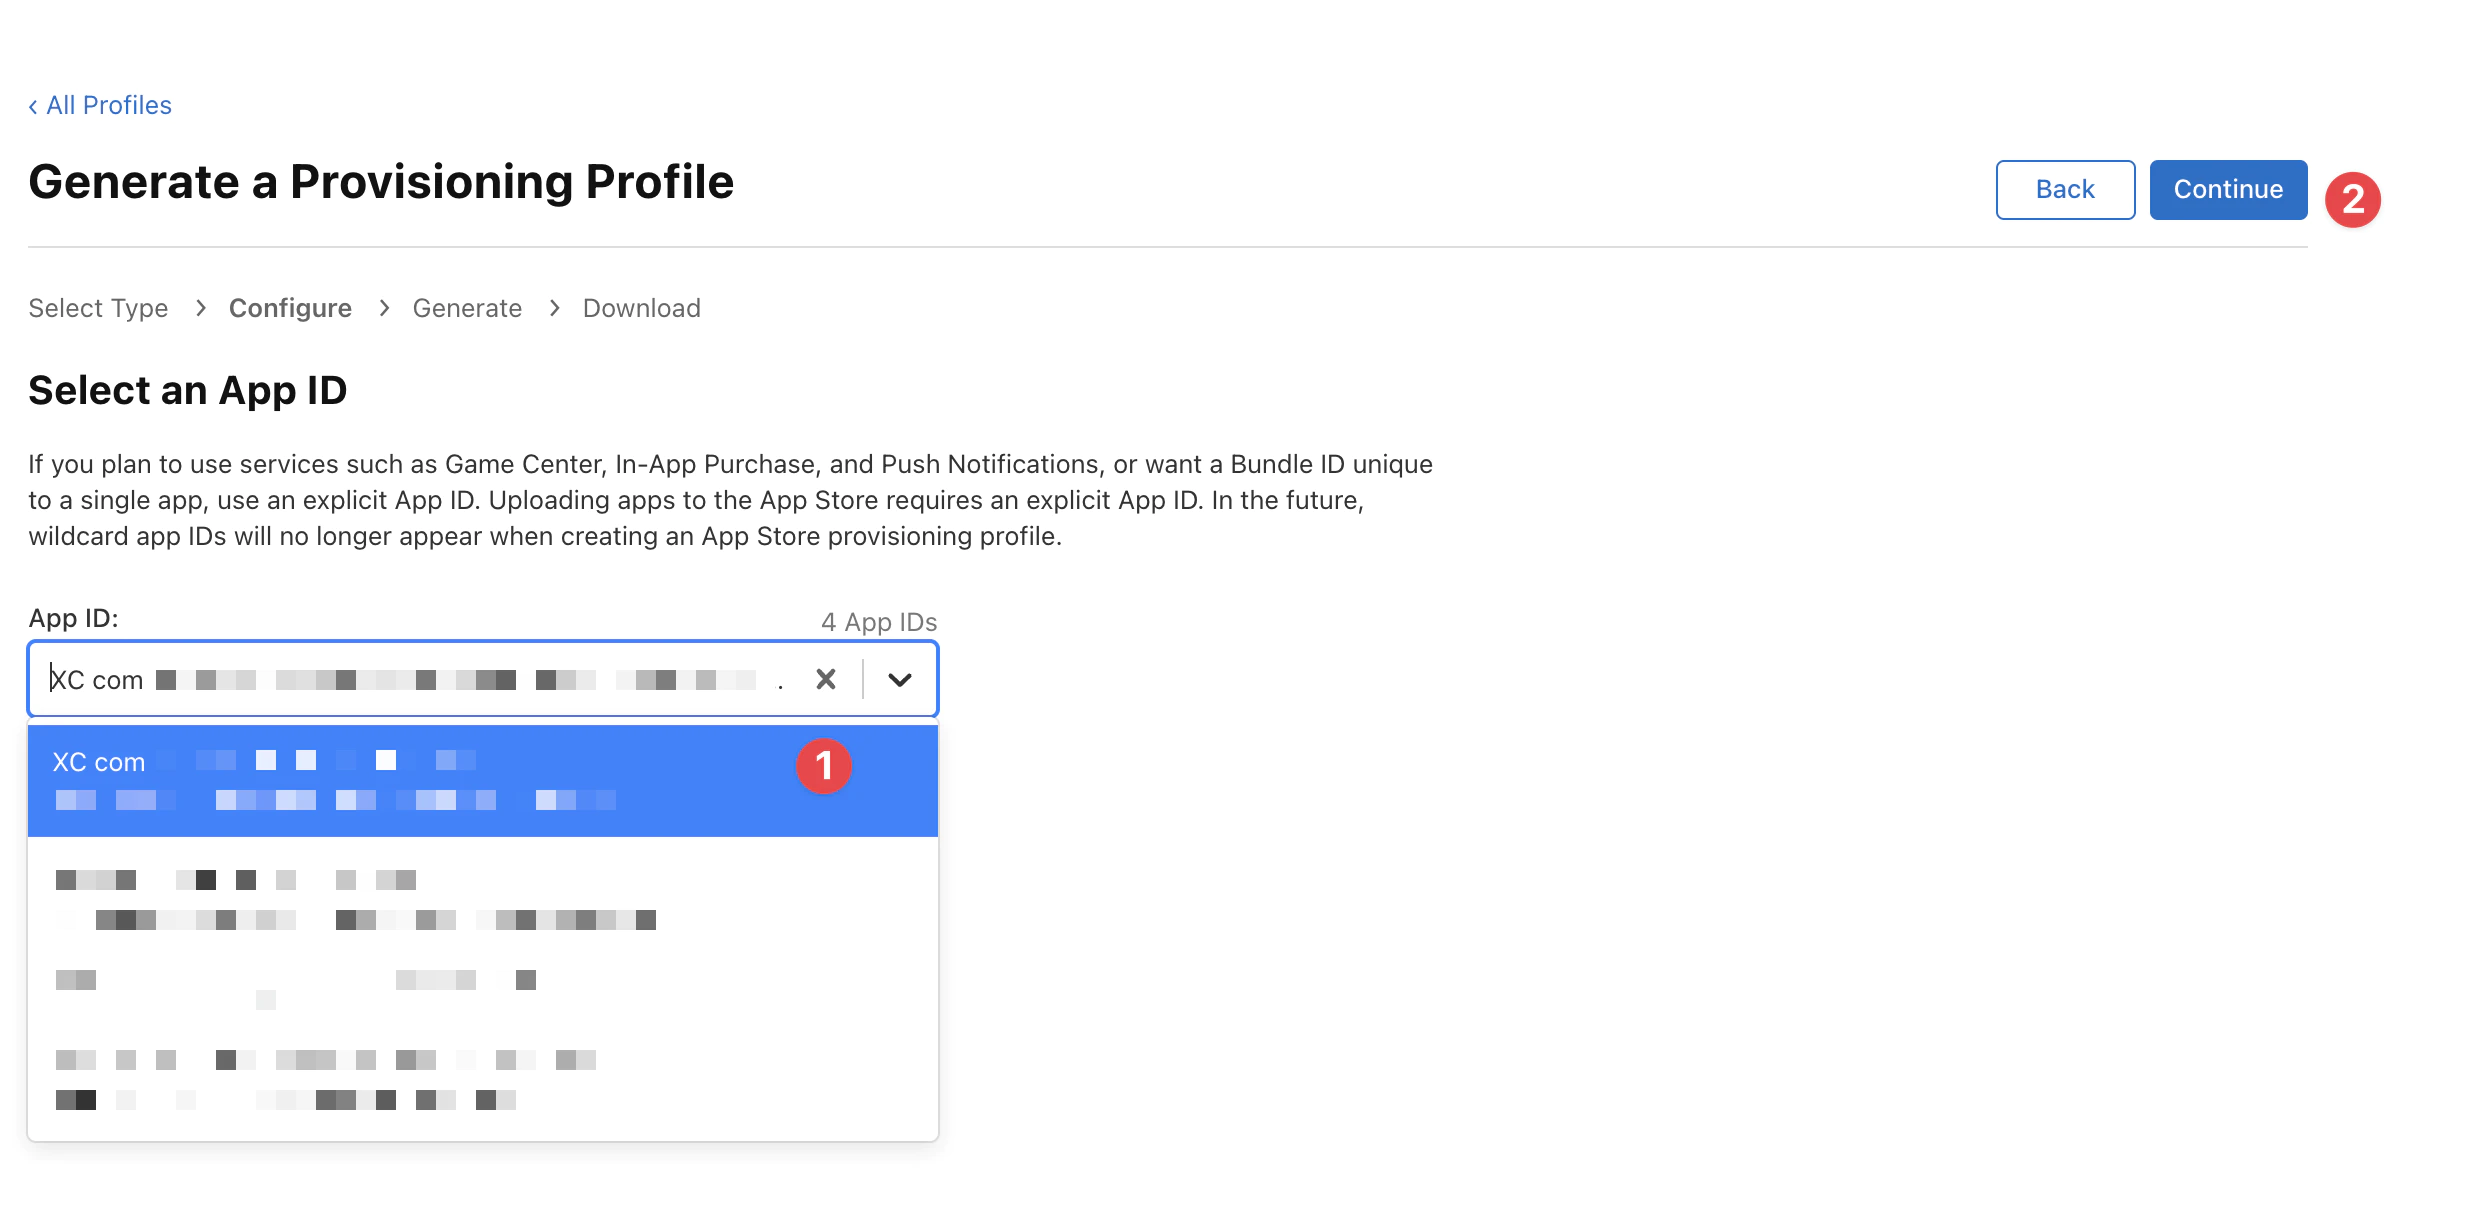
그런 다음 올바른 앱을 선택해야 합니다. 서명이 실패할 수 있으므로 와일드카드를 사용할 수 없으니 주의하세요.
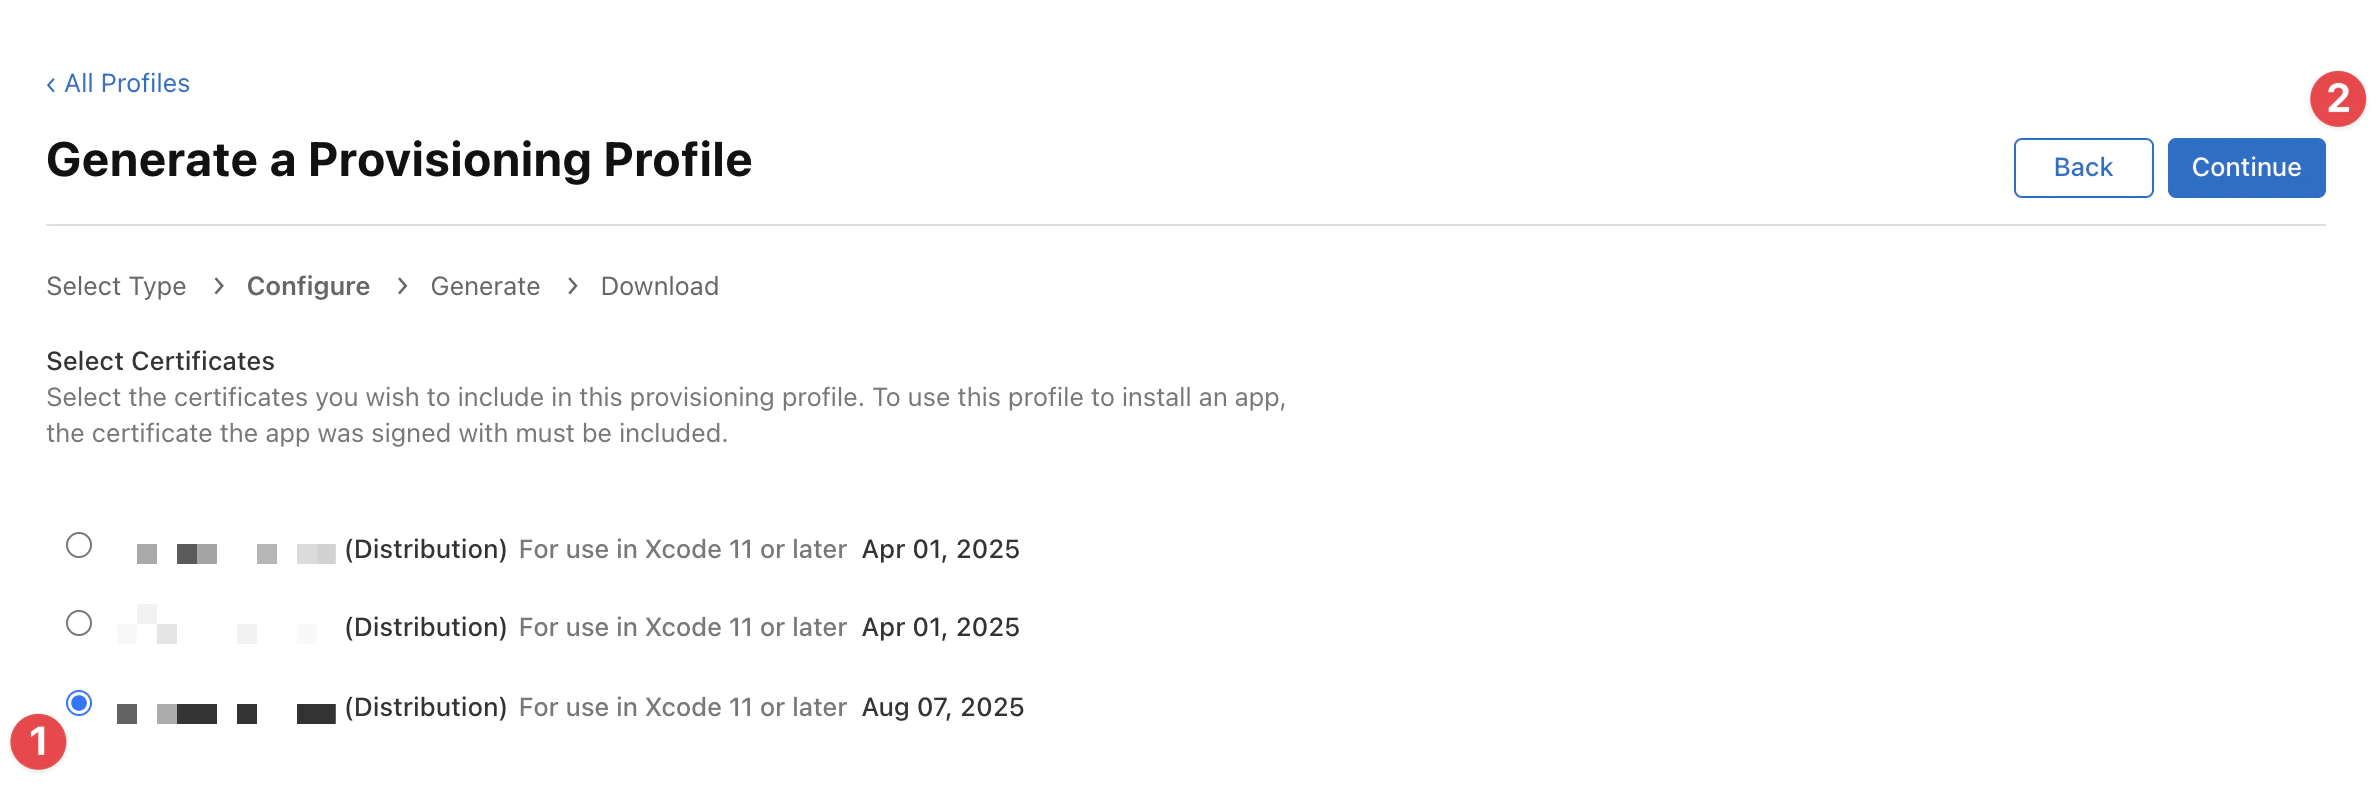
이전에 생성한 올바른 인증서를 선택하고(만료 날짜를 확인하세요. 오늘과 같은 날짜여야 합니다) 계속을 클릭하세요.
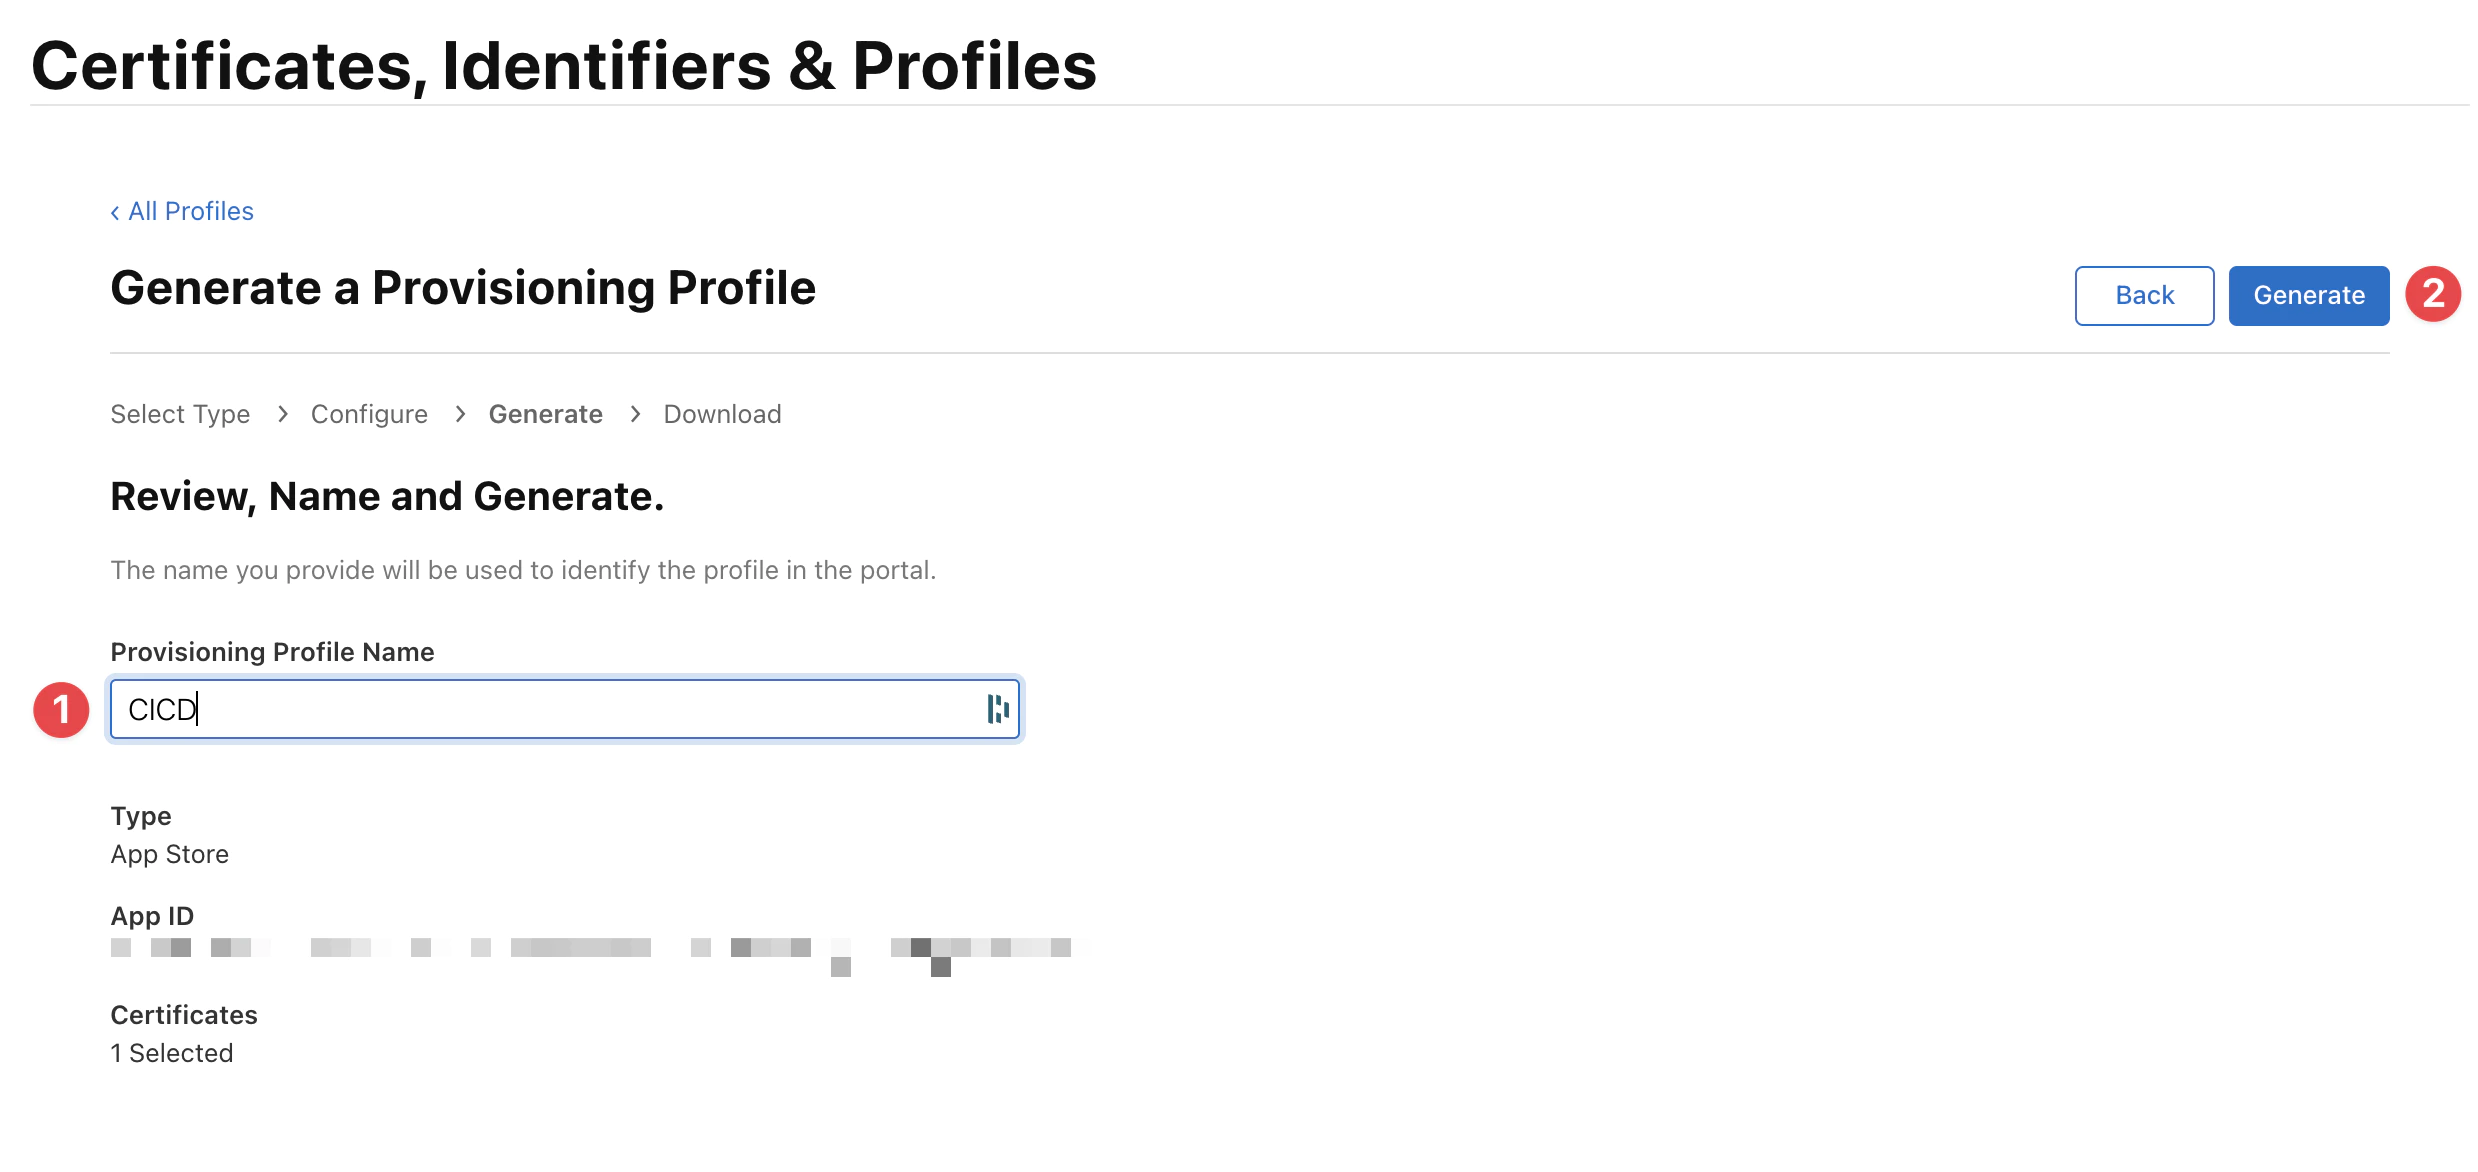
마지막으로 프로필의 이름을 입력하고 생성을 클릭하세요.
이 이름은 Fastlane에서
APPLE_PROFILE_NAME값으로 프로필을 식별하는 데 사용됩니다.
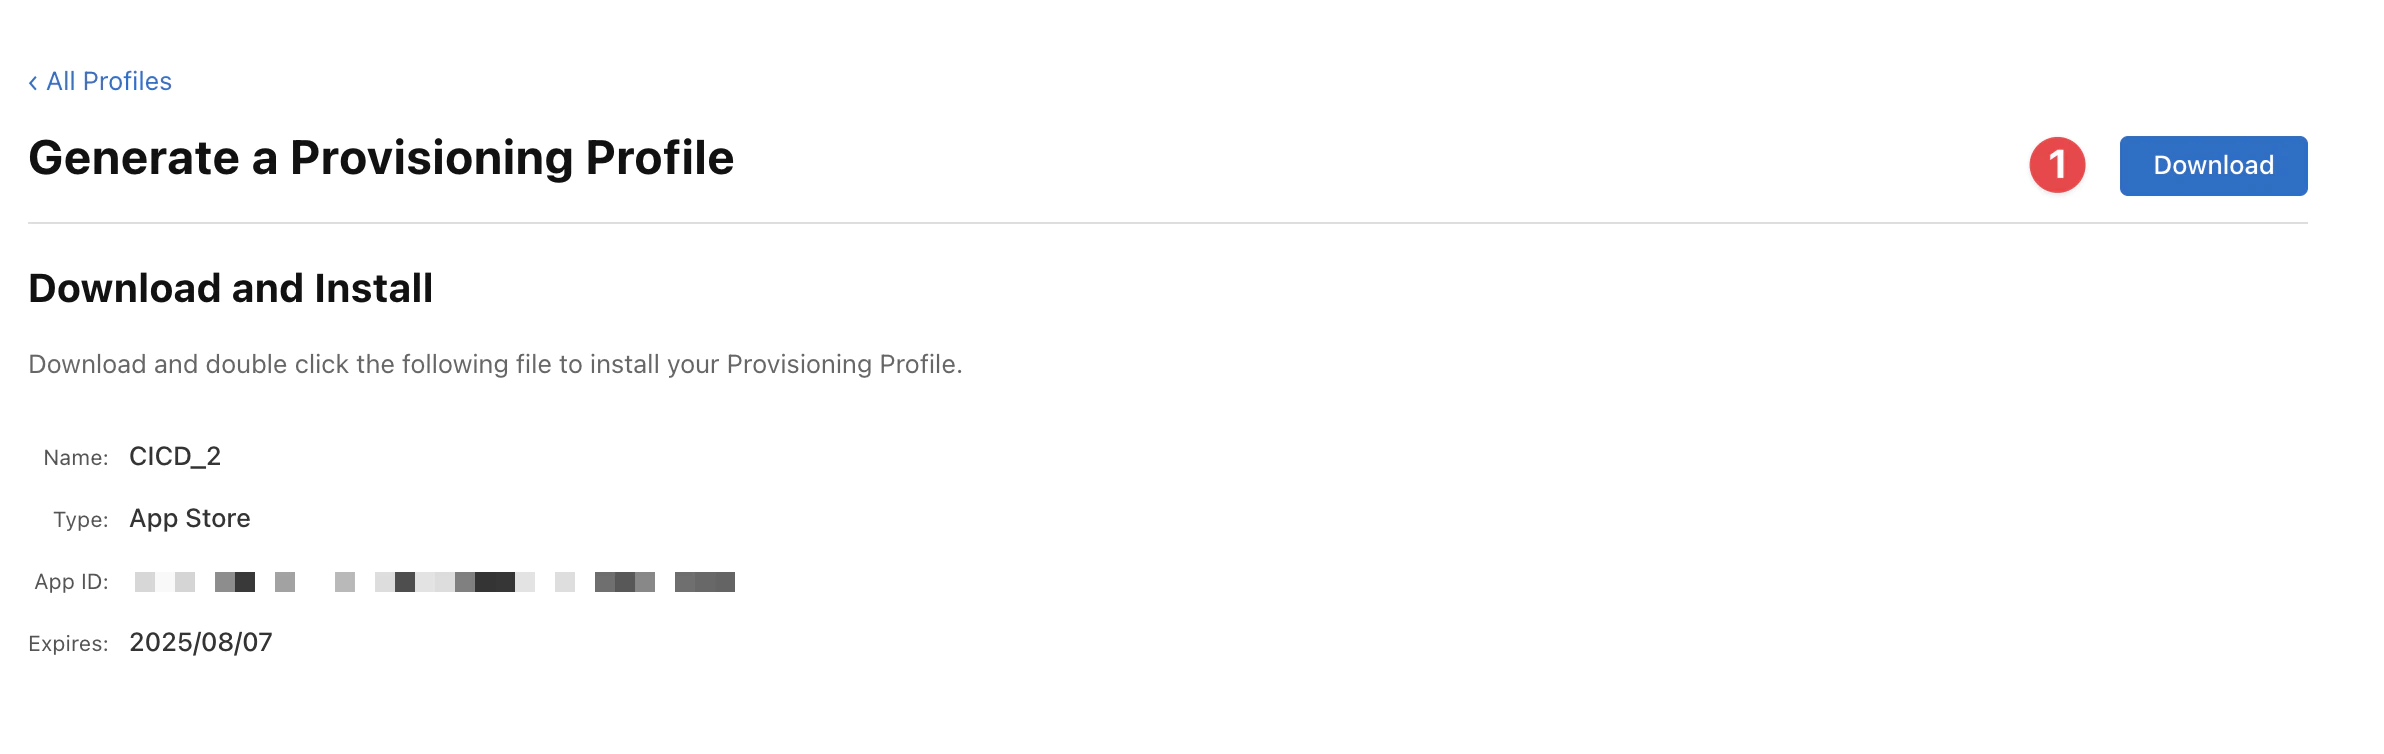
프로필을 mobileprovision 파일로 다운로드할 수 있습니다.
Base64로 프로파일을 변환하여 시크릿(BUILD_PROVISION_PROFILE_BASE64)으로 저장하세요
base64 -i BUILD_PROVISION_PROFILE.mobileprovision | pbcopy4. Fastlane 파일 복사
Fastlane은 일반적인 모바일 개발 작업을 자동화하기 위해 만들어진 Ruby 라이브러리입니다. Fastlane을 사용하면 일반적으로 Android Studio에서 수행하는 작업을 수행하는 “actions”를 번들로 묶는 사용자 정의 “lanes”를 구성할 수 있습니다. Fastlane으로 많은 것을 할 수 있지만, 이 튜토리얼에서는 핵심 작업 중 일부만 사용할 것입니다.
프로젝트 루트에 Fastlane 폴더를 만들고 다음 파일을 복사하세요:
Fastfile
platform :ios do  desc 'Export ipa and submit to TestFlight'  lane :beta do    keychain_info = { keychain_name: "ios-build-#{Time.now.to_i}.keychain", keychain_password: SecureRandom.uuid }
    begin      setup_signing(keychain_info)      bump_build_number      build_app_with_signing(keychain_info)      submit_to_testflight    ensure      cleanup_keychain(keychain_info)    end  end
  private_lane :setup_signing do |options|    create_keychain(      name: options[:keychain_name],      password: options[:keychain_password],      unlock: true,      timeout: 0,      lock_when_sleeps: false,      add_to_search_list: true    )    import_cert(options)    install_profile    update_project_settings  end
  lane :bump_build_number do    file = File.read('../package.json')    data_hash = JSON.parse(file)    api_key = app_store_connect_api_key(      key_id: ENV['APPLE_KEY_ID'],      issuer_id: ENV['APPLE_ISSUER_ID'],      key_content: Base64.decode64(ENV['APPLE_KEY_CONTENT']),      duration: 1200,      in_house: false    )    build_num = app_store_build_number(      api_key: api_key,      app_identifier: ENV['BUNDLE_IDENTIFIER'],      live: false    )    build_num = build_num + 1    UI.message("Bumped build number to #{build_num}")    increment_build_number(      build_number: build_num,      xcodeproj: "./ios/App/App.xcodeproj",      skip_info_plist: true    )  end
  private_lane :import_cert do |options|    cert_path = "#{Dir.tmpdir}/build_certificate.p12"    File.write(cert_path, Base64.decode64(ENV['BUILD_CERTIFICATE_BASE64']))    import_certificate(      certificate_path: cert_path,      certificate_password: ENV['P12_PASSWORD'] || "",      keychain_name: options[:keychain_name],      keychain_password: options[:keychain_password],      log_output: true    )    File.delete(cert_path)  end
  private_lane :cleanup_keychain do |options|    delete_keychain(      name: options[:keychain_name]    )  end
  private_lane :install_profile do    profile_path = "#{Dir.tmpdir}/build_pp.mobileprovision"    File.write(profile_path, Base64.decode64(ENV['BUILD_PROVISION_PROFILE_BASE64']))    UI.user_error!("Failed to create provisioning profile at #{profile_path}") unless File.exist?(profile_path)    ENV['PROVISIONING_PROFILE_PATH'] = profile_path    install_provisioning_profile(path: profile_path)    File.delete(profile_path)  end
  private_lane :update_project_settings do    update_code_signing_settings(      use_automatic_signing: false,      path: "./ios/App/App.xcodeproj",      code_sign_identity: "iPhone Distribution",      profile_name: ENV['APPLE_PROFILE_NAME'],      bundle_identifier: ENV['BUNDLE_IDENTIFIER'],      team_id: ENV['APP_STORE_CONNECT_TEAM_ID']    )    update_project_team(      path: "./ios/App/App.xcodeproj",      teamid: ENV['APP_STORE_CONNECT_TEAM_ID']    )  end
  private_lane :build_app_with_signing do |options|    unlock_keychain(      path: options[:keychain_name],      password: options[:keychain_password],      set_default: false    )    build_app(      workspace: "./ios/App/App.xcworkspace",      scheme: "App",      configuration: "Release",      export_method: "app-store",      output_name: "App.ipa",      export_options: {        provisioningProfiles: {          ENV['BUNDLE_IDENTIFIER'] => ENV['APPLE_PROFILE_NAME']        }      },      xcargs: "-verbose",      buildlog_path: "./build_logs",      export_xcargs: "-allowProvisioningUpdates",    )  end
  private_lane :submit_to_testflight do    api_key = app_store_connect_api_key(      key_id: ENV['APPLE_KEY_ID'],      issuer_id: ENV['APPLE_ISSUER_ID'],      key_content: Base64.decode64(ENV['APPLE_KEY_CONTENT']),      duration: 1200,      in_house: false    )    pilot(      api_key: api_key,      skip_waiting_for_build_processing: true,      skip_submission: true,      distribute_external: false,      notify_external_testers: false,      ipa: "./App.ipa"    )  endend
5. 시크릿 설정
로컬에서 fastlane은 시크릿에 env 파일을 사용합니다.
다음은 env 파일의 예시입니다:
APP_STORE_CONNECT_TEAM_ID=UVTJ336J2DBUNDLE_IDENTIFIER=ee.forgr.testfastlane# See previous section for these secretsBUILD_CERTIFICATE_BASE64=BUILD_PROVISION_PROFILE_BASE64=APPLE_KEY_ID=APPLE_ISSUER_ID=APPLE_KEY_CONTENT=P12_PASSWORD=APPLE_PROFILE_NAME=APP_STORE_CONNECT_TEAM_ID 얻기
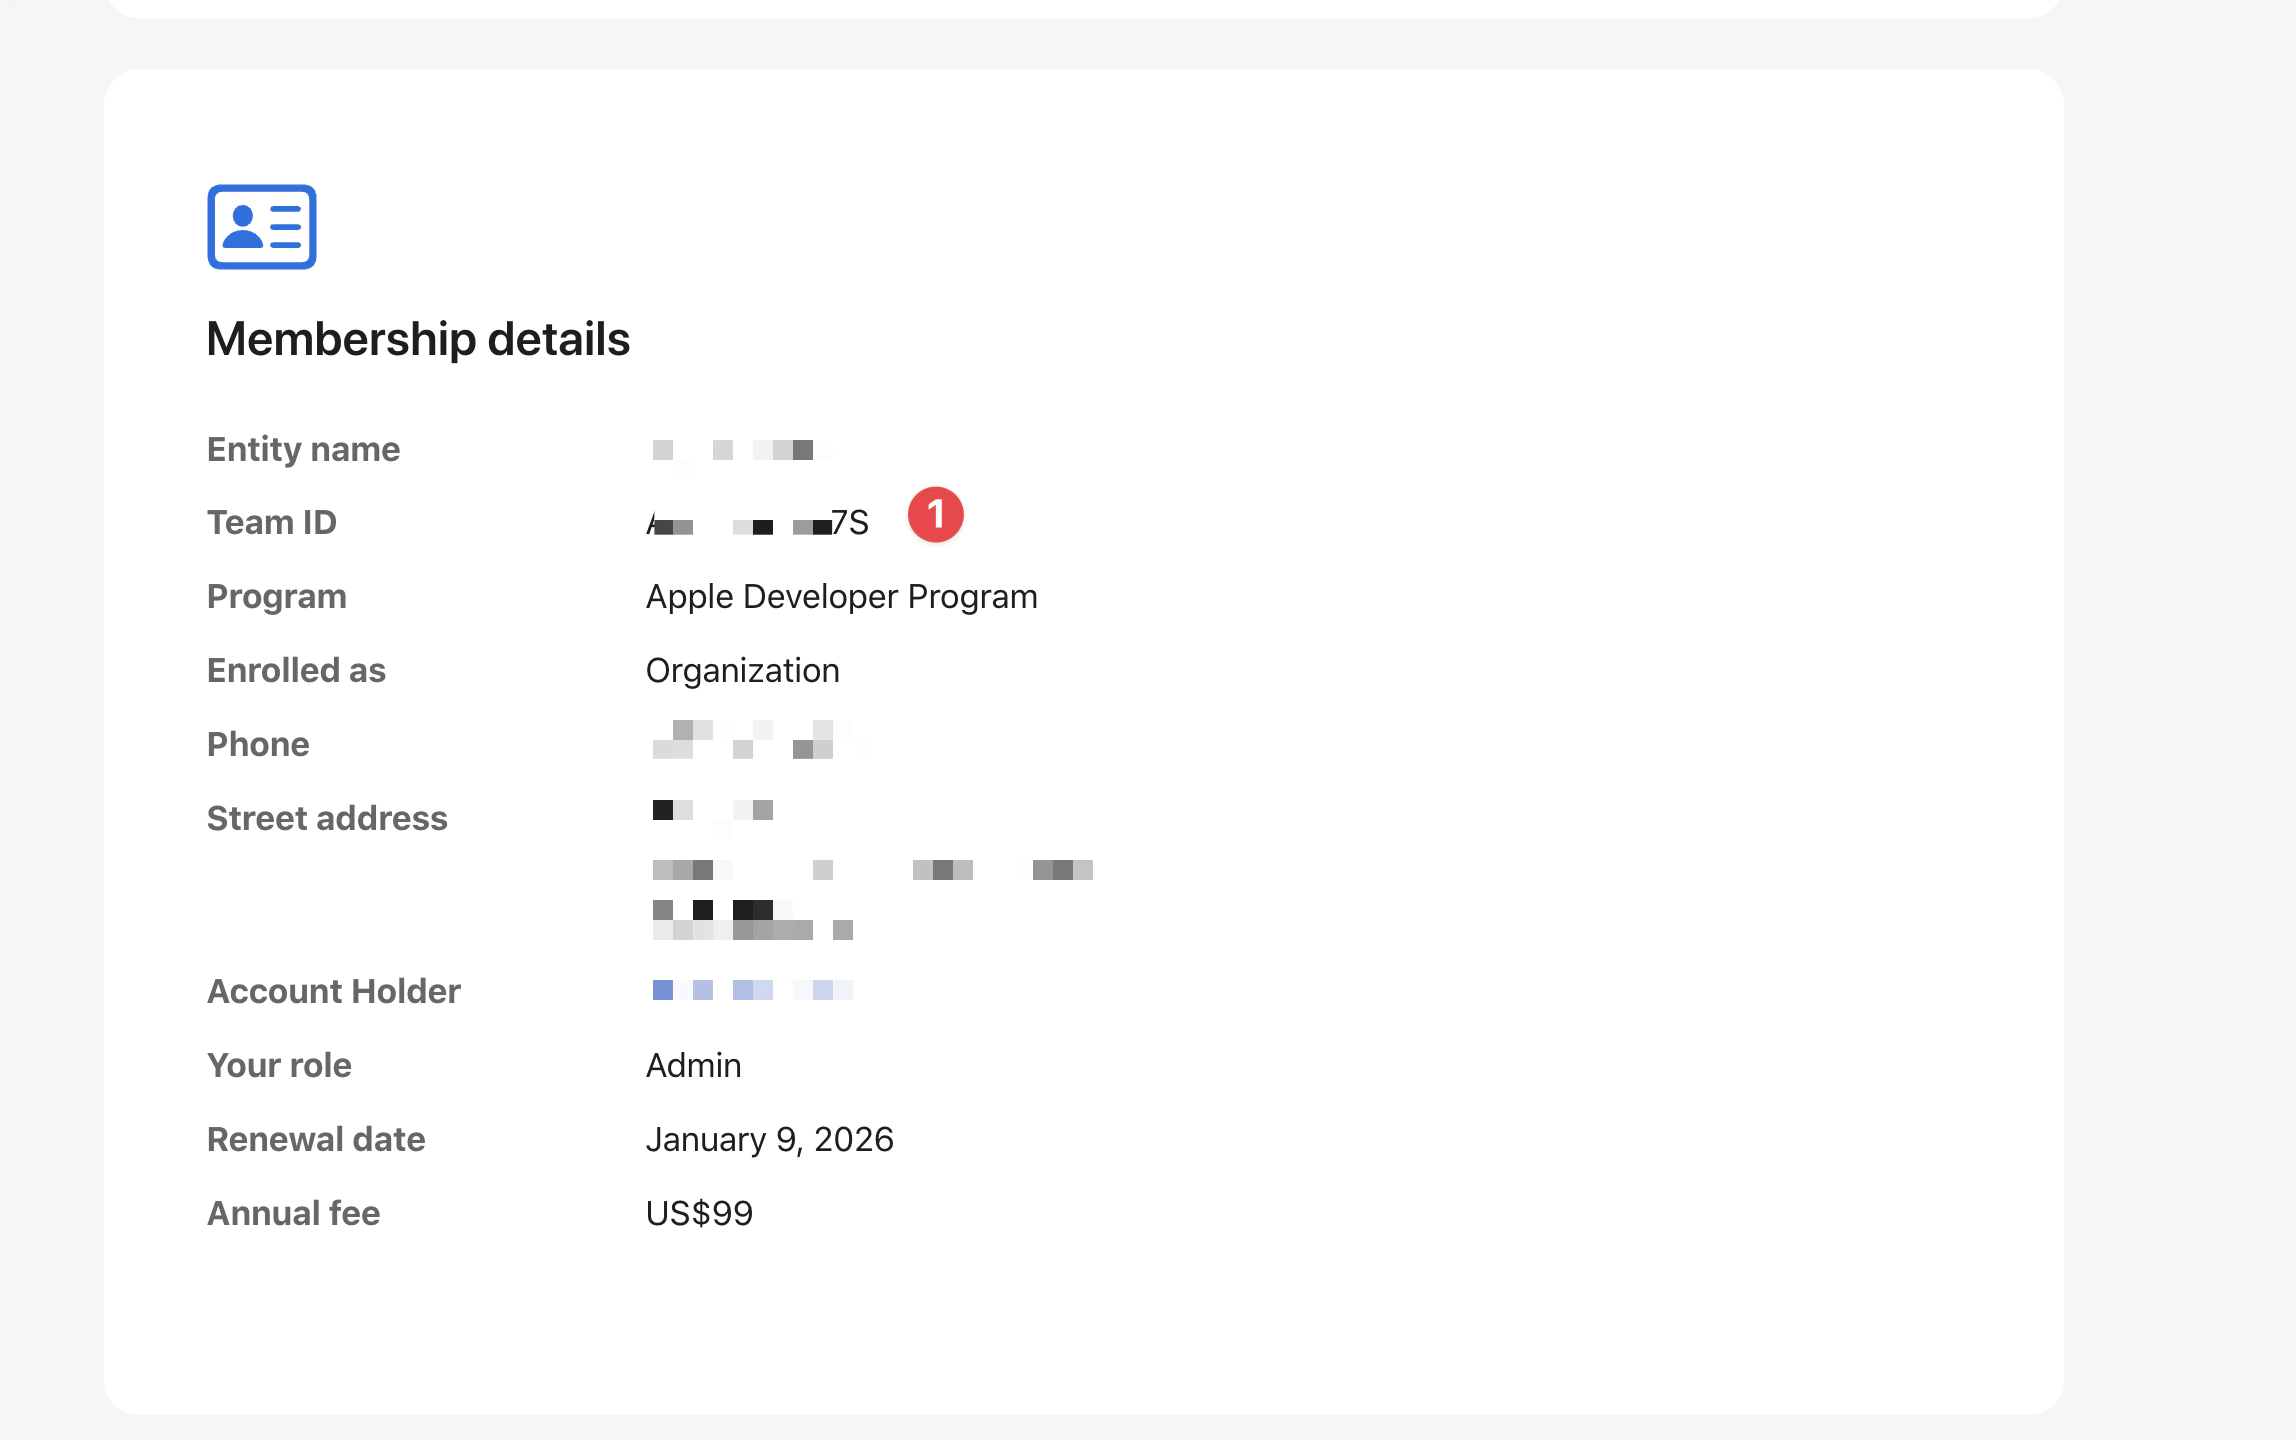
Developer Center로 이동하여 Membership details 섹션으로 스크롤하세요.
Team ID가 APP_STORE_CONNECT_TEAM_ID 시크릿에 설정해야 하는 값입니다.
<1> <2> <3>
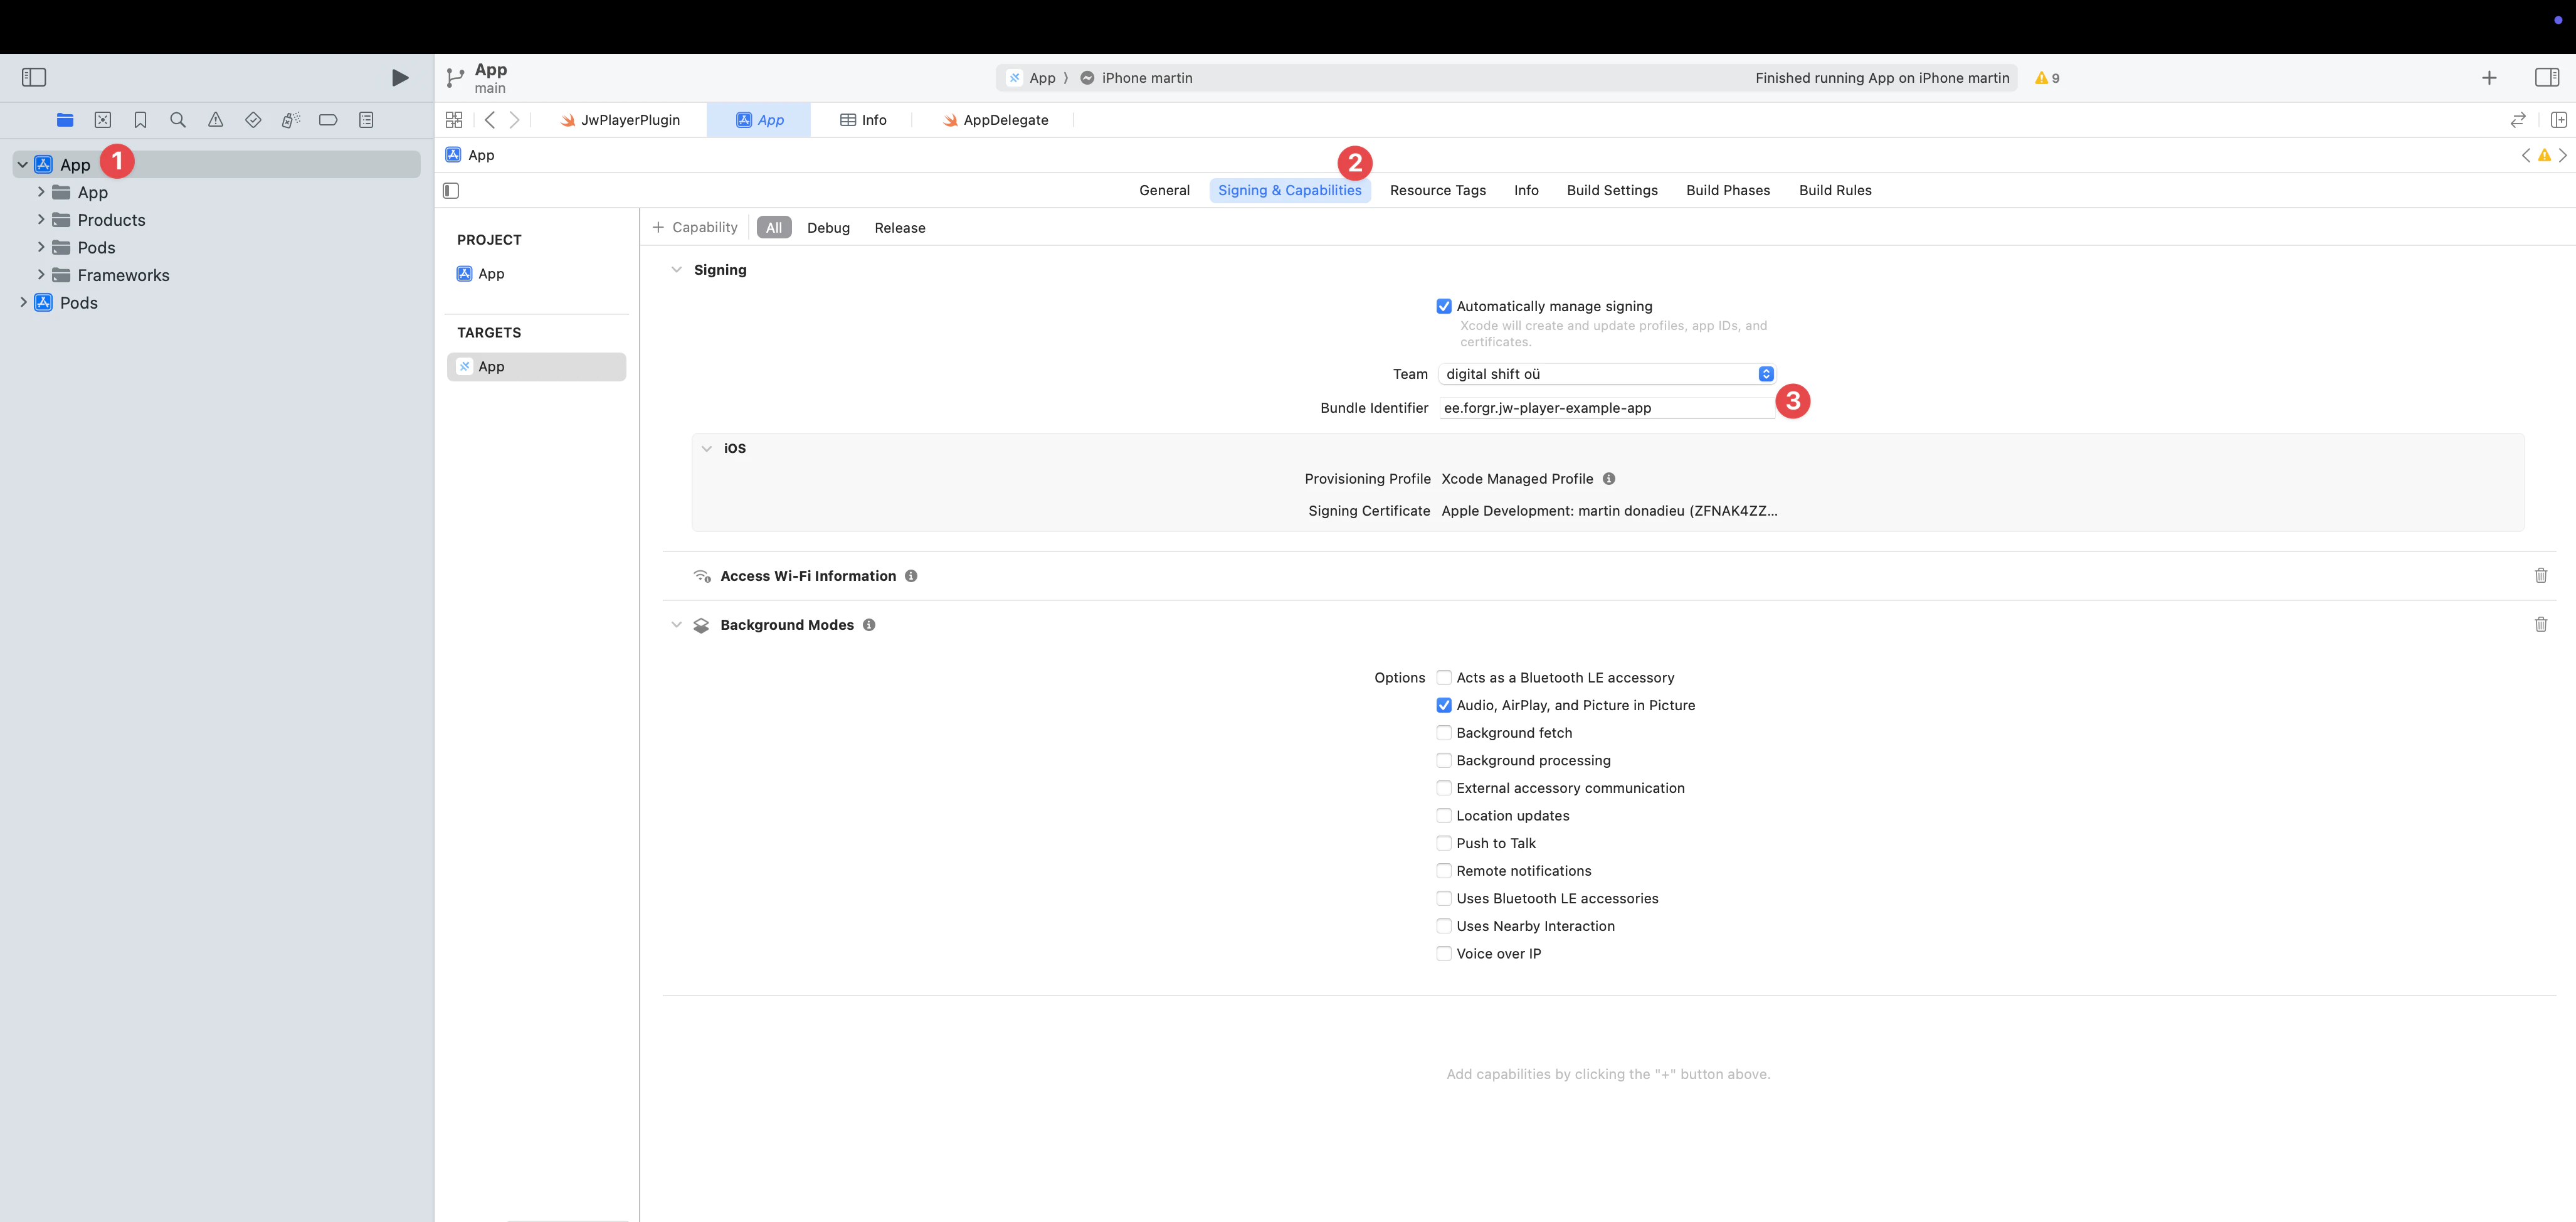
BUNDLE_IDENTIFIER 얻기
- Xcode 열기
- 프로젝트 네비게이터에서
App을 더블 클릭

6. 빌드 처리
GitHub Actions에서는 CI/CD 워크플로우 실행에 사용한 시간을 기준으로 요금이 청구됩니다. 제 경험상 App Store Connect에서 빌드가 처리되기까지 약 10-15분이 소요됩니다.
비공개 프로젝트의 경우, 빌드당 예상 비용은 프로젝트의 구성과 종속성에 따라 $0.08/분 x 15분 = $1.2 또는 그 이상이 될 수 있습니다.
비공개 프로젝트에서 비용이 우려된다면 skip_waiting_for_build_processing를 true로 설정할 수 있습니다. 이는 App Store Connect가 빌드 처리를 완료할 때까지 기다리지 않음으로써 빌드 시간을 절약합니다.
하지만 이는 트레이드오프가 있습니다 - 사용자에게 빌드를 배포하기 전에 App Store Connect에서 앱의 컴플라이언스 정보를 수동으로 업데이트해야 합니다.
이 최적화는 주로 빌드 시간에 비용이 발생하는 비공개 프로젝트에 유용합니다. 공개/무료 프로젝트의 경우 빌드 시간이 무료이므로 이 설정을 활성화할 필요가 없습니다. 자세한 내용은 GitHub의 가격 책정 페이지를 참조하세요.
7. GitHub Actions 설정
GitHub 시크릿 구성
env 파일에서 시크릿을 복사하여 GitHub 저장소 시크릿에 붙여넣으세요.
Settings > Secrets and variables > Actions > New repository secret로 이동하세요.
-
BUILD_CERTIFICATE_BASE64- Base64로 인코딩된 인증서 -
BUILD_PROVISION_PROFILE_BASE64- Base64로 인코딩된 프로비저닝 프로파일 -
BUNDLE_IDENTIFIER- 앱의 번들 식별자 -
APPLE_KEY_ID— App Store Connect API Key 🔺Key ID -
APPLE_ISSUER_ID— App Store Connect API Key 🔺Issuer ID -
APPLE_KEY_CONTENT— App Store Connect API Key 🔺 _p8_의 Key 내용, 확인하기
8. GitHub 워크플로우 파일 구성
GitHub 워크플로우 디렉토리 생성
cd .github/workflowsworkflow 폴더 내에 build-upload-ios.yml이라는 파일을 생성하고 다음을 추가하세요.
name: Build source code on ios
on:  push:    tags:      - '*'
jobs:  build_ios:    runs-on: macOS-latest    steps:      - uses: actions/checkout@v6      - name: Use Node.js 20        uses: actions/setup-node@v6        with:          node-version: 24          cache: npm      - name: Install dependencies        id: install_code        run: npm ci      - name: Build        id: build_code        run: npm run build      - name: Build        id: build_code        run: npm run mobile      - uses: actions/cache@v3        with:          path: ios/App/Pods          key: ${{ runner.os }}-pods-${{ hashFiles('**/Podfile.lock') }}          restore-keys: |            ${{ runner.os }}-pods-      - name: Sync        id: sync_code        run: npx cap sync      - uses: ruby/setup-ruby@v1        with:          ruby-version: '3.0'          bundler-cache: true      - uses: maierj/fastlane-action@v3.1.0        env:          APP_STORE_CONNECT_TEAM_ID: ${{ secrets.APP_STORE_CONNECT_TEAM_ID }}          BUNDLE_IDENTIFIER: ${{ secrets.BUNDLE_IDENTIFIER }}          BUILD_CERTIFICATE_BASE64: ${{ secrets.BUILD_CERTIFICATE_BASE64 }}          BUILD_PROVISION_PROFILE_BASE64: ${{ secrets.BUILD_PROVISION_PROFILE_BASE64 }}          APPLE_KEY_ID: ${{ secrets.APPLE_KEY_ID }}          APPLE_ISSUER_ID: ${{ secrets.APPLE_ISSUER_ID }}          APPLE_KEY_CONTENT: ${{ secrets.APPLE_KEY_CONTENT }}          P12_PASSWORD: ${{ secrets.P12_PASSWORD }}          APPLE_PROFILE_NAME: ${{ secrets.APPLE_PROFILE_NAME }}        with:          lane: ios beta      - name: Upload release bundle        uses: actions/upload-artifact@v4        with:          name: ios-release          path: ./App.ipa          retention-days: 10
이 워크플로우는 각 GitHub tag 후에 트리거되어야 합니다. 태그를 자동화해야 하는 경우 먼저 GitHub actions를 사용한 자동 빌드 및 릴리스를 참조하세요.
그런 다음 이 워크플로우는 NodeJS 종속성을 가져와서 설치하고 JavaScript 앱을 빌드합니다.
새로운 커밋을 보낼 때마다 TestFlight에 릴리스가 빌드됩니다.
앱이 Ionic을 사용할 필요는 없으며 Capacitor 기반만 필수입니다. 오래된 Cordova 모듈을 가질 수 있지만 Capacitor JS 플러그인을 선호해야 합니다.
8. 워크플로우 트리거
커밋 생성
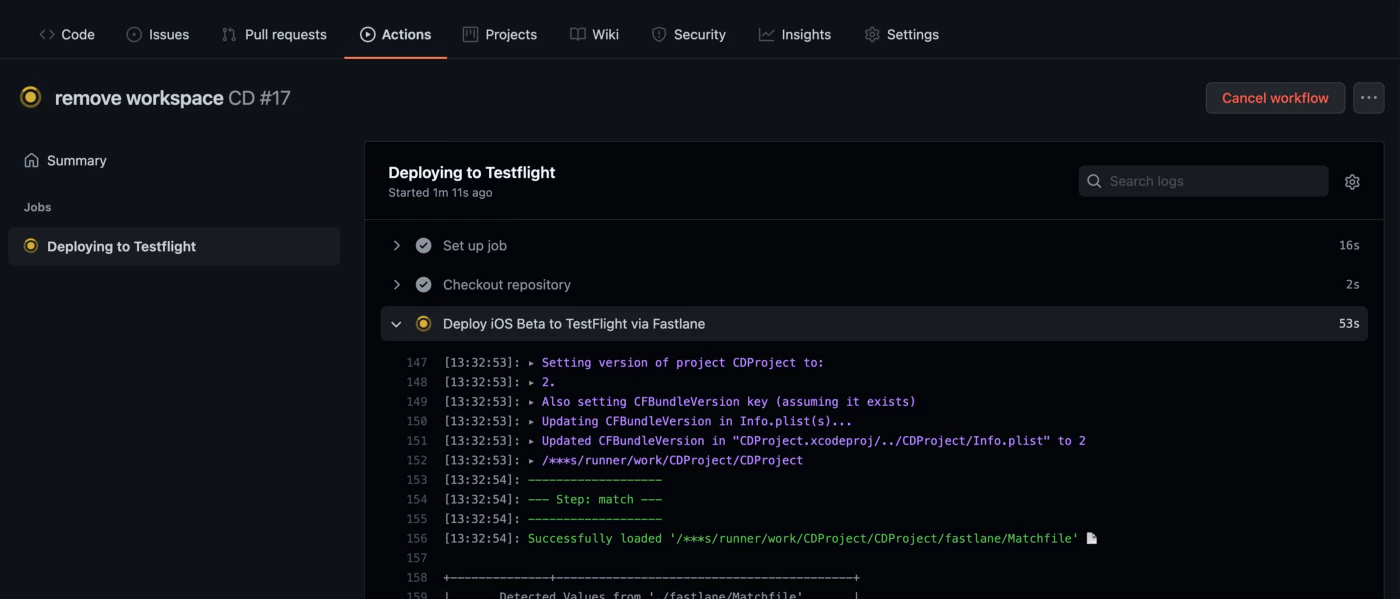
_커밋_을 만드세요. 저장소에서 활성 워크플로우를 확인할 수 있습니다.워크플로우 실행하기
main 또는 developement 브랜치에 새로운 커밋을 푸시하여 워크플로우를 실행하세요
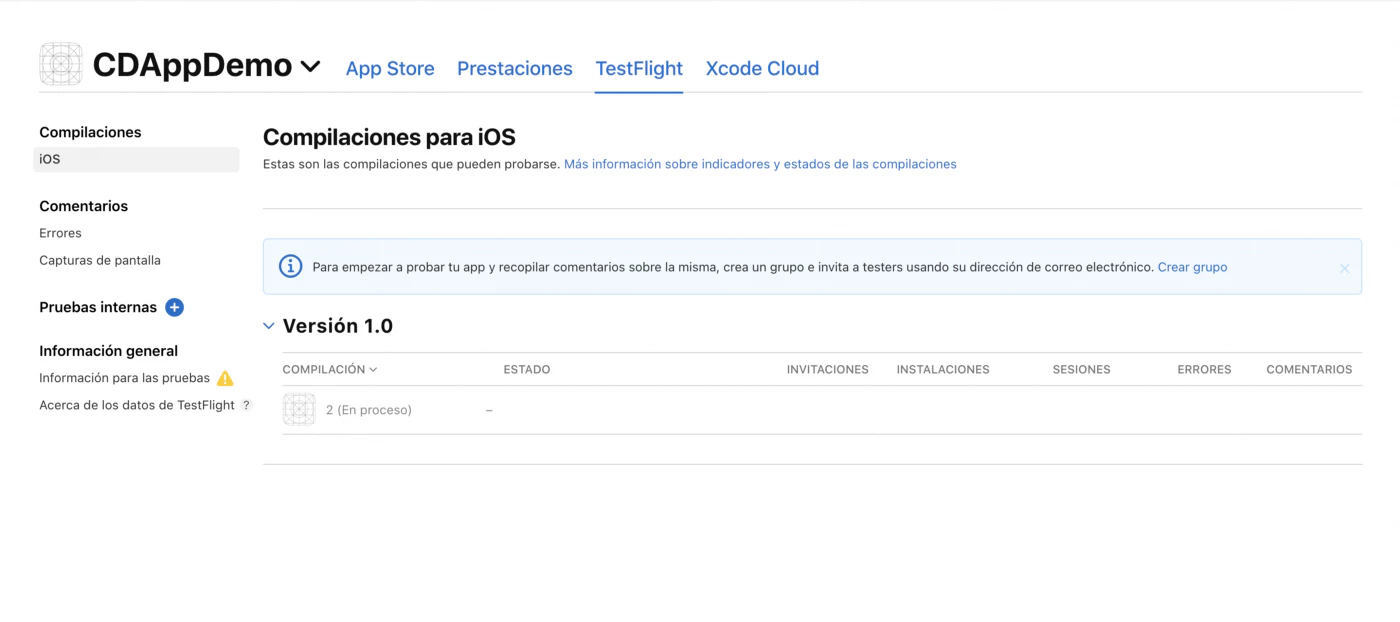
몇 분 후에 App Store Connect 대시보드에서 빌드를 확인할 수 있습니다
9. 로컬 머신에서 배포할 수 있나요?
네, 가능하며 매우 간단합니다
항상 그랬듯이 Xcode를 사용하여 앱을 빌드하고 서명할 수 있습니다
감사의 말
이 블로그는 다음 글들을 기반으로 작성되었습니다:


