article illustration Automatic Capacitor IOS build with GitHub actions using match
CI/CD
Last update: August 01, 2024

Automatic Capacitor IOS build with GitHub actions using match

How to set up a CI/CD pipeline for your IOS Ionic app using fastlane and GitHub Actions in 5 mins (2022)

Continuous Delivery for iOS using Fastlane and GitHub Actions using match

Prerequisites

Before continuing with the tutorial…

  • Make sure you have Fastlane installed on your development machine.
  • iOS developer program membership.
  • Desire to read 😆…
  • A team of many devs, otherwise we recommend to use fastlane cert for simpler workflows.

Important about the price

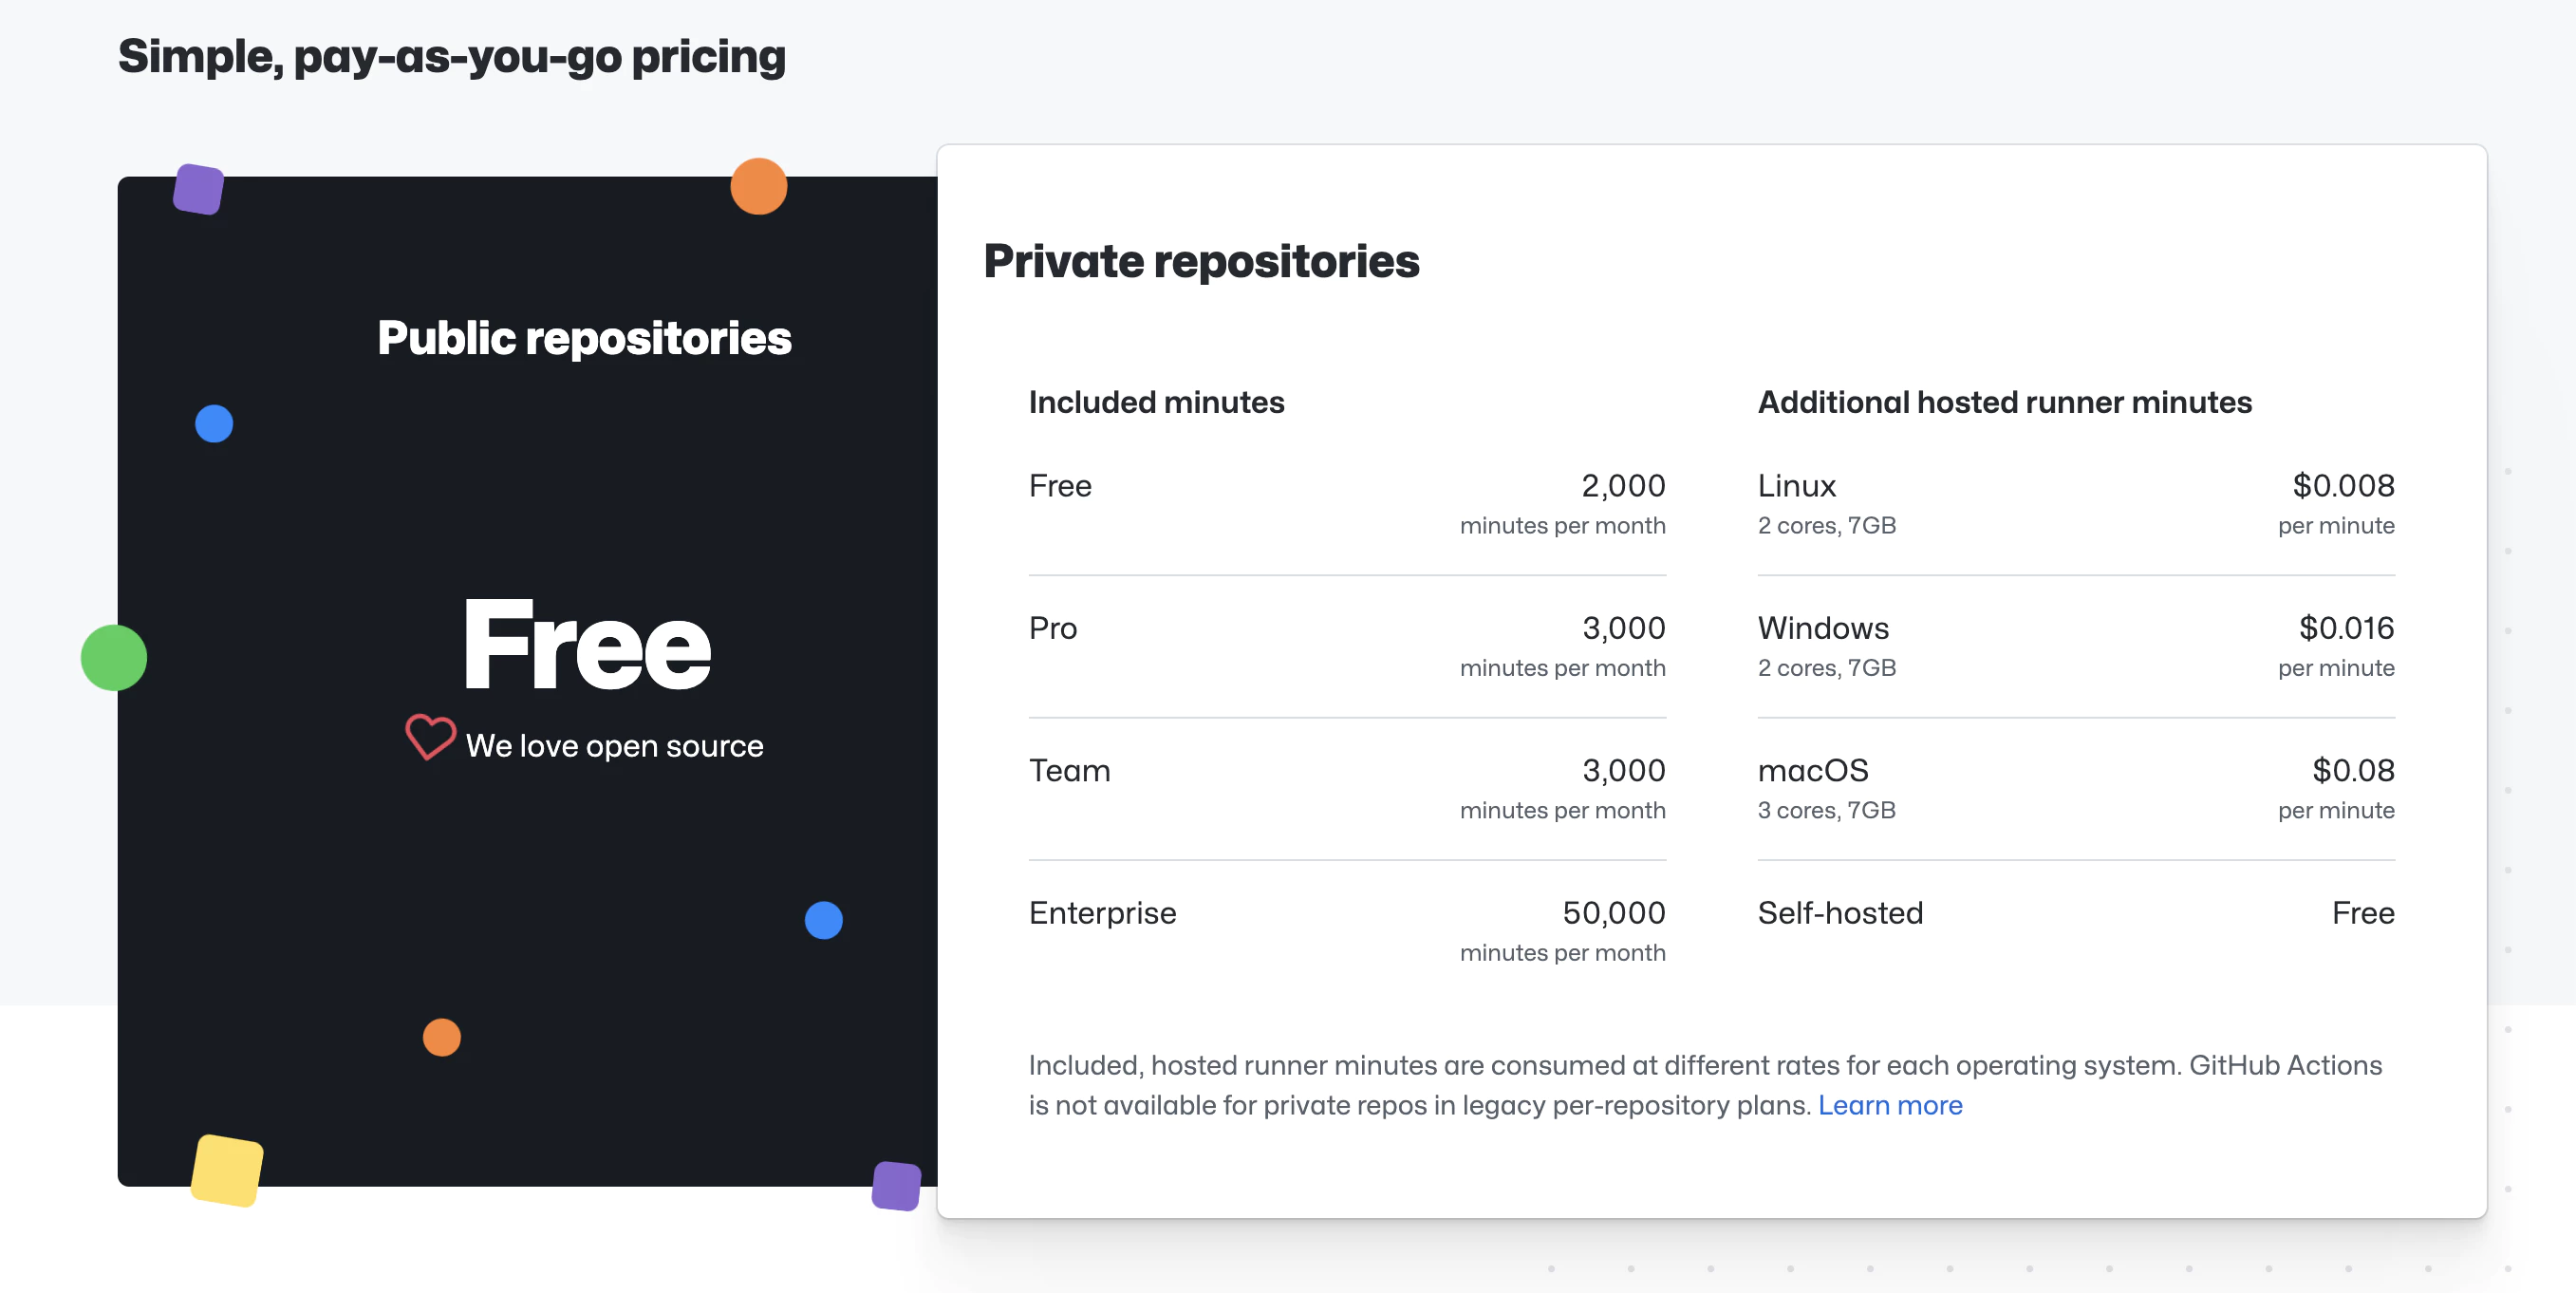
Price GitHub Action

https://github.com/features/actions

The service is ‘free’ up to the limit, depending on the chosen machine.
We are going to use a macOS machine, you can see in the screenshot its price and limits (prices as of the creation of the tutorial, they could undergo changes in the future)

🔴 Once warned of requirements and prices, if you like, we continue…

📣 In the post we assume that we have the app created in iTunes connect, we do have the certificates of the Apple ecosystem, everything will be copied by Fastlane!

Let’s go to the mess 🧑🏽💻

Steps to follow in the post

  1. Using App Store Connect API with Fastlane Match
  2. Requirements
  3. Creating an App Store Connect API Key
  4. Using an App Store Connect API Key
  5. Copy Fastline files
  6. Configure Fastlane matchs
  7. Configure Fastlane matchs

1. Using App Store Connect API with Fastlane Match

Starting February 2021, two-factor authentication or two-step verification is required for all users to sign in to App Store Connect. This extra layer of security for your Apple ID helps ensure that you’re the only person who can access your account.
From Apple Support

Getting started with match requires you to revoke your existing certificates. But no worry, you will have the new one directly.

Requirements

To be able to use App Store Connect API, Fastlane needs three things.

  1. Issuer ID.
  2. Key ID.
  3. Key file or Key content.

Creating an App Store Connect API Key

To generate keys, you must have Admin permission in App Store Connect. If you don’t have that permission, you can direct the relevant person to this article and follow the following instructions.

1 — Log in to App Store Connect.

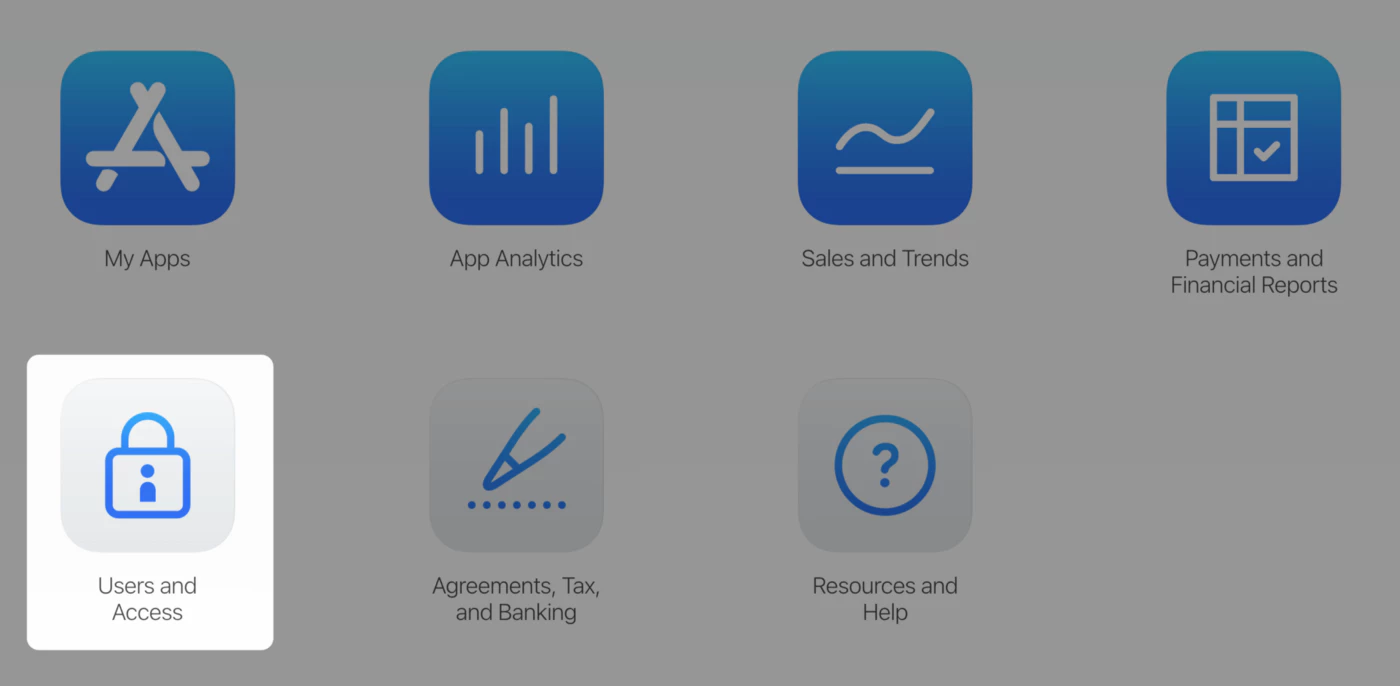
2 — Select Users and Access.

App Store Connect user access

3 — Select the API Keys tab.

App Store Connect API Keys

4 — Click Generate API Key or the Add (+) button.

App Store Connect API keys create

5 — Enter a name for the key. The name is for your reference only and is not part of the key itself.

App Store Connect API keys create name

6 — Under Access, select the role for the key. The roles that apply to keys are the same roles that apply to users on your team. See role permissions.

7 — Click Generate.

An API key’s access cannot be limited to specific apps.

The new key’s name, key ID, a download link, and other information appear on the page.

App Store Connect download keys

You can grab all three necessary information here.
<1> Issue ID.
<2> Key ID.
<3> Click “Download API Key” to download your API private key. The download link appears only if the private key has not yet been downloaded. Apple does not keep a copy of the private key. So, you can download it only once.

🔴 Store your private key in a safe place. You should never share your keys, store keys in a code repository, or include keys in client-side code.

Using an App Store Connect API Key

The API Key file (p8 file that you download), the key ID, and the issuer ID are needed to create the JWT token for authorization. There are multiple ways that these pieces of information can be input into Fastlane using Fastlane’s new action, app_store_connect_api_key. You can learn other ways in Fastlane documentation. I show this method because I think it is the easiest way to work with most CI out there, where you can set environment variables.

Now we can manage Fastlane with the App Store Connect API key, great!

2. Copy Fastline files

Fastlane is a Ruby library created to automate common mobile development tasks. Using Fastlane, you can configure custom “lanes” which bundle a series of “actions” that perform tasks that you’d normally perform using Android studio. You can do a lot with Fastlane, but for the purposes of this tutorial, we’ll be using only a handful of core actions.

Create a Fastlane folder at the root of your project and copy the following files: Fastfile

default_platform(:ios)
DEVELOPER_APP_IDENTIFIER = ENV["DEVELOPER_APP_IDENTIFIER"]
DEVELOPER_APP_ID = ENV["DEVELOPER_APP_ID"]
PROVISIONING_PROFILE_SPECIFIER = ENV["PROVISIONING_PROFILE_SPECIFIER"]
TEMP_KEYCHAIN_USER = ENV["TEMP_KEYCHAIN_USER"]
TEMP_KEYCHAIN_PASSWORD = ENV["TEMP_KEYCHAIN_PASSWORD"]
APPLE_ISSUER_ID = ENV["APPLE_ISSUER_ID"]
APPLE_KEY_ID = ENV["APPLE_KEY_ID"]
APPLE_KEY_CONTENT = ENV["APPLE_KEY_CONTENT"]
GIT_USERNAME = ENV["GIT_USERNAME"]
GIT_TOKEN = ENV["GIT_TOKEN"]
def delete_temp_keychain(name)
delete_keychain(
name: name
) if File.exist? File.expand_path("~/Library/Keychains/#{name}-db")
end
def create_temp_keychain(name, password)
create_keychain(
name: name,
password: password,
unlock: false,
timeout: 0
)
end
def ensure_temp_keychain(name, password)
delete_temp_keychain(name)
create_temp_keychain(name, password)
end
platform :ios do
lane :build do
build_app(
configuration: "Release",
workspace: "./ios/App/App.xcworkspace",
scheme: "App",
export_method: "app-store",
export_options: {
provisioningProfiles: {
DEVELOPER_APP_ID => "#{PROVISIONING_PROFILE_SPECIFIER}"
}
}
)
end
lane :refresh_profiles do
match(
type: "development",
force: true)
match(
type: "adhoc",
force: true)
end
desc "Register new device"
lane :register_new_device do |options|
device_name = prompt(text: "Enter the device name: ")
device_udid = prompt(text: "Enter the device UDID: ")
device_hash = {}
device_hash[device_name] = device_udid
register_devices(
devices: device_hash
)
refresh_profiles
end
lane :closed_beta do
keychain_name = TEMP_KEYCHAIN_USER
keychain_password = TEMP_KEYCHAIN_PASSWORD
ensure_temp_keychain(keychain_name, keychain_password)
api_key = app_store_connect_api_key(
key_id: APPLE_KEY_ID,
issuer_id: APPLE_ISSUER_ID,
key_content: APPLE_KEY_CONTENT,
duration: 1200,
in_house: false
)
match(
type: 'appstore',
git_basic_authorization: Base64.strict_encode64("#{GIT_USERNAME}:#{GIT_TOKEN}"),
readonly: true,
keychain_name: keychain_name,
keychain_password: keychain_password,
api_key: api_key
)
gym(
configuration: "Release",
workspace: "./ios/App/App.xcworkspace",
scheme: "App",
export_method: "app-store",
export_options: {
provisioningProfiles: {
DEVELOPER_APP_ID => "#{PROVISIONING_PROFILE_SPECIFIER}"
}
}
)
pilot(
apple_id: "#{DEVELOPER_APP_ID}",
app_identifier: "#{DEVELOPER_APP_IDENTIFIER}",
skip_waiting_for_build_processing: true,
skip_submission: true,
distribute_external: false,
notify_external_testers: false,
ipa: "./App.ipa"
)
delete_temp_keychain(keychain_name)
end
lane :submit_review do
version = ''
Dir.chdir("..") do
file = File.read("package.json")
data = JSON.parse(file)
version = data["version"]
end
deliver(
app_version: version,
submit_for_review: true,
automatic_release: true,
force: true, # Skip HTMl report verification
skip_metadata: false,
skip_screenshots: false,
skip_binary_upload: true
)
end
end

Appfile

app_identifier(ENV["DEVELOPER_APP_IDENTIFIER"])
apple_id(ENV["FASTLANE_APPLE_ID"])
itc_team_id(ENV["APP_STORE_CONNECT_TEAM_ID"])
team_id(ENV["DEVELOPER_PORTAL_TEAM_ID"])

Configure Fastlane match

Fastlane match is a new approach to iOS’s code signing. Fastlane match makes it easy for teams to manage the required certificates and provisioning profiles for your iOS apps.

Create a new private repository named certificates, for example on your GitHub personal account or organization.

Initialize Fastlane match for your iOS app.

Terminal window
fastlane match init

Then select option #1 (Git Storage).

[01:00:00]: fastlane match supports multiple storage modes, please select the one you want to use:1. git2. google_cloud3. s3?

Assign the URL of the newly created repository.

[01:00:00]: Please create a new, private git repository to store the certificates and profiles there[01:00:00]: URL of the Git Repo: <YOUR_CERTIFICATES_REPO_URL>

Now you have inside Fastlane folder a file named Matchfile and _git_url_should be set to the HTTPS URL of the certificates repository. Optionally, you can also use SSH, but it requires a different step to run.

# ios/Matchfilegit_url("https://github.com/gitusername/certificates")storage_mode("git")type("appstore")

Next, we go to generate the certificates and enter your credentials when asked with Fastlane Match.

You will be prompted to enter a passphrase. Remember it correctly because it will be used later by GitHub Actions to decrypt your certificates repository.

fastlane match appstore

If all went well, you should see something like that:

[01:40:52]: All required keys, certificates and provisioning profiles are installed 🙌

If you experienced any problem with GitHub and the necessary permissions, maybe this post will help you to generate authentication tokens for git.

Generated certificates and provisioning profiles are uploaded to the certificates repository resources

App Store Connect certificates

Lastly, open your project in Xcode, and update the provisioning profile for the release configuration of your app.

XCode certificates

Few things to note 💡

MATCH

For the CI/CD to import the certificates and provisioning profiles, it needs to have access to the certificates repository. You can do this by generating a personal access token (should be used before) that has the scope to access or read private repositories.

In GitHub, go to SettingsDeveloper SettingsPersonal access tokens → click Generate New Token → tick the repo scope → then click Generate token.

Create Personal access token

Have a copy of the personal access token generated. You will use it later for the environment variable GIT_TOKEN.

Then replace your match file generated in Fastlane folder by Matchfile

CERTIFICATE_STORE_URL = ENV["CERTIFICATE_STORE_URL"]
GIT_USERNAME = ENV["GIT_USERNAME"]
GIT_TOKEN = ENV["GIT_TOKEN"]
FASTLANE_APPLE_ID = ENV["FASTLANE_APPLE_ID"]
git_url(CERTIFICATE_STORE_URL)
storage_mode("git")
type("appstore")
git_basic_authorization(Base64.strict_encode64("#{GIT_USERNAME}:#{GIT_TOKEN}"))
username(FASTLANE_APPLE_ID)

This will be used by GitHub Actions to import the certificates and provisioning profiles. And var will be set in GitHub Secrets, instead of hard-coding them in the file.

Build Processing

In GitHub Actions, you are billed based on the minutes you have used for running your CI/CD workflow. From experience, it takes about 10–15 minutes before a build can be processed in App Store Connect.

For private projects, the estimated cost per build can go up to $0.08/min x 15 mins = $1.2, or more, depending on the configuration or dependencies of your project.

If you share the same concerns for the pricing as I do for private projects, you can keep the skip_waiting_for_build_processing to true.

What’s the catch? You have to manually update the compliance of your app in App Store Connect after the build has been processed, for you to distribute the build to your users.

This is just an optional parameter to update if you want to save on the build minutes for private projects. For free projects, this shouldn’t be a problem at all. See pricing.

3. Setup GitHub Actions

Configure GitHub secrets

Ever wonder where the values of the ENV are coming from? Well, it’s not a secret anymore – it’s from your project’s secret. 🤦

Set GitHub secrets

1. APP_STORE_CONNECT_TEAM_ID - the ID of your App Store Connect team in you’re in multiple teams.

2. DEVELOPER_APP_ID - in App Store Connect, go to the app → App Information → Scroll down to the General Information section of your app and look for Apple ID.

3. DEVELOPER_APP_IDENTIFIER - your app’s bundle identifier.

4. DEVELOPER_PORTAL_TEAM_ID - the ID of your Developer Portal team if you’re in multiple teams.

5. FASTLANE_APPLE_ID - the Apple ID or developer email you use to manage the app.

6. GIT_USERNAME & GIT_TOKEN - Your git username and your personal access token.

7. MATCH_PASSWORD - the passphrase that you assigned when initializing match, will be used for decrypting the certificates and provisioning profiles.

8. PROVISIONING_PROFILE_SPECIFIER - match AppStore <YOUR_APP_BUNDLE_IDENTIFIER>, eg. match AppStore com.domain.blabla.demo.

9. TEMP_KEYCHAIN_USER & TEMP_KEYCHAIN_PASSWORD - assign a temp keychain user and password for your workflow.

10. APPLE_KEY_ID — App Store Connect API Key 🔺Key ID.

11. APPLE_ISSUER_ID — App Store Connect API Key 🔺Issuer ID.

12. APPLE_KEY_CONTENT — App Store Connect API Key 🔺 Key file or Key content of .p8, check it

13. CERTIFICATE_STORE_URL — The repo url of your Match keys (ex: https://github.com/***/fastlane_match.git)

4. Configure GitHub workflow file

Create a GitHub workflow directory.

cd .github/workflows

Inside the workflow folder, create a file named build-upload-ios.ymland add the following.

name: Build source code on ios
on:
push:
tags:
- '*'
jobs:
build_ios:
runs-on: macOS-latest
steps:
- uses: actions/checkout@v4
- name: Use Node.js 16
uses: actions/setup-node@v3
with:
node-version: 16
cache: npm
- name: Install dependencies
id: install_code
run: npm ci
- name: Build
id: build_code
run: npm run build
- name: Build
id: build_code
run: npm run mobile
- uses: actions/cache@v3
with:
path: ios/App/Pods
key: ${{ runner.os }}-pods-${{ hashFiles('**/Podfile.lock') }}
restore-keys: |
${{ runner.os }}-pods-
- name: Sync
id: sync_code
run: npx cap sync
- uses: ruby/setup-ruby@v1
with:
ruby-version: 2.7.2
- uses: maierj/fastlane-action@v2.3.0
env:
DEVELOPER_APP_IDENTIFIER: ${{ secrets.DEVELOPER_APP_IDENTIFIER }}
DEVELOPER_APP_ID: ${{ secrets.DEVELOPER_APP_ID }}
PROVISIONING_PROFILE_SPECIFIER: match AppStore ${{ secrets.DEVELOPER_APP_IDENTIFIER }}
TEMP_KEYCHAIN_USER: ${{ secrets.TEMP_KEYCHAIN_USER }}
TEMP_KEYCHAIN_PASSWORD: ${{ secrets.TEMP_KEYCHAIN_PASSWORD }}
APPLE_ISSUER_ID: ${{ secrets.APPLE_ISSUER_ID }}
APPLE_KEY_ID: ${{ secrets.APPLE_KEY_ID }}
APPLE_KEY_CONTENT: ${{ secrets.APPLE_KEY_CONTENT }}
CERTIFICATE_STORE_URL: https://github.com/${{ secrets.CERTIFICATE_STORE_REPO }}.git
GIT_USERNAME: ${{ secrets.GIT_USERNAME }}
GIT_TOKEN: ${{ secrets.PERSONAL_ACCESS_TOKEN }}
FASTLANE_APPLE_ID: ${{ secrets.FASTLANE_APPLE_ID }}
MATCH_USERNAME: ${{ secrets.FASTLANE_APPLE_ID }}
MATCH_PASSWORD: ${{ secrets.MATCH_PASSWORD }}
APP_STORE_CONNECT_TEAM_ID: ${{ secrets.APP_STORE_CONNECT_TEAM_ID }}
DEVELOPER_PORTAL_TEAM_ID: ${{ secrets.DEVELOPER_PORTAL_TEAM_ID }}
with:
lane: closed_beta
- name: Upload release bundle
uses: actions/upload-artifact@v2
with:
name: ios-release
path: ./App.ipa
retention-days: 60

This workflow should be triggered after each GitHub tag, if you need to automatize tag please, refer to Automatic build and release with GitHub actions first.

Then this workflow will pull your NodeJS deps, install them and build your JavaScript app.

Each time you send a new commit, a release will be built in TestFlight.

Your App doesn’t need to use Ionic, only Capacitor base is mandatory., it can have old Cordova module, but Capacitor JS plugin should be preferred.

5. Trigger workflow

Create a Commit

Make a commit, you should see the active workflow in the repository.

Trigger the workflow

Push the new commits to the branch main or developement to trigger the workflow.

Started with commit

After a few minutes, the build should be available in your App Store Connect dashboard.

Testflight Dashboard

Can deploy from local machine?

Yes, you can, and it is effortless.

Imagine that you have a private repository, and you have used up the minutes of the free plan and you do not want to pay for new releases, or maybe you prefer to submit the application manually.

Let’s go for it

Ok, first we need to create in my_project_path/fastlane path a file called .env, just in the same path as Fastfile, to be able to create the same secret properties found in our _GitHub, a_s below:

.env file for deploy from local machine

Now, you can go to the terminal and launch the Fastlane from your machine:

fastlane closed_beta

❌ Essential about the .env file, as we would rather not expose this data, we must add it in our .gitignore, something like that: ❌

fastlane/*.env

It should work the same as it happens from GitHub Actions on the remote machine but in our local machine. 🍻

Local Fastlane run

Terminal execution: $ Fastlane closed_beta

If you have come this far, my congratulations, now you have a fully automated process for your iOS apps with Fastlane and GitHub Actions.

Each time you send a new commit, a release will be built in Google Play console, beta channel. I will improve this blog with your feedbacks, if you have any question or suggestion, please let me know by email martin@capgo.app

Build on your device

If you still need to build on your device, you need to add them manually to the provisionning. Connect your device to your mac and open the device menu find devic ios menu Then copy your identifier find identifier ios And then start the command: fastlane register_new_device it will ask you to set a device name and the identifier: set identifier ios

if you got issues

If you have issue with dev device not able to test etc that usually fix it.

There a magic command who can save you:

Terminal window
fastlane match nuke development
fastlane match development

Then : Clean the project by holding Shift(⇧)+Command(⌘)+K or selecting Product > Clean (it might be labelled “Clean Build Folder”)

Then try to run again the app on your device.

Thanks

This blog is based on the following articles:

Authored By

최신 뉴스

Capgo는 진정으로 전문적인 모바일 앱을 만드는 데 필요한 최고의 인사이트를 제공합니다.