Setting up CI/CD for Capacitor apps can be complex and time-consuming. Here’s what you need to know:
Recommended for New Builds: Use Capgo Build
We now recommend using Capgo Build with the Capgo CLI for native Capacitor builds. This Fastlane guide is kept for teams maintaining existing GitHub Actions pipelines, but new iOS builds should use the Capgo CLI so you do not have to maintain Fastlane, Xcode runners, certificates, and upload scripts yourself.
Capgo Build for CI/CD by Capgo
Skip the Fastlane, Xcode runner, certificate, provisioning profile, and upload-script maintenance. Capgo Build runs signed native iOS builds from your existing CI/CD pipeline:
- Works with your pipeline: Trigger Capgo Build from GitHub Actions, GitLab CI, Jenkins, or local scripts after your web build and
npx cap sync. - Signing from CI secrets: Keep App Store Connect keys, certificates, provisioning profiles, passwords, and team IDs in your own CI secrets.
- No native runner upkeep: Capgo Build provides maintained Apple build environments, so you do not have to manage macOS runners, Xcode images, or Fastlane lanes.
- Artifacts and submission: Download signed artifacts for QA or submit release builds through the Capgo CLI.
Pricing
- Capgo plans start at $12/month
- Includes OTA updates and about 15 native builds per month
- Extra build minutes are billed by minute through credits
Manual Setup Guide
Here’s what you need to do:
Continuous Delivery for iOS using Fastlane and GitHub Actions and certificate
Prerequisites
Before continuing with the tutorial:
- Make sure you have Fastlane installed on your development machine.
- Ensure that you are part of iOS developer program membership.
Important information about the price
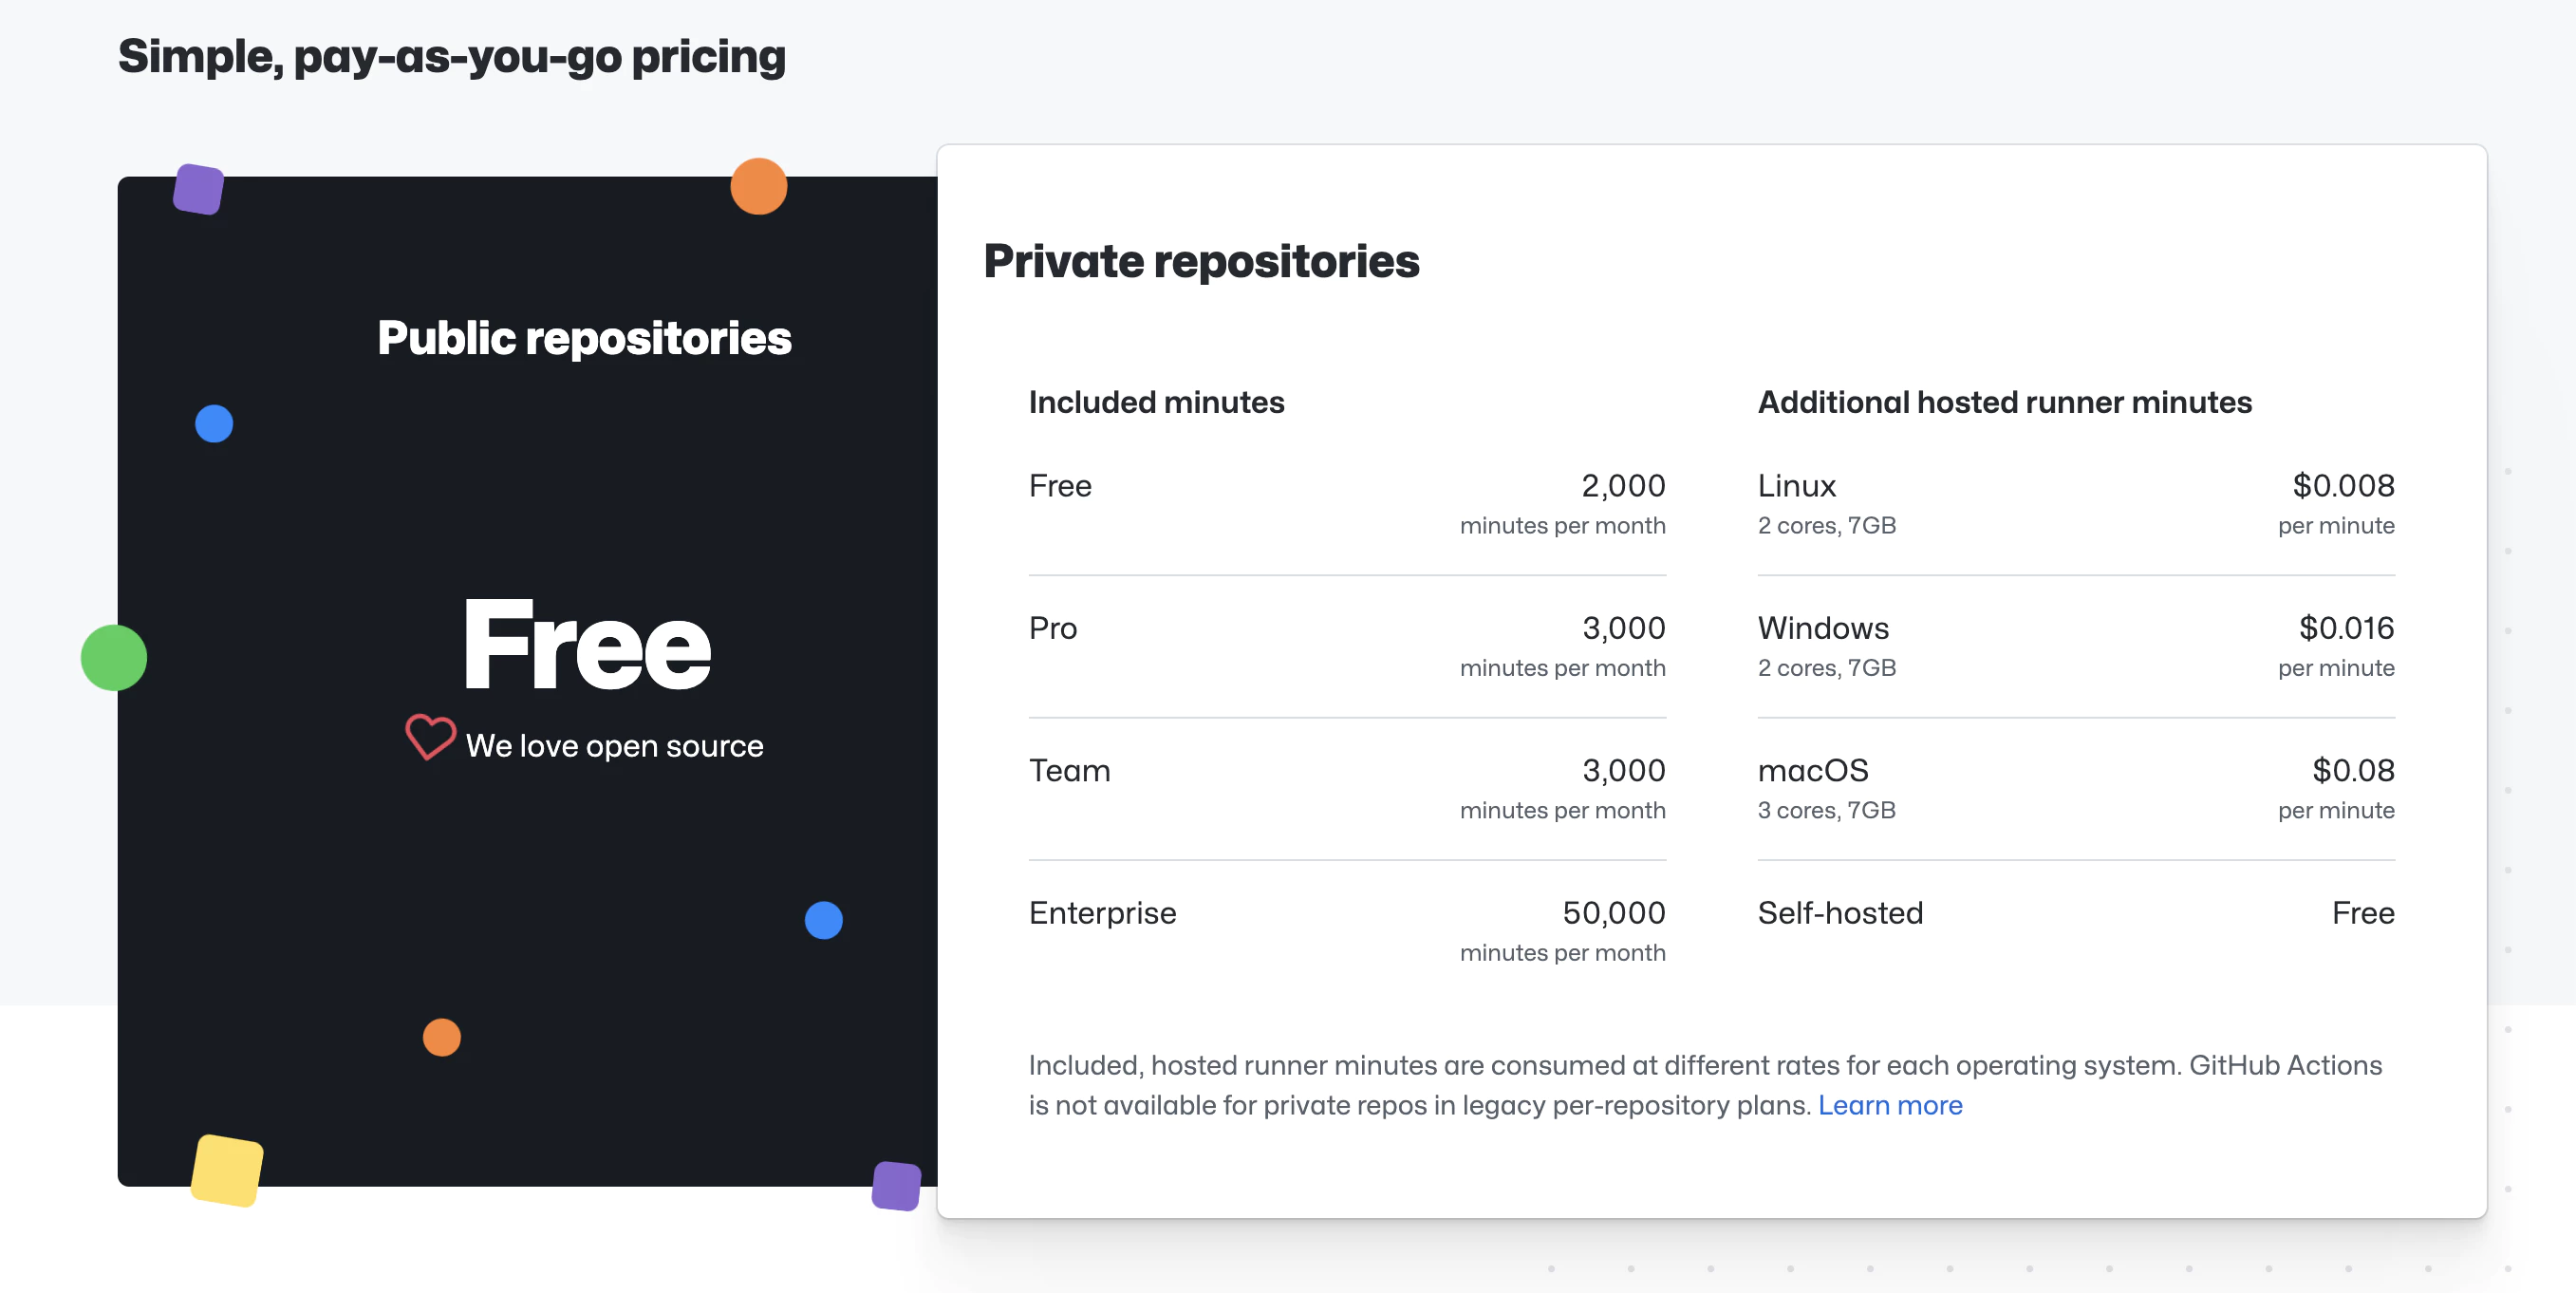
https://github.com/features/actions
The service is ‘free’ up to the limit, depending on the chosen machine.
We are going to use a macOS machine, you can see in the screenshot its price and limits (prices as of the creation of the tutorial, they could undergo changes in the future)
Once warned of requirements and prices, let’s continue.
Note: In the post I assume that you have the app created in App Store Connect. The important information will be copied by Fastlane!
What will you learn in the tutorial
Steps to follow in the post
- Using App Store Connect API with Fastlane
- Requirements:
- Creating an App Store Connect API Key
- Using an App Store Connect API Key
- Requirements:
- Copy Fastlane files
- Configure GitHub Actions
1. Using App Store Connect API with Fastlane
Starting February 2021, two-factor authentication or two-step verification is required for all users to sign in to App Store Connect. This extra layer of security for your Apple ID helps ensure that you’re the only person who can access your account.
From Apple Support
Requirements
In order for Fastlane to be able to use App Store Connect API to upload your app, you need to provide the following three things:
- Issuer ID
- Key ID
- Key file or Key content
Obtaining an App Store Connect API Key
To generate keys, you must have Admin permission in App Store Connect. If you don’t have that permission, you can direct the relevant person to this article.
-
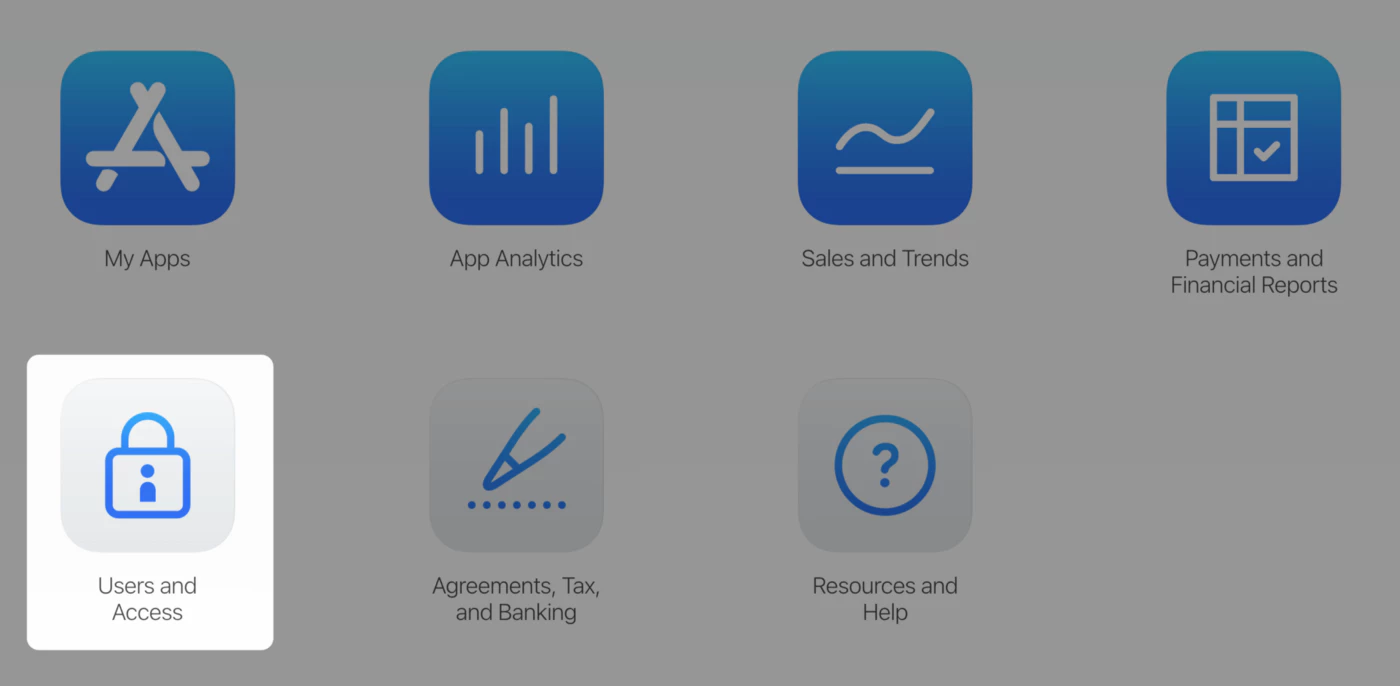
Log in to App Store Connect.
-
Select Users and Access.
3 — Select the Integration tab.
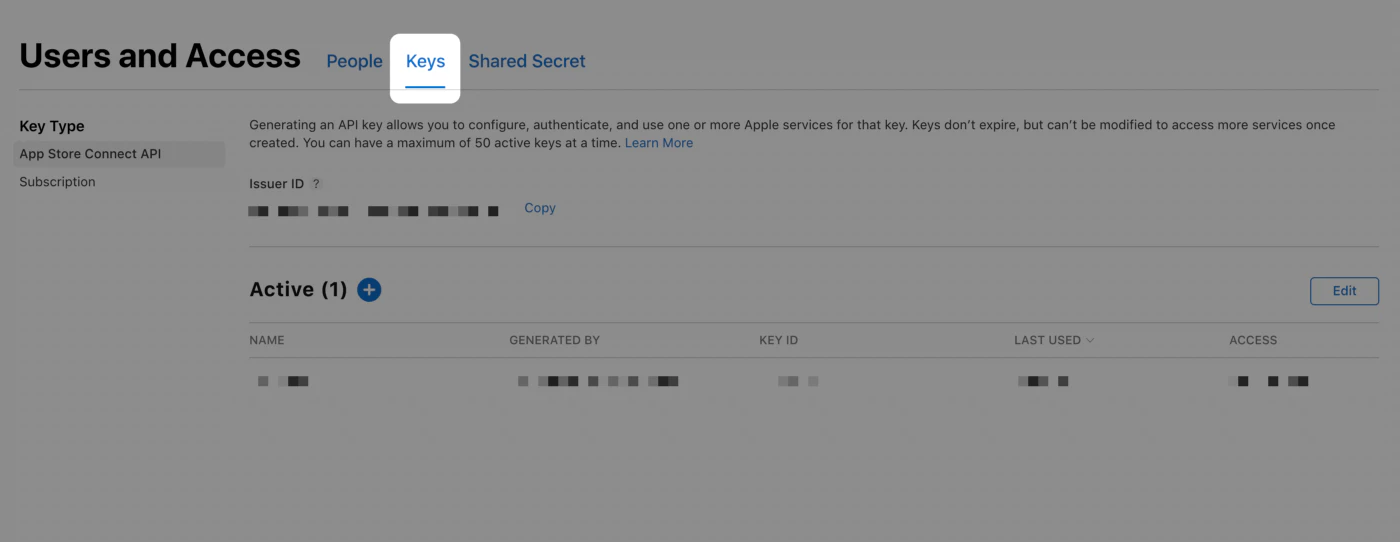
- Click Generate API Key or the Add (+) button.
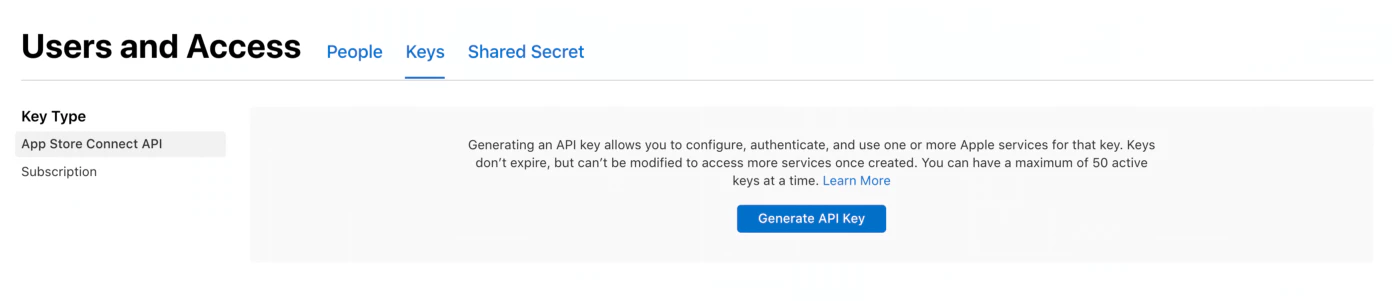
- Enter a name for the key. The name is for your reference only and is not part of the key itself.
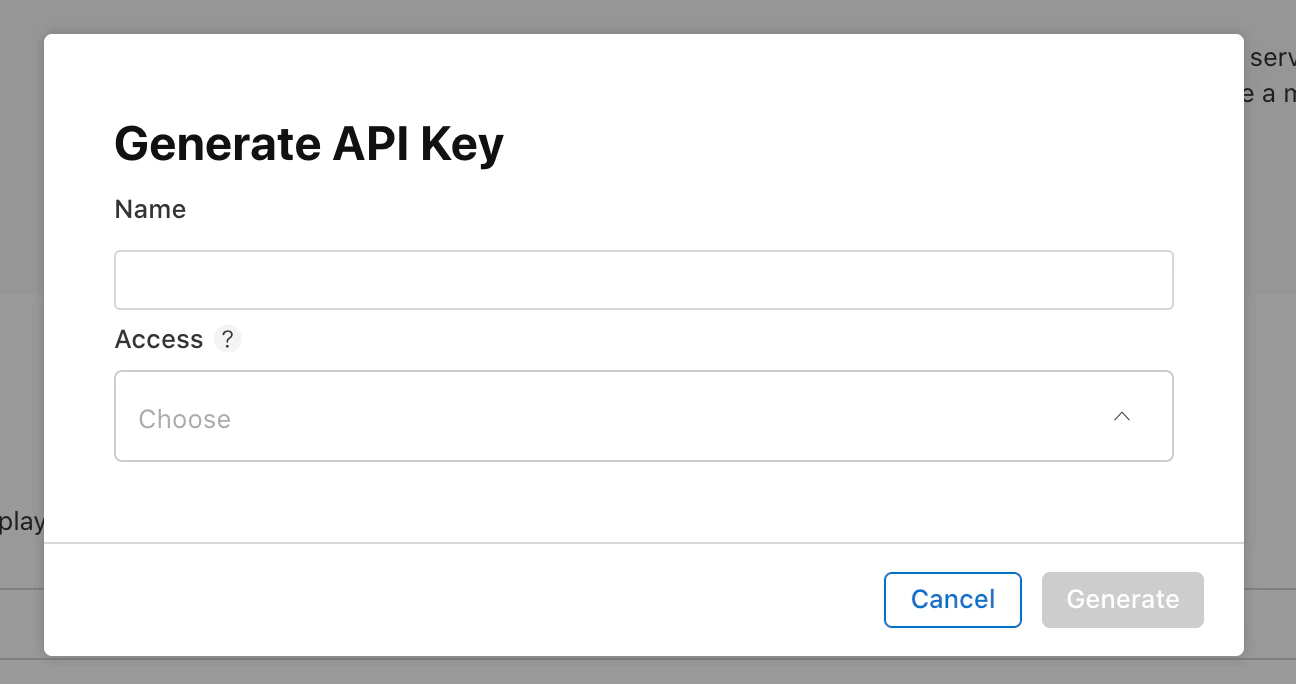
6 — Under Access, select the role for the key. The roles that apply to keys are the same roles that apply to users on your team. See role permissions. We recommend to select App manager.
- Click Generate.
An API key’s access cannot be limited to specific apps.
The new key’s name, key ID, a download link, and other information appear on the page.
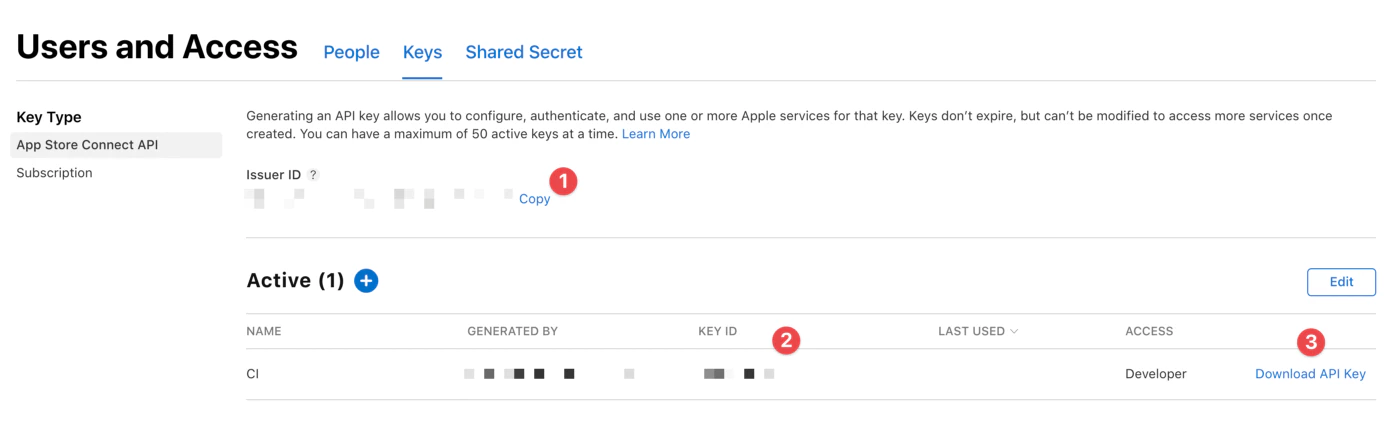
You can grab all three necessary information here.
<1> Issue ID. (APPLE_ISSUER_ID secret)
<2> Key ID. (APPLE_KEY_ID secret)
<3> Click “Download API Key” to download your API private key. The download link appears only if the private key has not yet been downloaded. Apple does not keep a copy of the private key. So, you can download it only once.
🔴 Store your private key in a safe place. You should never share your keys, store keys in a code repository, or include keys in client-side code.
Using an App Store Connect API Key
The API Key file (p8 file that you download), the key ID, and the issuer ID are required in order to create the JWT token for authorization. There are multiple ways that this information can be passed into Fastlane. I chose to use the Fastlane’s new action app_store_connect_api_key. You can learn other ways in Fastlane documentation. I show this method because I think it is the easiest way to work with most CI out there, where you can set environment variables.
Please convert the p8 file that you download to Base64 and store it as a secret (APPLE_KEY_CONTENT).
base64 -i APPLE_KEY_CONTENT.p8 | pbcopyNow we can manage the App Store Connect with Fastlane using the API key, great!
2. Certificates
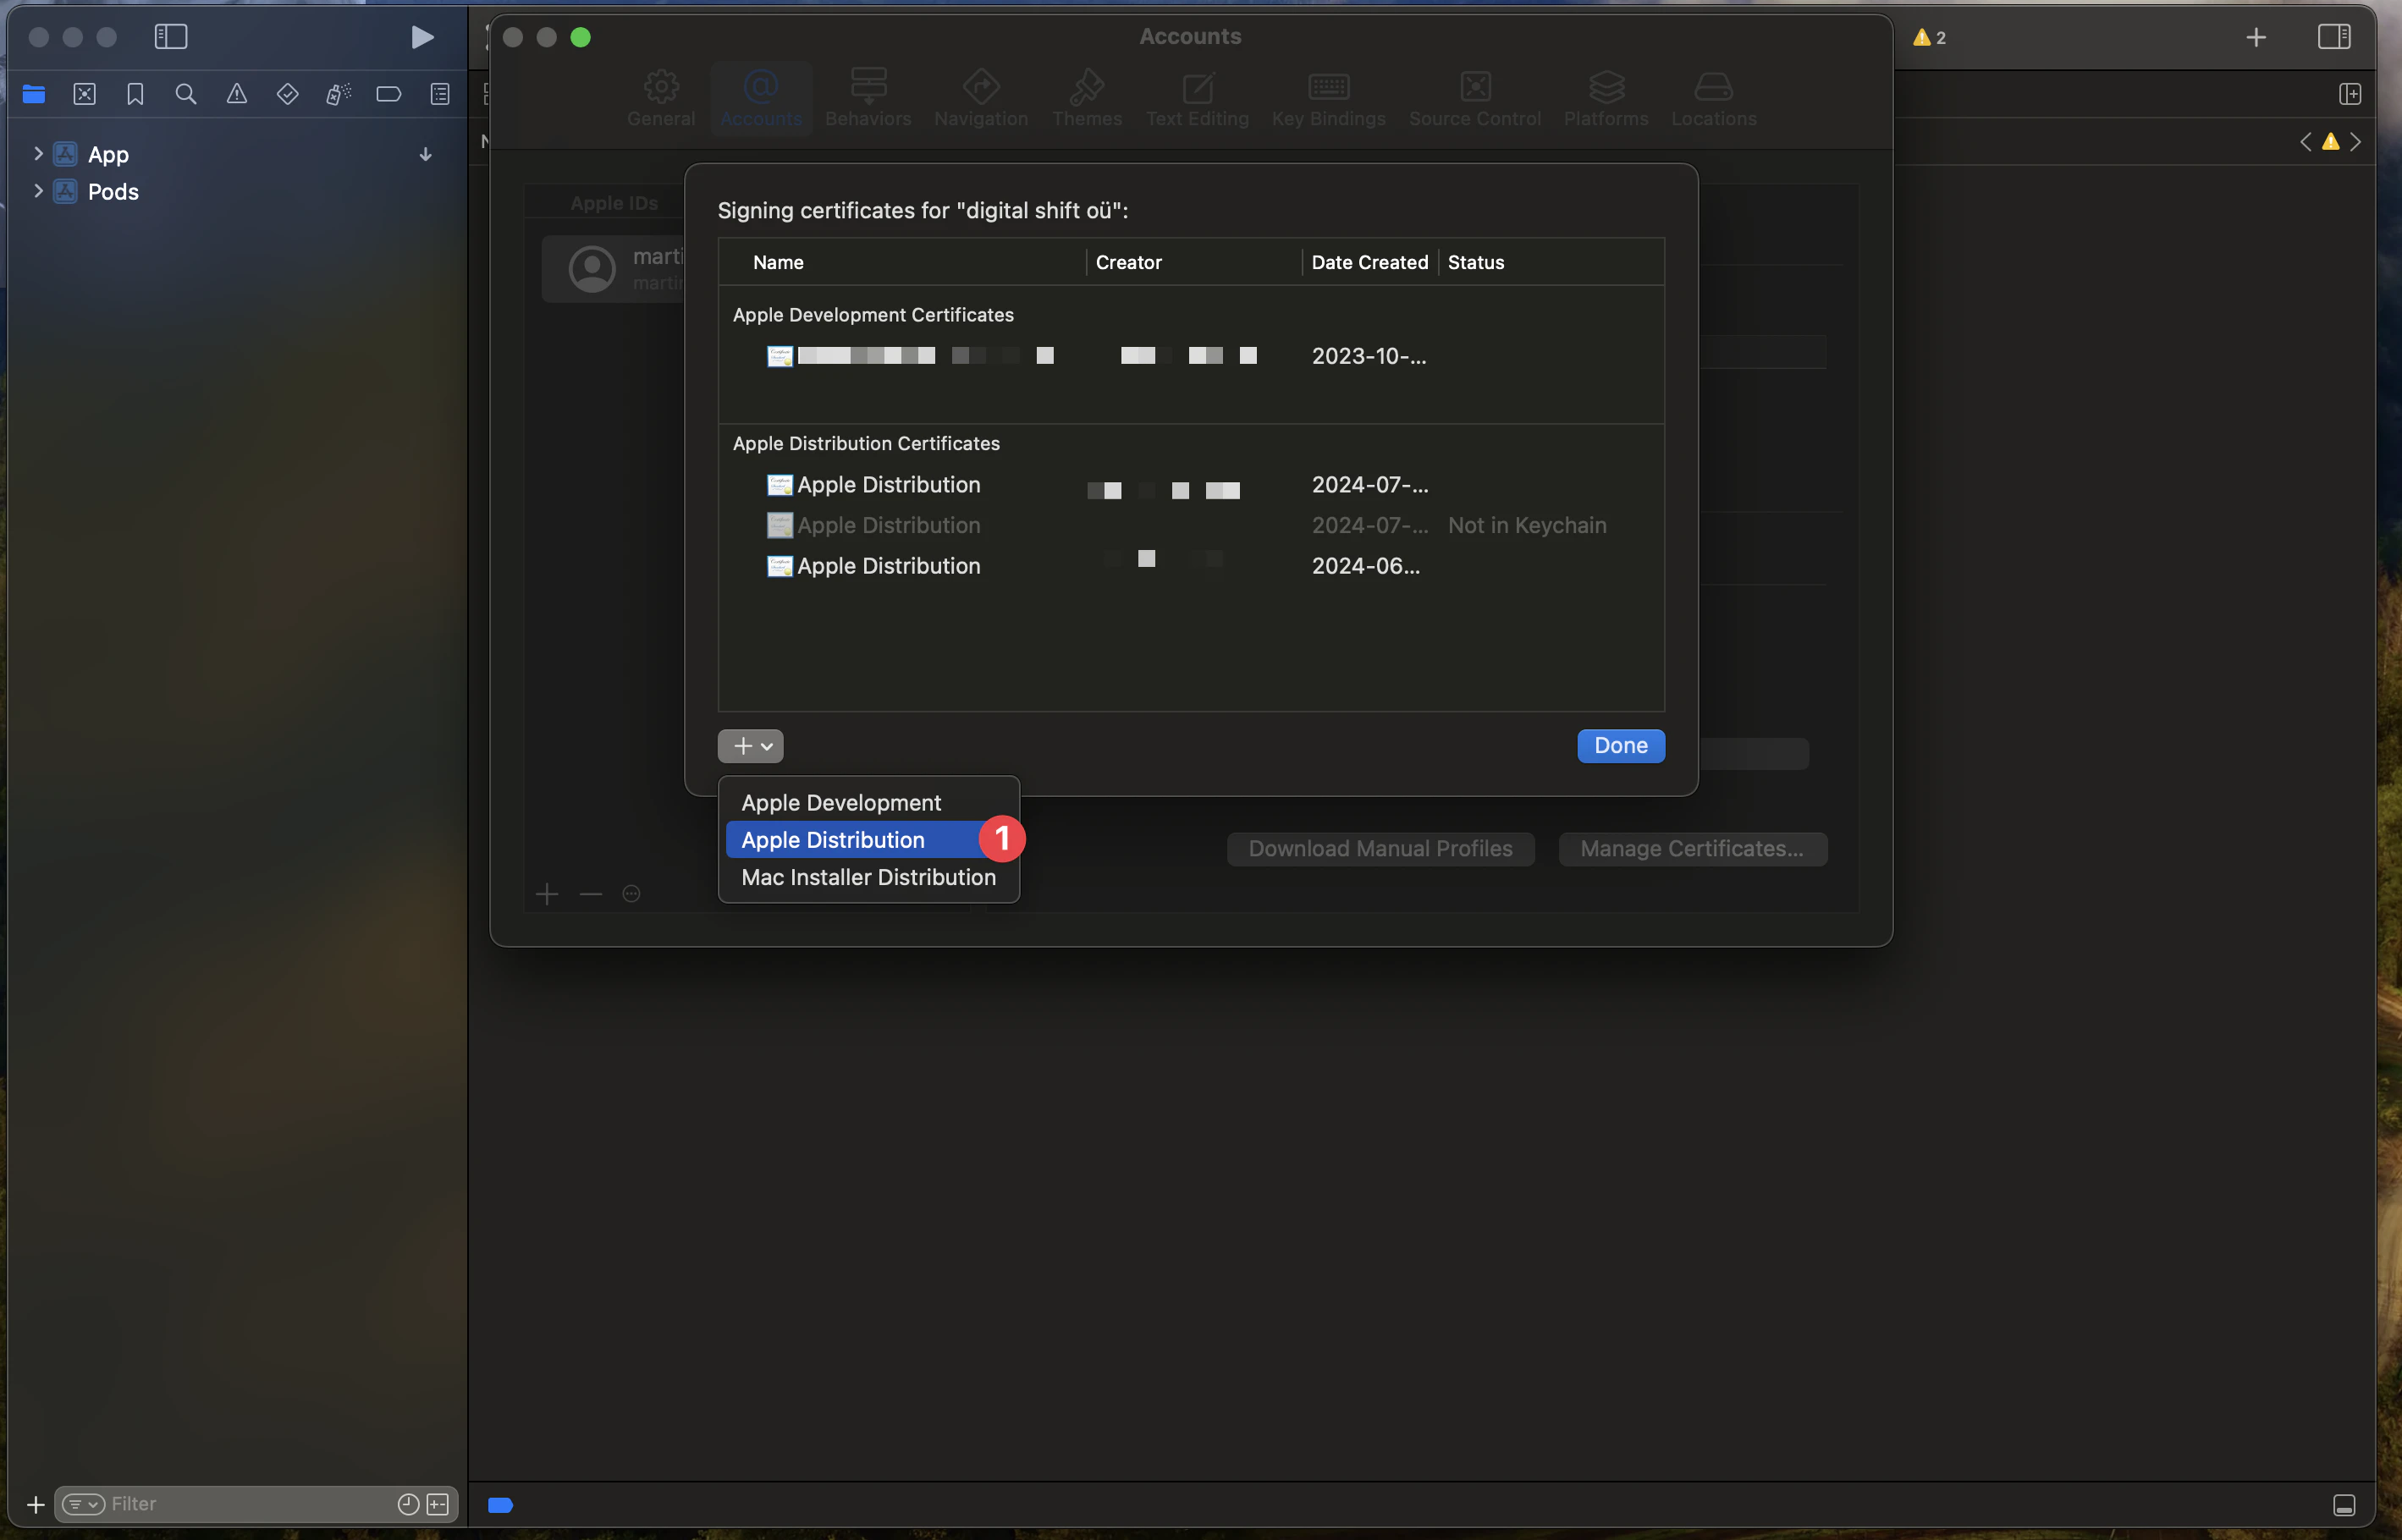
Open XCode and go to Settings > Accounts > Apple ID > Teams and select your team.
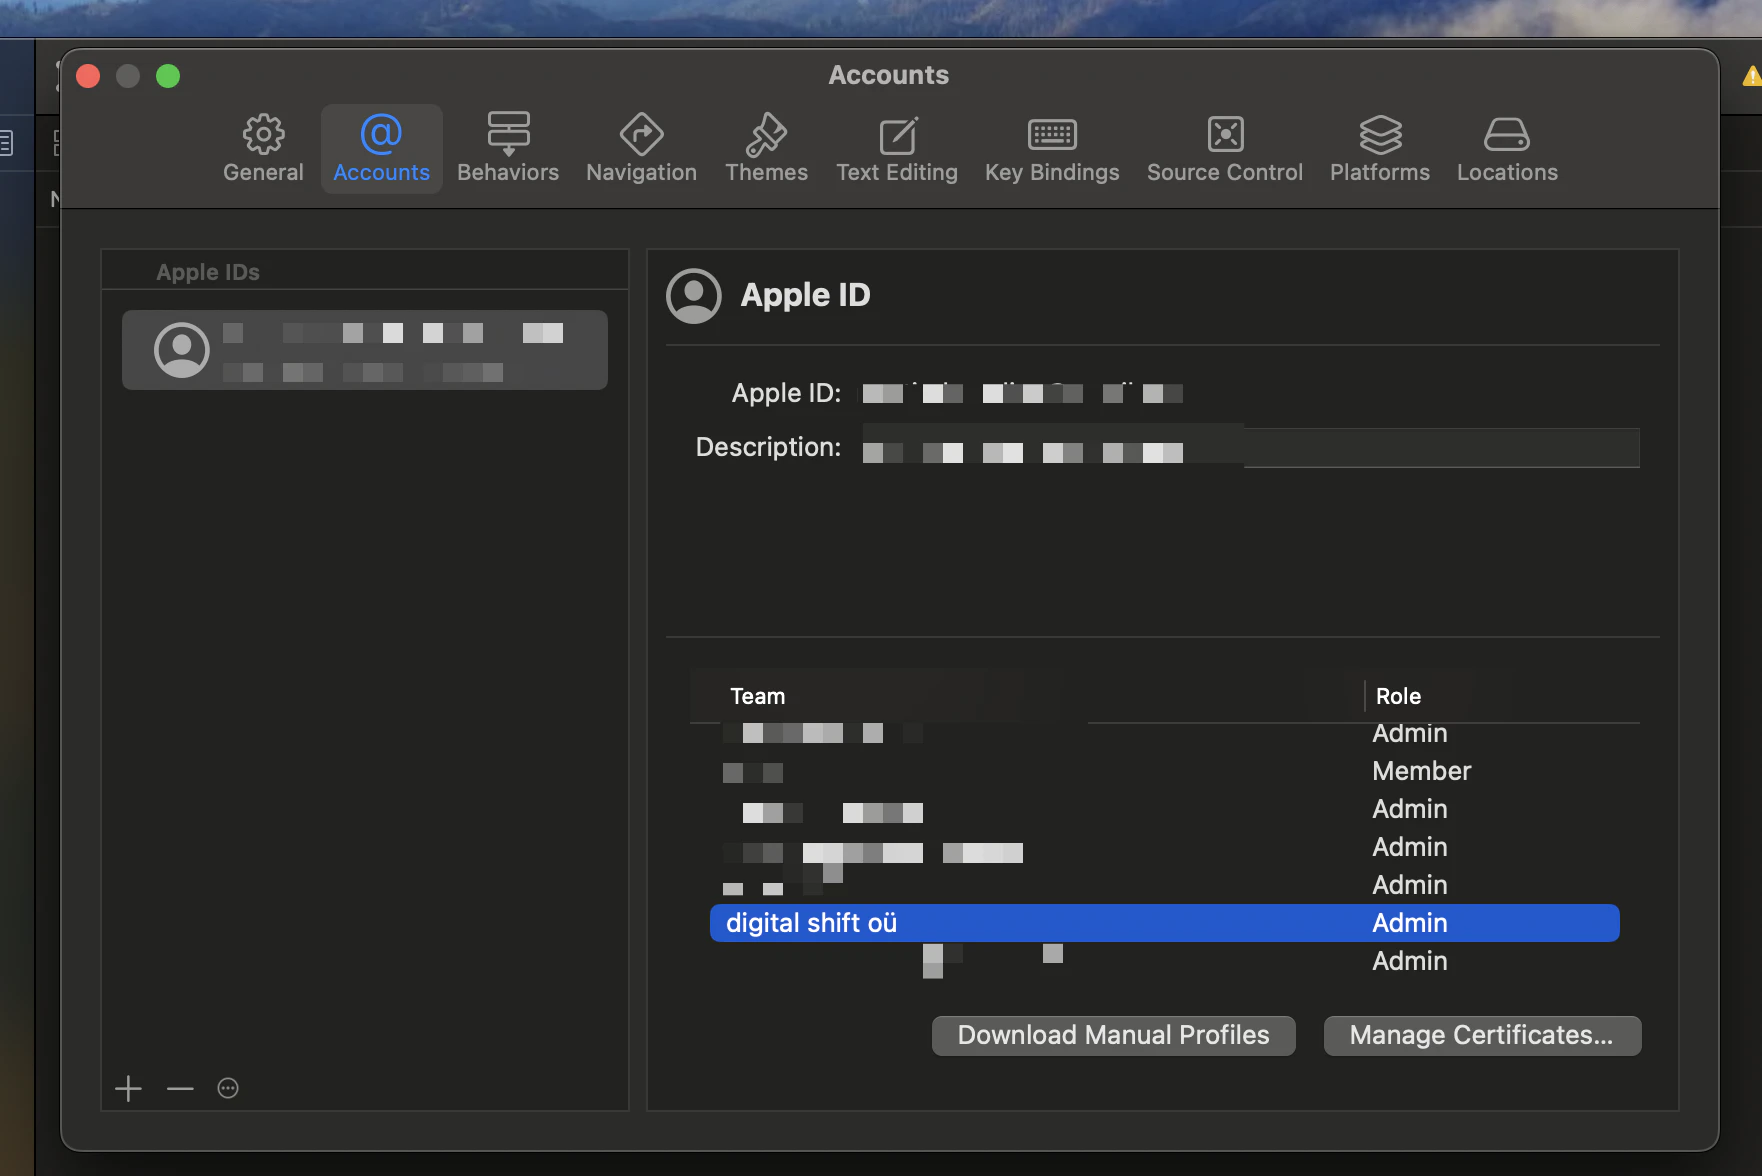
Click on Manage certificates.
If you haven’t already created a certificate, you can create a new certificate.
Click on + and select Apple Distribution
Then you need to go to keychain to download the certificate as a .p12 file.
To do so, you need to go to keychain switch to the login keychain and then the tab My Certificates.

Then you can select the certificate you want to download. (Look by the date of the certificate)
And then right-click on the private key on the certificate and select Export.
Choose the file format Personal Information Exchange (.p12).
That will download the certificate as a .p12 file.
Please open the file in a terminal and use the following command to convert it to Base64:
base64 -i BUILD_CERTIFICATE.p12 | pbcopyThis will become your BUILD_CERTIFICATE_BASE64 secret. Also, when asked, please provide the password of the certificate. This password will be your P12_PASSWORD secret.
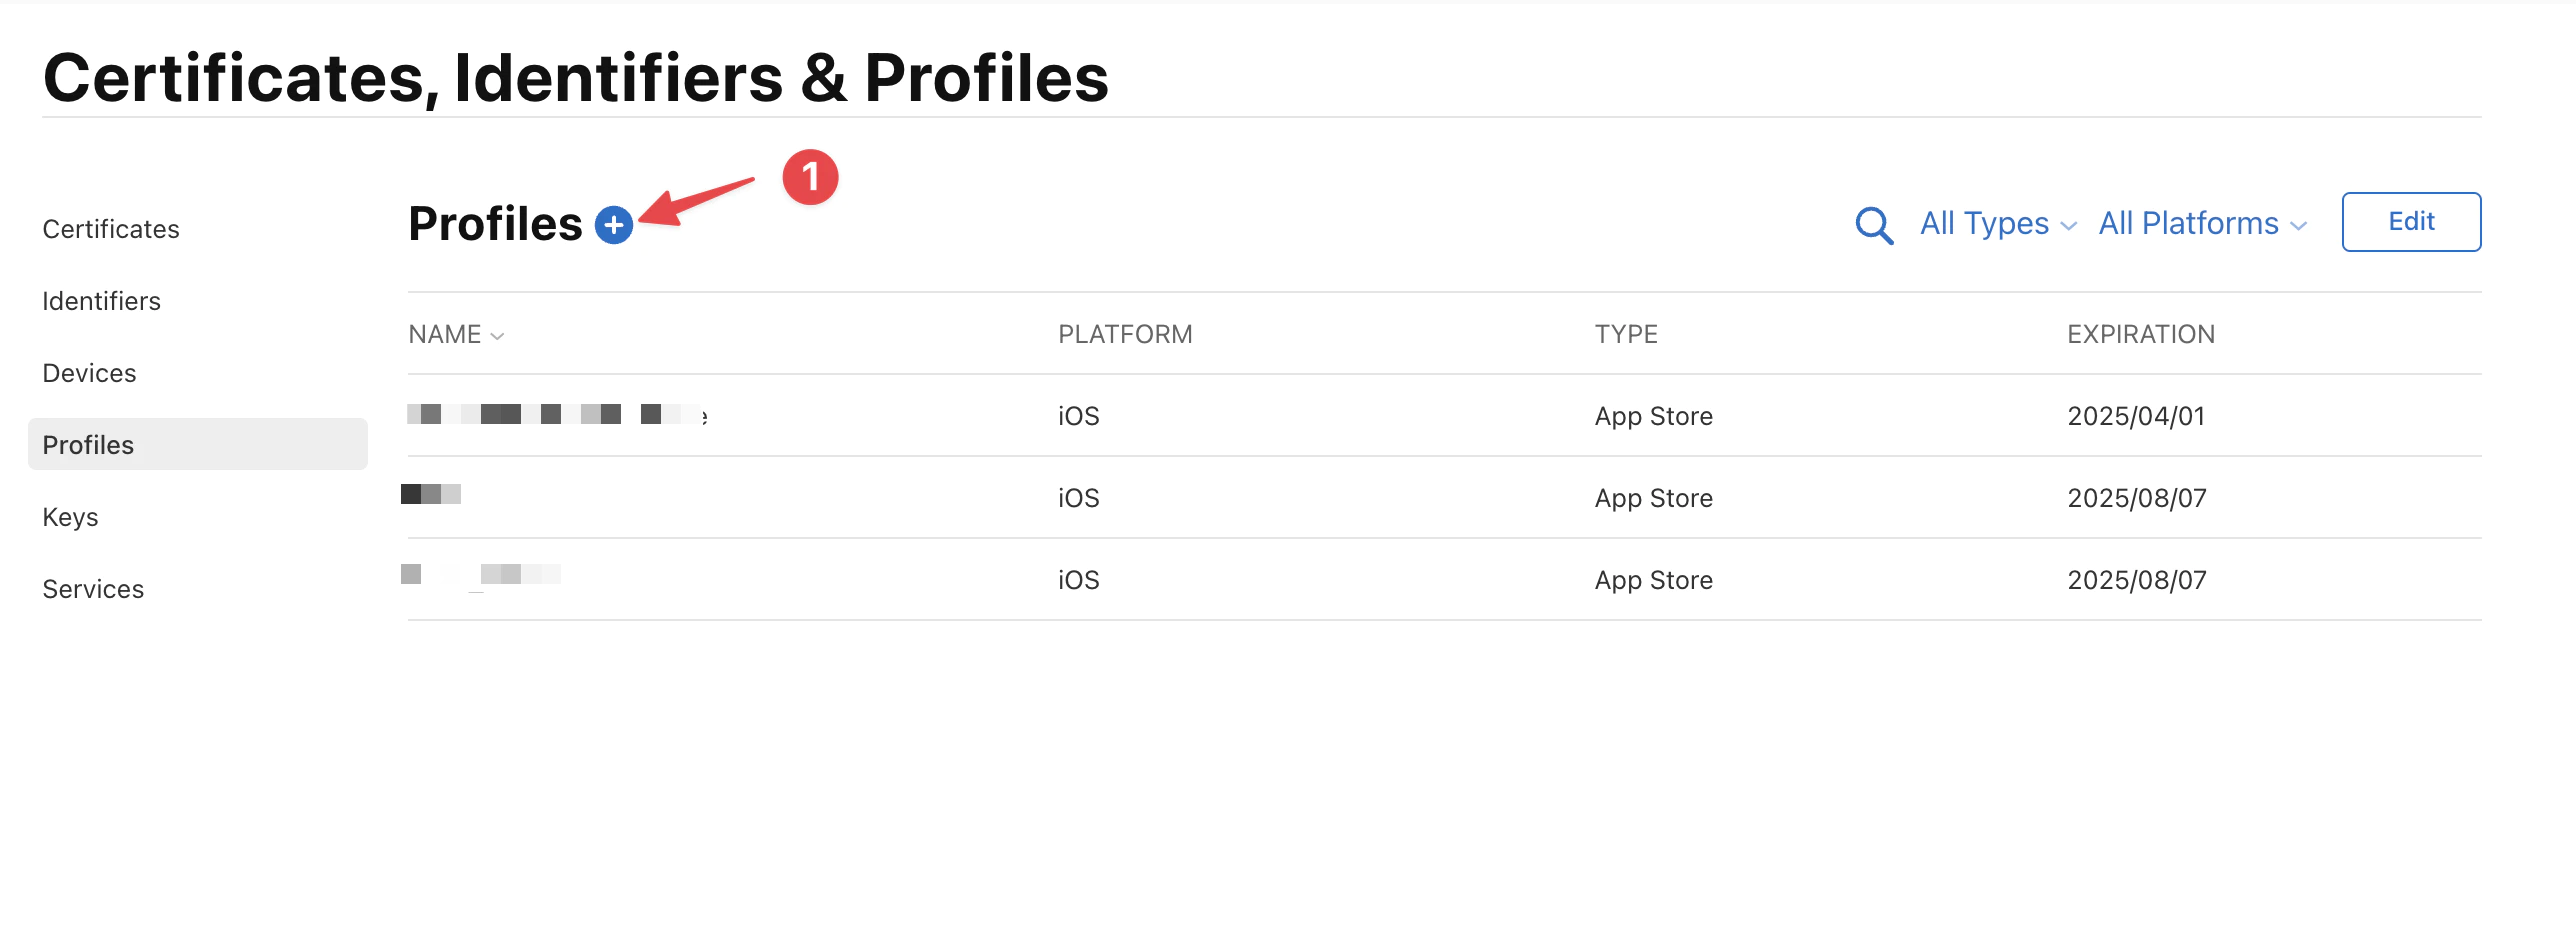
3. Provisioning profiles
Open Apple Developer and select the right team.
Then create a new profile, by clicking on +
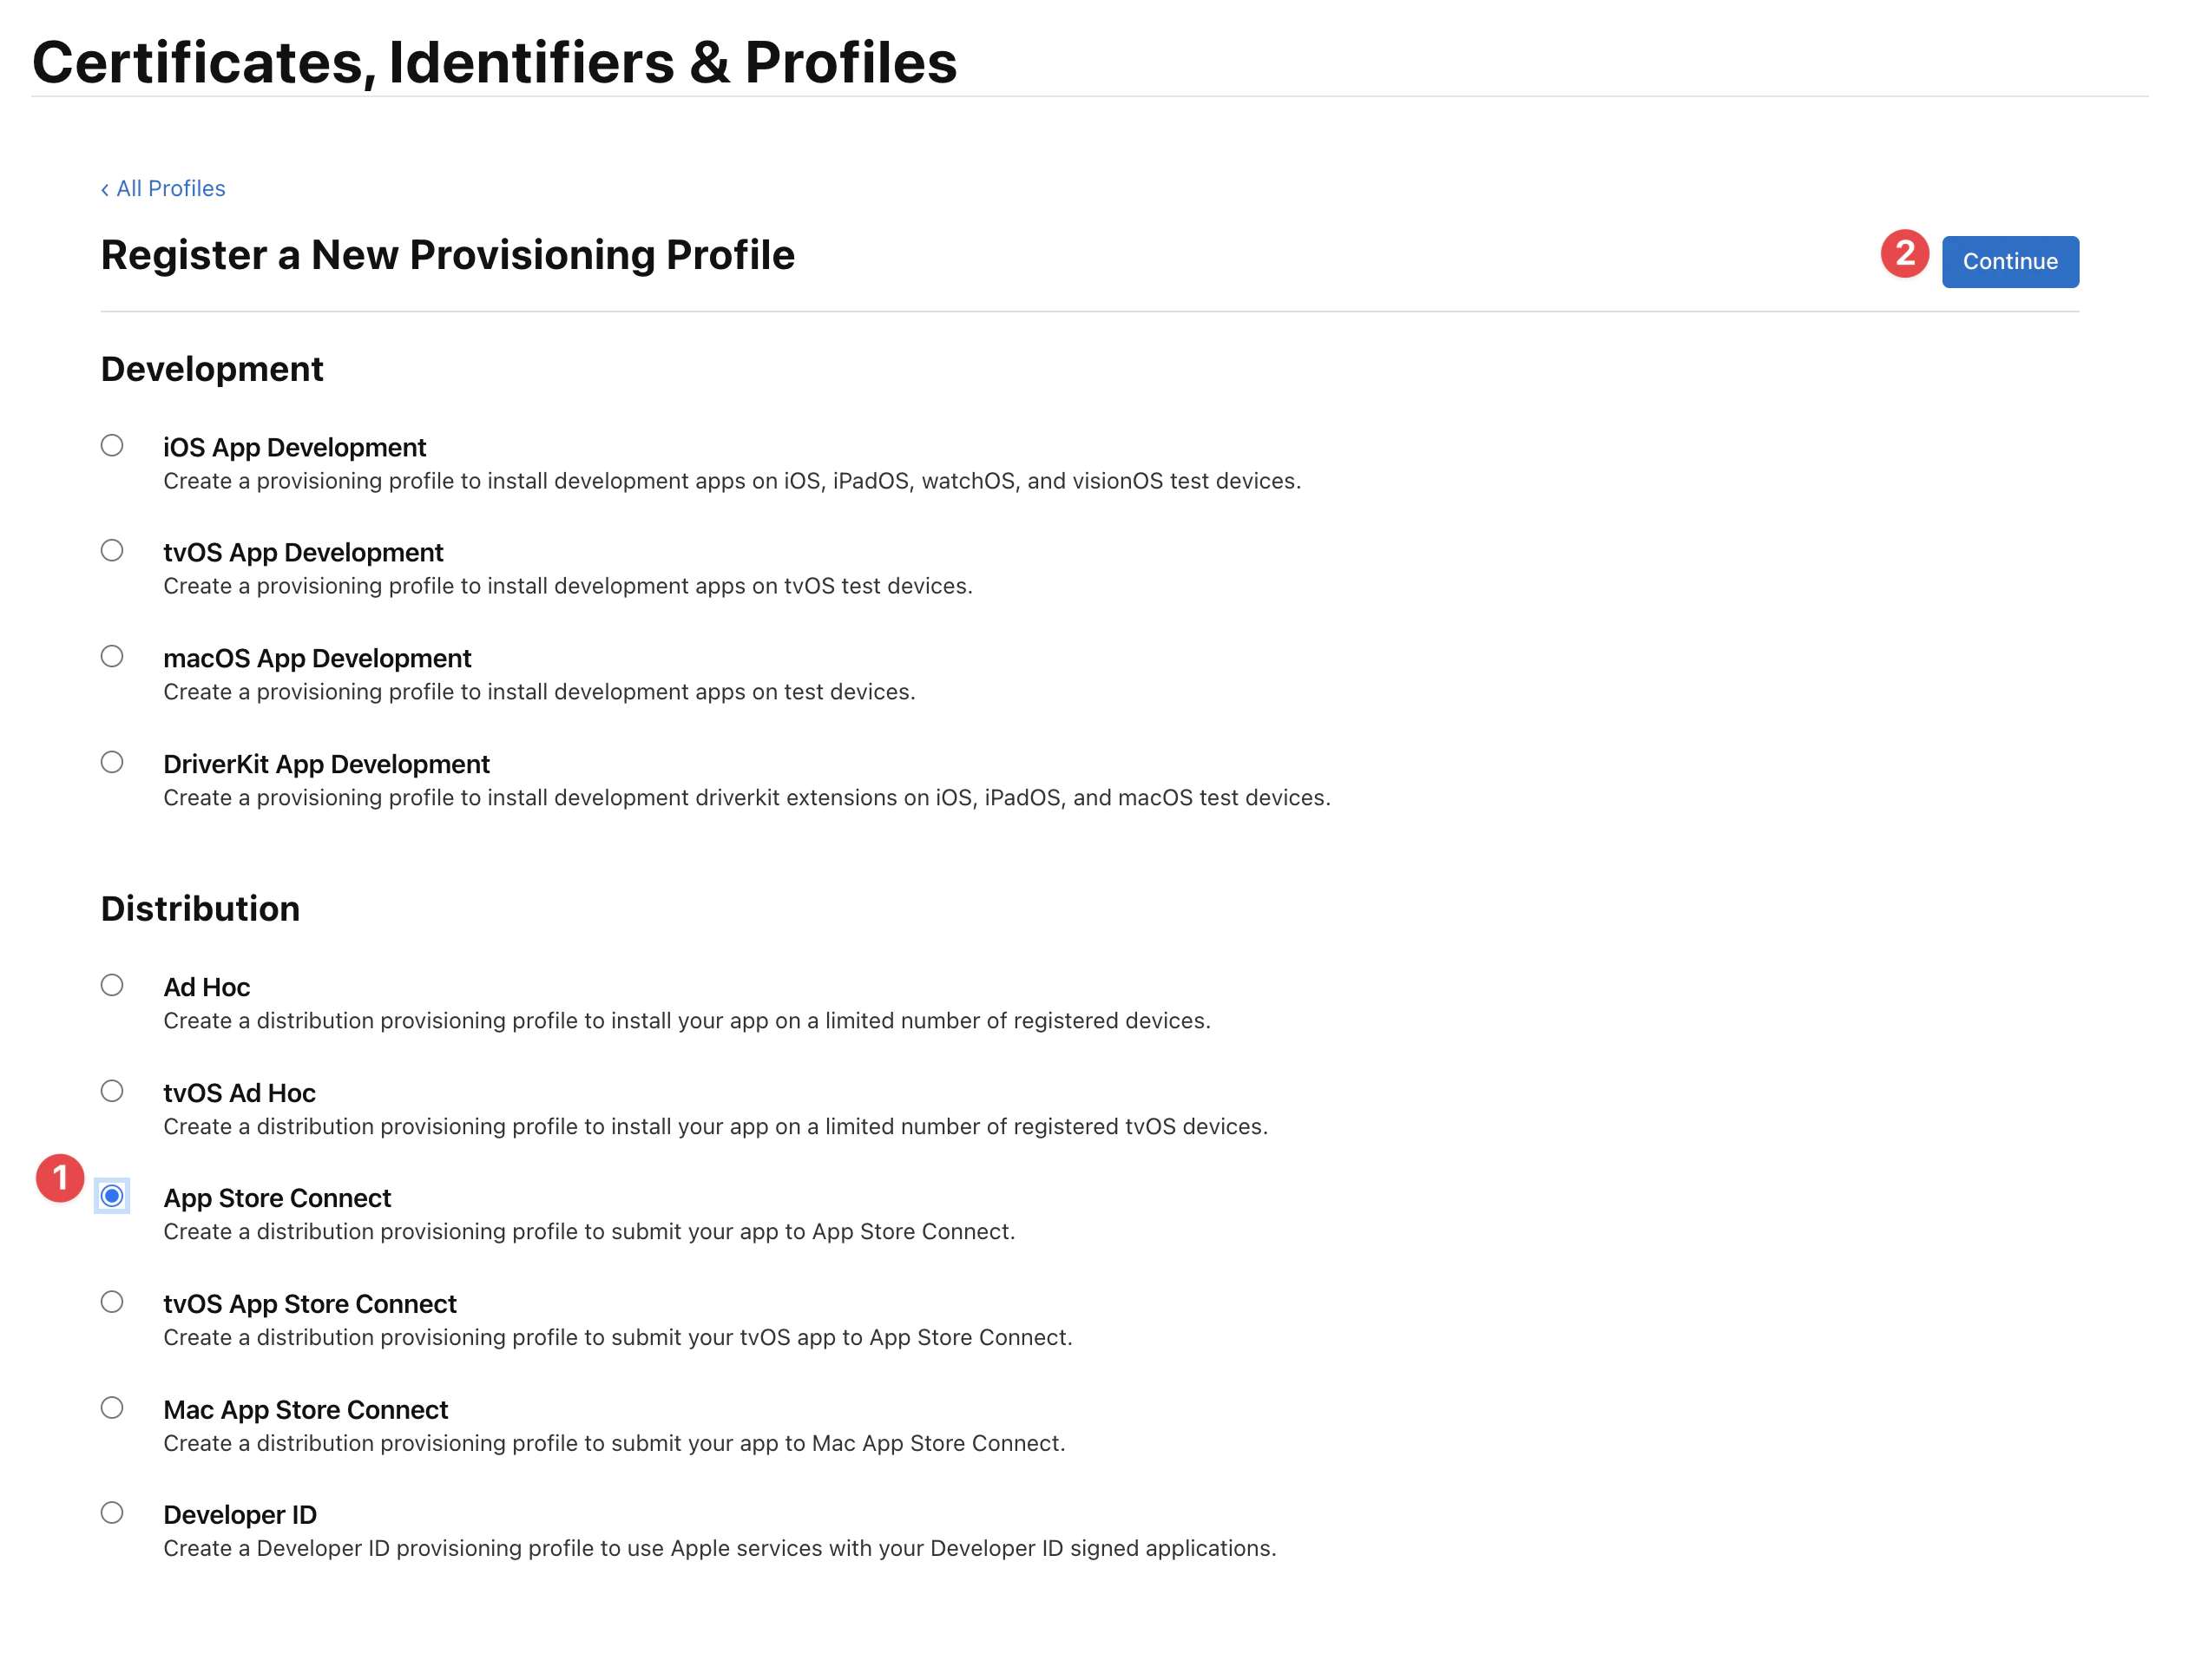
And select App Store Connect.
Then you need to select the right app, be careful you cannot use wildcard otherwise signing will fail.
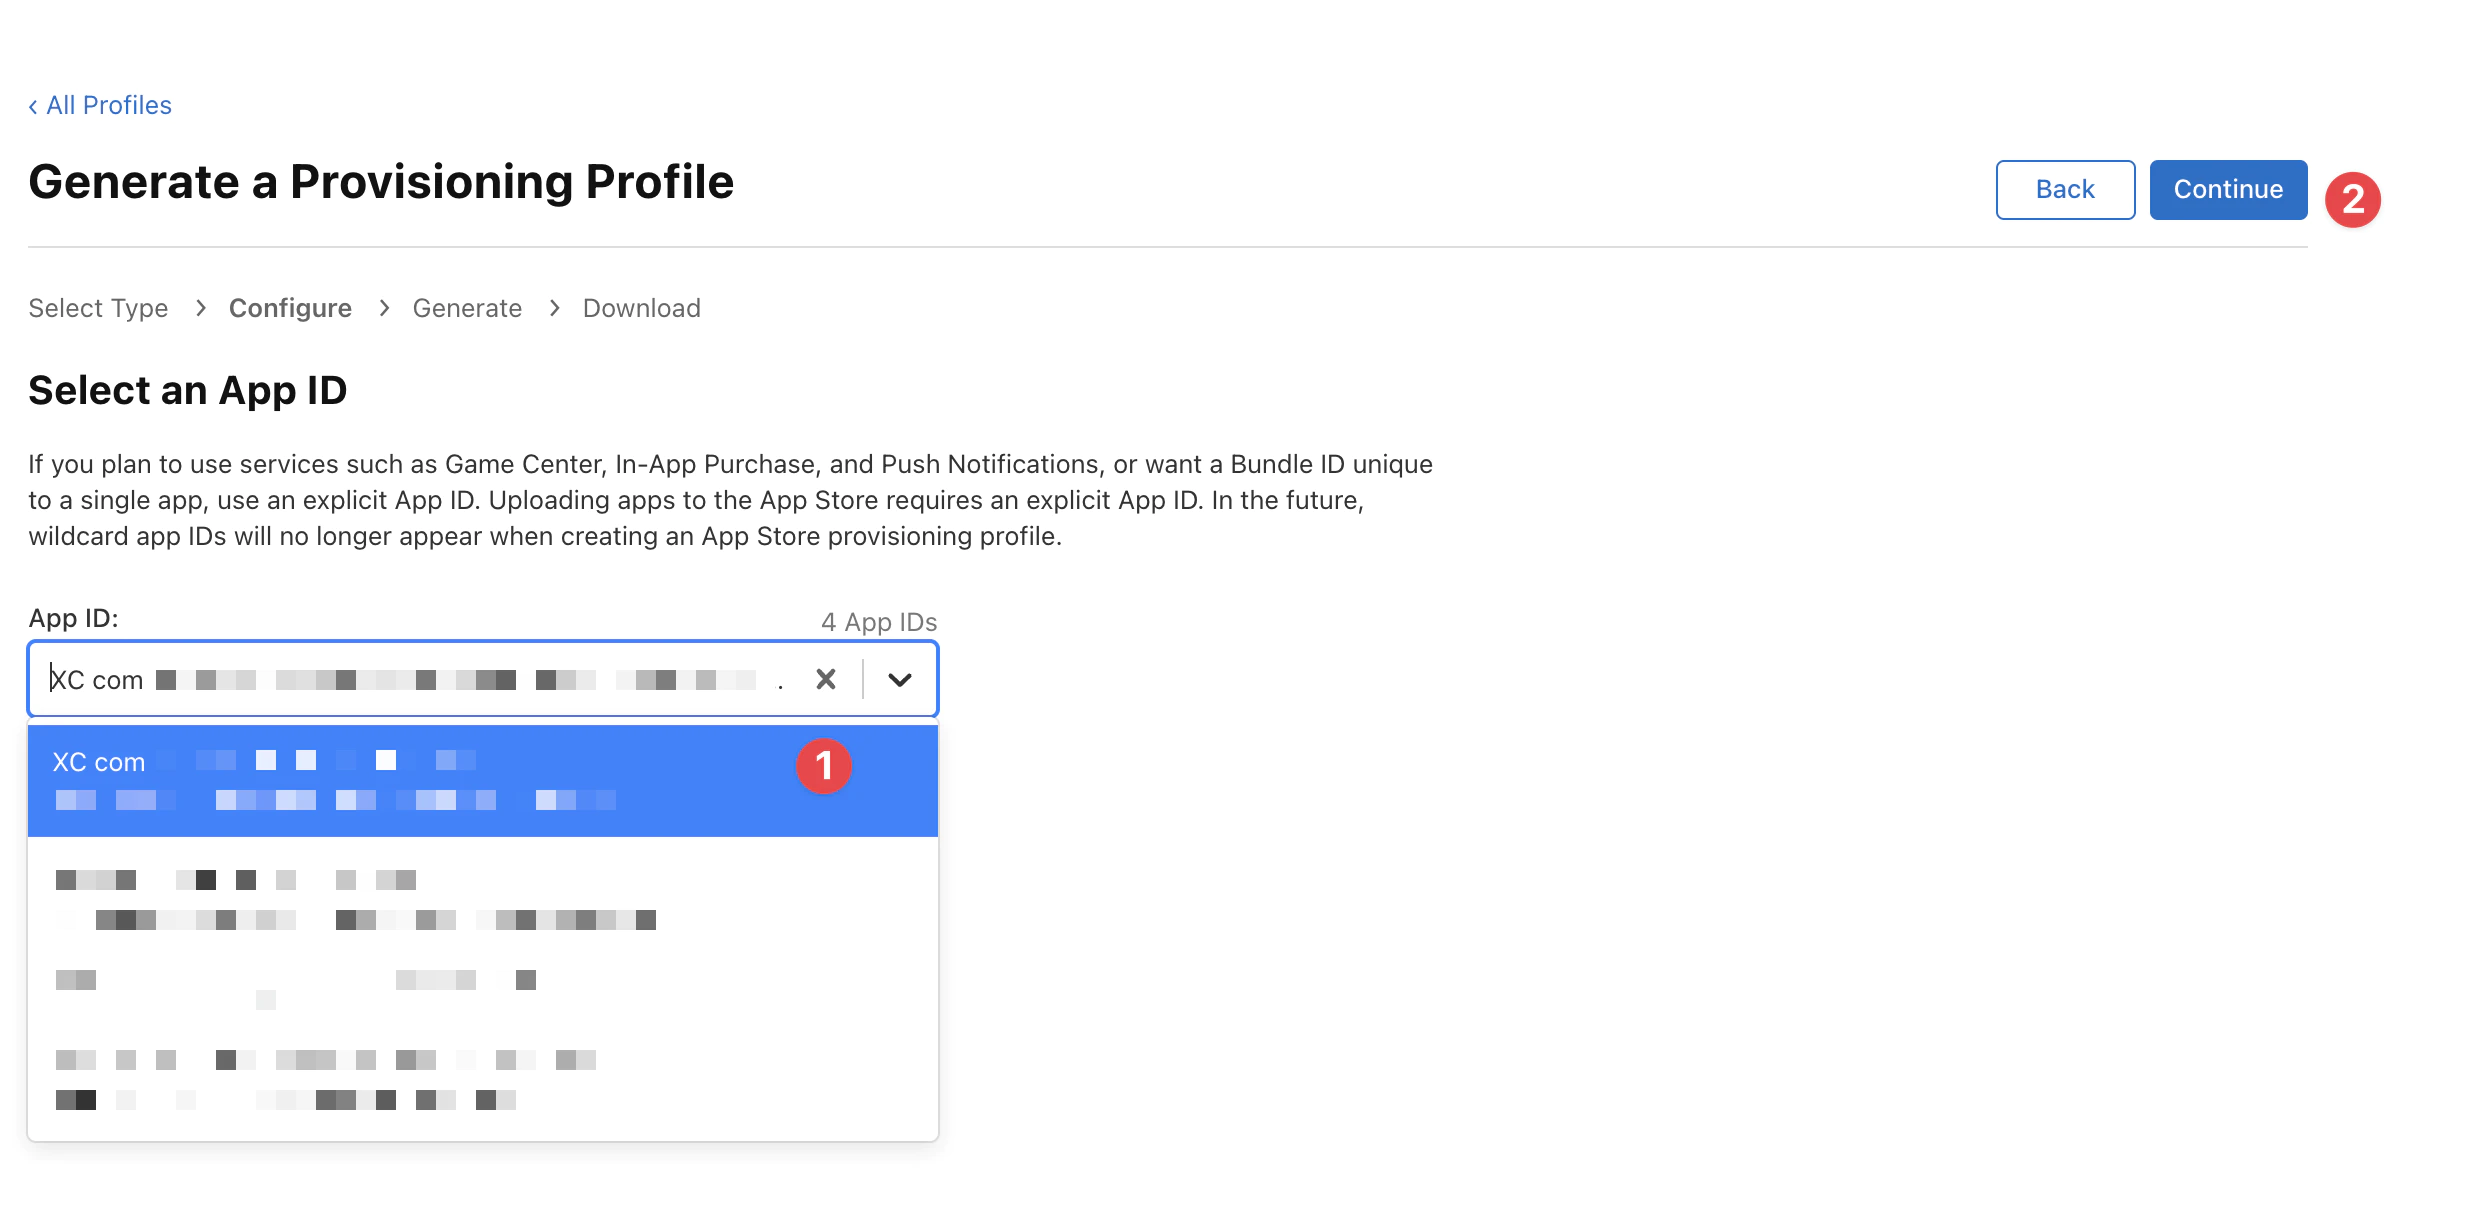
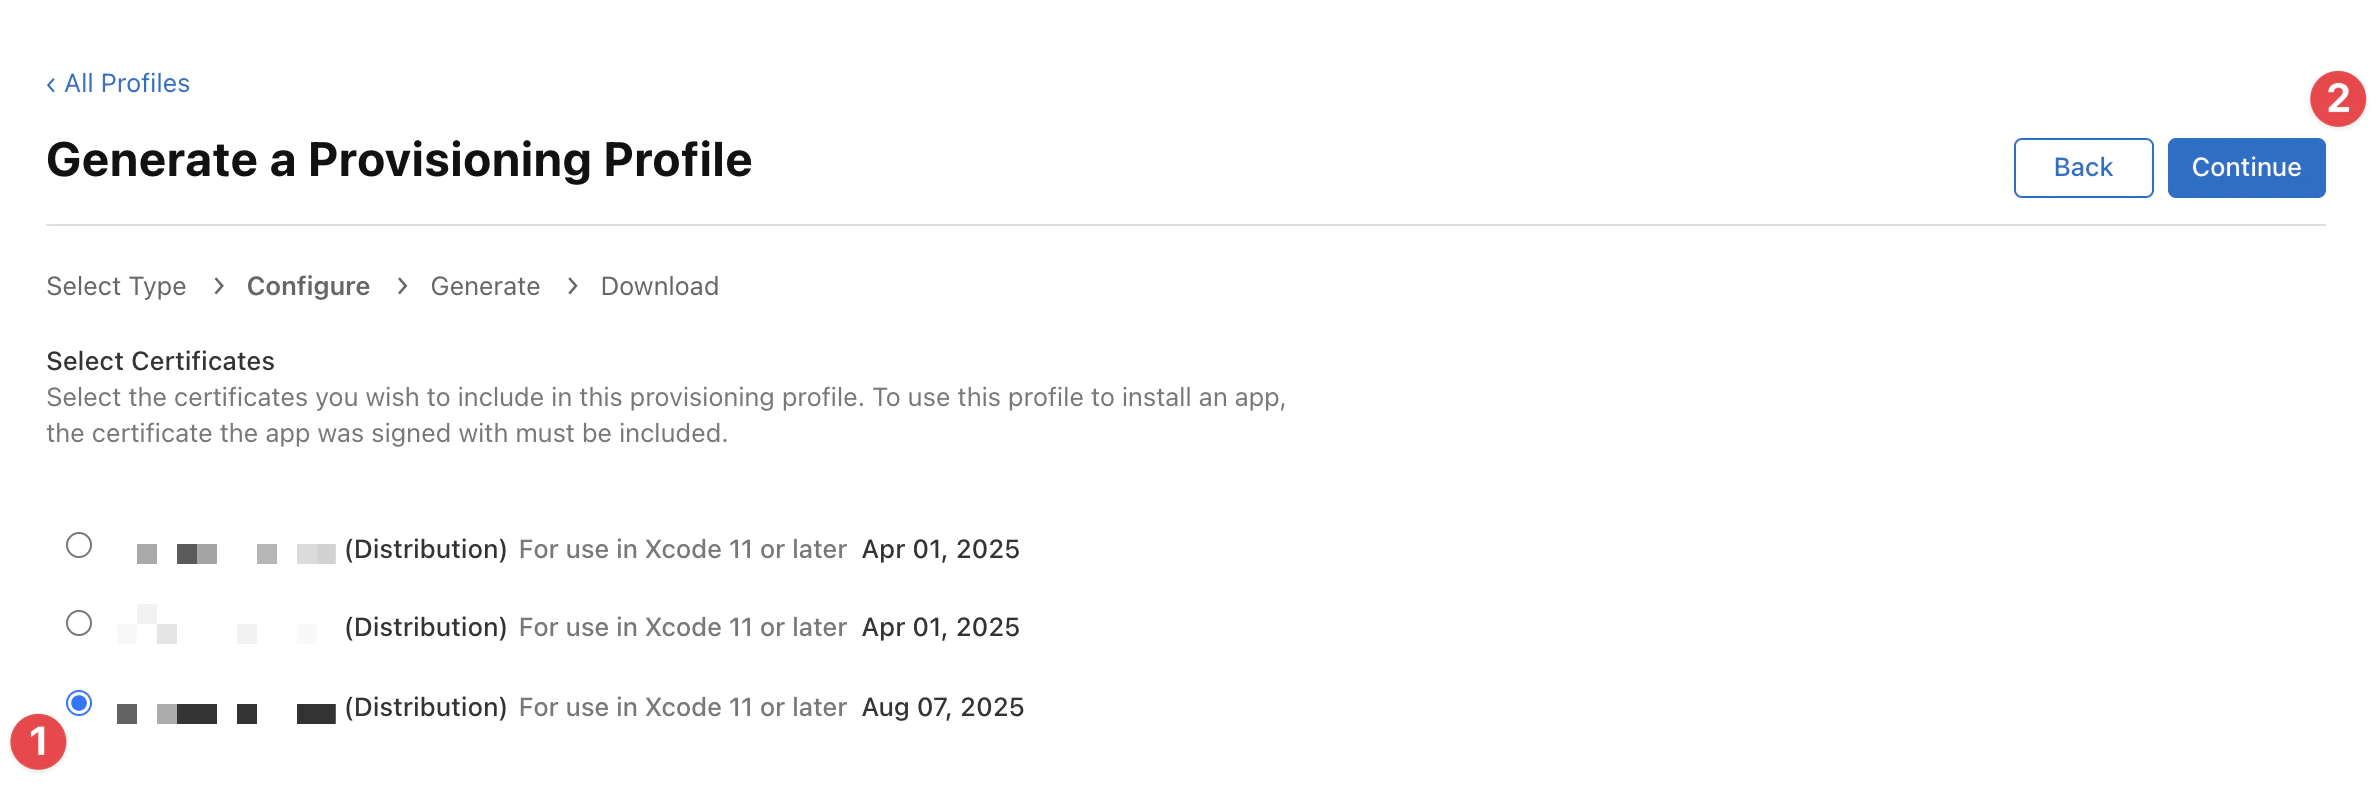
Select the right certificate you created before (look for the date of expiration it should same day and month as today) and click on Continue.
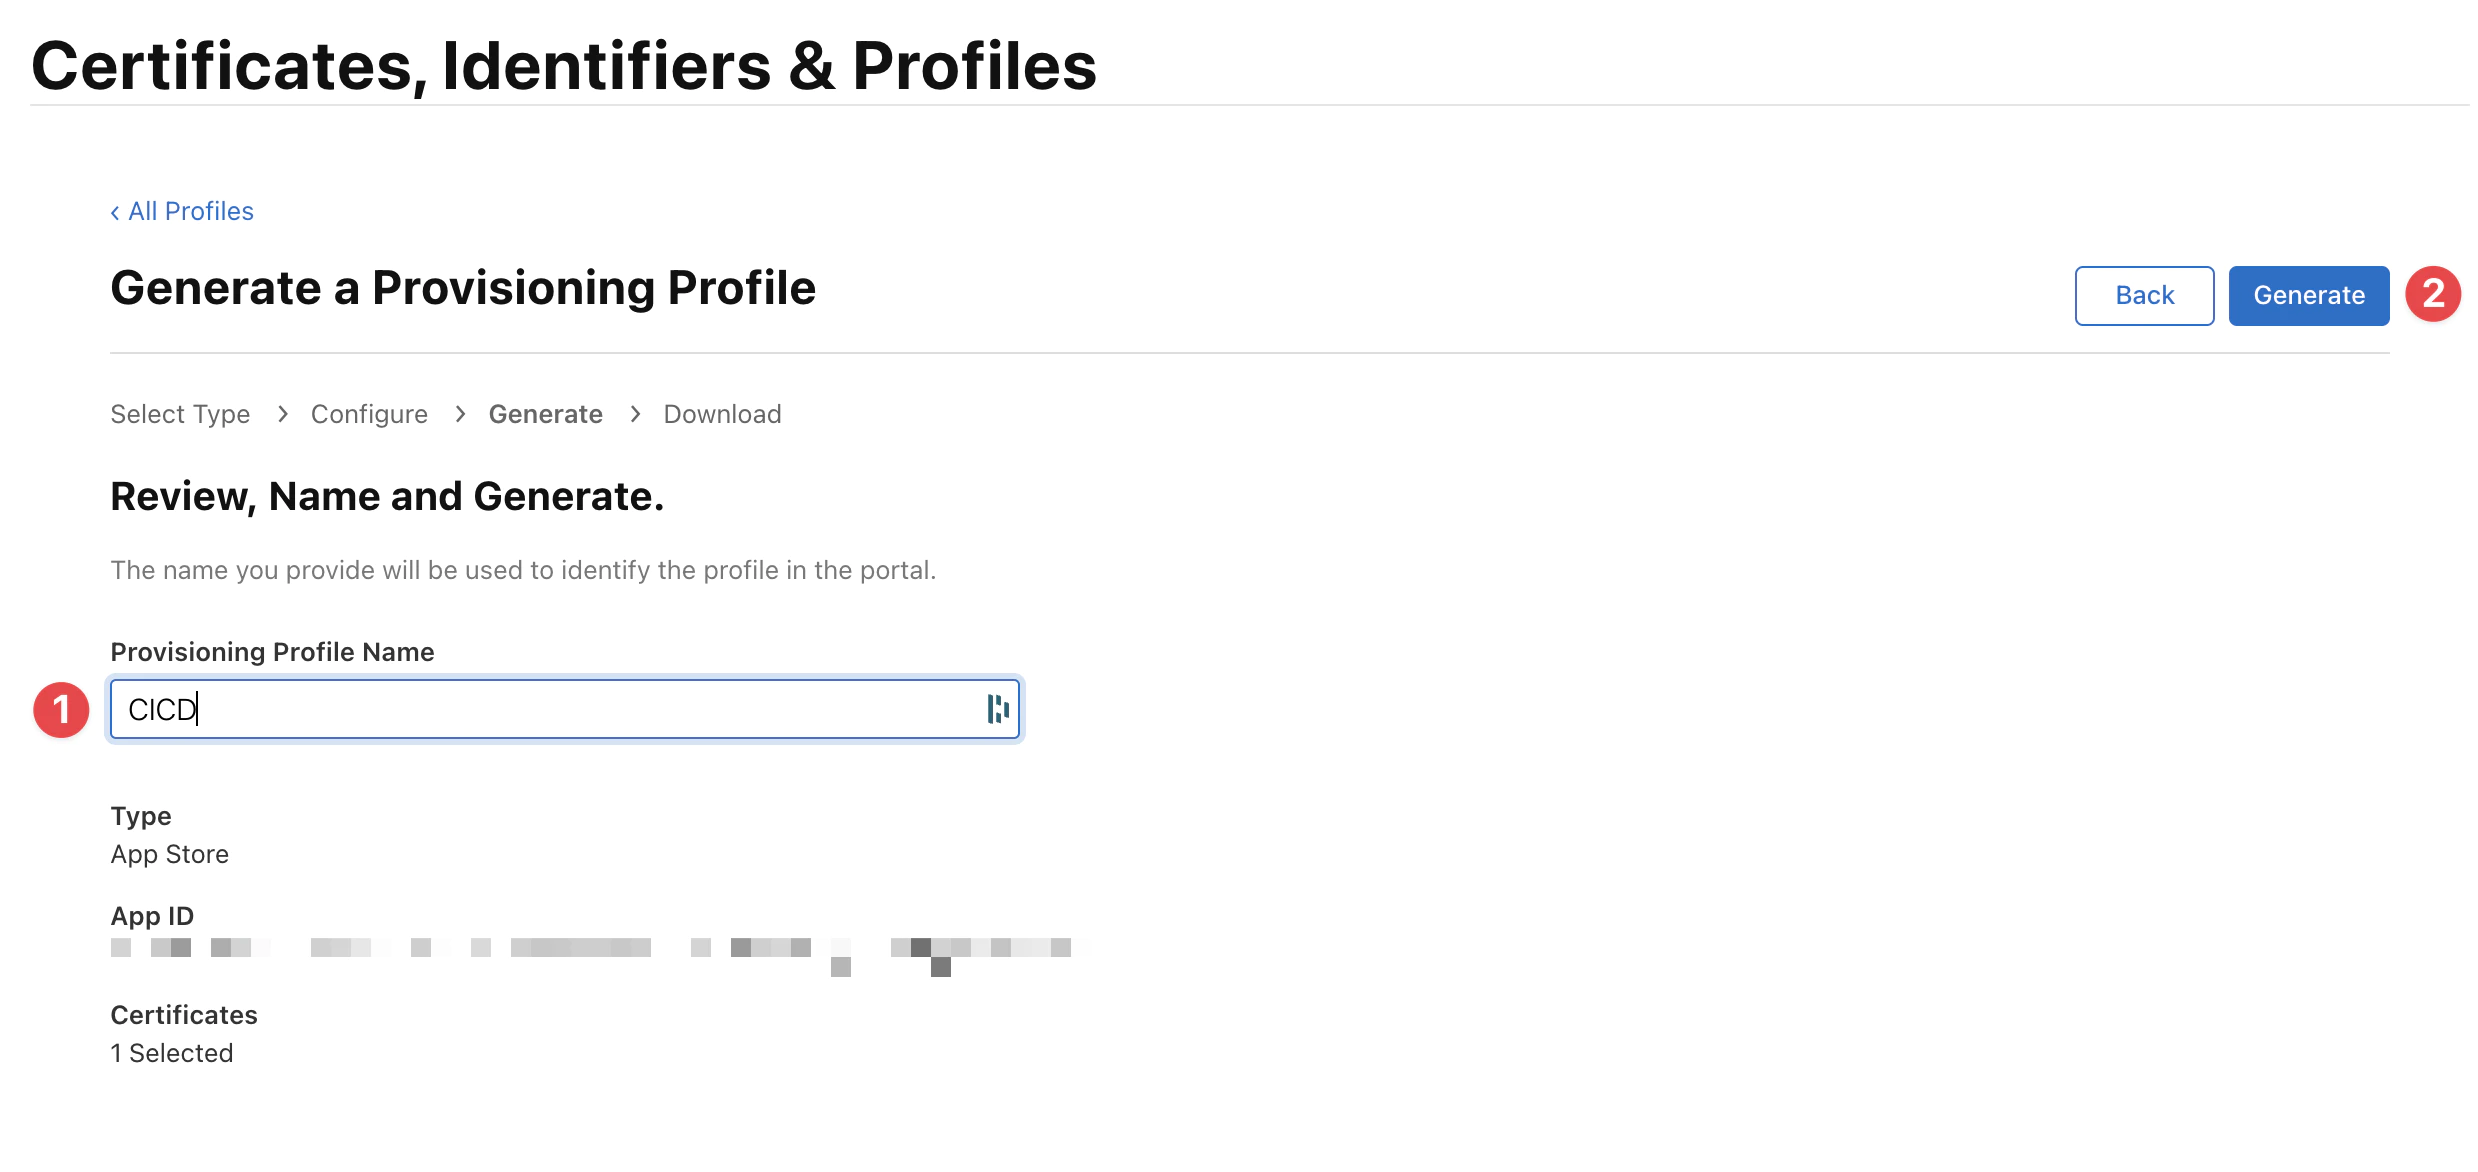
Finally enter the name of the profile and click on Generate.
The name will be used to identify the profile in Fastlane, under the value of
APPLE_PROFILE_NAME.
You can download the profile as a .mobileprovision file.
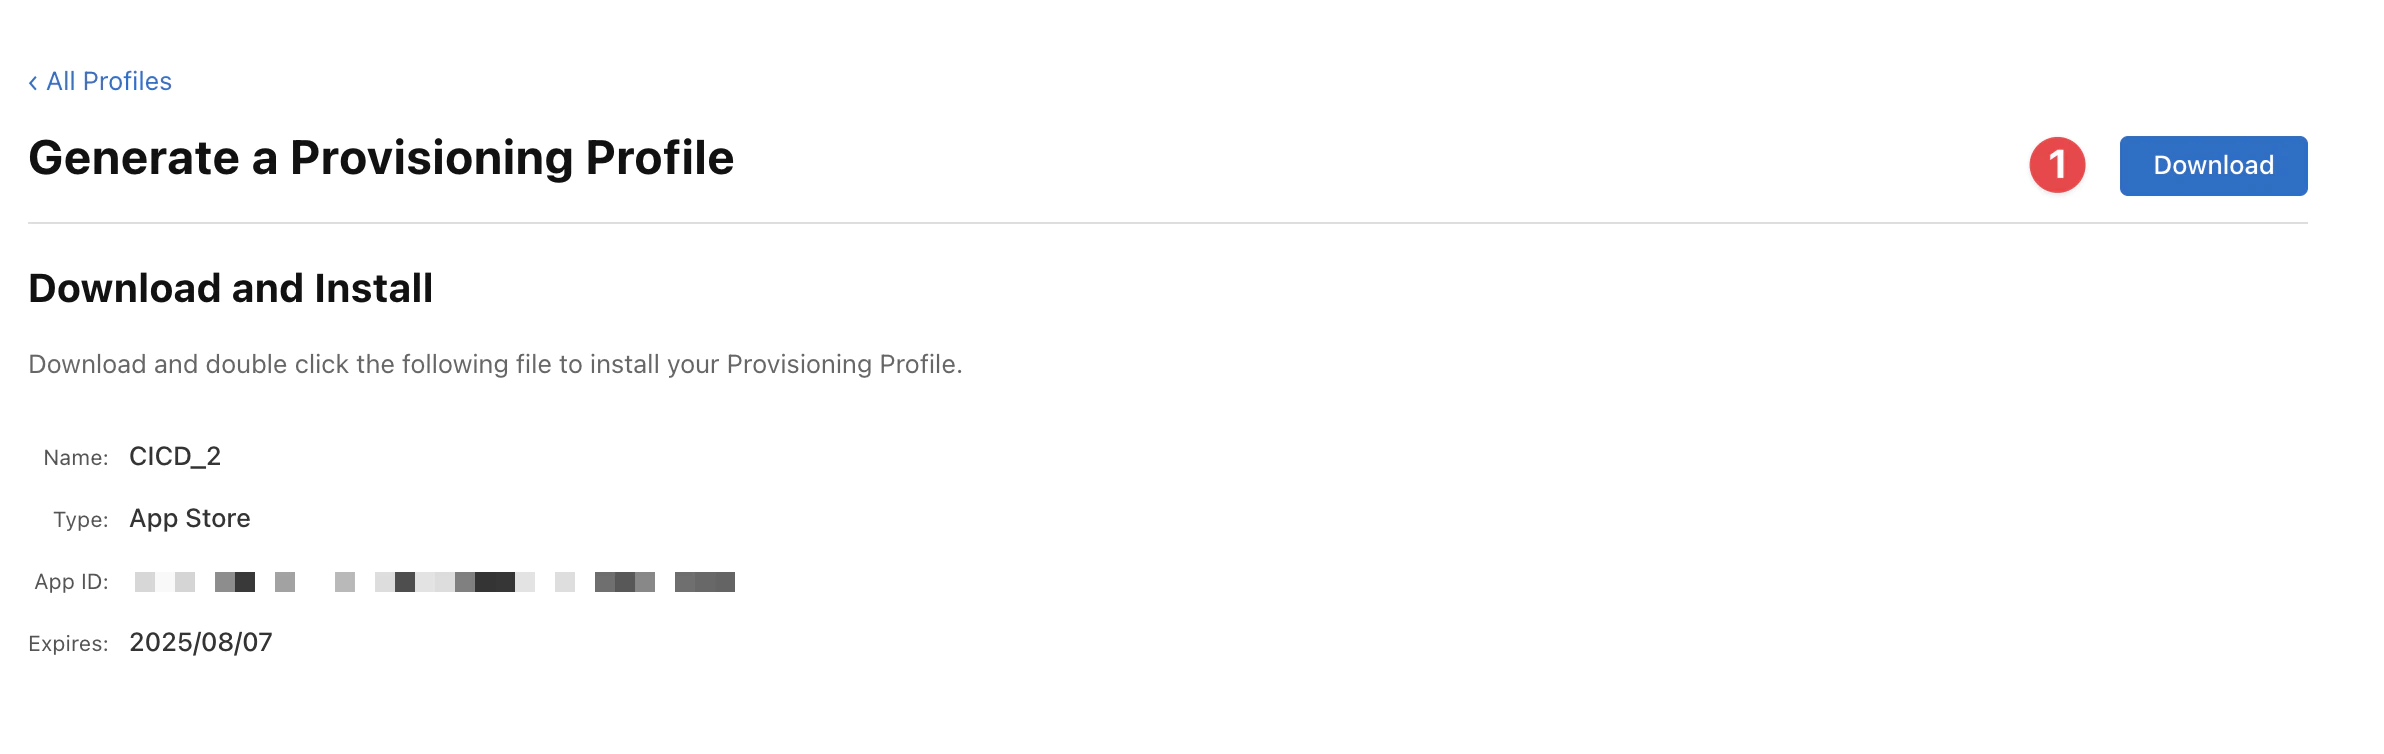
Please convert the profile to Base64 and store it as a secret (BUILD_PROVISION_PROFILE_BASE64).
base64 -i BUILD_PROVISION_PROFILE.mobileprovision | pbcopy4. Copy Fastlane files
Fastlane is a Ruby library created to automate common mobile development tasks. Using Fastlane, you can configure custom “lanes” which bundle a series of “actions” that perform tasks that you’d normally perform using Android studio. You can do a lot with Fastlane, but for the purposes of this tutorial, we’ll be using only a handful of core actions.
Create the Fastlane folder at the root of your Capacitor/Ionic project and add the Fastfile there:
- Folder:
<project-root>/fastlane/ - File:
<project-root>/fastlane/Fastfile
This is the same level as package.json, capacitor.config.*, and the ios/ folder. Do not create it inside ios/App/.
platform :ios do
  desc 'Export ipa and submit to TestFlight'
  lane :beta do
    keychain_info = { keychain_name: "ios-build-#{Time.now.to_i}.keychain", keychain_password: SecureRandom.uuid }

    begin
      setup_signing(keychain_info)
      bump_build_number
      build_app_with_signing(keychain_info)
      submit_to_testflight
    ensure
      cleanup_keychain(keychain_info)
    end
  end

  private_lane :setup_signing do |options|
    create_keychain(
      name: options[:keychain_name],
      password: options[:keychain_password],
      unlock: true,
      timeout: 0,
      lock_when_sleeps: false,
      add_to_search_list: true
    )
    import_cert(options)
    install_profile
    update_project_settings
  end

  lane :bump_build_number do
		file = File.read('../package.json')
		data_hash = JSON.parse(file)
		api_key = app_store_connect_api_key(
      key_id: ENV['APPLE_KEY_ID'],
      issuer_id: ENV['APPLE_ISSUER_ID'],
      key_content: ENV['APPLE_KEY_CONTENT'],
      is_key_content_base64: true,
      duration: 1200,
      in_house: false
    )
		build_num = app_store_build_number(
      api_key: api_key,
			app_identifier: ENV['BUNDLE_IDENTIFIER'],
			live: false
    )
		build_num = build_num + 1
		UI.message("Bumped build number to #{build_num}")
		increment_build_number(
			build_number: build_num,
			xcodeproj: "./ios/App/App.xcodeproj",
			skip_info_plist: true
		)
	end

  private_lane :import_cert do |options|
    cert_path = "#{Dir.tmpdir}/build_certificate.p12"
    File.write(cert_path, Base64.decode64(ENV['BUILD_CERTIFICATE_BASE64']))
    import_certificate(
      certificate_path: cert_path,
      certificate_password: ENV['P12_PASSWORD'] || "",
      keychain_name: options[:keychain_name],
      keychain_password: options[:keychain_password],
      log_output: true
    )
    File.delete(cert_path)
  end

  private_lane :cleanup_keychain do |options|
    delete_keychain(
      name: options[:keychain_name]
    )
  end

  private_lane :install_profile do
    profile_path = "#{Dir.tmpdir}/build_pp.mobileprovision"
    File.write(profile_path, Base64.decode64(ENV['BUILD_PROVISION_PROFILE_BASE64']))
    UI.user_error!("Failed to create provisioning profile at #{profile_path}") unless File.exist?(profile_path)
    ENV['PROVISIONING_PROFILE_PATH'] = profile_path
    install_provisioning_profile(path: profile_path)
    File.delete(profile_path)
  end

  private_lane :update_project_settings do
    update_code_signing_settings(
      use_automatic_signing: false,
      path: "./ios/App/App.xcodeproj",
      code_sign_identity: "iPhone Distribution",
      profile_name: ENV['APPLE_PROFILE_NAME'],
      bundle_identifier: ENV['BUNDLE_IDENTIFIER'],
      team_id: ENV['APP_STORE_CONNECT_TEAM_ID']
    )
    update_project_team(
      path: "./ios/App/App.xcodeproj",
      teamid: ENV['APP_STORE_CONNECT_TEAM_ID']
    )
  end

  private_lane :build_app_with_signing do |options|
    unlock_keychain(
      path: options[:keychain_name],
      password: options[:keychain_password],
      set_default: false
    )
    build_app(
      workspace: "./ios/App/App.xcworkspace",
      scheme: "App",
      configuration: "Release",
      export_method: "app-store",
      output_name: "App.ipa",
      export_options: {
        provisioningProfiles: {
          ENV['BUNDLE_IDENTIFIER'] => ENV['APPLE_PROFILE_NAME']
        }
      },
      xcargs: "-verbose",
      buildlog_path: "./build_logs",
      export_xcargs: "-allowProvisioningUpdates",
    )
  end

  private_lane :submit_to_testflight do
    api_key = app_store_connect_api_key(
      key_id: ENV['APPLE_KEY_ID'],
      issuer_id: ENV['APPLE_ISSUER_ID'],
      key_content: ENV['APPLE_KEY_CONTENT'],
      is_key_content_base64: true,
      duration: 1200,
      in_house: false
    )
    pilot(
      api_key: api_key,
      skip_waiting_for_build_processing: true,
      skip_submission: true,
      distribute_external: false,
      notify_external_testers: false,
      ipa: "./App.ipa"
    )
  end
end
5. Setting up secrets
GitHub Actions uses the repository secrets you configure in the next step. You only need a local .env file if you want to run or test Fastlane from your own machine.
For local testing, create <project-root>/fastlane/.env next to the Fastfile. Do not commit this file. Add fastlane/.env to your .gitignore first (or verify it is already ignored). Here is an example:
APP_STORE_CONNECT_TEAM_ID=UVTJ336J2D
BUNDLE_IDENTIFIER=ee.forgr.testfastlane
# See previous section for these secrets
BUILD_CERTIFICATE_BASE64=
BUILD_PROVISION_PROFILE_BASE64=
APPLE_KEY_ID=
APPLE_ISSUER_ID=
APPLE_KEY_CONTENT=
P12_PASSWORD=
APPLE_PROFILE_NAME=
Getting the APP_STORE_CONNECT_TEAM_ID
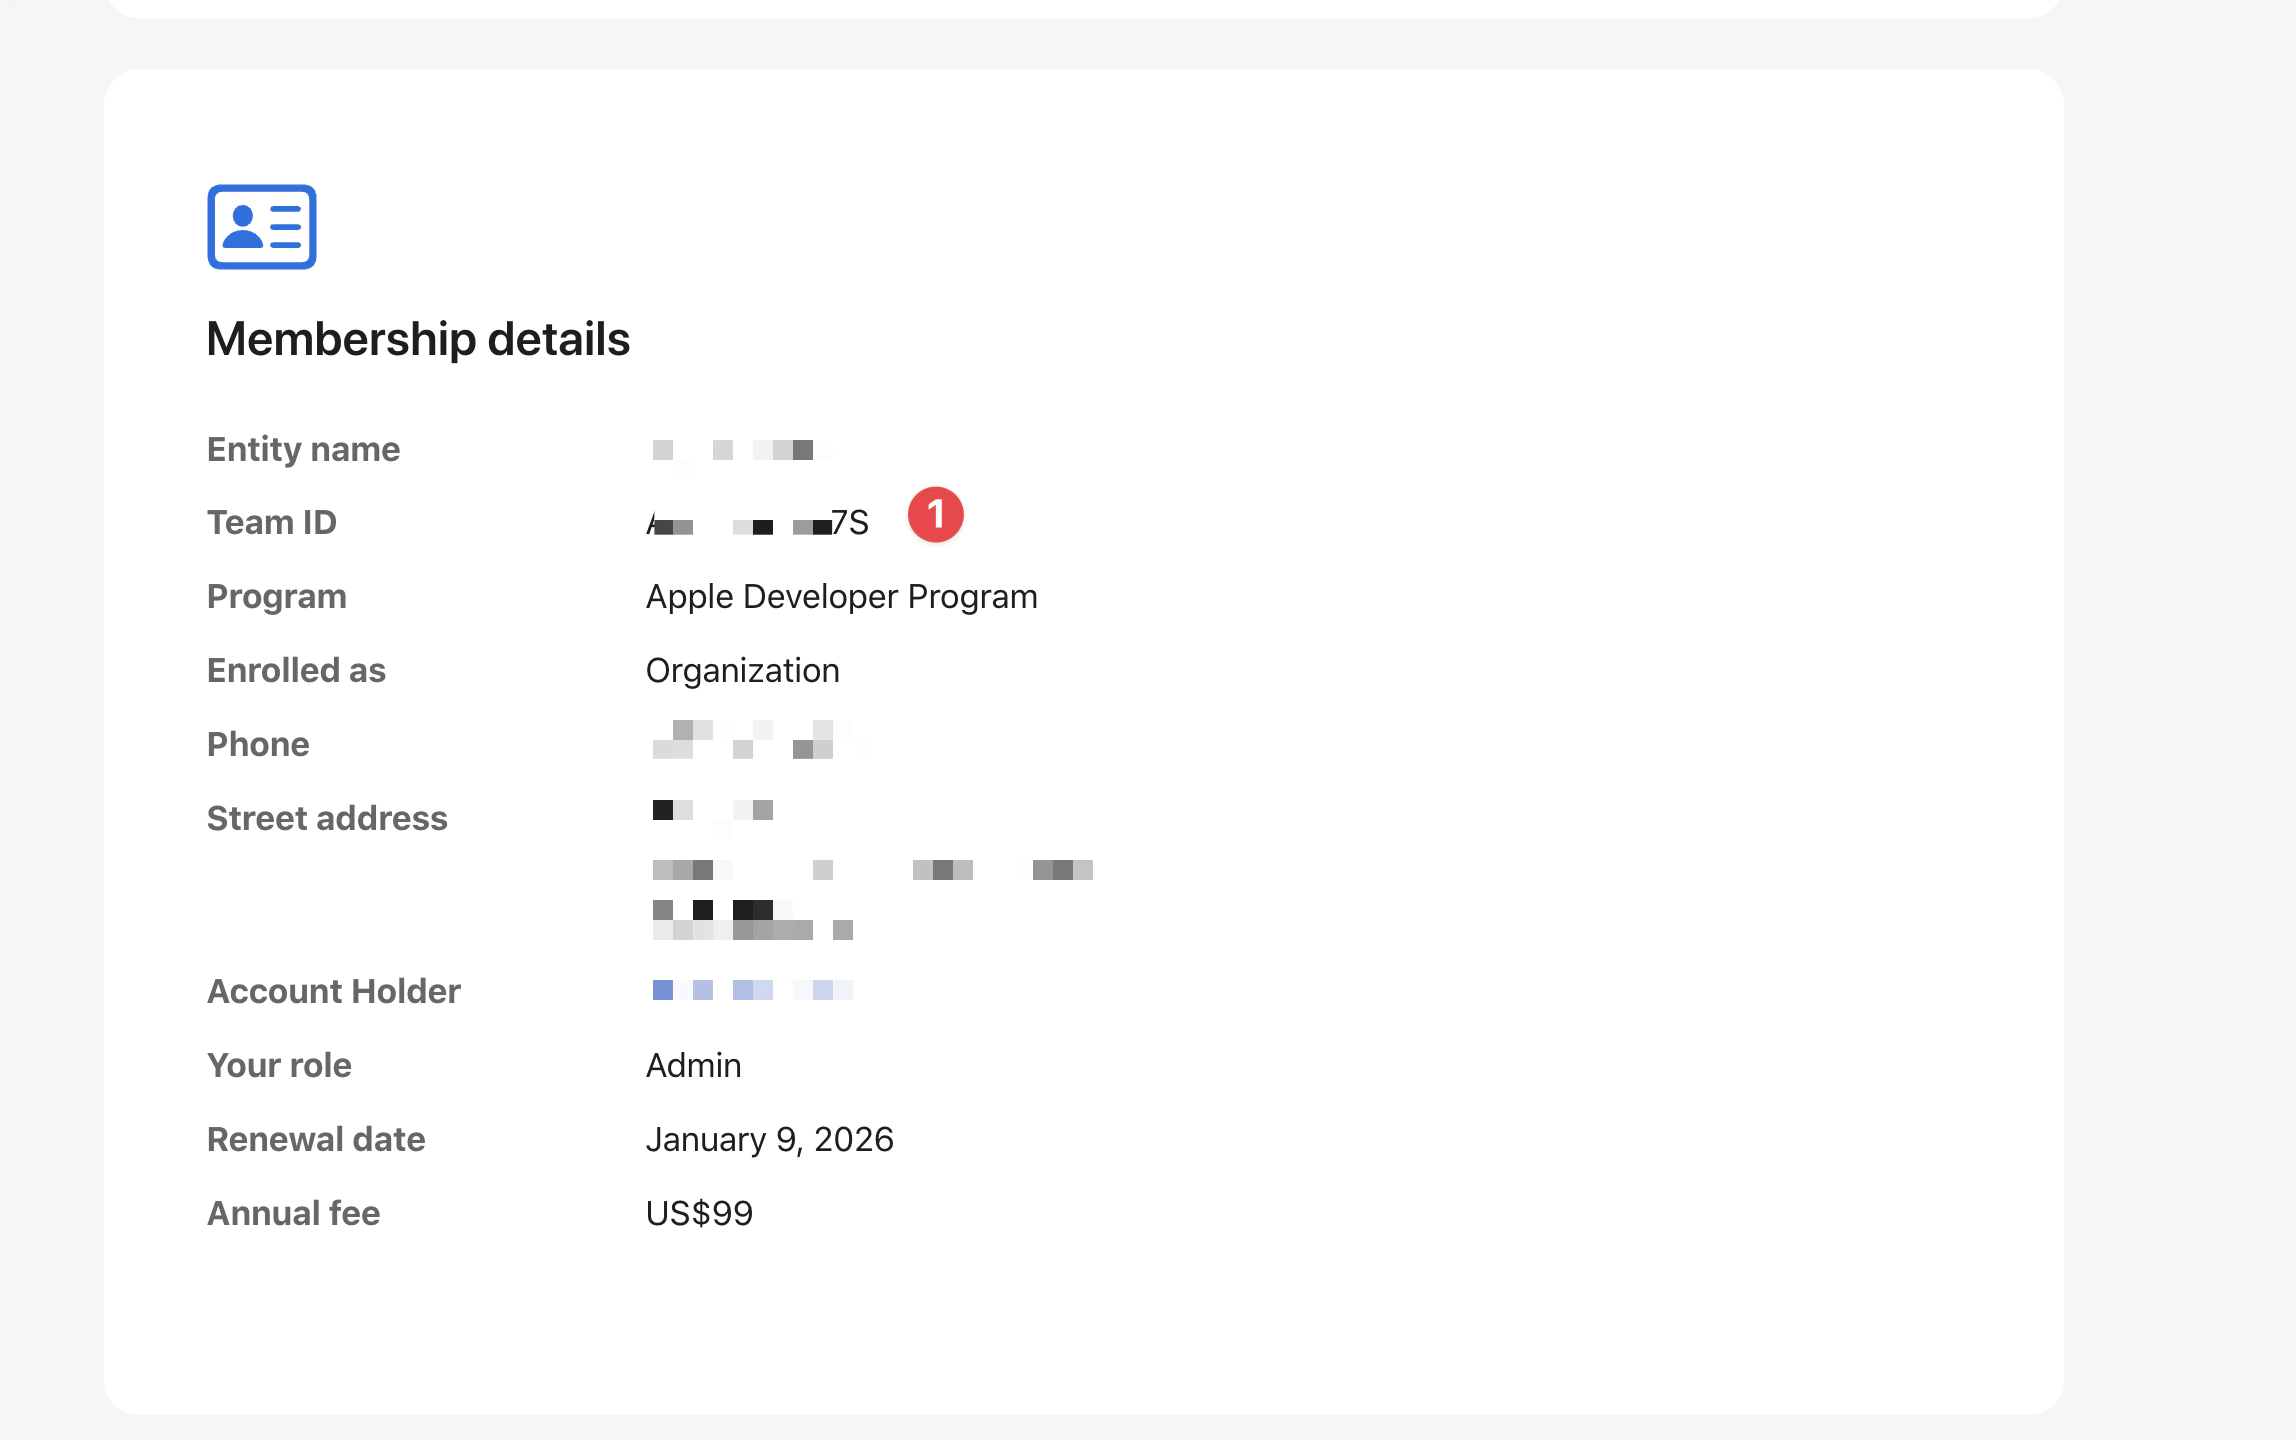
Go to Developer Center and scroll down to Membership details section.
The Team ID is the value you need to set in the APP_STORE_CONNECT_TEAM_ID secret.
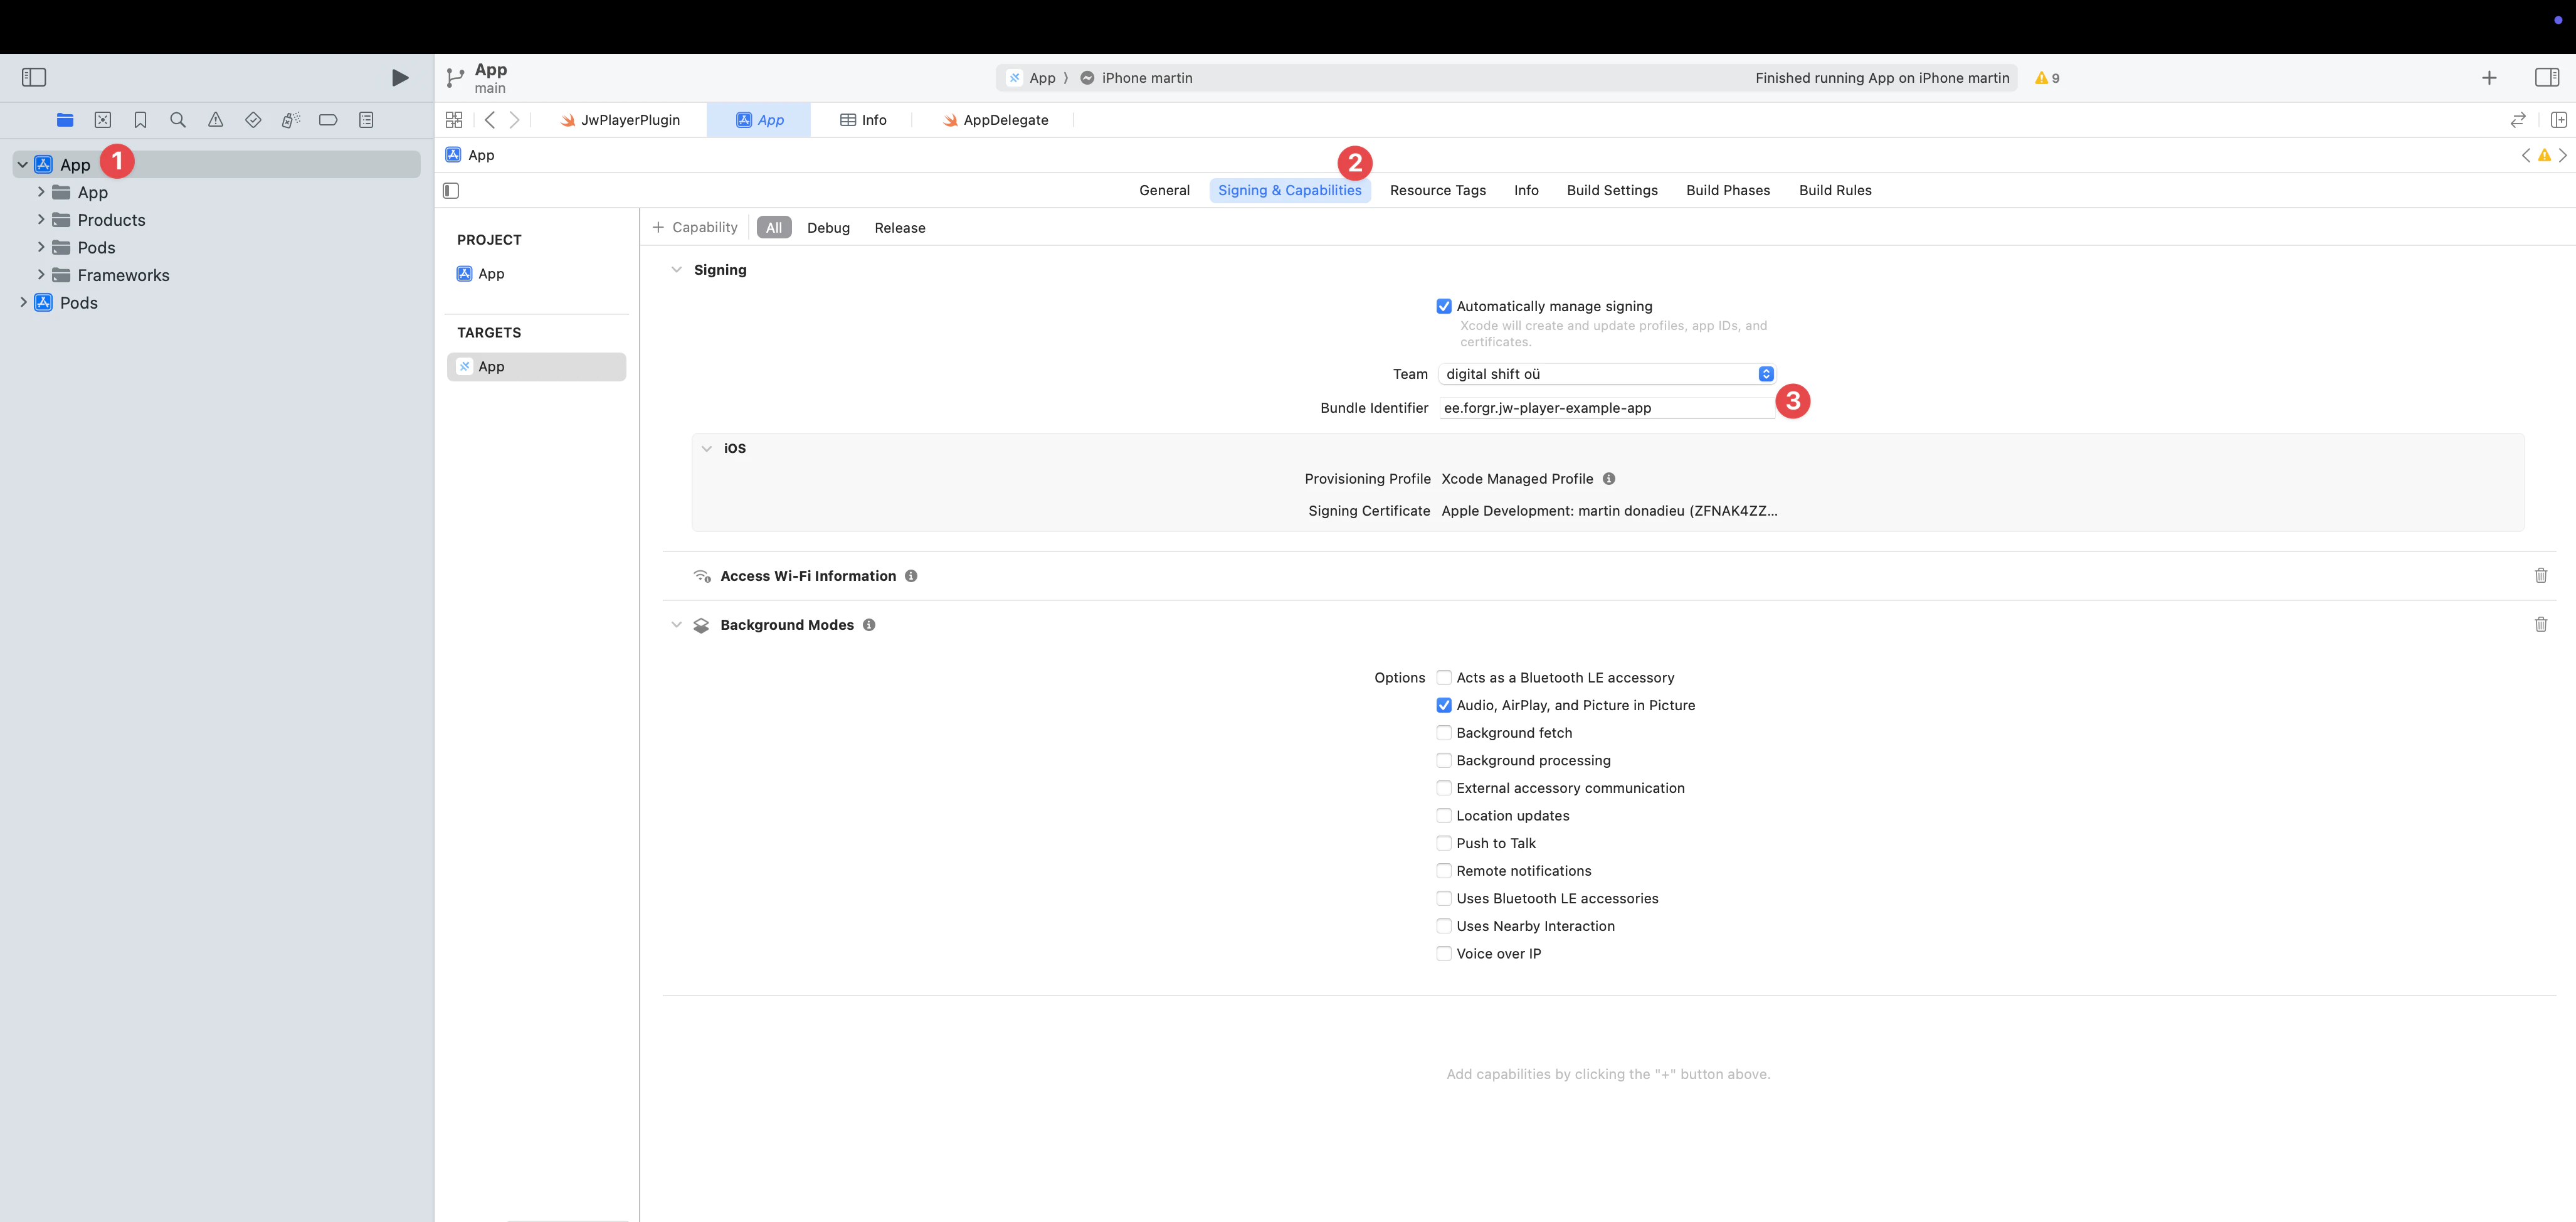
Getting the BUNDLE_IDENTIFIER
- Open Xcode
- Double click on the
Appin the project navigator - Then click on the tab
Signing and Capabilities - Copy the value of the
Bundle identifier. This is the value you need to set in theBUNDLE_IDENTIFIERsecret.
6. Build Processing
In GitHub Actions, you are billed based on the minutes you have used for running your CI/CD workflow. From my experience, it takes about 10–15 minutes before a build can be processed in App Store Connect.
For private projects, the estimated cost per build can go up to $0.08/min x 15 mins = $1.2, or more, depending on the configuration and dependencies of your project.
If you’re concerned about costs for private projects, you can set skip_waiting_for_build_processing to true. This will save build minutes by not waiting for App Store Connect to finish processing the build.
However, there is a tradeoff - you’ll need to manually update your app’s compliance information in App Store Connect before you can distribute the build to users.
This optimization is mainly useful for private projects where build minutes cost money. For public/free projects, the build minutes are free so there’s no need to enable this setting. See GitHub’s pricing page for more details.
7. Setup GitHub Actions
Configure GitHub secrets
Please copy the secrets from the .env file and paste them into the GitHub repository secrets.
Go to Settings > Secrets and variables > Actions > New repository secret

2. BUILD_CERTIFICATE_BASE64 - Base64 encoded certificate.
3. BUILD_PROVISION_PROFILE_BASE64 - Base64 encoded provisioning profile.
4. BUNDLE_IDENTIFIER - your app’s bundle identifier.
5. APPLE_KEY_ID — App Store Connect API Key 🔺Key ID.
6. APPLE_ISSUER_ID — App Store Connect API Key 🔺Issuer ID.
7. APPLE_KEY_CONTENT — App Store Connect API Key 🔺 Key content of .p8, check it
8. Configure GitHub workflow file
Create a GitHub workflow directory.
cd .github/workflowsInside the workflow folder, create a file named build-upload-ios.ymland add the following.
name: Build source code on ios

on:
  push:
    tags:
      - '*'

jobs:
  build_ios:
    runs-on: macOS-latest
    steps:
      - uses: actions/checkout@v6
      - name: Set Node.js
        uses: actions/setup-node@v6
        with:
          node-version: 24
          cache: npm
      - name: Install dependencies
        id: install_code
        run: npm ci
      - name: Build
        id: build_code
        run: npm run build
      - uses: actions/cache@v5
        with:
          path: ios/App/Pods
          key: ${{ runner.os }}-pods-${{ hashFiles('**/Podfile.lock') }}
          restore-keys: |
            ${{ runner.os }}-pods-
      - name: Sync
        id: sync_code
        run: npx cap sync
      - uses: ruby/setup-ruby@v1
        with:
          ruby-version: '3.0'
          bundler-cache: true
      - uses: maierj/fastlane-action@v3.1.0
        env:
          APP_STORE_CONNECT_TEAM_ID: ${{ secrets.APP_STORE_CONNECT_TEAM_ID }}
          BUNDLE_IDENTIFIER: ${{ secrets.BUNDLE_IDENTIFIER }}
          BUILD_CERTIFICATE_BASE64: ${{ secrets.BUILD_CERTIFICATE_BASE64 }}
          BUILD_PROVISION_PROFILE_BASE64: ${{ secrets.BUILD_PROVISION_PROFILE_BASE64 }}
          APPLE_KEY_ID: ${{ secrets.APPLE_KEY_ID }}
          APPLE_ISSUER_ID: ${{ secrets.APPLE_ISSUER_ID }}
          APPLE_KEY_CONTENT: ${{ secrets.APPLE_KEY_CONTENT }}
          P12_PASSWORD: ${{ secrets.P12_PASSWORD }}
          APPLE_PROFILE_NAME: ${{ secrets.APPLE_PROFILE_NAME }}
        with:
          lane: ios beta
      - name: Upload release bundle
        uses: actions/upload-artifact@v6
        with:
          name: ios-release
          path: ./App.ipa
          retention-days: 10
This workflow should be triggered after each GitHub tag, if you need to automatize tag please, refer to Automatic build and release with GitHub actions first.
Then this workflow will pull your NodeJS deps, install them and build your JavaScript app.
Each time you send a new commit, a release will be built in TestFlight.
Your App doesn’t need to use Ionic, only Capacitor base is mandatory., it can have old Cordova module, but Capacitor JS plugin should be preferred.
8. Trigger the workflow
Create a Commit
Make a commit, you should see the active workflow in the repository.
Trigger the workflow
Push the new commits to the branch main or development to trigger the workflow.
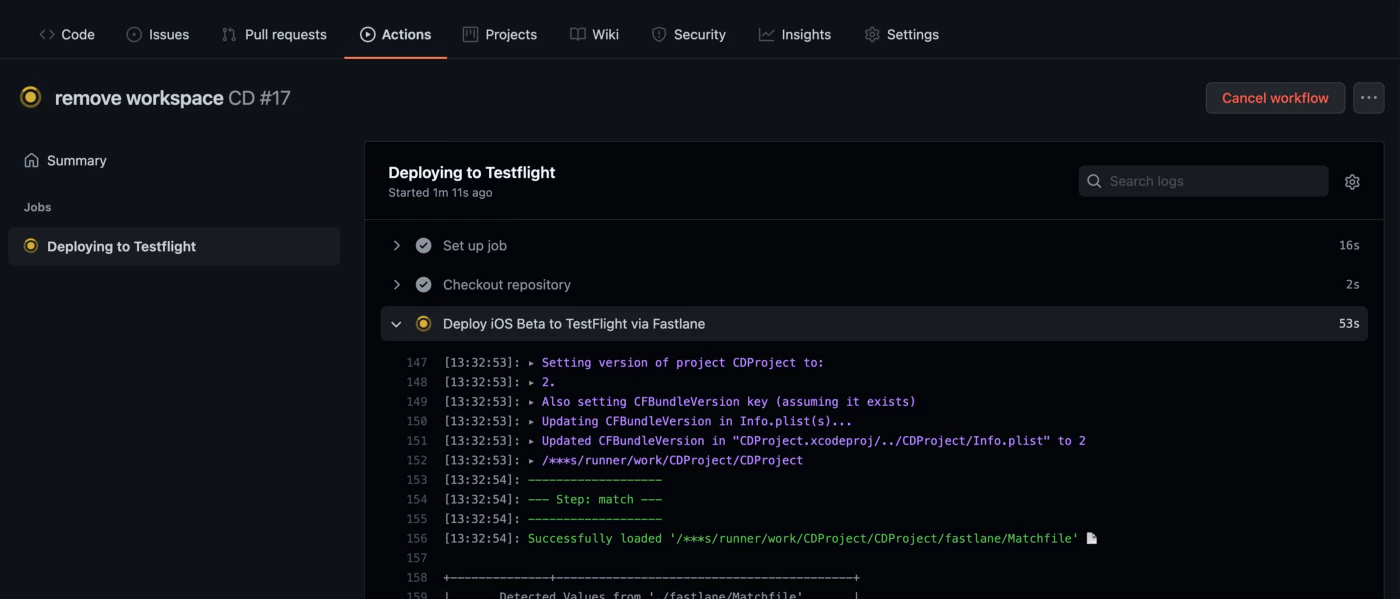
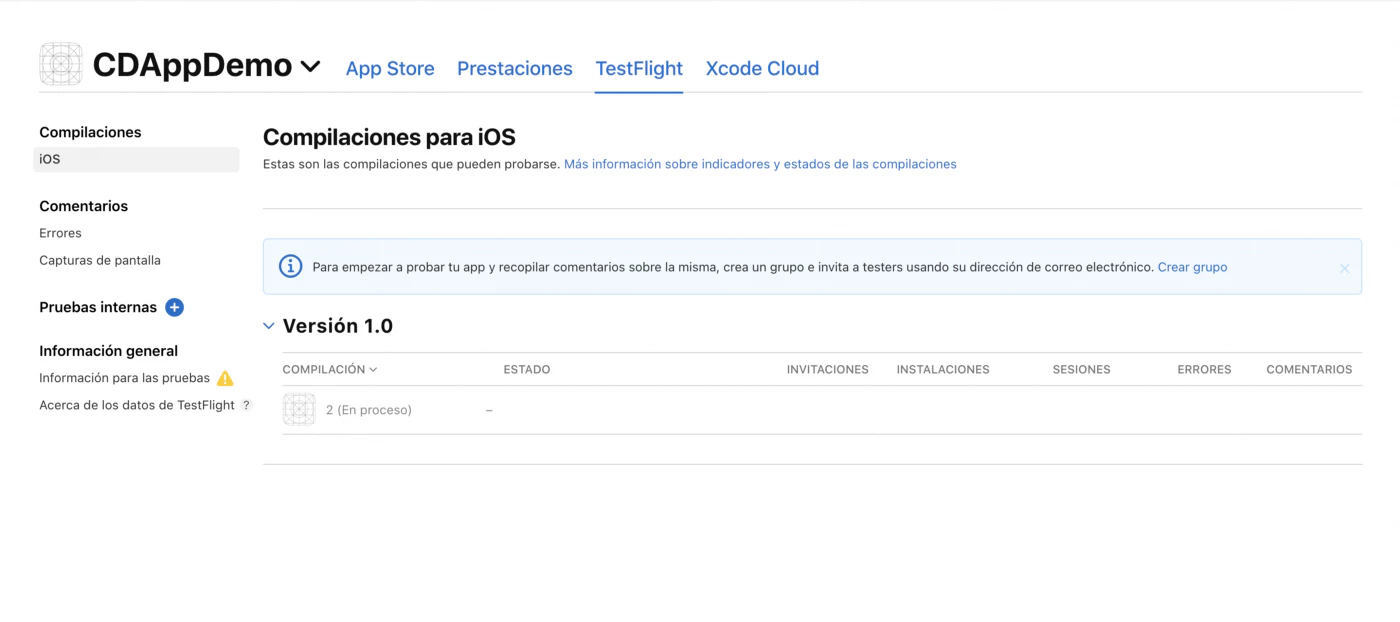
After a few minutes, the build should be available in your App Store Connect dashboard.
9. Can I deploy from local machine?
Yes, you can, and it is effortless.
You can use Xcode to build and sign your app, as always.
Related Articles
CI/CD Setup Guides
- Automatic Capacitor Android Build with GitHub Actions - Complete Android CI/CD setup
- Automatic Build and Release with GitHub Actions - Full CI/CD pipeline tutorial
- Manage Dev and Prod Builds with GitHub Actions - Environment management
- Automatic Capacitor iOS Build with Match - Alternative using Fastlane Match
Alternative CI/CD Platforms
- Build with GitLab CI - GitLab alternative
- Build with CodeMagic - CodeMagic setup guide
Live Updates & Deployment
- Capgo Live Updates Documentation - Add OTA updates to your app
- CI/CD Integration with Capgo - Integrate live updates in your pipeline
Thanks
This blog is based on the following articles:
- Continuous delivery for IOS using Fastlane and GitHub actions
- Fastlane Documentation
- This GitHub message from @mrogunlana
- This GitHub documentation
Keep going from Automatic Capacitor IOS build with GitHub actions with certificate
If you are using Automatic Capacitor IOS build with GitHub actions with certificate to plan CI/CD automation, connect it with Capgo CI/CD for the product workflow in Capgo CI/CD, Capgo Native Builds for the product workflow in Capgo Native Builds, Capgo Integrations for the product workflow in Capgo Integrations, CI/CD Integration for the implementation detail in CI/CD Integration, and GitHub Actions Integration for the implementation detail in GitHub Actions Integration.


