
Setting up CI/CD for Capacitor apps can be complex and time-consuming. Here’s what you need to know:
Recommended for New Builds: Use Capgo Build
We now recommend using Capgo Build with the Capgo CLI for native Capacitor builds. This Fastlane guide is kept for teams maintaining existing GitHub Actions pipelines, but new Android builds should use the Capgo CLI so you do not have to maintain Fastlane, Gradle runners, keystores, and upload scripts yourself.
Prerequisites
Before starting, you’ll need to set up:
- A GitHub account with admin access
- Your app already published on Google Play Store with proper signing
- Android signing key and keystore files
- Google Cloud Console project with Play Store API enabled
- Service account with proper permissions
- Understanding of GitHub Actions workflows
- Knowledge of Fastlane configuration
- Time to maintain and debug the pipeline
Professional CI/CD Setup by Capgo
Skip the complexity. Capgo configures your CI/CD pipeline directly in your preferred platform:
- Platform Independence: Works with GitHub Actions, GitLab CI, or others
- Seamless Integration: No platform switch needed, works with your current process
- Tailored Configuration: Customized setup matching your project needs
- Expert Guidance: We’ve already set up CI/CD for 50+ apps
Pricing
- One-time setup fee: $2,600
- Your running costs: ~$300/year
- Compare to Other proprietary solution: $6,000/year
- Save $26,100 over 5 years
Manual Setup Guide
If you still want to set up everything yourself, here’s what you need to do:
GitHub Actions Pricing
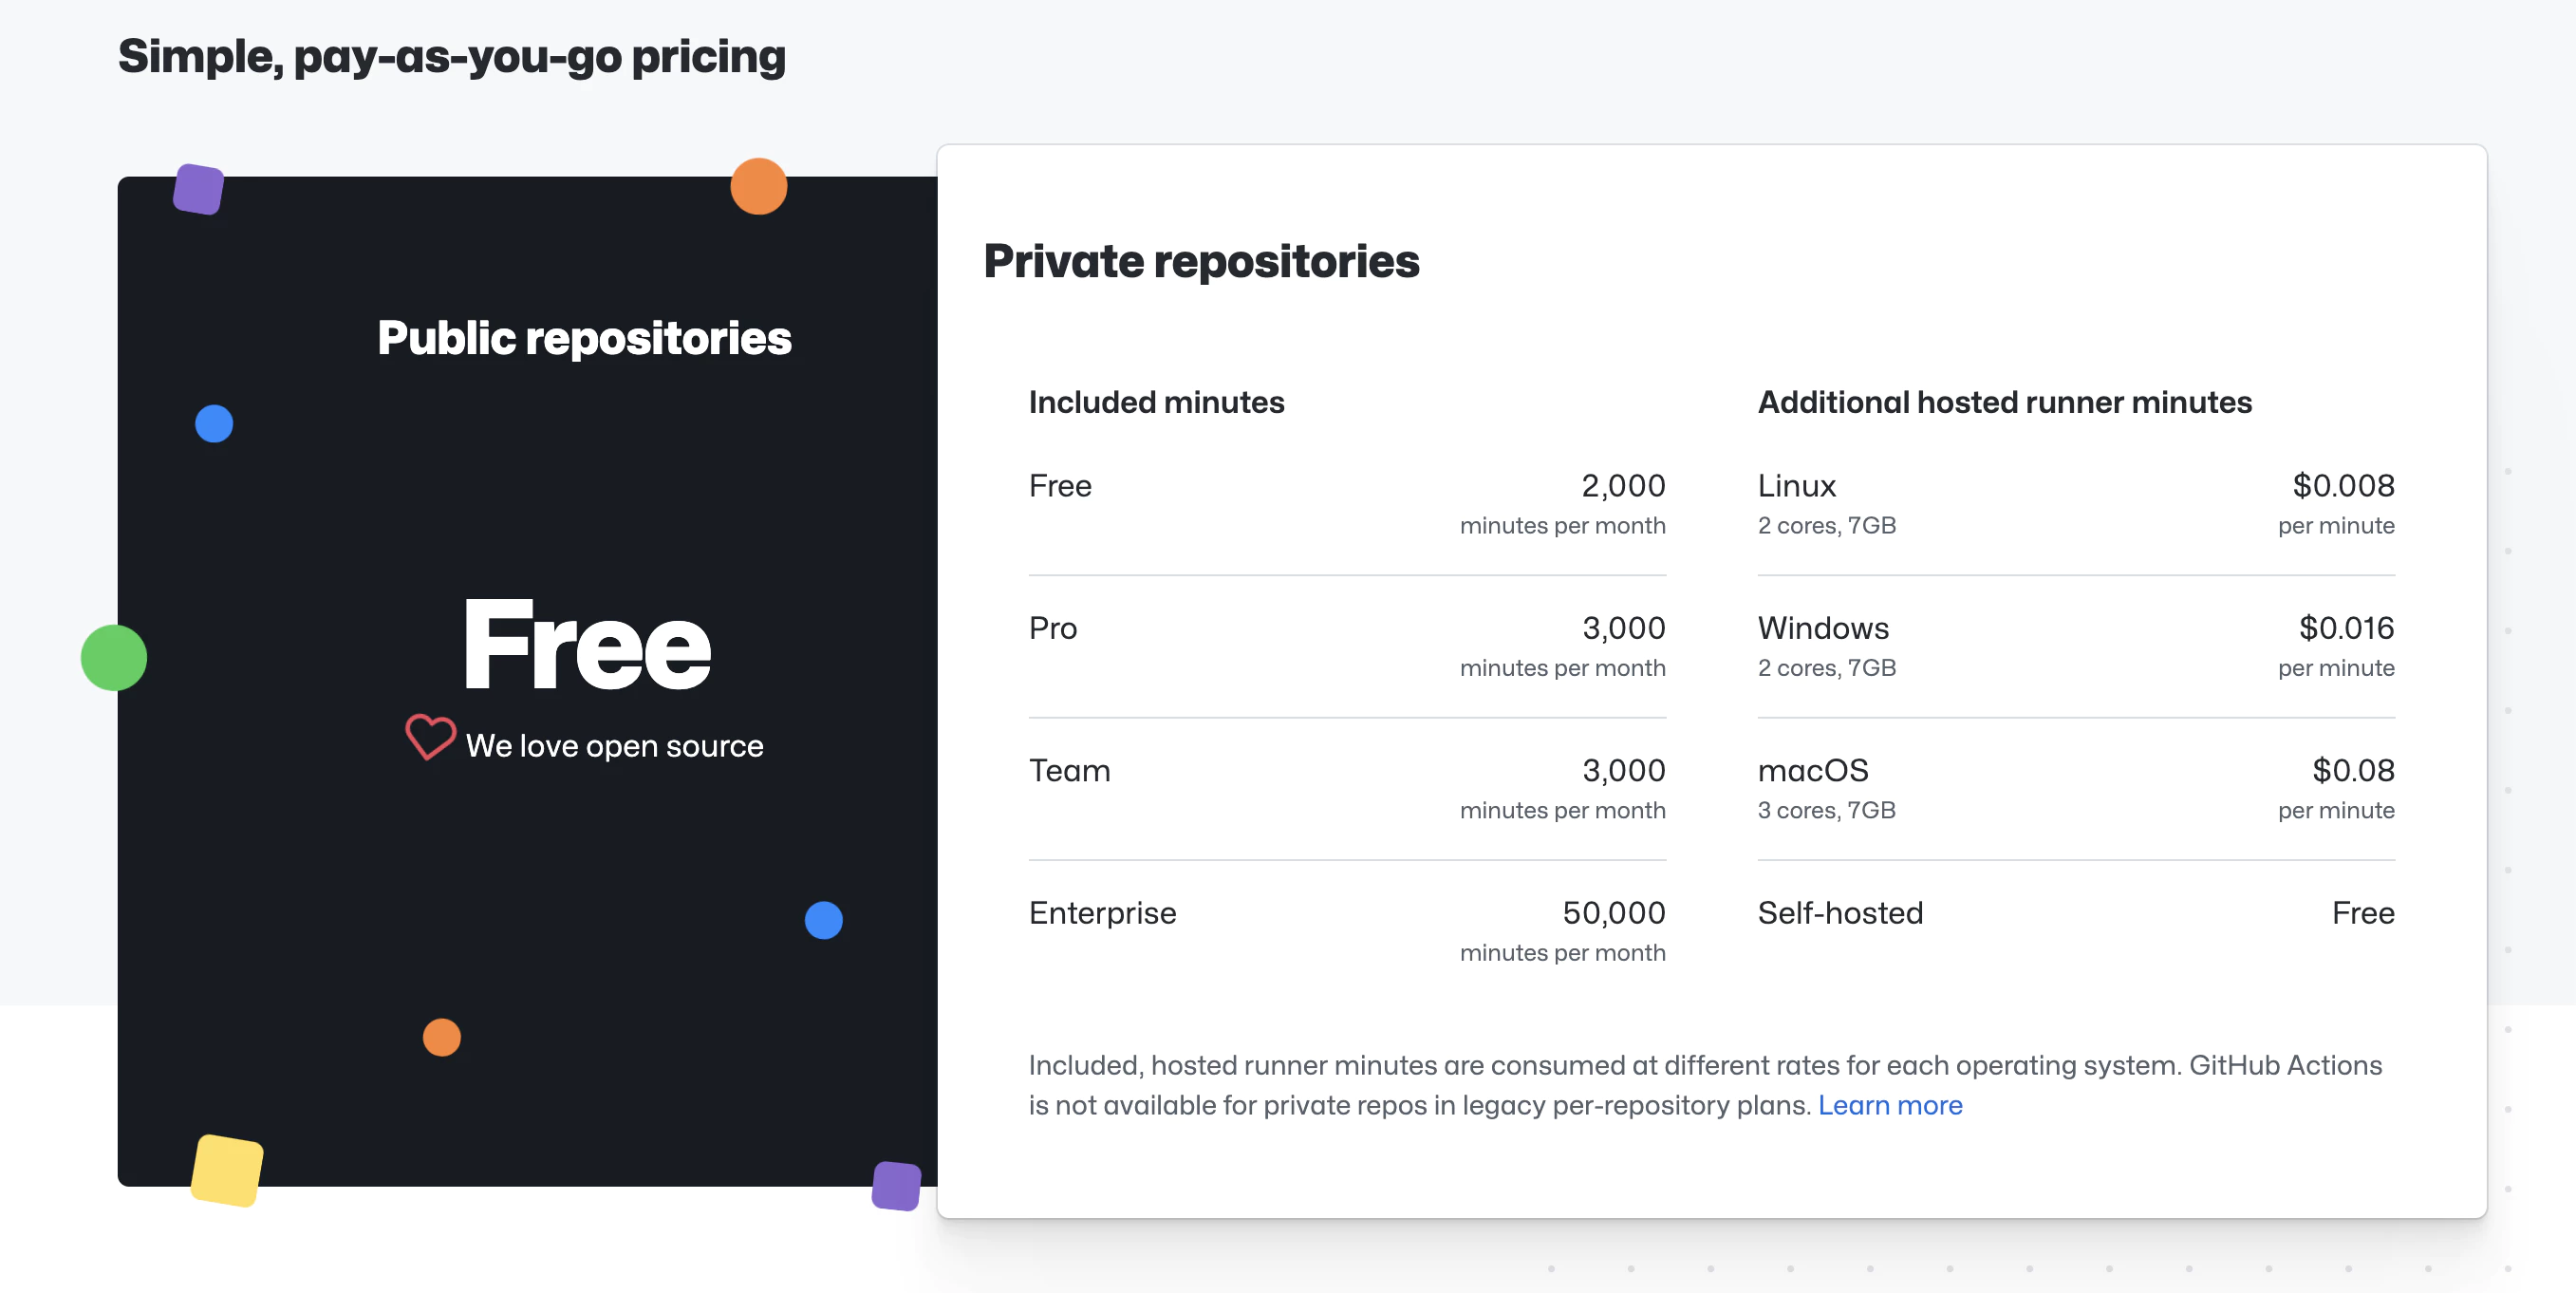
GitHub Actions offers free minutes based on your repository type:
- Public repositories: 2,000 minutes/month
- Private repositories: 2,000 minutes/month (Linux runners)
For private projects, costs are approximately $0.008/minute. A typical build takes 3-5 minutes.
Manual Setup Steps
- Create Android Keystore
- Set up Google Play Service Account
- Set up Fastlane
- Configure GitHub secrets
- Create GitHub Actions workflow
1. Create Android Keystore
Before you can sign and publish your Android app, you need to create a keystore file. This is a one-time setup.
Generate Keystore with keytool
Run this command in your terminal:
keytool -genkey -v -keystore my-release-key.keystore -alias my-key-alias -keyalg RSA -keysize 2048 -validity 10000You’ll be prompted for:
- Keystore password: Choose a strong password (you’ll need this as
KEYSTORE_STORE_PASSWORD) - Key password: Choose a strong password (you’ll need this as
KEYSTORE_KEY_PASSWORD) - Your name, organization, etc.: Fill in your details
Important Notes
-
Save these values securely:
- Keystore file location (e.g.,
my-release-key.keystore) - Key alias (e.g.,
my-key-alias) - you’ll need this asKEYSTORE_KEY_ALIAS - Keystore password - you’ll need this as
KEYSTORE_STORE_PASSWORD - Key password - you’ll need this as
KEYSTORE_KEY_PASSWORD
- Keystore file location (e.g.,
-
Backup the keystore file: If you lose it, you cannot update your published app
-
Keep it secret: Never commit the keystore file to git
-
Store it safely: Keep multiple backups in secure locations
Alternative: Use Existing Keystore
If you already published your app, you must use the same keystore you used initially. You can find it:
- In your local machine where you first built the app
- In your Play Console → Setup → App signing (if using Google Play App Signing)
2. Set up Google Play Service Account
To allow GitHub Actions to upload builds to Google Play, you need a service account.
Step 2.1: Create Google Cloud Project
- Go to Google Cloud Console
- Create a new project or select existing one
- Note the project ID
Step 2.2: Enable Google Play Developer API
- In Google Cloud Console, go to APIs & Services → Library
- Search for “Google Play Android Developer API”
- Click Enable
Step 2.3: Create Service Account
- Go to IAM & Admin → Service Accounts
- Click Create Service Account
- Enter details:
- Name:
github-actions-uploader - Description: “Service account for GitHub Actions to upload builds”
- Name:
- Click Create and Continue
- Skip role assignment for now (click Continue, then Done)
Step 2.4: Create Service Account Key
- Click on the newly created service account
- Go to Keys tab
- Click Add Key → Create new key
- Choose JSON format
- Click Create
- A JSON file will download - save this securely, you’ll need it later
Step 2.5: Grant Access in Play Console
- Go to Google Play Console
- Go to Setup → API access
- Under Service accounts, click Grant access for your service account
- On the App permissions tab, add your app
- On the Account permissions tab, grant these permissions:
- View app information and download bulk reports (read only)
- Create, edit, and delete draft apps
- Release apps to testing tracks
- Release apps to production, exclude, and other tracks
- Click Invite user
- Click Send invite
Step 2.6: Verify the JSON Key
The downloaded JSON file should look like this:
{
  "type": "service_account",
  "project_id": "your-project-id",
  "private_key_id": "...",
  "private_key": "-----BEGIN PRIVATE KEY-----\n...\n-----END PRIVATE KEY-----\n",
  "client_email": "github-actions-uploader@your-project-id.iam.gserviceaccount.com",
  "client_id": "...",
  "auth_uri": "https://accounts.google.com/o/oauth2/auth",
  "token_uri": "https://oauth2.googleapis.com/token",
  "auth_provider_x509_cert_url": "https://www.googleapis.com/oauth2/v1/certs",
  "client_x509_cert_url": "..."
}
You’ll convert this to base64 in the GitHub secrets setup step.
3. Set Up Fastlane
Create a fastlane folder at your project root and add a Fastfile with this content:
default_platform(:android)

KEYSTORE_KEY_ALIAS = ENV["KEYSTORE_KEY_ALIAS"]
KEYSTORE_KEY_PASSWORD = ENV["KEYSTORE_KEY_PASSWORD"]
KEYSTORE_STORE_PASSWORD = ENV["KEYSTORE_STORE_PASSWORD"]

platform :android do
    desc "Deploy a beta version to the Google Play"
    private_lane :verify_changelog_exists do |version_code: |
      changelog_path = "android/metadata/en-US/changelogs/#{version_code}.txt"
      UI.user_error!("Missing changelog file at #{changelog_path}") unless File.exist?(changelog_path)
      UI.message("Changelog exists for version code #{version_code}")
    end

    private_lane :verify_upload_to_staging do |version_name: |
      UI.message "Skipping staging verification step"
    end

    lane :beta do
        keystore_path = "#{Dir.tmpdir}/build_keystore.keystore"
        File.write(keystore_path, Base64.decode64(ENV['ANDROID_KEYSTORE_FILE']))
        json_key_data = Base64.decode64(ENV['PLAY_CONFIG_JSON'])

        # Get previous build number and increment
        previous_build_number = google_play_track_version_codes(
            package_name: ENV['DEVELOPER_PACKAGE_NAME'],
            track: "internal",
            json_key_data: json_key_data,
        )[0]
        current_build_number = previous_build_number + 1
        sh("export NEW_BUILD_NUMBER=#{current_build_number}")

        # Build the app
        gradle(
          task: "clean bundleRelease",
          project_dir: 'android/',
          print_command: false,
          properties: {
            "android.injected.signing.store.file" => "#{keystore_path}",
            "android.injected.signing.store.password" => "#{KEYSTORE_STORE_PASSWORD}",
            "android.injected.signing.key.alias" => "#{KEYSTORE_KEY_ALIAS}",
            "android.injected.signing.key.password" => "#{KEYSTORE_KEY_PASSWORD}",
            'versionCode' => current_build_number
          })

        # Upload to Play Store
        upload_to_play_store(
            package_name: ENV['DEVELOPER_PACKAGE_NAME'],
            json_key_data: json_key_data,
            track: 'internal',
            release_status: 'completed',
            skip_upload_metadata: true,
            skip_upload_changelogs: true,
            skip_upload_images: true,
            skip_upload_screenshots: true,
        )
    end
end
4. Configure GitHub Secrets
Now that you have your keystore and service account JSON, you need to store them securely in GitHub.
Step 4.1: Access GitHub Secrets
- Go to your repository on GitHub
- Click Settings → Secrets and variables → Actions
- Click New repository secret
Step 4.2: Add Required Secrets
Add each of these secrets one by one:
PLAY_CONFIG_JSON
- Take the service account JSON file you downloaded in Step 2.4
- Convert it to base64:
On macOS/Linux:
base64 service_account_key.json | pbcopyOn Windows (PowerShell):
[Convert]::ToBase64String([IO.File]::ReadAllBytes("service_account_key.json")) | Set-Clipboard- Create a new secret named
PLAY_CONFIG_JSONand paste the base64 string
ANDROID_KEYSTORE_FILE
- Convert your keystore to base64:
On macOS/Linux:
base64 my-release-key.keystore | pbcopyOn Windows (PowerShell):
[Convert]::ToBase64String([IO.File]::ReadAllBytes("my-release-key.keystore")) | Set-Clipboard- Create a new secret named
ANDROID_KEYSTORE_FILEand paste the base64 string
KEYSTORE_KEY_ALIAS
Create a new secret with the key alias you used when generating the keystore (e.g., my-key-alias)
KEYSTORE_KEY_PASSWORD
Create a new secret with the key password you set when generating the keystore
KEYSTORE_STORE_PASSWORD
Create a new secret with the keystore password you set when generating the keystore
DEVELOPER_PACKAGE_NAME
Create a new secret with your app’s package name (e.g., com.example.app)
You can find your package name in android/app/build.gradle under applicationId
Step 4.3: Verify All Secrets
Make sure you have these 6 secrets configured:
- ✅ PLAY_CONFIG_JSON
- ✅ ANDROID_KEYSTORE_FILE
- ✅ KEYSTORE_KEY_ALIAS
- ✅ KEYSTORE_KEY_PASSWORD
- ✅ KEYSTORE_STORE_PASSWORD
- ✅ DEVELOPER_PACKAGE_NAME
5. Create GitHub Actions Workflow
Create .github/workflows/build-upload-android.yml:
name: Build and Deploy Android App

on:
  push:
    tags:
      - '*'

jobs:
  build_android:
    runs-on: ubuntu-latest
    steps:
      - uses: actions/checkout@v6

      - name: Setup Node.js
        uses: actions/setup-node@v6
        with:
          node-version: 24
          cache: npm

      - name: Install dependencies
        run: npm ci

      - name: Cache Gradle
        uses: actions/cache@v5
        with:
          path: |
            ~/.gradle/caches
            ~/.gradle/wrapper
          key: ${{ runner.os }}-gradle-${{ hashFiles('**/*.gradle*', '**/gradle-wrapper.properties') }}
          restore-keys: |
            ${{ runner.os }}-gradle-

      - name: Build app
        run: npm run build

      - name: Sync Capacitor
        run: npx cap sync

      - name: Setup Java
        uses: actions/setup-node@v5
        with:
            distribution: 'zulu'
            java-version: '17'

      - name: Setup Ruby
        uses: ruby/setup-ruby@v1
        with:
          ruby-version: '3.0'
          bundler-cache: true

      - name: Run Fastlane
        uses: maierj/fastlane-action@v3.1.0
        env:
          PLAY_CONFIG_JSON: ${{ secrets.PLAY_CONFIG_JSON }}
          ANDROID_KEYSTORE_FILE: ${{ secrets.ANDROID_KEYSTORE_FILE }}
          DEVELOPER_PACKAGE_NAME: ${{ secrets.DEVELOPER_PACKAGE_NAME }}
          KEYSTORE_KEY_ALIAS: ${{ secrets.KEYSTORE_KEY_ALIAS }}
          KEYSTORE_KEY_PASSWORD: ${{ secrets.KEYSTORE_KEY_PASSWORD }}
          KEYSTORE_STORE_PASSWORD: ${{ secrets.KEYSTORE_STORE_PASSWORD }}
        with:
          lane: android beta

      - name: Upload artifact
        uses: actions/upload-artifact@v2
        with:
          name: android-release
          path: ./android/app/build/outputs/bundle/release/app-release.aab
          retention-days: 10
How It Works
- Create a Git tag to trigger the workflow
- GitHub Actions builds your app
- Fastlane uploads it to Google Play beta channel
- Your app is automatically updated
Build Time and Costs
- Build time: 3-5 minutes
- Cost for private repos: ~$0.04 per build
- Free for open-source projects
Related Articles
CI/CD Setup Guides
- Automatic Capacitor iOS Build with GitHub Actions - Complete iOS CI/CD setup
- Automatic Build and Release with GitHub Actions - Full CI/CD pipeline tutorial
- Manage Dev and Prod Builds with GitHub Actions - Environment management
Alternative CI/CD Platforms
- Build with GitLab CI - GitLab alternative for Android
- Build with CodeMagic - CodeMagic setup guide
Live Updates & Deployment
- Capgo Live Updates Documentation - Add OTA updates to your app
- CI/CD Integration with Capgo - Integrate live updates in your pipeline


