



このチュートリアルでは、まず新しい Angular app and transition into the native mobile app realm using Capacitor. You can also add Capgo Native Navigation and Transitions for a native mobile feel, and use tailwind-capacitor for safe areas.
Capacitor allows you to easily convert your Angular web application into a native mobile app without requiring significant modifications or learning a new skill like React Native.
Angularアプリケーションをモバイルアプリケーションに変換するには、数ステップで実行できます。
This tutorial will guide you through the process, starting with a new Angular app and then incorporating Capacitor to move into the realm of native mobile apps. You can also use Capgo Native Navigation, Transitions, and tailwind-capacitor for safe areas.
About Capacitor
CapacitorJSはゲームチェンジャーです! どのWebプロジェクトでもを簡単に組み込むことができ、Webアプリケーションをnative WebViewにwrapし、native XcodeとAndroid Studioプロジェクトを生成します。また、プラグインを使用すると、カメラなどのnativeデバイス機能にアクセスできます。
With Capacitor, you get a fantastic native mobile app without any complicated setup or steep learning curve. Its slim API and streamlined functionality make it a breeze to integrate into your project. Trust me, you’ll be amazed at how effortless it is to achieve a fully functional native app with Capacitor!
Angularアプリケーションを準備する
Angularアプリを作成するには、以下のコマンドを実行してください。
ng new my-app
cd my-app
「Angular」を選択してください。Angularのバージョンを尋ねられたときに。
ネイティブモバイルアプリを作成するには、プロジェクトのエクスポートが必要です。 エクスポート プロジェクトのpackage.jsonに、ネイティブモバイルアプリを作成するための簡単なスクリプトを含めましょう。 コマンドを実行した後、プロジェクトのルートディレクトリに新しいフォルダが見つかります。 このフォルダは、後で__CAPGO_KEEP_0__によって使用されますが、現在は正しく設定する必要があります。
{
  "scripts": {
    // ...
    "build": "ng build --prod"
  }
}
Angularアプリに__CAPGO_KEEP_0__を追加する build, you should be able to spot a fresh dist folder at your project’s root.
This folder will be used by Capacitor later on, but for now, we must set it up correctly.
Adding Capacitor to Your Angular App
任意のWebアプリをネイティブモバイルコンテナにパッケージ化するには、最初の数ステップを実行する必要がありますが、その後は単に1つのコマンドを実行するだけです。 sync 最初に、開発依存モジュールとして
をインストールし、プロジェクト内で設定します。セットアップ中に、名前とバンドルIDのデフォルト値を承認するには「Enter」を押すことができます。 Capacitor CLI 最後に、プラットフォームを追加し、
は各プラットフォーム用にプロジェクトのルートディレクトリにフォルダを作成します:
Finally, we can add the platforms, and Capacitor will create folders for each platform at the root of our project:
# Install the Capacitor CLI locally
npm install -D @capacitor/cli

# Initialize Capacitor in your Angular project
npx cap init

# Install the required packages
npm install @capacitor/core @capacitor/ios @capacitor/android

# Add the native platforms
npx cap add ios
npx cap add android
ios と android フォルダが観察できるはずです。 android
実際のネイティブプロジェクトです!
Androidプロジェクトにアクセスするには、後で必要になります。 Android StudioiOSの場合はMacが必要で、Xcodeをインストールする必要があります。 Xcode.
さらに、プロジェクト内で capacitor.config.ts file in your project, which contains some fundamental Capacitor settings utilized during the sync. The only thing you need to pay attention to is the __CAPGO_KEEP_0__設定が含まれています。注目すべきは
webDir capacitor.config.json ファイルと更新する webDir:
{
  "appId": "com.example.app",
  "appName": "my-app",
  "webDir": "dist"
}
以下のコマンドを実行してみてください。
npm run build
npx cap sync
最初のコマンド npm run build は、Angular プロジェクトをビルドし、静的ビルドをコピーするだけです。2 番目のコマンド npx cap sync は、ウェブ code をネイティブ プラットフォームの正しい場所に同步するので、アプリ内で表示されるようにします。
さらに、sync コマンドはネイティブ プラットフォームを更新し、プラグインをインストールする可能性があるため、新しい __CAPGO_KEEP_0__ プラグインをインストールしたときは Capacitor プラグイン を実行する必要があります。 npx cap sync 気づかないうちに、実際には完了しています。では、デバイスでアプリを確認してみましょう。
ネイティブ アプリをビルドしてデプロイする
ビルドしてデプロイする
iOSアプリを開発するには Xcode Androidアプリを開発するには Android Studio アプリをアプリストアに配信する場合、iOSはApple Developer Programに、AndroidはGoogle Play Consoleに登録する必要があります。
If you’re new to native mobile development, you can use the Capacitor CLI to easily open both native projects:
npx cap open ios
npx cap open android
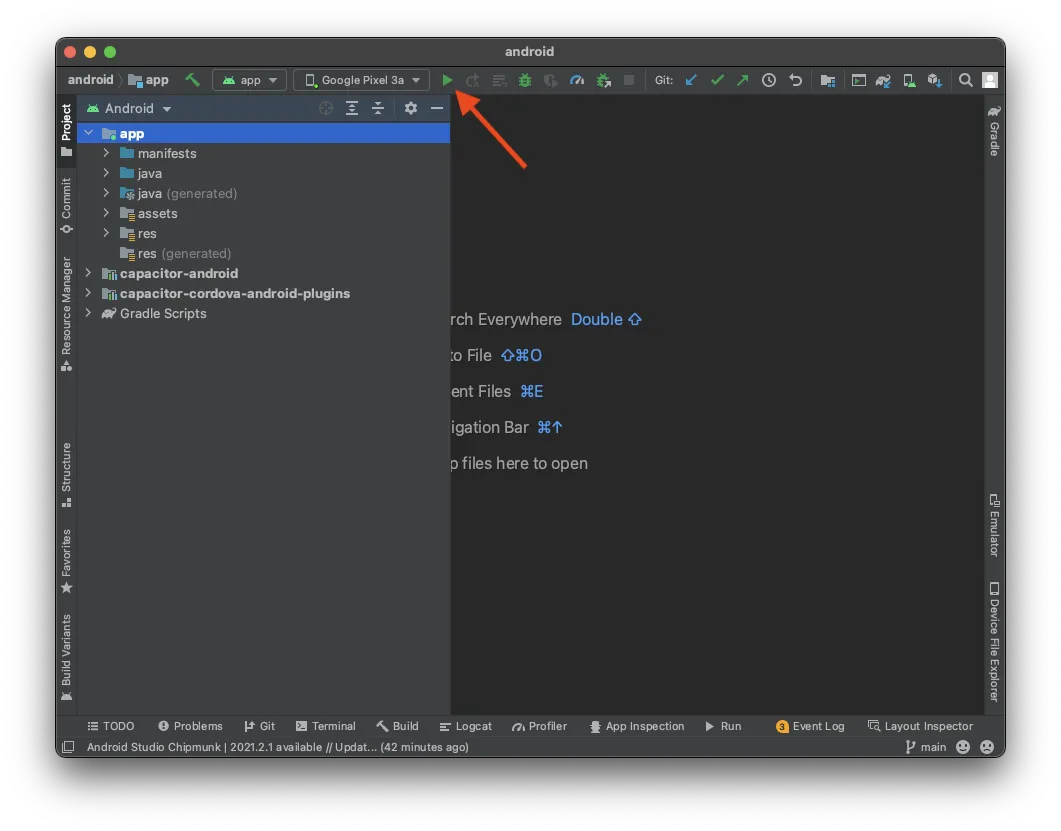
ネイティブプロジェクトを設定した後、実機にアプリをデプロイすることは簡単です。Android Studioでは、設定を変更することなく、実機にアプリをデプロイできます。例えば、次のようになります。
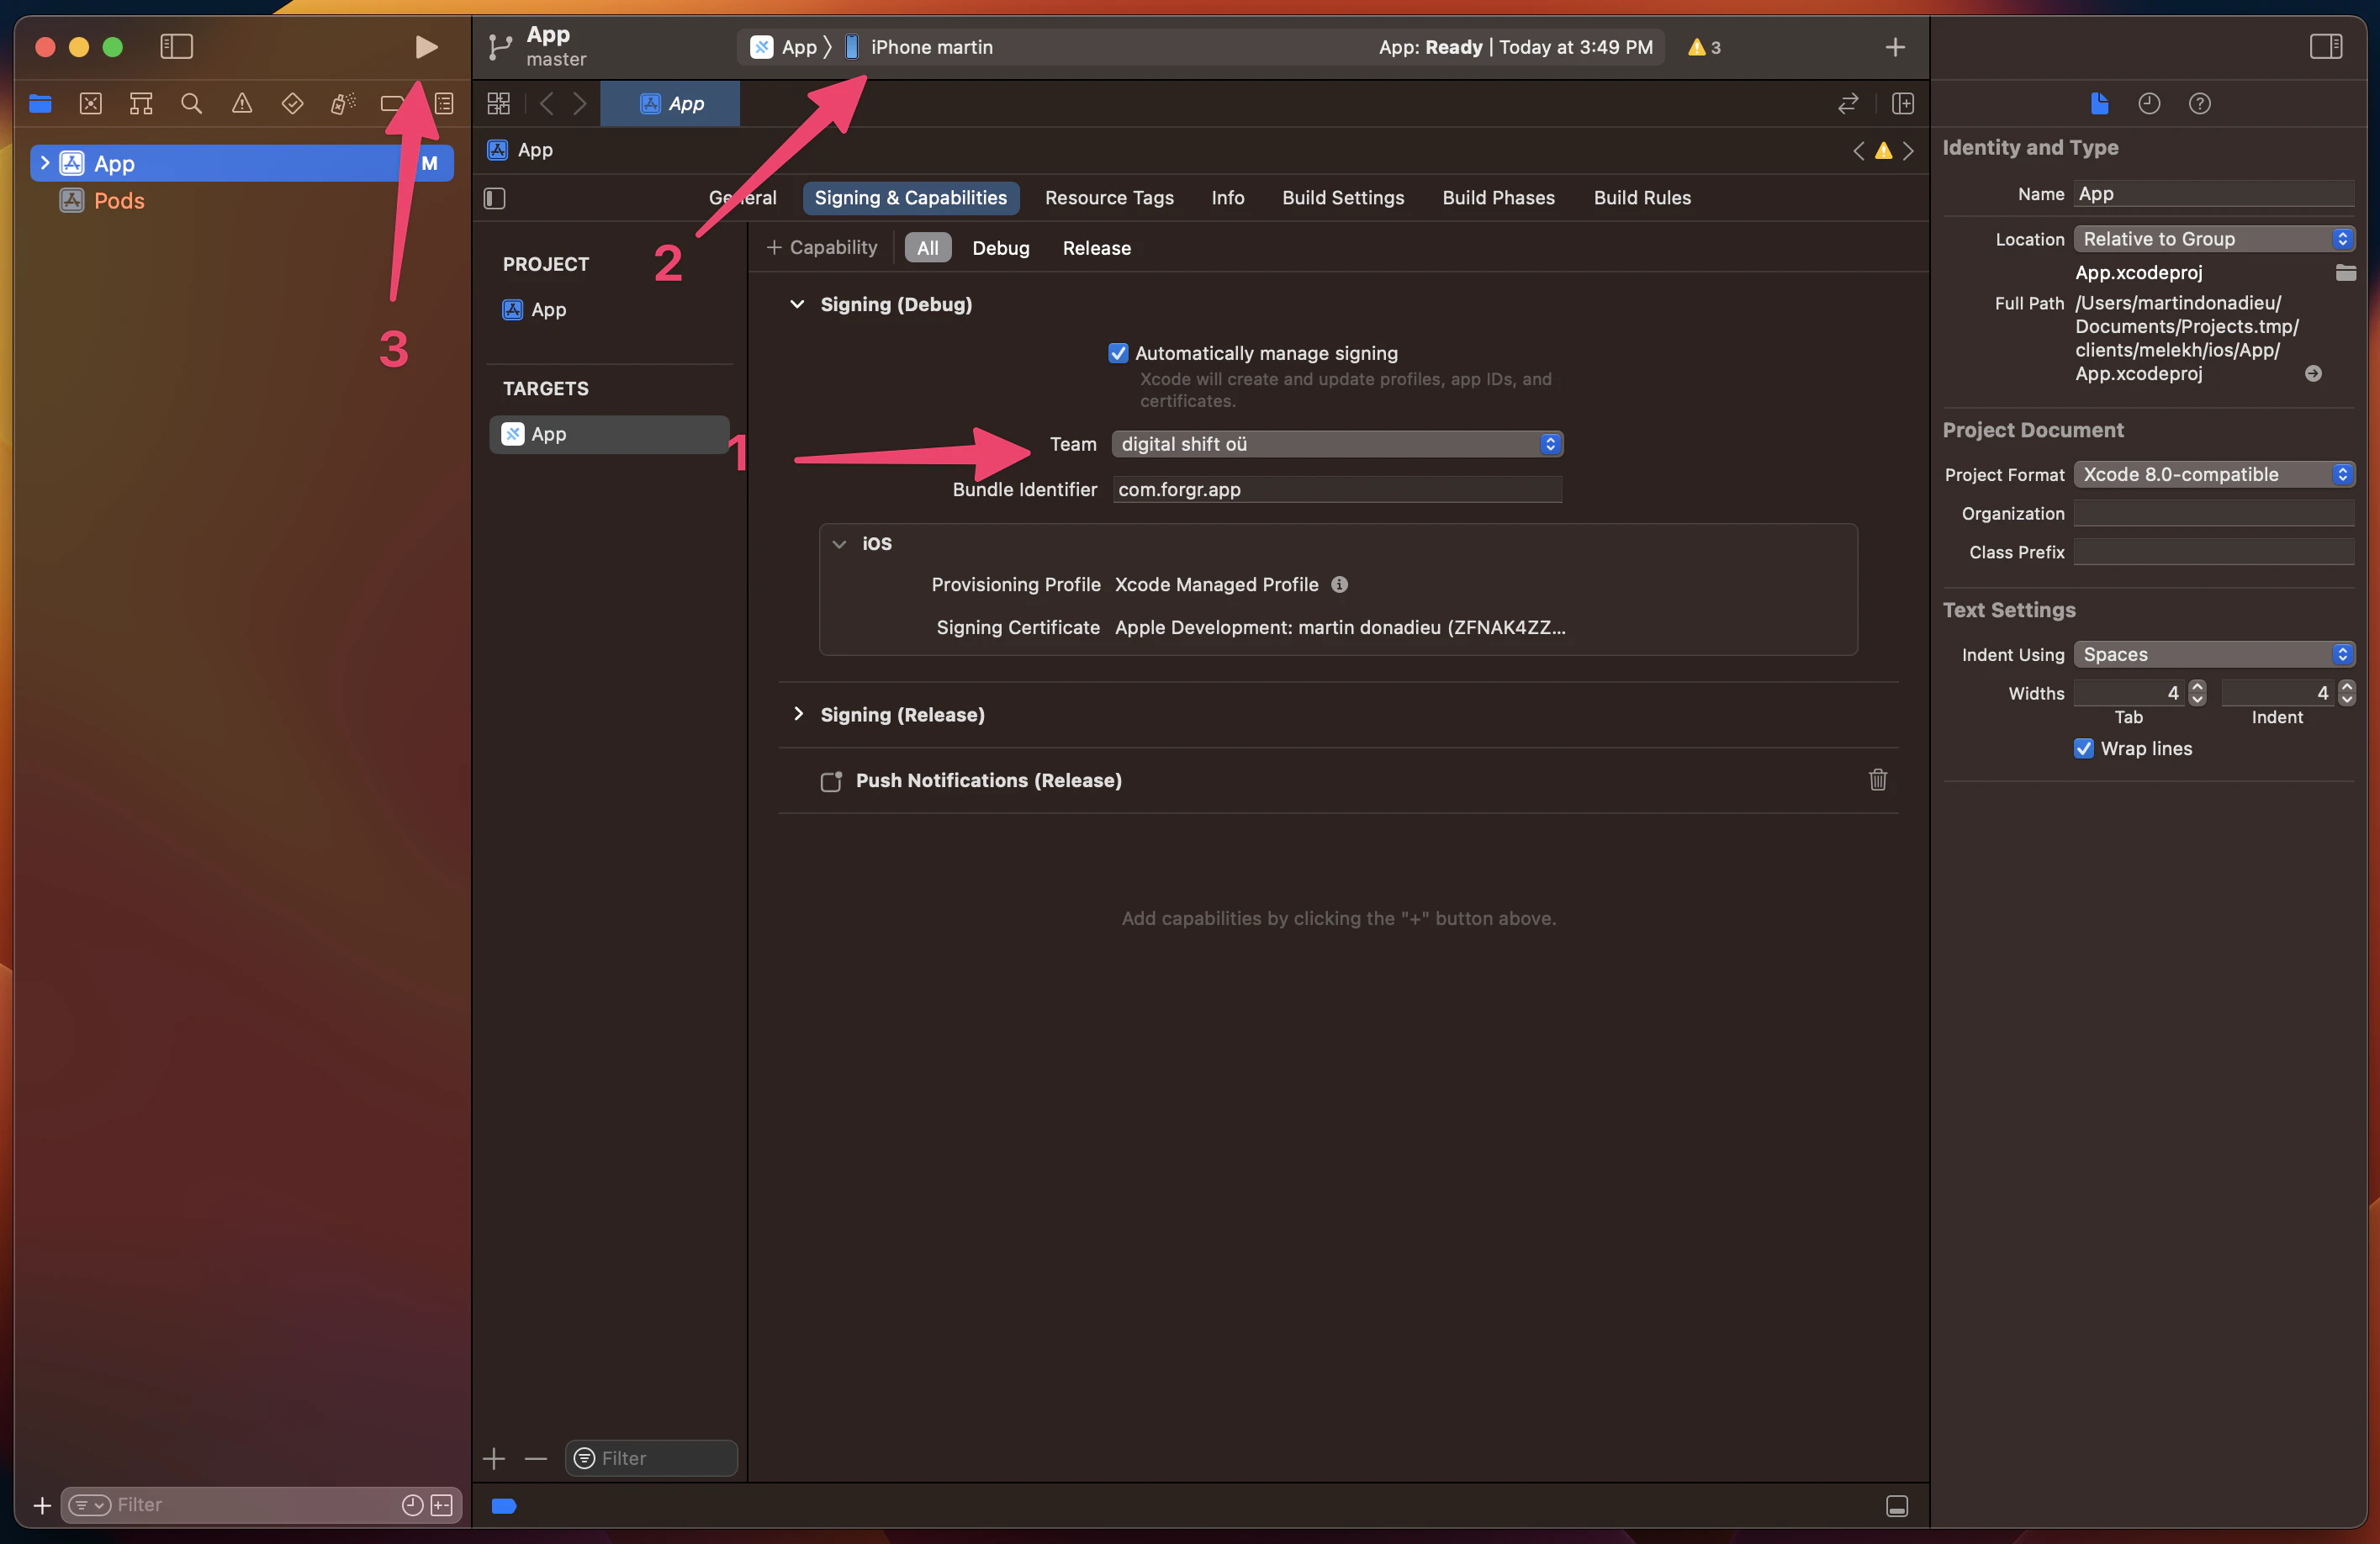
Xcodeでは、実機にアプリをデプロイするには署名アカウントを設定する必要があります。実機にアプリをデプロイする代わりにシミュレータにのみアプリをデプロイする場合は、設定を変更する必要はありません。署名アカウントを設定する必要がある場合は、Xcodeはプロセスを案内します (ただし、開発者プログラムに登録する必要があります)。署名アカウントを設定した後、実機にアプリをデプロイするには、上部で実機を選択して、実行をクリックするだけです。例えば、次のようになります。
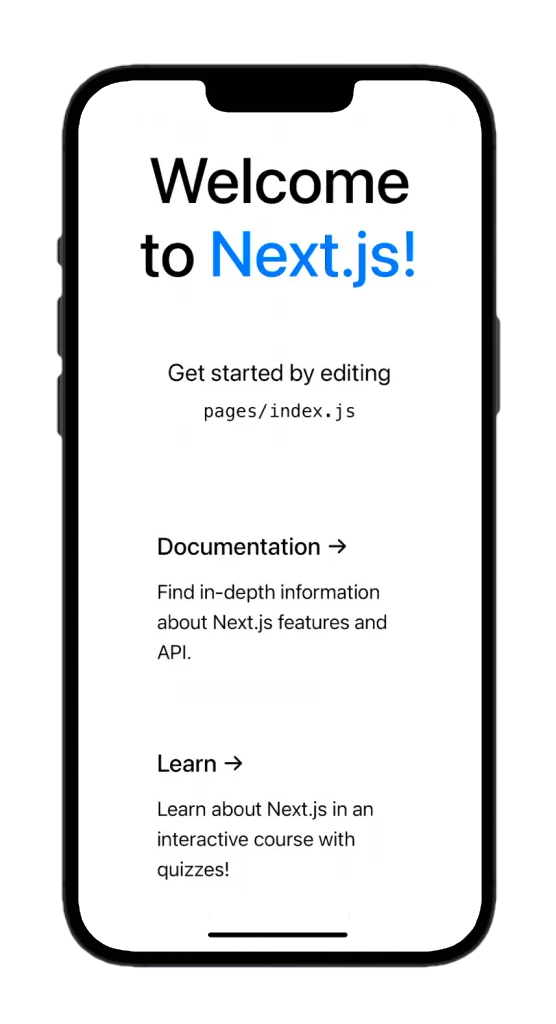
Angular Webアプリをモバイルデバイスに成功的にデプロイしました。例えば、次のようになります。
しかし、開発中にはもっと速い方法があります…
Capacitor Live Reload
この時点で、すべてのモダンフレームワークでホットリロードを利用しているのであれば、同じ機能をモバイルデバイスで利用できることを知っておくことができます。 モバイルデバイスで 最小限の手間で!
ローカルホストのアプリケーションにアクセスするために、ライブリロードをネットワーク上で有効にするには、__CAPGO_KEEP_0__ アプリが特定のURLからコンテンツを読み込むようにする必要があります。 最初のステップは、ローカルIPアドレスを調べることです。Macを使用している場合は、ターミナルで以下のコマンドを実行してIPアドレスを確認できます。 by having the Capacitor app load the content from the specific URL.
次に、IPv4アドレスを探します。
ipconfig getifaddr en0サーバーからアプリを直接読み込ませるには、__CAPGO_KEEP_0__ に追加のエントリを追加する必要があります。
ipconfigこれは、
We can instruct Capacitor to load the app directly from the server by adding another entry to our capacitor.config.ts ファイル:
import { CapacitorConfig } from '@capacitor/cli';

const config: CapacitorConfig = {
  appId: 'com.example.app',
  appName: 'my-app',
  webDir: 'dist',
  bundledWebRuntime: false,
  server: {
    url: 'http://192.168.x.xx:4200',
    cleartext: true
  }
};

export default config;
正しくIPアドレスとポート番号を使用してください。 この例では、デフォルトのAngularポートを使用しています。ここで、これらの変更をNativeプロジェクトにコピーして適用できます:
このコマンドは、
npx cap copyと似ていますが、Webフォルダと設定のみをコピーし、Nativeプロジェクトを更新しないようにします。 copy Android StudioまたはXcodeを使用してアプリをもう一度デプロイしてください。その後、Angularアプリに何か変更を加えた場合、アプリは自動的にリロードされます。 syncCapacitorを使用したAngularモバイルアプリの作成 Capacitorを使用したAngularモバイルアプリの作成 Capacitorを使用したAngularモバイルアプリの作成
Capacitorを使用したAngularモバイルアプリの作成 Capacitorを使用したAngularモバイルアプリの作成 そして変更を表示!
注意してください 新しいプラグインをインストールした場合、カメラなどの場合、まだネイティブプロジェクトの再構築が必要です。これは、ネイティブファイルが変更されたため、オンザフライで行うことはできません。
注意してください。正しいIPアドレスとポート番号を使用する必要があります。上のcodeブロックは、デモ用にデフォルトのAngularポートを示しています。
Capacitor プラグインの使用
Capacitor プラグインの使用方法を見てみましょう。これは何度も言及したことがあります。簡単なプラグインをインストールするには、次のコマンドを実行します。
npm i @capacitor/share__CAPGO_KEEP_0__ プラグインは何も特別なことはしていませんが、ネイティブの共有ダイアログを表示します! これで、パッケージをインポートし、関数を呼び出すだけです。アプリのsrc/app/app.component.tsを次のように変更してみましょう。 Share プラグインShare プラグイン share() src/app/app.component.ts src/app/app.component.ts src/app/app.component.ts
import { Component } from '@angular/core';
import { Share } from '@capacitor/share';

@Component({
  selector: 'app-root',
  templateUrl: './app.component.html',
  styleUrls: ['./app.component.scss']
})
export class AppComponent {
  title = 'my-app';

  async share() {
    await Share.share({
      title: 'Open Youtube',
      text: 'Check new video on youtube',
      url: 'https://www.youtube.com',
      dialogTitle: 'Share with friends'
    });
  }
}
新しいプラグインをインストールする場合、同期操作を実行し、次にアプリをデバイスに再デプロイする必要があります。 これを行うには、次のコマンドを実行してください。
npx cap syncボタンをクリックすると、美しいネイティブシェアダイアログが実行されます。
次に、Capgoナビゲーションとトランジションを使用して、iOSとAndroidでアプリをよりネイティブに感じさせることができます。また、水平オーバーフローまたは安全エリアがカットされたiOSの一般的なレイアウト問題を修正することもできます。
ネイティブフィーリングのUIとCapgoネイティブナビゲーションとトランジション
数年間、 Ionic を使用してクロスプラットフォームアプリケーションを構築してきましたが、Angularと統合することはハック的で、すでに Tailwind CSS.
を持っている場合、ほとんどの場合、値段がわかりません。Angular + Capacitorアプリでネイティブモバイルフィーリングを実現するには、WebのみのUIキットであるKonsta UIではなく、Capgoプラグインを使用します。
- @capgo/capacitor-native-navigation — iOSではLiquid Glassタブバー、Androidでは模様のタブバーのスタイルが使用されます。Angularルーターのルート状態が維持され、プラグインがネイティブのブラウザを管理します。
- @capgo/capacitor-transitions --- WebView層でIonicスタイルのページ遷移とiOSのエッジスワイプバックを実現する
両方をインストールする
bun add @capgo/capacitor-native-navigation @capgo/capacitor-transitions
bunx cap sync
CSSのインセットモードでネイティブのバーを認識するようにウェブコンテンツを設定する
import { NativeNavigation } from '@capgo/capacitor-native-navigation';

await NativeNavigation.configure({
  contentInsetMode: 'css',
  animationDuration: 360,
  glass: {
    effect: 'liquidGlass',
  },
});
液体ガラスのタブバーをレンダリングする (iOSはシステムのレンダリングを使用し、AndroidはぼやけたWebViewのバックグラウンドを使用する)
import { inject } from '@angular/core';
import { Router } from '@angular/router';

const router = inject(Router);

await NativeNavigation.setTabbar({
  selectedId: 'home',
  labelVisibilityMode: 'labeled',
  icons: true,
  colors: { dynamic: true },
  tabs: [
    { id: 'home', title: 'Home', icon: { svg: '...' } },
    { id: 'settings', title: 'Settings', icon: { svg: '...' } },
  ],
});

await NativeNavigation.addListener('tabSelect', ({ id }) => {
  router.navigate([`/${id}`]);
});
Add native page transitions in your app shell:

```typescript
// app.component.ts
import { Component, CUSTOM_ELEMENTS_SCHEMA, ElementRef, ViewChild, AfterViewInit } from '@angular/core';
import { Router } from '@angular/router';
import '@capgo/capacitor-transitions';
import { initTransitions, setDirection, setupRouterOutlet } from '@capgo/capacitor-transitions';

initTransitions({ platform: 'auto' });

@Component({
  selector: 'app-root',
  schemas: [CUSTOM_ELEMENTS_SCHEMA],
  template: `
    <cap-router-outlet #outlet platform="auto" swipe-gesture="auto">
      <router-outlet></router-outlet>
    </cap-router-outlet>
  `,
})
export class AppComponent implements AfterViewInit {
  @ViewChild('outlet') outlet?: ElementRef<HTMLElement>;

  constructor(private router: Router) {}

  ngAfterViewInit() {
    if (this.outlet?.nativeElement) {
      setupRouterOutlet(this.outlet.nativeElement, { platform: 'auto', swipeGesture: 'auto' });
    }
  }

  openSettings() {
    setDirection('forward');
    this.router.navigate(['/settings']);
  }
}
ルーティングされたページをwrapする cap-router-outlet, cap-page, cap-content, setDirection('forward') Capacitorライブアップデートの代替 setDirection('back') Capacitorライブアップデートの代替
Capacitorライブアップデートの代替 Using @capgo/capacitor-native-navigation ネイティブのナビゲーションを設定する前に行うこと。ウェブヘッダーまたはフッターを複製しないようにする。ネイティブのナビゲーションがウェブヘッダーまたはフッターを所有している場合に限る。 Capacitorを使用する@capgo/capacitor-transitions.
セーフエリアのTailwind
Tailwind CSSのデバイスセーフエリアの場合、使用 @capgo/tailwind-capacitor (__CAPGO_KEEP_0__で公開) tailwind-capacitor npmで提供 safe-areas TailwindプラグインのCapacitorフレンドリーな機能:
bun add -D tailwind-capacitorIn src/styles.css:
@import 'tailwindcss';
@plugin "@capgo/tailwind-capacitor/platform";
@plugin "@capgo/tailwind-capacitor/safe-areas";
Capacitorフレンドリーなユーティリティを使用 pt-safe, pb-safe, px-safe 代わりに手動で env(safe-area-inset-*) プラグインを使用して、必要なものが不足している場合、CapacitorのAngular設定 open a PR on GitHub.
iOSレイアウトの問題を修正する (ビューポート、セーフエリア、水平スクロール)
iOSでコンテンツが切り取られた、ずれた、または水平スクロールできるように見えている場合、ビューポートタグを追加または調整するだけでは通常解決されません。次のチェックを順番に実行してください。 overflow-x: hidden ビューポートメタタグが正しく適用されていることを確認する
In
で、ビューポートメタタグを src/index.htmliOSセーフエリアを1つのルートラッパーからのみ取り扱う <head>:
<meta name="viewport" content="width=device-width, initial-scale=1, viewport-fit=cover" />単一のアプリシェルを作成し、セーフエリアのパディングをそこに適用する — 複数のネストされたコンポーネントではありません:
すべてのページコンテンツを
html,
body,
app-root {
  width: 100%;
  min-height: 100%;
  margin: 0;
  padding: 0;
  overflow-x: hidden;
}

* {
  box-sizing: border-box;
}

.app-shell {
  min-height: 100dvh;
  width: 100%;
  padding-top: env(safe-area-inset-top);
  padding-right: env(safe-area-inset-right);
  padding-bottom: env(safe-area-inset-bottom);
  padding-left: env(safe-area-inset-left);
}
セーフエリアのパディングを複数回追加したり、ヘッダー、モーダル、レイアウトラッパーに追加すると、UIが切り取られたり大きすぎるように見えることがあります。 .app-shellWith
__CAPGO_KEEP_0__ @capgo/Tailwind-capacitor, Capgo のユーティリティを使用して同じパディングを表現できます。 pt-safe pb-safe px-safe その一つのシェル上に。
Set Capacitor iOS contentInset ライブアップデート never Angularモバイルアプリケーション開発にCapacitorを使用する
イン capacitor.config.ts, 自動表示を非表示にして CSS (またはネイティブナビゲーションの) contentInsetMode: 'css'セーフエリアを制御する
const config: CapacitorConfig = {
  appId: 'com.example.myapp',
  appName: 'my-app',
  webDir: 'www',
  ios: {
    contentInset: 'never',
  },
};
Mixing Capacitor’s automatic content inset with CSS env(safe-area-inset-*) ページパディングは、ダブルスペースの原因となることがよくあります。
真実のオーバーフロー要素を探します。
通常の原因は、固定ピクセル幅の要素を使用している 100vw, Tailwind w-screen, 固定ピクセル幅の要素 min-width.
Safari Web インスペクターで実行:
[...document.querySelectorAll('*')]
  .filter(el => el.scrollWidth > document.documentElement.clientWidth)
  .map(el => ({
    el,
    tag: el.tagName,
    class: el.className,
    scrollWidth: el.scrollWidth,
    clientWidth: document.documentElement.clientWidth,
  }));
Tailwindの場合、 w-screen を置き換える w-full 可能な限り 100vw / w-screen水平方向のオーバーフロー問題の多くは、
, セーフエリアの安全なパディングの複製、または固定幅のコンテナ — ではなく、ビューポートメタタグ自体から
Capacitor is an excellent option for building native applications based on an existing web project, offering a simple way to share code and maintain a consistent UI.
__CAPGO_KEEP_0__は、既存のWebプロジェクトに基づいてネイティブアプリケーションを構築するための優れたオプションであり、__CAPGO_KEEP_1__を簡単に共有し、UIの統一性を維持する方法を提供します。 そして、Capgoの追加Angularアプリにリアルタイムの更新を追加するのは、最新の機能やバグ修正に常にユーザーがアクセスできるようにするのに、さらに簡単です。
AngularアプリにCapgoを追加する方法を学びたい場合は、次の記事をご覧ください。
AngularアプリとCapacitorでモバイルアプリを構築する
Angularアプリを使用している場合 AngularアプリとCapacitorでモバイルアプリを構築する @__CAPGO_KEEP_0__/__CAPGO_KEEP_1__-live-activities @capgo/capacitor-live-activities @capgo/capacitor-live-activities @capgo/capacitor-video-player @capgo/capacitor-video-player @capgo/capacitor-video-player @capgo/capacitor-live-activities @capgo/capacitor-video-player Capgoの実装詳細については、@capgo/capacitor-video-playerを参照してください。 Using @capgo/capacitor-native-navigation for the native capability in Using @capgo/capacitor-native-navigation.