


이 튜토리얼에서는 새로운 SvelteKit 앱을 구축하고 Capacitor를 사용하여 네이티브 모바일 개발로 전환할 수 있습니다. 또한 Capgo Native Navigation and Transitions를 추가하여 네이티브 모바일 느낌을 구현하고, tailwind-capacitor를 사용하여 세이프 에어리어(safe areas)를 처리할 수 있습니다.
Capacitor를 사용하면 React Native 같은 새로운 기술을 배우거나 코드를 대폭 수정할 필요 없이 SvelteKit 웹 애플리케이션을 네이티브 모바일 앱으로 쉽게 변환할 수 있습니다.
Capacitor로 SvelteKit 앱을 모바일 앱으로 변환하는 단계별 가이드를 따라 해 보세요. 선택적으로 Capgo Native Navigation, Transitions, iOS 레이아웃 가이드도 활용할 수 있습니다.
Capacitor 소개
CapacitorJS는 게임 체인저입니다! 어떤 웹 프로젝트에도 손쉽게 통합할 수 있고, 앱을 네이티브 webview로 감싸 Xcode와 Android Studio 프로젝트를 대신 생성해 줍니다. 플러그인을 통해 JavaScript bridge로 카메라 같은 네이티브 기기 기능에 접근할 수 있습니다.
Capacitor를 사용하면 복잡한 설정이나 가파른 학습 곡선 없이도 멋진 네이티브 모바일 앱을 만들 수 있습니다. 가벼운 API과 간소화된 기능 덕분에 프로젝트에 쉽게 통합할 수 있습니다. Capacitor로 완전히 동작하는 네이티브 앱을 만드는 게 얼마나 간단한지 직접 확인해 보세요!
SvelteKit 앱 준비하기
새 SvelteKit 앱을 만들려면 다음 명령어를 실행하세요:
npm create svelte@latest my-app
cd my-app
npm install
npm run build
명령어를 실행한 후, build 프로젝트 루트 디렉토리에 새로운 dist 프로젝트 루트의 폴더입니다.
이 폴더는 나중에 Capacitor에서 사용되지만, 지금은 올바르게 설정해 두어야 합니다.
SvelteKit 앱에 Capacitor 추가하기
웹 앱을 네이티브 모바일 컨테이너로 패키징하려면 몇 가지 초기 단계를 거쳐야 합니다. 그다음에는 단 하나의 명령어만 실행하면 될 만큼 간단합니다. sync 명령어만 실행하면 됩니다.
먼저, Capacitor CLI를 를 개발 의존성(development dependency)으로 설치하고 프로젝트에 설정합니다. 설정 과정에서 “enter”를 누르면 이름과 bundle ID의 기본값을 그대로 사용할 수 있습니다.
그 다음, 코어 패키지와 iOS 및 Android 플랫폼용 관련 패키지를 설치합니다.
마지막으로 플랫폼을 추가하면, Capacitor가 프로젝트 루트에 각 플랫폼별 폴더를 생성합니다:
# Install the Capacitor CLI locally
npm install -D @capacitor/cli

# Initialize Capacitor in your SvelteKit project
npx cap init

# Install the required packages
npm install @capacitor/core @capacitor/ios @capacitor/android

# Add the native platforms
npx cap add ios
npx cap add android
이제 SvelteKit 프로젝트에서 새로운 ios 및 android 폴더를 확인할 수 있습니다.
이것들은 실제 Native 프로젝트입니다!
나중에 Android 프로젝트에 접근하려면 다음을 설치해야 합니다: Android Studio. iOS의 경우 Mac이 필요하며 다음을 설치해야 합니다: Xcode.
또한, 프로젝트 내에서 다음 파일을 찾아야 합니다: capacitor.config.ts 이 파일에는 sync 과정에서 사용되는 기본적인 Capacitor 설정이 포함되어 있습니다. 주의 깊게 확인해야 할 부분은 바로 webDir입니다. 이 값은 build 명령의 결과물을 가리켜야 합니다. 현재 설정은 잘못되어 있습니다.
이를 수정하려면 capacitor.config.ts 파일을 열고 다음을 업데이트하세요: webDir:
import { CapacitorConfig } from '@capacitor/cli'

const config: CapacitorConfig = {
  appId: 'com.example.app',
  appName: 'my-app',
  webDir: 'build',
}

export default config
Capacitor 설정을 업데이트했으니, 이제 적절한 static adapter 패키지를 다운로드하여 Sveltekit 프로젝트를 static application으로 전환해 보겠습니다:
npm i -D @sveltejs/adapter-static패키지 설치가 완료되면, svelte.config.js 파일을 auto-adapter에서 static으로 변경해야 합니다:
import adapter from '@sveltejs/adapter-static'
import { vitePreprocess } from '@sveltejs/kit/vite'

/** @type {import('@sveltejs/kit').Config} */
const config = {
// Consult https://kit.svelte.dev/docs/integrations#preprocessors
// for more information about preprocessors
  preprocess: vitePreprocess(),

  kit: {
    // adapter-auto only supports some environments, see https://kit.svelte.dev/docs/adapter-auto for a list.
    // If your environment is not supported or you settled on a specific environment, switch out the adapter.
    // See https://kit.svelte.dev/docs/adapters for more information about adapters.
    adapter: adapter({
      // default options are shown. On some platforms
      // these options are set automatically — see below
      pages: 'build',
      assets: 'build',
      fallback: null,
      precompress: false,
      strict: true
    })
  }
}

export default config
업데이트된 후, svelte.config.js 다음 항목을 추가해야 합니다: prerender 옵션을 위해, +layout.js 페이지를 생성하여 src/routes 다음 export를 추가하기만 하면 됩니다: +layout.js:
export const prerender = true해당 페이지를 추가하고 업데이트한 후, +layout.js 모바일 플랫폼을 추가하고 프로젝트를 다시 빌드하여 build 폴더를 생성해야 합니다.
다음 명령어를 실행하여 진행할 수 있습니다:
npm run build
npx cap sync
첫 번째 명령어는 npm run build SvelteKit 프로젝트를 빌드하고 정적 빌드 파일을 복사하며, 두 번째 명령어는 npx cap sync 모든 웹 code를 네이티브 플랫폼의 적절한 위치로 동기화하여 앱에서 표시할 수 있게 합니다.
또한, sync 명령어가 네이티브 플랫폼을 업데이트하거나 플러그인을 설치할 수도 있으므로, 새로운 Capacitor 플러그인을설치했다면, 이제 npx cap sync 다시.
자신도 모르는 사이에 모든 과정을 마쳤습니다. 이제 기기에서 앱을 확인해 봅시다!
네이티브 앱 빌드 및 배포
iOS 앱을 개발하려면 Xcode가 설치되어 있어야 하며, Android 앱의 경우 Android Studio를 설치해야 합니다. 또한 앱을 스토어에 배포하려면 iOS는 Apple Developer Program에, Android는 Google Play Console에 등록해야 합니다.
네이티브 모바일 개발이 처음이라면, Capacitor CLI을 사용하여 두 네이티브 프로젝트를 간편하게 열 수 있습니다:
npx cap open ios
npx cap open android
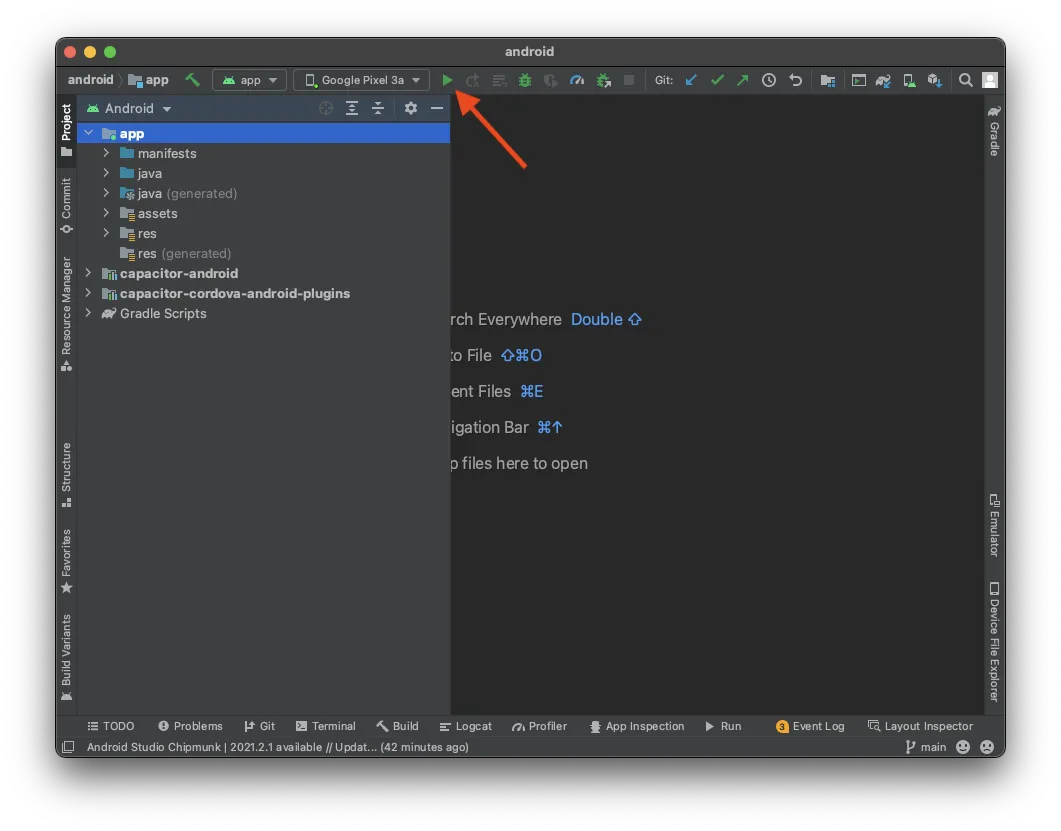
네이티브 프로젝트 설정이 완료되었다면, 연결된 기기에 앱을 배포하는 것은 매우 간단합니다. Android Studio에서는 모든 준비가 완료될 때까지 기다리기만 하면 별도의 설정 변경 없이 연결된 기기에 앱을 배포할 수 있습니다. 예시는 다음과 같습니다:
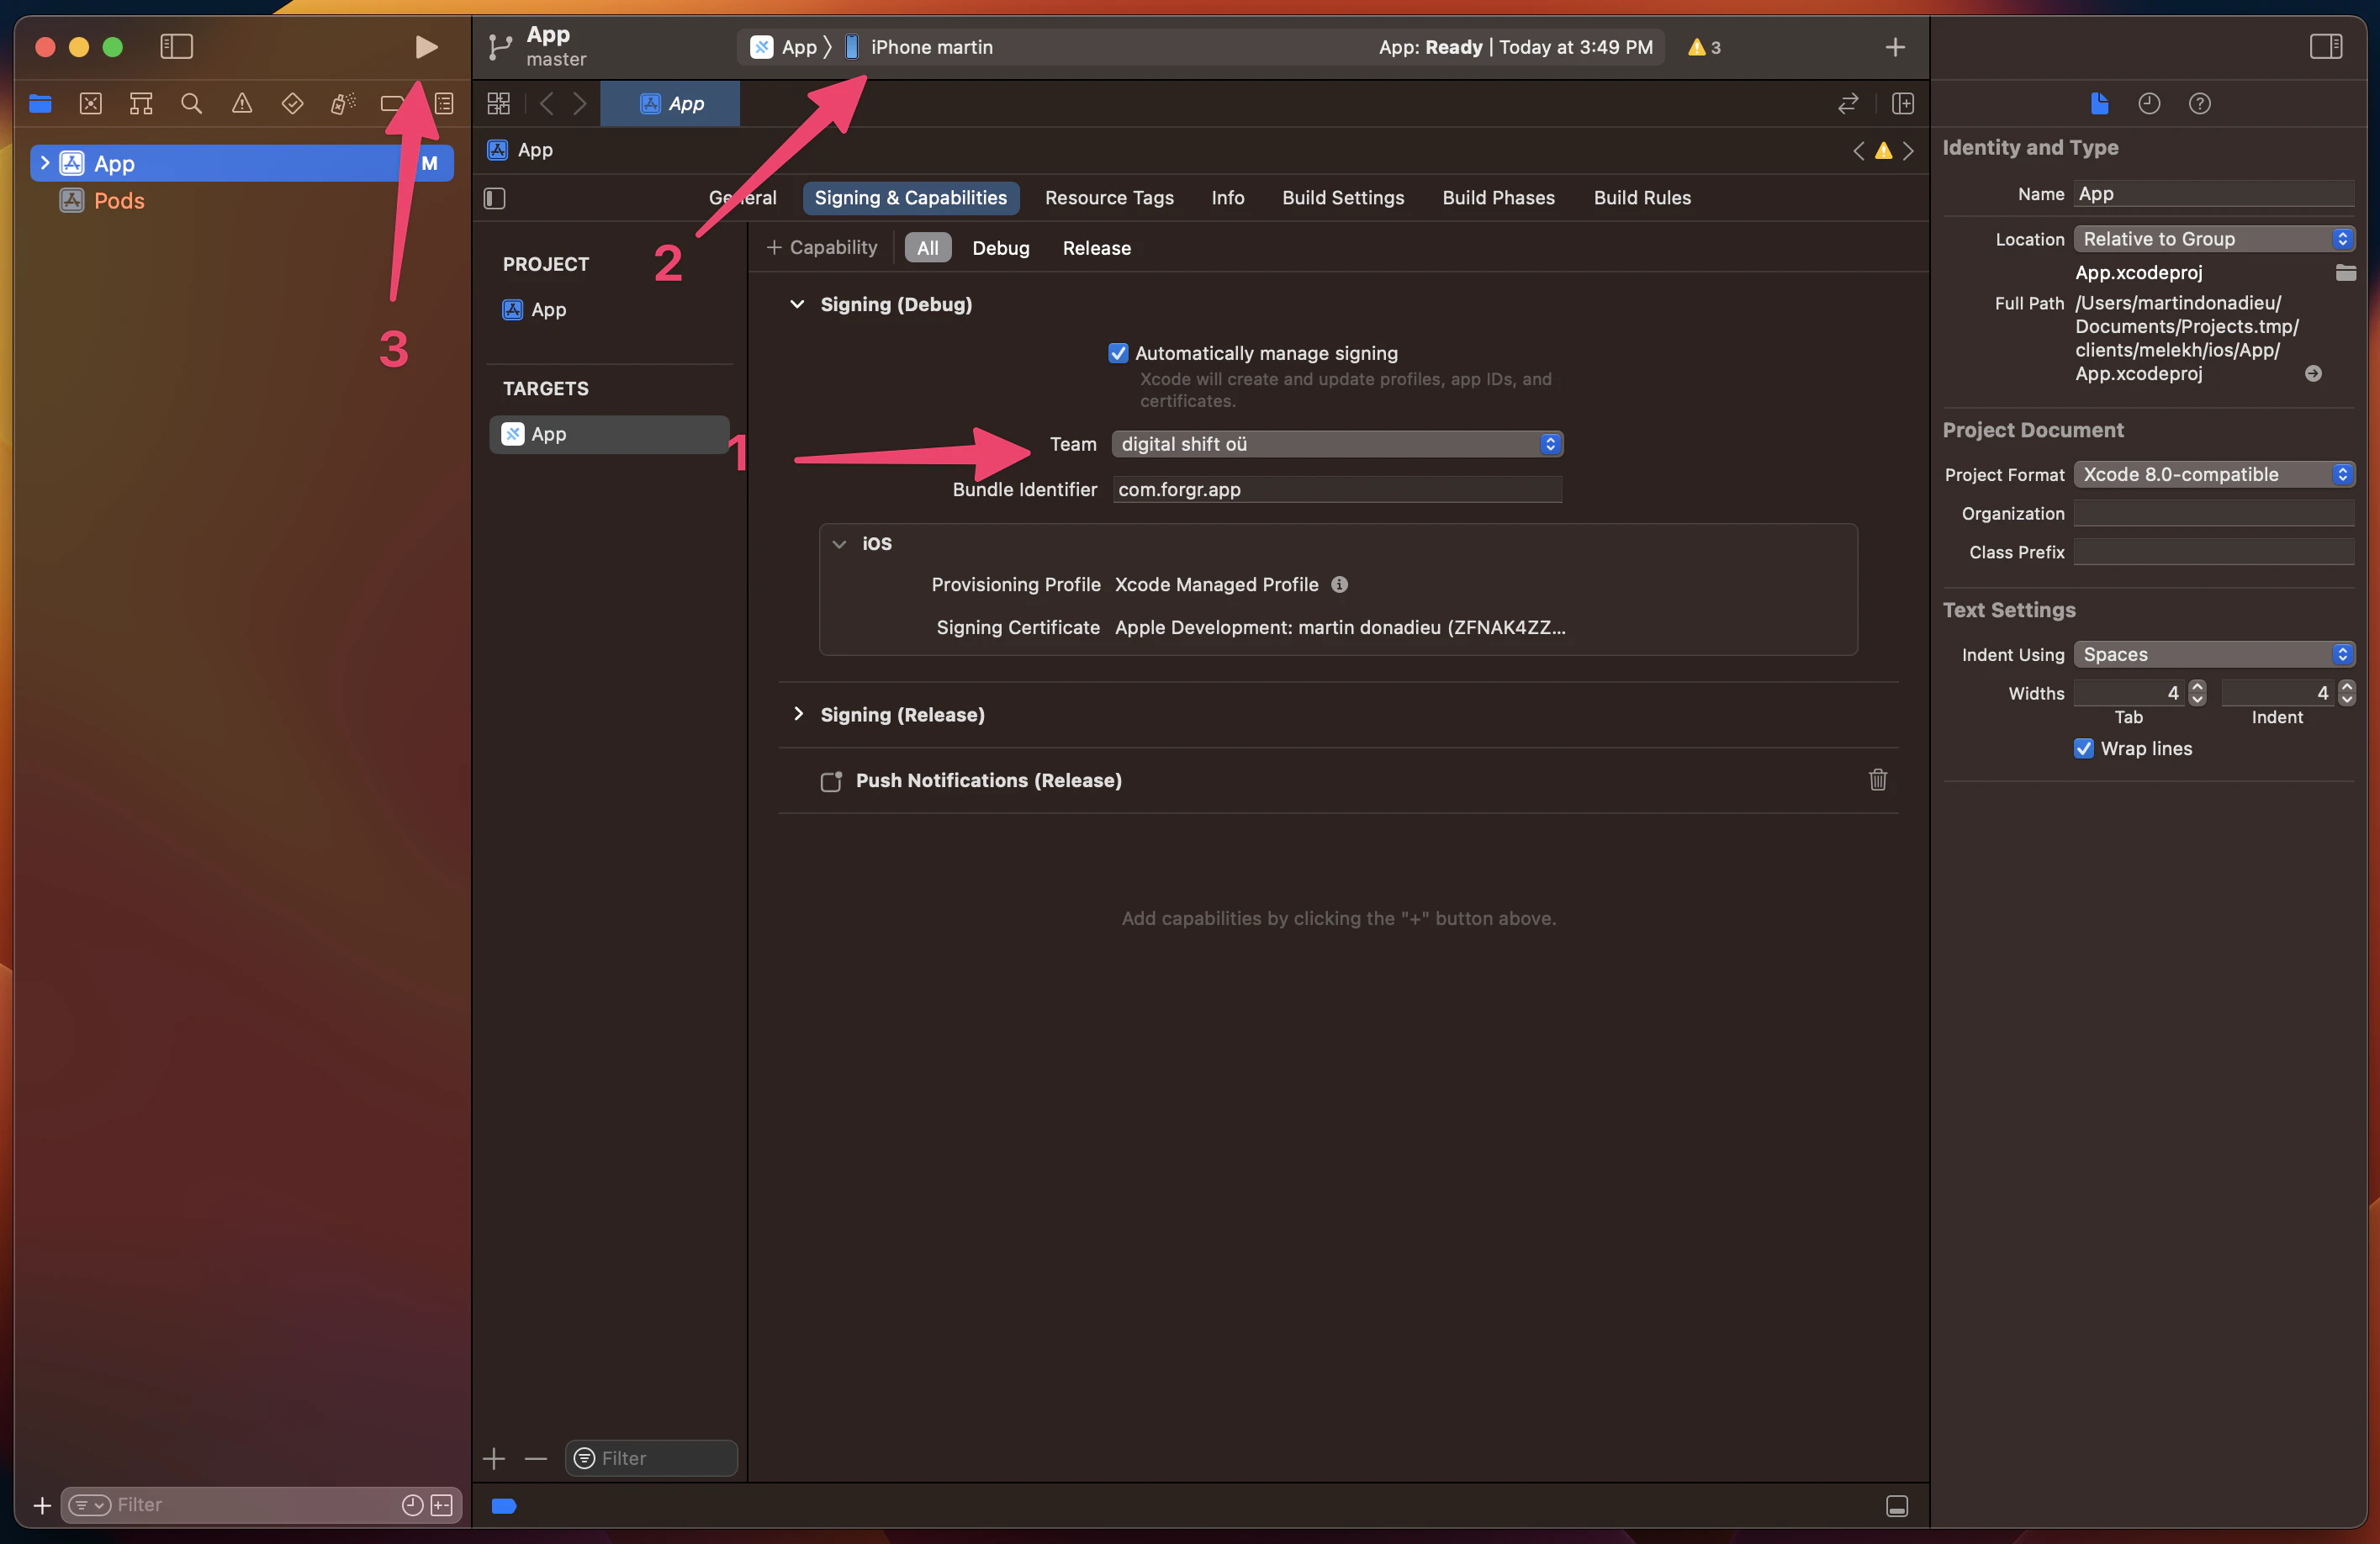
Xcode에서는 시뮬레이터가 아닌 실제 기기에 앱을 배포하려면 signing account를 설정해야 합니다. 처음이라면 Xcode의 안내에 따라 진행하면 됩니다 (단, Developer Program에 등록되어 있어야 합니다). 설정이 끝나면 상단에서 연결된 기기를 선택한 뒤, 실행 버튼을 눌러 앱을 구동할 수 있습니다. 예시는 다음과 같습니다:
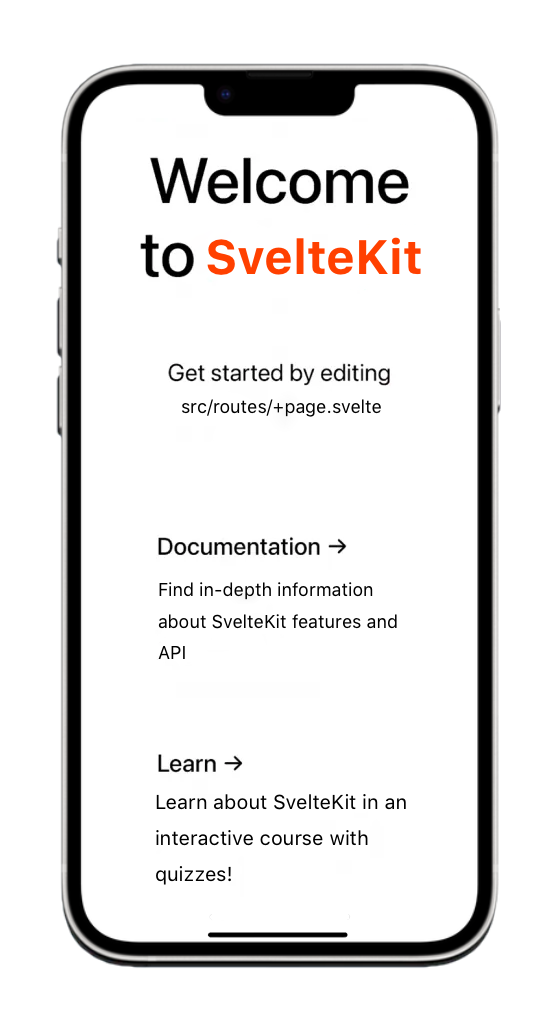
축하합니다! SvelteKit 웹 앱을 모바일 기기에 성공적으로 배포했습니다. 예시는 다음과 같습니다:
잠깐만요, 개발 중에는 이보다 더 빠른 방법이 있습니다...
Capacitor Live Reload
이미 최신 프레임워크의 hot reload에 익숙하실 텐데요, 좋은 소식은 모바일 기기에서도 동일한 기능을 사용할 수 있다는 점입니다. 아주 간편하게 말이죠!
live reload를 통해 로컬에서 실행 중인 애플리케이션에 접속하세요 네트워크에서 Capacitor 앱이 특정 URL에서 콘텐츠를 로드하도록 설정하여 구현할 수 있습니다.
가장 먼저 로컬 IP 주소를 확인해야 합니다. Mac을 사용 중이라면 터미널에서 다음 명령어를 실행하여 확인할 수 있습니다:
ipconfig getifaddr en0Windows에서는 다음을 실행하세요:
ipconfig그다음 IPv4 주소를 찾으세요.
Capacitor가 서버에서 앱을 직접 로드하도록 하려면 다음 항목에 설정을 추가하면 됩니다: capacitor.config.ts 파일에 포함하세요:
import { CapacitorConfig } from '@capacitor/cli';

const config: CapacitorConfig = {
  appId: 'com.example.app',
  appName: 'my-app',
  webDir: 'dist',
  bundledWebRuntime: false,
  server: {
    url: 'http://192.168.x.xx:3000',
    cleartext: true
  }
};

export default config;
반드시 올바른 IP와 포트를사용해야 합니다. 위 예시를 참고하세요.
이제 이 변경 사항을 네이티브 프로젝트에 복사하여 적용할 수 있습니다:
npx cap copy이 copy 명령어는 다음과 유사합니다: sync, 하지만 오직 web 폴더의 변경 사항만 복사하며 네이티브 프로젝트를 업데이트하지 않고 설정만 반영합니다.
이제 Android Studio나 Xcode를 통해 앱을 한 번 더 배포할 수 있습니다. 그 이후 Svelte 앱에서 무언가를 변경하면, 앱이 자동으로 리로드되어 변경 사항이 즉시 반영됩니다!
주의할 점은 카메라와 같은 새로운 플러그인을 설치할 경우, 여전히 네이티브 프로젝트의 rebuild가 필요하다는 것입니다. 이는 네이티브 파일이 변경되기 때문에 실시간(on the fly)으로 처리할 수 없기 때문입니다.
설정 시 올바른 IP와 포트를 사용해야 합니다. 위의 code 블록은 데모를 위해 기본 SvelteKit 포트를 보여줍니다.
Capacitor 플러그인 사용하기
앞서 몇 번 언급했던 Capacitor 플러그인을 실제로 어떻게 사용하는지 살펴보겠습니다. 다음 명령어를 실행하여 간단한 플러그인을 설치할 수 있습니다:
npm i @capacitor/share특별할 것 없는 플러그인 공유하기이지만, 네이티브 공유 다이얼로그를 띄워줍니다! 이제 패키지를 import하고 앱에서 해당 share() 함수를 호출하기만 하면 됩니다. 그럼 src/routes/index.svelte 다음과 같이:
<script>
  import { Share } from '@capacitor/share';

  async function share() {
    await Share.share({
      title: 'Open Youtube',
      text: 'Check new video on youtube',
      url: 'https://www.youtube.com',
      dialogTitle: 'Share with friends'
    });
  }
</script>

<h1>Welcome to SvelteKit and Capacitor!</h1>
<button on:click={share}>Share now!</button>
앞서 언급했듯이, 새로운 플러그인을 설치할 때는 sync 작업을 수행한 뒤 기기에 앱을 다시 배포해야 합니다. 이를 위해 다음 명령어를 실행하세요:
npx cap sync버튼을 누르면 멋진 네이티브 공유 다이얼로그가 작동하는 것을 확인할 수 있습니다!
다음으로, Capgo navigation 및 transition을 사용하여 iOS와 Android에서 앱을 더욱 네이티브 앱처럼 만들 수 있으며, 가로 오버플로우나 세이프 에어리어 잘림 같은 일반적인 iOS 레이아웃 문제도 해결할 수 있습니다.
Capgo Native Navigation 및 Transitions로 구현하는 네이티브 UI
저는 수년간 Ionic 크로스 플랫폼 앱을 빌드할 때 SvelteKit과 통합하는 방식은 다소 불안정하며, 이미 다음과 같은 도구를 사용 중이라면 굳이 시도할 가치가 낮습니다: Tailwind CSS.
SvelteKit + Capacitor 앱에서 네이티브 모바일 느낌을 구현하려면, Konsta UI 같은 웹 전용 UI 키트 대신 Capgo 플러그인을 사용하세요:
- @capgo/capacitor-native-navigation — 네이티브 navbar, iOS의 Liquid Glass tab bar, Android의 블러 처리된 tab bar 스타일을 제공합니다. SvelteKit 라우터는 라우트 상태를 관리하고, 플러그인은 네이티브 크롬(chrome)을 제어합니다.
- @capgo/capacitor-transitions — Ionic UI를 도입하지 않고도 WebView 레이어에서 Ionic 스타일의 페이지 전환과 iOS edge swipe-back 기능을 사용할 수 있습니다.
둘 다 설치하세요:
bun add @capgo/capacitor-native-navigation @capgo/capacitor-transitions
bunx cap sync
웹 콘텐츠가 네이티브 바 영역을 침범하지 않도록 CSS inset 모드로 네이티브 네비게이션을 설정하세요:
import { NativeNavigation } from '@capgo/capacitor-native-navigation';

await NativeNavigation.configure({
  contentInsetMode: 'css',
  animationDuration: 360,
  glass: {
    effect: 'liquidGlass',
  },
});
Liquid Glass tab bar를 렌더링합니다 (iOS는 시스템 렌더링을 사용하며, Android는 블러 처리된 WebView 배경을 사용합니다):
await NativeNavigation.setTabbar({
  selectedId: 'home',
  labelVisibilityMode: 'labeled',
  icons: true,
  colors: { dynamic: true },
  tabs: [
    { id: 'home', title: 'Home', icon: { svg: '...' } },
    { id: 'settings', title: 'Settings', icon: { svg: '...' } },
  ],
});

await NativeNavigation.addListener('tabSelect', ({ id }) => {
  goto(`/${id}`);
});
앱 셸(app shell)에 네이티브 페이지 전환을 추가하세요:
<script>
  import { goto } from '$app/navigation';
  import { routerOutlet, page, setDirection } from '@capgo/capacitor-transitions/svelte';
  import '@capgo/capacitor-transitions';

  function openSettings() {
    setDirection('forward');
    goto('/settings');
  }
</script>

<cap-router-outlet use:routerOutlet>
  <cap-page use:page>
    <cap-content slot="content">
      <slot />
    </cap-content>
  </cap-page>
</cap-router-outlet>
라우팅된 페이지를 다음으로 감싸세요: cap-router-outlet, cap-page, 그리고 cap-content, 그리고 호출하세요 setDirection('forward') 또는 setDirection('back') 네비게이션하기 전에 호출하세요. 네이티브 네비게이션이 해당 영역을 담당할 때는 웹 헤더나 푸터를 중복해서 만들지 마세요.
전체 가이드 보기: @capgo/capacitor-native-navigation 사용하기 및 @capgo/capacitor-transitions 사용하기.
Tailwind로 Safe area 처리
Tailwind CSS에서 디바이스 Safe area에는 다음을 사용하세요: @capgo/tailwind-capacitor (다음 이름으로 tailwind-capacitor npm에 발행됨). 이 기능은 safe-areas 유틸리티 및 기타 Capacitor 친화적인 Tailwind 플러그인:
bun add -D tailwind-capacitor에서 src/app.css:
@import 'tailwindcss';
@plugin "@capgo/tailwind-capacitor/platform";
@plugin "@capgo/tailwind-capacitor/safe-areas";
다음과 같은 유틸리티를 사용하세요 pt-safe, pb-safe, 그리고 px-safe 일일이 흩뿌리는 대신 env(safe-area-inset-*) 손으로 직접. 이 프로젝트는 활발히 개발 중입니다 — SvelteKit 설정에 빠진 게 있다면, GitHub에 PR을 올려주세요.
iOS 레이아웃 문제 해결 (Viewport, Safe Area, 가로 오버플로)
iOS에서 콘텐츠가 잘리거나, 밀리거나, 가로로 스크롤된다면, 더 추가하는 것 overflow-x: hidden 또는 viewport 태그만 수정해서는 대개 해결되지 않습니다. 다음 체크리스트를 순서대로 확인하세요.
viewport meta 태그가 올바르게 적용되었는지 확인하세요
에서 src/app.html, 다음에서 viewport meta tag를 설정하세요: <head>:
<meta name="viewport" content="width=device-width, initial-scale=1, viewport-fit=cover" />단 하나의 루트 wrapper에서 iOS safe area 처리하기
단일 app shell을 생성하고 그곳에 safe area padding을 적용하세요. 여러 중첩된 컴포넌트에 각각 적용하지 마세요:
html,
body,
body {
  width: 100%;
  min-height: 100%;
  margin: 0;
  padding: 0;
  overflow-x: hidden;
}

* {
  box-sizing: border-box;
}

.app-shell {
  min-height: 100dvh;
  width: 100%;
  padding-top: env(safe-area-inset-top);
  padding-right: env(safe-area-inset-right);
  padding-bottom: env(safe-area-inset-bottom);
  padding-left: env(safe-area-inset-left);
}
모든 페이지 콘텐츠를 다음으로 감싸세요: .app-shell. 헤더, 모달, 레이아웃 wrapper에 safe-area padding이 중복되면 UI가 잘리거나 너무 커 보일 수 있습니다.
다음 기능을 사용하면 @capgo/tailwind-capacitor, 다음과 같은 utility를 사용하여 동일한 padding을 표현할 수 있습니다: pt-safe pb-safe px-safe 해당 단일 shell에 적용하세요.
Capacitor iOS 설정 contentInset 로 never 먼저
에서 capacitor.config.ts, native inset을 비활성화하고 CSS(또는 Native Navigation의 contentInsetMode: 'css')가 safe area를 제어하도록 설정하세요:
const config: CapacitorConfig = {
  appId: 'com.example.myapp',
  appName: 'my-app',
  webDir: 'build',
  ios: {
    contentInset: 'never',
  },
};
Capacitor의 자동 content inset과 CSS env(safe-area-inset-*) padding을 혼용하면 여백이 이중으로 생기는 원인이 됩니다.
실제로 넘치는(overflowing) 요소를 찾으세요
주로 범인은 다음과 같은 요소를 사용하는 경우입니다: 100vw, Tailwind w-screen, 고정 픽셀 너비, 또는 큰 min-width.
Safari Web Inspector에서 다음을 실행하세요:
[...document.querySelectorAll('*')]
  .filter(el => el.scrollWidth > document.documentElement.clientWidth)
  .map(el => ({
    el,
    tag: el.tagName,
    class: el.className,
    scrollWidth: el.scrollWidth,
    clientWidth: document.documentElement.clientWidth,
  }));
Tailwind를 사용하는 경우, 다음을 교체하세요 w-screen 함께 w-full 가능한 한 피해야 합니다. 많은 가로 스크롤 오버플로 문제는 100vw / w-screen, 중복된 safe-area 패딩, 또는 고정 너비 컨테이너 때문에 발생하며, viewport meta tag 자체의 문제는 아닙니다.
결론
Capacitor는 기존 웹 프로젝트를 기반으로 네이티브 앱을 구축할 수 있는 훌륭한 옵션이며, code을 공유하고 일관된 UI를 유지하는 간편한 방법을 제공합니다.
여기에 Capgo를 더하면 앱에 live updates를 추가하기가 훨씬 쉬워지며, 사용자가 항상 최신 기능과 버그 수정 사항을 이용할 수 있도록 보장합니다.
SvelteKit 앱에 Capgo를 추가하는 방법을 배우고 싶다면 다음 아티클을 확인해 보세요:
Capgo를 통해 더 나은 앱을 더 빠르게 만드는 방법을 알아보세요. 지금 무료 계정을 생성하고 시작해 보세요.
SvelteKit과 Capacitor로 모바일 앱 만들기에서 계속하기
사용 중인 경우 SvelteKit과 Capacitor로 모바일 앱 구축하기 CI/CD 자동화를 계획하려면, 이것을 연결하세요 Capgo CI/CD Capgo CI/CD의 제품 워크플로우를 위해, Capgo Native Build Capgo Native Builds의 제품 워크플로우를 위해, Capgo 연동 서비스 Capgo Integrations의 제품 워크플로우를 위해, CI/CD 통합 그리고 CI/CD Integration의 구현 세부 사항은, GitHub Actions 연동 GitHub Actions Integration의 구현 세부 사항을 참고하세요.





