



在本教程中,我们将从一个全新的 SvelteKit 应用开始,并使用 Capacitor 转向原生移动开发。你还可以添加 Capgo Native Navigation and Transitions 来获得原生移动体验,并使用 tailwind-capacitor 来处理安全区域。
Capacitor 让你能够轻松地将 SvelteKit Web 应用转换为原生移动应用,无需进行大规模修改,也无需学习像 React Native 这样的新技能。
按照本分步指南,使用 Capacitor 将您的 SvelteKit 应用转换为移动应用,并可选使用 Capgo 实现原生导航、过渡效果以及 iOS 布局指导。
关于 Capacitor
CapacitorJS 彻底改变了开发模式!它可以轻松集成到任何 Web 项目中,将您的应用封装在原生 WebView 中,并为您生成原生的 Xcode 和 Android Studio 项目。其插件通过 JavaScript bridge 提供对摄像头等原生设备功能的使用权限。
Capacitor 让您无需复杂的配置或陡峭的学习曲线,即可创建出色的原生移动应用。其轻量级的 API 和精简的功能使其易于集成到您的项目中。您会惊讶于使用 Capacitor 实现功能完备的原生应用竟然如此简单!
准备您的 SvelteKit 应用
要创建一个新的 SvelteKit 应用,请运行以下命令:
npm create svelte@latest my-app
cd my-app
npm install
npm run build
运行完 build 命令后,您应该会看到一个新的 dist 文件夹出现在项目根目录下。
该文件夹稍后将供 Capacitor 使用,但现在我们需要对其进行正确配置。
在您的 SvelteKit 应用中添加 Capacitor
要将任何 Web 应用打包进原生移动容器,我们需要执行几个初始步骤。之后,只需运行一个简单的 sync 命令。
首先,安装 Capacitor CLI 作为开发依赖项并将其配置到项目中。在设置过程中,您可以按“enter”键来接受默认的名称和 bundle ID。
接下来,安装核心包以及 iOS 和 Android 平台的相关包。
最后,添加平台,Capacitor 会在您的项目根目录下为每个平台创建文件夹:
# Install the Capacitor CLI locally
npm install -D @capacitor/cli

# Initialize Capacitor in your SvelteKit project
npx cap init

# Install the required packages
npm install @capacitor/core @capacitor/ios @capacitor/android

# Add the native platforms
npx cap add ios
npx cap add android
此时,您应该能在 SvelteKit 项目中看到新的 iOS 和 android 文件夹。
这些都是真正的 Native 项目!
若想稍后访问 Android 项目,你需要安装 Android Studio。对于 iOS,你需要一台 Mac,并安装 Xcode.
此外,你还需要找到项目中的 capacitor.config.ts 文件,其中包含同步过程中使用的一些基础 Capacitor 设置。你唯一需要注意的是 webDir,它必须指向 build 命令的输出目录。目前该配置是错误的。
要修复此问题,请打开 capacitor.config.ts 文件并更新 webDir:
import { CapacitorConfig } from '@capacitor/cli'

const config: CapacitorConfig = {
  appId: 'com.example.app',
  appName: 'my-app',
  webDir: 'build',
}

export default config
既然我们已经更新了 Capacitor 设置,接下来让我们通过下载相应的静态适配器包,将 Sveltekit 项目转换为静态应用:
npm i -D @sveltejs/adapter-static安装完该包后,我们需要将 svelte.config.js 文件从自动适配模式改为静态模式:
import adapter from '@sveltejs/adapter-static'
import { vitePreprocess } from '@sveltejs/kit/vite'

/** @type {import('@sveltejs/kit').Config} */
const config = {
// Consult https://kit.svelte.dev/docs/integrations#preprocessors
// for more information about preprocessors
  preprocess: vitePreprocess(),

  kit: {
    // adapter-auto only supports some environments, see https://kit.svelte.dev/docs/adapter-auto for a list.
    // If your environment is not supported or you settled on a specific environment, switch out the adapter.
    // See https://kit.svelte.dev/docs/adapters for more information about adapters.
    adapter: adapter({
      // default options are shown. On some platforms
      // these options are set automatically — see below
      pages: 'build',
      assets: 'build',
      fallback: null,
      precompress: false,
      strict: true
    })
  }
}

export default config
在 svelte.config.js 更新后,我们需要通过创建一个 prerender 选项,即创建一个 +layout.js 页面来 src/routes 只需在以下文件中添加 export 即可: +layout.js:
export const prerender = true添加并更新 +layout.js 页面后,我们需要添加移动端平台,并重新构建项目以生成 build 文件夹
你可以通过运行以下命令来完成:
npm run build
npx cap sync
第一个命令 npm run build 将构建你的 SvelteKit 项目并复制静态 build,而第二个命令 npx cap sync 会将所有 Web code 同步到原生平台的正确位置,以便在 App 中显示。
此外,sync 命令可能会更新原生平台并安装插件,因此当你安装新的 Capacitor 插件时,需要再次运行 npx cap sync 。
不知不觉中,你已经完成了整个流程,现在让我们在真机上看看 App 吧!
构建并部署 Native Apps
要开发 iOS 应用,你需要安装 Xcode ;对于 Android 应用,你需要安装 Android Studio 。此外,如果你计划在应用商店发布 App,则需要加入 iOS 的 Apple Developer Program 和 Android 的 Google Play Console。
如果你是原生移动开发新手,可以使用 Capacitor CLI 来轻松打开这两个原生项目:
npx cap open ios
npx cap open android
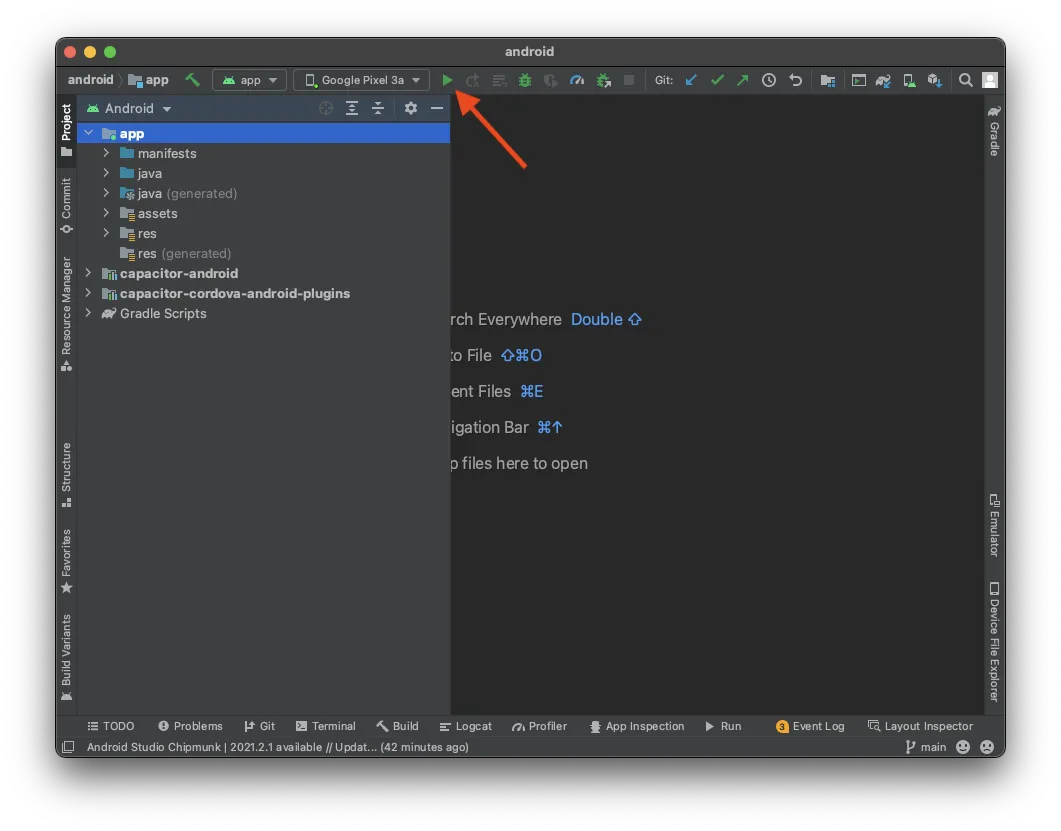
配置好原生项目后,把应用部署到已连接的设备很简单。在 Android Studio 中,只需等待一切就绪,无需更改任何设置,就能把应用部署到已连接的设备。示例如下:
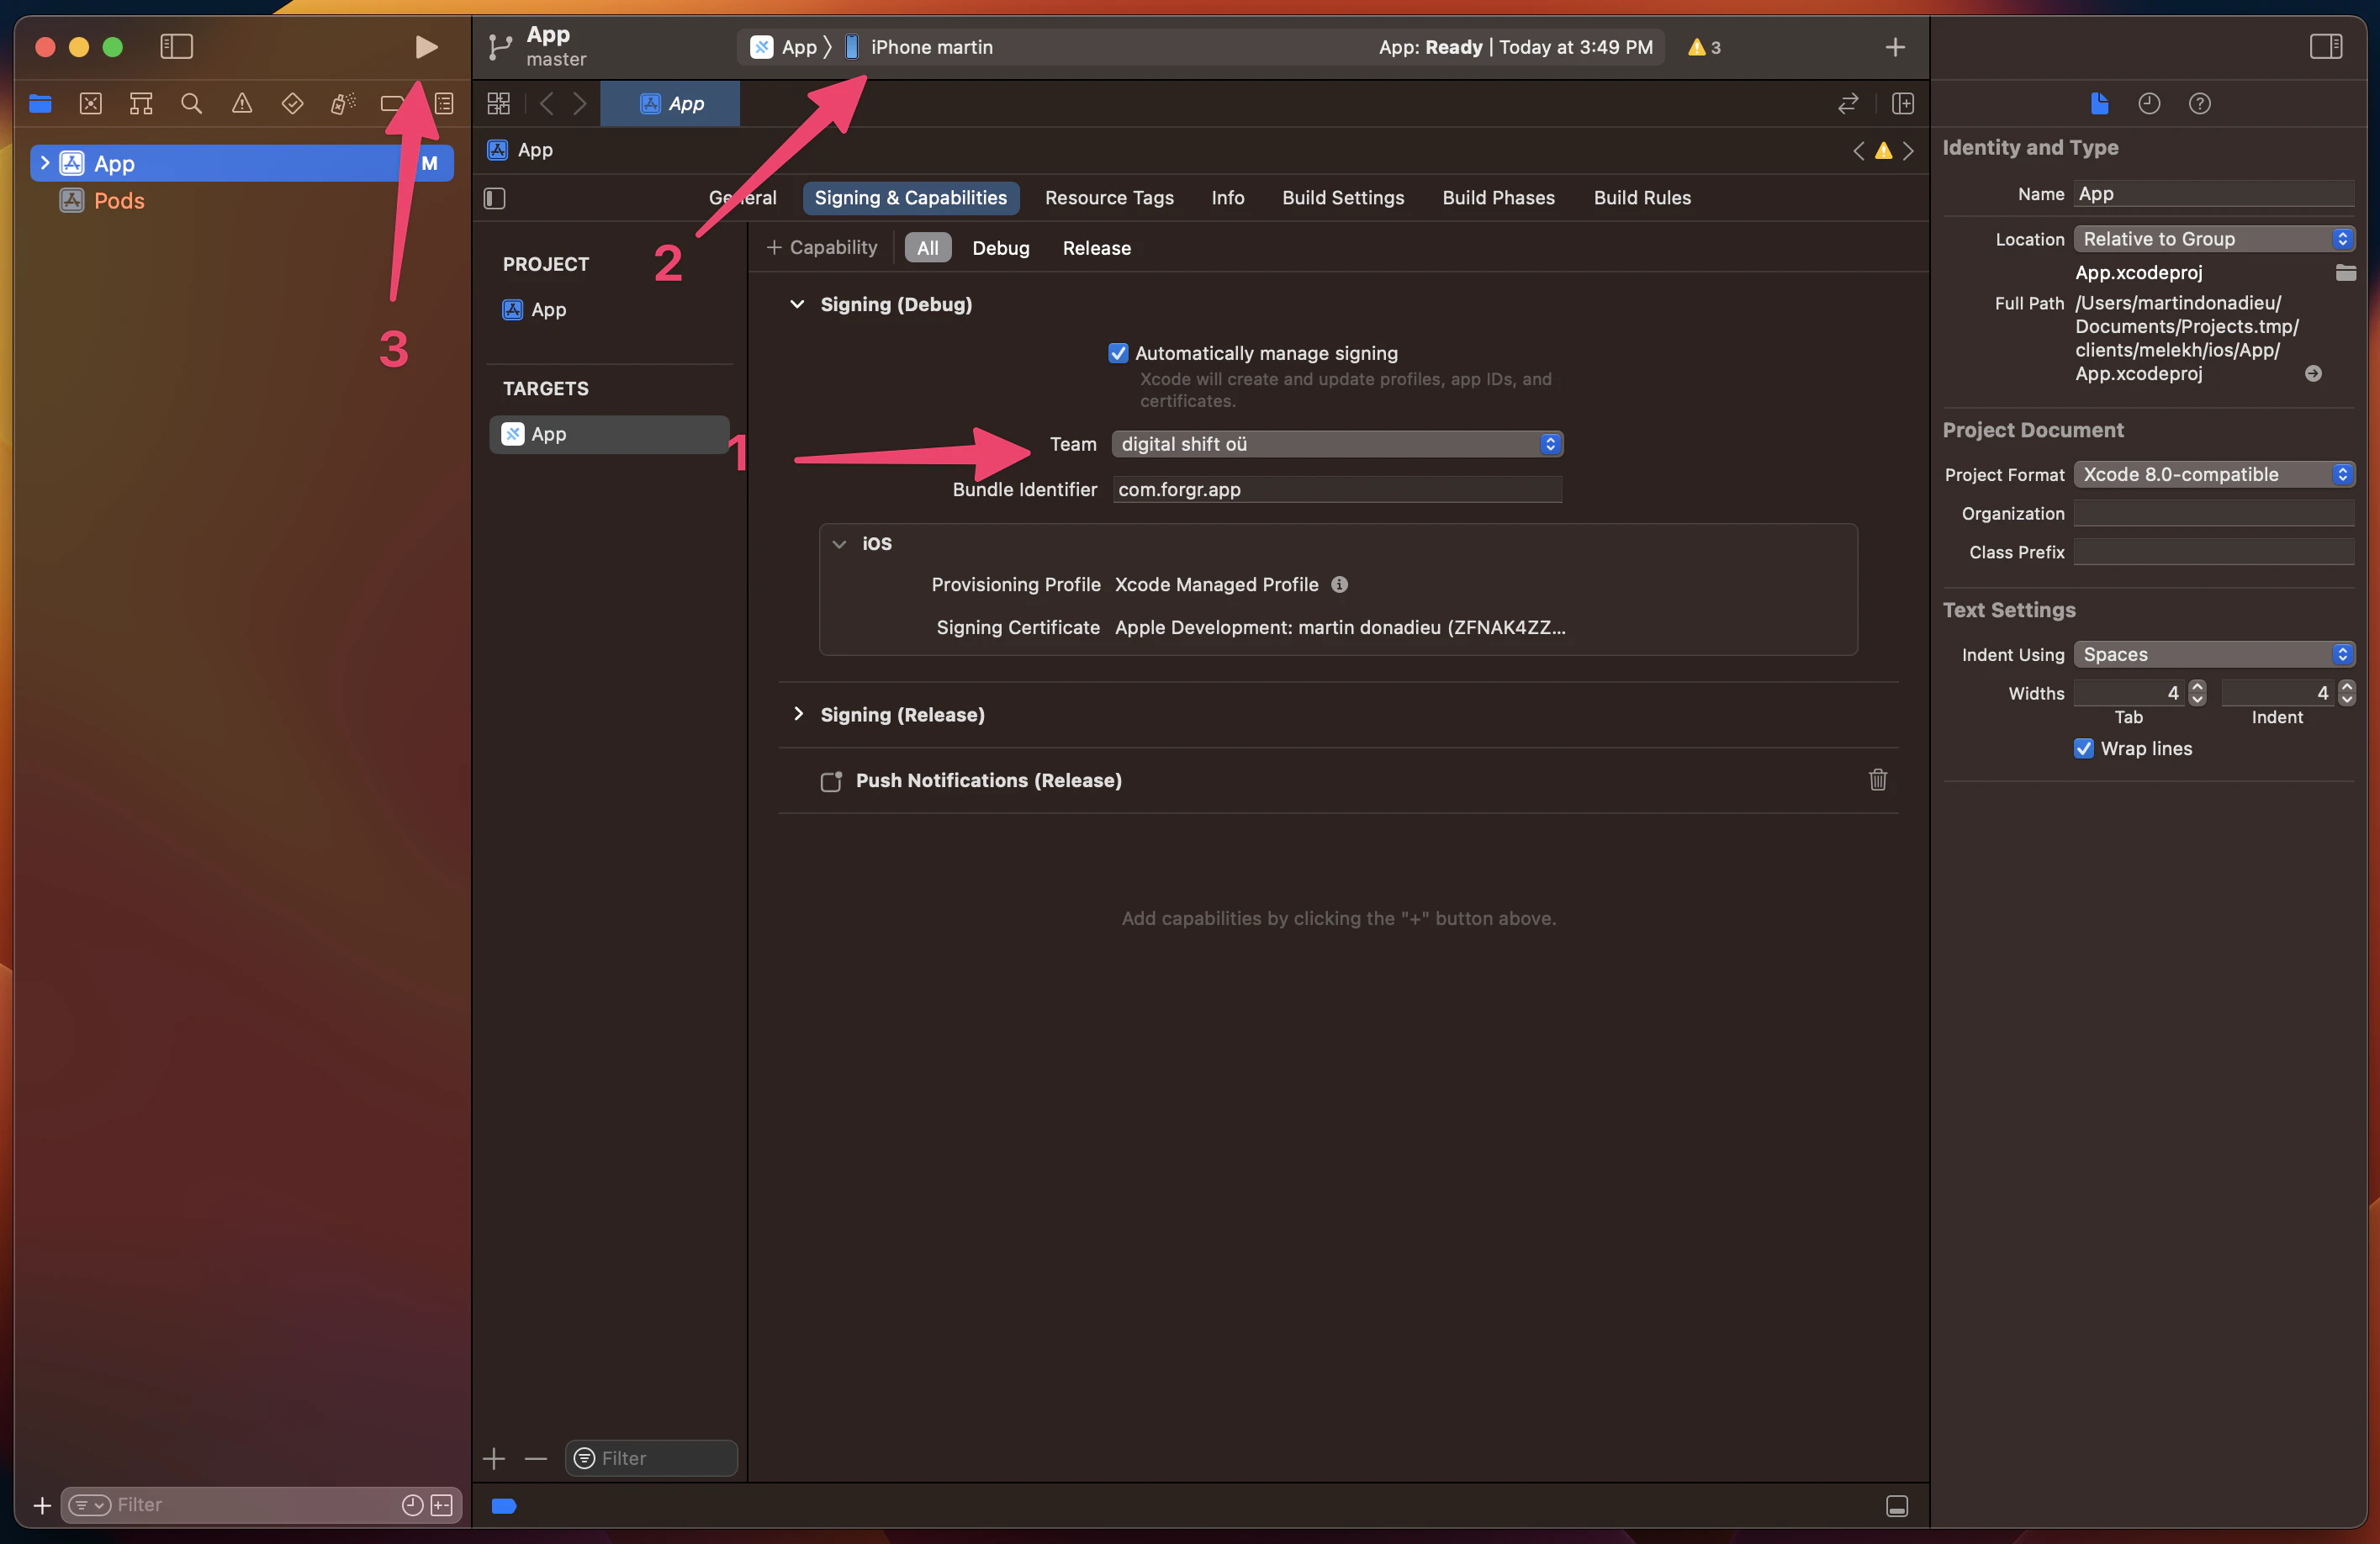
在 Xcode 中,你需要配置签名账号,以便将 App 部署到真机而非仅在模拟器上运行。如果你之前没有操作过,Xcode 会引导你完成整个流程(但前提是你需要加入 Developer Program)。完成后,只需点击运行按钮,即可在顶部选择的已连接设备上运行 App。示例如下:
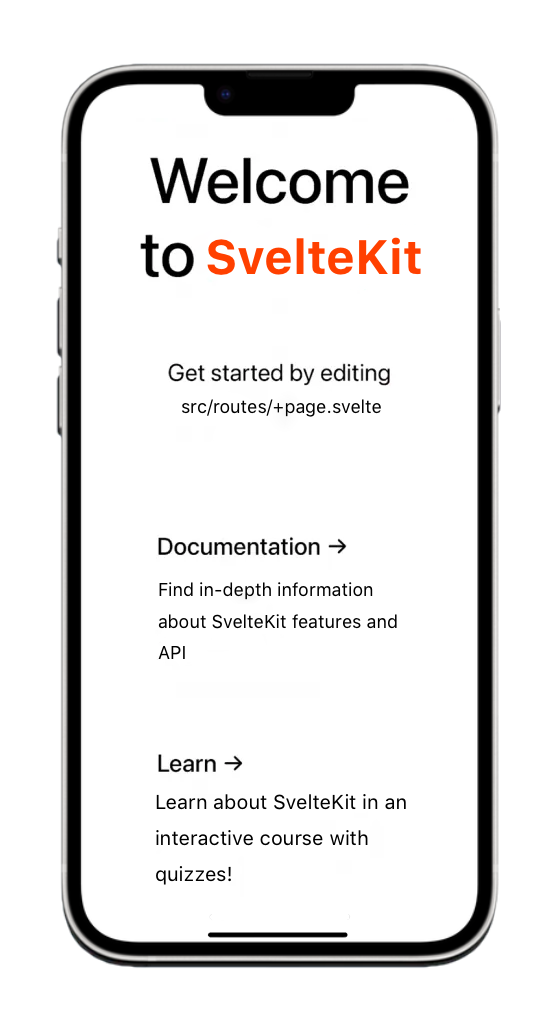
恭喜!你已成功将 SvelteKit Web App 部署到移动设备。示例如下:
不过等等,在开发过程中其实还有一种更快捷的方法……
Capacitor 热重载
到目前为止,你可能已经习惯了现代框架提供的 hot reload 功能,好消息是,你也可以在移动设备上 实现同样的功能, 而且几乎无需额外工作!
启用 live reload 以访问本地托管的应用 在你的网络中 通过让 Capacitor 应用从特定 URL 加载内容。
第一步是确定你的本地 IP 地址。如果你使用的是 Mac,可以在终端运行以下命令来查看:
ipconfig getifaddr en0在 Windows 上,运行:
ipconfig然后找到 IPv4 地址。
我们可以通过在我们的...中添加另一个条目,来指示 Capacitor 直接从服务器加载应用 capacitor.config.ts 文件:
import { CapacitorConfig } from '@capacitor/cli';

const config: CapacitorConfig = {
  appId: 'com.example.app',
  appName: 'my-app',
  webDir: 'dist',
  bundledWebRuntime: false,
  server: {
    url: 'http://192.168.x.xx:3000',
    cleartext: true
  }
};

export default config;
请务必使用 正确的 IP 和端口,如上例所示。
现在,我们可以通过将这些更改复制到我们的 native 项目中来应用它们:
npx cap copy该 copy 命令类似于 sync,但它只会 将 web 文件夹中的更改复制过来 以及配置,而不会更新 native 项目。
现在你可以通过 Android Studio 或 Xcode 再次部署你的 App。之后,如果你修改了 Svelte App 中的内容, App 将会自动重新加载 并显示更改!
请记住 如果你安装了新的 plugin(例如 camera),仍然需要重新构建你的 native 项目。这是因为 native 文件发生了变化,无法进行即时更新。
请注意,你应该在配置中使用正确的 IP 和端口。上方的 code 代码块仅用于演示默认的 SvelteKit 端口。
使用 Capacitor 插件
让我们来看看如何实际使用前面提到过的 Capacitor plugin。为此,我们可以通过运行以下命令安装一个简单的 plugin:
npm i @capacitor/share这个 分享插件没什么特别的,但它能调起原生分享弹窗!为此,我们只需导入这个 package,并在应用中调用 share() 该函数,然后把 src/routes/index.svelte 改成这样:
<script>
  import { Share } from '@capacitor/share';

  async function share() {
    await Share.share({
      title: 'Open Youtube',
      text: 'Check new video on youtube',
      url: 'https://www.youtube.com',
      dialogTitle: 'Share with friends'
    });
  }
</script>

<h1>Welcome to SvelteKit and Capacitor!</h1>
<button on:click={share}>Share now!</button>
如前所述,安装新 plugin 时,需要先执行 sync 操作,再把应用重新部署到设备上。为此,请运行以下命令:
npx cap sync点击按钮后,你就能看到漂亮的原生分享弹窗实际弹出来啦!
接下来,你可以借助 Capgo 导航和过渡效果,让应用在 iOS 和 Android 上更有原生感,并修复常见的 iOS 布局问题,比如水平溢出或安全区域被裁剪。
用 Capgo 原生导航与过渡打造原生感 UI
我多年来一直使用 Ionic 构建跨平台应用时,虽然可以将其与 SvelteKit 集成,但如果已经有了 Tailwind CSS.
若想在 SvelteKit + Capacitor 应用中获得原生移动端体验,请使用 Capgo 插件,而不是 Konsta UI 等仅限 Web 的 UI 组件库:
- @capgo/capacitor-native-navigation — 原生导航栏、iOS 上的 Liquid Glass 标签栏,以及 Android 上的毛玻璃效果标签栏。你的 SvelteKit router 负责路由状态,而插件则负责原生外壳(chrome)。
- @capgo/capacitor-transitions — 在 WebView 层实现 Ionic 风格的页面过渡和 iOS 边缘侧滑返回,而无需采用 Ionic UI。
安装两者:
bun add @capgo/capacitor-native-navigation @capgo/capacitor-transitions
bunx cap sync
使用 CSS inset 模式配置原生导航,让 Web 内容避开原生栏:
import { NativeNavigation } from '@capgo/capacitor-native-navigation';

await NativeNavigation.configure({
  contentInsetMode: 'css',
  animationDuration: 360,
  glass: {
    effect: 'liquidGlass',
  },
});
渲染 Liquid Glass 标签栏(iOS 由系统负责渲染;Android 使用毛玻璃 WebView 背景):
await NativeNavigation.setTabbar({
  selectedId: 'home',
  labelVisibilityMode: 'labeled',
  icons: true,
  colors: { dynamic: true },
  tabs: [
    { id: 'home', title: 'Home', icon: { svg: '...' } },
    { id: 'settings', title: 'Settings', icon: { svg: '...' } },
  ],
});

await NativeNavigation.addListener('tabSelect', ({ id }) => {
  goto(`/${id}`);
});
在 App Shell 中添加原生页面过渡效果:
<script>
  import { goto } from '$app/navigation';
  import { routerOutlet, page, setDirection } from '@capgo/capacitor-transitions/svelte';
  import '@capgo/capacitor-transitions';

  function openSettings() {
    setDirection('forward');
    goto('/settings');
  }
</script>

<cap-router-outlet use:routerOutlet>
  <cap-page use:page>
    <cap-content slot="content">
      <slot />
    </cap-content>
  </cap-page>
</cap-router-outlet>
将路由页面包装在 cap-router-outlet, cap-page,以及 cap-content,并调用 setDirection('forward') 或 setDirection('back') 进行跳转前。当原生导航已占用这些区域时,请勿重复添加 Web 端页眉或页脚。
查看完整指南: 使用 @capgo/capacitor-native-navigation 和 使用 @capgo/capacitor-transitions.
使用 Tailwind 处理安全区域
在 Tailwind CSS 中使用以下配置以适配设备安全区域: @capgo/tailwind-capacitor (发布于 tailwind-capacitor 在 npm 上。它提供了 safe-areas 工具和其他 Capacitor 友好的 Tailwind 插件:
bun add -D tailwind-capacitor在 src/app.css:
@import 'tailwindcss';
@plugin "@capgo/tailwind-capacitor/platform";
@plugin "@capgo/tailwind-capacitor/safe-areas";
使用如下工具,例如 pt-safe, pb-safe,以及 px-safe 而不是手动添加 env(safe-area-inset-*) 手动编写。该项目正在积极开发中 —— 如果你的 SvelteKit 配置中缺少某些功能, 请在 GitHub 上提交 PR.
修复 iOS 布局问题(视口、安全区域及水平溢出)
如果 iOS 上的内容看起来被裁剪、偏移或可横向滚动,仅靠添加或 overflow-x: hidden 调整 viewport 标签通常解决不了问题。请按顺序逐项检查。
确保正确应用 viewport meta 标签
在 src/app.html,在其中设置 viewport meta 标签 <head>:
<meta name="viewport" content="width=device-width, initial-scale=1, viewport-fit=cover" />仅通过一个根级 wrapper 处理 iOS 安全区域
创建一个单一 app shell,并在其中应用安全区域内边距——不要在多个嵌套组件中处理:
html,
body,
body {
  width: 100%;
  min-height: 100%;
  margin: 0;
  padding: 0;
  overflow-x: hidden;
}

* {
  box-sizing: border-box;
}

.app-shell {
  min-height: 100dvh;
  width: 100%;
  padding-top: env(safe-area-inset-top);
  padding-right: env(safe-area-inset-right);
  padding-bottom: env(safe-area-inset-bottom);
  padding-left: env(safe-area-inset-left);
}
将所有页面内容包裹在 .app-shell。在 header、modal 和 layout wrapper 中重复设置 safe-area padding,往往会导致 UI 看起来被裁剪或尺寸过大。
使用 @capgo/tailwind-capacitor,你可以使用如下 utility 来实现相同的 padding 效果 pt-safe pb-safe px-safe 在那个单一的 shell 上。
设置 Capacitor iOS contentInset 至 never 首先
在 capacitor.config.ts,建议禁用原生 inset,让 CSS(或 Native Navigation 的 contentInsetMode: 'css')来控制安全区域:
const config: CapacitorConfig = {
  appId: 'com.example.myapp',
  appName: 'my-app',
  webDir: 'build',
  ios: {
    contentInset: 'never',
  },
};
将 Capacitor 的自动内容 inset 与 CSS env(safe-area-inset-*) padding 混用,是导致双重间距的常见原因。
找到真正溢出的元素
问题通常出在某个元素使用了 100vw、Tailwind w-screen、固定像素宽度,或较大的 min-width.
在 Safari Web Inspector 中运行:
[...document.querySelectorAll('*')]
  .filter(el => el.scrollWidth > document.documentElement.clientWidth)
  .map(el => ({
    el,
    tag: el.tagName,
    class: el.className,
    scrollWidth: el.scrollWidth,
    clientWidth: document.documentElement.clientWidth,
  }));
使用 Tailwind,替换 w-screen 带 w-full 尽可能避免。许多水平溢出问题源于 100vw / w-screen,重复的 safe-area 内边距,或固定宽度容器——而不是 viewport meta 标签本身。
总结
Capacitor 是基于现有 Web 项目构建原生应用的绝佳选择,它提供了一种简单的方式来共享 code 并保持 UI 的一致性。
再加上 Capgo,为应用添加 Live Update 变得更加简单,确保您的用户始终能够使用最新的功能并获得 Bug 修复。
如果您想了解如何在 SvelteKit 应用中添加 Capgo,请阅读下一篇文章:
了解 Capgo 如何助您更快速地构建更优质的应用, 注册免费账号 ,就在今天。
延续《使用 SvelteKit 和 Capacitor 构建移动应用》的内容
如果你正在使用 使用 SvelteKit 和 Capacitor 构建移动应用 要规划 CI/CD 自动化,请将其与 Capgo CI/CD 用于 Capgo CI/CD 中的产品工作流, Capgo Native Build 用于 Capgo Native Builds 中的产品工作流, Capgo 集成 用于 Capgo 集成中的产品工作流, CI/CD 集成 用于 CI/CD 集成中的实现细节,以及 GitHub Actions 集成 有关 GitHub Actions 集成的实现细节。





