Preface
When you start to enjoy the update system of Capgo, like me for my apps, you will start to get the feeling “What if I want more?”
I got the feeling too, but since I’m the maker of Capgo, I was able to take a look!
Since all is open-source, you have this power too :)
The next pain I got in the Capacitor app distribution process is to make other teammates test the updates!
With TestFlight, the issue is simple, bringing people into your team and making them understand how to get it is time-consuming!
And of course, each time you send to Apple you have a random review process by a bot who can take 5 min or 5 hours, you never know.
I got many times my presentation delayed by this…
And for Google this is even worse, the big mystery of my life, releasing a production version takes less than 2 hours, but releasing a close beta takes 1–2 days.
Solution
To fix this, I crated the Channel system in Capgo.
npx @capgo/cli@latest bundle upload -c production will update to all users (if production channel is set to default)
If you do npx @capgo/cli@latest bundle upload -c development then the version land to a different channel, this can be automatized in GitHub action.
Then you have 2 way to let users get the updates from the channel
Super automatic Way
This can be useful when you don’t want to create your own backend for channel set, this is fast to implement.
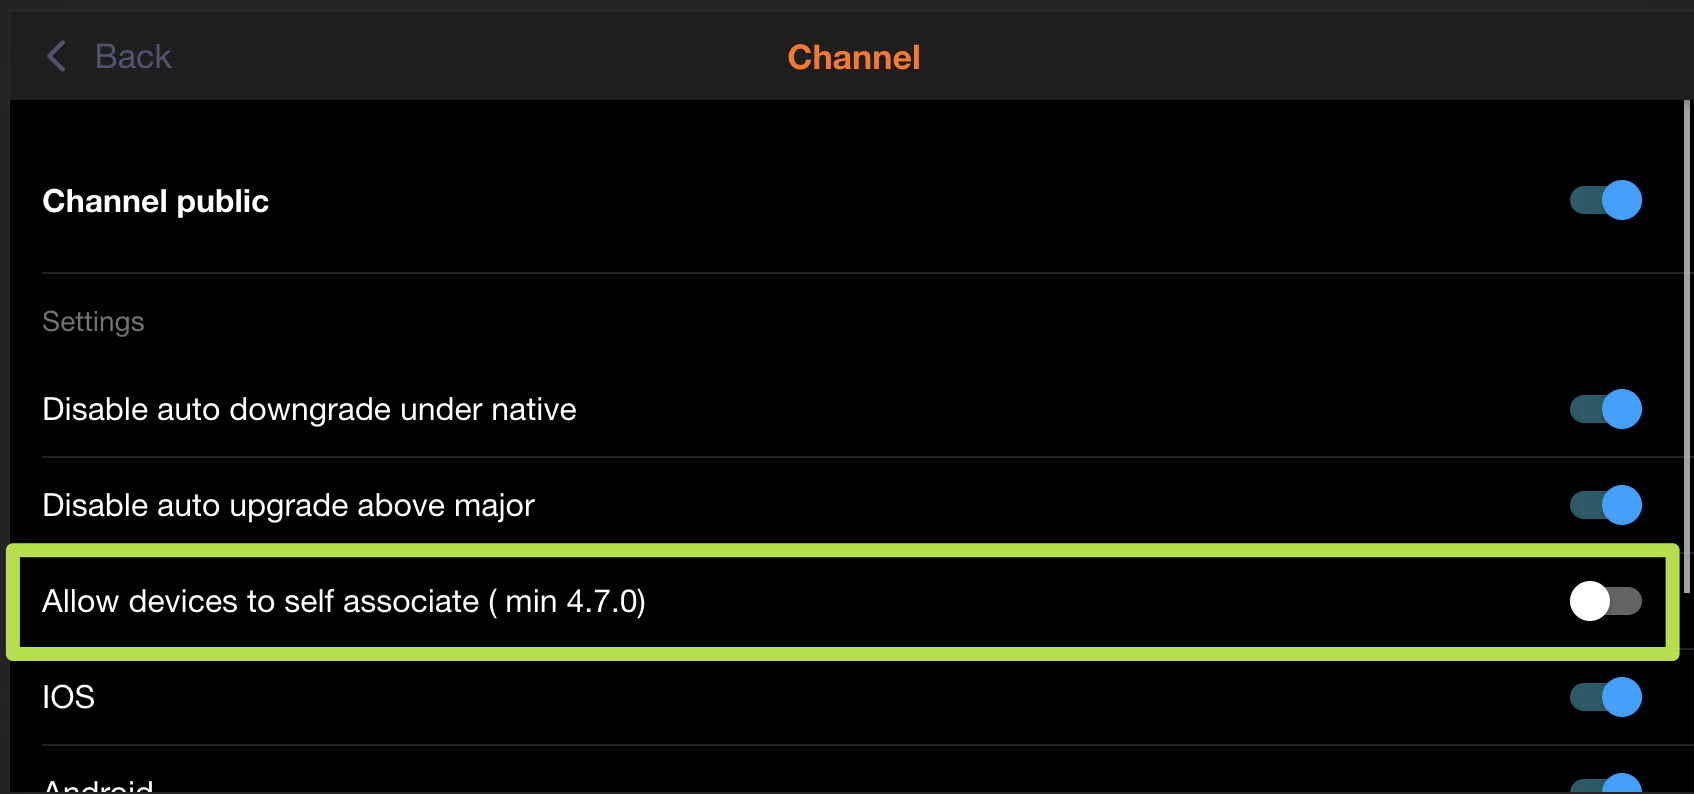
With that one, the only thing you need to do is allow one of your channels to be self to set.
And then add this in the code of your Ionic app, for best experience, use this after the user clicks on a button like “register for beta”
import { CapacitorUpdater } from '@capgo/capacitor-updater'

const deviceId = await CapacitorUpdater.setChannel({ channel: 'beta' })
Manual way
This can be useful for your internal team, this is fast to implement. Allow users to copy their deviceID from your app and send it to you manually, this code will help you to get it:
import { CapacitorUpdater } from '@capgo/capacitor-updater'

const deviceId = await CapacitorUpdater.getDeviceId()
Hide a button somewhere in your app, or show the button to only connected users with a admin role, for example.
Then Go to the Web app or native app Capgo, connect as app admin, select your app, click on the device list.
Then put in the search bar the deviceID click on the one found and then click on the Channel link choose the development, ask your teammate to open the app again, wait 30 sec and open close.
He should get your version.
Automatic way
This can be useful for your beta testers, this is longer to implement.
Same as the manual way, you have to get the deviceID
import { CapacitorUpdater } from '@capgo/capacitor-updater'

const deviceId = await CapacitorUpdater.getDeviceId()
But this time you have to send it automatically to your backend, I let you decide how you do that.
I will just suggest you to store it in a database, that will facilitate your life later.
Then in your backend you have to send it to Capgo backend too. Below two code examples:
NodeJS
import axios from 'axios'

await axios.post('https://api.capgo.app/device', {
  app_id: 'YOUR_APP_ID',
  device_id: 'DEVICE_ID',
  channel: 'CHANNEL_NAME', // The name of the channel, or undefined if version_id provided
  version_id: 'VERSION_NAME' // this is optional, if provide it will override the channel, that useful when you want to debug only one user.
}, {
  headers: {
    authorization: 'YOUR_API_KEY' // choose a key with 'write' or 'all' rights
  }
})
Cloudflare
addEventListener('fetch', (event) => {
  event.respondWith(
    handleRequest(event.request).catch(
      err => new Response(err.stack, { status: 500 })
    )
  )
})

async function handleRequest(request) {
  const { pathname, method } = new URL(request.url)
  const body = await request.json()
  const newBody = JSON.stringify({
    app_id: 'YOUR_APP_ID',
    device_id: body.device_id,
    channel: 'alpha'
  })
  const newUrl = new URL('https://api.capgo.app/device')
  const options = {
    headers: {
      authorization: 'YOUR_API_KEY',
    },
    method: 'POST',
    body: newBody
  }

  if (request.method === 'DELETE') {
    // DELETE the channel link
    options.method = 'DELETE'
    return fetch(newUrl.toString(), options)
  }

  return fetch(newUrl.toString(), options)
}
And just send your device_id in the body of it to the deployed URL with POST to add and DELETE method to delete.
After this configured, try to add a button in your app to opt in to the channel, and check in the web app if that has been set.
You can also send null to remove override
If you need to check programmatically what override is set on a device, you can get on the same URL
import axios from 'axios'

const res = await axios.get('https://api.capgo.app/device?app_id=YOUR_APP_ID&device_id=DEVICE_ID', {
  headers: {
    authorization: 'YOUR_API_KEY' // choose a key with 'write' or 'all' rights
  }
})

console.log('data', res.json())
Keep going from How to send specific update to one user or a group
If you are using How to send specific update to one user or a group to plan channel routing and staged rollout, connect it with Channels for the implementation detail in Channels, Channels for the implementation detail in Channels, Channels for the implementation detail in Channels, Beta Testing Solution for the product workflow in Beta Testing Solution, and Version Targeting Solution for the product workflow in Version Targeting Solution.


