이 튜토리얼에서는 Ionic Capacitor 앱에 Firebase를 사용하여 푸시 알림을 통합합니다. Firebase Cloud Messaging 지원을 위한 유지 관리 Capacitor 플러그인에 대해서는 @capgo/capacitor-firebase-messaging이러한 서비스가 필요하지 않지만, 여러 가지 설정을 미리 구성해야 합니다. Firebase는 Android에서 필수적이기 때문에, 데이터베이스를 사용하지 않고도 알림을 보내는 것이 간단합니다.
처음에, 우리는 Capacitor를 활성화하고 패키지 id를 지정하여 Ionic 앱을 만들 것입니다. 패키지 id는 앱의 고유 식별자입니다. 그런 다음, 앱을 빌드하고 네이티브 플랫폼을 추가하겠습니다. 이미 앱이 있다면, Capacitor.config.json을 변경하여 앱 id를 포함할 수 있습니다. 그러나 네이티브 폴더가 이미 존재한다면, 폴더를 생성하는 Capacitor는 id를 업데이트하지 않으므로, 모든 파일에서 id를 대체해야 합니다. Capacitor.config.json에서, 업데이트된 배지 수, 푸시 시 소리 재생, 알림이 도착했을 때 알림 표시와 같은 옵션을 지정할 수도 있습니다. package id__CAPGO_KEEP_0__.config.json
ionic start pushApp blank --type=angular --capacitor --package-id=com.appdactic.devpush
cd ./pushApp
ionic build
npx cap add ios
npx cap add android
appId capacitor __CAPGO_KEEP_0__.config.json appIdCapacitor __CAPGO_KEEP_0__.config.jsonoptions capacitor__CAPGO_KEEP_0__.config.json
{
  "appId": "com.appdactic.devpush",
  "appName": "pushApp",
  "bundledWebRuntime": false,
  "npmClient": "npm",
  "webDir": "www",
  "plugins": {
    "SplashScreen": {
      "launchShowDuration": 0
    },
    "PushNotifications": {
      "presentationOptions": ["badge", "sound", "alert"]
    }
  },
  "cordova": {}
}
Now, let’s configure push notifications outside the app.
파이어베이스 설정
먼저 새로운 파이어베이스 프로젝트를 만들거나 이미 있는 것을 사용하세요. 새로운 프로젝트에 대한 이름과 기본 옵션을 제공하세요.
새로운 앱이 있으면 “파이어베이스를 앱에 추가하여 시작하세요” 라는 문구를 앱의 대시보드에서 볼 수 있습니다. 그렇지 않으면, 기어 아이콘을 클릭하고 프로젝트 설정 으로 가서 앱을 추가하세요.
iOS와 Android의 대화 상자는 모두 유사하며, 중요한 것은 패키지 ID를 사용하세요 앱들을 위해.
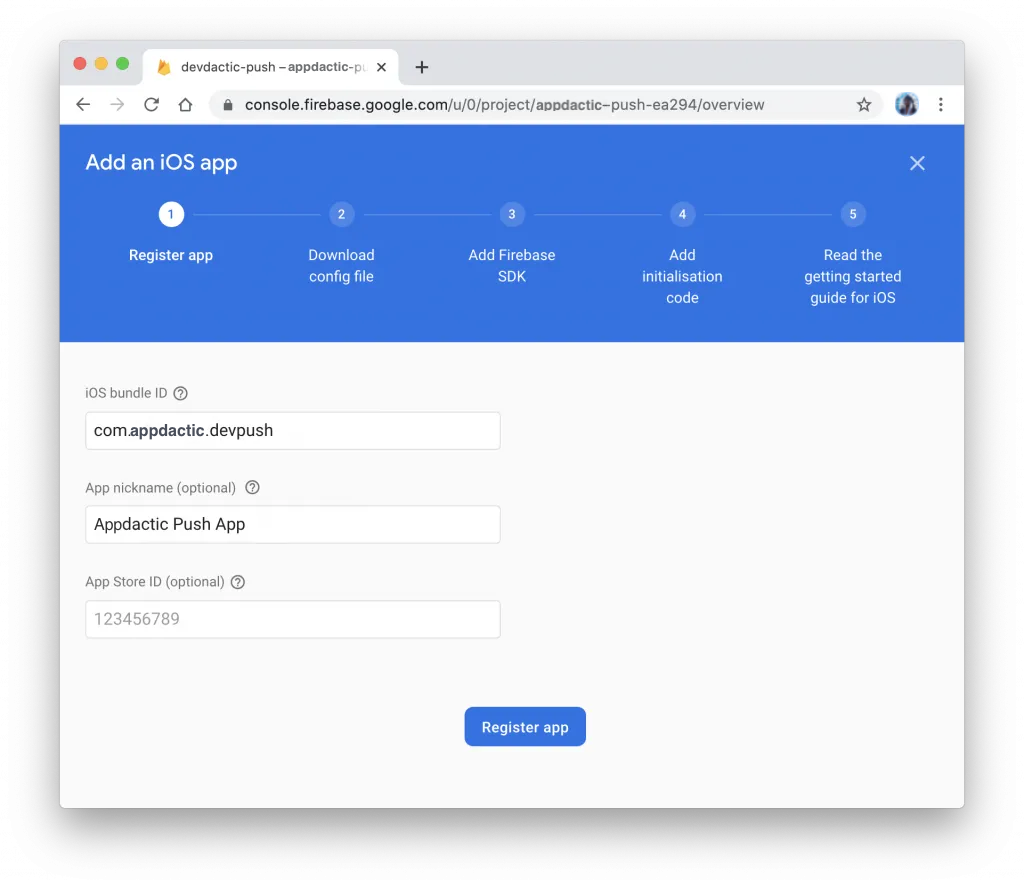
초기 단계 이후, 다음 파일들을 다운로드하세요:
- google-services.json 안드로이드용 파일
- GoogleService-info.plist iOS용 파일
다음으로 플랫폼을 구성하세요.
안드로이드 푸시 준비
안드로이드의 경우, 다운로드한 google-services.json 파일을 이동합니다. 안드로이드 폴더. 폴더.
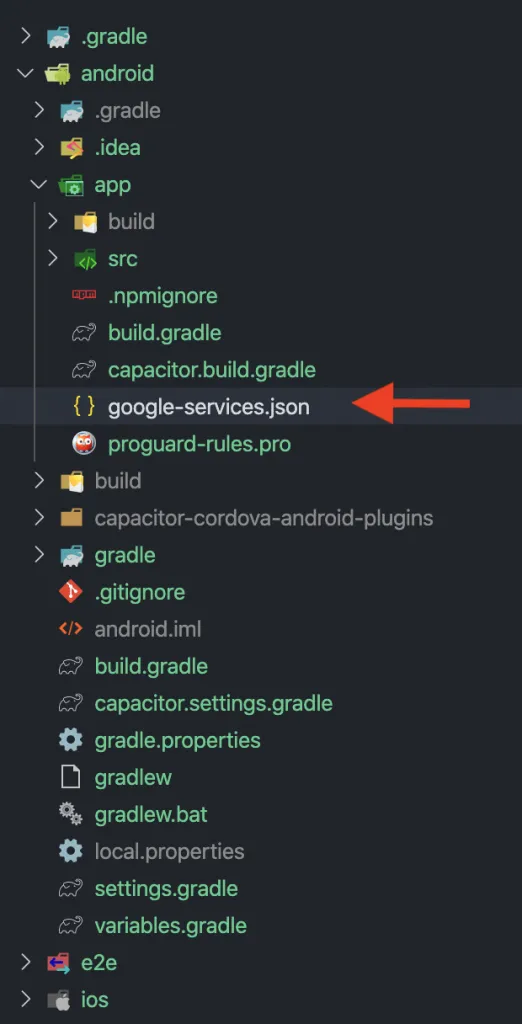
안드로이드 설정이 끝났습니다. 이제 iOS를 설정해 보겠습니다.
iOS 푸시 준비
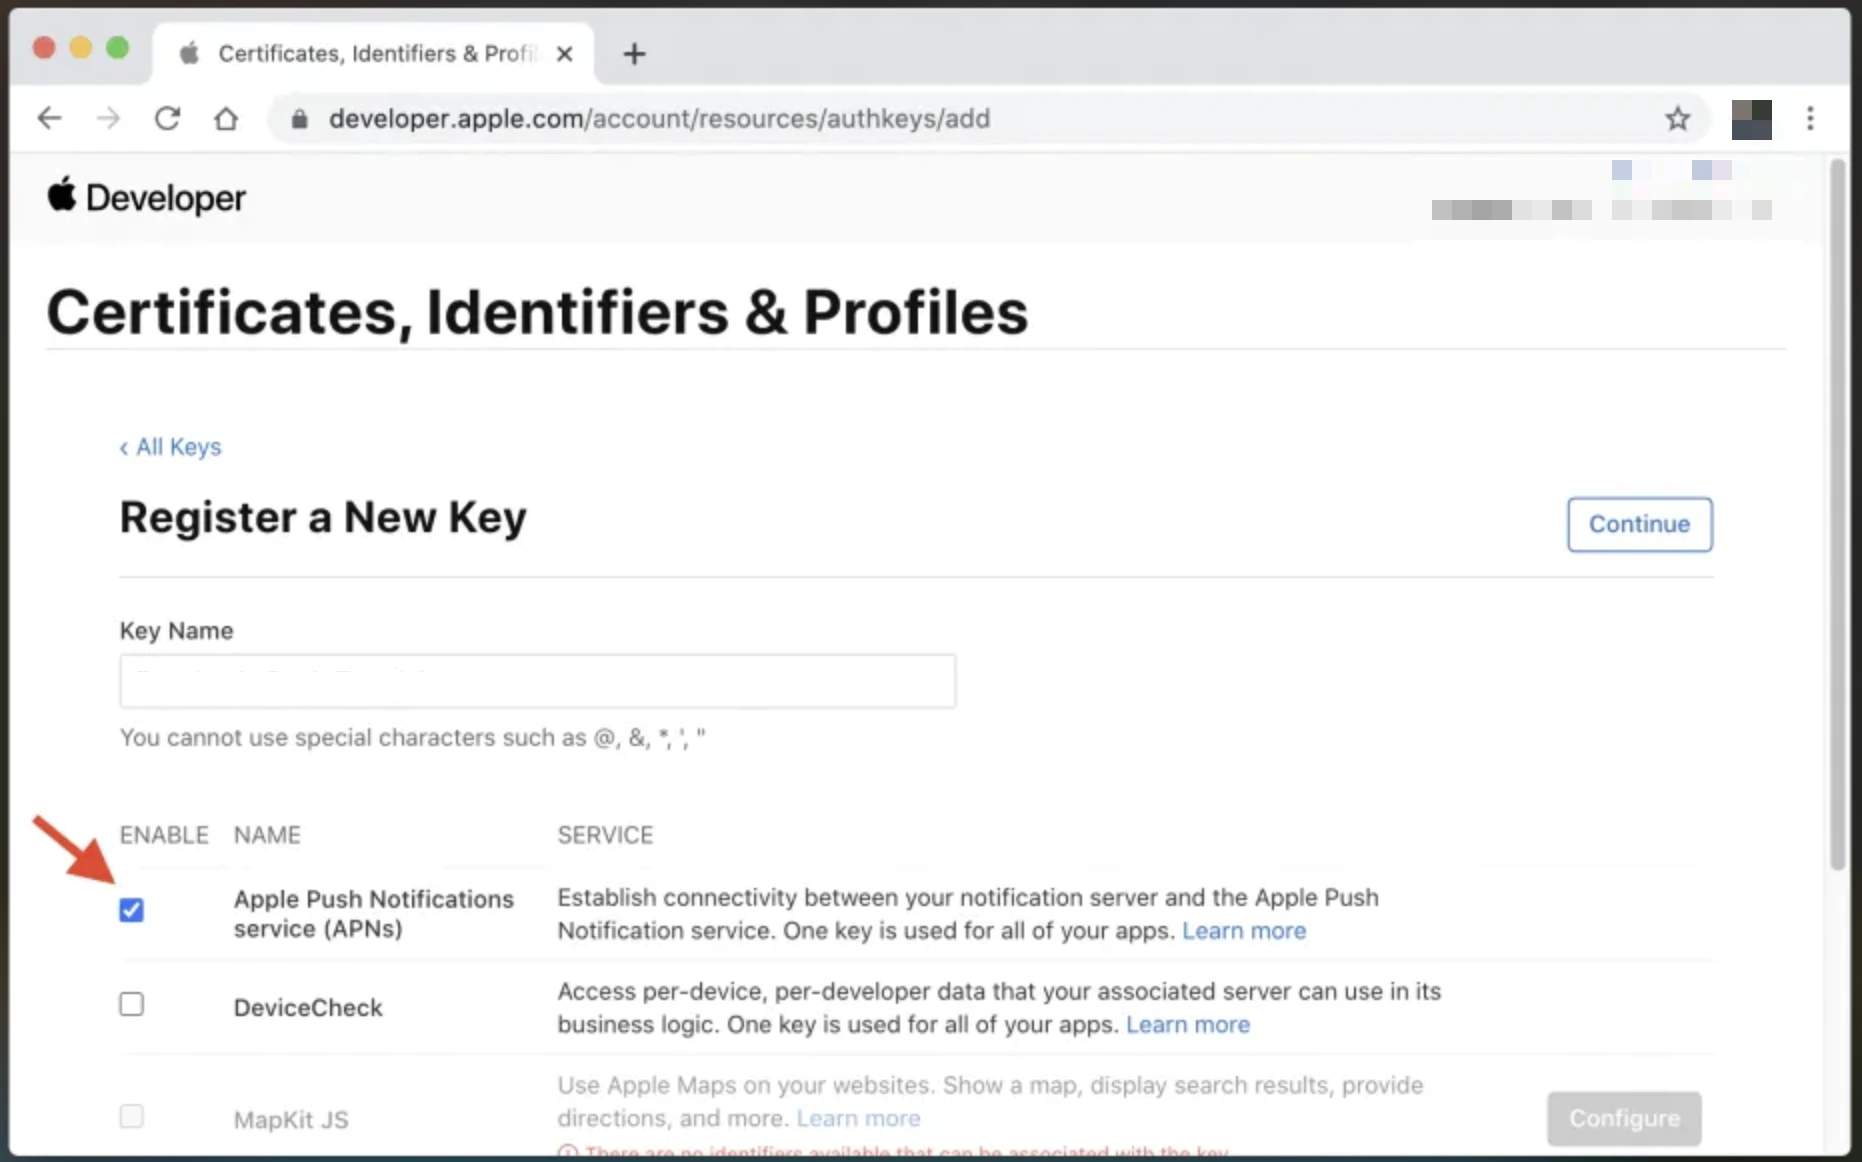
이 부분은 더 복잡합니다. 먼저 애플 개발자 계정의 식별자 목록에서 앱 ID를 생성하세요. 푸시 알림 기능을 선택하세요. ionic-ios-push-id The
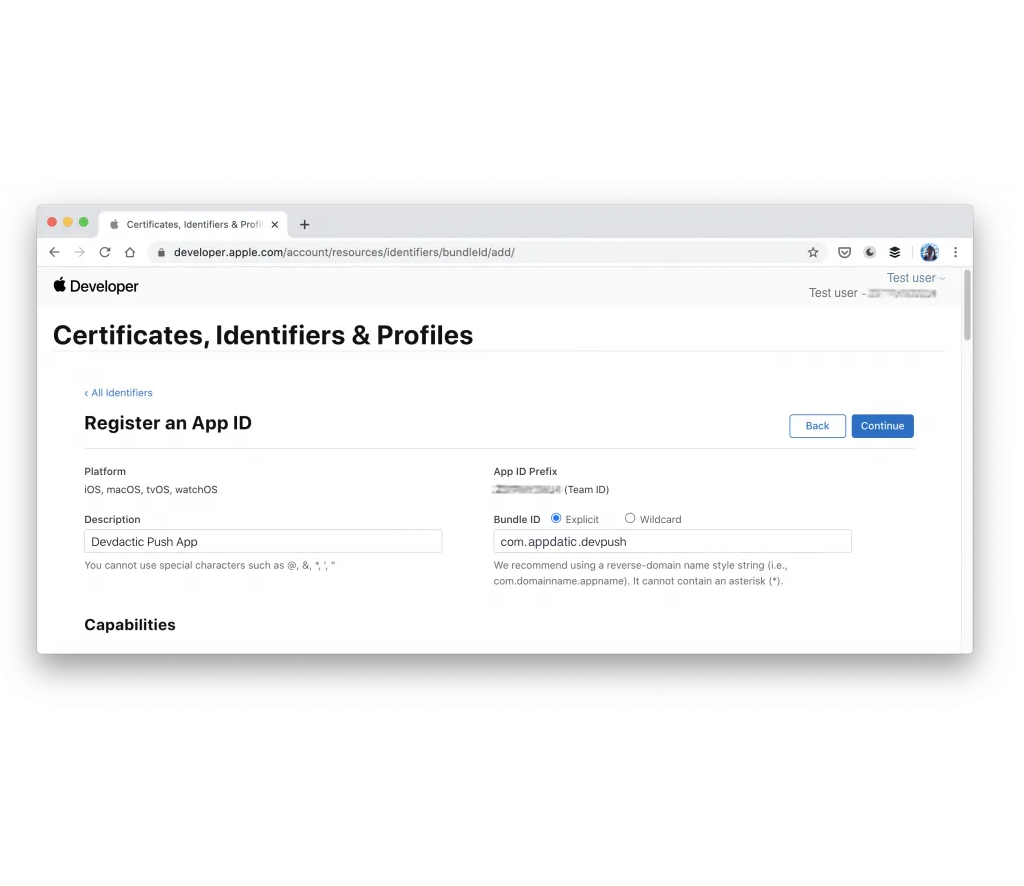
__CAPGO_KEEP_1__ Bundle ID는 __CAPGO_KEEP_0__와 Firebase 내의 App ID와 동일해야 합니다. should be the same as your App ID within Capacitor and Firebase.
Key를 생성하고 Apple Push Notifications 서비스 (APNs)를 활성화하세요. . 만약 키의 최대 수를 초과했다면, 기존 키 또는 인증서를 사용할 수 있지만 프로세스는 더 복잡합니다. ios-developer-push-key다운로드 받은
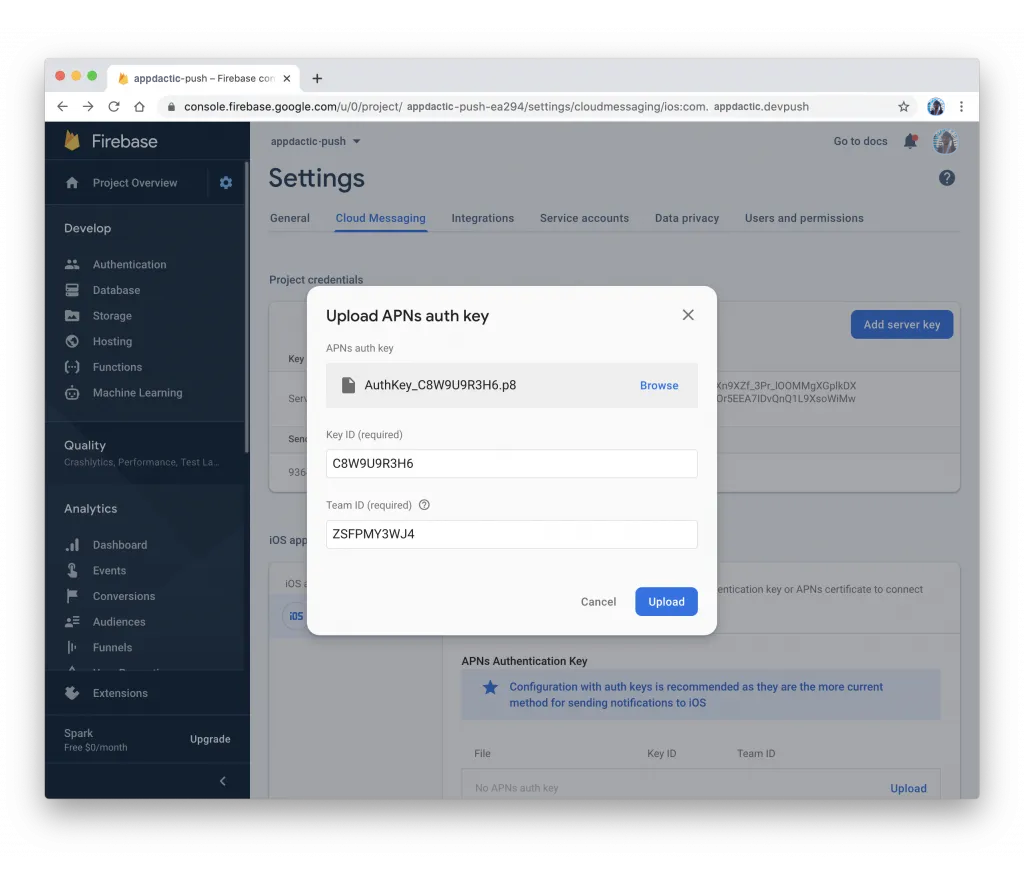
파일을 Firebase에 업로드하세요. Cloud Messaging에서 을 열어보세요. Cloudflare Capacitor Firebase 프로젝트 설정에서 탭을 클릭하여 파일을 업로드하고 Key ID와 Team ID의 세부 정보를 입력하세요.
Xcode 프로젝트를 수정하려면 다음 명령어를 실행하세요:
npx cap open iosFirebase에서 다운로드 한 "GoogleService-Info.plist" 파일을 iOS 프로젝트에 복사하세요. Xcode 프로젝트 내부의 app/app 폴더에 파일을 끌어다 놓고 "Copy items if needed"를 선택하세요. Firebase 의존성을 위한 새로운 Pod을 ios/App/Podfile에 추가하세요. 자연 플랫폼을 업데이트하려면 다음 명령어를 실행하세요: 자연 Swift __CAPGO_KEEP_0__을 ios/App/App/AppDelegate.swift에서 수정하세요..
Copy the ios/App/App/AppDelegate.swift:
target 'App' do
  capacitor_pods
  # Add your Pods here
  pod 'Firebase/Messaging'
end
ios/App/Podfile
npx cap update iosModify the native Swift code in Xcode project Firebase와 함께 등록하고 앱에 올바른 토큰을 반환하세요.
import UIKit
import Capacitor
import Firebase
@UIApplicationMain
class AppDelegate: UIResponder, UIApplicationDelegate {
var window: UIWindow?
func application(_ application: UIApplication, didFinishLaunchingWithOptions launchOptions: [UIApplication.LaunchOptionsKey: Any]?) -> Bool {
// Override point for customization after application launch.
FirebaseApp.configure()
return true
}
// All the existing functions
// ...
// Update this one:
func application(_ application: UIApplication, didRegisterForRemoteNotificationsWithDeviceToken deviceToken: Data) {
Messaging.messaging().apnsToken = deviceToken
InstanceID.instanceID().instanceID { (result, error) in
if let error = error {
NotificationCenter.default.post(name: Notification.Name(CAPNotifications.DidFailToRegisterForRemoteNotificationsWithError.name()), object: error)
} else if let result = result {
NotificationCenter.default.post(name: Notification.Name(CAPNotifications.DidRegisterForRemoteNotificationsWithDeviceToken.name()), object: result.token)
}
}
}
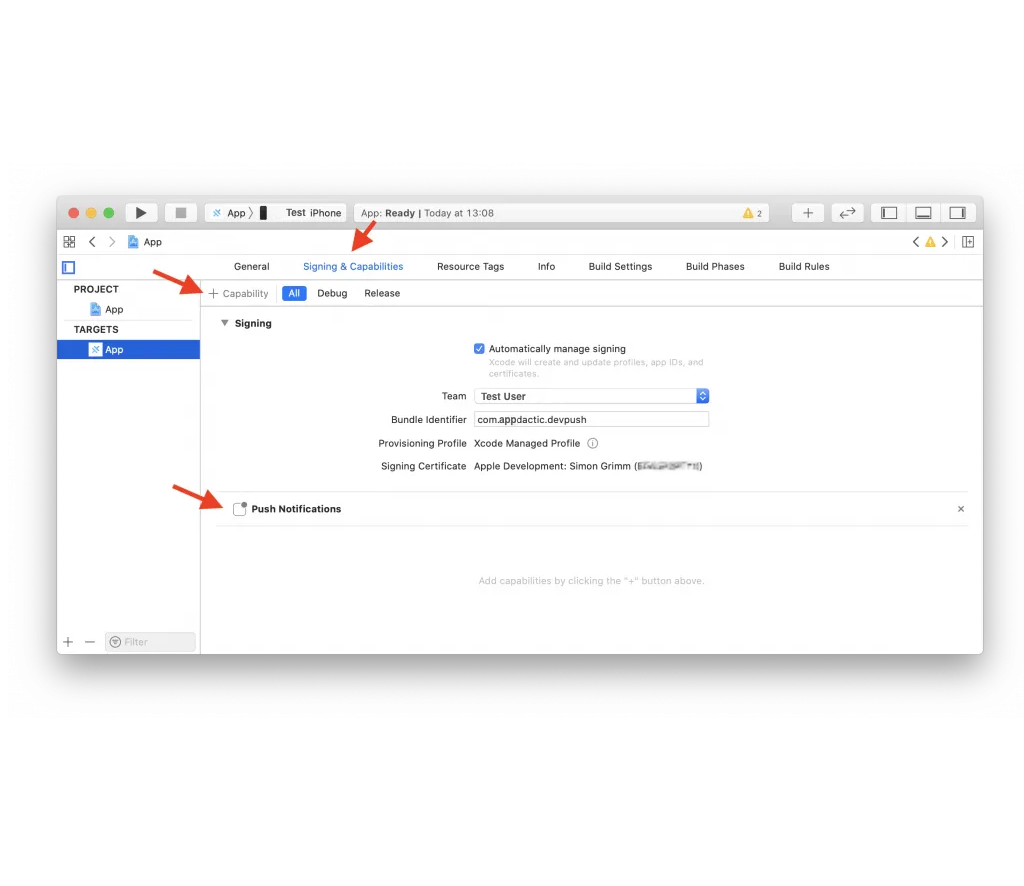
}마지막으로, Xcode 프로젝트 내에서 푸시 알림 기능을 활성화하세요.
앱을 빌드하고 푸시 알림을 통합하세요.
아이오닉 푸시 알림 통합
아이오닉 프로젝트에서 서비스와 새로운 페이지를 생성하세요:
ionic g service services/fcm
ionic g page pages/details
app/app-routing.module.ts 새로운 페이지를 동적 아이디로 포함하여 라우팅을 업데이트하세요: 푸시 알림을 처리하는 서비스를 생성하세요:
import { NgModule } from '@angular/core';
import { PreloadAllModules, RouterModule, Routes } from '@angular/router';

const routes: Routes = [
  {
    path: 'home',
    loadChildren: () => import('./home/home.module').then( m => m.HomePageModule)
  },
  {
    path: '',
    redirectTo: 'home',
    pathMatch: 'full'
  },
  {
    path: 'home/:id',
    loadChildren: () => import('./pages/details/details.module').then( m => m.DetailsPageModule)
  },
];

@NgModule({
  imports: [
    RouterModule.forRoot(routes, { preloadingStrategy: PreloadAllModules })
  ],
  exports: [RouterModule]
})
export class AppRoutingModule { }
services/fcm.service.ts 푸시 알림을 처리하는 서비스를 호출하세요::
import { Injectable } from '@angular/core';
import {
  Plugins,
  PushNotification,
  PushNotificationToken,
  PushNotificationActionPerformed,
  Capacitor
} from '@capacitor/core';
import { Router } from '@angular/router';

const { PushNotifications } = Plugins;

@Injectable({
  providedIn: 'root'
})
export class FcmService {

  constructor(private router: Router) { }

  initPush() {
    if (Capacitor.platform !== 'web') {
      this.registerPush();
    }
  }

  private registerPush() {
    PushNotifications.requestPermission().then((permission) => {
      if (permission.granted) {
        // Register with Apple / Google to receive push via APNS/FCM
        PushNotifications.register();
      } else {
        // No permission for push granted
      }
    });

    PushNotifications.addListener(
      'registration',
      (token: PushNotificationToken) => {
        console.log('My token: ' + JSON.stringify(token));
      }
    );

    PushNotifications.addListener('registrationError', (error: any) => {
      console.log('Error: ' + JSON.stringify(error));
    });

    PushNotifications.addListener(
      'pushNotificationReceived',
      async (notification: PushNotification) => {
        console.log('Push received: ' + JSON.stringify(notification));
      }
    );

    PushNotifications.addListener(
      'pushNotificationActionPerformed',
      async (notification: PushNotificationActionPerformed) => {
        const data = notification.notification.data;
        console.log('Action performed: ' + JSON.stringify(notification.notification));
        if (data.detailsId) {
          this.router.navigateByUrl(`/home/${data.detailsId}`);
        }
      }
    );
  }
}
Now, build your app and integrate push notifications. initPush() 함수 app/app.component.ts:
import { Component } from '@angular/core';

import { Platform } from '@ionic/angular';
import { SplashScreen } from '@ionic-native/splash-screen/ngx';
import { StatusBar } from '@ionic-native/status-bar/ngx';
import { FcmService } from './services/fcm.service';

@Component({
  selector: 'app-root',
  templateUrl: 'app.component.html',
  styleUrls: ['app.component.scss']
})
export class AppComponent {
  constructor(
    private platform: Platform,
    private splashScreen: SplashScreen,
    private statusBar: StatusBar,
    private fcmService: FcmService
  ) {
    this.initializeApp();
  }

  initializeApp() {
    this.platform.ready().then(() => {
      this.statusBar.styleDefault();
      this.splashScreen.hide();

      // Trigger the push setup
      this.fcmService.initPush();
    });
  }
}
세부 정보 페이지에서 정보를 처리하는 방법 pages/details/details.page.ts:
import { Component, OnInit } from '@angular/core';
import { ActivatedRoute } from '@angular/router';
import { Plugins } from '@capacitor/core';
const { PushNotifications } = Plugins;

@Component({
  selector: 'app-details',
  templateUrl: './details.page.html',
  styleUrls: ['./details.page.scss'],
})
export class DetailsPage implements OnInit {
  id = null;

  constructor(private route: ActivatedRoute) { }

  ngOnInit() {
    this.route.paramMap.subscribe(params => {
      this.id = params.get('id');
    });
  }

  resetBadgeCount() {
    PushNotifications.removeAllDeliveredNotifications();
  }

}
세부 정보를 표시 pages/details/details.page.html:
<ion-header>
  <ion-toolbar>
    <ion-buttons slot="start">
      <ion-back-button defaultHref="/"></ion-back-button>
    </ion-buttons>
    <ion-title>Details</ion-title>
  </ion-toolbar>
</ion-header>

<ion-content>
  My Id from push: {{ id }}

  <ion-button (click)="resetBadgeCount()" expand="block">
    Reset Badge Count
  </ion-button>
</ion-content>
앱을 빌드하고 변경 사항을 동기화하고 장치에 배포하세요.
ionic build
npx cap sync
Firebase를 사용하여 푸시 알림을 보낼 수 있습니다.
Firebase를 사용하여 푸시 알림을 보낼 수 있는 방법은 여러 가지입니다.
특정 장치 테스트
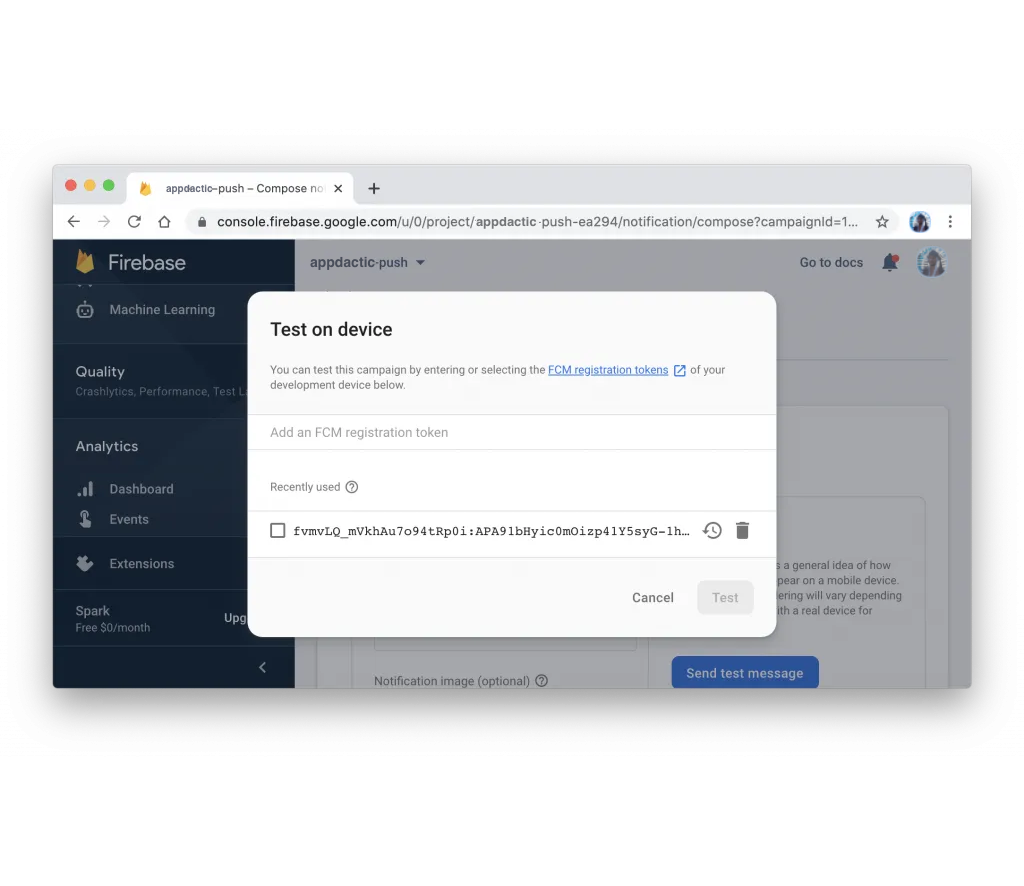
장치에 앱을 배포한 후, 등록 후 토큰을 확인하기 위해 콘솔 로그를 확인할 수 있습니다. 이 토큰을 사용하여 대상 테스트 푸시를 보내어 통합이 작동하는지 확인하세요. Firebase에서 '보내기'로 이동하세요.
In Firebase, go to Cloud Messaging 그리고 선택 테스트 메시지를 전송. 로그에서 디바이스 토큰을 추가하세요.
설정이 올바르게 설정되어 있다면, 디바이스에서 푸시 알림을 볼 수 있어야 합니다.
Payload를 포함한 푸시 메시지
추가 정보와 플랫폼을 선택하여 푸시 알림을 테스트하려면, 같은 페이지의 마법사를 따라하세요. 일반 정보를 지정하고 추가 옵션 푸시 알림에 Payload를 포함하여 전송
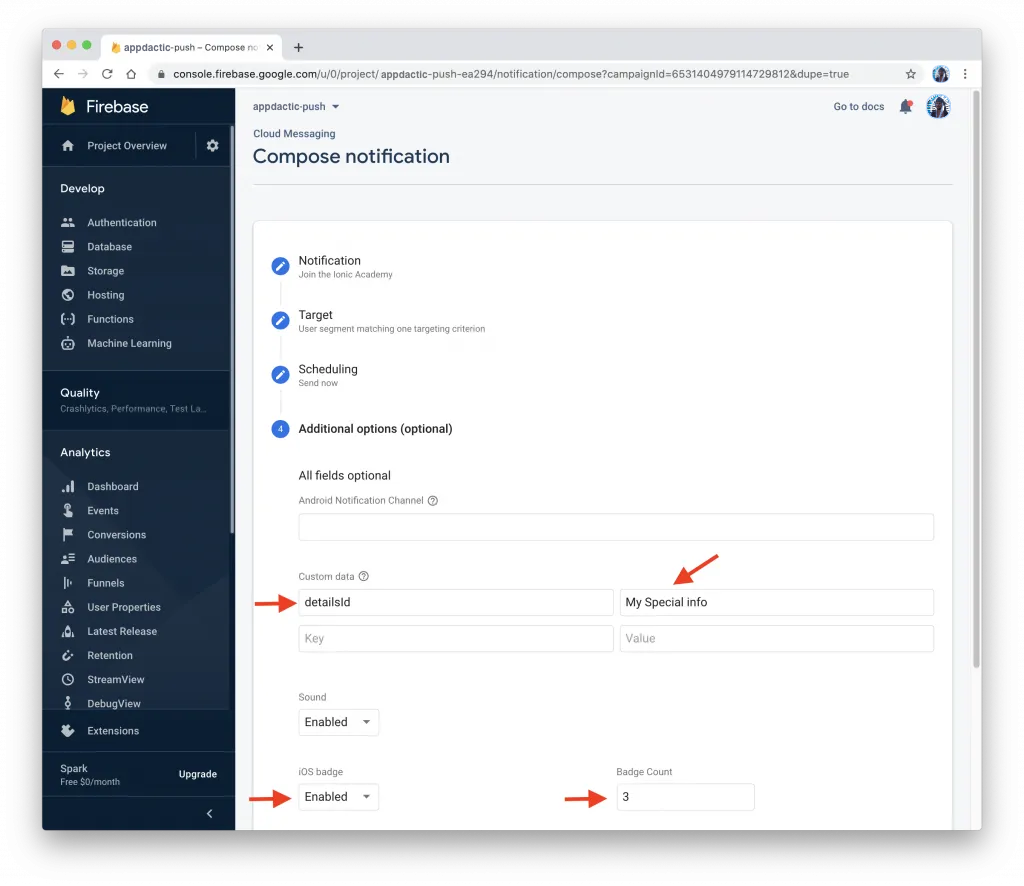
In the 고급 설정 섹션, 추가하십시오 사용자 정의 데이터 키-값 pair. 예를 들어, 키 "__CAPGO_KEEP_0__"와 선택한 값이 있습니다. 이 데이터는 앱에서 id가 지정된 세부 정보 페이지로 이동하는 데 사용됩니다. detailsId 푸시 알림을 보내고 나면, 앱은 푸시 알림을 받고 id가 지정된 세부 정보 페이지를 표시할 때 알림을 탭할 때 표시해야 합니다.
Firebase __CAPGO_KEEP_0__ 사용
Firebase API를 사용하여 푸시 알림을 프로그래밍적으로 보내는 것도 가능합니다. 이 작업을 수행하려면 Firebase 프로젝트 설정에서 Cloud Messaging 탭에서 Server key를 얻어야 합니다.
You can also send push notifications programmatically using the Firebase API. To do this, you need to obtain the from your Firebase project settings under the Cloud Messaging tab. You can also send push notifications programmatically using the Firebase __CAPGO_KEEP_0__. To do this, you need to obtain the
Firebase API에 POST 요청을 보내려면 서버 키가 필요합니다. Node.js와 함께 다음 예제를 사용하여 payload가 필요한 경우 서버 키와 디바이스 토큰을 입력하세요. request library:
const request = require('request');

const serverKey = 'YOUR_SERVER_KEY';
const deviceToken = 'YOUR_DEVICE_TOKEN';

const options = {
  method: 'POST',
  url: 'https://fcm.googleapis.com/fcm/send',
  headers: {
    'Content-Type': 'application/json',
    Authorization: 'key=' + serverKey
  },
  body: JSON.stringify({
    to: deviceToken,
    notification: {
      title: 'Test Push',
      body: 'This is a test push notification with custom data'
    },
    data: {
      detailsId: '123'
    }
  })
};

request(options, (error, response, body) => {
  if (error) {
    console.error('Error sending push:', error);
  } else {
    console.log('Push sent successfully:', body);
  }
});
__CAPGO_KEEP_0__을 교체하고 YOUR_SERVER_KEY __CAPGO_KEEP_0__을 교체하여 실제 서버 키와 디바이스 토큰을 입력하세요. 스크립트를 실행하면 디바이스가 커스텀 페이로드와 함께 푸시 알림을 받을 것입니다. YOUR_DEVICE_TOKEN 이것만! Ionic __CAPGO_KEEP_0__ 앱에 푸시 알림을 성공적으로 통합했습니다. 이제 Android 및 iOS 플랫폼에서 사용자에게 푸시 알림을 보낼 수 있습니다.
Ionic Capacitor Push Notifications with Firebase: A Step-by-Step Guide에서 계속 진행하세요.
Ionic Capacitor Push Notifications with Firebase: A Step-by-Step Guide를 사용하여 계획 및 기업 운영을 위한 마이그레이션을 계획하고 있습니다. Capacitor Enterprise와 연결하여 Capacitor Enterprise의 제품 워크플로우를 연결하세요.
__CAPGO_KEEP_0__ Enterprise Capacitor Enterprise __CAPGO_KEEP_0__ Enterprise Capgo Enterprise Capgo Enterprise Ionic Enterprise Plugin Alternatives Ionic Enterprise Plugin Alternatives 제품 워크플로우를 위해 Capgo Alternatives Capgo Alternatives 제품 워크플로우를 위해 Capgo Consulting Capgo Consulting 제품 워크플로우를 위해, 그리고 Capgo Premium Support Capgo Premium Support 제품 워크플로우를 위해.


