Dalam tutorial ini, kami akan mengintegrasikan pemberitahuan push di aplikasi Ionic Capacitor menggunakan Firebase. Untuk plugin yang dipelihara Capacitor dengan dukungan Firebase Cloud Messaging, lihat @capgo/capacitor-firebase-messaging. Anda tidak memerlukan layanan tertentu untuk ini, tetapi Anda perlu mengonfigurasi beberapa hal sebelumnya. Firebase adalah pilihan yang baik karena diperlukan untuk Android, dan Anda dapat dengan mudah menggunakan Firebase untuk mengirimkan pemberitahuan tanpa menggunakan database.
Pertama, kita akan membuat aplikasi Ionic dengan Capacitor diaktifkan dan spesifikasikan ID paket kita, yang merupakan identifikasi unik untuk aplikasi Anda. Kemudian, kita akan membangun aplikasi dan menambahkan platform native. Jika Anda sudah memiliki aplikasi, Anda dapat mengubah __CAPGO_KEEP_0__.config.json untuk mencakup ID aplikasi Anda. Namun, jika folder native Anda sudah ada, Anda perlu mengganti ID di semua file yang muncul, karena __CAPGO_KEEP_0__ hanya membuat folder sekali dan tidak akan memperbarui ID itu sendiri.Dalam __CAPGO_KEEP_0__.config.json, Anda juga dapat menentukan opsi seperti memperbarui jumlah badge, memainkan suara ketika menerima push, dan menampilkan peringatan ketika pemberitahuan datang.
ionic start pushApp blank --type=angular --capacitor --package-id=com.appdactic.devpush
cd ./pushApp
ionic build
npx cap add ios
npx cap add android
ID Paket capacitor.config.json ID Aplikasi folder native. However, if your native folders already exist, you will need to replace the id in all files where it appears, as Capacitor only creates the folder once and folderID Aplikasi capacitor.config.jsonperingatan
{
  "appId": "com.appdactic.devpush",
  "appName": "pushApp",
  "bundledWebRuntime": false,
  "npmClient": "npm",
  "webDir": "www",
  "plugins": {
    "SplashScreen": {
      "launchShowDuration": 0
    },
    "PushNotifications": {
      "presentationOptions": ["badge", "sound", "alert"]
    }
  },
  "cordova": {}
}
Sekarang, mari kita atur notifikasi push di luar aplikasi.
Konfigurasi Firebase
Mulai dengan membuat proyek Firebase baru atau menggunakan yang sudah ada. Berikan nama dan opsi default untuk proyek baru.
Jika Anda memiliki aplikasi baru, Anda seharusnya melihat “Mulai dengan menambahkan Firebase ke aplikasi Anda” di dashboard aplikasi Anda. Jika tidak, klik ikon gear dan pergi ke pengaturan proyek untuk menambahkan aplikasi.
Dialog untuk iOS dan Android sama, dan hal yang penting adalah menggunakan ID paket Anda untuk aplikasi.
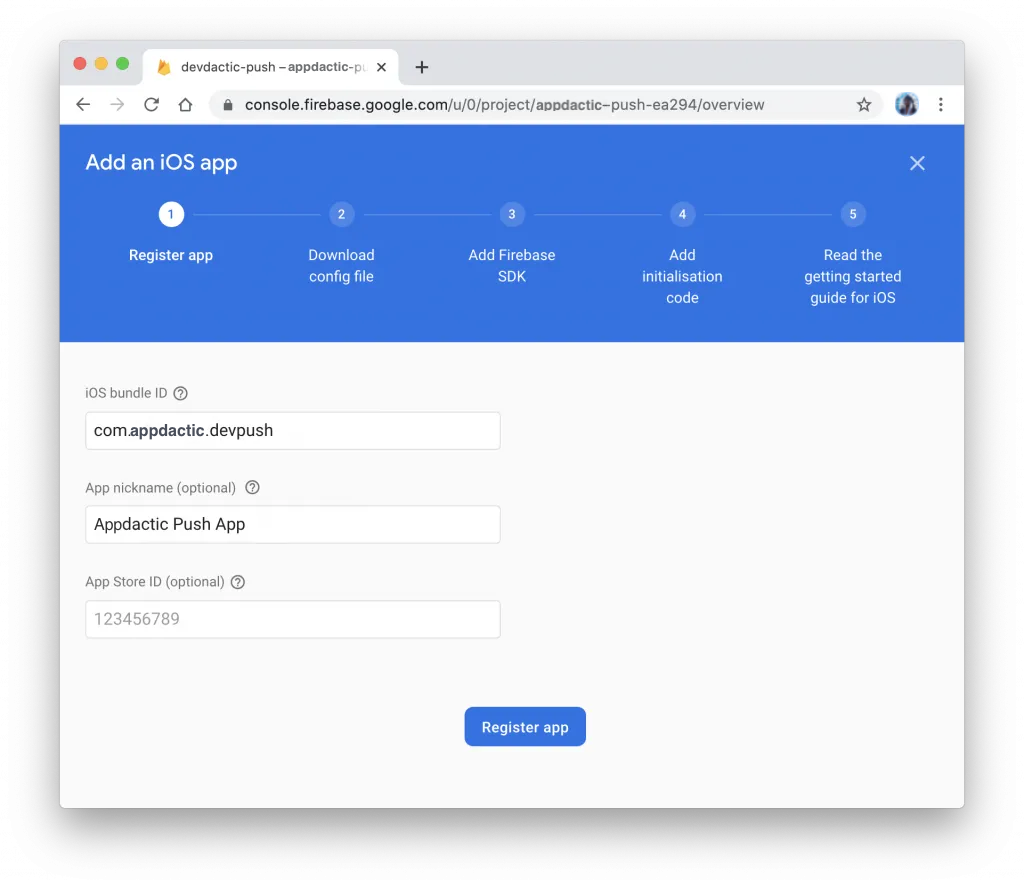
Setelah langkah awal, download file-file berikut:
- google-services.json file untuk Android
- GoogleService-info.plist file untuk iOS
Selanjutnya, atur platform.
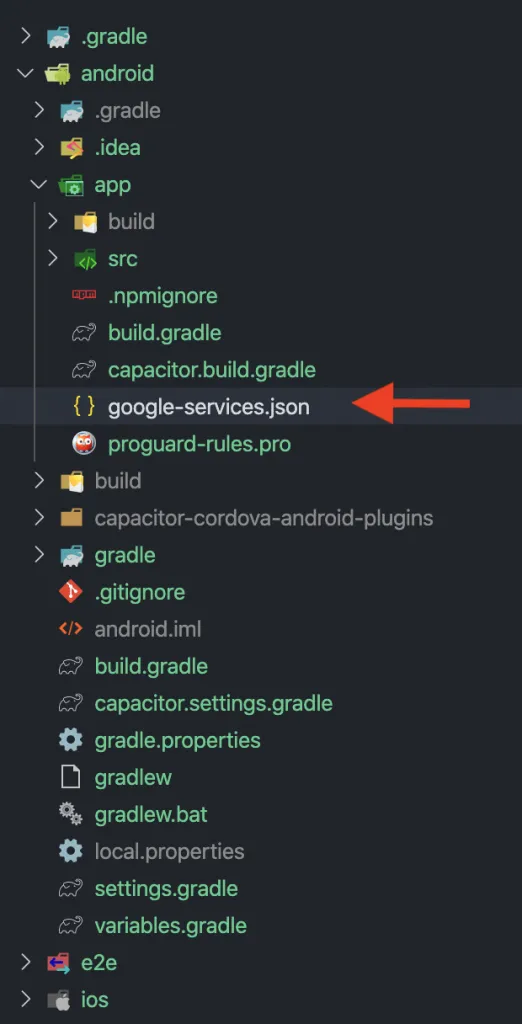
Persiapan Push Android
Untuk Android, pindahkan google-services.json file yang Anda download ke android/app/ folder.
Semua sudah selesai untuk Android. Sekarang mari kita atur iOS.
Pengaturan Push iOS
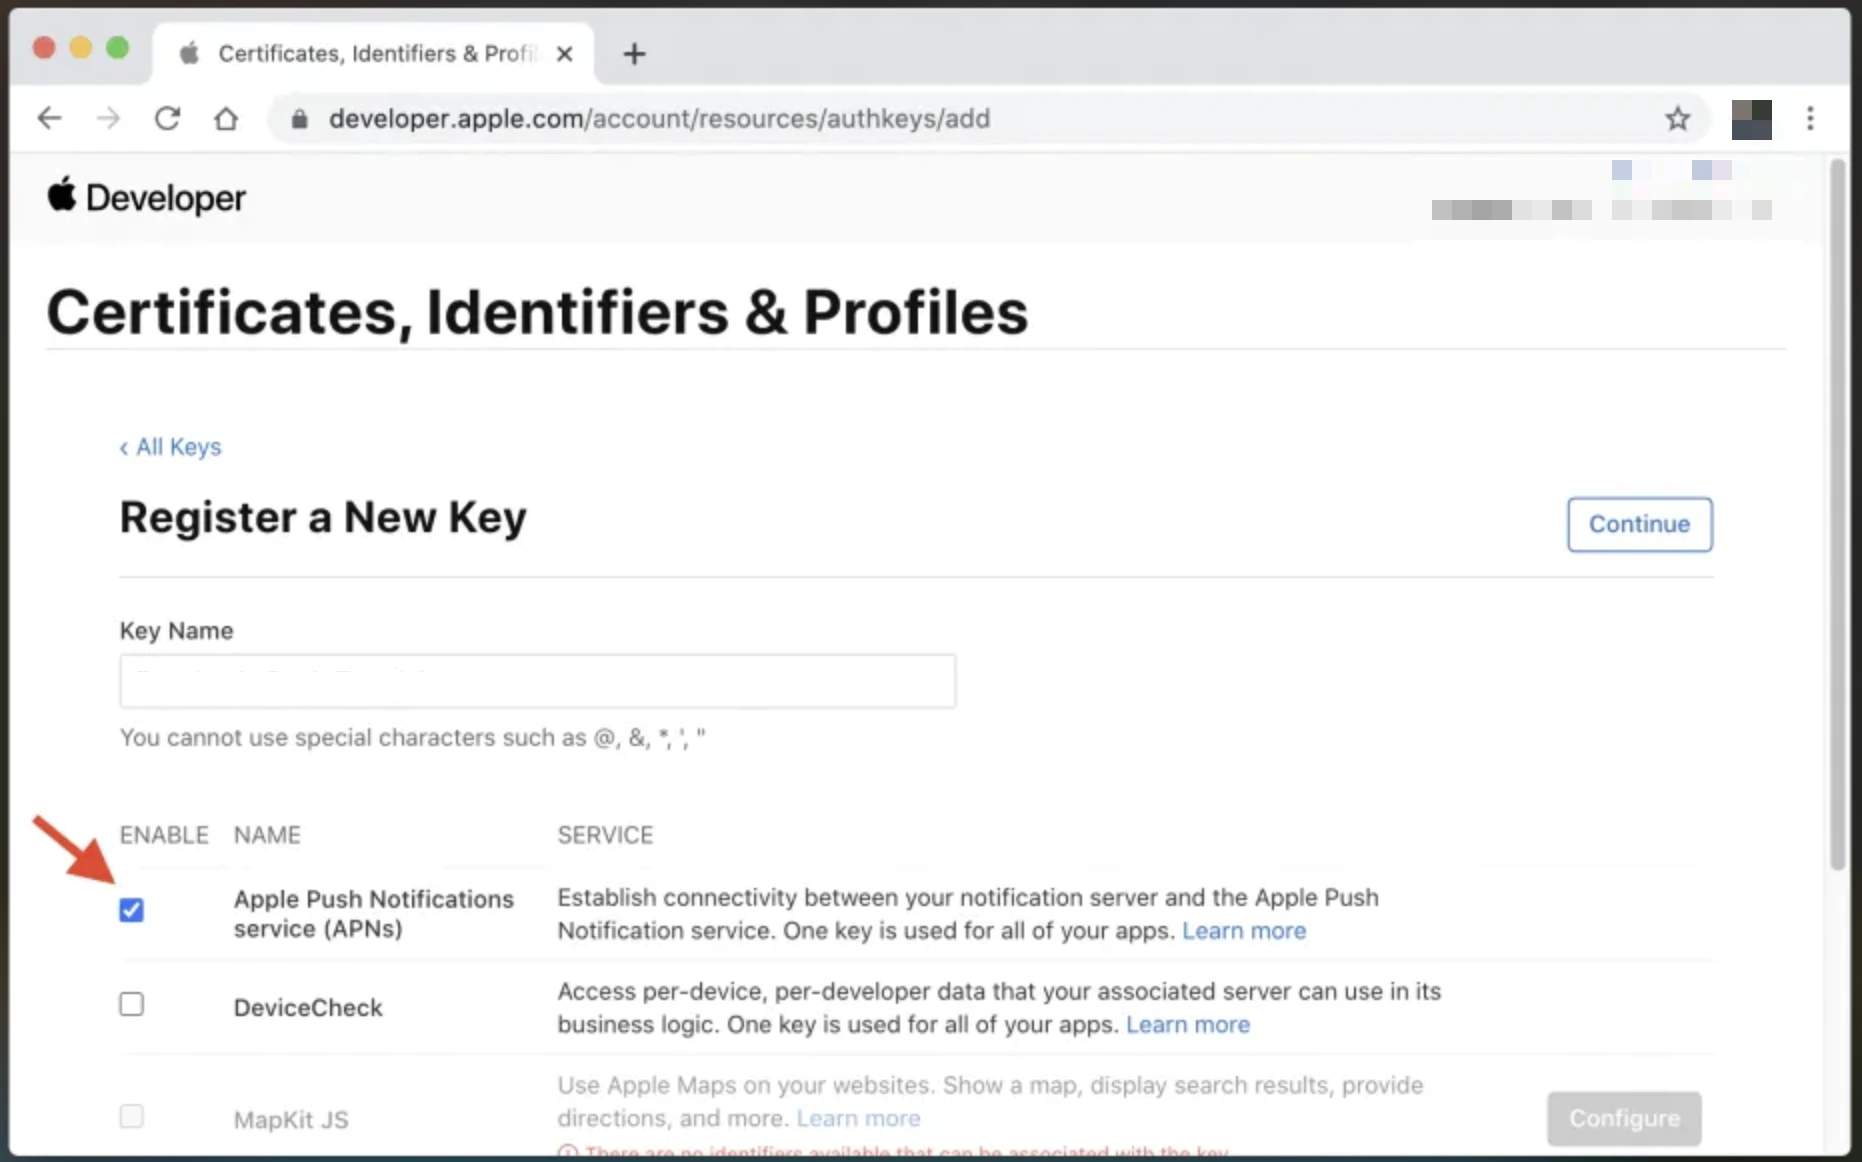
Bagian ini lebih rumit. Pertama-tama, buat ID Aplikasi untuk aplikasi Anda di dalam daftar identifikasi dari akun Pengembang Apple Anda. Pastikan Anda memilih kemampuan Notifikasi Push dari daftar. ionic-ios-push-id The
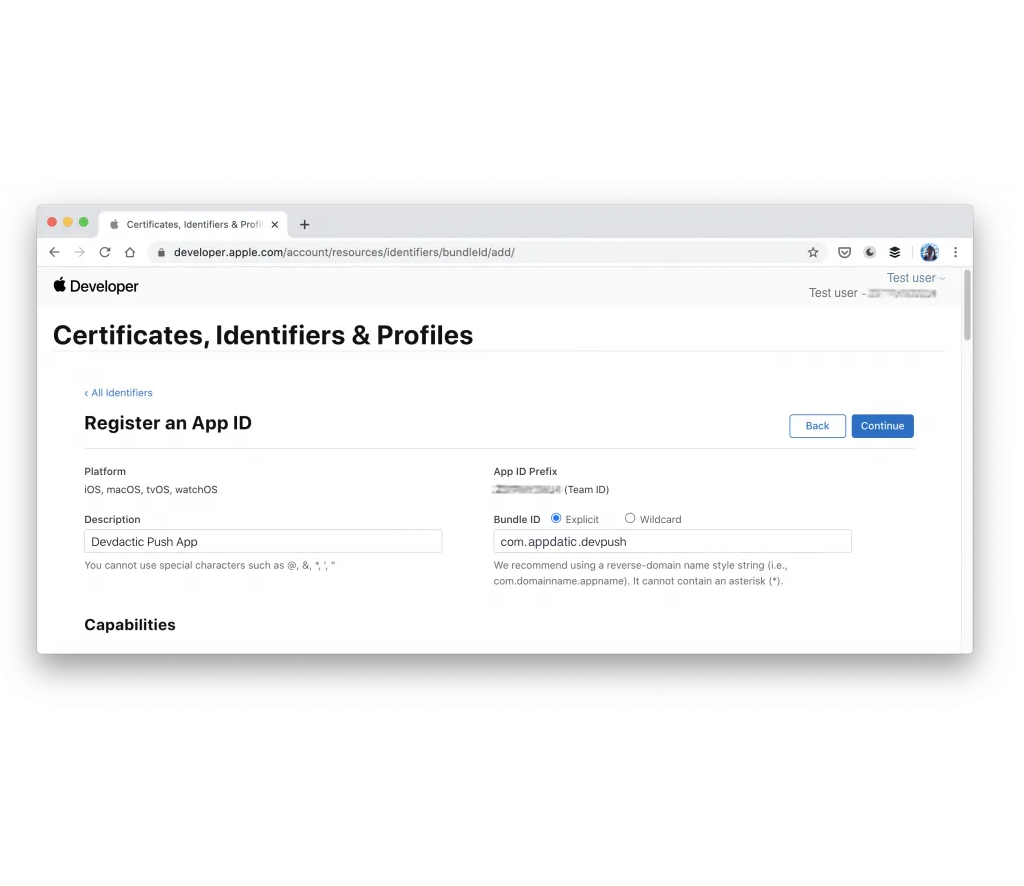
__CAPGO_KEEP_1__ ID Paket harus sama dengan ID Aplikasi Anda di __CAPGO_KEEP_0__ dan Firebase. should be the same as your App ID within Capacitor and Firebase.
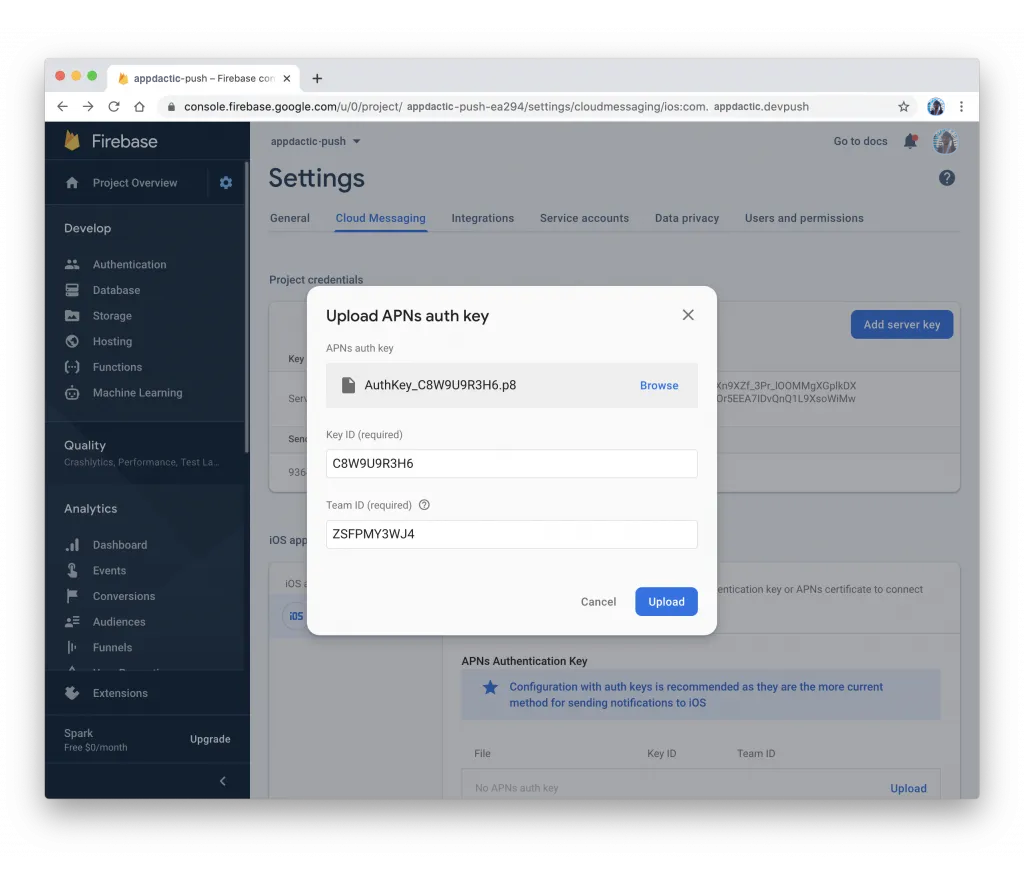
Buatlah Kunci dan aktifkan layanan Notifikasi Push Apple (APNs) . Jika Anda telah mencapai batas jumlah kunci, Anda dapat menggunakan kunci yang sudah ada atau sertifikat, tetapi prosesnya lebih rumit. kunci-push-ios-developerSetelah mengunduh file .p8, unggahlah ke Firebase. Buka
Bundle ID harus sama dengan ID Aplikasi Anda di __CAPGO_KEEP_0__ dan Firebase. Sekarang, Buatlah Kunci dan aktifkan layanan Notifikasi Push Apple (APNs) untuk mengirimkan notifikasi push ke perangkat iOS Anda. Jika Anda telah mencapai batas jumlah kunci, Anda dapat menggunakan kunci yang sudah ada atau sertifikat, tetapi prosesnya lebih rumit. tab di pengaturan proyek Firebase Anda, unggah file, dan masukkan detail untuk Key ID dan ID Tim dari iOS.
Sekarang, ubah perubahan pada proyek Xcode Anda dengan menjalankan:
npx cap open iosSalin file GoogleService-Info.plist yang Anda download dari Firebase ke proyek iOS. Drag file ke dalam proyek Xcode di dalam folder app/app, dan pilih Salin item jika perlu.
Selanjutnya, tambahkan Pod baru untuk dependensi Firebase di ios/App/Podfile:
target 'App' do
  capacitor_pods
  # Add your Pods here
  pod 'Firebase/Messaging'
end
Perbarui platform native dengan perintah ini:
npx cap update iosModifikasi native Swift code di ios/App/App/AppDelegate.swift untuk mendaftar dengan Firebase dan mengembalikan token yang benar ke aplikasi Anda.
import UIKit
import Capacitor
import Firebase

@UIApplicationMain
class AppDelegate: UIResponder, UIApplicationDelegate {

  var window: UIWindow?

  func application(_ application: UIApplication, didFinishLaunchingWithOptions launchOptions: [UIApplication.LaunchOptionsKey: Any]?) -> Bool {
    // Override point for customization after application launch.
    FirebaseApp.configure()
    return true
  }

  // All the existing functions
  // ...

  // Update this one:
    func application(_ application: UIApplication, didRegisterForRemoteNotificationsWithDeviceToken deviceToken: Data) {
        Messaging.messaging().apnsToken = deviceToken
        InstanceID.instanceID().instanceID { (result, error) in
            if let error = error {
                NotificationCenter.default.post(name: Notification.Name(CAPNotifications.DidFailToRegisterForRemoteNotificationsWithError.name()), object: error)
            } else if let result = result {
                NotificationCenter.default.post(name: Notification.Name(CAPNotifications.DidRegisterForRemoteNotificationsWithDeviceToken.name()), object: result.token)
            }
        }
    }
}
Akhirnya, tambahkan Kemampuan untuk Notifikasi Push dalam proyek Xcode Anda.
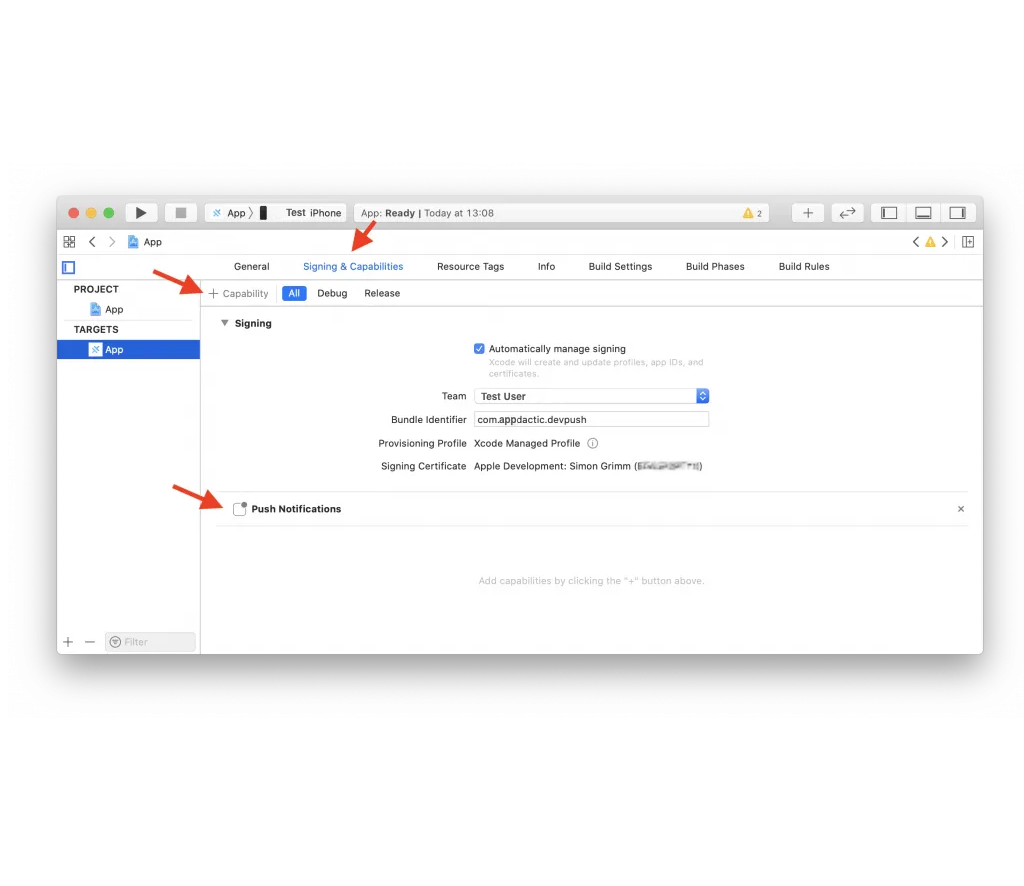
Sekarang, bangun aplikasi Anda dan integrasikan notifikasi push.
Integrasi Notifikasi Push Ionic
Buat layanan dan halaman baru dalam proyek Ionic Anda:
ionic g service services/fcm
ionic g page pages/details
Perbarui routing di app/app-routing.module.ts untuk mencakup halaman baru dengan id dinamis:
import { NgModule } from '@angular/core';
import { PreloadAllModules, RouterModule, Routes } from '@angular/router';

const routes: Routes = [
  {
    path: 'home',
    loadChildren: () => import('./home/home.module').then( m => m.HomePageModule)
  },
  {
    path: '',
    redirectTo: 'home',
    pathMatch: 'full'
  },
  {
    path: 'home/:id',
    loadChildren: () => import('./pages/details/details.module').then( m => m.DetailsPageModule)
  },
];

@NgModule({
  imports: [
    RouterModule.forRoot(routes, { preloadingStrategy: PreloadAllModules })
  ],
  exports: [RouterModule]
})
export class AppRoutingModule { }
Buat layanan untuk mengelola notifikasi push di services/fcm.service.ts:
import { Injectable } from '@angular/core';
import {
  Plugins,
  PushNotification,
  PushNotificationToken,
  PushNotificationActionPerformed,
  Capacitor
} from '@capacitor/core';
import { Router } from '@angular/router';

const { PushNotifications } = Plugins;

@Injectable({
  providedIn: 'root'
})
export class FcmService {

  constructor(private router: Router) { }

  initPush() {
    if (Capacitor.platform !== 'web') {
      this.registerPush();
    }
  }

  private registerPush() {
    PushNotifications.requestPermission().then((permission) => {
      if (permission.granted) {
        // Register with Apple / Google to receive push via APNS/FCM
        PushNotifications.register();
      } else {
        // No permission for push granted
      }
    });

    PushNotifications.addListener(
      'registration',
      (token: PushNotificationToken) => {
        console.log('My token: ' + JSON.stringify(token));
      }
    );

    PushNotifications.addListener('registrationError', (error: any) => {
      console.log('Error: ' + JSON.stringify(error));
    });

    PushNotifications.addListener(
      'pushNotificationReceived',
      async (notification: PushNotification) => {
        console.log('Push received: ' + JSON.stringify(notification));
      }
    );

    PushNotifications.addListener(
      'pushNotificationActionPerformed',
      async (notification: PushNotificationActionPerformed) => {
        const data = notification.notification.data;
        console.log('Action performed: ' + JSON.stringify(notification.notification));
        if (data.detailsId) {
          this.router.navigateByUrl(`/home/${data.detailsId}`);
        }
      }
    );
  }
}
Tetapkan panggilan ke initPush() fungsi di app/app.component.ts:
import { Component } from '@angular/core';

import { Platform } from '@ionic/angular';
import { SplashScreen } from '@ionic-native/splash-screen/ngx';
import { StatusBar } from '@ionic-native/status-bar/ngx';
import { FcmService } from './services/fcm.service';

@Component({
  selector: 'app-root',
  templateUrl: 'app.component.html',
  styleUrls: ['app.component.scss']
})
export class AppComponent {
  constructor(
    private platform: Platform,
    private splashScreen: SplashScreen,
    private statusBar: StatusBar,
    private fcmService: FcmService
  ) {
    this.initializeApp();
  }

  initializeApp() {
    this.platform.ready().then(() => {
      this.statusBar.styleDefault();
      this.splashScreen.hide();

      // Trigger the push setup
      this.fcmService.initPush();
    });
  }
}
Tangani informasi pada halaman detail di pages/details/details.page.ts:
import { Component, OnInit } from '@angular/core';
import { ActivatedRoute } from '@angular/router';
import { Plugins } from '@capacitor/core';
const { PushNotifications } = Plugins;

@Component({
  selector: 'app-details',
  templateUrl: './details.page.html',
  styleUrls: ['./details.page.scss'],
})
export class DetailsPage implements OnInit {
  id = null;

  constructor(private route: ActivatedRoute) { }

  ngOnInit() {
    this.route.paramMap.subscribe(params => {
      this.id = params.get('id');
    });
  }

  resetBadgeCount() {
    PushNotifications.removeAllDeliveredNotifications();
  }

}
Tampilkan detail di pages/details/details.page.html:
<ion-header>
  <ion-toolbar>
    <ion-buttons slot="start">
      <ion-back-button defaultHref="/"></ion-back-button>
    </ion-buttons>
    <ion-title>Details</ion-title>
  </ion-toolbar>
</ion-header>

<ion-content>
  My Id from push: {{ id }}

  <ion-button (click)="resetBadgeCount()" expand="block">
    Reset Badge Count
  </ion-button>
</ion-content>
Buat aplikasi, sinkronkan perubahan, dan terapkan ke perangkat Anda.
ionic build
npx cap sync
Sekarang, Anda dapat mengirimkan pemberitahuan push dengan Firebase.
Mengirim Pemberitahuan Push dengan Firebase
Ada beberapa cara untuk mengirimkan pemberitahuan push dengan Firebase.
Uji Perangkat Khusus
Setelah mengirimkan aplikasi ke perangkat, Anda dapat memeriksa log konsol untuk melihat token setelah registrasi. Gunakan token ini untuk mengirimkan pemberitahuan push sasaran untuk memastikan integrasi Anda berfungsi. Pengiriman Pesan dan pilih Kirim pesan uji. Tambahkan token perangkat dari log.
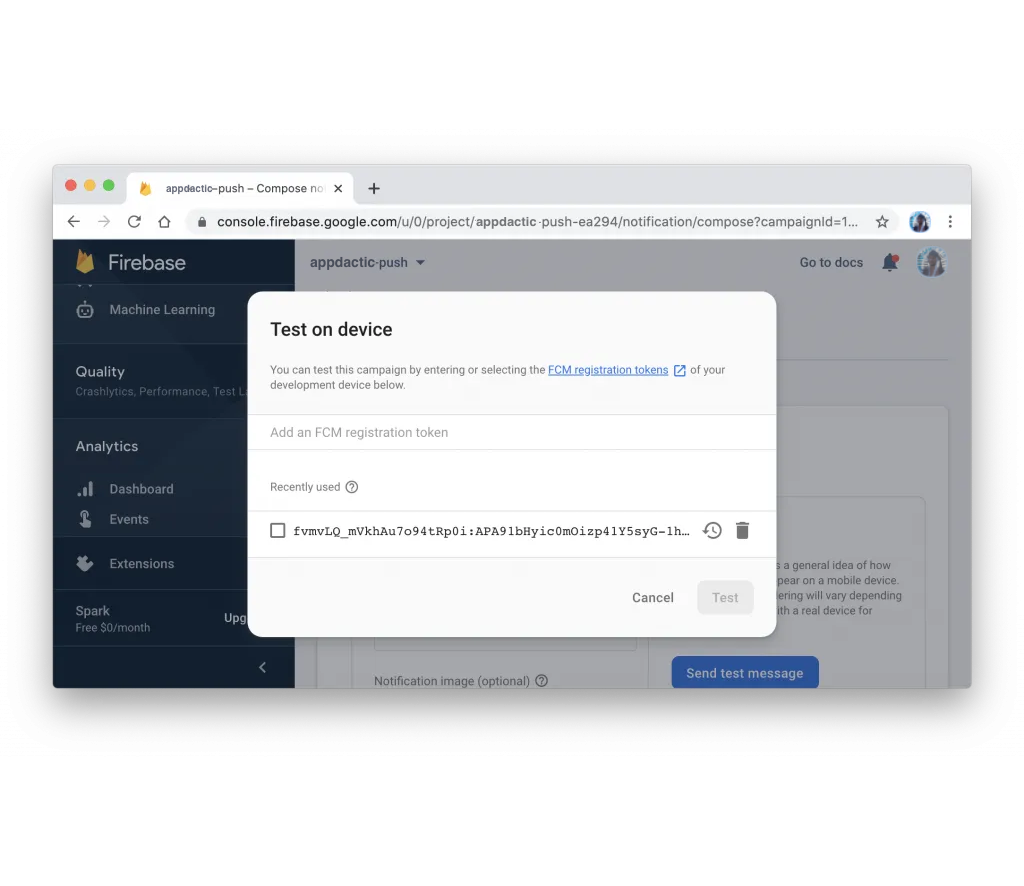
Jika semua pengaturan sudah benar, Anda harus melihat notifikasi push di perangkat Anda.
Pesan Push dengan Payload
Untuk menguji notifikasi push dengan informasi tambahan, ikuti petunjuk di halaman yang sama untuk menentukan informasi umum dan pilih platform yang ingin ditargetkan. Tambahkan opsional tambahan untuk mengirim payload dengan notifikasi push Anda.
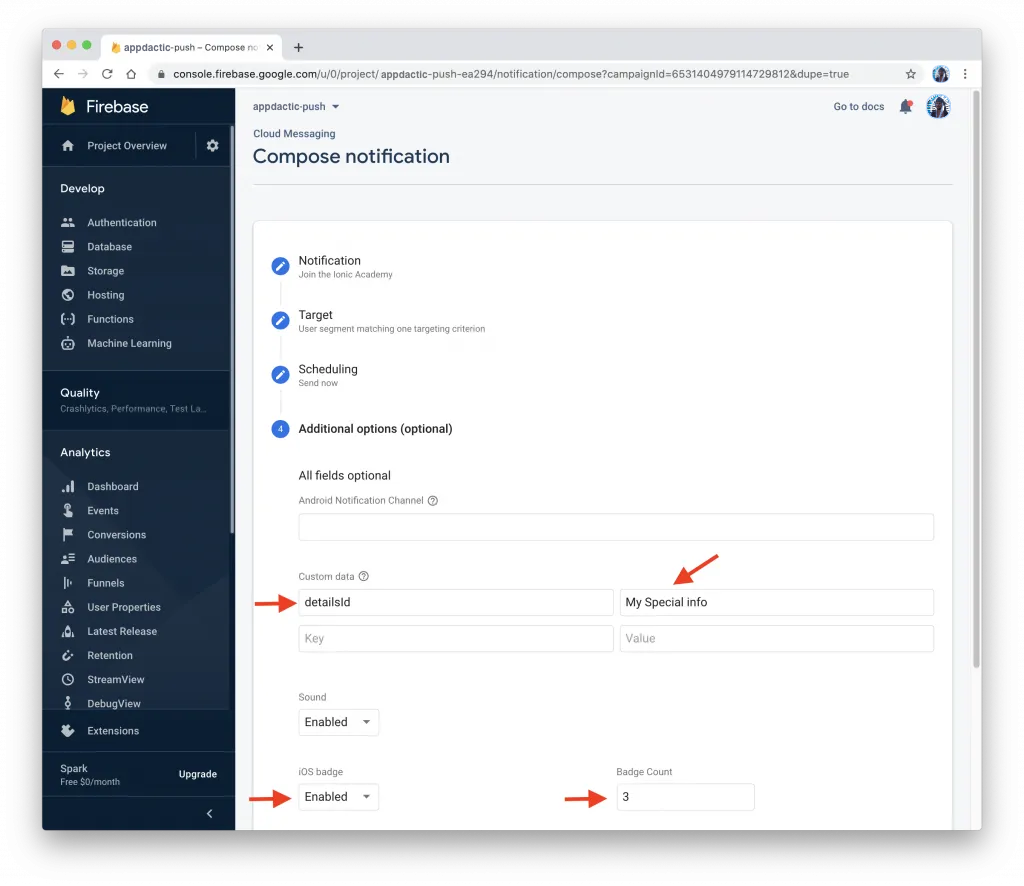
Di Opsi lanjutan menambahkan bagian, Data kustom pasang nilai. Misalnya, Anda dapat menggunakan kunci detailsId dan nilai pilihan Anda. Data ini akan digunakan di aplikasi untuk menavigasi ke halaman detail dengan id yang ditentukan.
Setelah mengirimkan notifikasi push, aplikasi Anda harus menerima dan menampilkan halaman detail dengan id yang ditentukan ketika notifikasi ditekan.
Menggunakan Firebase API
Anda juga dapat mengirimkan notifikasi push secara programatis menggunakan Firebase API. Untuk melakukan ini, Anda perlu mendapatkan Kunci Server dari pengaturan proyek Firebase Anda di bawah tab Pengiriman Pesan .
Dengan kunci server, Anda dapat mengirimkan permintaan POST ke Firebase API dengan payload yang diperlukan. Berikut adalah contoh menggunakan Node.js dan request library:
const request = require('request');

const serverKey = 'YOUR_SERVER_KEY';
const deviceToken = 'YOUR_DEVICE_TOKEN';

const options = {
  method: 'POST',
  url: 'https://fcm.googleapis.com/fcm/send',
  headers: {
    'Content-Type': 'application/json',
    Authorization: 'key=' + serverKey
  },
  body: JSON.stringify({
    to: deviceToken,
    notification: {
      title: 'Test Push',
      body: 'This is a test push notification with custom data'
    },
    data: {
      detailsId: '123'
    }
  })
};

request(options, (error, response, body) => {
  if (error) {
    console.error('Error sending push:', error);
  } else {
    console.log('Push sent successfully:', body);
  }
});
Ganti YOUR_SERVER_KEY dan YOUR_DEVICE_TOKEN dengan kunci server Anda yang sebenarnya dan token perangkat. Jalankan skrip, dan perangkat Anda seharusnya menerima notifikasi push dengan payload kustom.
Itu saja! Anda telah berhasil mengintegrasikan notifikasi push di aplikasi Ionic Capacitor Anda menggunakan Firebase. Sekarang Anda dapat mengirimkan notifikasi push ke pengguna Anda di kedua platform Android dan iOS.
Lanjutkan dari Ionic Capacitor Push Notifications dengan Firebase: Panduan Langkah demi Langkah
Jika Anda menggunakan Ionic Capacitor Push Notifications dengan Firebase: Panduan Langkah demi Langkah untuk merencanakan migrasi dan operasi bisnis, hubungkannya dengan Capgo Enterprise untuk alur kerja produk di Capgo Enterprise, Alternatif Plugin Bisnis Ionic Enterprise untuk alur kerja produk di Alternatif Plugin Bisnis Ionic Enterprise, Capgo Alternatif untuk alur kerja produk di Capgo Alternatif, Capgo Konsultasi untuk alur kerja produk di Capgo Konsultasi, dan Capgo Layanan Premium untuk alur kerja produk di Capgo Layanan Premium.


