在本教程中,我们将在 Ionic Capacitor 应用中使用 Firebase 进行推送通知的配置。有关 Firebase Cloud Messaging 支持的维护 Capacitor 插件,请参见 @capgo/capacitor-firebase-messaging您不需要特定的服务,但您需要在推送通知之前配置几个东西。Firebase 是一个很好的选择,因为它是 Android 所必需的,而且您可以轻松地使用它发送通知而不使用数据库。
首先,我们将创建一个带有Capacitor启用的Ionic应用,并指定我们的 package id,这是您的应用的唯一标识符。然后,我们将构建应用并添加原生平台。
ionic start pushApp blank --type=angular --capacitor --package-id=com.appdactic.devpush
cd ./pushApp
ionic build
npx cap add ios
npx cap add android
如果您已经有一个应用,可以更改的 capacitor.config.json 以包含您的 appId。然而,如果您的原生文件夹已经存在,您将需要在所有文件中替换ID,因为Capacitor只创建文件夹一次,并且 不会更新ID本身。在 capacitor.config.json,您还可以指定选项,如更新徽章计数、在推送时播放声音以及在通知到达时显示警告。
{
  "appId": "com.appdactic.devpush",
  "appName": "pushApp",
  "bundledWebRuntime": false,
  "npmClient": "npm",
  "webDir": "www",
  "plugins": {
    "SplashScreen": {
      "launchShowDuration": 0
    },
    "PushNotifications": {
      "presentationOptions": ["badge", "sound", "alert"]
    }
  },
  "cordova": {}
}
现在,让我们在应用程序外配置推送通知。
Firebase 配置
首先 创建一个新的 Firebase 项目 或使用现有的一个。为新项目提供一个名称和默认选项。
如果您有一个新的应用程序,您应该看到 “Get started by adding Firebase to your app” 在应用程序的控制台中。否则,点击齿轮图标并转到 项目设置 添加应用程序。
iOS 和 Android 的对话框看起来类似,重要的是要使用您的 包 ID 为应用程序。
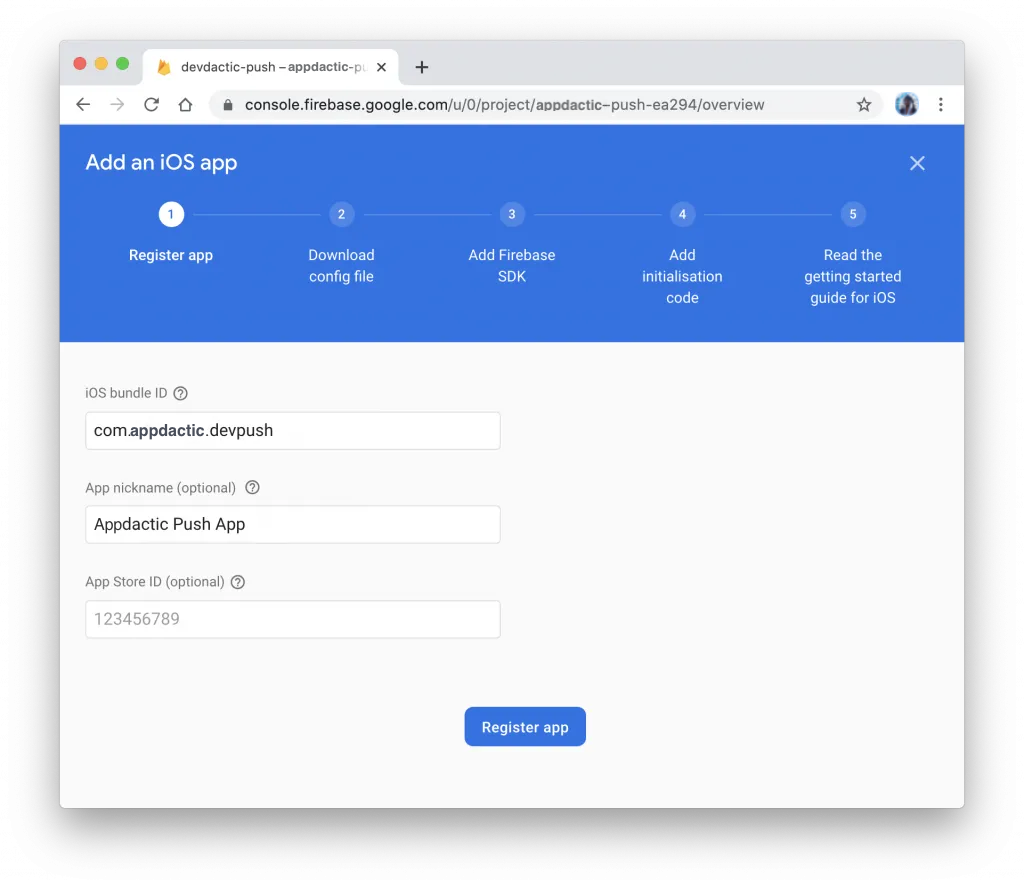
完成初始步骤后,请下载以下文件:
- google-services.json Android 文件
- GoogleService-info.plist iOS 文件
接下来,配置平台。
Android 推送准备
对于 Android,移动 google-services.json 您下载的文件 android/app/ 文件夹。
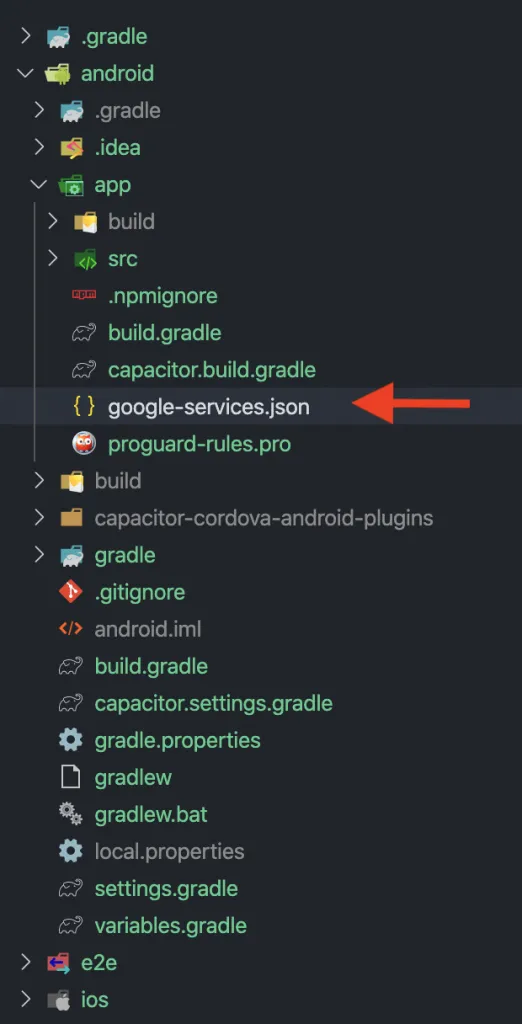
Android配置完成。现在让我们配置iOS。
iOS推送准备
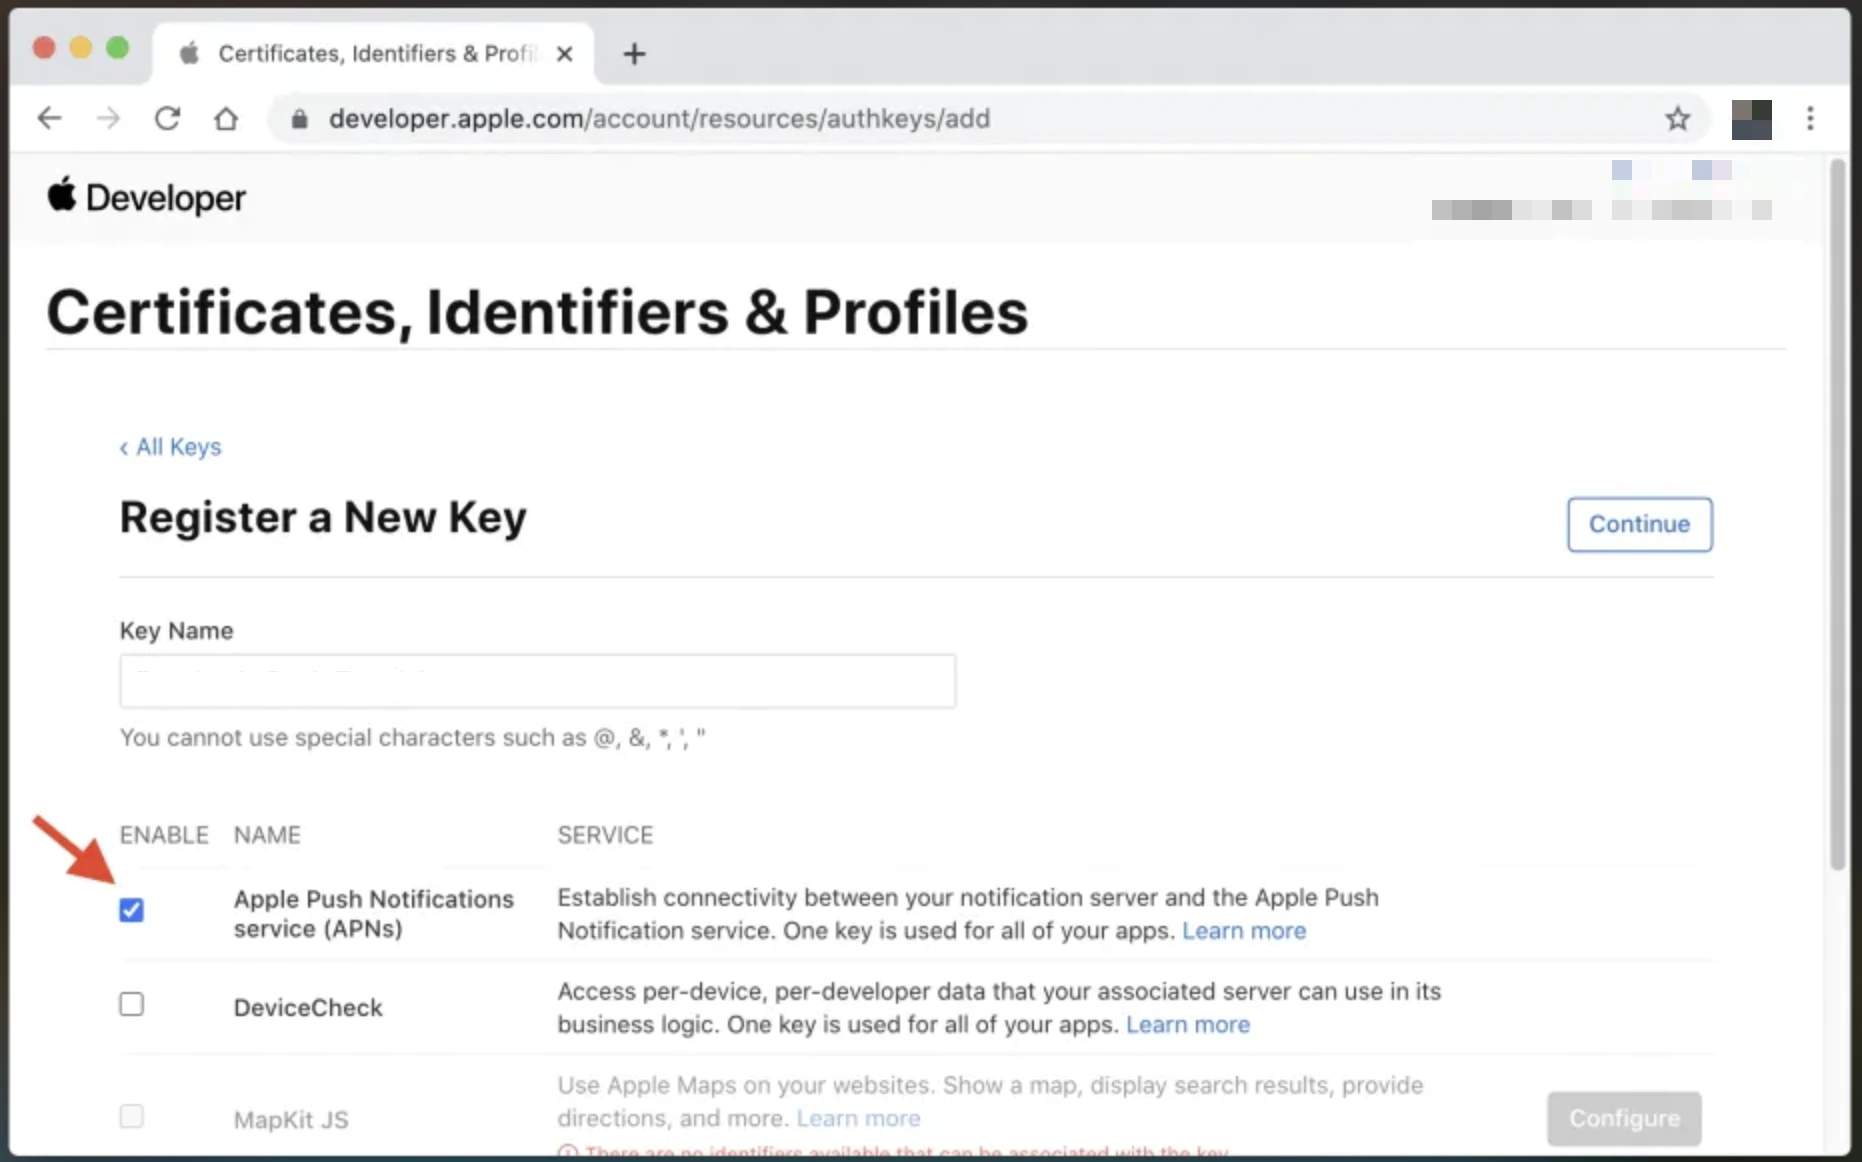
这个部分更复杂。首先, 在您的Apple Developer帐户的标识符列表中为您的应用创建一个App ID。确保您 从列表中选择推送通知能力。 ionic-ios推送ID The
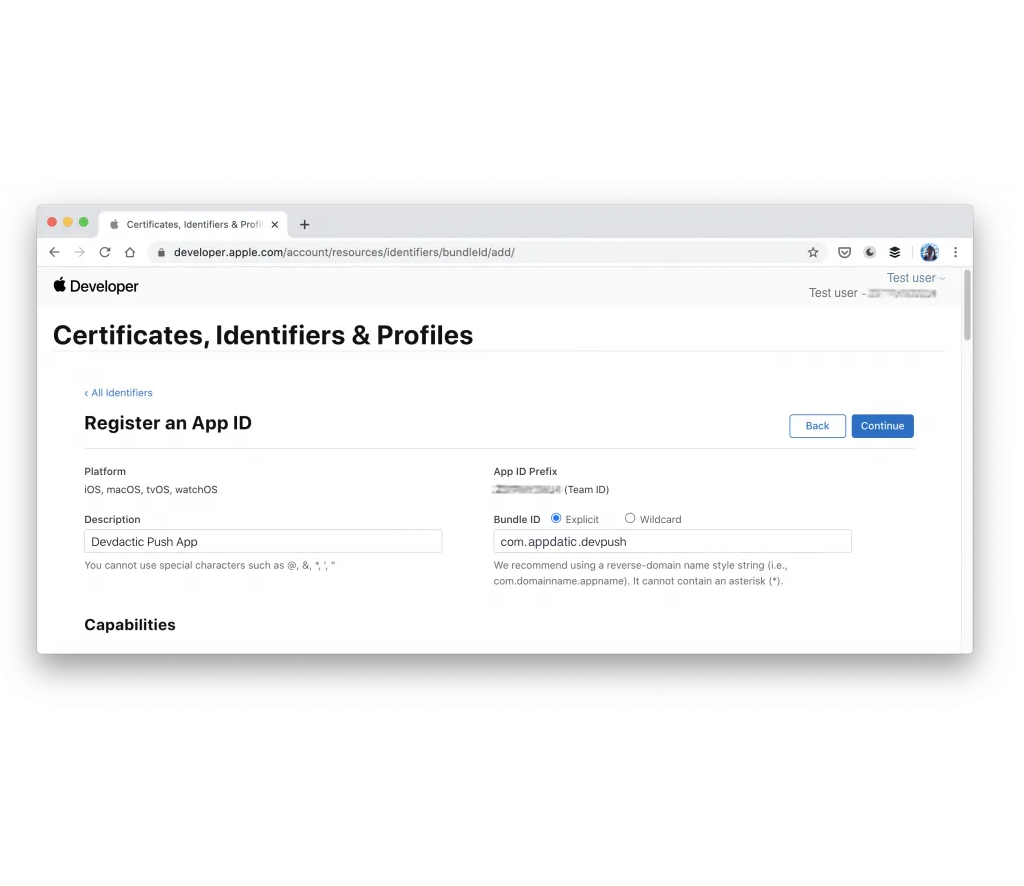
在您的Apple Developer帐户的标识符列表中为您的应用创建一个App ID。确保您 Bundle ID 应该与您的 __CAPGO_KEEP_0__ 和 Firebase 内的 App ID 一致。 should be the same as your App ID within Capacitor and Firebase.
现在, 创建一个密钥 并启用 Apple Push Notifications 服务 (APNs)。如果您已经达到最大密钥数量,可以使用现有的密钥或证书,但该过程更为复杂。
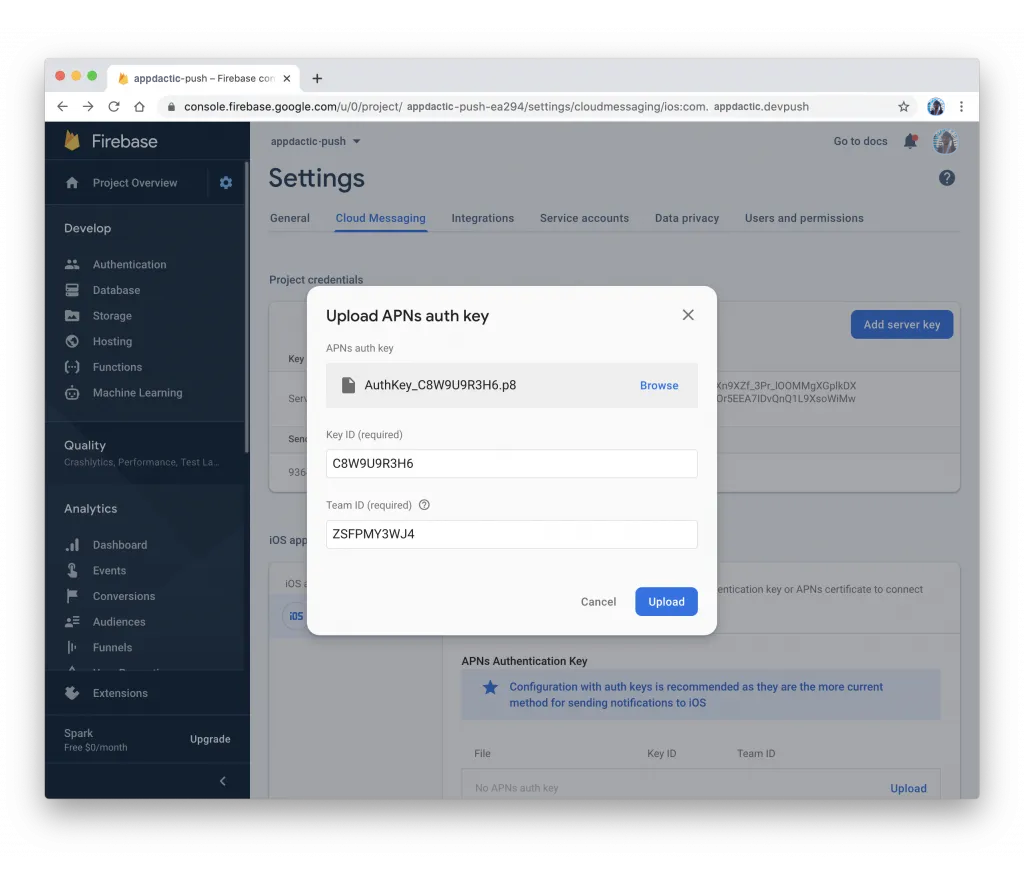
下载完成后,您需要将 .p8 文件上传到 Firebase。打开 Cloud Messaging 。 ios-developer-push-key 在您的 Firebase 项目设置中,找到标签,上传文件,并输入 iOS 中的 Key ID 和您的团队 ID 的详细信息。
现在,通过运行命令来修改您的 Xcode 项目:
npx cap open ios复制您从 Firebase 下载的 GoogleService-Info.plist 文件并将其拖放到 iOS 项目中,选择 Copy items if needed.
接下来,在 ios/App/Podfile:
target 'App' do
  capacitor_pods
  # Add your Pods here
  pod 'Firebase/Messaging'
end
中添加一个新的 Pod 来添加 Firebase 依赖项。
npx cap update iosModify the native Swift code in 修改本机 Swift 中的 __CAPGO_KEEP_0__: 注册 Firebase 并将正确的令牌返回给您的应用。
import UIKit
import Capacitor
import Firebase
@UIApplicationMain
class AppDelegate: UIResponder, UIApplicationDelegate {
var window: UIWindow?
func application(_ application: UIApplication, didFinishLaunchingWithOptions launchOptions: [UIApplication.LaunchOptionsKey: Any]?) -> Bool {
// Override point for customization after application launch.
FirebaseApp.configure()
return true
}
// All the existing functions
// ...
// Update this one:
func application(_ application: UIApplication, didRegisterForRemoteNotificationsWithDeviceToken deviceToken: Data) {
Messaging.messaging().apnsToken = deviceToken
InstanceID.instanceID().instanceID { (result, error) in
if let error = error {
NotificationCenter.default.post(name: Notification.Name(CAPNotifications.DidFailToRegisterForRemoteNotificationsWithError.name()), object: error)
} else if let result = result {
NotificationCenter.default.post(name: Notification.Name(CAPNotifications.DidRegisterForRemoteNotificationsWithDeviceToken.name()), object: result.token)
}
}
}
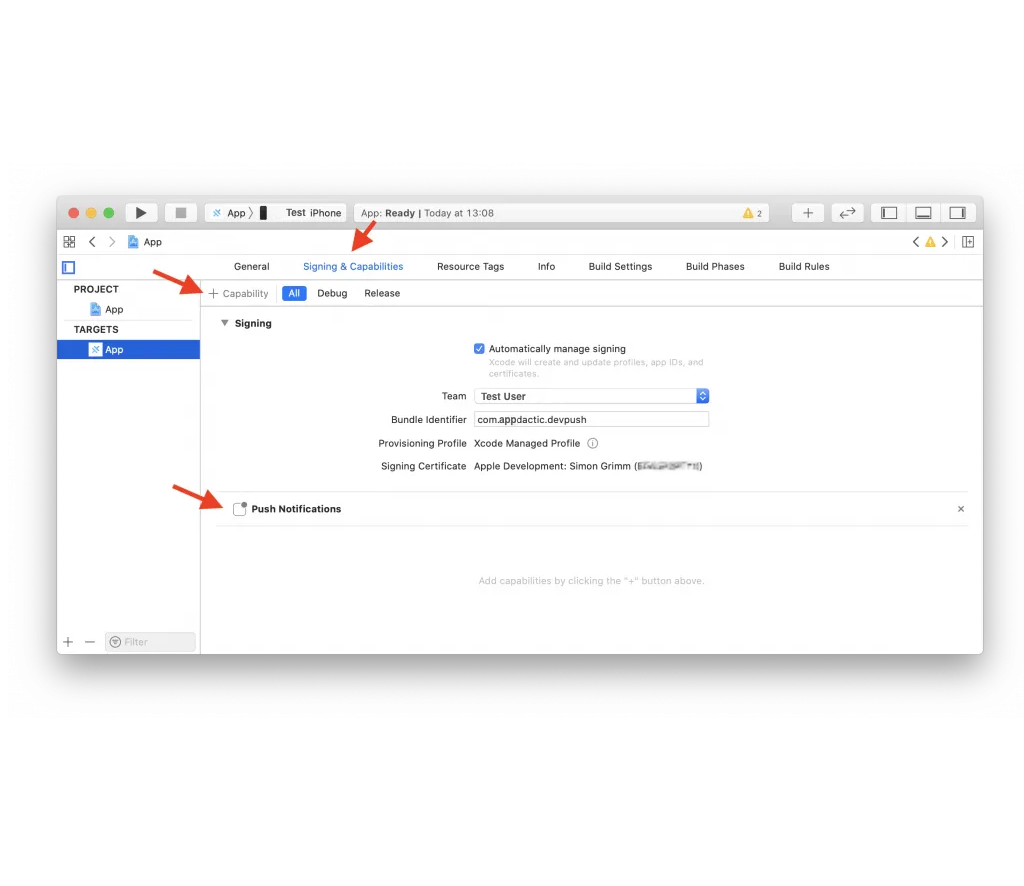
}最后,在您的 Xcode 项目中添加推送通知的能力。
现在,构建您的应用并将推送通知集成到其中。
Ionic 推送通知集成
在您的 Ionic 项目中创建一个服务和一个新页面:
ionic g service services/fcm
ionic g page pages/details
更新 app/app-routing.module.ts 以动态 ID 包含新页面:
import { NgModule } from '@angular/core';
import { PreloadAllModules, RouterModule, Routes } from '@angular/router';

const routes: Routes = [
  {
    path: 'home',
    loadChildren: () => import('./home/home.module').then( m => m.HomePageModule)
  },
  {
    path: '',
    redirectTo: 'home',
    pathMatch: 'full'
  },
  {
    path: 'home/:id',
    loadChildren: () => import('./pages/details/details.module').then( m => m.DetailsPageModule)
  },
];

@NgModule({
  imports: [
    RouterModule.forRoot(routes, { preloadingStrategy: PreloadAllModules })
  ],
  exports: [RouterModule]
})
export class AppRoutingModule { }
创建一个服务来处理推送通知的 services/fcm.service.ts:
import { Injectable } from '@angular/core';
import {
  Plugins,
  PushNotification,
  PushNotificationToken,
  PushNotificationActionPerformed,
  Capacitor
} from '@capacitor/core';
import { Router } from '@angular/router';

const { PushNotifications } = Plugins;

@Injectable({
  providedIn: 'root'
})
export class FcmService {

  constructor(private router: Router) { }

  initPush() {
    if (Capacitor.platform !== 'web') {
      this.registerPush();
    }
  }

  private registerPush() {
    PushNotifications.requestPermission().then((permission) => {
      if (permission.granted) {
        // Register with Apple / Google to receive push via APNS/FCM
        PushNotifications.register();
      } else {
        // No permission for push granted
      }
    });

    PushNotifications.addListener(
      'registration',
      (token: PushNotificationToken) => {
        console.log('My token: ' + JSON.stringify(token));
      }
    );

    PushNotifications.addListener('registrationError', (error: any) => {
      console.log('Error: ' + JSON.stringify(error));
    });

    PushNotifications.addListener(
      'pushNotificationReceived',
      async (notification: PushNotification) => {
        console.log('Push received: ' + JSON.stringify(notification));
      }
    );

    PushNotifications.addListener(
      'pushNotificationActionPerformed',
      async (notification: PushNotificationActionPerformed) => {
        const data = notification.notification.data;
        console.log('Action performed: ' + JSON.stringify(notification.notification));
        if (data.detailsId) {
          this.router.navigateByUrl(`/home/${data.detailsId}`);
        }
      }
    );
  }
}
调用 initPush() function in app/app.component.ts:
import { Component } from '@angular/core';

import { Platform } from '@ionic/angular';
import { SplashScreen } from '@ionic-native/splash-screen/ngx';
import { StatusBar } from '@ionic-native/status-bar/ngx';
import { FcmService } from './services/fcm.service';

@Component({
  selector: 'app-root',
  templateUrl: 'app.component.html',
  styleUrls: ['app.component.scss']
})
export class AppComponent {
  constructor(
    private platform: Platform,
    private splashScreen: SplashScreen,
    private statusBar: StatusBar,
    private fcmService: FcmService
  ) {
    this.initializeApp();
  }

  initializeApp() {
    this.platform.ready().then(() => {
      this.statusBar.styleDefault();
      this.splashScreen.hide();

      // Trigger the push setup
      this.fcmService.initPush();
    });
  }
}
在 pages/details/details.page.ts:
import { Component, OnInit } from '@angular/core';
import { ActivatedRoute } from '@angular/router';
import { Plugins } from '@capacitor/core';
const { PushNotifications } = Plugins;

@Component({
  selector: 'app-details',
  templateUrl: './details.page.html',
  styleUrls: ['./details.page.scss'],
})
export class DetailsPage implements OnInit {
  id = null;

  constructor(private route: ActivatedRoute) { }

  ngOnInit() {
    this.route.paramMap.subscribe(params => {
      this.id = params.get('id');
    });
  }

  resetBadgeCount() {
    PushNotifications.removeAllDeliveredNotifications();
  }

}
在 pages/details/details.page.html:
<ion-header>
  <ion-toolbar>
    <ion-buttons slot="start">
      <ion-back-button defaultHref="/"></ion-back-button>
    </ion-buttons>
    <ion-title>Details</ion-title>
  </ion-toolbar>
</ion-header>

<ion-content>
  My Id from push: {{ id }}

  <ion-button (click)="resetBadgeCount()" expand="block">
    Reset Badge Count
  </ion-button>
</ion-content>
构建应用程序,同步您的更改,并将其部署到您的设备。
ionic build
npx cap sync
现在,您可以使用 Firebase 发送推送通知。
使用 Firebase 发送推送通知
使用 Firebase 发送推送通知有多种方式。
特定设备测试
在将应用程序部署到设备后,您可以检查控制台日志以查看注册后生成的令牌。使用此令牌发送一个针对性的测试推送以确认您的集成正在工作。在 Firebase 中,转到 云端消息 并选择 发送测试消息. 从日志中添加设备令牌。
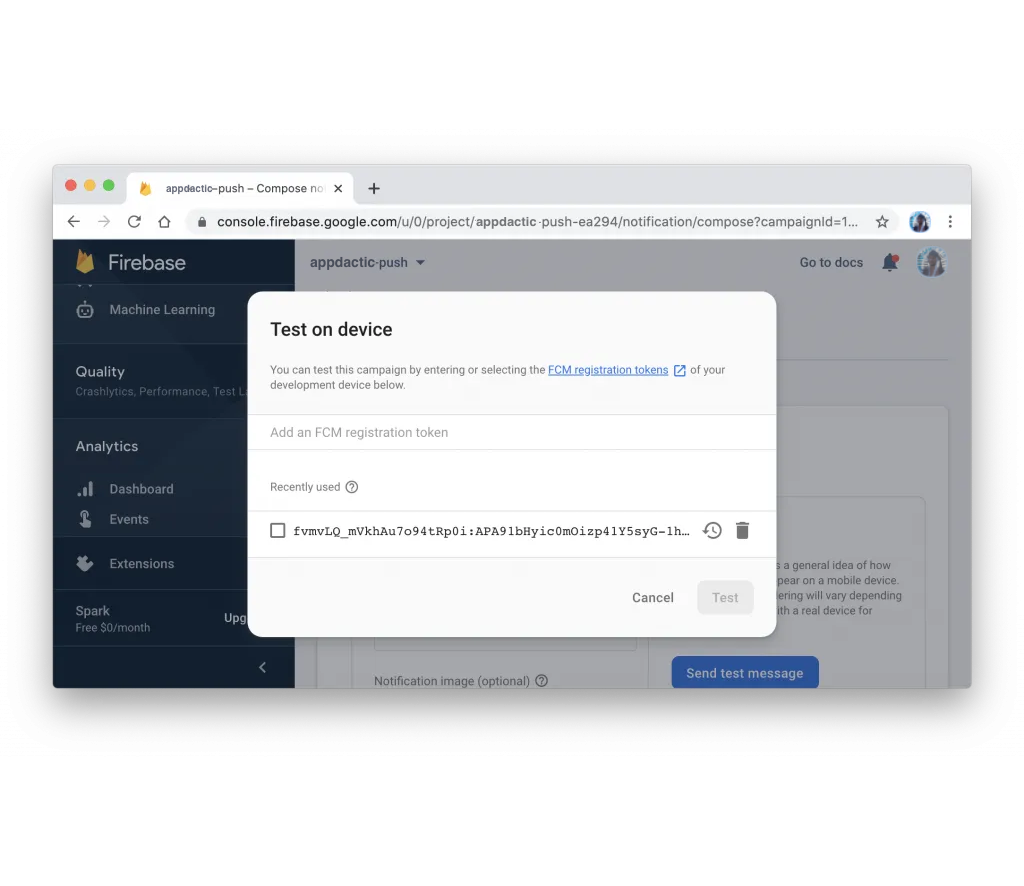
如果设置正确,应该在设备上看到推送通知。
带有载荷的推送消息
要测试带有额外信息的推送通知,请在同一页上按照向导的步骤指定一般信息并选择要目标的平台。添加 额外选项 以发送带有推送通知的载荷。
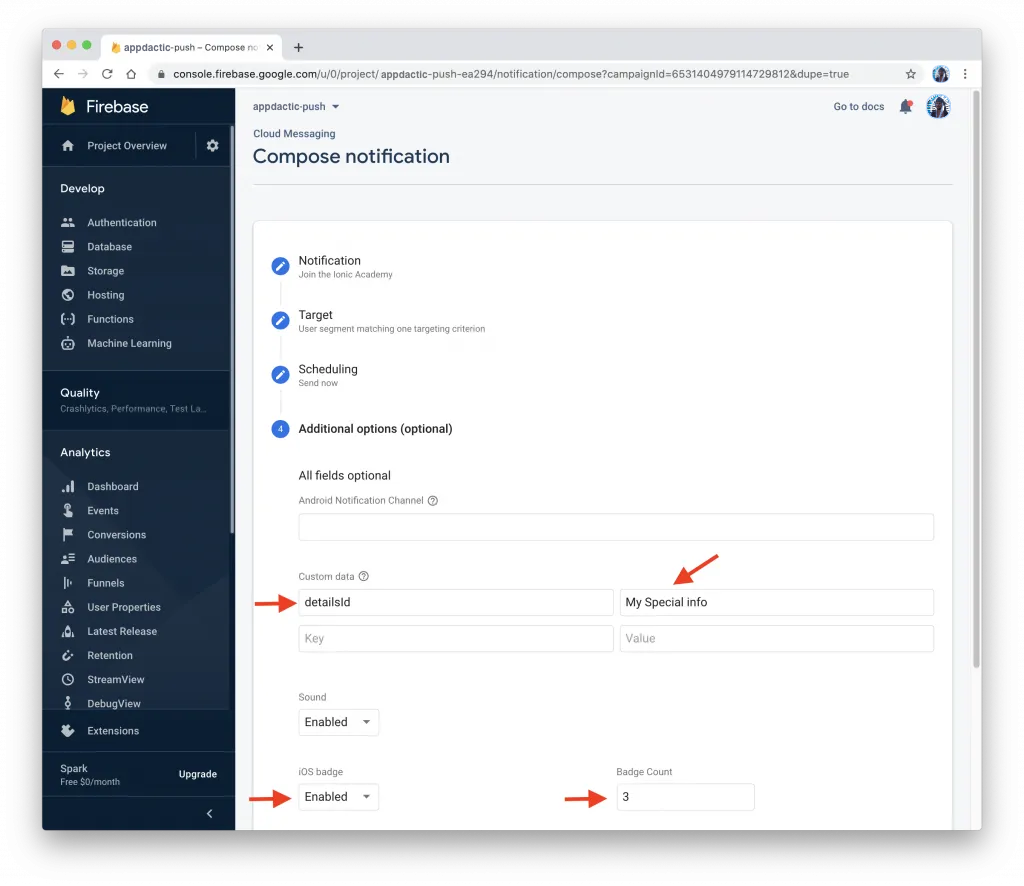
在 高级选项 section, 添加一个 自定义数据 键值对。例如,您可以使用键 detailsId 并选择一个值。这段数据将用于在应用中导航到ID为指定值的详细页面。
在发送推送通知后,应用应该接收到它并在点击通知时显示ID为指定值的详细页面。
使用 Firebase API
您还可以使用 Firebase API 程序matic 地发送推送通知。要实现此功能,您需要从 Firebase 项目设置中获取 服务器密钥 从您的 Firebase 项目设置下的 Cloud Messaging 选项卡中获取。
使用服务器密钥,您可以向 Firebase API 发送一个 POST 请求,带有所需的负载。使用 Node.js 和 的示例代码: request library:
const request = require('request');

const serverKey = 'YOUR_SERVER_KEY';
const deviceToken = 'YOUR_DEVICE_TOKEN';

const options = {
  method: 'POST',
  url: 'https://fcm.googleapis.com/fcm/send',
  headers: {
    'Content-Type': 'application/json',
    Authorization: 'key=' + serverKey
  },
  body: JSON.stringify({
    to: deviceToken,
    notification: {
      title: 'Test Push',
      body: 'This is a test push notification with custom data'
    },
    data: {
      detailsId: '123'
    }
  })
};

request(options, (error, response, body) => {
  if (error) {
    console.error('Error sending push:', error);
  } else {
    console.log('Push sent successfully:', body);
  }
});
用您的实际服务器密钥和设备令牌替换 YOUR_SERVER_KEY 和 YOUR_DEVICE_TOKEN 。运行脚本,设备应该会接收到带有自定义负载的推送通知。
这就完成了!您已经成功在 Ionic Capacitor 应用中集成 Firebase 推送通知。现在,您可以在 Android 和 iOS 平台上向用户发送推送通知。
继续阅读 Ionic Capacitor Push Notifications with Firebase: A Step-by-Step Guide
如果您正在使用 Ionic Capacitor Push Notifications with Firebase: A Step-by-Step Guide 来规划迁移和企业运营,连接它到 Capgo Enterprise 来管理Capgo Enterprise 产品工作流程。 Ionic Enterprise Plugin 的替代品 Ionic Enterprise Plugin 的替代品产品工作流程 Capgo 的替代品 Capgo Alternatives 产品工作流程 Capgo 咨询 Capgo 咨询产品工作流程,以及 Capgo Premium 支持 Capgo Premium 支持产品工作流程


