このチュートリアルでは、Ionic Capacitor アプリにFirebaseを使用してPush通知を実装します。Firebase Cloud Messagingをサポートするために、Firebase Cloud Messagingを使用するための、メンテナンスされているCapacitor プラグインを参照してください。 @capgo/capacitor-firebase-messagingこのサービスは必要ありませんが、複数の設定を事前に設定する必要があります。Firebaseは、Androidの場合に必須であり、データベースを使用せずに通知を送信することも簡単です。
First, we will create an Ionic app with Capacitor enabled and specify our アプリケーションパッケージID、これはあなたのアプリの固有の識別子です。次に、ビルドしてネイティブプラットフォームを追加します。
ionic start pushApp blank --type=angular --capacitor --package-id=com.appdactic.devpush
cd ./pushApp
ionic build
npx cap add ios
npx cap add android
既存のアプリがある場合は、 capacitor.config.json を変更してあなたの アプリIDを含めることができます。ただし、ネイティブフォルダがすでに存在する場合は、すべてのファイルでIDを置き換える必要があります。Capacitorはフォルダを作成するのみで、ID自体を更新しないためです。 __CAPGO_KEEP_0__.config.jsonでは、バッジカウントの更新、プッシュ時のサウンド再生、通知が来るときにアラートを表示するオプションなども指定できます。. capacitor.config.json__CAPGO_KEEP_0__
{
  "appId": "com.appdactic.devpush",
  "appName": "pushApp",
  "bundledWebRuntime": false,
  "npmClient": "npm",
  "webDir": "www",
  "plugins": {
    "SplashScreen": {
      "launchShowDuration": 0
    },
    "PushNotifications": {
      "presentationOptions": ["badge", "sound", "alert"]
    }
  },
  "cordova": {}
}
現在は、アプリ外でプッシュ通知を設定しましょう。
Firebaseの設定
最初は 新しいFirebaseプロジェクトを作成するか、既存のものを使用します。 新しいプロジェクトの場合、名前とデフォルトの設定を提供します。
新しいアプリがある場合は、 “Get started by adding Firebase to your app” in your app’s dashboard. Otherwise, click the gear icon and go to project settings to add an app.
The dialog for both iOS and Android looks similar, and the important thing is to use your パッケージIDを使用してください アプリ用。
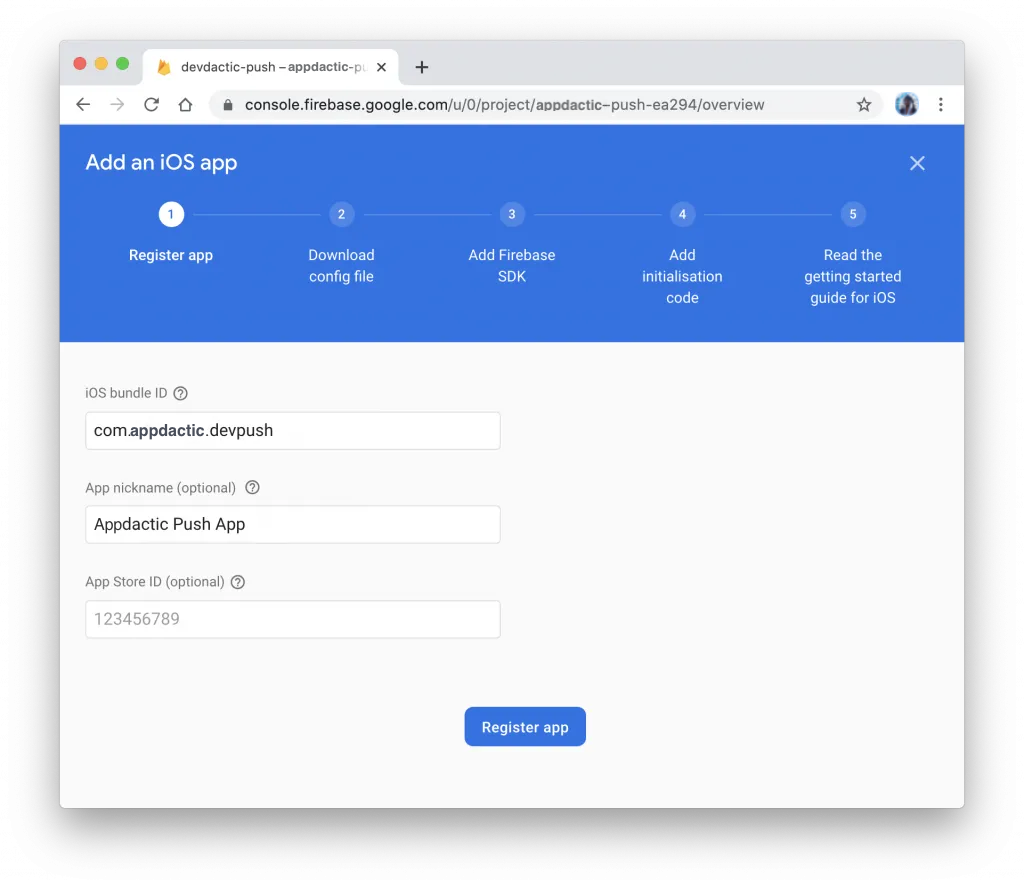
初期ステップの後、次のファイルをダウンロードしてください。
- google-services.json Android用のファイル
- GoogleService-info.plist iOS用のファイル
次に、プラットフォームを設定します。
Android Push Preparation
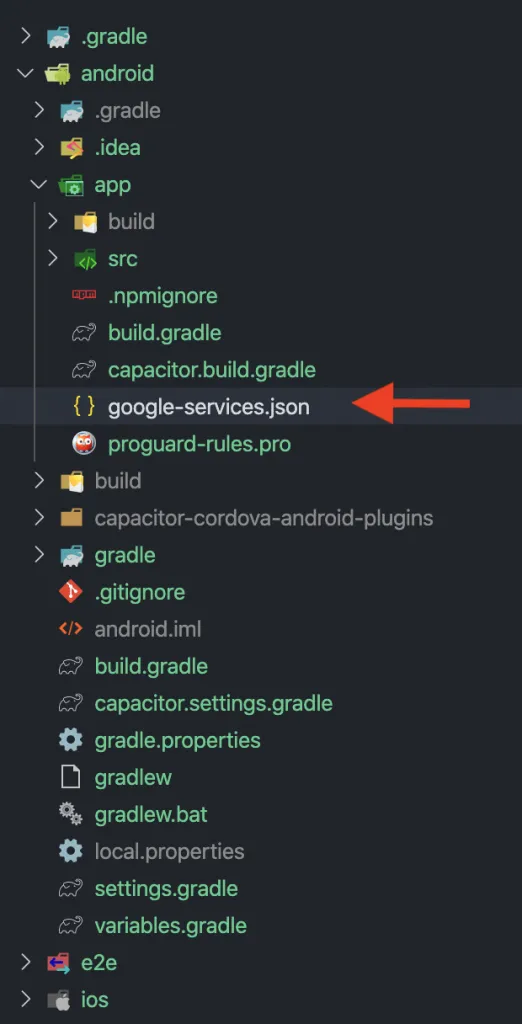
Androidの場合、ダウンロードした google-services.json ファイルを移動してください。 android/app/ フォルダ。
Androidの設定は終わりました。iOSの設定を始めましょう。
iOS Pushの準備
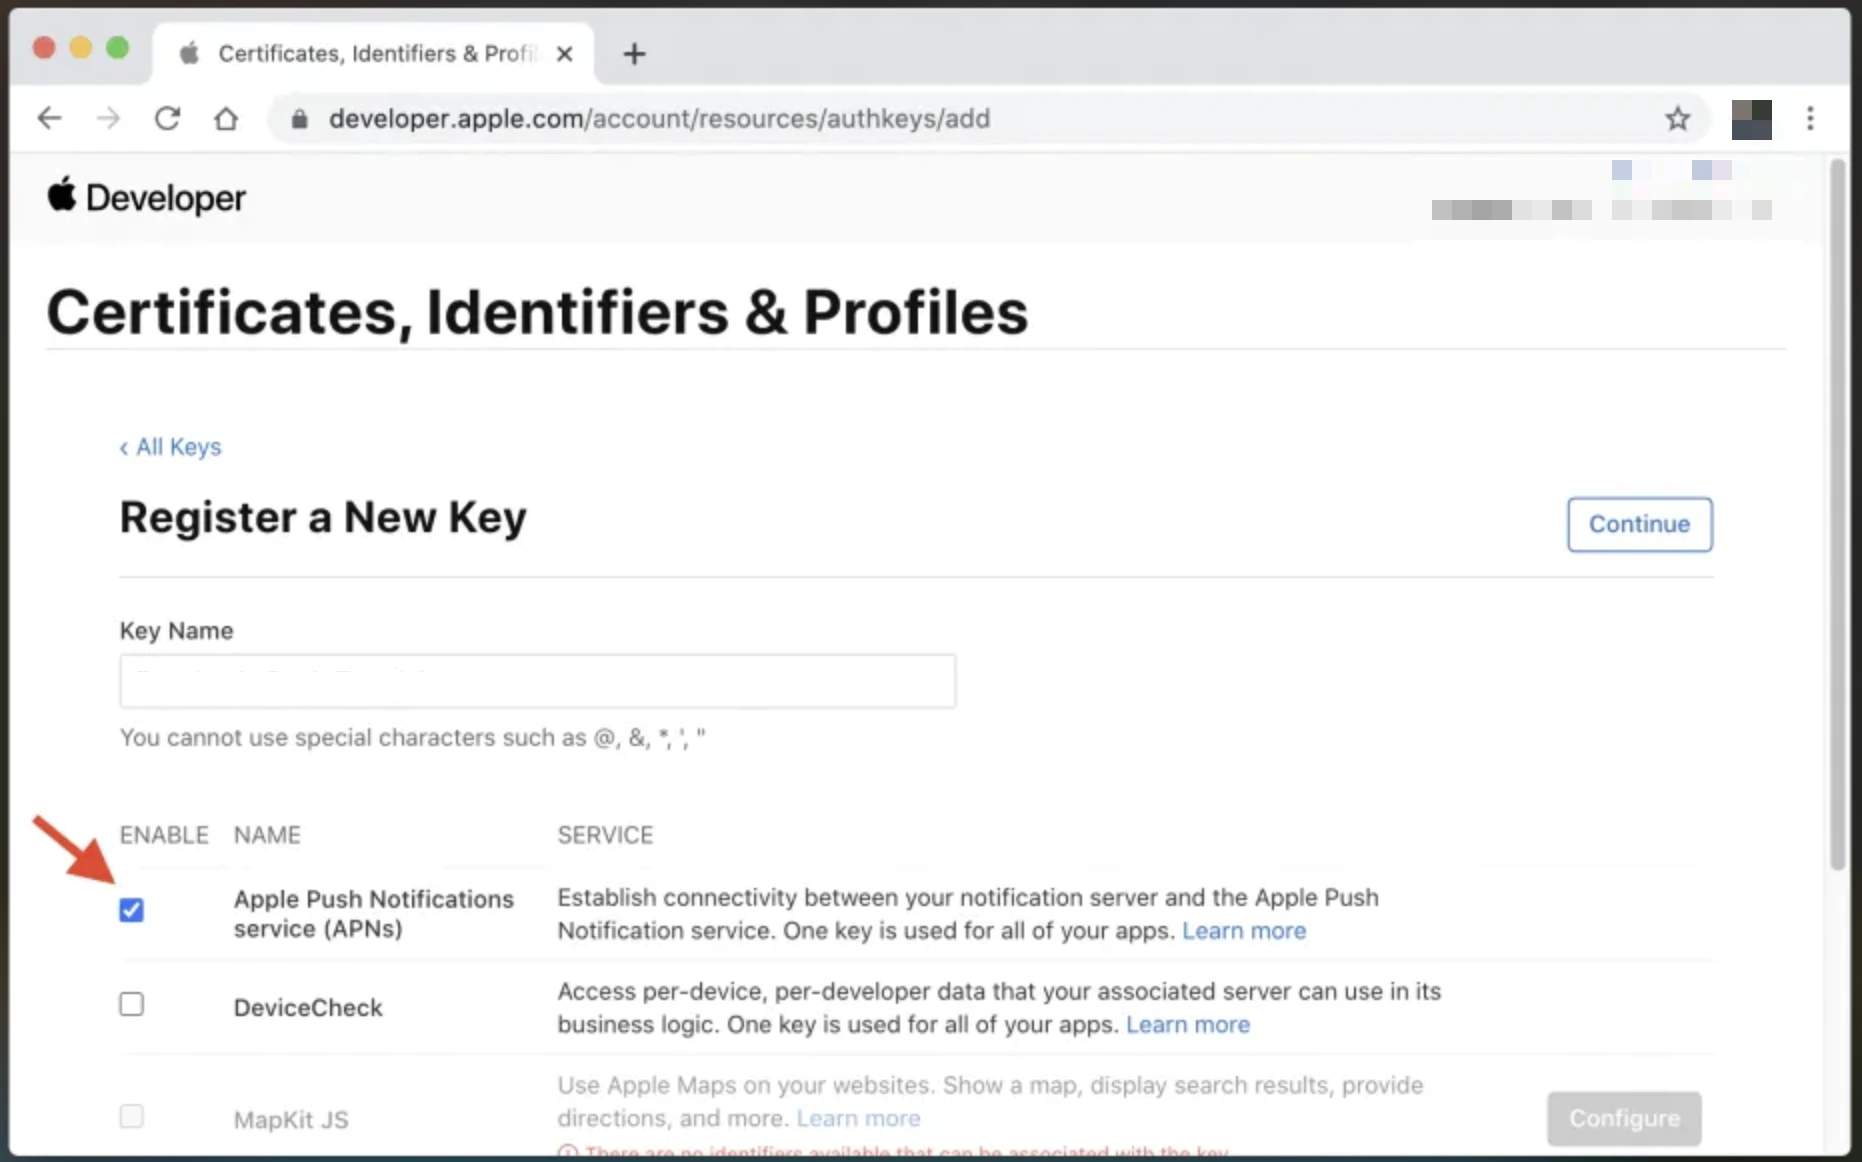
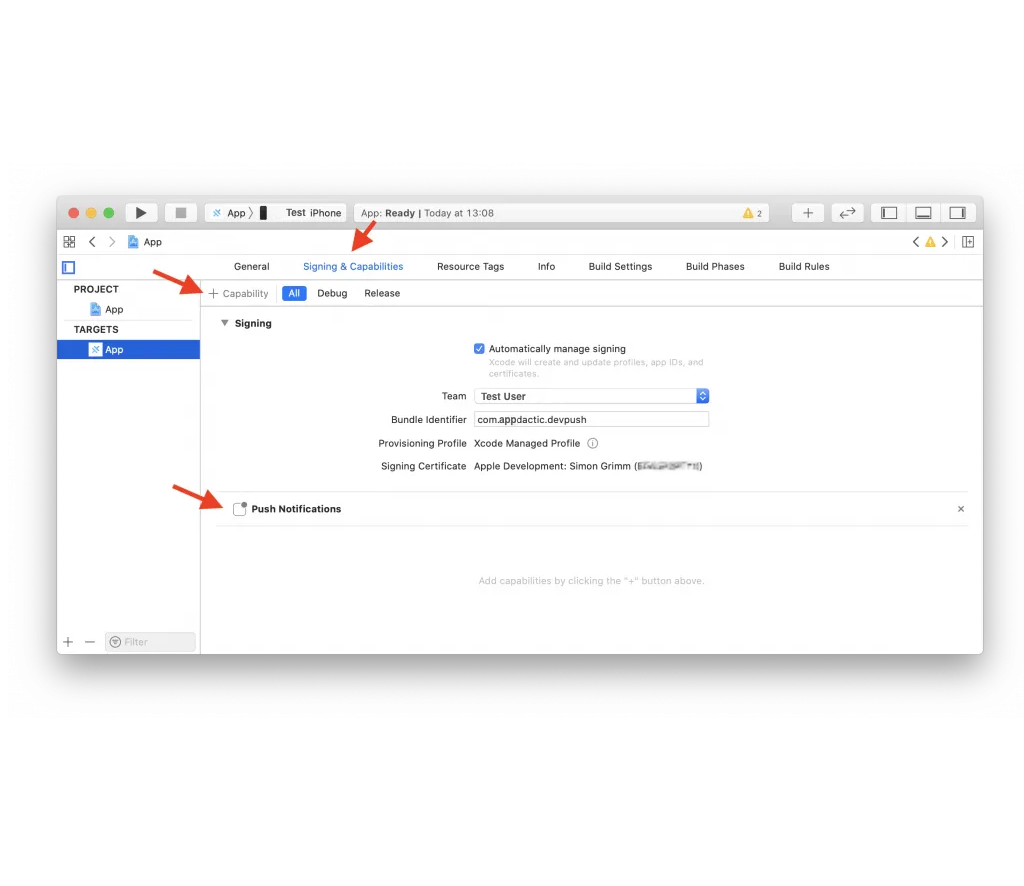
この部分は複雑です。まず、 Apple Developerアカウントの識別子リスト内で アプリのためのApp IDを作成してください。Push通知の機能を選択してください。 ionic-ios-push-id The
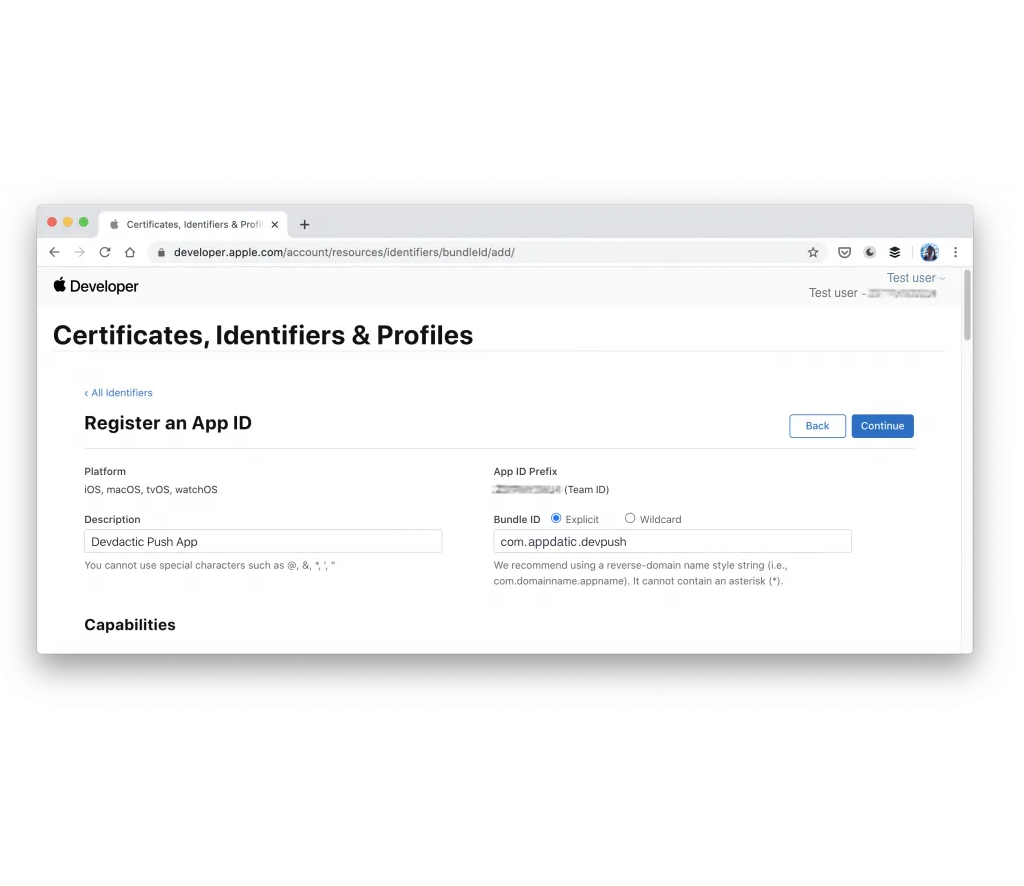
__CAPGO_KEEP_1__. Bundle ID CapacitorとFirebase内でのApp IDと同じでなければなりません。
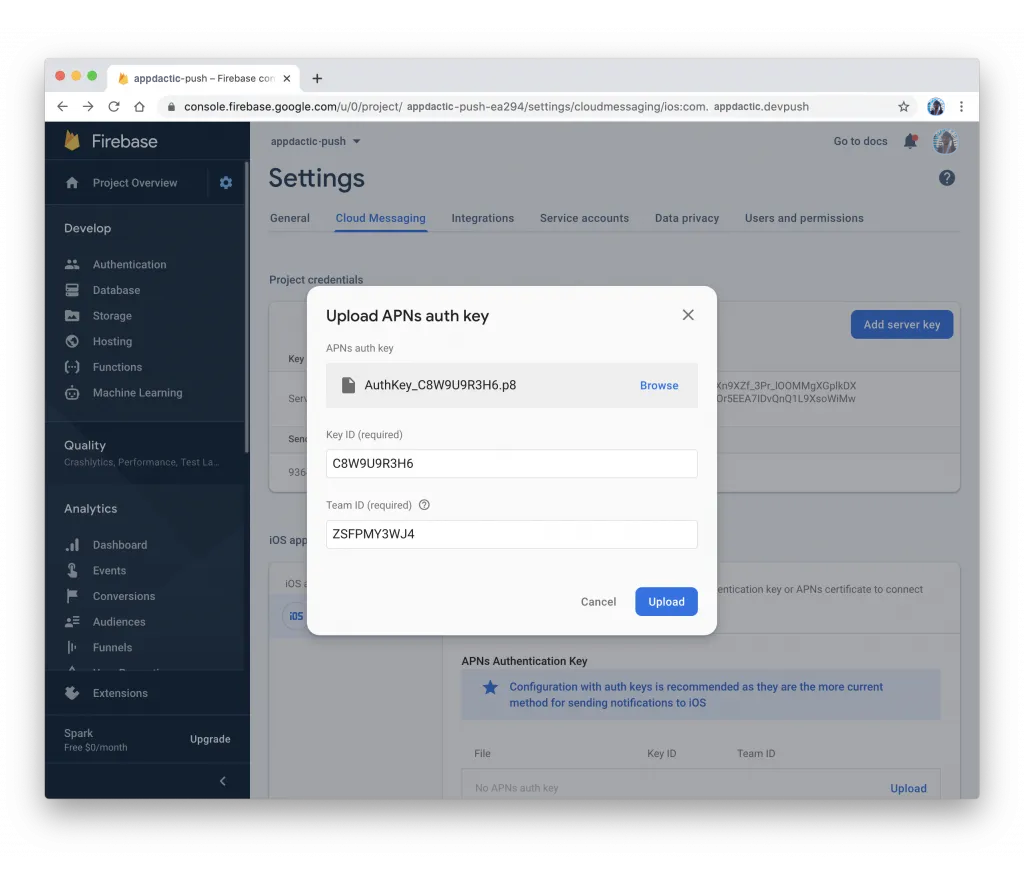
さて、 Keyを作成し Apple Push Notifications service (APNs)を有効化し . また、最大数のキーを取得した場合は既存のキーまたは証明書を使用できますが、プロセスは複雑になります。ios-developer-push-key
Cloudflareの Cloud Messagingを開きます。 Cloud Messagingを開きます。 Cloud Messagingを開きます。 __CAPGO_KEEP_0__
Xcodeプロジェクトを変更するには、以下のコマンドを実行してください。
npx cap open iosGoogleService-Info.plist ファイルをダウンロードしたFirebaseからiOSプロジェクトにコピーしてください。ファイルをXcodeプロジェクト内にドラッグして、app/appフォルダ内に配置し、 必要に応じてコピー Firebase依存関係の新しいPodを追加するには、以下のファイルを編集してください。.
ios/App/Podfile ネイティブプラットフォームを更新するには、以下のコマンドを実行してください。:
target 'App' do
  capacitor_pods
  # Add your Pods here
  pod 'Firebase/Messaging'
end
ネイティブSwift __CAPGO_KEEP_0__を修正するには、以下のファイルを編集してください。
npx cap update iosModify the native Swift code in ios/App/App/AppDelegate.swift __CAPGO_KEEP_0__-xcode-capability
import UIKit
import Capacitor
import Firebase

@UIApplicationMain
class AppDelegate: UIResponder, UIApplicationDelegate {

  var window: UIWindow?

  func application(_ application: UIApplication, didFinishLaunchingWithOptions launchOptions: [UIApplication.LaunchOptionsKey: Any]?) -> Bool {
    // Override point for customization after application launch.
    FirebaseApp.configure()
    return true
  }

  // All the existing functions
  // ...

  // Update this one:
    func application(_ application: UIApplication, didRegisterForRemoteNotificationsWithDeviceToken deviceToken: Data) {
        Messaging.messaging().apnsToken = deviceToken
        InstanceID.instanceID().instanceID { (result, error) in
            if let error = error {
                NotificationCenter.default.post(name: Notification.Name(CAPNotifications.DidFailToRegisterForRemoteNotificationsWithError.name()), object: error)
            } else if let result = result {
                NotificationCenter.default.post(name: Notification.Name(CAPNotifications.DidRegisterForRemoteNotificationsWithDeviceToken.name()), object: result.token)
            }
        }
    }
}
Firebaseと連携し、正しいトークンをアプリに返すために登録します。
アプリをビルドし、プッシュ通知を統合します。
イオニックプッシュ通知統合
Ionicプロジェクトでサービスと新しいページを作成します:
ionic g service services/fcm
ionic g page pages/details
routingを更新する app/app-routing.module.ts 新しいページを動的IDで含めるようにします:
import { NgModule } from '@angular/core';
import { PreloadAllModules, RouterModule, Routes } from '@angular/router';

const routes: Routes = [
  {
    path: 'home',
    loadChildren: () => import('./home/home.module').then( m => m.HomePageModule)
  },
  {
    path: '',
    redirectTo: 'home',
    pathMatch: 'full'
  },
  {
    path: 'home/:id',
    loadChildren: () => import('./pages/details/details.module').then( m => m.DetailsPageModule)
  },
];

@NgModule({
  imports: [
    RouterModule.forRoot(routes, { preloadingStrategy: PreloadAllModules })
  ],
  exports: [RouterModule]
})
export class AppRoutingModule { }
プッシュ通知を処理するサービスを作成します。 services/fcm.service.ts:
import { Injectable } from '@angular/core';
import {
  Plugins,
  PushNotification,
  PushNotificationToken,
  PushNotificationActionPerformed,
  Capacitor
} from '@capacitor/core';
import { Router } from '@angular/router';

const { PushNotifications } = Plugins;

@Injectable({
  providedIn: 'root'
})
export class FcmService {

  constructor(private router: Router) { }

  initPush() {
    if (Capacitor.platform !== 'web') {
      this.registerPush();
    }
  }

  private registerPush() {
    PushNotifications.requestPermission().then((permission) => {
      if (permission.granted) {
        // Register with Apple / Google to receive push via APNS/FCM
        PushNotifications.register();
      } else {
        // No permission for push granted
      }
    });

    PushNotifications.addListener(
      'registration',
      (token: PushNotificationToken) => {
        console.log('My token: ' + JSON.stringify(token));
      }
    );

    PushNotifications.addListener('registrationError', (error: any) => {
      console.log('Error: ' + JSON.stringify(error));
    });

    PushNotifications.addListener(
      'pushNotificationReceived',
      async (notification: PushNotification) => {
        console.log('Push received: ' + JSON.stringify(notification));
      }
    );

    PushNotifications.addListener(
      'pushNotificationActionPerformed',
      async (notification: PushNotificationActionPerformed) => {
        const data = notification.notification.data;
        console.log('Action performed: ' + JSON.stringify(notification.notification));
        if (data.detailsId) {
          this.router.navigateByUrl(`/home/${data.detailsId}`);
        }
      }
    );
  }
}
プッシュ通知サービスを呼び出します。 initPush() function in app/app.component.ts:
import { Component } from '@angular/core';

import { Platform } from '@ionic/angular';
import { SplashScreen } from '@ionic-native/splash-screen/ngx';
import { StatusBar } from '@ionic-native/status-bar/ngx';
import { FcmService } from './services/fcm.service';

@Component({
  selector: 'app-root',
  templateUrl: 'app.component.html',
  styleUrls: ['app.component.scss']
})
export class AppComponent {
  constructor(
    private platform: Platform,
    private splashScreen: SplashScreen,
    private statusBar: StatusBar,
    private fcmService: FcmService
  ) {
    this.initializeApp();
  }

  initializeApp() {
    this.platform.ready().then(() => {
      this.statusBar.styleDefault();
      this.splashScreen.hide();

      // Trigger the push setup
      this.fcmService.initPush();
    });
  }
}
詳細ページの情報を処理する pages/details/details.page.ts:
import { Component, OnInit } from '@angular/core';
import { ActivatedRoute } from '@angular/router';
import { Plugins } from '@capacitor/core';
const { PushNotifications } = Plugins;

@Component({
  selector: 'app-details',
  templateUrl: './details.page.html',
  styleUrls: ['./details.page.scss'],
})
export class DetailsPage implements OnInit {
  id = null;

  constructor(private route: ActivatedRoute) { }

  ngOnInit() {
    this.route.paramMap.subscribe(params => {
      this.id = params.get('id');
    });
  }

  resetBadgeCount() {
    PushNotifications.removeAllDeliveredNotifications();
  }

}
詳細を表示する pages/details/details.page.html:
<ion-header>
  <ion-toolbar>
    <ion-buttons slot="start">
      <ion-back-button defaultHref="/"></ion-back-button>
    </ion-buttons>
    <ion-title>Details</ion-title>
  </ion-toolbar>
</ion-header>

<ion-content>
  My Id from push: {{ id }}

  <ion-button (click)="resetBadgeCount()" expand="block">
    Reset Badge Count
  </ion-button>
</ion-content>
アプリをビルドし、変更を同期し、デバイスにデプロイする
ionic build
npx cap sync
Firebaseを使用してプッシュ通知を送信する
Firebaseを使用してプッシュ通知を送信する方法は複数あります。
特定のデバイスのテスト
デバイスにアプリをデプロイした後、コンソールログを確認して、登録後にトークンが取得されたことを確認できます。このトークンを使用して、ターゲット化されたテストプッシュを送信して、インテグレーションが正常に動作していることを確認します。Firebaseに移動して
__CAPGO_KEEP_0__ Cloud Messaging と選択 テストメッセージを送信. ログからデバイストークンを追加してください。
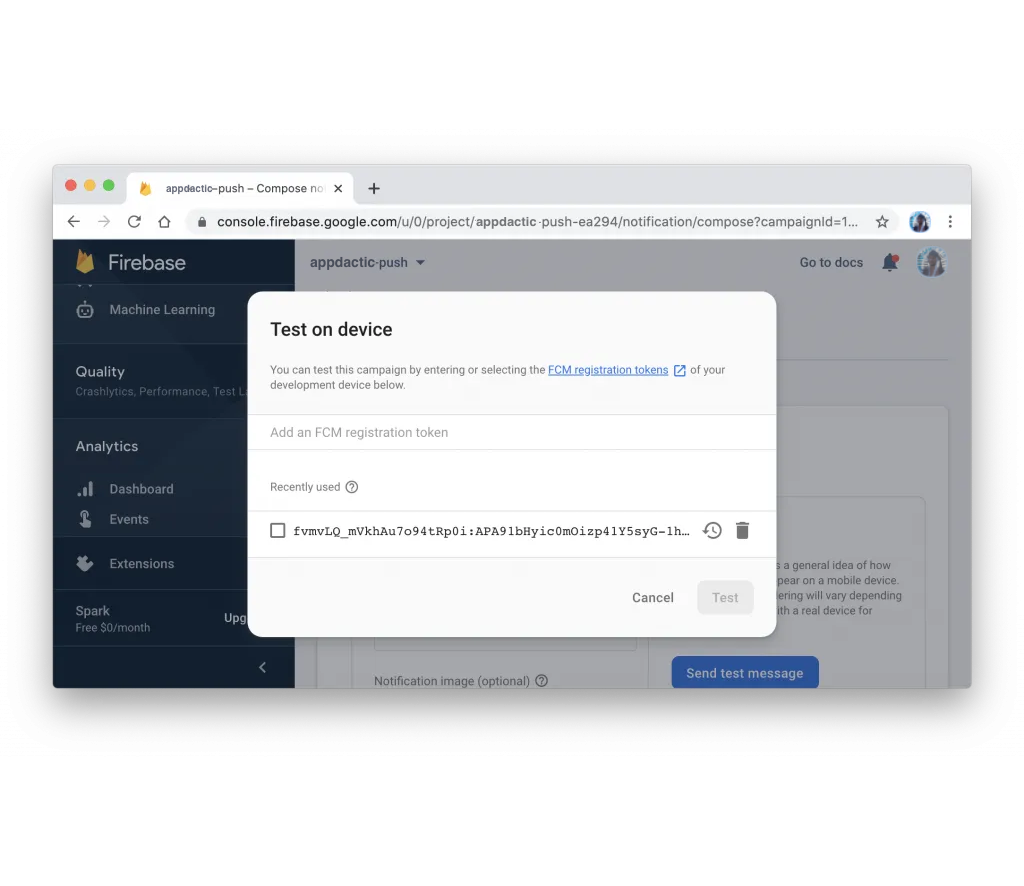
設定が正しくできていれば、デバイス上でプッシュ通知を受信するはずです。
プッシュメッセージにペイロードを含める
プッシュ通知に追加情報を含めるテストを行うには、同じページのガイドに従って、一般情報を指定し、ターゲットとするプラットフォームを選択します。追加 オプション プッシュ通知にペイロードを含めるように送信します。
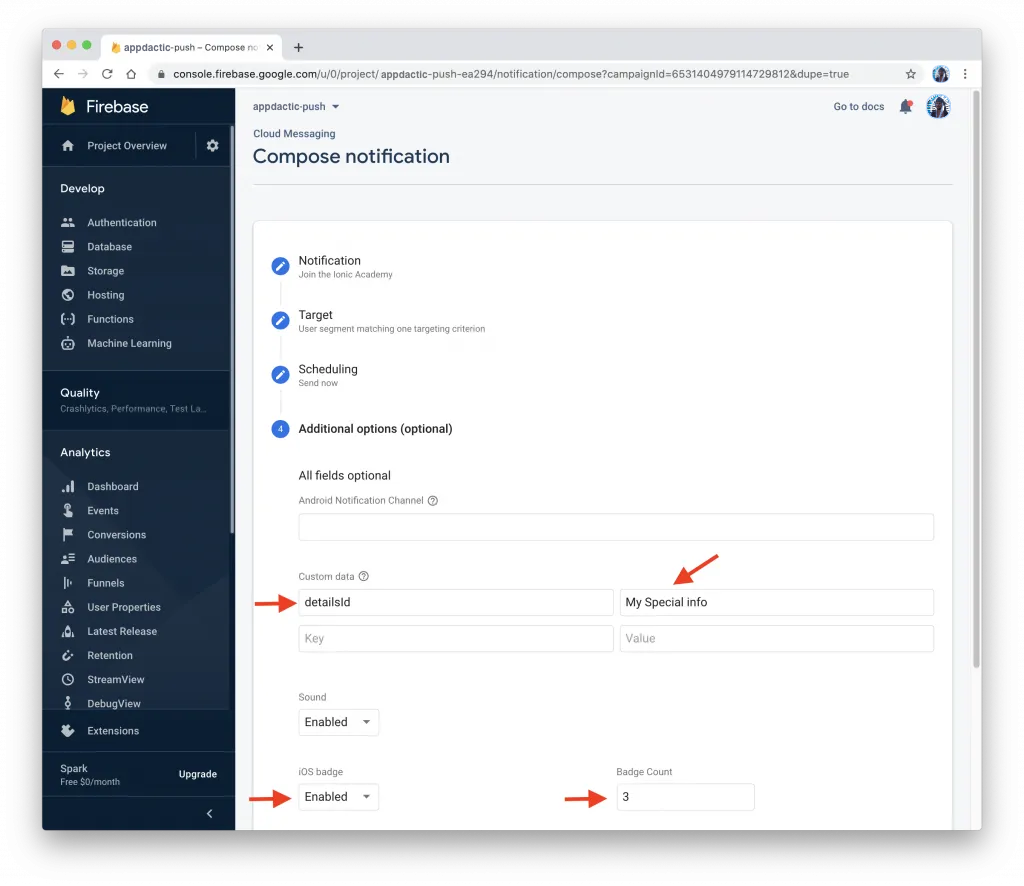
イン 詳細設定 セクションに追加する カスタムデータ key-valueペア。例えば、keyに任意の値を指定し、valueに任意の値を指定することができます。このデータは、指定されたIDの詳細ページに遷移するためにアプリ内で使用されます。 detailsId プッシュ通知を送信した後、アプリは指定されたIDの詳細ページを表示する必要があります。通知がタップされたときに指定されたIDの詳細ページを表示するようにしてください。
Firebase __CAPGO_KEEP_0__を使用する
プッシュ通知をプログラムで送信することもできます。Firebase APIを使用するには、Firebaseプロジェクトの設定から
You can also send push notifications programmatically using the Firebase API. To do this, you need to obtain the を取得する必要があります。 Cloud Messaging タブの下にあります。 tab.
Firebaseのサーバーキーを使用して、必要なペイロードとともに、Firebase API にPOSTリクエストを送信できます。Node.jsとライブラリを使用した例はこちらです。 request ライブラリ:
const request = require('request');

const serverKey = 'YOUR_SERVER_KEY';
const deviceToken = 'YOUR_DEVICE_TOKEN';

const options = {
  method: 'POST',
  url: 'https://fcm.googleapis.com/fcm/send',
  headers: {
    'Content-Type': 'application/json',
    Authorization: 'key=' + serverKey
  },
  body: JSON.stringify({
    to: deviceToken,
    notification: {
      title: 'Test Push',
      body: 'This is a test push notification with custom data'
    },
    data: {
      detailsId: '123'
    }
  })
};

request(options, (error, response, body) => {
  if (error) {
    console.error('Error sending push:', error);
  } else {
    console.log('Push sent successfully:', body);
  }
});
実際のサーバーキーとデバイストークンに置き換えてください。スクリプトを実行し、デバイスはカスタムペイロードを含むプッシュ通知を受信するはずです。 YOUR_SERVER_KEY これが終わりです!Ionic __CAPGO_KEEP_0__ アプリにFirebaseを使用してプッシュ通知を統合しました。AndroidおよびiOSプラットフォームの両方でユーザーにプッシュ通知を送信することができます。 YOUR_DEVICE_TOKEN Ionic __CAPGO_KEEP_0__ Push Notifications with Firebase: A Step-by-Step Guideから続けてください。
Ionic Capacitor Push Notifications with Firebase: A Step-by-Step Guideを使用して、計画、企業運用、移行などを実施する場合、Capacitor Enterpriseと接続してください。Capacitor Enterpriseの製品ワークフローに接続してください。
Capacitor Enterprise
__CAPGO_KEEP_0__ Enterprise Capacitor Enterprise __CAPGO_KEEP_0__ Enterprise Capgo Enterprise Capgo Enterprise Ionic Enterprise Plugin Alternatives Ionic Enterprise Pluginの代替品 Capgo Alternatives Capgoの代替品 Capgo Consulting Capgoのコンサルティング Capgo Premium Support Capgoのプレミアムサポート


