


소개
Lovable 는 prompt를 몇 분 만에 작동하는 React 앱으로 바꿔주는 AI 앱 빌더입니다. 브라우저에서 빠르게 배포할 수 있지만, 앱을 다른 네이티브 앱처럼 App Store와 Google Play에 올려 홈 화면에 두고 싶다면 어떨까요?
요약하자면: 이 Lovable 앱을 iOS 및 Android로 전환하기 export, Capacitor, Mac 없이 하는 cloud build, live update까지 전체 과정을 한 화면에 요약해 줍니다.
이 가이드에서는 전체 과정을 다룹니다. Lovable에서 export한 웹 앱을 Capacitor, build signed iOS and Android binaries in the cloud with Capgo 빌더 (no Mac required), add a real native feature, and push a layout fix over the air with Capgo Live Updates.
저희는 Cursor를 전 과정에서 사용합니다. 직접 타이핑하기 번거롭다면 AI가 대부분의 터미널 명령어를 대신 실행해 줄 수 있습니다.
소요 시간: 초기 설정 및 클라우드 빌드 대기 시간을 포함해 약 1~2시간 정도 소요됩니다.
완료 시 결과물:
- Xcode나 Android Studio 없이 클라우드에서 빌드된 iOS 및 Android 네이티브 앱
- 실제 기기에서 실행되는 앱 (TestFlight, 직접 설치 또는 Play 내부 테스트)
- 네이티브 앱에서만 가능한 카메라 기능 구현
- 스토어 심사 없이 UI 및 CSS 수정을 배포할 수 있는 Live Updates 설정
사전 요구사항
| 요구 사항 | 상세 정보 |
|---|---|
| 컴퓨터 | Mac, Windows, Linux 모두 가능 — 클라우드 빌드는 모든 OS에서 작동합니다 |
| code 에디터 | Cursor를 (권장) 또는 VS Code |
| Node.js | 24 LTS (최신 버전 — 다음에서 다운로드) nodejs.org) |
| Git | GitHub에서 Lovable 레포지토리 클론하기 |
| Capgo 계정 | 무료 가입 — 클라우드 빌드 및 Live Updates |
비용 (공개 배포 시에만 발생):
| 항목 | 비용 |
|---|---|
| Apple Developer Program | 연간 $99 |
| Google Play Console | 일회성 $25 |
| Cursor Pro | 월 $20 (AI 명령 실행을 위해 권장) |
| Capgo | 무료 티어 제공; 프로덕션용 유료 플랜 있음 |
선택 사항 (로컬 시뮬레이터 전용):
| 도구 | 이유 |
|---|---|
| Xcode (~15 GB, macOS 전용) | Mac용 iOS Simulator |
| Android Studio (~1 GB + SDKs) | Android 에뮬레이터 |
둘 다 건너뛰어도 됩니다. 이 가이드의 메인 경로는 클라우드에서 빌드하여 이 도구들 없이도 실제 기기에 설치합니다.
Lovable 및 프레임워크 관련 참고 사항
code를 다루기 전에 다음을 알아두세요. Lovable이 생성하는 웹 앱의 종류에 따라 모바일 래핑 방식이 달라집니다..
오랫동안 Lovable의 기본 설정은 React + Vite 싱글 페이지 앱(SPA)였습니다. 2026년 5월 기준으로, 최신 Lovable 앱은 다음을 사용할 수 있습니다. 기본적으로 서버 사이드 렌더링(SSR)을 지원하는 TanStack Start SSR은 웹에 최적화되어 있지만, Capacitor은 정적 빌드 즉, HTML, CSS, JavaScript 폴더를 index.html 루트에 포함하여 디바이스 앱 내부로 배포합니다.
SSR 앱은 요청마다 페이지를 렌더링할 서버가 필요합니다. 하지만 모바일 기기 내부에는 서버가 없으므로, Capacitor을 사용하려면 정적 클라이언트 렌더링 결과물.
해결 방법:
- 새로 시작하기: Lovable에게 다음을 요청하세요: 싱글 페이지 앱(SPA) 또는 SSR을 건너뛰고 static build를 생성하도록 요청하세요.
dist/폴더입니다. - 이미 TanStack Start(SSR)를 사용 중이라면: 프리렌더링을 설정하거나 정적 SPA를 출력하도록 구성하세요. 필수 요구 사항은 다음 내용이 포함된 정적 빌드 폴더입니다.
index.html. - 기존 Next.js Lovable 프로젝트: 사용하세요: 정적 내보내기(static export) — 출력 경로:
out/대신dist/.
어떤 프레임워크를 사용하든, Capacitor의 webDir 해당 폴더를 지정하세요. Vite SPA의 경우, 그 폴더는 dist.
1단계 — Lovable 앱을 GitHub로 내보내기
Lovable은 GitHub을 연결하기 전까지 에디터에 code를 유지합니다.
- 브라우저에서 Lovable 프로젝트를 엽니다
- 클릭 업그레이드 (우측 상단)에서 필요 시 선택한 후, Git 왼쪽 메뉴에서
- 선택 GitHub Lovable 권한을 승인하고 계정을 연결합니다
- Lovable이 자동으로 리포지토리를 생성하고 앱을 푸시합니다
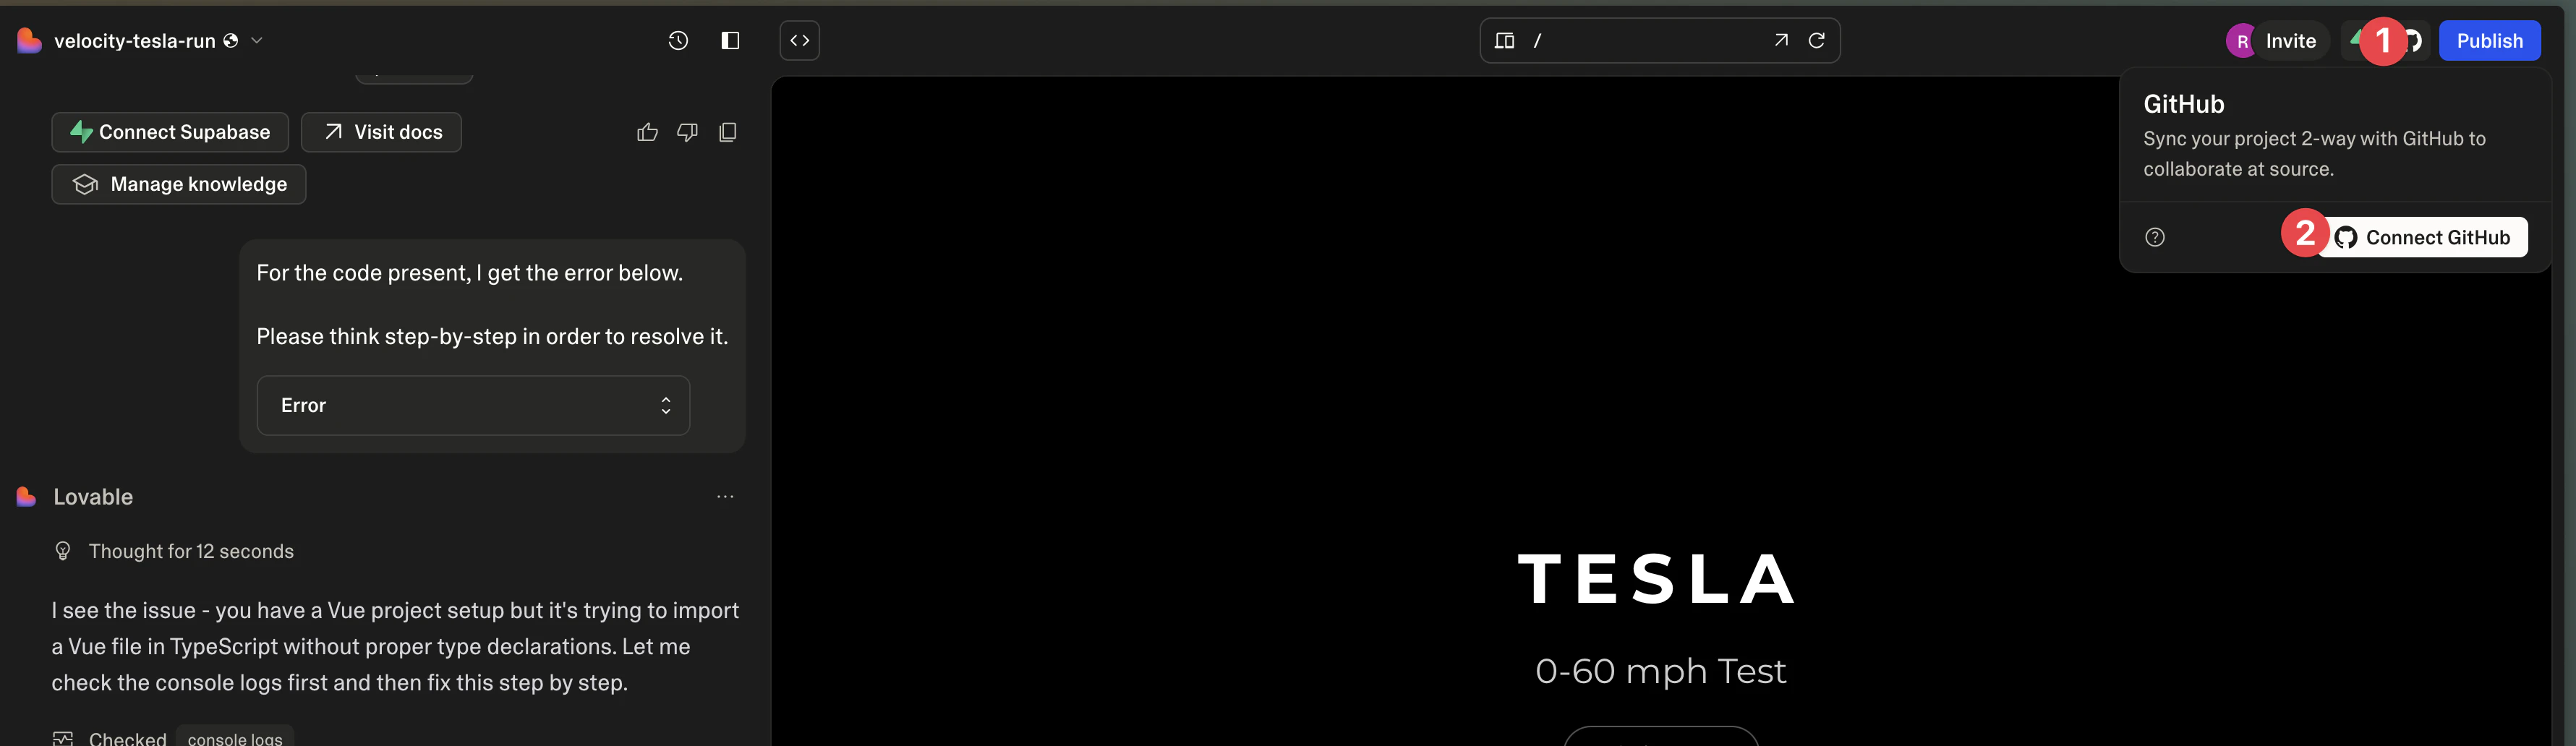
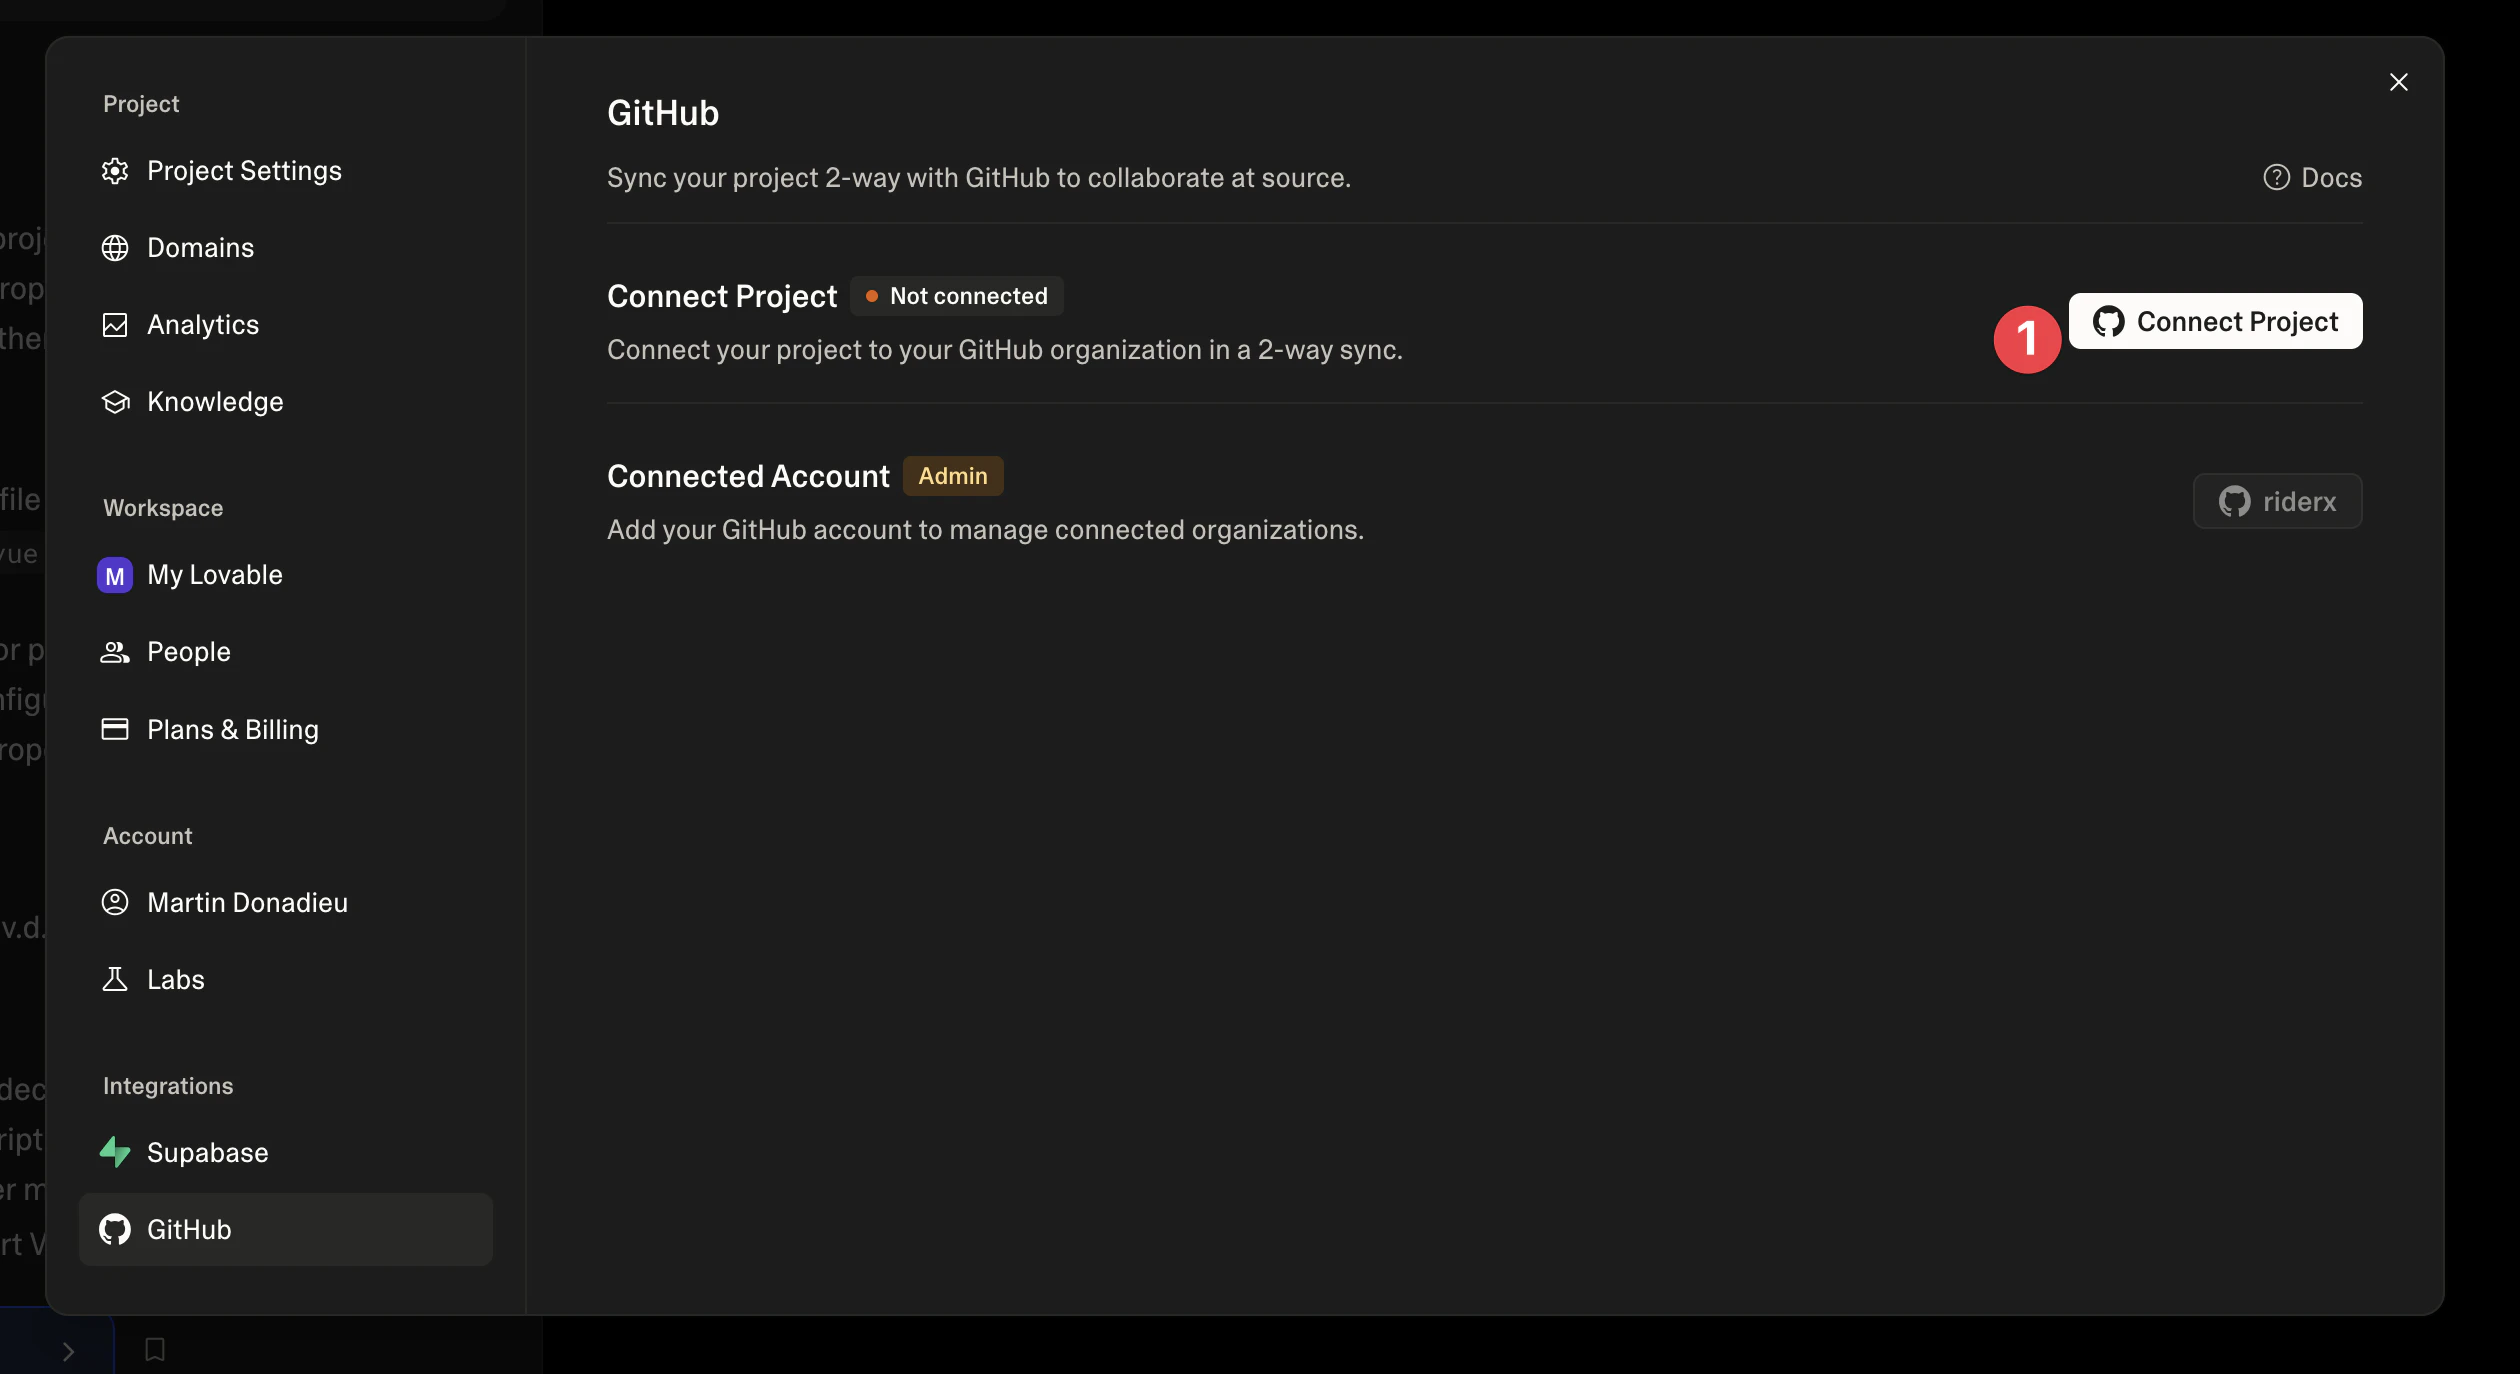
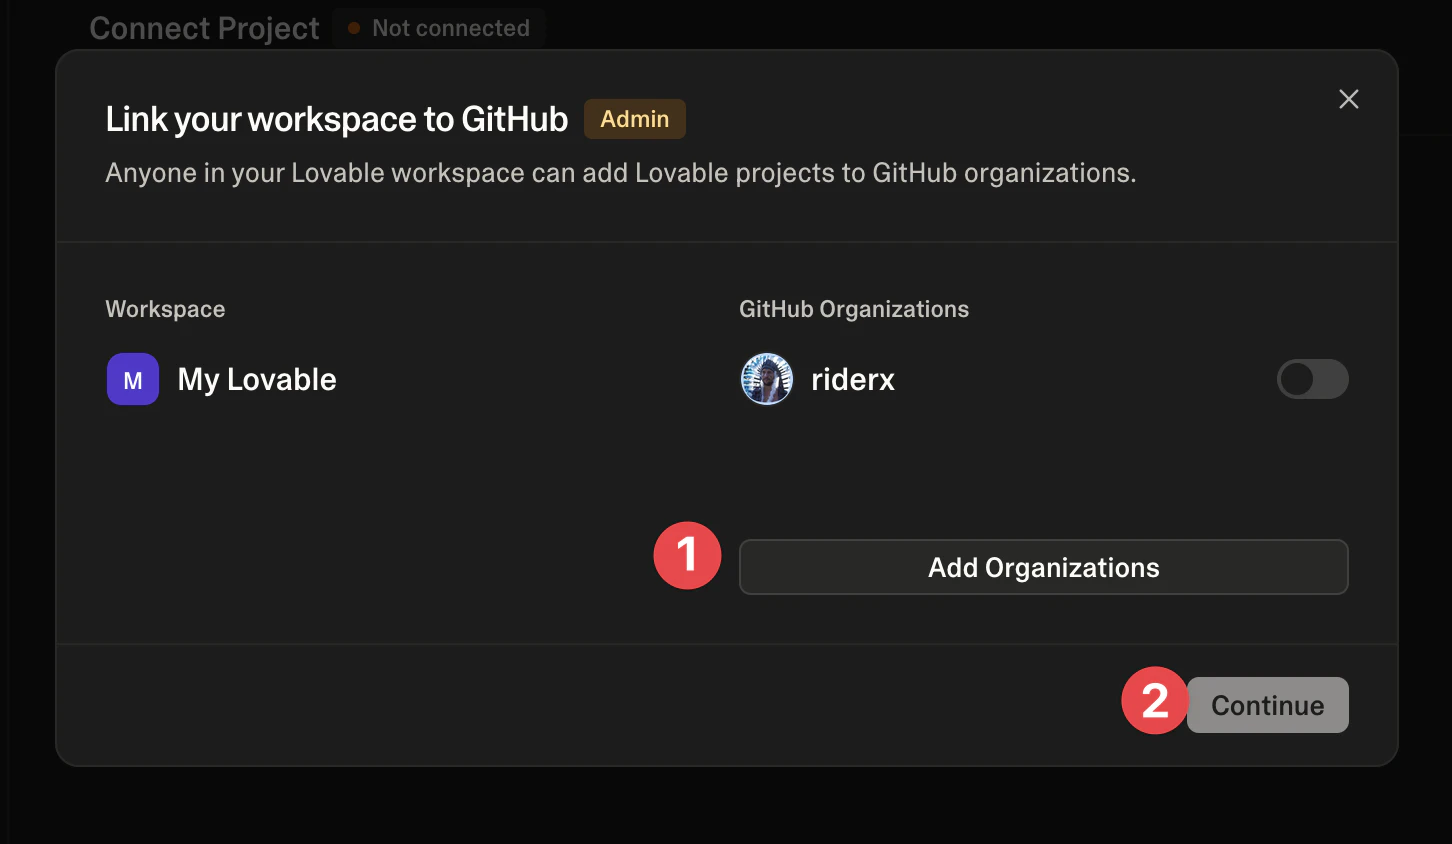
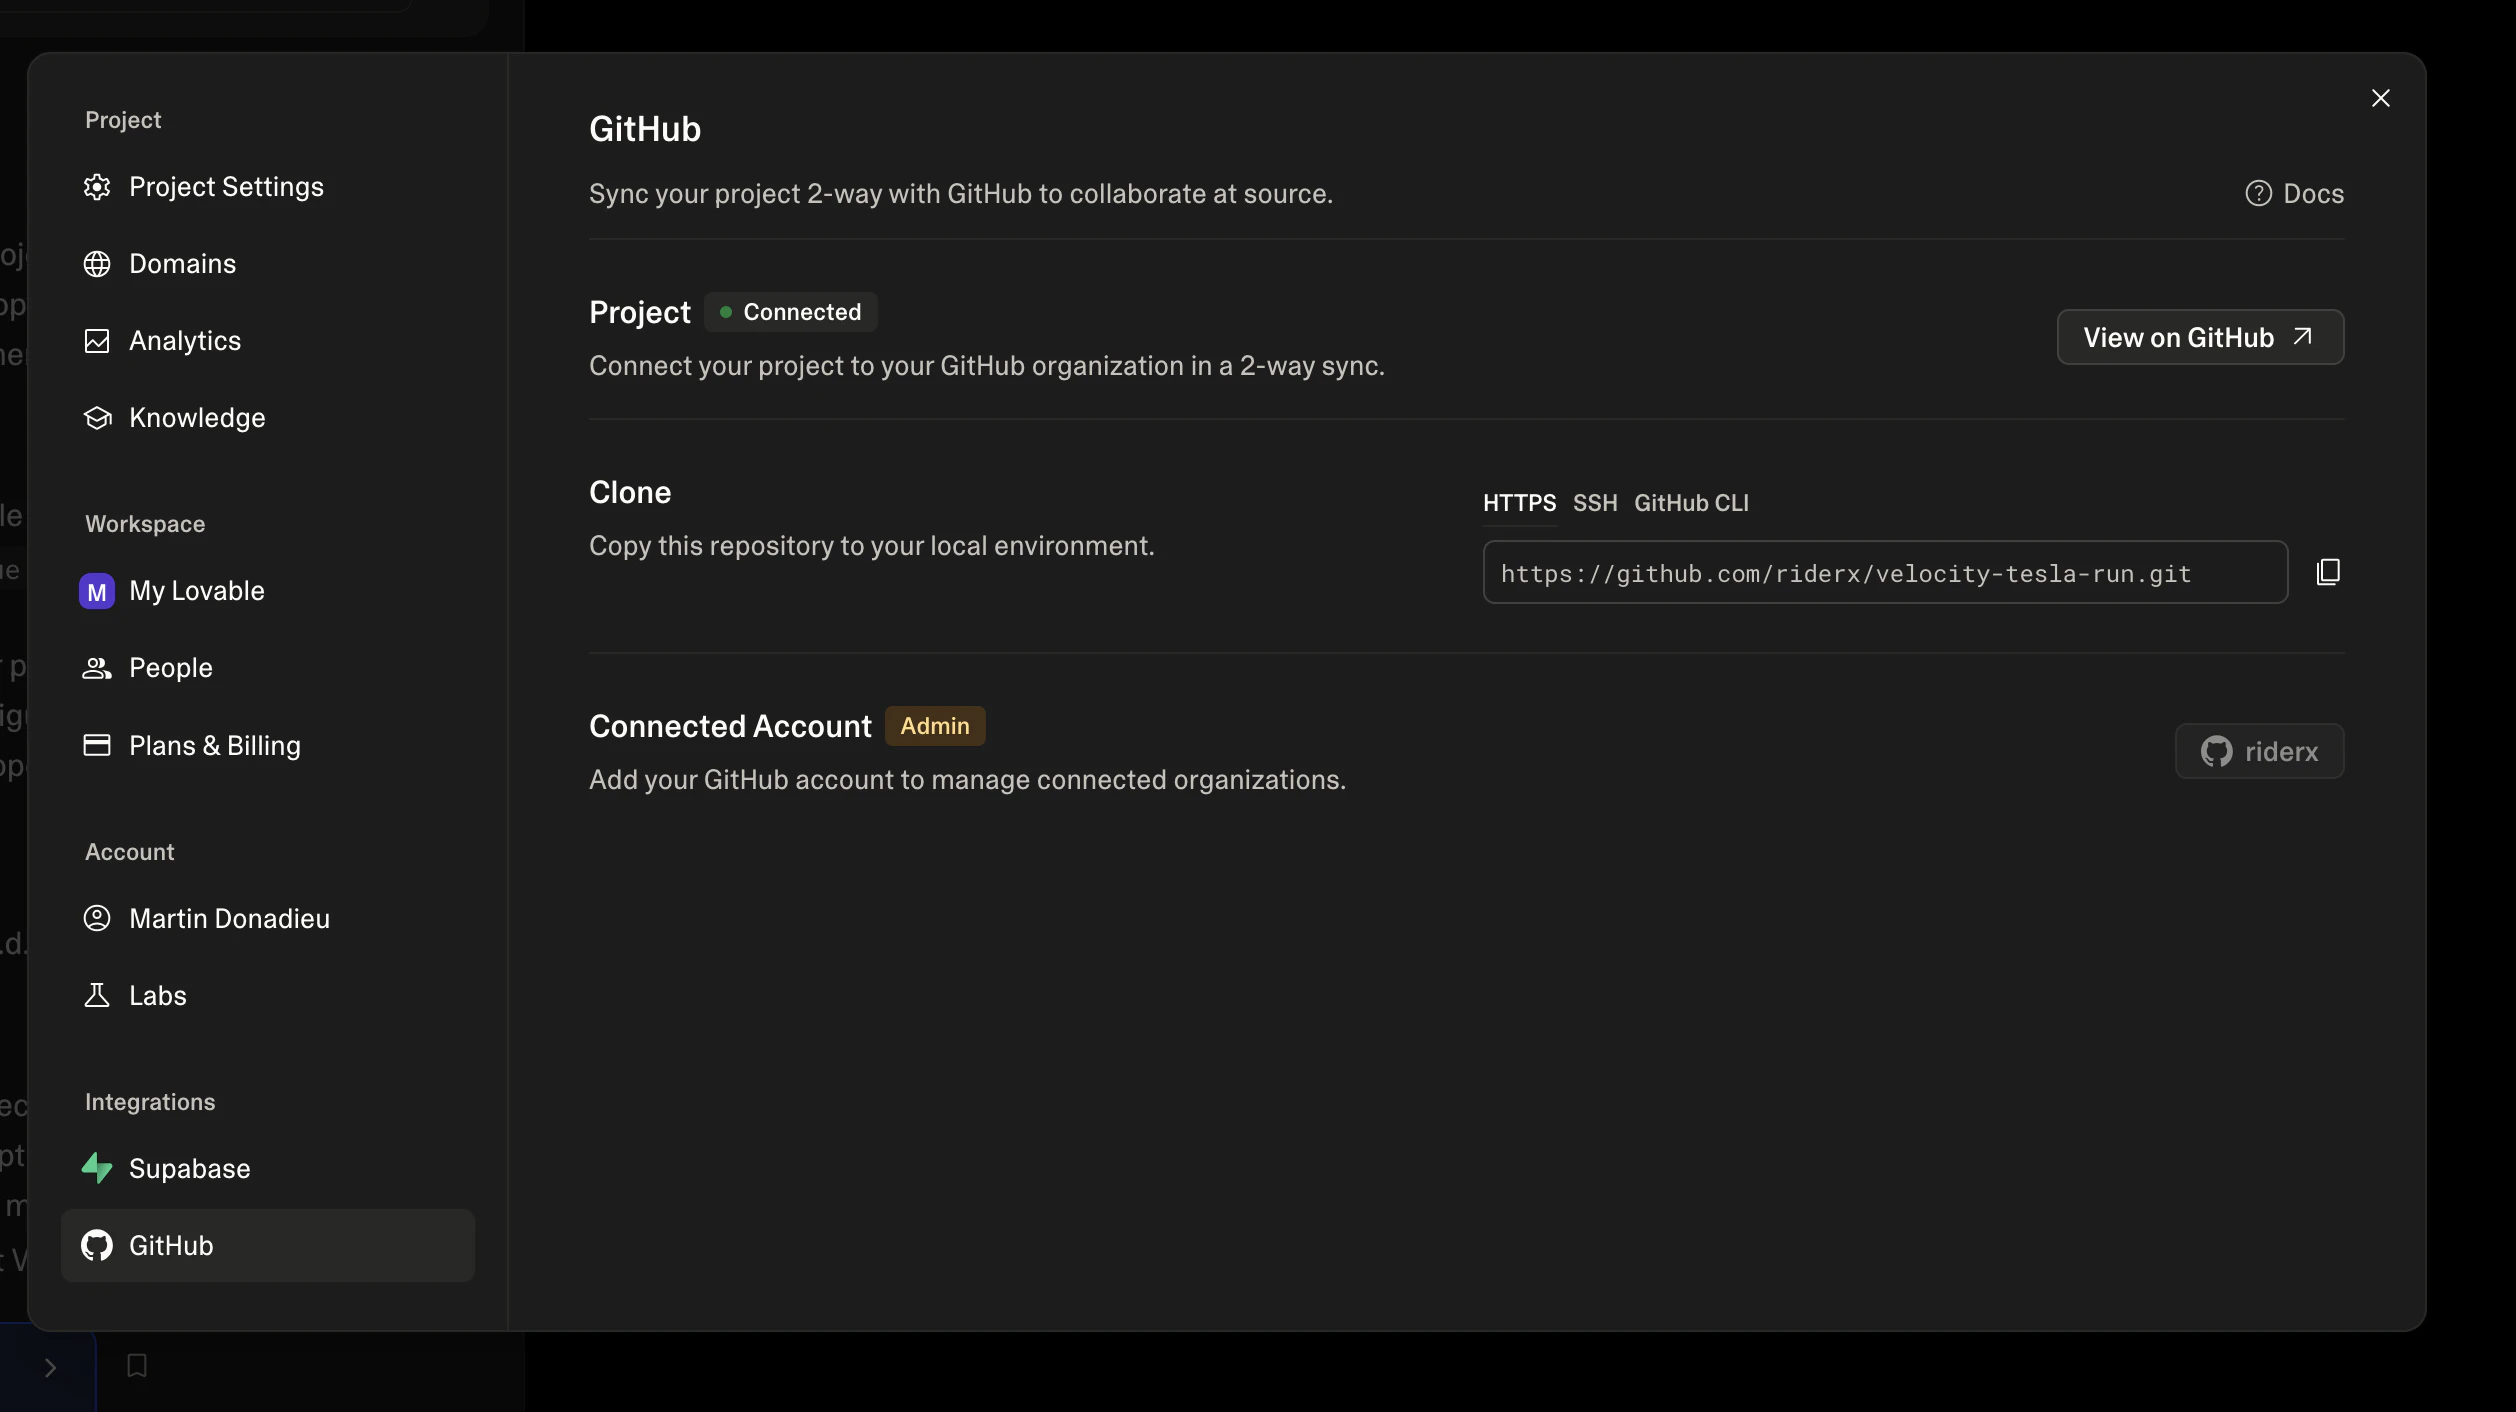
✅ 성공: 방문 중: github.com/YOUR-USERNAME/your-app 앱의 code을(를) 보여줍니다.
2단계 — Cursor 설정 및 프로젝트 클론
code을(를) 로컬에서 작업하려면 code 에디터가 필요합니다. 다음을 추천합니다: Cursor를, 터미널 명령어를 대신 실행할 수 있는 AI 기반 에디터입니다.
Cursor 다운로드 및 설치
- Visit cursor.sh 사용 중인 OS 버전을 다운로드하세요
- 설치 마법사에 따라 Cursor를 설치합니다
- 설치가 완료되면 Cursor를 실행하세요
AI 개발을 위한 Cursor 설정하기
최적의 환경을 위해 시작 전 다음 설정을 권장합니다:
- Cursor 플랜 구독하기 — 무료 티어도 제공되지만, Pro 플랜($20/월)을 사용하면 무제한 AI 완성, Claude 및 GPT-4 액세스, 명령 실행 기능을 사용할 수 있습니다
- Cursor 설정 열기 를(을) 눌러서
Command+,(Mac) 또는Ctrl+,(Windows)
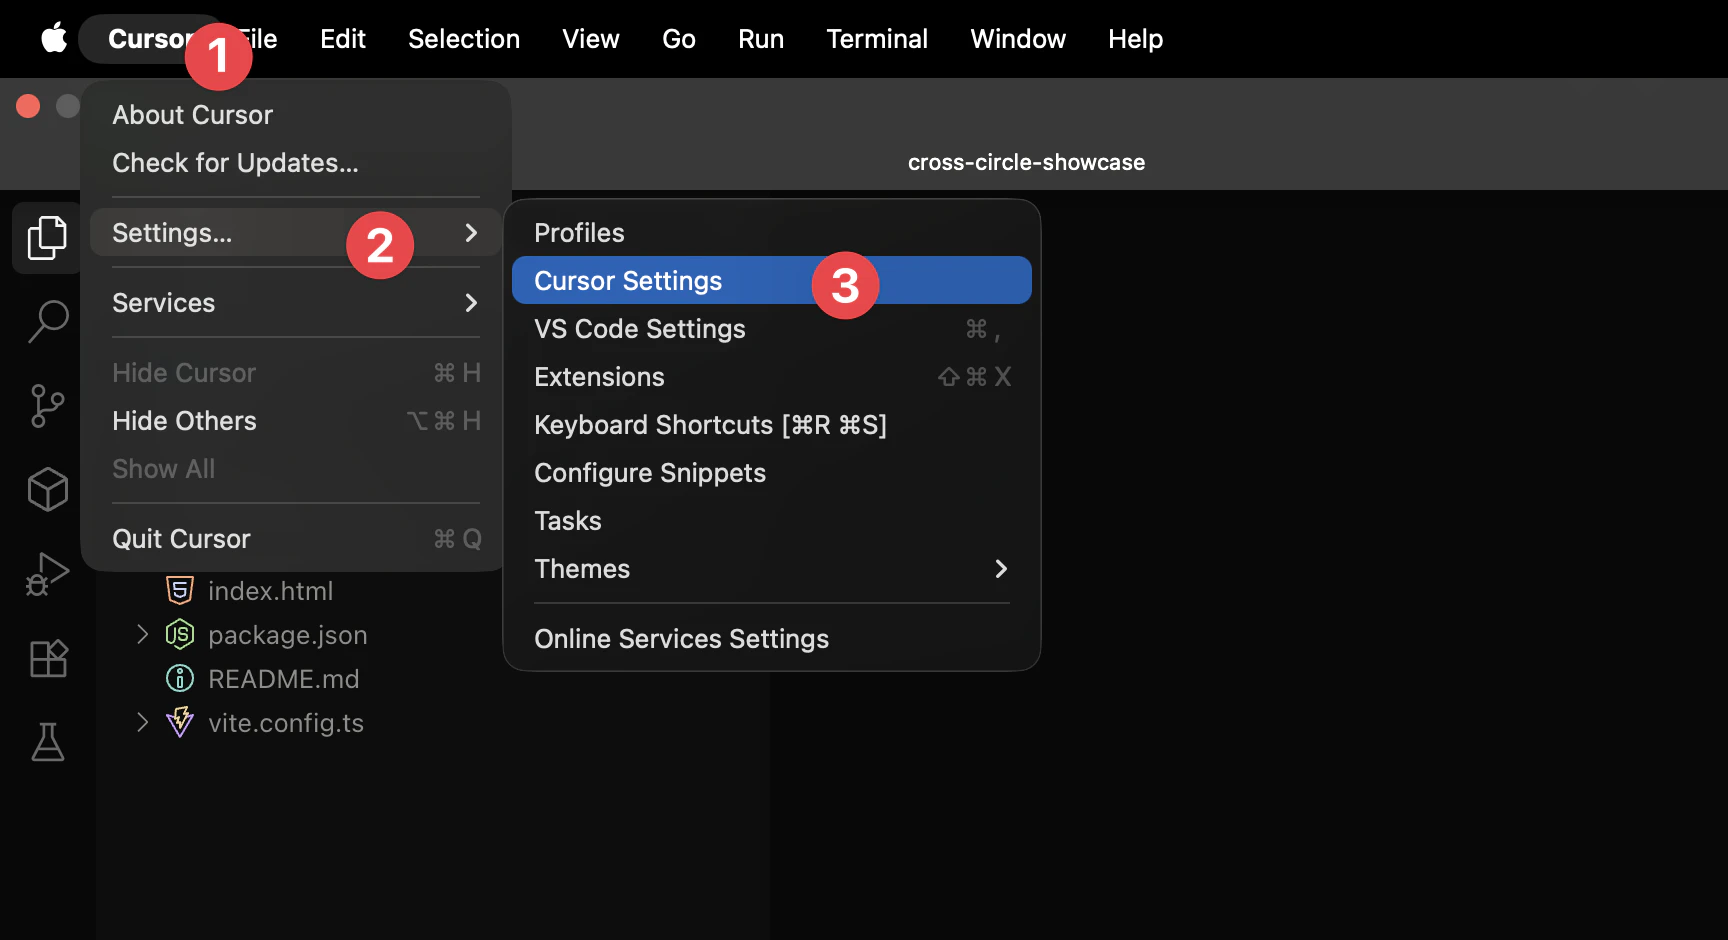
- AI 모델 활성화 — AI 기능이 활성화되어 있는지 확인하세요:
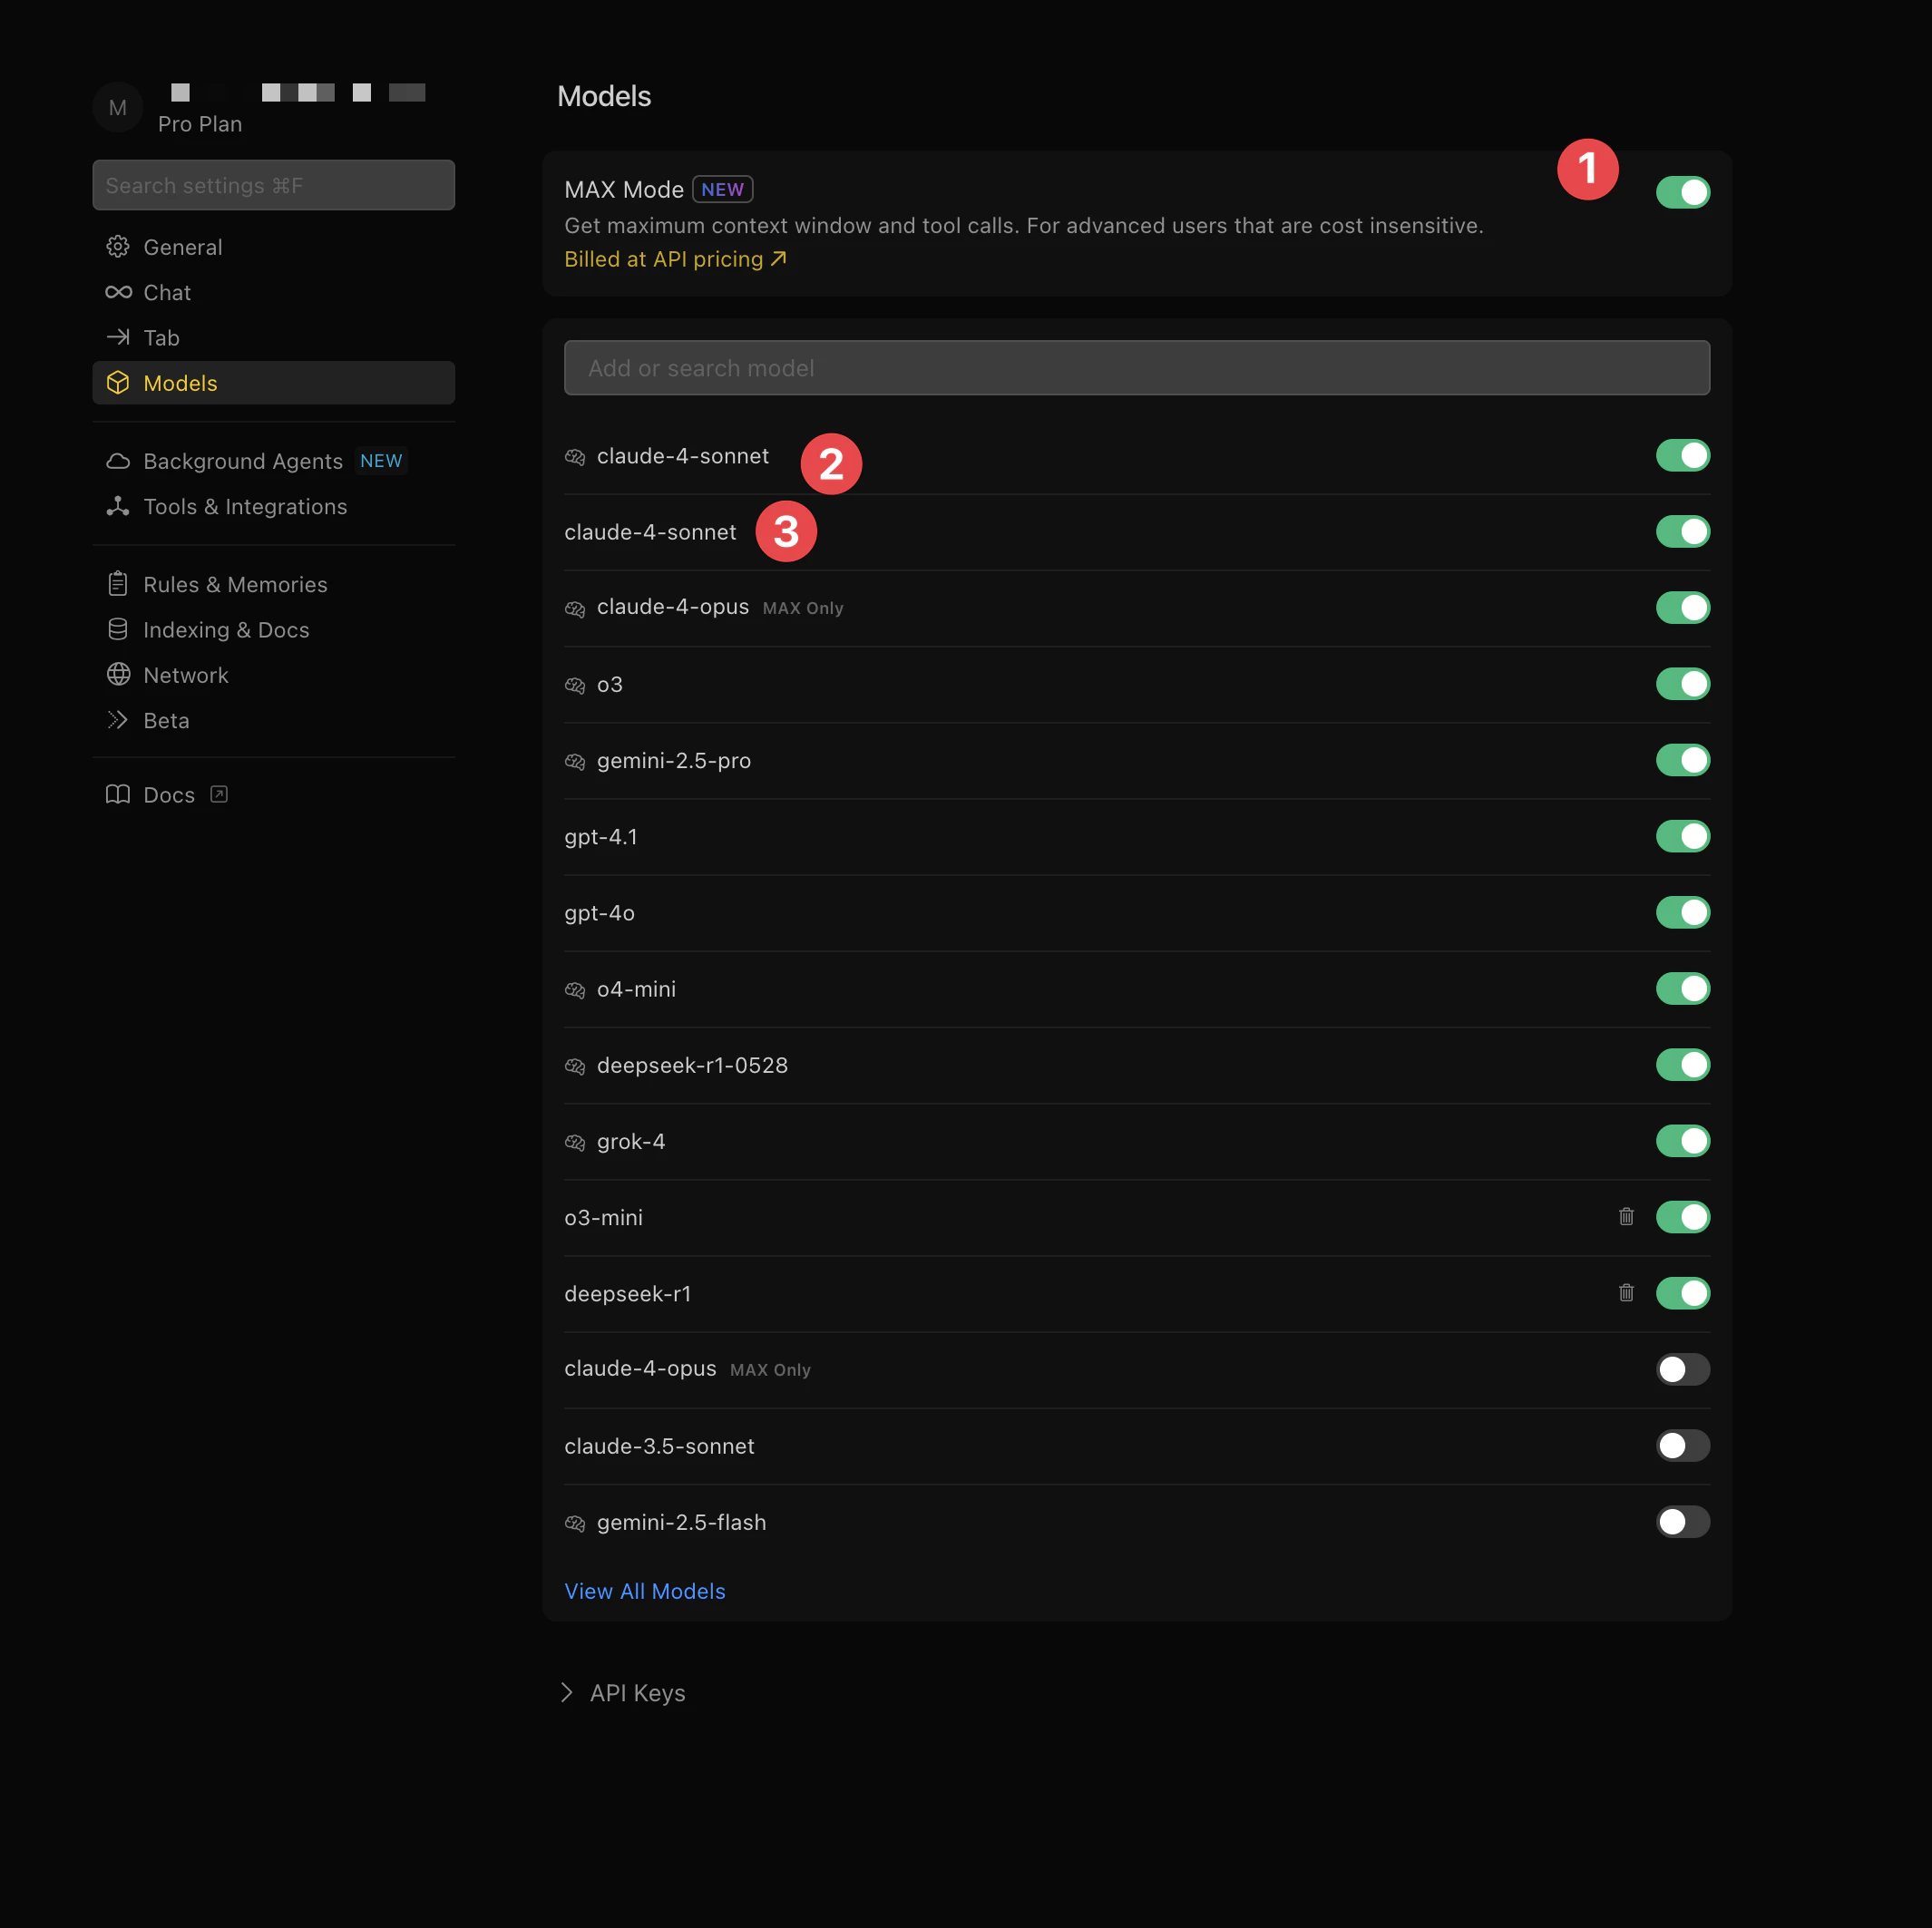
- 사용할 모델 선택 — 최상의 결과를 위해 Claude 또는 GPT-4를 선택하세요:
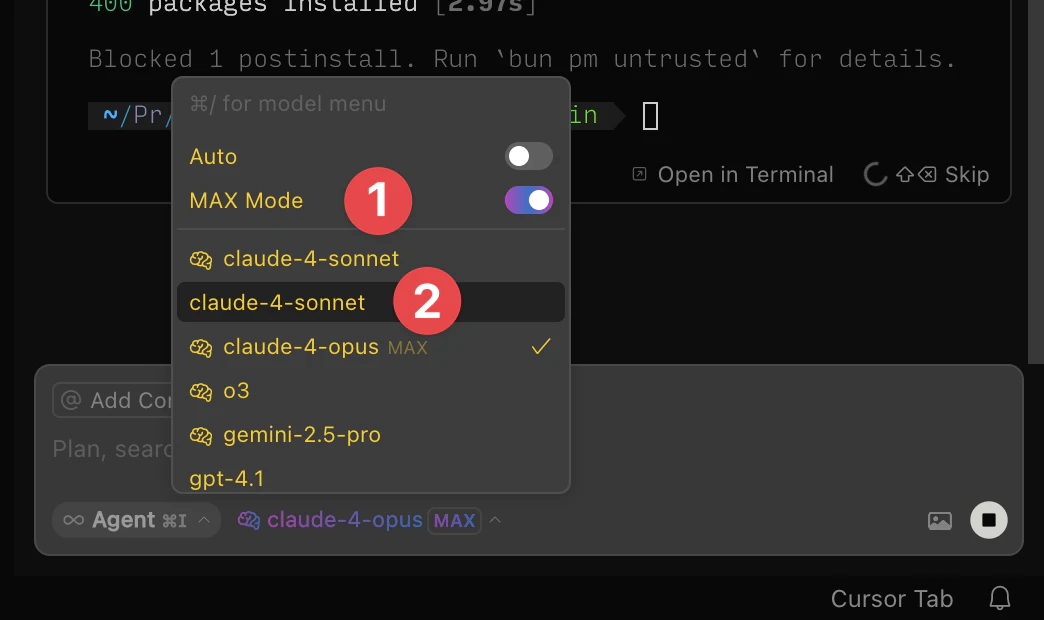
- 명령어 실행 허용 — Cursor가 명령어를 직접 실행할 수 있도록 설정하세요:
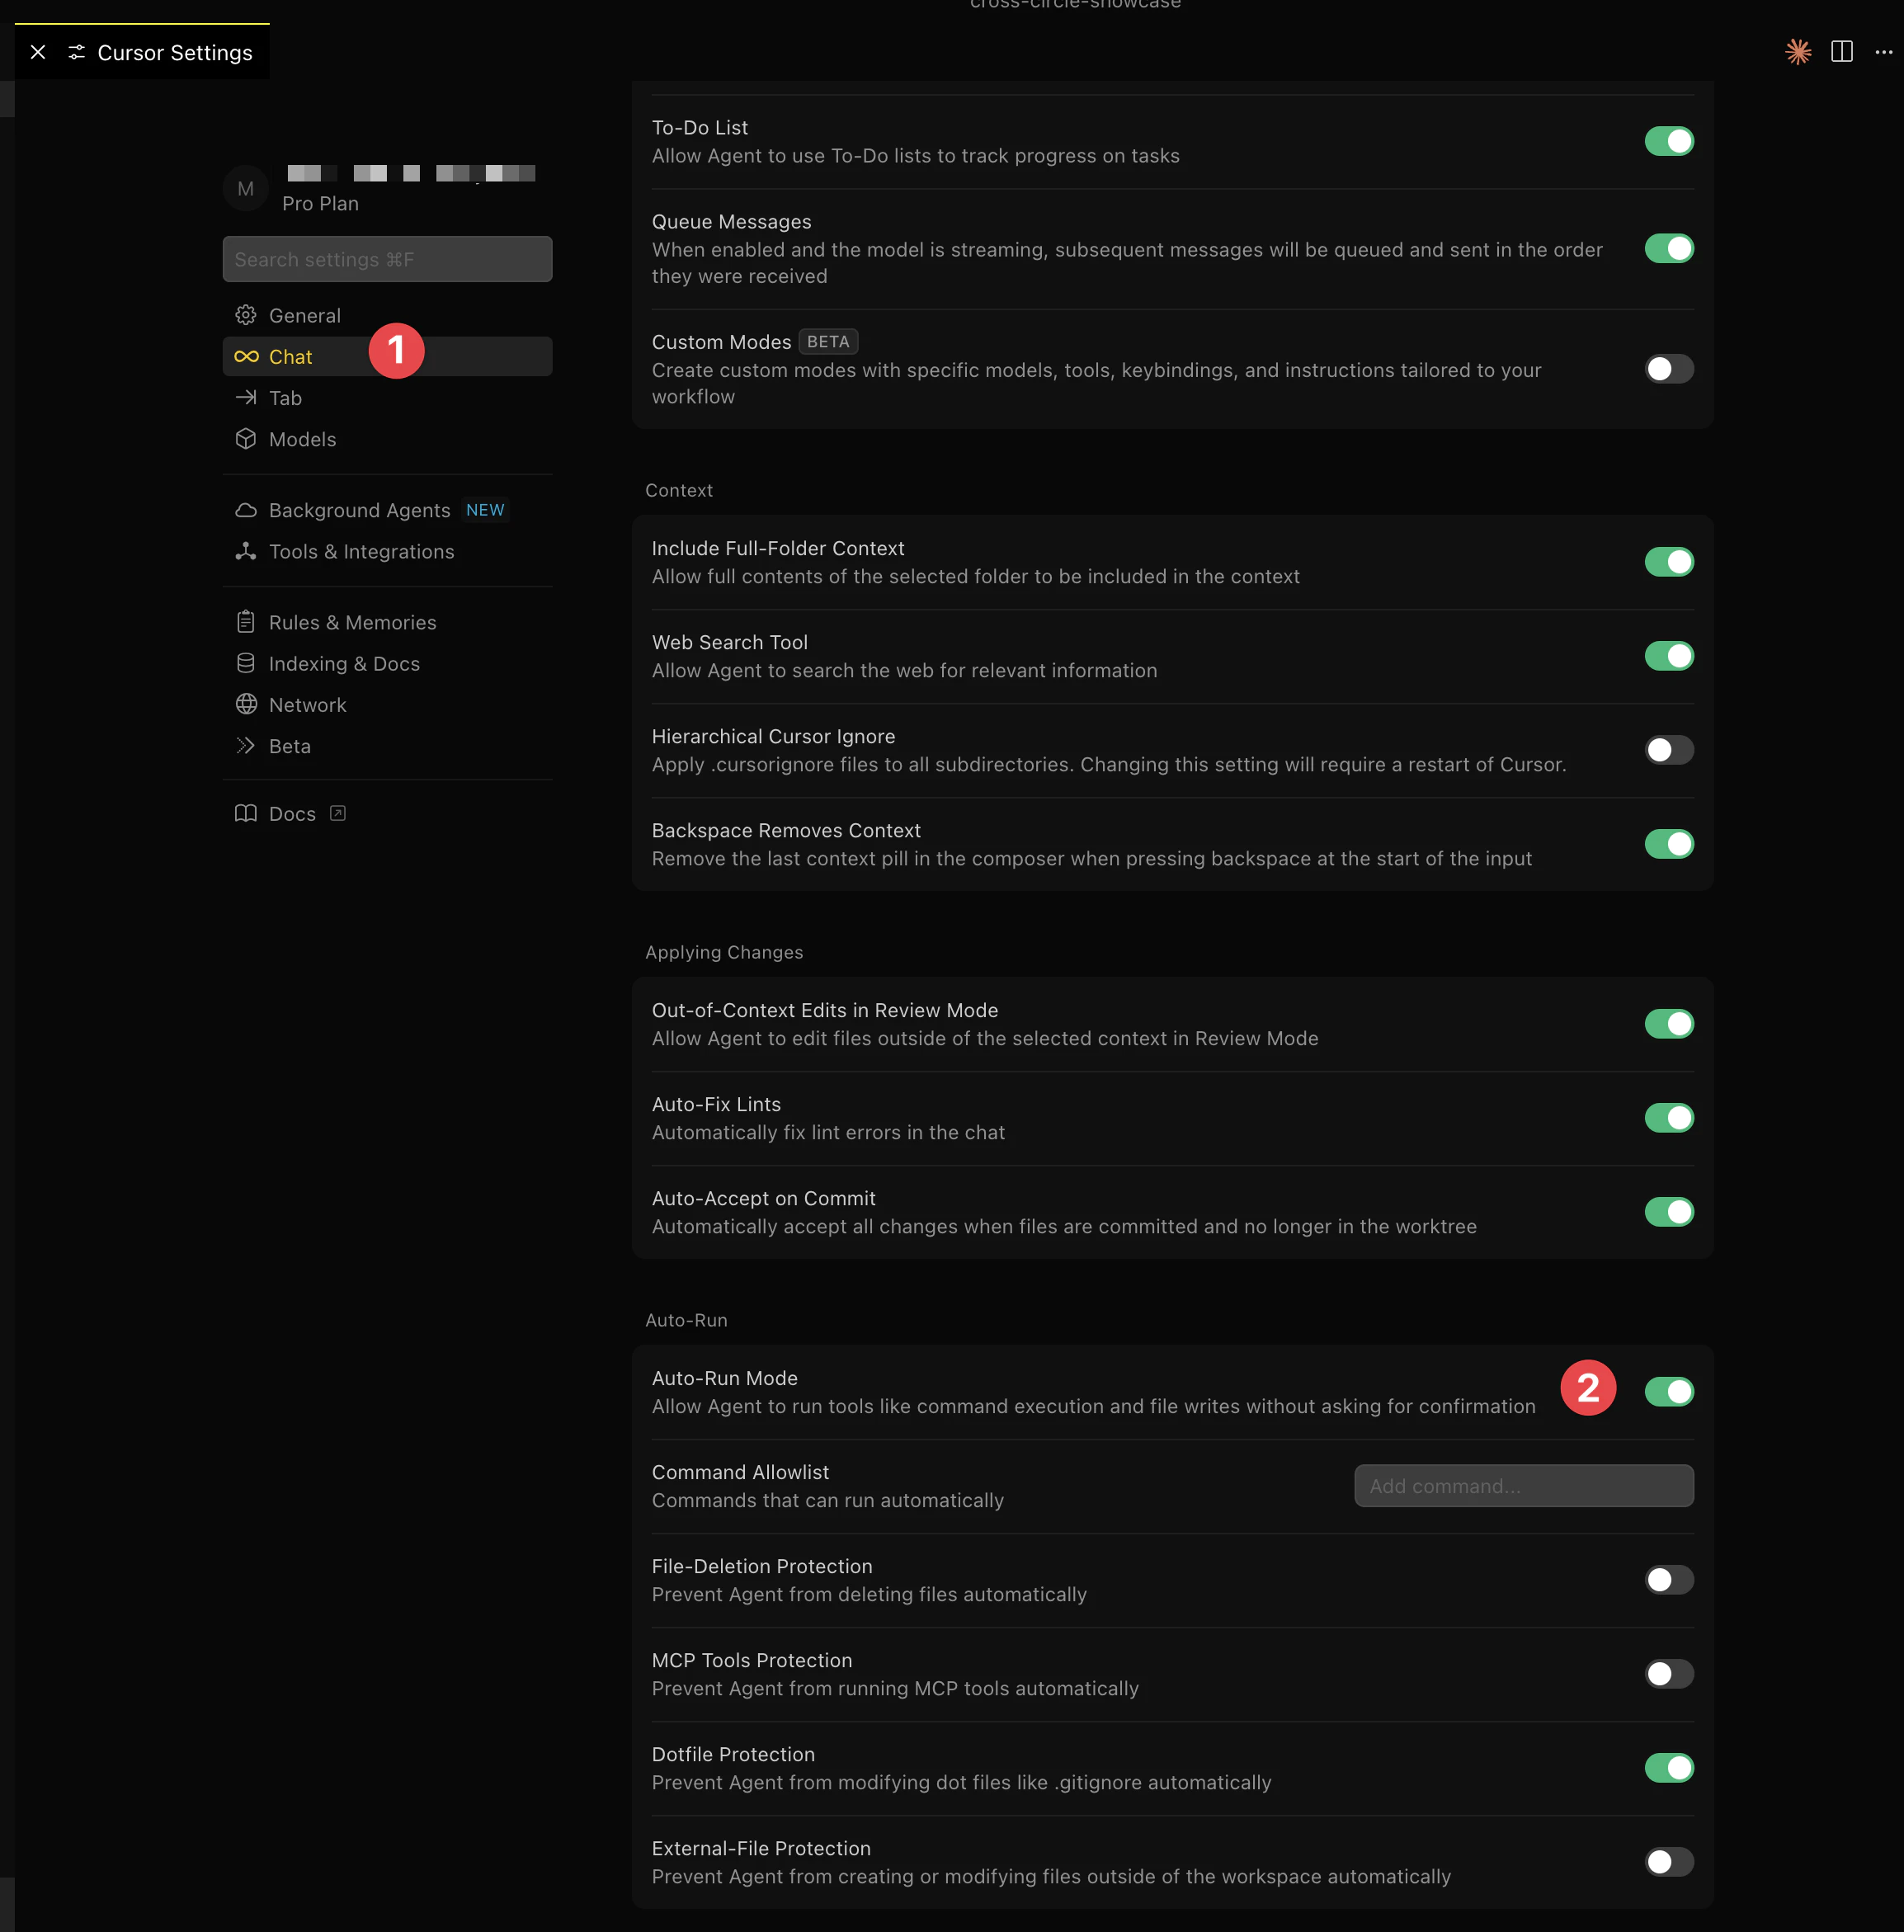
Cursor에서 레포지토리 클론하기
- Cursor에서
Shift+Command+P(Mac) 또는Shift+Ctrl+P(Windows) 명령 팔레트를 열려면 - “clone”을 입력하고 다음을 선택하세요: Git: Clone
- GitHub 저장소 URL을 붙여넣으세요:
https://github.com/YOUR-USERNAME/your-lovable-app.git - 프로젝트를 저장할 폴더를 선택하세요
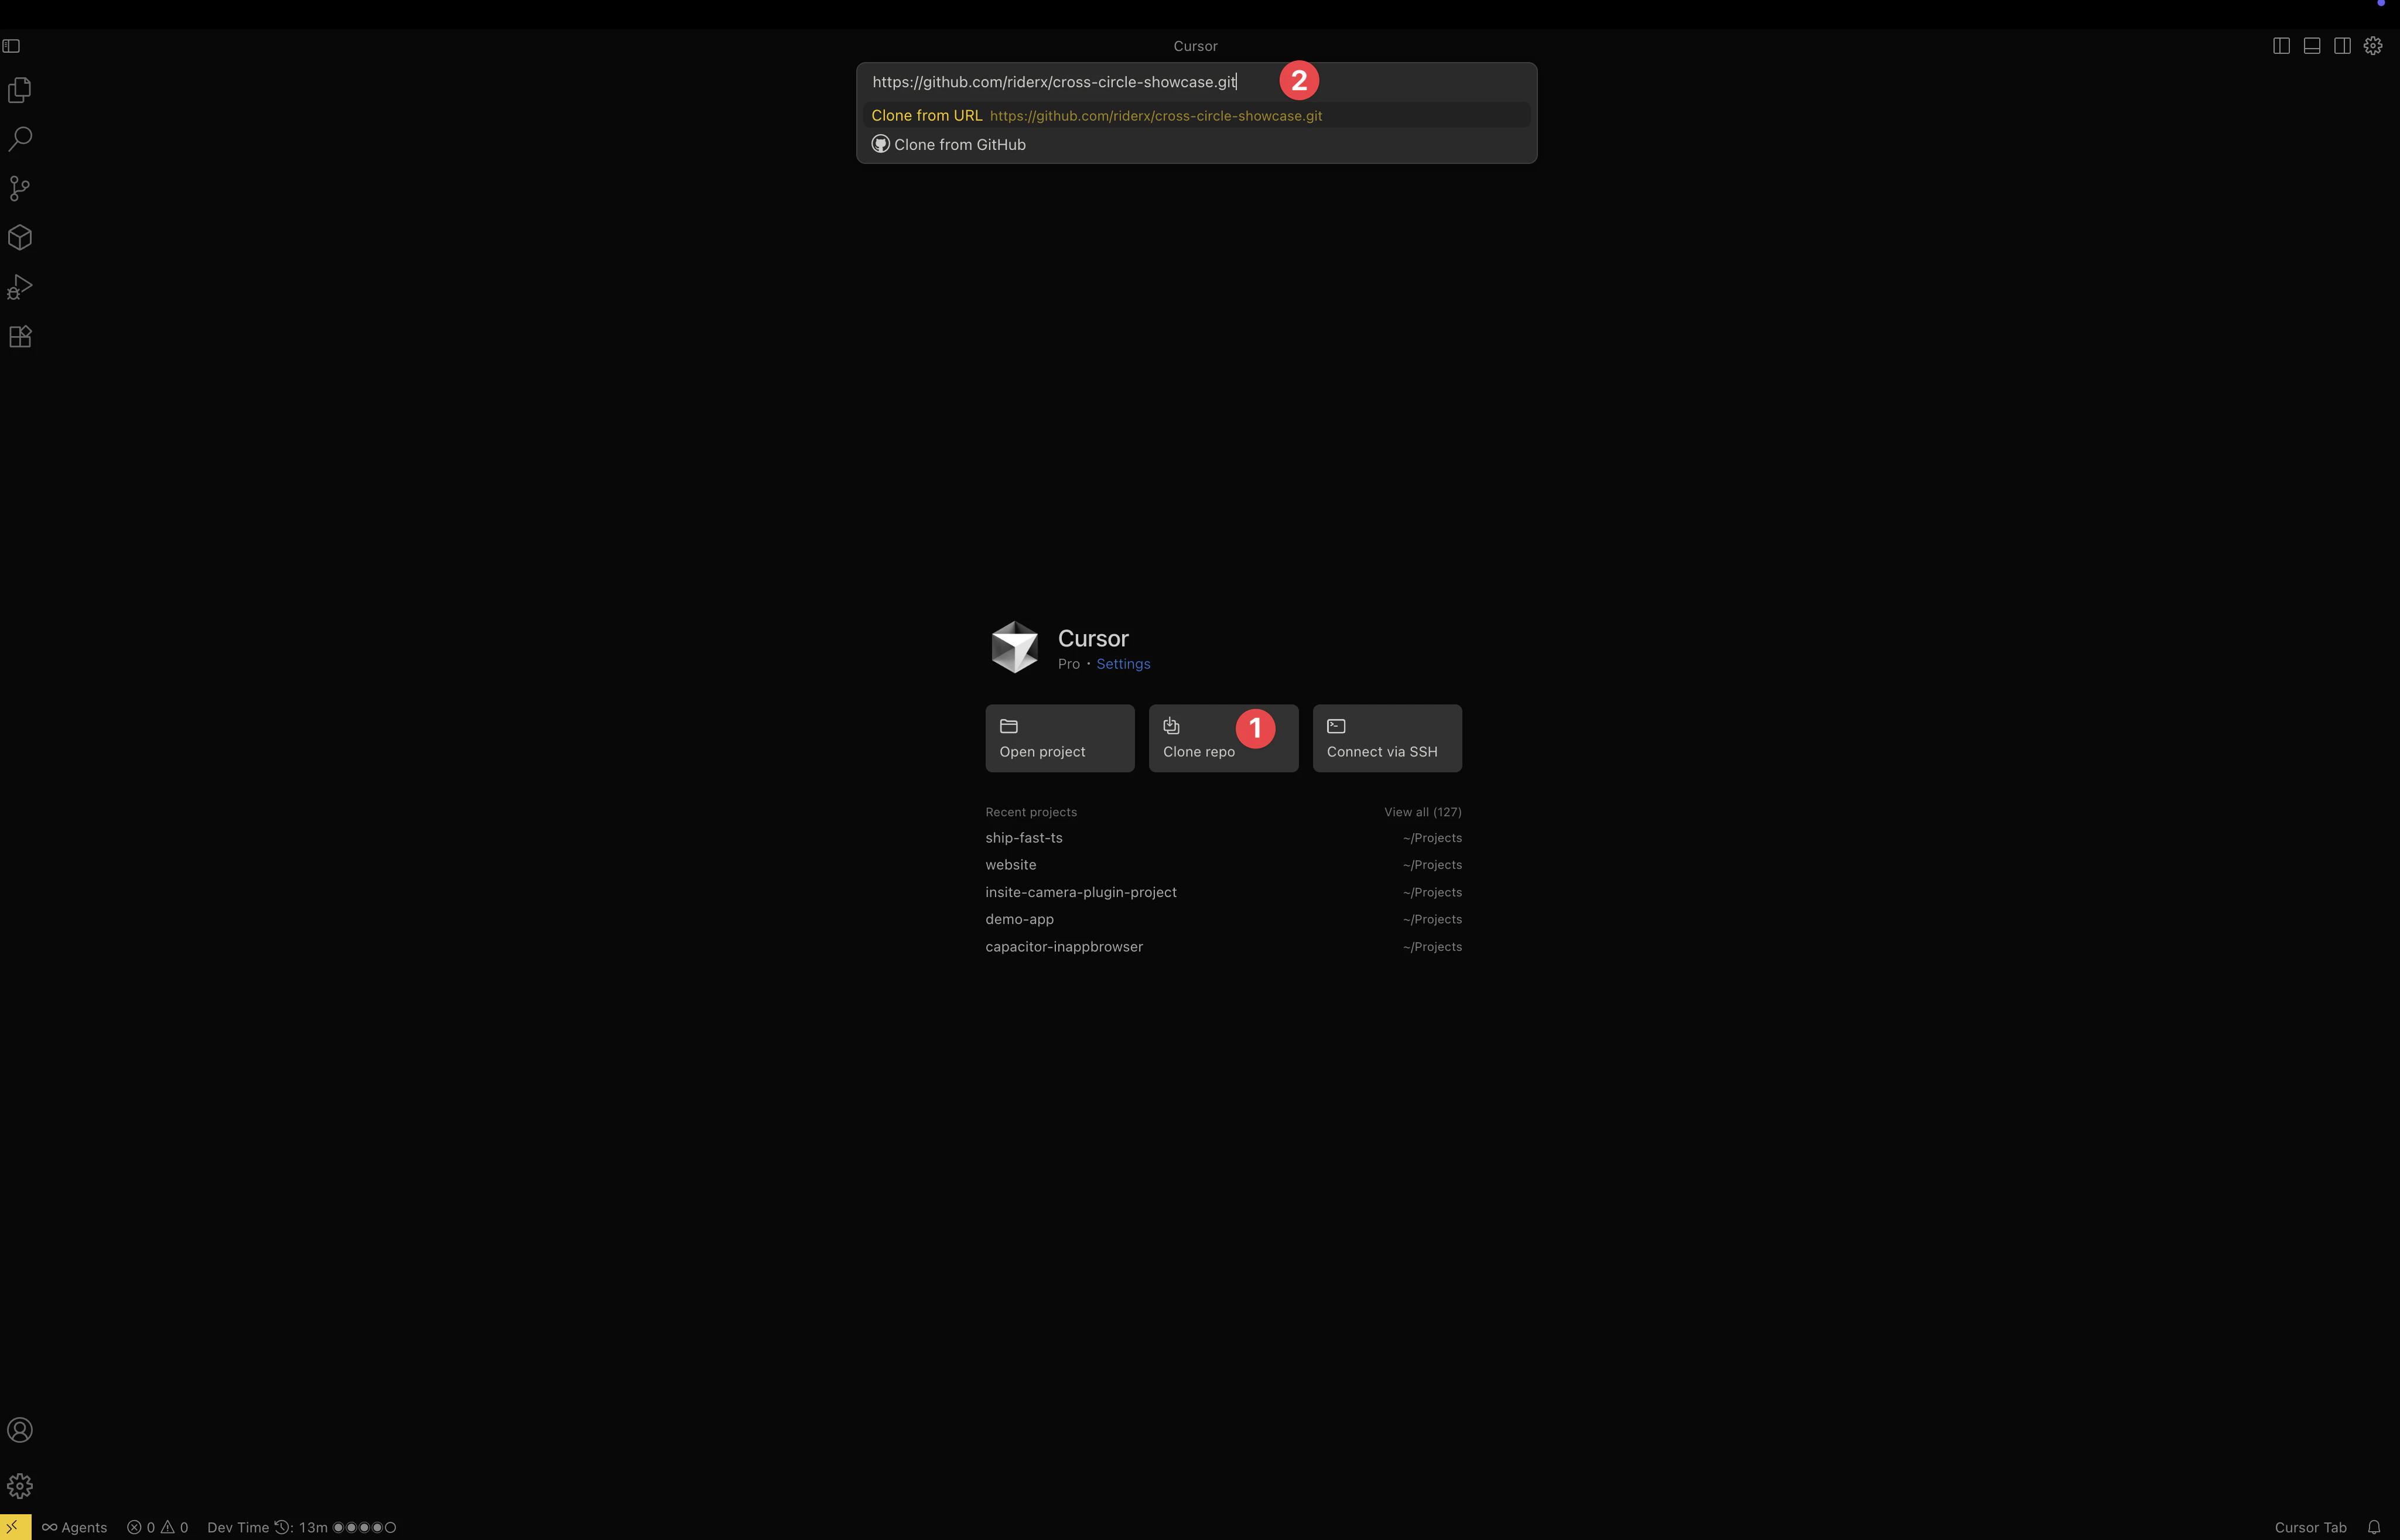
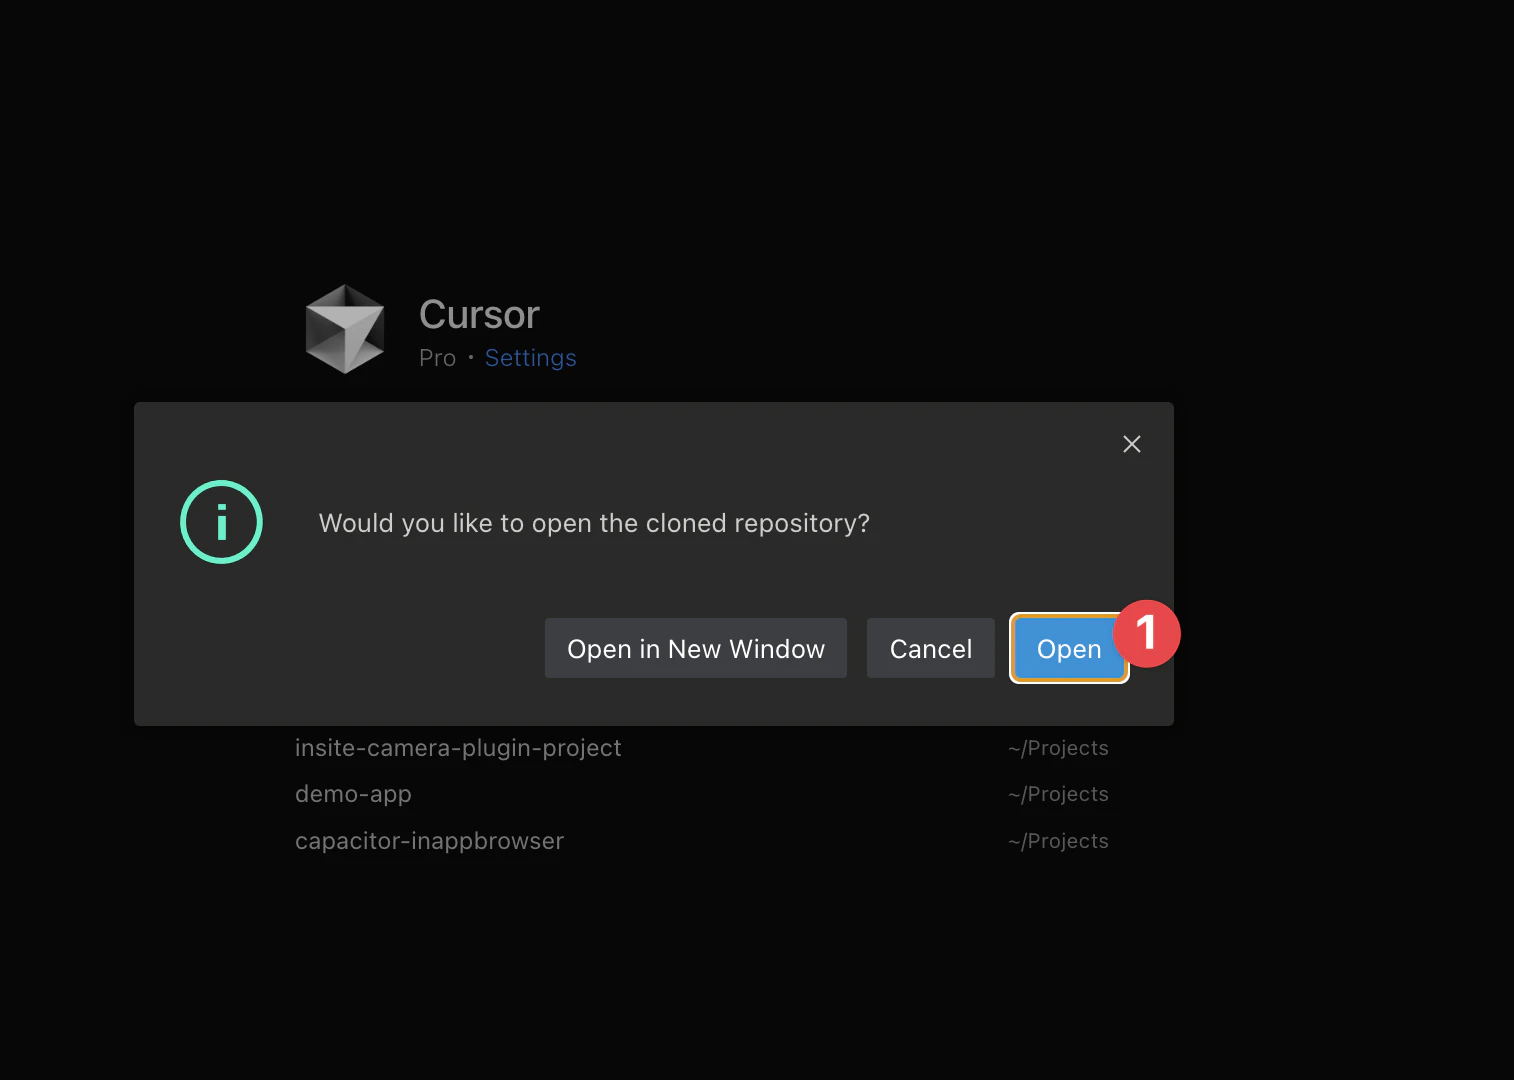
- Cursor가 프로젝트를 clone하고 엽니다
3단계 — 의존성 설치 및 로컬 실행
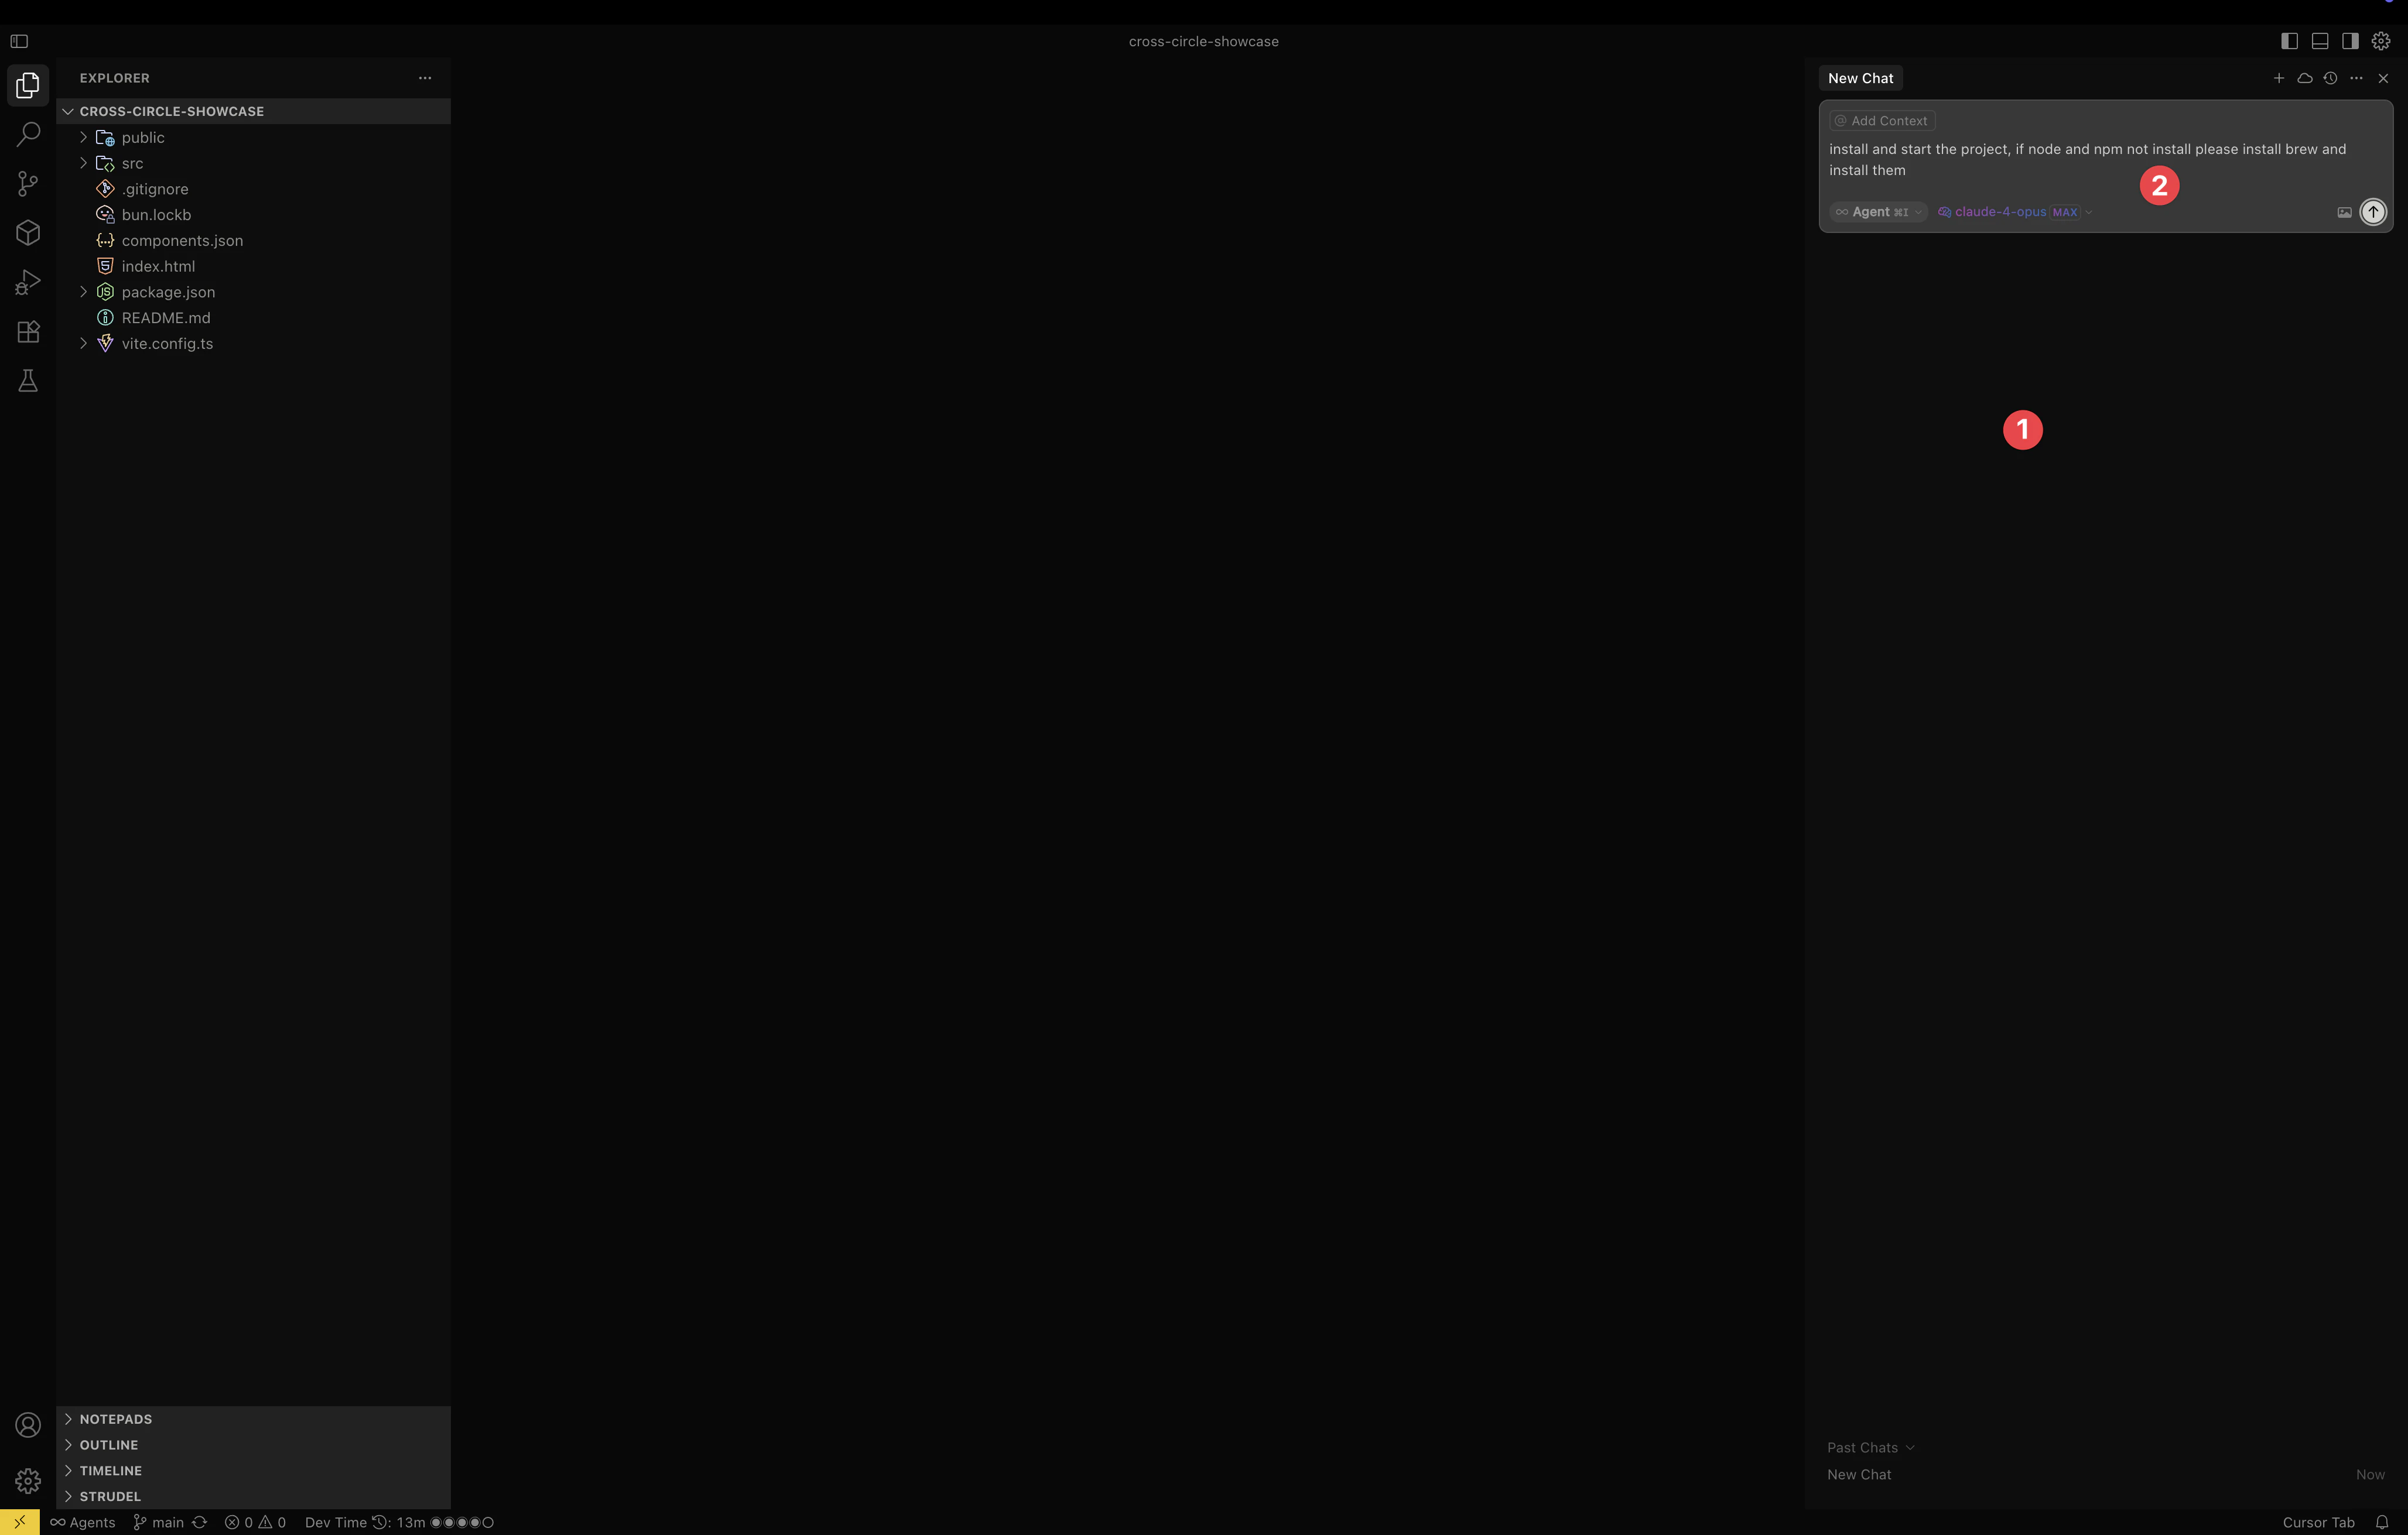
방법 1: Cursor AI 사용 (권장)
- 다음 키를 눌러 Cursor의 AI 탭을 여세요
Command+K(Mac) 또는Ctrl+K(Windows) - 다음 명령어를 입력하세요:
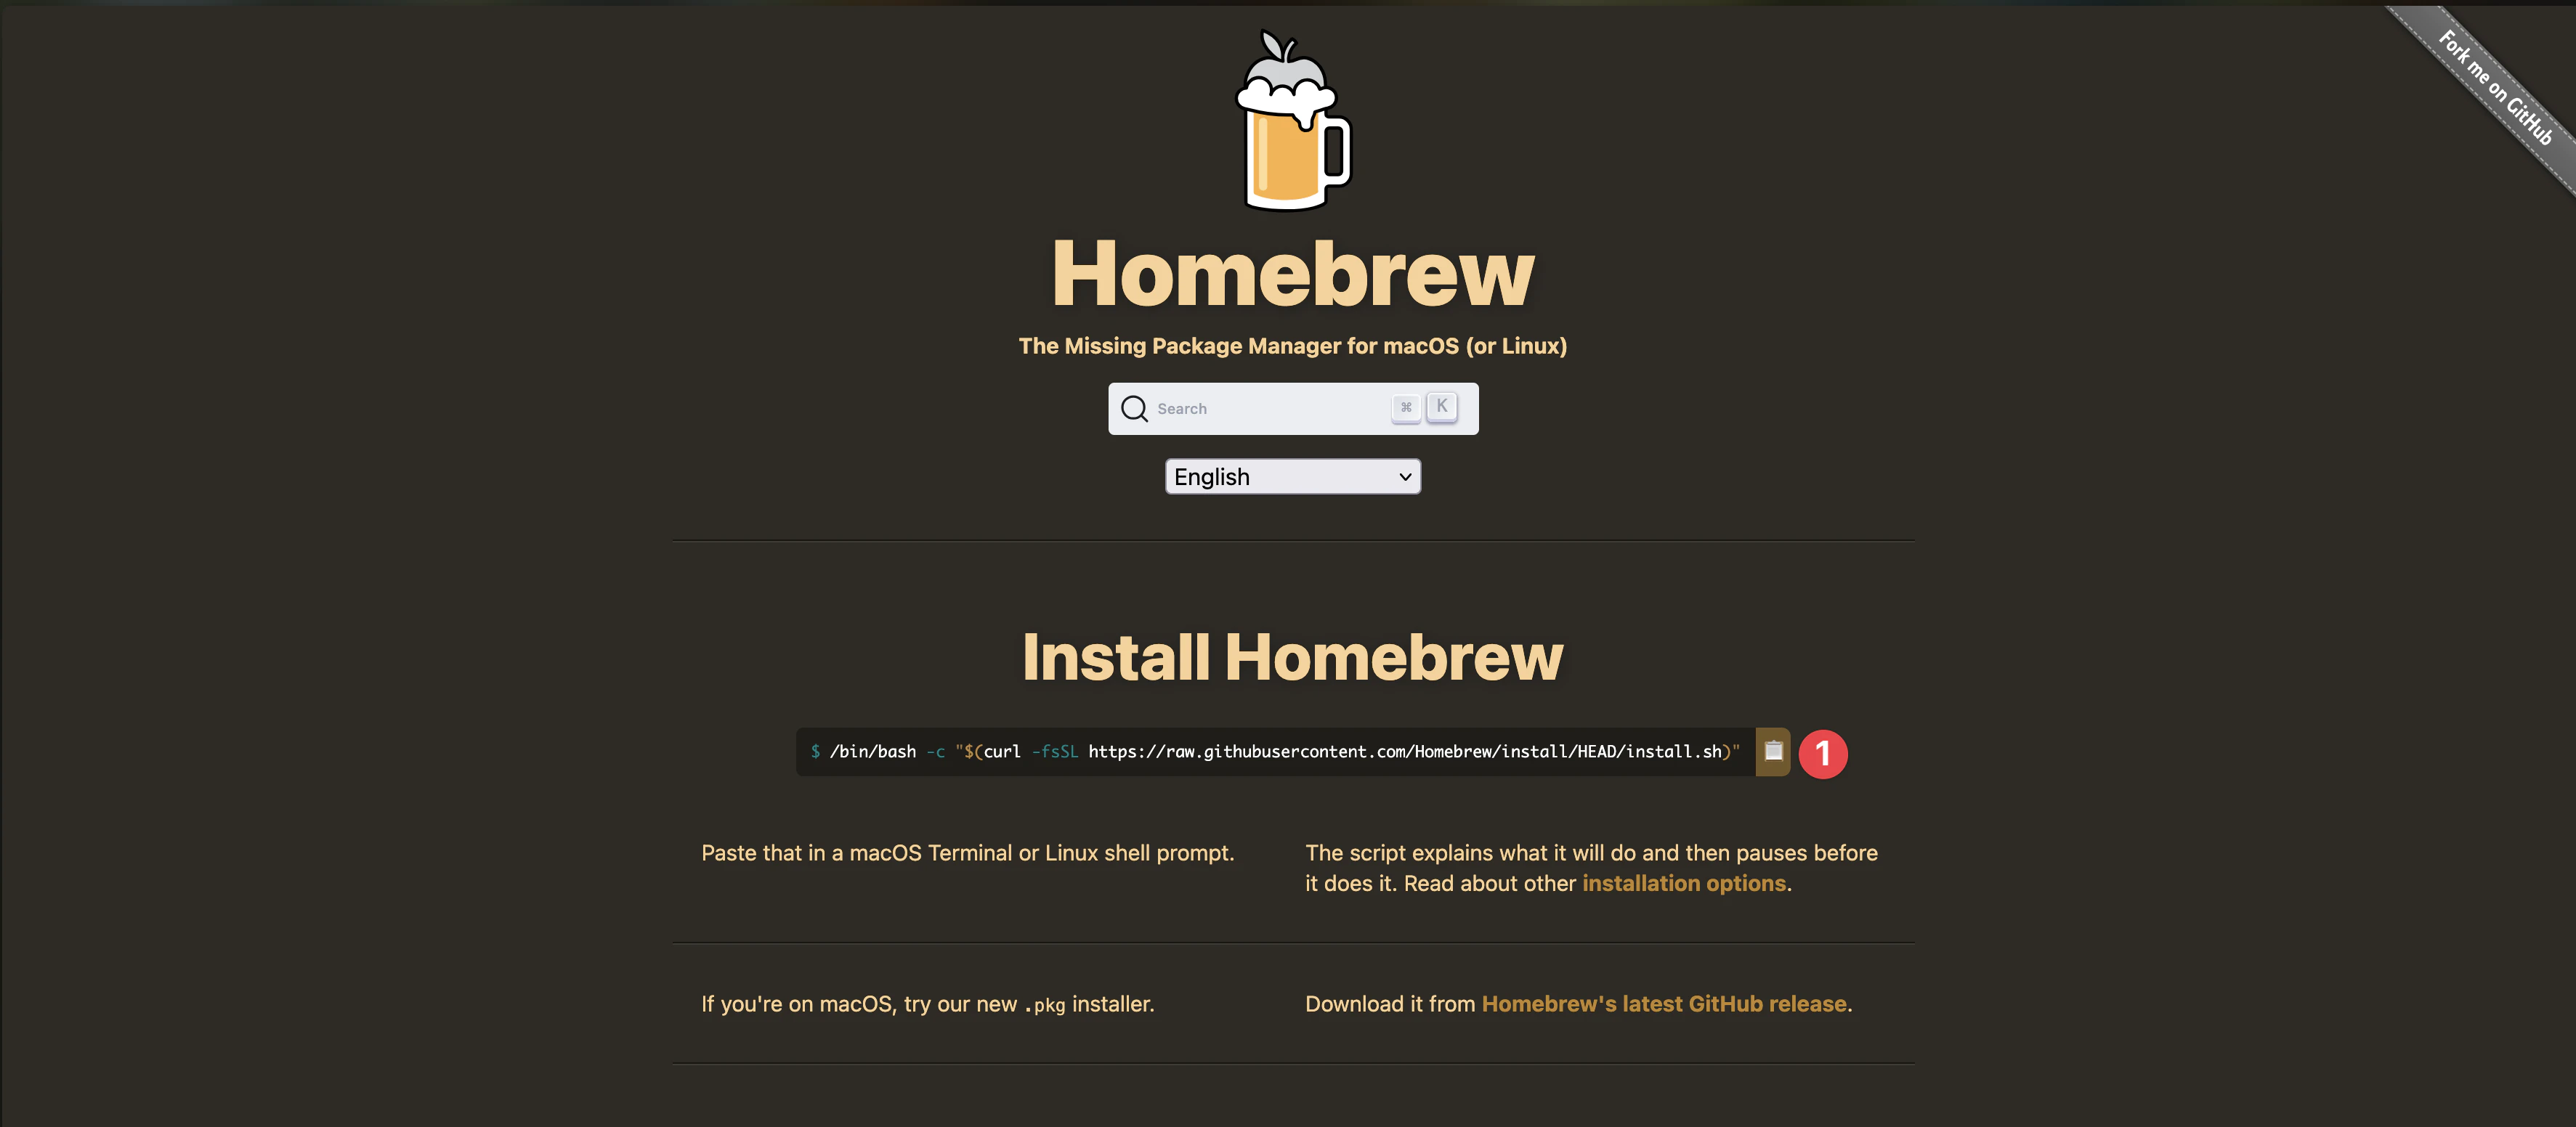
Install Homebrew, Node.js and npm on my system, then install dependencies and run the dev serverAI가 OS를 자동으로 감지하여 Node.js를 설치하고, npm install개발 서버를 실행합니다. npm run dev.
방법 2: 수동 설치
Cursor에서 다음 단축키를 눌러 터미널을 엽니다: Shift+Command+T (Mac) 또는 Shift+Ctrl+T (Windows)를 누른 후:
macOS의 경우:
/bin/bash -c "$(curl -fsSL https://raw.githubusercontent.com/Homebrew/install/HEAD/install.sh)"
brew install node
cd your-lovable-app
npm install
npm run dev
Windows의 경우:
- 다운로드하세요: 24 LTS 다음에서 설치: nodejs.org
- 설치 프로그램을 실행하세요
- 터미널을 열고 다음을 실행하세요:
cd your-lovable-app
npm install
npm run dev
Lovable 앱은 보통 다음에서 실행됩니다: http://localhost:8080 또는 http://localhost:5173 — 터미널에 표시된 주소를 사용하세요.
누르기 Ctrl + C 다음 단계로 넘어가려면 dev server를 중지하세요.
✅ 성공: UI가 정상 작동하며 브라우저에서 앱이 열립니다.
4단계 — 정적 프로덕션 빌드 준비
Capacitor를 네이티브 플랫폼에 추가하기 전에 프로덕션 빌드가 필요합니다.
React + Vite (대부분의 Lovable 앱)
방법 1: Cursor AI 사용 (권장)
누르기 Command+K (Mac) 또는 Ctrl+K (Windows)에서 다음과 같이 요청하세요:
Configure vite.config for Capacitor mobile deployment with base './' and production build to dist방법 2: 수동 설정
확인 vite.config.ts 에셋이 네이티브 WebView 내에서 로드되도록 상대 경로를 사용합니다:
import { defineConfig } from 'vite'
import react from '@vitejs/plugin-react'

export default defineConfig({
  plugins: [react()],
  base: './',
  build: {
    outDir: 'dist',
  },
})
빌드 및 확인:
npm run build다음 항목이 보일 것입니다: dist/ 폴더 내에 index.html 루트에 위치합니다.

기존 Next.js Lovable 프로젝트
Next.js를 사용하는 경우 Cursor에 문의하세요:
Add a static export script to package.json and configure next.config.js for mobile export with Capacitor또는 다음을 따르세요 Next.js 앱을 모바일로 변환하기 전체 next.config 설정을 마친 후, webDir: 'out' Capacitor 대신 Capacitor를 사용하세요 dist.
✅ 성공: 정적 빌드 폴더가 존재합니다 (dist/ 또는 out/) 및 index.html.
5단계 — Capacitor 및 Native Platforms 추가
Capacitor를 사용하면 웹 앱을 실제 iOS 및 Android 셸로 감싸주므로 코드를 다시 작성할 필요가 없습니다.
방법 1: Cursor AI 사용 (권장)
누르기 Command+K (Mac) 또는 Ctrl+K (Windows)에서 다음과 같이 질문하세요:
Install Capacitor CLI, initialize it for my app with webDir dist, and add iOS and Android platformsAI가 다음 정보를 요청할 것입니다: 앱 이름 및 bundle ID (예: com.yourcompany.myapp).

방법 2: 수동 설치
npm install @capacitor/core @capacitor/cli
npx cap init
프롬프트가 나타나면:
| Prompt | 예시 | 참고 사항 |
|---|---|---|
| 앱 이름 | 나의 Lovable App | 앱 아이콘 아래에 표시됨 |
| 앱 패키지 ID | com.yourcompany.myapp | 역도메인 방식 — 스토어 출시 후 변경 불가 |
| 웹 에셋 디렉토리 | dist |
사용하세요: out Next.js 정적 내보내기용 |
실제로 소유한 패키지 ID를 선택하세요. Bundle ID는 전 세계적으로 고유합니다. 처음부터 제어 가능한 도메인을 기반으로 역도메인 ID를 사용하세요. 나중에 변경하려면 전체를 찾아 바꾸고 ios/ 및 android/ 다시 빌드해야 합니다.
npm run build
npm install @capacitor/ios @capacitor/android
npx cap add ios
npx cap add android
npx cap sync
Capacitor 설정하기
방법 1: Cursor AI 사용 (권장)
Cursor에게 물어보기:
Update capacitor.config.ts to use dist as webDir and set up for HTTPSNext.js 정적 내보내기(static export)의 경우, 다음을 사용하도록 요청하세요: out 대신 사용하세요.
방법 2: 수동 설정
import type { CapacitorConfig } from '@capacitor/cli';

const config: CapacitorConfig = {
  appId: 'com.yourcompany.myapp',
  appName: 'My Lovable App',
  webDir: 'dist',
  server: {
    androidScheme: 'https',
  },
};

export default config;
Build 및 Sync
방법 1: Cursor AI 사용 (권장)
Cursor에게 다음과 같이 입력하세요:
Build the production web app and sync it with Capacitor platforms방법 2: 수동 명령어
npm run build
npx cap sync
프로젝트 구성 결과:
your-lovable-app/
├── android/              ← native Android project
├── ios/                  ← native iOS project
├── dist/                 ← built web app (or out/ for Next.js)
├── src/                  ← your Lovable app code
├── capacitor.config.ts
└── package.json
CocoaPods가 필요 없습니다. Capacitor 8은 iOS 의존성을 위해 Swift Package Manager를 자동으로 사용합니다.
✅ 성공: ios/ 및 android/ 폴더가 나타나고 터미널에 표시됩니다 Sync finished.
6단계 — 확인하기 .gitignore
Capgo Builder는 Git 리포지토리에서 컴파일하므로, ios/ 및 android/ 커밋해야 합니다. 흔히 하는 실수는 리포지토리 루트에서 이를 무시하는 것입니다.
확인:
- 루트
.gitignore무시됨node_modules및dist(클라우드에서 다시 빌드dist하는 웹 빌드 중) ios/및android/자체는 이 오버라이드는 제외됨
✅ 성공: git status 표시됨 ios/ 및 android/ 커밋 가능 (제외되지 않음).
7단계 — Commit 및 Push
git add .
git commit -m "Add Capacitor and native iOS/Android platforms"
git push
✅ 성공: GitHub 저장소에 다음이 표시됩니다: ios/ 및 android/ 폴더.
8단계 — Capgo Builder로 스토어용 바이너리 빌드
배포를 위해 Mac이나 로컬 Xcode/Android Studio 파이프라인이 필요하지 않습니다. Capgo 빌더 클라우드에서 iOS 및 Android 빌드를 컴파일, 서명 및 제출할 수 있습니다.
Capgo Builder 설정하기
npx @capgo/cli@latest login
npx @capgo/cli@latest init
npx @capgo/cli@latest build init --platform ios
npx @capgo/cli@latest build init --platform android
서명 자격 증명을 한 번만 저장하세요. 생성에 도움이 필요하면 다음 무료 도구를 사용하세요:
- iOS 인증서 생성기
- Android Keystore 생성기
- iOS UDID 찾기 — 개발용 빌드를 위해 iPhone 등록하기
참고 자격 증명 관리 및 Windows에서 iOS 빌드하기.
클라우드 빌드 요청하기
npm run build
npx cap sync
npx @capgo/cli@latest build com.yourcompany.myapp --platform ios --build-mode release
npx @capgo/cli@latest build com.yourcompany.myapp --platform android --build-mode release
빌드 로그가 터미널에 스트리밍됩니다. App Store Connect가 설정되어 있으면 iOS 빌드를 TestFlight에 자동으로 upload할 수 있습니다.
실제 기기에 설치하기:
- iOS: TestFlight(권장) 또는 기기 UDID가 등록된 개발용 빌드
- Android: Google Play 내부 테스트 트랙 또는 서명된 release APK/AAB
✅ 성공: 서명된 빌드가 완료되어 실제 기기에 설치할 수 있습니다.
단계 9 — 선택 사항: Xcode 또는 Android Studio에서 로컬 테스트
Mac을 사용 중이거나 클라우드 빌드 전에 에뮬레이터 테스트를 원하는 경우:
iOS의 경우
방법 1: Cursor AI 사용 (권장)
Open the iOS project in Xcode방법 2: 수동 명령 사용
npx cap open ios
Xcode 최초 설정:
- 기기 드롭다운에서 시뮬레이터 선택 (예: iPhone 15)
- 실제 기기 사용 시: 활성화 Signing 자동 관리 및 Apple Developer 팀 선택
- ▶️ Play 버튼 클릭 — 첫 빌드는 5~10분 소요

Android의 경우
방법 1: Cursor AI 사용 (권장)
Open the Android project in Android Studio방법 2: 수동 명령 사용
npx cap open android
Android Studio 최초 설정:
- 필요 시 누락된 SDK 패키지 설치
- Device Manager에서 에뮬레이터 생성 (예: Pixel 6, API 33+)
- 초록색 ▶️ Run 버튼을 클릭하세요 — 첫 빌드는 5~15분 정도 소요됩니다

일상적인 디버깅에는 로컬 IDE를 사용하세요. 다음을 사용하세요: Capgo 빌더 서명된 릴리스 바이너리가 필요한 경우.
✅ 성공: 시뮬레이터 또는 에뮬레이터에서 Lovable 콘텐츠가 포함된 앱이 실행됩니다.
10단계 — Live Reload 활성화 (개발용)
네이티브 쉘을 로컬 개발 서버로 연결하여 반복 작업 속도를 높이세요.
방법 1: Cursor AI 사용 (권장)
Cursor에게 다음과 같이 요청하세요:
Set up live reload for Capacitor development with my local IP address방법 2: 수동 설정
- 로컬 IP 주소를 확인하세요:
# macOS
ipconfig getifaddr en0

# Windows
ipconfig- 업데이트
capacitor.config.ts:
import type { CapacitorConfig } from '@capacitor/cli';

const config: CapacitorConfig = {
  appId: 'com.yourcompany.myapp',
  appName: 'My Lovable App',
  webDir: 'dist',
  server: {
    url: 'http://YOUR_IP_ADDRESS:5173',
    cleartext: true,
  },
};

export default config;
포트 사용 8080 또는 3000 만약 그것이 npm run dev 출력된다면.
- 변경 사항 적용:
npx cap copy
✅ 성공: 웹 code 수정 사항이 기기나 시뮬레이터에서 hot-reload됩니다.
11단계 — 네이티브 기능 추가: 카메라
Capacitor 플러그인을 사용하면 JavaScript로 실제 기기 기능을 호출할 수 있습니다. 브라우저 탭에서는 안정적으로 수행하기 어려운 사진 촬영 기능을 위해 Camera 플러그인을 추가해 보겠습니다.
방법 1: Cursor AI 사용 (권장)
Cursor에 다음과 같이 입력하세요:
Add the Capacitor Camera plugin with iOS and Android permissions and a button to take a photo방법 2: 수동 설치
npm install @capacitor/camera
npx cap sync
iOS — 다음 항목을 추가하세요: ios/App/App/Info.plist 최상위 디렉토리 내에 <dict>:
<key>NSCameraUsageDescription</key>
<string>This app uses the camera to take photos.</string>
Android — 다음 항목을 내부에 추가하세요: <manifest> 에서 android/app/src/main/AndroidManifest.xml:
<uses-permission android:name="android.permission.CAMERA" />import { Camera, CameraResultType } from '@capacitor/camera';
async function takePhoto() {
const photo = await Camera.getPhoto({
quality: 90,
resultType: CameraResultType.Uri,
});
return photo.webPath;
}
플러그인을 추가하려면 새로운 Native Build가 필요합니다 기기에서 작동하기 전에 Capgo Builder를 통해 확인합니다.
✅ 성공: Camera code 컴파일 및 npx cap sync 오류 없이 완료되었습니다.
12단계 — Capgo Live Updates 추가
일반적으로 모든 네이티브 변경 사항은 앱 스토어 심사를 거쳐야 합니다. Capgo Live Updates 앱의 웹 레이어(HTML, CSS, JS, 이미지) 변경 사항을 몇 분 만에 OTA로 푸시하세요.
첫 번째 릴리스에 updater를 설치하여 수정이 필요할 때 심사 결과를 기다리느라 지체되는 일을 방지하세요.
npm install @capgo/capacitor-updater
npx cap sync
다음 항목에 추가: capacitor.config.ts:
import type { CapacitorConfig } from '@capacitor/cli';

const config: CapacitorConfig = {
  appId: 'com.yourcompany.myapp',
  appName: 'My Lovable App',
  webDir: 'dist',
  plugins: {
    CapacitorUpdater: {
      autoUpdate: true,
    },
  },
};

export default config;
앱 엔트리 포인트에서 초기화(예: src/main.tsx):
import { CapacitorUpdater } from '@capgo/capacitor-updater';

void CapacitorUpdater.notifyAppReady();
새로운 Capgo Builder 빌드를 commit, push하고 실행하여 SDK updater가 native shell에 포함되도록 합니다.
출시 후 웹 번들을 upload 하려면:
npm run build
npx @capgo/cli@latest bundle upload --channel production클릭할 때마다 이 upload 과정을 자동화하려면 배포 Lovable에서 다음 단계를 따르세요. GitHub Actions를 사용하여 Lovable의 Capgo Live Updates 자동화하기.
✅ 성공: Updater 플러그인이 설치되었으며 notifyAppReady() 시작 시 실행됩니다.
13단계 — Live Update로 상태 표시줄 간격 수정하기
실제 iPhone에서는 헤더가 다음 영역에 겹쳐 보일 수 있습니다 (시계 및 배터리 표시). 최신 Capacitor는 edge-to-edge 디자인을 사용하므로, 앱에서 반드시 safe area insets를 준수해야 합니다.: env(safe-area-inset-top), -bottom, -left, -right.
많은 Lovable 앱들이 하단 inset은 처리하지만, 상단 inset 없이 pt-6고정된 top padding만 사용하는 경우가 많습니다.
1. 확인하기 viewport-fit=cover 에서 index.html:
<meta name="viewport" content="width=device-width, initial-scale=1.0, viewport-fit=cover" />2. 상단 헤더 수정 — use max() 를 사용하세요:
/* Before */
padding-top: 1.5rem;

/* After */
padding-top: max(1.5rem, env(safe-area-inset-top));
Cursor나 Lovable에서 다음과 같이 요청하세요:
“모바일에서는 앱 콘텐츠가 상단 상태 표시줄 아래에 위치합니다. 각 페이지 헤더의
env(safe-area-inset-top)각 페이지 헤더의 상단 패딩에 적용하기 위해max()기존 패딩을 최소값으로 유지하세요.”
3. OTA로 수정 사항 배포하기 — 순수 CSS 작업이므로 Native Build가 필요 없습니다:
git add .
git commit -m "Fix top safe area on mobile"
git push
npm run build
npx @capgo/cli@latest bundle upload --channel production
기기에서 앱을 강제 종료한 뒤 다시 실행하고, 약 15~30초 정도 기다렸다가 다시 열어보세요. 헤더가 상태 표시줄 아래로 내려가 있다면, 스토어 심사 없이 수정이 완료된 것입니다.
✅ 성공: OTA 번들이 적용된 후 상단 콘텐츠가 상태 표시줄과 겹치지 않습니다.
더 자세한 레이아웃 작업은 다음을 참고하세요: @capgo/tailwind-capacitor 및 Capacitor edge-to-edge 디스플레이.
14단계 — 스토어 등록 정보 준비하기
앱 빌드와 설치가 완료되었고, 즉시 업데이트도 가능합니다. 이제 스토어 출시를 위한 서류 작업만 남았습니다:
- 앱 아이콘 — iOS용 1024×1024px (투명도 없음), Google Play용 512×512px
- 스크린샷 — Apple은 iPhone 6.9” (1320×2868px) 스크린샷을 요구합니다
- 앱 이름, 부제목, 설명, 키워드
- 개인정보 처리방침 URL — 무료 앱이라도 양쪽 스토어 모두 필수입니다
- 연령 등급 — 각 콘솔의 설문 조사 작성
- 데이터 수집 공개 항목 — Apple 개인정보 보호 영양 성분표 및 Google 데이터 보안
방법 1: Cursor AI 사용 (권장)
Set up app icons and splash screens for my Capacitor app방법 2: 수동 설정
npm install -D @capacitor/assets
# Add assets/icon.png (1024x1024) and assets/splash.png (2732x2732)
npx capacitor-assets generate
npx cap sync
실제 출시 전 남은 단계:
- Google Play 비공개 테스트 (2023년 11월 13일 이후 생성된 개인 계정): 프로덕션 액세스 전 최소 12명의 테스터가 14일 연속으로 테스트해야 합니다. iOS는 해당 사항 없음.
- 심사 제출 — 테스트 요건 충족 후 Apple 약 3~5일, Google 약 3~7일 소요.
전체 체크리스트는 첫 앱 심사 가이드 를 확인하세요.
자주 발생하는 오류 (및 해결 방법)
Could not find the web assets directory: ./dist— 실행npm run build하기npx cap add또는npx cap sync. 반드시 확인하세요webDir에서capacitor.config.ts프레임워크 출력값과 일치하는지 ("distVite의 경우,out용 Next.js static export의 경우)."- “이 App ID …를 사용할 수 없습니다” — Bundle ID는 전 세계적으로 고유합니다. 직접 소유한 reverse-domain ID를 선택하세요.
- Bundle ID 변경 후 iOS build 실패 — 네이티브 프로젝트의 ID는 Apple App Store Connect와 일치해야 합니다. 전체 검색 및 바꾸기를 통해
ios/및android/수정하고, 커밋한 뒤, 다시 빌드하세요. - 실행 시 흰 화면이 나타나는 경우 — Vite 설정에서
base: './'를 설정한 후, 다시 빌드하고 실행하세요.npx cap sync. - 상태 표시줄 아래에 콘텐츠가 겹치는 경우 —
viewport-fit=cover및env(safe-area-inset-top)패딩을 추가하세요 (Step 13). - 디버그 모드로 서명된 APK — Google Play는 디버그 빌드를 거부합니다. 키스토어로 서명된 릴리스 빌드를 사용하세요.
- 배포 거부 — 이미 존재하는 버전입니다 — 네이티브 프로젝트의 버전/빌드 번호를 올린 후 다시 빌드하세요.
Capgo Builder 관련 문제는 다음을 참조하세요: Native Build 트러블슈팅 및 Live Updates 디버깅.
결론
Lovable 웹 앱을 네이티브 iOS 및 Android로 전환했습니다. Mac 없이 클라우드에서 빌드하고, 실제 카메라 기능을 구현했으며, 레이아웃 수정 사항도 OTA로 배포했습니다. 가장 어려운 단계를 마친 셈입니다.
다음 단계
- Capgo Live Updates — 스토어 심사를 기다리지 않고 UI 및 문구 수정 사항 배포
- Capgo 빌더 — CI에서 릴리스 빌드 자동화
- Capgo 플러그인 디렉토리 — 생체 인식, 푸시 알림, 위치 정보 등 지원
- 관련 가이드: Base44를 모바일로 전환하기 · Bolt.new를 모바일로 전환하기
Capgo 무료 계정 만들기 Live Updates 및 클라우드 Native Build를 사용해 보세요.
리소스
- Lovable 문서
- Capacitor 문서
- Capgo Native Build
- Capgo — Capacitor 앱을 위한 Live Updates
- Windows에서 iOS 빌드하기
- 모바일용 Next.js 정적 내보내기
Capacitor로 Lovable 앱을 iOS 및 Android로 전환하기 이어보기
사용 중인 경우 Capacitor로 Lovable 앱을 iOS 및 Android로 변환하기 네이티브 플러그인 작업을 계획하려면, 이를 연결하세요: Capgo 플러그인 디렉토리 Capgo 플러그인 디렉토리의 제품 워크플로우를 보려면, Capgo 제공 Capacitor 플러그인 Capgo 제공 Capacitor 플러그인의 구현 세부 사항을 보려면, Capgo Native Build Capgo Native Builds 제품 워크플로우를 위해, Windows에서 iOS 빌드하기 Mac 없이 클라우드에서 iOS 빌드하기 위해.





