介绍
Lovable 是一款AI应用构建器,能将提示转换为几分钟内工作的React应用。您可以快速在浏览器中发布 — 但如果您想将应用发布到App Store和Google Play,放置在主屏幕上像其他本机应用一样?
本指南将指导您完成整个路径:从Lovable导出,wrap web应用在 Capacitor,在云中使用__CAPGO_KEEP_1__ Builder构建签名的iOS和Android二进制文件 Capgo Builder (无需 Mac) 添加一个真正的本机功能,并通过无线方式推送一个布局修复 Capgo Live Updates.
我们使用 Cursor ,它的 AI 可以自动执行大部分终端命令,如果您不想手动输入命令。
所需时间: 大约 1–2 小时第一次,主要是账户设置和等待云端构建。
最后,您将拥有:
- 从云端构建的本机 iOS 和 Android 应用程序 — 无需在主路径上使用 Xcode 或 Android Studio
- 在真实设备上运行的应用程序(TestFlight、直接安装或 Play 内部测试)
- 一个工作的摄像头功能,只有本机应用程序才能提供
- 实时更新已配置好,UI和CSS修复可以不经过商店审查就发布
前提条件
| 要求 | 详细信息 |
|---|---|
| 一台电脑 | Mac、Windows或Linux —— 云端构建可以从任何操作系统上进行 |
| 一个code编辑器 | 光标 (推荐)或VSCode |
| Node.js | 24 LTS (最新版本 —— 从nodejs.org下载) 24 LTS (latest — download from) |
| Git | 从 GitHub 克隆您的 Lovable 仓库 |
| Capgo 账户 | 免费注册 — 云构建和实时更新 |
发布费用(仅限公开发布):
| 项目 | 成本 |
|---|---|
| Apple Developer Program | $99/年 |
| Google Play Console | $25 一次性 |
| Cursor Pro | $20/month (optional but recommended for AI command execution) |
| Capgo | 提供免费层; 支付计划适用于生产规模 |
Optional (local simulator only):
| 工具 | 为什么 |
|---|---|
| Xcode (~15 GB, macOS only) | 在 Mac 上的 iOS 模拟器 |
| Android Studio (~1 GB + SDKs) | Android 模拟器 |
您可以跳过这两者。 本教程的主要路径在云端构建并在真实设备上安装,而不需要它们。
A Quick Note on Lovable and Frameworks
在触摸 code 之前,了解以下事项 Lovable 生成的 web 应用类型会影响移动设备的包装.
很长一段时间以来,Lovable 的默认设置是 React + Vite 单页面应用 (SPA). 从 2026 年 5 月起,新创建的 Lovable 应用将使用 TanStack Start,带有服务器端渲染 (SSR) 的默认设置 SSR 对 web 来说很棒,但 Capacitor 包含一个 静态构建 — 包含 HTML、CSS 和 JavaScript 的文件夹,根目录下有一个 index.html ,将其打包到设备上
一个使用 SSR 的应用期望在每个请求中有一个服务器来渲染页面。手机里没有服务器,所以在 Capacitor 中你想要 静态, 客户端渲染输出.
要做的事情:
- 从头开始: 请 Lovable 为您提供一个 单页应用 (SPA) 或跳过 SSR 以获得静态
dist/文件夹。 - 已经在 TanStack Start (SSR) 上: 配置它以预渲染或输出静态 SPA。唯一的硬性要求是包含
index.html. - 遗留 Next.js Lovable 项目: 使用 静态导出 — 输出结果输出到
out/而不是dist/.
无论您使用哪个框架,都将 Capacitor 指向 webDir 在 Vite SPA 中,__CAPGO_KEEP_0__ 的位置是 dist.
步骤 1 — 将您的可爱的应用程序导出到 GitHub
可爱会将您的 code 在其编辑器中保留,直到您连接 GitHub。
- 在浏览器中打开您的 Lovable 项目
- 点击 升级 (右上角) 如果需要,请打开 Git 在左侧菜单中
- 选择 GitHub, 授权 Lovable, 并链接您的账户
- Lovable 创建一个仓库并自动推送您的应用
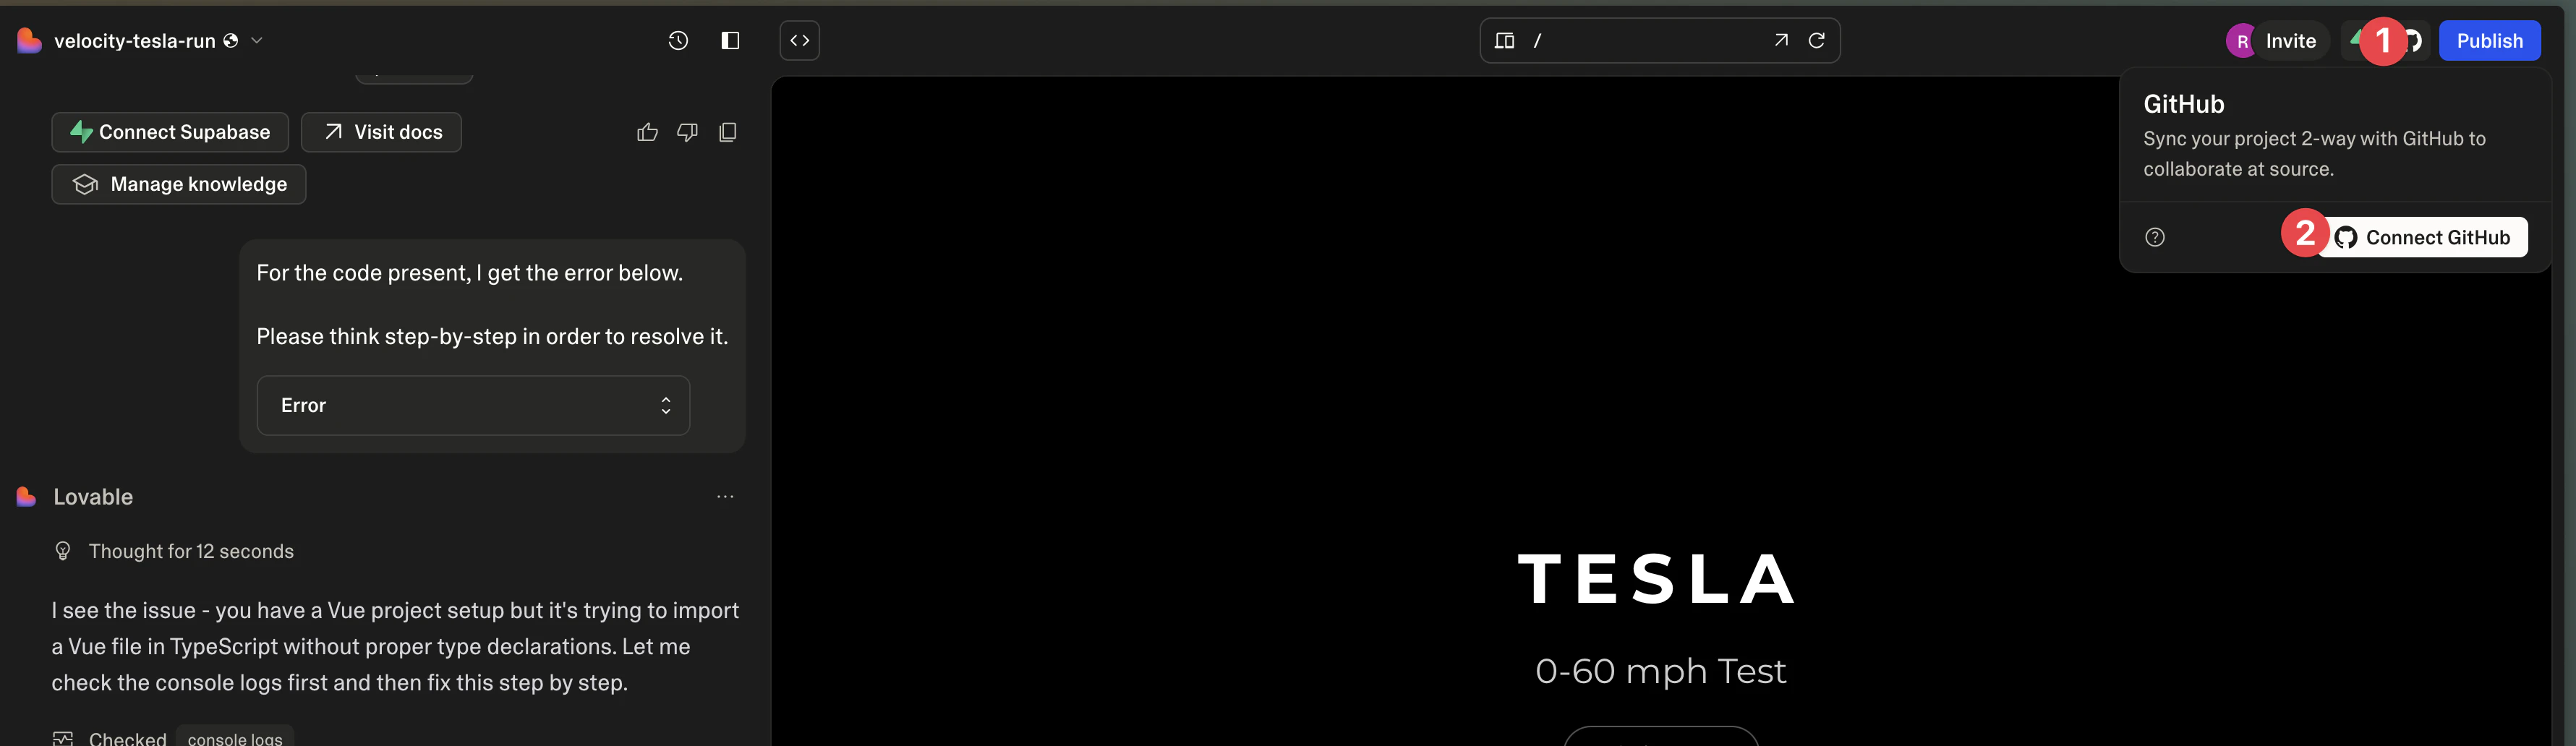


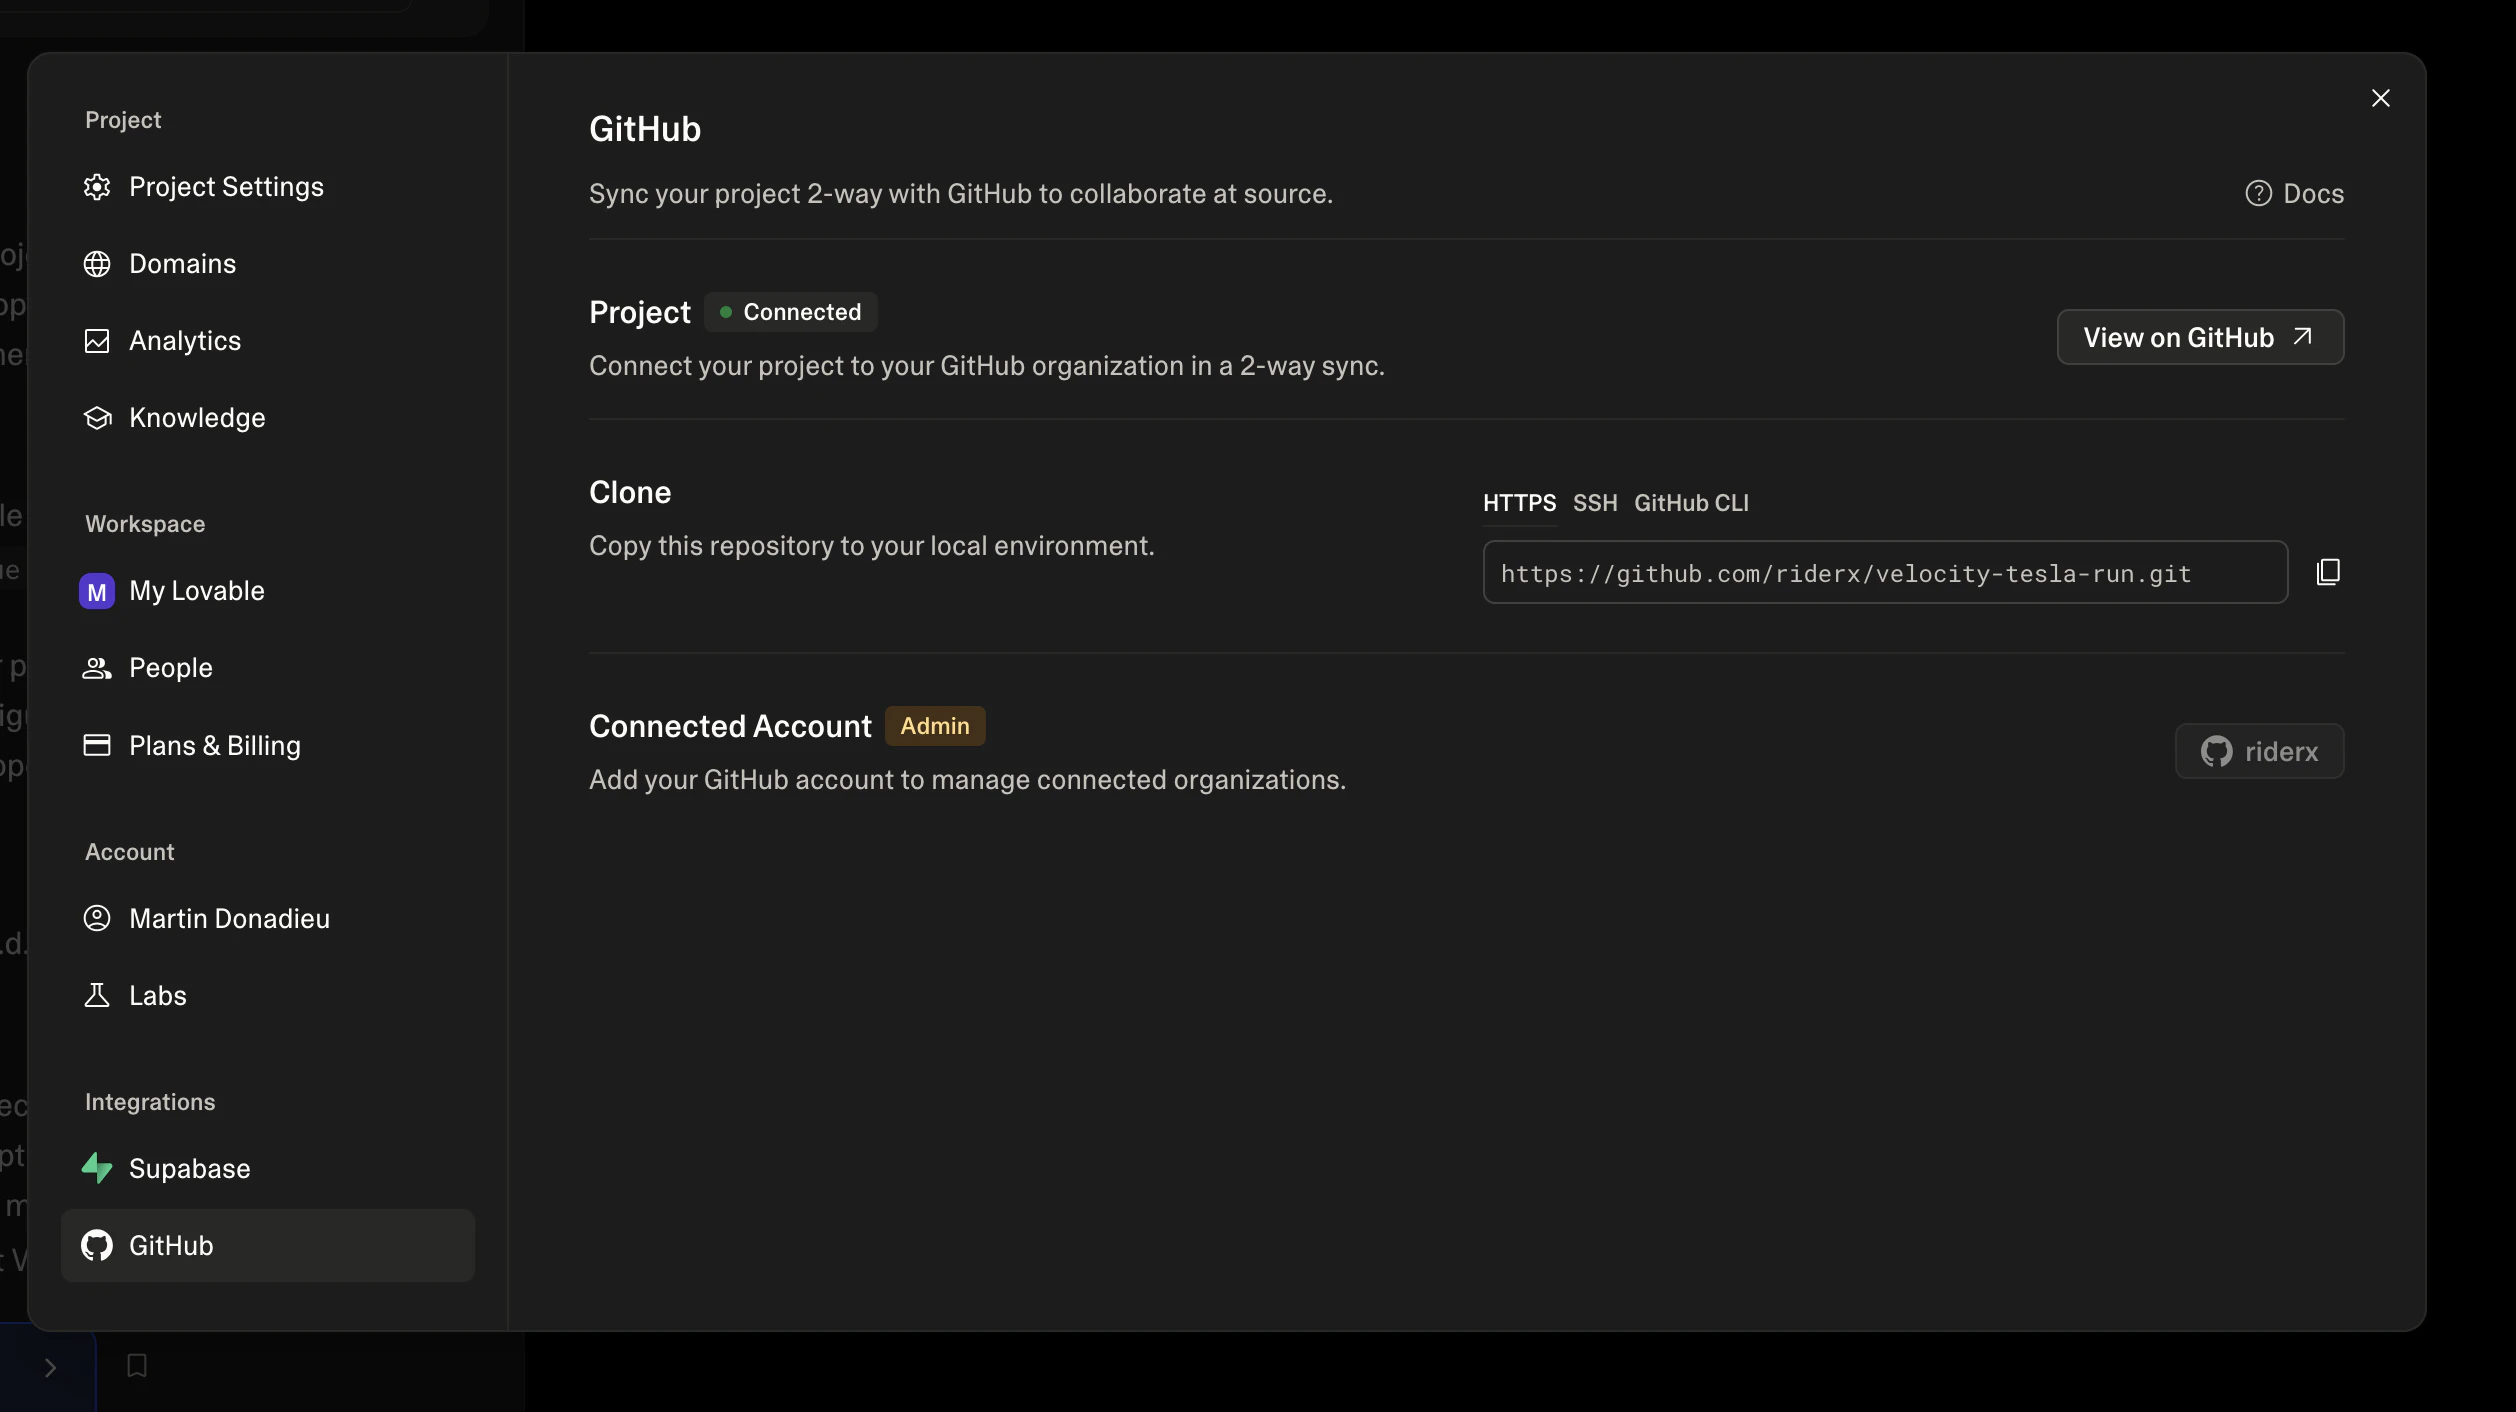
✅ 成功: 访问 github.com/YOUR-USERNAME/your-app 显示您的应用的 code。
步骤 2 — 设置游标并克隆您的项目
为了在本地与您的 code 进行工作,您需要一个 code 编辑器。我们推荐 Cursor,一个可以为您运行终端命令的 AI 驱动编辑器。
下载并安装 Cursor
- 访问 cursor.sh 并下载适合您的操作系统的版本
- 按照安装向导安装 Cursor
- 安装完成后打开 Cursor
为 AI 开发配置 Cursor
为了获得最佳体验,请在开始之前配置 Cursor:
- 购买一个Cursor计划 — 虽然Cursor提供了免费的计划,但Pro计划(每月20美元)可以为您提供无限的AI完成项、对Claude和GPT-4的访问以及命令执行
- 打开Cursor设置 通过按
Command+,(Mac)Ctrl+,(Windows)
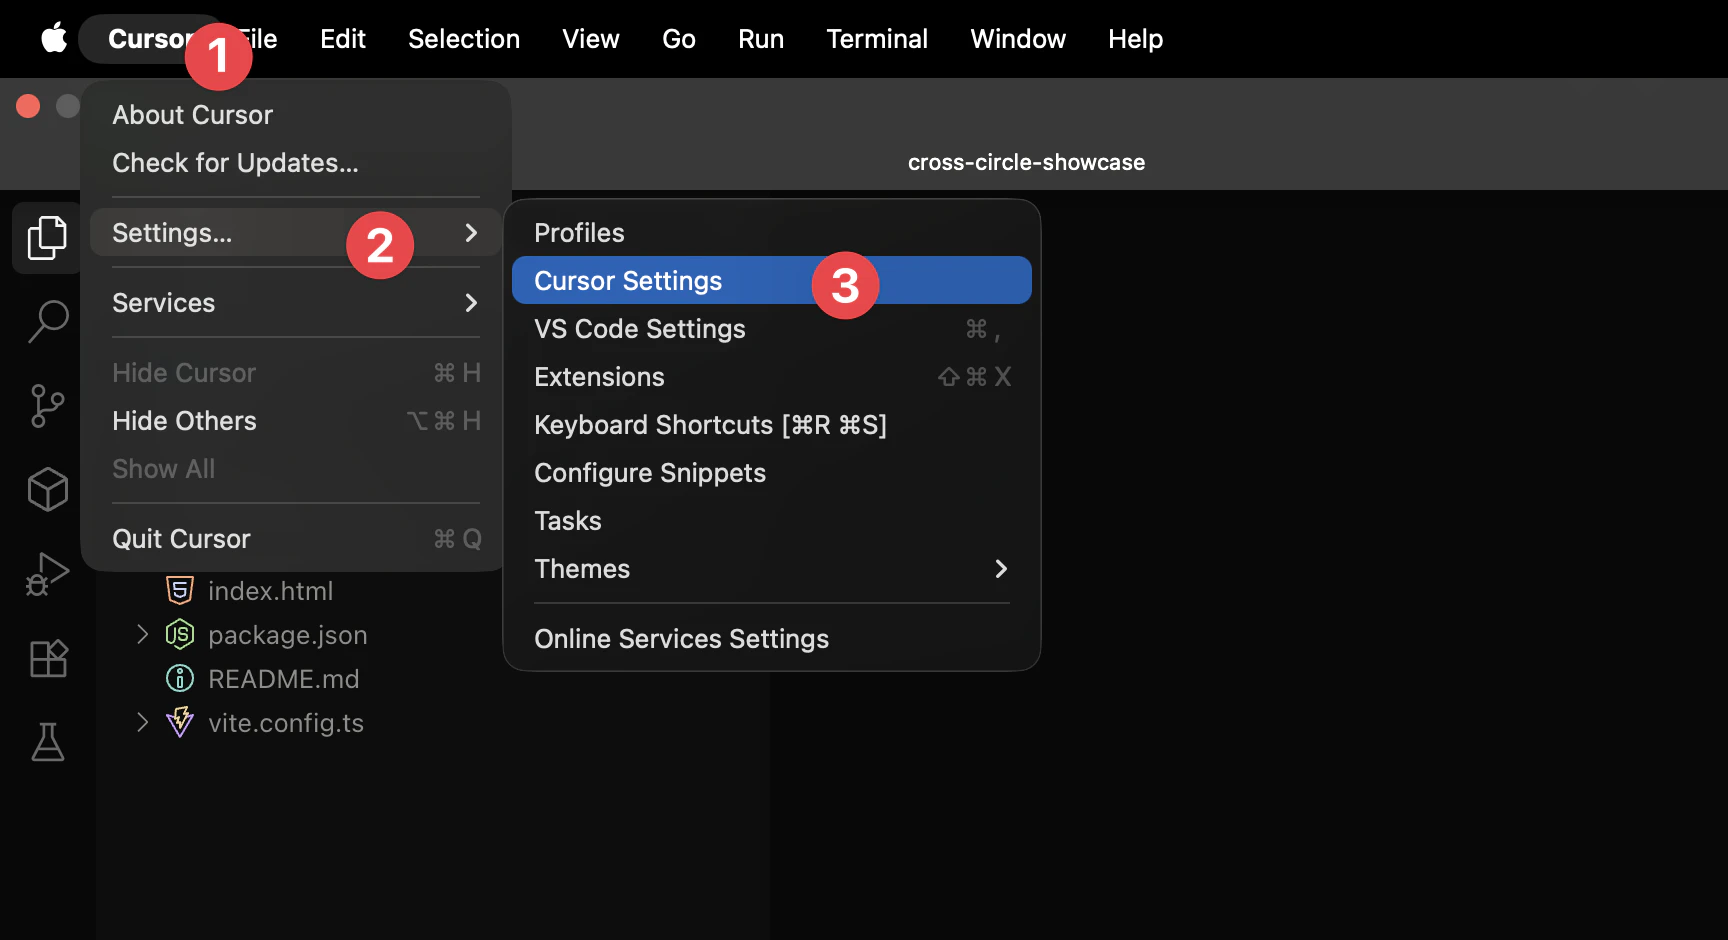
- 启用AI模型 — 确保AI功能已启用:
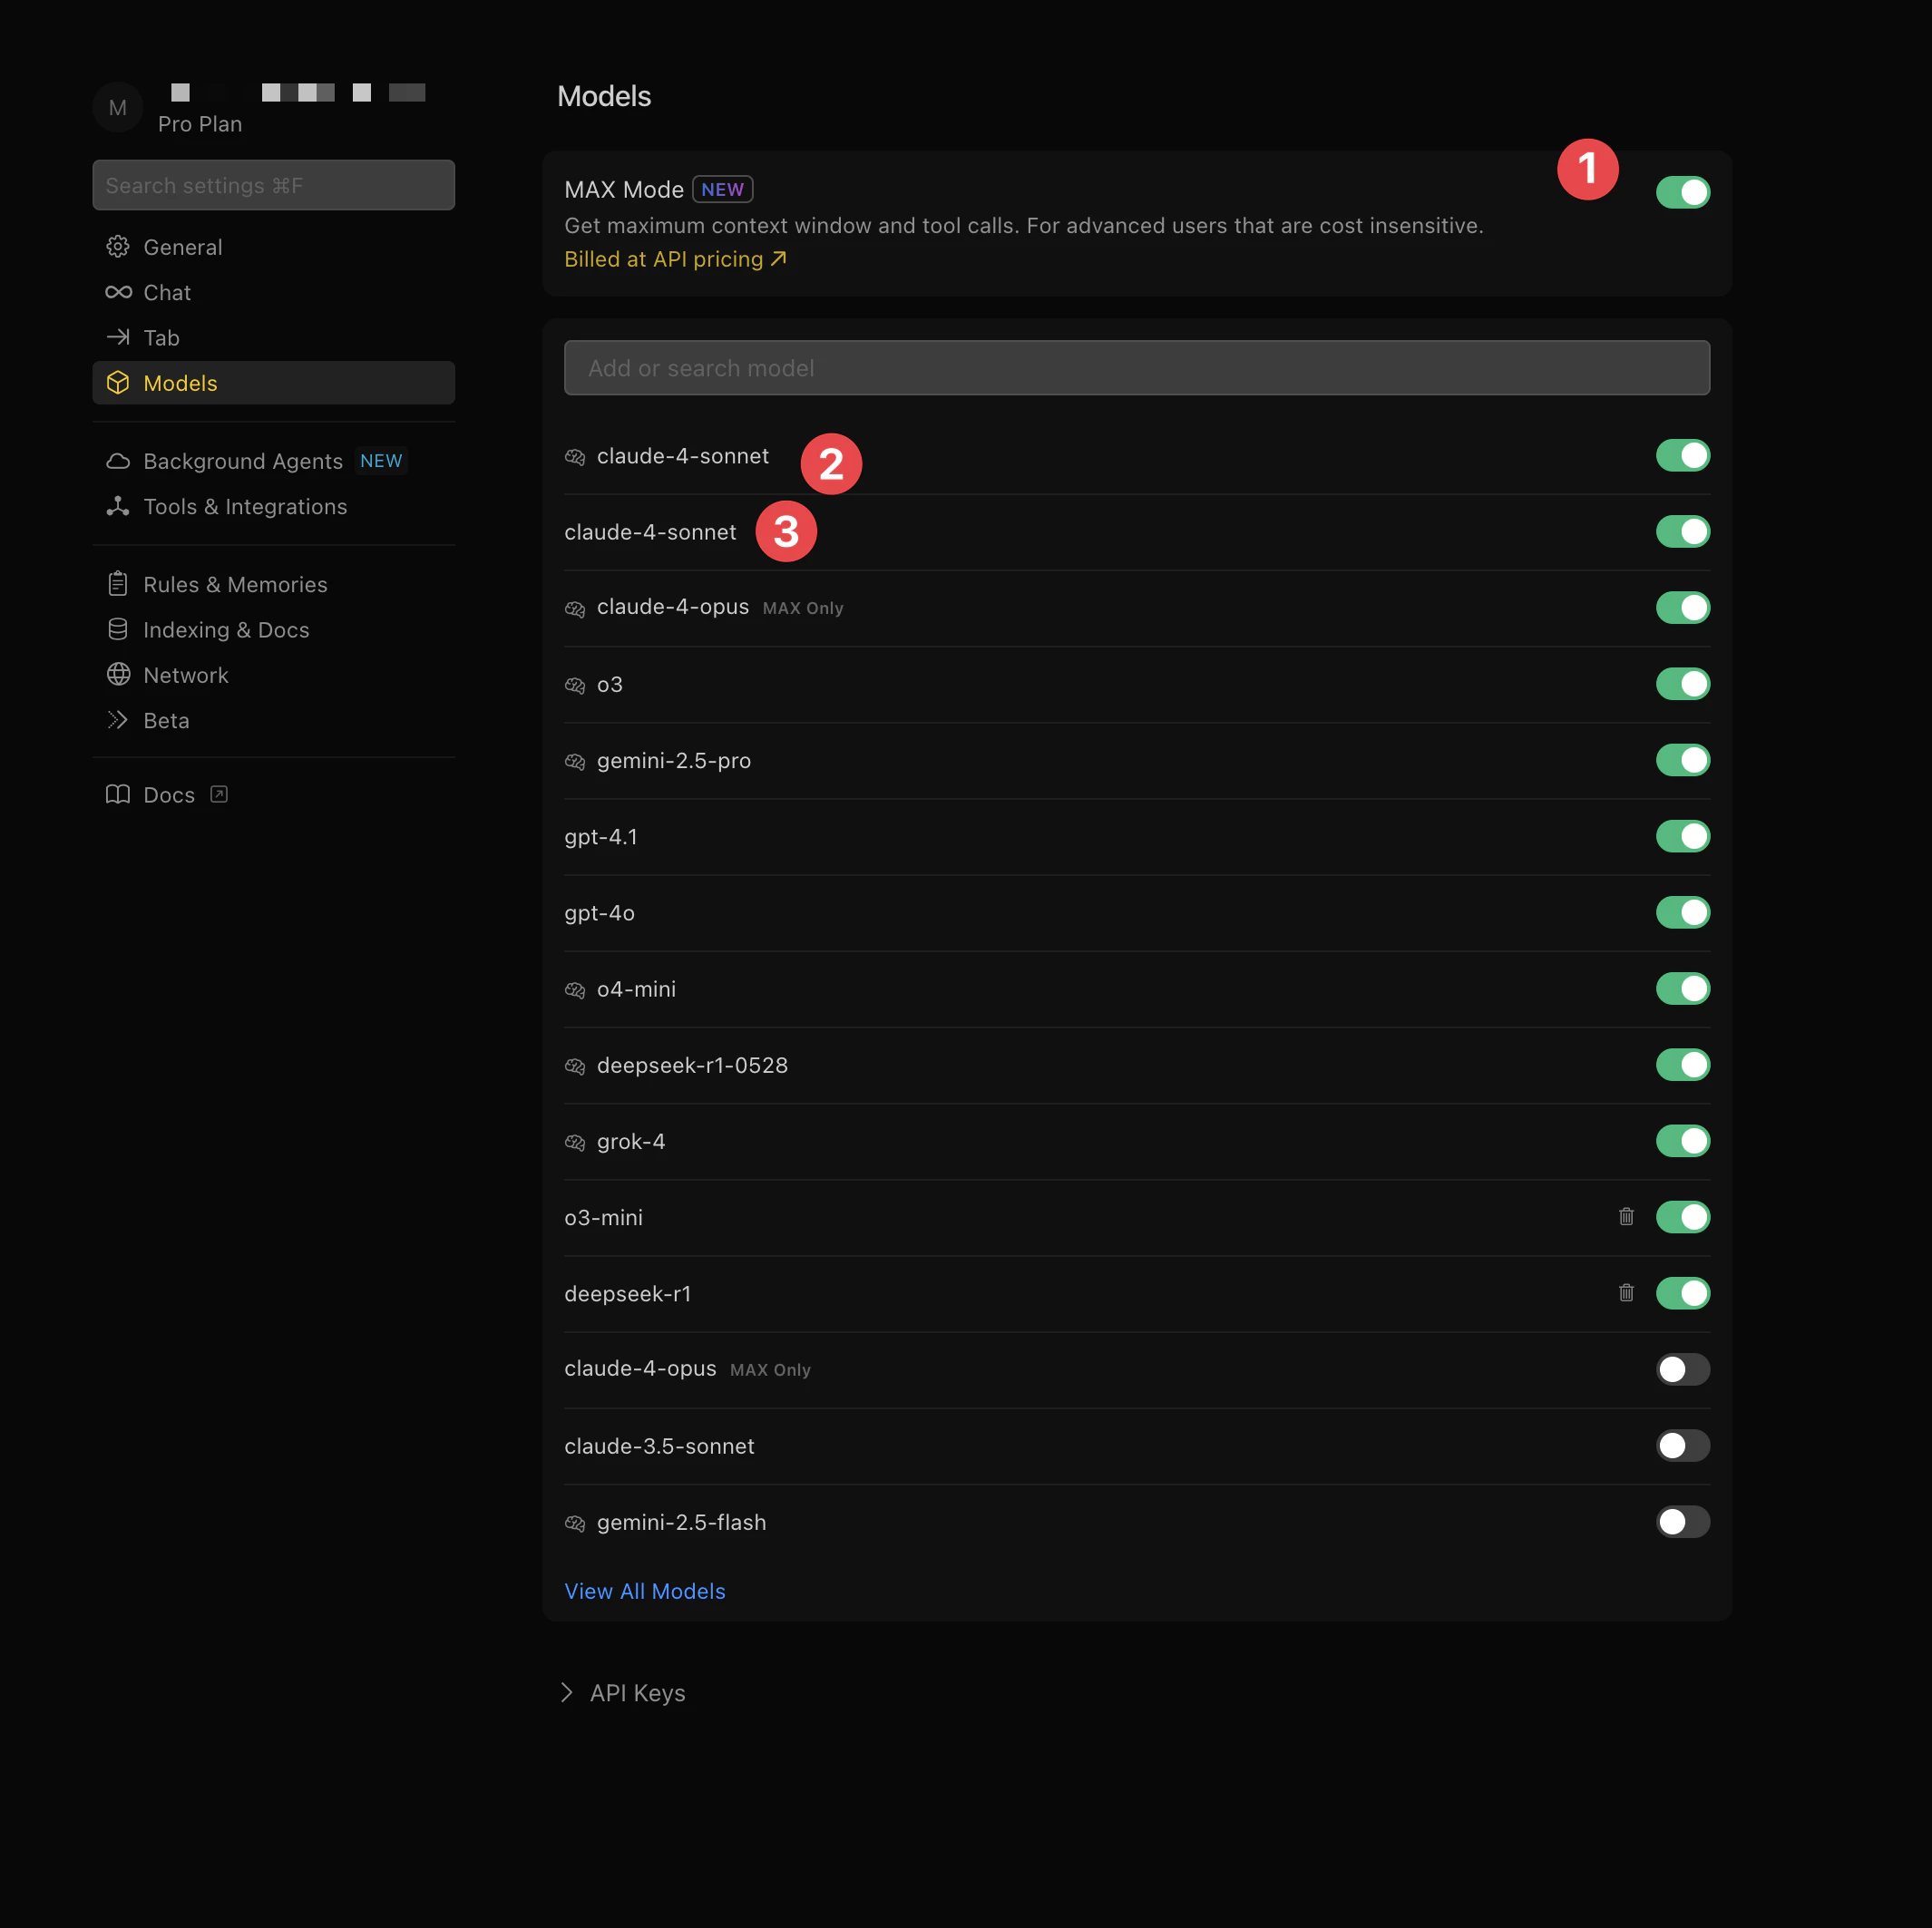
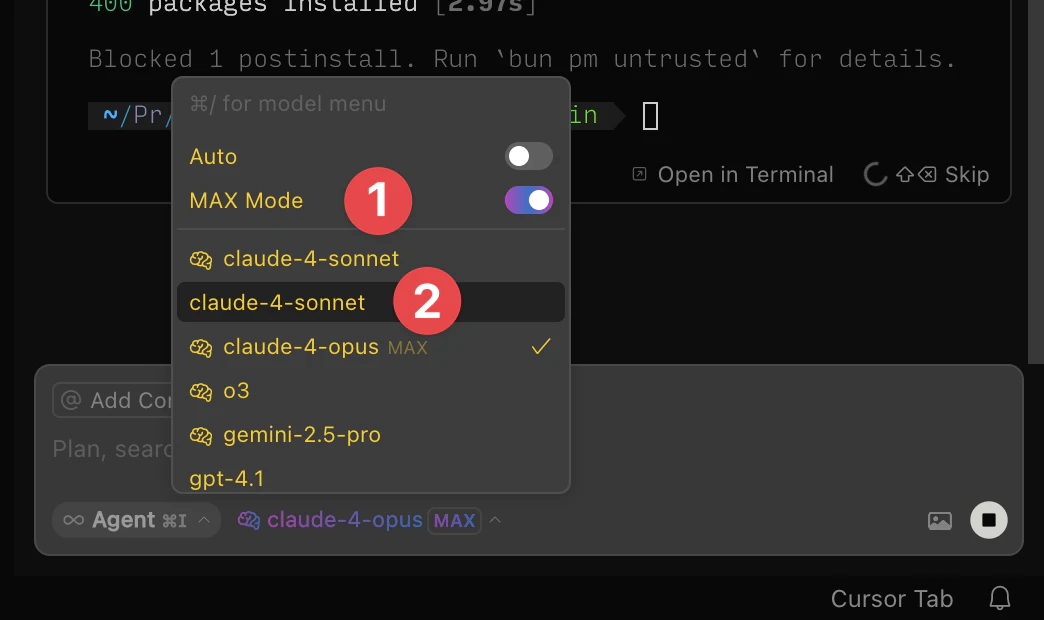
- 选择您的首选模型 — 选择Claude或GPT-4以获得最佳结果:
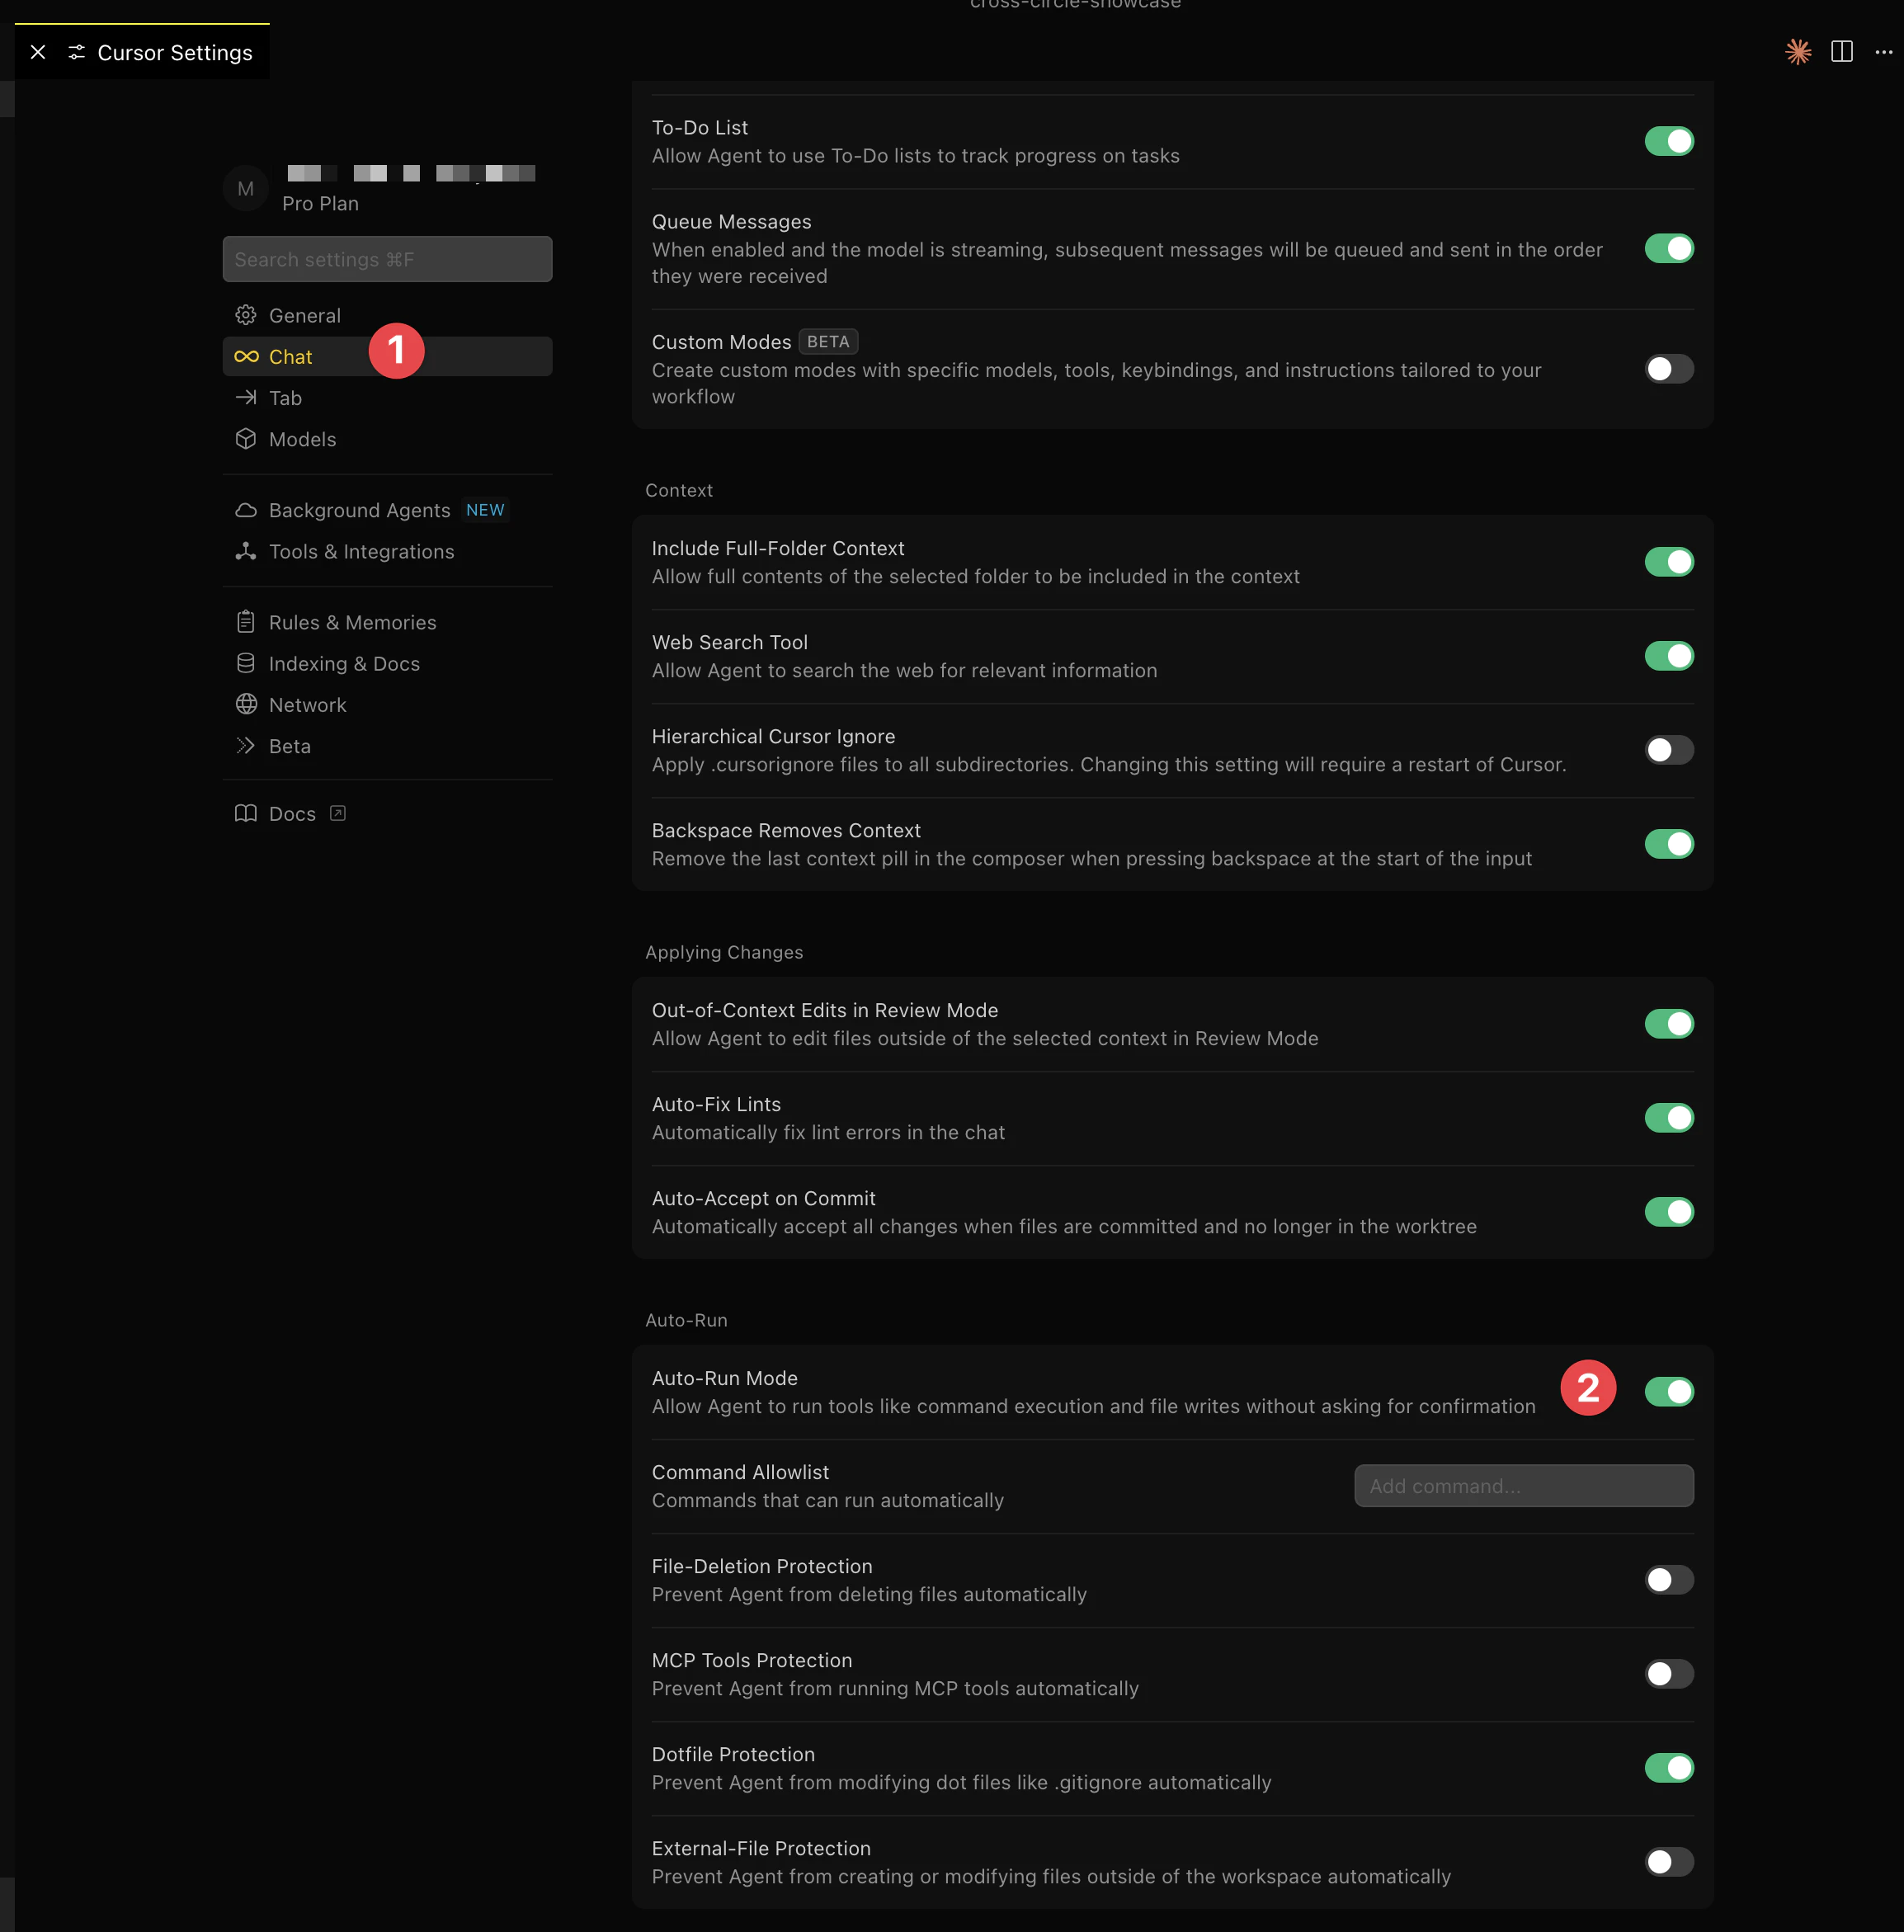
- 允许执行命令 — 启用光标以执行命令:
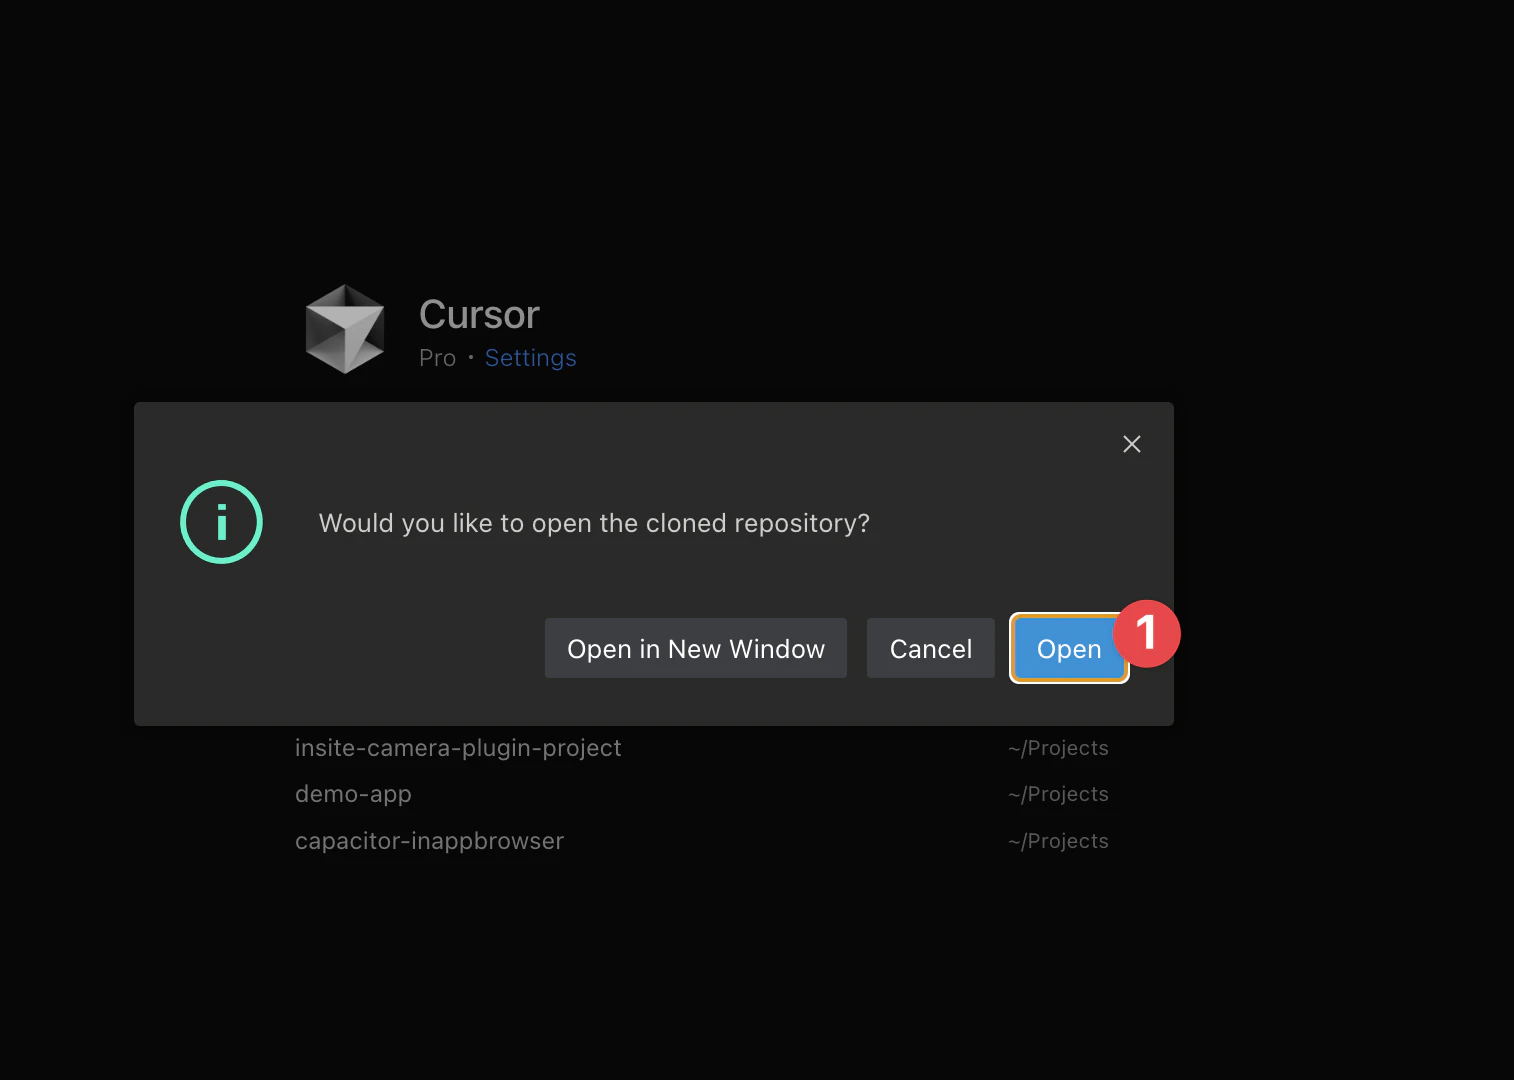
在光标中克隆您的仓库
- 在光标中,按
Shift+Command+P(Mac) 或Shift+Ctrl+P(Windows) 打开命令面板 - 输入“clone”并选择 Git: 克隆“
- 粘贴您的GitHub仓库URL:
https://github.com/YOUR-USERNAME/your-lovable-app.git - 选择要保存项目的文件夹
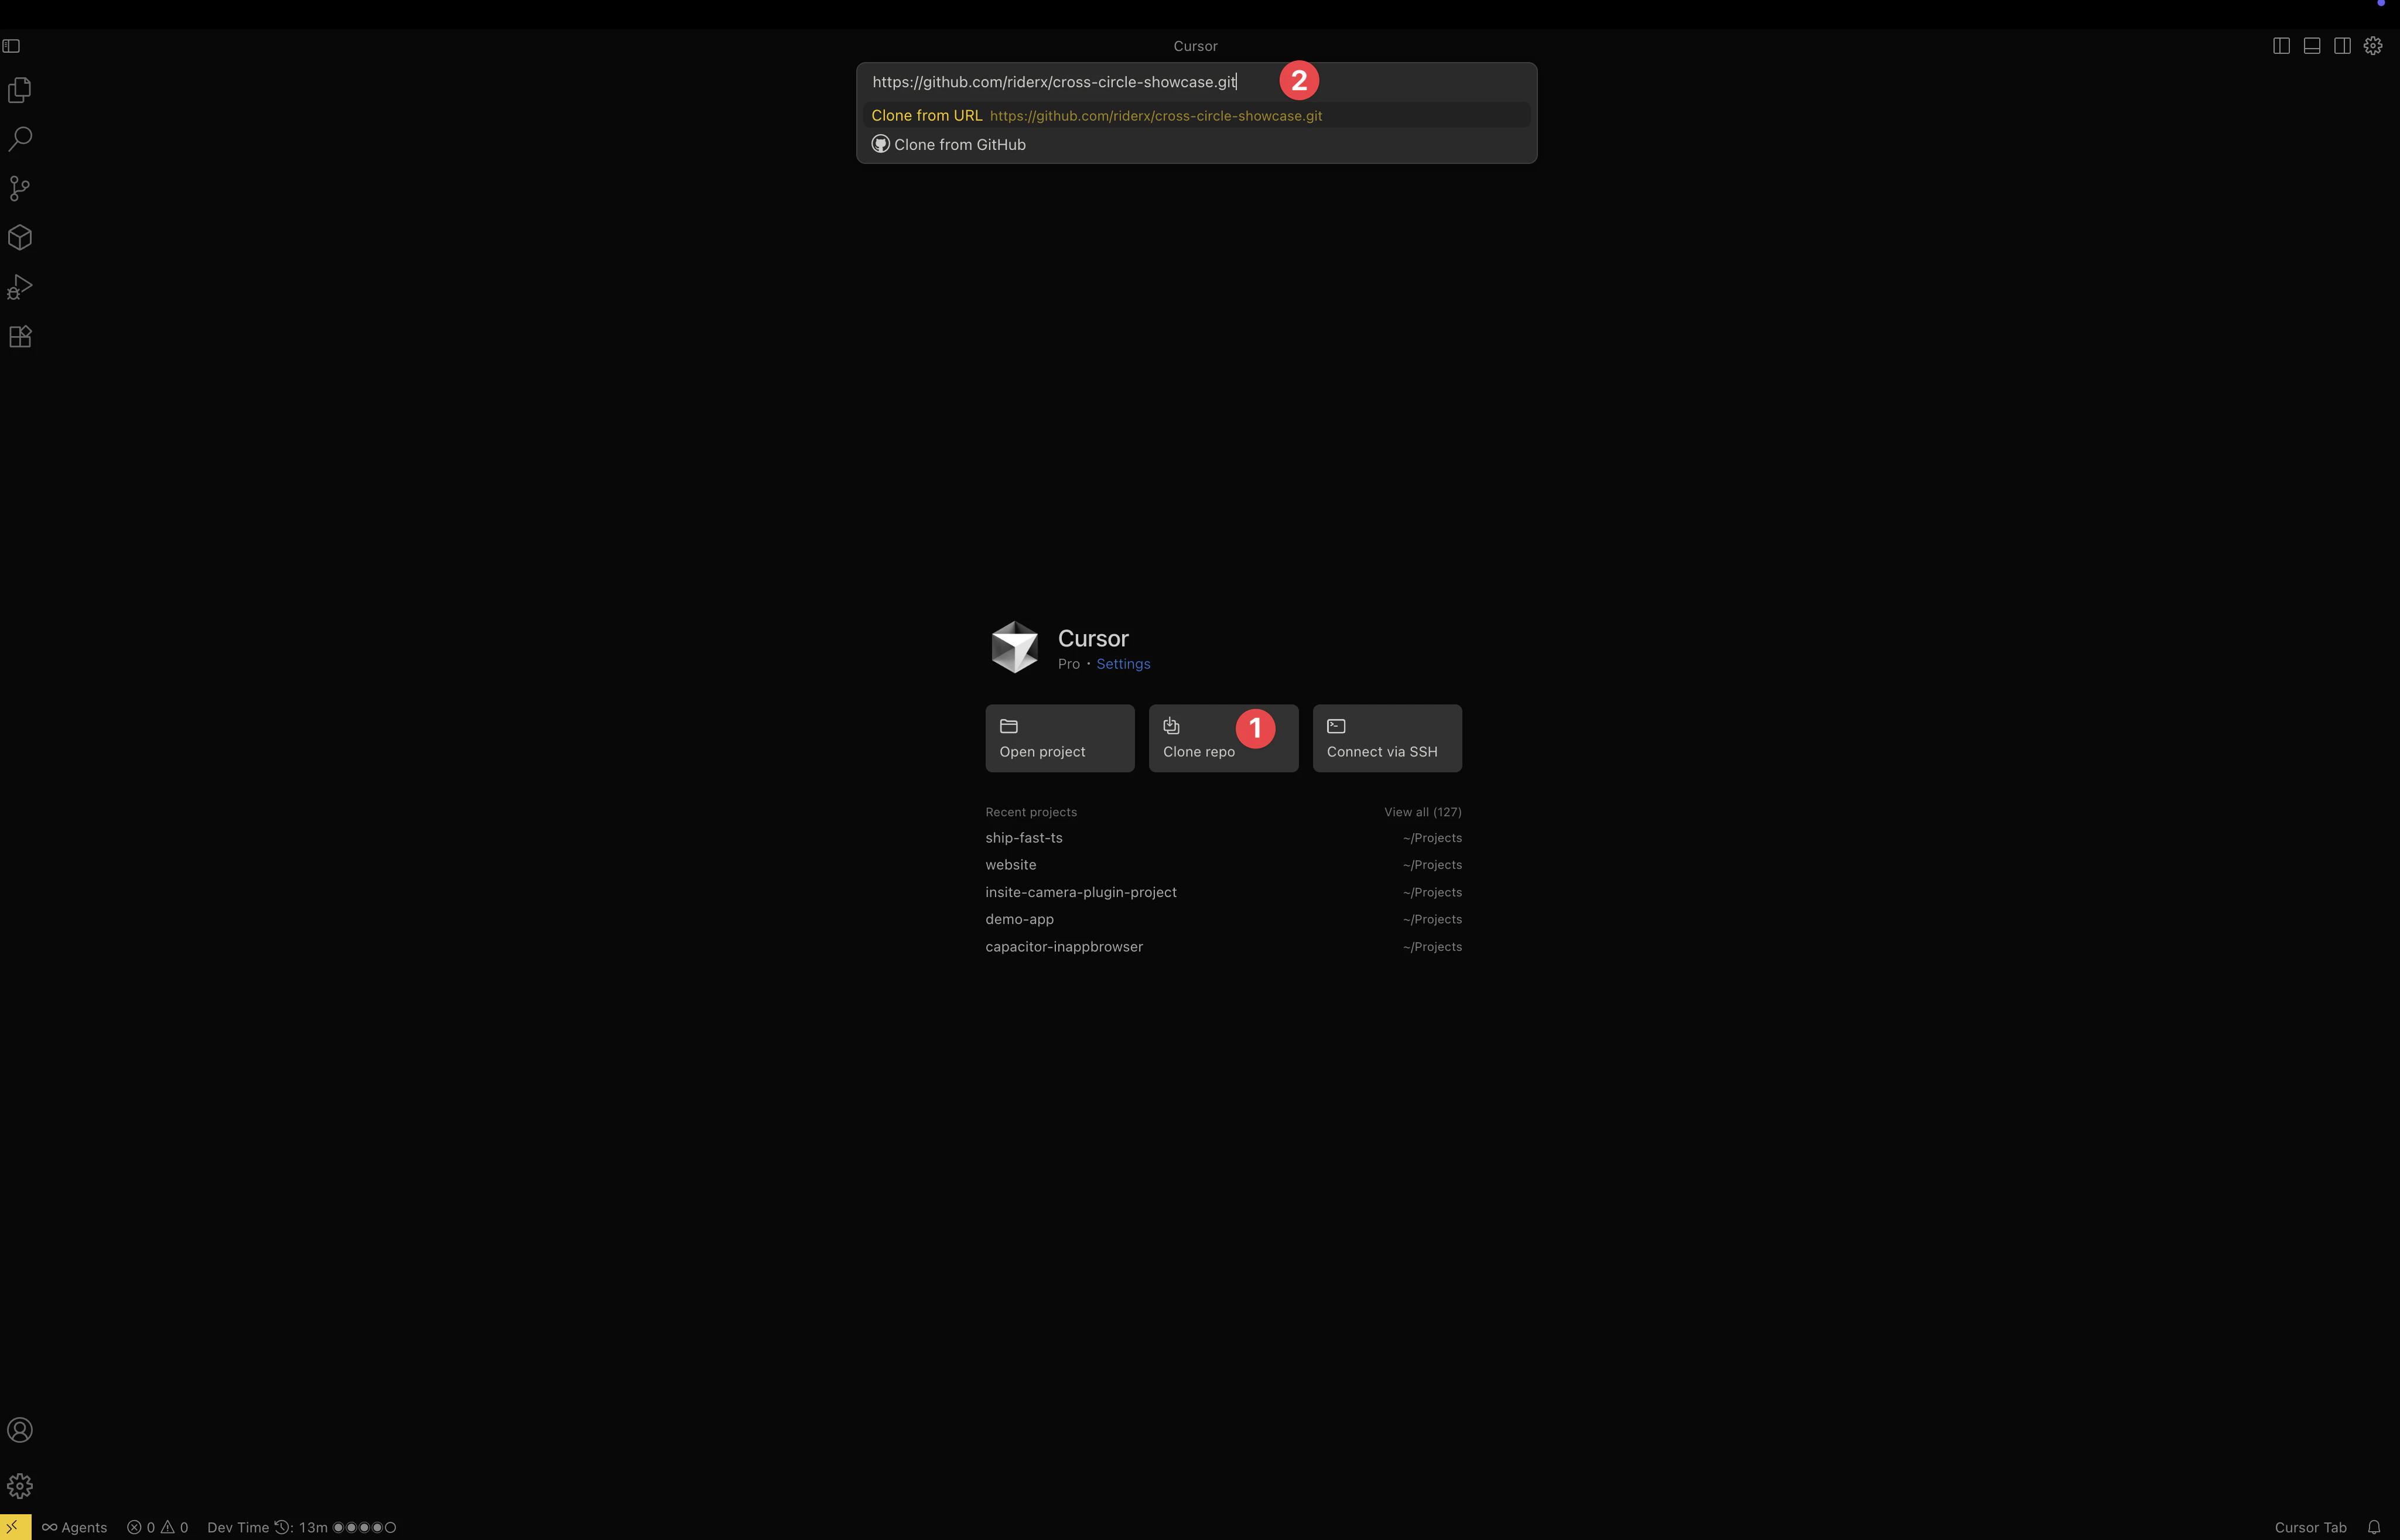
- 游标将克隆并打开您的项目
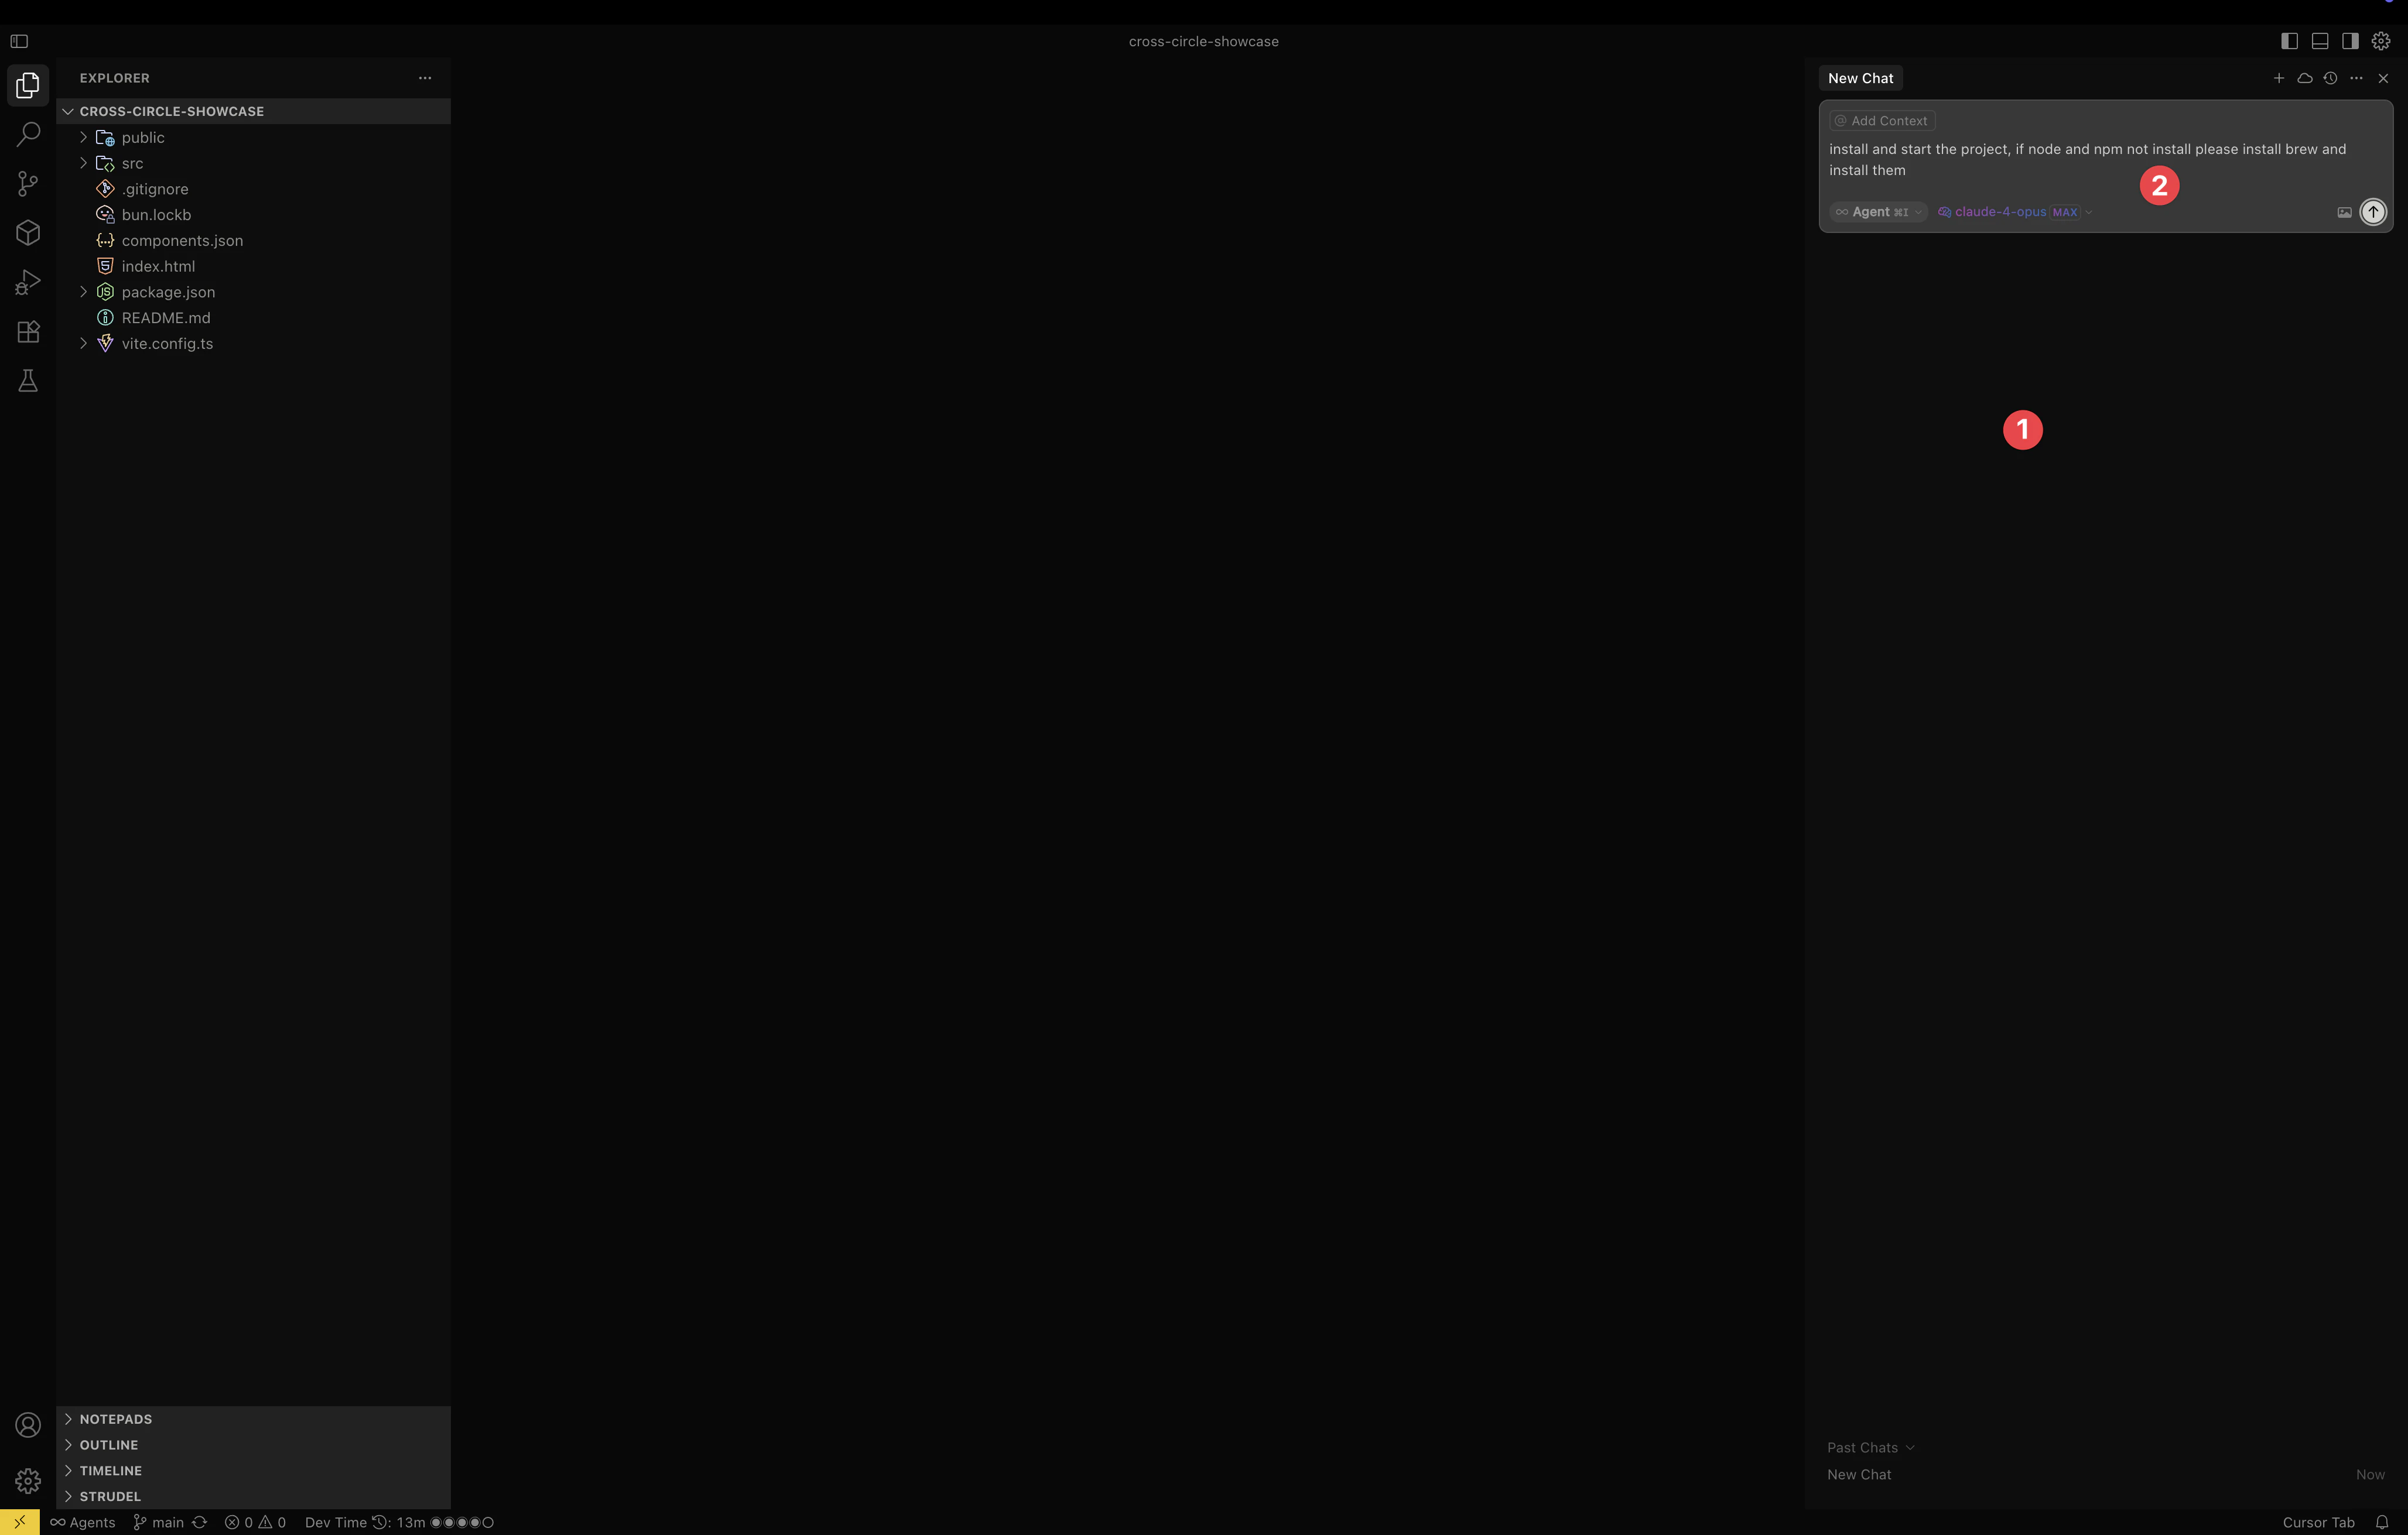
步骤 3 — 安装依赖项并在本地运行
方法 1:使用游标 AI(推荐)
- 按
Command+K(Mac)或Ctrl+K(Windows) - 输入以下命令:
Install Homebrew, Node.js and npm on my system, then install dependencies and run the dev serverAI 将自动检测您的操作系统,安装 Node.js,运行 npm install,并使用 npm run dev.
方法 2:手动安装
在 Cursor 中打开终端,按下 Shift+Command+T (Mac) 或 Shift+Ctrl+T (Windows),然后:
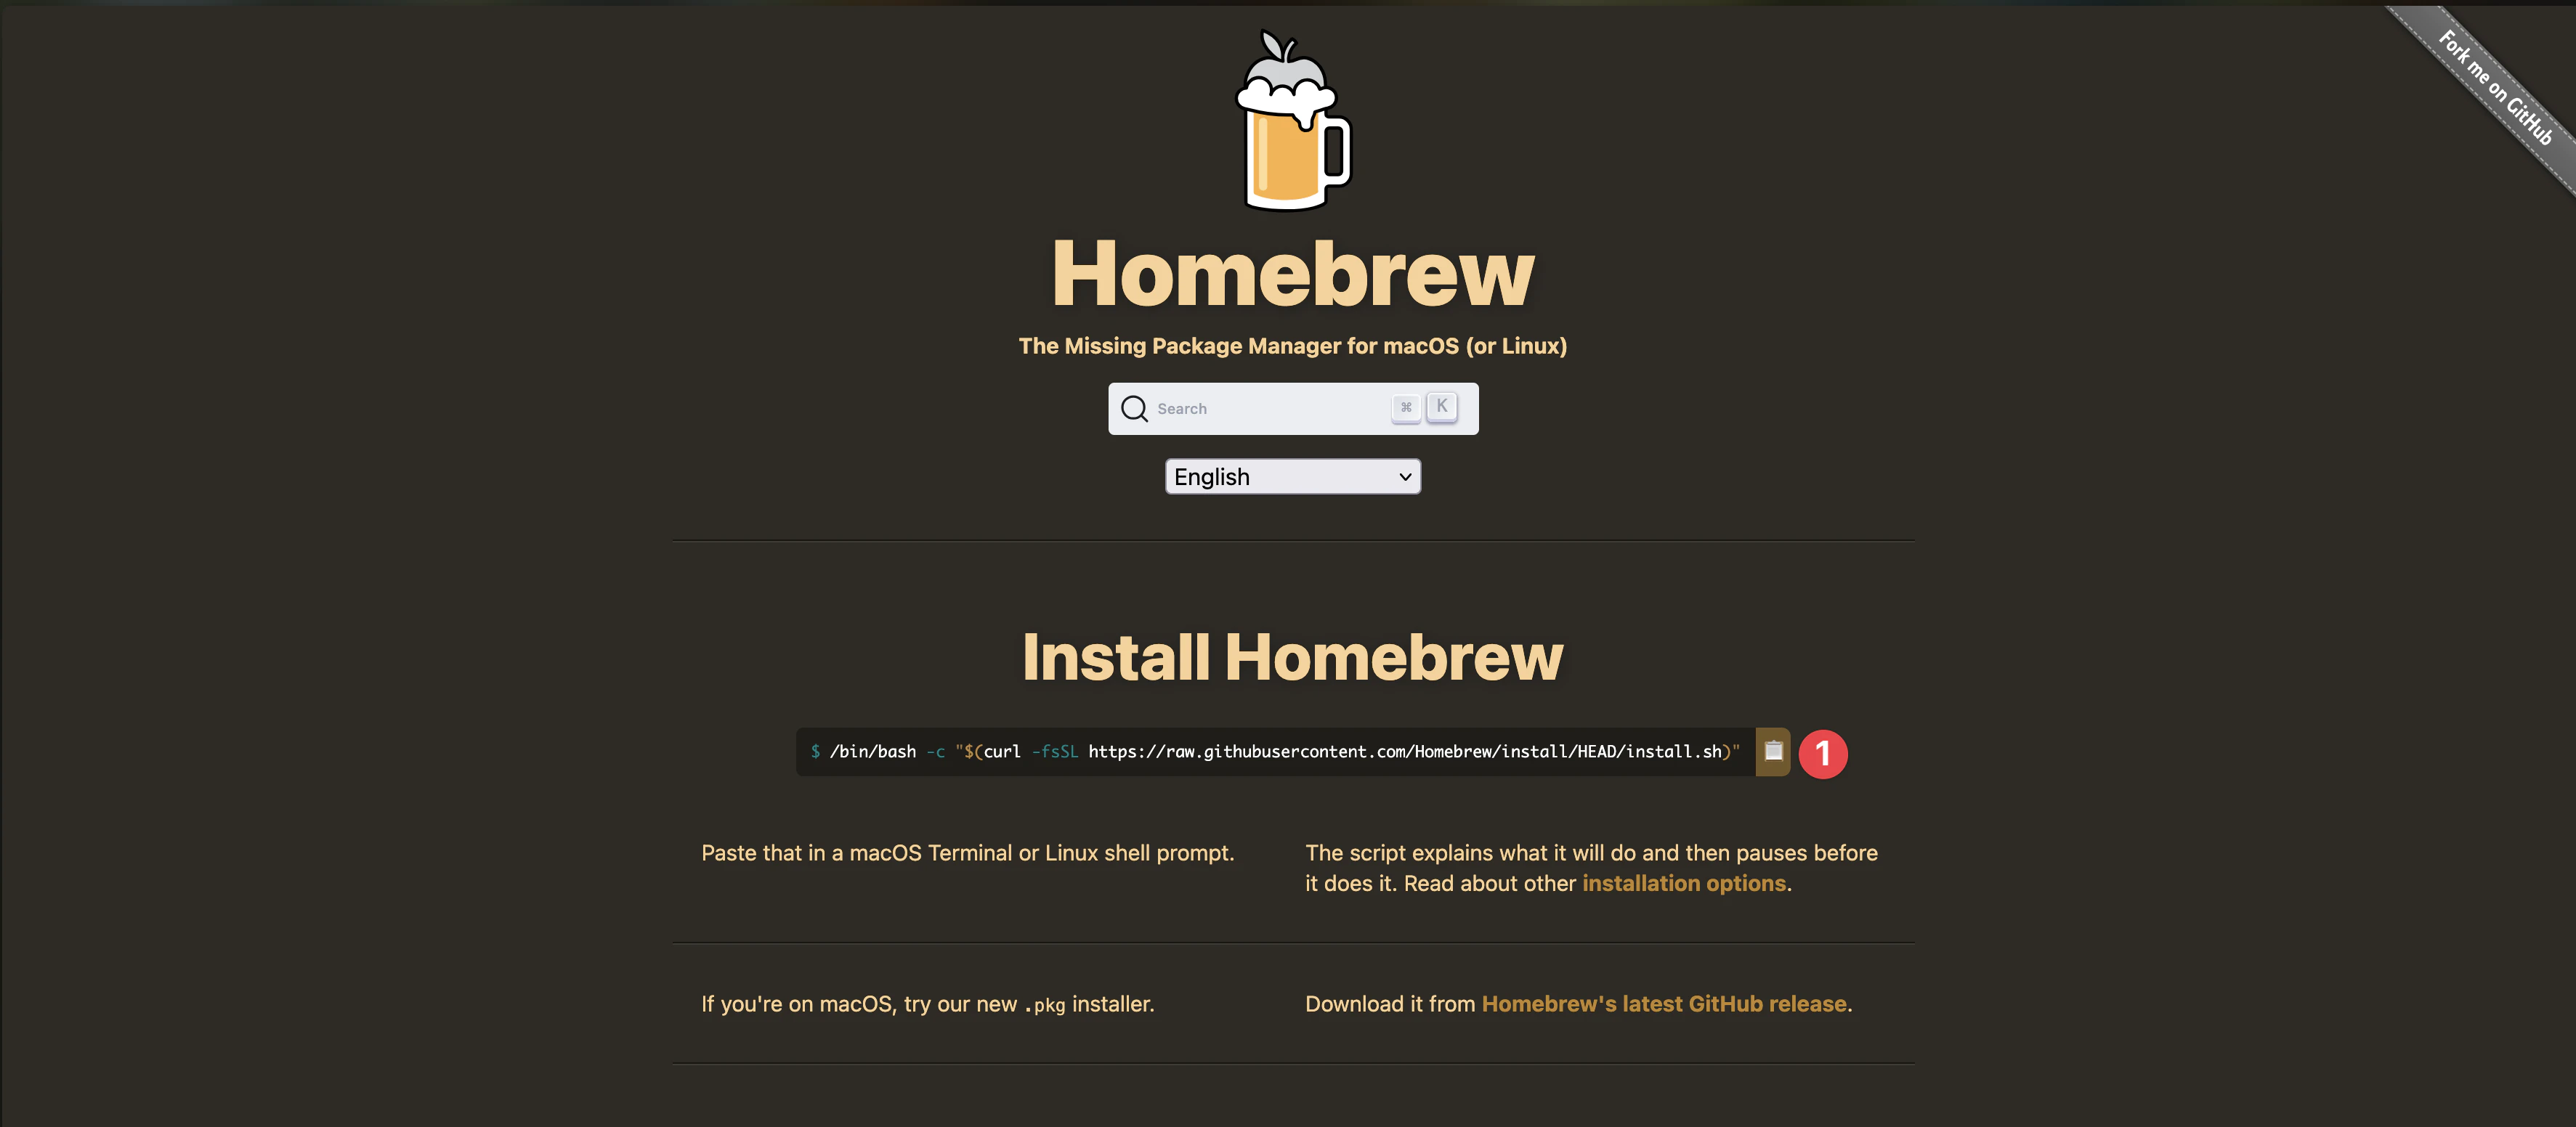
对于 macOS:
/bin/bash -c "$(curl -fsSL https://raw.githubusercontent.com/Homebrew/install/HEAD/install.sh)"
brew install node
cd your-lovable-app
npm install
npm run dev
对于 Windows:
- 从 24 LTS 下载安装程序 从
- nodejs.org
- 运行安装程序
cd your-lovable-app
npm install
npm run dev
Lovable apps通常在 http://localhost:8080 或 http://localhost:5173 — 使用终端打印的地址。
按 Ctrl + C 停止开发服务器时按
✅ 成功: 您的应用程序在浏览器中打开,UI正常工作。
步骤 4 — 准备静态生产构建
Capacitor需要在添加原生平台之前准备生产构建。
React + Vite(大多数Lovable应用)
方法 1:使用Cursor AI(推荐)
点击 Command+K (Mac) 或 Ctrl+K (Windows) 按
Configure vite.config for Capacitor mobile deployment with base './' and production build to dist方法 2: 手动配置
确认 vite.config.ts 使用相对基准,因此资产在本机 WebView 内加载:
import { defineConfig } from 'vite'
import react from '@vitejs/plugin-react'

export default defineConfig({
  plugins: [react()],
  base: './',
  build: {
    outDir: 'dist',
  },
})
构建并验证:
npm run build您应该看到一个 dist/ 文件夹 index.html 在其根目录。

Legacy Next.js Lovable 项目
如果您的仓库使用 Next.js,请问 Cursor:
Add a static export script to package.json and configure next.config.js for mobile export with Capacitor或遵循 将您的 Next.js 应用程序转换为移动应用 获取完整 next.config 设置,然后使用 webDir: 'out' 在 Capacitor 中代替 dist.
✅ 成功: 存在静态构建文件夹(dist/ 或) out/包含 index.html.
步骤 5 — 添加 Capacitor 和本机平台
Capacitor 将您的 web 应用程序包装在真实的 iOS 和 Android 外壳中 — 无需重写。
方法 1:使用 Cursor AI (推荐)
按 Command+K (Mac) 或 Ctrl+K (Windows) 并问:
Install Capacitor CLI, initialize it for my app with webDir dist, and add iOS and Android platformsAI 将要求您输入 应用程序名称 和 包 ID (例如 com.yourcompany.myapp).

方法 2:手动安装
npm install @capacitor/core @capacitor/cli
npx cap init
当被要求时:
| 提示 | 示例 | 注意 |
|---|---|---|
| 应用名称 | 我的可爱应用 | 应用程序图标下显示 |
| 应用程序包ID | com.yourcompany.myapp | 反向域名风格 — 不能在商店发布后更改 |
| Web 资产目录 | dist |
使用 out 适用于 Next.js 静态导出 |
选择一个您实际拥有的包 ID。 包 ID 全球唯一。从开始就使用基于您控制的域名的反向域 ID — 修改它后意味着需要在所有 ios/ 和 android/ 和重建。
npm run build
npm install @capacitor/ios @capacitor/android
npx cap add ios
npx cap add android
npx cap sync
配置 Capacitor
方法 1:使用 Cursor AI(推荐)
问 Cursor:
Update capacitor.config.ts to use dist as webDir and set up for HTTPS对于 Next.js 静态导出,要求它使用 out 代替。
方法 2:手动配置
import type { CapacitorConfig } from '@capacitor/cli';

const config: CapacitorConfig = {
  appId: 'com.yourcompany.myapp',
  appName: 'My Lovable App',
  webDir: 'dist',
  server: {
    androidScheme: 'https',
  },
};

export default config;
构建和同步
方法 1:使用 Cursor AI(推荐)
告诉 Cursor:
Build the production web app and sync it with Capacitor platforms方法 2:手动命令
npm run build
npx cap sync
您的项目现在看起来像这样:
your-lovable-app/
├── android/              ← native Android project
├── ios/                  ← native iOS project
├── dist/                 ← built web app (or out/ for Next.js)
├── src/                  ← your Lovable app code
├── capacitor.config.ts
└── package.json
不需要 CocoaPods。 Capacitor 8 使用 Swift Package Manager 自动为 iOS 依赖项
✅ 成功: ios/ 并且文件夹出现,终端显示 android/ 步骤 6 — 检查您的 Sync finished.
and .gitignore
Capgo Builder 从您的 Git 仓库编译,因此 ios/ 和 android/ 必须提交. 忽略它们在仓库根目录是常见的错误。
确认:
- 根目录
.gitignore忽略node_modules和dist(云端重建dist在 web 构建期间 ios/和android/自身 not 忽略
✅ 成功: git status 显示 ios/ 和 android/ 已准备好提交(不忽略)。
步骤 7 — 提交和推送
git add .
git commit -m "Add Capacitor and native iOS/Android platforms"
git push
✅ 成功: 您的 GitHub 仓库显示 ios/ 和 android/ 文件夹。
步骤 8 — 使用 Capgo Builder 构建商店准备好的二进制文件
您不需要 Mac 或本地 Xcode/Android Studio pipeline 来发布。 Capgo Builder 从云端编译、签名并提交 iOS 和 Android 构建。
设置 Capgo Builder
npx @capgo/cli@latest login
npx @capgo/cli@latest init
npx @capgo/cli@latest build init --platform ios
npx @capgo/cli@latest build init --platform android
只需保存一次签名凭证。如需帮助生成凭证,请使用我们的免费工具:
- iOS Certificate 生成器
- Android Keystore 生成器
- iOS UDID 找到器 — 为开发构建注册您的 iPhone
查看 管理凭证 和 在 Windows 上构建 iOS.
请求云构建
npm run build
npx cap sync
npx @capgo/cli@latest build com.yourcompany.myapp --platform ios --build-mode release
npx @capgo/cli@latest build com.yourcompany.myapp --platform android --build-mode release
在您的终端中,构建日志会实时流动。配置了 App Store Connect 后,iOS 构建可以自动上传到 TestFlight。
在真机设备上安装:
- iOS: TestFlight(推荐)或已注册设备 UDID 的开发构建
- Android: Google Play 内部测试轨道或已签名的发布 APK/AAB
✅ 成功: 已签名的构建完成,您可以在真机设备上安装。
步骤 9 — 可选:在 Xcode 或 Android Studio 中进行本地测试
如果您有 Mac 或想在云构建之前进行模拟器测试:
For iOS
方法 1:使用 Cursor AI (推荐)
Open the iOS project in Xcode方法 2:手动命令
npx cap open ios
第一次 Xcode 设置:
- 从设备下拉菜单中选择一个模拟器(例如 iPhone 15)
- 对于真实设备:启用 自动管理签名 并选择您的 Apple 开发者团队
- 点击 ▶️ Play 按钮 — 第一次构建需要 5–10 分钟

For Android
方法 1:使用 Cursor AI (推荐)
Open the Android project in Android Studio方法 2:手动命令
npx cap open android
第一次 Android Studio 设置:
- 如果提示,请安装缺少的 SDK 包
- 在设备管理器中创建一个模拟器(例如 Pixel 6,API 33+)
- 点击绿色 ▶️ 运行按钮 — 第一次构建需要 5–15 分钟

使用本地 IDE 进行日常调试。使用 Capgo Builder 当您需要签名的发布二进制文件时
✅ 成功: App 在模拟器或模拟器中打开,显示您的可爱内容。
第 10 步 — 启用 Live Reload (开发)
通过将本机 shell 指向您的本地开发服务器来加速迭代。
方法 1:使用 Cursor AI (推荐)
告诉 Cursor:
Set up live reload for Capacitor development with my local IP address方法 2:手动设置
- 找到您的本地 IP 地址:
# macOS
ipconfig getifaddr en0

# Windows
ipconfig- 更新
capacitor.config.ts:
import type { CapacitorConfig } from '@capacitor/cli';

const config: CapacitorConfig = {
  appId: 'com.yourcompany.myapp',
  appName: 'My Lovable App',
  webDir: 'dist',
  server: {
    url: 'http://YOUR_IP_ADDRESS:5173',
    cleartext: true,
  },
};

export default config;
使用端口 8080 或 3000 如果那就是 npm run dev 打印的内容。
- Apply changes:
npx cap copy
✅ Success: 对您的 web code 进行编辑,热重载将在设备或模拟器上生效。
第 11 步 — 添加原生功能:摄像头
一个 Capacitor 插件让 JavaScript 可以调用真实设备功能。我们将添加摄像头插件,使用户可以拍照 — 这在浏览器标签中不可靠。
方法 1:使用 Cursor AI (推荐)
告诉 Cursor:
Add the Capacitor Camera plugin with iOS and Android permissions and a button to take a photo方法 2:手动安装
npm install @capacitor/camera
npx cap sync
iOS — 添加到 ios/App/App/Info.plist 在顶级目录 <dict>:
<key>NSCameraUsageDescription</key>
<string>This app uses the camera to take photos.</string>
Android — 在内部添加 <manifest> 在 android/app/src/main/AndroidManifest.xml:
<uses-permission android:name="android.permission.CAMERA" />import { Camera, CameraResultType } from '@capacitor/camera';
async function takePhoto() {
const photo = await Camera.getPhoto({
quality: 90,
resultType: CameraResultType.Uri,
});
return photo.webPath;
}
添加插件需要一个 通过 __CAPGO_KEEP_0__ Builder 的新原生构建 through Capgo Builder before it works on devices.
✅ 成功: 相机 code 编译并 npx cap sync 没有错误完成。
步骤 12 — 添加 Capgo Live Updates
每个原生更改通常需要通过应用商店审查。 Capgo 实时更新 将更改推送到您的应用的 web 层 (HTML、CSS、JS、图像) 只需几分钟。
在您的首次发布中安装更新器 这样您就不会在需要发布修复时等待审查。
npm install @capgo/capacitor-updater
npx cap sync
添加到 capacitor.config.ts:
import type { CapacitorConfig } from '@capacitor/cli';

const config: CapacitorConfig = {
  appId: 'com.yourcompany.myapp',
  appName: 'My Lovable App',
  webDir: 'dist',
  plugins: {
    CapacitorUpdater: {
      autoUpdate: true,
    },
  },
};

export default config;
在应用入口中初始化 (例如 src/main.tsx):
import { CapacitorUpdater } from '@capgo/capacitor-updater';

void CapacitorUpdater.notifyAppReady();
提交、推送并运行一个新的 Capgo Builder 构建,以便更新器 SDK 位于本机 shell 中。
在发布后上传 web 包:
npm run build
npx @capgo/cli@latest bundle upload --channel production
查看 Capgo 实时更新文档.
✅ 成功: 更新器插件已安装 notifyAppReady() 在启动时运行。
第 13 步 — 使用实时更新修复状态栏间距
在真实的 iPhone 上,头部可能会位于 状态栏(时钟和电池)下面。现代 Capacitor 绘制从边缘到边缘,因此您的应用程序必须尊严: env(safe-area-inset-top), -bottom, -left, -right.
安全区域内边距 pt-6许多可爱的应用程序已经处理了底部内边距,但使用固定顶部填充(如
)而没有顶部内边距。 viewport-fit=cover 1. 确认 index.html:
<meta name="viewport" content="width=device-width, initial-scale=1.0, viewport-fit=cover" />在 2. 修复顶部标题 — 使用 max() To 保持网页的内边距并在凹形设备上生长:
/* Before */
padding-top: 1.5rem;

/* After */
padding-top: max(1.5rem, env(safe-area-inset-top));
In Cursor 或 Lovable 中询问:
“在移动设备上,应用内容在顶部状态栏下运行。添加
env(safe-area-inset-top)到每个页面标题的顶部内边距,保持现有的内边距为最小。”max()3. 将修复通过OTA发送
— 这是纯CSS,不需要原生重建: 在您的设备上强制关闭应用,重新打开它,等待~15-30秒,然后再次打开。标题应该位于状态栏下方——修复了无需商店审查。
git add .
git commit -m "Fix top safe area on mobile"
git push
npm run build
npx @capgo/cli@latest bundle upload --channel production
成功:
✅ 顶部内容在OTA包应用后清除状态栏。 对于更深入的布局工作,请参见
@__CAPGO_KEEP_0__/tailwind-__CAPGO_KEEP_1__ @capgo/tailwind-capacitor 和 Capacitor 全屏幕显示.
步骤 14 — 准备您的商店列表
您的应用程序已构建,安装并可推送即时更新。将应用程序发布到公共商店中主要是文书工作:
- 应用程序图标 — iOS 需要 1024×1024px(无透明度),Google Play 需要 512×512px
- 截图 — 苹果要求 iPhone 6.9“ (1320×2868px) 截图
- 应用程序名称、副标题、描述、关键词
- 隐私政策 URL — 两家商店都需要,甚至对于免费应用程序
- 年龄等级 — 每个控制台的问卷
- 数据收集披露 — Apple隐私营养标签和Google数据安全
方法 1:使用Cursor AI(推荐)
Set up app icons and splash screens for my Capacitor app方法 2:手动设置
npm install -D @capacitor/assets
# Add assets/icon.png (1024x1024) and assets/splash.png (2732x2732)
npx capacitor-assets generate
npx cap sync
“live”之前剩余的内容:
- Google Play关闭测试 (个人帐户创建于2023年11月13日之后): 在生产访问之前,至少12名测试者在14个连续的日子内
- iOS没有等效 提交审核
— Apple ~3–5天,Google ~3–7天,测试要求满足后 首次应用审查指南 查看完整清单。
常见错误(和如何修复它们)
Could not find the web assets directory: ./dist— 运行npm run build在npx cap add或npx cap sync. 确保webDir在capacitor.config.ts与您的框架输出匹配(dist对于 Vite,out对于 Next.js 静态导出)- “此 App ID … 不可用” — 选择一个你控制的反向域名ID。
- iOS 构建失败后改变了包ID — 本地项目中的 ID 必须与 Apple App Store Connect 匹配。 找到并替换所有
ios/和android/, - commit 重建。
base: './'启动时白屏npx cap sync. - — 在 Vite 配置中设置 在
viewport-fit=cover重建并运行env(safe-area-inset-top)状态栏下方的内容 - APK已签名为调试模式 — Google Play拒绝调试构建。使用您的keystore签署一个发布构建。
- 部署被拒绝 — 版本已经存在 — 在本机项目中增加版本/构建号并重新构建。
有关Capgo Builder问题,请参见 本机构建故障排除 和 实时更新调试.
结论
您将可爱的Web应用转换为本机iOS和Android — 在云中构建而无需Mac,具有实时相机功能和布局修复的实时更新。完成了难部分。
下一步
- Capgo 实时更新 —— 在商店审查前,直接发货 UI 和副本修复
- Capgo 构建器 —— 在 CI 中自动化发布构建
- Capgo 插件目录 —— 生物识别、推送通知、地理位置等
- 相关指南: Base44 到移动 · Bolt.new 到移动
注册一个免费的 Capgo 帐户 以启用实时更新和云原生构建。
资源
继续使用 Capacitor 将您的可爱应用转换为 iOS 和 Android
如果您正在使用 使用 Capacitor 将您的可爱应用转换为 iOS 和 Android 来规划原生插件工作,连接它与 Capgo 插件目录 在 Capgo 插件目录中 Capacitor 由 Capgo 提供的插件 for the implementation detail in Capacitor Plugins by Capgo, Capgo 本机构建 对于在 Capgo 本机构建中的产品工作流程 在 Windows 上从本机构建 iOS 在没有 Mac 的情况下进行云 iOS 构建


