


Introduction
Lovable is an AI app builder that turns prompts into working React apps in minutes. You can ship in the browser fast — but what if you want your app on the App Store and Google Play, sitting on home screens like every other native app?
Short version: the Lovable to iOS and Android page sums up the whole path on one screen: export, Capacitor, cloud builds without a Mac, and live updates.
This guide walks through the full path: export from Lovable, wrap the web app with Capacitor, build signed iOS and Android binaries in the cloud with Capgo Builder (no Mac required), add a real native feature, and push a layout fix over the air with Capgo Live Updates.
We use Cursor throughout — its AI can run most of the terminal commands for you if you prefer not to type them manually.
Time required: about 1–2 hours the first time, mostly account setup and waiting on cloud builds.
By the end, you’ll have:
- A native iOS and Android app built from the cloud — no Xcode or Android Studio on the main path
- The app running on a real device (TestFlight, direct install, or Play internal testing)
- A working camera feature that only a native app can offer
- Live Updates configured so UI and CSS fixes ship without store review
Prerequisites
| Requirement | Details |
|---|---|
| A computer | Mac, Windows, or Linux — cloud builds work from any OS |
| A code editor | Cursor (recommended) or VS Code |
| Node.js | 24 LTS (latest — download from nodejs.org) |
| Git | To clone your Lovable repo from GitHub |
| Capgo account | Free signup — cloud builds and Live Updates |
Costs (only to publish publicly):
| Item | Cost |
|---|---|
| Apple Developer Program | $99/year |
| Google Play Console | $25 one-time |
| Cursor Pro | $20/month (optional but recommended for AI command execution) |
| Capgo | Free tier available; paid plans for production scale |
Optional (local simulator only):
| Tool | Why |
|---|---|
| Xcode (~15 GB, macOS only) | iOS Simulator on your Mac |
| Android Studio (~1 GB + SDKs) | Android emulator |
You can skip both. The main path in this guide builds in the cloud and installs on real devices without them.
A Quick Note on Lovable and Frameworks
Before touching code, know that the kind of web app Lovable generates affects mobile wrapping.
For a long time, Lovable’s default was a React + Vite single-page app (SPA). As of May 2026, brand-new Lovable apps may use TanStack Start with server-side rendering (SSR) by default. SSR is great for the web, but Capacitor wraps a static build — a folder of HTML, CSS, and JavaScript with an index.html at its root — that ships inside the app on the device.
An SSR app expects a server to render pages on each request. There is no server inside a phone, so for Capacitor you want static, client-rendered output.
What to do:
- Starting fresh: Ask Lovable for a single-page app (SPA) or to skip SSR so you get a static
dist/folder. - Already on TanStack Start (SSR): Configure it to pre-render or output a static SPA. The only hard requirement is a static build folder containing
index.html. - Legacy Next.js Lovable projects: Use static export — output goes to
out/instead ofdist/.
Whatever framework you use, point Capacitor’s webDir at that folder. For a Vite SPA, that folder is dist.
Step 1 — Export Your Lovable App to GitHub
Lovable keeps your code in its editor until you connect GitHub.
- Open your Lovable project in the browser
- Click Upgrade (top-right) if needed, then open Git in the left menu
- Choose GitHub, authorize Lovable, and link your account
- Lovable creates a repository and pushes your app automatically
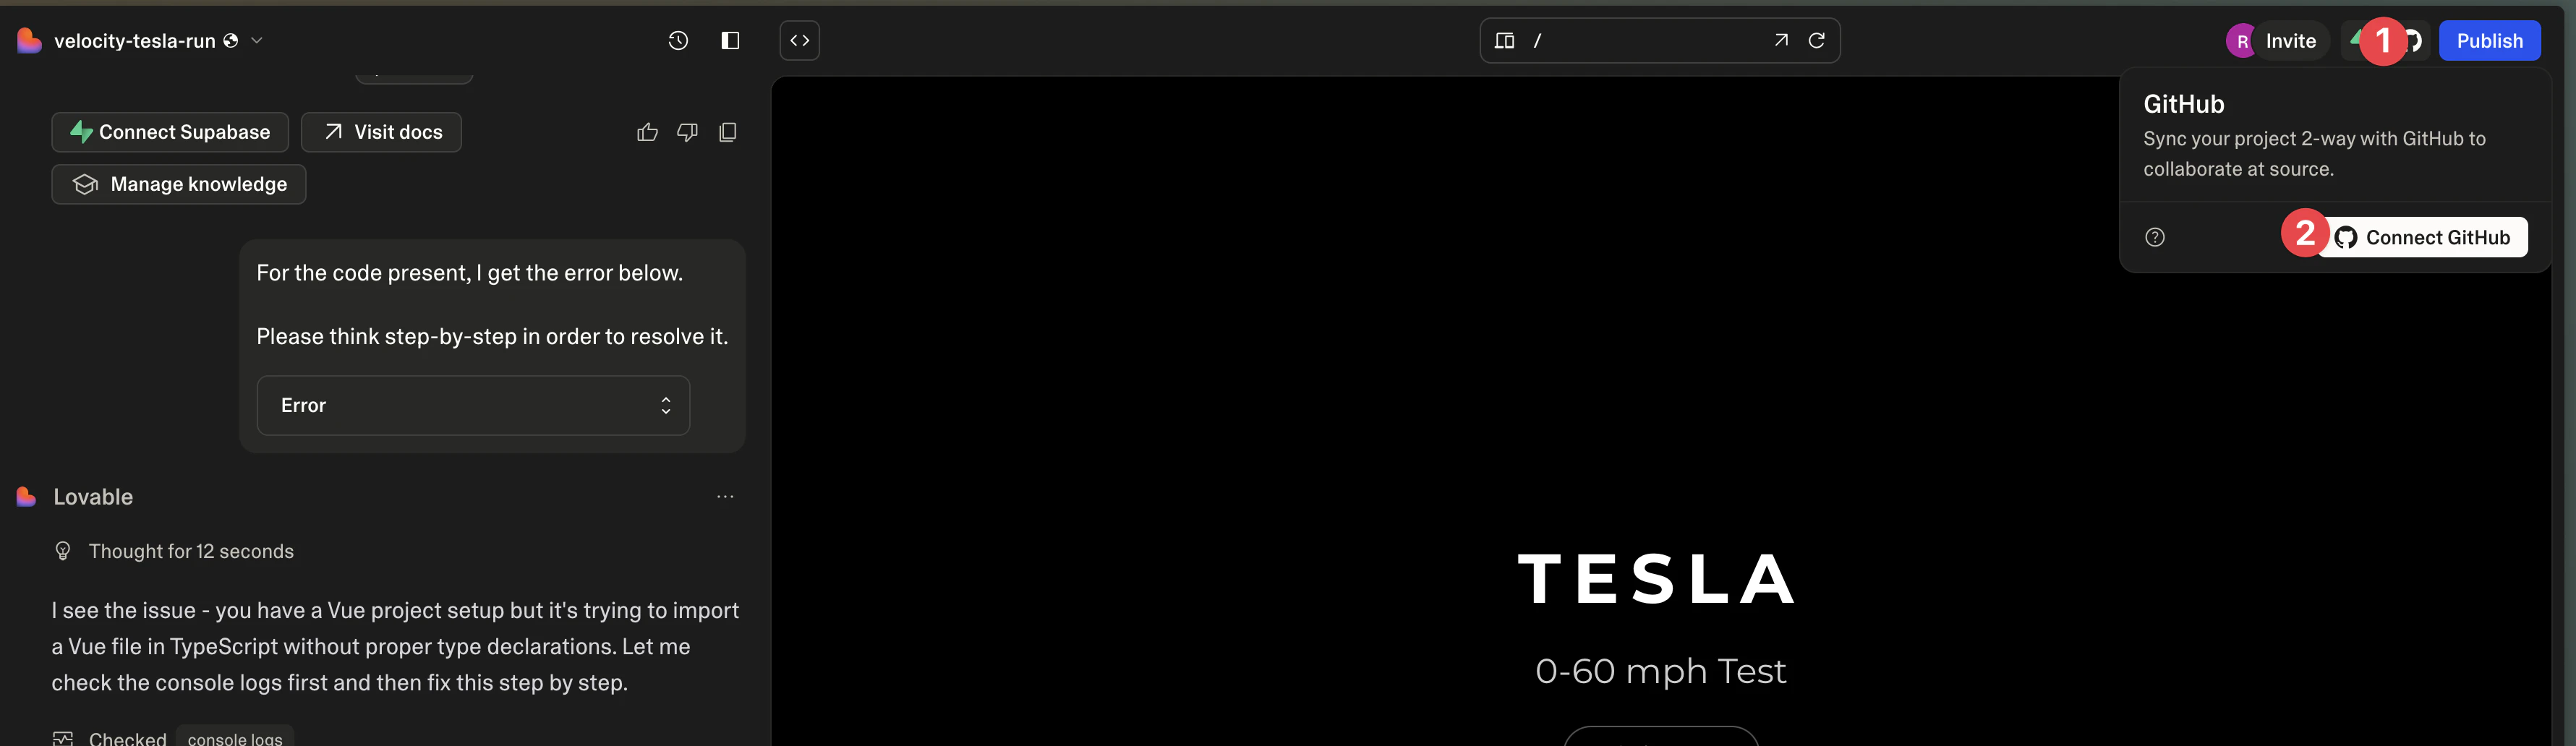
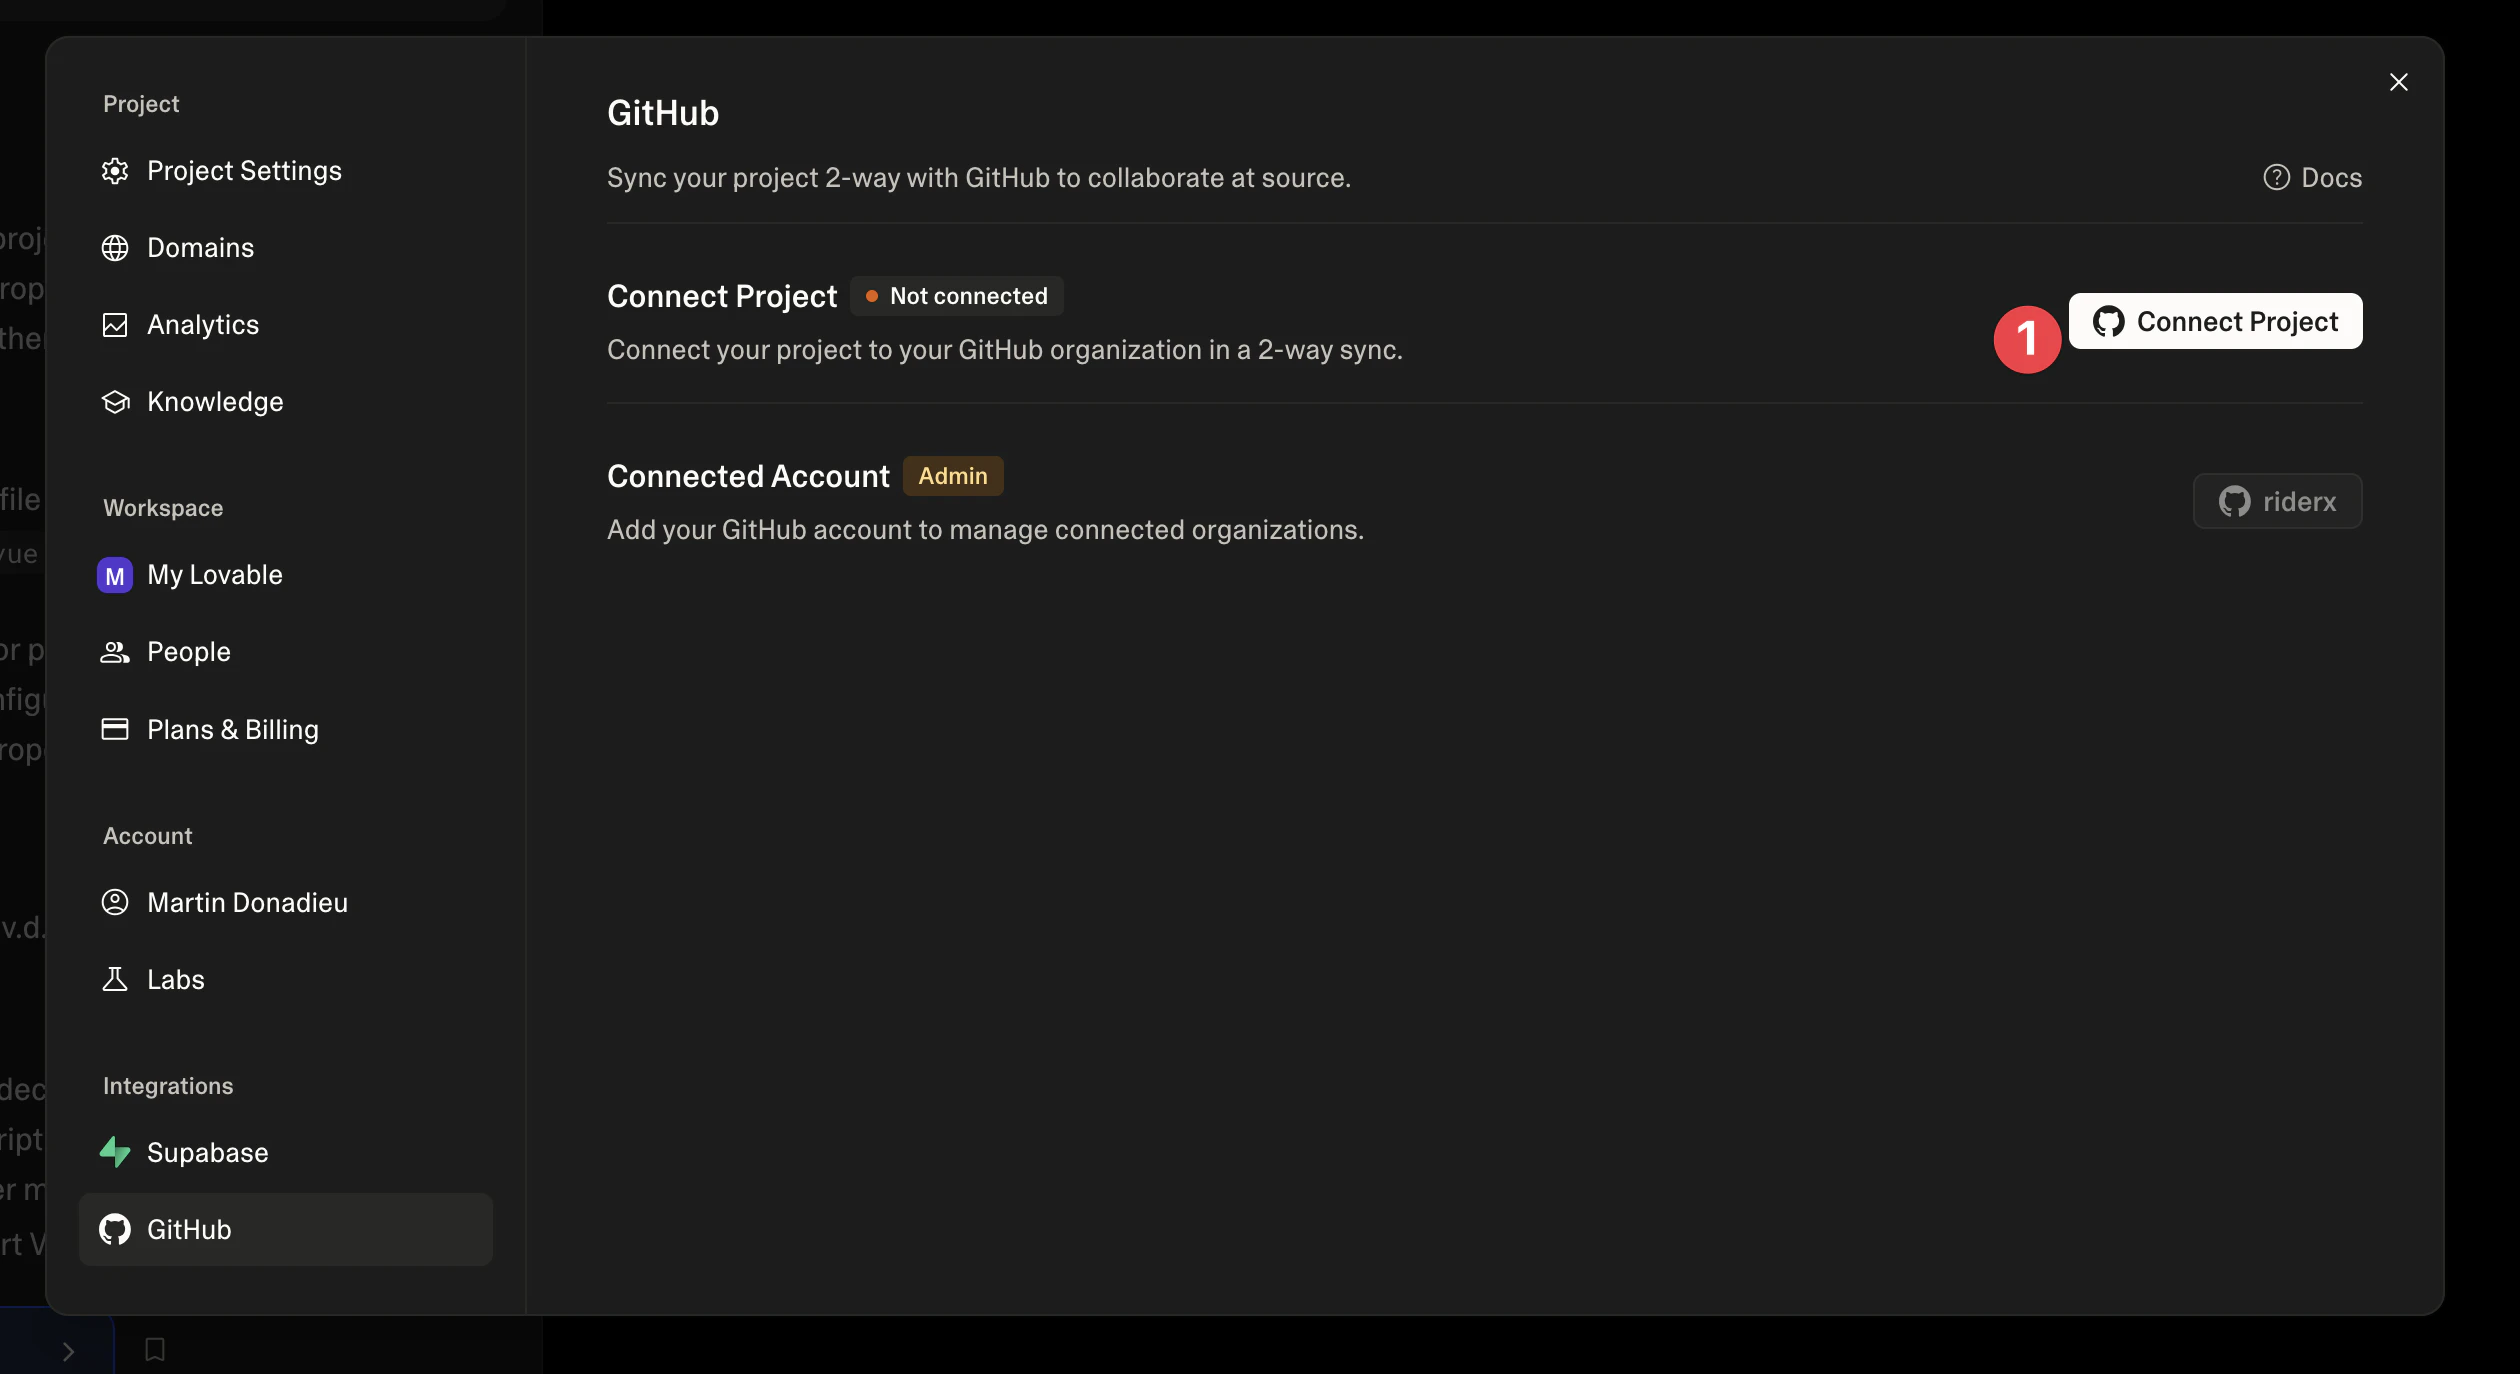
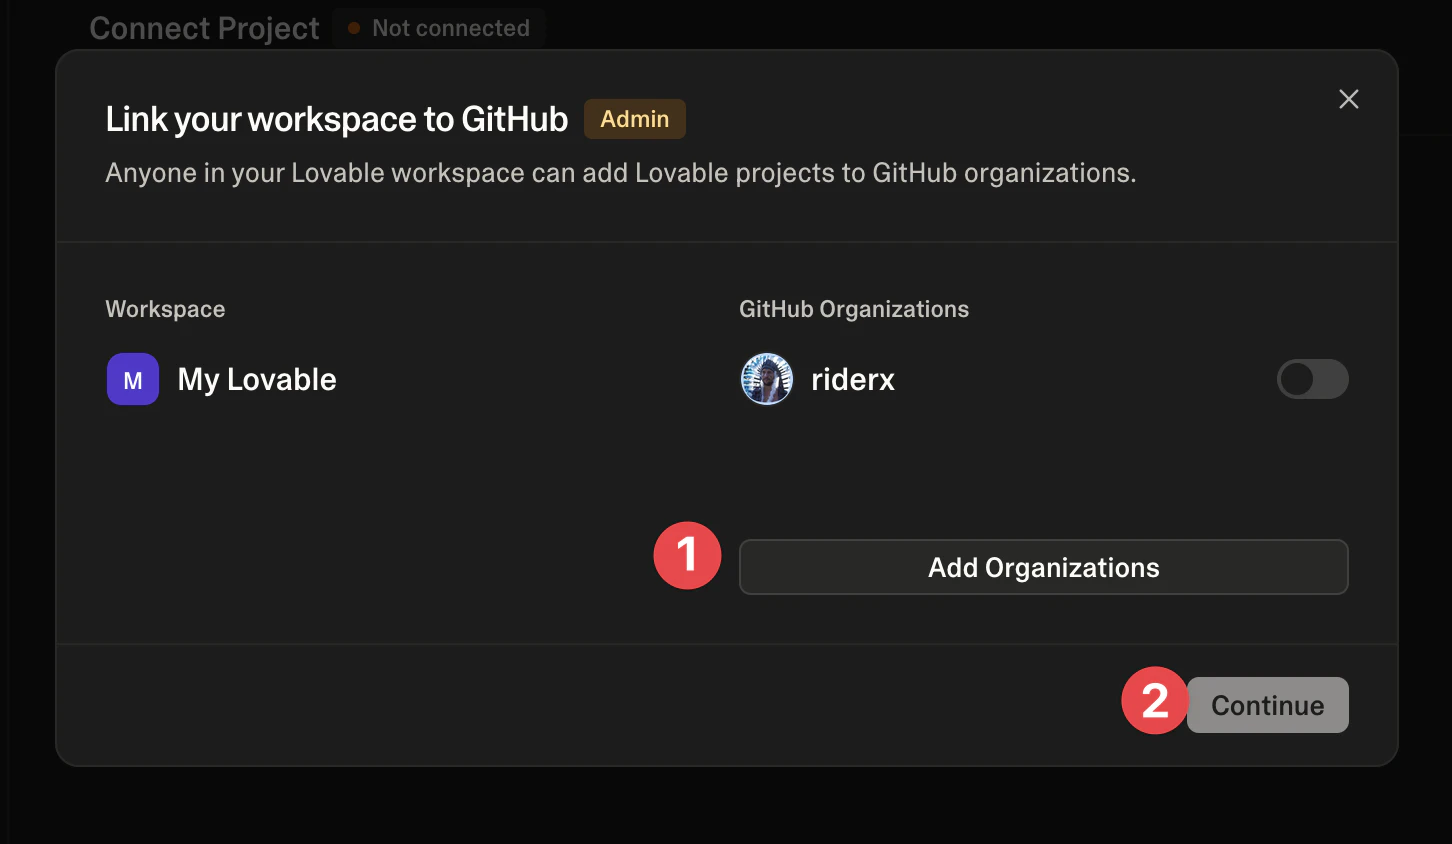
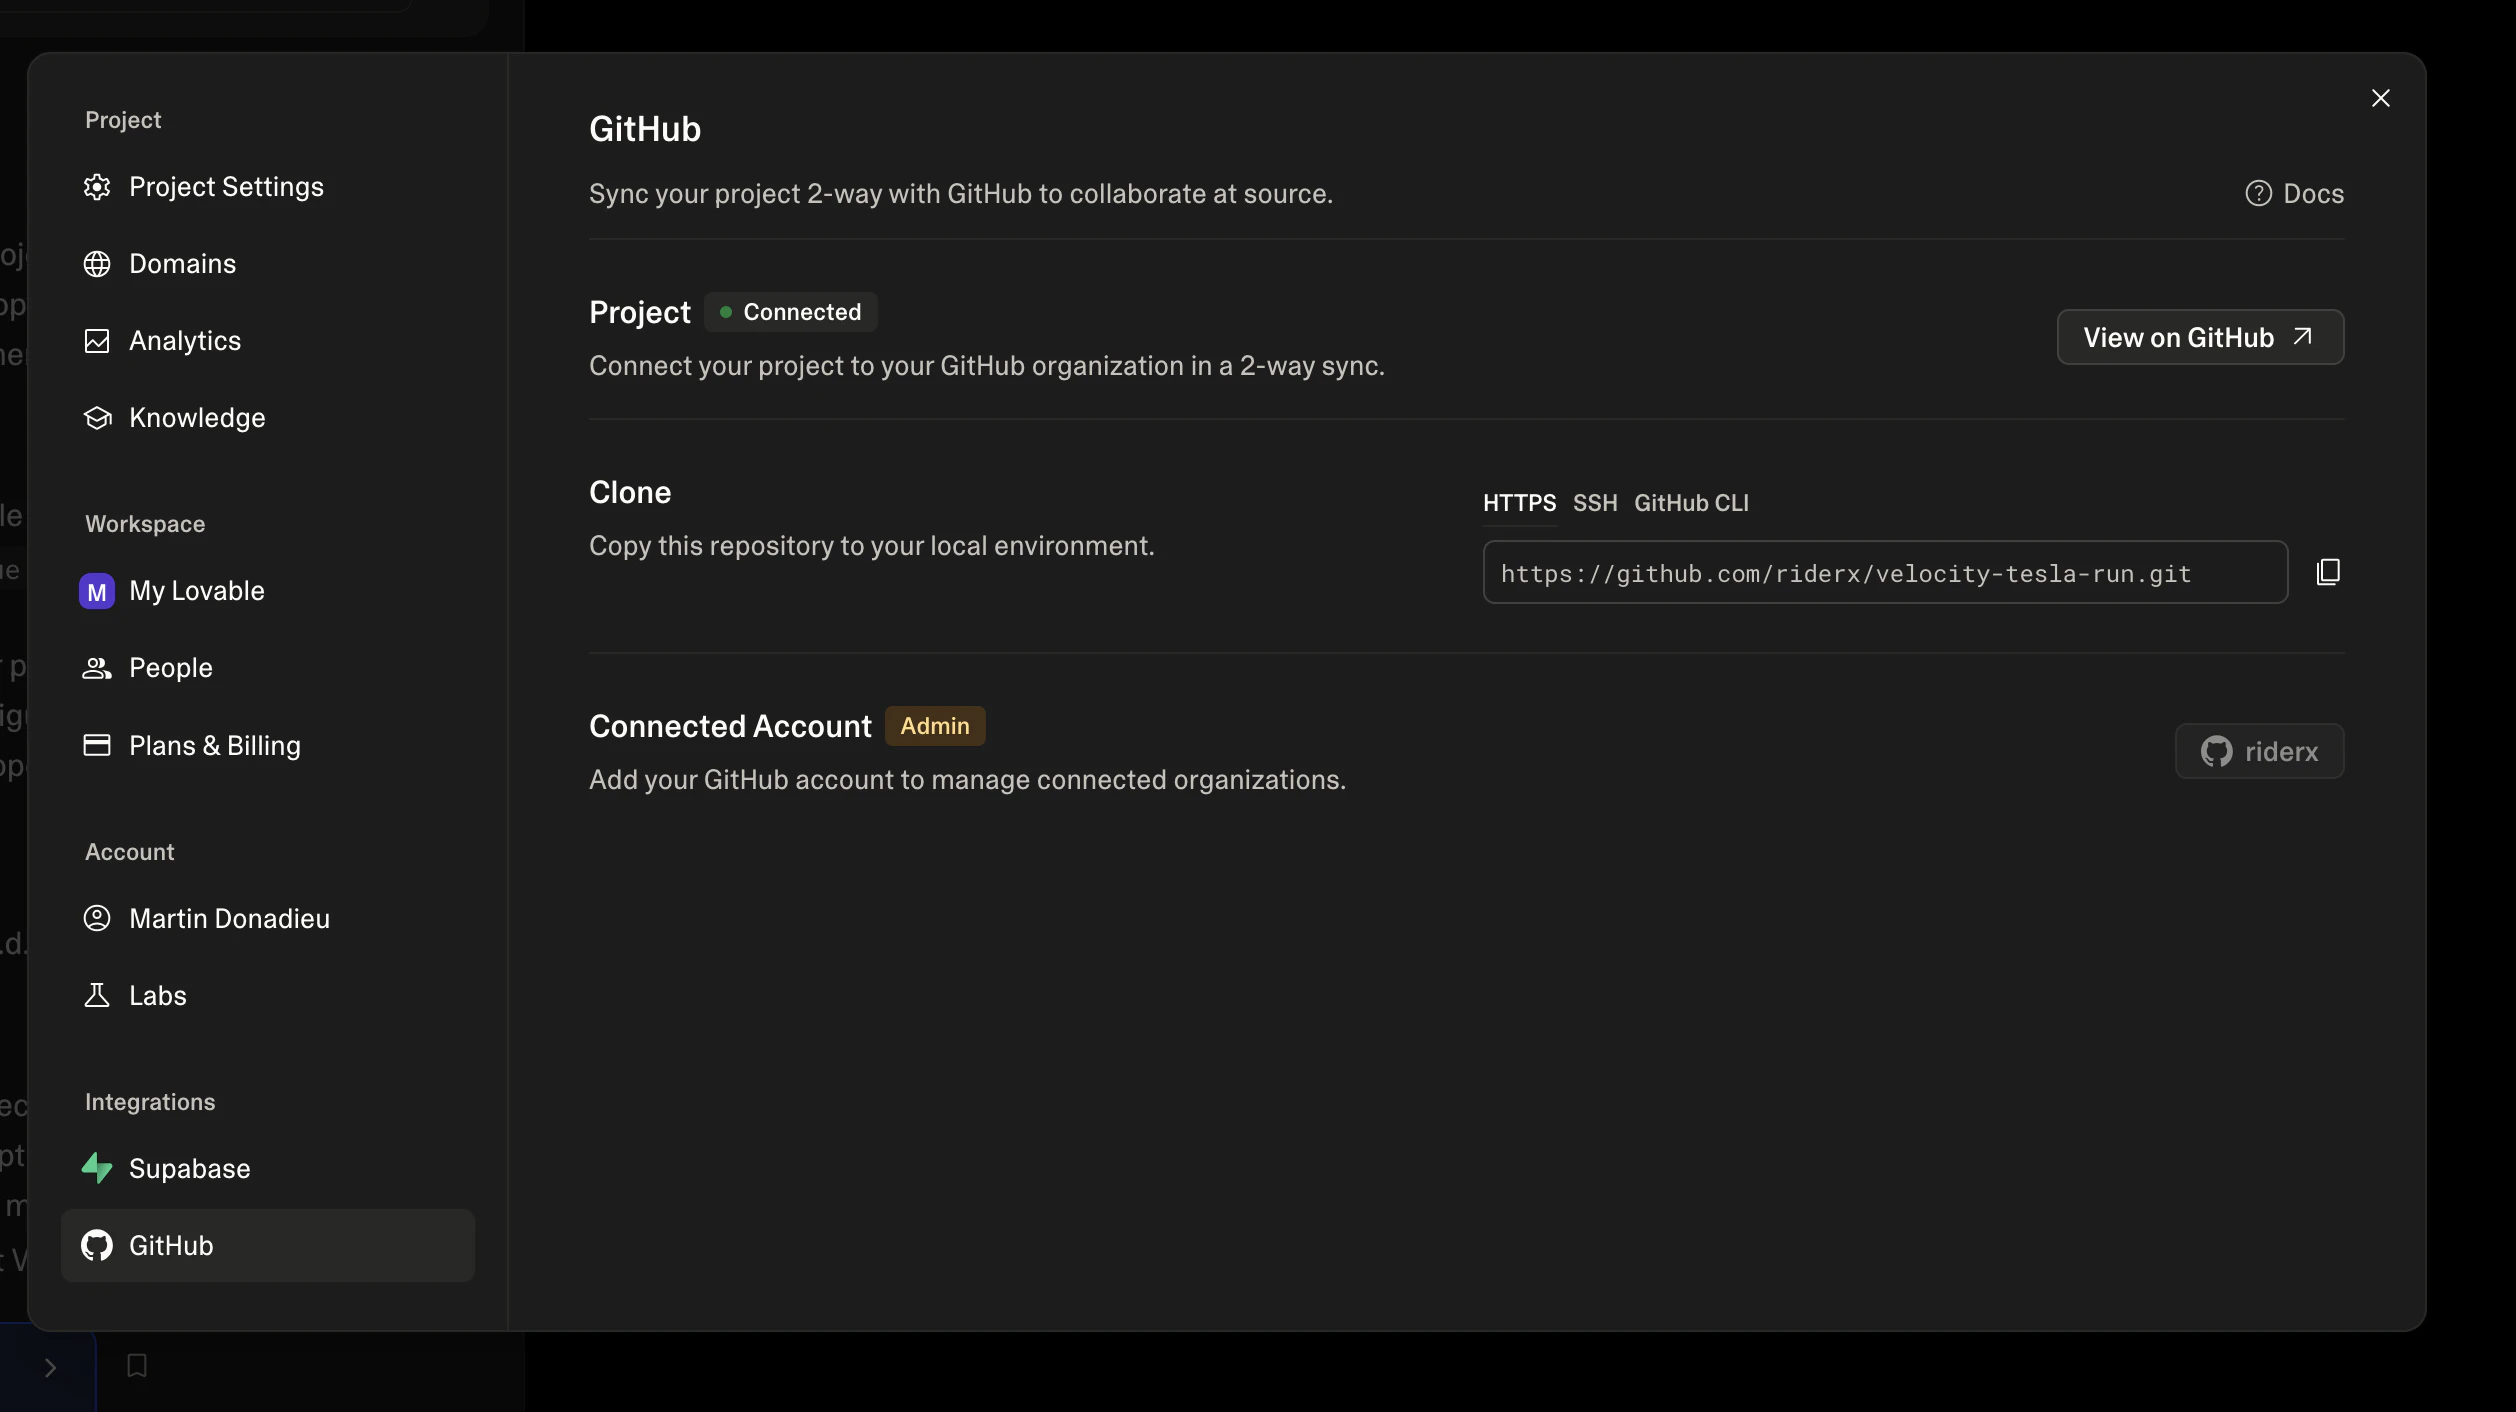
✅ Success: Visiting github.com/YOUR-USERNAME/your-app shows your app’s code.
Step 2 — Set Up Cursor and Clone Your Project
Before we can work with your code locally, you’ll need a code editor. We recommend Cursor, an AI-powered editor that can run terminal commands for you.
Download and Install Cursor
- Visit cursor.sh and download the version for your operating system
- Install Cursor following the installation wizard
- Once installed, open Cursor
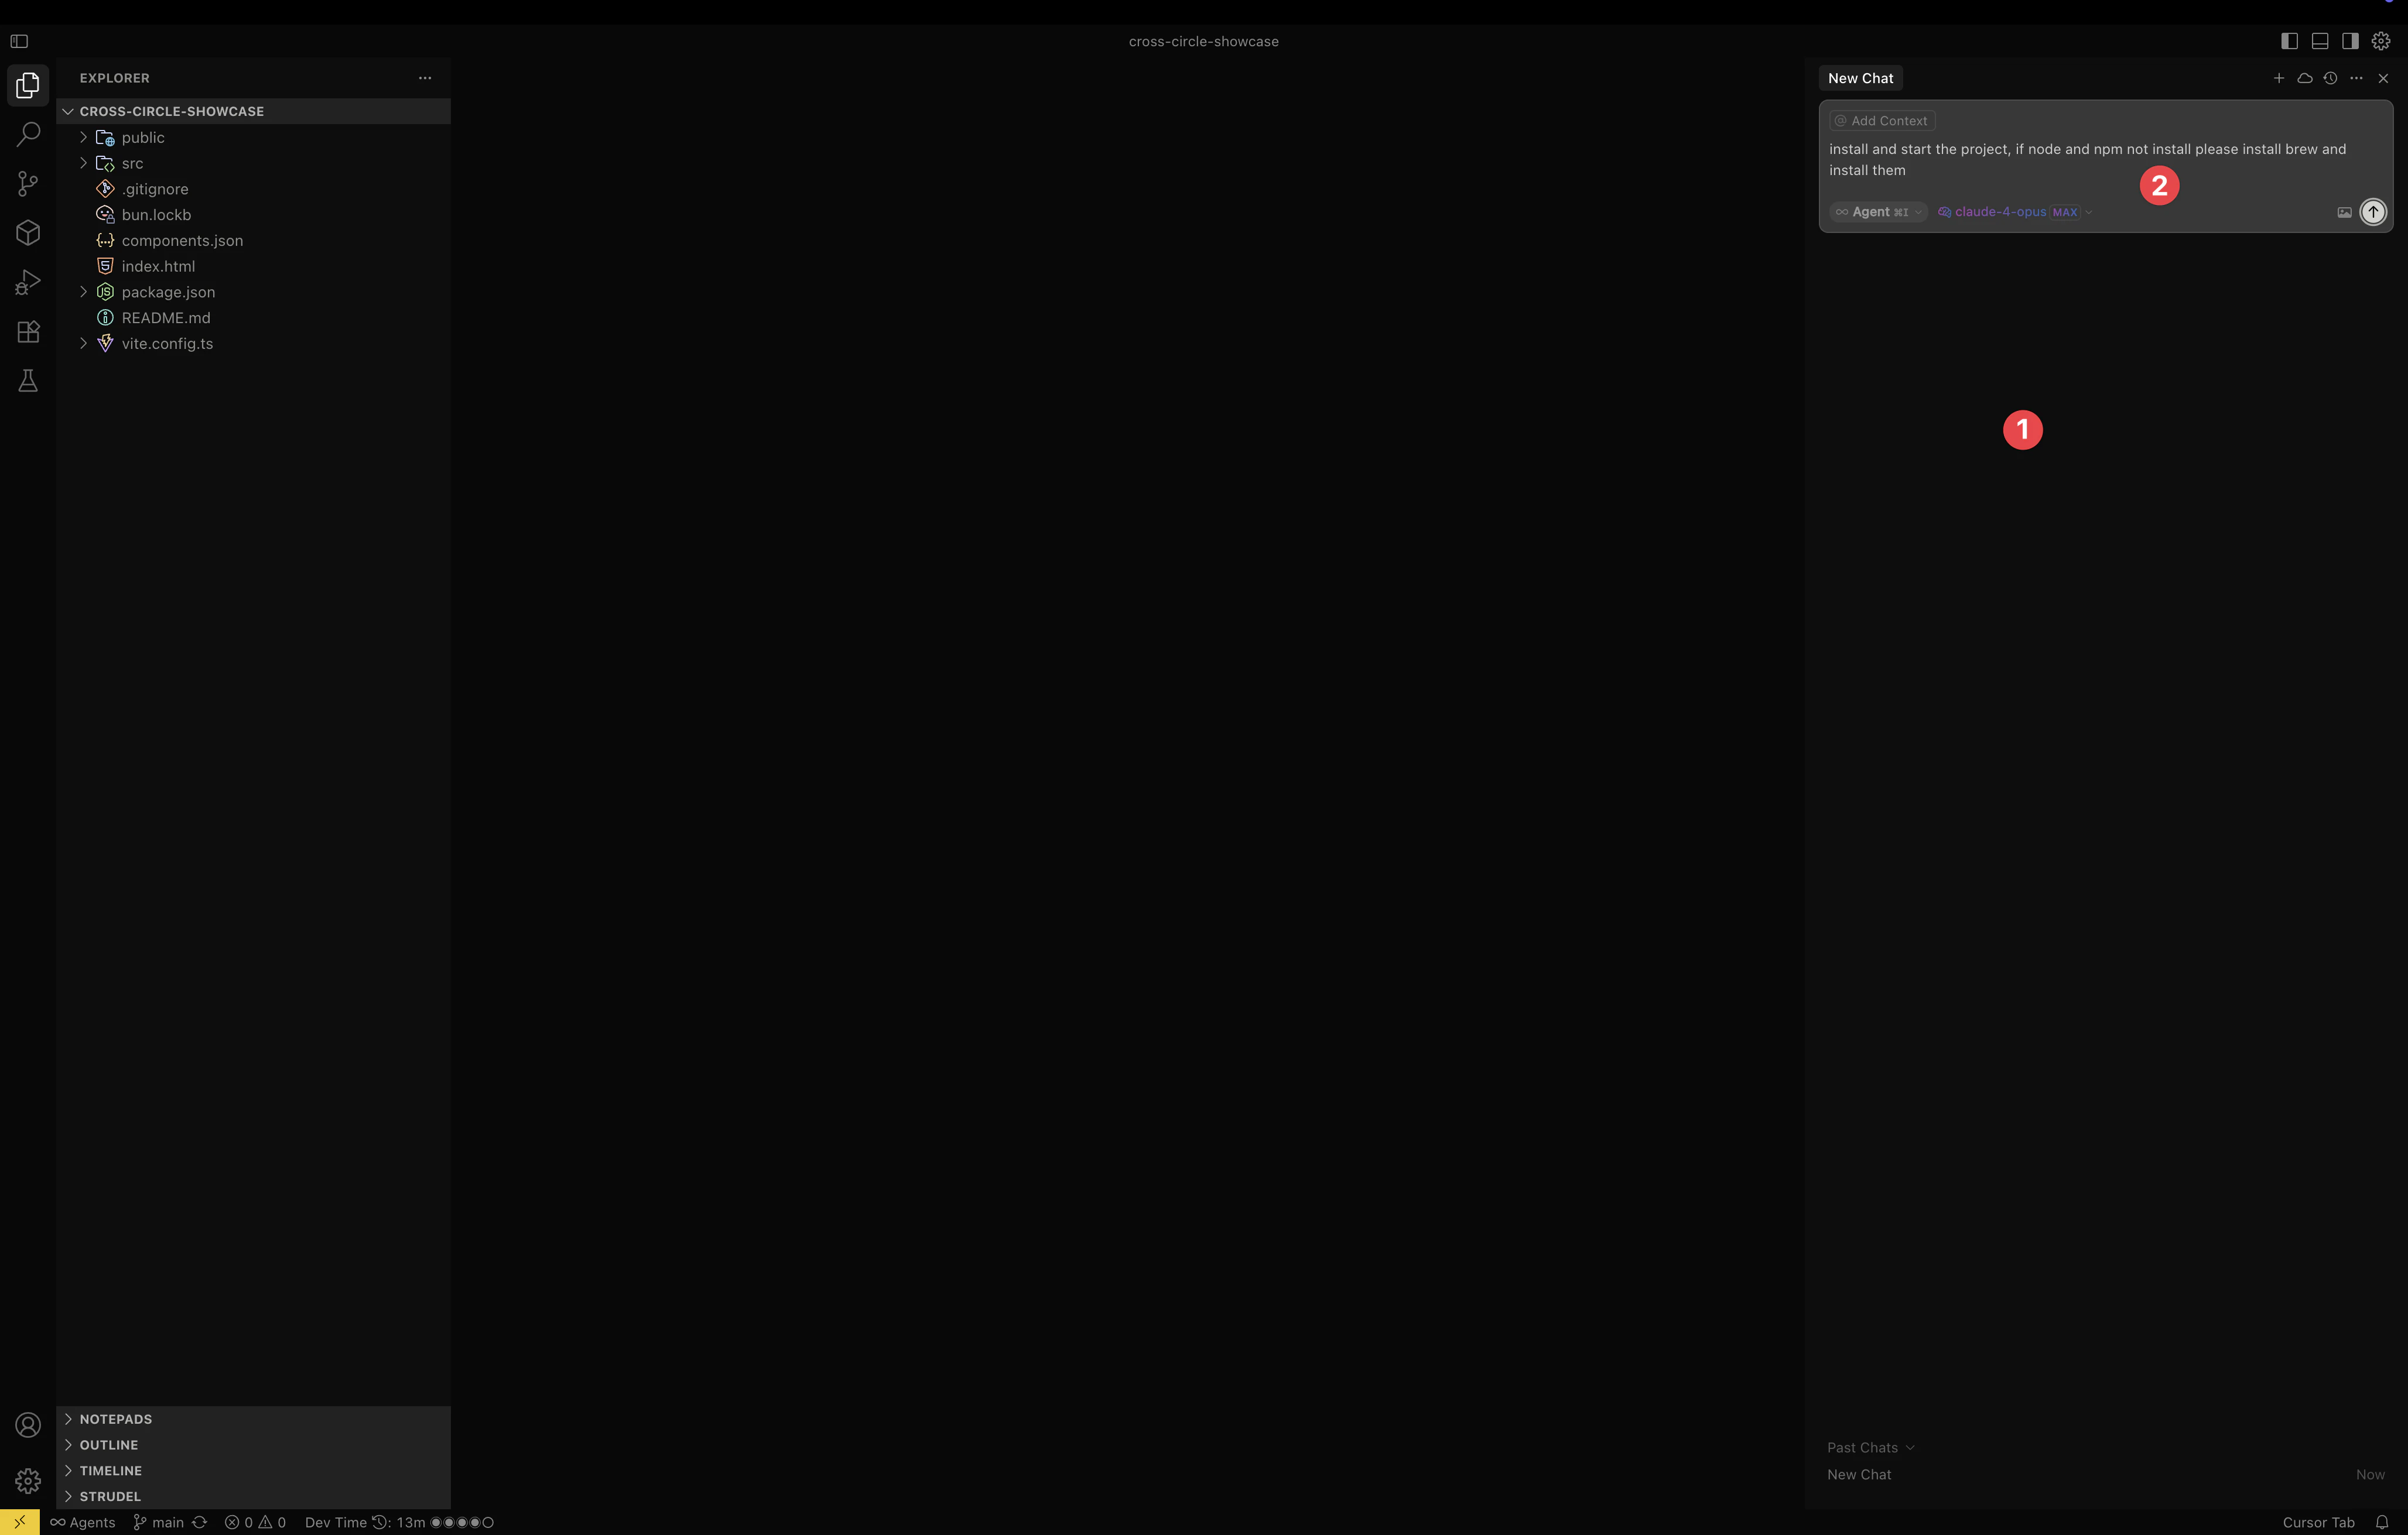
Configure Cursor for AI Development
For the best experience, configure Cursor before you start:
- Buy a Cursor Plan — While Cursor offers a free tier, a Pro plan ($20/month) gives you unlimited AI completions, access to Claude and GPT-4, and command execution
- Open Cursor Settings by pressing
Command+,(Mac) orCtrl+,(Windows)
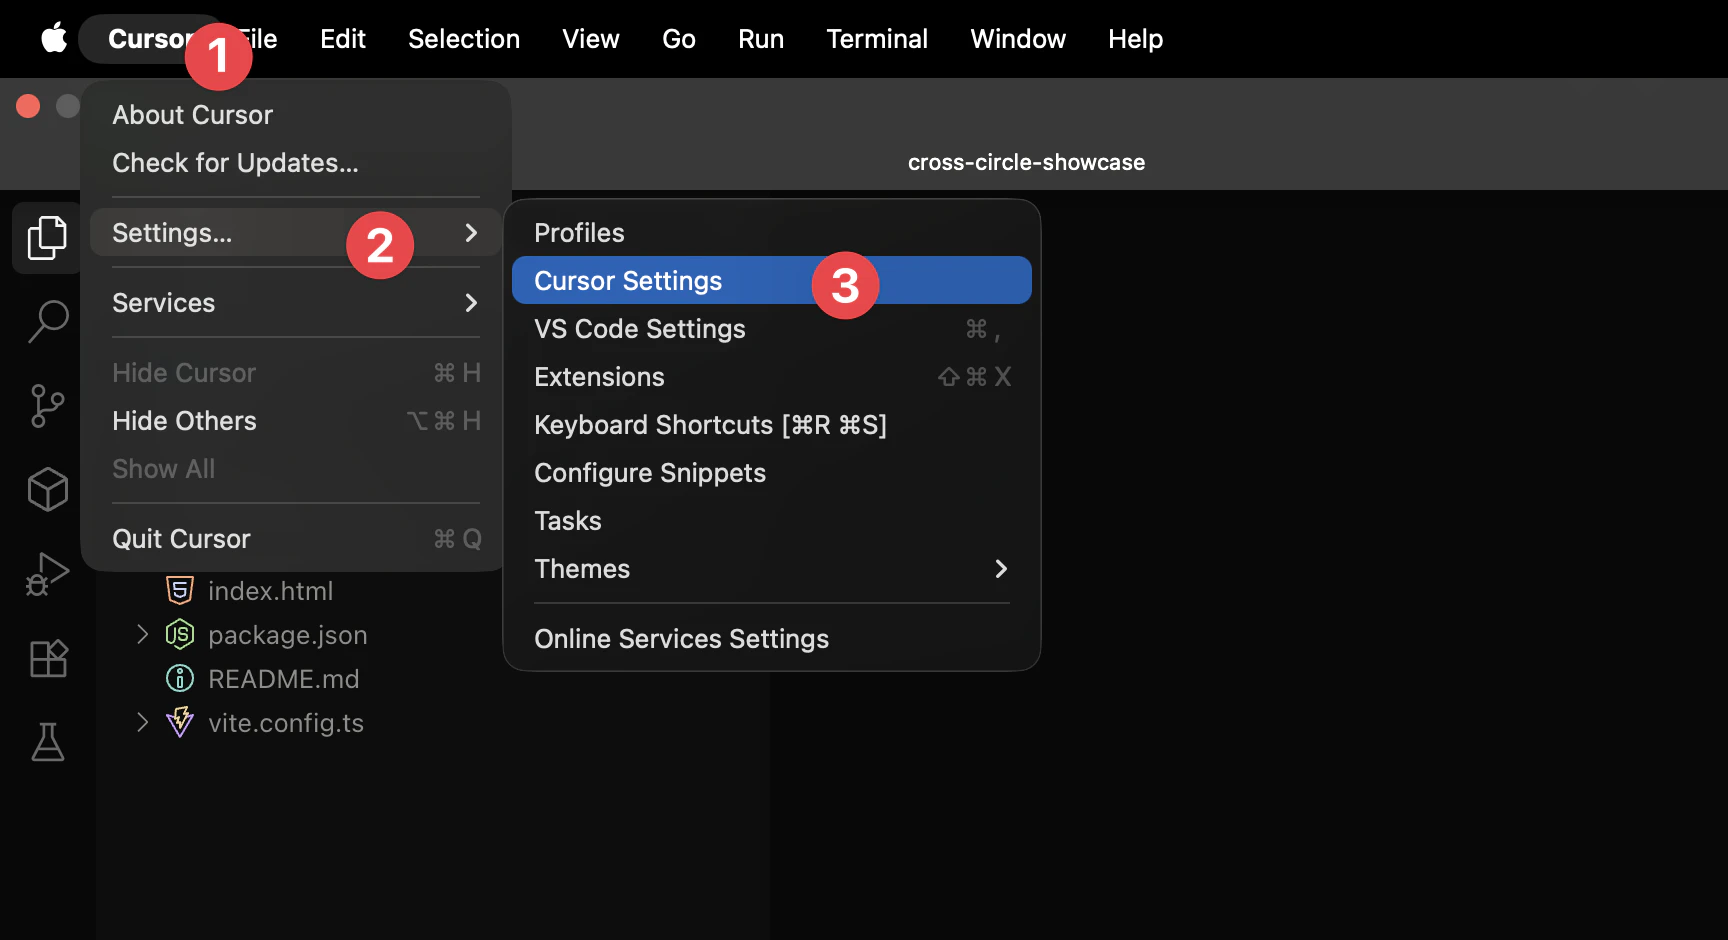
- Enable AI Models — Make sure AI features are enabled:
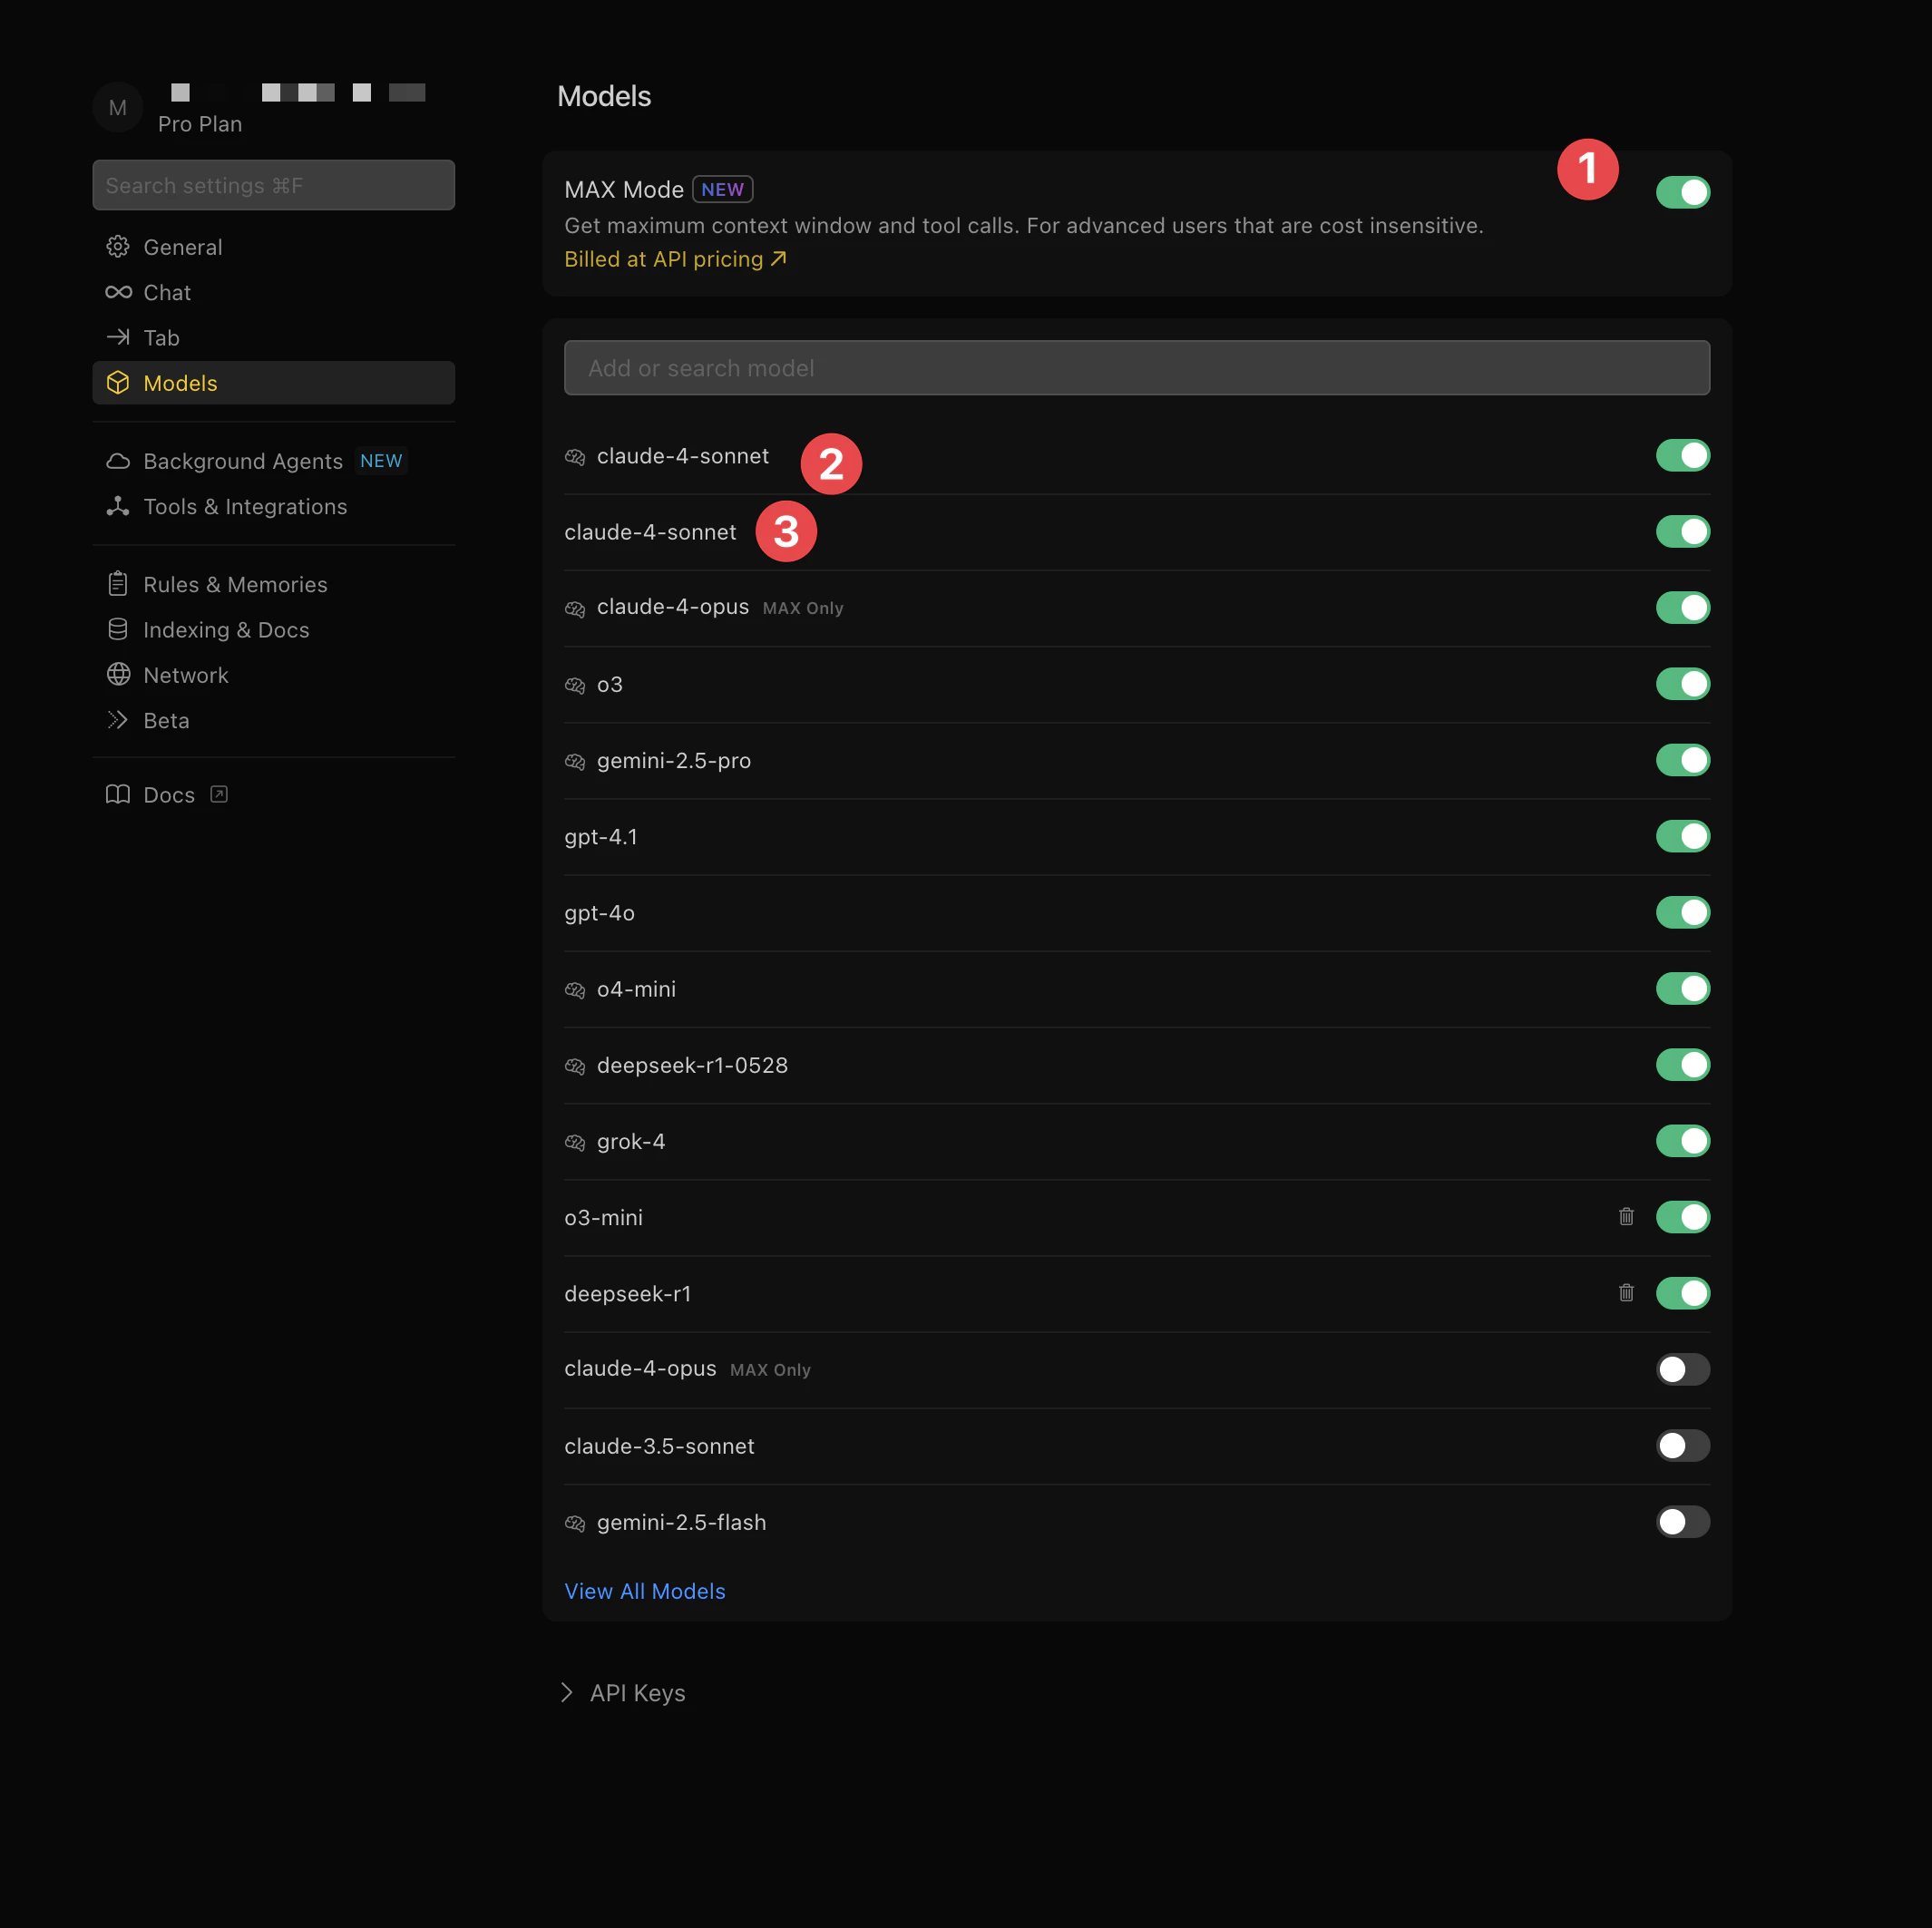
- Select Your Preferred Model — Choose Claude or GPT-4 for best results:
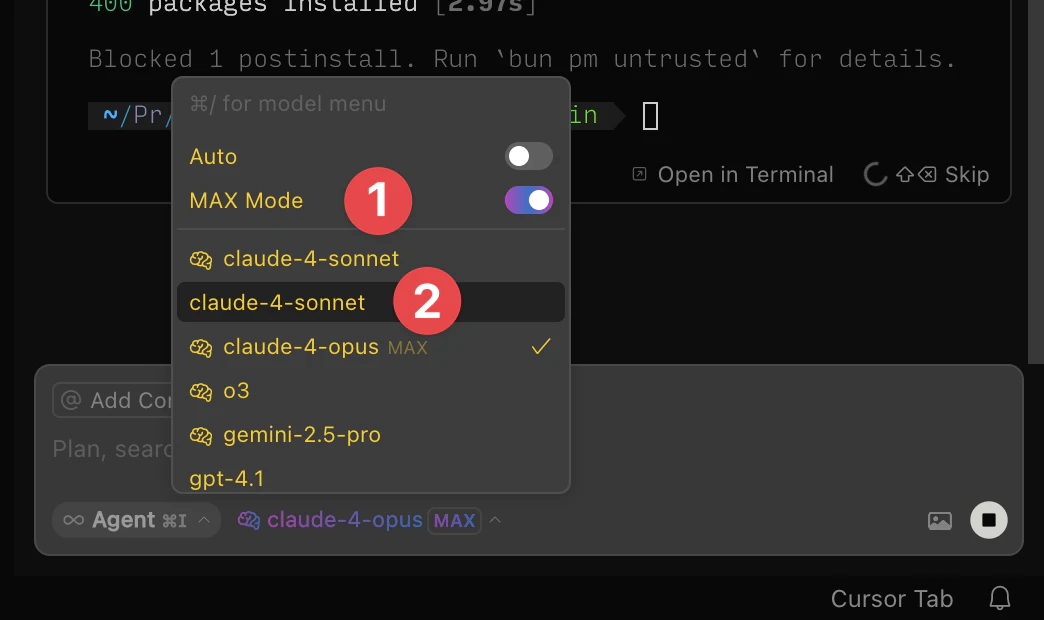
- Allow Command Execution — Enable Cursor to run commands for you:
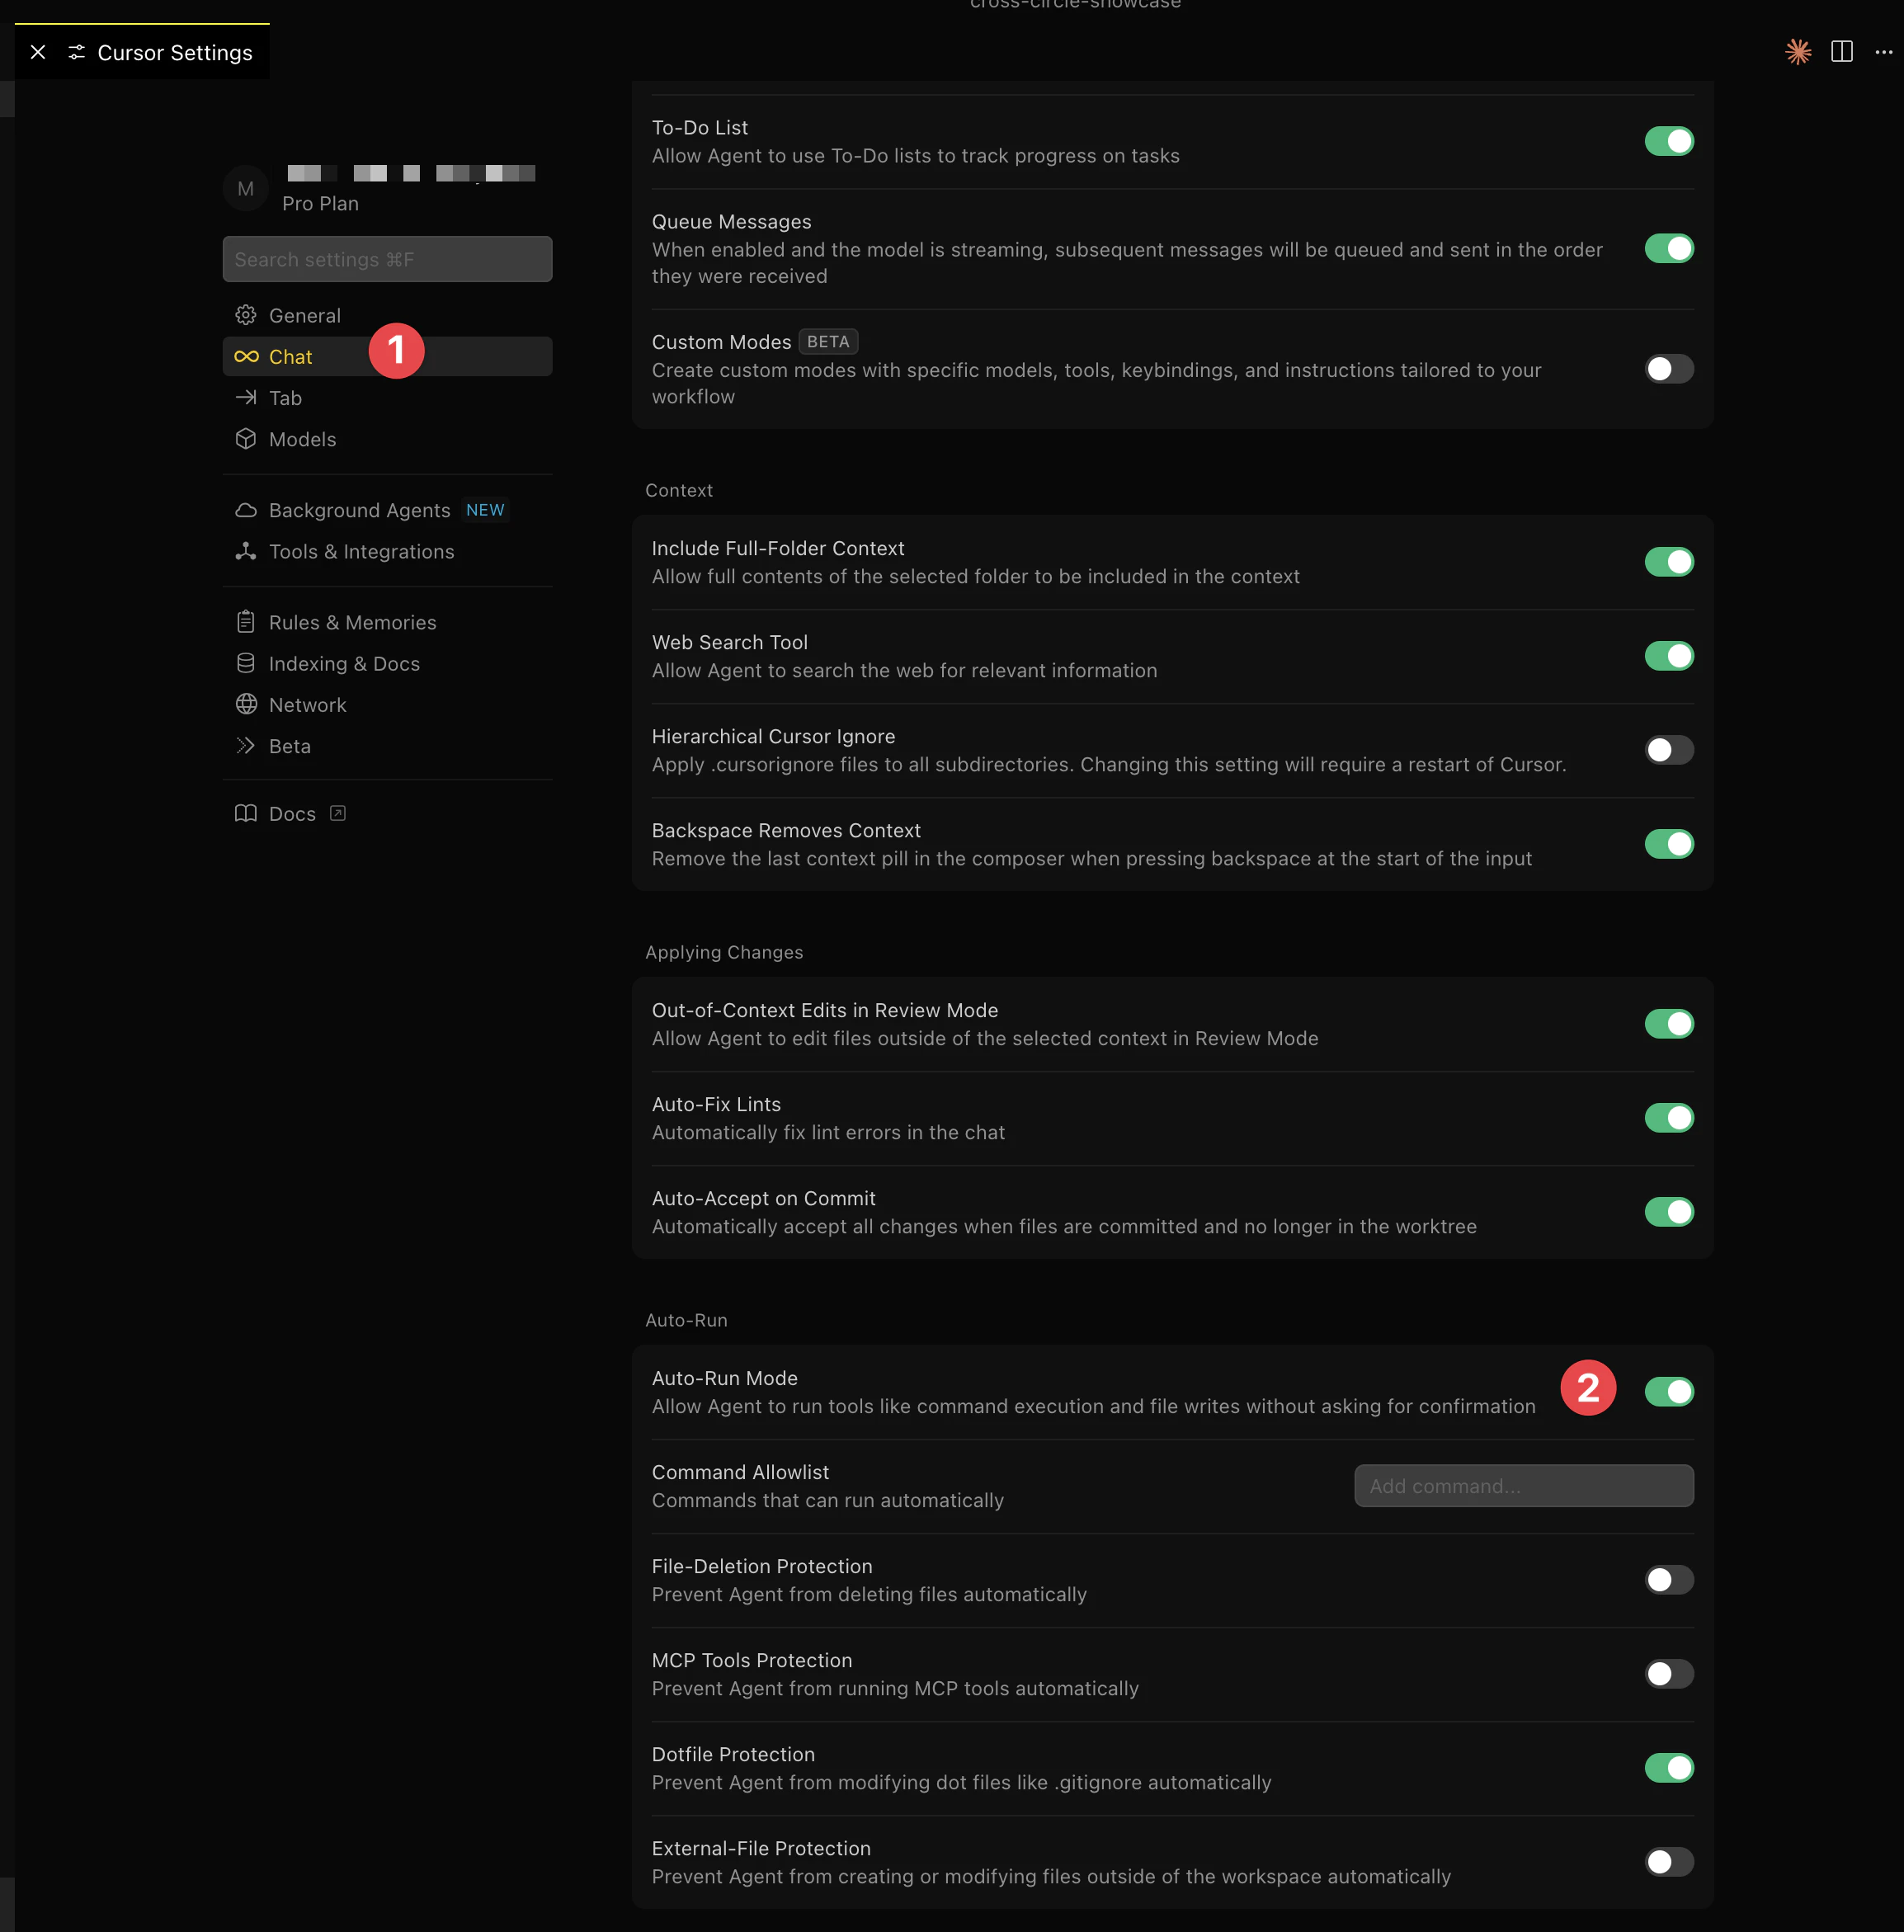
Clone Your Repository in Cursor
- In Cursor, press
Shift+Command+P(Mac) orShift+Ctrl+P(Windows) to open the command palette - Type “clone” and select Git: Clone”
- Paste your GitHub repository URL:
https://github.com/YOUR-USERNAME/your-lovable-app.git - Choose a folder where you want to save the project
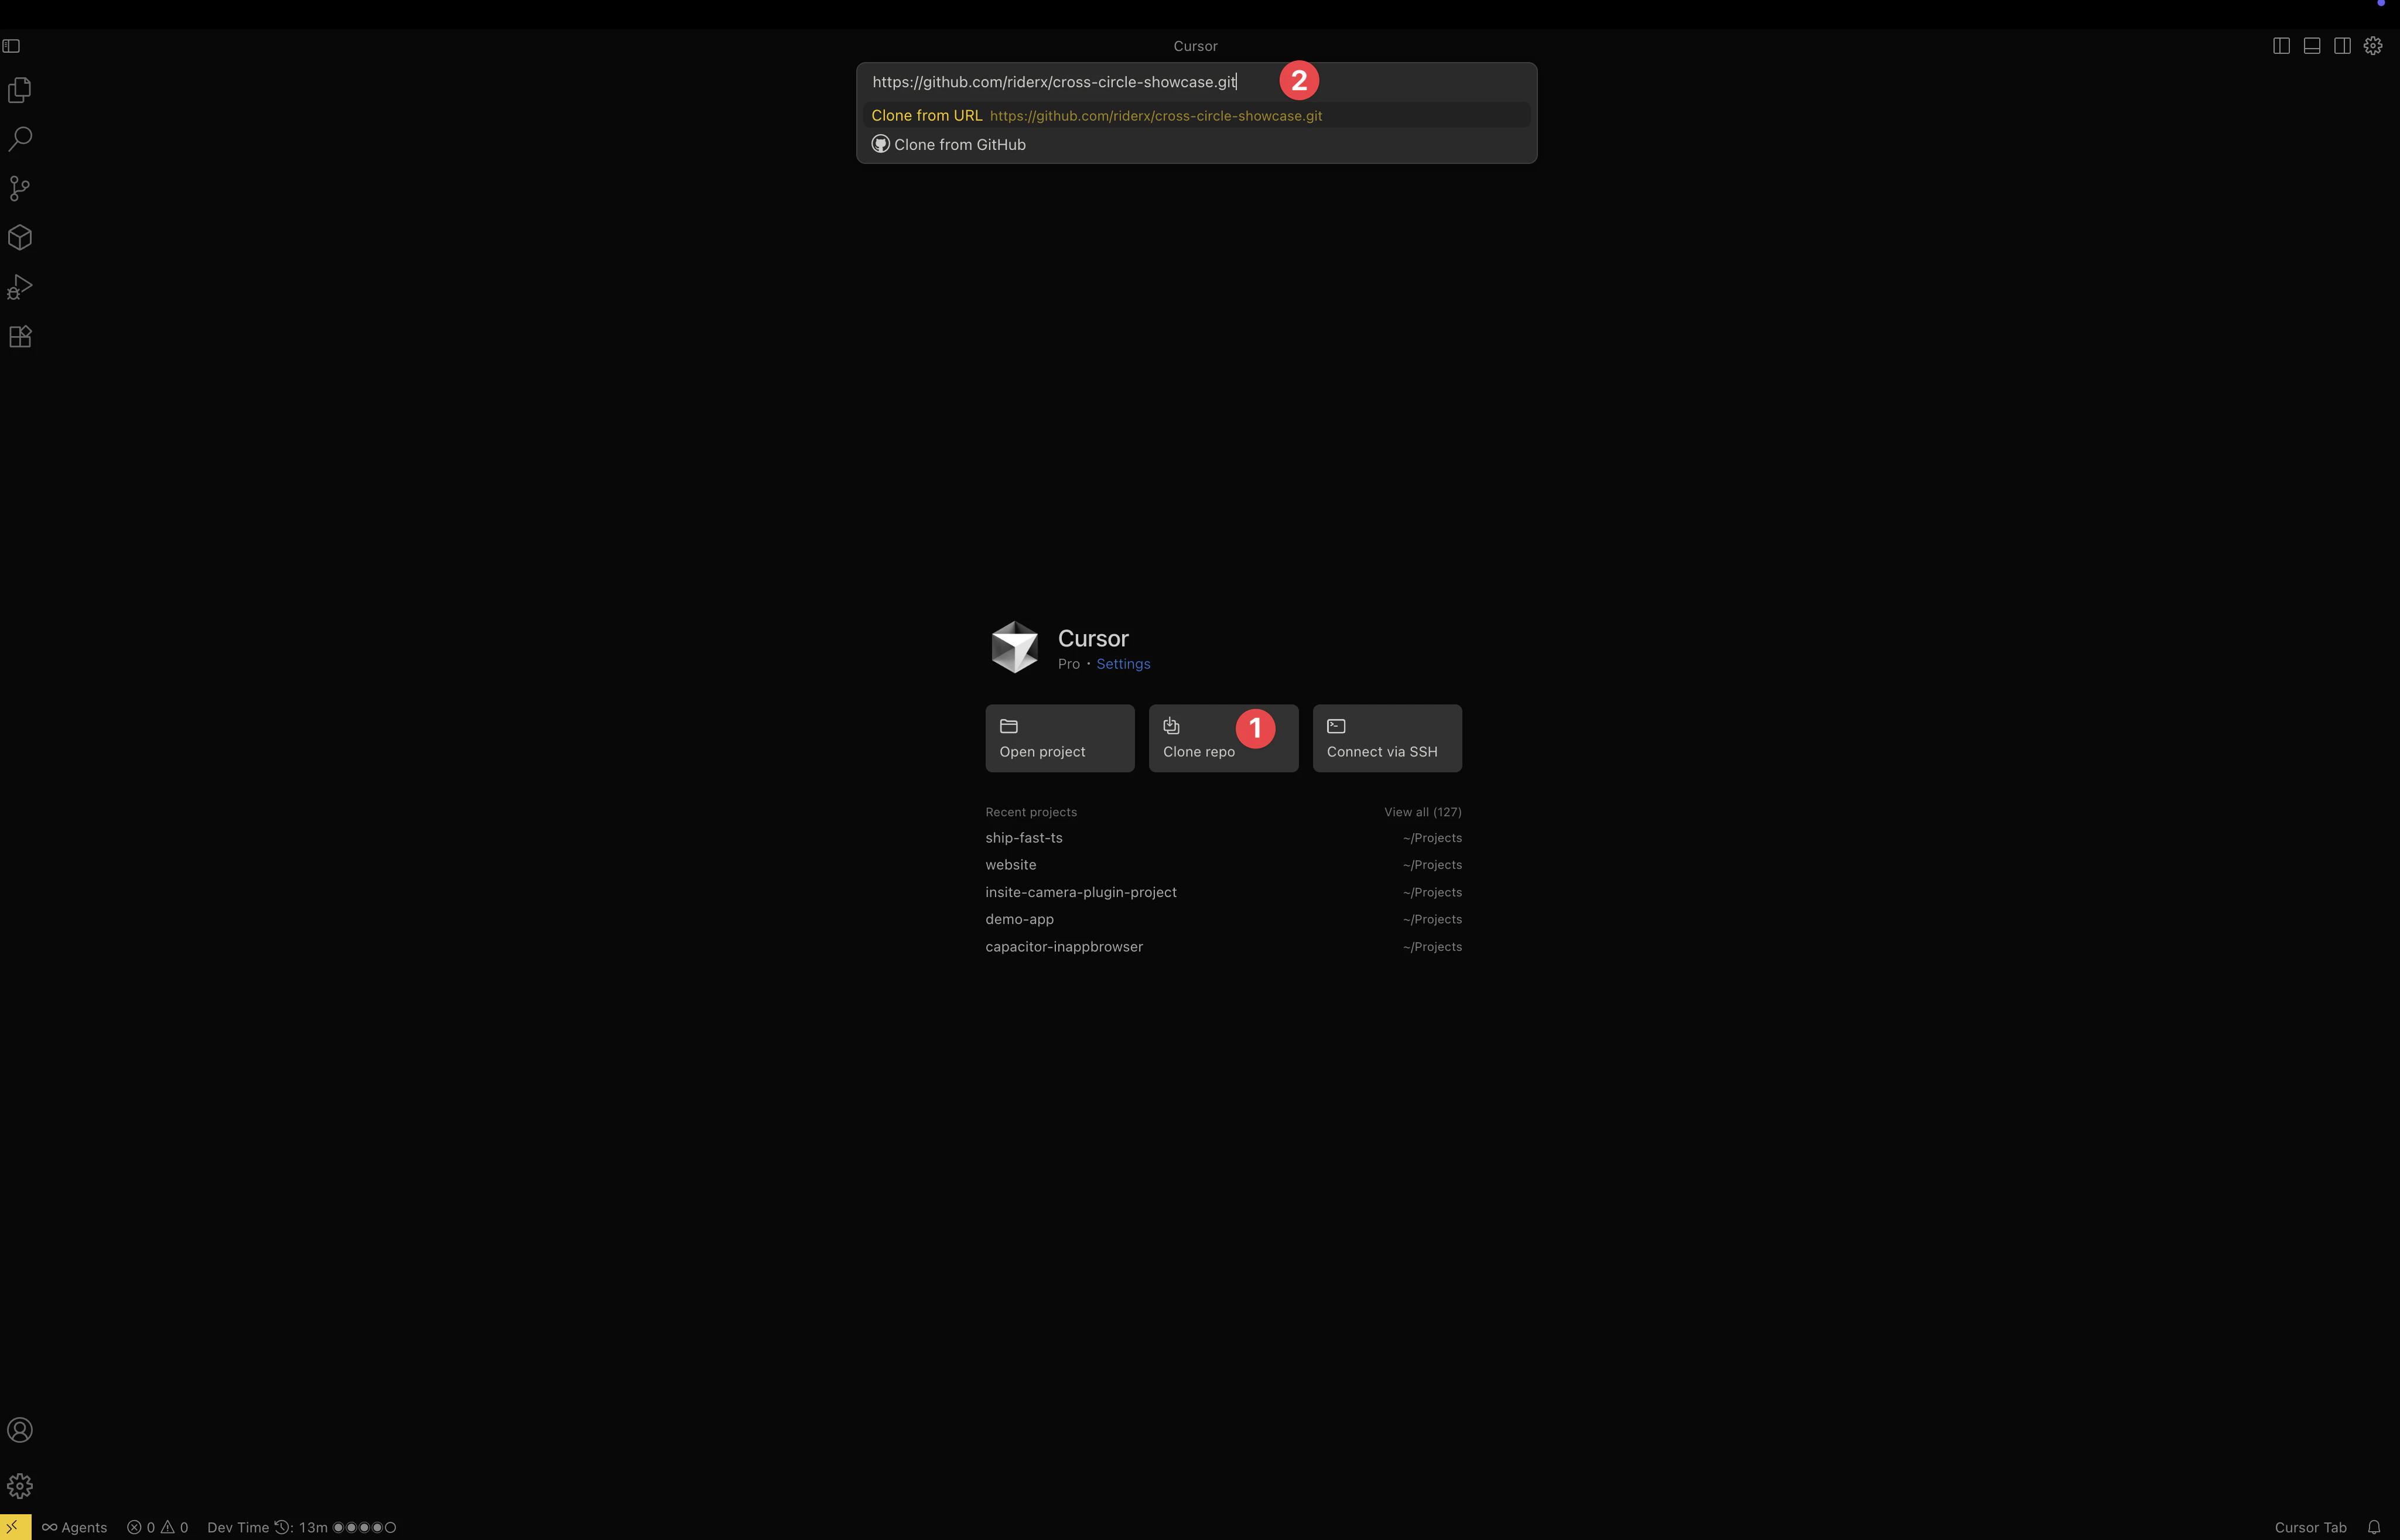
- Cursor will clone and open your project
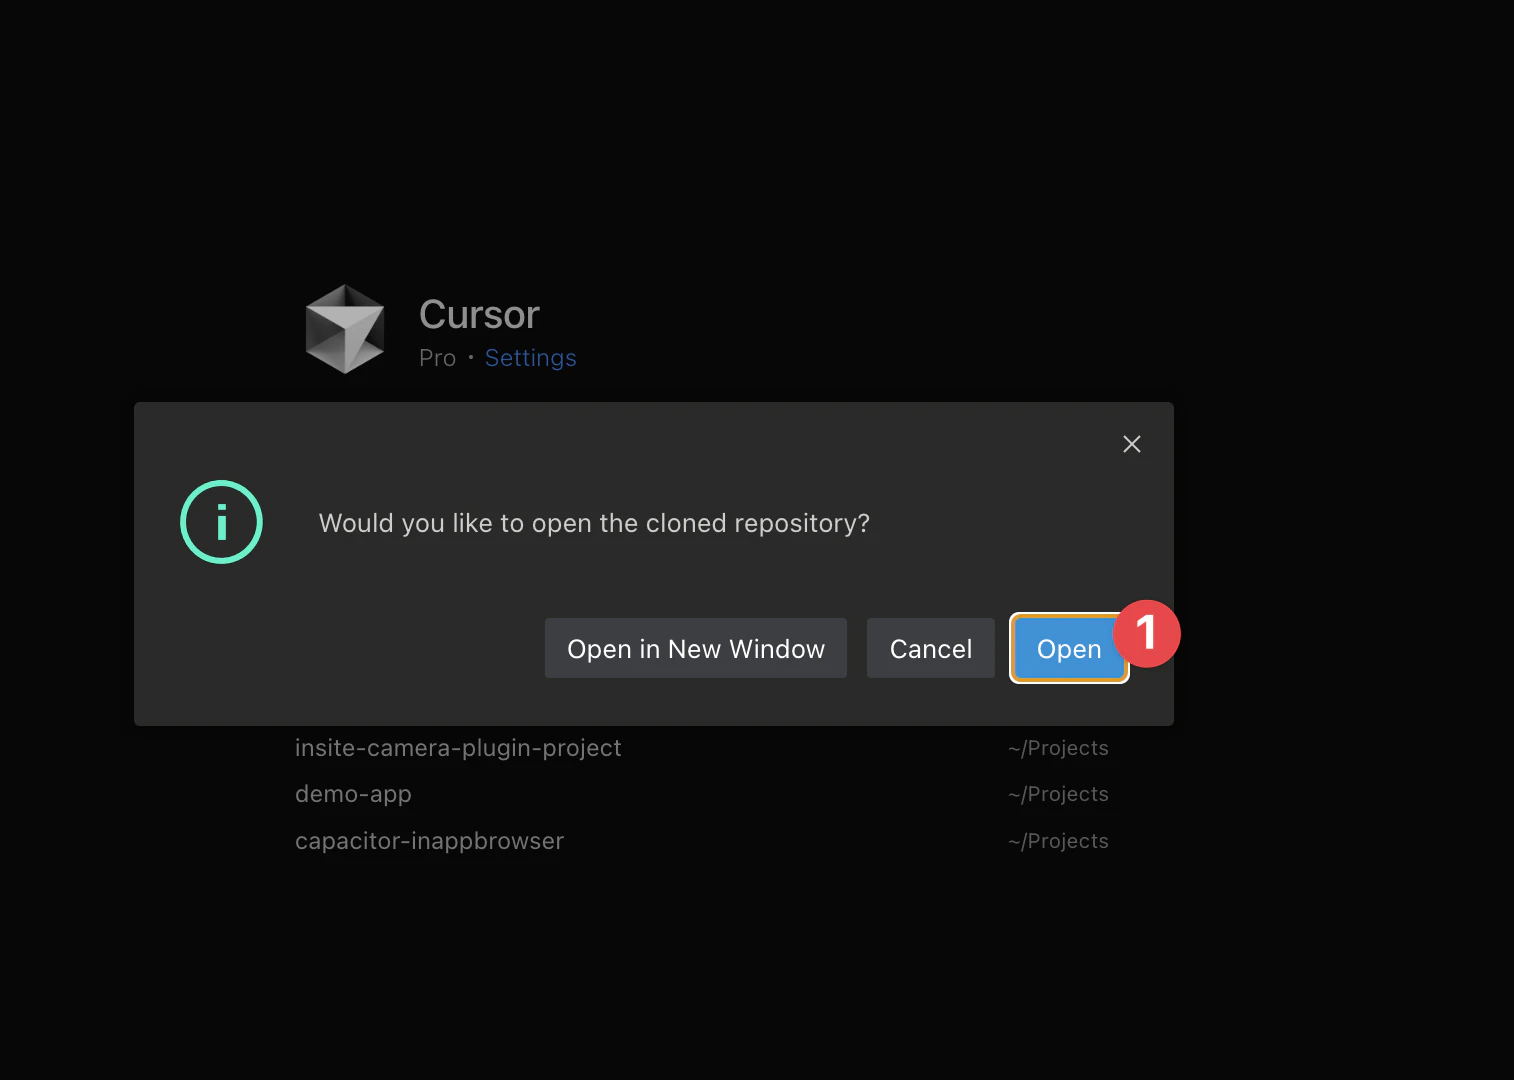
Step 3 — Install Dependencies and Run Locally
Method 1: Using Cursor AI (Recommended)
- Open Cursor’s AI tab by pressing
Command+K(Mac) orCtrl+K(Windows) - Type the following command:
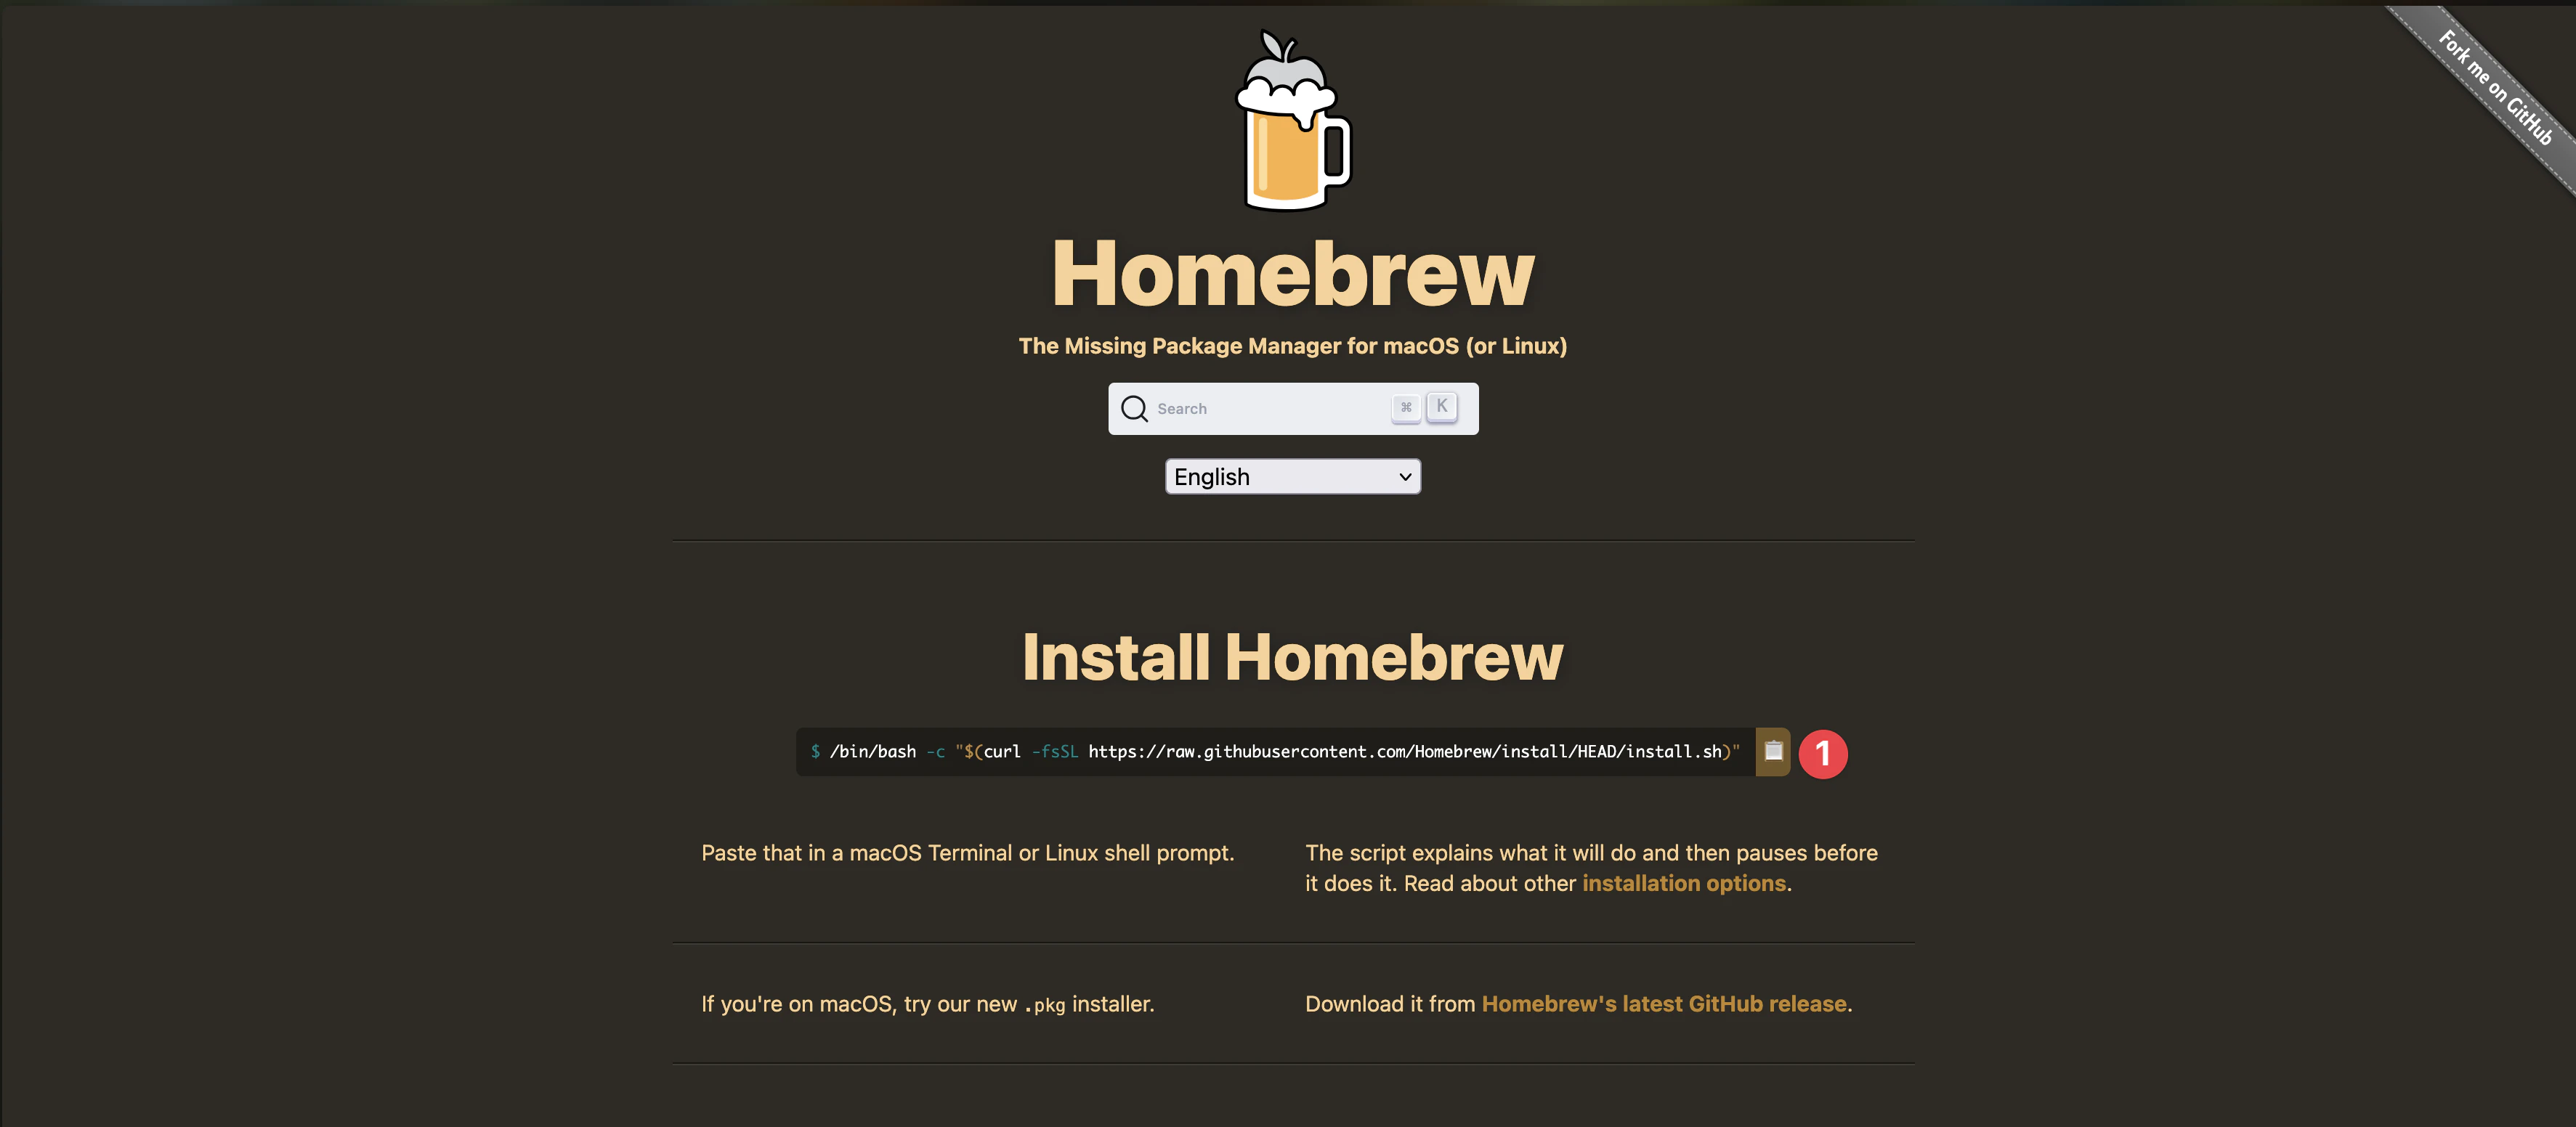
Install Homebrew, Node.js and npm on my system, then install dependencies and run the dev serverThe AI will automatically detect your OS, install Node.js, run npm install, and start the dev server with npm run dev.
Method 2: Manual Installation
Open the terminal in Cursor by pressing Shift+Command+T (Mac) or Shift+Ctrl+T (Windows), then:
For macOS:
/bin/bash -c "$(curl -fsSL https://raw.githubusercontent.com/Homebrew/install/HEAD/install.sh)"
brew install node
cd your-lovable-app
npm install
npm run dev
For Windows:
- Download the 24 LTS installer from nodejs.org
- Run the installer
- Open terminal and run:
cd your-lovable-app
npm install
npm run dev
Lovable apps typically run on http://localhost:8080 or http://localhost:5173 — use whatever address your terminal prints.
Press Ctrl + C to stop the dev server when you’re ready to continue.
✅ Success: Your app opens in the browser with its UI working.
Step 4 — Prepare the Static Production Build
Capacitor needs a production build before you add native platforms.
React + Vite (most Lovable apps)
Method 1: Using Cursor AI (Recommended)
Press Command+K (Mac) or Ctrl+K (Windows) and ask:
Configure vite.config for Capacitor mobile deployment with base './' and production build to distMethod 2: Manual Configuration
Confirm vite.config.ts uses a relative base so assets load inside the native WebView:
import { defineConfig } from 'vite'
import react from '@vitejs/plugin-react'

export default defineConfig({
  plugins: [react()],
  base: './',
  build: {
    outDir: 'dist',
  },
})
Build and verify:
npm run buildYou should see a dist/ folder with index.html at its root.

Legacy Next.js Lovable projects
If your repo uses Next.js, ask Cursor:
Add a static export script to package.json and configure next.config.js for mobile export with CapacitorOr follow Convert Your Next.js App to Mobile for the full next.config setup, then use webDir: 'out' in Capacitor instead of dist.
✅ Success: A static build folder exists (dist/ or out/) with index.html.
Step 5 — Add Capacitor and Native Platforms
Capacitor wraps your web app in real iOS and Android shells — no rewrite needed.
Method 1: Using Cursor AI (Recommended)
Press Command+K (Mac) or Ctrl+K (Windows) and ask:
Install Capacitor CLI, initialize it for my app with webDir dist, and add iOS and Android platformsThe AI will ask for your app name and bundle ID (e.g. com.yourcompany.myapp).

Method 2: Manual Installation
npm install @capacitor/core @capacitor/cli
npx cap init
When prompted:
| Prompt | Example | Notes |
|---|---|---|
| App name | My Lovable App | Shown under the app icon |
| App Package ID | com.yourcompany.myapp | Reverse-domain style — cannot change after store publish |
| Web assets directory | dist |
Use out for Next.js static export |
Pick a Package ID you actually own. Bundle IDs are globally unique. Use a reverse-domain ID based on a domain you control from the start — changing it later means find-and-replacing across ios/ and android/ and rebuilding.
npm run build
npm install @capacitor/ios @capacitor/android
npx cap add ios
npx cap add android
npx cap sync
Configure Capacitor
Method 1: Using Cursor AI (Recommended)
Ask Cursor:
Update capacitor.config.ts to use dist as webDir and set up for HTTPSFor Next.js static export, ask it to use out instead.
Method 2: Manual Configuration
import type { CapacitorConfig } from '@capacitor/cli';

const config: CapacitorConfig = {
  appId: 'com.yourcompany.myapp',
  appName: 'My Lovable App',
  webDir: 'dist',
  server: {
    androidScheme: 'https',
  },
};

export default config;
Build and Sync
Method 1: Using Cursor AI (Recommended)
Tell Cursor:
Build the production web app and sync it with Capacitor platformsMethod 2: Manual Commands
npm run build
npx cap sync
Your project now looks like:
your-lovable-app/
├── android/              ← native Android project
├── ios/                  ← native iOS project
├── dist/                 ← built web app (or out/ for Next.js)
├── src/                  ← your Lovable app code
├── capacitor.config.ts
└── package.json
No CocoaPods needed. Capacitor 8 uses Swift Package Manager for iOS dependencies automatically.
✅ Success: ios/ and android/ folders appear and the terminal shows Sync finished.
Step 6 — Check Your .gitignore
Capgo Builder compiles from your Git repository, so ios/ and android/ must be committed. A common mistake is ignoring them at the repo root.
Confirm:
- Root
.gitignoreignoresnode_modulesanddist(the cloud rebuildsdistduring web builds) ios/andandroid/themselves are not ignored
✅ Success: git status shows ios/ and android/ ready to commit (not ignored).
Step 7 — Commit and Push
git add .
git commit -m "Add Capacitor and native iOS/Android platforms"
git push
✅ Success: Your GitHub repo shows the ios/ and android/ folders.
Step 8 — Build Store-Ready Binaries with Capgo Builder
You do not need a Mac or local Xcode/Android Studio pipeline to ship. Capgo Builder compiles, signs, and can submit iOS and Android builds from the cloud.
Set up Capgo Builder
npx @capgo/cli@latest login
npx @capgo/cli@latest init
npx @capgo/cli@latest build init --platform ios
npx @capgo/cli@latest build init --platform android
Save signing credentials once. Use our free tools if you need help generating them:
- iOS Certificate Generator
- Android Keystore Generator
- iOS UDID Finder — register your iPhone for development builds
See Managing Credentials and Build iOS from Windows.
Request a cloud build
npm run build
npx cap sync
npx @capgo/cli@latest build com.yourcompany.myapp --platform ios --build-mode release
npx @capgo/cli@latest build com.yourcompany.myapp --platform android --build-mode release
Build logs stream in your terminal. With App Store Connect configured, iOS builds can upload to TestFlight automatically.
Install on a real device:
- iOS: TestFlight (recommended) or a development build with your device UDID registered
- Android: Google Play internal testing track or a signed release APK/AAB
✅ Success: A signed build completes and you can install it on a real device.
Step 9 — Optional: Test Locally in Xcode or Android Studio
If you have a Mac or want emulator testing before cloud builds:
For iOS
Method 1: Using Cursor AI (Recommended)
Open the iOS project in XcodeMethod 2: Manual Command
npx cap open ios
First-time Xcode setup:
- Select a simulator from the device dropdown (e.g. iPhone 15)
- For real devices: enable Automatically manage signing and select your Apple Developer team
- Click the ▶️ Play button — first build takes 5–10 minutes

For Android
Method 1: Using Cursor AI (Recommended)
Open the Android project in Android StudioMethod 2: Manual Command
npx cap open android
First-time Android Studio setup:
- Install missing SDK packages if prompted
- Create an emulator in Device Manager (e.g. Pixel 6, API 33+)
- Click the green ▶️ Run button — first build takes 5–15 minutes

Use local IDEs for day-to-day debugging. Use Capgo Builder when you need signed release binaries.
✅ Success: App opens in simulator or emulator showing your Lovable content.
Step 10 — Enable Live Reload (Development)
Speed up iteration by pointing the native shell at your local dev server.
Method 1: Using Cursor AI (Recommended)
Tell Cursor:
Set up live reload for Capacitor development with my local IP addressMethod 2: Manual Setup
- Find your local IP address:
# macOS
ipconfig getifaddr en0

# Windows
ipconfig- Update
capacitor.config.ts:
import type { CapacitorConfig } from '@capacitor/cli';

const config: CapacitorConfig = {
  appId: 'com.yourcompany.myapp',
  appName: 'My Lovable App',
  webDir: 'dist',
  server: {
    url: 'http://YOUR_IP_ADDRESS:5173',
    cleartext: true,
  },
};

export default config;
Use port 8080 or 3000 if that is what npm run dev prints.
- Apply changes:
npx cap copy
✅ Success: Edits to your web code hot-reload on the device or simulator.
Step 11 — Add a Native Feature: The Camera
A Capacitor plugin lets JavaScript call real device features. We’ll add the Camera plugin so users can snap a photo — something a browser tab cannot do reliably.
Method 1: Using Cursor AI (Recommended)
Tell Cursor:
Add the Capacitor Camera plugin with iOS and Android permissions and a button to take a photoMethod 2: Manual Installation
npm install @capacitor/camera
npx cap sync
iOS — add to ios/App/App/Info.plist inside the top-level <dict>:
<key>NSCameraUsageDescription</key>
<string>This app uses the camera to take photos.</string>
Android — add inside <manifest> in android/app/src/main/AndroidManifest.xml:
<uses-permission android:name="android.permission.CAMERA" />import { Camera, CameraResultType } from '@capacitor/camera';
async function takePhoto() {
const photo = await Camera.getPhoto({
quality: 90,
resultType: CameraResultType.Uri,
});
return photo.webPath;
}
Adding a plugin requires a fresh native build through Capgo Builder before it works on devices.
✅ Success: Camera code compiles and npx cap sync finishes without errors.
Step 12 — Add Capgo Live Updates
Every native change normally goes through app store review. Capgo Live Updates push changes to your app’s web layer (HTML, CSS, JS, images) over the air in minutes.
Install the updater in your first release so you’re never stuck waiting on review when you need to ship a fix.
npm install @capgo/capacitor-updater
npx cap sync
Add to capacitor.config.ts:
import type { CapacitorConfig } from '@capacitor/cli';

const config: CapacitorConfig = {
  appId: 'com.yourcompany.myapp',
  appName: 'My Lovable App',
  webDir: 'dist',
  plugins: {
    CapacitorUpdater: {
      autoUpdate: true,
    },
  },
};

export default config;
Initialize in your app entry (e.g. src/main.tsx):
import { CapacitorUpdater } from '@capgo/capacitor-updater';

void CapacitorUpdater.notifyAppReady();
Commit, push, and run a new Capgo Builder build so the updater SDK is in the native shell.
Upload web bundles after launch:
npm run build
npx @capgo/cli@latest bundle upload --channel productionTo automate this upload every time someone clicks Publish in Lovable, follow Automate Capgo Live Updates from Lovable with GitHub Actions.
✅ Success: Updater plugin is installed and notifyAppReady() runs on startup.
Step 13 — Fix Status Bar Spacing with a Live Update
On a real iPhone, your header may sit under the status bar (clock and battery). Modern Capacitor draws edge-to-edge, so your app must respect safe area insets: env(safe-area-inset-top), -bottom, -left, -right.
Many Lovable apps already handle the bottom inset but use fixed top padding (like pt-6) without the top inset.
1. Confirm viewport-fit=cover in index.html:
<meta name="viewport" content="width=device-width, initial-scale=1.0, viewport-fit=cover" />2. Fix top headers — use max() to keep web padding and grow on notched devices:
/* Before */
padding-top: 1.5rem;

/* After */
padding-top: max(1.5rem, env(safe-area-inset-top));
In Cursor or Lovable, ask:
“The app content runs under the status bar at the top on mobile. Add
env(safe-area-inset-top)to the top padding of each page header usingmax(), keeping the existing padding as the minimum.”
3. Ship the fix over the air — this is pure CSS, no native rebuild needed:
git add .
git commit -m "Fix top safe area on mobile"
git push
npm run build
npx @capgo/cli@latest bundle upload --channel production
Force-close the app on your device, reopen it, wait ~15–30 seconds, and open again. The header should sit below the status bar — fixed without store review.
✅ Success: Top content clears the status bar after the OTA bundle applies.
For deeper layout work, see @capgo/tailwind-capacitor and Capacitor edge-to-edge display.
Step 14 — Prepare Your Store Listing
Your app is built, installable, and you can push instant updates. Going live on the public stores is mostly paperwork:
- App icon — 1024×1024px for iOS (no transparency), 512×512px for Google Play
- Screenshots — Apple requires iPhone 6.9” (1320×2868px) screenshots
- App name, subtitle, description, keywords
- Privacy policy URL — required by both stores, even for free apps
- Age rating — questionnaire in each console
- Data collection disclosures — Apple Privacy Nutrition Labels and Google Data Safety
Method 1: Using Cursor AI (Recommended)
Set up app icons and splash screens for my Capacitor appMethod 2: Manual Setup
npm install -D @capacitor/assets
# Add assets/icon.png (1024x1024) and assets/splash.png (2732x2732)
npx capacitor-assets generate
npx cap sync
What’s left before “live”:
- Google Play closed testing (personal accounts created after Nov 13, 2023): at least 12 testers for 14 consecutive days before production access. iOS has no equivalent.
- Submit for review — Apple ~3–5 days, Google ~3–7 days after testing requirements are met.
See our first-time app review guide for the full checklist.
Common Errors (and How to Fix Them)
Could not find the web assets directory: ./dist— Runnpm run buildbeforenpx cap addornpx cap sync. Make surewebDirincapacitor.config.tsmatches your framework output (distfor Vite,outfor Next.js static export).- “This App ID … is not available” — Bundle IDs are globally unique. Pick a reverse-domain ID you control.
- iOS build fails after changing the bundle ID — The ID in your native project must match Apple App Store Connect. Find-and-replace across
ios/andandroid/, commit, rebuild. - White screen on launch — Set
base: './'in Vite config, rebuild, and runnpx cap sync. - Content under the status bar — Add
viewport-fit=coverandenv(safe-area-inset-top)padding (Step 13). - APK signed in debug mode — Google Play rejects debug builds. Use a release build signed with your keystore.
- Deployment rejected — version already exists — Bump version/build number in native projects and rebuild.
For Capgo Builder issues, see Native Build troubleshooting and Live Updates debugging.
Conclusion
You took a Lovable web app to native iOS and Android — built in the cloud without a Mac, with a real camera feature and a layout fix shipped over the air. That’s the hard part done.
Next Steps
- Capgo Live Updates — Ship UI and copy fixes without waiting on store review
- Capgo Builder — Automate release builds in CI
- Capgo Plugin Directory — Biometrics, push notifications, geolocation, and more
- Related guides: Base44 to mobile · Bolt.new to mobile
Sign up for a free Capgo account to enable Live Updates and cloud native builds.
Resources
- Lovable Documentation
- Capacitor Documentation
- Capgo Native Builds
- Capgo — Live Updates for Capacitor Apps
- Build iOS from Windows
- Next.js static export for mobile
Keep going from Convert Your Lovable App to iOS and Android with Capacitor
If you are using Convert Your Lovable App to iOS and Android with Capacitor to plan native plugin work, connect it with Capgo Plugin Directory for the product workflow in Capgo Plugin Directory, Capacitor Plugins by Capgo for the implementation detail in Capacitor Plugins by Capgo, Capgo Native Builds for the product workflow in Capgo Native Builds, and Build iOS from Windows for cloud iOS builds without a Mac.





