Pengaturan Login Facebook
Pengantar
Section titled “Pengantar”Dalam panduan ini, Anda akan mempelajari cara mengatur Login Facebook dengan Capgo Social Login. Anda akan memerlukan hal berikut:
- Akun Facebook Developer
- Package name/bundle ID aplikasi Anda
- Akses ke terminal untuk menghasilkan key hashes (Android)
Pengaturan Umum
Section titled “Pengaturan Umum”Jika Anda belum memiliki aplikasi Facebook yang dibuat, ikuti langkah-langkah berikut:
-
Buat Aplikasi Facebook
Ikuti tutorial untuk Create an App
-
Tambahkan Facebook Login ke aplikasi Anda
Di Facebook Developer Dashboard Anda, tambahkan produk Facebook Login ke aplikasi Anda
-
Sebelum Anda dapat merilis aplikasi Anda ke publik, ikuti tutorial ini untuk mempublikasikannya
Informasi Penting
Section titled “Informasi Penting”Berikut adalah tempat untuk menemukan informasi kunci yang Anda perlukan untuk integrasi:
-
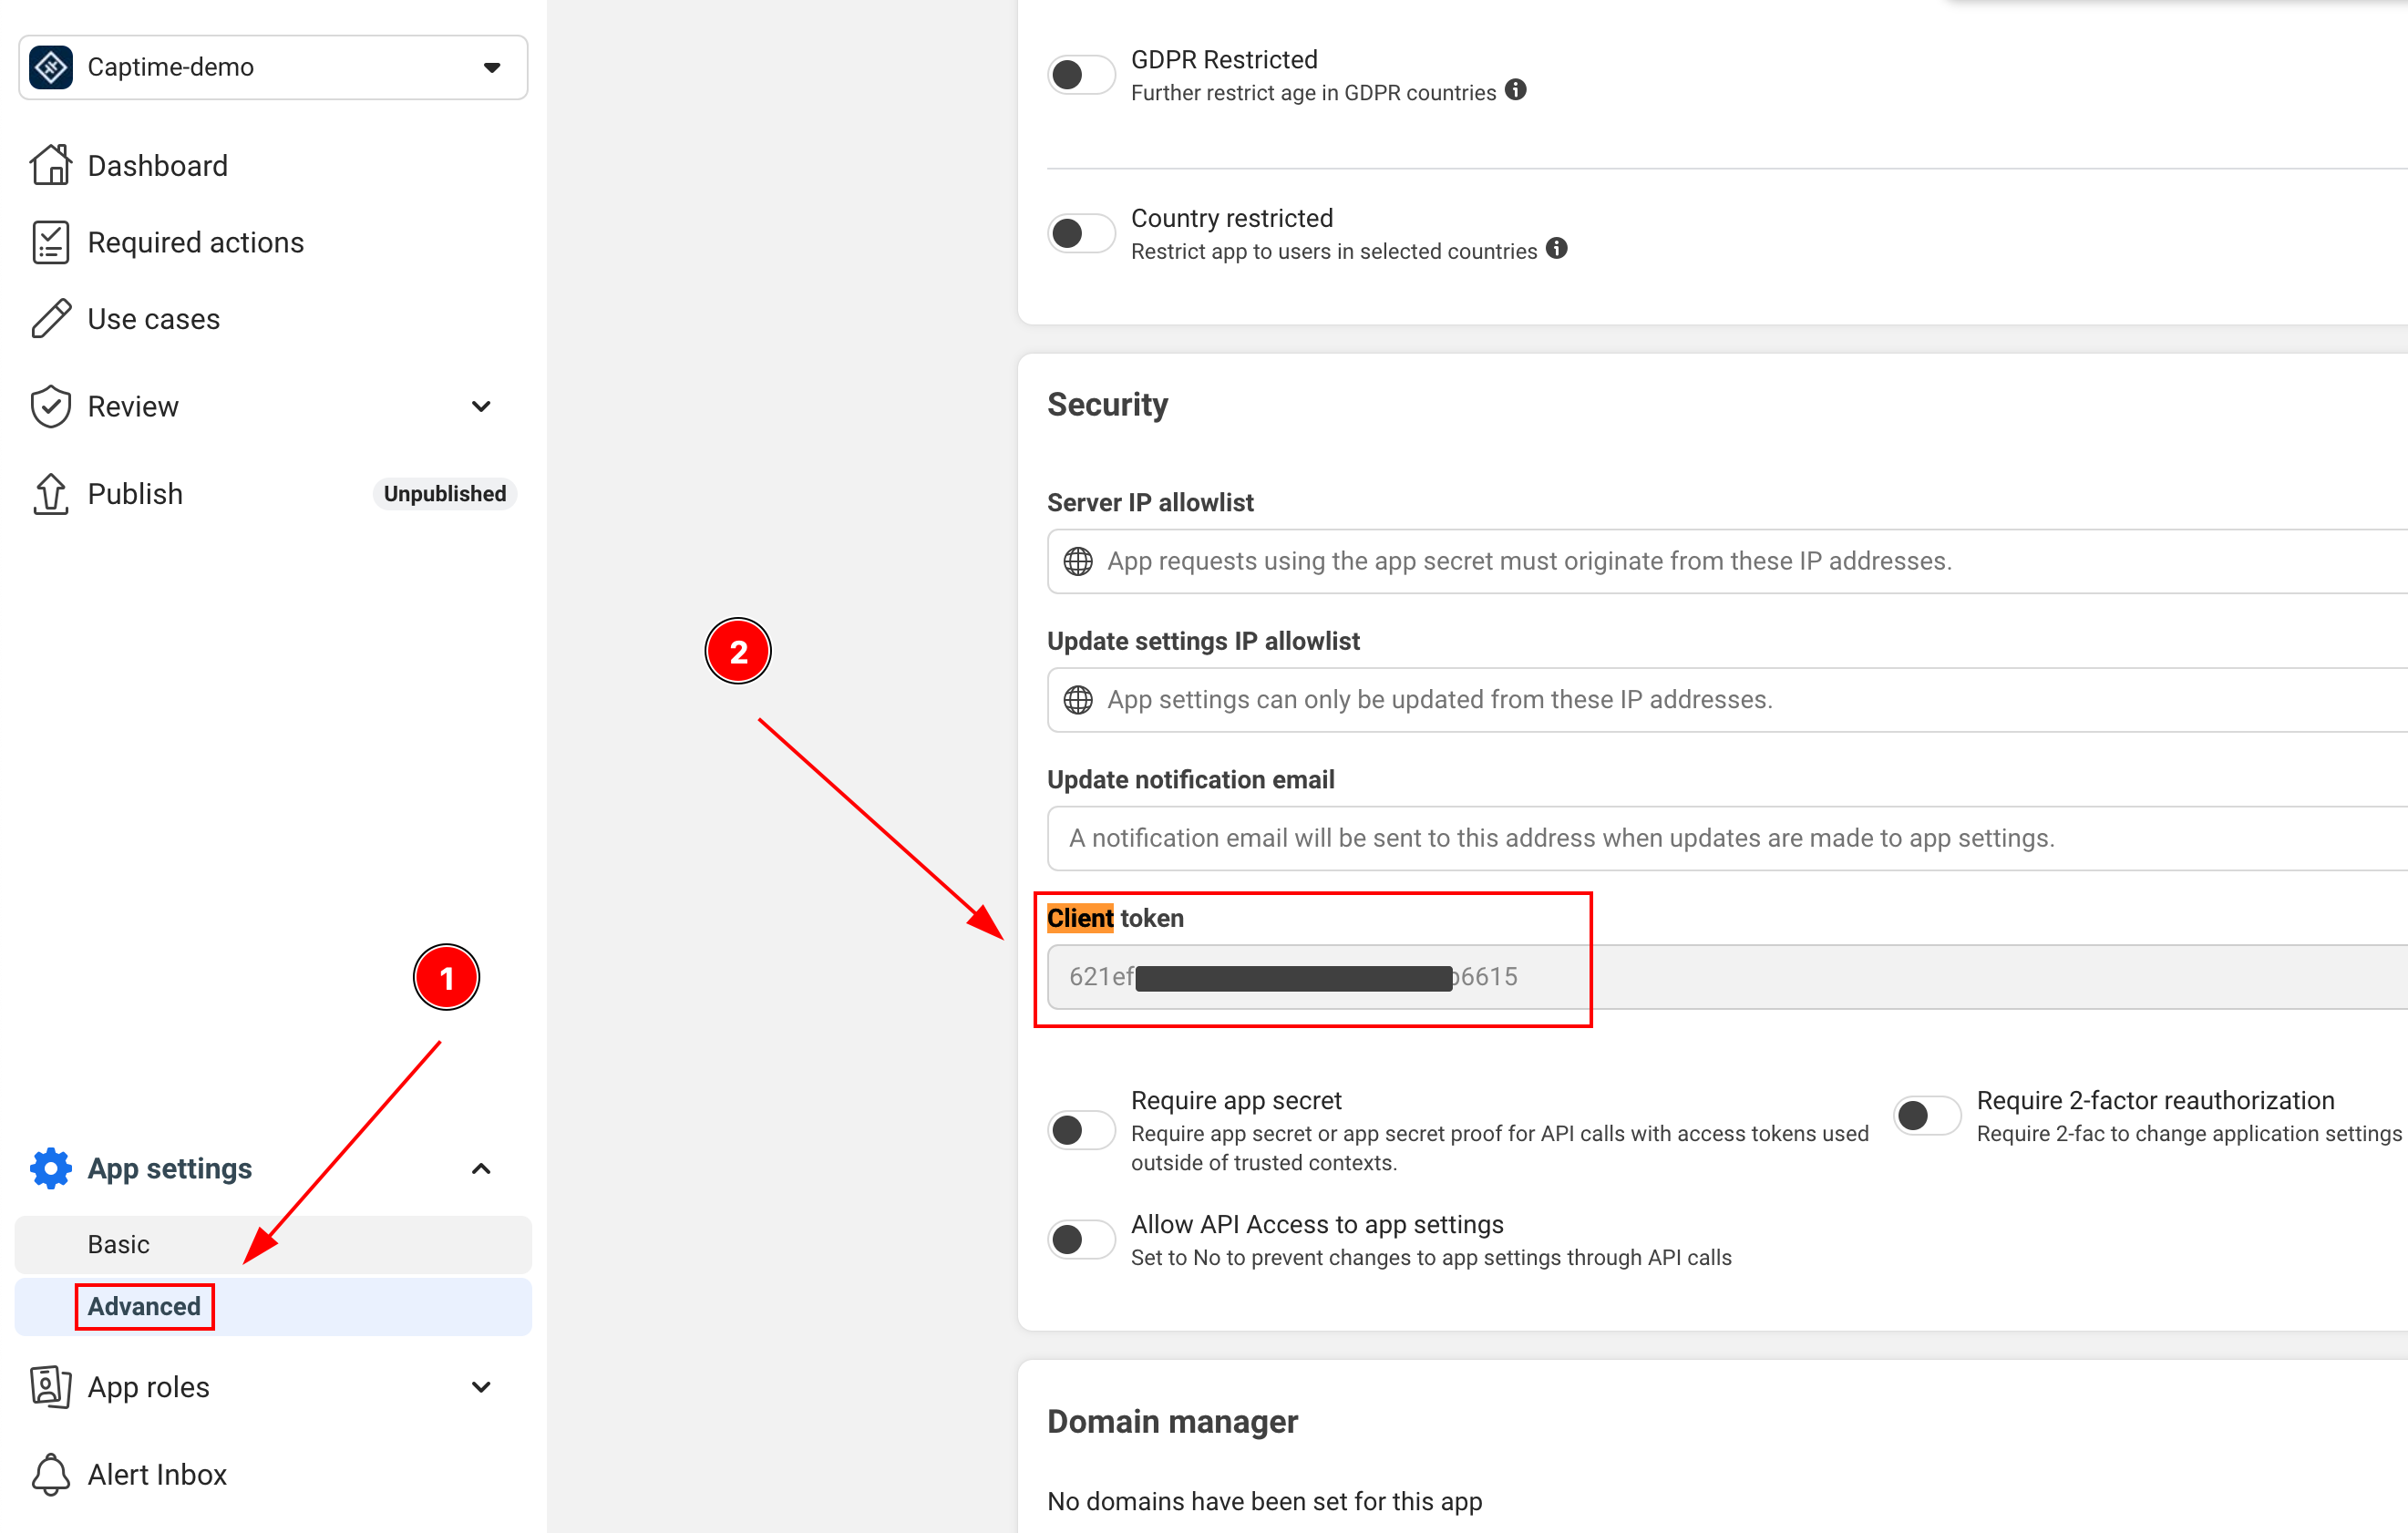
CLIENT_TOKEN:
-
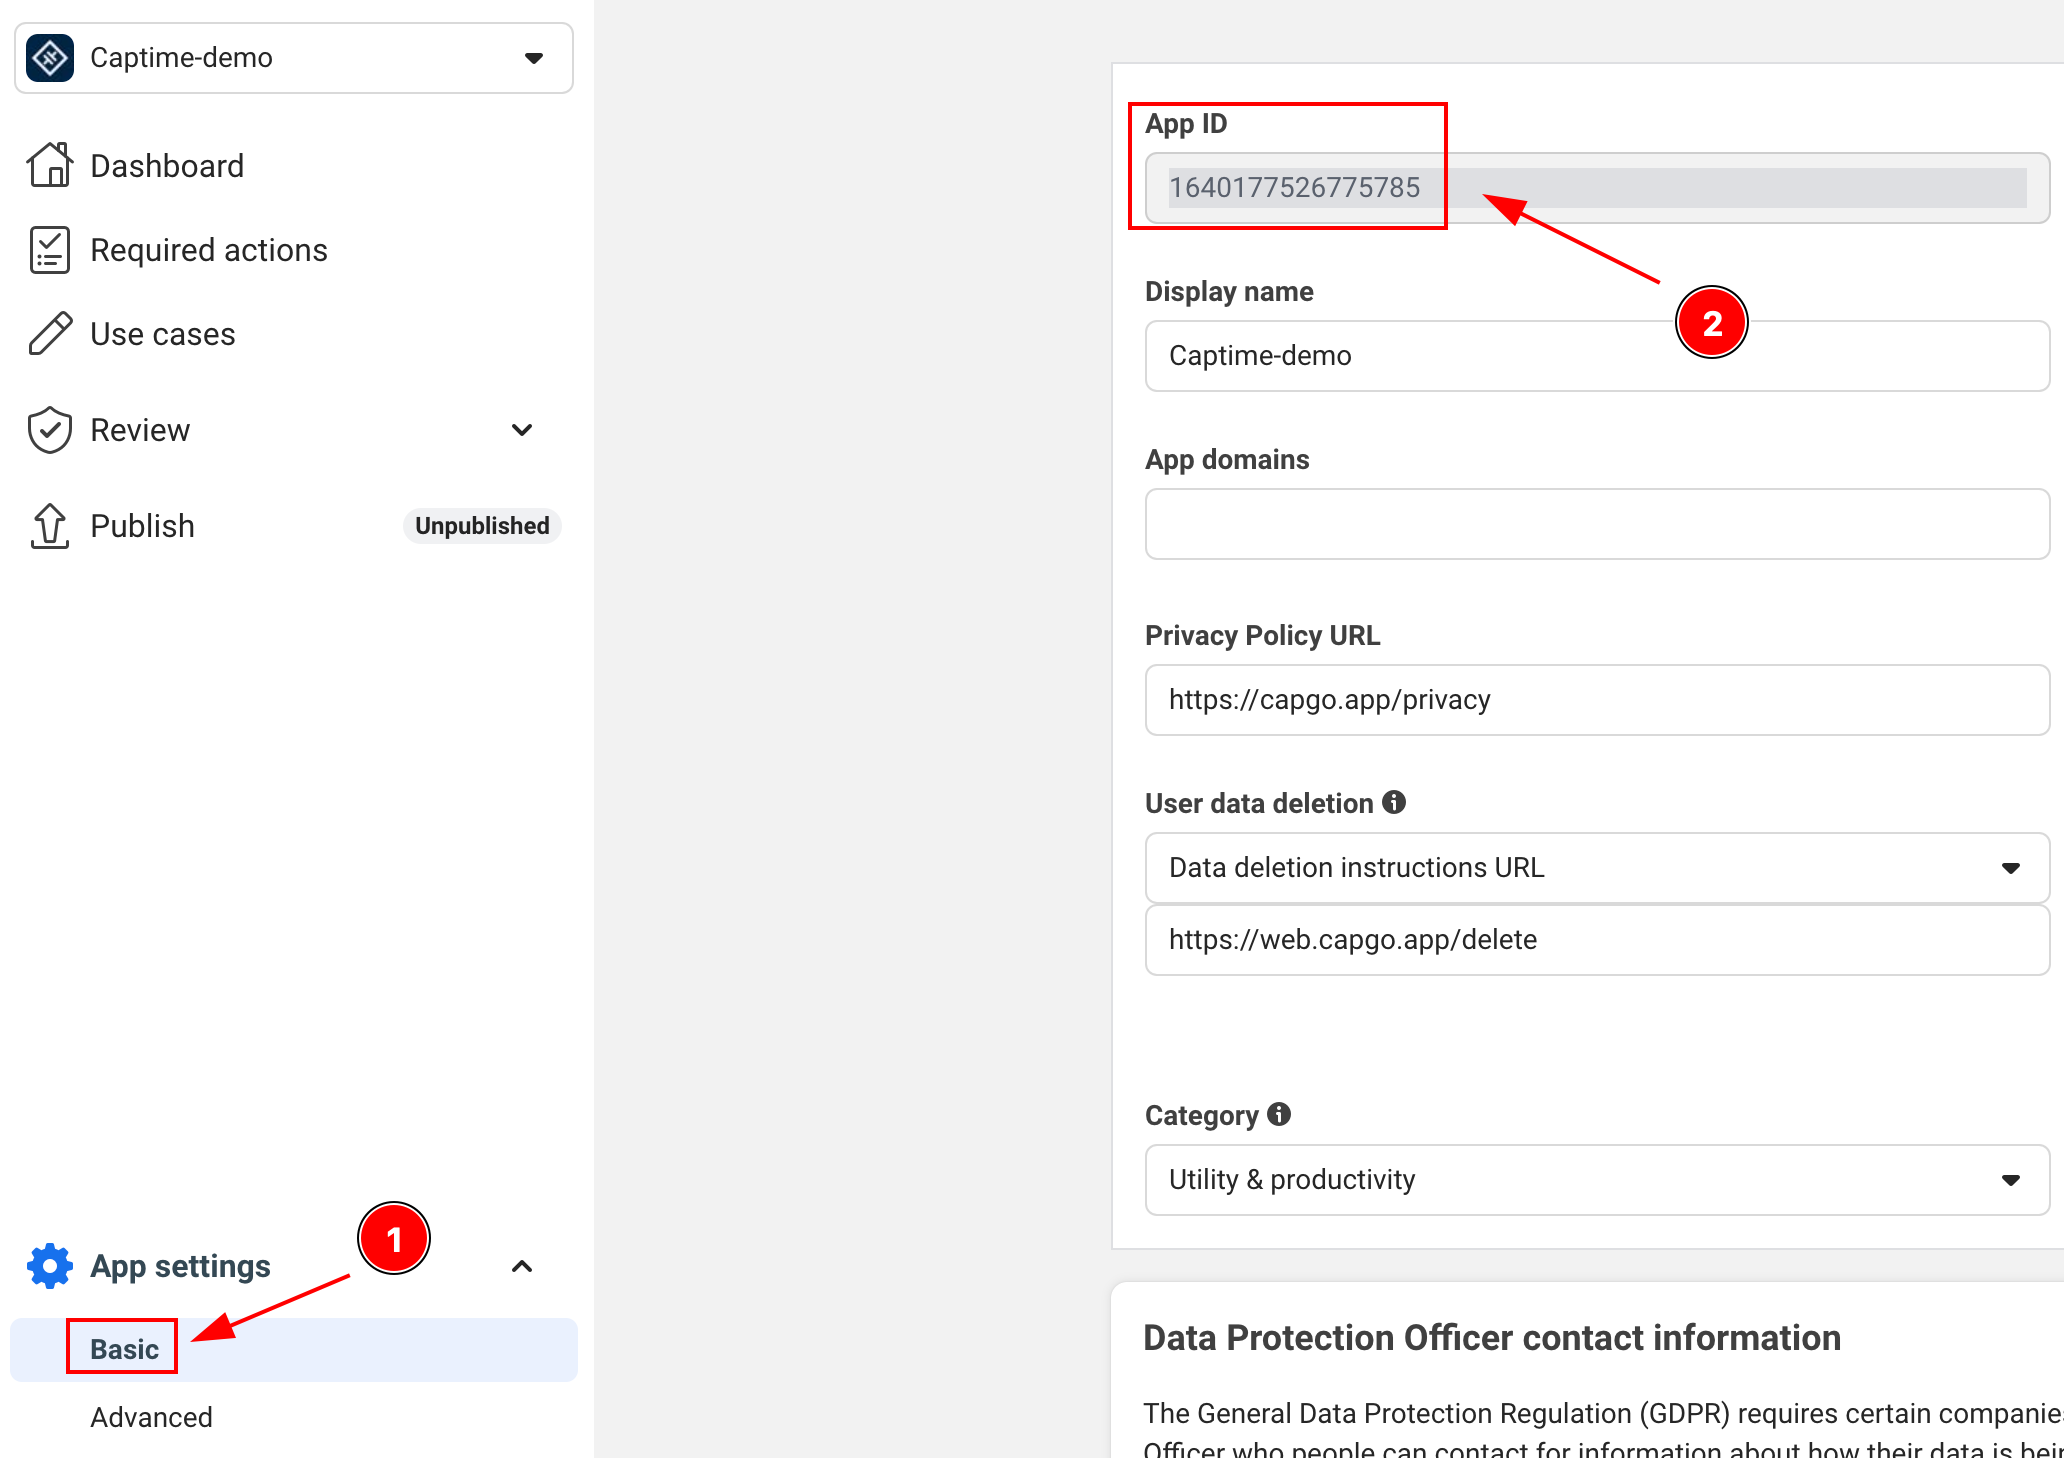
APP_ID:
-
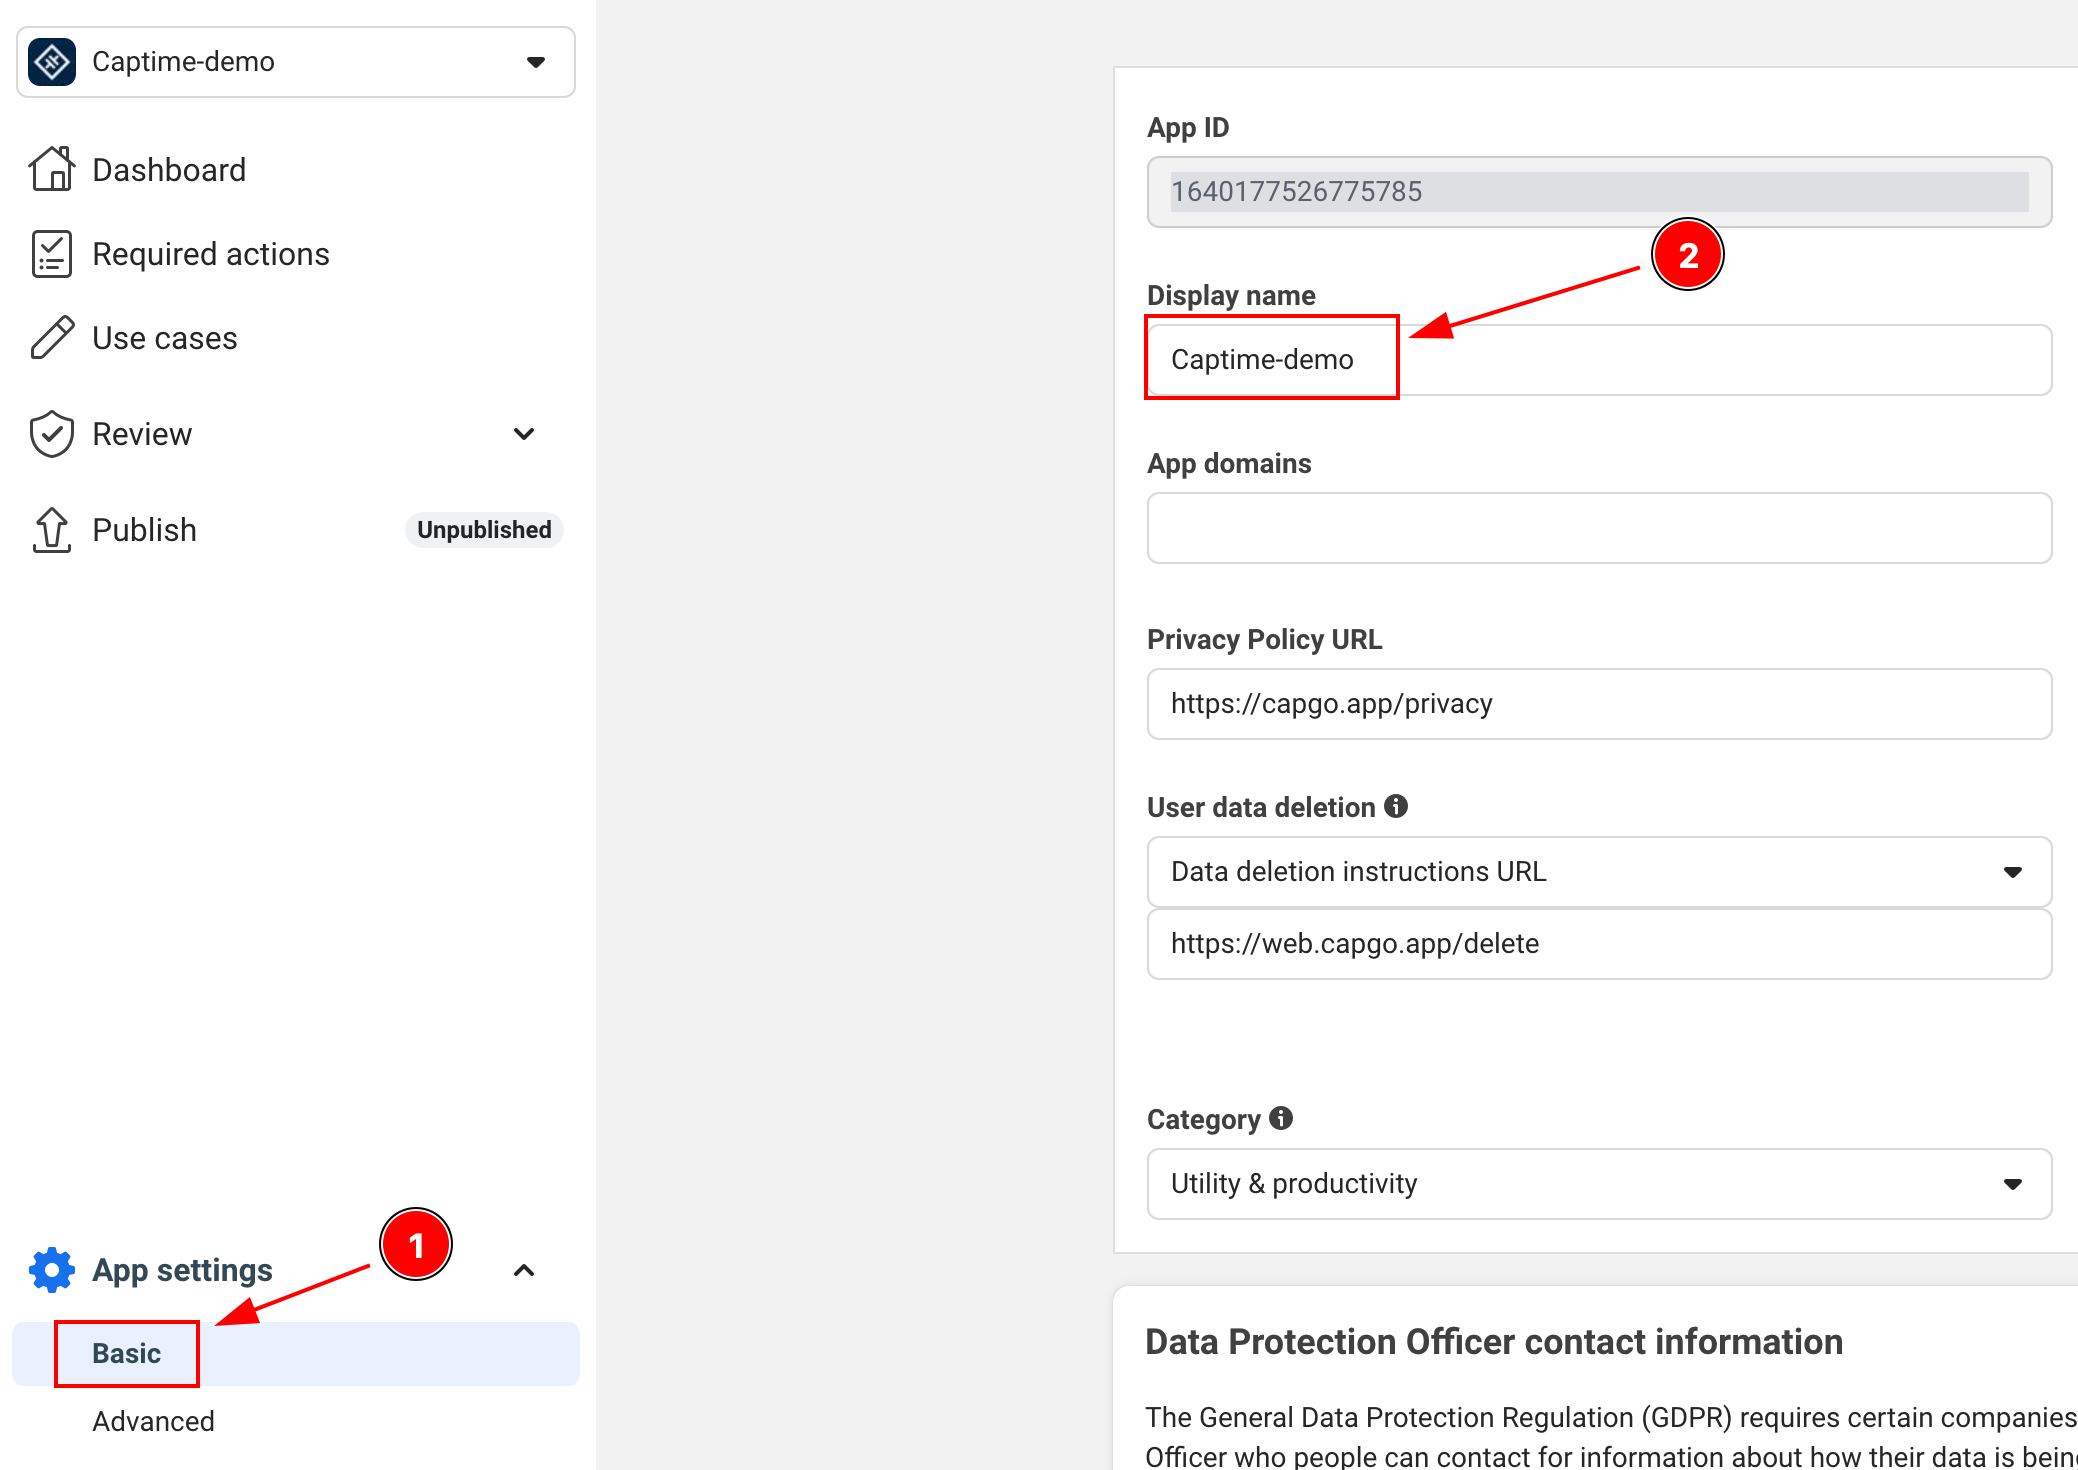
APP_NAME:
Pengaturan Android
Section titled “Pengaturan Android”-
Tambahkan izin internet ke
AndroidManifest.xmlAndaPastikan baris ini ada:
<uses-permission android:name="android.permission.INTERNET"/> -
Hasilkan Android key hash Anda
Ini adalah langkah keamanan penting yang diperlukan oleh Facebook. Buka terminal Anda dan jalankan:
Terminal window keytool -exportcert -alias androiddebugkey -keystore ~/.android/debug.keystore | openssl sha1 -binary | openssl base64 -ASaat diminta password, gunakan:
android -
Tambahkan key hash ke aplikasi Facebook Anda
- Buka dashboard aplikasi Anda di Facebook Developers
- Navigasikan ke Settings > Basic
- Gulir ke bawah ke bagian “Android”
- Klik “Add Platform” jika Android belum ditambahkan dan isi detailnya
- Tambahkan key hash yang Anda hasilkan
- Untuk production, tambahkan debug dan release key hashes
-
Perbarui
AndroidManifest.xmlAnda untuk menyertakan:<application>...<activity android:name="com.facebook.FacebookActivity"android:configChanges="keyboard|keyboardHidden|screenLayout|screenSize|orientation"android:label="@string/app_name" /><activityandroid:name="com.facebook.CustomTabActivity"android:exported="true"><intent-filter><action android:name="android.intent.action.VIEW" /><category android:name="android.intent.category.DEFAULT" /><category android:name="android.intent.category.BROWSABLE" /><data android:scheme="FB[APP_ID]" /></intent-filter></activity></application>
Pengaturan iOS
Section titled “Pengaturan iOS”-
Tambahkan platform iOS di Facebook Developer Console
- Buka dashboard aplikasi Anda di Facebook Developers
- Navigasikan ke Settings > Basic
- Gulir ke bawah ke bagian paling bawah halaman dan klik “Add Platform”
- Pilih iOS dan isi detail yang diperlukan
-
Buka proyek Xcode Anda dan navigasikan ke Info.plist
-
Tambahkan entri berikut ke Info.plist Anda:
<key>FacebookAppID</key><string>[APP-ID]</string><key>FacebookClientToken</key><string>[CLIENT-TOKEN]</string><key>FacebookDisplayName</key><string>[APP-NAME]</string><key>LSApplicationQueriesSchemes</key><array><string>fbapi</string><string>fb-messenger-share-api</string></array><key>CFBundleURLTypes</key><array><dict><key>CFBundleURLSchemes</key><array><string>fb[APP-ID]</string></array></dict></array> -
Modifikasi
AppDelegate.swiftimport FBSDKCoreKit@UIApplicationMainclass AppDelegate: UIResponder, UIApplicationDelegate {func application(_ application: UIApplication, didFinishLaunchingWithOptions launchOptions: [UIApplication.LaunchOptionsKey: Any]?) -> Bool {// Override point for customization after application launch.// Initialize Facebook SDKFBSDKCoreKit.ApplicationDelegate.shared.application(application,didFinishLaunchingWithOptions: launchOptions)return true}func application(_ app: UIApplication, open url: URL, options: [UIApplication.OpenURLOptionsKey: Any] = [:]) -> Bool {// Called when the app was launched with a url. Feel free to add additional processing here,// but if you want the App API to support tracking app url opens, make sure to keep this callif (FBSDKCoreKit.ApplicationDelegate.shared.application(app,open: url,sourceApplication: options[UIApplication.OpenURLOptionsKey.sourceApplication] as? String,annotation: options[UIApplication.OpenURLOptionsKey.annotation])) {return true;} else {return ApplicationDelegateProxy.shared.application(app, open: url, options: options)}}}
Menggunakan Login Facebook di Aplikasi Anda
Section titled “Menggunakan Login Facebook di Aplikasi Anda”-
Inisialisasi login Facebook di aplikasi Anda
import { SocialLogin } from '@capgo/capacitor-social-login';// Initialize during app startupawait SocialLogin.initialize({facebook: {appId: 'APP_ID',clientToken: 'CLIENT_TOKEN',}}) -
Implementasikan fungsi login
async function loginWithFacebook() {try {const result = await SocialLogin.login({provider: 'facebook',options: {permissions: ['email', 'public_profile'],limitedLogin: false // See Limited Login section below for important details}});console.log('Facebook login result:', result);// Handle successful login} catch (error) {console.error('Facebook login error:', error);// Handle error}} -
Dapatkan Data Profil Pengguna
Setelah login berhasil, Anda dapat mengambil informasi profil tambahan:
async function getFacebookProfile() {try {const profileResponse = await SocialLogin.providerSpecificCall({call: 'facebook#getProfile',options: {fields: ['id', 'name', 'email', 'first_name', 'last_name', 'picture']}});console.log('Facebook profile:', profileResponse.profile);return profileResponse.profile;} catch (error) {console.error('Failed to get Facebook profile:', error);return null;}}// Example usage after loginasync function loginAndGetProfile() {const loginResult = await loginWithFacebook();if (loginResult) {const profile = await getFacebookProfile();if (profile) {console.log('User ID:', profile.id);console.log('Name:', profile.name);console.log('Email:', profile.email);console.log('Profile Picture:', profile.picture?.data?.url);}}}Keterbatasan Jenis Token: Panggilan
getProfilehanya berfungsi ketika Anda memiliki access token (login standar dengan tracking diizinkan). Jika pengguna menolak tracking atau Anda menggunakan limited login (hanya JWT token), panggilan ini akan gagal. Dalam hal ini, gunakan data profil yang disediakan dalam respons login awal.
⚠️ Kritis: Penanganan Token Backend
Section titled “⚠️ Kritis: Penanganan Token Backend”Backend Anda harus menangani dua jenis token berbeda karena pengguna iOS dapat menerima access token atau JWT token tergantung pada pilihan App Tracking Transparency mereka, sementara pengguna Android selalu menerima access token.
Jenis Token berdasarkan Platform
Section titled “Jenis Token berdasarkan Platform”| Platform | Pengaturan limitedLogin | Pilihan ATT Pengguna | Jenis Token Hasil |
|---|---|---|---|
| iOS | true | Apa pun | JWT Token |
| iOS | false | Mengizinkan tracking | Access Token |
| iOS | false | Menolak tracking | JWT Token (override otomatis) |
| Android | Apa pun | N/A | Access Token (selalu) |
Implementasi Backend
Section titled “Implementasi Backend”-
Deteksi Jenis Token dan Tangani Sesuai
async function loginWithFacebook() {try {const loginResult = await SocialLogin.login({provider: 'facebook',options: {permissions: ['email', 'public_profile'],limitedLogin: false // iOS: depends on ATT, Android: ignored}});if (loginResult.accessToken) {// Access token (Android always, iOS when tracking allowed)return handleAccessToken(loginResult.accessToken.token);} else if (loginResult.idToken) {// JWT token (iOS only when tracking denied or limitedLogin: true)return handleJWTToken(loginResult.idToken);}} catch (error) {console.error('Facebook login error:', error);}} -
Contoh Integrasi Firebase
import { OAuthProvider, FacebookAuthProvider, signInWithCredential } from 'firebase/auth';async function handleAccessToken(accessToken: string, nonce: string) {// For access tokens, use OAuthProvider (new method)const fbOAuth = new OAuthProvider("facebook.com");const credential = fbOAuth.credential({idToken: accessToken,rawNonce: nonce});try {const userResponse = await signInWithCredential(auth, credential);return userResponse;} catch (error) {console.error('Firebase OAuth error:', error);return false;}}async function handleJWTToken(jwtToken: string) {// For JWT tokens, send to your backend for validationtry {const response = await fetch('/api/auth/facebook-jwt', {method: 'POST',headers: {'Content-Type': 'application/json',},body: JSON.stringify({ jwtToken })});const result = await response.json();return result;} catch (error) {console.error('JWT validation error:', error);return false;}} -
Validasi JWT Backend
// Backend: Validate JWT token from Facebookimport jwt from 'jsonwebtoken';import { Request, Response } from 'express';app.post('/api/auth/facebook-jwt', async (req: Request, res: Response) => {const { jwtToken } = req.body;try {// Verify JWT token with Facebook's public key// See: https://developers.facebook.com/docs/facebook-login/limited-login/token/validating/#standard-claimsconst decoded = jwt.verify(jwtToken, getFacebookPublicKey(), {algorithms: ['RS256'],audience: process.env.FACEBOOK_APP_ID,issuer: 'https://www.facebook.com' // From: https://www.facebook.com/.well-known/openid-configuration/?_rdr});// Extract user info from JWTconst userInfo = {id: decoded.sub,email: decoded.email,name: decoded.name,isJWTAuth: true};// Create your app's session/tokenconst sessionToken = createUserSession(userInfo);res.json({success: true,token: sessionToken,user: userInfo});} catch (error) {console.error('JWT validation failed:', error);res.status(401).json({ success: false, error: 'Invalid token' });}}); -
Penangan Token Backend Generik
// Handle both token types in your backendasync function authenticateFacebookUser(tokenData: any) {if (tokenData.accessToken) {// Handle access token - validate with Facebook Graph APIconst response = await fetch(`https://graph.facebook.com/me?access_token=${tokenData.accessToken}&fields=id,name,email`);const userInfo = await response.json();return {user: userInfo,tokenType: 'access_token',expiresIn: tokenData.expiresIn || 3600};} else if (tokenData.jwtToken) {// Handle JWT token - decode and validate// See: https://developers.facebook.com/docs/facebook-login/limited-login/token/validating/#standard-claimsconst decoded = jwt.verify(tokenData.jwtToken, getFacebookPublicKey());return {user: {id: decoded.sub,name: decoded.name,email: decoded.email},tokenType: 'jwt',expiresIn: decoded.exp - Math.floor(Date.now() / 1000)};} else {throw new Error('No valid token provided');}}
Pertimbangan Utama
Section titled “Pertimbangan Utama”Access Token (Login Standar):
- ✅ Android: Selalu tersedia (pembatasan khusus iOS tidak berlaku)
- ✅ iOS: Hanya ketika pengguna secara eksplisit mengizinkan app tracking
- ✅ Dapat digunakan untuk mengakses Facebook Graph API
- ✅ Waktu kedaluwarsa lebih lama
- ✅ Lebih banyak data pengguna tersedia
- ❌ Menjadi kurang umum di iOS karena pengguna semakin menolak tracking
JWT Token (Mode Privasi Khusus iOS):
- ❌ Android: Tidak pernah terjadi (tidak didukung)
- ✅ iOS: Saat tracking ditolak atau
limitedLogin: true - ✅ Menghormati preferensi privasi pengguna iOS
- ❌ Hanya berisi info pengguna dasar
- ❌ Waktu kedaluwarsa lebih pendek
- ❌ Tidak ada akses ke Facebook Graph API
- ⚠️ Sekarang skenario paling umum untuk pengguna iOS
Perilaku Khusus Platform:
- Aplikasi iOS: Harus menangani access token DAN JWT token
- Aplikasi Android: Hanya perlu menangani access token
- Aplikasi lintas platform: Harus mengimplementasikan kedua metode penanganan token
Persyaratan Konteks Aman (Web/Capacitor)
Section titled “Persyaratan Konteks Aman (Web/Capacitor)”Keterbatasan Crypto API
Section titled “Keterbatasan Crypto API”Alur login Facebook yang diperbarui memerlukan Web Crypto API untuk generasi nonce, yang hanya tersedia dalam konteks aman:
// This requires secure context (HTTPS or localhost)async function sha256(message: string) { const msgBuffer = new TextEncoder().encode(message); const hashBuffer = await crypto.subtle.digest("SHA-256", msgBuffer); // ❌ Fails in insecure context // ...}Masalah Lingkungan Pengembangan
Section titled “Masalah Lingkungan Pengembangan”Masalah Umum: ionic serve dengan URL HTTP merusak autentikasi Facebook
| Lingkungan | Crypto API Tersedia | Facebook Login Berfungsi |
|---|---|---|
http://localhost:3000 | ✅ Ya | ✅ Ya |
http://127.0.0.1:3000 | ✅ Ya | ✅ Ya |
http://192.168.1.100:3000 | ❌ Tidak | ❌ Tidak |
https://any-domain.com | ✅ Ya | ✅ Ya |
Solusi untuk Pengembangan Capacitor
Section titled “Solusi untuk Pengembangan Capacitor”-
Gunakan localhost untuk pengujian web
Terminal window # Instead of ionic serve --host=0.0.0.0ionic serve --host=localhost -
Aktifkan HTTPS di Ionic
Terminal window ionic serve --ssl -
Uji pada perangkat sebenarnya
Terminal window # Capacitor apps run in secure context on devicesionic cap run iosionic cap run android -
Generasi nonce alternatif untuk pengembangan
async function generateNonce() {if (typeof crypto !== 'undefined' && crypto.subtle) {// Secure context - use crypto.subtlereturn await sha256(Math.random().toString(36).substring(2, 10));} else {// Fallback for development (not secure for production)console.warn('Using fallback nonce - not secure for production');return btoa(Math.random().toString(36).substring(2, 10));}}
Catatan Integrasi Firebase
Section titled “Catatan Integrasi Firebase”Dokumentasi Firebase terbaru memerlukan JWT token dengan nonce untuk autentikasi Facebook, terlepas dari pengaturan login. Pendekatan ini berfungsi dengan limitedLogin: true dan limitedLogin: false:
// Both modes can return JWT tokens depending on user choice const loginResult = await SocialLogin.login({ provider: 'facebook', options: { permissions: ['email', 'public_profile'], limitedLogin: false, // true = always JWT, false = depends on user tracking choice nonce: nonce } });Keterbatasan Pengembangan: Jika Anda menggunakan ionic serve pada IP jaringan (bukan localhost), login Facebook akan gagal karena pembatasan crypto API. Gunakan localhost atau HTTPS untuk pengujian web.
Pemecahan Masalah
Section titled “Pemecahan Masalah”Masalah Umum dan Solusi
Section titled “Masalah Umum dan Solusi”-
Kesalahan key hash di Android
- Periksa kembali bahwa Anda telah menambahkan key hash yang benar ke dashboard Facebook
- Untuk release builds, pastikan Anda telah menambahkan debug dan release key hashes
- Verifikasi Anda menggunakan keystore yang benar saat menghasilkan hash
-
Tombol login Facebook tidak muncul
- Verifikasi semua entri manifest sudah benar
- Periksa bahwa Facebook App ID dan Client Token Anda sudah benar
- Pastikan Anda telah menginisialisasi SDK dengan benar
-
Masalah iOS umum
- Pastikan semua entri Info.plist sudah benar
- Verifikasi URL scheme dikonfigurasi dengan benar
- Periksa bahwa bundle ID Anda cocok dengan yang terdaftar di dashboard Facebook
Pengujian
Section titled “Pengujian”-
Sebelum pengujian, tambahkan test users di Facebook Developer Console
- Buka Roles > Test Users
- Buat test user
- Gunakan kredensial ini untuk pengujian
-
Uji debug dan release builds
- Debug build dengan debug key hash
- Release build dengan release key hash
- Uji pada emulator dan perangkat fisik
Ingat untuk menguji alur login lengkap, termasuk:
- Login berhasil
- Pembatalan login
- Penanganan kesalahan
- Fungsi logout
