
在本教程中,我们将从一个新的 React 应用程序开始,逐步过渡到使用Capacitor进行原生移动开发。您还可以添加Capgo Native Navigation和Transitions来实现原生移动体验,并使用tailwind-capacitor来安全区域。
Capacitor使您能够轻松将React Web应用程序转换为原生移动应用程序,无需进行重大修改或学习新的技能,如React Native。
With just a few simple steps, most React applications can be transformed into mobile apps.
This tutorial will guide you through the process, starting with a new React app and then incorporating Capacitor to move into the realm of native mobile apps. You can also use Capgo Native Navigation, Transitions, and tailwind-capacitor for safe areas.
关于Capacitor
CapacitorJS 是一个革命性的工具!您可以轻松将其整合到任何 Web 项目中,它会将您的应用包装在一个原生 WebView 中,生成原生 Xcode 和 Android Studio 项目,并且其插件提供对原生设备功能的访问,例如通过 JS 桥访问摄像头。
With Capacitor, you get a fantastic native mobile app without any complicated setup or steep learning curve. Its slim API and streamlined functionality make it a breeze to integrate into your project. Trust me, you’ll be amazed at how effortless it is to achieve a fully functional native app with Capacitor!
准备您的 React 应用
虽然有各种方法来启动 React 应用,但在本教程中,我们将选择最简单的方法,即提供一个空白的 React 应用:
npx create-react-app my-app为了创建一个原生移动应用,我们需要一个 export 我们的项目。因此,让我们在我们的 package.json 中包含一个简单的脚本,以便可以利用它来构建和导出 React 项目:
{
  "scripts": {
    "start": "react-scripts start",
    "build": "react-scripts build",
    "test": "react-scripts test",
    "eject": "react-scripts eject"
  }
}
您现在可以无忧无虑地运行了,应该能在项目根目录看到一个新鲜的输出文件夹。 npm run build 不用担心,__CAPGO_KEEP_0__将在稍后使用这个文件夹,但现在我们必须正确地设置它。
将Capacitor添加到您的React App中
Adding Capacitor to Your React App
首先,我们可以将__CAPGO_KEEP_0__和__CAPGO_KEEP_1__安装为开发依赖项,然后在项目中设置它。在设置过程中,您可以按“回车”键以接受名称和包ID的默认值。 sync 接下来,我们需要安装核心包和iOS和Android平台的相关包。
最后,我们可以添加平台,__CAPGO_KEEP_0__将在项目根目录创建每个平台的文件夹: Capacitor CLI __CAPGO_KEEP_0__将在稍后使用这个文件夹,但现在我们必须正确地设置它。
__CAPGO_KEEP_0__和__CAPGO_KEEP_1__将作为开发依赖项安装在您的项目中。
Capacitor将在项目根目录创建每个平台的文件夹。
# Install the Capacitor CLI locally
npm install -D @capacitor/cli

# Initialize Capacitor in your React project
npx cap init

# Install the required packages
npm install @capacitor/core @capacitor/ios @capacitor/android

# Add the native platforms
npx cap add ios
npx cap add android
__CAPGO_KEEP_0__将在稍后使用这个文件夹,但现在我们必须正确地设置它。 ios 和 android 在您的React项目中创建的文件夹。
这些是真正的本机项目!
为了以后访问Android项目,您必须安装 Android Studio。对于iOS,您需要一台Mac,并应安装 Xcode.
此外,您应该在项目中找到一个 capacitor.config.ts 文件,这个文件包含一些基本的Capacitor设置,在同步过程中会使用这些设置。您需要注意的唯一事情是 webDir, 必须指向您的构建命令的结果。当前,情况不准确。
要纠正此问题,请打开 capacitor.config.json 文件并更新 webDir:
{
  "appId": "com.example.app",
  "appName": "my-app",
  "webDir": "out",
  "bundledWebRuntime": false
}
您可以通过执行以下命令来尝试它:
npm run build
npx cap sync
第一个命令 npm run build 将仅构建您的 React 项目并导出静态构建。
而第二个命令 npx cap sync 将同步所有 web code 到 native 平台的正确位置,以便在应用中显示。
此外,同步命令可能会更新 native 平台并安装插件,因此当您安装新时,可能会更新 native 平台并安装插件。 Capacitor 插件 是时候运行了 npx cap sync 再次。
你可能没有注意到,你已经完成了,来看看在设备上的应用吧!
构建和部署原生应用
为了开发 iOS 应用,你需要安装 Xcode ,并且为了开发 Android 应用,你需要安装 Android Studio 。此外,如果你打算在应用商店上发布你的应用,你需要在 iOS 上注册 Apple Developer Program,和在 Android 上注册 Google Play Console。
如果你是新手,想要进行原生移动开发,你可以使用 Capacitor CLI 来轻松打开两个原生项目:
npx cap open ios
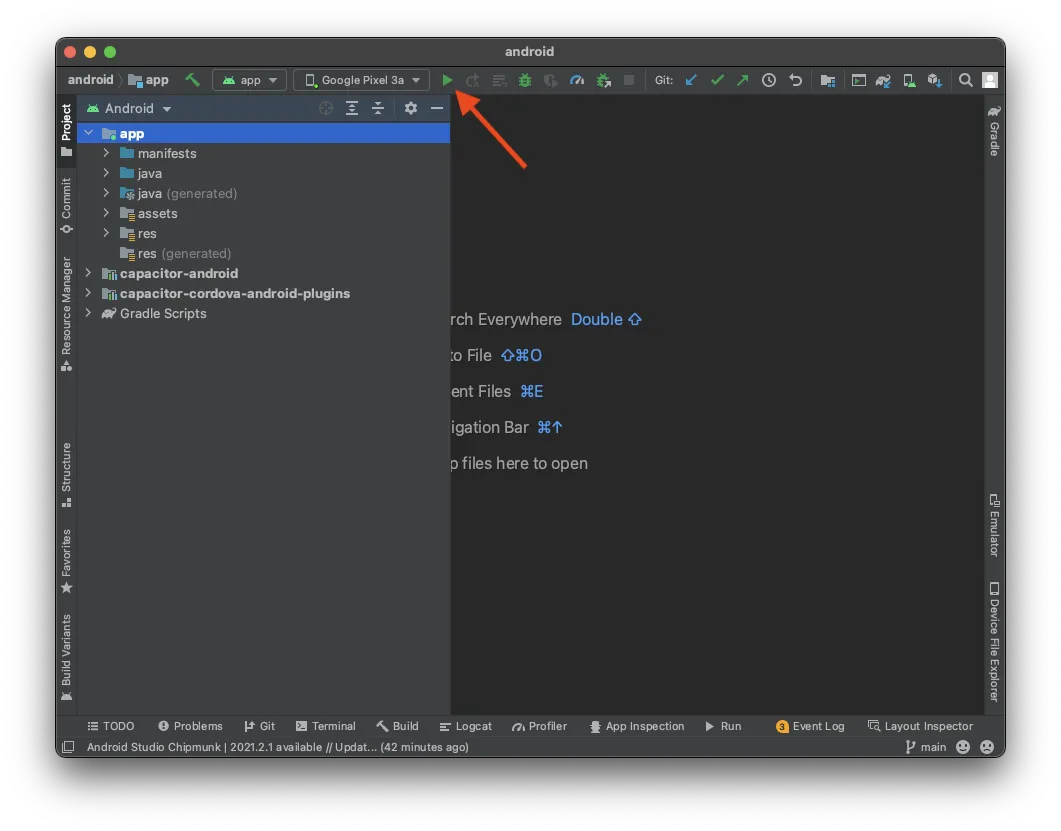
npx cap open android一旦你设置好了原生项目,部署应用到连接的设备就很容易了。在 Android Studio 中,你只需要等待所有内容就绪,然后你就可以在不改变任何设置的情况下将应用部署到连接的设备。以下是一个例子:
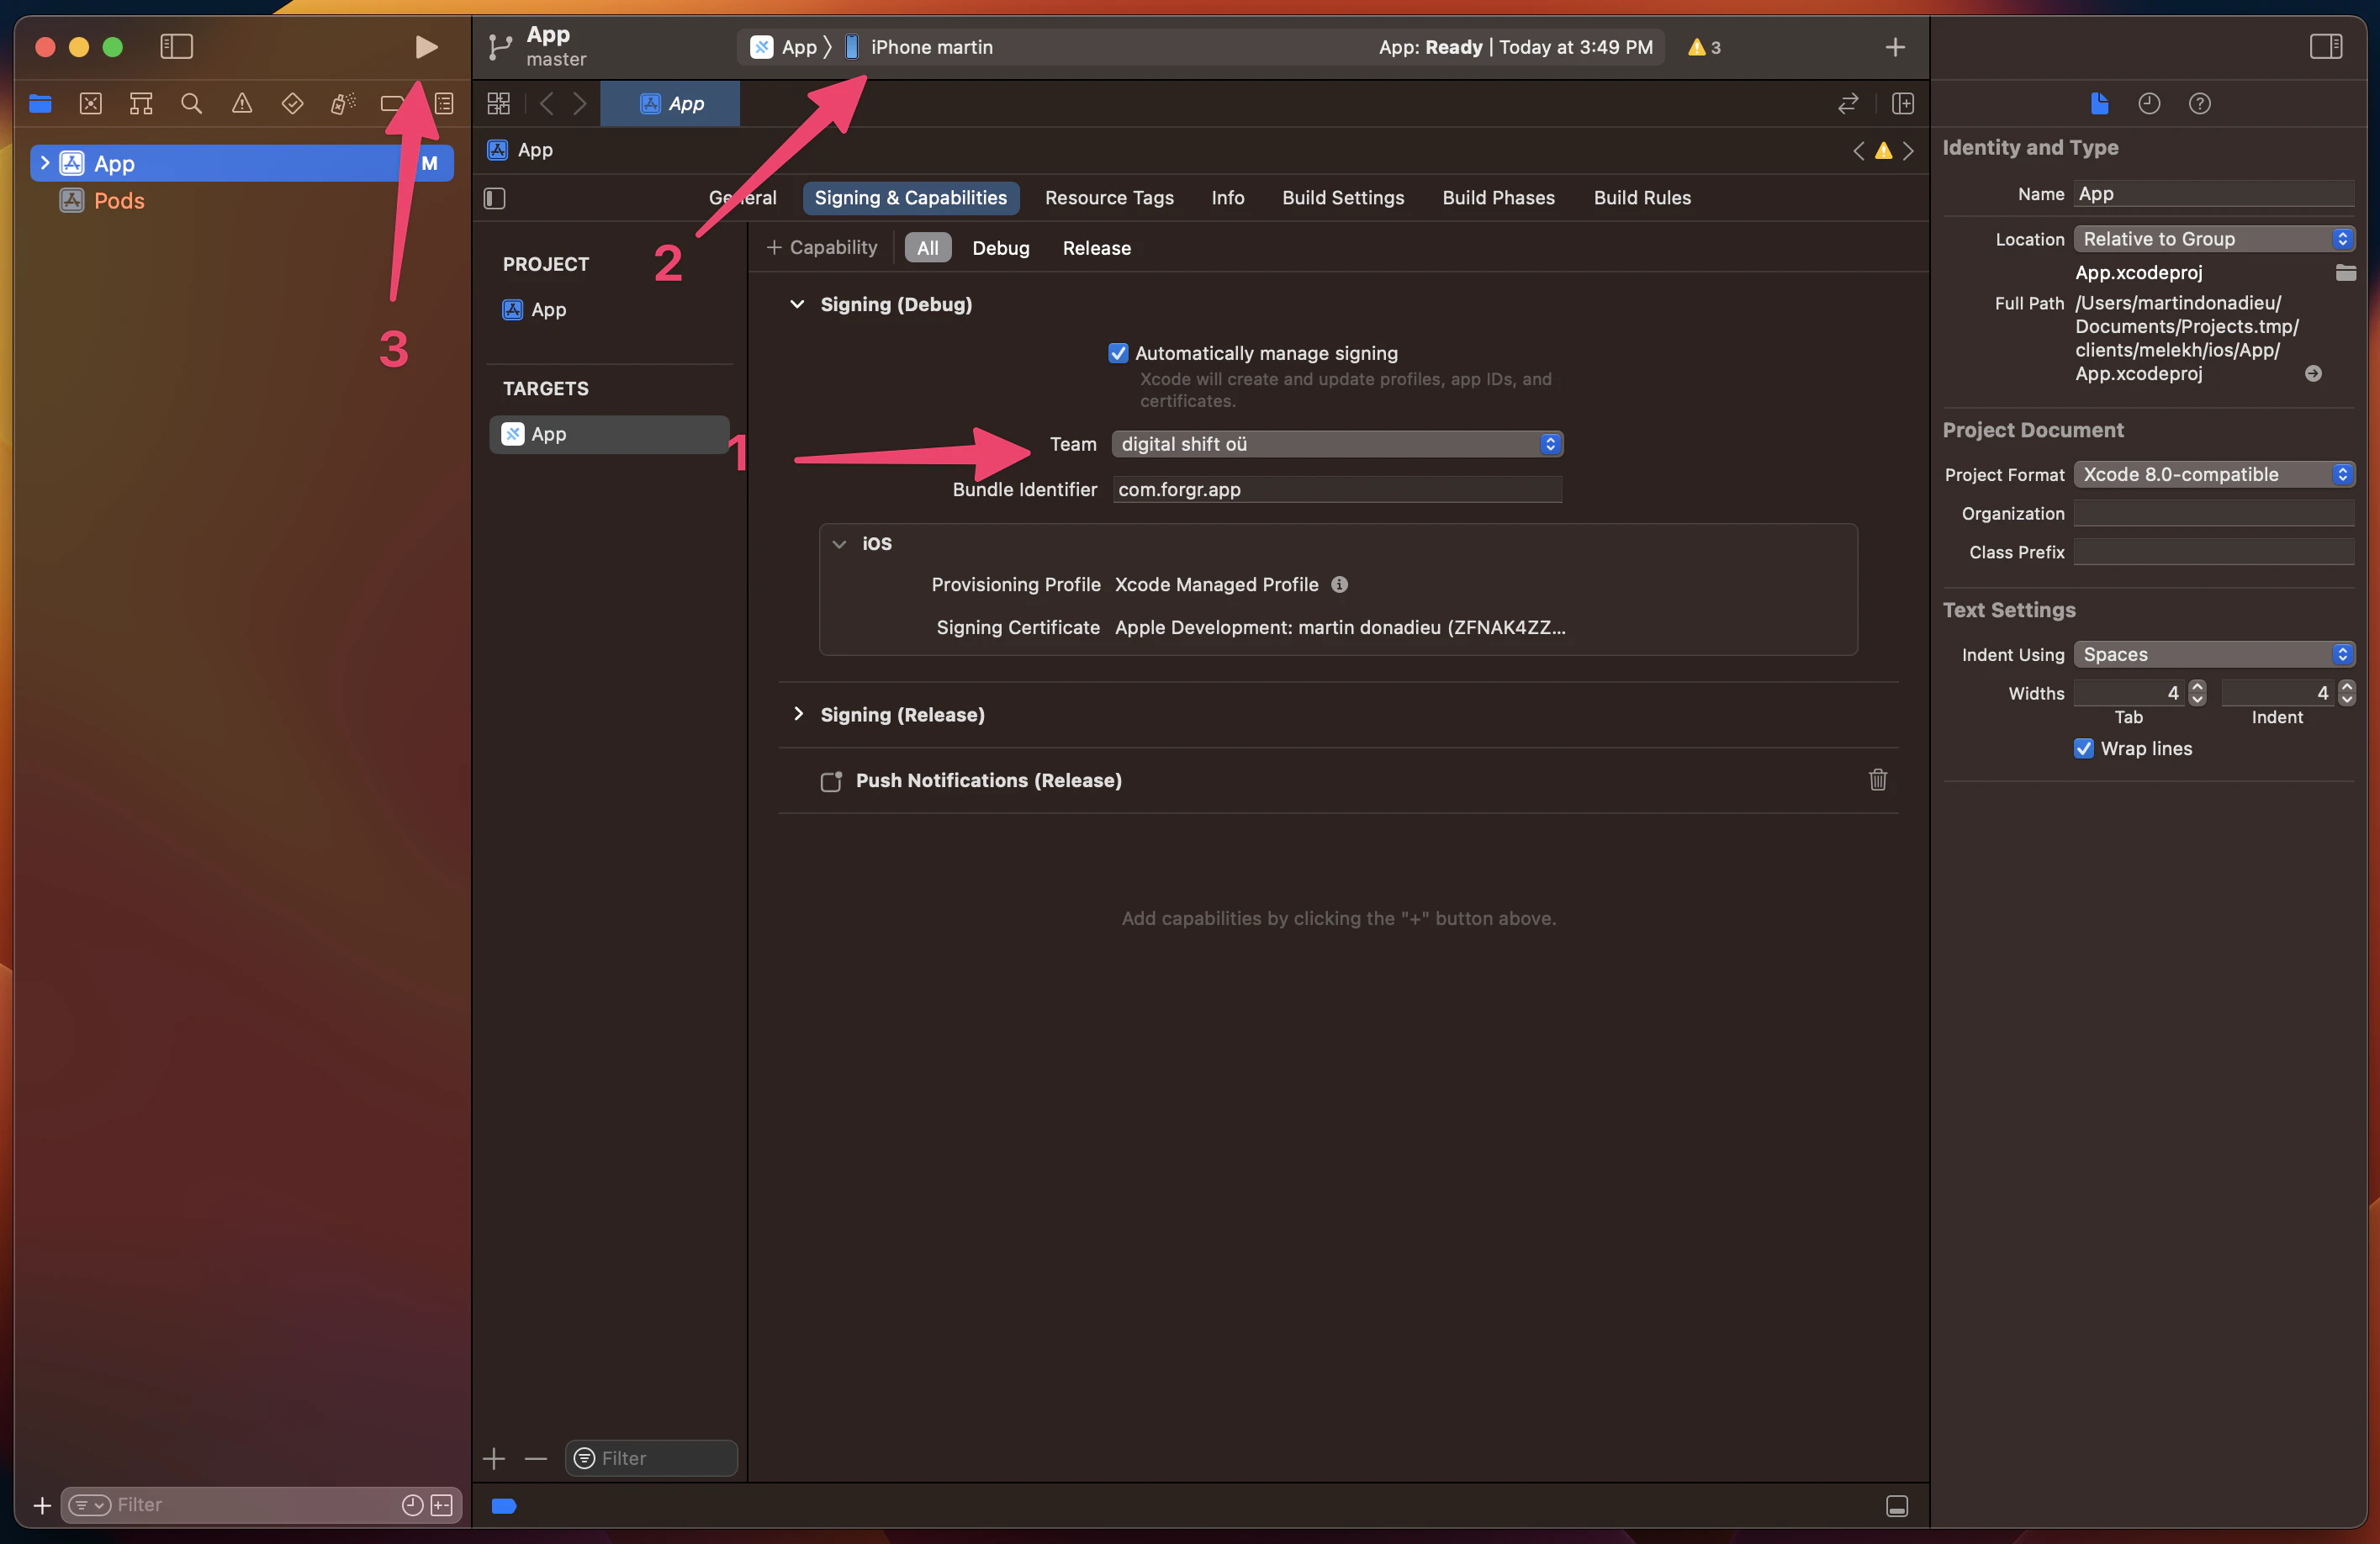
在 Xcode 中,您需要设置您的签名账户才能将应用部署到真实设备而不是仅仅模拟器。 如果您之前没有这样做过,Xcode 将指导您完成该过程(但再次,您需要注册开发者计划)。 之后,您可以简单地点击播放以在连接的设备上运行应用,您可以在顶部选择设备。 以下是一个示例:
恭喜!您成功部署了 React 网页应用到移动设备。以下是一个示例:
但请稍等,开发期间还有更快的方法……
Capacitor Live Reload
到目前为止,您可能已经习惯了所有现代框架中的热重载功能,好消息是您可以轻松获得相同的功能 在移动设备上 只需花费最少的努力!
启用对您的本地托管应用的访问,具有实时重载 在您的网络上 通过让Capacitor应用从特定的URL加载内容。
第一步是确定你的本地IP地址。如果你使用Mac,可以通过在终端中运行以下命令来找到它:
ipconfig getifaddr en0在Windows上运行:
ipconfig然后查找IPv4地址。
我们可以通过在文件中添加另一个条目来指示Capacitor从服务器直接加载应用: capacitor.config.ts 请确保使用
import { CapacitorConfig } from '@capacitor/cli';

const config: CapacitorConfig = {
  appId: 'com.example.app',
  appName: 'my-app',
  webDir: 'out',
  bundledWebRuntime: false,
  server: {
    url: 'http://192.168.x.xx:3000',
    cleartext: true
  }
};

export default config;
正确的IP和端口 ,我在这个例子中使用了默认的React端口。现在,我们可以通过将这些更改复制到本地项目中来应用这些更改:
命令与
npx cap copy类似 copy by having the __CAPGO_KEEP_0__ app load the content from the specific URL. sync但是它只会 将对 web 文件夹的修改 和配置复制过去,而不更新原生项目。
您可以通过 Android Studio 或 Xcode 再次部署您的应用程序。之后,如果您在 React 应用程序中进行更改 应用程序将自动重新加载 并显示更改!
请注意 如果您安装新插件,如摄像头插件,它仍然需要重新构建原生项目。这是因为原生文件已更改,而不能在实时进行。
请注意,您应该在配置中使用正确的 IP 和端口。上面的 code 块显示了用于演示目的的默认 React 端口。
使用 Capacitor 插件
让我们看看如何使用一个 Capacitor 插件的示例,我们之前提到过几次。要实现这一点,我们可以通过运行以下命令安装一个相当简单的插件:
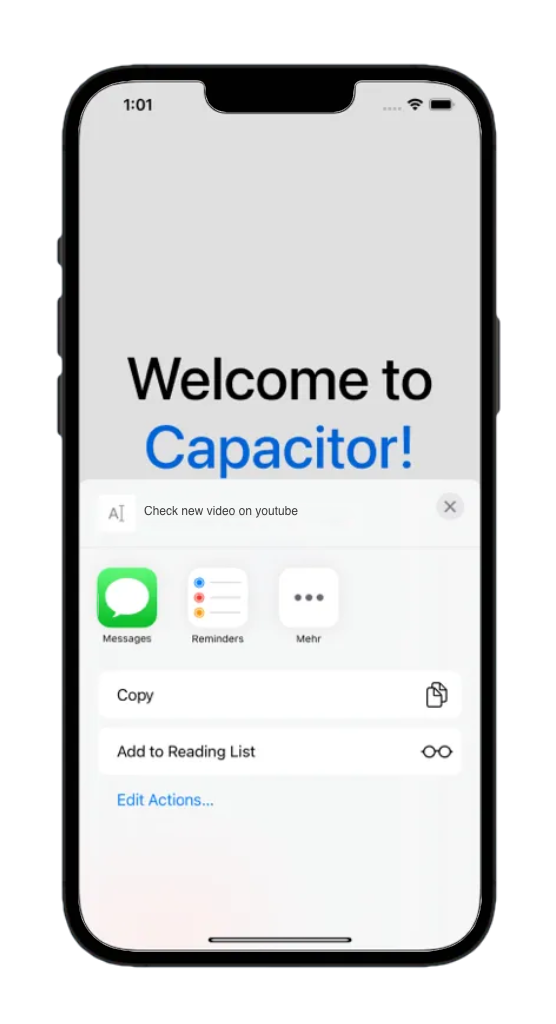
npm i @capacitor/share没有什么特别的 分享插件,但它仍然会弹出原生分享对话框!为了实现这一点,我们现在只需要导入包并调用 share() 函数从我们的应用中。让我们修改 src/App.js 到这个:
import React from 'react';
import { Share } from '@capacitor/share';

function App() {
  const share = async () => {
    await Share.share({
      title: 'Open Youtube',
      text: 'Check new video on youtube',
      url: 'https://www.youtube.com',
      dialogTitle: 'Share with friends'
    });
  };

  return (
    <div>
      <h1>Welcome to React and Capacitor!</h1>
      <p>
        <h2>Cool channel</h2>
        <button onClick={() => share()}>Share now!</button>
      </p>
    </div>
  );
}

export default App;
如前所述,当安装新插件时,我们需要执行同步操作,然后重新部署应用到我们的设备上。要实现这一点,请运行以下命令:
npx cap sync点击按钮后,您可以亲眼目睹美丽的原生分享对话框!
接下来,您可以让应用在iOS和Android上感觉更原生,使用Capgo导航和过渡,解决常见的iOS布局问题,例如水平溢出或裁剪安全区域。
原生感知UI与Capgo原生导航和过渡
我已经与 Ionic To 构建跨平台应用,但将其与 React 集成起来很hacky,并且当你已经有了 Tailwind CSS.
为了在 React + Capacitor 应用中获得原生移动体验,使用 Capgo 插件而不是仅限Web的UI套件,如Konsta UI:
- @capgo/capacitor-native-navigation — 原生导航栏、Liquid Glass iOS标签栏和Android模糊标签栏样式。您的React路由器保留路由状态;插件拥有原生浏览器。
- @capgo/capacitor-transitions — 在WebView层中实现Ionic样式页面过渡和iOS边缘滑动返回,且不采用Ionic UI。
安装两者:
bun add @capgo/capacitor-native-navigation @capgo/capacitor-transitions
bunx cap sync
配置原生导航栏的CSS inset模式,以便Web内容尊重原生栏:
import { NativeNavigation } from '@capgo/capacitor-native-navigation';

await NativeNavigation.configure({
  contentInsetMode: 'css',
  animationDuration: 360,
  glass: {
    effect: 'liquidGlass',
  },
});
渲染一个Liquid Glass标签栏(iOS使用系统渲染;Android使用模糊的WebView背景):
await NativeNavigation.setTabbar({
  selectedId: 'home',
  labelVisibilityMode: 'labeled',
  icons: true,
  colors: { dynamic: true },
  tabs: [
    { id: 'home', title: 'Home', icon: { svg: '...' } },
    { id: 'settings', title: 'Settings', icon: { svg: '...' } },
  ],
});

await NativeNavigation.addListener('tabSelect', ({ id }) => {
  navigate(`/${id}`);
});
在应用壳中添加原生页面过渡:
import { useEffect, useRef } from 'react';
import { useNavigate } from 'react-router-dom';
import '@capgo/capacitor-transitions';
import { initTransitions, setDirection, setupRouterOutlet } from '@capgo/capacitor-transitions/react';

initTransitions({ platform: 'auto' });

export function AppShell() {
  const navigate = useNavigate();
  const outletRef = useRef<HTMLElement>(null);

  useEffect(() => {
    if (outletRef.current) {
      setupRouterOutlet(outletRef.current, { platform: 'auto', swipeGesture: 'auto' });
    }
  }, []);

  const openSettings = () => {
    setDirection('forward');
    navigate('/settings');
  };

  return <cap-router-outlet ref={outletRef}>{/* routes */}</cap-router-outlet>;
}
将路由页面包裹在 cap-router-outlet, cap-page, 和 cap-content, 和调用 setDirection('forward') 或 setDirection('back') 在导航之前。不要在原生导航拥有这些表面的情况下重复显示网页头部或底部。
查看完整指南: 使用@capgo/capacitor-原生导航 和 使用@capgo/capacitor-过渡.
安全区域与 Tailwind
在 Tailwind CSS 中使用设备安全区域,请使用 @capgo/tailwind-capacitor (发布于 tailwind-capacitor 在 npm). 它提供 safe-areas 工具和其他 Capacitor-友好的 Tailwind 插件:
bun add -D tailwind-capacitor在 src/index.css:
@import 'tailwindcss';
@plugin "@capgo/tailwind-capacitor/platform";
@plugin "@capgo/tailwind-capacitor/safe-areas";
使用工具,如 pt-safe, pb-safe, px-safe 而不是手动 env(safe-area-inset-*) 通过这些检查顺序进行工作。 open a PR on GitHub.
如果内容看起来被裁剪、偏移或水平滚动在 iOS 上,添加更多
或调整视口标签通常无法修复它。 overflow-x: hidden 修复 iOS 布局问题(视口、安全区域和水平溢出)
如果内容看起来被裁剪、偏移或水平滚动在 iOS 上,添加更多
在 <meta> 标签中添加视口 index.html 内部 <head>:
<meta name="viewport" content="width=device-width, initial-scale=1, viewport-fit=cover" />从根组件中只处理 iOS 安全区域
创建一个单独的应用程序壳,并在其中应用安全区域填充 — 不在多个嵌套组件中:
html,
body,
#root {
  width: 100%;
  min-height: 100%;
  margin: 0;
  padding: 0;
  overflow-x: hidden;
}

* {
  box-sizing: border-box;
}

.app-shell {
  min-height: 100dvh;
  width: 100%;
  padding-top: env(safe-area-inset-top);
  padding-right: env(safe-area-inset-right);
  padding-bottom: env(safe-area-inset-bottom);
  padding-left: env(safe-area-inset-left);
}
将所有页面内容包装在 .app-shell在头部、模态对话框和布局包装器中重复的安全区域填充通常会使 UI 看起来被裁剪或过大。
使用 @capgo/tailwind-capacitor,您可以使用类似 pt-safe pb-safe px-safe 的工具表达相同的填充。
在单个壳中设置 Capacitor iOS contentInset 安全区域 never 首先
在 capacitor.config.ts, 优先使用原生 inset 并让 CSS (或 Native Navigation 的) contentInsetMode: 'css') 来控制安全区域:
const config: CapacitorConfig = {
  appId: 'com.example.myapp',
  appName: 'my-app',
  webDir: 'dist',
  ios: {
    contentInset: 'never',
  },
};
混合 Capacitor 自动内容 inset 与 CSS env(safe-area-inset-*) padding 是双倍间距的常见原因。
找到真正溢出的元素
通常的罪魁祸首是使用 100vw, Tailwind w-screen, 固定像素宽度或一个很大的 min-width.
在 Safari Web Inspector 中运行:
[...document.querySelectorAll('*')]
  .filter(el => el.scrollWidth > document.documentElement.clientWidth)
  .map(el => ({
    el,
    tag: el.tagName,
    class: el.className,
    scrollWidth: el.scrollWidth,
    clientWidth: document.documentElement.clientWidth,
  }));
使用 Tailwind 替代 w-screen With w-full 当可能时。许多水平溢出问题来自 100vw / w-screen,重复的安全区域填充或固定宽度容器 — 而不是视口元标签本身。
结论
Capacitor 是基于现有 Web 项目构建原生应用的优秀选择,提供了一个简单的方法来共享 code 并保持一致的 UI。
并且,通过添加 Capgo,您甚至可以更轻松地向应用添加实时更新,从而确保您的用户始终可以访问最新的功能和 bug 修复。
如果您想学习如何将 Capgo 添加到您的 React 应用中,请查看下一篇文章:
继续阅读 Building Mobile Apps with React 和 Capacitor
如果您正在使用 Building Mobile Apps with React 和 Capacitor 为CI/CD自动化编排,连接 Capgo CI/CD 在Capgo CI/CD中, Capgo 原生构建 在Capgo 原生构建中, Capgo 集成 在Capgo 集成中, CI/CD集成 在CI/CD集成的实现细节中, GitHub 动作集成 在GitHub 动作集成的实现细节中。


