Migration Summary
- Capgo is a service that helps development teams send live app to deployed apps.
- Capacitor JS apps written in jQuery Mobile, Framework 7, Sencha, KendoUI, Ionic or even your own custom solution can be migrated. An existing Ionic app is not required..
- Colt offers equivalent services for App Center Build (build Android/iOS apps). For Test, Diagnostics, and Analytics services.
Note
If your app is still using Cordova, it’s necessary to migrate to Capacitor first before migrating to Capgo.
Built by the Ionic team as a spiritual successor to Cordova, Capacitor allows development to move close to the native tooling and capabilities with the goal of providing an even better user experience and performance.
Fortunately, the migration process is easy and the majority of Cordova plugins are backward compatible with Capacitor. Start migrating here.
About Capgo
Capgo, handles updating apps over time. Development teams can focus completely on the unique features of their app and outsource the complicated app delivery process to Capgo.
Capgo fills in the gaps between web delivery and mobile.
Capgo Prerequisites
Like App Center, Capgo supports apps hosted in Git repositories on Azure DevOps, Bitbucket, GitHub, and GitLab.
Install Capgo CLI
note
Have Node and NPM installed on your computer, you need before proceeding. Always use the current LTS version Capgo do not older versions.
Create package.json and Capacitor config files
note
Before you begin, I recommend making changes on a fresh Git branch.
Since Capgo was created to automate capacitor apps, it requires one file that your app may not have. First, create a capacitor.config.json file. The easiest way to create it is to run in the root of your app:
npm install @capacitor/coreThen, initialize Capacitor using the CLI questionnaire:
npx cap initThe CLI will ask you a few questions, starting with your app name, and the package ID you would like to use for your app.
Finally, commit the new files to your project:
git add .git commit -m "added package json and capacitor config" && git pushMigrate the Code
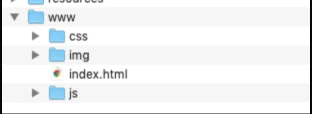
Now that you have the new required Capgo files in place, you can turn our attention to the actual app itself. Capgo expects the entire built app to be inside a directory named dist.
If your built code is not in a dist directory, change this value in the Capacitor config file.
Here is what the app’s directory structure should look like:
Capgo Configuration
With your app ready for Capgo integration, it’s time to sign up, and get your API key to upload your first version! Begin by signing up for a Capgo account.
Once you’re logged into Capgo, navigate to the Account page then click on API key, then click on the ‘write’ key to copy it to your clipboard.
Install the Capgo SDK
From a command line, directly into the root of your Capacitor app folder, run the following command:
npm i @capgo/capacitor-updater && npx cap sync
To install the plugin into your Capacitor app.
And then add to your app this code as replacement of CodePush one:
import { CapacitorUpdater } from '@capgo/capacitor-updater'

CapacitorUpdater.notifyAppReady()
This will tell the native plugin the installation as succeeded.
Deploying Live Updates (CodePush Alternative)
The Live Update feature works by using the installed Capgo SDK in your native application to listen to a particular Deploy Channel Destination. When a Web build is assigned to a Channel Destination, that update will be deployed to user devices running binaries that are configured to listen to the specified Channel Destination.
Login to Capgo CLOUD
First, use the all apikey present in your account to log in with the CLI:
npx @capgo/cli@latest login YOURKEYAdd your first app
Let’s get started by first creating the app in Capgo Cloud with the CLI.
npx @capgo/cli@latest app add
This command will use all variables defined in the Capacitor config file to create the app.
Upload your first bundle
Run the command to build your code and send it to Capgo with:
npx @capgo/cli@latest bundle upload --channel productionBy default, the version name will be the one in your package.json file.
Check in Capgo if the build is present.
You can even test it with my mobile sandbox app.
Make channel default
After you have sent your app to Capgo, you need to make your channel default to let apps receive updates from Capgo.
npx @capgo/cli@latest channel set production -s defaultConfigure app to validate updates
Add this config to your main JavaScript file.
import { CapacitorUpdater } from '@capgo/capacitor-updater'

CapacitorUpdater.notifyAppReady()
Then do a npm run build && npx cap copy to update your app.
Receive a Live Update on a Device
For your application to receive a live update from Deploy, you’ll need to run the app on a device or an emulator. The easiest way to do this is simply to use the following command to launch your local app in an emulator or a device connected to your computer.
npx cap run [ios | android]Open the app, put it in the background and open it again, you should see in the logs the app did the update.
Congrats! 🎉 You have successfully deployed your first Live Update. This is just the start of what you can do with Live Updates. To learn more, view the complete Live Updates docs.
Remove App Center Dependencies
Now that we’ve integrated Capgo’s services, you should remove any references to App Center. Besides being a best practice to remove unused code/services, removing the SDK should reduce the size of your apps.
First, open a terminal then uninstall the App Center plugins:
cordova plugin remove cordova-plugin-appcenter-analytics cordova-plugin-appcenter-crashes cordova-plugin-code-pushNext, open config.xml and remove the following preference values. They will look similar to:
<preference name="APP_SECRET" value="0000-0000-0000-0000-000000000000" /><preference name="CodePushDeploymentKey" value="YOUR-ANDROID-DEPLOYMENT-KEY" /><preference name="CodePushPublicKey" value="YOUR-PUBLIC-KEY" />If you were using App Center Analytics in your app, remove the following preferences elements: APPCENTER_ANALYTICS_ENABLE_IN_JS and APPCENTER_CRASHES_ALWAYS_SEND.
Remove the following <access /> elements:
<access origin="https://codepush.appcenter.ms" /><access origin="https://codepush.blob.core.windows.net" /><access origin="https://codepushupdates.azureedge.net" />Remove the reference to CodePush in the CSP meta tag in the index.html file (https://codepush.appcenter.ms):
<meta http-equiv="Content-Security-Policy" content="default-src https://codepush.appcenter.ms 'self' data: gap: https://ssl.gstatic.com 'unsafe-eval'; style-src 'self' 'unsafe-inline'; media-src *" />Finally, within your app, remove any code references to App Center services, such as codePush.sync();.
Next Steps
You’ve migrated from App Center to Capgo, utilizing the Live Updates. This is just the beginning of what you can use Capgo for. Explore the rest of the service includes Channel (multiple environments) and override. Cloud CLI integration, use Capgo inside your CI/CD platform of choice (such as GitHub Action, GitLab, Jenkins, and more).
Automatic send app update
If your code is hosted on GitHub, you can set up automatic build and release in a few more steps, thanks to GitHub actions.
I have made a second article to allow you to so.
Credits
Thanks a lot to Ionic, this article is based on this article rewrote with chat-gpt-3 and adapted.
Keep going from Migrating from App Center to Capgo
If you are using Migrating from App Center to Capgo to plan migration and enterprise operations, connect it with Capgo Enterprise for the product workflow in Capgo Enterprise, Ionic Enterprise Plugin Alternatives for the product workflow in Ionic Enterprise Plugin Alternatives, Capgo Alternatives for the product workflow in Capgo Alternatives, Capgo Consulting for the product workflow in Capgo Consulting, and Capgo Premium Support for the product workflow in Capgo Premium Support.


