



導入
既存のNext.jsのWebアプリがある場合、このガイドでは、Capacitorを使用してiOSおよびAndroidのネイティブモバイルアプリに変換する方法を学びます。 Capacitor 8 — 最新バージョンでパフォーマンスが向上し、新機能が追加された。
Capacitor wraps your web app in a native container, giving you access to device APIs like camera, filesystem, and push notifications while keeping your existing React codebase. Unlike React Native, you don’t need to rewrite anything — your Next.js code runs as-is.
学ぶこと:
- 既存のNext.jsアプリを静的エクスポート用に設定する
- Capacitor 8にエッセンシャルネイティブプラグインを追加する
- iOSとAndroidのシミュレータでビルドしてテストする
- 開発を高速化するためにライブリロードを有効にする
- iOSの一般的なレイアウト問題を修正する(ビューポート、セーフエリア、水平オーバーフロー)
- Capgoネイティブナビゲーションとトランジションを使用してネイティブフィーリングのUIを追加する
新しいプロジェクトから始めるには、以下のガイドを参照してください: Next.jsモバイルアプリの構築.
Next.jsとCapacitorの利点
- Codeの再利用性codeは、Webアプリとモバイルアプリ間で共有できる再利用可能なコンポーネントを書くことを可能にし、開発時間と労力を節約することができます。
- パフォーマンス: Next.jsには、サーバーサイドレンダリングやcodeのスプリッティングなどのパフォーマンス最適化機能が組み込まれており、高速なロード時間と滑らかなユーザー体験を実現します。
- ネイティブ機能: Capacitorは、カメラ、位置情報、などネイティブデバイスの機能にアクセスできるため、機能豊富なモバイルアプリを構築できます。
- 開発の簡素化: Capacitorを使用すると、モバイルアプリの開発とテストを、馴染みのあるWeb技術を使用して行うことができ、学習カーブが低減され、開発プロセスがスムーズになります。
前提条件
: まず、以下の条件を確認してください。
- Node.js 18+ が
- インストール されていることです。 アプリケーション
- Xcode (iOS開発用、macOSのみ)
- Android Studio (Android開発用)
Next.jsアプリをモバイル向けに設定する
最初のステップは、Next.jsアプリを静的エクスポート用に設定することです。Capacitorは、静的HTML/JS/CSSファイルをネイティブアプリにバンドルする必要があります。
アプリを開きます next.config.js 設定 next.config.ts設定は、Next.jsが静的HTMLファイルを生成するように指示します。
/** @type {import('next').NextConfig} */
const nextConfig = {
  output: 'export',
  images: {
    unoptimized: true,
  },
};

module.exports = nextConfig;
設定 output: 'export' __CAPGO_KEEP_0__ images: { unoptimized: true } __CAPGO_KEEP_0__
重要: サーバー機能を使用している場合は、API ルート、サーバーコンポーネントのデータフェッチなどをクライアントサイドの代替または外部APIに切り替える必要があります。
__CAPGO_KEEP_0__ に特定のスクリプトを追加します。 package.json:
{
  "scripts": {
    "dev": "next dev",
    "build": "next build",
    "start": "next start",
    "lint": "next lint",
    "mobile": "bun run build && bunx cap sync",
    "mobile:ios": "bun run mobile && bunx cap open ios",
    "mobile:android": "bun run mobile && bunx cap open android"
  }
}
静的エクスポートをテストするには、以下のコマンドを実行してください。
bun run build__CAPGO_KEEP_0__ を実行すると、 out プロジェクトのルートディレクトリに、Capacitor がネイティブアプリにバンドルする静的ファイルが含まれるディレクトリが作成されます。
Capacitor 8 をプロジェクトに追加する
ネイティブモバイルコンテナにパッケージ化するには、以下の手順に従ってください。
- Capacitor コアとCLI をインストールします。
bun add @capacitor/core
bun add -D @capacitor/cli- インストールする必要がある一般的なCapacitor プラグインをインストールします。
bun add @capacitor/app @capacitor/keyboard @capacitor/splash-screen @capacitor/preferencesこれらのプラグインは、以下の機能を提供します:
- @capacitor/app@__CAPGO_KEEP_0__のライフサイクルイベントをハンドル (前景/背景、URL)
- @capacitor/keyboard@__CAPGO_KEEP_0__のキーボードの動作を制御
- @capacitor/スプラッシュ画面@__CAPGO_KEEP_0__のネイティブ スプラッシュスクリーンを管理
- @capacitor/プリファレンス@__CAPGO_KEEP_0__でキー値データを永続的に保存
- Initialize Capacitor with your project details:
bunx cap init my-app com.example.myapp --web-dir out置き換え my-app アプリ名と com.example.myapp アプリID (逆ドメイン記法) と
- Nativeモバイルアプリを作成または更新します。
capacitor.config.ts必要な構成ファイルを用意します。
import type { CapacitorConfig } from '@capacitor/cli';

const config: CapacitorConfig = {
  appId: 'com.example.myapp',
  appName: 'my-app',
  webDir: 'out',
  plugins: {
    SplashScreen: {
      launchShowDuration: 2000,
      launchAutoHide: true,
      androidScaleType: 'CENTER_CROP',
      showSpinner: false,
      splashFullScreen: true,
      splashImmersive: true,
    },
  },
};

export default config;- ネイティブプラットフォームをインストールします。
bun add @capacitor/ios @capacitor/android- ネイティブプラットフォームのフォルダをプロジェクトのルートに追加します。
bunx cap add ios
bunx cap add android
Capacitorはプロジェクトのルートにネイティブプロジェクトを含むフォルダを作成します。 ios and android AndroidプロジェクトをビルドするにはAndroid Studioが必要です。
iOSプロジェクトをビルドするにはMacとXcodeが必要です。 プロジェクトをビルドしてSyncします。プロジェクトをビルドしてSyncします。 Xcode.
- Xcode
bun run mobileこのスクリプトを実行すると、Next.jsプロジェクトをビルドし、静的ファイルをネイティブプラットフォームと同期します。
ネイティブアプリのビルドとデプロイ
iOSアプリを開発するには、Xcodeをインストールする必要があります。 Xcode Android Studio ネイティブプロジェクトを開く: iOSの場合:
- Androidの場合:
iOS用
bun run mobile:iosアプリをビルドおよび実行する:
bun run mobile:androidOr directly with Capacitor CLI:
bunx cap open ios
bunx cap open android- __CAPGO_KEEP_0__ __CAPGO_KEEP_1__
-
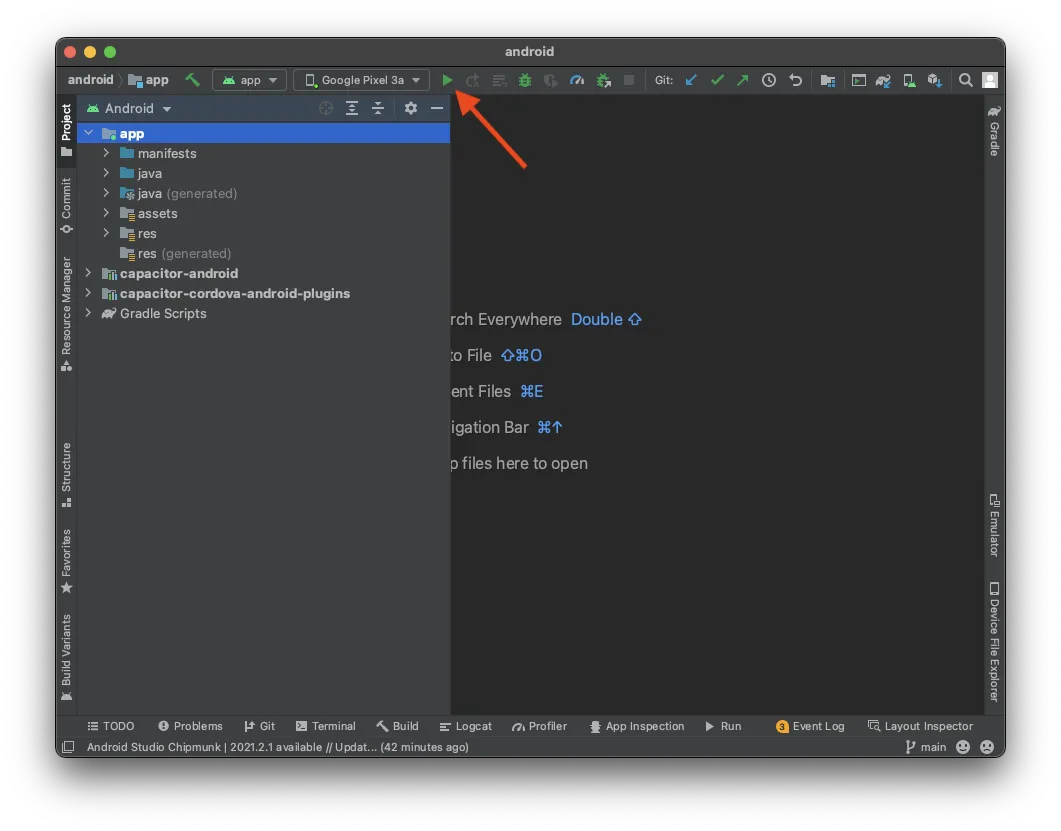
Android Studioでプロジェクトが準備できたら、実機またはエミュレータにアプリをデプロイするために「Run」ボタンをクリックしてください。
-
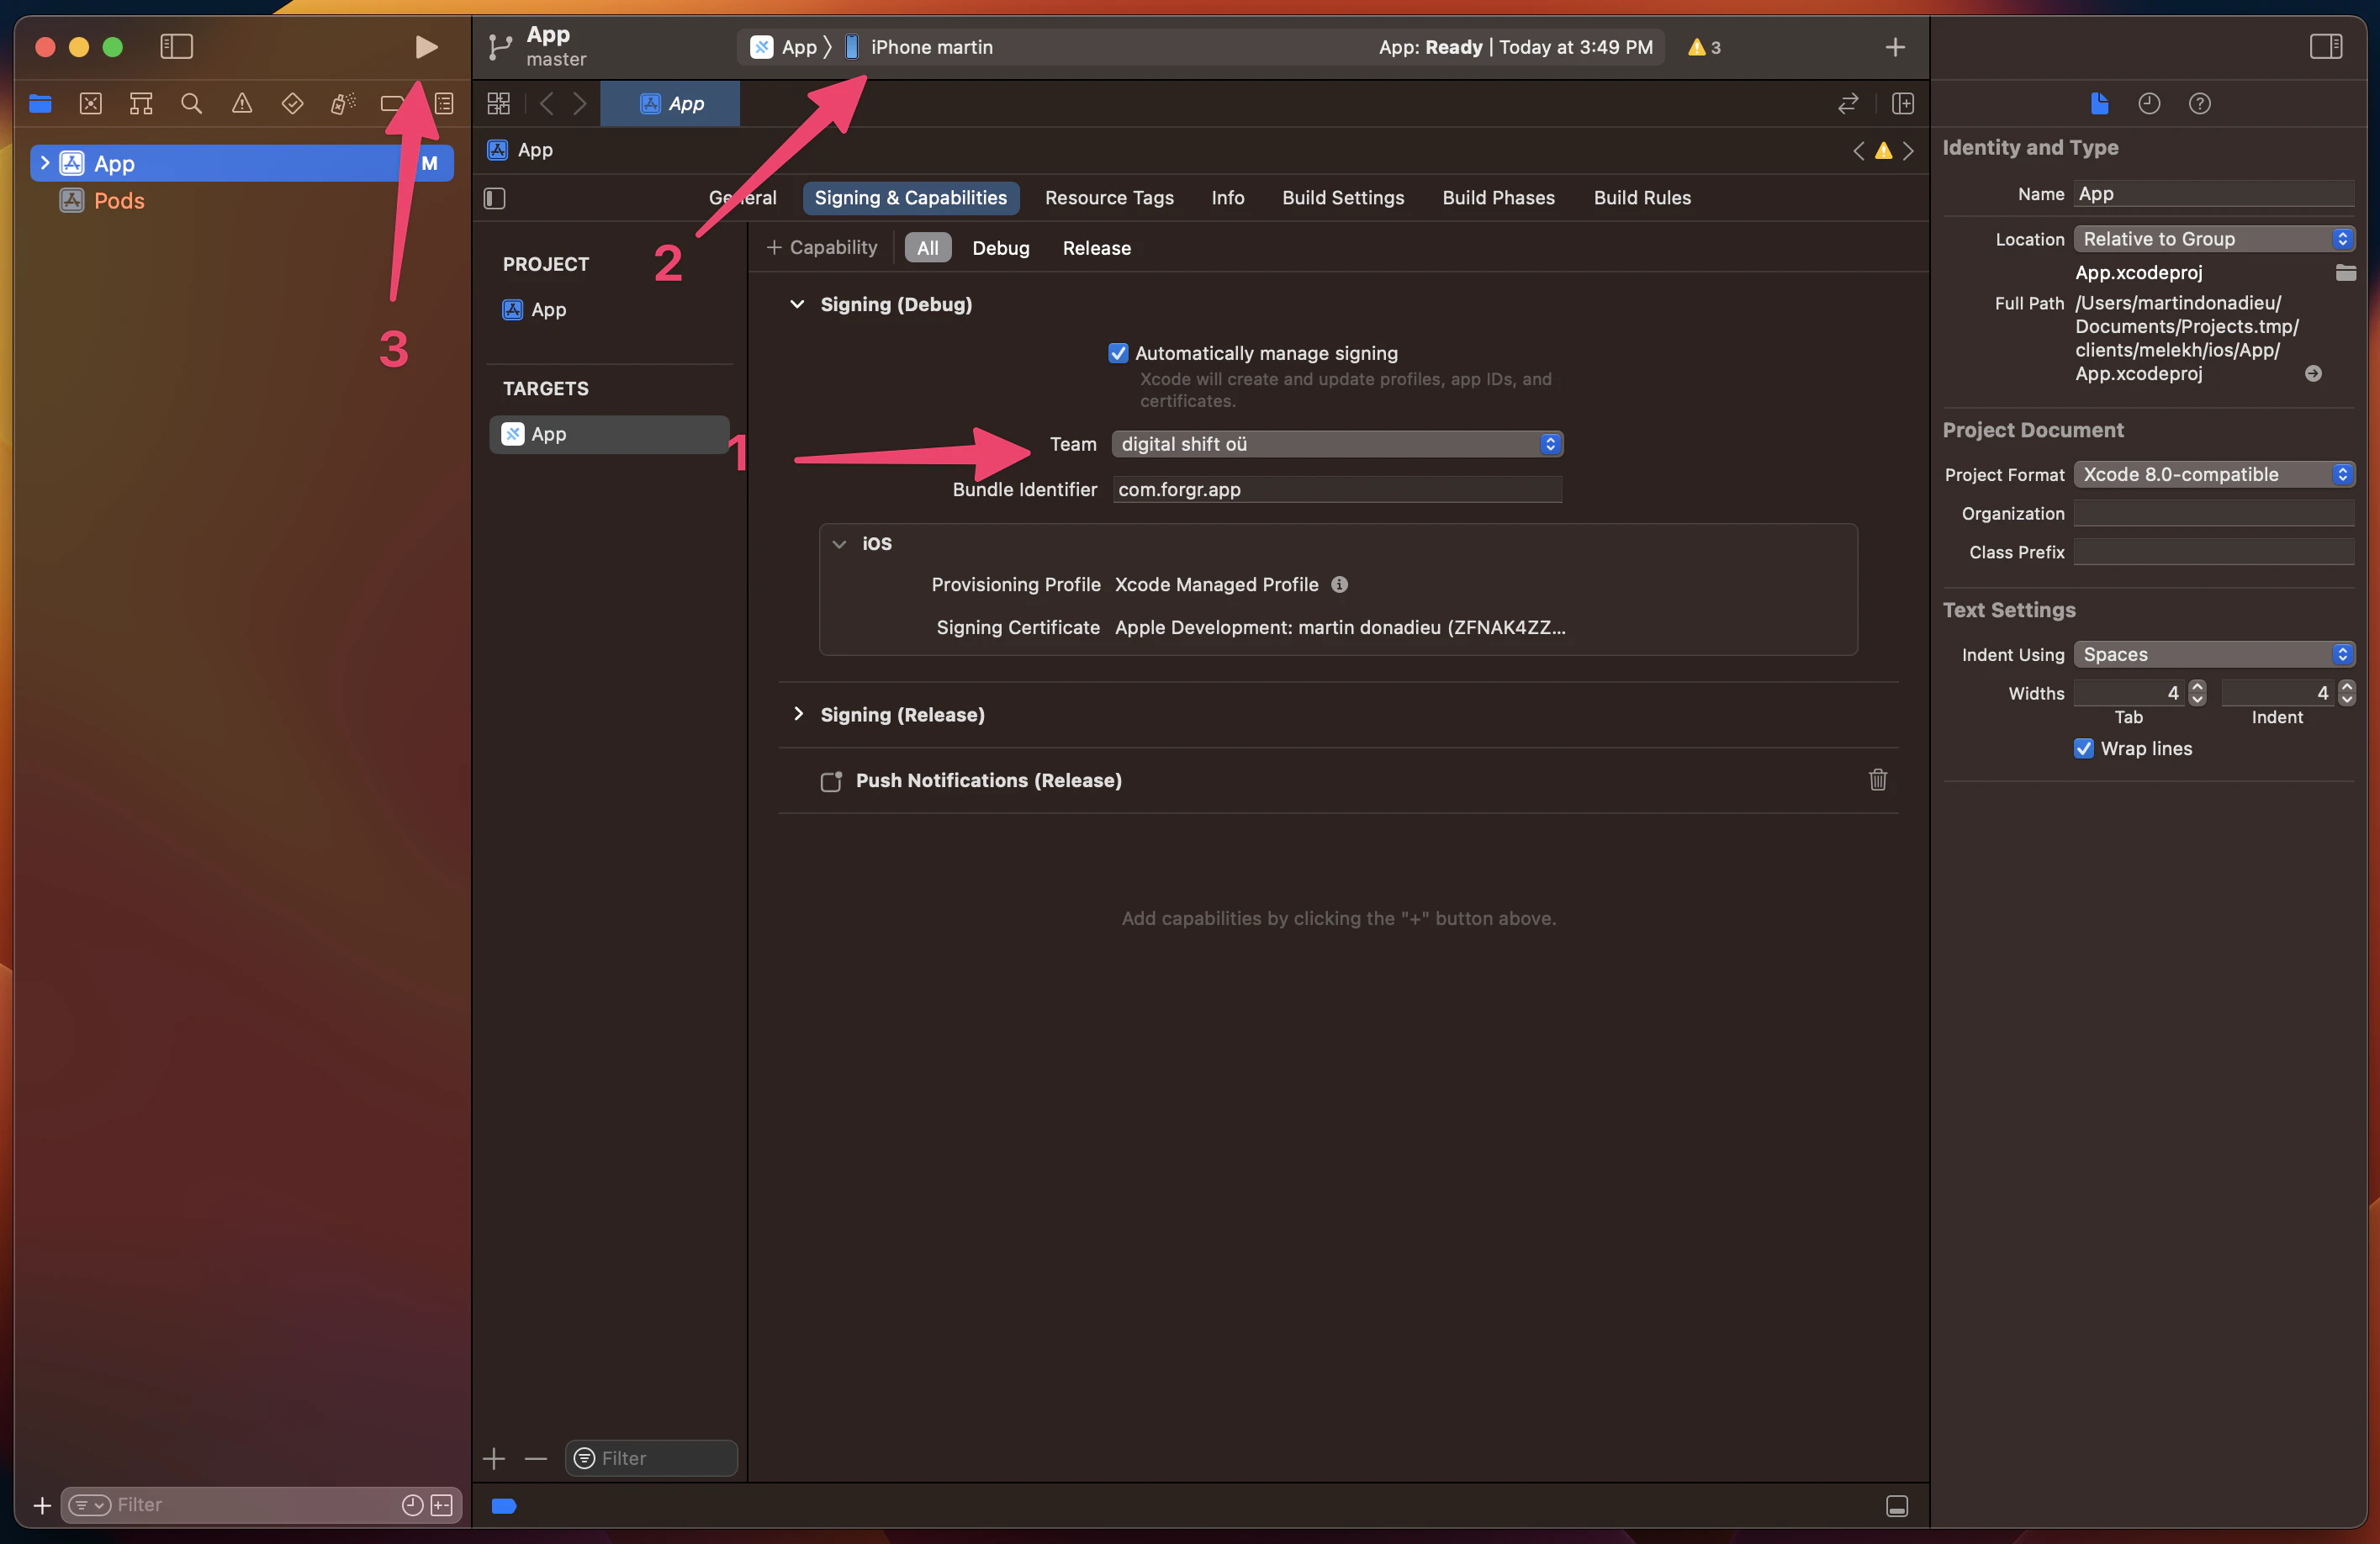
Xcodeで実機にアプリをデプロイするために署名アカウントを設定してください。署名アカウントを設定する必要がある場合は、Apple Developer Programに登録されている必要があります。署名アカウントを設定したら、「Play」ボタンをクリックして実機でアプリを実行してください。
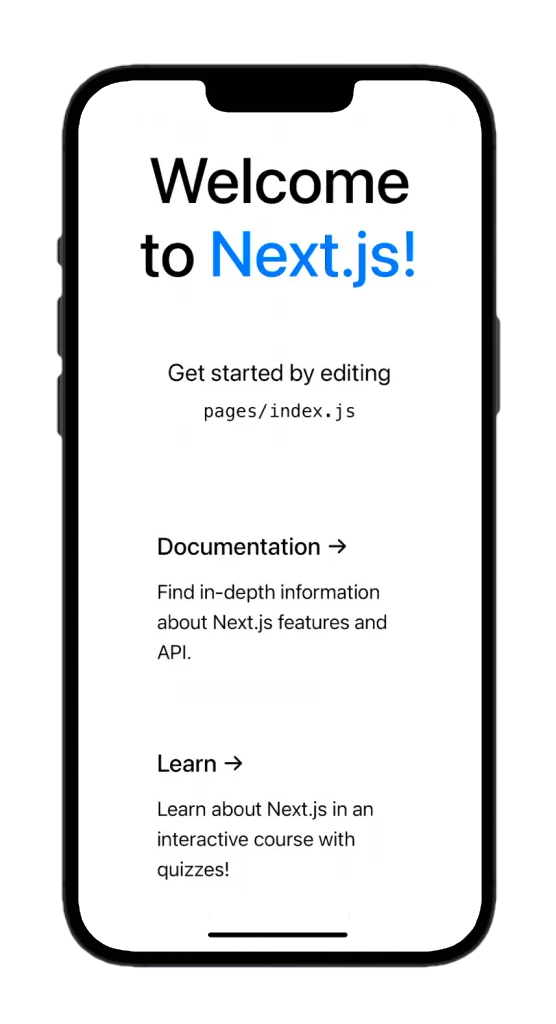
Next.jsのウェブアプリをモバイルデバイスに成功的にデプロイしました。
Capacitor ライブ リロード
開発中は、実機で即時反映されるようにLive Reloadを利用できます。Live Reloadを有効にするには、以下の手順に従ってください。
- ローカルIPアドレスを検索してください。
-
macOSの場合、ターミナルで以下のコマンドを実行してください。
ipconfig getifaddr en0 -
Windowsの場合、以下のコマンドを実行してください。
ipconfigIPv4 アドレスを出力で探してください。
- Live Update
capacitor.config.tsCapacitor
import type { CapacitorConfig } from '@capacitor/cli';

const config: CapacitorConfig = {
  appId: 'com.example.app',
  appName: 'my-app',
  webDir: 'out',
  server: {
    url: 'http://YOUR_IP_ADDRESS:3000',
    cleartext: true,
  },
};

export default config;
Capacitor YOUR_IP_ADDRESS Capacitor 192.168.1.100).
- Cloudflare
bunx cap copyGitHub copy Capgo
- API
SDK
Note: If you install new plugins or make changes to native files, you’ll need to rebuild the native project since live reloading only applies to web code changes.
Using Capacitor Plugins
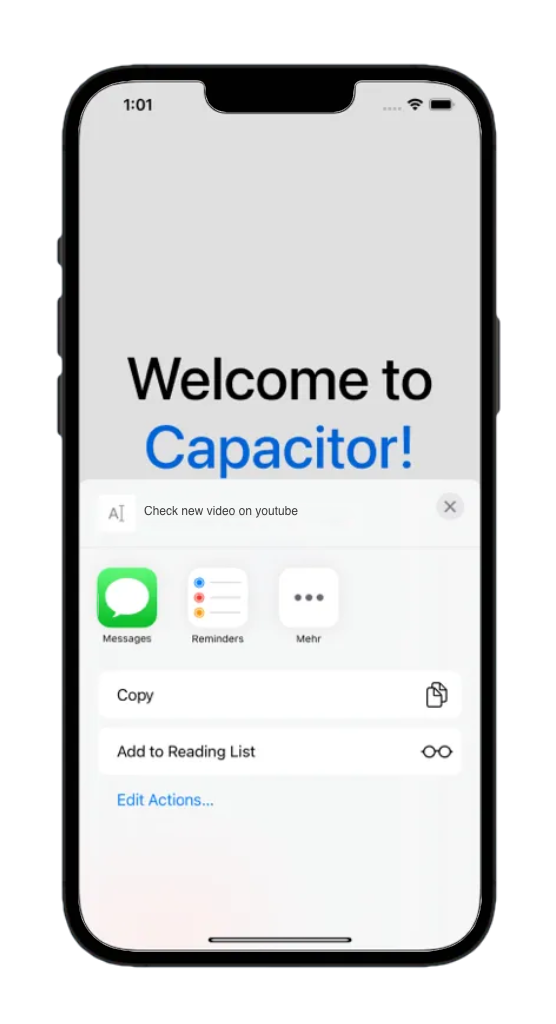
Capacitor プラグインは、Next.js アプリからネイティブ デバイスの機能にアクセスすることを可能にします。Let’s は、Share プラグインを使用する方法を調べてみましょう。 Share プラグイン 例として、Share プラグインを使用してみましょう:
- Share プラグインをインストールするには:
bun add @capacitor/share- アップデートする
pages/index.js変更をネイティブ プロジェクトと同期する:
import Head from 'next/head';
import styles from '../styles/Home.module.css';
import { Share } from '@capacitor/share';

export default function Home() {
  const share = async () => {
    await Share.share({
      title: 'Open Youtube',
      text: 'Check new video on youtube',
      url: 'https://www.youtube.com',
      dialogTitle: 'Share with friends',
    });
  };

  return (
    <div className={styles.container}>
      <Head>
        <title>Create Next App</title>
        <meta name="description" content="Generated by create next app" />
        <link rel="icon" href="/favicon.ico" />
      </Head>

      <main className={styles.main}>
        <h1 className={styles.title}>
          Welcome to <a href="https://nextjs.org">Capgo!</a>
        </h1>

        <p className={styles.description}>
          <h2>Cool channel</h2>
          <button onClick={() => share()}>Share now!</button>
        </p>
      </main>
    </div>
  );
}- 原生プロジェクトと同期する
または、再構築せずに同期するだけ:
bun run mobileアプリをデバイスに再構築して実行してください。
bunx cap sync- アプリを再構築してデバイスで実行する。
next-__CAPGO_KEEP_0__-share
数年間、Ionicを使用してクロスプラットフォームアプリケーションを構築してきましたが、Next.jsと統合することはハック的で、すでにTailwind CSS 4を持っている場合にはほとんど価値がありません。 Ionic @__CAPGO_KEEP_0__/__CAPGO_KEEP_1__-native-navigation —ネイティブのナビゲーションバー、iOS用のLiquid Glassタブバー、Android用のブラーされたタブバーのスタイル。Next.jsルーターはルートの状態を維持しますが、プラグインはネイティブのブラウザを管理します。.
@Capacitor/Capgo-transitions
- @capgo/capacitor-ネイティブナビゲーション 両方をインストールします。
- @capgo/capacitor-transitions Ionic
Tailwind CSS 4
bun add @capgo/capacitor-native-navigation @capgo/capacitor-transitions
bunx cap sync
Next.js
import { NativeNavigation } from '@capgo/capacitor-native-navigation';

await NativeNavigation.configure({
  contentInsetMode: 'css',
  animationDuration: 360,
  glass: {
    effect: 'liquidGlass',
  },
});
iOSはシステムのレンダリングを使用し、AndroidはぼやけたWebViewバックグラウンドを使用してLiquid Glassタブバーをレンダリングします。
await NativeNavigation.setTabbar({
  selectedId: 'home',
  labelVisibilityMode: 'labeled',
  icons: true,
  colors: { dynamic: true },
  tabs: [
    { id: 'home', title: 'Home', icon: { svg: '...' } },
    { id: 'settings', title: 'Settings', icon: { svg: '...' } },
  ],
});

await NativeNavigation.addListener('tabSelect', ({ id }) => {
  router.push(`/${id}`);
});
アプリシェルにネイティブのページ遷移を追加します:
import '@capgo/capacitor-transitions';
import { initTransitions, setDirection, setupRouterOutlet } from '@capgo/capacitor-transitions/react';

initTransitions({ platform: 'auto' });
ルーティングされたページをwrapします: cap-router-outlet, cap-page, cap-content, setDirection('forward') または setDirection('back') before router.push() または router.back()これを行う前に
。ネイティブのナビゲーションがヘッダーまたはフッターを所有している場合、そのような表面を複製しないでください。 Using @capgo/capacitor-native-navigation and Using @capgo/capacitor-transitions.
セーフエリアに安全なスペースを確保する
デバイスのセーフエリアをTailwind CSSで設定するには @capgo/tailwind-capacitorを使用します (Capacitorで公開された) tailwind-capacitor Capacitorを使用してNext.jsと組み合わせて、npm). It provides safe-areas utilities とその他の Capacitor に対応した Tailwind プラグイン
bun add -D tailwind-capacitorIn styles/globals.css:
@import 'tailwindcss';
@plugin "@capgo/tailwind-capacitor/platform";
@plugin "@capgo/tailwind-capacitor/safe-areas";
Capacitorフレンドリな pt-safe, pb-safe, and px-safe Capacitorフレンドリな env(safe-area-inset-*) Capacitorフレンドリな open a PR on GitHub.
iOSレイアウトの問題を修正する (ビューポート、セーフエリア、水平オーバーフロー)
iOSでコンテンツが切り取られた、ずれた、または水平方向にスクロールできるように見えている場合、ビューポートタグを追加したり変更したりするだけでは通常解決されません。次のチェックを順番に実行してください。 overflow-x: hidden ビューポートメタタグが正しく適用されていることを確認する
Appルーター
export (app/from viewport Pagesルーター app/layout.tsx:
import type { Viewport } from 'next';

export const viewport: Viewport = {
  width: 'device-width',
  initialScale: 1,
  viewportFit: 'cover',
};
ビューポートメタタグを (pages/、ではなく pages/_app.tsx, not _document.tsx protectedTokens _document.tsx ビュー ポートの動作の期待どおりです。
iOS セーフ エリアを 1 つのルート ウラッパーからのみ処理します。
1 つのアプリ シェルを作成し、その中にセーフ エリアのパディングを適用してください。複数のネストされたコンポーネントにパディングを適用するのではなく:
html,
body,
#__next {
  width: 100%;
  min-height: 100%;
  margin: 0;
  padding: 0;
  overflow-x: hidden;
}

* {
  box-sizing: border-box;
}

.app-shell {
  min-height: 100dvh;
  width: 100%;
  padding-top: env(safe-area-inset-top);
  padding-right: env(safe-area-inset-right);
  padding-bottom: env(safe-area-inset-bottom);
  padding-left: env(safe-area-inset-left);
}
すべてのページ コンテンツを .app-shell内部に Wrap してください。
With @capgo/Tailwind-capacitor, you can express the same padding with utilities like pt-safe pb-safe px-safe on that single shell.
Set Capacitor iOS contentInset to never first
In capacitor.config.ts, nativeのインセットを有効にし、CSS (またはNative Navigationの) contentInsetMode: 'css')が安全エリアを管理するようにします:
const config: CapacitorConfig = {
  appId: 'com.example.myapp',
  appName: 'my-app',
  webDir: 'out',
  ios: {
    contentInset: 'never',
  },
};
Capacitorの自動コンテンツインセットとCSSのパディングを組み合わせると、一般的なダブルスペースの原因となります。 env(safe-area-inset-*) 実際にオーバーフローしている要素を探します
通常の原因は、
, Tailwind 100vw, 固定ピクセル幅、または大きい w-screenSafari Web Inspectorで実行します: min-width.
Tailwindの場合、
[...document.querySelectorAll('*')]
  .filter(el => el.scrollWidth > document.documentElement.clientWidth)
  .map(el => ({
    el,
    tag: el.tagName,
    class: el.className,
    scrollWidth: el.scrollWidth,
    clientWidth: document.documentElement.clientWidth,
  }));
に置き換えます w-screen with w-full 可能な限り。多くの水平オーバーフロー問題は、安全エリアの重複パディングや固定幅のコンテナからではなく、ビューポートメタタグ自体から生じます。 100vw / w-screenパフォーマンス最適化
最適なパフォーマンスを確保するには、以下のベストプラクティスを考慮してください。
Next.jsとCapacitorアプリの最適なパフォーマンスを確保するには、以下のベストプラクティスを考慮してください。
- 画像や他のメディアファイルを最適化して、読み込み時間を短縮してください。
- コンポーネントやページの遅延ロードを実装して、初期ロードパフォーマンスを向上させてください。
- サーバーサイドレンダリング(SSR)を使用して、Next.jsを活用してアプリのロード速度と検索エンジン最適化(SEO)を向上させてください。
- Capacitorの組み込み最適化を活用して、Web Viewキャッシュとアプリバンドリングを実現してください。
- Leverage Capacitor’s built-in optimizations, such as web view caching and app bundling.
Conclusion
You’ve successfully converted your existing Next.js web application into native iOS and Android apps using Capacitor 8. Your web codebase now runs natively on mobile devices with access to device APIs.
__CAPGO_KEEP_0__
- Next.jsを静的エクスポート用に設定しました。
- Capacitor 8 に必要なプラグインを追加しました。
- iOSとAndroidのシミュレータにビルドしてデプロイしました。
- 開発用にライブリロードを有効にしました。
- iOSの一般的なレイアウト問題を修正しました (ビュー ポート、セーフ エリア、オーバーフロー)。
- Capgo Native NavigationとTransitionsを使用してネイティブフィーリングのUIを追加しました。
次のステップは次のとおりです。
- セットアップ Capgo オーバー・ザ・エア更新のためにアプリストアの再提出を回避する
- カメラ、位置情報、またはプッシュ通知などのネイティブプラグインを追加する
- アプリアイコンとスプラッシュスクリーンをプロダクション用に設定する
- App StoreとGoogle Playへの提出に備えてアプリを準備する
新しいプロジェクトから始めるのですか? 以下のガイド付きウォークスルーを参照してください。 Next.jsモバイルアプリの作成 リソース
Next.jsドキュメント
- @__CAPGO_KEEP_0__/__CAPGO_KEEP_1__-native-navigation
- @capgo/capacitor-ネイティブナビゲーション __CAPGO_KEEP_0__ 8ドキュメント
- @Capacitor/__CAPGO_KEEP_1__-transitions
- @capgo/capacitor-transitions @__CAPGO_KEEP_0__/tailwind-__CAPGO_KEEP_1__
- @capgo/Tailwind-capacitor ——Tailwind安全領域ユーティリティのCapacitor
- Capgo - Capacitor アプリ向けのライブアップデート
Capgoを使用して、より良いアプリを迅速に作成する方法を学びましょう 無料アカウントに登録する 今日
Convert Your Next.jsアプリをiOS & Androidに変換するCapacitor 8
あなたが使用している Convert Your Next.jsアプリをiOS & Androidに変換するCapacitor 8 ネイティブプラグインの作業を計画するには、__CAPGO_KEEP_0__ Plugin Directoryと接続する Capgo Plugin Directoryの製品ワークフロー Capgo Plugins by __CAPGO_KEEP_1__ Capacitor プラグインは Capgo によって提供されます。 Capacitor プラグインの実装詳細については、Capgo プラグインを参照してください。 プラグインの追加または更新 __CAPGO_KEEP_0__ プラグインの実装詳細については、プラグインの追加または更新を参照してください。 イオニック エンタープライズ プラグインの代替 __CAPGO_KEEP_0__ プラグインの製品ワークフローについては、イオニック エンタープライズ プラグインの代替を参照してください。 Capgo ネイティブ ビルド Capgo プラグインの製品ワークフローについては、Capgo ネイティブ ビルドを参照してください。





