



简介
已经有一个现成的 Next.js Web 应用了吗?在本指南中,你将学习如何使用 Capacitor 8 —— 这是包含性能优化和新功能的最新版本。
Capacitor 将您的 Web 应用封装在原生容器中,在保留现有 React 代码库的同时,让您能够调用摄像头、文件系统和推送通知等设备 API。与 React Native 不同,您无需重写任何内容 —— 您的 Next.js code 可以直接运行。
您将学到:
- 配置现有的 Next.js 应用进行静态导出
- 添加包含核心原生插件的 Capacitor 8
- 在 iOS 和 Android 模拟器上进行构建与测试
- 启用 live reload 以加速开发
- 修复常见的 iOS 布局问题(viewport、安全区域、水平溢出)
- 使用 Capgo Native Navigation and Transitions 打造原生感的 UI
想要从零开始启动新项目?请查看我们的指南: 从零开始构建 Next.js Mobile App.
使用 Next.js 和 Capacitor 的优势
- Code 代码复用性: Next.js 让你可以编写可复用的组件,并在 Web 端与移动端应用之间共享 code,从而节省开发时间和精力。
- 性能: Next.js 内置性能优化,例如服务端渲染和 code 拆分,确保快速加载和流畅的用户体验。
- 原生能力: Capacitor 提供对摄像头、地理位置等原生设备功能的访问,让你能够构建功能丰富的移动应用。
- 简化开发: 通过 Capacitor,你可以使用熟悉的 Web 技术来开发和测试移动应用,降低学习成本并简化开发流程。
前提条件
开始前,请确保已具备:
- Node.js 18+ 已安装
- 现有的 Next.js 15+ 应用
- Xcode (用于 iOS 开发,仅限 macOS)
- Android Studio (用于 Android 开发)
为移动端配置 Next.js 应用
第一步是为 Next.js 应用配置静态导出。Capacitor 需要静态的 HTML/JS/CSS 文件来打包进 Native Build。
打开你的 next.config.js (或 next.config.ts) 文件并添加 export 配置:
/** @type {import('next').NextConfig} */
const nextConfig = {
  output: 'export',
  images: {
    unoptimized: true,
  },
};

module.exports = nextConfig;
该 output: 'export' 设置会让 Next.js 生成静态 HTML 文件,并且 images: { unoptimized: true } 绕过需要服务器支持的 Next.js 图片优化功能。
重要提示: 如果你使用了需要服务器的功能(如 API 路由、带有数据获取的 Server Components 等),则需要将其重构为使用客户端替代方案或外部 API。
在你的项目中添加移动端专用脚本 package.json:
{
  "scripts": {
    "dev": "next dev",
    "build": "next build",
    "start": "next start",
    "lint": "next lint",
    "mobile": "bun run build && bunx cap sync",
    "mobile:ios": "bun run mobile && bunx cap open ios",
    "mobile:android": "bun run mobile && bunx cap open android"
  }
}
通过运行以下命令测试静态导出:
bun run build你应该会在项目根目录下看到一个 out 文件夹。其中包含了 Capacitor 将会 bundle 到你 Native Build 中的所有静态文件。
将 Capacitor 8 添加到你的项目中
要将你的 Next.js 应用打包进原生移动端容器,请按照以下步骤操作:
- 安装 Capacitor core 和 CLI:
bun add @capacitor/core
bun add -D @capacitor/cli- 安装你可能需要的常用 Capacitor plugins:
bun add @capacitor/app @capacitor/keyboard @capacitor/splash-screen @capacitor/preferences这些 plugins 提供了核心功能:
- @capacitor/app: 处理应用生命周期事件(前台/后台、URL)
- @capacitor/keyboard: 控制移动端的键盘行为
- @capacitor/splash-screen: 管理原生启动页 (splash screen)
- @capacitor/preferences: 持久化存储键值对数据
- 使用您的项目详情初始化 Capacitor:
bunx cap init my-app com.example.myapp --web-dir out替换 my-app 为您的应用名称以及 com.example.myapp 使用您的 App ID(反向域名格式)。
- 创建或更新
capacitor.config.ts配置文件,并设置正确的配置:
import type { CapacitorConfig } from '@capacitor/cli';

const config: CapacitorConfig = {
  appId: 'com.example.myapp',
  appName: 'my-app',
  webDir: 'out',
  plugins: {
    SplashScreen: {
      launchShowDuration: 2000,
      launchAutoHide: true,
      androidScaleType: 'CENTER_CROP',
      showSpinner: false,
      splashFullScreen: true,
      splashImmersive: true,
    },
  },
};

export default config;- 安装原生平台:
bun add @capacitor/ios @capacitor/android- 添加原生平台文件夹:
bunx cap add ios
bunx cap add android
Capacitor 将创建 ios 和 android 包含原生项目的根目录文件夹。
要构建 Android 项目,您需要 Android Studio。对于 iOS,您需要一台安装了 Xcode 的 Mac.
- 构建并同步项目:
bun run mobile这将运行您的自定义脚本,用于构建 Next.js 项目并将静态文件同步到原生平台。
构建与部署原生 App
要构建并部署您的原生移动 App,请遵循以下步骤: 开发 iOS App,您需要安装 Xcode ,而开发 Android App,您需要安装 Android Studio 。此外,如果您计划在应用商店发布 App,则需要加入 iOS 的 Apple Developer Program 和 Android 的 Google Play Console。
- 打开原生项目:
iOS 端:
bun run mobile:iosAndroid 端:
bun run mobile:android或者直接使用 Capacitor CLI:
bunx cap open ios
bunx cap open android- 构建并运行应用:
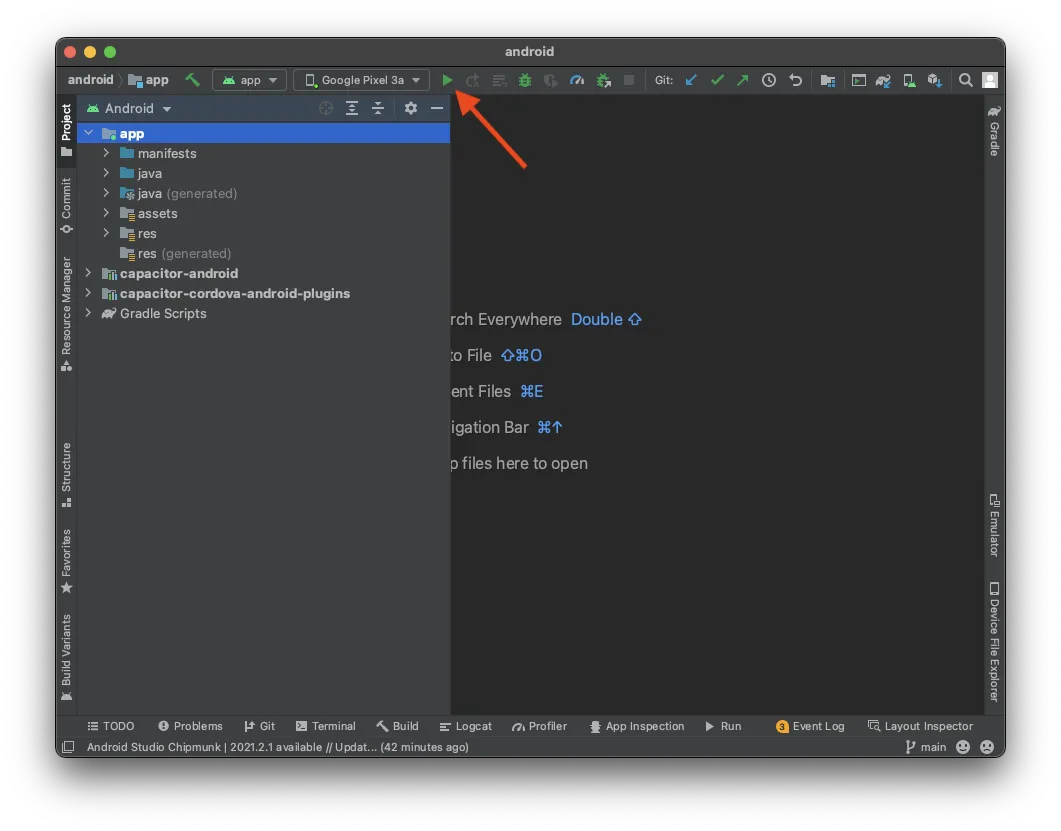
-
在 Android Studio 中,等待项目准备就绪,然后点击 “Run” 按钮将应用部署到已连接的设备或模拟器上。
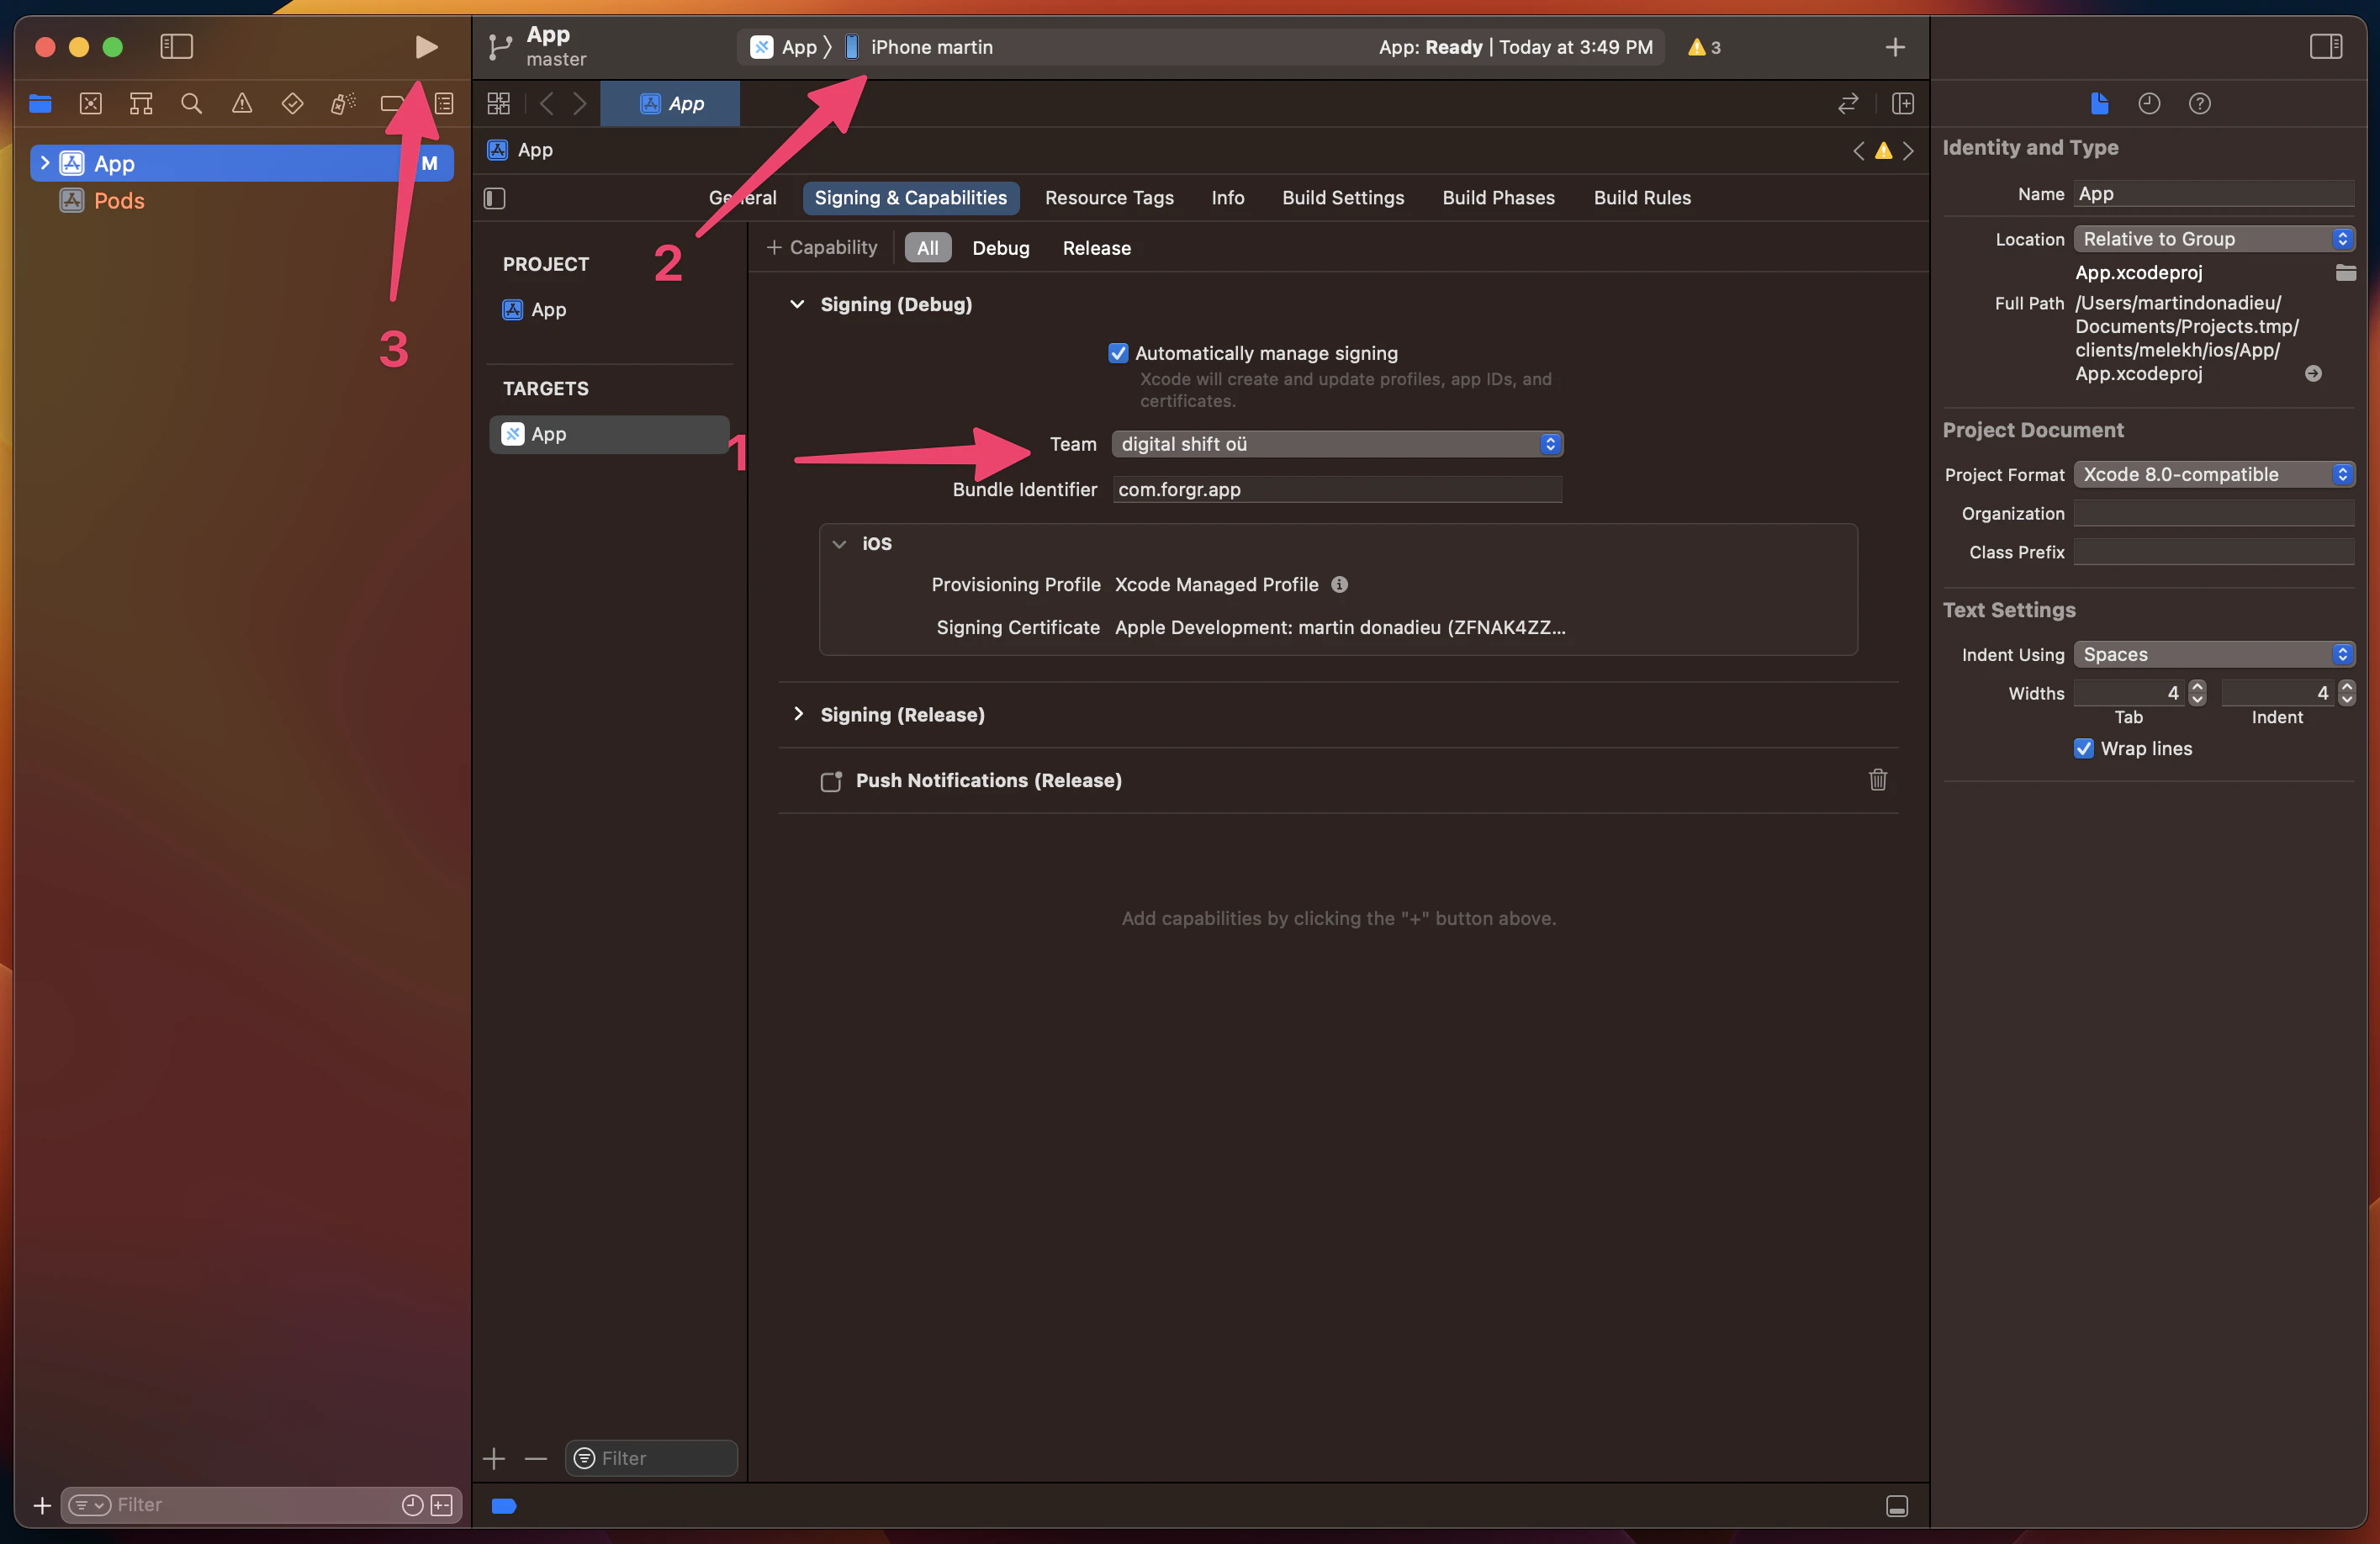
-
在 Xcode 中,配置好签名账号以便将应用部署到真机。如果你之前从未操作过,Xcode 会引导你完成该流程(请注意,你需要加入 Apple Developer Program)。配置完成后,点击 “Play” 按钮即可在已连接的设备上运行应用。
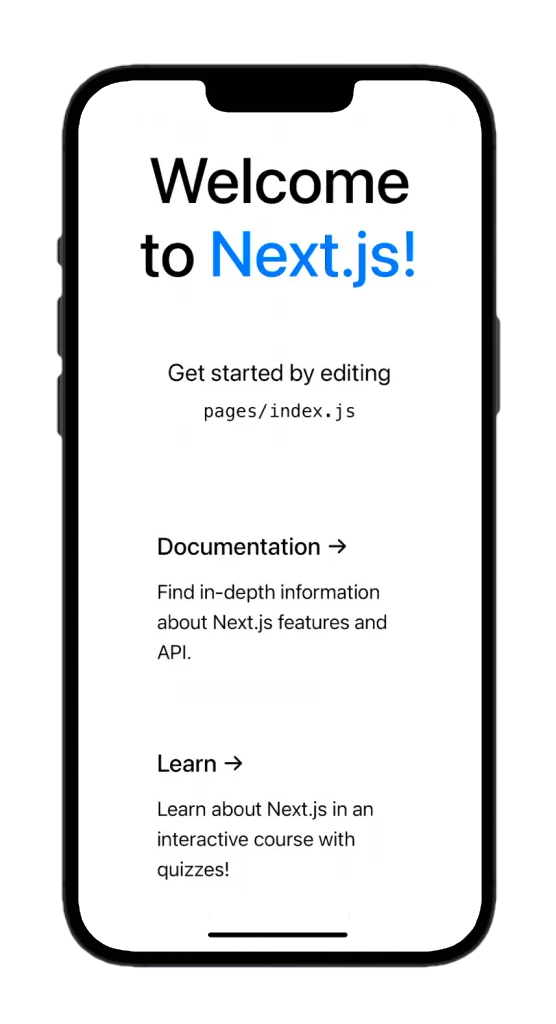
恭喜!你已成功将 Next.js Web 应用部署到移动设备。
Capacitor Live Reload
在开发期间,你可以利用 Live Reload 功能在移动设备上即时查看更改。要启用此功能,请按照以下步骤操作:
- 查找你的本地 IP 地址:
-
在 macOS 上,请在终端运行以下命令:
ipconfig getifaddr en0 -
在 Windows 上运行:
ipconfig在输出结果中查找 IPv4 地址。
- 更新你的
capacitor.config.ts以指向你的开发服务器:
import type { CapacitorConfig } from '@capacitor/cli';

const config: CapacitorConfig = {
  appId: 'com.example.app',
  appName: 'my-app',
  webDir: 'out',
  server: {
    url: 'http://YOUR_IP_ADDRESS:3000',
    cleartext: true,
  },
};

export default config;
将 YOUR_IP_ADDRESS 替换为你的本地 IP 地址(例如, 192.168.1.100).
- 将更改应用到你的原生项目:
bunx cap copy该 copy 该命令会将 web 文件夹和配置更改复制到原生项目,而无需更新整个项目。
- 使用 Android Studio 或 Xcode 在设备上重新构建并运行 App。
现在,每当你对 Next.js 应用进行更改时,移动端 App 都会自动重新加载以反映这些更改。
注意:如果你安装了新插件或更改了原生文件,则需要重新构建原生项目,因为热重载仅适用于 web code 更改。
使用 Capacitor 插件
Capacitor 插件让你能在 Next.js 应用中调用原生设备功能。让我们以 Share 插件 为例进行探索:
- 安装 Share 插件:
bun add @capacitor/share- 更新
pages/index.js文件以使用 Share 插件:
import Head from 'next/head';
import styles from '../styles/Home.module.css';
import { Share } from '@capacitor/share';

export default function Home() {
  const share = async () => {
    await Share.share({
      title: 'Open Youtube',
      text: 'Check new video on youtube',
      url: 'https://www.youtube.com',
      dialogTitle: 'Share with friends',
    });
  };

  return (
    <div className={styles.container}>
      <Head>
        <title>Create Next App</title>
        <meta name="description" content="Generated by create next app" />
        <link rel="icon" href="/favicon.ico" />
      </Head>

      <main className={styles.main}>
        <h1 className={styles.title}>
          Welcome to <a href="https://nextjs.org">Capgo!</a>
        </h1>

        <p className={styles.description}>
          <h2>Cool channel</h2>
          <button onClick={() => share()}>Share now!</button>
        </p>
      </main>
    </div>
  );
}- 将更改同步到原生项目:
如前所述,安装新插件时,我们需要执行 sync 操作,然后将应用重新部署到设备。请运行以下命令:
bun run mobile或者仅进行 sync 而无需重新构建:
bunx cap sync- 重新构建并在设备上运行应用。
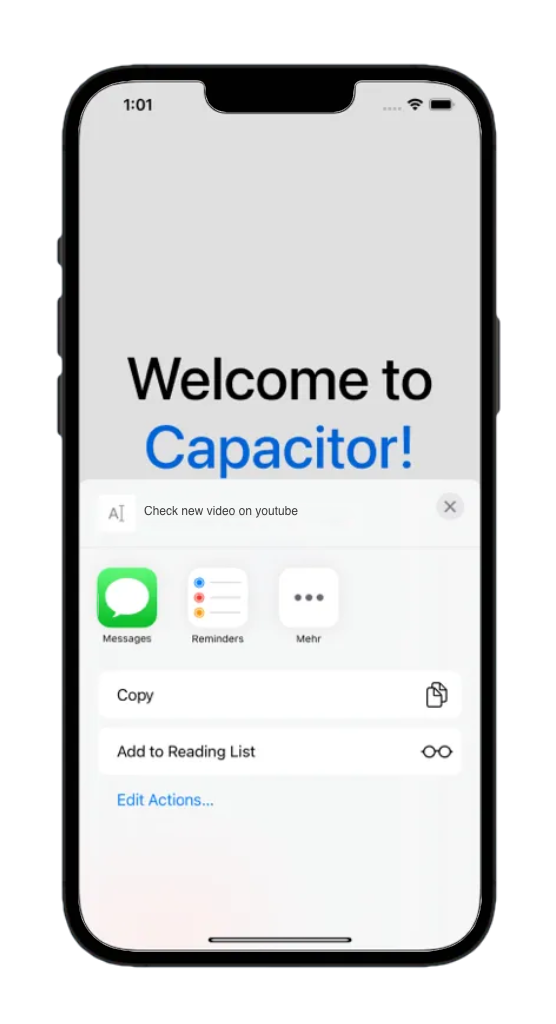
现在,当你点击“Share now!”按钮时,就会弹出原生分享对话框,让你能将内容分享到其他应用。
我多年来一直使用 Ionic 来构建跨平台应用,但如果已经有了 Tailwind CSS 4.
若想在 Next.js + Capacitor 应用中获得原生移动端体验,请使用 Capgo 插件,而不是 Konsta UI 等仅限 Web 的 UI kit:
- @capgo/capacitor-native-navigation — 原生导航栏、iOS 上的 Liquid Glass 标签栏,以及 Android 上的毛玻璃标签栏样式。你的 Next.js router 会保留路由状态,而插件则负责管理原生外壳(native chrome)。
- @capgo/capacitor-transitions — 在 WebView 层实现 Ionic 风格的页面过渡和 iOS 边缘侧滑返回,而无需采用 Ionic UI。
安装两者:
bun add @capgo/capacitor-native-navigation @capgo/capacitor-transitions
bunx cap sync
使用 CSS inset 模式配置原生导航,让 Web 内容避开原生栏:
import { NativeNavigation } from '@capgo/capacitor-native-navigation';

await NativeNavigation.configure({
  contentInsetMode: 'css',
  animationDuration: 360,
  glass: {
    effect: 'liquidGlass',
  },
});
渲染 Liquid Glass 标签栏(iOS 由系统负责渲染;Android 使用毛玻璃 WebView 背景):
await NativeNavigation.setTabbar({
  selectedId: 'home',
  labelVisibilityMode: 'labeled',
  icons: true,
  colors: { dynamic: true },
  tabs: [
    { id: 'home', title: 'Home', icon: { svg: '...' } },
    { id: 'settings', title: 'Settings', icon: { svg: '...' } },
  ],
});

await NativeNavigation.addListener('tabSelect', ({ id }) => {
  router.push(`/${id}`);
});
在 App Shell 中添加原生页面过渡效果:
import '@capgo/capacitor-transitions';
import { initTransitions, setDirection, setupRouterOutlet } from '@capgo/capacitor-transitions/react';

initTransitions({ platform: 'auto' });
将路由页面包裹在 cap-router-outlet, cap-page,以及 cap-content,并调用 setDirection('forward') 或 setDirection('back') 在 router.push() 或 router.back()。当原生导航接管这些界面时,请勿重复添加 Web 端页眉或页脚。
查看完整指南: 使用 @capgo/capacitor-native-navigation 和 使用 @capgo/capacitor-transitions.
使用 Tailwind 处理安全区域
在 Tailwind CSS 中处理设备安全区域,请使用 @capgo/tailwind-capacitor (发布于 tailwind-capacitor 于 npm)。它提供了 safe-areas 工具类以及其他对 Capacitor 友好的 Tailwind 插件:
bun add -D tailwind-capacitor在 styles/globals.css:
@import 'tailwindcss';
@plugin "@capgo/tailwind-capacitor/platform";
@plugin "@capgo/tailwind-capacitor/safe-areas";
使用如下工具类: pt-safe, pb-safe,以及 px-safe 而不是到处散落 env(safe-area-inset-*) 手动完成。该项目正在积极开发中 —— 如果你的 Next.js 配置缺少某些功能, 请在 GitHub 上提交 PR.
修复 iOS 布局问题(视口、安全区域及水平溢出)
如果 iOS 上的内容看起来被裁剪、偏移或可横向滚动,仅靠添加或 overflow-x: hidden 调整 viewport 标签通常解决不了问题。请按顺序逐项检查。
确保正确应用 viewport meta 标签
App Router (app/): export viewport from app/layout.tsx:
import type { Viewport } from 'next';

export const viewport: Viewport = {
  width: 'device-width',
  initialScale: 1,
  viewportFit: 'cover',
};
Pages Router (pages/): 将 viewport meta 标签放入 pages/_app.tsx,而不是 _document.tsx (Next.js 可能无法按 _document.tsx 你预期的 viewport 行为应用标签)。
仅通过一个根级 wrapper 处理 iOS 安全区域
创建一个单一 app shell,并在其中应用安全区域内边距——不要在多个嵌套组件中处理:
html,
body,
#__next {
  width: 100%;
  min-height: 100%;
  margin: 0;
  padding: 0;
  overflow-x: hidden;
}

* {
  box-sizing: border-box;
}

.app-shell {
  min-height: 100dvh;
  width: 100%;
  padding-top: env(safe-area-inset-top);
  padding-right: env(safe-area-inset-right);
  padding-bottom: env(safe-area-inset-bottom);
  padding-left: env(safe-area-inset-left);
}
将所有页面内容包裹在 .app-shell页眉、模态框和布局包装器中重复的安全区域 (safe-area) 内边距,常会导致 UI 看起来被裁剪或过大。
使用 @capgo/tailwind-capacitor你可以使用如下工具类来表达相同的内边距: pt-safe pb-safe px-safe 在那个单一 shell 上。
设置 Capacitor iOS contentInset 至 never 首先
在 capacitor.config.ts,建议禁用原生 inset,让 CSS(或 Native Navigation 的 contentInsetMode: 'css')来控制安全区域:
const config: CapacitorConfig = {
  appId: 'com.example.myapp',
  appName: 'my-app',
  webDir: 'out',
  ios: {
    contentInset: 'never',
  },
};
将 Capacitor 的自动内容 inset 与 CSS env(safe-area-inset-*) padding 混用,是导致双重间距的常见原因。
找到真正溢出的元素
问题通常出在某个元素使用了 100vw、Tailwind w-screen、固定像素宽度,或较大的 min-width.
在 Safari Web Inspector 中运行:
[...document.querySelectorAll('*')]
  .filter(el => el.scrollWidth > document.documentElement.clientWidth)
  .map(el => ({
    el,
    tag: el.tagName,
    class: el.className,
    scrollWidth: el.scrollWidth,
    clientWidth: document.documentElement.clientWidth,
  }));
使用 Tailwind,替换 w-screen 带 w-full 尽可能避免。许多水平溢出问题源于 100vw / w-screen,重复的 safe-area 内边距,或固定宽度容器——而不是 viewport meta 标签本身。
性能优化
为了确保您的 Next.js 和 Capacitor 应用达到最佳性能,请参考以下最佳实践:
- 通过移除未使用的依赖项和资源来减小应用体积。
- 优化图片和其他媒体文件,以缩短加载时间。
- 为组件和页面实现懒加载 (lazy loading),以提升初始加载性能。
- 使用 Next.js 的服务端渲染 (SSR),提升应用加载速度和搜索引擎优化 (SEO)。
- 利用 Capacitor 的内置优化,例如 WebView 缓存和应用打包。
总结
您已成功使用 Capacitor 8 将现有的 Next.js Web 应用转换为 iOS 和 Android 原生应用。您的 Web 代码库现在可以在移动设备上原生运行,并可访问设备 API。
学习成果:
- 配置 Next.js 静态导出
- 添加 Capacitor 8 及核心插件
- 构建并部署至 iOS 和 Android 模拟器
- 开启开发环境下的 live reload
- 修复常见的 iOS 布局问题 (viewport, safe area, overflow)
- 使用 Capgo Native Navigation and Transitions 实现原生感 UI
下一步:
- 配置 Capgo 以实现无需通过 App Store 审核的 OTA 更新
- 添加更多原生插件,如 Camera、Geolocation 或 Push Notifications
- 配置生产环境的应用图标与启动页
- 为提交 App Store 和 Google Play 做准备
想要开启一个新项目?请查看 从零开始构建 Next.js 移动应用 获取分步指南。
资源
- Next.js 文档
- @capgo/capacitor-native-navigation — 玻璃拟态 (Liquid Glass) 标签栏与原生 UI 元素
- Capacitor 8 文档
- @capgo/capacitor-transitions — 原生感的页面过渡动画
- @capgo/tailwind-capacitor — 适用于 Capacitor 的 Tailwind safe-area 工具库
- Capgo - 为 Capacitor 应用提供 Live Updates
了解 Capgo 如何助您更高效地构建优质应用, 注册免费账号 ,就在今天。
继续阅读:使用 Capacitor 将您的 Next.js 应用转换为 iOS & Android 8
如果你正在使用 使用 Capacitor 8 将 Next.js 应用转换为 iOS 和 Android 要规划原生插件工作,请将其连接到 Capgo 插件目录 用于 Capgo 插件目录中的产品工作流, 由 Capgo 提供的 Capacitor 插件 有关 Capgo 编写的 Capacitor 插件实现细节, 添加或更新插件 关于“添加或更新插件”中的实现细节, Ionic Enterprise 插件替代方案 了解 Ionic Enterprise 插件替代方案的产品工作流,以及 Capgo Native Build 关于 Capgo Native Builds 中的产品工作流。





