



このチュートリアルでは、Capacitorを使用してReactアプリをモバイルアプリに変換する方法を説明します。 React app and transition to native mobile development using Capacitor. You can also add Capgo Native Navigation and Transitions for a native mobile feel, and use tailwind-capacitor for safe areas.
Capacitor allows you to easily convert your React web application into a native mobile app without significant modifications or learning a new skill like React Native.
Capacitorは、Reactアプリをモバイルアプリに変換するための簡単な方法を提供します。
This tutorial will guide you through the process, starting with a new React app and then incorporating Capacitor to move into the realm of native mobile apps. You can also use Capgo Native Navigation, Transitions, and tailwind-capacitor for safe areas.
About Capacitor
Capacitorについて
With Capacitor, you get a fantastic native mobile app without any complicated setup or steep learning curve. Its slim API and streamlined functionality make it a breeze to integrate into your project. Trust me, you’ll be amazed at how effortless it is to achieve a fully functional native app with Capacitor!
Capacitorを使用すると、複雑なセットアップや急激な学習カーブなしで、素晴らしいネイティブモバイルアプリが得られます。Capacitorはスリムで機能が簡素化されており、プロジェクトに簡単に取り入れることができます。Capacitorを使用すると、完全に機能するネイティブアプリを簡単に実現できます。
Reactアプリケーションを始める方法は様々ありますが、このチュートリアルでは最もシンプルな方法を取り上げます。
npx create-react-app my-appnativeモバイルアプリを作成するには、プロジェクトの export が必要です。したがって、プロジェクトの package.json に簡単なスクリプトを追加して、Reactプロジェクトをビルドしてエクスポートすることができます。
{
  "scripts": {
    "start": "react-scripts start",
    "build": "react-scripts build",
    "test": "react-scripts test",
    "eject": "react-scripts eject"
  }
}
問題なく実行できます。プロジェクトのルートディレクトリに新しい npm run build out
This folder will be used by Capacitor later on, but for now, we must set it up correctly.
このフォルダは後でCapacitorによって使用されますが、現在は正しく設定する必要があります。
__CAPGO_KEEP_0__をReactアプリに追加する sync Webアプリをnativeモバイルコンテナにパッケージ化するには、いくつかの初期ステップを実行する必要がありますが、その後は単に1つのコマンドを実行するだけです。
Firstly, we can install the Capacitor CLI Capacitorを開発依存としてインストールし、プロジェクト内でセットアップします。セットアップ中、名前とバンドルIDのデフォルト値を承認するには「Enter」を押すことができます。
次に、iOSおよびAndroidプラットフォームのためのコアパッケージと関連パッケージをインストールする必要があります。
Finally, we can add the platforms, and Capacitor will create folders for each platform at the root of our project:
# Install the Capacitor CLI locally
npm install -D @capacitor/cli

# Initialize Capacitor in your React project
npx cap init

# Install the required packages
npm install @capacitor/core @capacitor/ios @capacitor/android

# Add the native platforms
npx cap add ios
npx cap add android
この時点で、Reactプロジェクト内に新しい ios と context":"Page/area: Capgo marketing website. Role: Short UI label or navigation item. Seen in: page trust.astro. Message key `and` (And)." android
フォルダが観察できます。
これらは実際のネイティブプロジェクトです! Android Studio. For iOS, you need a Mac and should install Xcode.
Additionally, you should find a capacitor.config.ts file in your project, which contains some fundamental Capacitor settings utilized during the sync. The only thing you need to pay attention to is the webDirwhich must point to the result of your build command. Currently, it is inaccurate.
To rectify this, open the capacitor.config.json file and update the webDir:
{
  "appId": "com.example.app",
  "appName": "my-app",
  "webDir": "out",
  "bundledWebRuntime": false
}
実行するには、以下のコマンドを実行してみてください。
npm run build
npx cap sync
最初のコマンド npm run build は、React プロジェクトを単にビルドし、静的ビルドをエクスポートします。
2 番目のコマンド npx cap sync will sync all the web code into the right places of the native platforms so they can be displayed in an app.
また、Sync コマンドは、ネイティブプラットフォームを更新し、プラグインをインストールする可能性があるため、新しい Capacitor プラグインをインストールした場合 npx cap sync 再度実行する必要があります。
気づかないうちに、実際には完了しています。
デバイスでアプリを表示してみましょう。
ネイティブアプリをビルドしてデプロイするには Xcode がインストールされている場合、Android アプリの場合は Android Studio がインストールされている必要があります。また、App Store でアプリを配布する場合、iOS の場合は Apple Developer Program に、Android の場合は Google Play Console に登録する必要があります。
native mobile development に新人ですか? Capacitor CLI を使用すると、両方のネイティブ プロジェクトを簡単に開くことができます。
npx cap open ios
npx cap open android
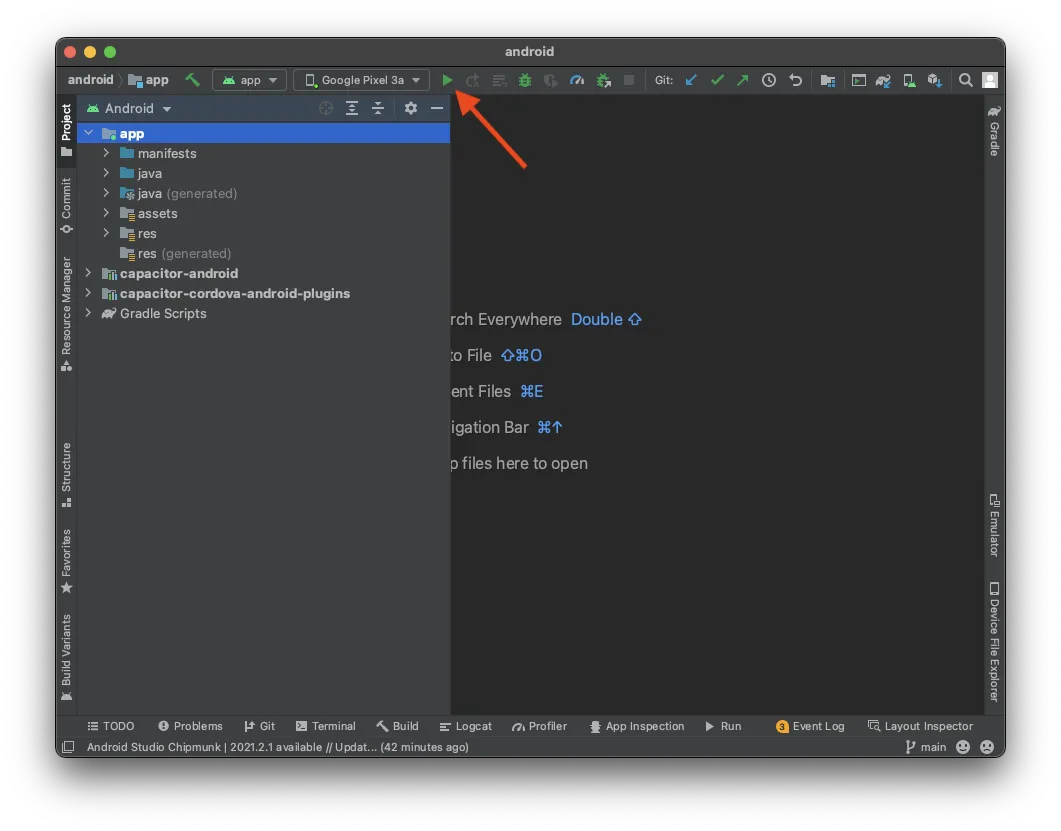
ネイティブ プロジェクトを設定した後、デバイスにアプリをデプロイするのは簡単です。Android Studio の場合、設定を変更することなく、デバイスにアプリをデプロイする準備が整うのを待ちます。ここに例があります:
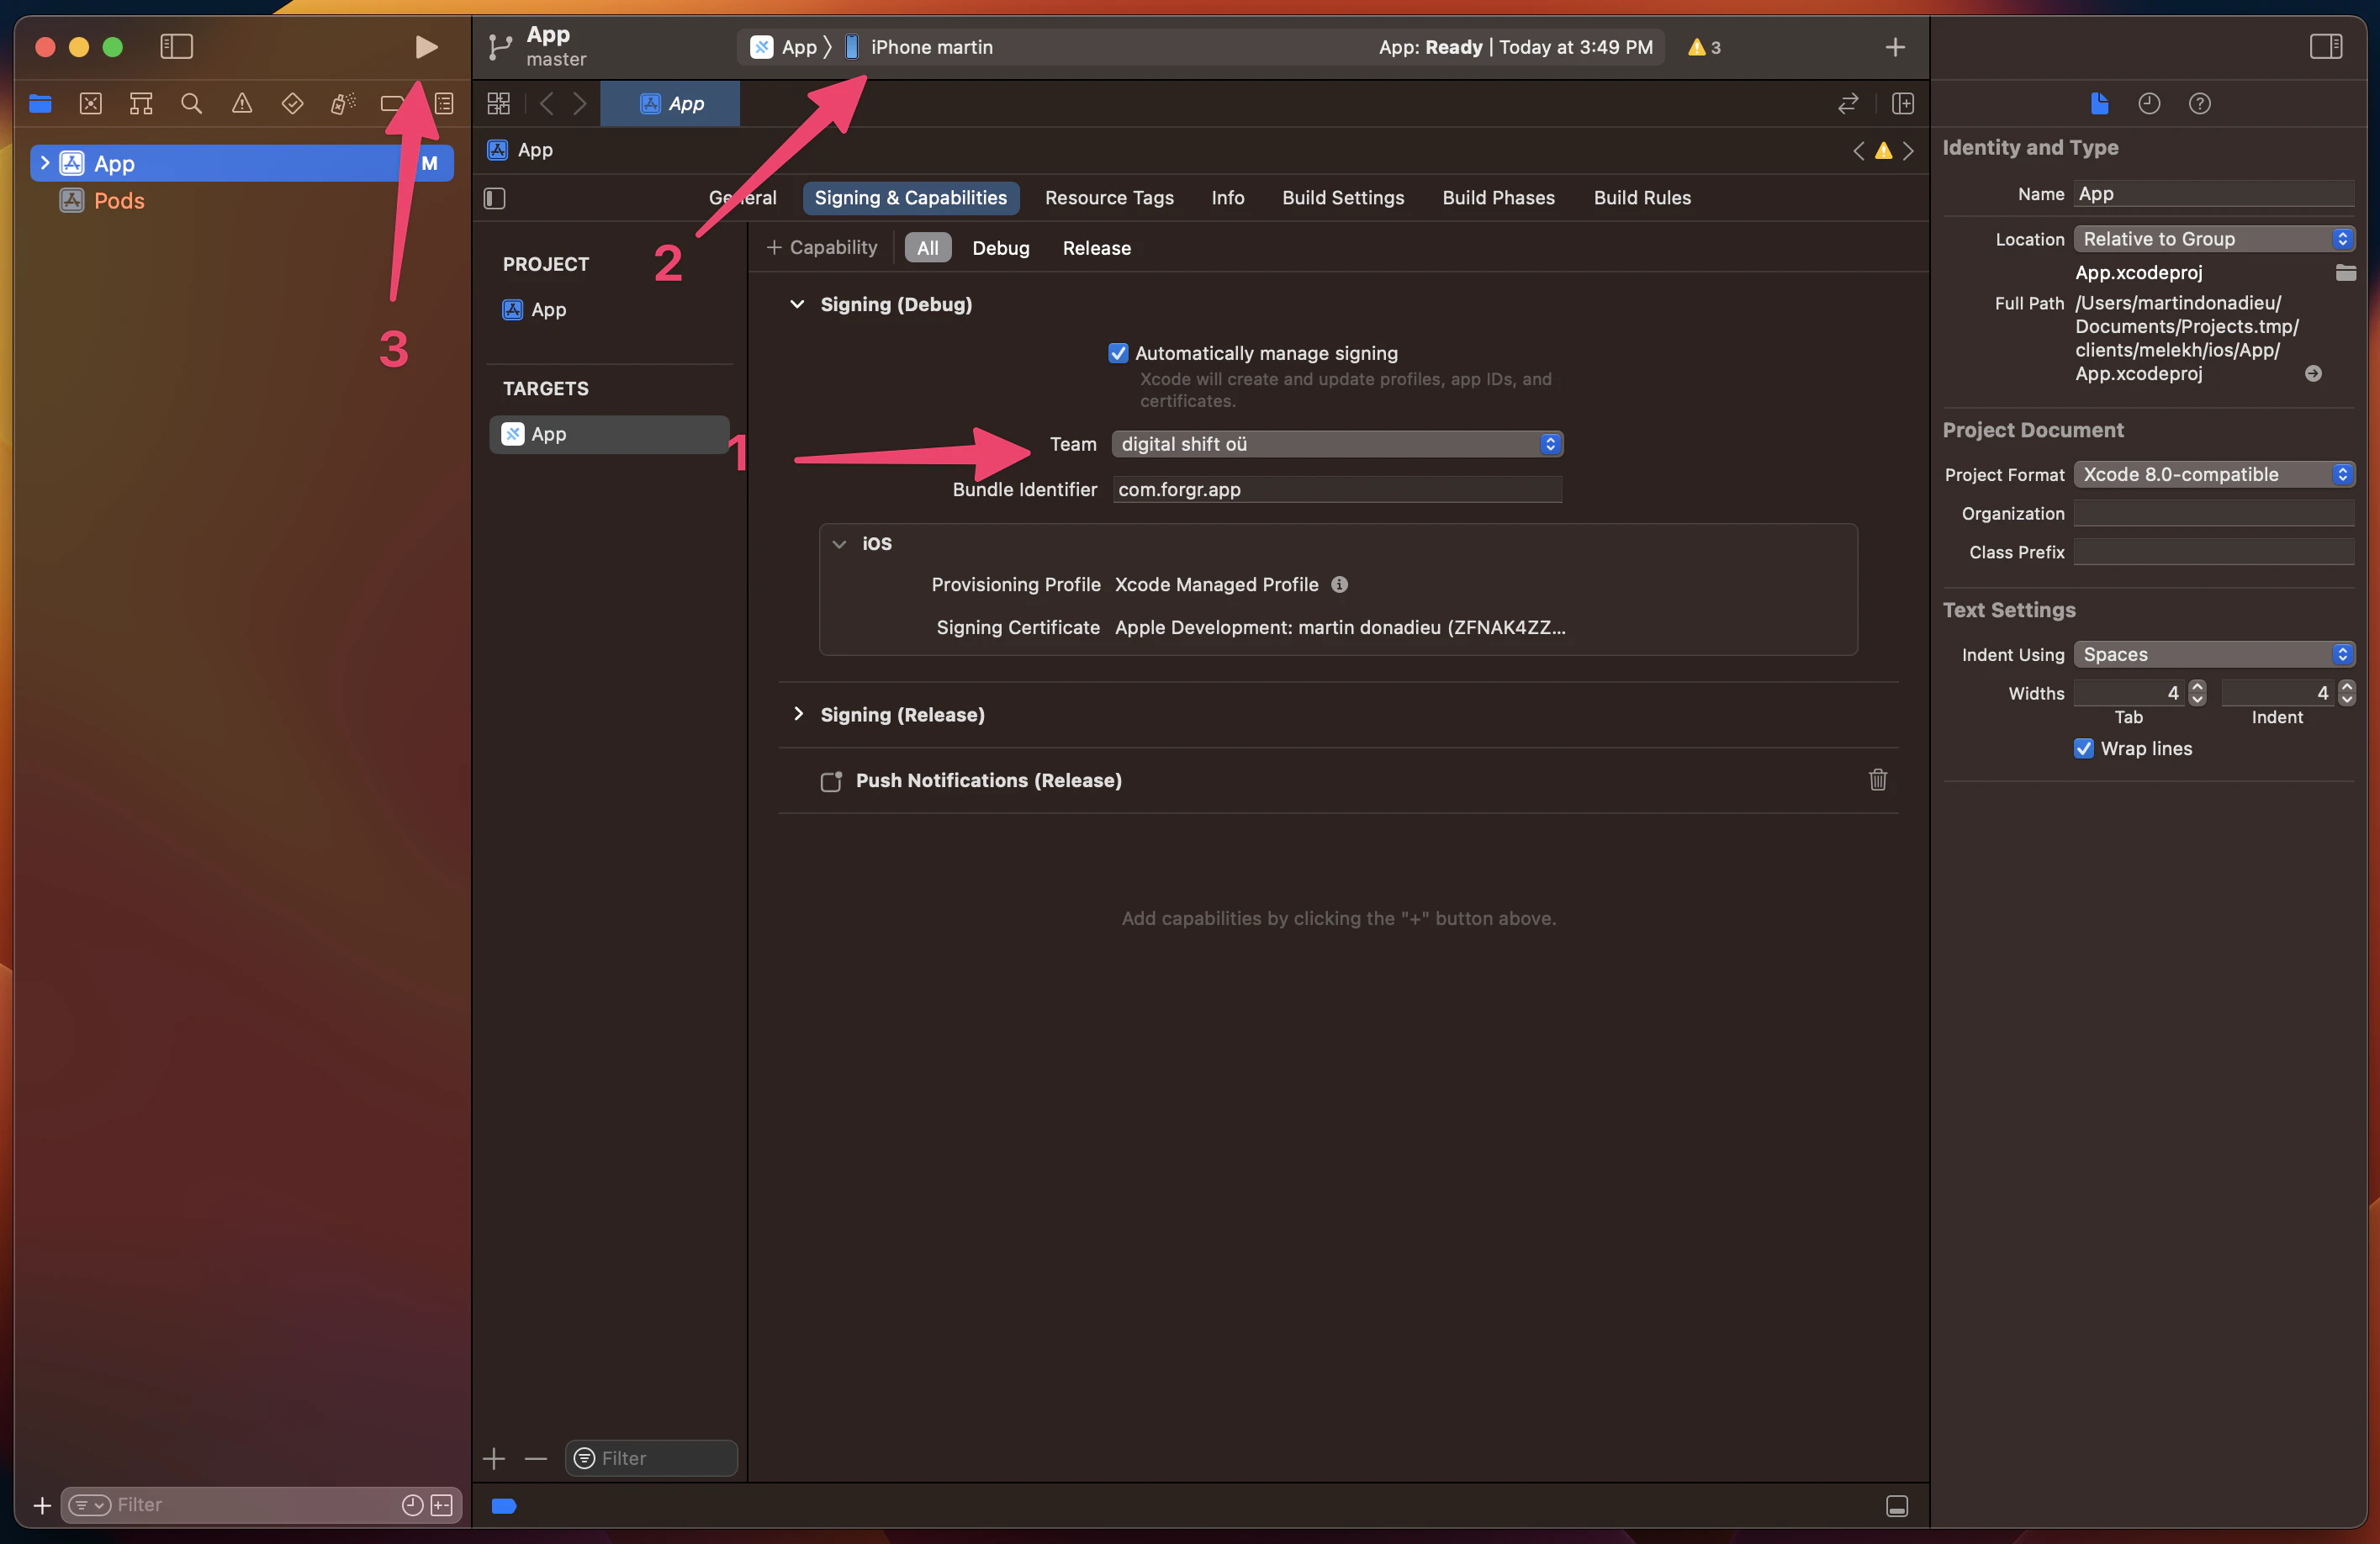
Xcode の場合、実機にアプリをデプロイするには署名アカウントを設定する必要があります。シミュレーターにのみアプリをデプロイする場合は設定を変更する必要はありませんが、実機にアプリをデプロイする場合は署名アカウントを設定する必要があります。署名アカウントを設定する必要がある場合は、Xcode がガイドを提供します (ただし、開発者プログラムに登録する必要があります)。署名アカウントを設定した後、実機にアプリをデプロイするには、上部で選択したデバイスを選択し、実行をクリックするだけです。ここに例があります:
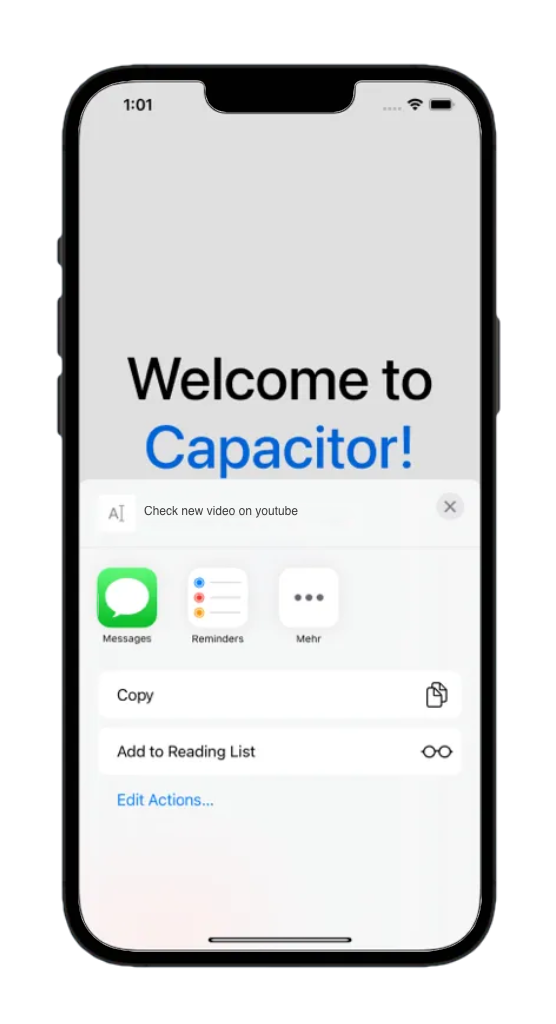
成功しました! React ウェブアプリをモバイル デバイスにデプロイしました。ここに例があります:
しかし、開発中はもっと速くする方法もあります…
Capacitor Live Reload
現在、すべてのモダンフレームワークでホットリロードができるようになっているので、同じ機能をモバイルデバイスで利用できることを知っています。 モバイルデバイスで同じ機能を利用できることを知っています。 モバイルデバイスで同じ機能を簡単に利用できることを知っています。
ローカルホストのアプリケーションにアクセスし、ライブリロードを有効にすることができます。 ローカルネットワーク上でライブリロードを有効にすることができます。 Capacitor アプリが特定のURLからコンテンツを読み込むように設定することで、ローカルホストのアプリケーションにアクセスし、ライブリロードを有効にすることができます。
ローカルIPアドレスを調べる第一歩は、ローカルIPアドレスを調べることです。Macを使用している場合、ターミナルで以下のコマンドを実行してください。
ipconfig getifaddr en0Windowsを使用している場合、以下のコマンドを実行してください。
ipconfig次に、IPv4アドレスを探してください。
Capacitor をサーバーから直接読み込むように指示するには、ファイルに別のエントリを追加する必要があります。 capacitor.config.ts __CAPGO_KEEP_0__ をサーバーから直接読み込むように指示するには、ファイルに別のエントリを追加する必要があります。
import { CapacitorConfig } from '@capacitor/cli';

const config: CapacitorConfig = {
  appId: 'com.example.app',
  appName: 'my-app',
  webDir: 'out',
  bundledWebRuntime: false,
  server: {
    url: 'http://192.168.x.xx:3000',
    cleartext: true
  }
};

export default config;
Capgoを使用する際には 正しいIPアドレスとポート番号を使用してくださいこの例では、デフォルトのReactポートを使用しています。
ここで、これらの変更をNativeプロジェクトにコピーできます:
npx cap copyこのコマンドは copy と似ていますが、 syncWebフォルダと設定のみをコピーし、Nativeプロジェクトを更新せずに実行します。 Android StudioまたはXcodeを使用してアプリを再度デプロイできます。その後、Reactアプリに何か変更を加えた場合、アプリは自動的に更新され、変更が表示されます! Capacitorを使用してReactアプリをモバイルアプリに変換する方法
Capacitorを使用してReactアプリをモバイルアプリに変換する方法 Capacitorを使用してReactアプリをモバイルアプリに変換する方法 Capacitorを使用してReactアプリをモバイルアプリに変換する方法
ご注意 新しいプラグインをインストールした場合、カメラなどの場合、ネイティブプロジェクトを再構築する必要があります。これは、ネイティブファイルが変更されたため、オンザフライで行うことはできません。
注意してください。構成ファイルで正しいIPアドレスとポート番号を使用する必要があります。上のcodeブロックはデモ用にデフォルトのReactポートを示しています。
Capacitor プラグインの使用
Let’s take a look at how to use a Capacitor plugin in action, which we’ve mentioned a few times before. To do this, we can install a fairly simple plugin by running:
npm i @capacitor/shareShare プラグインは何も特別なことはありませんが、ネイティブの共有ダイアログを表示します。ここで、パッケージをインポートし、関数を呼び出すだけです。アプリのsrc/App.jsを次のように変更してみましょう。 前にも言及したように、新しいプラグインをインストールした場合、Sync操作を実行し、再度アプリをデバイスにデプロイする必要があります。次のコマンドを実行してください。src/App.js share() src/App.jsを変更する アプリを再度デプロイする アプリを再度デプロイする
import React from 'react';
import { Share } from '@capacitor/share';

function App() {
  const share = async () => {
    await Share.share({
      title: 'Open Youtube',
      text: 'Check new video on youtube',
      url: 'https://www.youtube.com',
      dialogTitle: 'Share with friends'
    });
  };

  return (
    <div>
      <h1>Welcome to React and Capacitor!</h1>
      <p>
        <h2>Cool channel</h2>
        <button onClick={() => share()}>Share now!</button>
      </p>
    </div>
  );
}

export default App;
コマンドを実行する
npx cap syncボタンを押した後、美しいネイティブシェアダイアログが実際に動作します!
次に、iOSとAndroidでアプリがよりネイティブに感じられるようにすることができます。Capgoナビゲーションとトランジションを使用し、水平オーバーフローまたはクロップされたセーフエリアが原因となる一般的なiOSレイアウト問題を修正します。
ネイティブフィーリングのUIとCapgoネイティブナビゲーションとトランジション
数年間、Ionicを使用してクロスプラットフォームアプリケーションを構築してきましたが、Reactと統合することはハック的で、すでにTailwind CSSを持っている場合にはほとんど価値がありません。 Ionic Tailwind CSS React + __CAPGO_KEEP_0__アプリケーションでネイティブモバイルフィーリングを実現するには、WebのみのUIキットであるKonsta UIではなく、__CAPGO_KEEP_1__プラグインを使用します。.
@Capacitor/Capgo-native-navigation
- @capgo/capacitor-native-navigation @__CAPGO_KEEP_0__/__CAPGO_KEEP_1__-transitions
- @capgo/capacitor-native-navigation — WebViewレイヤーで、Ionicスタイルのページ遷移とiOSのエッジスワイプバックを実現する。Ionic UIを採用する必要はありません。
両方をインストールする:
bun add @capgo/capacitor-native-navigation @capgo/capacitor-transitions
bunx cap sync
ネイティブのナビゲーションをCSSのインセットモードで設定して、ウェブコンテンツがネイティブのバーを尊重するようにします:
import { NativeNavigation } from '@capgo/capacitor-native-navigation';

await NativeNavigation.configure({
  contentInsetMode: 'css',
  animationDuration: 360,
  glass: {
    effect: 'liquidGlass',
  },
});
液体ガラスのタブバーをレンダリングします (iOSはシステム所有のレンダリングを使用し、AndroidはぼやけたWebViewのバックグラウンドを使用します):
await NativeNavigation.setTabbar({
  selectedId: 'home',
  labelVisibilityMode: 'labeled',
  icons: true,
  colors: { dynamic: true },
  tabs: [
    { id: 'home', title: 'Home', icon: { svg: '...' } },
    { id: 'settings', title: 'Settings', icon: { svg: '...' } },
  ],
});

await NativeNavigation.addListener('tabSelect', ({ id }) => {
  navigate(`/${id}`);
});
アプリシェルでネイティブのページ遷移を追加します:
import { useEffect, useRef } from 'react';
import { useNavigate } from 'react-router-dom';
import '@capgo/capacitor-transitions';
import { initTransitions, setDirection, setupRouterOutlet } from '@capgo/capacitor-transitions/react';

initTransitions({ platform: 'auto' });

export function AppShell() {
  const navigate = useNavigate();
  const outletRef = useRef<HTMLElement>(null);

  useEffect(() => {
    if (outletRef.current) {
      setupRouterOutlet(outletRef.current, { platform: 'auto', swipeGesture: 'auto' });
    }
  }, []);

  const openSettings = () => {
    setDirection('forward');
    navigate('/settings');
  };

  return <cap-router-outlet ref={outletRef}>{/* routes */}</cap-router-outlet>;
}
ルーティングされたページを cap-router-outlet, cap-page, cap-contentにラップし、 setDirection('forward') または setDirection('back') を呼び出します。
または Using @capgo/capacitor-native-navigation と @capgo/capacitor-transitions.
セーフエリア
デバイスのセーフエリアをTailwind CSSで使用するには @capgo/tailwind-capacitor (公開日 tailwind-capacitor npmで safe-areas 機能やその他のCapacitor向けのTailwindプラグインを提供します。
bun add -D tailwind-capacitorIn src/index.css:
@import 'tailwindcss';
@plugin "@capgo/tailwind-capacitor/platform";
@plugin "@capgo/tailwind-capacitor/safe-areas";
機能を使用する pt-safe, pb-safe、 px-safe 代わりに env(safe-area-inset-*) 手作で。プロジェクトは活発に開発されています — React セットアップの場合、必要なものが不足している場合 GitHub に PR を提出してください.
iOS レイアウトの修正 (ビュー ポート、セーフ エリア、水平オーバーフロー)
iOS でコンテンツが切り取られた、ずれた、または水平方向にスクロールできる場合、ビュー ポート タグを追加したり修正したりするだけでは通常解決しません。次のチェックを順番に実行してください。 overflow-x: hidden ビュー ポート メタタグが正しく適用されていることを確認してください
ビュー ポート メタタグを追加してください
ビュー ポート メタタグを追加してください index.html セーフ エリアを 1 つのルート ウォッパーからのみハンドルしてください <head>:
<meta name="viewport" content="width=device-width, initial-scale=1, viewport-fit=cover" />単一のアプリ シェルを作成し、セーフ エリアのパディングを適用してください — 複数のネストされたコンポーネントにのみ適用してください:
すべてのページ コンテンツを
html,
body,
#root {
  width: 100%;
  min-height: 100%;
  margin: 0;
  padding: 0;
  overflow-x: hidden;
}

* {
  box-sizing: border-box;
}

.app-shell {
  min-height: 100dvh;
  width: 100%;
  padding-top: env(safe-area-inset-top);
  padding-right: env(safe-area-inset-right);
  padding-bottom: env(safe-area-inset-bottom);
  padding-left: env(safe-area-inset-left);
}
セーフ エリアのパディングが複製されたヘッダー、モーダル、レイアウト ウォッパーは、UI が切り取られたり大きすぎるように見えることがよくあります。 .app-shell__CAPGO_KEEP_0__
With @capgo/tailwind-capacitor、 pt-safe pb-safe px-safe on that single shell.
Set Capacitor iOS contentInset を never first
In capacitor.config.ts, contentInsetMode: 'css'native insetを無効にして、CSS (またはNative Navigationの)
const config: CapacitorConfig = {
  appId: 'com.example.myapp',
  appName: 'my-app',
  webDir: 'dist',
  ios: {
    contentInset: 'never',
  },
};
Mixing Capacitor’s automatic content inset with CSS env(safe-area-inset-*) Mixing __CAPGO_KEEP_0__’s automatic content inset with CSS
真実のオーバーフロー要素を見つける
通常の容疑者は、固定ピクセル幅の要素を使用している 100vw、Tailwind w-screen、固定ピクセル幅の要素を使用している min-width.
、または大きい
[...document.querySelectorAll('*')]
  .filter(el => el.scrollWidth > document.documentElement.clientWidth)
  .map(el => ({
    el,
    tag: el.tagName,
    class: el.className,
    scrollWidth: el.scrollWidth,
    clientWidth: document.documentElement.clientWidth,
  }));
Safari Web インスペクターで実行: w-screen Tailwindの場合、 w-full を置き換える 100vw / w-screenを置き換える
できる場合。多くの水平オーバーフロー問題は、
Capacitor is an excellent option for building native applications based on an existing web project, offering a simple way to share code and maintain a consistent UI.
結論 CapgoCapacitorを使用してReactモバイルアプリを作成する
If you would like to learn how to add Capgo to your React app, take a look at the next article:
Keep going from Building Mobile Apps with React and Capacitor
Capacitorを使用してReactアプリを構築し続ける Building Mobile Apps with React and Capacitor Capacitorを使用してReactアプリを構築し続ける Capgo CI/CD for the product workflow in Capgo CI/CD, Capgo Native Builds for the product workflow in Capgo Native Builds, Capgo Integrations Capacitor製品ワークフローにおけるCapgo統合 CI/CD統合 CI/CD統合の実装詳細については GitHubアクション統合 GitHubアクション統合の実装詳細については