Impostazione di accesso Facebook
Copia un prompt di configurazione con i passaggi di installazione e la guida markdown completa per questo plugin.
Introduzione
Sottosezione intitolata “Introduzione”In questo guide, imparerai a configurare Facebook Login con Capgo Social Login. Avrai bisogno dei seguenti:
- Un account di sviluppatore Facebook
- Nome pacchetto/app ID del tuo'app
- Accesso a una finestra di comando per generare hash chiave (Android)
Configurazione generale
Sottosezione intitolata “Configurazione generale”Se non hai già creato un'app Facebook, segui questi passaggi:
-
Crea un'applicazione Facebook
Segui il tutorial per Crea un'applicazione
-
Aggiungi Facebook Login alla tua app
Nel tuo pannello di controllo del developer Facebook, aggiungi il prodotto Facebook Login alla tua app
-
Prima di poter rilasciare la tua app al pubblico, segui questo tutorial per pubblicarla
Informazioni importanti
Sezione intitolata “Informazioni importanti”Ecco dove trovare le informazioni chiave che ti serviranno per l'integrazione:
-
CLIENT_TOKEN: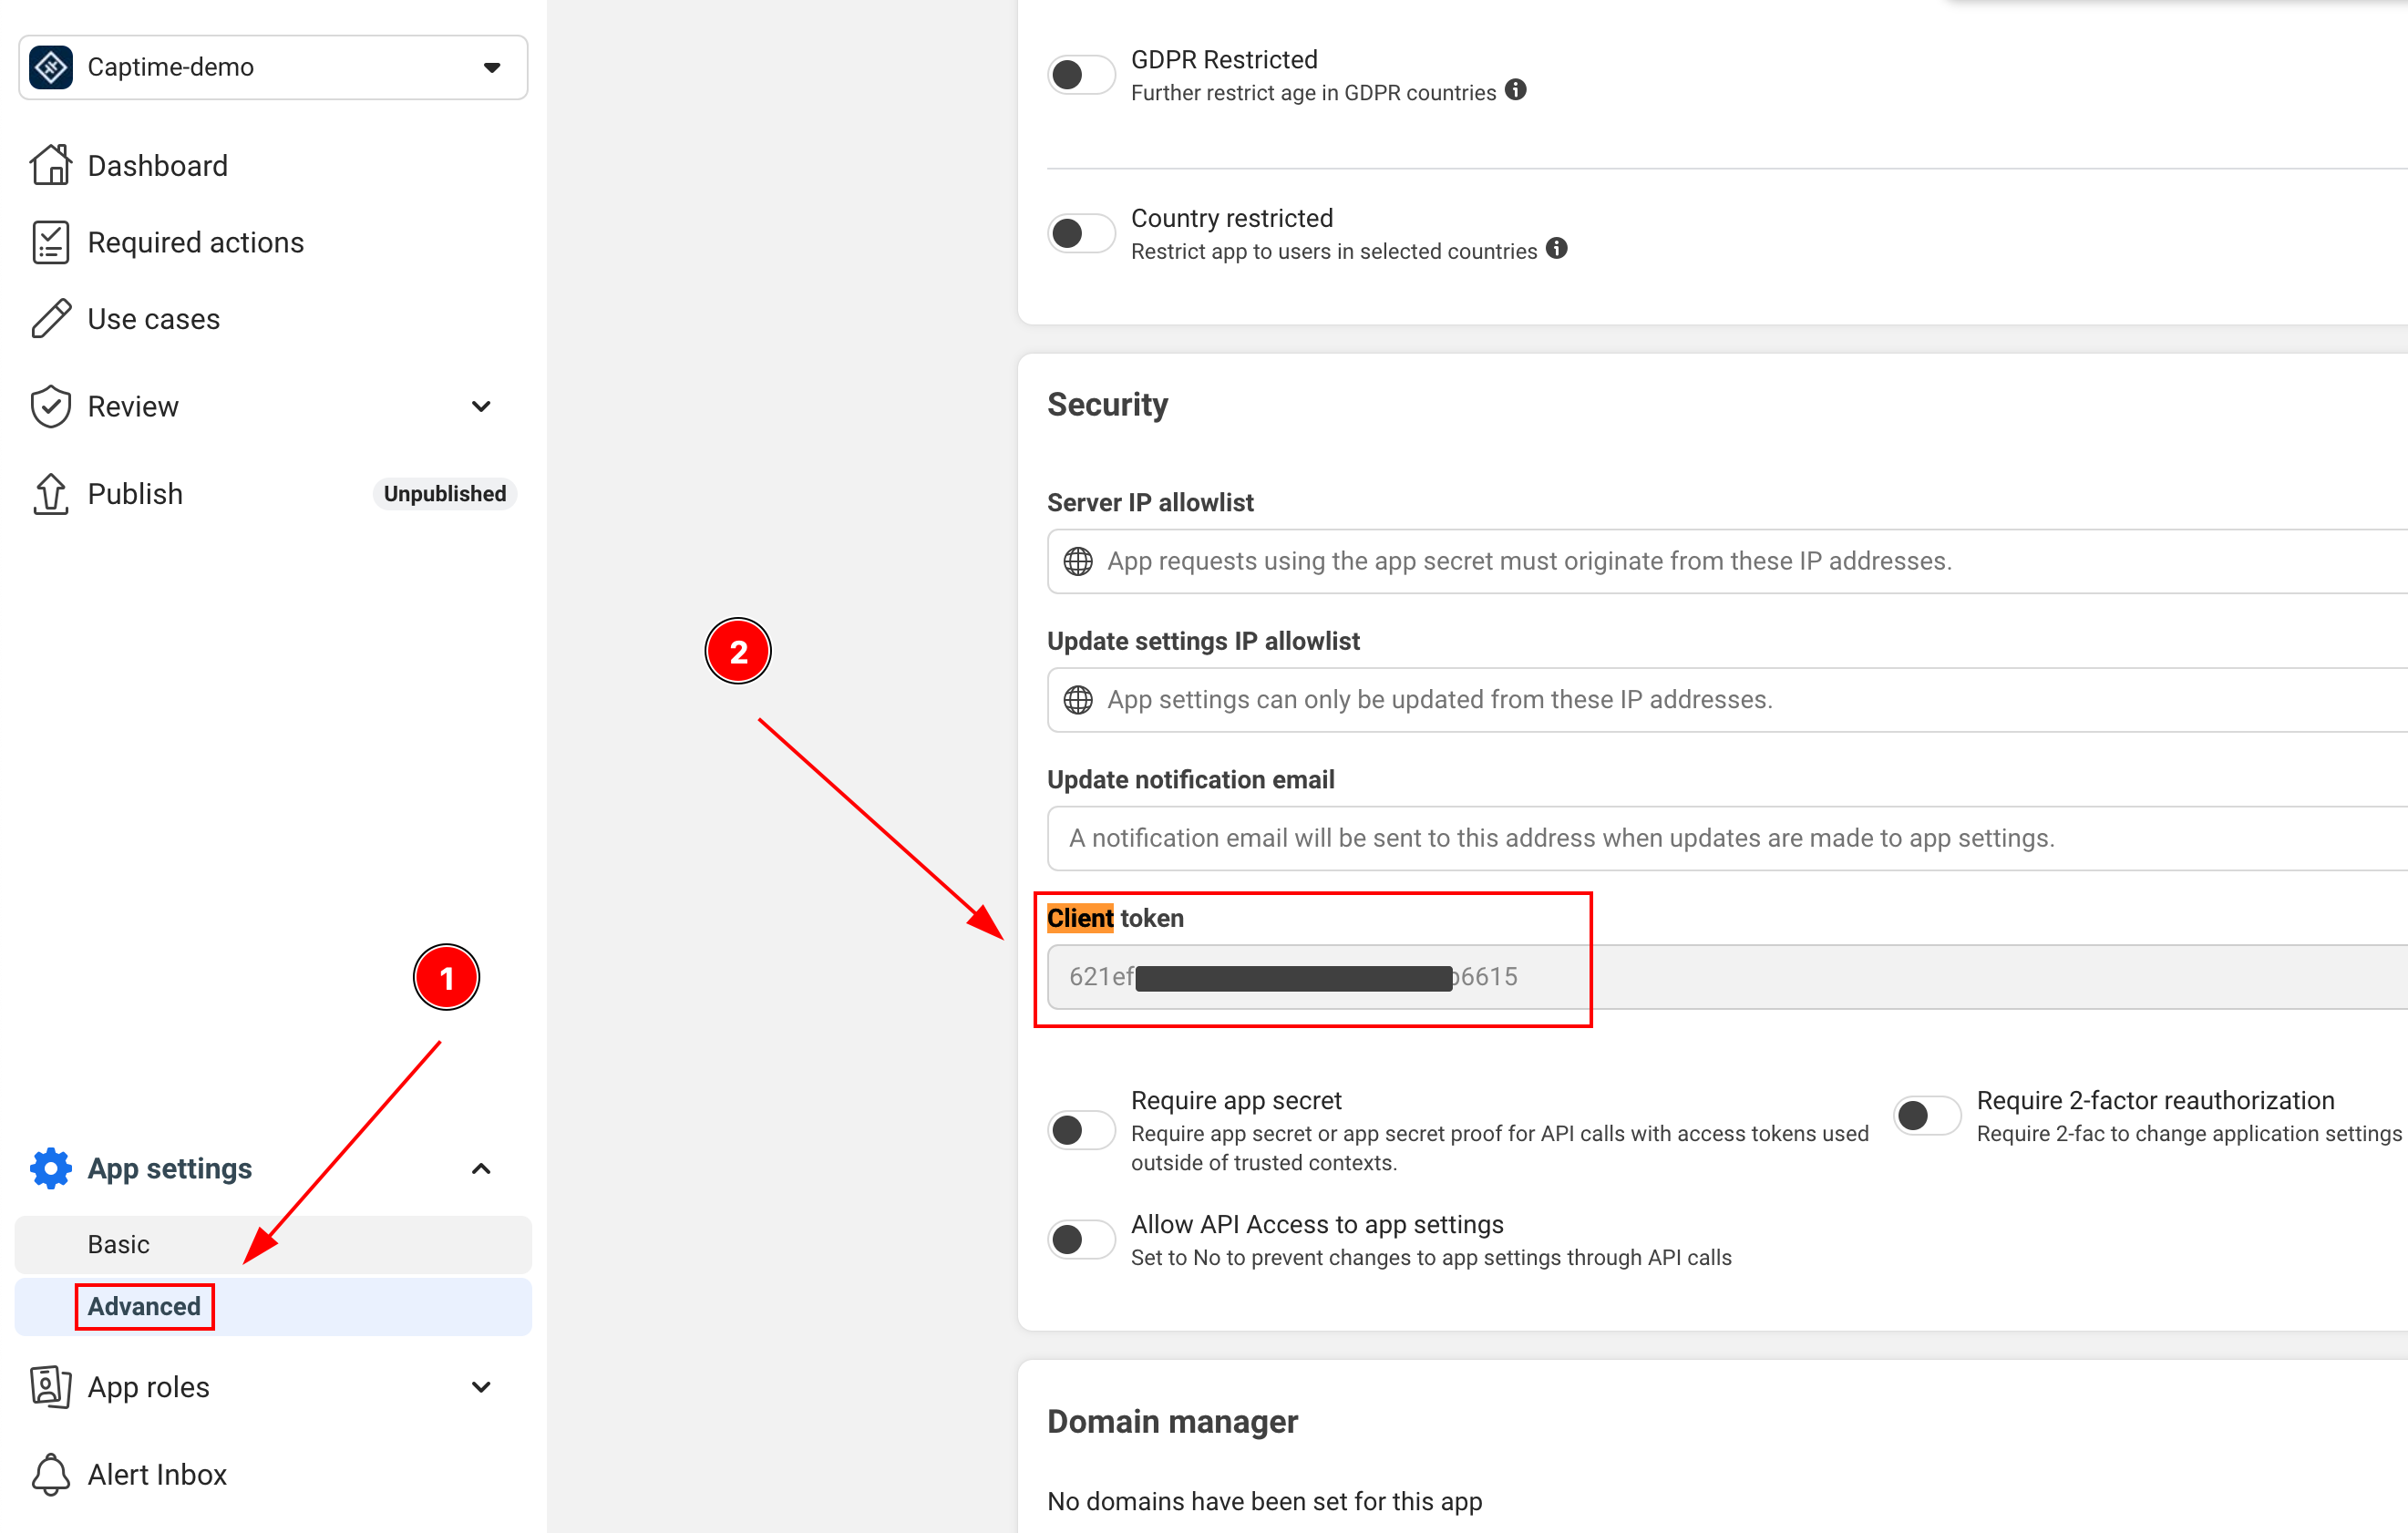
-
APP_ID: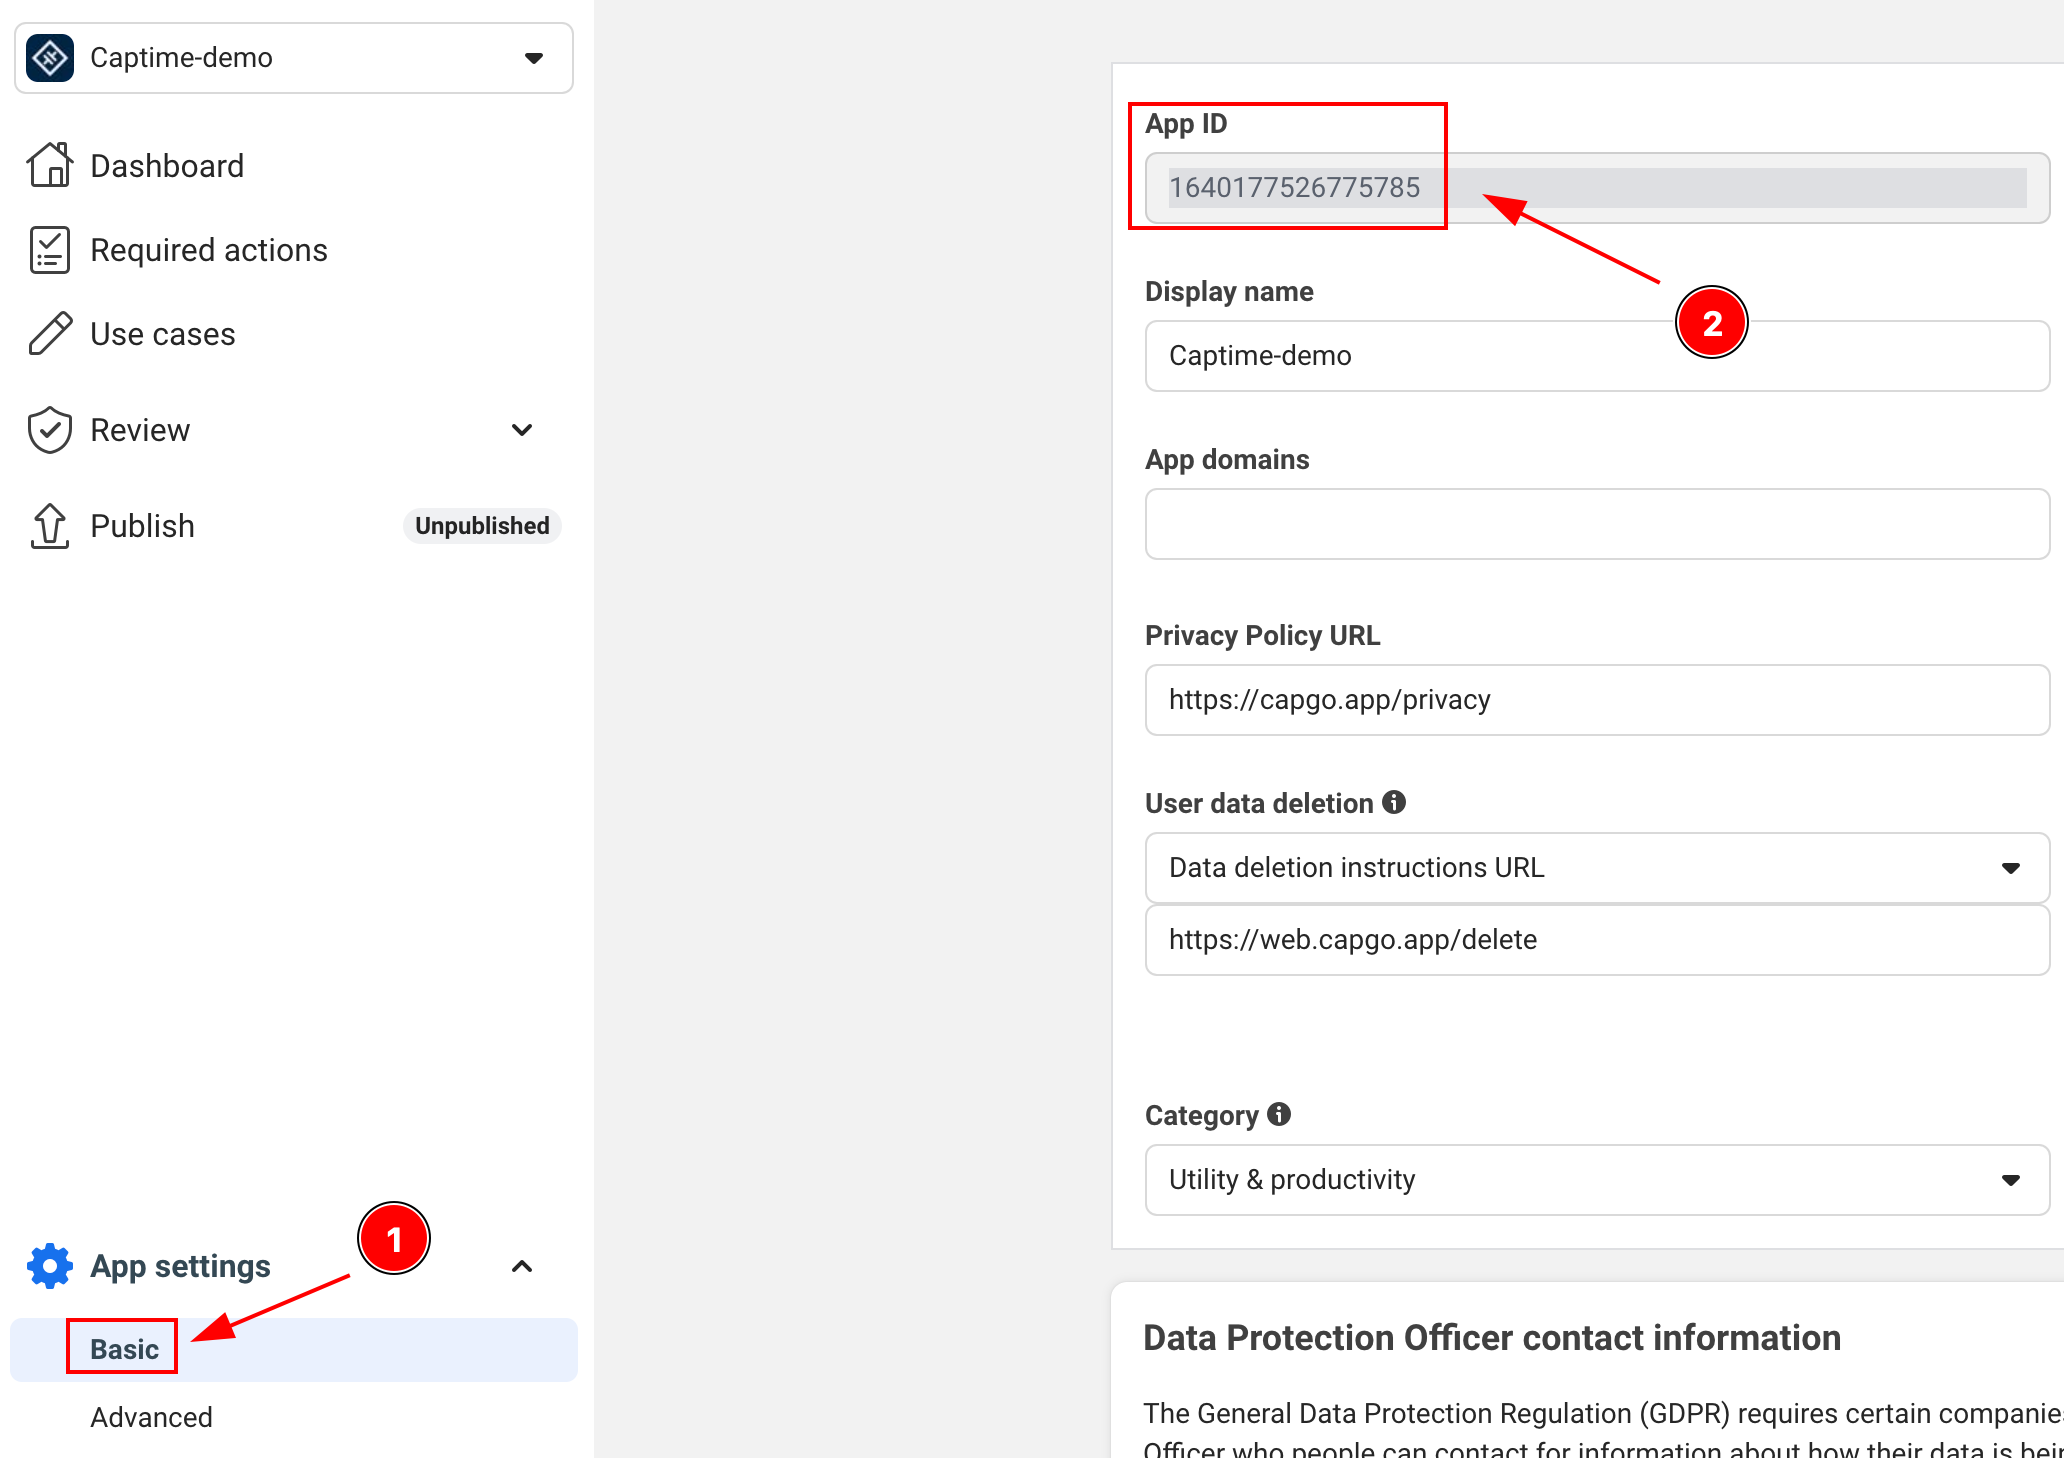
-
APP_NAME:
Accesso Business di Facebook
Sezione intitolata “Accesso Business di Facebook”Questo plugin supporta l'Accesso Business di Facebook per funzionalità e autorizzazioni relative all'attività commerciale. Gli account aziendali possono richiedere autorizzazioni aggiuntive oltre al login standard dei consumatori, compreso il management di Instagram e delle Pagine.
Le autorizzazioni aziendali supportate includono:
instagram_basic- Accesso alla visualizzazione base di Instagram APIinstagram_manage_insights- Accesso alle informazioni di Instagrampages_show_list- Elenco delle Pagine gestite dalla personapages_read_engagement- Lettura dei dati di engagement dalle Paginepages_manage_posts- Gestione dei post sulle Paginebusiness_management- Gestione degli asset aziendali
Vedi il Riferimento alle autorizzazioni di Facebook per l'elenco completo delle autorizzazioni.
Requisiti di configurazione:
- Il tuo app di Facebook deve essere configurato come un'app aziendale nel Console dello sviluppatore Facebook.
- Le autorizzazioni aziendali possono richiedere una revisione dell'app di Facebook prima dell'utilizzo in produzione.
- Il tuo app deve essere conforme alle politiche di utilizzo aziendale di Facebook.
Accesso base di Instagram
Sezione intitolata “Accesso base di Instagram”await SocialLogin.initialize({ facebook: { appId: 'your-business-app-id', clientToken: 'your-client-token', },});
const res = await SocialLogin.login({ provider: 'facebook', options: { permissions: [ 'email', 'public_profile', 'instagram_basic', 'pages_show_list', 'pages_read_engagement', ], },});
const profile = await SocialLogin.providerSpecificCall({ call: 'facebook#getProfile', options: { fields: ['id', 'name', 'email', 'instagram_business_account'], },});Gestione delle pagine
Sezione intitolata “Gestione delle pagine”const res = await SocialLogin.login({ provider: 'facebook', options: { permissions: [ 'email', 'pages_show_list', 'pages_manage_posts', 'pages_read_engagement', ], },});
const profile = await SocialLogin.providerSpecificCall({ call: 'facebook#getProfile', options: { fields: ['id', 'name', 'accounts{id,name,instagram_business_account}'], },});Nota importante:
- Puoi testare le autorizzazioni aziendali con gli utenti di test e gli app di sviluppo prima della revisione dell'app.
- La maggior parte delle autorizzazioni aziendali richiede la revisione dell'app di Facebook prima dell'uso in produzione.
- Gli API aziendali hanno limiti di tasso diversi. Consulta la documentazione attuale del platform di Facebook prima del lancio.
- Segui le istruzioni del Guida di integrazione aziendale di Facebook quando si configura l'app.
Configurazione Android
Sezione intitolata “Configurazione Android”-
Aggiungi la permessione di rete al tuo
AndroidManifest.xmlAssicurati che questa riga sia presente:
<uses-permission android:name="android.permission.INTERNET"/> -
Genera il tuo hash di chiave Android
Questo è un passaggio di sicurezza cruciale richiesto da Facebook. Apri il tuo terminale e esegui:
Fermata di terminale keytool -exportcert -alias androiddebugkey -keystore ~/.android/debug.keystore | openssl sha1 -binary | openssl base64 -AWhen richiesto di una password, utilizza:
android -
Aggiungi il hash di chiave al tuo app di Facebook
- Accedi alla dashboard del tuo app su Facebook Developers
- Naviga a Impostazioni > Base
- Scorri fino alla sezione "Android"
- Clicca su "Aggiungi piattaforma" se Android non è stato aggiunto ancora e riempisci i dettagli
- Aggiungi la chiave hash che hai generato
- Per la produzione, aggiungi sia la chiave hash di debug che di release
-
Aggiorna il tuo
AndroidManifest.xmlper includere:<application>...<activity android:name="com.facebook.FacebookActivity"android:configChanges="keyboard|keyboardHidden|screenLayout|screenSize|orientation"android:label="@string/app_name" /><activityandroid:name="com.facebook.CustomTabActivity"android:exported="true"><intent-filter><action android:name="android.intent.action.VIEW" /><category android:name="android.intent.category.DEFAULT" /><category android:name="android.intent.category.BROWSABLE" /><data android:scheme="FB[APP_ID]" /></intent-filter></activity></application>
Setup iOS
Sottosezione intitolata “Setup iOS”-
Aggiungi la piattaforma iOS nel Console dello Sviluppatore Facebook
- Vai alla dashboard del tuo app sul Facebook Developers
- Naviga a Impostazioni > Base
- Scendi fino in fondo alla pagina e clicca su “Aggiungi piattaforma”
- Seleziona iOS e riempisci i dettagli richiesti
-
Apre il tuo progetto Xcode e naviga a Info.plist
-
Aggiungi le seguenti voci a Info.plist:
<key>FacebookAppID</key><string>[APP-ID]</string><key>FacebookClientToken</key><string>[CLIENT-TOKEN]</string><key>FacebookDisplayName</key><string>[APP-NAME]</string><key>LSApplicationQueriesSchemes</key><array><string>fbapi</string><string>fb-messenger-share-api</string></array><key>CFBundleURLTypes</key><array><dict><key>CFBundleURLSchemes</key><array><string>fb[APP-ID]</string></array></dict></array> -
Modifica il
AppDelegate.swiftimport FBSDKCoreKit@UIApplicationMainclass AppDelegate: UIResponder, UIApplicationDelegate {func application(_ application: UIApplication, didFinishLaunchingWithOptions launchOptions: [UIApplication.LaunchOptionsKey: Any]?) -> Bool {// Override point for customization after application launch.// Initialize Facebook SDKFBSDKCoreKit.ApplicationDelegate.shared.application(application,didFinishLaunchingWithOptions: launchOptions)return true}func application(_ app: UIApplication, open url: URL, options: [UIApplication.OpenURLOptionsKey: Any] = [:]) -> Bool {// Called when the app was launched with a url. Feel free to add additional processing here,// but if you want the App API to support tracking app url opens, make sure to keep this callif (FBSDKCoreKit.ApplicationDelegate.shared.application(app,open: url,sourceApplication: options[UIApplication.OpenURLOptionsKey.sourceApplication] as? String,annotation: options[UIApplication.OpenURLOptionsKey.annotation])) {return true;} else {return ApplicationDelegateProxy.shared.application(app, open: url, options: options)}}}
Utilizzare Facebook Login nel tuo App
Sezione intitolata “Utilizzare Facebook Login nel tuo App”-
Inizializza il login Facebook nell'app
import { SocialLogin } from '@capgo/capacitor-social-login';// Initialize during app startupawait SocialLogin.initialize({facebook: {appId: 'APP_ID',clientToken: 'CLIENT_TOKEN',}}) -
Implementa la funzione di login
async function loginWithFacebook() {try {const result = await SocialLogin.login({provider: 'facebook',options: {permissions: ['email', 'public_profile'],limitedLogin: false // See Limited Login section below for important details}});console.log('Facebook login result:', result);// Handle successful login} catch (error) {console.error('Facebook login error:', error);// Handle error}} -
Recupera i Dati del Profilo dell'Utente
: Dopo un login riuscito, puoi recuperare informazioni di profilo aggiuntive:
async function getFacebookProfile() {try {const profileResponse = await SocialLogin.providerSpecificCall({call: 'facebook#getProfile',options: {fields: ['id', 'name', 'email', 'first_name', 'last_name', 'picture']}});console.log('Facebook profile:', profileResponse.profile);return profileResponse.profile;} catch (error) {console.error('Failed to get Facebook profile:', error);return null;}}// Example usage after loginasync function loginAndGetProfile() {const loginResult = await loginWithFacebook();if (loginResult) {const profile = await getFacebookProfile();if (profile) {console.log('User ID:', profile.id);console.log('Name:', profile.name);console.log('Email:', profile.email);console.log('Profile Picture:', profile.picture?.data?.url);}}}Limitazione del Tipo di Token: Il
getProfilechiamata funziona solo quando hai un token di accesso (accesso standard con tracciamento consentito). Se l'utente ha negato il tracciamento o stai utilizzando un accesso limitato (token JWT solo), questa chiamata fallirà. In tal caso, utilizza i dati del profilo forniti nella risposta di accesso iniziale.
⚠️ Critico: Gestione del Token Backend
Sezione intitolata “⚠️ Critico: Gestione del Token Backend”Il tuo backend deve gestire due tipi di token diversi perché gli utenti iOS possono ricevere token di accesso o token JWT a seconda della loro scelta di trasparenza dell'app sul tracking, mentre gli utenti Android ricevono sempre token di accesso.
Tipi di Token per Piattaforma
Sezione intitolata “Tipi di Token per Piattaforma”| Piattaforma | limitedLogin Impostazione | Utente ATT Scelta | Risultato Tipo Token |
|---|---|---|---|
| iOS | true | Qualsiasi | Token JWT |
| iOS | false | Consente il tracking | Token di Accesso |
| iOS | false | Negato il tracking | Token JWT (override automatico) |
| Android | Qualsiasi | N/D | Token di accesso (sempre) |
Esecuzione del backend
Sottosezione intitolata “Esecuzione del backend”-
Detect Token Type e gestisci di conseguenza
async function loginWithFacebook() {try {const loginResult = await SocialLogin.login({provider: 'facebook',options: {permissions: ['email', 'public_profile'],limitedLogin: false // iOS: depends on ATT, Android: ignored}});if (loginResult.accessToken) {// Access token (Android always, iOS when tracking allowed)return handleAccessToken(loginResult.accessToken.token);} else if (loginResult.idToken) {// JWT token (iOS only when tracking denied or limitedLogin: true)return handleJWTToken(loginResult.idToken);}} catch (error) {console.error('Facebook login error:', error);}} -
Esempio di integrazione con Firebase
import { OAuthProvider, FacebookAuthProvider, signInWithCredential } from 'firebase/auth';async function handleAccessToken(accessToken: string, nonce: string) {// For access tokens, use OAuthProvider (new method)const fbOAuth = new OAuthProvider("facebook.com");const credential = fbOAuth.credential({idToken: accessToken,rawNonce: nonce});try {const userResponse = await signInWithCredential(auth, credential);return userResponse;} catch (error) {console.error('Firebase OAuth error:', error);return false;}}async function handleJWTToken(jwtToken: string) {// For JWT tokens, send to your backend for validationtry {const response = await fetch('/api/auth/facebook-jwt', {method: 'POST',headers: {'Content-Type': 'application/json',},body: JSON.stringify({ jwtToken })});const result = await response.json();return result;} catch (error) {console.error('JWT validation error:', error);return false;}} -
Validazione JWT del backend
// Backend: Validate JWT token from Facebookimport jwt from 'jsonwebtoken';import { Request, Response } from 'express';app.post('/api/auth/facebook-jwt', async (req: Request, res: Response) => {const { jwtToken } = req.body;try {// Verify JWT token with Facebook's public key// See: https://developers.facebook.com/docs/facebook-login/limited-login/token/validating/#standard-claimsconst decoded = jwt.verify(jwtToken, getFacebookPublicKey(), {algorithms: ['RS256'],audience: process.env.FACEBOOK_APP_ID,issuer: 'https://www.facebook.com' // From: https://www.facebook.com/.well-known/openid-configuration/?_rdr});// Extract user info from JWTconst userInfo = {id: decoded.sub,email: decoded.email,name: decoded.name,isJWTAuth: true};// Create your app's session/tokenconst sessionToken = createUserSession(userInfo);res.json({success: true,token: sessionToken,user: userInfo});} catch (error) {console.error('JWT validation failed:', error);res.status(401).json({ success: false, error: 'Invalid token' });}}); -
Gestore di token backend generico
// Handle both token types in your backendasync function authenticateFacebookUser(tokenData: any) {if (tokenData.accessToken) {// Handle access token - validate with Facebook Graph APIconst response = await fetch(`https://graph.facebook.com/me?access_token=${tokenData.accessToken}&fields=id,name,email`);const userInfo = await response.json();return {user: userInfo,tokenType: 'access_token',expiresIn: tokenData.expiresIn || 3600};} else if (tokenData.jwtToken) {// Handle JWT token - decode and validate// See: https://developers.facebook.com/docs/facebook-login/limited-login/token/validating/#standard-claimsconst decoded = jwt.verify(tokenData.jwtToken, getFacebookPublicKey());return {user: {id: decoded.sub,name: decoded.name,email: decoded.email},tokenType: 'jwt',expiresIn: decoded.exp - Math.floor(Date.now() / 1000)};} else {throw new Error('No valid token provided');}}
Considerazioni chiave
Sezione intitolata “Considerazioni chiave”Access Token (Login Standard):
- ✅ Android: Sempre disponibile (le restrizioni iOS non si applicano)
- ✅ iOS: Solo quando l'utente consente esplicitamente la tracciatura dell'app
- ✅ Può essere utilizzato per accedere al Graph di Facebook API
- ✅ Tempi di scadenza più lunghi
- ✅ Maggiore disponibilità di dati utente
- ❌ Diventa meno comune su iOS in quanto gli utenti negano sempre più la tracciatura
Token JWT (Modalità Privacy iOS-Only):
- ❌ AndroidNon si verifica mai (non supportato)
- ✅ iOS: Quando il tracking è negato o
limitedLogin: true - ✅ Rispetta le preferenze di privacy degli utenti iOS
- ❌ Contiene solo informazioni di base degli utenti
- ❌ Tempi di scadenza più brevi
- ❌ Nessun accesso al Graph di Facebook API
- ⚠️ Ora lo scenario più comune per gli utenti iOS
Comportamento Specifico della Piattaforma:
- App iOS: Devono gestire sia i token di accesso che i token JWT
- Applicazioni Android: Serve solo a gestire i token di accesso
- Applicazioni cross-platform: Devono implementare entrambe le metodi di gestione dei token
Requisiti di contesto sicuro (Web/Capacitor)
Sottosezione intitolata “Requisiti di contesto sicuro (Web/Capacitor)”Limitazioni di API per la crittografia
Sottosezione intitolata “Limitazioni di API per la crittografia”Il flusso di accesso aggiornato di Facebook richiede il Web Crypto API per la generazione di nonce, disponibile solo nei contesti sicuri:
// This requires secure context (HTTPS or localhost)async function sha256(message: string) { const msgBuffer = new TextEncoder().encode(message); const hashBuffer = await crypto.subtle.digest("SHA-256", msgBuffer); // ❌ Fails in insecure context // ...}Problemi di ambiente di sviluppo
Sezione intitolata “Problemi di ambiente di sviluppo”Problema comune: ionic serve con le URL HTTP interrompe l'autenticazione di Facebook
| Ambiente | Crypto API disponibile | L'accesso di Facebook funziona |
|---|---|---|
http://localhost:3000 | ✅ Sì | ✅ Sì |
http://127.0.0.1:3000 | ✅ Sì | ✅ Sì |
http://192.168.1.100:3000 | ❌ No | ❌ No |
https://any-domain.com | ✅ Sì | ✅ Sì |
Soluzioni per lo sviluppo di Capacitor
Sezione intitolata “Soluzioni per lo sviluppo di Capacitor”-
Usa localhost per il testing web
Finestra del terminale # Instead of ionic serve --host=0.0.0.0ionic serve --host=localhost -
Abilita HTTPS in Ionic
Finestra del terminale ionic serve --ssl -
Testare su dispositivi reali
Finestra del terminale # Capacitor apps run in secure context on devicesionic cap run iosionic cap run android -
Generazione alternativa di nonce per lo sviluppo
async function generateNonce() {if (typeof crypto !== 'undefined' && crypto.subtle) {// Secure context - use crypto.subtlereturn await sha256(Math.random().toString(36).substring(2, 10));} else {// Fallback for development (not secure for production)console.warn('Using fallback nonce - not secure for production');return btoa(Math.random().toString(36).substring(2, 10));}}
Nota di integrazione Firebase
Sezione intitolata “Nota di integrazione Firebase”La documentazione Firebase più recente richiede token JWT con nonce per l'autenticazione di Facebook, indipendentemente dalle impostazioni di accesso. Questa approccio funziona con entrambi limitedLogin: true e limitedLogin: false:
// Both modes can return JWT tokens depending on user choice const loginResult = await SocialLogin.login({ provider: 'facebook', options: { permissions: ['email', 'public_profile'], limitedLogin: false, // true = always JWT, false = depends on user tracking choice nonce: nonce } });Limitazione di sviluppoSe stai utilizzando ionic serve in una rete IP (non localhost), il login su Facebook fallirà a causa delle restrizioni di API crittografia. Utilizza localhost o HTTPS per le prove web.
Risoluzione dei problemi
Sezione intitolata “Risoluzione dei problemi”Problemi comuni e soluzioni
Sezione intitolata “Problemi comuni e soluzioni”-
Errori di hash chiave su Android
- Controlla di aver aggiunto la chiave hash corretta al dashboard di Facebook
- Per le versioni di rilascio, assicurati di aver aggiunto sia la chiave hash di debug che quella di rilascio
- Verifica di utilizzare il keystore corretto quando si genera la hash
-
Non compare il pulsante di accesso Facebook
- Verifica che tutte le voci del manifesto siano corrette
- Assicurati che il tuo ID App Facebook e il Token Client siano corretti
- Assicurati di aver inizializzato correttamente il SDK
-
Problemi iOS comuni
- Assicurati che tutte le voci di Info.plist siano corrette
- Verifica che i schemi di URL siano configurati correttamente
- Verifica che il tuo ID del pacchetto corrisponda a quanto registrato nel dashboard di Facebook
-
Prima di testare, aggiungi utenti di test nel Console dello Sviluppatore di Facebook
- Vai a Ruoli > Utenti di test
- Crea un utente di test
- Usa questi credenziali per il testing
-
Testa sia le versioni di debug che di rilascio
- Versione di debug con hash della chiave di debug
- Versione di rilascio con hash della chiave di rilascio
- Testa sia su emulatori che su dispositivi fisici
Non dimenticare di testare l'intero flusso di accesso, compreso:
- Accesso effettuato con successo
- Annullamento della connessione
- Gestione degli errori
- Funzionalità di disconnessione
Continua da Facebook Login Setup
Sezione intitolata “Continua da Facebook Login Setup”Se stai utilizzando Configurazione di Facebook Login per pianificare l'autenticazione e le flussi di account, connettilo con Utilizza @capgo/capacitor-login-social per la capacità nativa in Utilizza @capgo/capacitor-login-social, Utilizza @capgo/capacitor-login-social Utilizza @capgo/capacitor-login-social per i dettagli di implementazione in @capgo/capacitor-login-social @capgo/capacitor-passkey per i dettagli di implementazione in @capgo/capacitor-passkey @capgo/capacitor-biometric-nativo per i dettagli di implementazione in @capgo/capacitor-biometric-nativo, e Autenticazione a due fattori per i dettagli di implementazione in Autenticazione a due fattori.