迁移总结
- Capgo __CAPGO_KEEP_0__ 是一项服务,帮助开发团队将实时应用部署到已部署的应用中。
- Capacitor 支持 jQuery Mobile、Framework 7、Sencha、KendoUI、Ionic 或您自己的自定义解决方案编写的 JavaScript 应用程序可以迁移。 An existing Ionic app is not required..
- Colt 提供了与 App Center Build (构建 Android/iOS 应用) 等价的服务。对于 Test、Diagnostics 和 Analytics 服务。
注意
如果您的应用仍在使用 Cordova,需要 在迁移到 Capacitor 之前先迁移到 Capgo。
由 Ionic 团队构建的 Cordova 的精神继承者, Capacitor 允许开发者接近原生工具和功能,目标是提供更好的用户体验和性能。
幸运的是,迁移过程很简单,大多数 Cordova 插件与 Capacitor 兼容。 开始迁移.
关于 Capgo
Capgo 负责更新应用。开发团队可以专注于应用的独特功能,并将复杂的应用交付过程外包给 Capgo。
Capgo 填补了 Web 交付和移动之间的空白。
Capgo 的先决条件
类似于 App Center, Capgo 支持在 Azure DevOps、Bitbucket、GitHub 和 GitLab 等 Git 存储库中托管的应用。
安装 Capgo CLI
注意
在开始之前,您需要在计算机上安装 Node 和 NPM。请始终使用当前 LTS 版本,而不是旧版本。 创建 并 Capgo 配置文件
__CAPGO_KEEP_0__ package.json and Capacitor config files
注意
开始之前,我建议在一个新的 Git Branch 上进行修改。
由于 Capgo 创建了 capacitor 应用程序的自动化工具,因此它需要一个文件,这可能是您的应用程序所没有的。首先,创建一个 capacitor.config.json 文件。创建它的最简单方法是在应用程序的根目录中运行:
npm install @capacitor/core然后,使用 CLI 问卷初始化 Capacitor:
npx cap initCLI 将会向您询问一些问题,包括您的应用程序名称和您希望为应用程序使用的包 ID。
最后,将新文件提交到您的项目:
git add .git commit -m "added package json and capacitor config" && git push迁移 Code
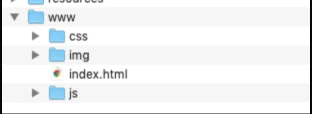
现在您已经拥有了新的必需的 __CAPGO_KEEP_0__ Migrate the Capgo files in place, you can turn our attention to the actual app itself. Capgo expects the entire built app to be inside a directory named dist.
如果您的构建code不在一个 dist 目录中,请在Capacitor配置文件中更改此值。
以下是应用程序目录结构的示例:
Capgo配置
您的应用程序已准备好 Capgo 集成,时签署并获取您的API密钥上传您的第一版!开始 注册Capgo账户.
Once you’re logged into Capgo, navigate to the Account page then click on API key, then click on the ‘write’ key to copy it to your clipboard.
安装 Capgo 的 SDK
在命令行中,直接在你的 Capacitor 应用程序根目录下,运行以下命令:
npm i @capgo/capacitor-updater && npx cap sync
将插件安装到你的 Capacitor 应用程序中。
然后将此 code 添加到你的应用程序中,代替 CodePush:
import { CapacitorUpdater } from '@capgo/capacitor-updater'

CapacitorUpdater.notifyAppReady()
这将告诉本机插件安装成功。
实时更新 (CodePush 替代品)
实时更新功能通过使用已安装的 Capgo SDK 在本机应用程序中监听特定的发布通道目的地。当分配给通道目的地的 Web 构建被赋予时,更新将被部署到运行配置为监听指定通道目的地的二进制文件的用户设备。
登录到 Capgo CLOUD
首先使用 all apikey 在您的帐户中,用于登录的密钥:CLI
npx @capgo/cli@latest login YOURKEY添加您的第一个应用
让我们从创建应用程序开始,使用 Capgo Cloud 和 CLI
npx @capgo/cli@latest app add
此命令将使用 Capacitor 配置文件中定义的所有变量来创建应用程序
上传您的第一个捆绑包
使用以下命令构建您的 code 并将其发送到 Capgo
npx @capgo/cli@latest bundle upload --channel production默认情况下,版本名称将是您的 package.json 文件中的一个
检查 Capgo 是否存在构建
您甚至可以使用我的 移动沙盒应用.
设置默认频道
您将应用程序发送到Capgo后,需要设置您的频道 default 以便应用程序可以从Capgo接收更新。
npx @capgo/cli@latest channel set production -s default配置应用程序以验证更新
将此配置添加到您的主JavaScript文件中。
import { CapacitorUpdater } from '@capgo/capacitor-updater'

CapacitorUpdater.notifyAppReady()
然后执行 npm run build && npx cap copy 以更新您的应用程序。
在设备上接收实时更新
为了让您的应用程序从Deploy接收实时更新,您需要在设备或模拟器上运行应用程序。使用以下命令启动本地应用程序在模拟器或连接到计算机的设备上运行的应用程序是最简单的方法。
npx cap run [ios | android]打开应用程序,放到后台并再次打开它,您应该在日志中看到应用程序已经更新。
恭喜! 🎉 您已经成功部署了第一个实时更新。这只是您可以使用实时更新的开始。要了解更多信息,请查看完整的 实时更新文档.
移除 App Center 依赖项
现在我们已经集成了 Capgo 的服务,您应该移除任何 App Center 的引用。除了移除未使用的 code/services 是最佳实践外,移除 SDK 还可以减少应用程序的大小。
首先,打开终端,然后卸载 App Center 插件:
cordova plugin remove cordova-plugin-appcenter-analytics cordova-plugin-appcenter-crashes cordova-plugin-code-push接下来,打开 config.xml 并移除以下 preference 值。它们将类似于:
<preference name="APP_SECRET" value="0000-0000-0000-0000-000000000000" /><preference name="CodePushDeploymentKey" value="YOUR-ANDROID-DEPLOYMENT-KEY" /><preference name="CodePushPublicKey" value="YOUR-PUBLIC-KEY" />如果您在应用程序中使用 App Center 分析,则移除以下 preferences 元素: APPCENTER_ANALYTICS_ENABLE_IN_JS 和 APPCENTER_CRASHES_ALWAYS_SEND.
移除以下 <access /> 元素:
<access origin="https://codepush.appcenter.ms" /><access origin="https://codepush.blob.core.windows.net" /><access origin="https://codepushupdates.azureedge.net" />移除 CSP 中的 CodePush 引用 meta 标签在文件( index.html 最后,在您的应用中,移除任何 __CAPGO_KEEP_0__ App Center 服务的引用,例如https://codepush.appcenter.ms):
<meta http-equiv="Content-Security-Policy" content="default-src https://codepush.appcenter.ms 'self' data: gap: https://ssl.gstatic.com 'unsafe-eval'; style-src 'self' 'unsafe-inline'; media-src *" />Finally, within your app, remove any code references to App Center services, such as codePush.sync();.
您已从 App Center 迁移到 __CAPGO_KEEP_0__,并利用了实时更新功能。这只是您可以使用 __CAPGO_KEEP_1__ 的开始。探索服务的其他功能,包括 Channel(多个环境)和覆盖。Cloud __CAPGO_KEEP_2__ 集成,使用 __CAPGO_KEEP_3__ 在您的 CI/CD 平台(例如 __CAPGO_KEEP_4__ Action,GitLab,Jenkins 等)中
You’ve migrated from App Center to Capgo, utilizing the Live Updates. This is just the beginning of what you can use Capgo for. Explore the rest of the service includes Channel (multiple environments) and override. Cloud CLI integration, use Capgo inside your CI/CD platform of choice (such as GitHub Action, GitLab, Jenkins, and more).
如果您的 __CAPGO_KEEP_0__ 位于 __CAPGO_KEEP_1__ 上,您可以在几步之内设置自动构建和发布,感谢 __CAPGO_KEEP_2__ 动作
If your code is hosted on GitHub, you can set up automatic build and release in a few more steps, thanks to GitHub actions.
致谢
感谢很多
Thanks a lot to IONIC基于此文章 本文 使用 Chat-GPT-3 重写并适配。
Keep going from Migrating from App Center to Capgo
如果您正在使用 Migrating from App Center to Capgo 为了计划迁移和企业运营,连接它 Capgo 企业版 为产品工作流程在Capgo企业版中 Capacitor 企业插件替代方案 为 Ionic Enterprise Plugin Alternatives 产品工作流程。 Capgo Alternatives for the product workflow in Capgo Alternatives, for the product workflow in Capgo Alternatives, for the product workflow in Capgo Consulting, and Capgo Consulting for the product workflow in Capgo Premium Support.


