Configuración de inicio de sesión de Facebook
Copie un prompt de configuración con los pasos de instalación y la guía de markdown completa para este plugin.
Introducción
Sección titulada “Introducción”En esta guía, aprenderás a configurar el inicio de sesión de Facebook con Capgo Inicio de sesión social. Necesitarás lo siguiente:
- Una cuenta de desarrollador de Facebook
- El nombre de paquete o ID de paquete de tu aplicación
- Acceso a una terminal para generar claves de hash (Android)
Configuración general
Sección titulada “Configuración general”Si no tienes ya una aplicación de Facebook creada, sigue estos pasos:
-
Crear una aplicación de Facebook
Sigue el tutorial para Crear una aplicación
-
Agregar inicio de sesión de Facebook a tu aplicación
En la consola de desarrolladores de Facebook, agrega el producto de inicio de sesión de Facebook a tu aplicación
-
Antes de que puedas publicar tu aplicación para el público, sigue este tutorial para publicarla
Información importante
Sección titulada “Información importante”Aquí es donde encontrarás la información clave que necesitarás para la integración:
-
CLIENT_TOKEN: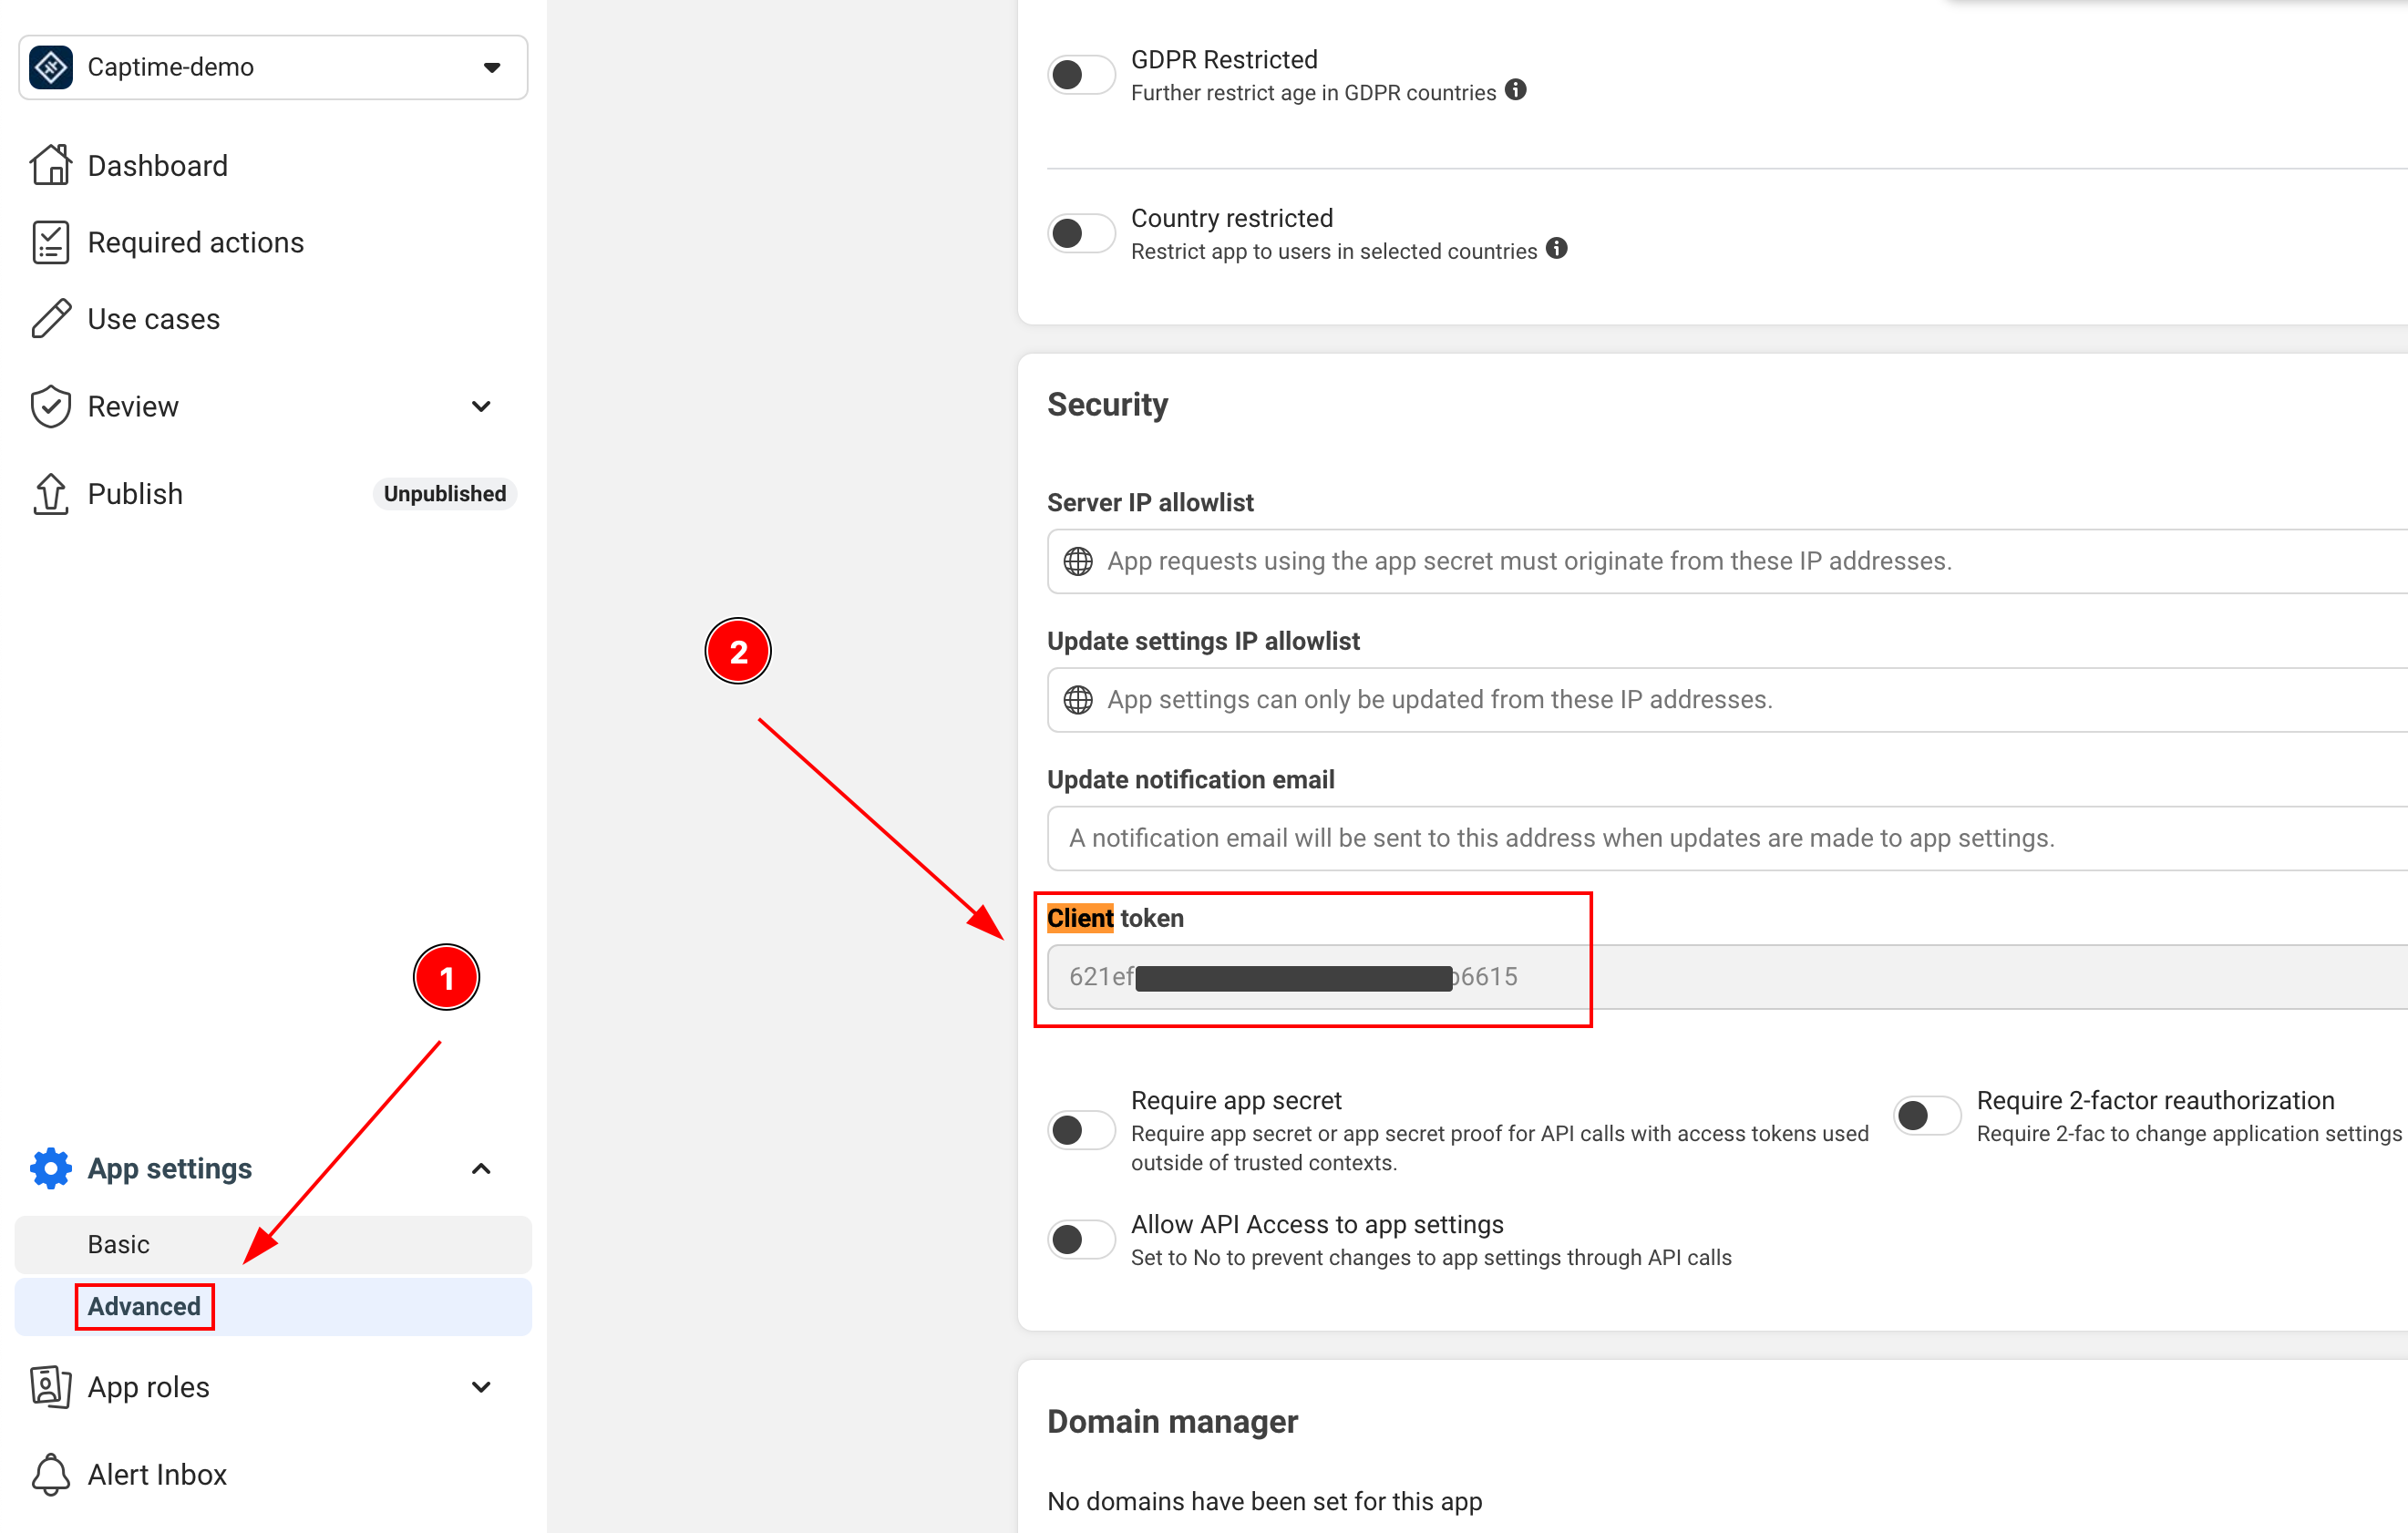
-
APP_ID: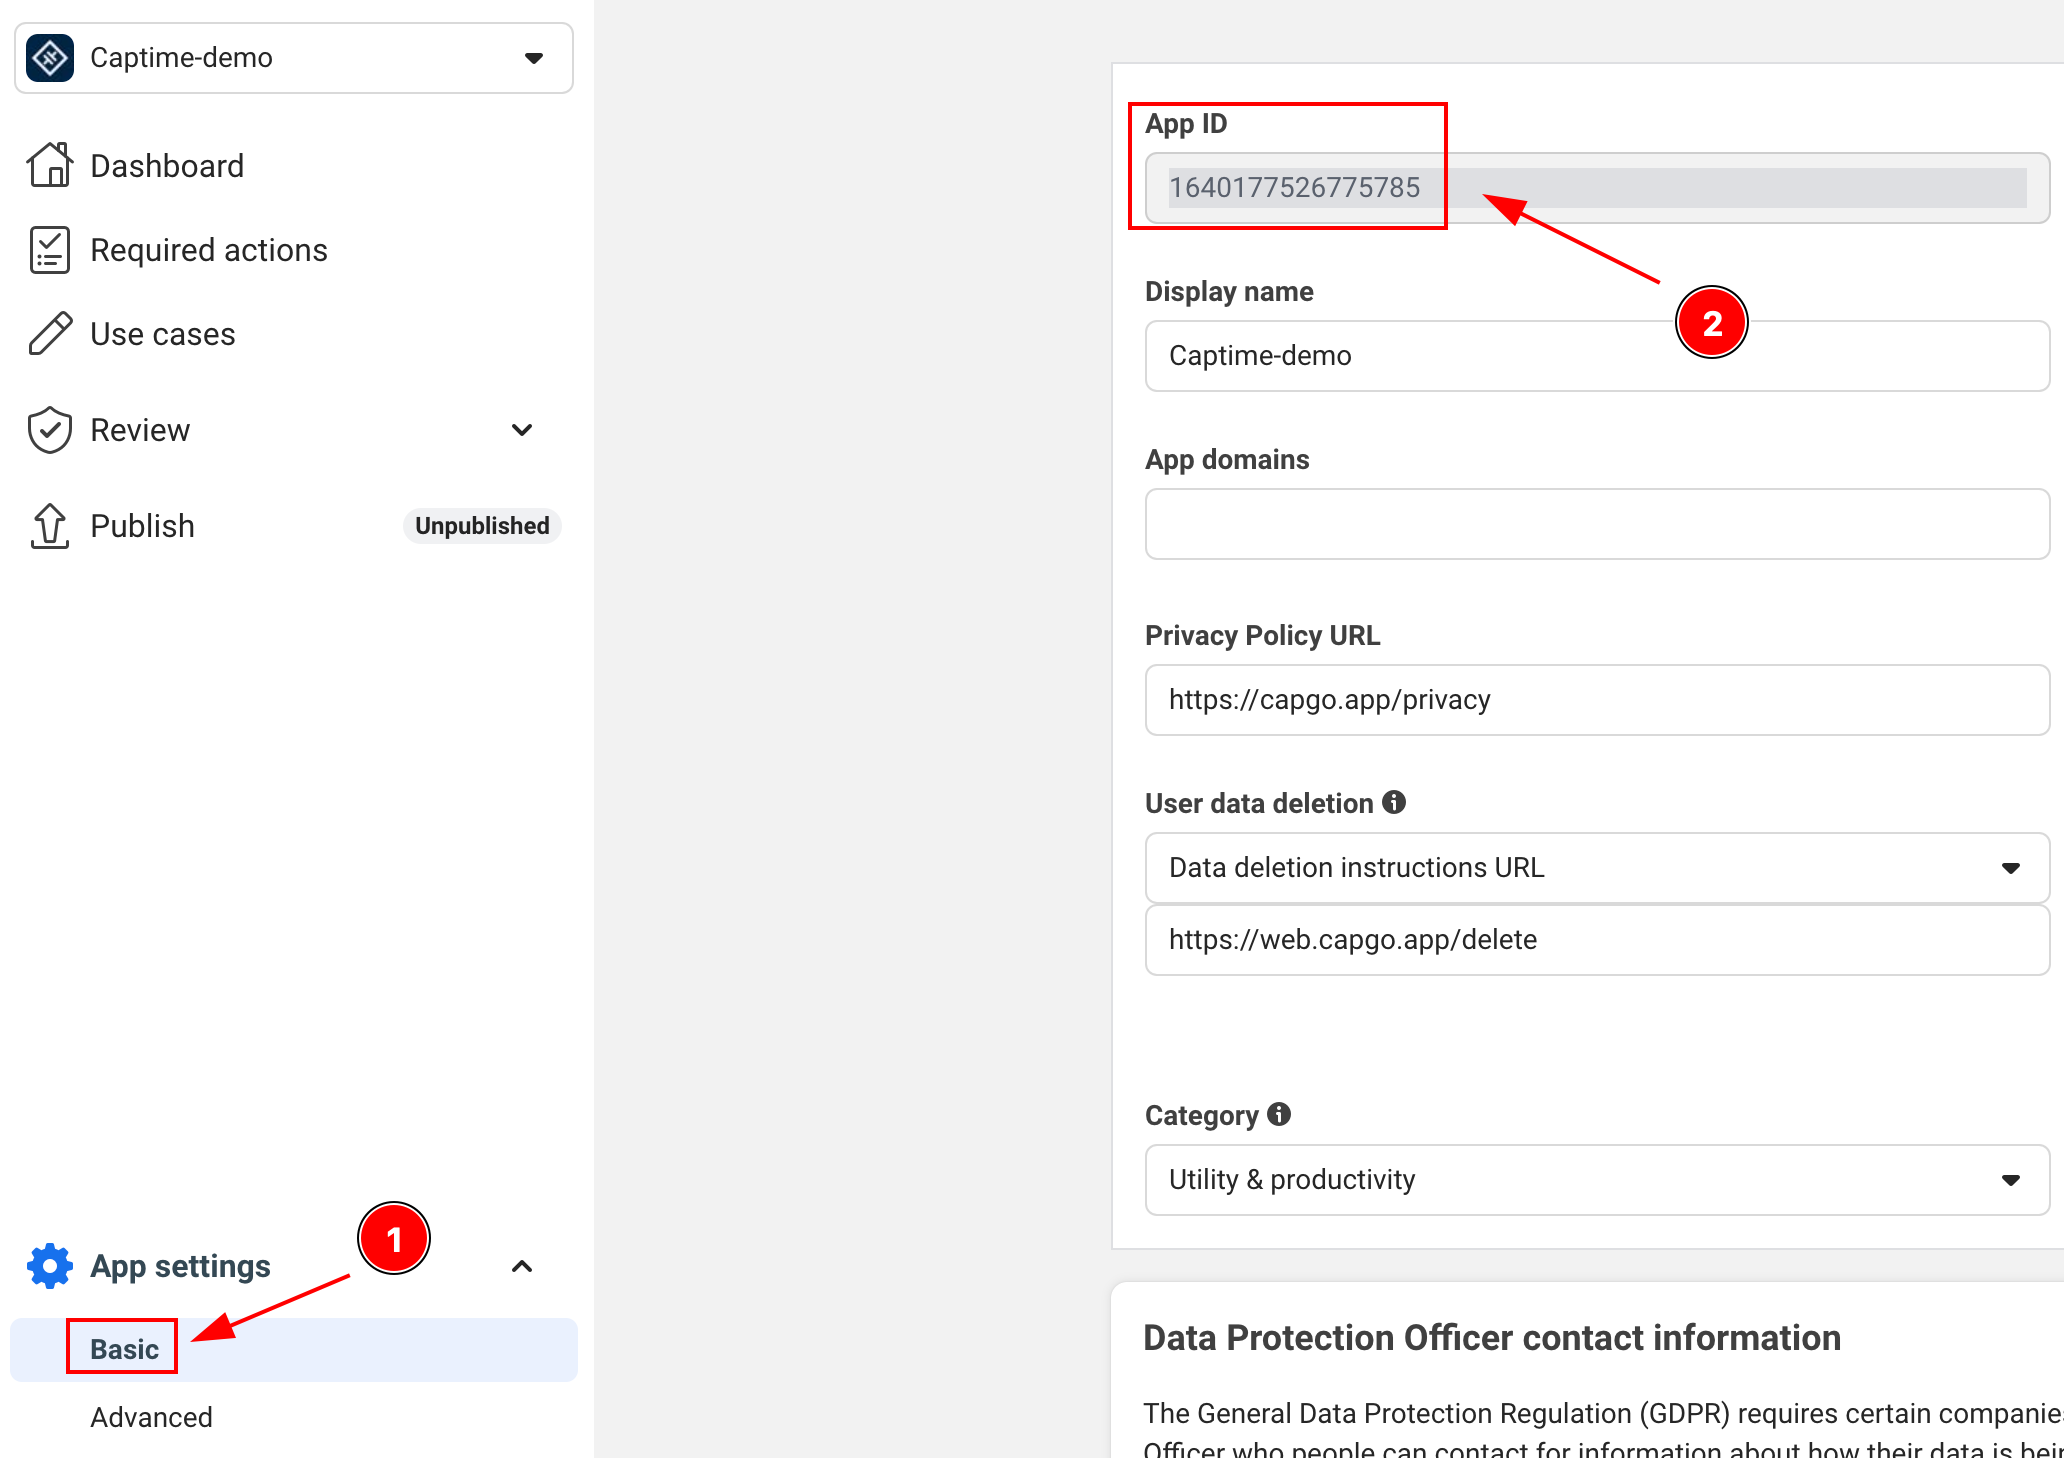
-
APP_NAME: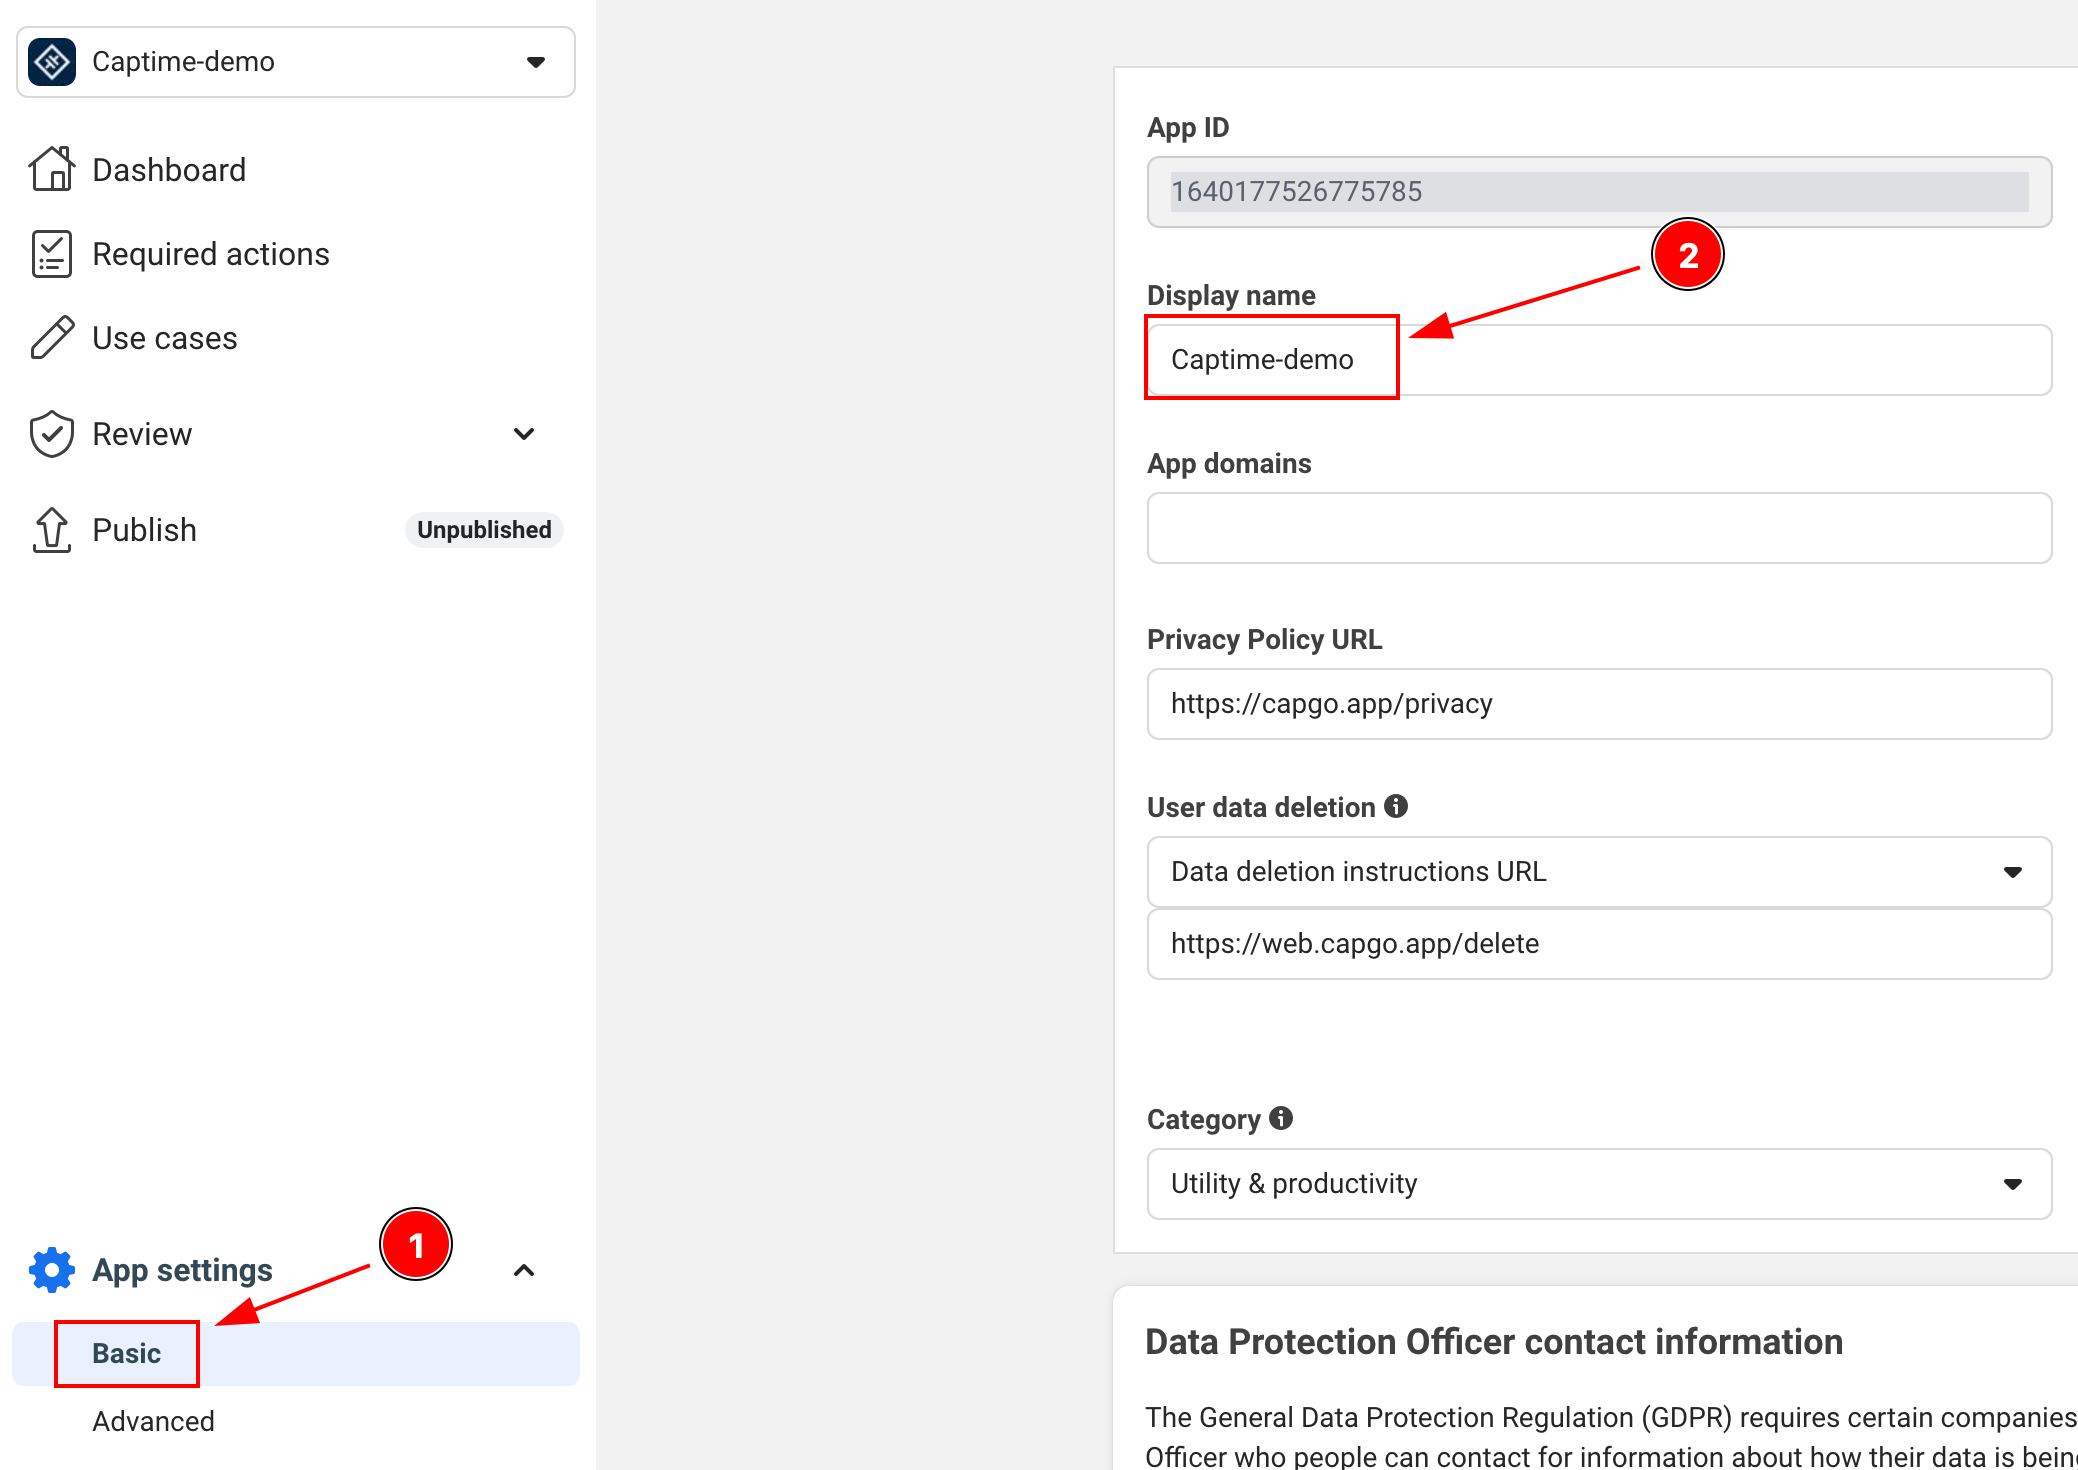
Iniciar sesión de Facebook Business
Sección titulada “Iniciar sesión de Facebook Business”Este plugin admite el inicio de sesión de Facebook Business para características y permisos relacionados con negocios. Los cuentas de negocios pueden solicitar permisos adicionales más allá del inicio de sesión estándar de consumidores, incluyendo la gestión de Instagram y Páginas.
Los permisos de negocios admitidos incluyen:
instagram_basic- Acceso a Instagram Basic Display APIinstagram_manage_insights- Acceso a Instagram Insightspages_show_list- Lista de Páginas que el usuario administrapages_read_engagement- Leer datos de compromiso de Páginaspages_manage_posts- Administrar publicaciones en Páginasbusiness_management- Administrar activos de negocios
Vea la Referencia de permisos de Facebook para obtener la lista completa de permisos.
Requisitos de configuración:
- Su aplicación de Facebook debe estar configurada como una aplicación de negocios en el Console de Desarrolladores de Facebook.
- Los permisos de negocio pueden requerir una revisión de la aplicación de Facebook antes del uso en producción.
- Su aplicación debe cumplir con las políticas de uso de negocios de Facebook.
Acceso básico de Instagram
Sección titulada “Acceso básico de Instagram”await SocialLogin.initialize({ facebook: { appId: 'your-business-app-id', clientToken: 'your-client-token', },});
const res = await SocialLogin.login({ provider: 'facebook', options: { permissions: [ 'email', 'public_profile', 'instagram_basic', 'pages_show_list', 'pages_read_engagement', ], },});
const profile = await SocialLogin.providerSpecificCall({ call: 'facebook#getProfile', options: { fields: ['id', 'name', 'email', 'instagram_business_account'], },});Gestión de páginas
Sección titulada “Gestión de páginas”const res = await SocialLogin.login({ provider: 'facebook', options: { permissions: [ 'email', 'pages_show_list', 'pages_manage_posts', 'pages_read_engagement', ], },});
const profile = await SocialLogin.providerSpecificCall({ call: 'facebook#getProfile', options: { fields: ['id', 'name', 'accounts{id,name,instagram_business_account}'], },});Notas importantes:
- Puede probar los permisos de negocio con usuarios de prueba y aplicaciones de desarrollo antes de la revisión de la aplicación.
- La mayoría de los permisos de negocio requieren la revisión de la aplicación de Facebook antes del uso de producción.
- Las APIs de negocio tienen límites de velocidad diferentes. Revisa la documentación actual del plataforma de Facebook antes del lanzamiento.
- Sigue el Guía de Integración de Negocios de Facebook cuando configuras la aplicación.
Configuración de Android
Sección titulada “Configuración de Android”-
Agrega permiso de Internet a tu
AndroidManifest.xmlAsegúrate de que esta línea esté presente:
<uses-permission android:name="android.permission.INTERNET"/> -
Genera tu clave de hash de Android
Este es un paso crucial de seguridad requerido por Facebook. Abre tu terminal y ejecuta:
Ventana de terminal keytool -exportcert -alias androiddebugkey -keystore ~/.android/debug.keystore | openssl sha1 -binary | openssl base64 -ACuando se te pregunte por una contraseña, utiliza:
android -
Agrega la clave de hash a tu aplicación de Facebook
- Ir a la consola de tu aplicación en Facebook Developers
- Navega a Configuración > Básico
- Desplázate hacia abajo hasta la sección de "Android"
- Haz clic en "Agregar plataforma" si Android no está agregado aún y rellena los detalles
- Agrega la clave hash que generaste
- Para producción, agrega ambas claves hash de depuración y de lanzamiento
-
Actualiza tu
AndroidManifest.xmlpara incluir:<application>...<activity android:name="com.facebook.FacebookActivity"android:configChanges="keyboard|keyboardHidden|screenLayout|screenSize|orientation"android:label="@string/app_name" /><activityandroid:name="com.facebook.CustomTabActivity"android:exported="true"><intent-filter><action android:name="android.intent.action.VIEW" /><category android:name="android.intent.category.DEFAULT" /><category android:name="android.intent.category.BROWSABLE" /><data android:scheme="FB[APP_ID]" /></intent-filter></activity></application>
Configuración de iOS
Sección titulada “Configuración de iOS”-
Agregar la plataforma iOS en el Console de Desarrollador de Facebook
- Ir a la consola de tu aplicación en Desarrolladores de Facebook
- Navegar a Configuración > Básico
- Desplazarse hacia abajo hasta el final de la página y hacer clic en “Agregar plataforma”
- Seleccionar iOS y rellenar los detalles requeridos
-
Abrir tu proyecto de Xcode y navegar a Info.plist
-
Agregar los siguientes registros a tu Info.plist:
<key>FacebookAppID</key><string>[APP-ID]</string><key>FacebookClientToken</key><string>[CLIENT-TOKEN]</string><key>FacebookDisplayName</key><string>[APP-NAME]</string><key>LSApplicationQueriesSchemes</key><array><string>fbapi</string><string>fb-messenger-share-api</string></array><key>CFBundleURLTypes</key><array><dict><key>CFBundleURLSchemes</key><array><string>fb[APP-ID]</string></array></dict></array> -
Modificar el
AppDelegate.swiftimport FBSDKCoreKit@UIApplicationMainclass AppDelegate: UIResponder, UIApplicationDelegate {func application(_ application: UIApplication, didFinishLaunchingWithOptions launchOptions: [UIApplication.LaunchOptionsKey: Any]?) -> Bool {// Override point for customization after application launch.// Initialize Facebook SDKFBSDKCoreKit.ApplicationDelegate.shared.application(application,didFinishLaunchingWithOptions: launchOptions)return true}func application(_ app: UIApplication, open url: URL, options: [UIApplication.OpenURLOptionsKey: Any] = [:]) -> Bool {// Called when the app was launched with a url. Feel free to add additional processing here,// but if you want the App API to support tracking app url opens, make sure to keep this callif (FBSDKCoreKit.ApplicationDelegate.shared.application(app,open: url,sourceApplication: options[UIApplication.OpenURLOptionsKey.sourceApplication] as? String,annotation: options[UIApplication.OpenURLOptionsKey.annotation])) {return true;} else {return ApplicationDelegateProxy.shared.application(app, open: url, options: options)}}}
Usando Facebook Login en Tu Aplicación
Sección titulada “Usando Facebook Login en Tu Aplicación”-
Iniciar el inicio de sesión de Facebook en su aplicación
import { SocialLogin } from '@capgo/capacitor-social-login';// Initialize during app startupawait SocialLogin.initialize({facebook: {appId: 'APP_ID',clientToken: 'CLIENT_TOKEN',}}) -
Implementar la función de inicio de sesión
async function loginWithFacebook() {try {const result = await SocialLogin.login({provider: 'facebook',options: {permissions: ['email', 'public_profile'],limitedLogin: false // See Limited Login section below for important details}});console.log('Facebook login result:', result);// Handle successful login} catch (error) {console.error('Facebook login error:', error);// Handle error}} -
Obtener Datos de Perfil del Usuario
: Después de un inicio de sesión exitoso, puedes recuperar información de perfil adicional:
async function getFacebookProfile() {try {const profileResponse = await SocialLogin.providerSpecificCall({call: 'facebook#getProfile',options: {fields: ['id', 'name', 'email', 'first_name', 'last_name', 'picture']}});console.log('Facebook profile:', profileResponse.profile);return profileResponse.profile;} catch (error) {console.error('Failed to get Facebook profile:', error);return null;}}// Example usage after loginasync function loginAndGetProfile() {const loginResult = await loginWithFacebook();if (loginResult) {const profile = await getFacebookProfile();if (profile) {console.log('User ID:', profile.id);console.log('Name:', profile.name);console.log('Email:', profile.email);console.log('Profile Picture:', profile.picture?.data?.url);}}}Limitación de tipo de token: El
getProfilellamada solo funciona cuando tienes un token de acceso (iniciación estándar con seguimiento permitido). Si el usuario denegó el seguimiento o estás utilizando inicio de sesión limitado (solo token JWT), esta llamada fallará. En ese caso, utiliza los datos de perfil proporcionados en la respuesta de inicio de sesión inicial.
⚠️ Crítico: Manejo de tokens de backend
Sección titulada “⚠️ Crítico: Manejo de Token de Backend”Su servidor debe manejar dos tipos de tokens diferentes ya que los usuarios de iOS pueden recibir tokens de acceso o tokens JWT dependiendo de su elección de transparencia de seguimiento de aplicaciones, mientras que los usuarios de Android siempre reciben tokens de acceso.
Tipos de tokens por plataforma
Sección titulada “Tipos de tokens por plataforma”| Plataforma | Configuración de inicio de sesión limitado | Usuario ELECCION DE USUARIO | Tipo de Token de Resultado |
|---|---|---|---|
| iOS | true | Cualquiera | Token JWT |
| iOS | false | Permite el seguimiento | Token de Acceso |
| iOS | false | Deniega el seguimiento | Token JWT (auto-sobreescribir) |
| Android | Cualquiera | N/A | Token de acceso (siempre) |
Implementación de Backend
Sección titulada “Implementación de Backend”-
Detectar tipo de token y manejar según corresponda
async function loginWithFacebook() {try {const loginResult = await SocialLogin.login({provider: 'facebook',options: {permissions: ['email', 'public_profile'],limitedLogin: false // iOS: depends on ATT, Android: ignored}});if (loginResult.accessToken) {// Access token (Android always, iOS when tracking allowed)return handleAccessToken(loginResult.accessToken.token);} else if (loginResult.idToken) {// JWT token (iOS only when tracking denied or limitedLogin: true)return handleJWTToken(loginResult.idToken);}} catch (error) {console.error('Facebook login error:', error);}} -
Ejemplo de integración con Firebase
import { OAuthProvider, FacebookAuthProvider, signInWithCredential } from 'firebase/auth';async function handleAccessToken(accessToken: string, nonce: string) {// For access tokens, use OAuthProvider (new method)const fbOAuth = new OAuthProvider("facebook.com");const credential = fbOAuth.credential({idToken: accessToken,rawNonce: nonce});try {const userResponse = await signInWithCredential(auth, credential);return userResponse;} catch (error) {console.error('Firebase OAuth error:', error);return false;}}async function handleJWTToken(jwtToken: string) {// For JWT tokens, send to your backend for validationtry {const response = await fetch('/api/auth/facebook-jwt', {method: 'POST',headers: {'Content-Type': 'application/json',},body: JSON.stringify({ jwtToken })});const result = await response.json();return result;} catch (error) {console.error('JWT validation error:', error);return false;}} -
Validación de JWT de Backend
// Backend: Validate JWT token from Facebookimport jwt from 'jsonwebtoken';import { Request, Response } from 'express';app.post('/api/auth/facebook-jwt', async (req: Request, res: Response) => {const { jwtToken } = req.body;try {// Verify JWT token with Facebook's public key// See: https://developers.facebook.com/docs/facebook-login/limited-login/token/validating/#standard-claimsconst decoded = jwt.verify(jwtToken, getFacebookPublicKey(), {algorithms: ['RS256'],audience: process.env.FACEBOOK_APP_ID,issuer: 'https://www.facebook.com' // From: https://www.facebook.com/.well-known/openid-configuration/?_rdr});// Extract user info from JWTconst userInfo = {id: decoded.sub,email: decoded.email,name: decoded.name,isJWTAuth: true};// Create your app's session/tokenconst sessionToken = createUserSession(userInfo);res.json({success: true,token: sessionToken,user: userInfo});} catch (error) {console.error('JWT validation failed:', error);res.status(401).json({ success: false, error: 'Invalid token' });}}); -
Manejador de token de backend genérico
// Handle both token types in your backendasync function authenticateFacebookUser(tokenData: any) {if (tokenData.accessToken) {// Handle access token - validate with Facebook Graph APIconst response = await fetch(`https://graph.facebook.com/me?access_token=${tokenData.accessToken}&fields=id,name,email`);const userInfo = await response.json();return {user: userInfo,tokenType: 'access_token',expiresIn: tokenData.expiresIn || 3600};} else if (tokenData.jwtToken) {// Handle JWT token - decode and validate// See: https://developers.facebook.com/docs/facebook-login/limited-login/token/validating/#standard-claimsconst decoded = jwt.verify(tokenData.jwtToken, getFacebookPublicKey());return {user: {id: decoded.sub,name: decoded.name,email: decoded.email},tokenType: 'jwt',expiresIn: decoded.exp - Math.floor(Date.now() / 1000)};} else {throw new Error('No valid token provided');}}
Consideraciones importantes
Sección titulada “Consideraciones importantes”Access Token (Ingreso estándar):
- ✅ Android: Siempre disponible (restricciones de iOS no se aplican)
- ✅ iOS: Solo cuando el usuario permite explícitamente el seguimiento de la aplicación
- ✅ Puede usarse para acceder al gráfico de Facebook API
- ✅ Tiempos de expiración más largos
- ✅ Más datos del usuario disponibles
- ❌ Muy poco común en iOS ya que los usuarios deniegan cada vez más el seguimiento
JWT Token (Modo de privacidad de iOS solo):
- ❌ Android: Nunca ocurre (no soportado)
- ✅ iOS: Cuando se deniega el seguimiento o
limitedLogin: true - ✅ Respeto las preferencias de privacidad del usuario de iOS
- ❌ Contiene información de usuario básica solo
- ❌ Tiempos de expiración más cortos
- ❌ No tiene acceso al gráfico de Facebook API
- ⚠️ Ahora el escenario más común para usuarios de iOS
Comportamiento específico de plataforma:
- Aplicaciones de iOS: Deben manejar tanto tokens de acceso como tokens JWT
- Aplicaciones de AndroidSolo necesita manejar tokens de acceso
- Aplicaciones híbridasDeben implementar ambos métodos de manejo de tokens
Requisitos de contexto seguro (Web/Capacitor)
Sección titulada “Requisitos de contexto seguro (Web/Capacitor)”Limitaciones de API de criptografía
Sección titulada “Limitaciones de API de criptografía”El flujo de inicio de sesión de Facebook actualizado requiere el Web Crypto API para la generación de nonce, que solo está disponible en contextos seguros:
// This requires secure context (HTTPS or localhost)async function sha256(message: string) { const msgBuffer = new TextEncoder().encode(message); const hashBuffer = await crypto.subtle.digest("SHA-256", msgBuffer); // ❌ Fails in insecure context // ...}Problemas del entorno de desarrollo
Sección titulada “Problemas del entorno de desarrollo”Problema común: ionic serve con URLs HTTP rompe la autenticación de Facebook
| Entorno | Crypto API disponible | El inicio de sesión de Facebook funciona |
|---|---|---|
http://localhost:3000 | ✅ Sí | ✅ Sí |
http://127.0.0.1:3000 | ✅ Sí | ✅ Sí |
http://192.168.1.100:3000 | ❌ No | ❌ No |
https://any-domain.com | ✅ Sí | ✅ Sí |
Soluciones para el desarrollo de Capacitor
Título de la sección “Soluciones para el desarrollo de Capacitor”-
Usar localhost para pruebas de web
Ventana de terminal # Instead of ionic serve --host=0.0.0.0ionic serve --host=localhost -
Habilitar HTTPS en Ionic
Ventana de terminal ionic serve --ssl -
Probar en dispositivos reales
Ventana de terminal # Capacitor apps run in secure context on devicesionic cap run iosionic cap run android -
Generación alternativa de nonce para desarrollo
async function generateNonce() {if (typeof crypto !== 'undefined' && crypto.subtle) {// Secure context - use crypto.subtlereturn await sha256(Math.random().toString(36).substring(2, 10));} else {// Fallback for development (not secure for production)console.warn('Using fallback nonce - not secure for production');return btoa(Math.random().toString(36).substring(2, 10));}}
Nota de integración con Firebase
Título de la sección “Nota de integración con Firebase”La documentación de Firebase más reciente requiere tokens JWT con nonce para la autenticación de Facebook, independientemente de los ajustes de inicio de sesión. Este enfoque funciona con ambos limitedLogin: true y limitedLogin: false:
// Both modes can return JWT tokens depending on user choice const loginResult = await SocialLogin.login({ provider: 'facebook', options: { permissions: ['email', 'public_profile'], limitedLogin: false, // true = always JWT, false = depends on user tracking choice nonce: nonce } });Limitación de Desarrollo: Si estás utilizando ionic serve en una IP de red (no localhost), el inicio de sesión de Facebook fallará debido a restricciones de API de criptografía. Utiliza localhost o HTTPS para pruebas web.
Solución de Problemas
Sección titulada “Solución de Problemas”Problemas Comunes y Soluciones
Sección titulada “Problemas y soluciones comunes”-
Errores de clave hash en Android
- Revisa que hayas agregado la clave hash correcta en la consola de Facebook
- Para ediciones de lanzamiento, asegúrate de haber agregado ambas claves de hash de depuración y de lanzamiento
- Verifica que estás utilizando el keystore correcto al generar la hash
-
El botón de inicio de sesión de Facebook no aparece
- Verifica que todas las entradas del manifiesto sean correctas
- Asegúrate de que tu ID de aplicación de Facebook y tu token de cliente sean correctos
- Asegúrate de haber inicializado correctamente el SDK
-
Problemas comunes de iOS
- Asegúrate de que todas las entradas de Info.plist sean correctas
- Verifica que los esquemas de URL estén configurados correctamente
- Verifique que su identificador de paquete coincida con lo registrado en la consola de Facebook
Pruebas
Sección titulada “Pruebas”-
Antes de realizar pruebas, agregue usuarios de prueba en la consola de desarrolladores de Facebook
- Ir a Roles > Usuarios de prueba
- Crear un usuario de prueba
- Use estos credenciales para realizar pruebas
-
Realice pruebas tanto en versiones de depuración como de lanzamiento
- Versión de depuración con clave de hash de depuración
- Versión de lanzamiento con clave de hash de lanzamiento
- Realice pruebas tanto en emuladores como en dispositivos físicos
Recuerde realizar el flujo de inicio de sesión completo, incluyendo:
- Ingreso exitoso
- Cancelación de inicio de sesión
- Gestión de errores
- Funcionalidad de cierre de sesión
Sigue adelante desde la configuración de inicio de sesión de Facebook
Sección titulada “Sigue adelante desde la configuración de inicio de sesión de Facebook”Si estás utilizando Configuración de inicio de sesión de Facebook para planificar la autenticación y los flujos de cuenta, conecta Usando @capgo/capacitor-social-login para la capacidad nativa en Usando @capgo/capacitor-social-login, @capgo/capacitor-social-login para el detalle de implementación en @capgo/capacitor-login-social @capgo/capacitor-clave-privada para el detalle de implementación en @capgo/capacitor-clave-privada @capgo/capacitor-biometría-nativa para el detalle de implementación en @capgo/capacitor-biometría-nativa, y autenticación de dos factores para el detalle de implementación en autenticación de dos factores.