

導入
既存のNuxt Webアプリケーションがある場合、このガイドでは、Capacitor 8を使用してiOSおよびAndroidモバイルアプリケーションに変換する方法を学びます。 Capacitor Capacitor 8 — 最新バージョンでパフォーマンスが向上し、新機能が追加されたものです。
Capacitorは、カメラ、ファイルシステム、プッシュ通知などのデバイスAPIにアクセスできるネイティブコンテナで、既存のVueコードベースを保持します。FlutterやReact Nativeとは異なり、既存のNuxtcodeはそのまま動作します。
学ぶこと:
- 既存のNuxtアプリを静的生成用に設定する
- Capacitor 8にエッセンシャルネイティブプラグインを追加する
- iOSとAndroidのシミュレータでビルドしてテストする
- 開発を高速化するためにライブリロードを有効にする
- iOSの一般的なレイアウト問題(ビューポート、セーフエリア、水平オーバーフロー)を修正する
- Capgoネイティブナビゲーションとトランジションを使用してネイティブフィーリングのUIを追加する
新しいプロジェクトから始めるには、以下のガイドを参照してください。 Building a Nuxt Mobile App from Scratch.
Capacitorの利点
- Codeの再利用性: Webアプリとモバイルアプリ間でVueコンポーネントとロジックを共有することができます。
- : パフォーマンス: Nuxtの静的生成により、モバイル向けに最適化されたバンドルが作成されます。
- : ネイティブ機能: Capacitor プラグインを使用して、カメラ、位置情報、ファイルシステムなどのデバイス機能にアクセスできます。
- : FamiliarなVue/Nuxtパターンを使用して、ネイティブ開発を学ぶことなく開発を簡素化できます。: 開始する前に、以下を確認してください。
: Node.js 18+
: インストール済み
- : 既存の protectedTokens
- targetLanguage Nuxt 4 アプリケーション
- Xcode (iOS開発用、macOSのみ)
- Android Studio (Android開発用)
Nuxtアプリのモバイル設定
最初のステップは、Nuxtアプリを静的生成用に設定することです。Capacitorは、静的HTML/JS/CSSファイルをネイティブアプリにバンドルする必要があります。
generateスクリプトが含まれていることを確認してください。 package.json 重要な注意:
{
  "scripts": {
    "dev": "nuxt dev",
    "build": "nuxt build",
    "generate": "nuxt generate",
    "preview": "nuxt preview",
    "mobile": "bun run generate && bunx cap sync",
    "mobile:ios": "bun run mobile && bunx cap open ios",
    "mobile:android": "bun run mobile && bunx cap open android"
  }
}
サーバーサイド機能を使用している場合 (__CAPGO_KEEP_0__ ルート、サーバーミドルウェアなど)、クライアントサイドの代替または外部APIを使用する必要があります。 If you’re using server-side features (API routes, server middleware, etc.), you’ll need to refactor those to use client-side alternatives or external APIs.
テスト用の静的生成を実行してください:
bun run generate__CAPGO_KEEP_0__ を見ることができます。 .output/public フォルダに静的ファイルが見つかります。これは、Capacitor がネイティブアプリにパッケージングするものです。
Capacitor に Capacitor を追加する
ネイティブモバイルコンテナにNuxtアプリをパッケージングするには、以下の手順に従ってください。
- Install Capacitor core and CLI:
bun add @capacitor/core
bun add -D @capacitor/cli- Install common Capacitor plugins you’ll likely need:
bun add @capacitor/app @capacitor/keyboard @capacitor/splash-screen @capacitor/status-bar @capacitor/preferencesこれらのプラグインは、以下の機能を提供します。
- @capacitor/app: アプリのライフサイクルイベントをハンドリングします (前景/背景、深いリンク)
- @capacitor/keyboard: モバイル上のキーボードの動作を制御します
- @capacitor/splash-screen: @__CAPGO_KEEP_0__のネイティブ スプラッシュ画面を管理する
- @capacitor/status-bar: @__CAPGO_KEEP_0__でデバイス ステータス バーをスタイリングする
- @capacitor/preferences: @__CAPGO_KEEP_0__のキー値 ストレージ (localStorageと同様のネイティブ)
- Initialize Capacitor with your project details:
bunx cap init my-app com.example.myapp --web-dir .output/publicを置き換える my-app アプリ名と com.example.myapp を置き換える (逆ドメイン表記)
- Capgoの適切な構成でファイルを作成または更新する:
capacitor.config.tsを置き換える
import type { CapacitorConfig } from '@capacitor/cli';

const config: CapacitorConfig = {
  appId: 'com.example.myapp',
  appName: 'my-app',
  webDir: '.output/public',
  plugins: {
    SplashScreen: {
      launchShowDuration: 2000,
      launchAutoHide: true,
      androidScaleType: 'CENTER_CROP',
      splashFullScreen: true,
      splashImmersive: true,
    },
    Keyboard: {
      resize: 'body',
      resizeOnFullScreen: true,
    },
    StatusBar: {
      style: 'dark',
    },
  },
};

export default config;- プラットフォームをインストール:
bun add @capacitor/ios @capacitor/android- ネイティブプラットフォームのフォルダを追加:
bunx cap add ios
bunx cap add android
Capacitorは ios と android プロジェクトのルートディレクトリにネイティブプロジェクトを含むフォルダを作成します。
Androidプロジェクトをビルドするには Android Studioが必要です。iOSの場合は Xcode.
- が必要です。Macが必要です。
bun run mobileプロジェクトをビルドして同期:
このコマンドは、カスタムスクリプトを実行して静的Nuxtビルドを生成し、ファイルをネイティブプラットフォームと同期します。
nativeモバイルアプリを構築および配信するには、以下の手順に従ってください。
iOSアプリを開発するには、 Xcode がインストールされている必要があります。また、Androidアプリを開発するには、 Android Studio がインストールされている必要があります。さらに、App Storeでアプリを配信する場合、iOSではApple Developer Programに登録し、AndroidではGoogle Play Consoleに登録する必要があります。
- nativeプロジェクトを開きます:
iOSの場合:
bun run mobile:iosAndroidの場合:
bun run mobile:androidまたは直接Capacitor CLIで:
bunx cap open ios
bunx cap open android- アプリをビルドおよび実行します:
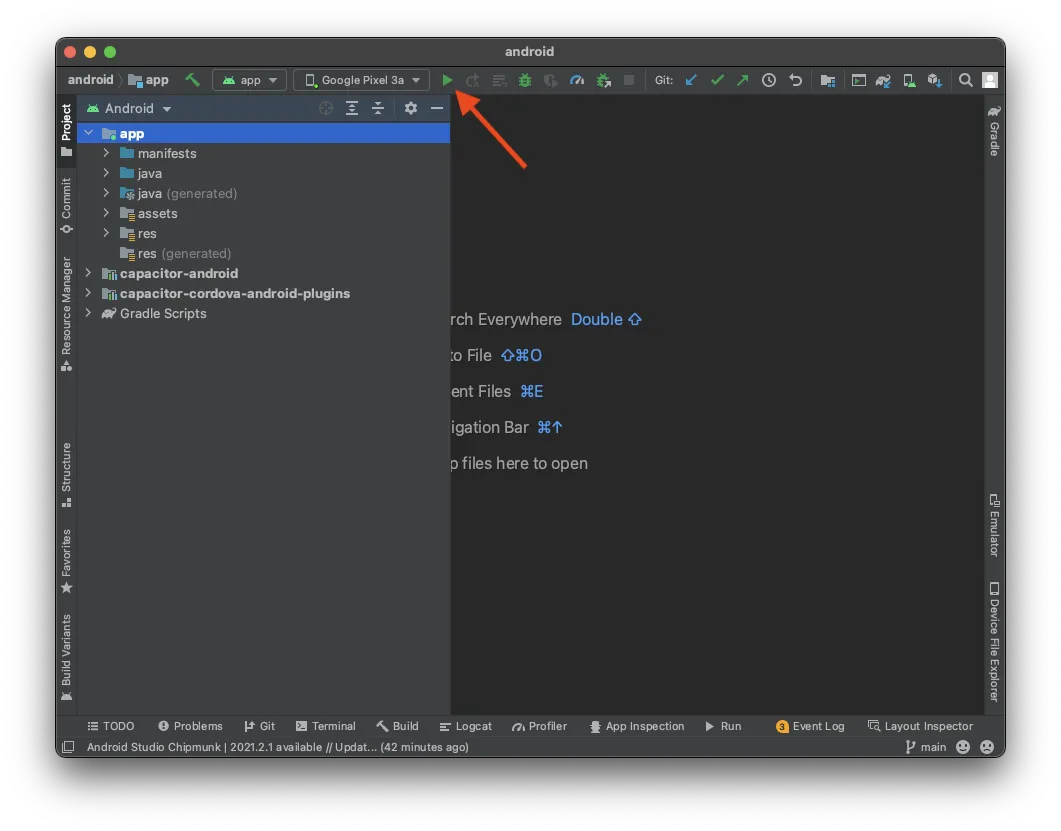
- In Android Studio, __CAPGO_KEEP_0__ project を待ち、 “Run” ボタンをクリックして、接続されたデバイスまたはエミュレータにアプリをデプロイします。
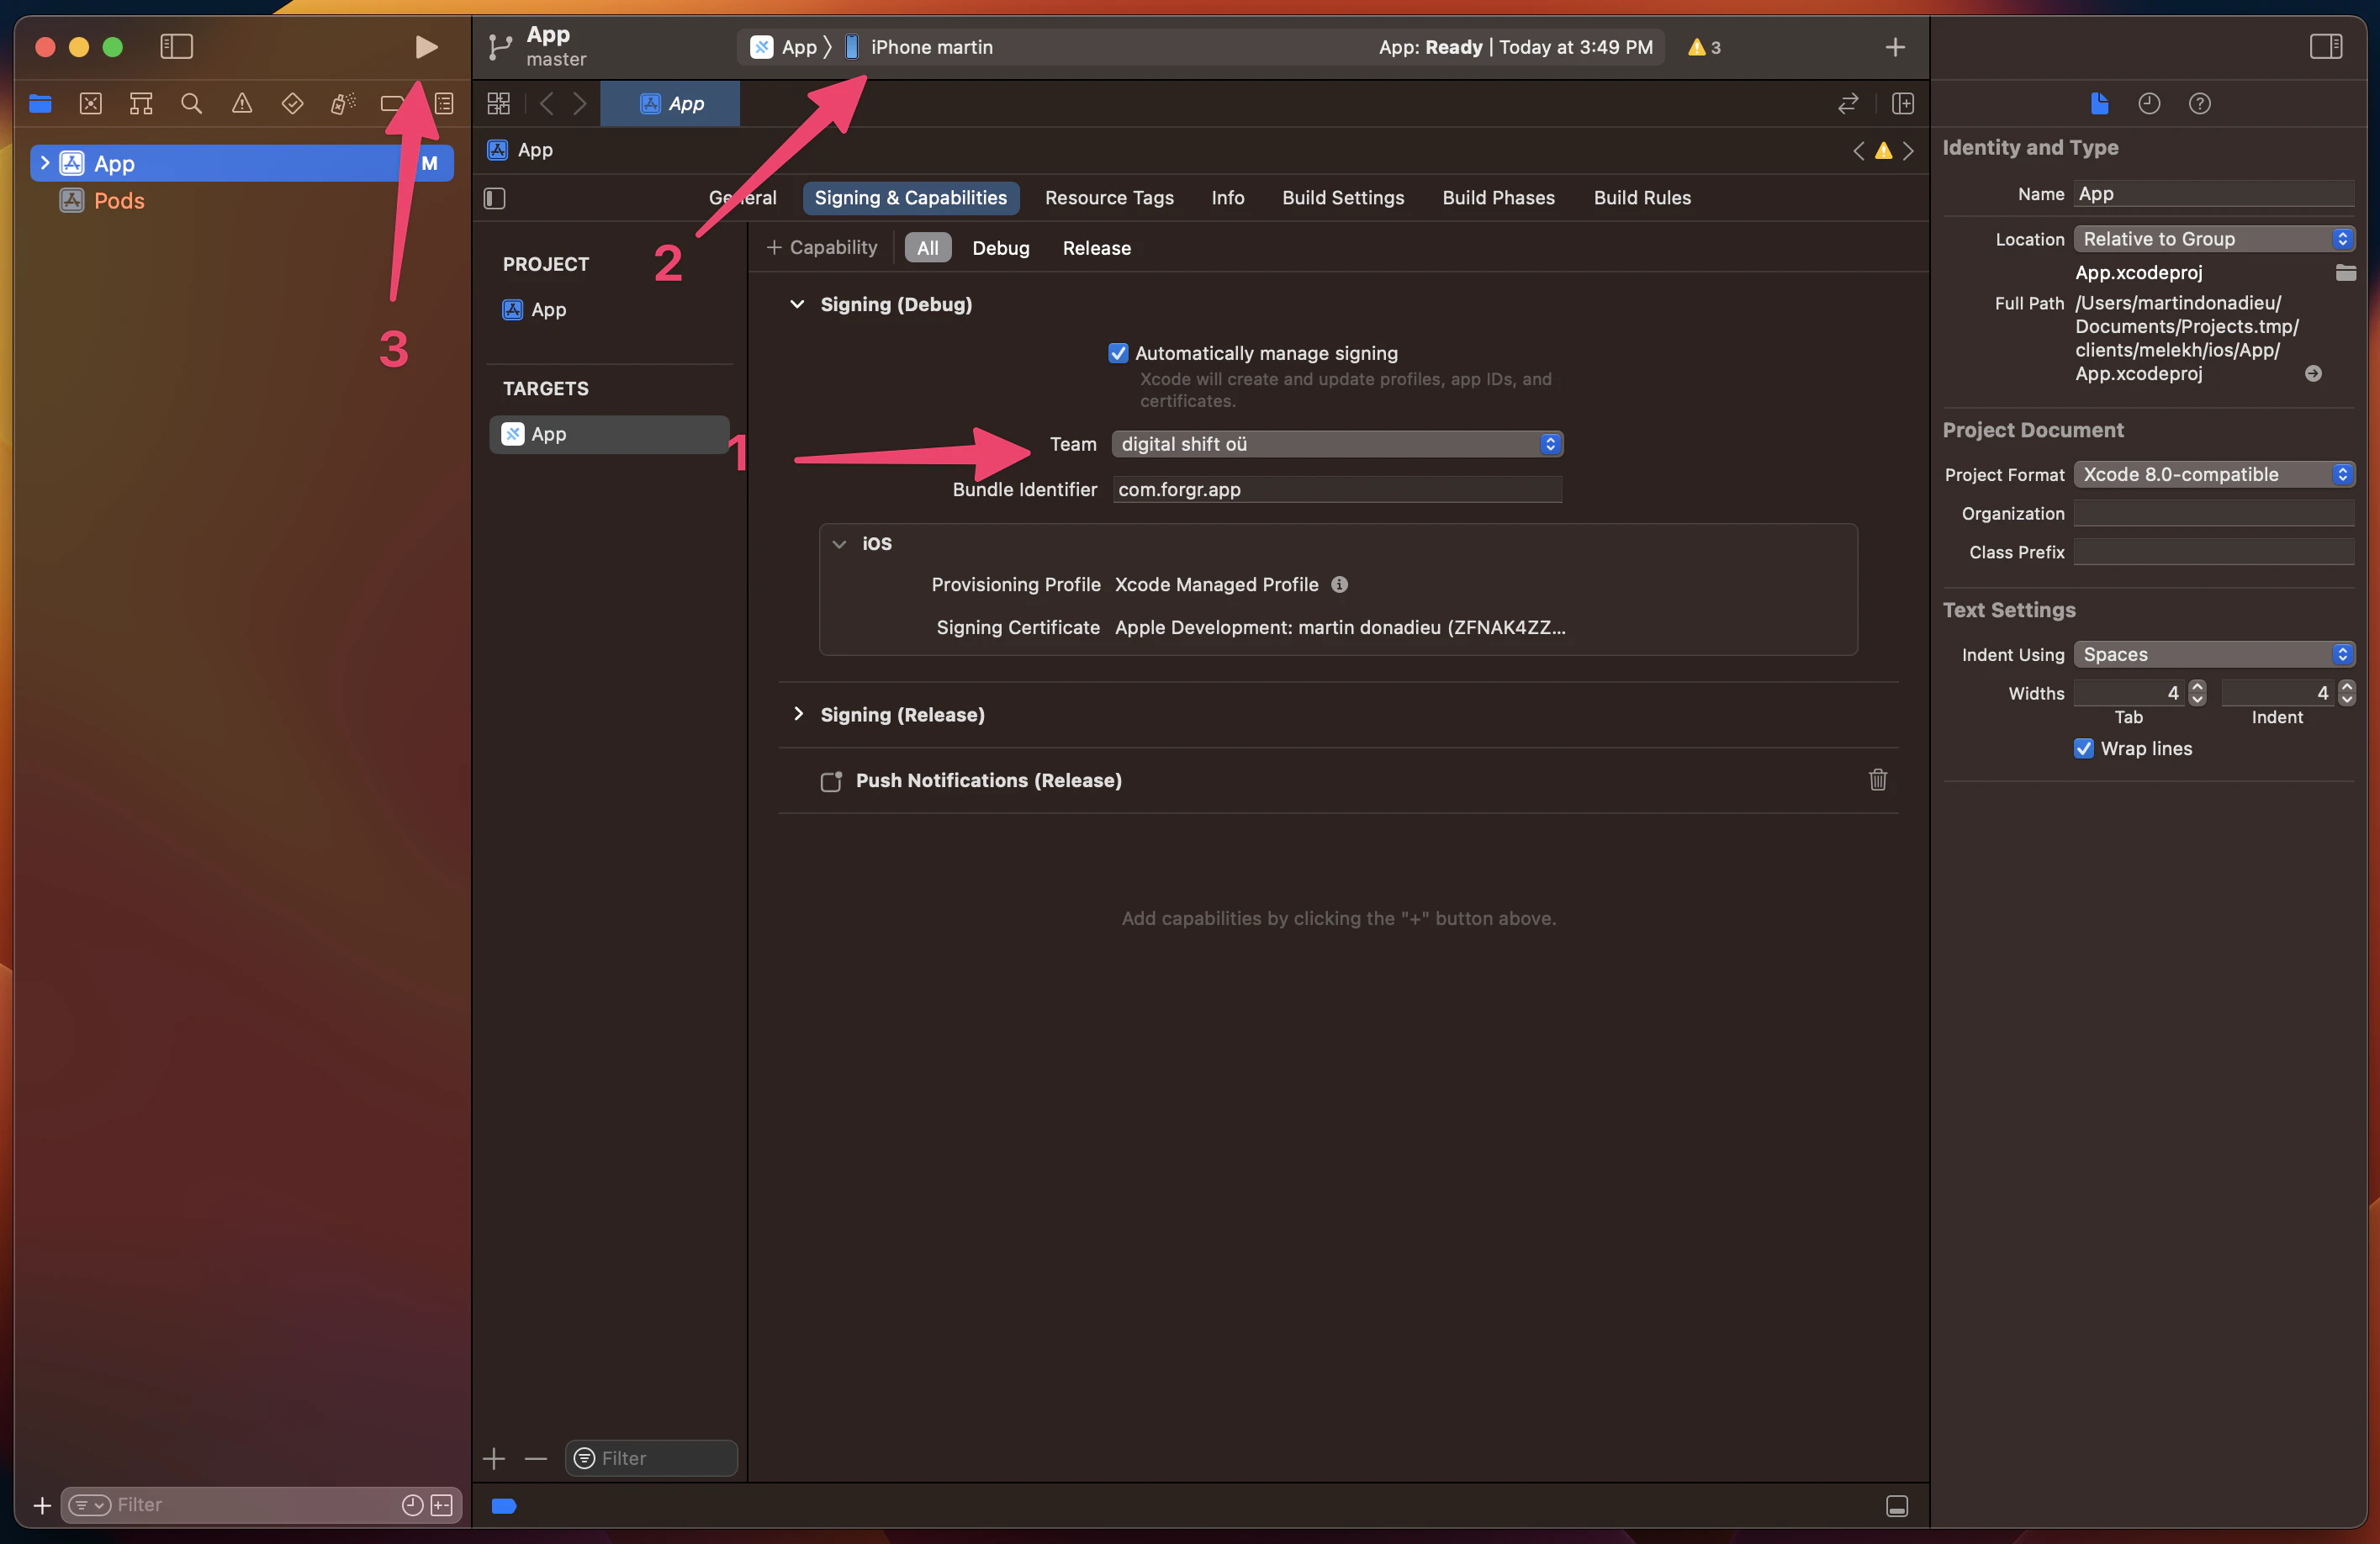
- In Xcode, __CAPGO_KEEP_0__ signing account を設定して、実機にアプリをデプロイします。初めての場合は、Xcode がガイドを提供します (Apple Developer Program に登録されている必要があります)。設定が完了したら、 “Play” ボタンをクリックして、接続されたデバイスでアプリを実行します。
Congratulations! Nuxt web アプリをモバイル デバイスに成功でデプロイしました。
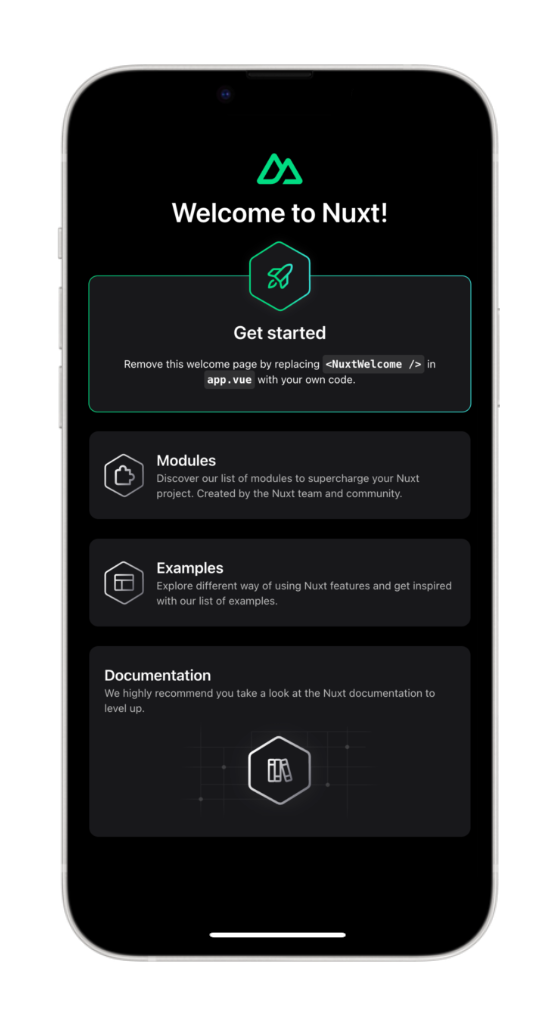
しかし、開発中にはもっと速い方法があります…
Capacitor Live Reload
開発中は、モバイル デバイスで即時反映できるように Live Reload を利用できます。機能を有効にするには、次の手順に従ってください:
- __CAPGO_KEEP_0__ IP アドレスを探します:
-
macOS の場合、ターミナルで次のコマンドを実行します:
ipconfig getifaddr en0 -
Windows の場合、実行します:
ipconfig出力で IPv4 アドレスを探します。
- Capgoをアップデートして
capacitor.config.tsを開発サーバーに指すようにします:
import type { CapacitorConfig } from '@capacitor/cli';

const config: CapacitorConfig = {
  appId: 'com.example.app',
  appName: 'my-app',
  webDir: '.output/public',
  server: {
    url: 'http://YOUR_IP_ADDRESS:3000',
    cleartext: true,
  },
  plugins: {
    // ... your plugin config
  },
};

export default config;
を YOUR_IP_ADDRESS に置き換えてください (例:) 192.168.1.100).
- Capgoの設定を変更してください:
bunx cap copyの copy コマンドは、Webフォルダと設定変更をネイティブプロジェクトにコピーし、プロジェクト全体を更新しません。
- Capgoの開発サーバーを起動し、Xcode/Android Studioで再構築してください:
bun run devCapgoアプリを起動すると、Nuxtアプリの変更が自動的に反映されます。
注意: If you install new plugins or make changes to native files, you’ll need to rebuild the native project since live reloading only applies to web code changes.
Capacitor プラグインを使用する
Capacitor プラグインを使用すると、Nuxt アプリからネイティブデバイスの機能にアクセスできます。Nuxt と Capacitor を組み合わせてネイティブモバイルアプリを構築する方法をご紹介します。 Share プラグイン 例として、Share プラグインを使用してみましょう。
- Share プラグインをインストールします。
bun add @capacitor/share- Share プラグインを使用するページを作成または更新します。Nuxt 4 では、ページは
app/pages/:
<template>
  <div class="p-6">
    <h1 class="text-2xl font-bold mb-4">Welcome to Nuxt + Capacitor!</h1>
    <button
      @click="shareContent"
      class="px-6 py-3 bg-blue-600 text-white rounded-lg font-semibold"
    >
      Share now!
    </button>
  </div>
</template>

<script setup lang="ts">
import { Share } from '@capacitor/share';

async function shareContent() {
  await Share.share({
    title: 'Check this out!',
    text: 'Built with Nuxt and Capacitor',
    url: 'https://capacitorjs.com',
    dialogTitle: 'Share with friends',
  });
}
</script>- Sync の変更をネイティブプロジェクトと同期します。
bun run mobileまたは、再構築せずに同期します。
bunx cap sync- アプリをデバイス上で実行してください。
「Share now!」ボタンをクリックすると、ネイティブシェアダイアログが表示されます。
次に、iOS と Android でネイティブの Capgo ナビゲーションとトランジションを使用して、アプリをよりネイティブに感じさせることができます。また、iOS で水平オーバーフローまたは安全エリアがカットされる問題を解決することもできます。
ネイティブなUIと Capgo ナビゲーションとトランジション
私は数年間 イオンティック クロスプラットフォームアプリケーションを構築するには、しかし、Nuxtと統合することはハックであり、既に持っている場合にあまりにも価値がない タイルウィンドCSS.
For a native mobile feel in a Nuxt + Capacitor app, use Capgo plugins instead of web-only UI kits like Konsta UI:
- @capgo/capacitor-native-navigation —ネイティブのナビゲーションバー、iOSのLiquid Glassタブバー、Androidのブラーされたタブバー
- @capgo/capacitor-transitions —イオンティックスタイルのページトランジションとiOSのエッジスワイプバック、WebViewレイヤー内で、イオンティックUIを採用することなく
両方をインストールする
bun add @capgo/capacitor-native-navigation @capgo/capacitor-transitions
bunx cap sync
ネイティブナビゲーションをCSSのインセットモードで構成して、Webコンテンツがネイティブバーを尊重するようにする
import { NativeNavigation } from '@capgo/capacitor-native-navigation';

await NativeNavigation.configure({
  contentInsetMode: 'css',
  animationDuration: 360,
  glass: {
    effect: 'liquidGlass',
  },
});
液体ガラスのタブバーをレンダリングする(iOSはシステムが所有するレンダリングを使用し、AndroidはブラーされたWebViewのバックグラウンドを使用)
await NativeNavigation.setTabbar({
  selectedId: 'home',
  labelVisibilityMode: 'labeled',
  icons: true,
  colors: { dynamic: true },
  tabs: [
    { id: 'home', title: 'Home', icon: { svg: '...' } },
    { id: 'settings', title: 'Settings', icon: { svg: '...' } },
  ],
});

await NativeNavigation.addListener('tabSelect', ({ id }) => {
  router.push(`/${id}`);
});
ネイティブのページトランジションをアプリケーションシェルに追加する
<script setup>
import { ref, onMounted } from 'vue';
import { useRouter } from 'vue-router';
import '@capgo/capacitor-transitions';
import { initTransitions, setDirection, setupRouterOutlet } from '@capgo/capacitor-transitions/vue';

initTransitions({ platform: 'auto' });

const router = useRouter();
const outletRef = ref(null);

onMounted(() => {
  if (outletRef.value) {
    setupRouterOutlet(outletRef.value, { platform: 'auto', swipeGesture: 'auto' });
  }
});

const openSettings = () => {
  setDirection('forward');
  router.push('/settings');
};
</script>

<template>
  <cap-router-outlet ref="outletRef">
    <router-view />
  </cap-router-outlet>
</template>
Wrap routed pages in cap-router-outlet, cap-page、そして cap-content、そして呼び出す setDirection('forward') または setDirection('back') Capacitorライブアップデートの代替
Capacitorライブアップデートの代替 Using @capgo/capacitor-native-navigation Capawesomeの代替 Using @capgo/capacitor-transitions.
Appflowプラグインまたは
Capgoマーケティングサイト @capgo/tailwind-capacitor (公開された) tailwind-capacitor on npm。 safe-areas Capacitor向けのユーティリティやその他のTailwindプラグインを提供します。
bun add -D tailwind-capacitorNuxt 4とTailwind CSS 4の場合、CSSファイルから参照されるファイルに次のimportを保持してください。 app/assets/css/main.css:
@import 'tailwindcss';
@plugin "@capgo/tailwind-capacitor/platform";
@plugin "@capgo/tailwind-capacitor/safe-areas";
Tailwind CSSのユーティリティを使用してください、 nuxt.config.ts.
、 pt-safe, pb-safe、 px-safe 手動で追加するのではなく。 env(safe-area-inset-*) プロジェクトは積極的に開発されています。Nuxtの設定で不足しているものがある場合、 open a PR on GitHub.
にPRを提出してください。
iOSレイアウトの問題を修正する (ビューポート、セーフエリア、水平方向のオーバーフロー) overflow-x: hidden または、ビューポートタグを調整するだけでは、問題を解決することはできません。順序に従って、これらのチェックを実行してください。
ビューポートメタタグが正しく適用されていることを確認してください。
In nuxt.config.ts, app.head:
export default defineNuxtConfig({
  app: {
    head: {
      meta: [
        {
          name: 'viewport',
          content: 'width=device-width, initial-scale=1, viewport-fit=cover',
        },
      ],
    },
  },
});
iOSのセーフエリアを1つのルートラッパーからのみ取り扱います。
単一のアプリシェルを作成し、その中にセーフエリアのパディングを適用するのではなく、複数のネストされたコンポーネントに適用しないでください:
html,
body,
#__nuxt {
  width: 100%;
  min-height: 100%;
  margin: 0;
  padding: 0;
  overflow-x: hidden;
}

* {
  box-sizing: border-box;
}

.app-shell {
  min-height: 100dvh;
  width: 100%;
  padding-top: env(safe-area-inset-top);
  padding-right: env(safe-area-inset-right);
  padding-bottom: env(safe-area-inset-bottom);
  padding-left: env(safe-area-inset-left);
}
すべてのページコンテンツを .app-shellに含めることができます。ヘッダー、モーダル、レイアウトラッパーなどに複数回セーフエリアのパディングを追加すると、UIが切り取られたり大きすぎるように見えることがあります。
With @capgo/tailwind-capacitorを使用すると、同じパディングを単一のシェルに表現できます。 pt-safe pb-safe px-safe on that single shell.
Set Capacitor iOS contentInset に設定 never 最初
In capacitor.config.ts、原生インセットを無効にして、CSS (またはNative Navigationの) contentInsetMode: 'css'Mixing __CAPGO_KEEP_0__’s automatic content inset with CSS
const config: CapacitorConfig = {
  appId: 'com.example.myapp',
  appName: 'my-app',
  webDir: 'out',
  ios: {
    contentInset: 'never',
  },
};
Mixing Capacitor’s automatic content inset with CSS env(safe-area-inset-*) 実際にオーバーフローしている要素を見つける
通常の原因は、
、Tailwind 100vw、固定ピクセル幅、または大きい w-screen, a fixed pixel width, or a large min-width.
In Safari Web Inspector, run:
[...document.querySelectorAll('*')]
  .filter(el => el.scrollWidth > document.documentElement.clientWidth)
  .map(el => ({
    el,
    tag: el.tagName,
    class: el.className,
    scrollWidth: el.scrollWidth,
    clientWidth: document.documentElement.clientWidth,
  }));
Tailwindを使用して w-screen を置き換え w-full できる場合 100vw / w-screen水平方向のオーバーフロー問題の多くは
安全なエリアの重複したパディング、または固定幅のコンテナから来ています — ではなく、ビューポートメタタグ自体から
You’ve successfully converted your existing Nuxt web application into native iOS and Android apps using Capacitor 8. Your Vue codebase now runs natively on mobile devices with access to device APIs.
Capgoを使用して、既存のNuxt WebアプリケーションをiOSおよびAndroid用のネイティブアプリケーションに変換しました。__CAPGO_KEEP_0__ 8のVueコードベースは、デバイスAPIにアクセスできるモバイルデバイス上で実行されます。
- 達成したこと:
- Added Capacitor 8 with essential plugins
- Capgo 8に必要なプラグインを追加
- iOSおよびAndroidのシミュレータにビルドおよびデプロイすること
- iOSレイアウトの一般的な問題を解決しました (ビューポート、セーフエリア、オーバーフロー)
- Capgoネイティブナビゲーションとトランジションを追加してネイティブなUIを実現しました
次のステップ:
- ページ/エリア: Capgo Builder / ネイティブクラウドビルド製品ページ。役割: 短いUIラベルまたはナビゲーションアイテム。メッセージキー `native_build_builder_credit_next` (ネイティブビルドビルダークレジットネクスト)。 Capgo __CAPGO_KEEP_0__
- ページ/エリア: Capgo マーケティングウェブサイト。役割: ウェブサイトコピーの文。見つかった場所: contributing.astro ページ。Capgo製品/ブランドと開発者用語を完全に保持します。メッセージキー `submitting_a_pr_to_capgo` (Capgoにプルリクエストを提出する)
- アプリをアプリストアの再提出なしでオーバー・ザ・エア更新に適応させる
- カメラ、位置情報、またはプッシュ通知などのネイティブプラグインを追加する
アプリのアイコンとスプラッシュスクリーンをプロダクション用に設定する アプリをApp StoreとGoogle Playの提出に準備する 新しいプロジェクトを始めるのですか? 以下のガイド付きウォークスルーをご確認ください。
リソース
- ヌクスドキュメント
- Capacitor 8 ドキュメント
- capgo/capacitor-ネイティブナビゲーション — リキッドグラス タブ バーとネイティブ クローム
- capgo/capacitor-トランジション — ネイティブ フィーリング ページ トランジション
- capgo/テイルウィンド-capacitor — Tailwind safe-area utilities for Capacitor
- Capgo - Live Updates for Capacitor Apps
Capgo は、__CAPGO_KEEP_1__ アプリをより速く作るのに役立つ方法を学びましょう 無料アカウントに登録してください 今日。
Keep going from Convert Your Nuxt App to iOS & Android with Capacitor 8
Capgoを使用している場合 Convert Your Nuxt App to iOS & Android with Capacitor 8 Capgoを使用してネイティブプラグインの作業を計画するには、Capgoプラグインディレクトリと接続する必要があります。 Capgo Plugin Directory for the product workflow in Capgo Plugin Directory, Capacitor Plugins by Capgo for the implementation detail in Capacitor Plugins by Capgo, プラグインの追加または更新の実装詳細 Ionic Enterpriseプラグインの代替 Capgo 8を参照してください。 Capgo製品ワークフローについてのIonic Enterprise Plugin Alternatives Capgoネイティブビルド Capgo製品ワークフローについてのCapgoネイティブビルド