Commands
Usage
All command should be run in your app folder with capacitor project ignited properly.
Init
npx @capgo/cli@latest init [apikey]
This method is here to onboard you step by step.
It will add your app to Capgo. It will add the code to your app to validate the update. Likewise, it will build your app. Furthermore, it will upload your app to Capgo. And it will help you to check if the update works.
Login
npx @capgo/cli login [apikey]
This method is here to remember the apikey for you.
Optionaly you can give:
--local This will store your apikey in the local repo and git ignore it.
Doctor
npx @capgo/cli doctor
Command to check if you are up-to-date with Capgo packages.
This command will also be useful for bug report.
App
Add
npx @capgo/cli app add [appId]
[appId] your app ID the format com.test.app is explained here.
💡 All option will be guessed in your config if not provided.
Optionally, you can give:
--icon [/path/to/my/icon]to have a custom icon display in Capgo web app.--name [test]to have a custom name in the list.--apikey [key]API key to link to your account.--retention [retention]retention period of app bundle in days, 0 by default = infinite.
Example of capacitor.config.json for appId and AppName, the icon is guess in the resources folder
{ "appId": "ee.forgr.capacitor_go", "appName": "Capgo", "webDir": "dist"}Set
npx @capgo/cli app set [appId]
[appId] is your app ID, the format is explained here.
Optionally, you can give:
--icon [/path/to/my/icon]to have a custom icon display in Capgo web app.--name [test]to have a custom name in the list.--retention [retention]retention period of app bundle in days, 0 by default = infinite.--apikey [key]API key to link to your account.
List
npx @capgo/cli app list [appId]
[appId] your app ID the format com.test.app is explained here.
Optionally, you can give:
--apikey [key]API key to link to your account.
Delete
npx @capgo/cli app delete [appId]
[appId] your app ID the format com.test.app is explained here.
Optionally, you can give:
--apikey [key]API key to link to your account.--bundlewith the version number will only delete this version.
Debug
npx @capgo/cli app debug [appId]
[appId] your app ID the format com.test.app is explained here.
Optionally, you can give:
--apikey [key]API key to link to your account.--devicewith the specific device you want to debug
Setting
npx @capgo/cli app setting [path]
Edit the Capacitor config.
[path] - path of the setting that you would like to change. For example, to change the appId, provide appId.
If you wish to disable auto update in the capacitor-updater provide plugins.CapacitorUpdater.autoUpdate
You MUST provide either --string or --bool!
Options:
--string <string>- sets the setting to a string--bool <true | false>- sets the setting to a boolean
Bundle
Upload
npx @capgo/cli bundle upload [appId]
[appId] is your app ID, the format is explained here.
Optionally, you can give:
--apikey <apikey>API key to link to your account.--path <path>Path of the folder to upload.--channel <channel>Channel to link to.--external <url>Link to external URL instead of uploading to Capgo Cloud.--iv-session-key <key>Set the IV and session key for bundle URL external.--s3-endpoint <s3Endpoint>URL of S3 endpoint. Do not work with Partial upload, or external option.--s3-region <region>Region for your S3 bucket.--s3-apikey <apikey>API key for your S3 endpoint.--s3-apisecret <apisecret>API secret for your S3 endpoint.--s3-bucket-name <bucketName>Name for your AWS S3 bucket.--s3-port <port>Port for your S3 endpoint.--no-s3-sslDisable SSL for S3 upload.--key <key>Custom path for public signing key (v1 system).--key-data <keyData>Public signing key (v1 system).--key-v2 <key>Custom path for private signing key (v2 system).--key-data-v2 <keyData>Private signing key (v2 system).--bundle-urlPrints bundle URL into stdout.--no-keyIgnore signing key and send clear update.--no-code-checkIgnore checking if notifyAppReady() is called in source code and index present in root folder.--display-iv-sessionShow in the console the IV and session key used to encrypt the update.--bundle <bundle>Bundle version number of the bundle to upload.--min-update-version <minUpdateVersion>Minimal version required to update to this version. Used only if the disable auto update is set to metadata in channel.--auto-min-update-versionSet the min update version based on native packages.--ignore-metadata-checkIgnores the metadata (node_modules) check when uploading.--ignore-checksum-checkIgnores the checksum check when uploading.--timeout <timeout>Timeout for the upload process in seconds.--partialDoes not upload partial files to Capgo cloud.--tusUpload the bundle using tus protocol.--multipartUses multipart protocol to upload data to S3, Deprecated, use TUS instead.--encrypted-checksum <encryptedChecksum>An encrypted checksum (signature). Used only when uploading an external bundle.--package-json <packageJson>A path to package.json. Usefull for monorepos.--auto-set-bundleSet the bundle in capacitor.config.json.--node-modules <nodeModules>A list of path to node_modules. Usefull for monorepos (comma separated ex: ../../node_modules,./node_modules)
⭐️ External option helps to unlock 2 cases: corporate with privacy concern, don’t send the code to a third part and app bigger than 200 MB. With this setting, Capgo store only the link to the zip and sends the link to all apps.
👀 Capgo cloud never looks at what is in the link (for external option), or in the code when stored.
🔑 You can add a second layer of security by using encryption, then Capgo will not be able to look or modify anything, it becomes “trustless”.
Example of package.json for version
{ "version": "1.0.2"}⛔ Version should be greater than “0.0.0”.
💡 Don’t forget to update the version number each time you send one, version number cannot be overridden, or reused after deletion for security reason.
List
npx @capgo/cli bundle list [appId]
[appId] your app ID the format com.test.app is explained here.
Optionally, you can give:
--apikey [key]API key to link to your account.
Delete
npx @capgo/cli bundle delete [appId]
[appId] your app ID the format com.test.app is explained here.
Optionally, you can give:
--apikey [key]API key to link to your account.--bundlewith the version number will only delete this version.
Cleanup
in a SemVer range for a major version to Cloud
npx @capgo/cli bundle cleanup [appId] --bundle=[majorVersion] --keep=[numberToKeep]
[appId] your app ID the format com.test.app is explained here.
Optionally, you can give:
--apikey [key]API key to link to your account.--bundle [majorVersion]a version you wish to remove previous packages for, it will keep the last one +numberToKeep.--keep [numberToKeep]the number of packages you wish to keep (default 4).
For example: If you have 10 versions from 10.0.1 to 10.0.11, and you use npx @capgo/cli cleanup [appId] --bundle=10.0.0 it will remove 10.0.1 to 10.0.6. 10.0.7 until 10.0.11 will be kept.
If you have 20 versions in total, and you don’t provide a bundle number like this: npx @capgo/cli cleanup [appId] --keep=2 It will remove 18 versions, and keep the last 2.
This command will ask for confirmation, it shows a table of what it will be keeping and removing.
Encrypt
Warning: This command is deprecated and will be removed in the next major release. Please use the new encryption system.
npx @capgo/cli bundle encrypt [path/to/zip]
This command is used when you use external source to store your code or for test purpose.
Optionally, you can give:
--key [/path/to/my/private_key] the path of your private key.
--key-data [privateKey] the private key data, if you want to use inline.
The command will print your ivSessionKeyy and generate an encrypted zip, to use it with the upload command or decryt command.
Encrypt V2
npx @capgo/cli bundle encrypt [path/to/zip] [checksum]
This command is used when you use external source to store your code or for test purpose. The checksum is the sha256 of the bundle (generated by —key-v2), it is used to verify the integrity of the file after decryption. It will be enncrypted with the private key and sent along with the bundle. In encryption v2 the checksum is upgraded to become a “signature” of the bundle.
Optionally, you can give:
--key [/path/to/my/private_key] the path of your private key.
--key-data [privateKey] the private key data, if you want to use inline.
--json to output info as json.
The command will print your ivSessionKeyy and generate an encrypted zip, to use it with the upload command or decryt command.
Decrypt
npx @capgo/cli bundle decrypt [path/to/zip] [ivSessionKey]
Optionally, you can give:
--key [/path/to/my/private_key] the path of your private key.
--key-data [privateKey] the private key data, if you want to use inline. This command is mainly used for test purpose, it will decrypt the zip and print the base64 decrypted session key in the console.
Decrypt V2
npx @capgo/cli bundle decryptV2 [path/to/zip] [ivSessionKey]
Optionally, you can give:
--key [/path/to/my/private_key] the path of your private key.
--key-data [privateKey] the private key data, if you want to use inline. This command is mainly used for test purpose, it will decrypt the zip and print the base64 decrypted session key in the console.
--checksum [checksum] the checksum of the file, it will verify the checksum after decryption.
Zip
npx @capgo/cli bundle zip [appId]
[appId] is your app ID, the format is explained here.
Optionally, you can give:
--path [/path/to/my/bundle]to upload a specific folder.--bundle [1.0.0]to set the bundle version number of the filename.--name [myapp]to override the filename.--jsonto output info as json.--no-code-checkto ignore the code check and send the bundle anyway.--key-v2to use the new encryption system. This is required as new encryption system use better checksums to verify the integrity of the file.
Compatibility
npx @capgo/cli bundle compatibility [appId] -c [channelId]
[appId] is your app ID, the format is explained here.
[channelId] the name of your new channel.
Optionally, you can give:
--apikey [key]API key to link to your account.--textuse text instead of emojis in the table--channel [channel]the channel to check the compatibility with.--package-json <packageJson>A path to package.json. Usefull for monorepos--node-modules <nodeModules>A list of path to node_modules. Usefull for monorepos (comma separated ex: ../../node_modules,./node_modules)
Channel
Add
npx @capgo/cli channel add [channelId] [appId]
[channelId] the name of your new channel. [appId] your app ID the format com.test.app is explained here.
Delete
npx @capgo/cli channel delete [channelId] [appId]
[channelId] the name of your channel you want to delete. [appId] your app ID the format com.test.app is explained here.
List
npx @capgo/cli channel list [appId]
[appId] your app ID the format com.test.app is explained here.
Optionally, you can give:
--apikey [key]API key to link to your account.
Set
npx @capgo/cli channel set [channelId] [appId]
[appId] is your app ID, the format is explained here.
Optionally, you can give:
--bundle [1.2.3]your app bundle already sent to the cloud, to link it to a channel.--latestget the bundle version frompackage.json:version, cannot be used with--bundle.--state [ normal | default ]set the channel state, can benormalordefault. One channel needs to bedefault.--downgradeallows the channel to send downgrade version to devices.--no-downgradedisallows the channel to send downgrade version to devices.--upgradeallows the channel to send upgrade (major) version to devices.--no-upgradedisallow the channel to send upgrade (major) version to devices.--iosallows the channel to send version to iOS devices.--no-iosdisallows the channel to send version to iOS devices.--androidallows the channel to send version to android devices.--no-androiddisallows the channel to send version to android devices.--self-assignallows devices to self assign to this channel.--no-self-assigndisallows devices to self assign to this channel.--disable-auto-update STRATEGYDisable auto update strategy for this channel. The possible options are: major, minor, metadata, none.--apikey [key]API key to link to your account.
Disable updates strategy
There are a few ways to handle disabling updates for too old versions.
Capgo cannot update native code thus an update from a version with the old native code to a version with the updated native code should not be possible.
There are a couple of ways to achieve that.
First, the major strategy. It prevents an update from 0.0.0 -> 1.0.0. The major is the highlighted number (1.0.0 and 0.0.0).
Second is the minor strategy. It prevents an update from 0.0.0 -> 1.1.0 or an update from 1.1.0 to 1.2.0.
BE AWARE this strategy does not prevent an update from 0.1.0 -> 1.1.0
Third, the patch strategy. It was added into capgo as a very strict mode. It’s not recomended to be used unless you fully understand how it works.
In order for it to accept a update the following conditions must be meet:
- The major is the same between the new and the old version
- The minor is the same between the new and the old version
- The patch of the new version if greater then the patch of the old version
Here is an example of which scenarios the update is allowed or denied
- 0.0.311 -> 0.0.314 ✅
- 0.0.0 -> 0.0.314 ✅
- 0.0.316 -> 0.0.314 ❌
- 0.1.312 -> 0.0.314 ❌
- 1.0.312 -> 0.0.314 ❌
Lastly the most complicated strategy. The metadata strategy.
First you need to know that initially after you enable it the updates WILL fail as the channel is lacking the required metadata.
If the channel is lacking metadata you will see a message like this:

If you see something like this you know that you have to go to the current bundle for the failing channel and set the metadata.
First, figure out what channel is failing. You can do that by looking at the misconfigured column
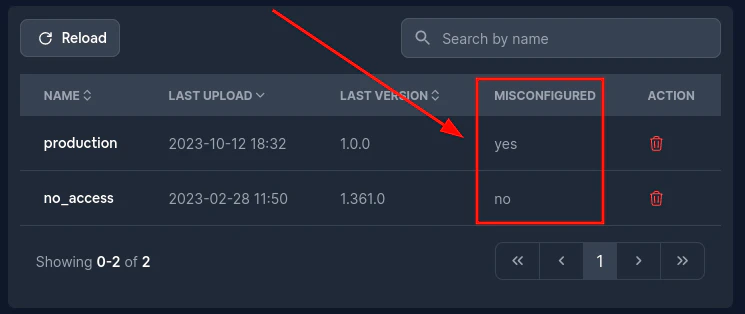
Then go to the failing channel and click on Bundle number. This should take you to the bundle page.
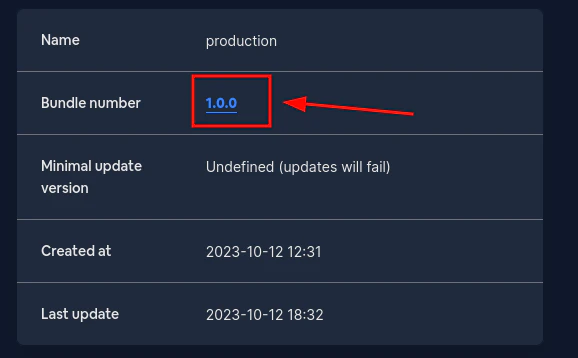
Once there fill the Minimal update version field. This should be a semver.
If the value you pass is not a semver you will get an error, but if everything goes correctly you should see something like this:
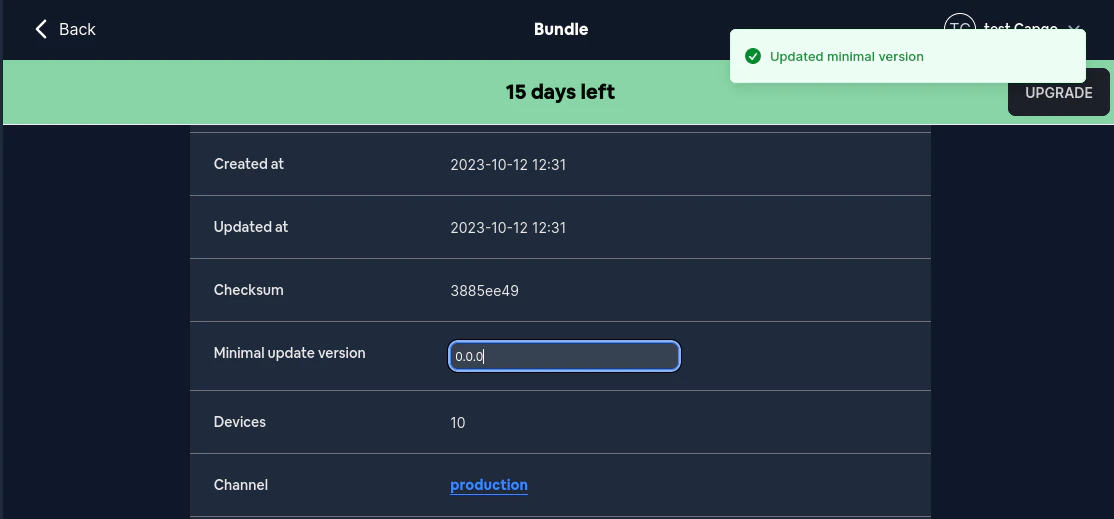
Now, you likely do not want to set this data manually every time you update. Fortunately, the CLI will prevent you from sending an update without this metadata

To properly upload a bundle when using the metadata option you need to pass the --min-update-version with the valid semver. Something like this:
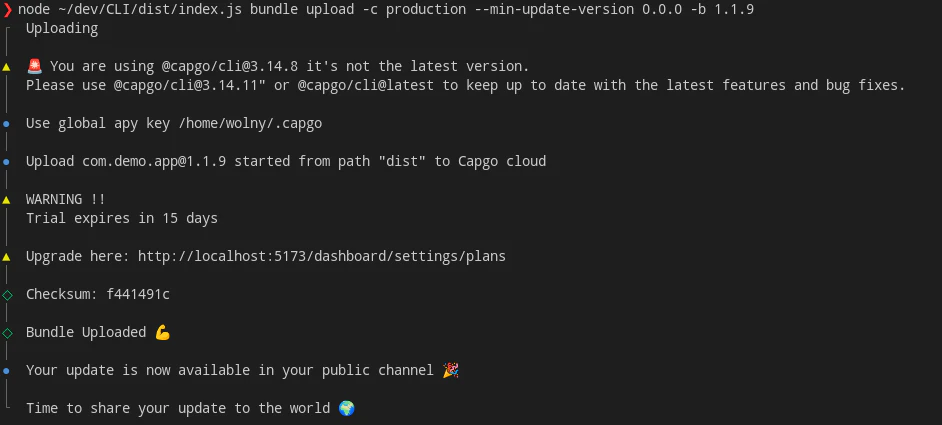
The --min-update-version is not the ONLY way to do compatibility.
There also exists the --auto-min-update-version. Here is how it works.
First, it takes a look at the version curently uploaded to the channel. It checks compatibility same as bundle compatibility command would.
Second, if the new version is 100% compatible it reuses the min_update_version from the latest version in the channel.
If not, then it sets the min_update_version to the bundle number of the newly uploaded version.
You will always get an information what is the min_update_version when using this option. It will look something like this:

If the new version is not compatible it should look something like this

End-to-End encryption (Trustless)
Capgo supports end-to-end encryption, this means that your bundle(code) is encrypted before sent to the cloud and decrypted on the device. For that, you need to generate an RSA key pair, you can use the following command to generate it.
The encryption system is a combination of RSA and AES, the RSA key is used to encrypt the AES key, and the AES key is used to encrypt the file.
See below for more information about the encryption system.
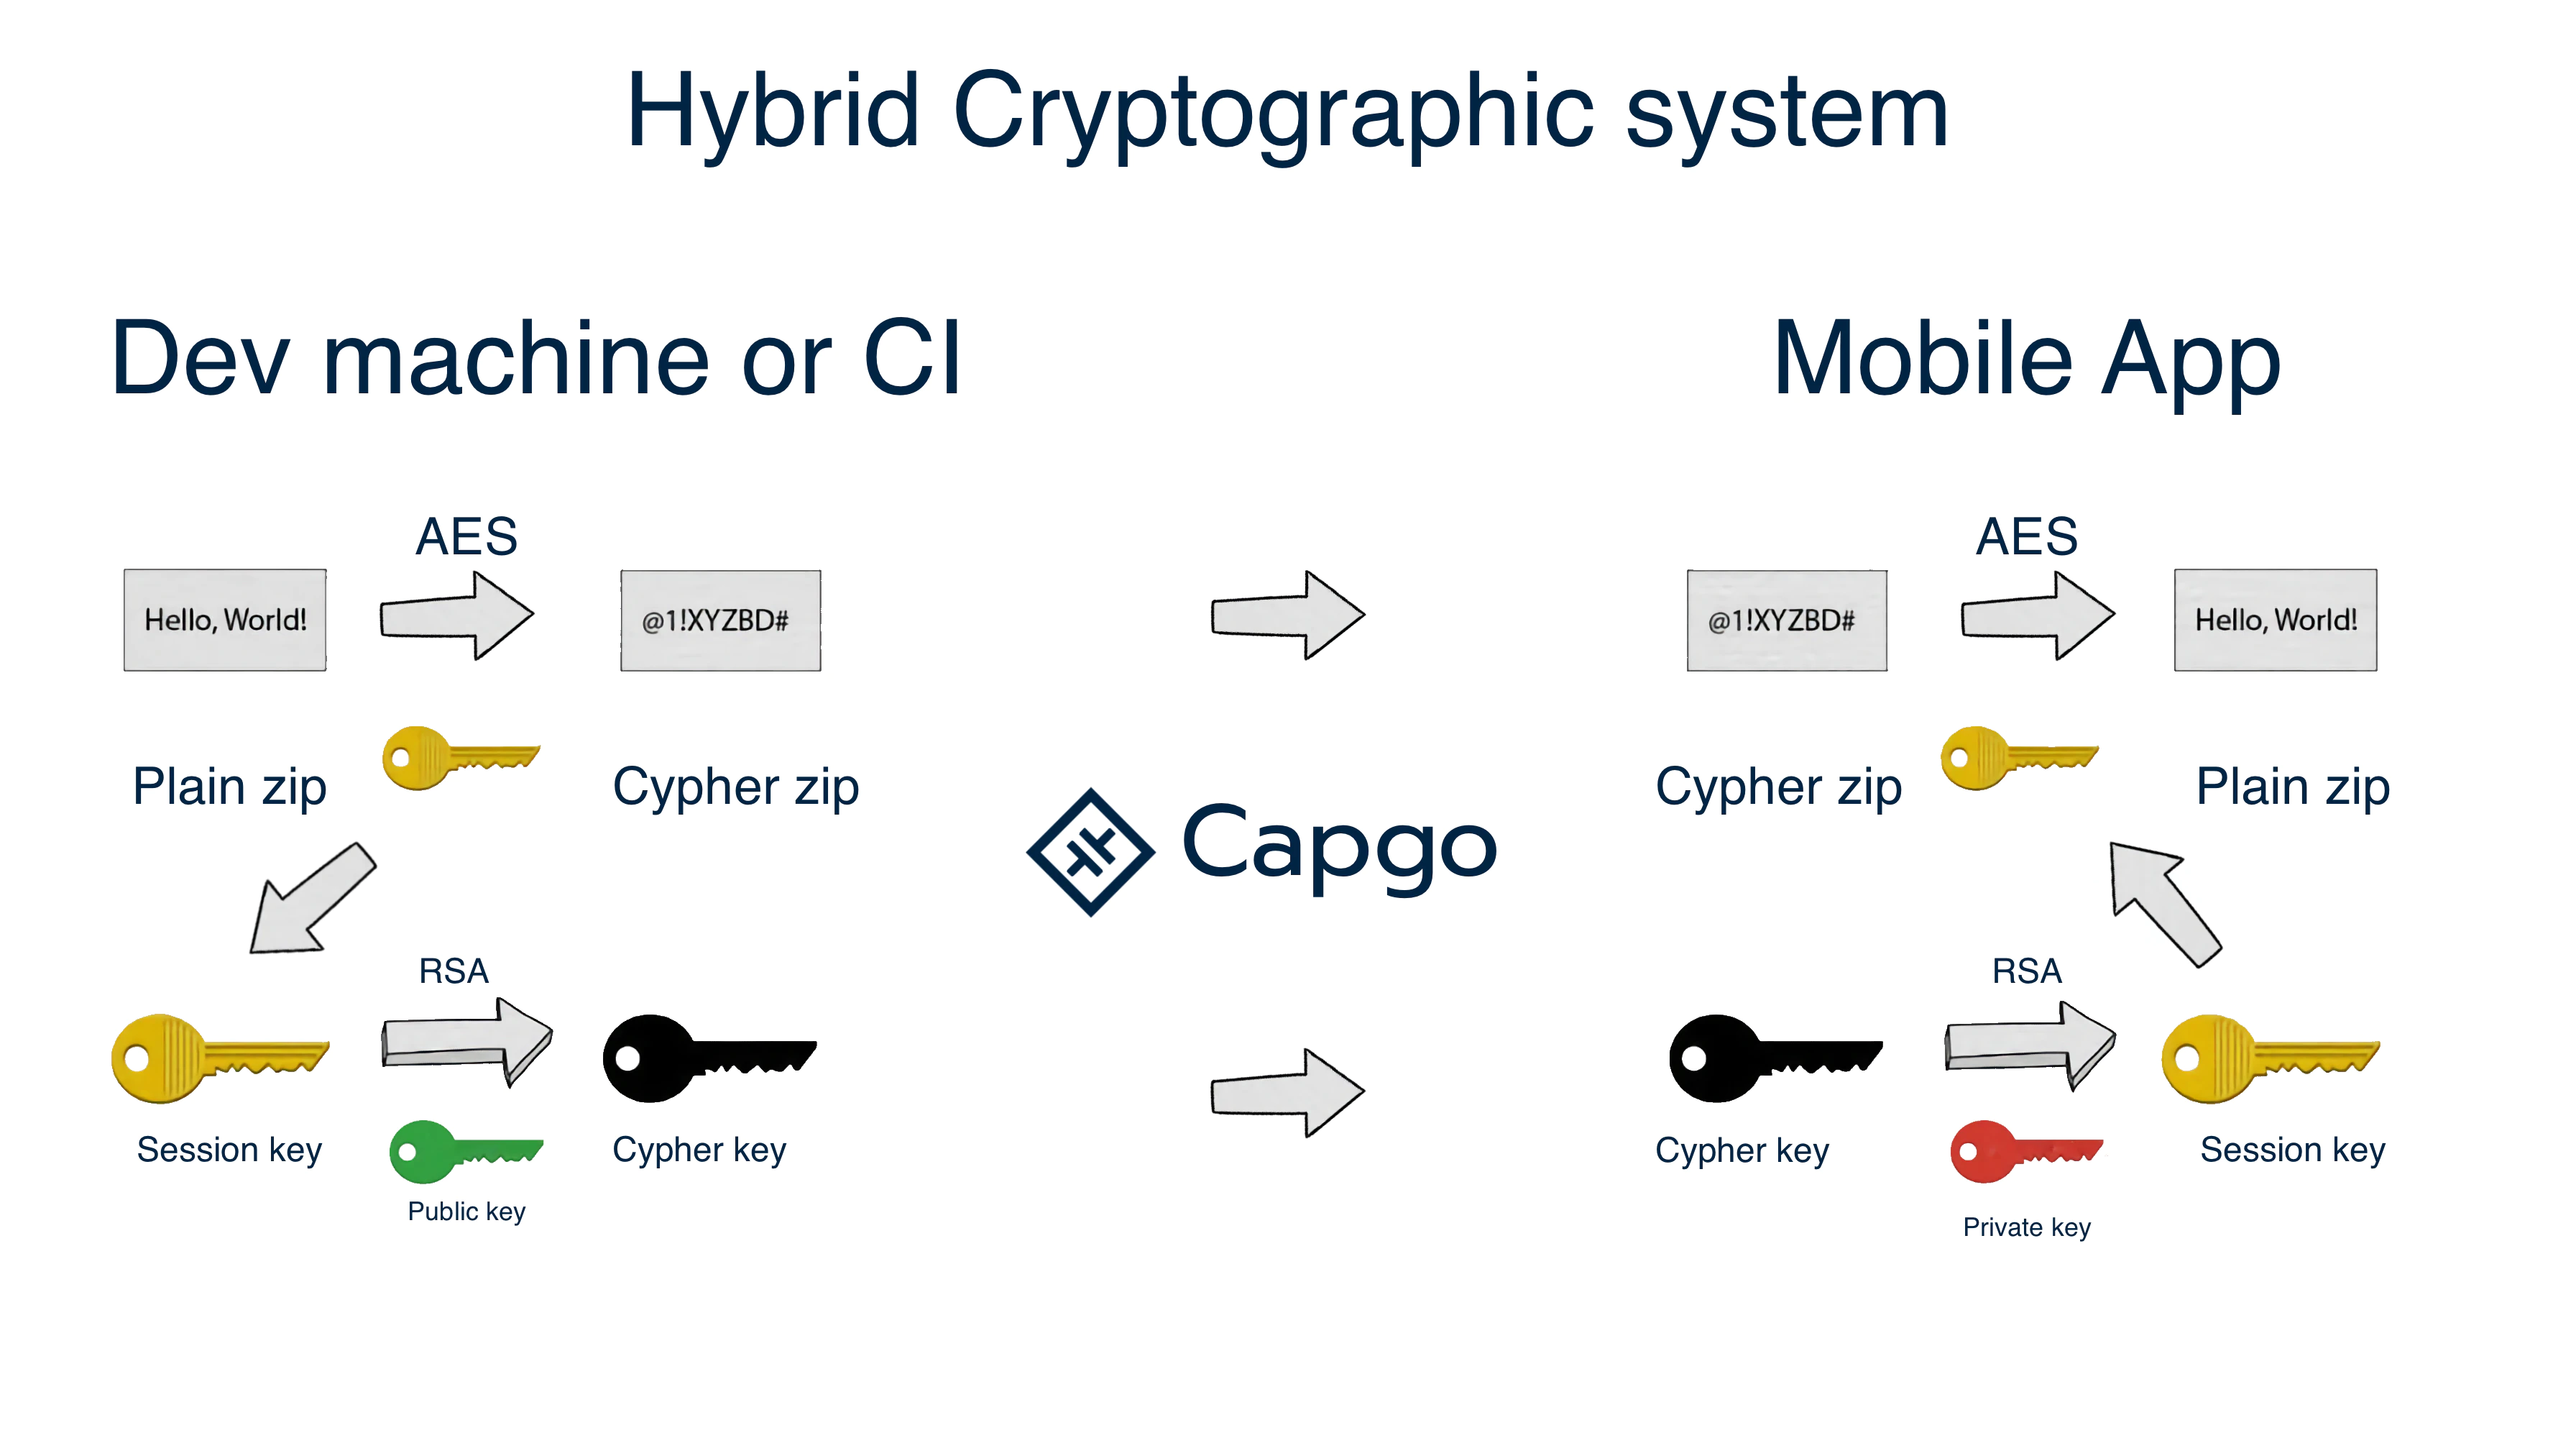
Ecryption schema
Create key for your app
npx @capgo/cli key create
Optionally, you can give: --force to overwrite the existing key. This command will create for you a key pair in your app, and will ask you to save the private key in a safe place. It’s recommended to not git commit the private key, and to not share it with anyone.
After your local test, remove the key from the config file and add it on the CI step with
key save
Save key in your app config
npx @capgo/cli key save
Optionally, you can give:
--key [/path/to/my/private_key] the path of your private key.
--key-data [privateKey] the private key data, if you want to use inline. This command is useful if you followed the recommendation and didn’t commit the key in your app, and in the config.
Ci integration
To automate your work, I recommend you make GitHub action do the job of pushing to our server
Our demo app
Don’t forget to configure CI env variable with your API key