
Google Login on Android
Copy a setup prompt with the install steps and the full markdown guide for this plugin.
Introduction
Section titled “Introduction”In this guide, you will learn how to setup Google Login with Capgo Social Login for Android. I assume that you have already read the general setup guide.
Using Google login on Android
Section titled “Using Google login on Android”In this part, you will learn how to setup Google login in Android.
-
Create an Android client ID.
-
Click on the search bar

-
Search for
credentialsand click on theAPIs and Servicesone (number 2 on the screenshot)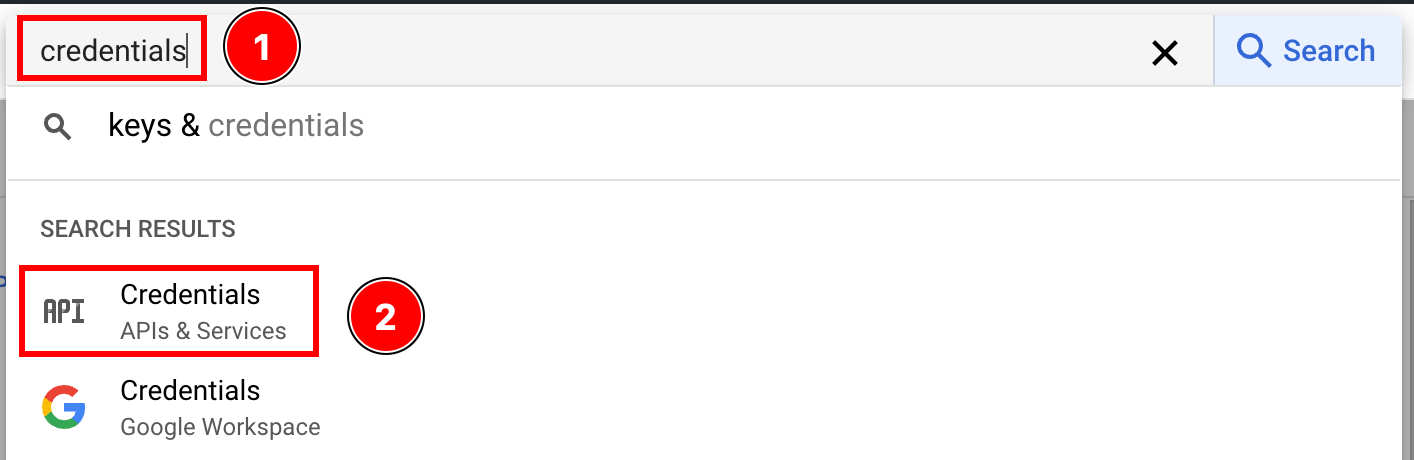
-
Click on the
create credentials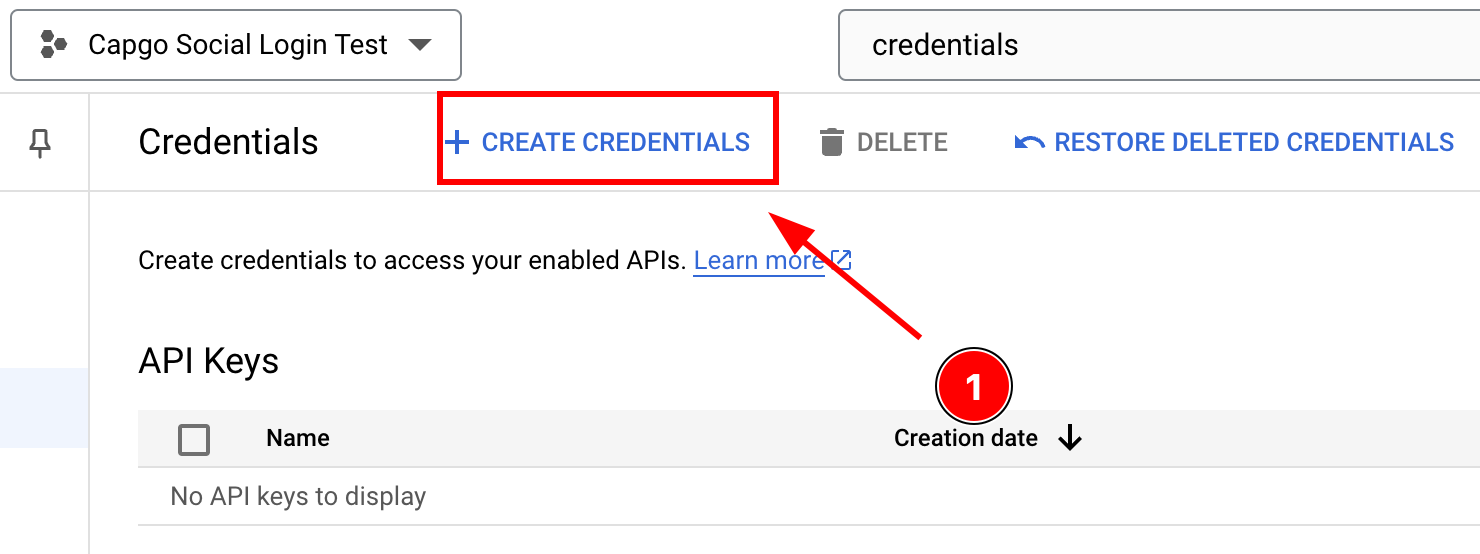
-
Select
OAuth client ID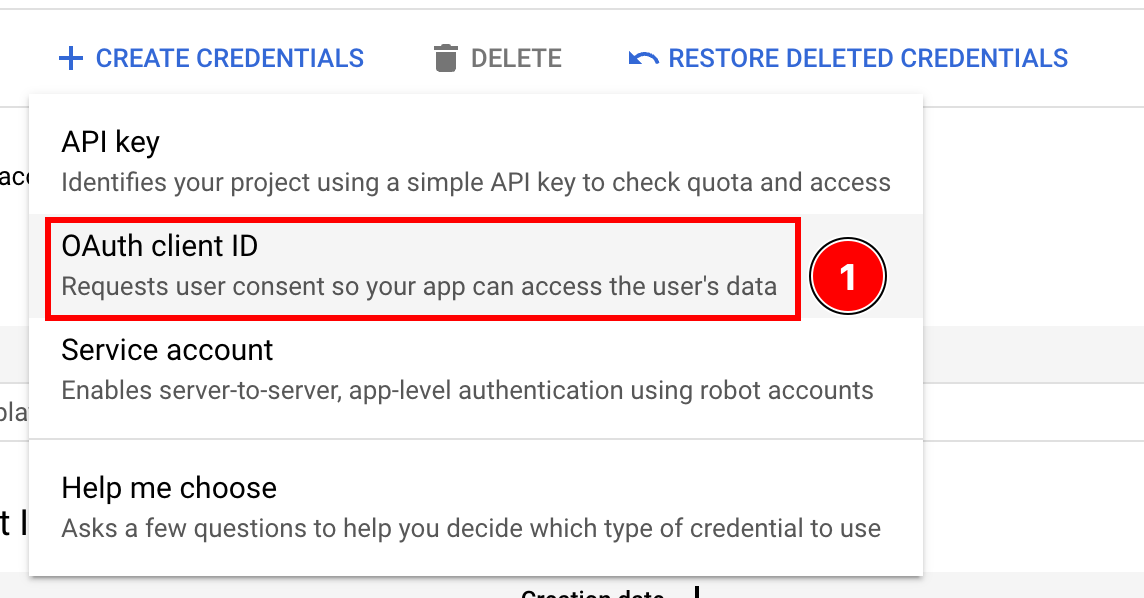
-
Select the
Androidapplication type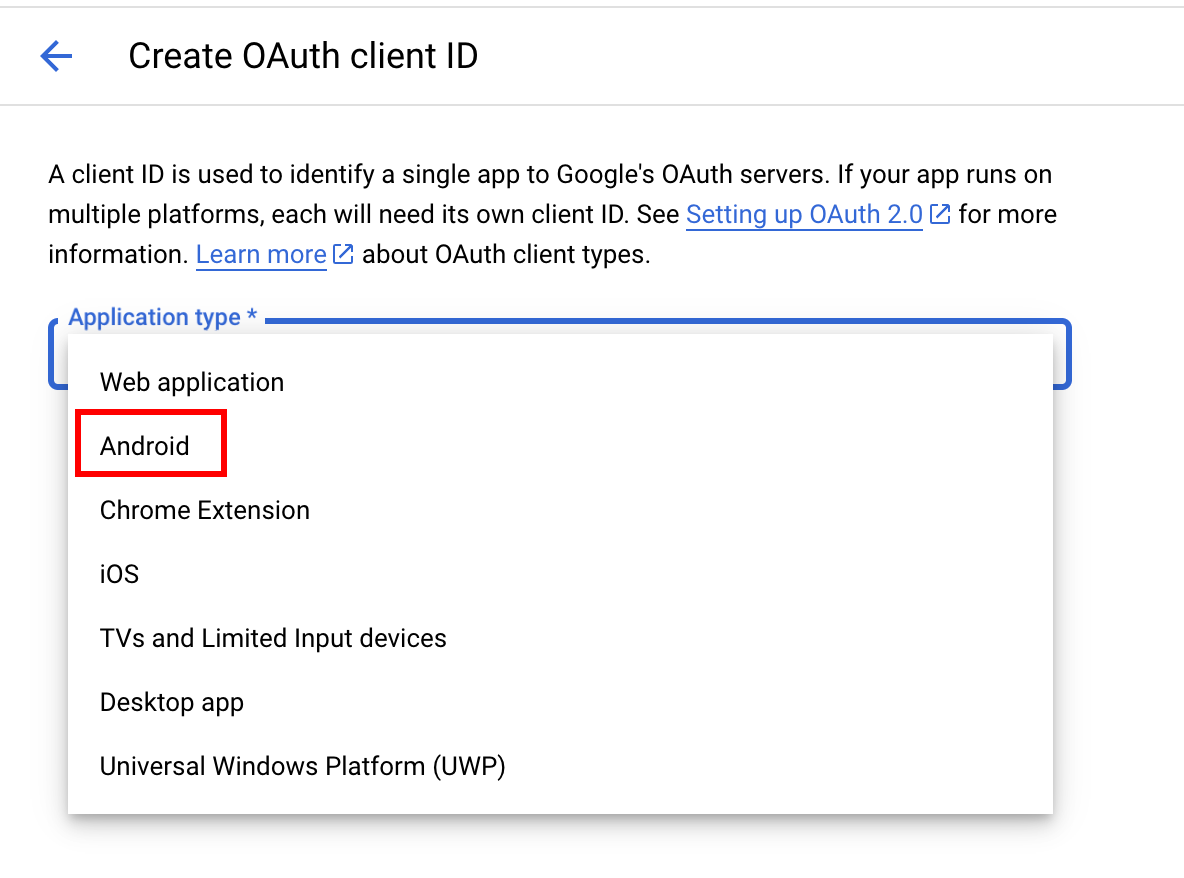
-
Open Android Studio
-
At the very bottom of the navigator, find the
Gradle Scripts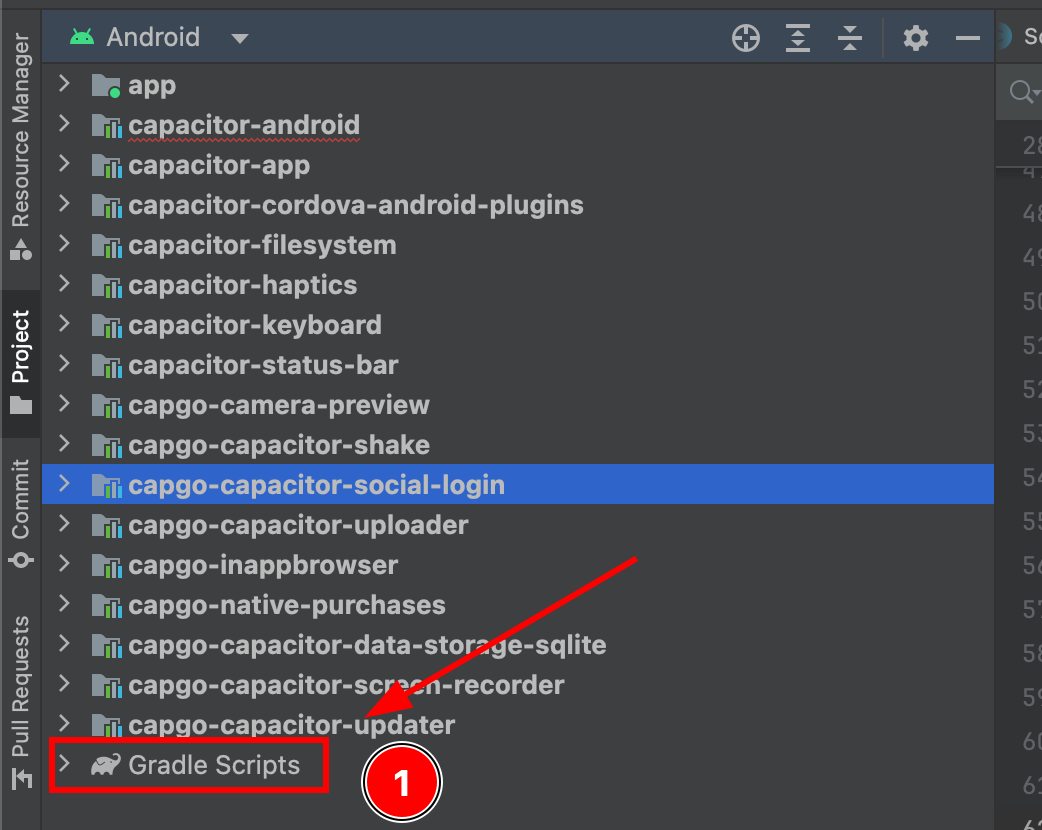
-
Find
build.gradlefor the moduleapp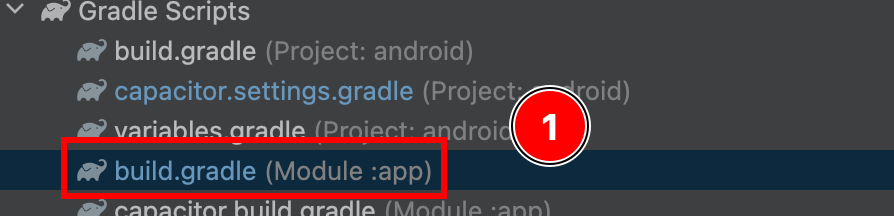
-
Copy the
android.defaultConfig.applicationId. This will be yourpackage namein the Google console
-
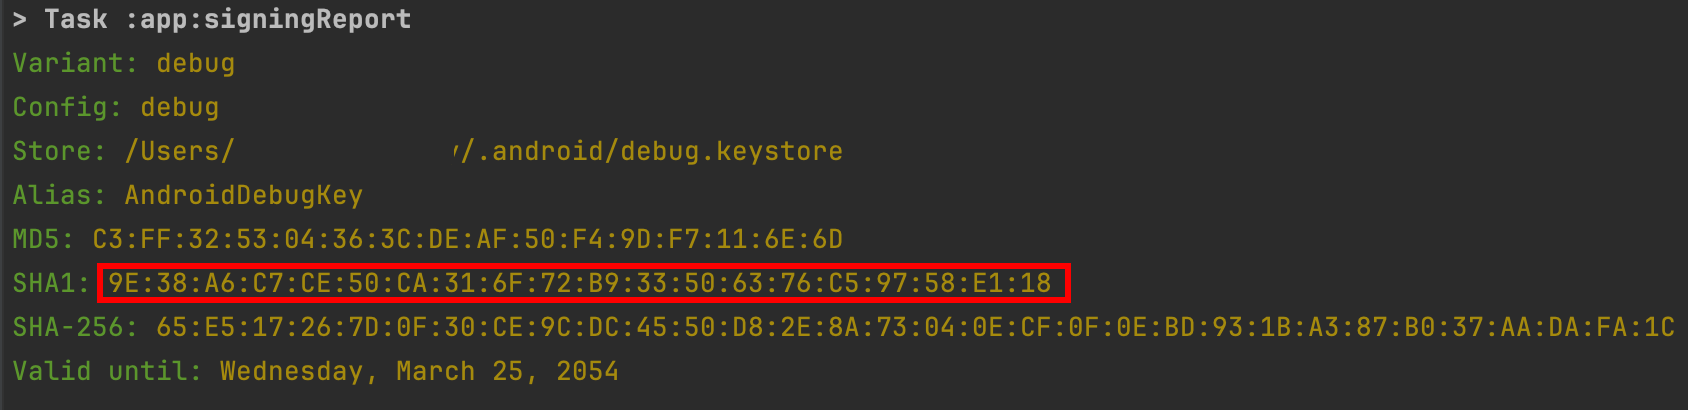
Now, open the terminal. Make sure that you are in the
androidfolder of your app and run./gradlew signInReport

- Scroll to the top of this command. You should see the following. Copy the
SHA1.
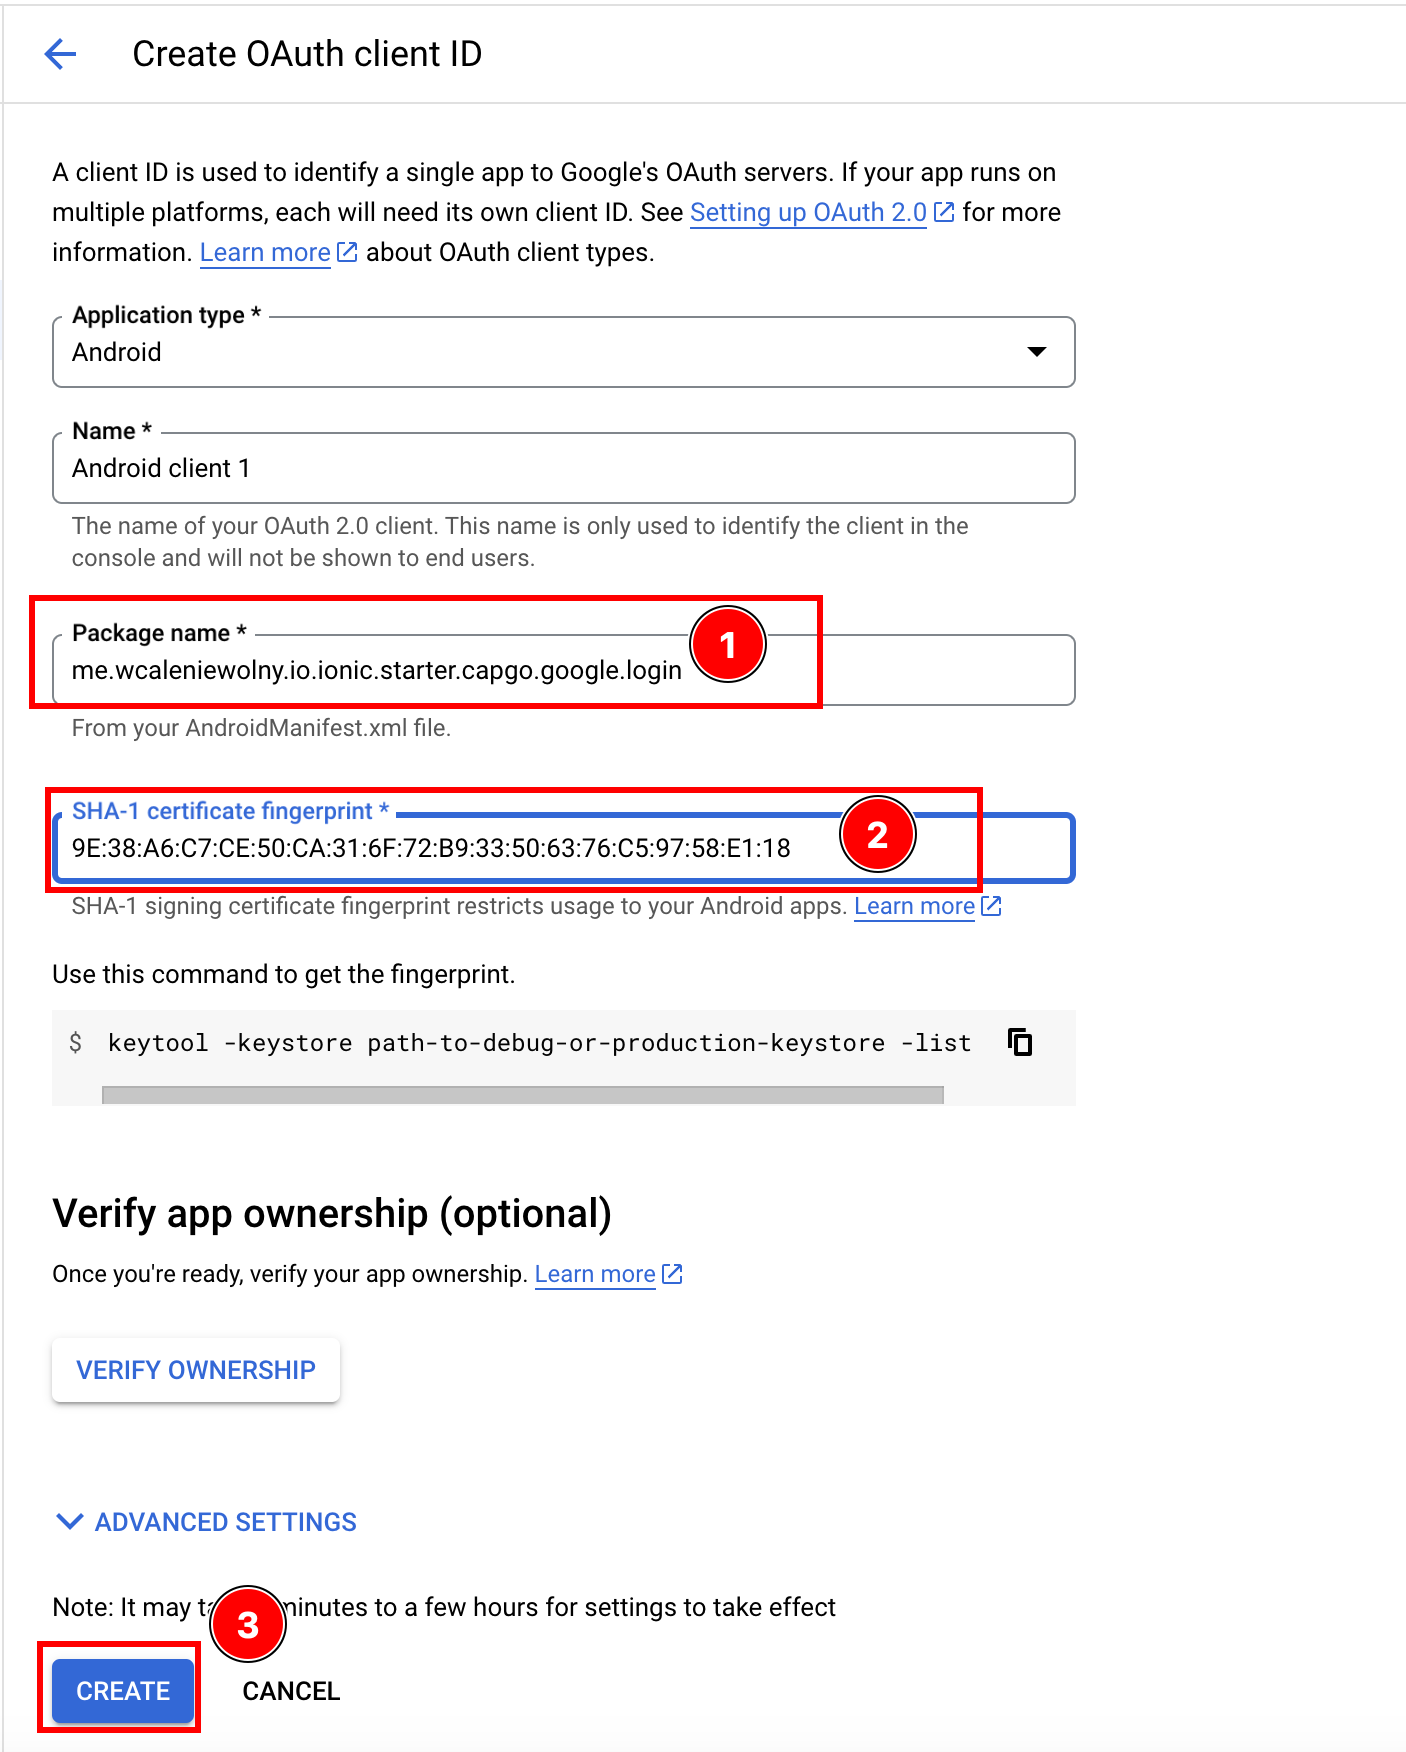
- Now, go back to the Google Console. Enter your
applicationIdas thePackage Nameand your SHA1 in the certificate field and clickcreate
-
-
Create a web client (this is required for Android)
-
Go to the
Create credentialspage in Google Console -
Set application type to
Web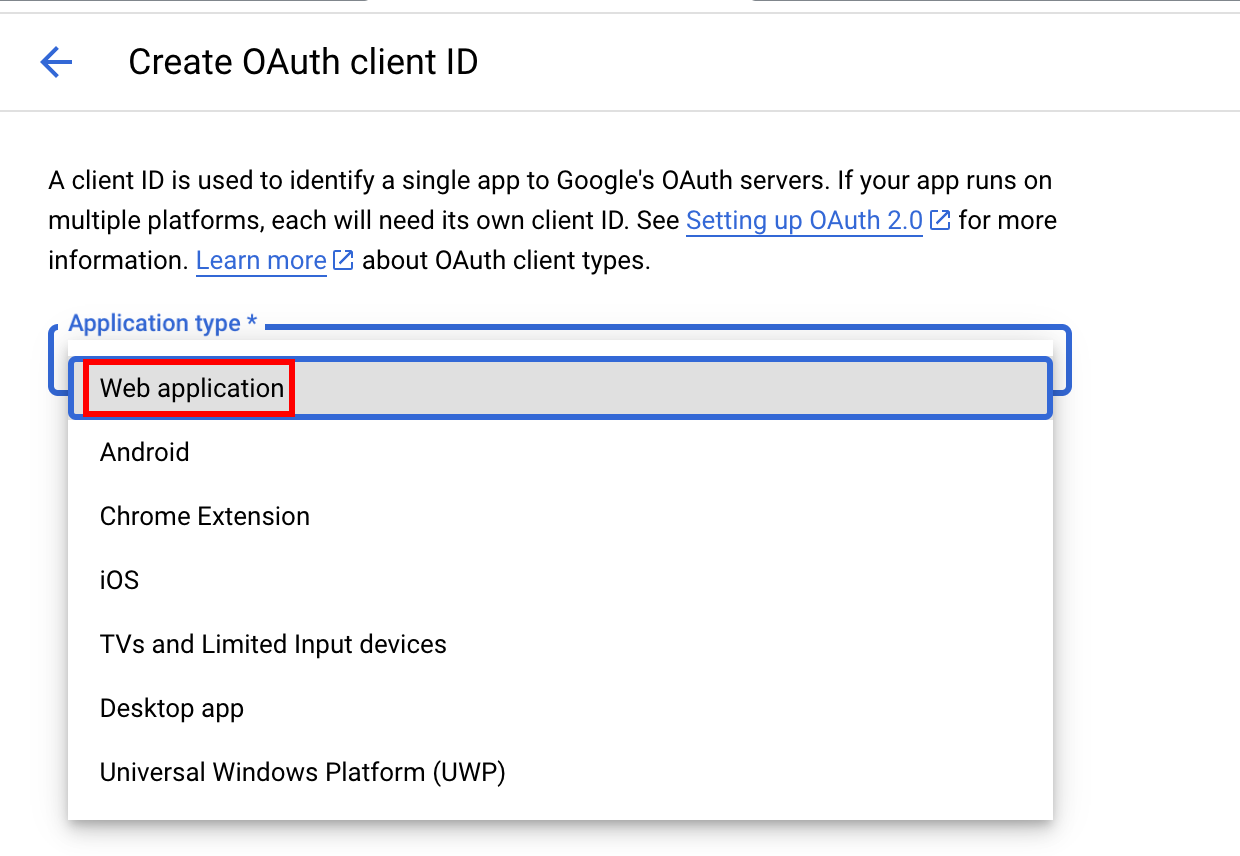
-
Click
Create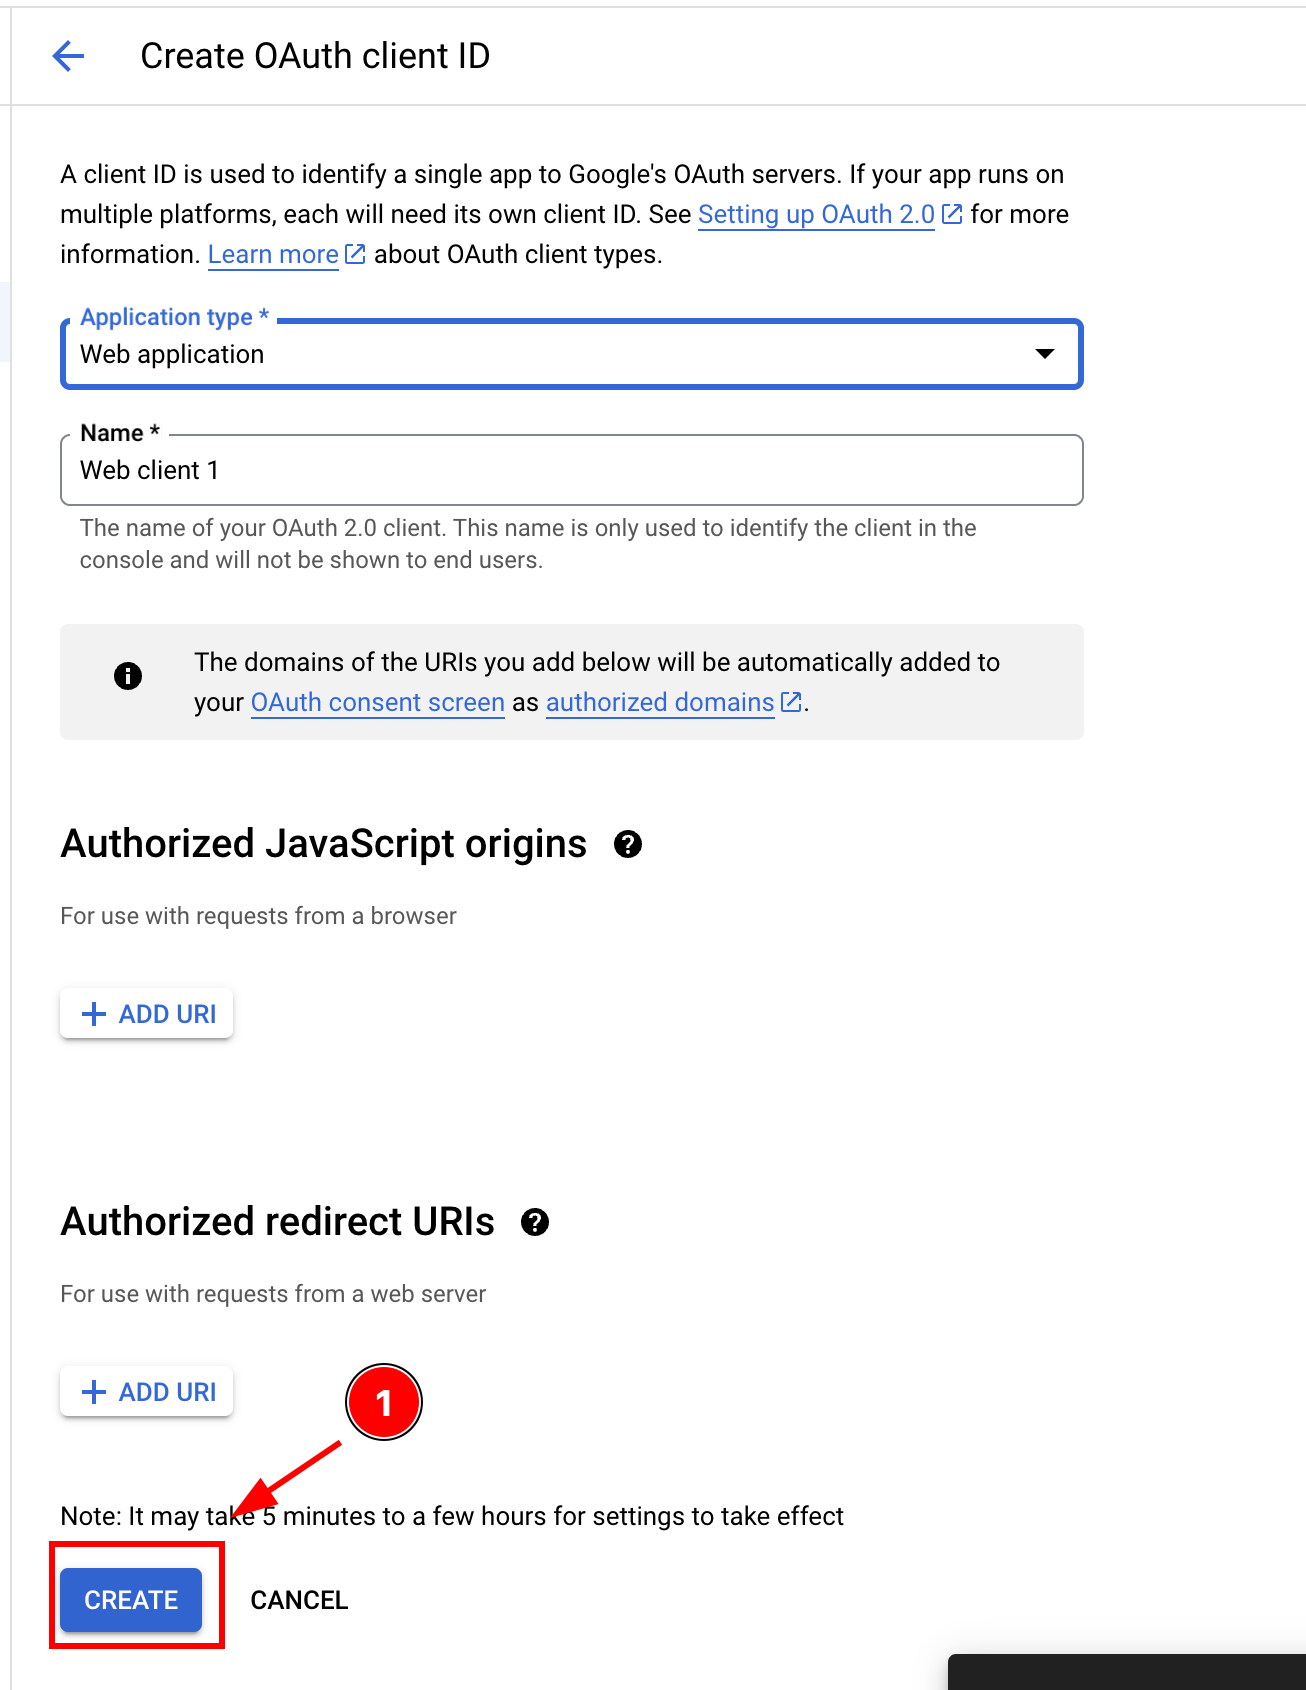
-
Copy the client ID, you’ll use this as the
webClientIdin your JS/TS code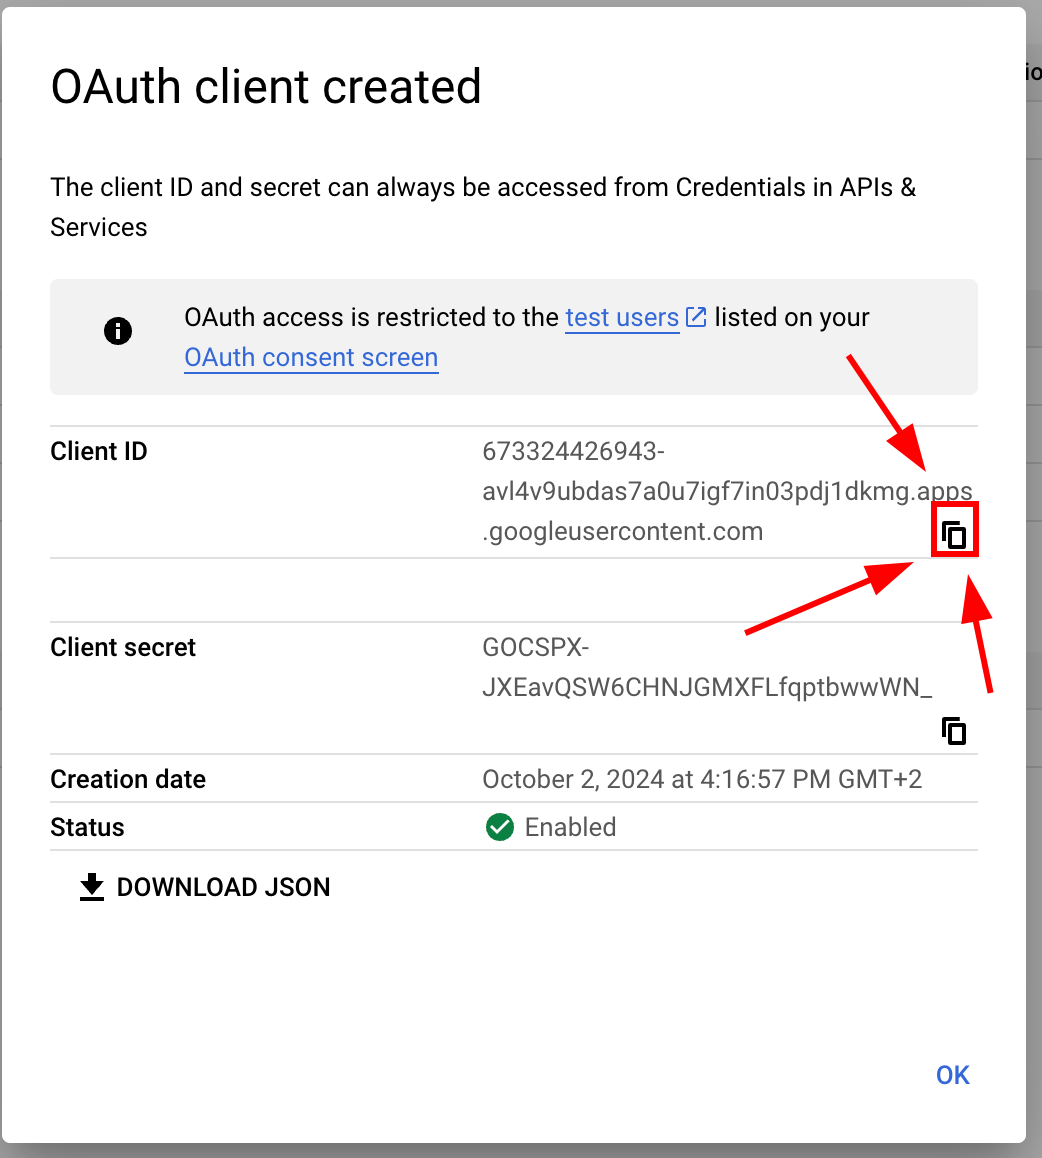
-
-
Modify your
MainActivity-
Please open your app in Android Studio. You can run
cap open android -
Find
MainActivity.java-
Open the
appfolder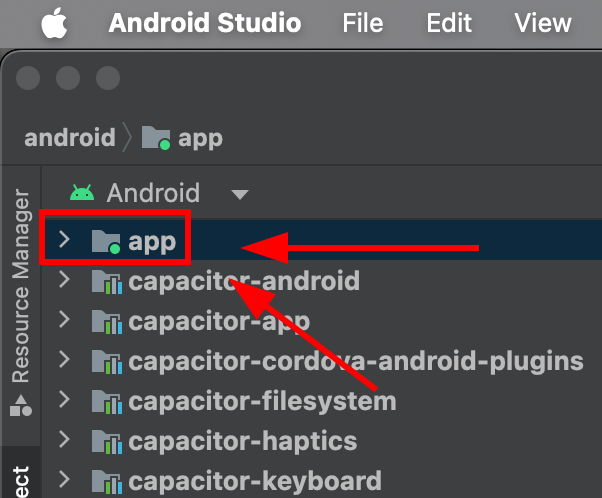
-
Find
java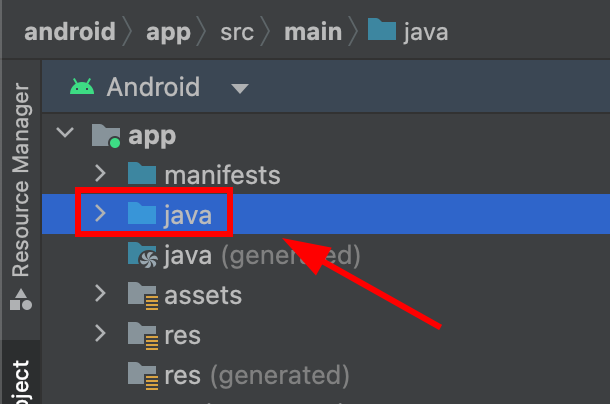
-
Find your
MainActivity.javaand click on it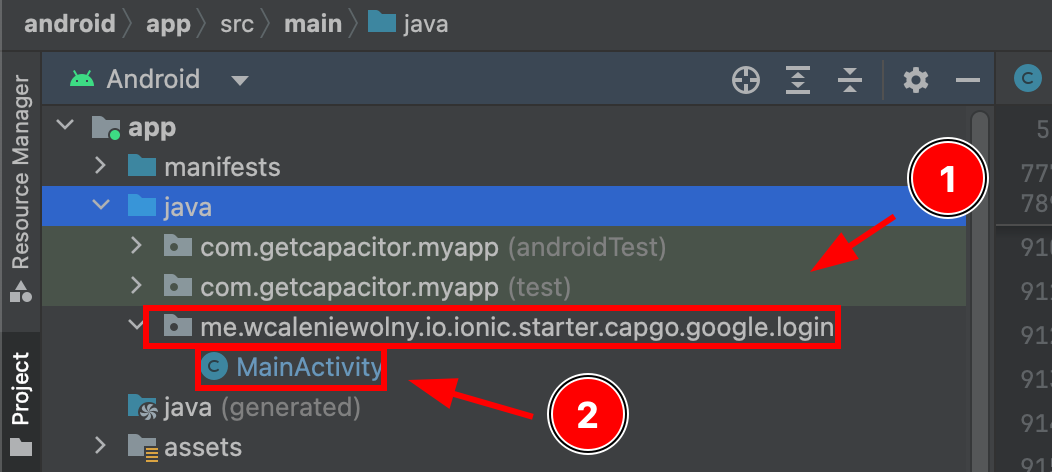
-
-
Modify
MainActivity.java. Please add the following codeimport ee.forgr.capacitor.social.login.GoogleProvider;import ee.forgr.capacitor.social.login.SocialLoginPlugin;import ee.forgr.capacitor.social.login.ModifiedMainActivityForSocialLoginPlugin;import com.getcapacitor.PluginHandle;import com.getcapacitor.Plugin;import android.content.Intent;import android.util.Log;import com.getcapacitor.BridgeActivity;// ModifiedMainActivityForSocialLoginPlugin is VERY VERY important !!!!!!public class MainActivity extends BridgeActivity implements ModifiedMainActivityForSocialLoginPlugin {@Overridepublic void onActivityResult(int requestCode, int resultCode, Intent data) {super.onActivityResult(requestCode, resultCode, data);if (requestCode >= GoogleProvider.REQUEST_AUTHORIZE_GOOGLE_MIN && requestCode < GoogleProvider.REQUEST_AUTHORIZE_GOOGLE_MAX) {PluginHandle pluginHandle = getBridge().getPlugin("SocialLogin");if (pluginHandle == null) {Log.i("Google Activity Result", "SocialLogin login handle is null");return;}Plugin plugin = pluginHandle.getInstance();if (!(plugin instanceof SocialLoginPlugin)) {Log.i("Google Activity Result", "SocialLogin plugin instance is not SocialLoginPlugin");return;}((SocialLoginPlugin) plugin).handleGoogleLoginIntent(requestCode, data);}}// This function will never be called, leave it empty@Overridepublic void IHaveModifiedTheMainActivityForTheUseWithSocialLoginPlugin() {}} -
Save the file
-
-
Use Google Login in your application
-
First, import
SocialLoginimport { SocialLogin } from '@capgo/capacitor-social-login'; -
Call initialize. This should be called only once.
// onMounted is Vue specific// webClientId is the client ID you got in the web client creation step not the android client ID.onMounted(() => {SocialLogin.initialize({google: {webClientId: '673324426943-avl4v9ubdas7a0u7igf7in03pdj1dkmg.apps.googleusercontent.com',}})}) -
Call
SocialLogin.login. Create a button and run the following code on click.const res = await SocialLogin.login({provider: 'google',options: {}})// handle the responseconsole.log(JSON.stringify(res))
-
-
Configure the emulator for testing
-
Go into
Device managerand click the plus button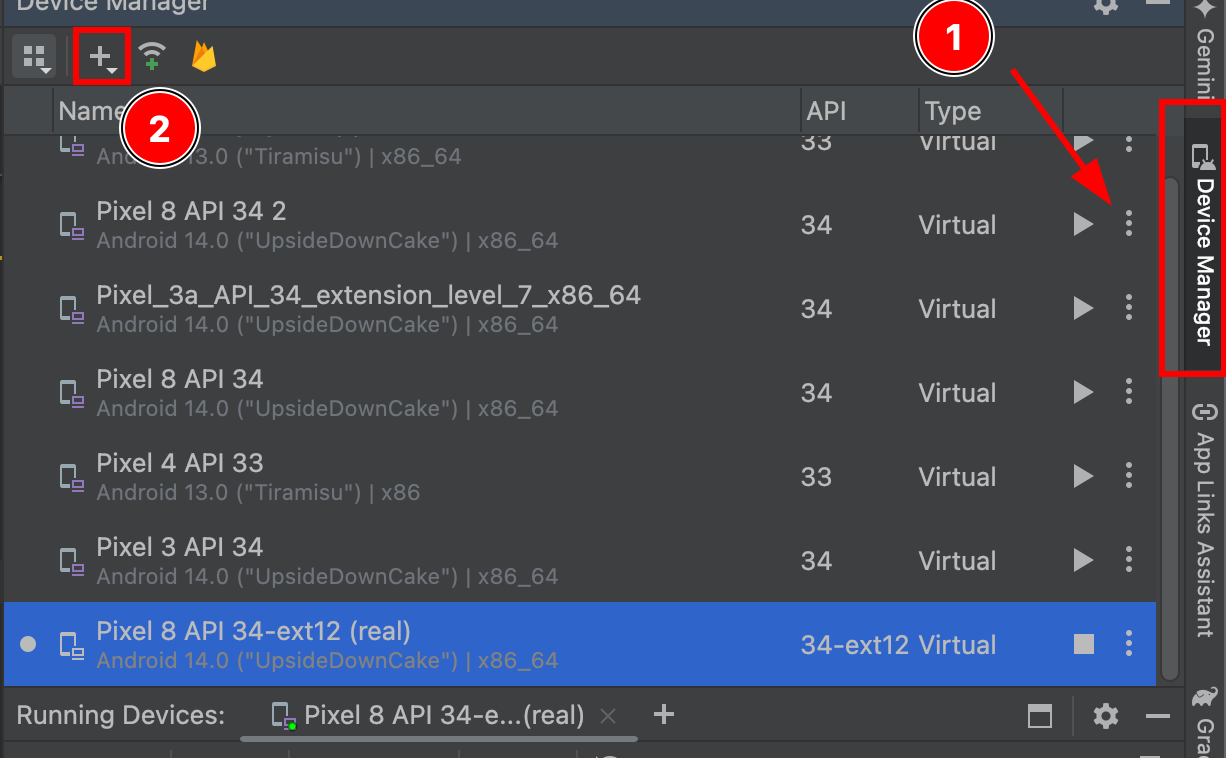
-
Create a virtual device
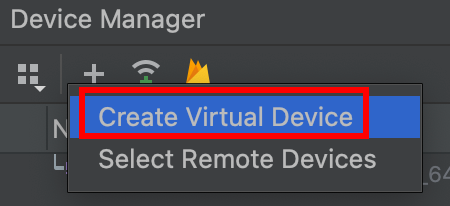
-
Select any device with a
Play Storeicon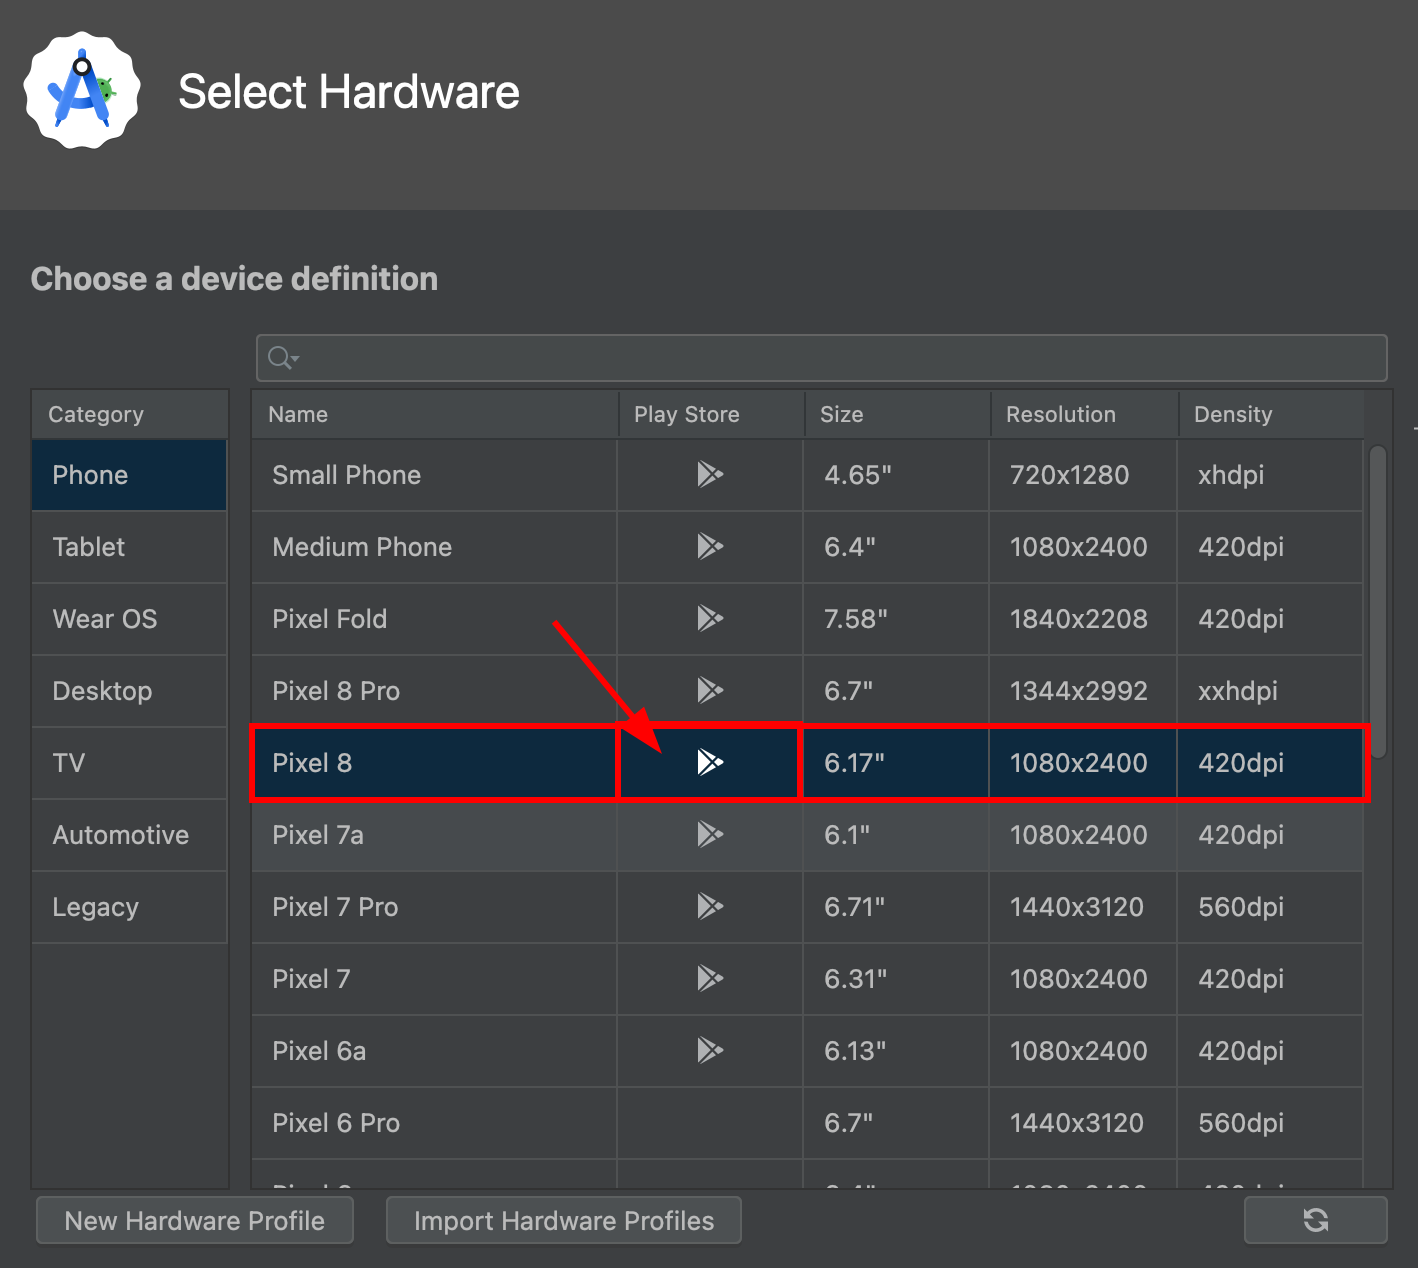
As you can see, the
pixel 8supports thePlay Storeservices -
Click
next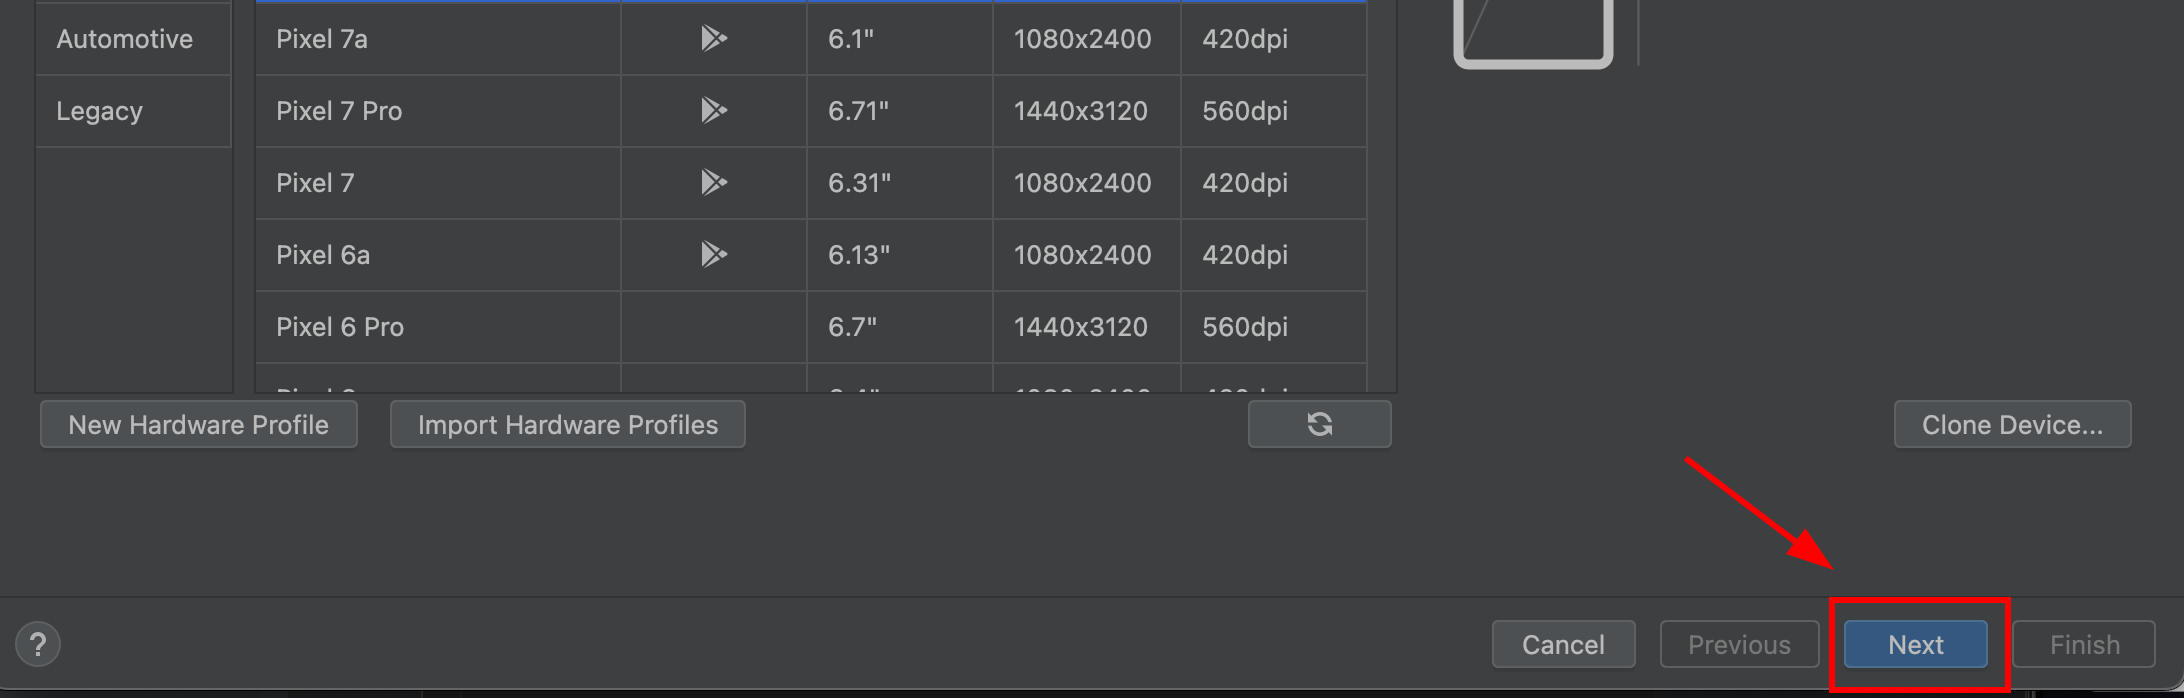
-
Make sure that the OS image is of type
Google Play. IT MUST be of typeGoogle Play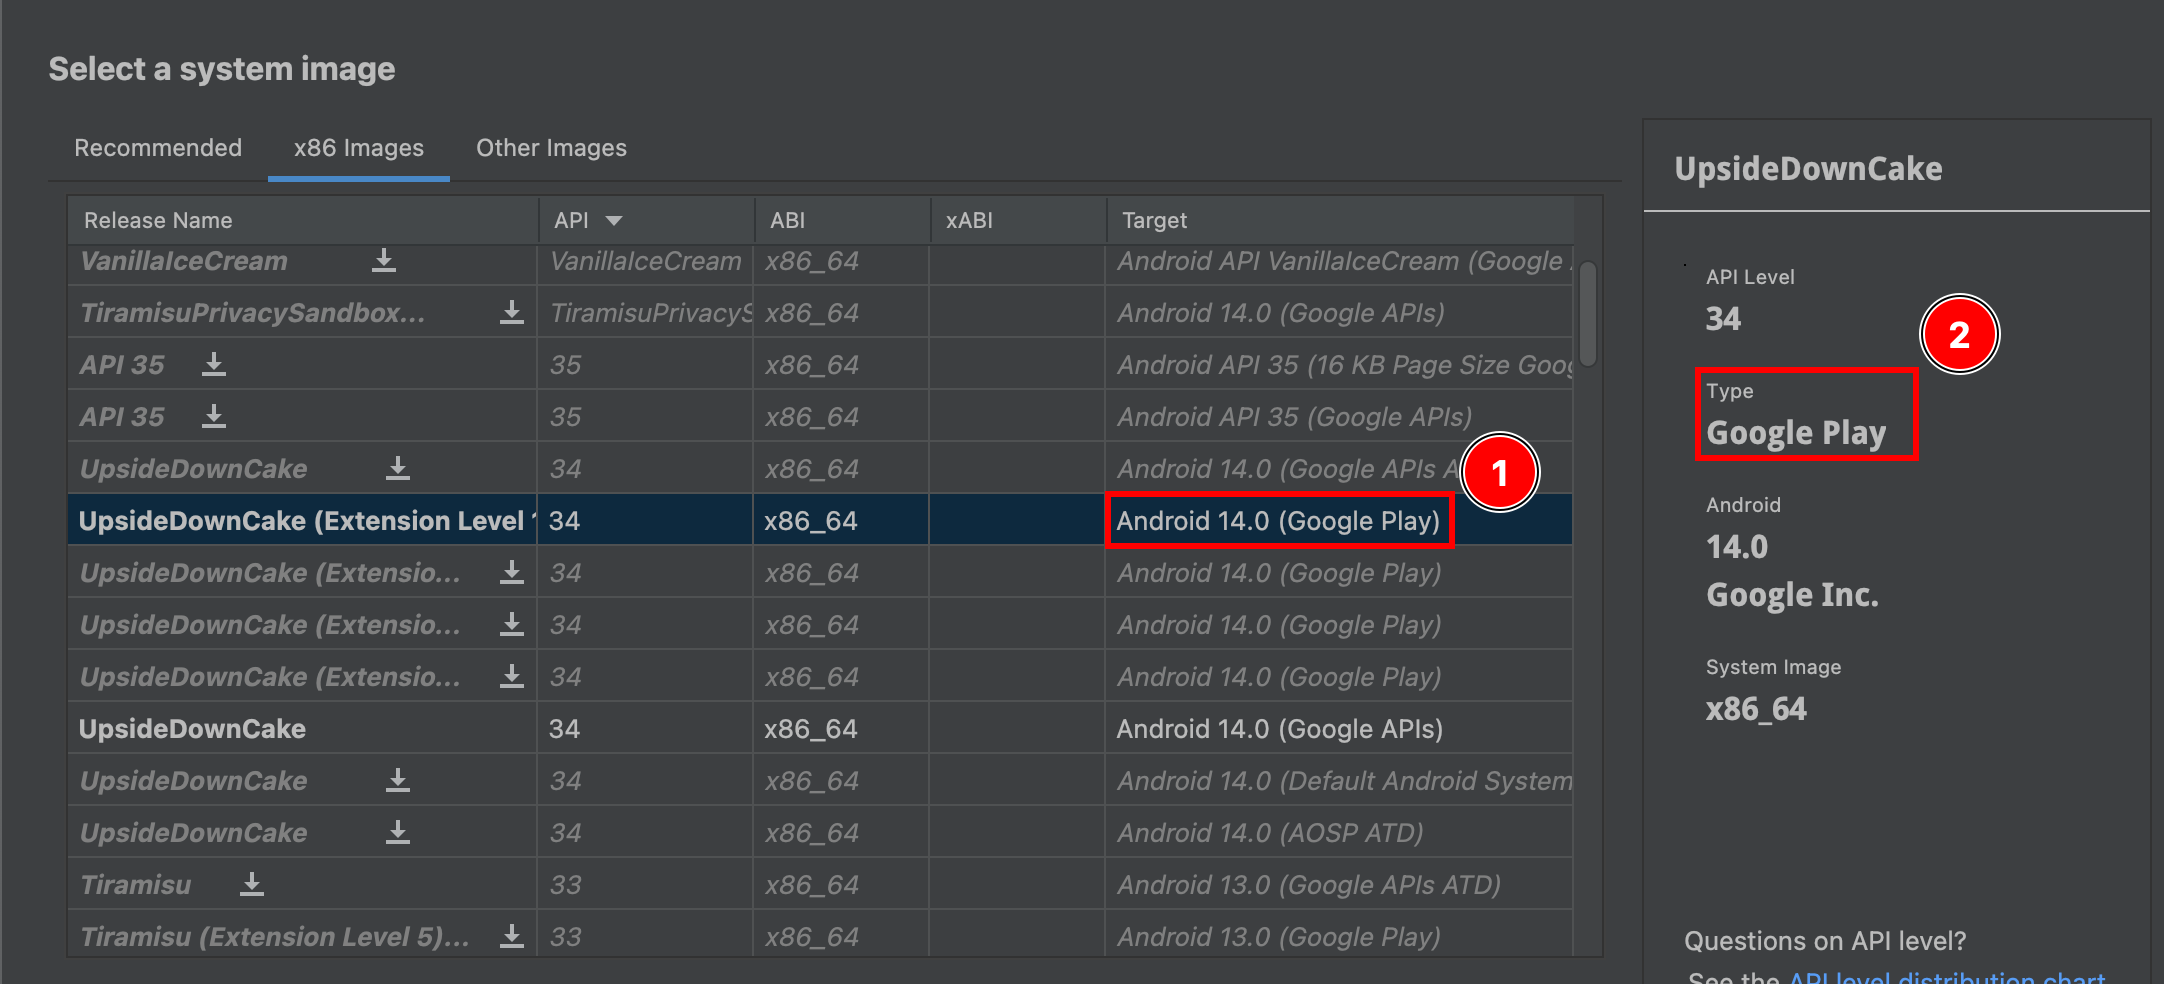
-
Click next
-
Confirm your device. You can name your emulator as you prefer
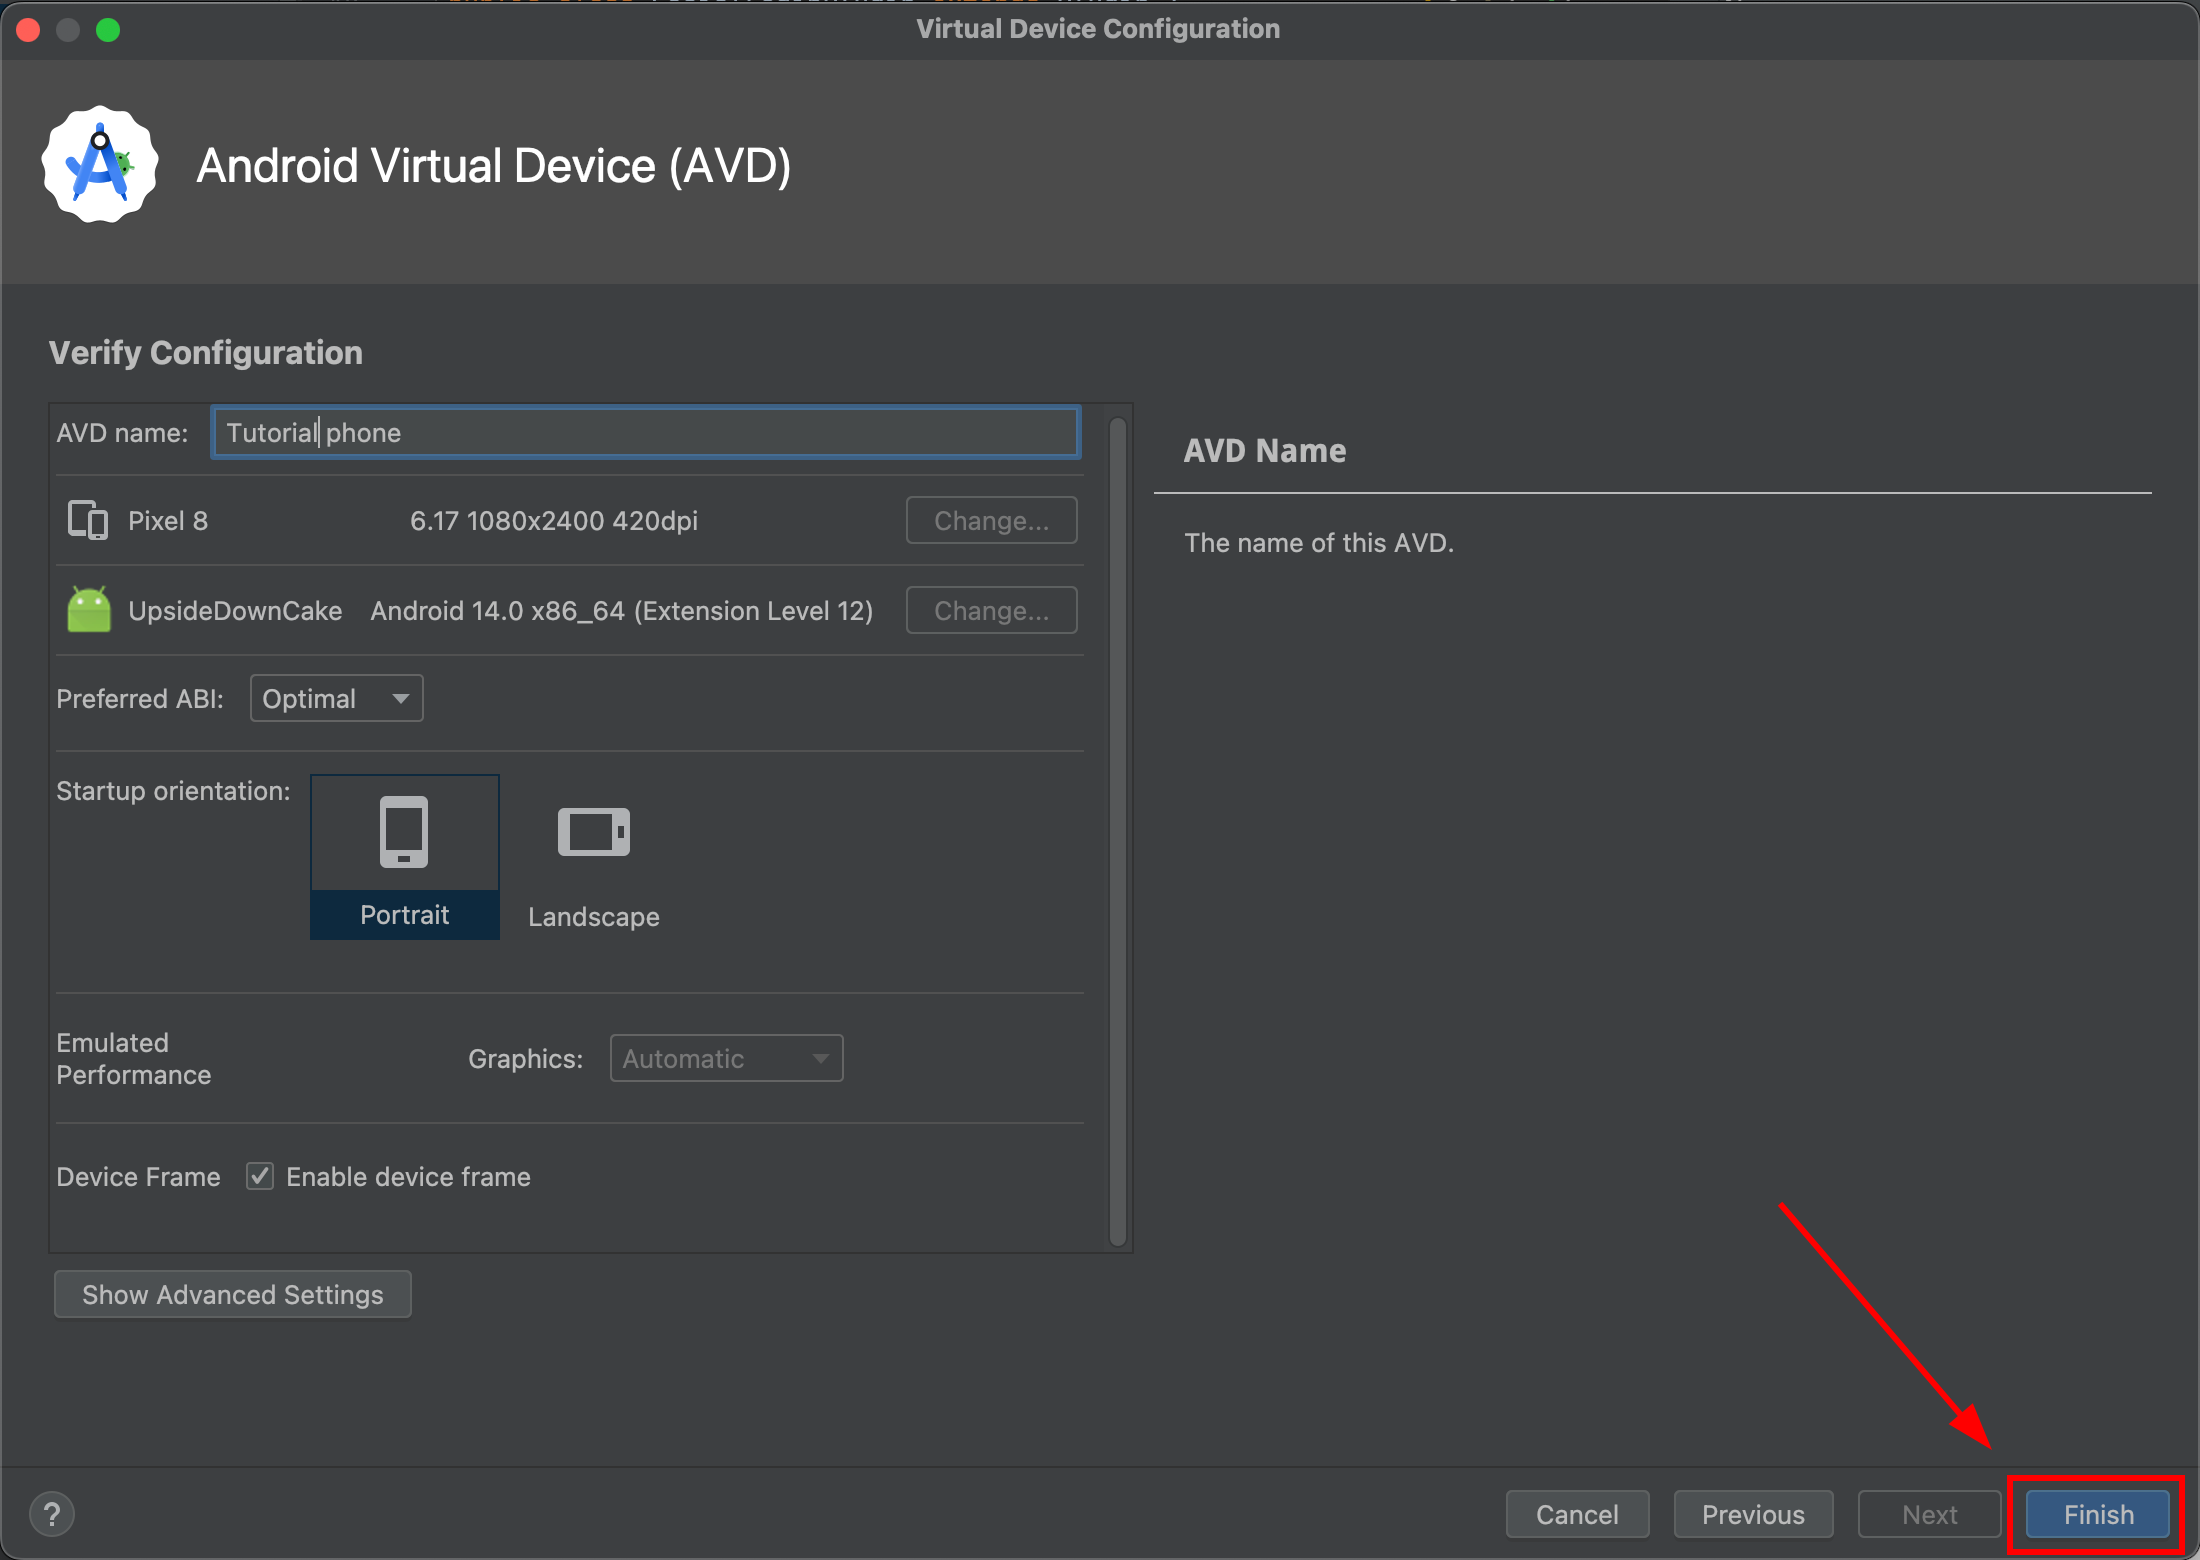
-
Go into
Device Managerand boot up your simulator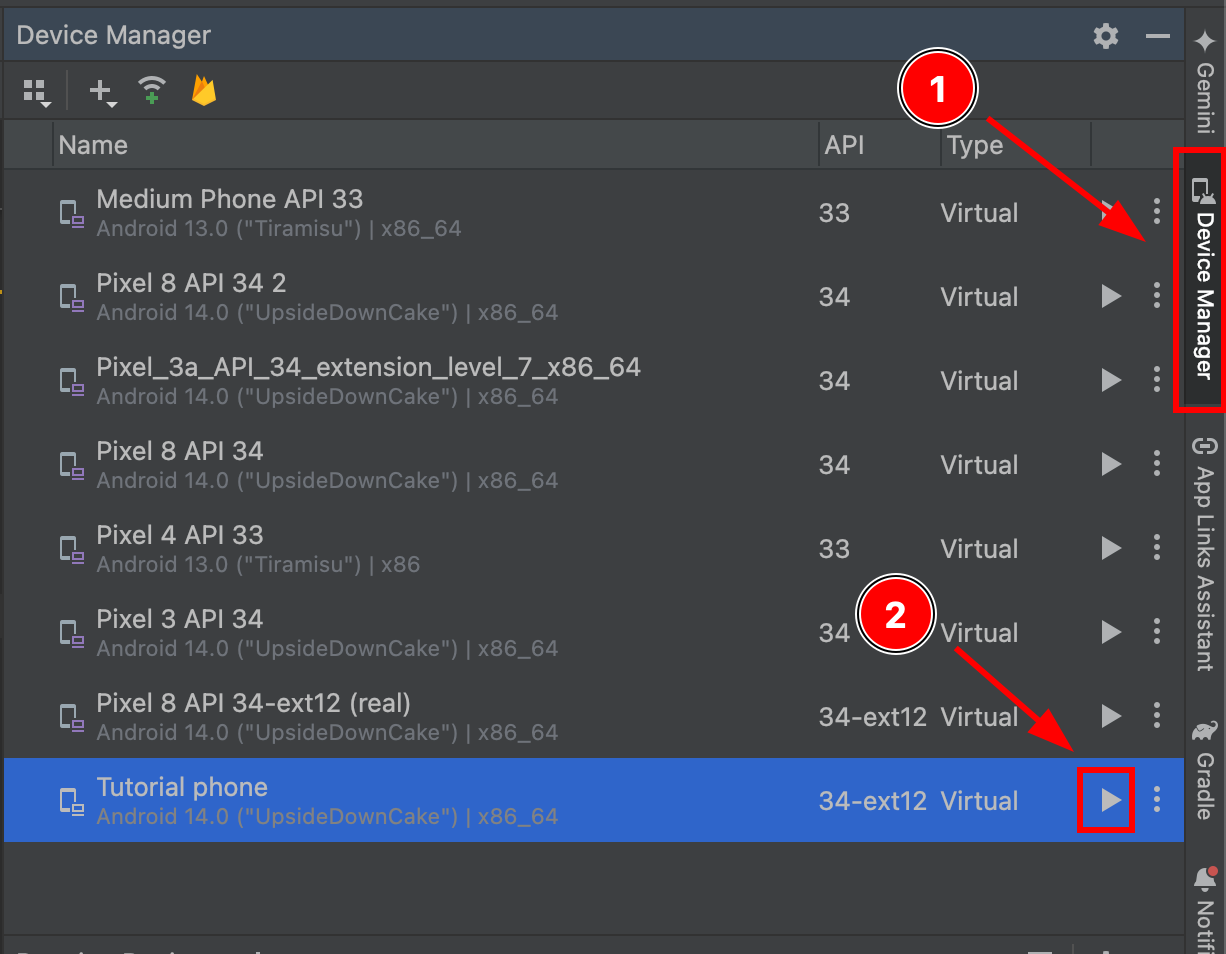
-
After the simulator boots up, go into its settings
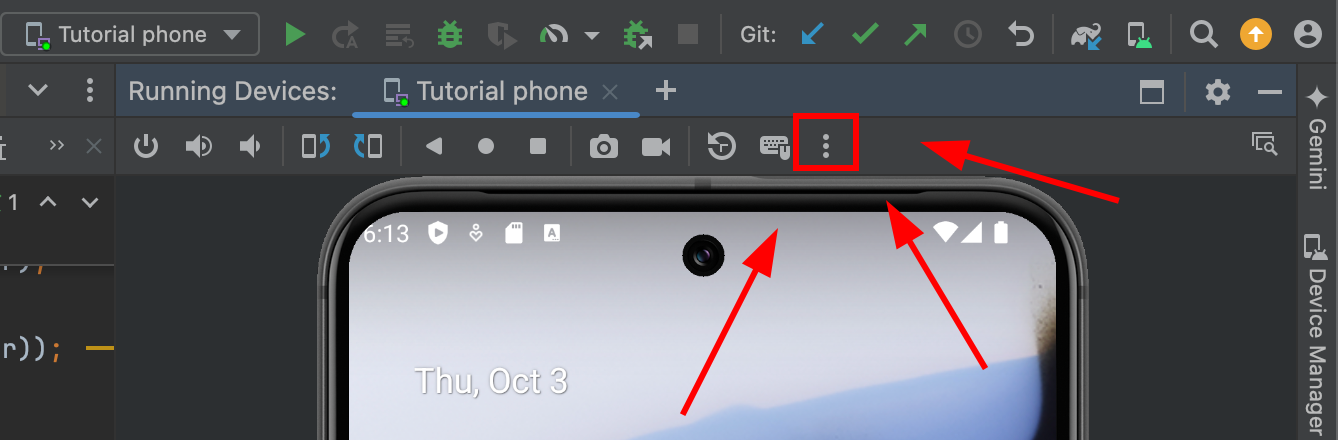
-
Go into
Google Play
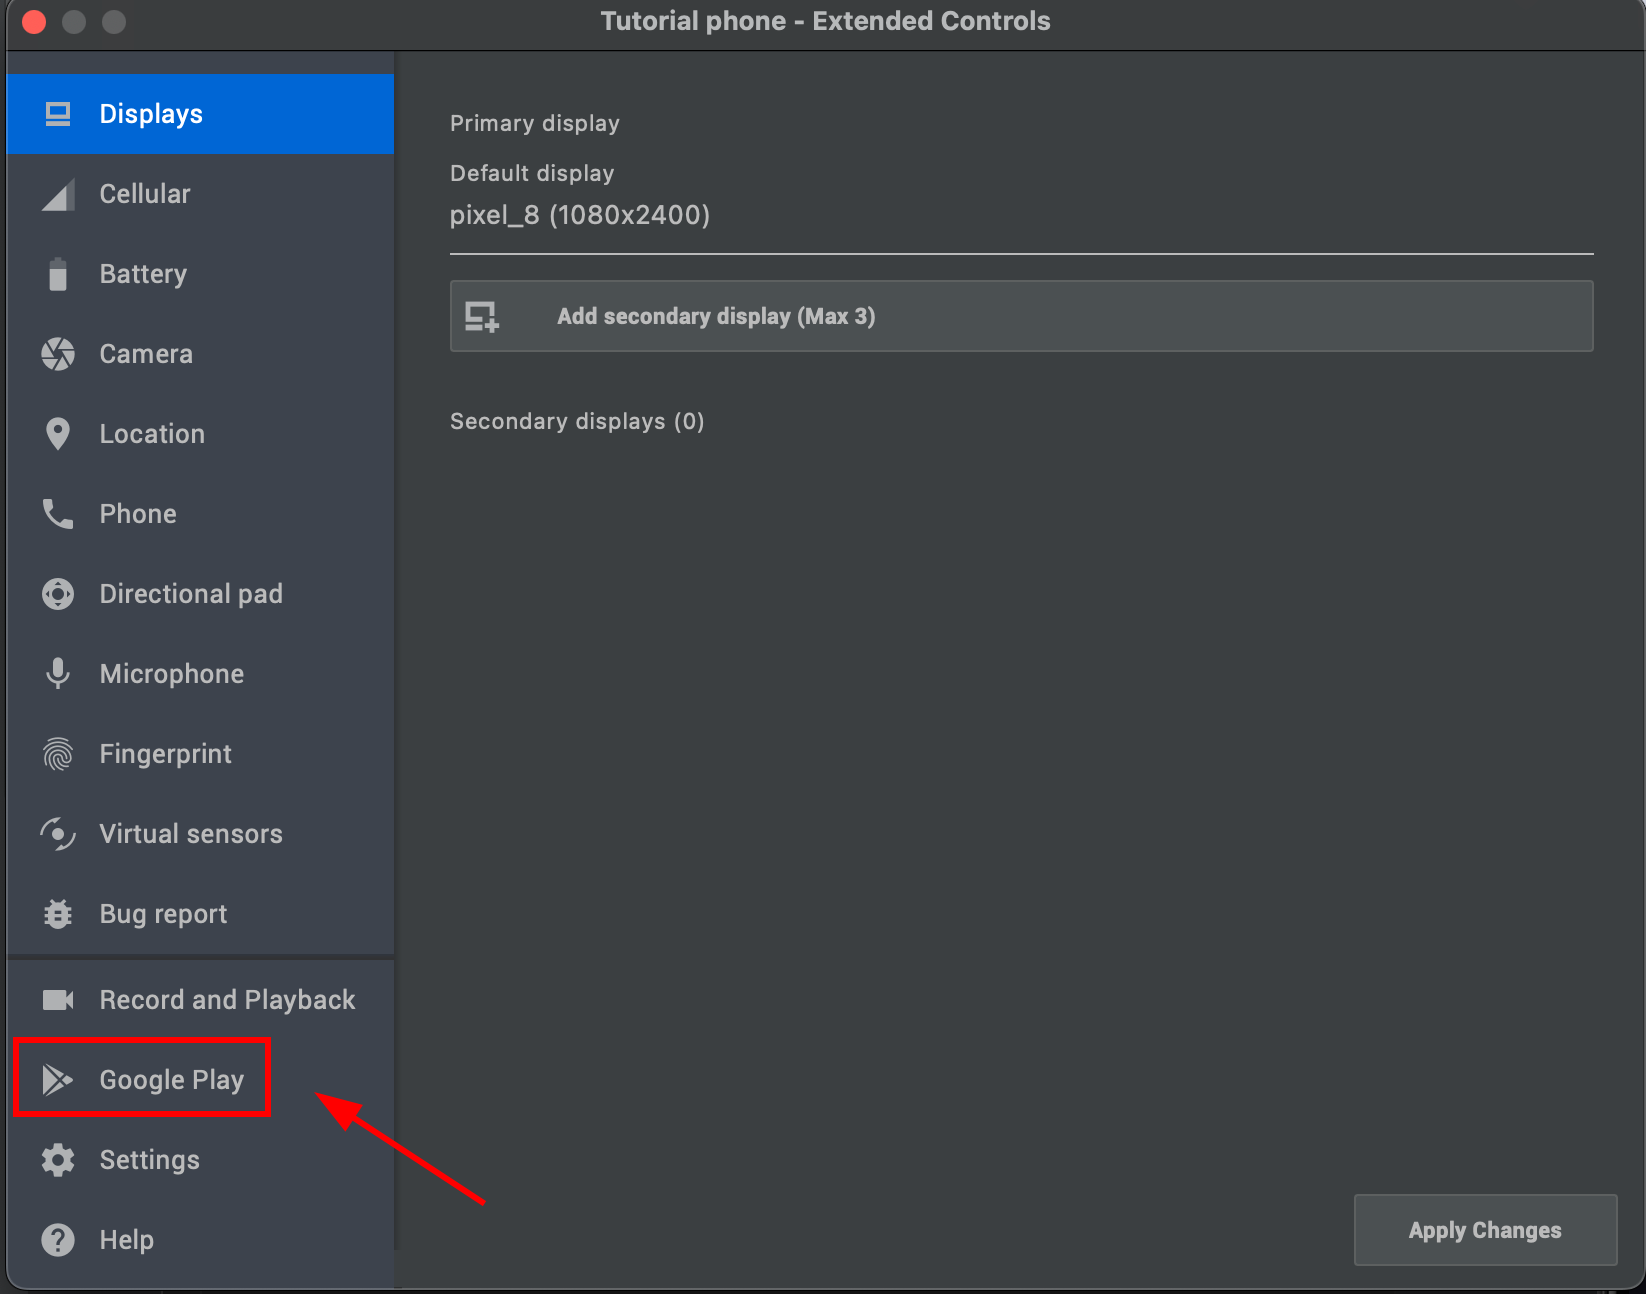
- Click
Updateand wait about 60 seconds
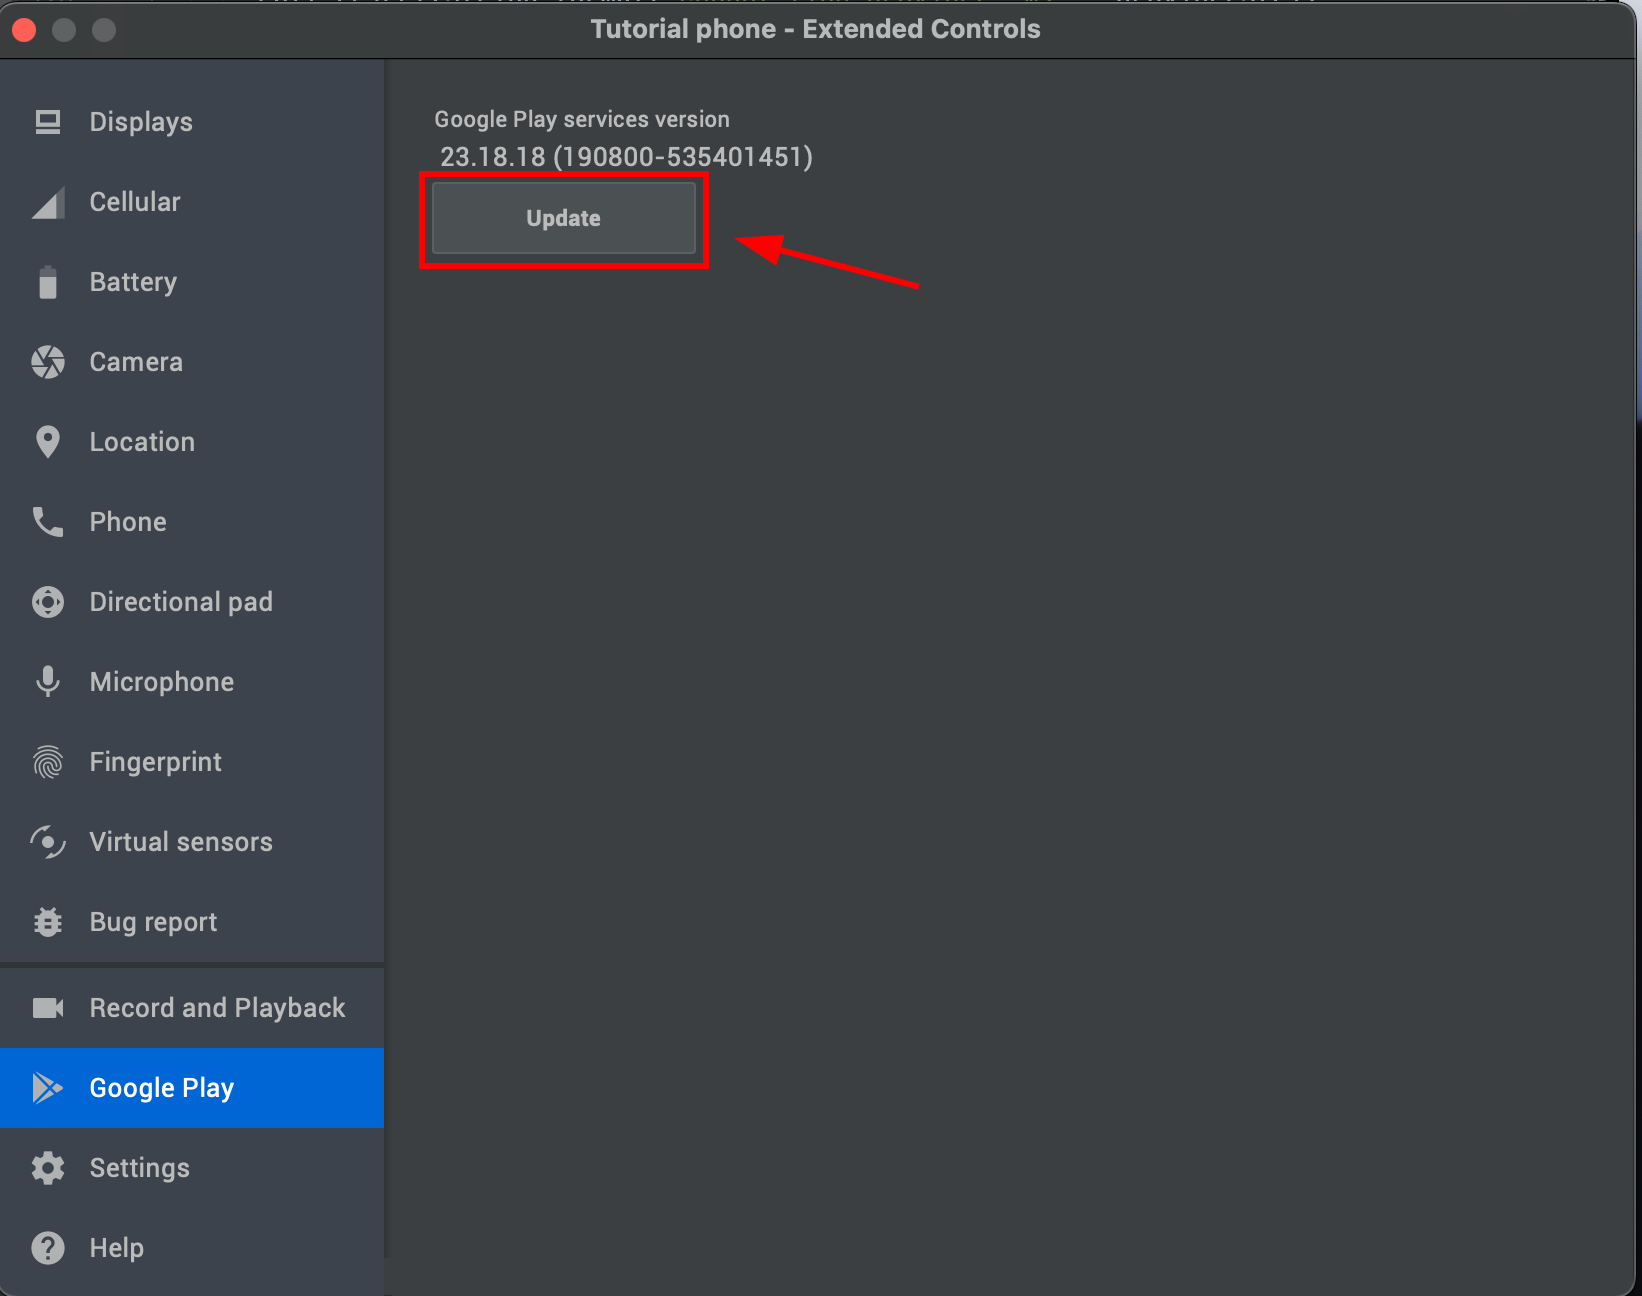
-
-
Test your application

If you did everything correctly, you should see the Google login flow working properly:
Troubleshooting
Section titled “Troubleshooting”If you have any issues, first compare your app configuration with the Google Cloud Console values. Android Google Sign-In failures are usually caused by a package name, SHA-1, or client ID mismatch.
Credential Manager, SHA-1, and Firebase
Section titled “Credential Manager, SHA-1, and Firebase”On Android this plugin uses Google Credential Manager (androidx.credentials and Sign in with Google), not the legacy GoogleSignInClient API. Logcat errors such as GetCredentialCustomException: [28444] Developer console is not set up correctly come from that stack.
Filter Logcat with GoogleProvider or CapgoSocialLogin after a failed login. The plugin logs your package name, signing SHA-1, and a masked webClientId so you can compare them against Google Cloud Console.
Required Google Cloud setup
Section titled “Required Google Cloud setup”You need two kinds of OAuth 2.0 client IDs in the same Google Cloud project:
| Client type | Used for | Where it goes |
|---|---|---|
| Web application | Server / ID token audience | webClientId in SocialLogin.initialize() |
| Android, one per signing key | Proves your APK is allowed to call Google | Google Cloud Console only. Do not pass this ID to webClientId |
A common mistake is using the Android client ID as webClientId. Credential Manager requires the Web client ID there. The Android client only needs the correct package name and SHA-1 registered in the console.
Create one Android OAuth client for each certificate that signs builds you test:
- Debug: from
./gradlew signingReportfor the debug variant. - Release: from the APK or AAB you actually install.
- Play App Signing: from Play Console > App integrity > App signing key certificate. This is required for Play Store builds even if your upload key SHA-1 is already registered.
The applicationId in android/app/build.gradle must exactly match the Android OAuth client package name, including any .debug suffix.
If the OAuth consent screen is in Testing mode, add every Google account you test with under Audience > Test users. Publishing the app to Production is not required for email and profile scopes. Digital Asset Links (assetlinks.json) are not required for Sign in with Google through Credential Manager.
Google Cloud changes can take up to a few hours to propagate.
Error 28444: Developer console is not set up correctly
Section titled “Error 28444: Developer console is not set up correctly”This almost always means Google rejected the combination of installed APK signing certificate, package name, and webClientId. Work through this checklist:
- Confirm
webClientIdis the Web application client ID and ends with.apps.googleusercontent.com. - Run the app, reproduce the failure, and read Logcat for
GoogleProvider,signingSha1=, andpackage=. - In Google Cloud Console > Credentials, open your Android OAuth client and verify the exact package name and SHA-1.
- If testing a release build, register the SHA-1 from that build, not only the debug keystore.
- If the app is distributed through Play Store, also register the Play App Signing SHA-1.
- Ensure Web and Android clients live in the same Google Cloud project.
- If the consent screen is in Testing, confirm the Google account is a test user.
- Wait and retry after console changes.
USER_CANCELLED after picking an account on a misconfigured debug build can still be a SHA-1 or client ID mismatch. Fix the console setup above first.
Extract SHA-1 from the build you install
Section titled “Extract SHA-1 from the build you install”Debug or local builds:
cd android && ./gradlew signingReportSigned release APK:
keytool -printcert -jarfile android/app/release/app-release.apkAdd that SHA-1 to an Android OAuth client with the matching package name, reinstall the same signed APK, and test again:
adb install android/app/release/app-release.apkReading the login result
Section titled “Reading the login result”Tokens are nested under result:
const login = await SocialLogin.login({ provider: 'google' });const idToken = login.result?.idToken;For Firebase Auth, create credentials with that idToken and use the Web client ID as webClientId in initialize.
If you cannot get the development SHA-1 certificate, try a custom keystore. This issue comment explains how to add a keystore to your project.
Keep going from Google Login on Android
Section titled “Keep going from Google Login on Android”If you are using Google Login on Android to plan authentication and account flows, connect it with Using @capgo/capacitor-social-login for the native capability in Using @capgo/capacitor-social-login, @capgo/capacitor-social-login for the implementation detail in @capgo/capacitor-social-login, @capgo/capacitor-passkey for the implementation detail in @capgo/capacitor-passkey, @capgo/capacitor-native-biometric for the implementation detail in @capgo/capacitor-native-biometric, and Two-factor authentication for the implementation detail in Two-factor authentication.
Ship Capacitor apps without the wait
Build with your AI coding agent, ship fixes in minutes, build iOS and Android without a Mac, and observe every release.


Enterprise needs? Talk to our team