
안드로이드에서 Google 로그인
이 플러그인의 설치 단계와 전체 마크다운 가이드를 포함한 설정 명령어를 복사하세요.
소개
소개 섹션이 가이드에서 Capgo Android용 Social Login을 설정하는 방법을 배울 것입니다. 이 가이드를 읽기 전에 이미 일반 설정 가이드를 읽었다고 가정합니다. 일반 설정 가이드.
안드로이드에서 Google 로그인 사용
안드로이드에서 Google 로그인 사용하는 방법이 부분에서, Android에서 Google 로그인을 설정하는 방법을 배울 것입니다.
-
Android 클라이언트 ID를 만들려면
-
검색 바 클릭

-
검색하여
credentials그리고 Google 콘솔의APIs and Services(스크린샷의 2번)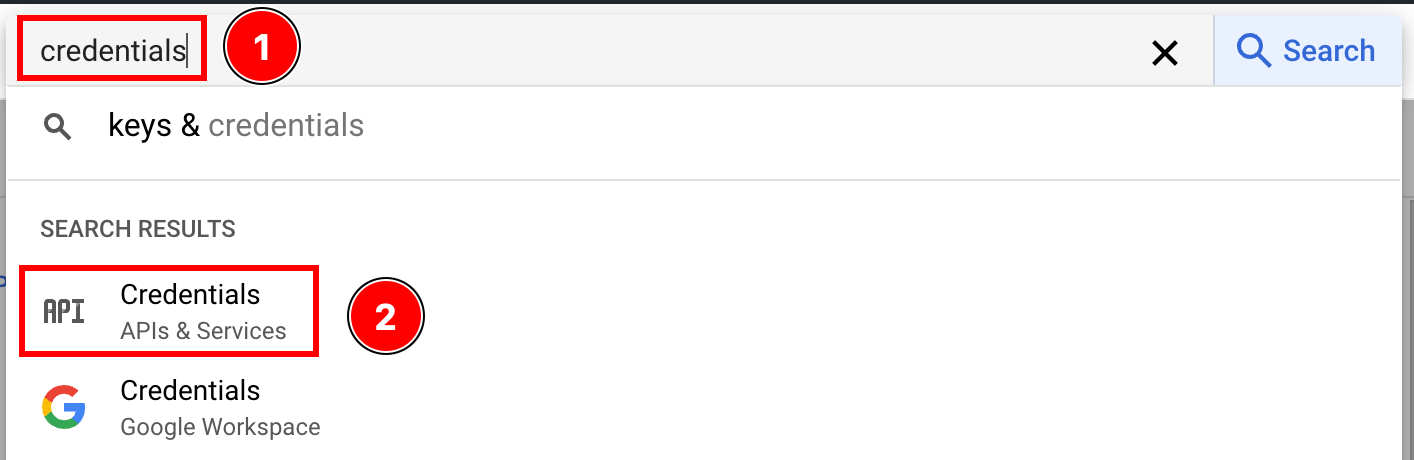
-
Google 콘솔의
create credentials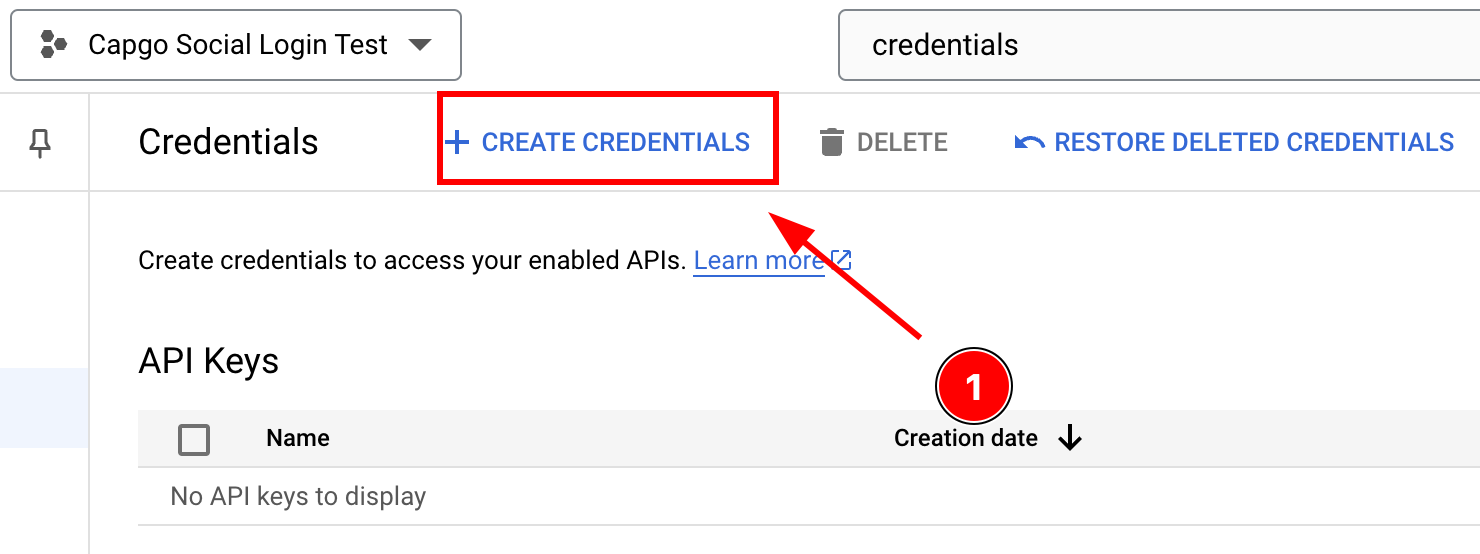
-
선택
OAuth client ID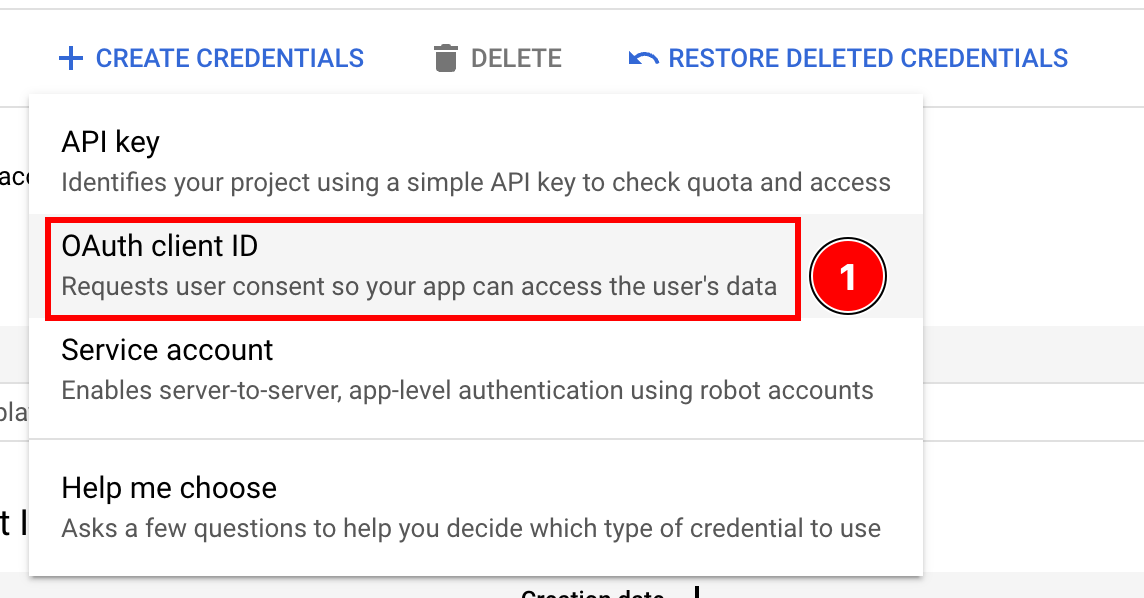
-
선택하세요
Android애플리케이션 유형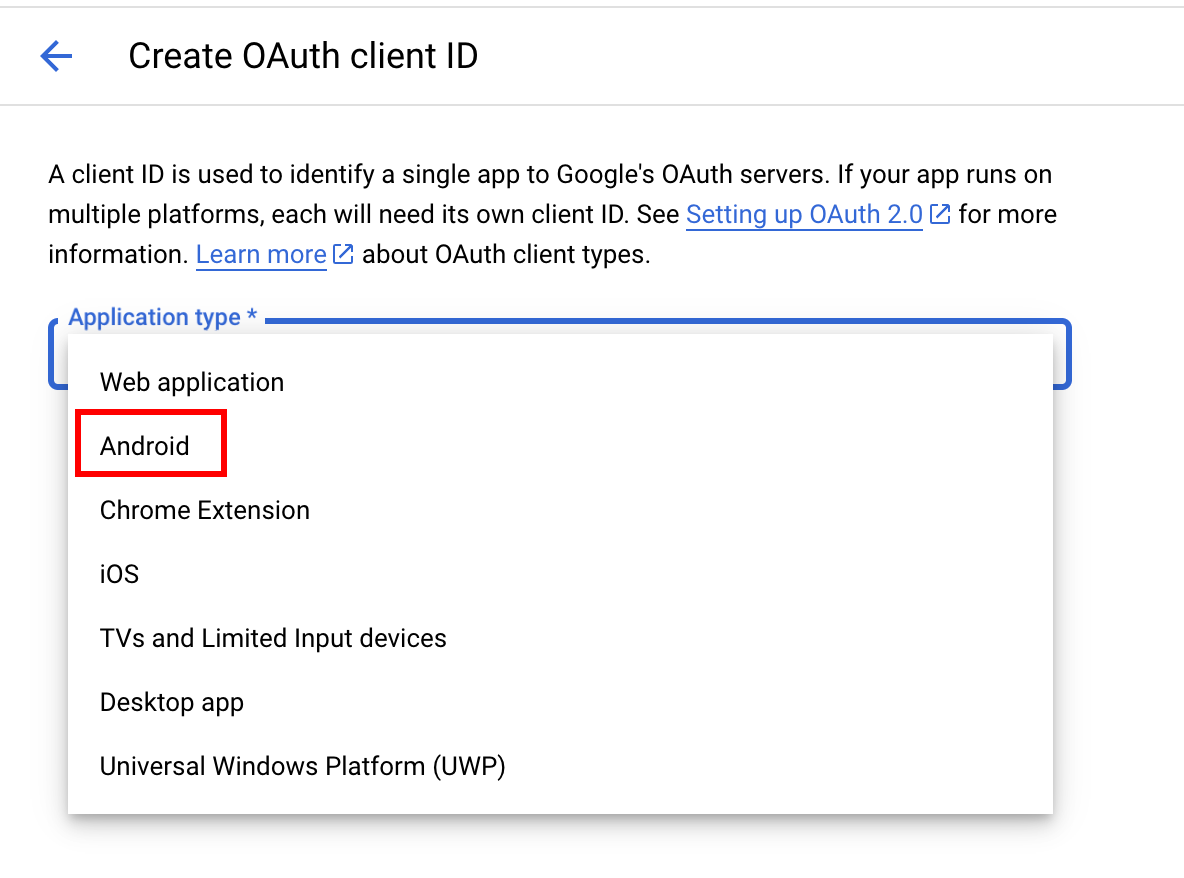
-
안드로이드 스튜디오 열기
-
프로젝트 탐색기 하단에 위치한 Gradle Scripts 섹션을 찾으세요
Gradle Scripts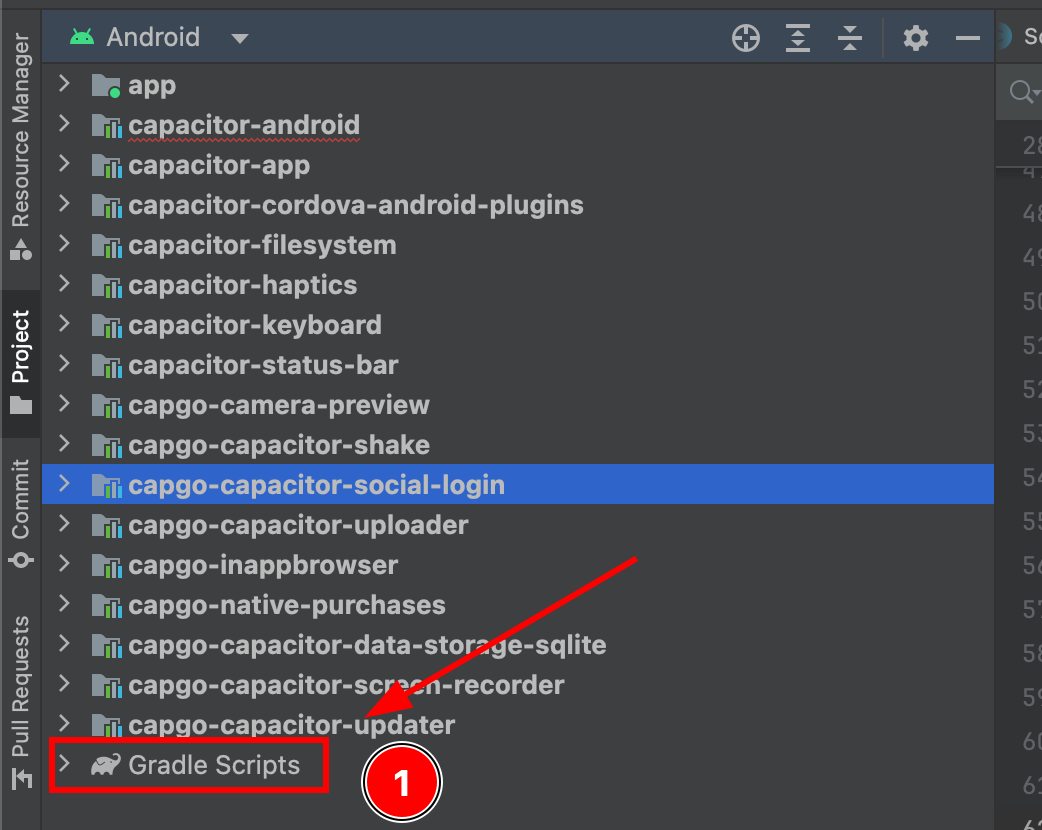
-
모듈
build.gradlebuild.gradle (Module: app) 파일을 찾으세요app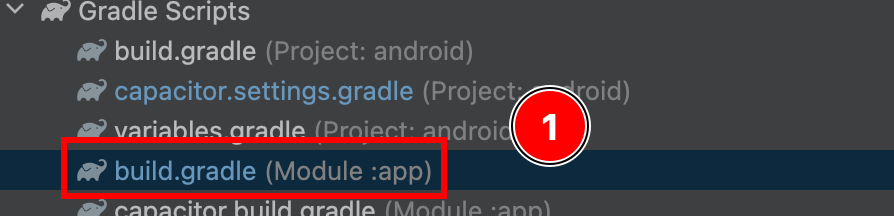
-
인증서버 ID 옵션
android.defaultConfig.applicationId. 이 앱의package nameGoogle 콘솔에
-
터미널을 열어보세요. 앱 폴더에 위치한 터미널을 열어보세요.
android터미널에서 gradlew signInReport 명령어를 실행하세요../gradlew signInReport

- SHA1 인증서 지문이 출력된 터미널 화면
SHA1.
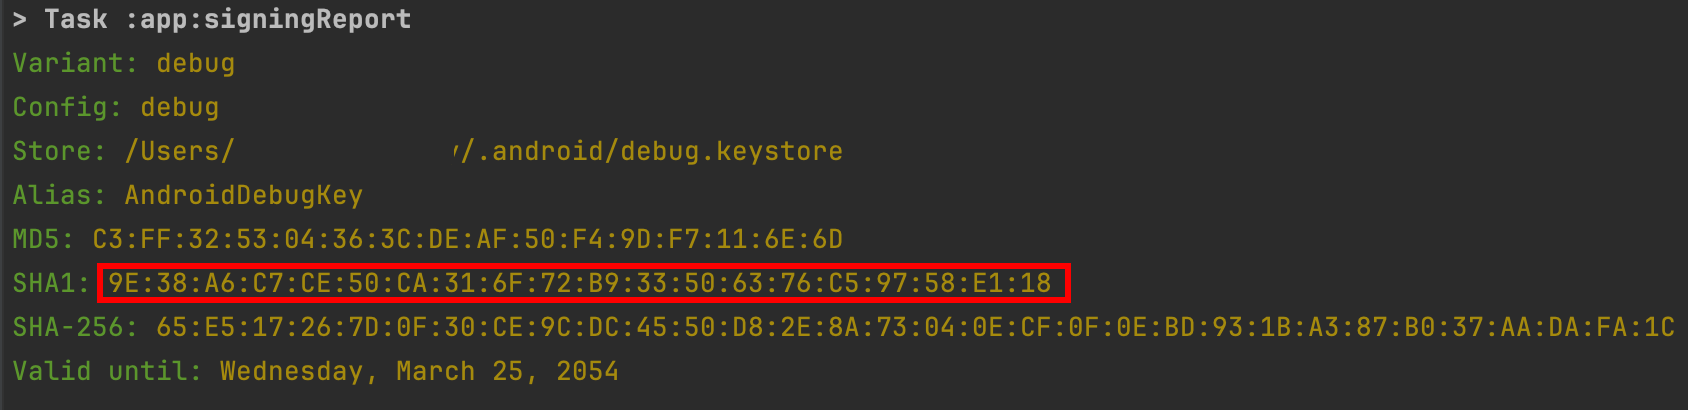
- 으로 입력하고
applicationId인증서 필드에Package Name패키지 이름과 SHA1 필드를 입력한 Android 클라이언트 생성 화면create
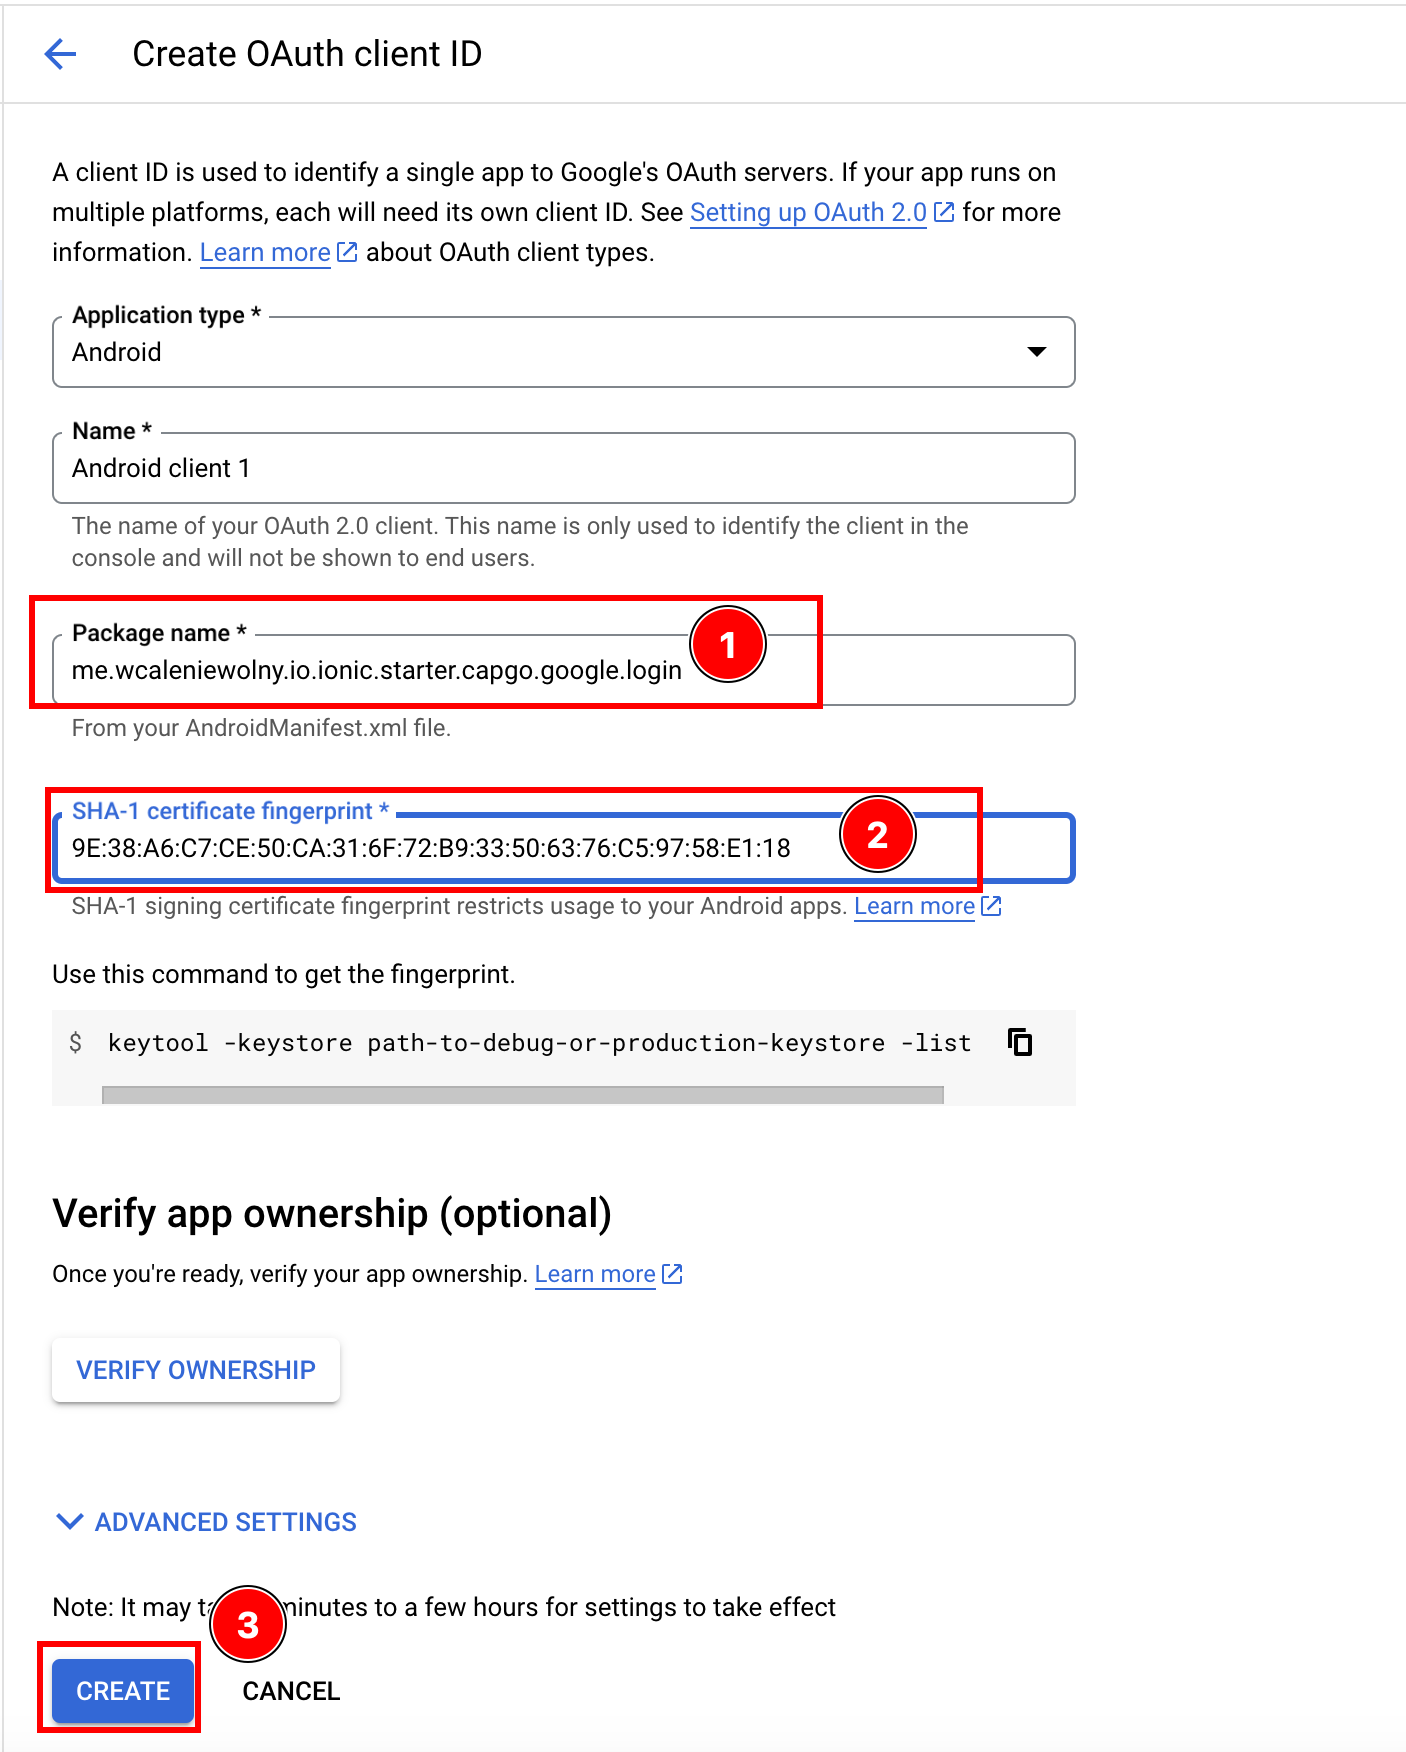
-
-
Android용으로 Google 소셜 로그인 플러그인을 사용하려면 웹 클라이언트를 생성해야 합니다.
-
Google 콘솔로 이동하세요.
Create credentialsGoogle 콘솔의 -
웹 애플리케이션 유형을
Web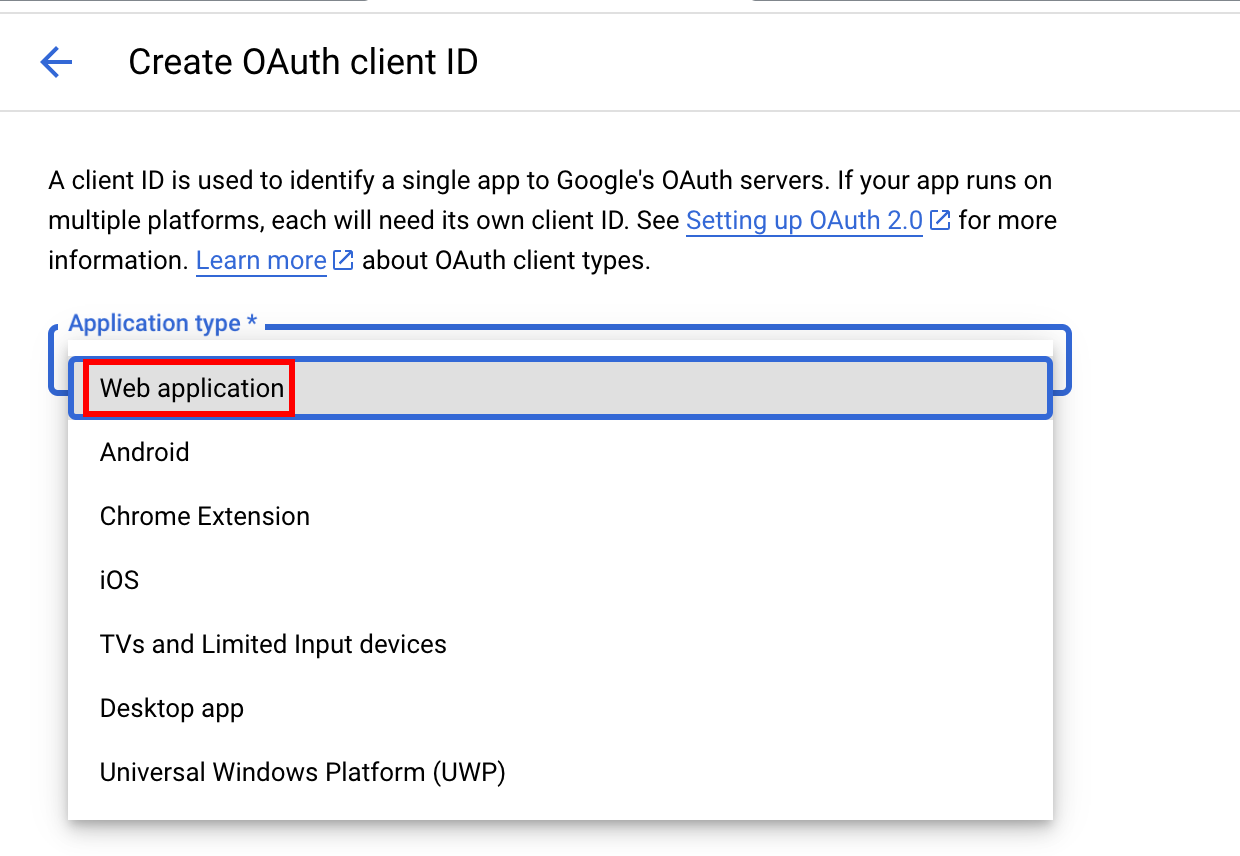
-
클릭하세요.
Create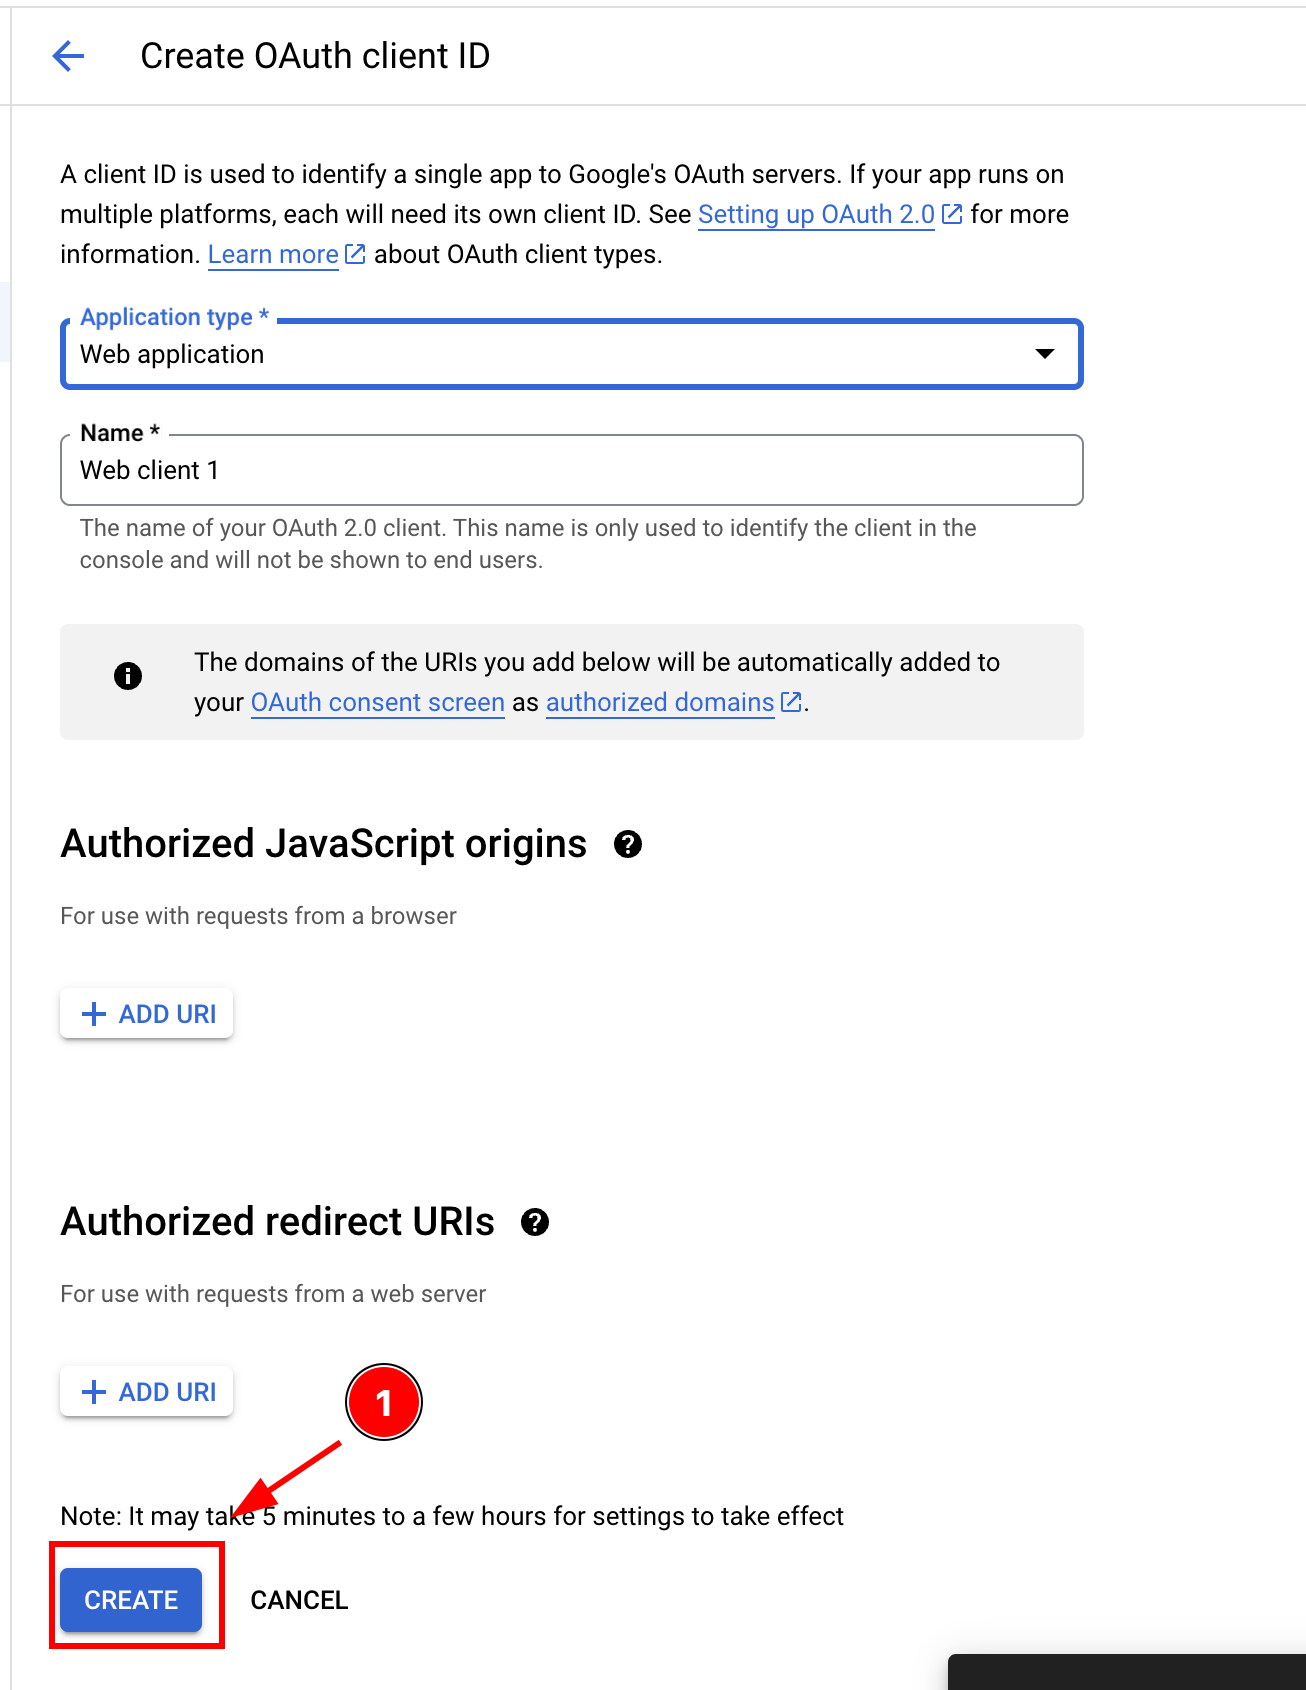
-
클라이언트 ID를 복사하세요. 이 ID를 JS/TS에서 사용합니다.
webClientIdin your JS/TS code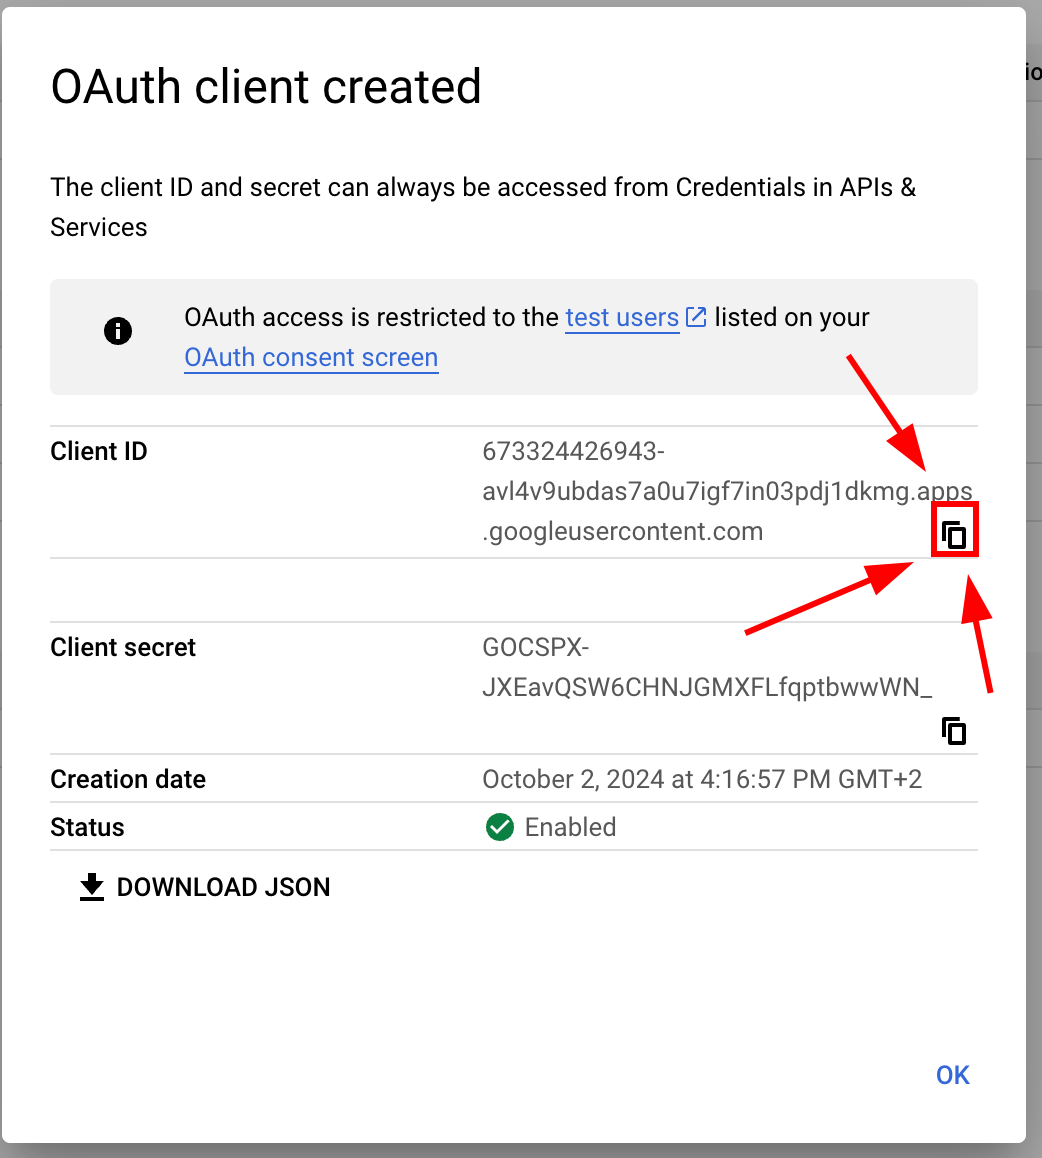
-
-
수정해주세요
MainActivity-
Android Studio에서 앱을 열어주세요. 앱을 실행할 수 있습니다.
cap open android -
찾아보기
MainActivity.java-
열기
app폴더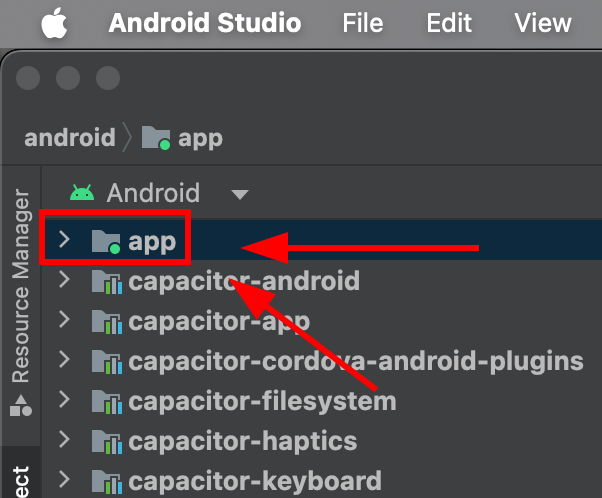
-
찾아보기
java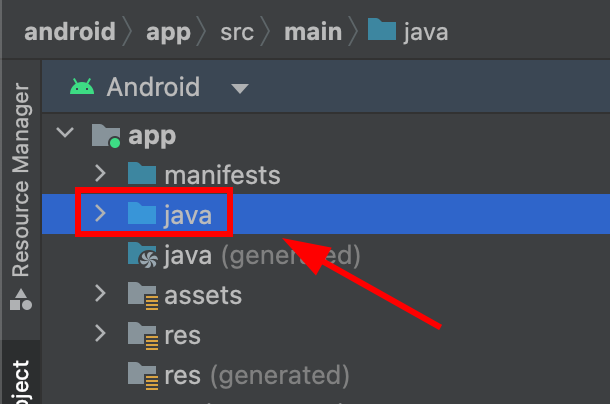
-
찾아보세요
MainActivity.java클릭하세요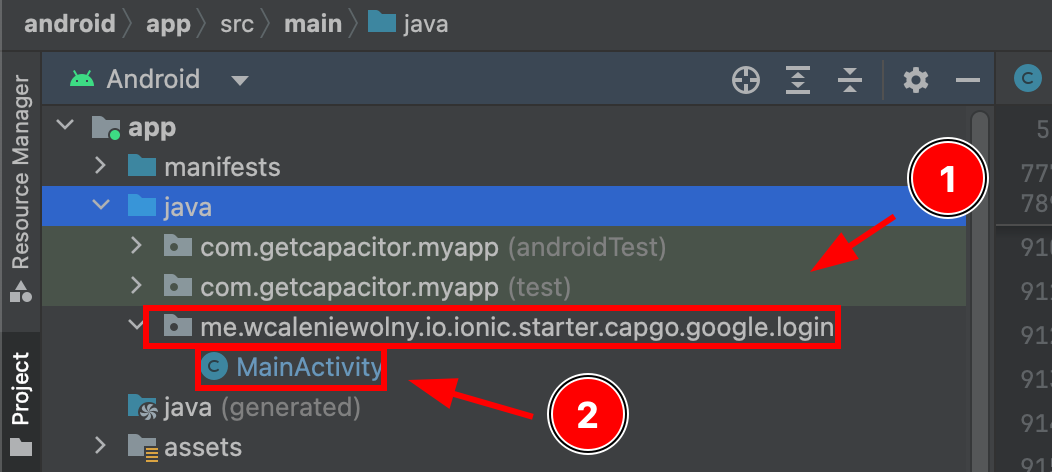
-
-
수정하세요
MainActivity.java다음과 같이 code을 추가하세요import ee.forgr.capacitor.social.login.GoogleProvider;import ee.forgr.capacitor.social.login.SocialLoginPlugin;import ee.forgr.capacitor.social.login.ModifiedMainActivityForSocialLoginPlugin;import com.getcapacitor.PluginHandle;import com.getcapacitor.Plugin;import android.content.Intent;import android.util.Log;import com.getcapacitor.BridgeActivity;// ModifiedMainActivityForSocialLoginPlugin is VERY VERY important !!!!!!public class MainActivity extends BridgeActivity implements ModifiedMainActivityForSocialLoginPlugin {@Overridepublic void onActivityResult(int requestCode, int resultCode, Intent data) {super.onActivityResult(requestCode, resultCode, data);if (requestCode >= GoogleProvider.REQUEST_AUTHORIZE_GOOGLE_MIN && requestCode < GoogleProvider.REQUEST_AUTHORIZE_GOOGLE_MAX) {PluginHandle pluginHandle = getBridge().getPlugin("SocialLogin");if (pluginHandle == null) {Log.i("Google Activity Result", "SocialLogin login handle is null");return;}Plugin plugin = pluginHandle.getInstance();if (!(plugin instanceof SocialLoginPlugin)) {Log.i("Google Activity Result", "SocialLogin plugin instance is not SocialLoginPlugin");return;}((SocialLoginPlugin) plugin).handleGoogleLoginIntent(requestCode, data);}}// This function will never be called, leave it empty@Overridepublic void IHaveModifiedTheMainActivityForTheUseWithSocialLoginPlugin() {}} -
파일을 저장하세요
-
-
Google 로그인을 애플리케이션에 사용하세요
-
먼저 import를 해주세요
SocialLoginimport { SocialLogin } from '@capgo/capacitor-social-login'; -
초기화 함수를 호출하세요. 이 함수는 한 번만 호출되어야 합니다.
// onMounted is Vue specific// webClientId is the client ID you got in the web client creation step not the android client ID.onMounted(() => {SocialLogin.initialize({google: {webClientId: '673324426943-avl4v9ubdas7a0u7igf7in03pdj1dkmg.apps.googleusercontent.com',}})}) -
호출
SocialLogin.login. 버튼을 만들고 클릭 시 다음 code를 실행하세요.const res = await SocialLogin.login({provider: 'google',options: {}})// handle the responseconsole.log(JSON.stringify(res))
-
-
백엔드에서 Google 리프레시 토큰을 저장하고, 백엔드에서 리프레시하십시오.
-
Go into
Device manager로 이동하십시오.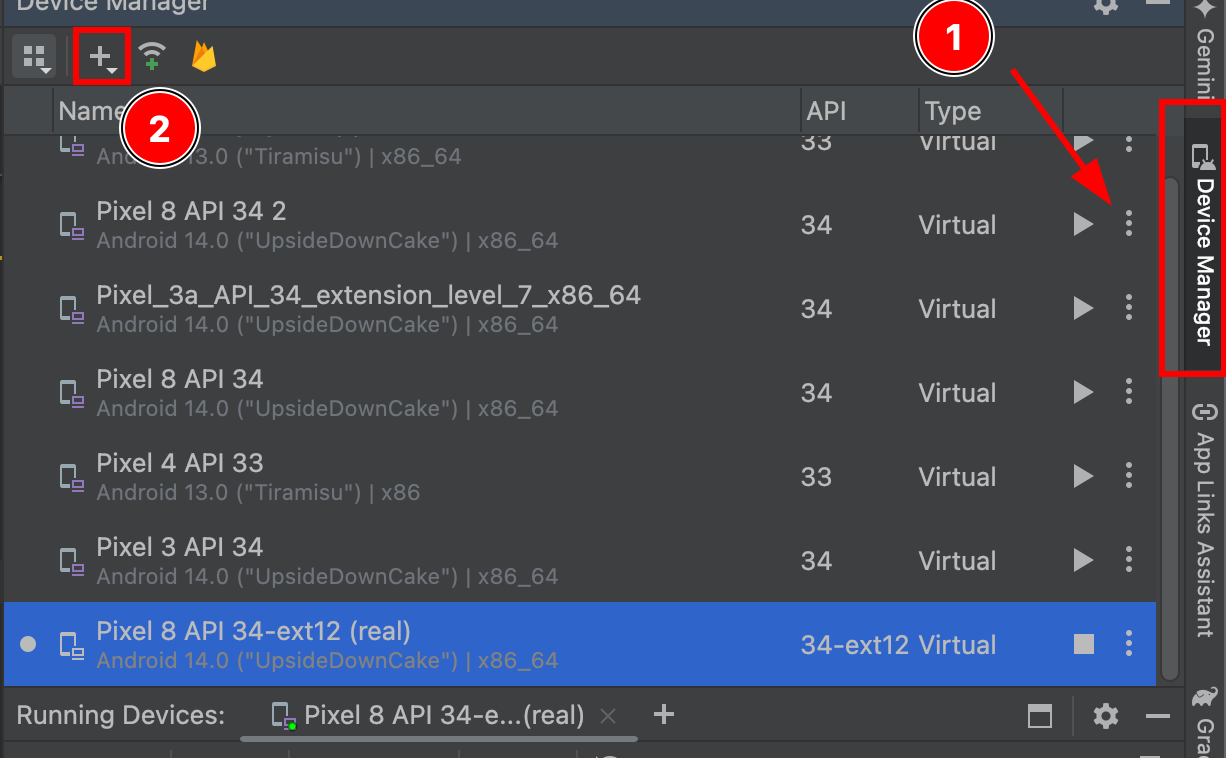
-
Android Studio의 디바이스 매니저에서 플러스 버튼이 강조되어 있습니다.
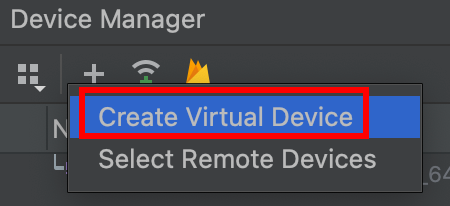
-
가상 장치 구성에서 가상 장치 생성 버튼을 클릭하십시오.
Play Storeicon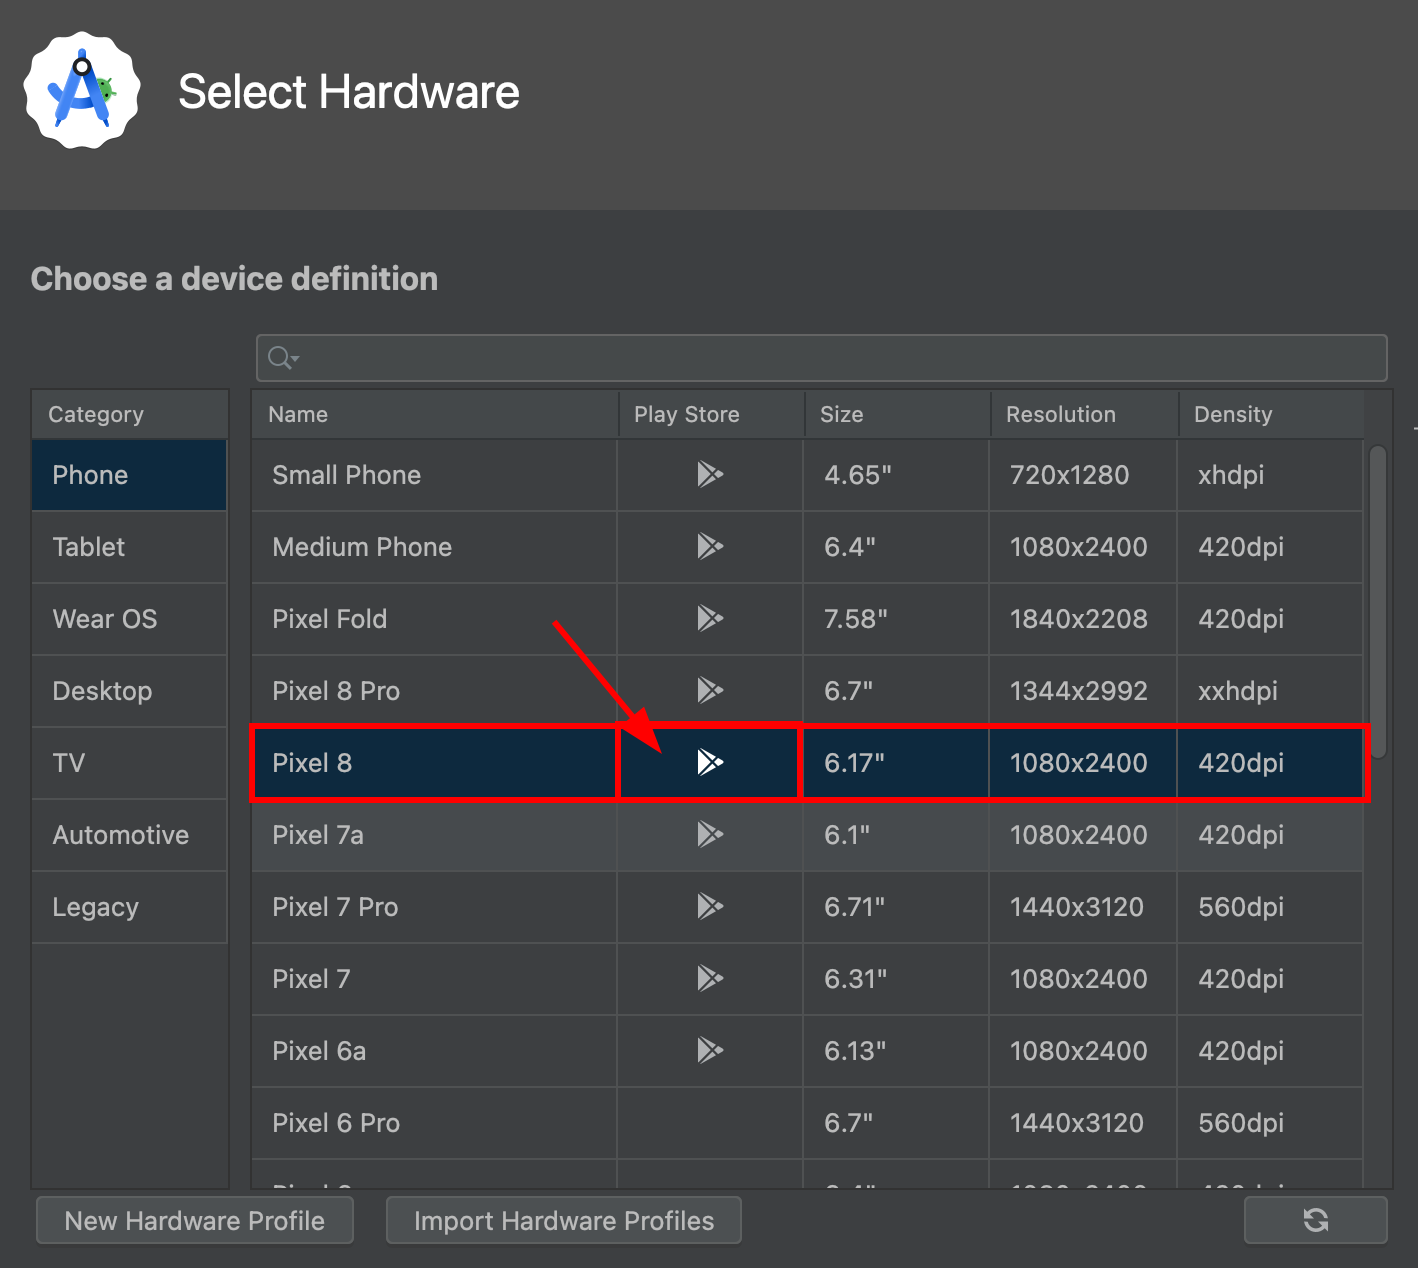
보시다시피,
pixel 8지원하는Play Store서비스 -
클릭
next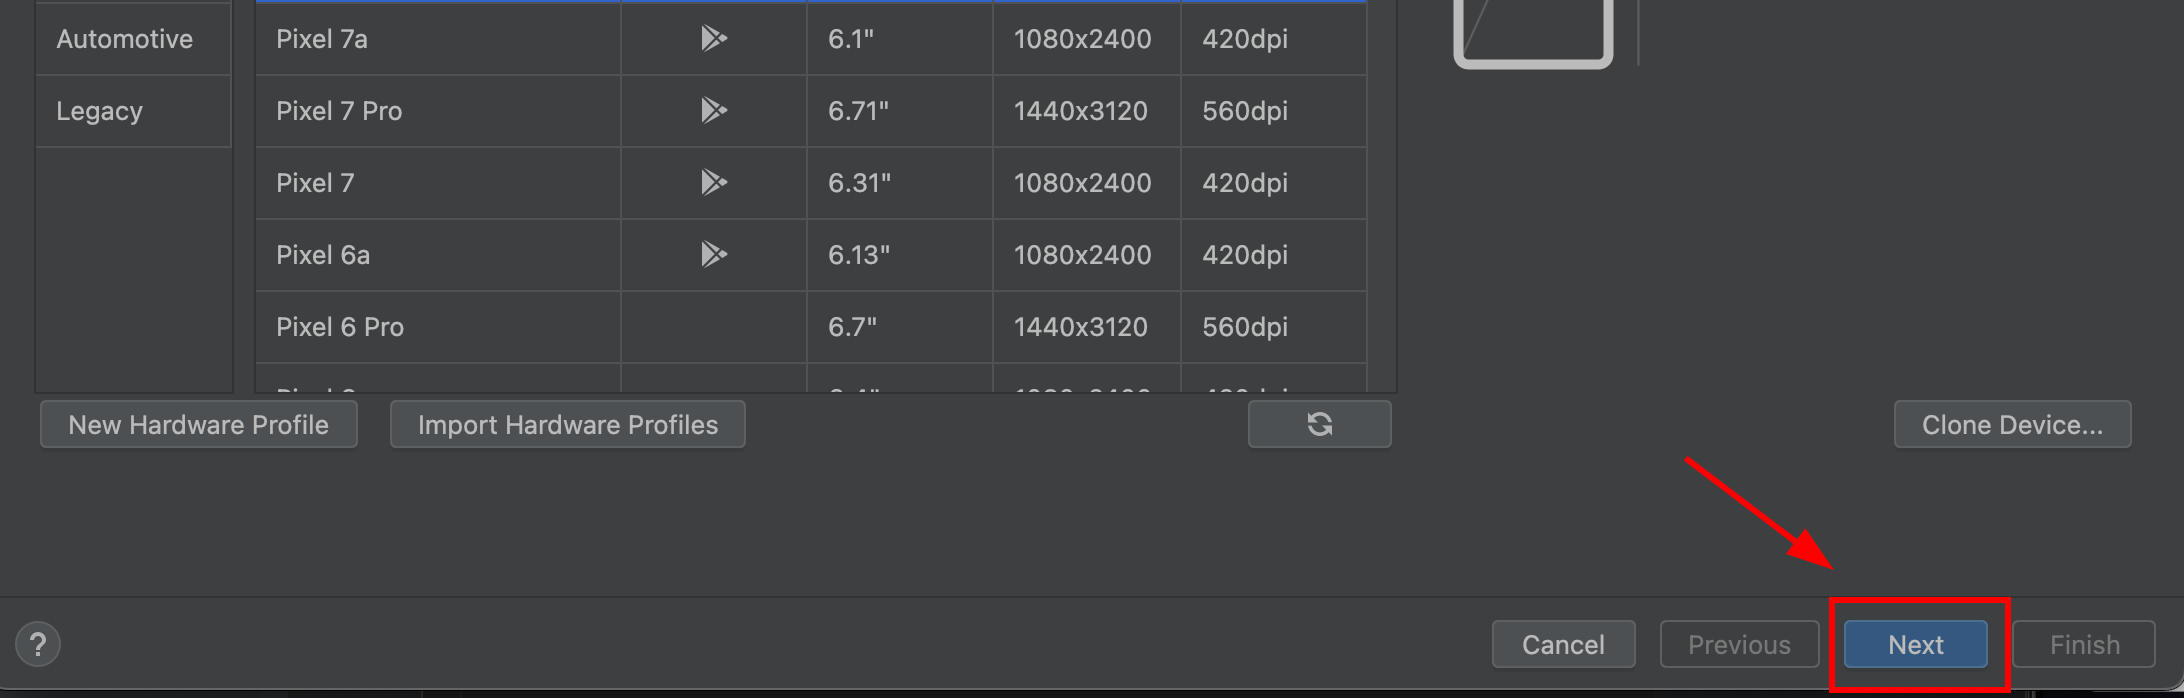
-
OS 이미지 타입이 맞는지 확인하세요
Google Play. OS 이미지가 유형이 IT MUSTGoogle Play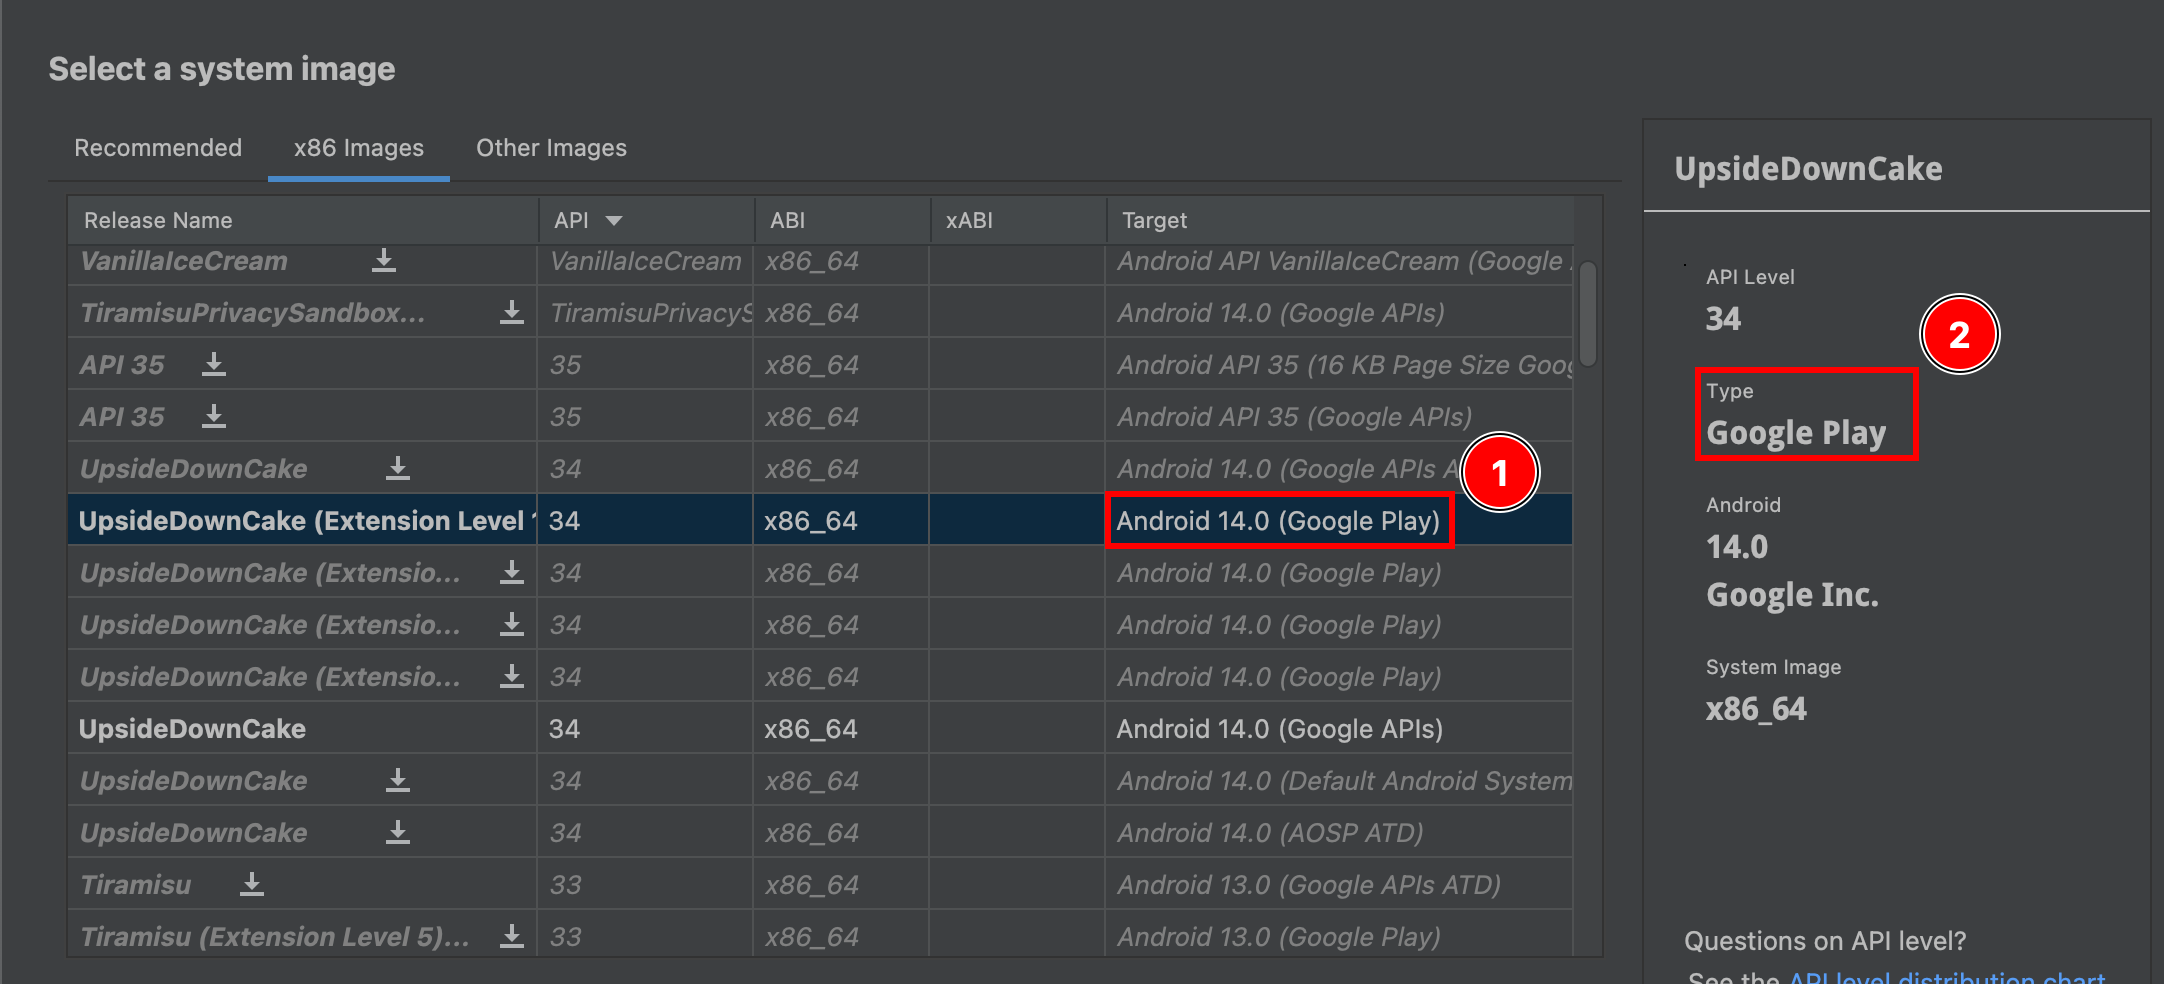
-
다음으로 이동
-
장치 확인을 하세요. 에뮬레이터 이름을 원하는 대로 지어보세요.
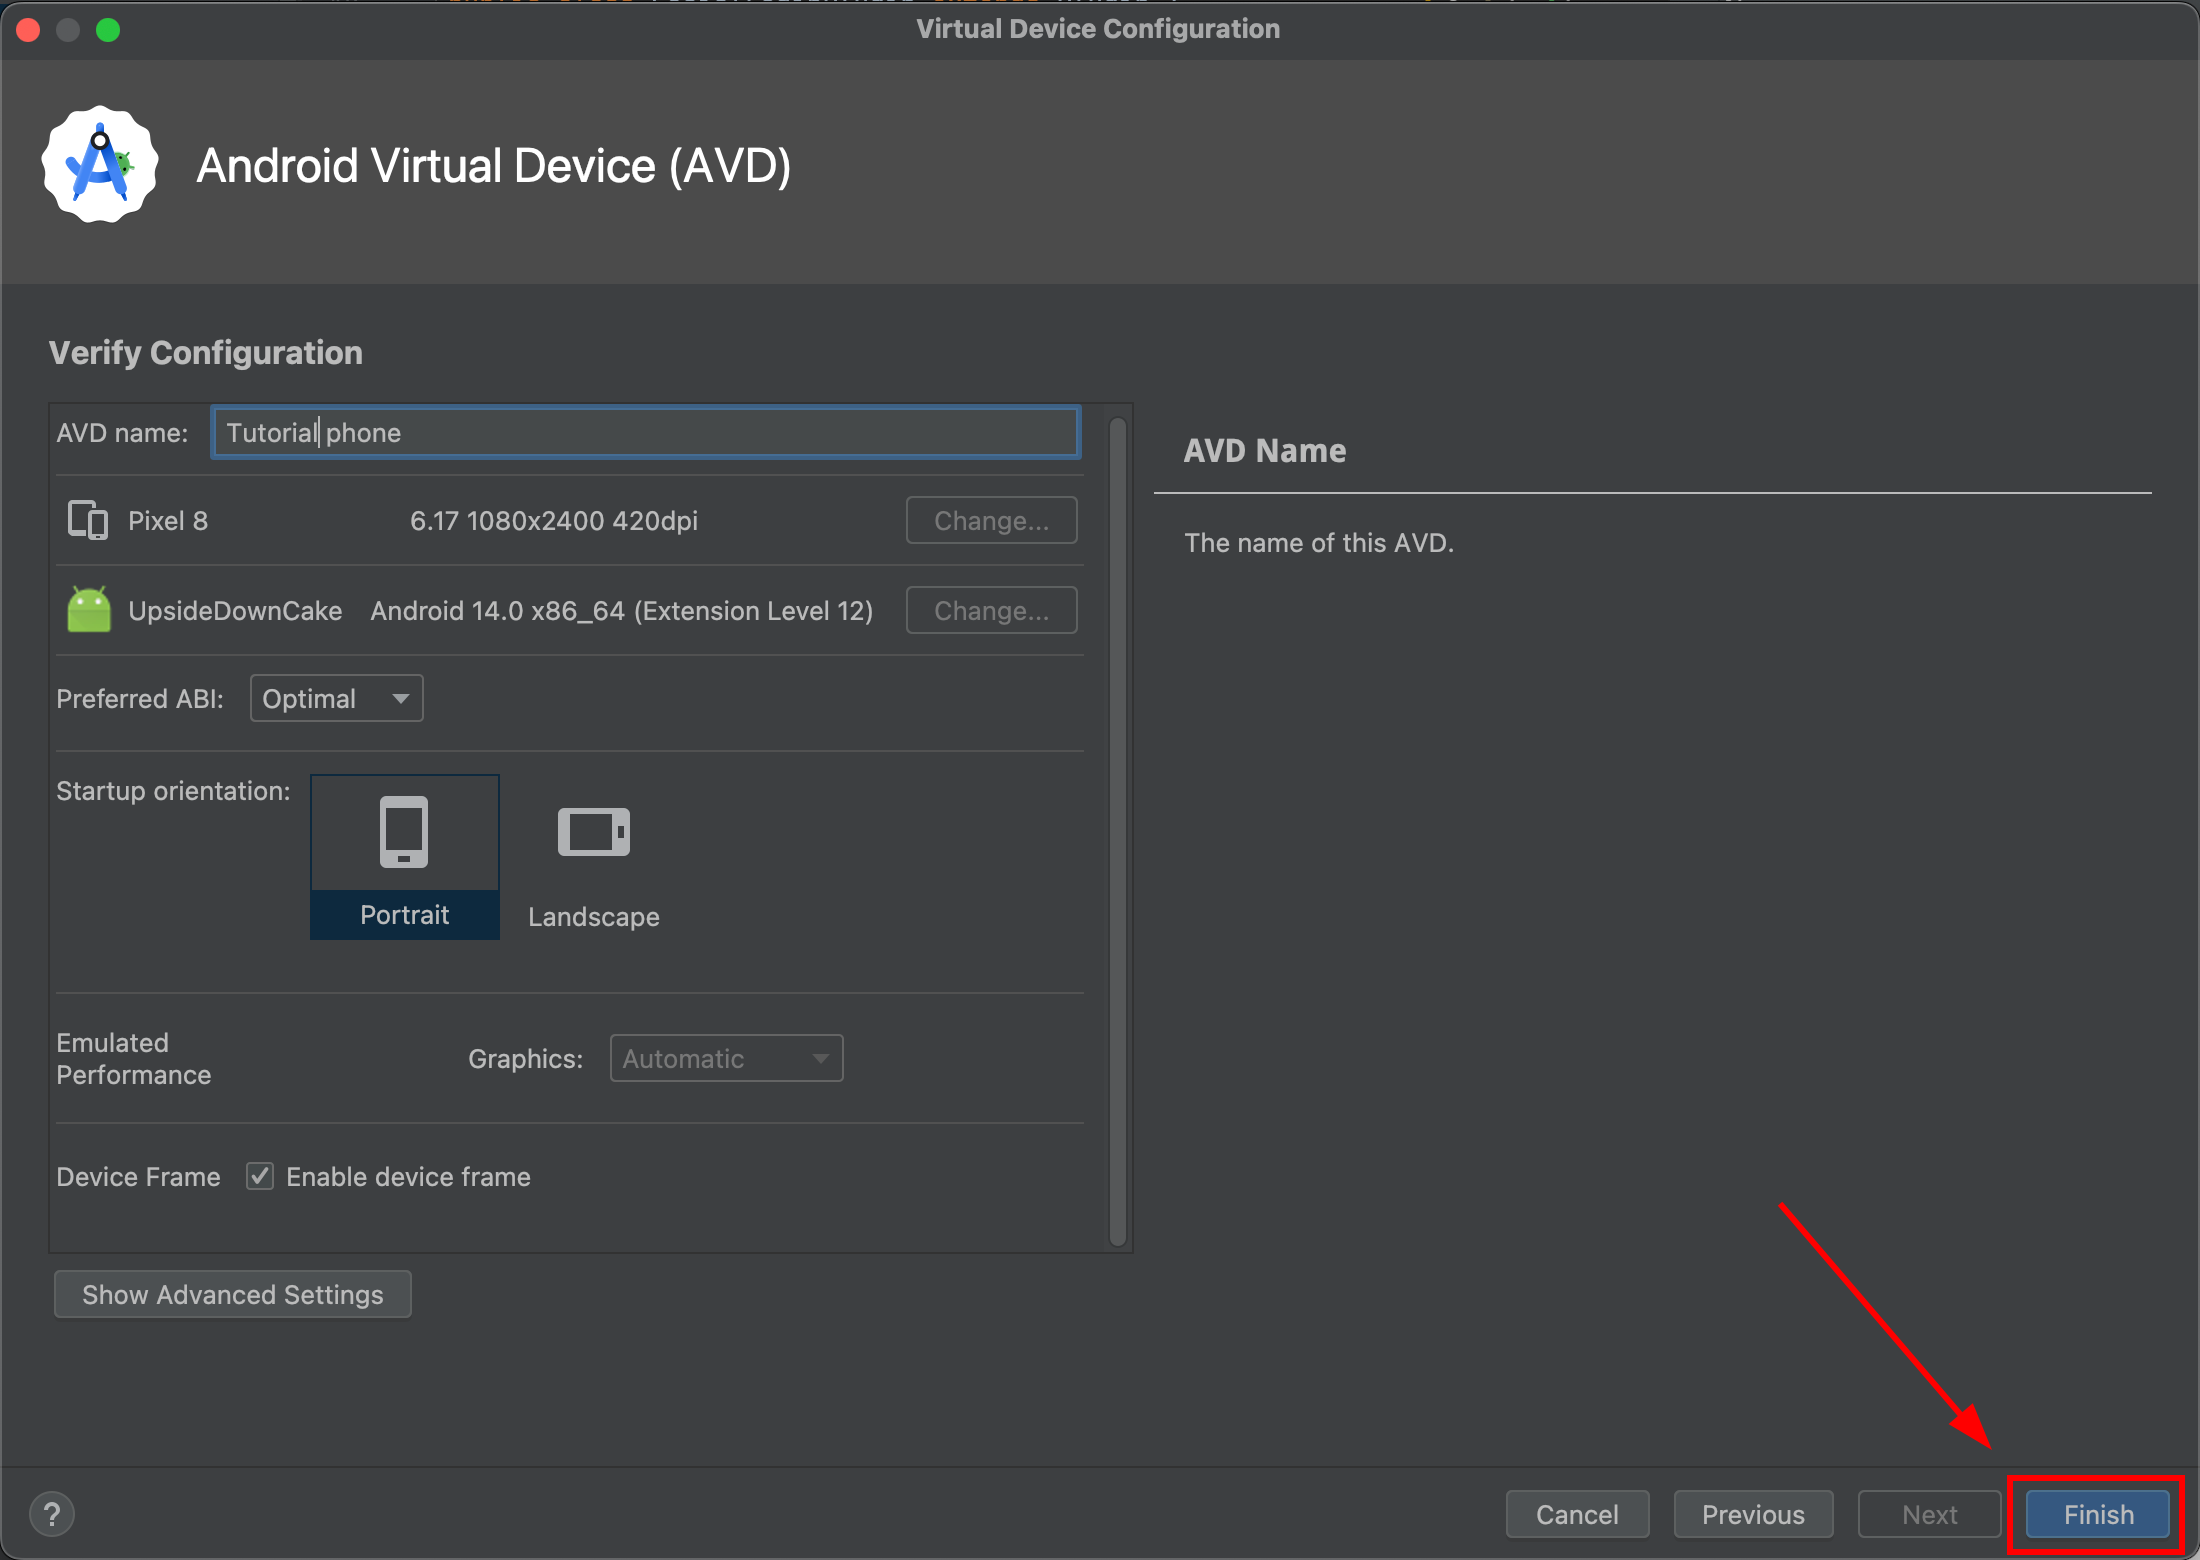
-
로 가세요.
Device Manager시뮬레이터를 부팅하세요.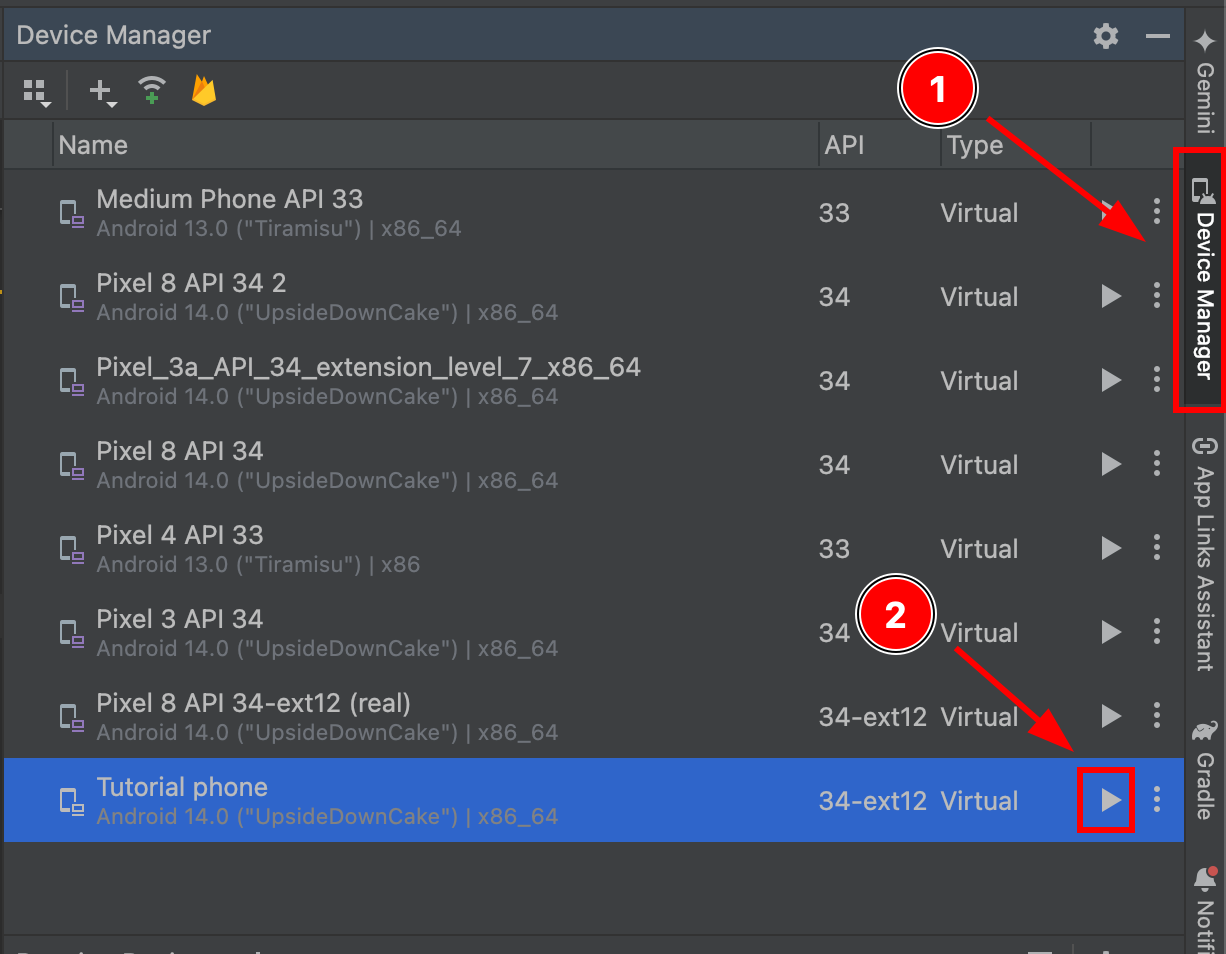
-
시뮬레이터가 부팅되면 설정 앱으로 이동하세요.
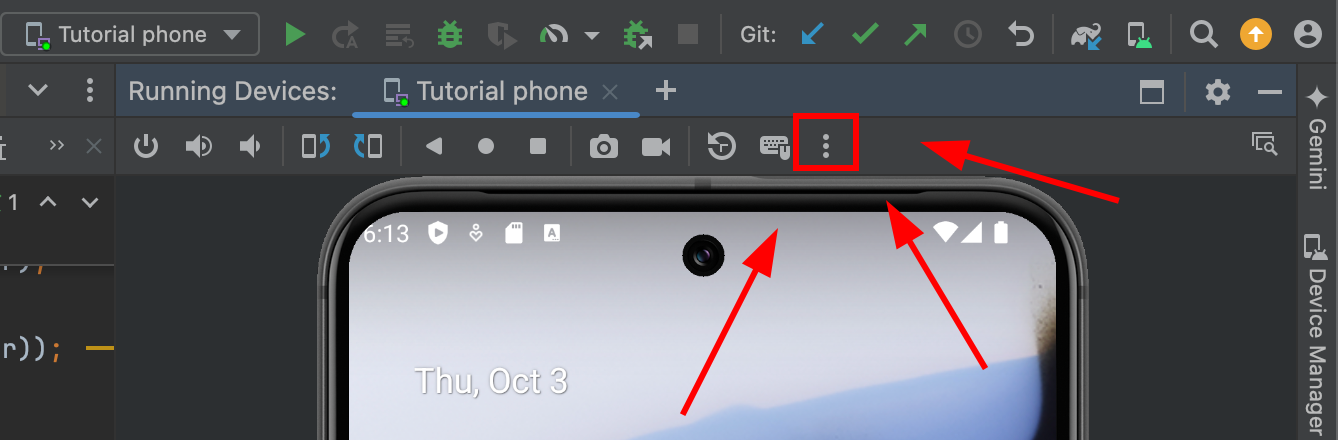
-
로 가세요.
Google Play
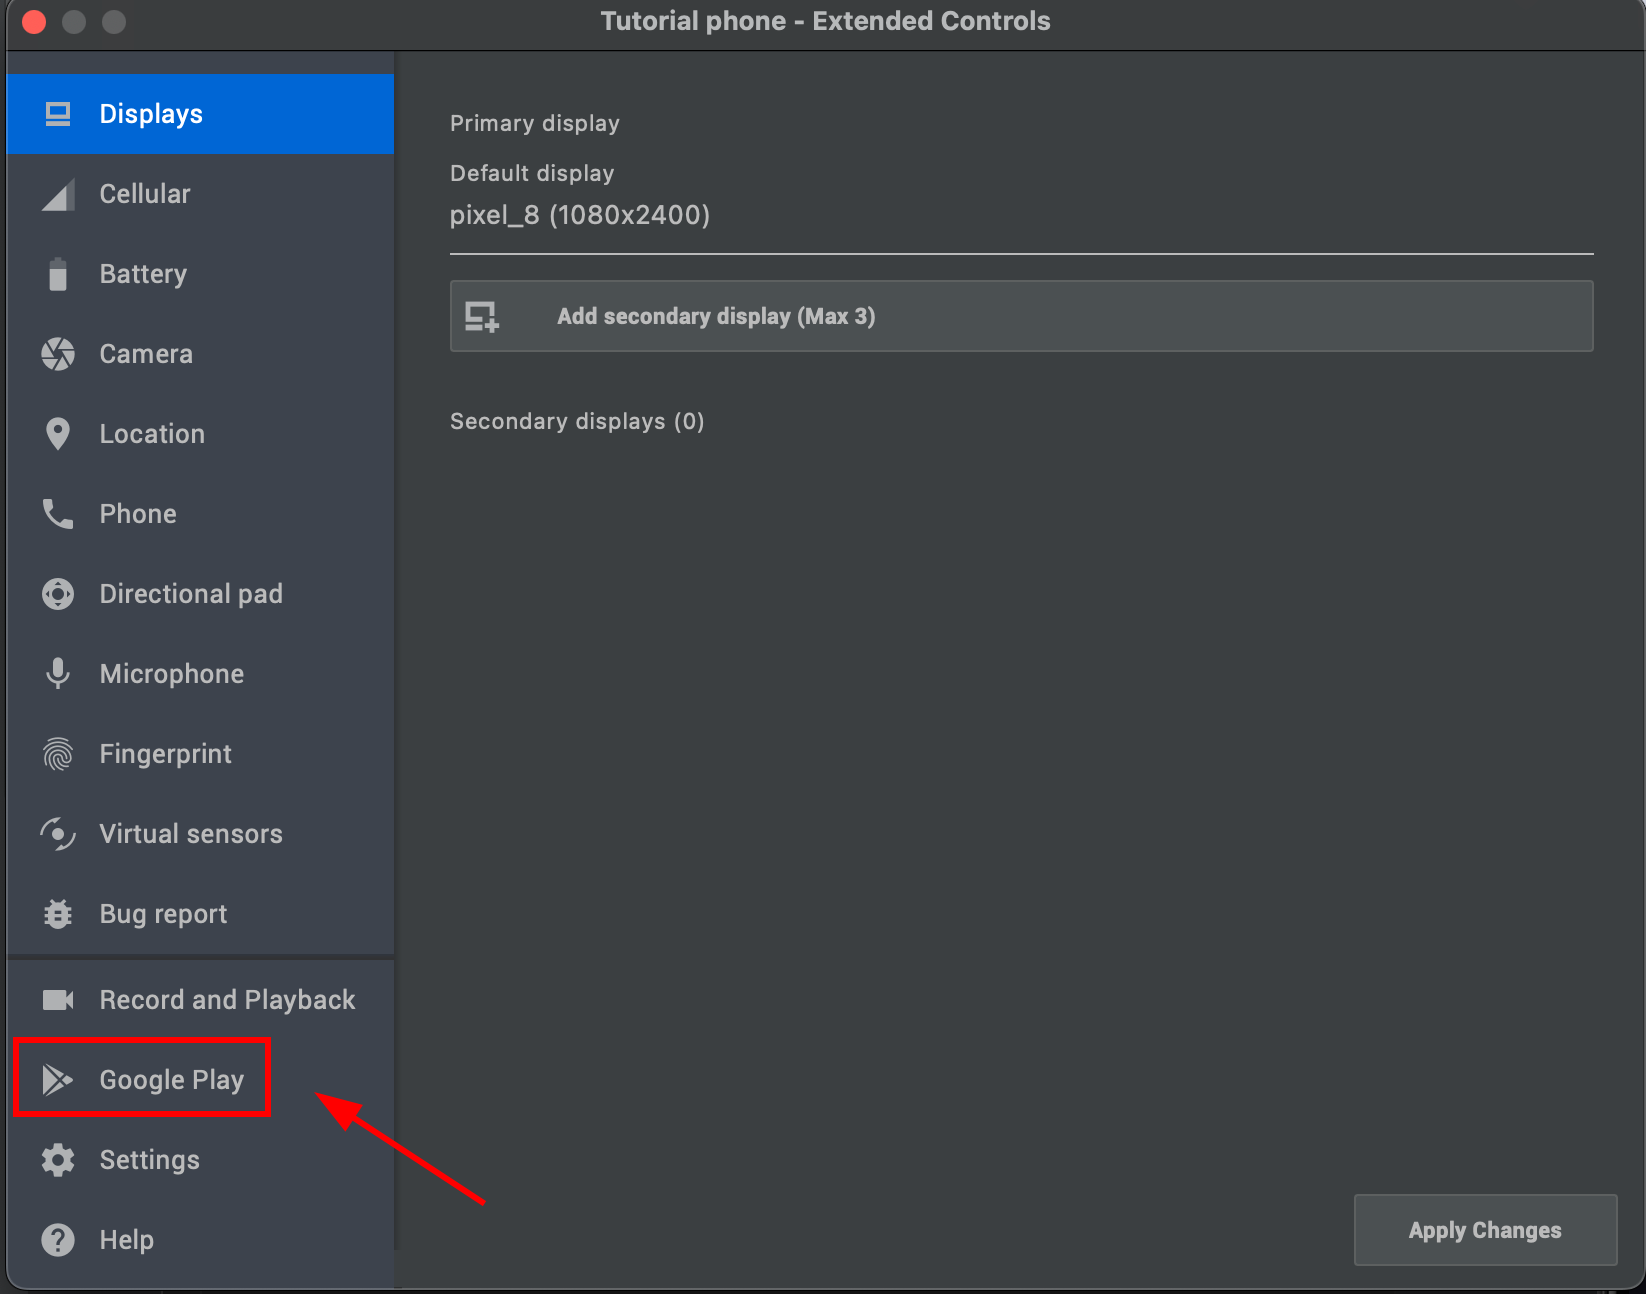
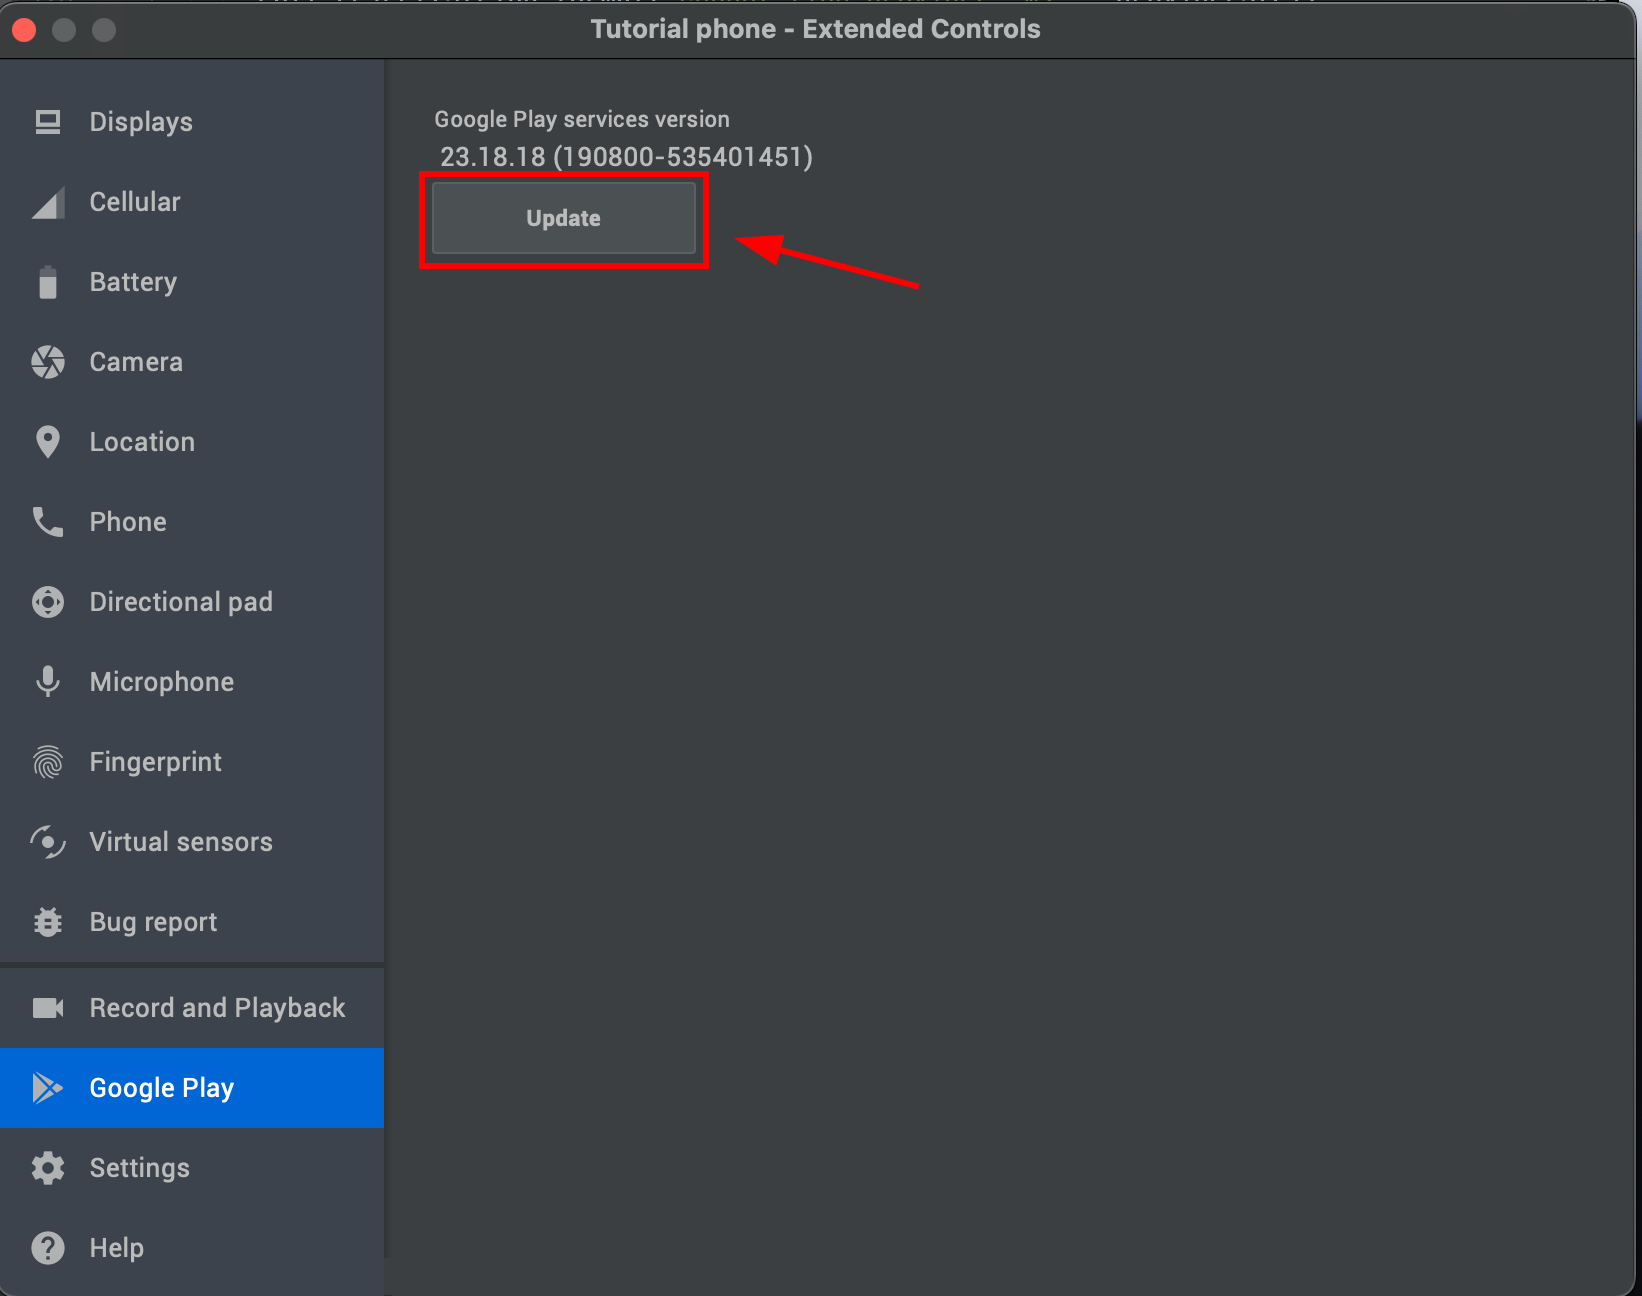
- Click
UpdateGoogle Play 업데이트 화면에서 업데이트 버튼을 클릭하세요.
-
-
애플리케이션을 테스트하세요

모든 것을 올바르게 수행했다면, Google 로그인 흐름이 올바르게 작동되어야 합니다:
문제 해결
문제 해결어떤 문제가 발생하더라도, 먼저 Google Cloud Console의 값과 앱 구성과 비교하세요. Android Google Sign-In 오류는 일반적으로 패키지 이름, SHA-1, 또는 클라이언트 ID 일치 오류로 인해 발생합니다.
인증 관리자, SHA-1, 및 Firebase
인증 관리자, SHA-1, 및 Firebase안드로이드에서 이 플러그인은 Google Credential Manager를 사용합니다.androidx.credentials 오류 로그캣 오류, __CAPGO_KEEP_0__ GoogleSignInClient API GetCredentialCustomException: [28444] Developer console is not set up correctly __CAPGO_KEEP_0__
로그캣 필터링 GoogleProvider 또는 CapgoSocialLogin 구글 로그인 플러그인 webClientId 구글 클라우드 설정
클라이언트 유형
| 사용 | 위치 | 웹 애플리케이션 |
|---|---|---|
| 서버 / ID 토큰 청구자 | 실패한 로그인 후 로그 | webClientId 안드로이드 SocialLogin.initialize() |
| 한 개의 서명 키당 | Google과 연결된 APK가 있는지 증명합니다. | Google Cloud Console에서만 사용할 수 있습니다. 이 ID를 webClientId |
Android 클라이언트 ID를 사용하는 것을 피하십시오. webClientIdCredential Manager는 Web 클라이언트 ID를 요구합니다. Android 클라이언트는 단지 패키지 이름과 SHA-1을 올바르게 등록한 콘솔만 필요합니다.
테스트 중인 빌드에 서명하는 각 인증서에 대해 Android OAuth 클라이언트를 하나씩 생성하십시오:
- Debug:
./gradlew signingReport데버그 빌드용입니다. - Release: 실제로 설치하는 APK 또는 AAB에서.
- Play App Signing: Play Console > 앱 무결성 > 앱 서명 키 인증서에서.
이 applicationId in android/app/build.gradle 패키지 이름의 모든 접미사를 포함해야 합니다. .debug suffix.
앱을 프로덕션으로 배포하는 것은 필수적이지 않습니다. email scopes. profile 디지털 자산 링크 (assetlinks.json)는 Credential Manager를 통해 Google으로 로그인하는 경우 필수적이지 않습니다.
Google Cloud의 변경 사항은 몇 시간 동안 전파될 수 있습니다.
오류 28444: 개발자 콘솔이 올바르게 설정되지 않았습니다.
개발자 콘솔이 올바르게 설정되지 않았습니다.이것은 거의 항상 설치된 APK 서명 인증서, 패키지 이름, 및 combination이 Google에 의해 거부된 경우입니다. webClientId이 체크리스트를 따라서:
- 확인
webClientId웹 애플리케이션 클라이언트 ID이며 끝에.apps.googleusercontent.com. - 앱을 실행하고 실패를 재현하고 Logcat을 읽어보세요.
GoogleProvider,signingSha1=, 그리고package=. - In Google Cloud Console > 인증 정보, Android OAuth 클라이언트를 열고 정확한 패키지 이름과 SHA-1을 확인하세요.
- 릴리스 빌드를 테스트하는 경우, 디버그 키 스토어만 등록하지 마세요.
- 릴리스 빌드의 SHA-1을 등록하세요.
- 앱이 Play Store를 통해 배포되는 경우, Play App Signing SHA-1도 등록하세요.
- 웹과 Android 클라이언트가 동일한 Google Cloud 프로젝트에 존재해야 합니다.
- consent 화면이 테스트 모드인 경우, Google 계정이 테스트 사용자인지 확인하세요.
USER_CANCELLED 구성 오류로 인해 선택한 계정에 대한 SHA-1 또는 클라이언트 ID 불일치가 여전히 발생할 수 있습니다. 위의 콘솔 설정을 먼저 수정하세요.
설치한 빌드에서 SHA-1을 추출하세요.
설치한 빌드에서 SHA-1을 추출하세요debug 또는 로컬 빌드:
cd android && ./gradlew signingReport등록된 릴리스 APK:
keytool -printcert -jarfile android/app/release/app-release.apkSHA-1을 Android OAuth 클라이언트에 패키지 이름이 일치하는 것에 추가하고 동일한 등록된 APK를 다시 설치한 후 다시 테스트하세요:
adb install android/app/release/app-release.apk로그인 결과 읽기
로그인 결과 읽기 섹션토큰은 다음과 같이 중첩되어 있습니다. result:
const login = await SocialLogin.login({ provider: 'google' });const idToken = login.result?.idToken;Firebase Auth에 대한 인증 정보를 생성하세요. idToken 파이어베이스 인증을 위한, 해당 키로 인증서를 생성하세요. webClientId in initialize.
in 개발 SHA-1 인증서를 얻을 수 없다면, 커스텀 키스토어를 사용하세요. 이 이슈 댓글
이 프로젝트에 키스토어를 추가하는 방법을 설명합니다.
구글 로그인 Android에서 계속하기Android에서 Google 로그인 사용 중이라면 Android에서 Google 로그인 사용 중이라면 인증 및 계정 흐름을 계획하고 계정 관리를 위해 Android에서 Google 로그인과 연결하세요. @capgo/capacitor-social-login Using @capgo/capacitor-social-login Using @capgo/capacitor-social-login Using @capgo/capacitor-passkey Using @capgo/capacitor-passkey Using @capgo/capacitor-native-biometric Using @capgo/capacitor-native-biometric for capgo의 구현 세부 정보에 대한 @capacitor-native-biometric, 및 두 단계 인증 구글 로그인 구현 세부 사항에 대한 정보입니다.
Capacitor 앱을 배포하세요 context: Page/area: Capgo marketing website. Role: Short UI label or navigation item. Seen in: component doc/SignupCta.astro, component Hero.astro. Message key `hero_title_line1` (Hero Title Line1).
기다리지 마세요


context: Page/area: Capgo marketing website. Role: Website copy sentence. Seen in: component doc/SignupCta.astro, component Hero.astro. Message key `hero_subtitle_v2` (Hero Subtitle V2). 무료로 시작하세요