iOS에서 Google 로그인
이 플러그인의 설치 단계와 전체 마크다운 가이드를 포함한 설정 프롬프트를 복사하세요.
In this guide, you will learn how to setup Google Login with Capgo Social Login for iOS. I assume that you have already read the iOS에서 Google 로그인을 사용하는 방법.
이 섹션에서는 iOS에서 Google 로그인을 설정하는 방법을 배울 것입니다.
이 안내서에서는 iOS에서 Google 로그인을 설정하는 방법을 배울 것입니다.이 안내서에서는 iOS에서 Google 로그인을 설정하는 방법을 배울 것입니다.
-
iOS 클라이언트 ID를 Google 콘솔에서 생성하세요.
-
검색 바 클릭

-
를 검색하세요.
credentialsAPI 및 서비스가 강조된 자격 증명 옵션을 보여주는 검색 결과APIs and ServicesGoogle 콘솔에서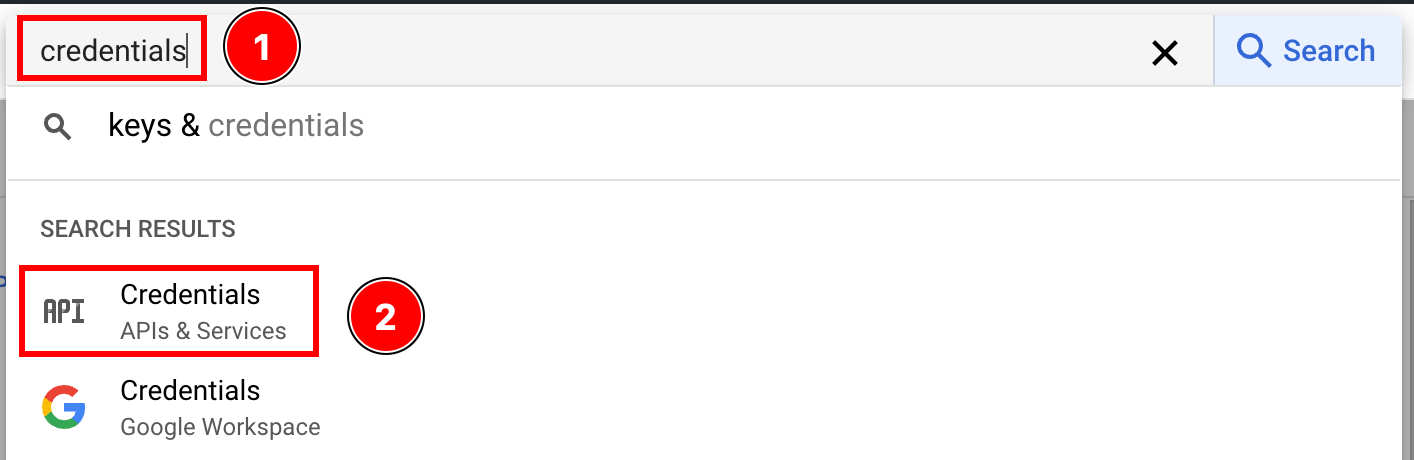
-
APIs & Services에서
create credentials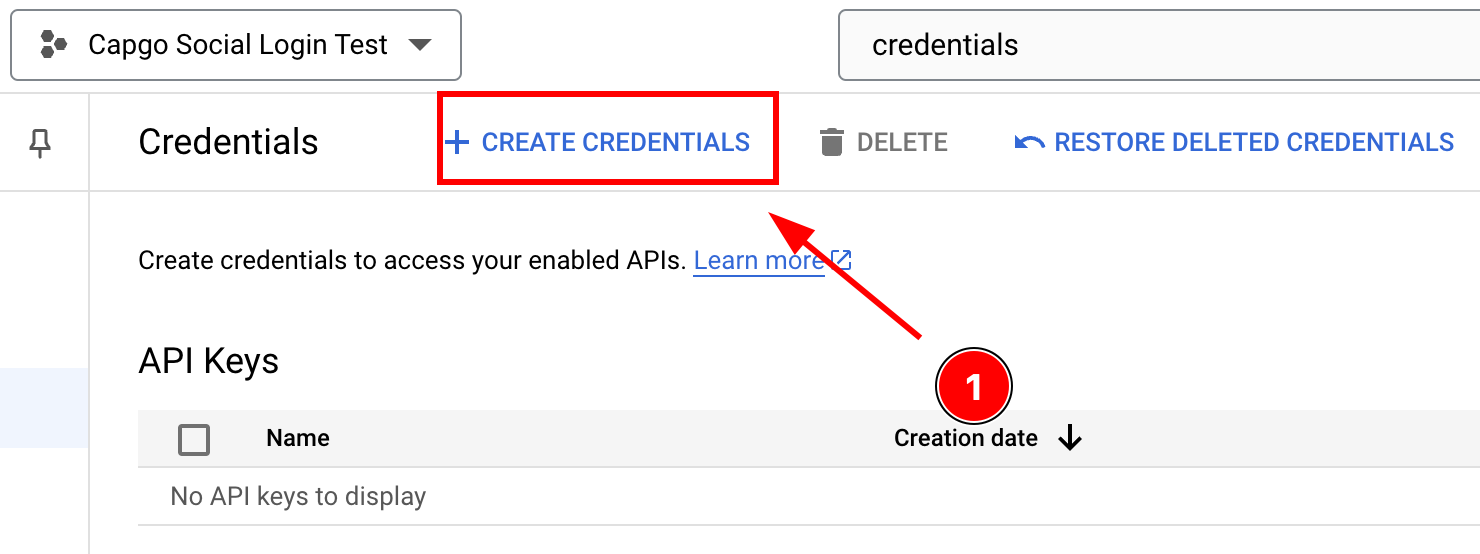
-
APIs & Services에서 자격 증명 옵션을 선택하세요.
OAuth client ID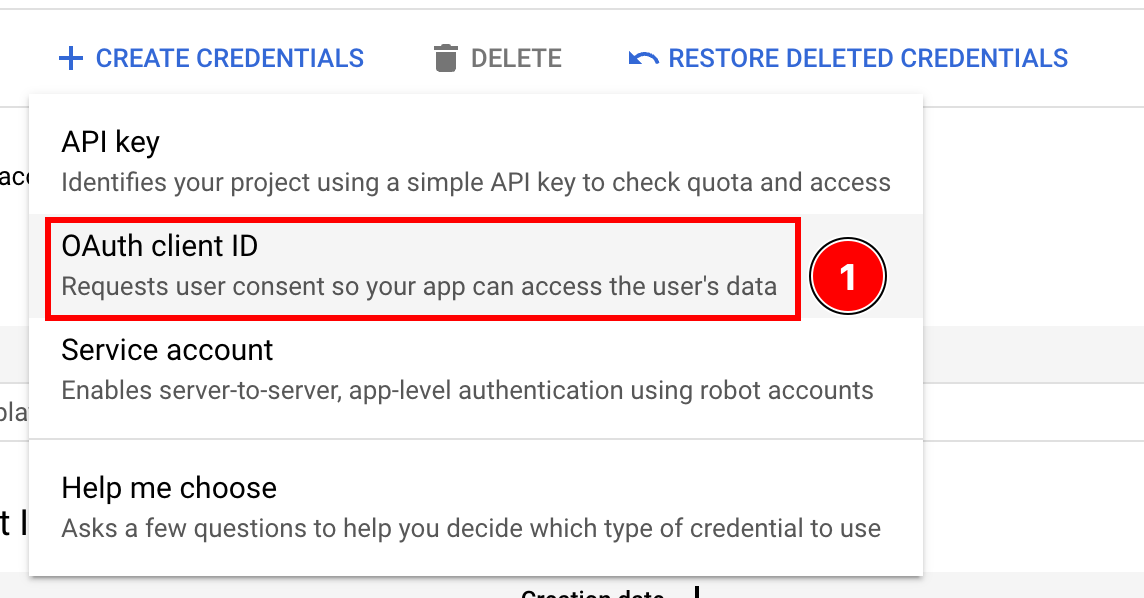
-
APIs & Services에서 자격 증명 옵션을 선택하세요.
Application typeiOS 옵션을 강조한 애플리케이션 유형 선택iOS
-
Xcode를 열어보세요
-
Xcode 프로젝트 탐색기에서
-
App 대상
App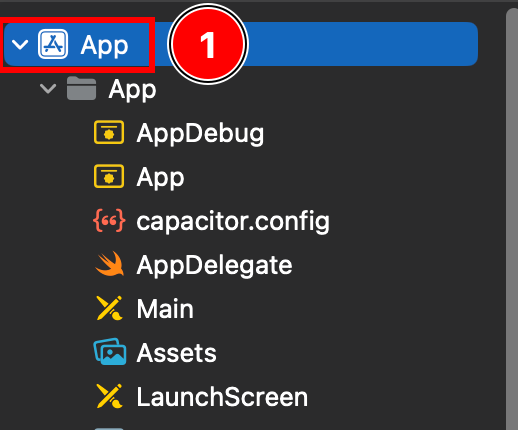
-
Google Console로 돌아가서 Bundle ID를 붙여넣으세요
Targets -> App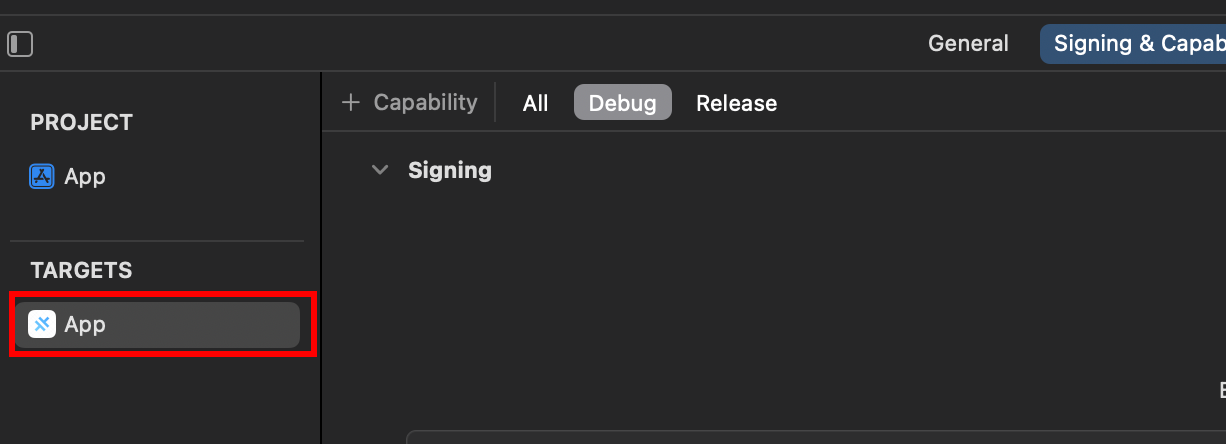
-
Xcode 프로젝트 설정에서 Targets 섹션에 App을 선택하세요
Bundle Identifier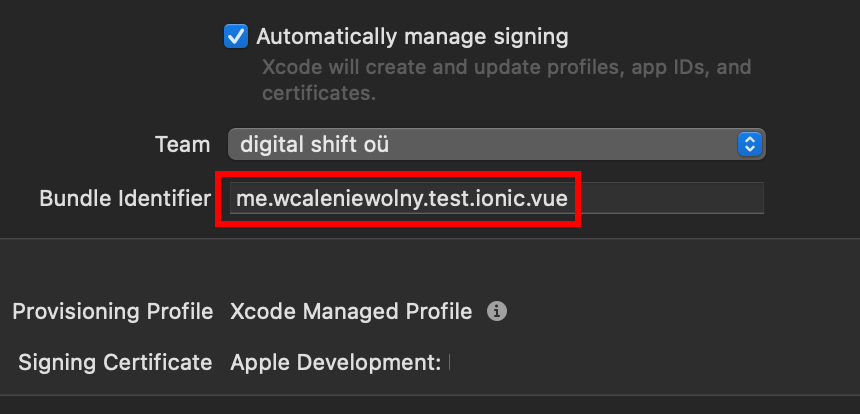
-
Xcode 프로젝트 탐색기에서 App 대상에 두 번 클릭하세요
Bundle IdentifierXcode 프로젝트 설정에서 Targets 섹션에 App을 선택하세요Bundle ID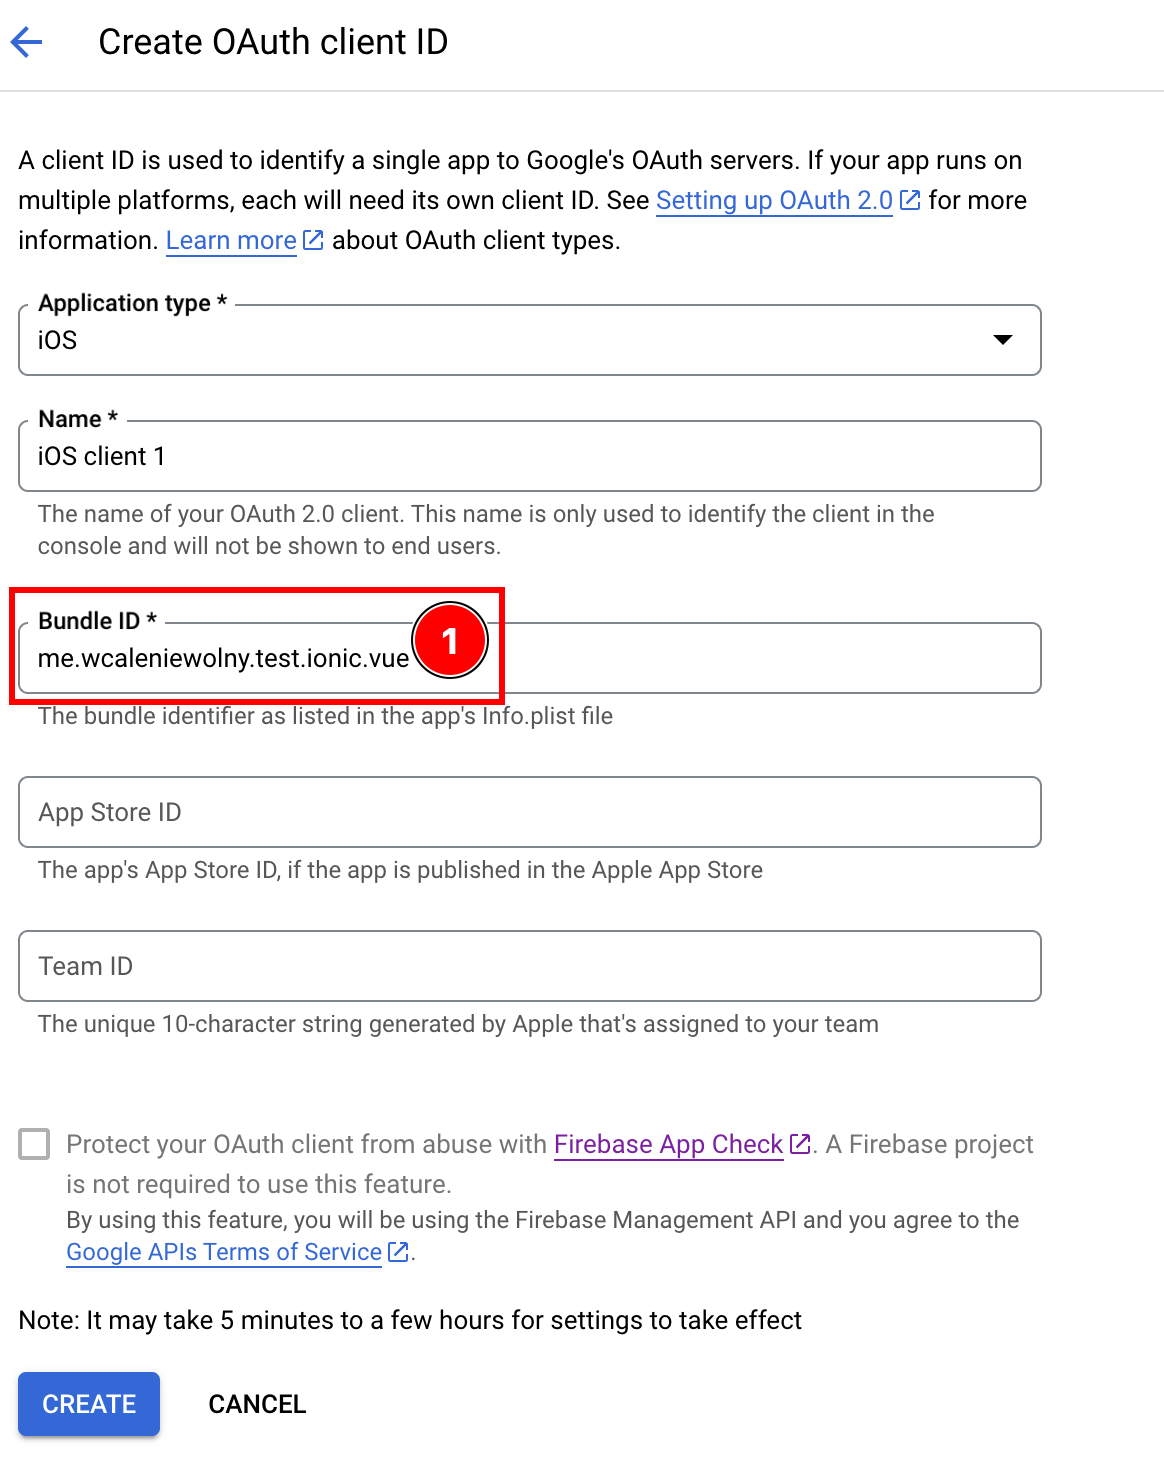
-
-
Optionally, add your
App Store IDorTeam IDApp Store에 앱을 출시한 경우에만 -
After filling all the details, click
create
-
Click
OK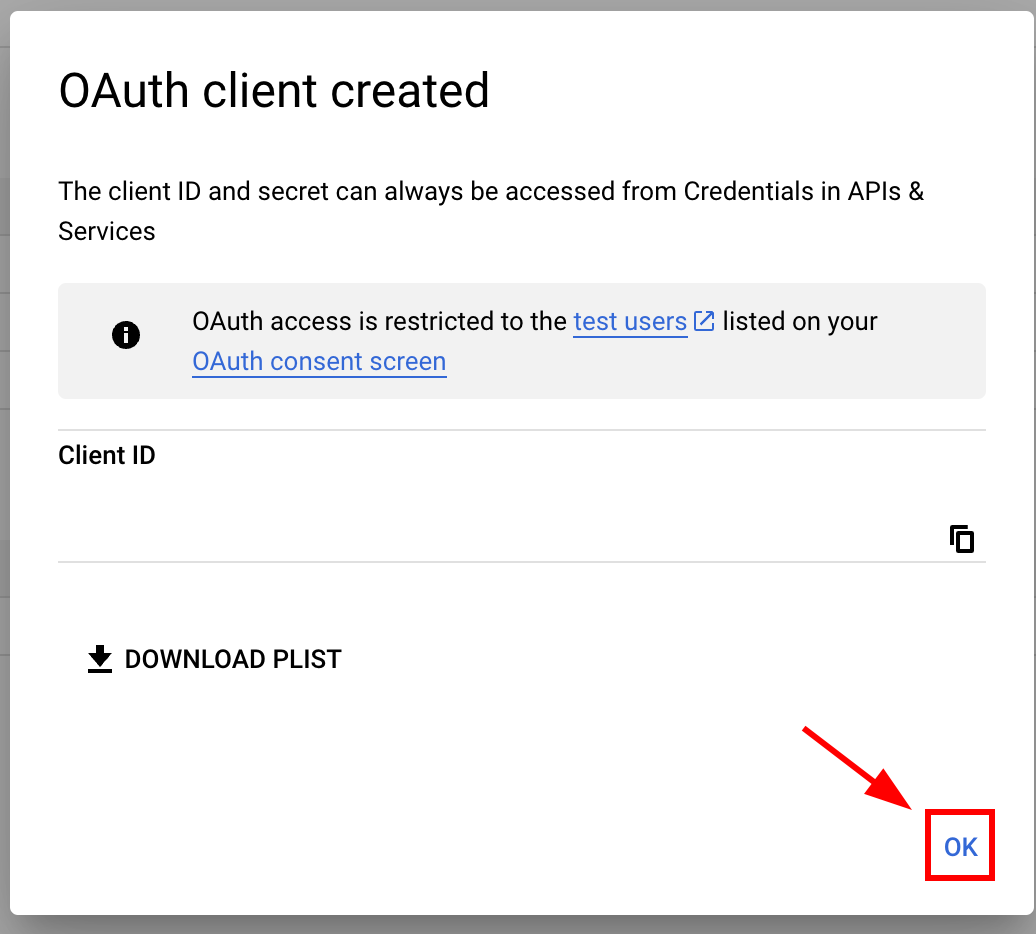
-
Open the newly created iOS client

-
Copy the following data

-
-
앱의 Info.plist를 수정하세요.
-
Xcode에서 열고 프로젝트 탐색기에서
Info.plist파일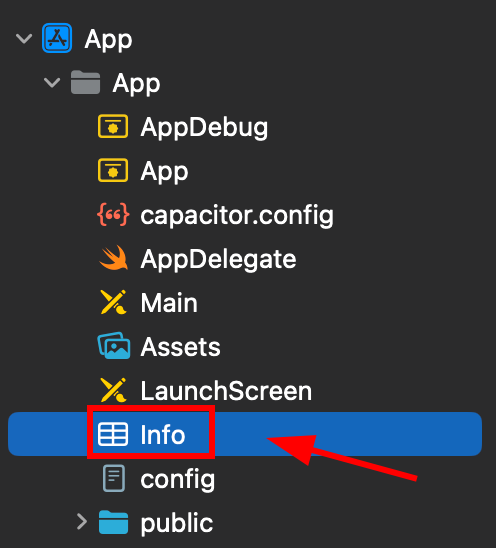
-
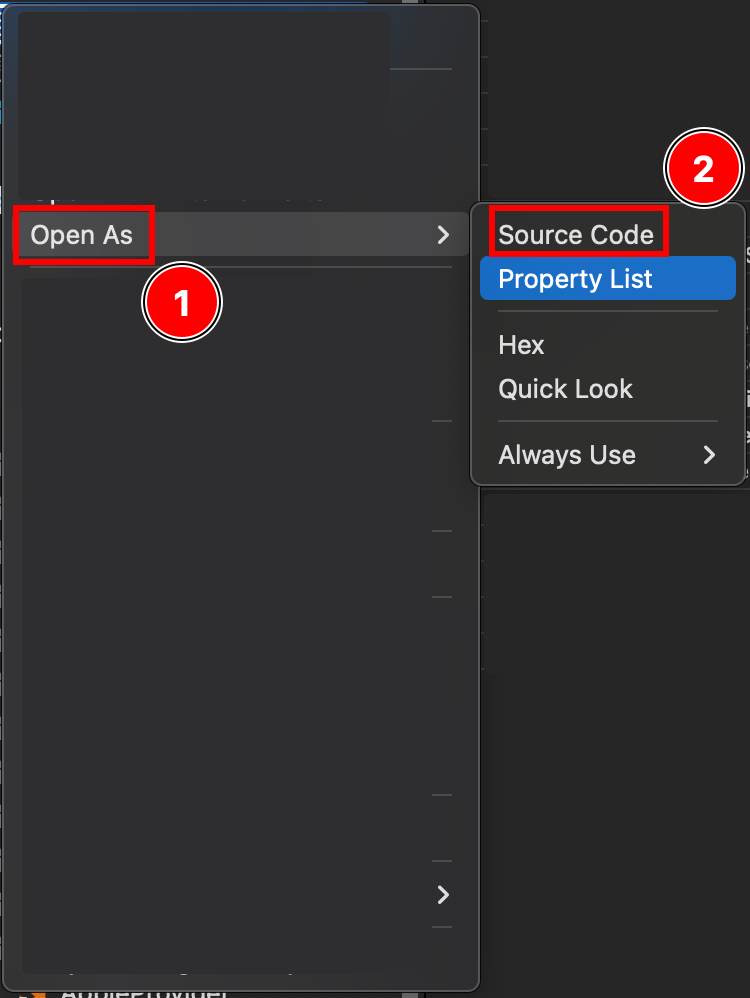
오른쪽 클릭하여 이 파일을 소스 code로 열어보세요.
-
파일의 하단에서
Plist파일의 하단에서</dict>태그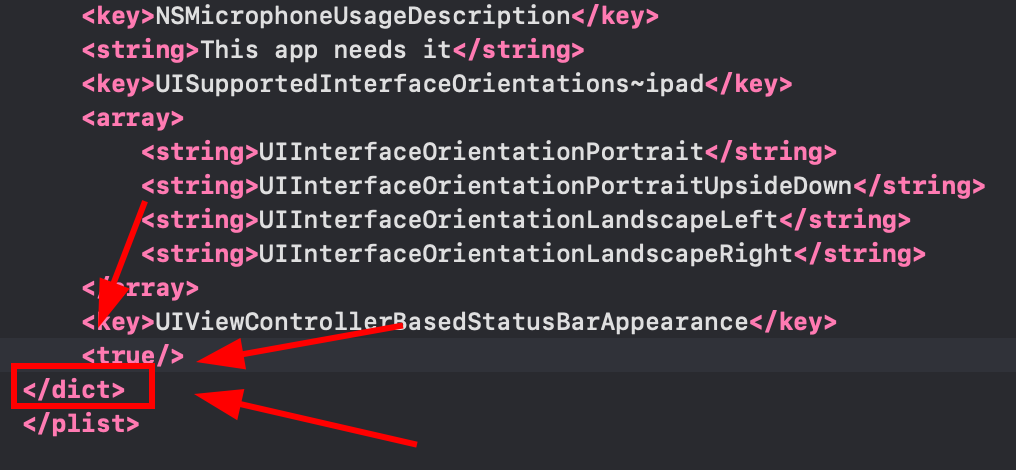
-
닫는 태그 바로 앞에 다음 코드를 삽입하세요.
</dict>URL schemes __CAPGO_KEEP_0__를 Info.plist에 삽입한 파일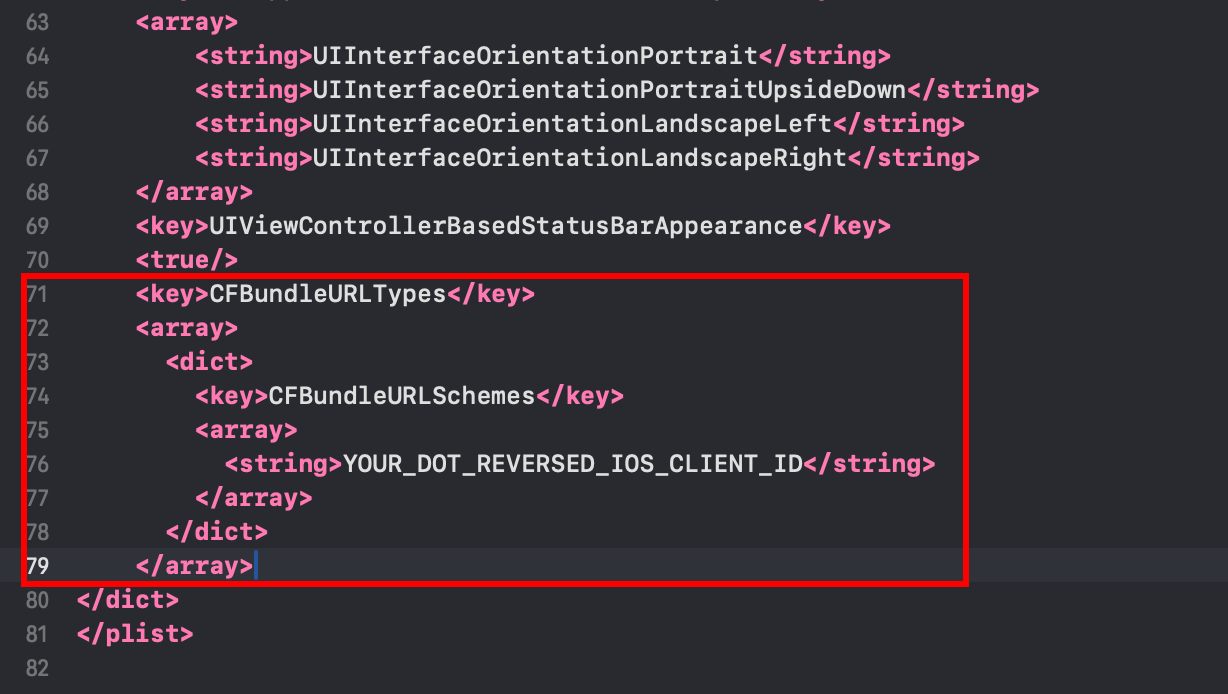 <key>CFBundleURLTypes</key><array><dict><key>CFBundleURLSchemes</key><array><string>YOUR_DOT_REVERSED_IOS_CLIENT_ID</string></array></dict></array>
 -
이 값으로 바꿔보세요.
YOUR_DOT_REVERSED_IOS_CLIENT_IDto the value copied in the previous step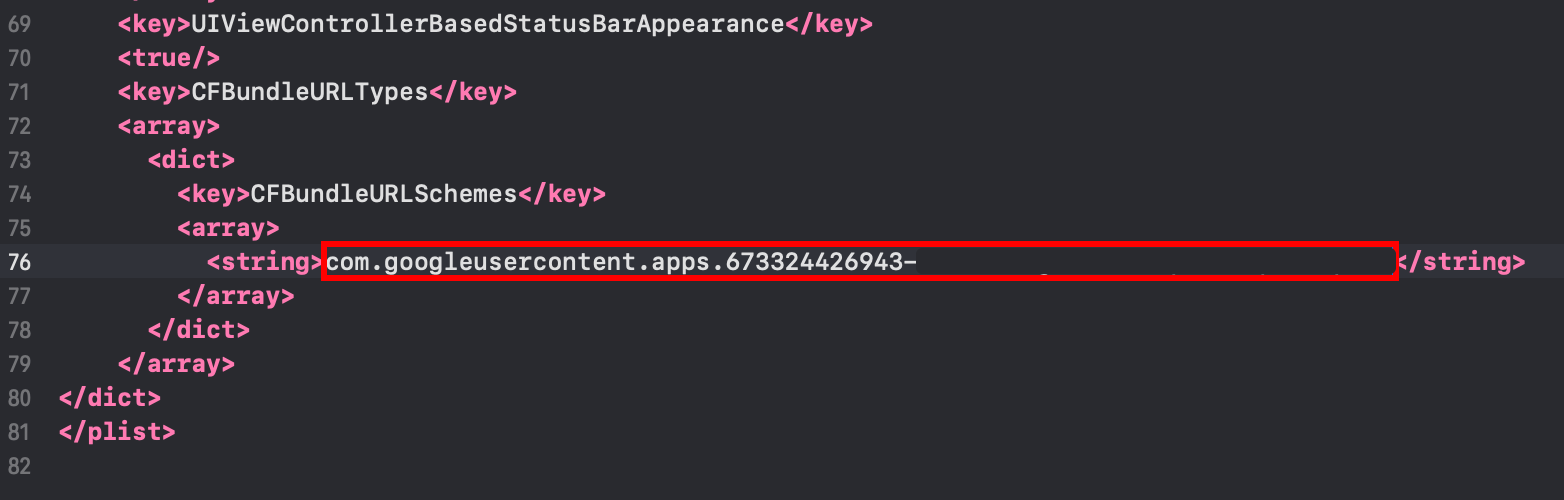
-
__CAPGO_KEEP_0__ 파일을
Command + S
-
-
__CAPGO_KEEP_1__을 수정하여
AppDelegate.swift-
AppDelegate
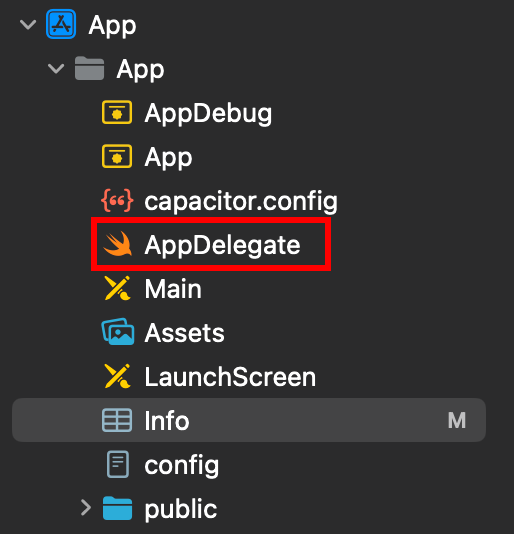
-
__CAPGO_KEEP_2__을 삽입하여
import GoogleSignIn__CAPGO_KEEP_3__의 위쪽에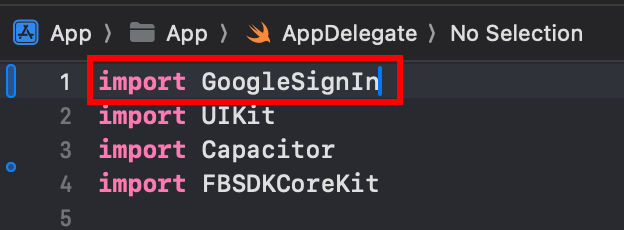
-
Find the
func application(_ app: UIApplication, open url: URL, options: [UIApplication.OpenURLOptionsKey: Any] = [:])function
-
Modify the function to look like this
func application(_ app: UIApplication, open url: URL, options: [UIApplication.OpenURLOptionsKey: Any] = [:]) -> Bool {// Called when the app was launched with a url. Feel free to add additional processing here,// but if you want the App API to support tracking app url opens, make sure to keep this callvar handled: Boolhandled = GIDSignIn.sharedInstance.handle(url)if handled {return true}return ApplicationDelegateProxy.shared.application(app, open: url, options: options)}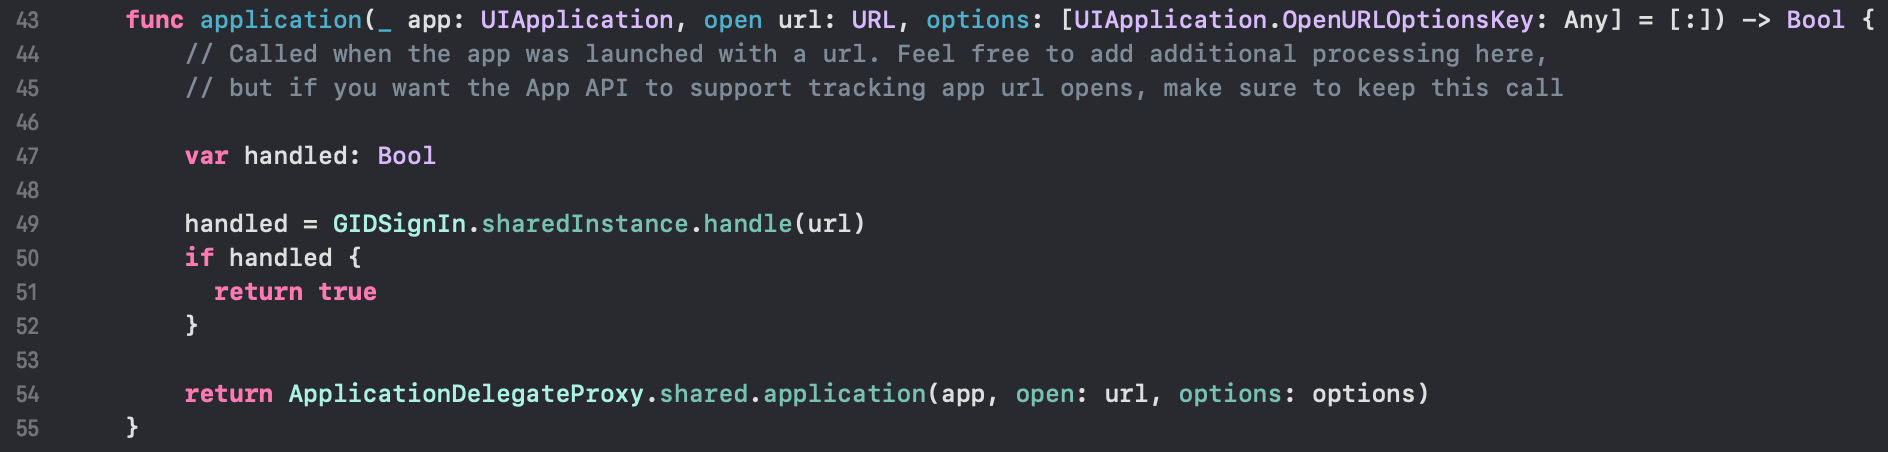
-
Save the file with
Command + S
-
-
Google 로그인 설정을 JavaScript/TypeScript code에서
-
Import
SocialLoginandCapacitorimport { SocialLogin } from '@capgo/capacitor-social-login';import { Capacitor } from '@capacitor/core'; -
__CAPGO_KEEP_0__을 호출하세요 (한 번만 호출하세요)
기본 설정 (온라인 모드 - 대부분의 앱에 권장):
// onMounted is Vue specificonMounted(() => {SocialLogin.initialize({google: {iOSClientId: '673324426943-redacted.apps.googleusercontent.com',mode: 'online' // Default mode}})})고급 설정에 추가 클라이언트 ID를 사용합니다.
onMounted(() => {SocialLogin.initialize({google: {webClientId: 'YOUR_WEB_CLIENT_ID', // Optional: for web platform supportiOSClientId: 'YOUR_IOS_CLIENT_ID', // Required: from step 1iOSServerClientId: 'YOUR_WEB_CLIENT_ID', // Optional: same as webClientId, needed for some advanced featuresmode: 'online' // 'online' or 'offline'}})}) -
Implement the login function. Create a button and run the following code on click
클립보드 복사
const res = await SocialLogin.login({provider: 'google',options: {}})// handle the response - contains user dataconsole.log(JSON.stringify(res))클립보드 복사
const res = await SocialLogin.login({provider: 'google',options: {forceRefreshToken: true // Recommended for offline mode}})// res contains serverAuthCode, not user data// Send serverAuthCode to your backend to get user information// Do not call SocialLogin.refresh() in offline modeconsole.log('Server auth code:', res.result.serverAuthCode)
-
-
protectedTokens
-
애플리케이션을 빌드하고 실행하세요
cap sync -
모든 것을 올바르게 수행했다면, Google 로그인 흐름이 올바르게 작동하는 것을 볼 수 있어야 합니다
-
알려진 문제
알려진 문제개인 정보 보호 화면 플러그인 불일치
개인 정보 보호 화면 플러그인 불일치Google 로그인 플러그인은 @capacitor/privacy-screen. Google 로그인 웹뷰가 개인화 화면에 의해 중단될 수 있습니다.
Workaround: Call await PrivacyScreen.disable(); Google 로그인 함수를 호출하기 전에
import { PrivacyScreen } from '@capacitor/privacy-screen';import { SocialLogin } from '@capgo/capacitor-social-login';
await PrivacyScreen.disable();await SocialLogin.login({  provider: 'google',  options: {}});
iOS에서 Google 로그인으로 계속하기
iOS에서 Google 로그인을 사용하는 경우Google Login on iOS를 사용하여 인증 및 계정 흐름을 계획하고 계정에 연결하세요. Using @__CAPGO_KEEP_0__/__CAPGO_KEEP_1__-social-login Using @__CAPGO_KEEP_0__/__CAPGO_KEEP_1__-social-login for the native capability in Using @__CAPGO_KEEP_0__/__CAPGO_KEEP_1__-social-login, Using @capgo/capacitor-social-login for the native capability in Using @capgo/capacitor-social-login, @capgo/capacitor-social-login 구현 세부 사항은 @capgo/capacitor-social-login에서 확인할 수 있습니다. @capgo/capacitor-passkey 구현 세부 사항은 @capgo/capacitor-passkey에서 확인할 수 있습니다. @capgo/capacitor-native-biometric 구현 세부 사항은 @capgo/capacitor-native-biometric에서 확인할 수 있습니다. 두 단계 인증 구현 세부 사항은 두 단계 인증에서 확인할 수 있습니다.