Facebook 로그인 설정
설치 단계와 이 플러그인의 전체 마크다운 가이드를 포함한 설정 프롬프트 복사
소개
제목이In this guide, you will learn how to setup Facebook Login with Capgo Social Login. You will need the following:
- 인 소개
- 인 소개
- 터미널에 접근하여 키 해시를 생성하는 방법 (Android)
일반 설정
일반 설정Facebook 앱이 이미 존재하지 않는 경우, 다음 단계를 따르세요:
-
Facebook 앱 만들기
이 튜토리얼을 따라서 앱 만들기
-
Facebook 로그인 기능을 앱에 추가하세요
Facebook 개발자 센터에서 Facebook 로그인 기능을 앱에 추가하세요
-
앱을 일반 사용자에게 공개하기 전에, 다음 튜토리얼을 따라서 앱을 공개하세요 __CAPGO_KEEP_0__
중요한 정보
중요한 정보 섹션통합에 필요한 주요 정보를 찾는 곳입니다.
-
CLIENT_TOKEN: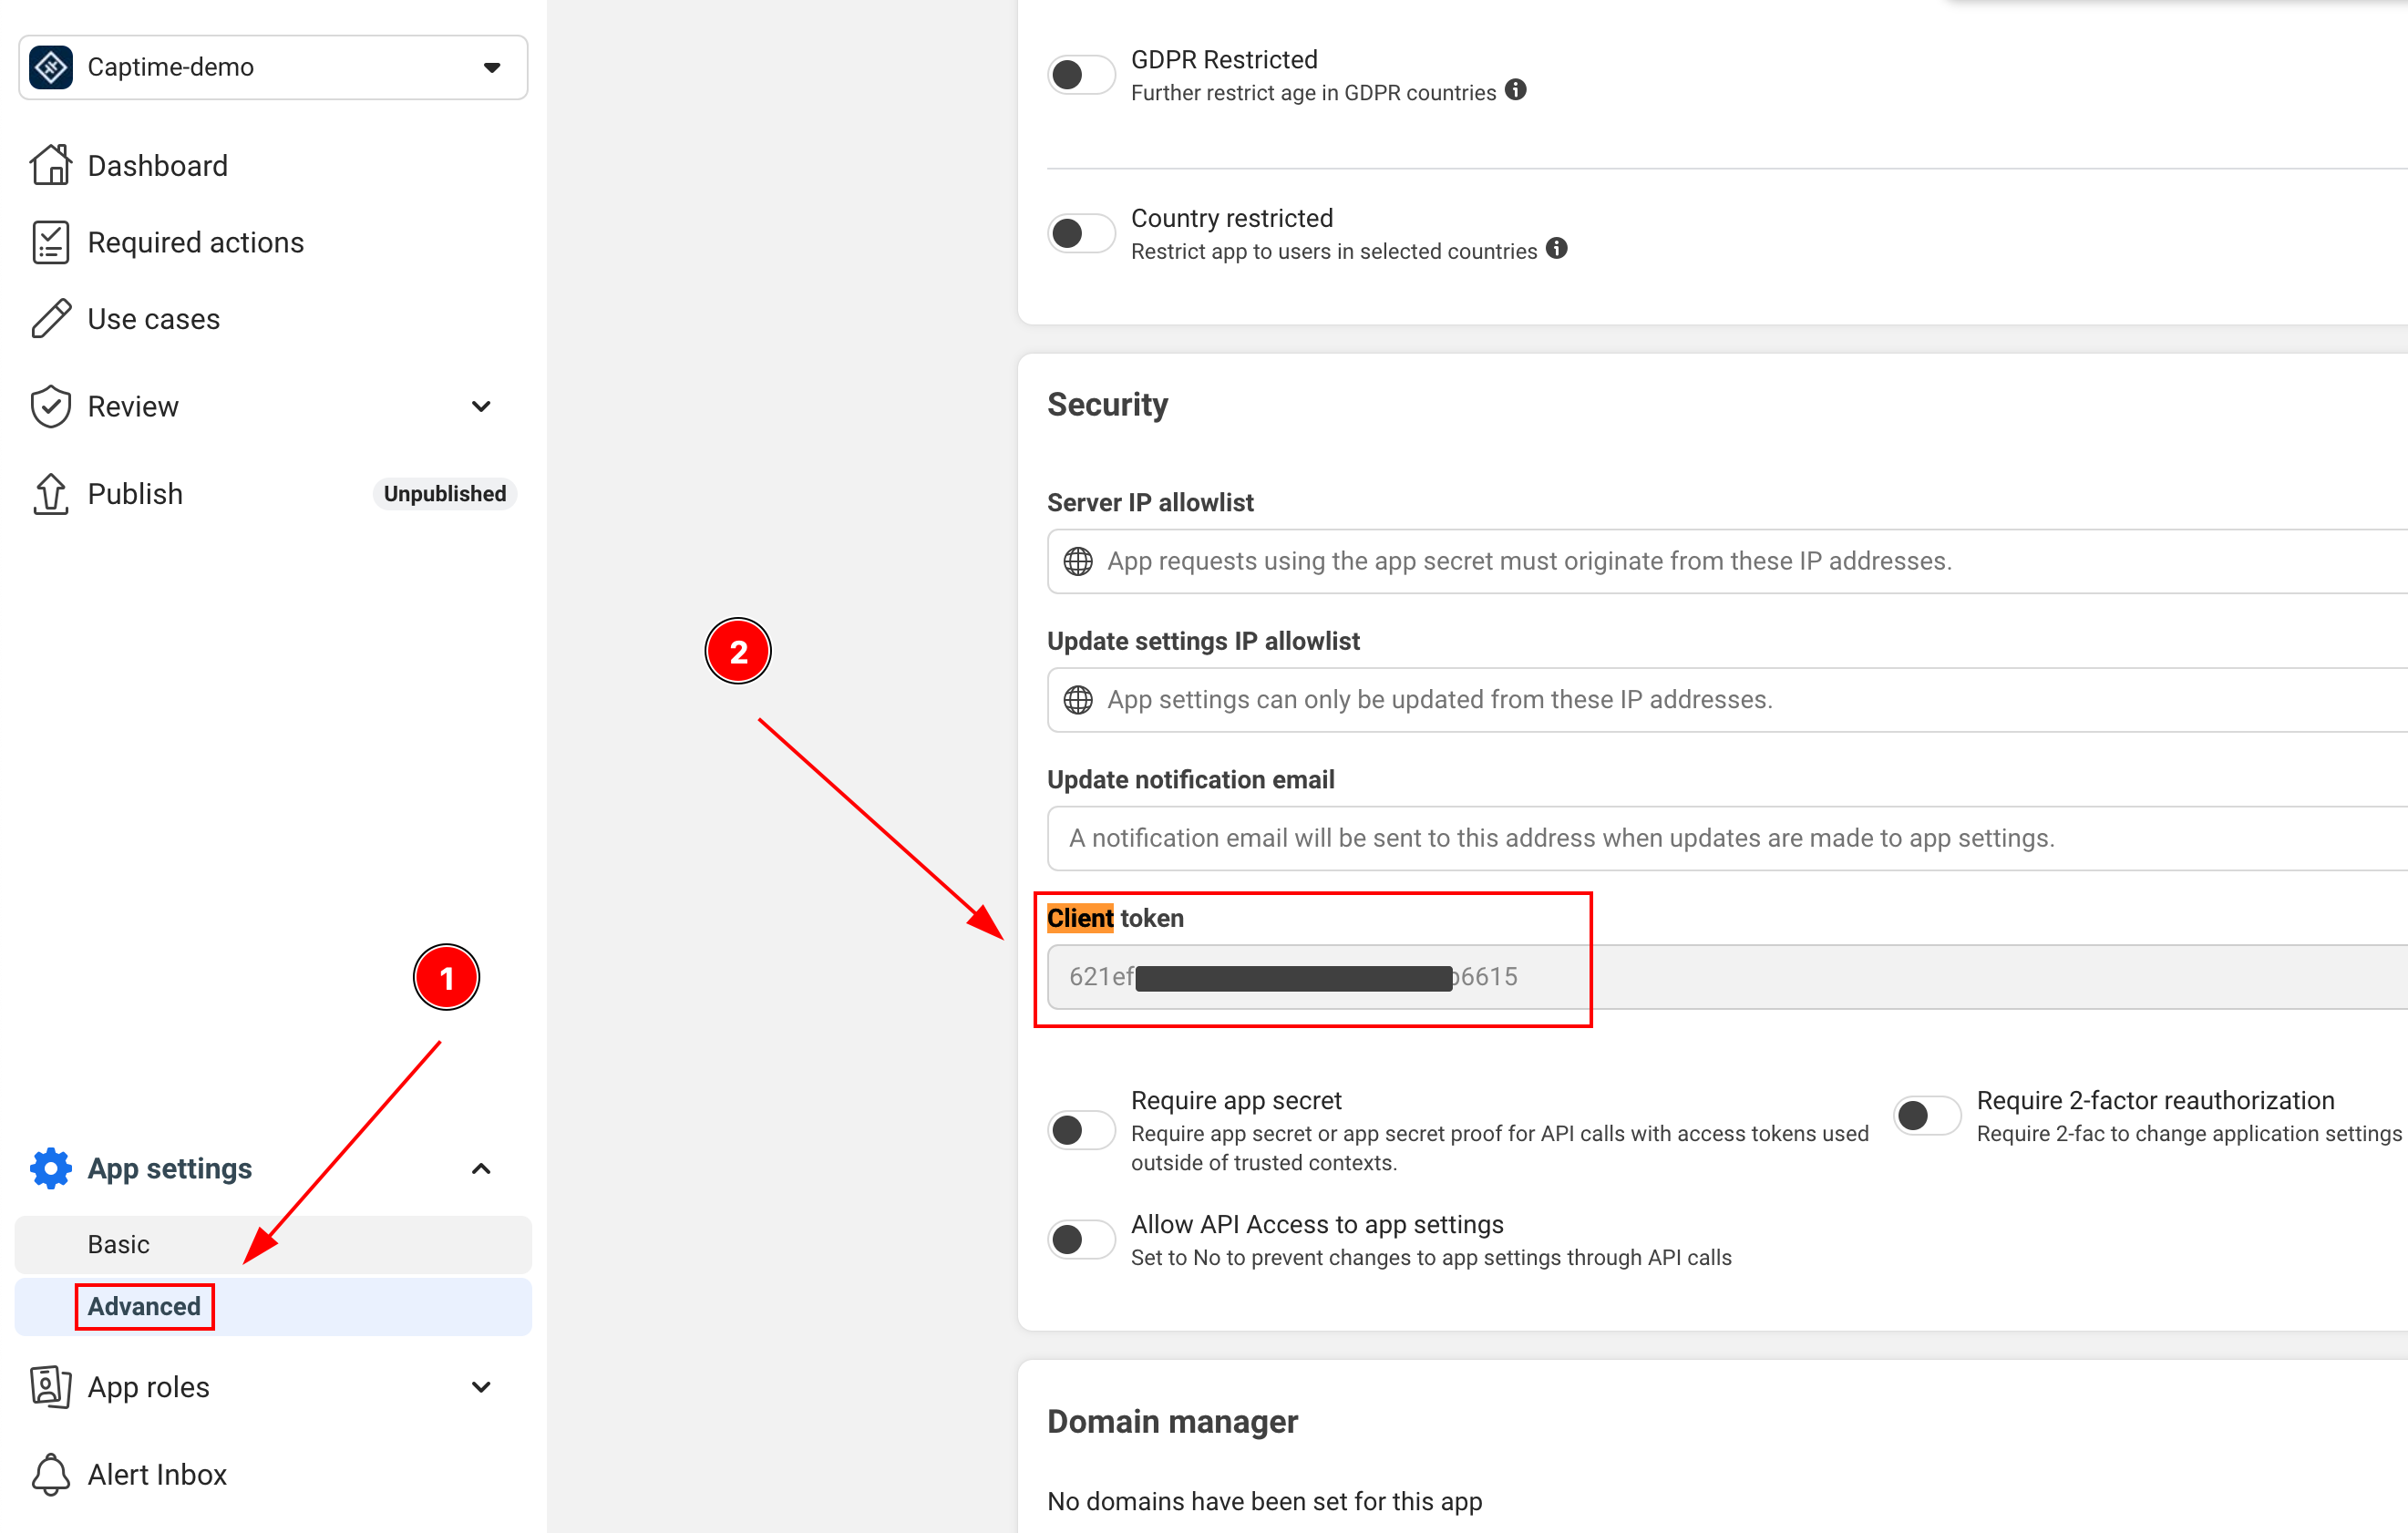
-
APP_ID: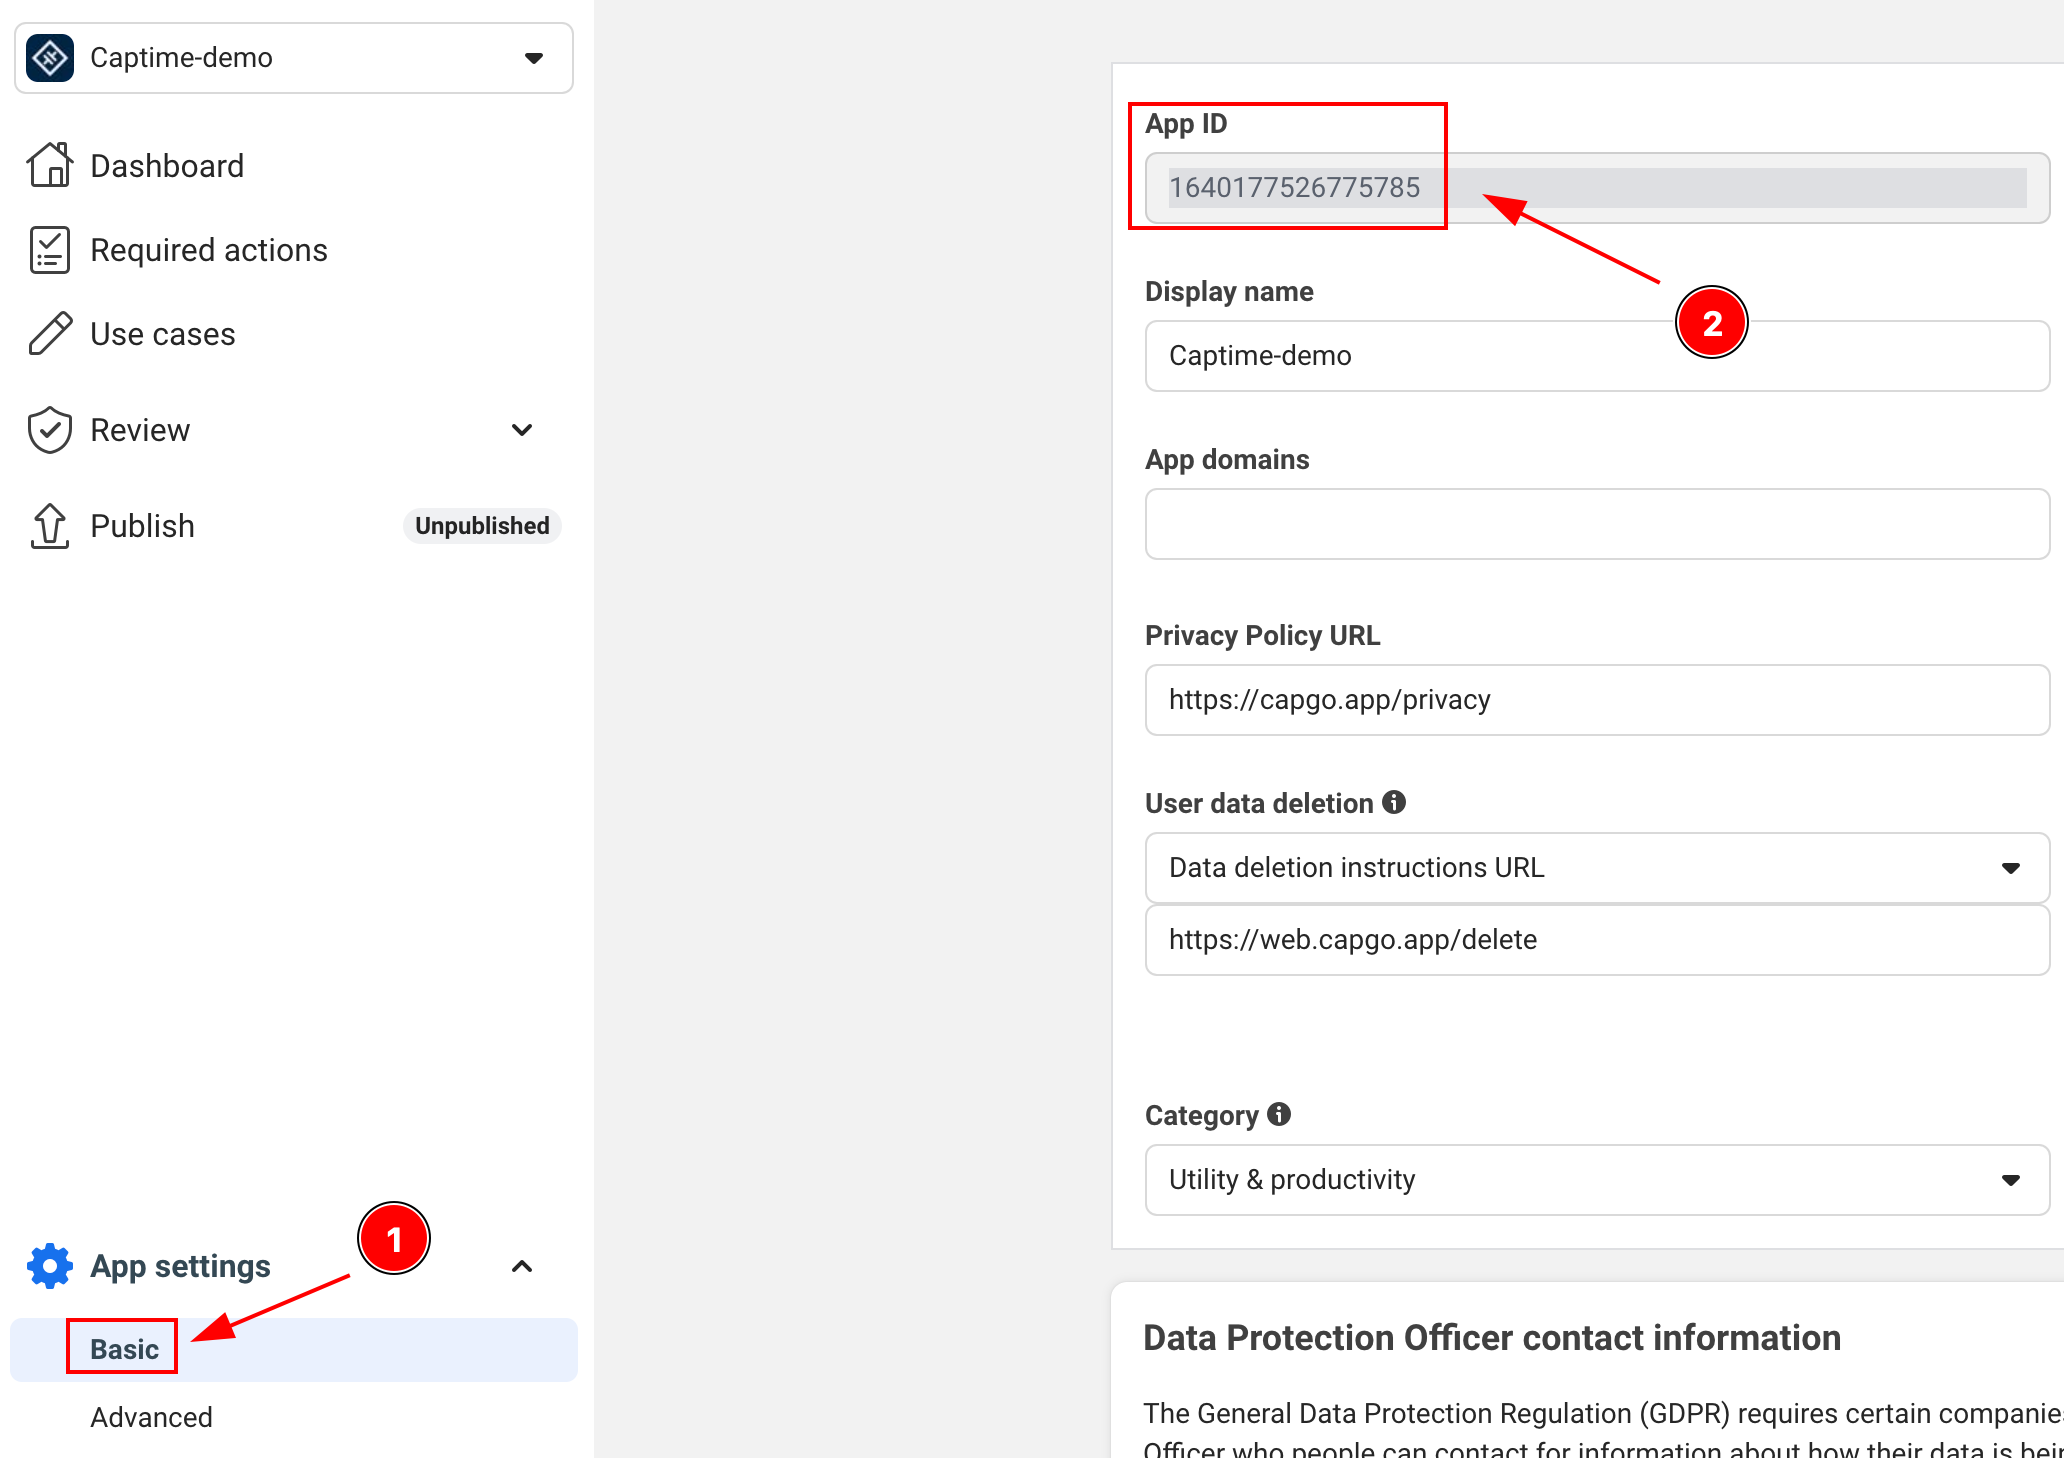
-
APP_NAME: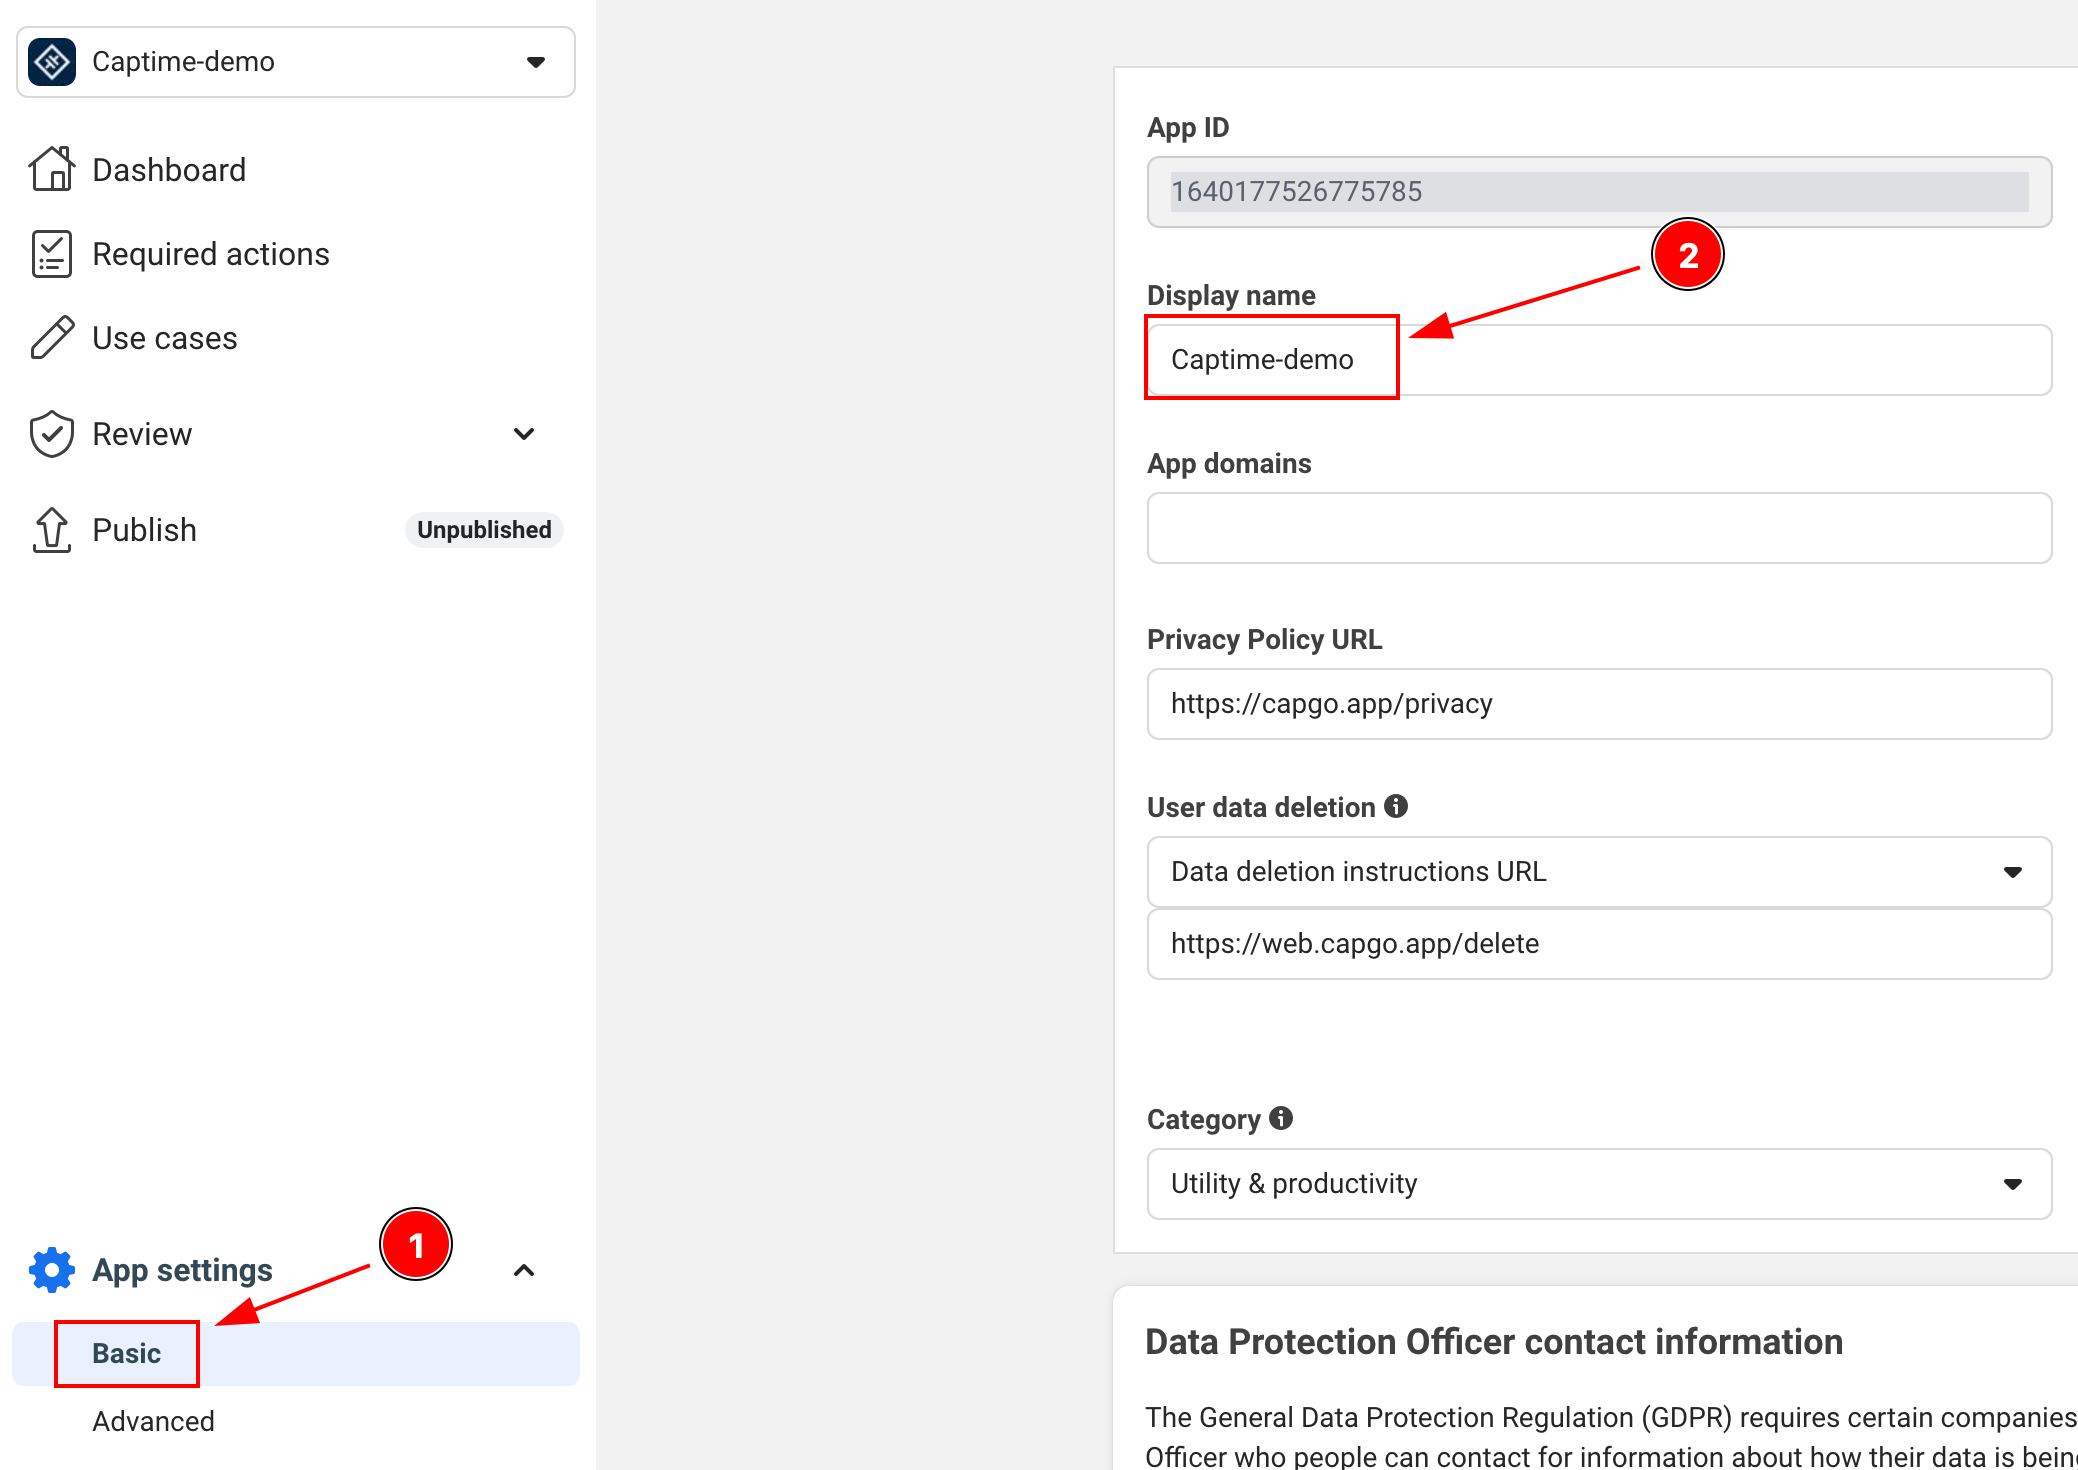
Facebook Business 로그인
Facebook Business 로그인 섹션이 플러그인은 비즈니스 관련 기능 및 권한을 지원하는 Facebook Business Login을 지원합니다. 비즈니스 계정은 표준 소비자 로그인 이외의 추가 권한을 요청할 수 있습니다. 이에는 Instagram 및 Pages 관리도 포함됩니다.
지원되는 비즈니스 권한에는 다음이 포함됩니다.
instagram_basic- Instagram Basic Display에 대한 접근 APIinstagram_manage_insights- Instagram Insights에 대한 접근pages_show_list- 사용자가 관리하는 페이지 목록pages_read_engagement- 페이지에서 참여도 데이터를 읽어오기pages_manage_posts- 페이지에서 게시물을 관리하기business_management- 비즈니스 자산을 관리하기
See the Facebook Permissions Reference for the full permission list.
구성 요구 사항:
- Facebook Developer Console에서 비즈니스 앱으로 Facebook 앱을 구성해야 합니다.
- 비즈니스 권한은 프로덕션 사용 전에 Facebook App Review가 필요할 수 있습니다.
- 앱은 Facebook의 비즈니스 사용 사례 정책을 준수해야 합니다.
Instagram Basic Access
인스타그램 기본 액세스 섹션await SocialLogin.initialize({ facebook: { appId: 'your-business-app-id', clientToken: 'your-client-token', },});
const res = await SocialLogin.login({ provider: 'facebook', options: { permissions: [ 'email', 'public_profile', 'instagram_basic', 'pages_show_list', 'pages_read_engagement', ], },});
const profile = await SocialLogin.providerSpecificCall({ call: 'facebook#getProfile', options: { fields: ['id', 'name', 'email', 'instagram_business_account'], },});페이지 관리
페이지 관리 섹션const res = await SocialLogin.login({ provider: 'facebook', options: { permissions: [ 'email', 'pages_show_list', 'pages_manage_posts', 'pages_read_engagement', ], },});
const profile = await SocialLogin.providerSpecificCall({ call: 'facebook#getProfile', options: { fields: ['id', 'name', 'accounts{id,name,instagram_business_account}'], },});중요 참고 사항:
- 테스트 사용자와 개발 앱을 통해 비즈니스 권한을 테스트할 수 있습니다. 앱 리뷰 전에는 App Review가 필요합니다.
- 생산 사용 전에 대부분의 비즈니스 권한이 App Review를 필요로 합니다.
- 비즈니스 API는 다른 속도 제한을 가집니다. 런칭 전에 Facebook의 현재 플랫폼 문서를 검토하세요.
- Facebook Business Integration Guide를 구성할 때 따르세요. __CAPGO_KEEP_0__
안드로이드 설정
안드로이드 설정 섹션 제목-
Android 앱에 인터넷 권한을 추가하세요.
AndroidManifest.xml이 줄이 포함되어 있어야 합니다.
<uses-permission android:name="android.permission.INTERNET"/> -
Android 키 해시를 생성하세요.
Facebook에 의해 요구되는 중요한 보안 단계입니다. 터미널을 열고 다음 명령어를 실행하세요.
터미널 창 keytool -exportcert -alias androiddebugkey -keystore ~/.android/debug.keystore | openssl sha1 -binary | openssl base64 -A암호를 입력할 때 사용하세요.
android -
Facebook 앱에 키 해시 추가
- Facebook Developers에서 앱의 대시보드로 이동
- 설정 > 기본 설정
- ‘Android’ 섹션으로 스크롤 다운
- Android가 아직 추가되지 않은 경우 ‘플랫폼 추가’ 클릭하고 세부 정보 입력
- 생성한 키 해시 추가
- 프로덕션에서 debug 및 release 키 해시 모두 추가
-
업데이트하여
AndroidManifest.xml키 해시를 포함하도록<application>...<activity android:name="com.facebook.FacebookActivity"android:configChanges="keyboard|keyboardHidden|screenLayout|screenSize|orientation"android:label="@string/app_name" /><activityandroid:name="com.facebook.CustomTabActivity"android:exported="true"><intent-filter><action android:name="android.intent.action.VIEW" /><category android:name="android.intent.category.DEFAULT" /><category android:name="android.intent.category.BROWSABLE" /><data android:scheme="FB[APP_ID]" /></intent-filter></activity></application>
iOS 설정 섹션
Facebook 개발자 콘솔에서 iOS 플랫폼을 추가하세요-
Facebook 개발자 콘솔에서 앱의 대시보드에 가세요
- 설정 > 기본으로 이동하세요
- 페이지의 하단에 있는 “플랫폼 추가” 버튼을 클릭하세요
- __CAPGO_KEEP_0__
- iOS를 선택하고 필요한 정보를 입력하세요
-
Xcode 프로젝트를 열고 Info.plist로 이동하세요
-
Info.plist에 다음 항목을 추가하세요:
<key>FacebookAppID</key><string>[APP-ID]</string><key>FacebookClientToken</key><string>[CLIENT-TOKEN]</string><key>FacebookDisplayName</key><string>[APP-NAME]</string><key>LSApplicationQueriesSchemes</key><array><string>fbapi</string><string>fb-messenger-share-api</string></array><key>CFBundleURLTypes</key><array><dict><key>CFBundleURLSchemes</key><array><string>fb[APP-ID]</string></array></dict></array> -
수정
AppDelegate.swiftimport FBSDKCoreKit@UIApplicationMainclass AppDelegate: UIResponder, UIApplicationDelegate {func application(_ application: UIApplication, didFinishLaunchingWithOptions launchOptions: [UIApplication.LaunchOptionsKey: Any]?) -> Bool {// Override point for customization after application launch.// Initialize Facebook SDKFBSDKCoreKit.ApplicationDelegate.shared.application(application,didFinishLaunchingWithOptions: launchOptions)return true}func application(_ app: UIApplication, open url: URL, options: [UIApplication.OpenURLOptionsKey: Any] = [:]) -> Bool {// Called when the app was launched with a url. Feel free to add additional processing here,// but if you want the App API to support tracking app url opens, make sure to keep this callif (FBSDKCoreKit.ApplicationDelegate.shared.application(app,open: url,sourceApplication: options[UIApplication.OpenURLOptionsKey.sourceApplication] as? String,annotation: options[UIApplication.OpenURLOptionsKey.annotation])) {return true;} else {return ApplicationDelegateProxy.shared.application(app, open: url, options: options)}}}
Facebook 로그인 사용
Facebook 로그인 사용-
앱에 Facebook 로그인을 초기화하세요
import { SocialLogin } from '@capgo/capacitor-social-login';// Initialize during app startupawait SocialLogin.initialize({facebook: {appId: 'APP_ID',clientToken: 'CLIENT_TOKEN',}}) -
로그인 함수를 implement하세요
async function loginWithFacebook() {try {const result = await SocialLogin.login({provider: 'facebook',options: {permissions: ['email', 'public_profile'],limitedLogin: false // See Limited Login section below for important details}});console.log('Facebook login result:', result);// Handle successful login} catch (error) {console.error('Facebook login error:', error);// Handle error}} -
사용자 프로필 데이터 가져오기
성공적으로 로그인한 후 추가 프로필 정보를 가져올 수 있습니다:
async function getFacebookProfile() {try {const profileResponse = await SocialLogin.providerSpecificCall({call: 'facebook#getProfile',options: {fields: ['id', 'name', 'email', 'first_name', 'last_name', 'picture']}});console.log('Facebook profile:', profileResponse.profile);return profileResponse.profile;} catch (error) {console.error('Failed to get Facebook profile:', error);return null;}}// Example usage after loginasync function loginAndGetProfile() {const loginResult = await loginWithFacebook();if (loginResult) {const profile = await getFacebookProfile();if (profile) {console.log('User ID:', profile.id);console.log('Name:', profile.name);console.log('Email:', profile.email);console.log('Profile Picture:', profile.picture?.data?.url);}}}토큰 유형 제한:
getProfilecall only works when you have an __CAPGO_KEEP_0__. access token (표준 로그인에 추적 허용). 사용자가 추적 거부하거나 제한 로그인(JWT 토큰만)을 사용하는 경우, 이 호출은 실패합니다. 그 경우, 초기 로그인 응답에서 제공된 프로필 데이터를 사용하세요.
⚠️ 중요: 백엔드 토큰 처리
Backend Token 처리에 대한 중요 공지백엔드에서는 두 가지 토큰 타입을 처리해야 합니다. iOS 사용자는 App Tracking Transparency 설정에 따라 Access 토큰 또는 JWT 토큰을 받을 수 있기 때문입니다. 반면 Android 사용자는 항상 Access 토큰을 받습니다. __CAPGO_KEEP_0__
플랫폼별 토큰 유형
플랫폼별 토큰 유형 섹션 제목| 플랫폼 | limitedLogin 설정 | 사용자 ATT 선택 | 결과 토큰 유형 |
|---|---|---|---|
| iOS | true | 어떤 | JWT 토큰 |
| iOS | false | 추적 허용 | 액세스 토큰 |
| iOS | false | tracking을 거부합니다. | __CAPGO_KEEP_0__ (자동으로 덮어쓰기) |
| Android | 어떤 경우든 | N/A | __CAPGO_KEEP_0__ (항상) |
__CAPGO_KEEP_1__ 구현
__CAPGO_KEEP_2__ 구현-
__CAPGO_KEEP_3__ 구현
async function loginWithFacebook() {try {const loginResult = await SocialLogin.login({provider: 'facebook',options: {permissions: ['email', 'public_profile'],limitedLogin: false // iOS: depends on ATT, Android: ignored}});if (loginResult.accessToken) {// Access token (Android always, iOS when tracking allowed)return handleAccessToken(loginResult.accessToken.token);} else if (loginResult.idToken) {// JWT token (iOS only when tracking denied or limitedLogin: true)return handleJWTToken(loginResult.idToken);}} catch (error) {console.error('Facebook login error:', error);}} -
__CAPGO_KEEP_5__ 예시
import { OAuthProvider, FacebookAuthProvider, signInWithCredential } from 'firebase/auth';async function handleAccessToken(accessToken: string, nonce: string) {// For access tokens, use OAuthProvider (new method)const fbOAuth = new OAuthProvider("facebook.com");const credential = fbOAuth.credential({idToken: accessToken,rawNonce: nonce});try {const userResponse = await signInWithCredential(auth, credential);return userResponse;} catch (error) {console.error('Firebase OAuth error:', error);return false;}}async function handleJWTToken(jwtToken: string) {// For JWT tokens, send to your backend for validationtry {const response = await fetch('/api/auth/facebook-jwt', {method: 'POST',headers: {'Content-Type': 'application/json',},body: JSON.stringify({ jwtToken })});const result = await response.json();return result;} catch (error) {console.error('JWT validation error:', error);return false;}} -
백엔드 JWT 유효성 검사
// Backend: Validate JWT token from Facebookimport jwt from 'jsonwebtoken';import { Request, Response } from 'express';app.post('/api/auth/facebook-jwt', async (req: Request, res: Response) => {const { jwtToken } = req.body;try {// Verify JWT token with Facebook's public key// See: https://developers.facebook.com/docs/facebook-login/limited-login/token/validating/#standard-claimsconst decoded = jwt.verify(jwtToken, getFacebookPublicKey(), {algorithms: ['RS256'],audience: process.env.FACEBOOK_APP_ID,issuer: 'https://www.facebook.com' // From: https://www.facebook.com/.well-known/openid-configuration/?_rdr});// Extract user info from JWTconst userInfo = {id: decoded.sub,email: decoded.email,name: decoded.name,isJWTAuth: true};// Create your app's session/tokenconst sessionToken = createUserSession(userInfo);res.json({success: true,token: sessionToken,user: userInfo});} catch (error) {console.error('JWT validation failed:', error);res.status(401).json({ success: false, error: 'Invalid token' });}}); -
일반 백엔드 토큰 처리기
// Handle both token types in your backendasync function authenticateFacebookUser(tokenData: any) {if (tokenData.accessToken) {// Handle access token - validate with Facebook Graph APIconst response = await fetch(`https://graph.facebook.com/me?access_token=${tokenData.accessToken}&fields=id,name,email`);const userInfo = await response.json();return {user: userInfo,tokenType: 'access_token',expiresIn: tokenData.expiresIn || 3600};} else if (tokenData.jwtToken) {// Handle JWT token - decode and validate// See: https://developers.facebook.com/docs/facebook-login/limited-login/token/validating/#standard-claimsconst decoded = jwt.verify(tokenData.jwtToken, getFacebookPublicKey());return {user: {id: decoded.sub,name: decoded.name,email: decoded.email},tokenType: 'jwt',expiresIn: decoded.exp - Math.floor(Date.now() / 1000)};} else {throw new Error('No valid token provided');}}
중요 고려 사항
중요 고려 사항 섹션Access Token (표준 로그인):
- ✅ 안드로이드: 항상 사용 가능 (iOS-ONLY 제한이 적용되지 않음)
- ✅ iOS: 사용자가 앱 추적을 허용할 때만
- ✅ Facebook Graph에 접근할 수 있습니다 API
- ✅ 더 긴 유효 기간
- ✅ 사용자 데이터가 더 많이 사용 가능합니다.
- ❌ iOS에서 사용하는 경우가 점점 줄어들고 있습니다. 사용자가 트래킹 거부하는 경우
iOS-Only Privacy Mode에서 사용하는 JWT 토큰:
- ❌ Android: 사용되지 않습니다 (지원되지 않음)
- ✅ iOS: 트래킹이 거부되거나
limitedLogin: true - ✅ iOS 사용자 개인 정보 보호 설정을 존중합니다.
- ❌ 기본 사용자 정보만 포함합니다.
- ❌ 유효 시간이 짧습니다.
- ❌ Facebook Graph에 접근할 수 없습니다 API
- ⚠️ iOS 사용자들의 가장 일반적인 상황은
플랫폼에 따른 동작:
- iOS 앱iOS 앱은
- : 액세스 토큰과 JWT 토큰 모두 처리해야 합니다안드로이드 앱
- : 액세스 토큰만 처리해야 합니다크로스 플랫폼 앱
보안 컨텍스트 요구 사항 (Web/Capacitor)
보안 컨텍스트 요구 사항 (Web/Capacitor)API 암호화 제한
API 암호화 제한업데이트 된 Facebook 로그인 흐름은 __CAPGO_KEEP_0__ Web API __CAPGO_KEEP_0__를 생성하기 위해 사용하는 nonce는 보안 컨텍스트에서만 사용할 수 있습니다. 클립보드 복사:
// This requires secure context (HTTPS or localhost)async function sha256(message: string) { const msgBuffer = new TextEncoder().encode(message); const hashBuffer = await crypto.subtle.digest("SHA-256", msgBuffer); // ❌ Fails in insecure context // ...}Section titled “개발 환경 문제”
일반적인 문제commonProblem: ionic serve HTTP URL을 사용하는 경우 Facebook 인증이 깨지게 됩니다.
| 환경 | API을 사용하는 Crypto | Facebook 로그인 작동 |
|---|---|---|
http://localhost:3000 | ✅ 예 | ✅ 예 |
http://127.0.0.1:3000 | ✅ 예 | ✅ 예 |
http://192.168.1.100:3000 | ❌ 아니오 | ❌ 아니오 |
https://any-domain.com | ✅ 예 | ✅ 예 |
Capacitor 개발을 위한 솔루션
Capacitor 개발을 위한 솔루션 섹션 제목-
localhost를 사용하여 웹 테스트
터미널 창 # Instead of ionic serve --host=0.0.0.0ionic serve --host=localhost -
Ionic에서 HTTPS를 활성화
터미널 창 ionic serve --ssl -
실제 기기에서 테스트
터미널 창 # Capacitor apps run in secure context on devicesionic cap run iosionic cap run android -
개발을 위한 대체 nonce 생성
async function generateNonce() {if (typeof crypto !== 'undefined' && crypto.subtle) {// Secure context - use crypto.subtlereturn await sha256(Math.random().toString(36).substring(2, 10));} else {// Fallback for development (not secure for production)console.warn('Using fallback nonce - not secure for production');return btoa(Math.random().toString(36).substring(2, 10));}}
Firebase Integration Note
Firebase Integration Note최근 Firebase 문서에서는 Facebook 인증을 위해 JWT 토큰과 NONCE가 필요합니다. 로그인 설정에 관계없이 이 방법은 양쪽 모두에 작동합니다. limitedLogin: true 및 limitedLogin: false:
// Both modes can return JWT tokens depending on user choice const loginResult = await SocialLogin.login({ provider: 'facebook', options: { permissions: ['email', 'public_profile'], limitedLogin: false, // true = always JWT, false = depends on user tracking choice nonce: nonce } });개발 제한개발 제한 ionic serve on a network IP (not localhost), Facebook login will fail due to crypto API restrictions. Use localhost or HTTPS for web testing.
문제 해결
제목: 문제 해결일반적인 문제와 해결 방법
제목: 일반적인 문제와 해결 방법-
Android에서 키 해시 오류
- 정확한 키 해시를 Facebook 대시보드에 추가했는지 다시 확인하세요.
- 릴리즈 빌드의 경우, 디버그 및 릴리즈 키 해시 모두를 추가했는지 확인하세요.
- 해시를 생성할 때 올바른 키 스토어를 사용하고 있는지 확인하세요.
-
Facebook 로그인 버튼이 나타나지 않습니다.
- 모든 매니페스트 항목이 정확한지 확인하세요.
- Facebook App ID 및 Client Token이 정확한지 확인하세요.
- SDK을 올바르게 초기화했는지 확인하세요.
-
iOS에서 발생하는 일반적인 문제
- Info.plist 항목이 모두 정확한지 확인하세요.
- URL 스키마가 올바르게 구성되었는지 확인하세요.
- Facebook 대시보드에 등록된 것과 일치하는지 확인하세요.
테스트
테스트-
테스트하기 전에 Facebook 개발자 콘솔에서 테스트 사용자를 추가하세요.
- Roles > Test Users로 이동하세요.
- 테스트 사용자를 생성하세요.
- 테스트를 위해 이 인증 정보를 사용하세요.
-
debug 및 release 빌드 모두 테스트하세요.
- __CAPGO_KEEP_0__ 빌드에 대한 디버그 키 해시
- __CAPGO_KEEP_0__ 빌드에 대한 릴리스 키 해시
- 에뮬레이터와 물리 장치 모두에서 테스트하기
로그인 흐름의 전체를 테스트하세요. 그 중에는:
- 로그인 성공
- 로그인 취소
- 오류 처리
- 로그아웃 기능
Facebook 로그인 설정에서 계속하기
Facebook 로그인 설정에서 계속하기__CAPGO_KEEP_1__이 사용 중이라면 Facebook 로그인 설정에서 계속하기 인증 및 계정 흐름을 계획하고 연결하세요. @capgo/capacitor-social-login을 사용하여 @capgo/capacitor-social-login의 원시 기능을 사용하여 @capgo/capacitor-social-login @capgo/capacitor-social-login의 구현 세부 정보를 사용하여 @capgo/capacitor-passkey @capgo/capacitor-passkey의 구현 세부 정보를 사용하여 @capgo/capacitor-native-biometric @capgo/capacitor-native-biometric의 구현 세부 정보를 사용하여 두 가지 인증 방법을 사용하고 두 단계 인증 두 단계 인증의 구현 세부 정보를 사용하여