Apple Anmeldung bei Android
Apple Die Anmeldung auf Android ist schwierig. Apple bietet keine offizielle Unterstützung für Sign in with Apple auf Android, daher ist die Lösung etwas hackig.
Android verwendet derzeit Chrome-Tabs, um eine OAuth2-Website anzuzeigen. Dieser Ansatz birgt folgende Herausforderungen:
- Schwierige Konfiguration
- Ein Backend ist erforderlich
Den Ablauf auf Android verstehen.
Section titled “Den Ablauf auf Android verstehen.”Lassen Sie mich den Ablauf auf Android anhand eines Diagramms erläutern:
flowchart TD
    A("await SocialLogin.login()") -->|Im Plugin behandelt|B(Anmelde-URL generieren)
    B --> |Link übergeben| C (Öffnen Sie den Chrome-Browser)
    C -> D (Warten Sie, bis sich der Benutzer anmeldet)
    D --> |Apple leitet zu Ihrem Backend weiter|E(Verarbeitet die von Apple zurückgegebenen Daten)
    E -> F (Zurück zur App weiterleiten)
    F -> G(Zurück zu JS)
Nachdem Sie nun die Herausforderungen und den Ablauf kennen, beginnen wir mit der Konfiguration.
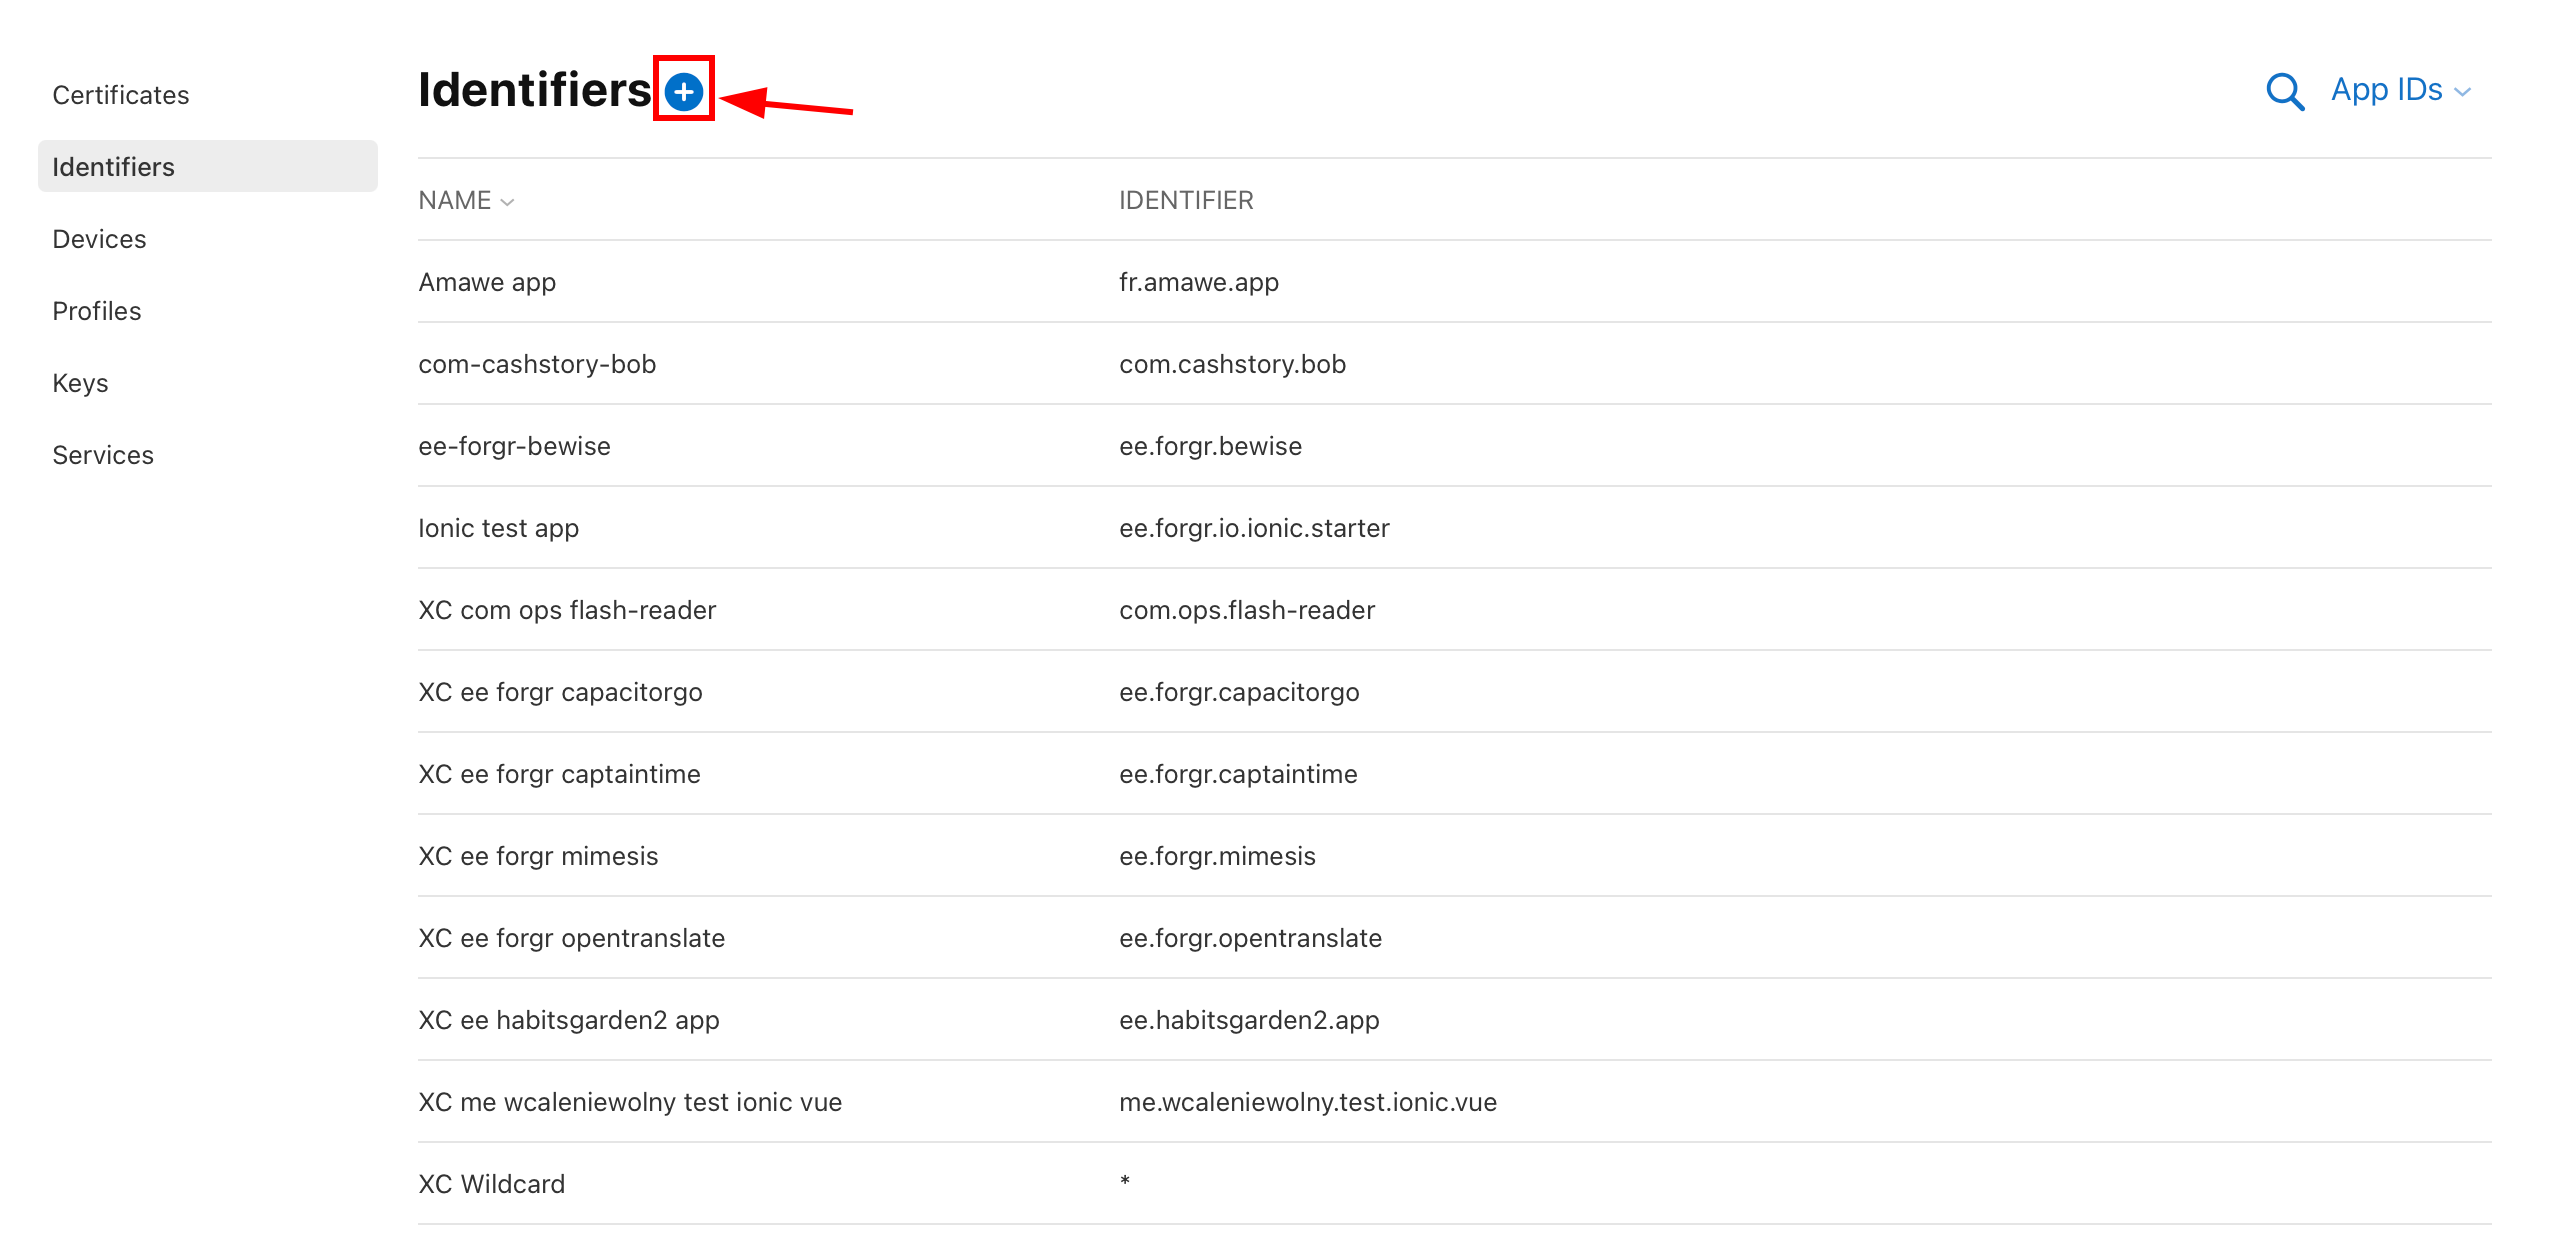
Erstellen der Service-ID
Section titled “Erstellen der Service-ID”-
Melden Sie sich beim Apple Entwicklerportal an.
-
Klicken Sie auf
Identifiers.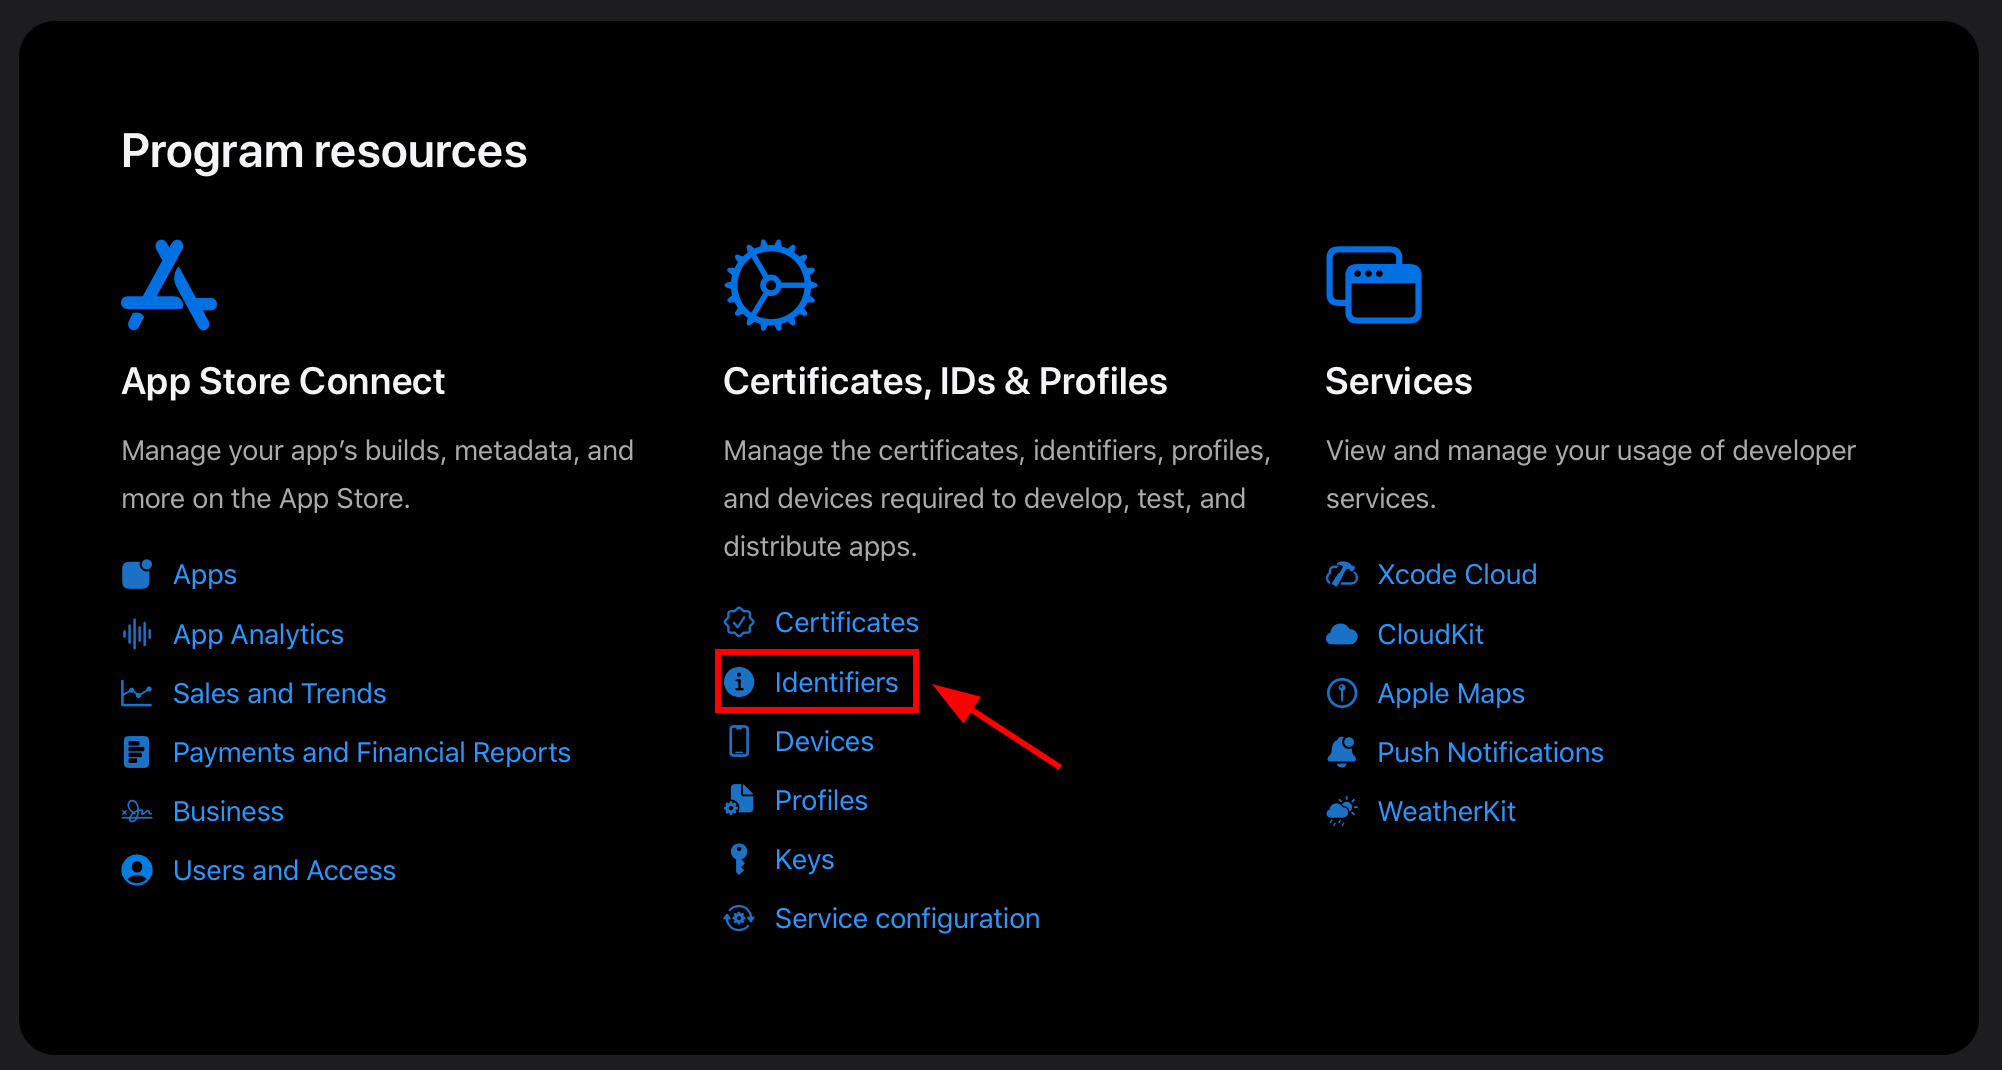
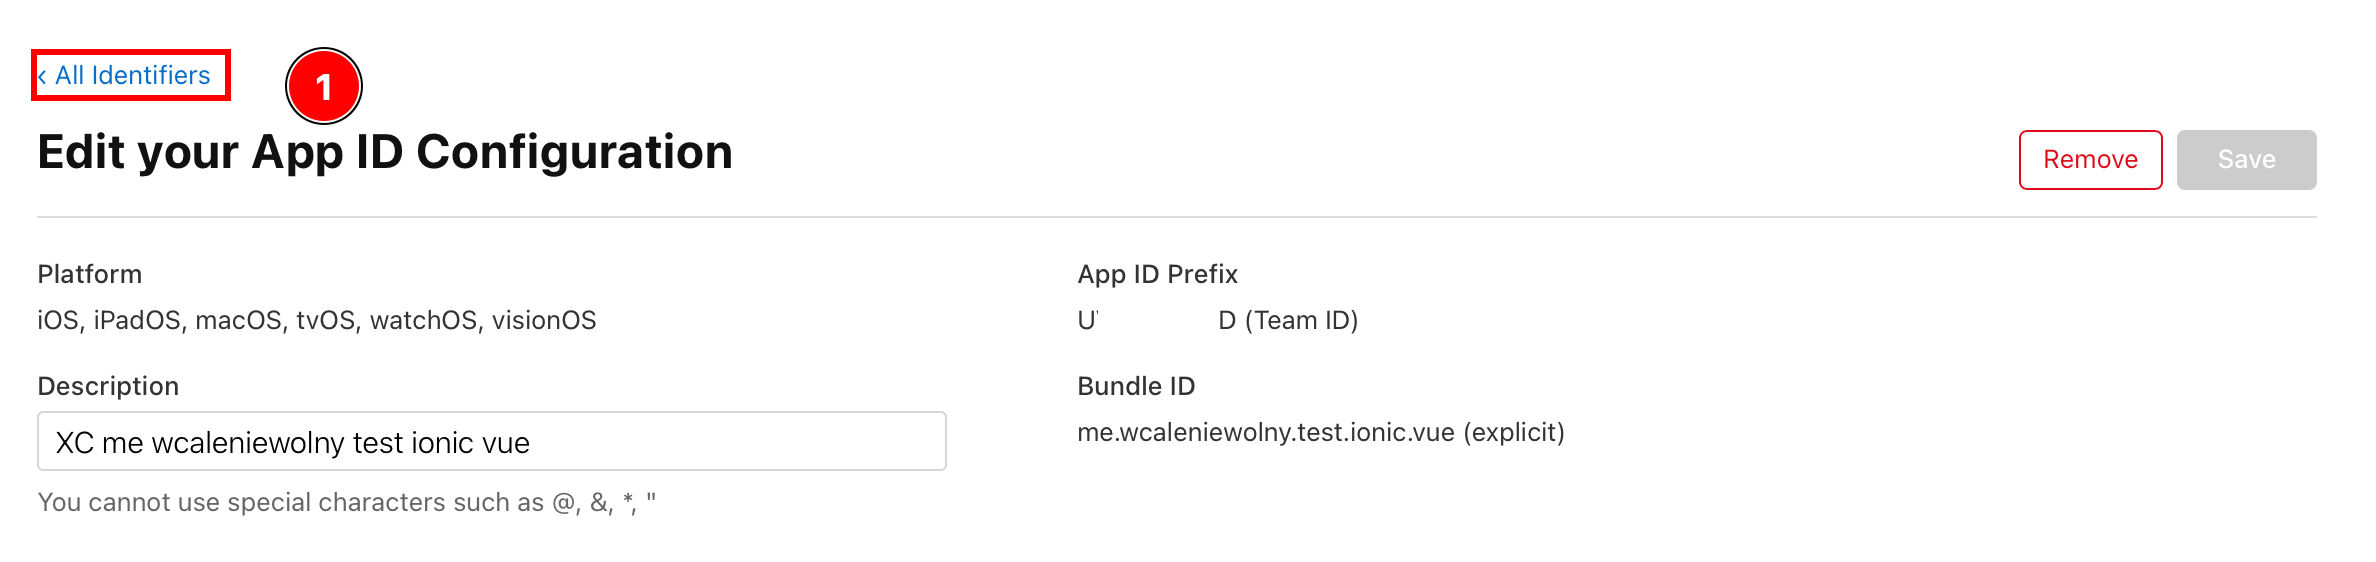
Sie sollten einen Bildschirm sehen, der so aussieht:
- Stellen Sie sicher, dass in diesem Feld
App IDssteht. - Stellen Sie sicher, dass Sie Ihre App-ID finden können.
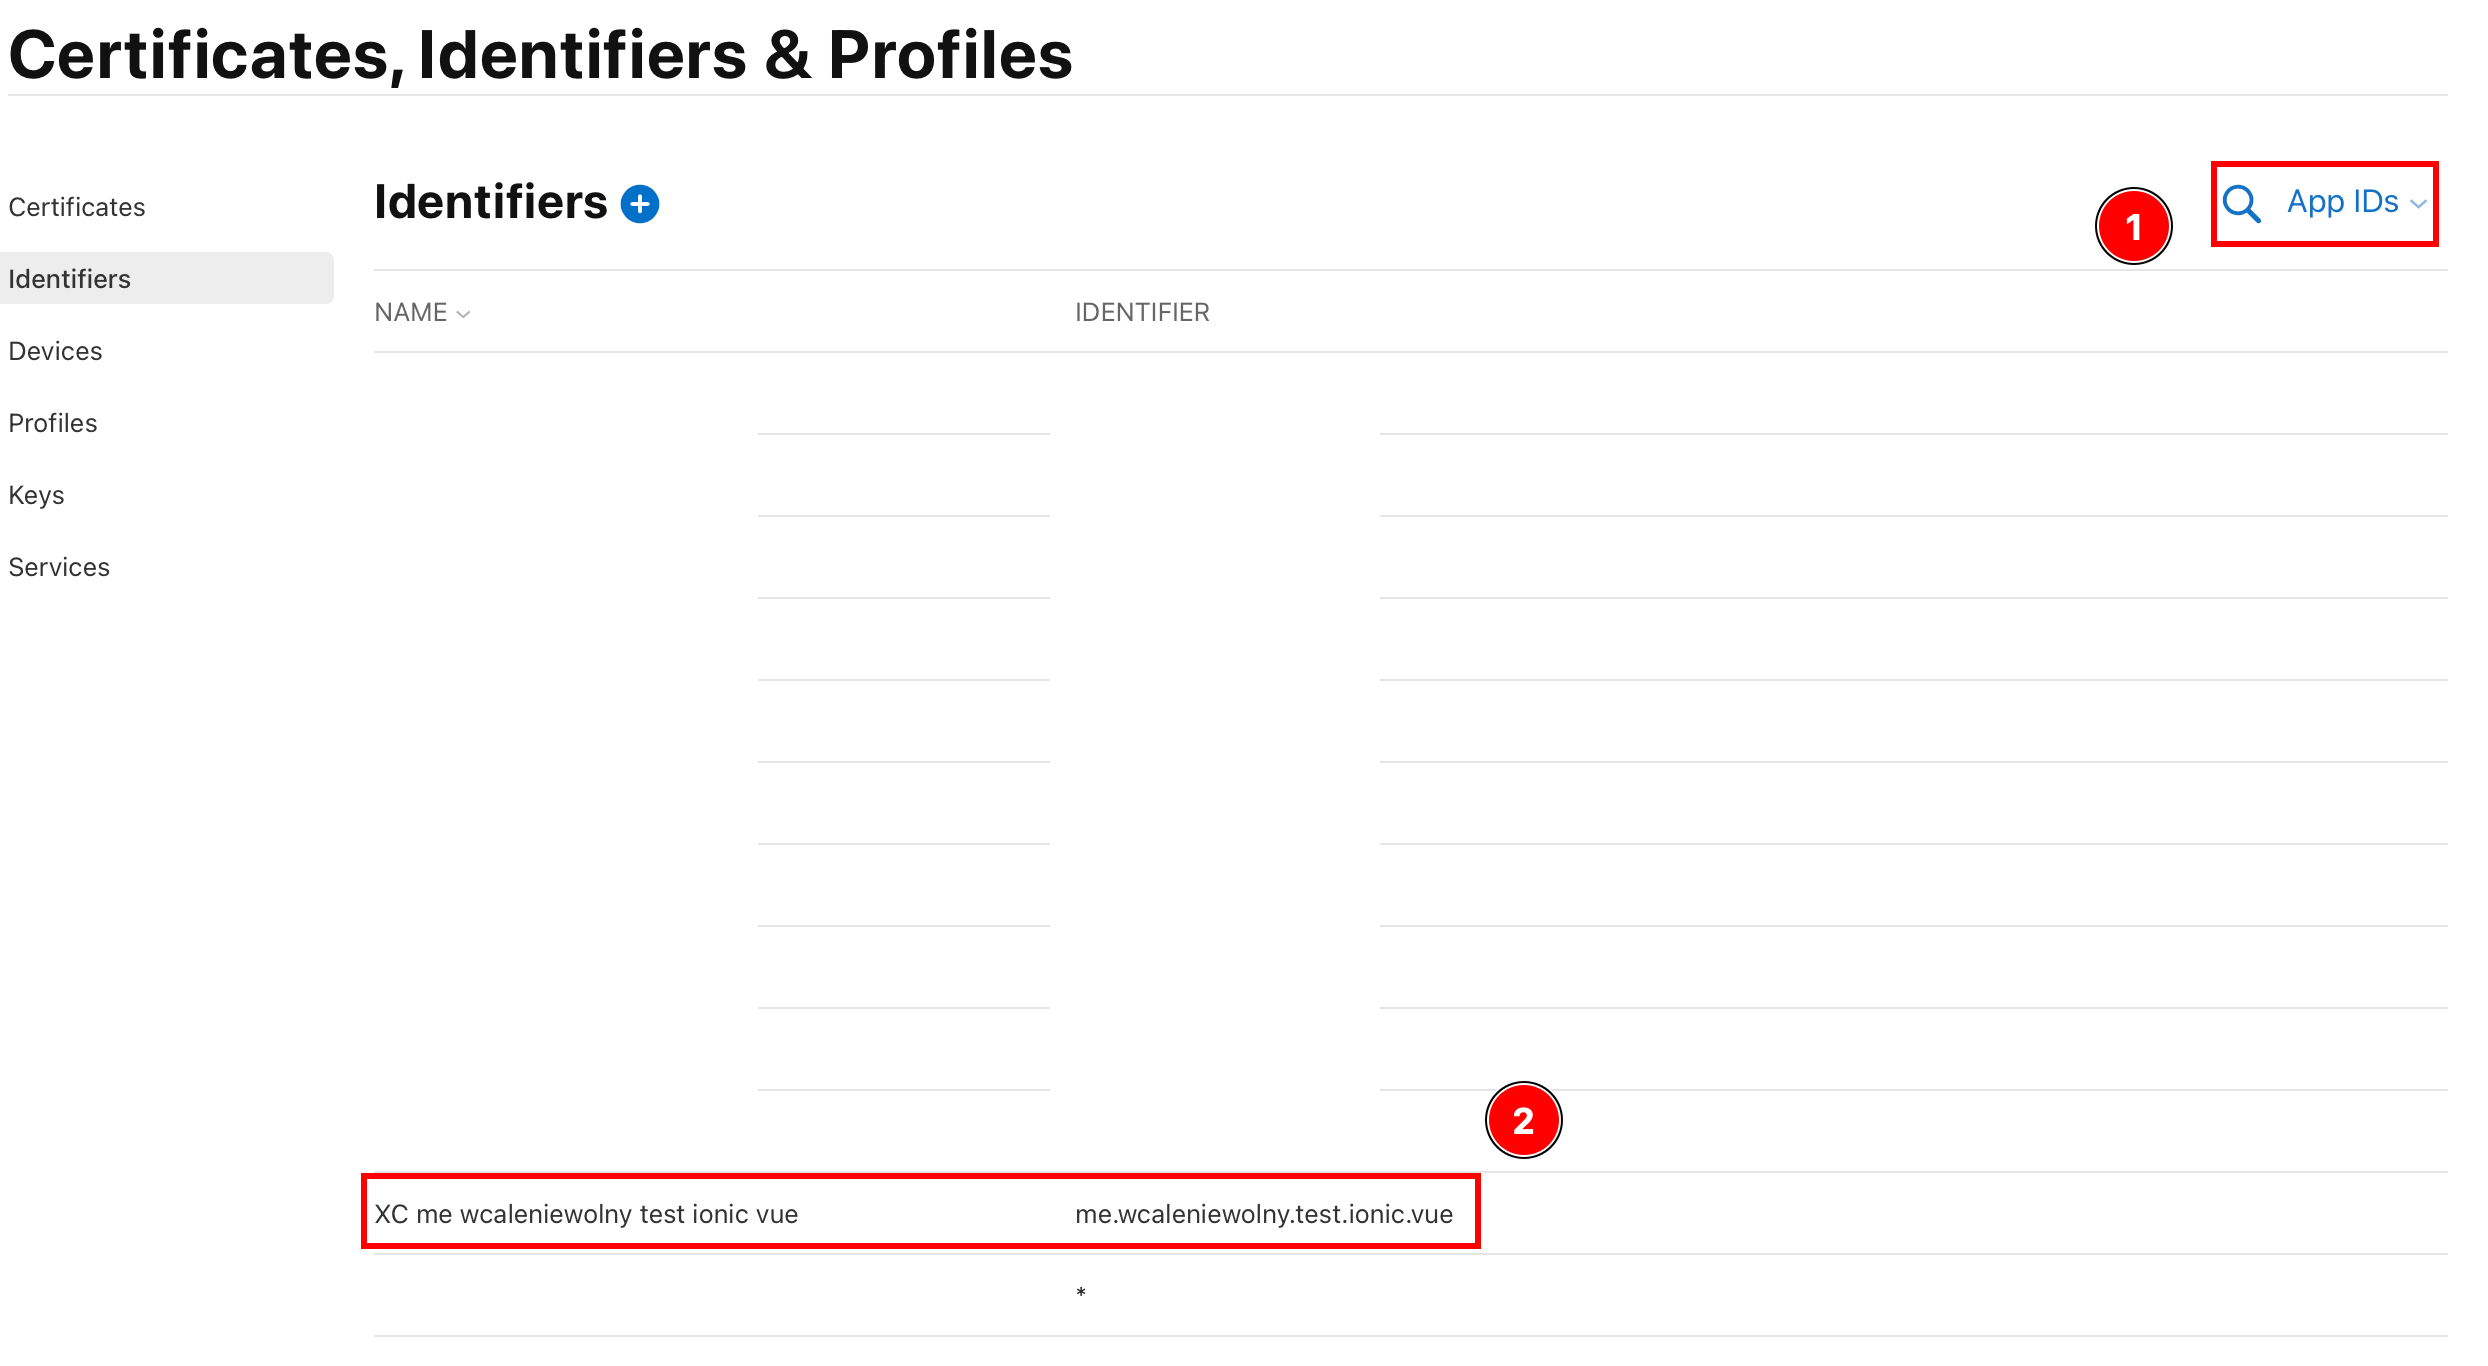
Wenn Sie Apple Login für IOS nicht konfiguriert haben, müssen Sie eines erstellen. Für mich habe ich bereits eines erstellt. Die App-ID, die ich verwenden werde, ist
me.wcaleniewolny.test.ionic.vue. Wenn Sie noch keine haben, erstellen Sie bitte eine mit dem Schritt „App erstellen“.
- Stellen Sie sicher, dass in diesem Feld
-
Stellen Sie sicher, dass die Funktion
Sign in with Applefür Ihre App aktiviert ist- Klicken Sie auf Ihre App
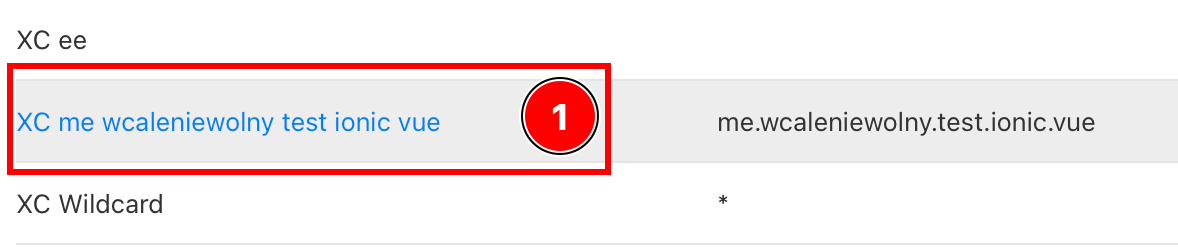
- Stellen Sie sicher, dass die Funktion
Sign in with Appleaktiviert ist
- Wenn es nicht aktiviert ist, aktivieren Sie es.
- Klicken Sie auf Ihre App
-
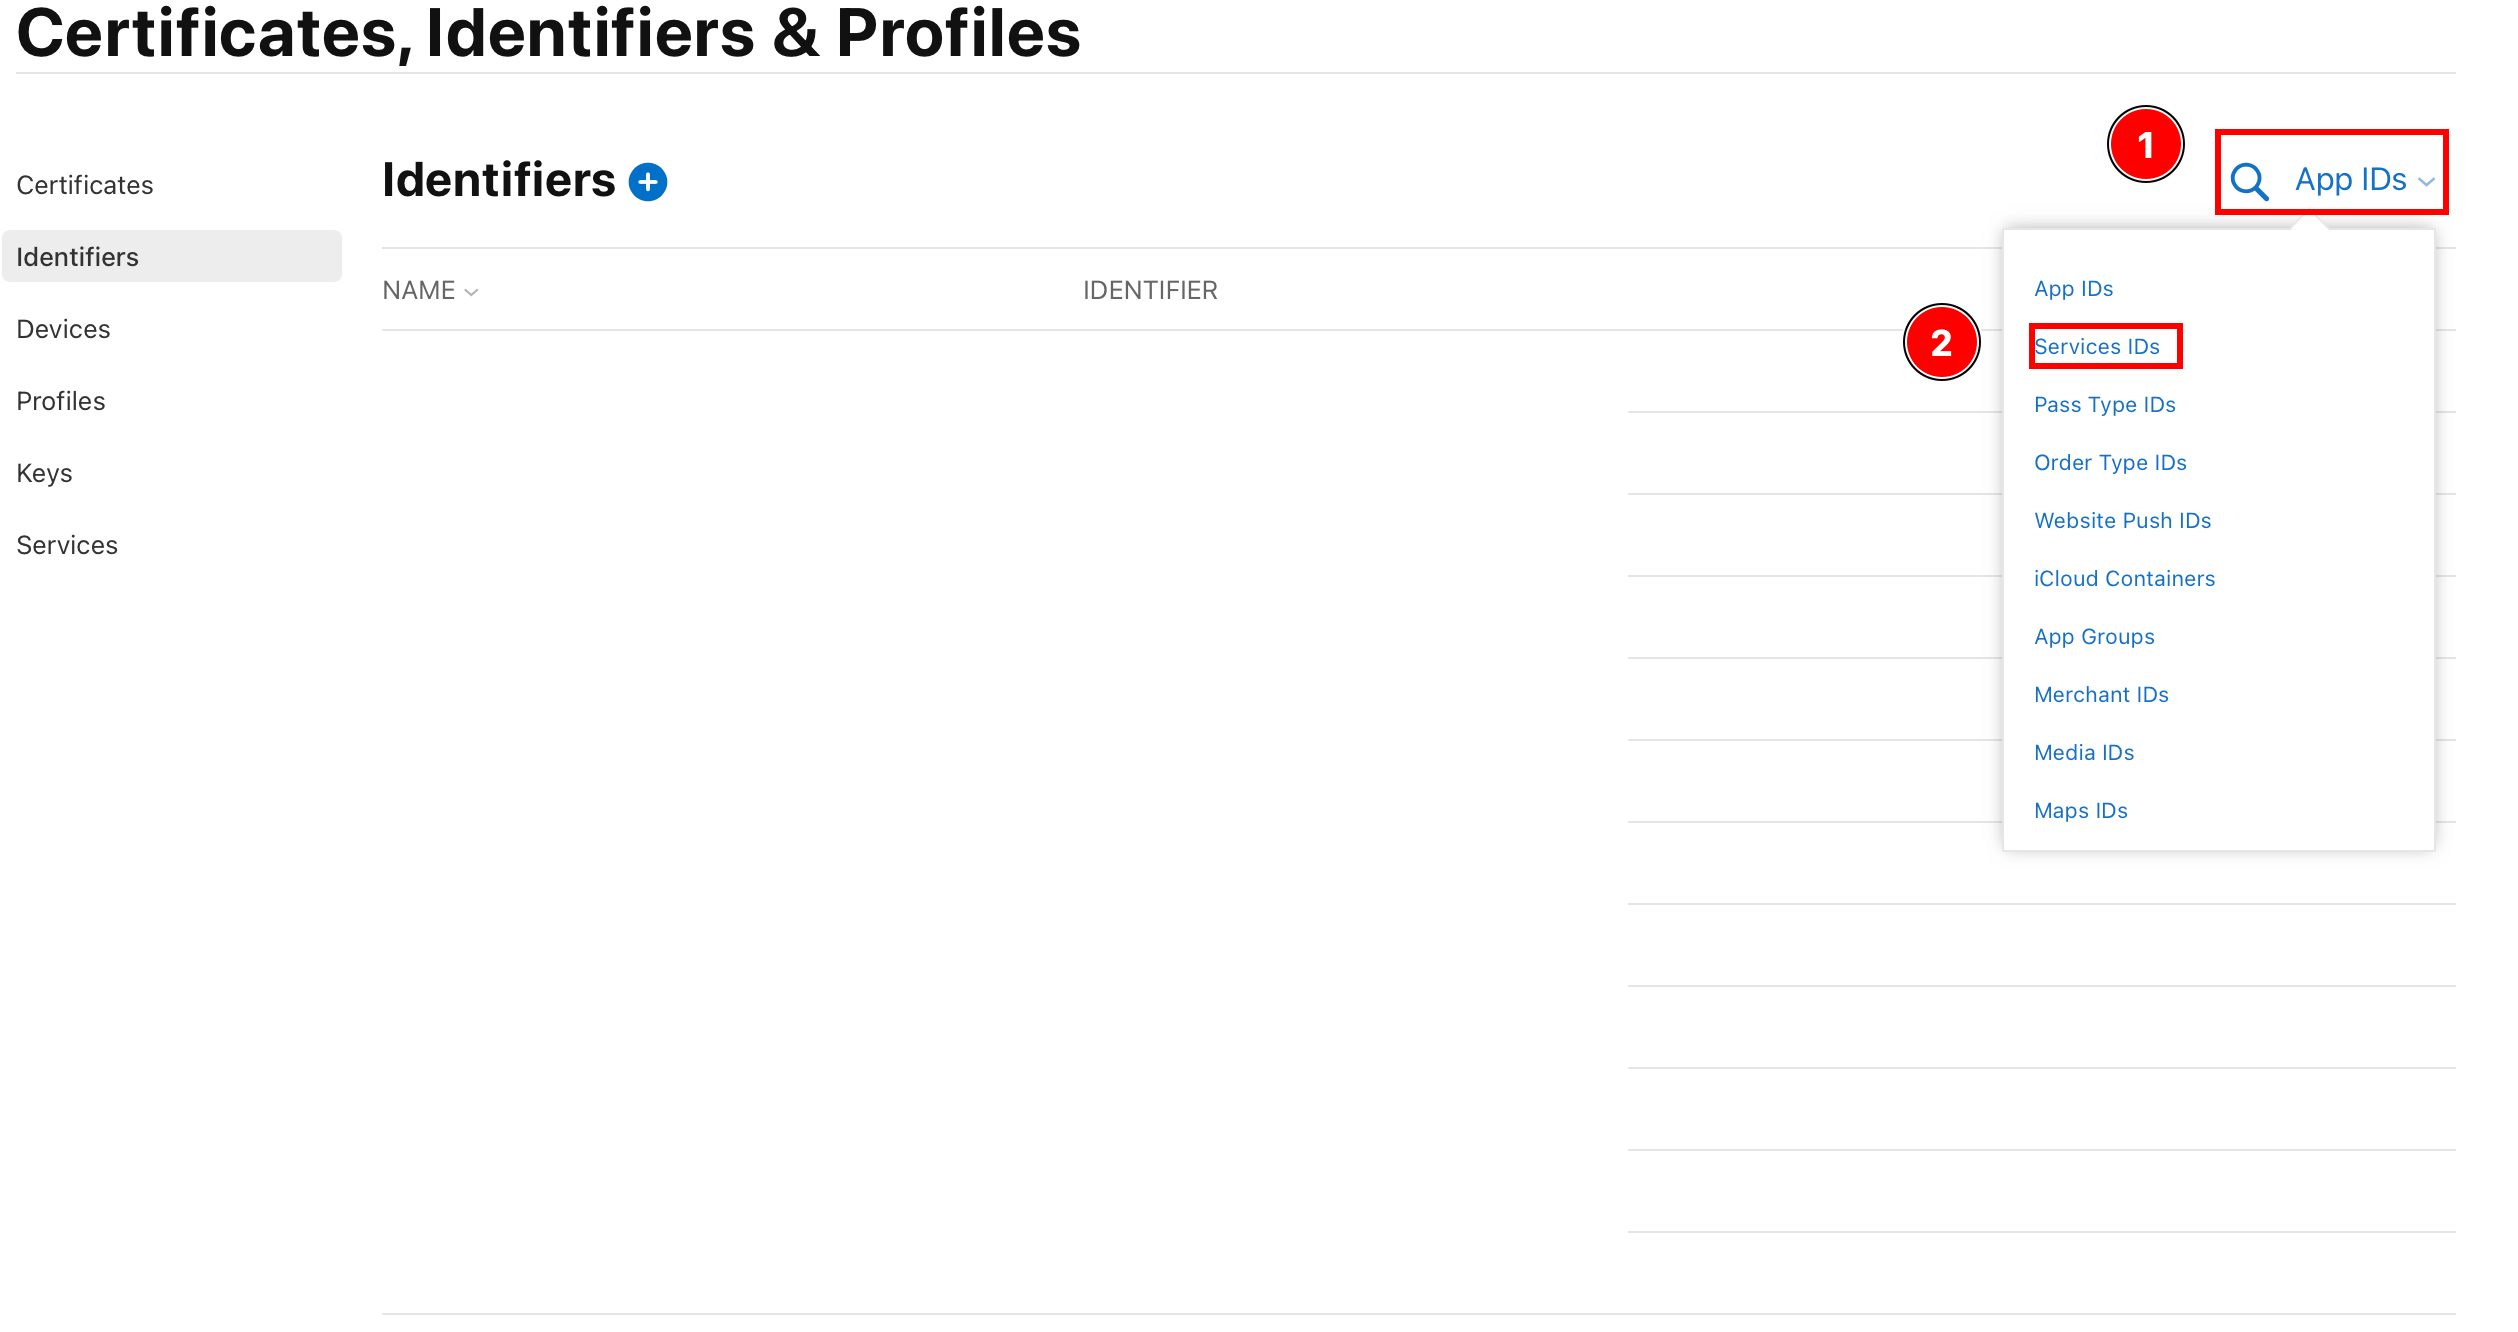
Gehen Sie zurück zu „Alle Bezeichner“.
-
Klicken Sie auf „App-IDs“ und gehen Sie zu „Dienst-IDs“.
-
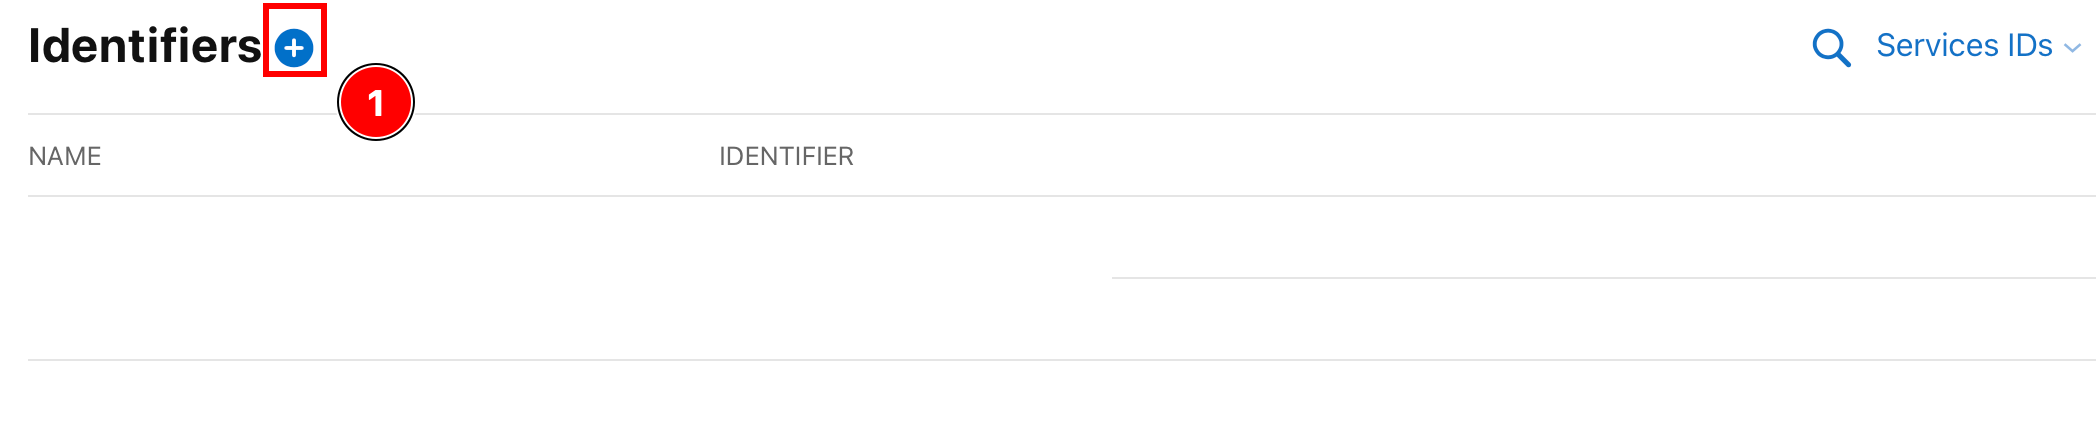
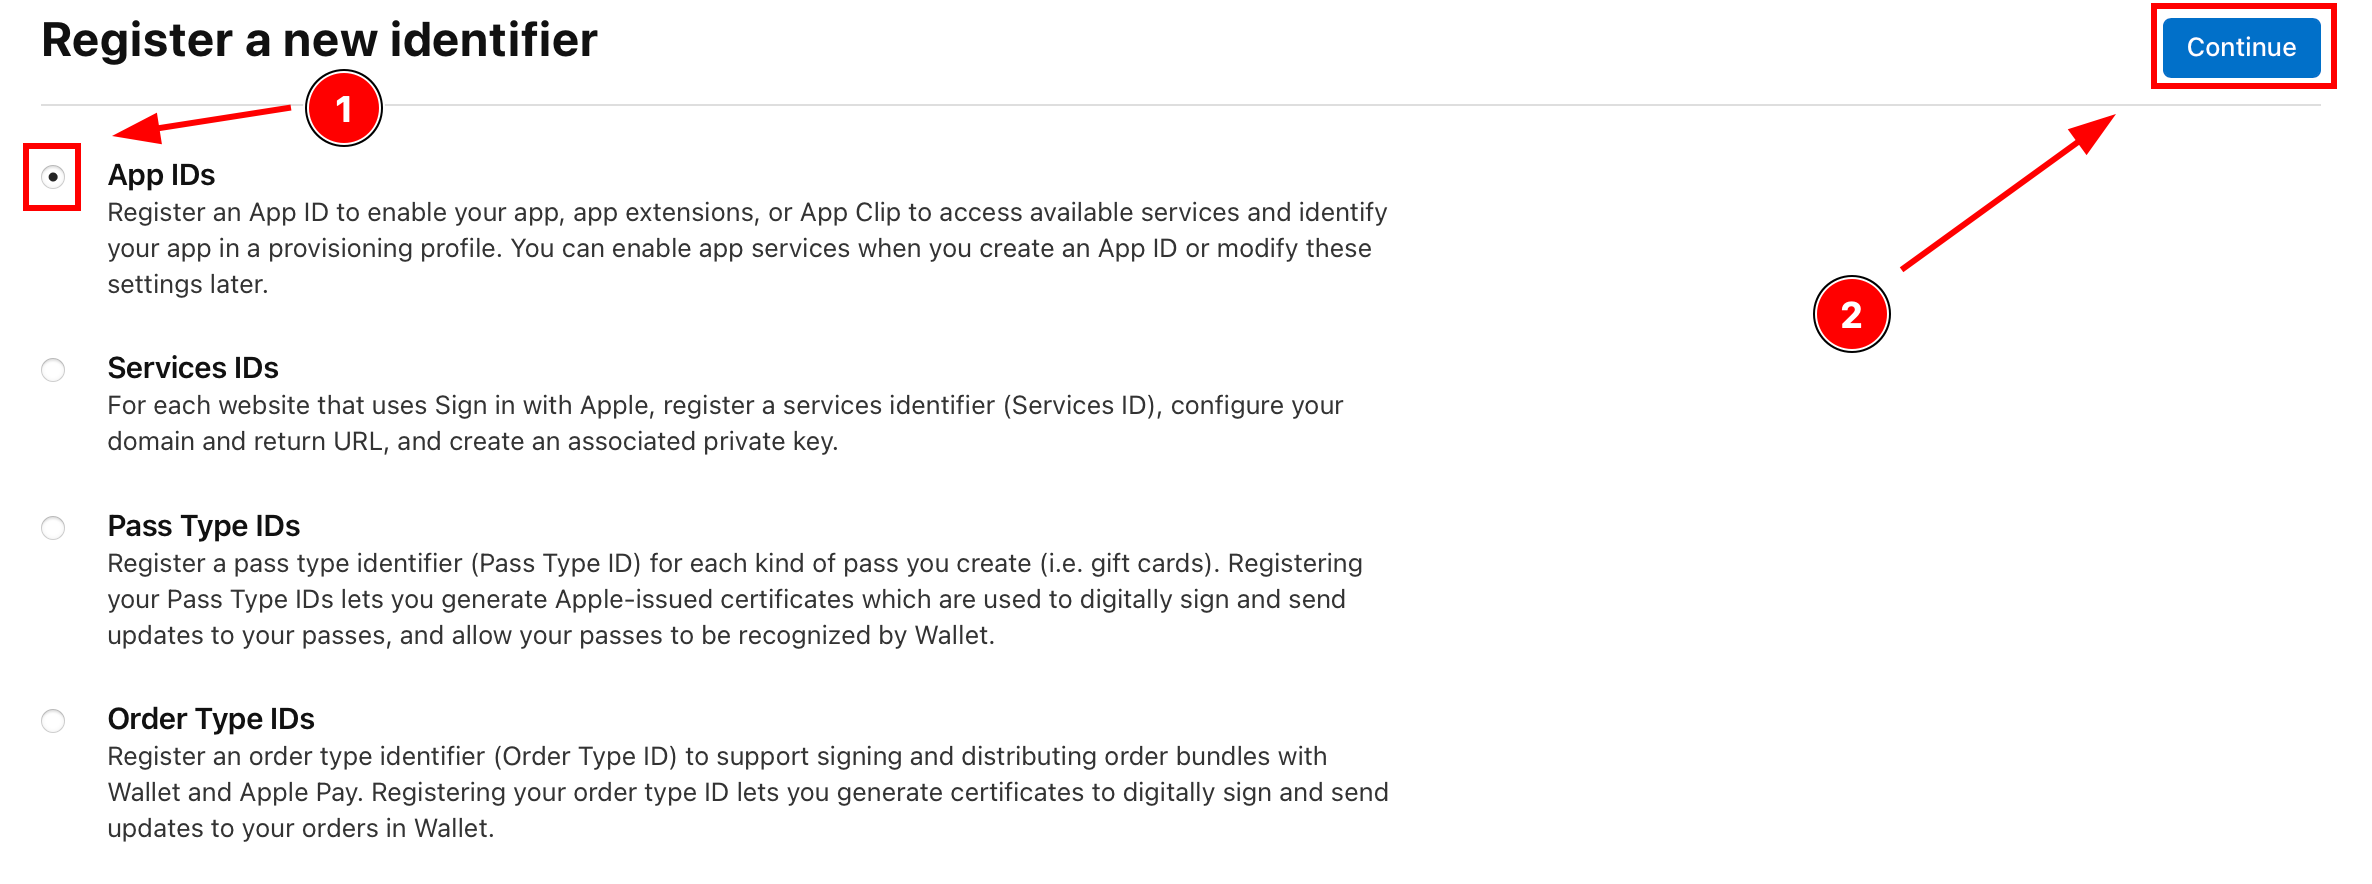
Erstellen Sie eine neue Kennung
-
Klicken Sie auf den Plus-Button
-
Wählen Sie „Dienst-IDs“ und klicken Sie auf
Continue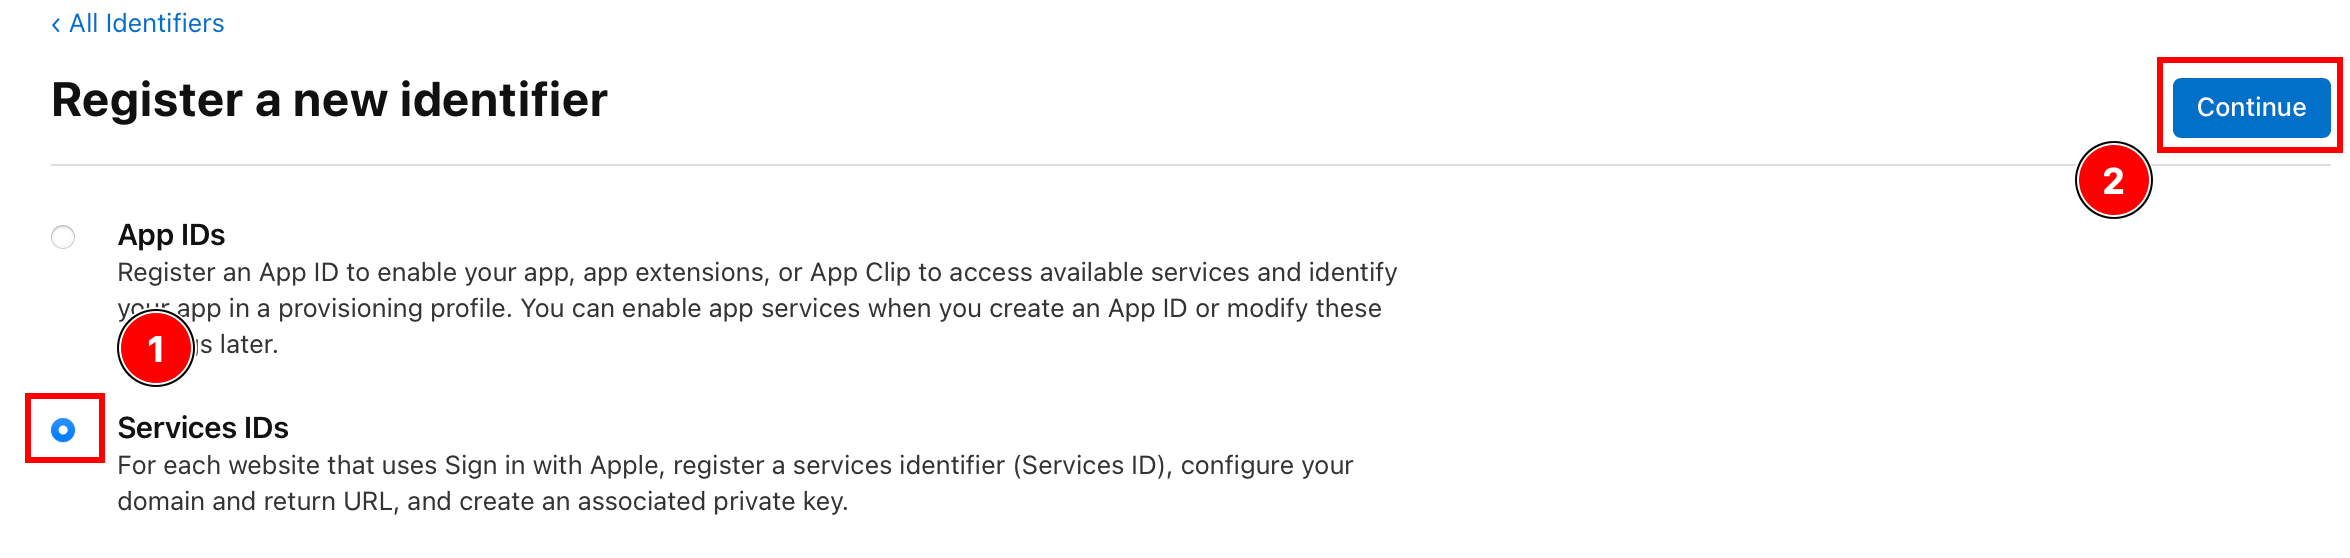
-
Geben Sie eine Beschreibung und eine Kennung ein und klicken Sie auf
Continuie.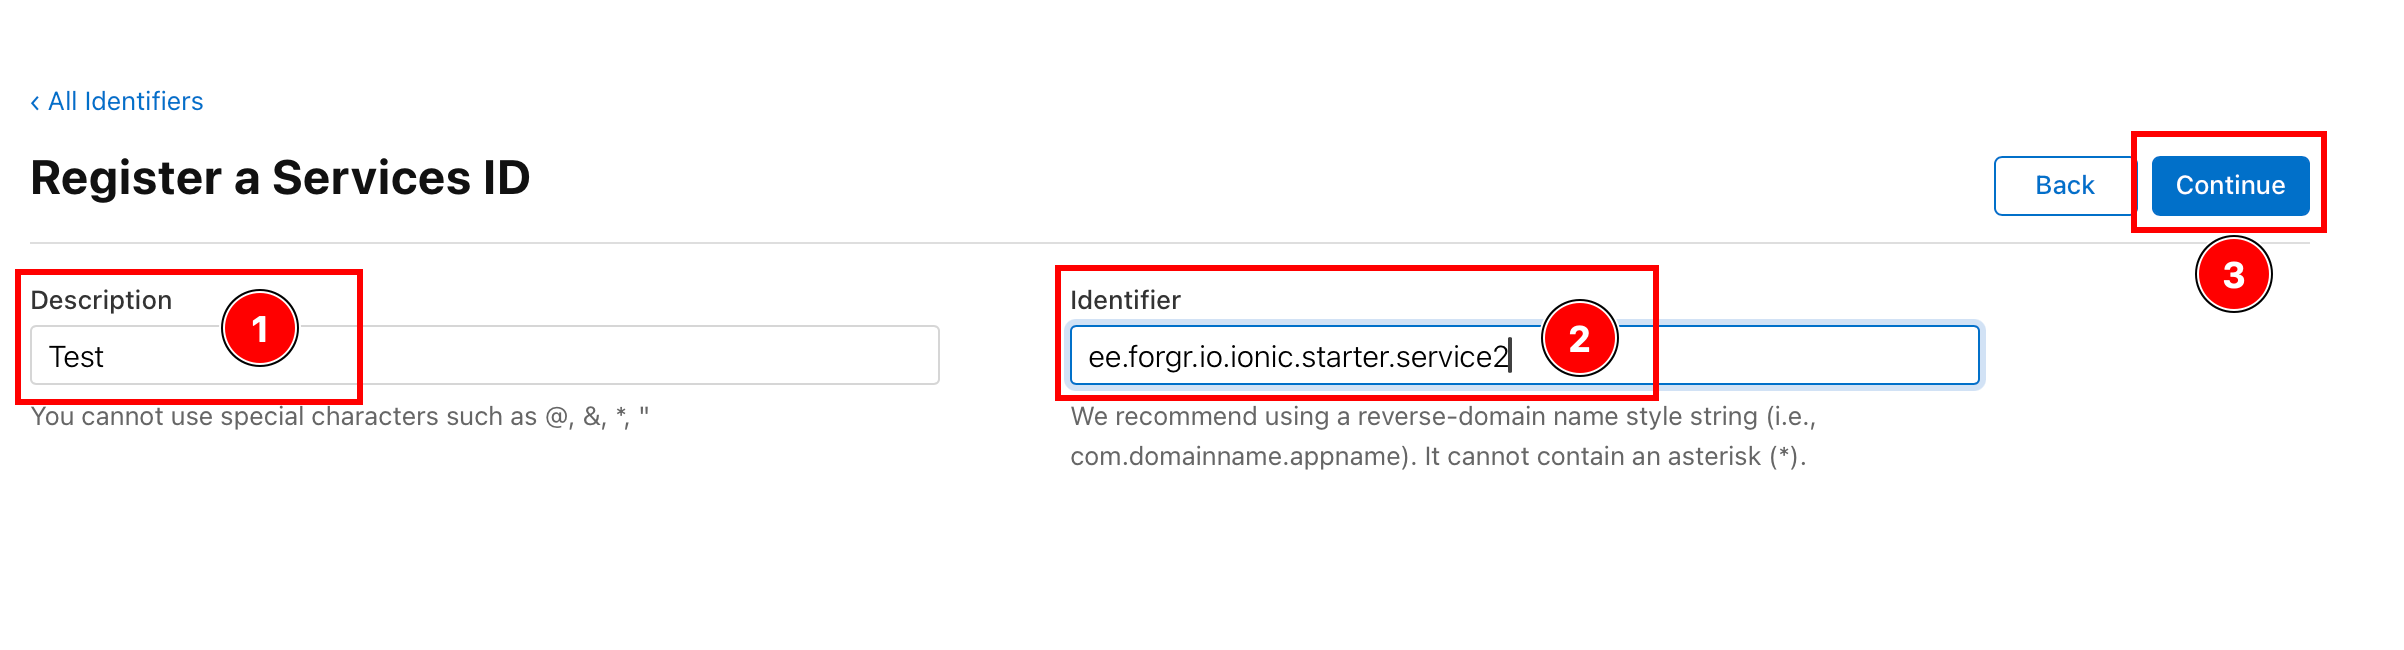
Dieser
identifierswird zumclientId, den Sie in der FunktioninitializeUNDANDROID_SERVICE_IDfür das Backend übergeben.Bitte speichern!!!
Die Service-ID muss nicht mit der App-ID übereinstimmen, ich empfehle jedoch, die Service-ID auf
YOUR_APP_ID.servicefestzulegen. Zur Erinnerung: Ich verwendeme.wcaleniewolny.test.ionic.vueals meine App-ID, aber ich verwendeee.forgr.io.ionic.service2als Dienst-ID. -
Bitte überprüfen Sie die Details und klicken Sie auf
Register
-
Klicken Sie auf den neu erstellten Dienst

-
Aktivieren Sie die Option
Sign in with Apple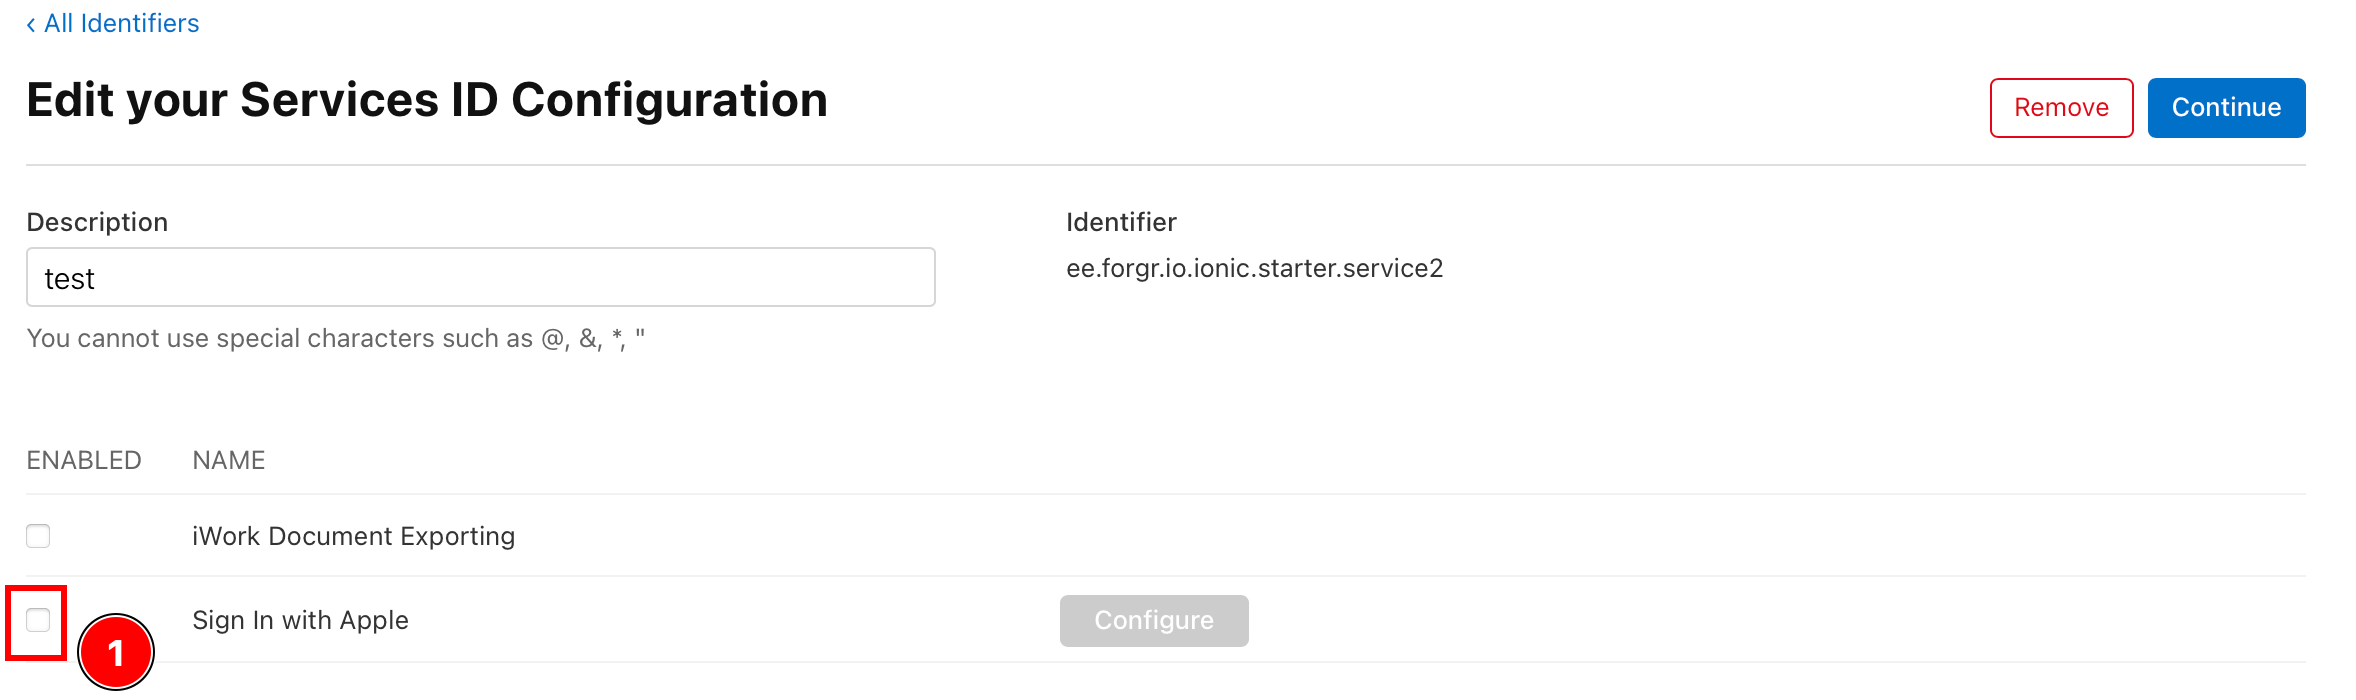
-
Konfigurieren Sie den
Sign In with Apple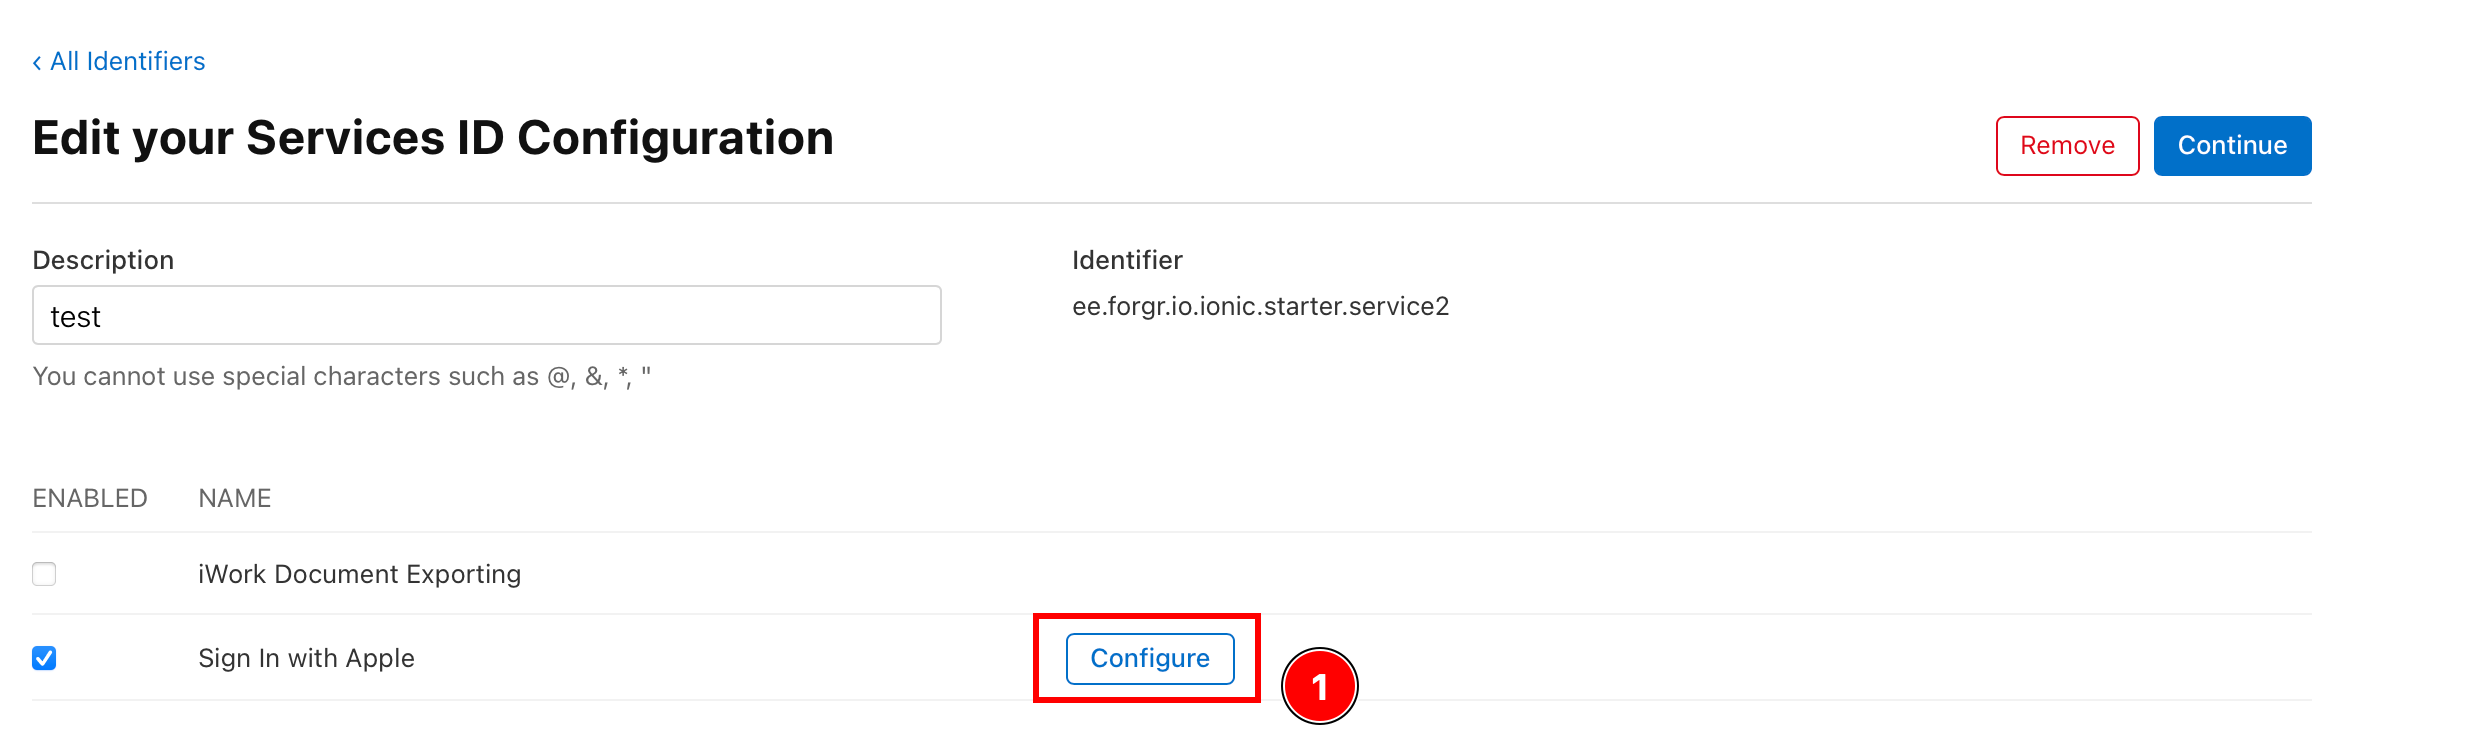
-
Stellen Sie sicher, dass die „Primäre App-ID“ auf die im vorherigen Schritt konfigurierte App-ID eingestellt ist
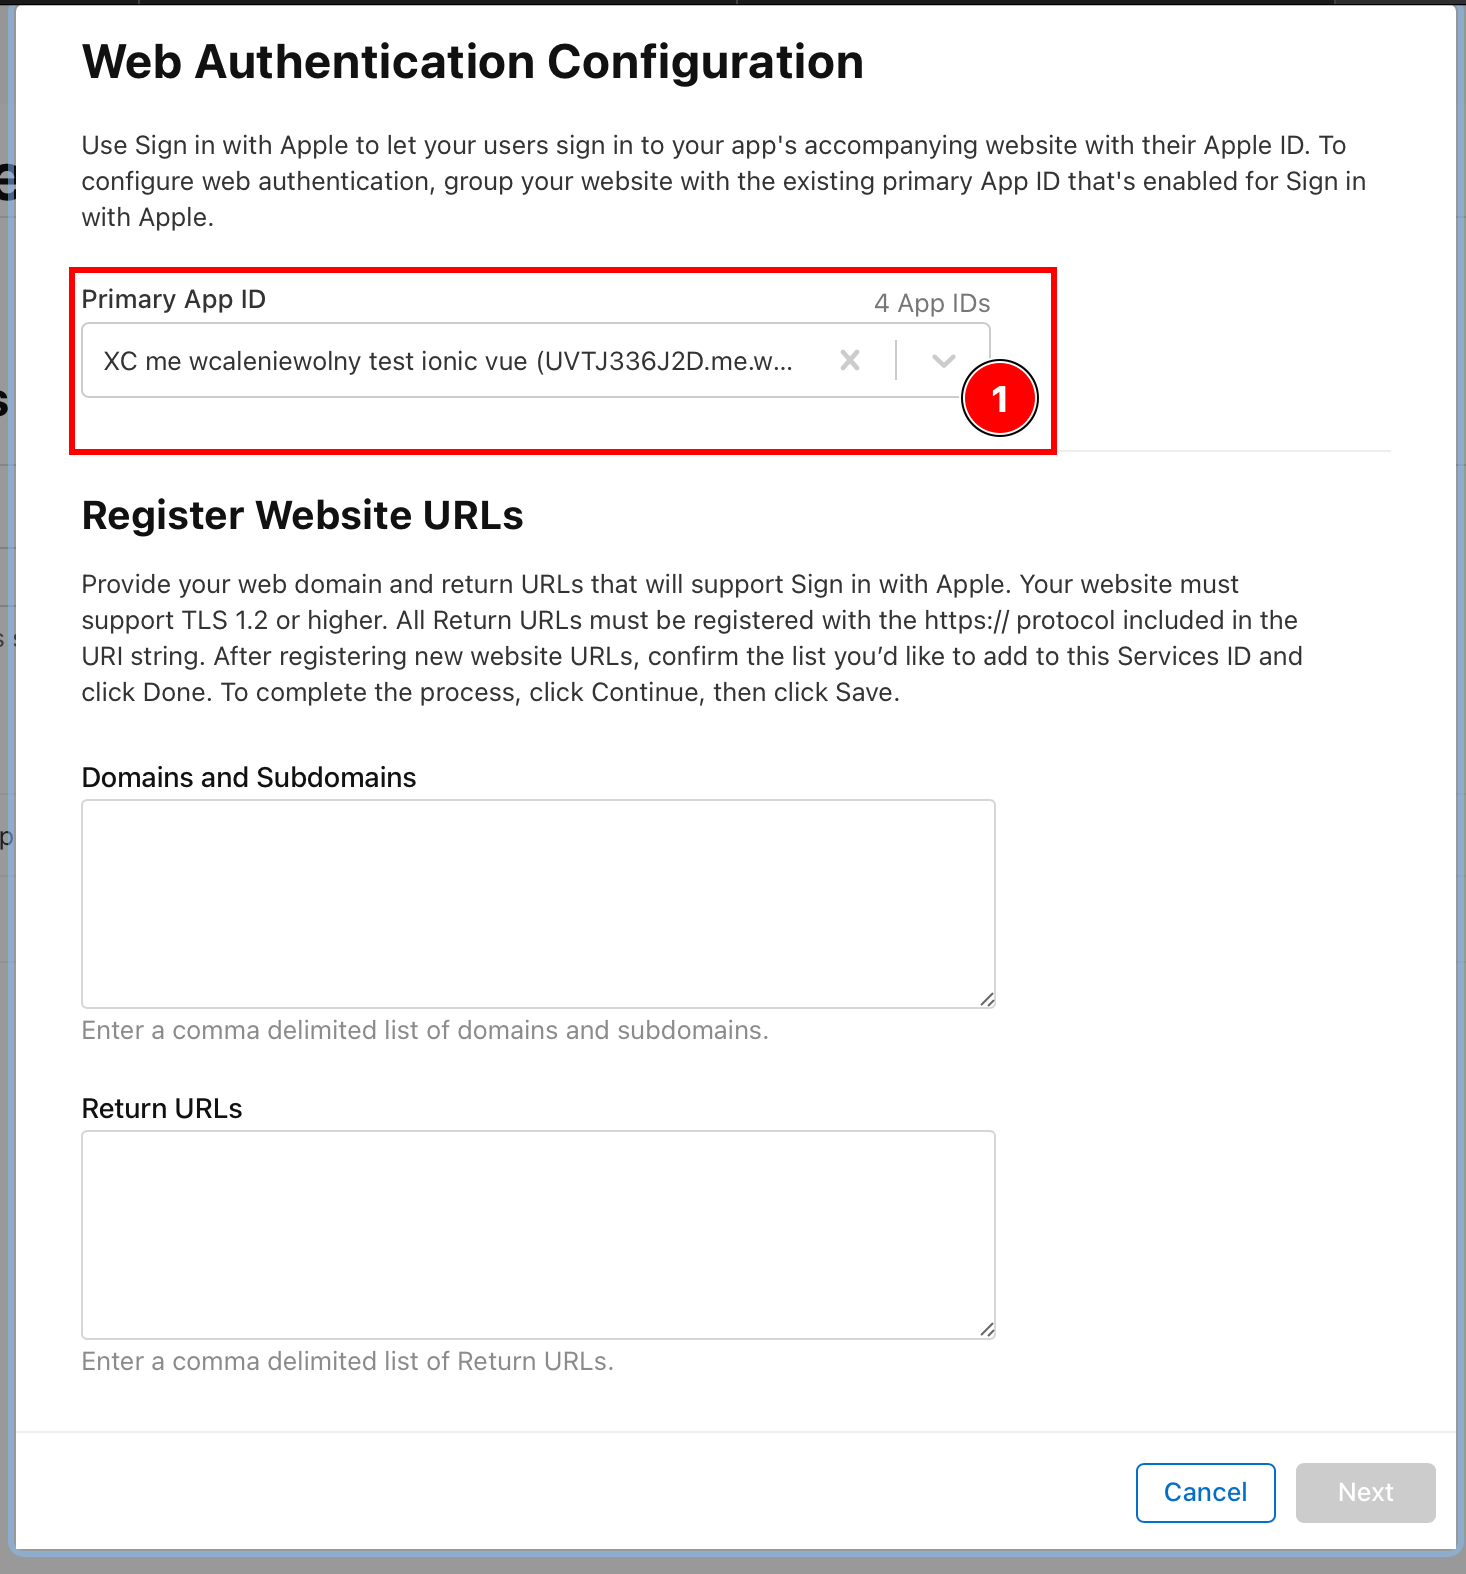
-
Fügen Sie die Domäne hinzu, auf der Sie Ihr Backend hosten möchten.
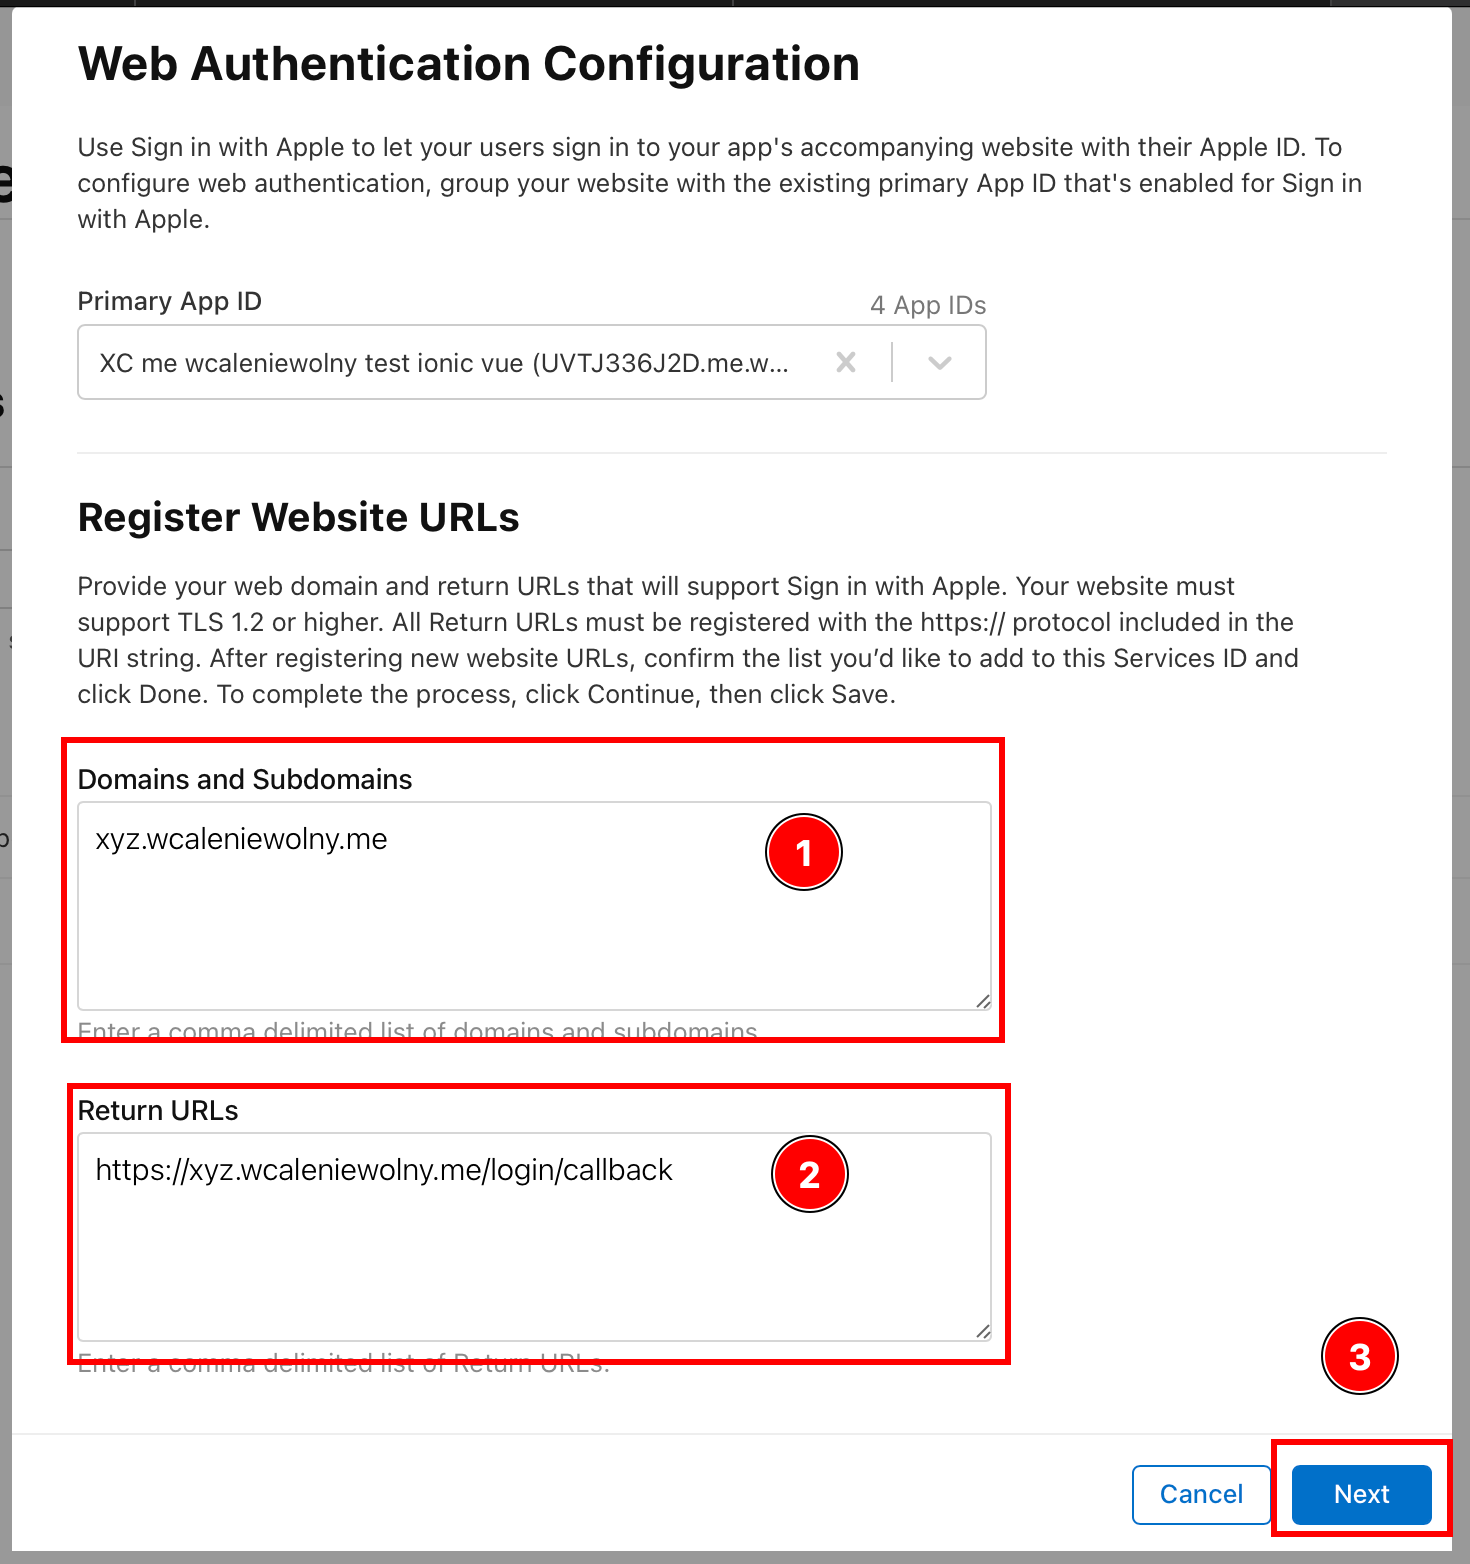
Dieses Backend muss auf HTTPS ausgeführt werden. Was die „Rückgabe-URLs“ betrifft, möchten Sie möglicherweise darauf zurückkommen, nachdem Sie den nächsten Abschnitt dieses Tutorials gelesen und das Backend konfiguriert haben. Für die Zwecke dieses Tutorials verwende ich
https://xyz.wcaleniewolny.me/login/callbackals Rückgabe-URL undxyz.wcaleniewolny.meals Domäne. Drücken Sie Weiter. -
Bestätigen Sie die Daten und klicken Sie auf
Done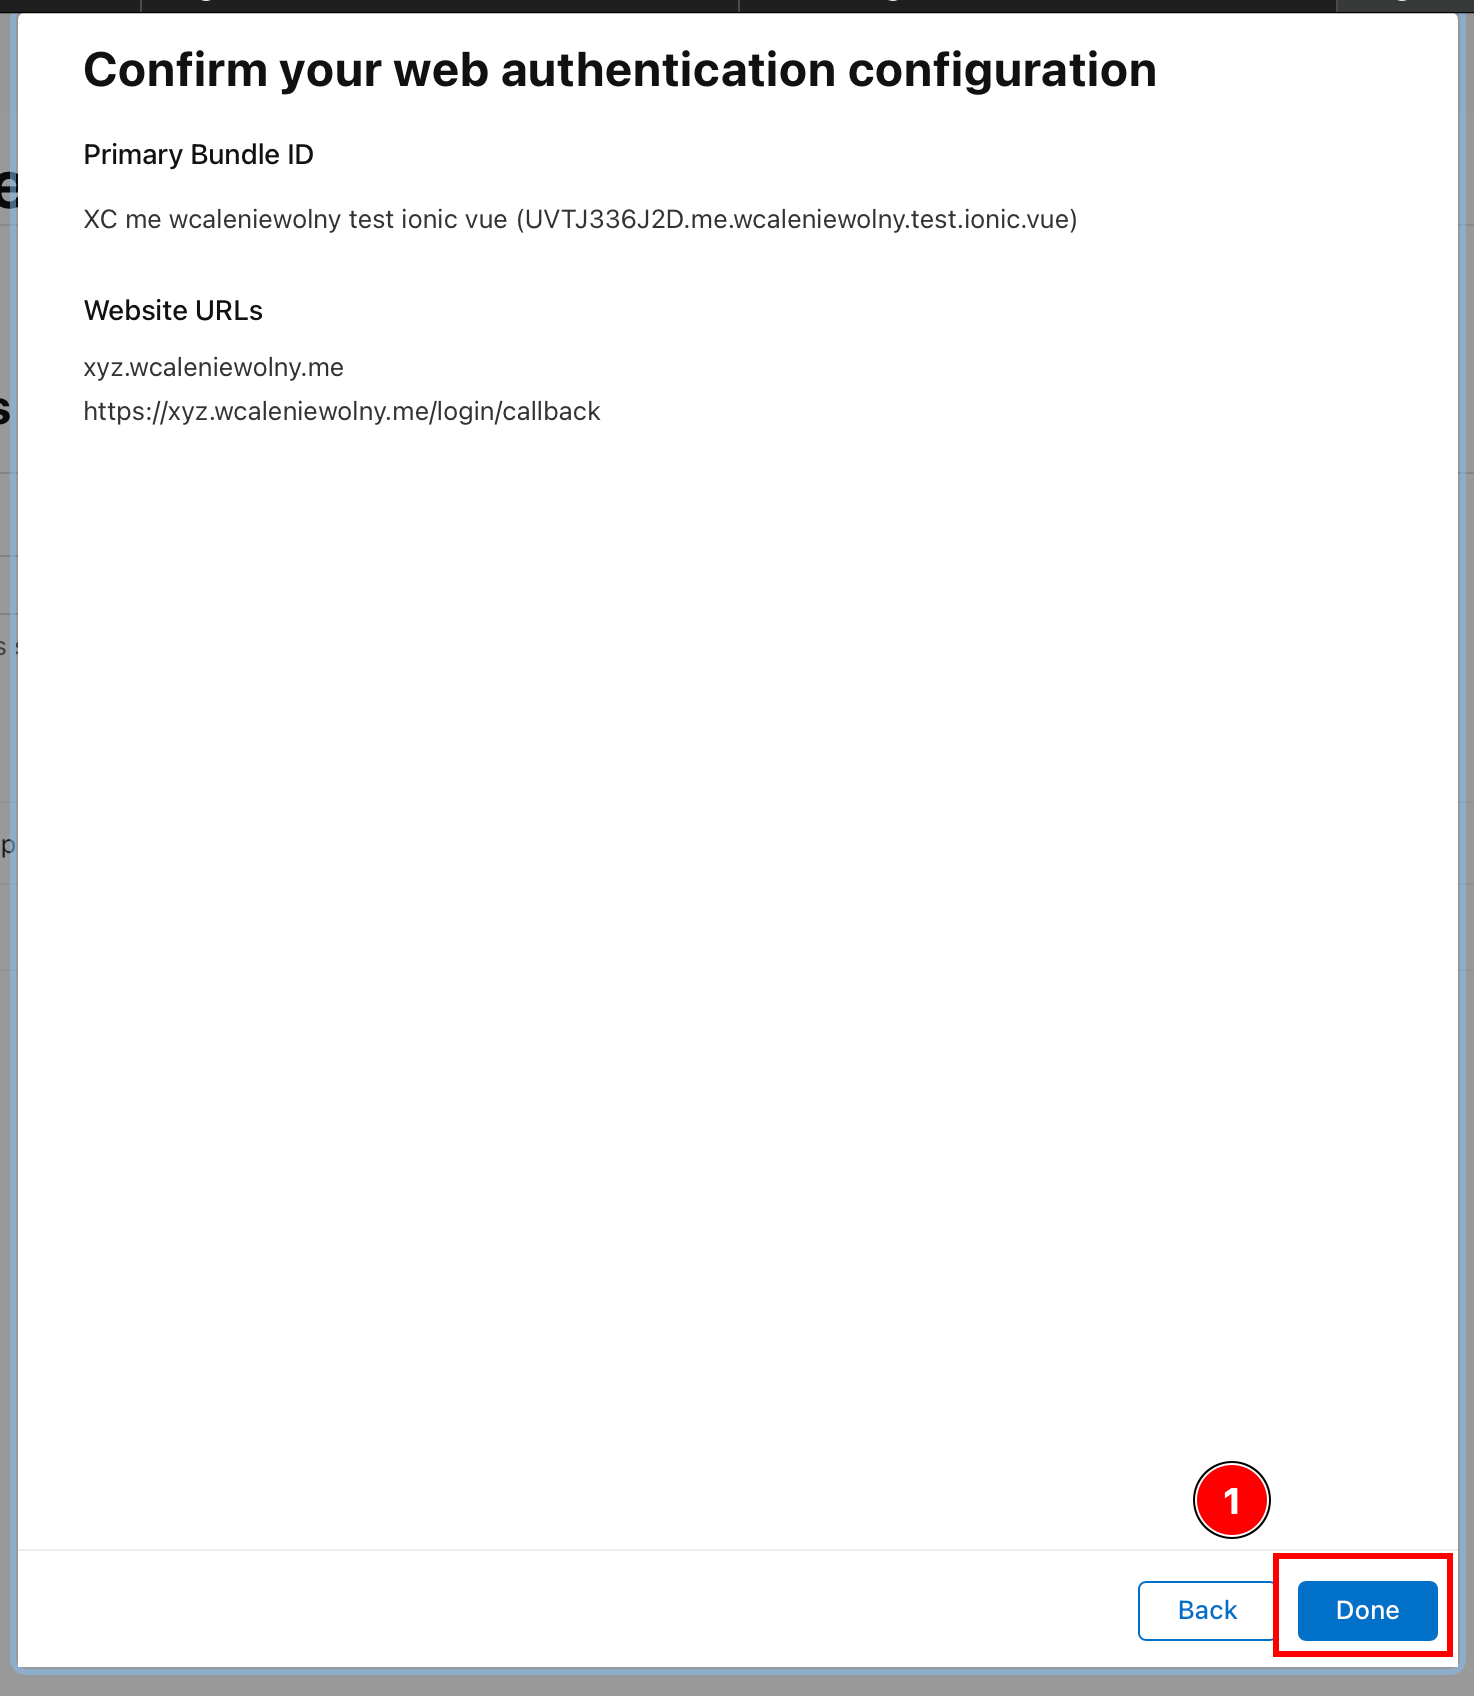
-
Klicken Sie auf
Continue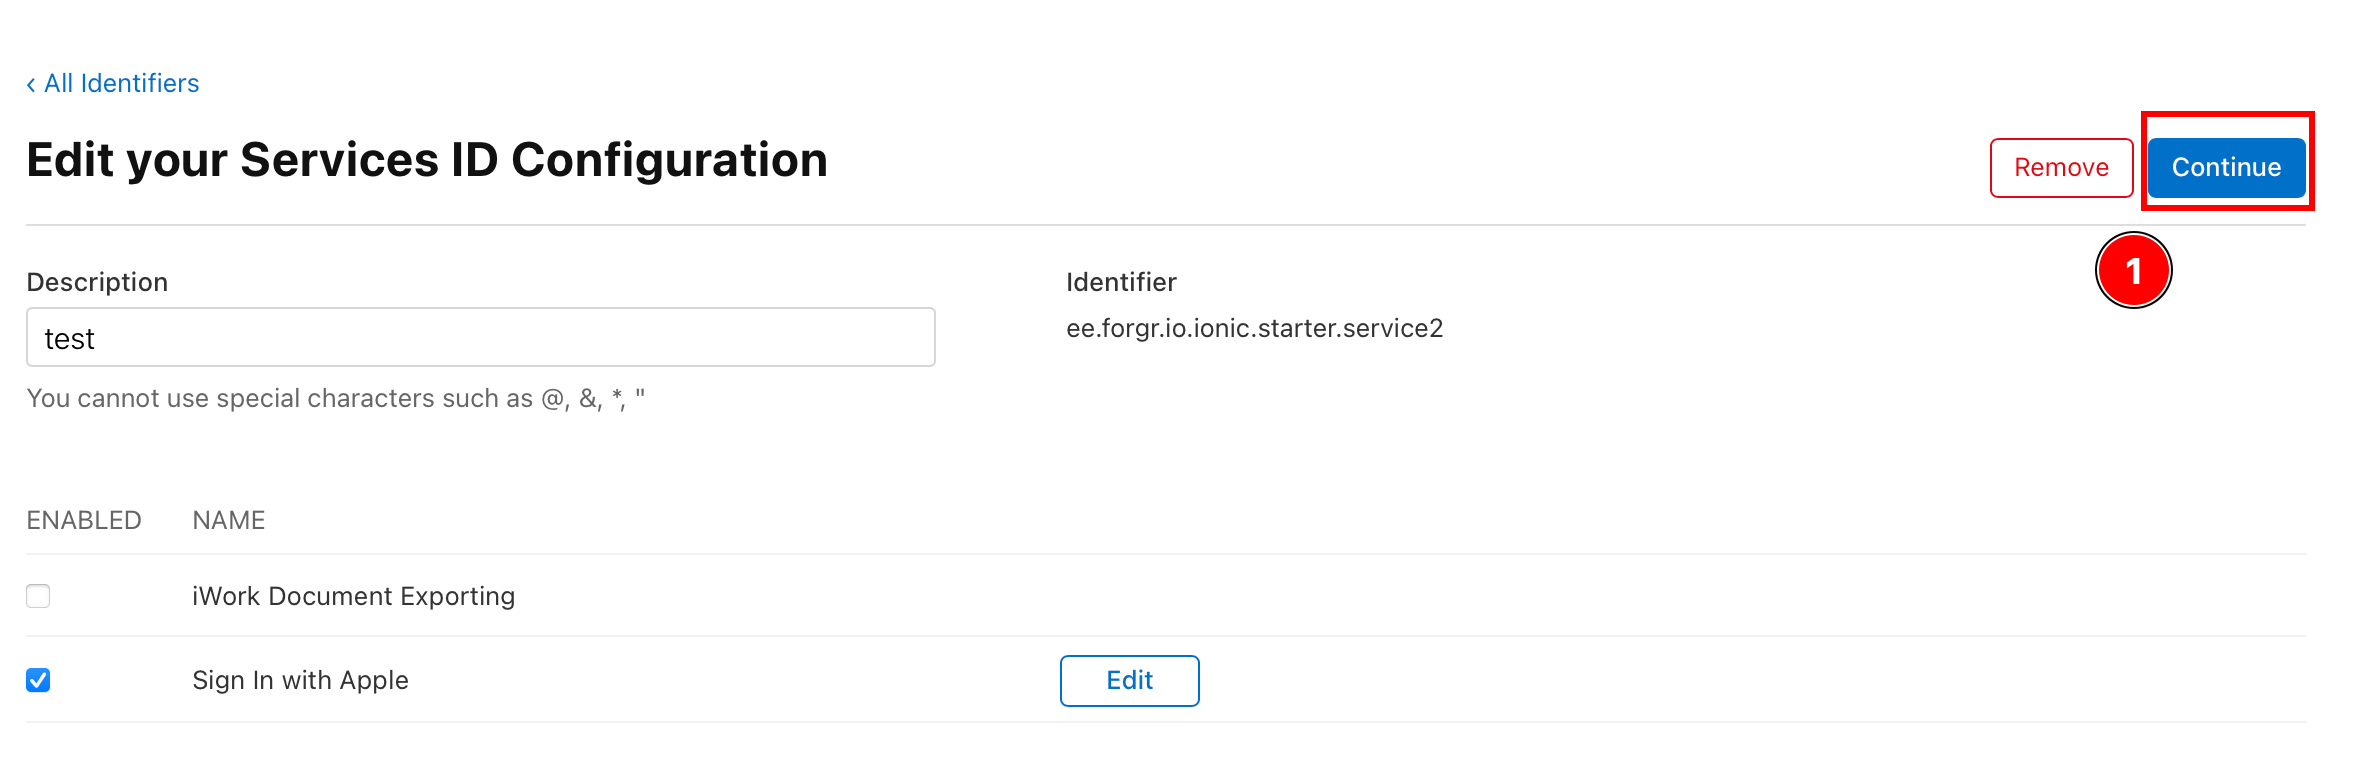
-
Klicken Sie auf
Save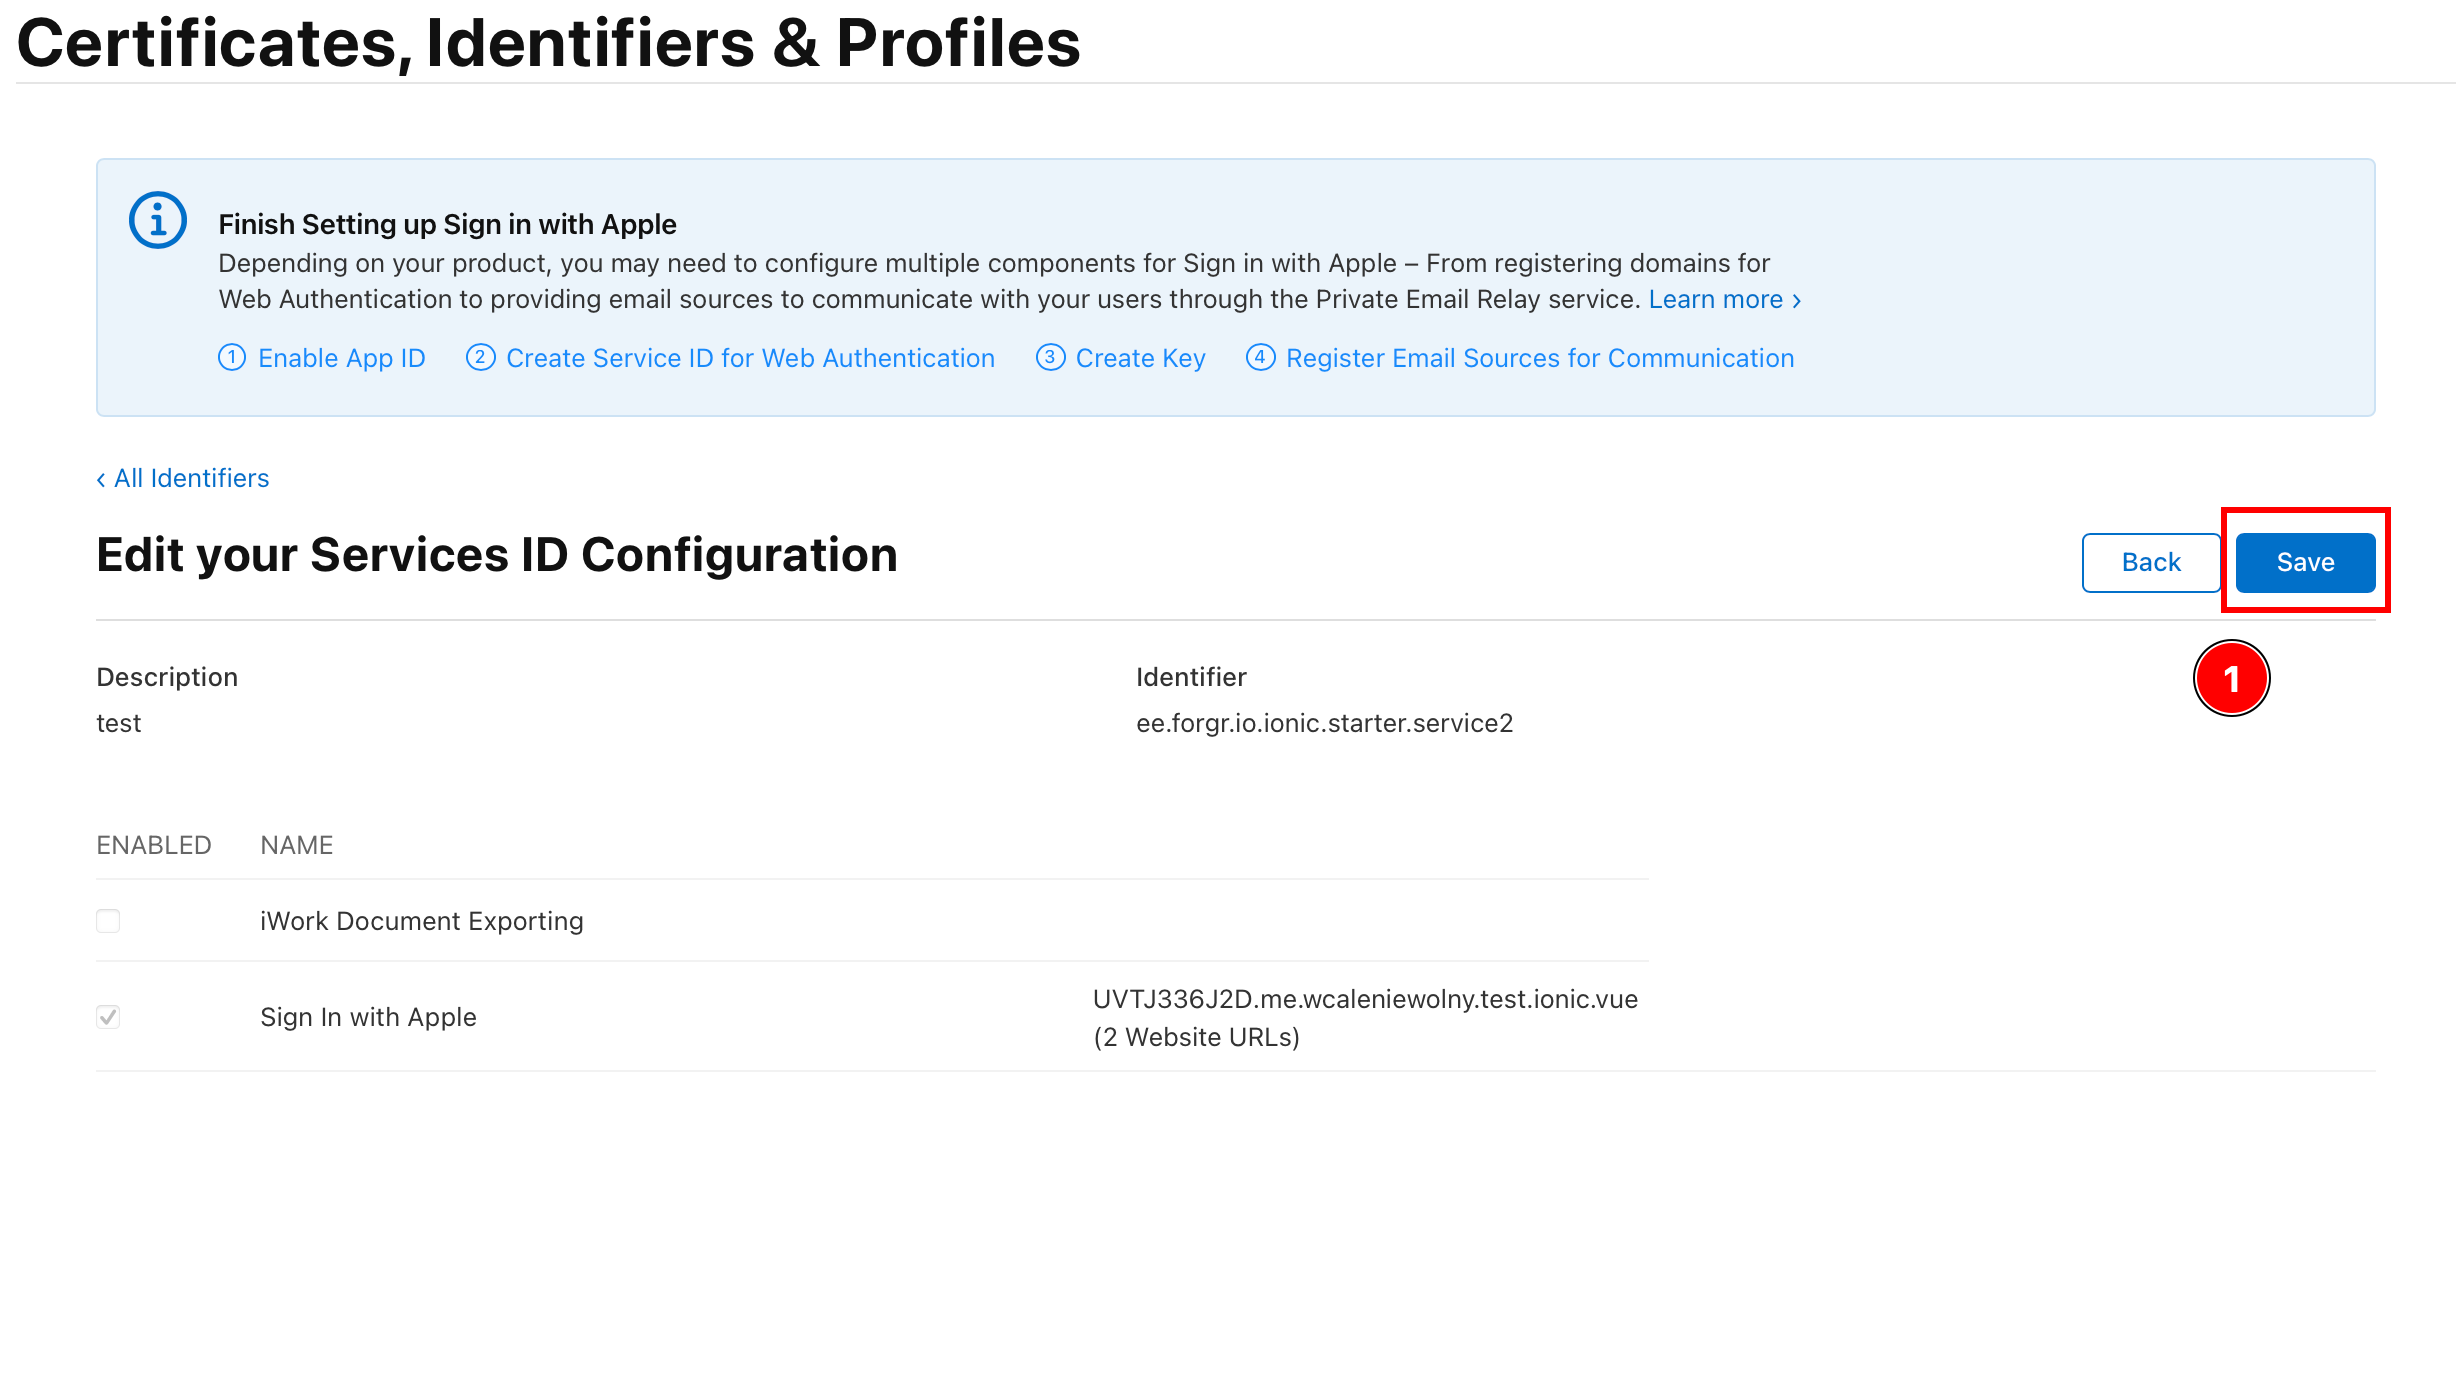
-
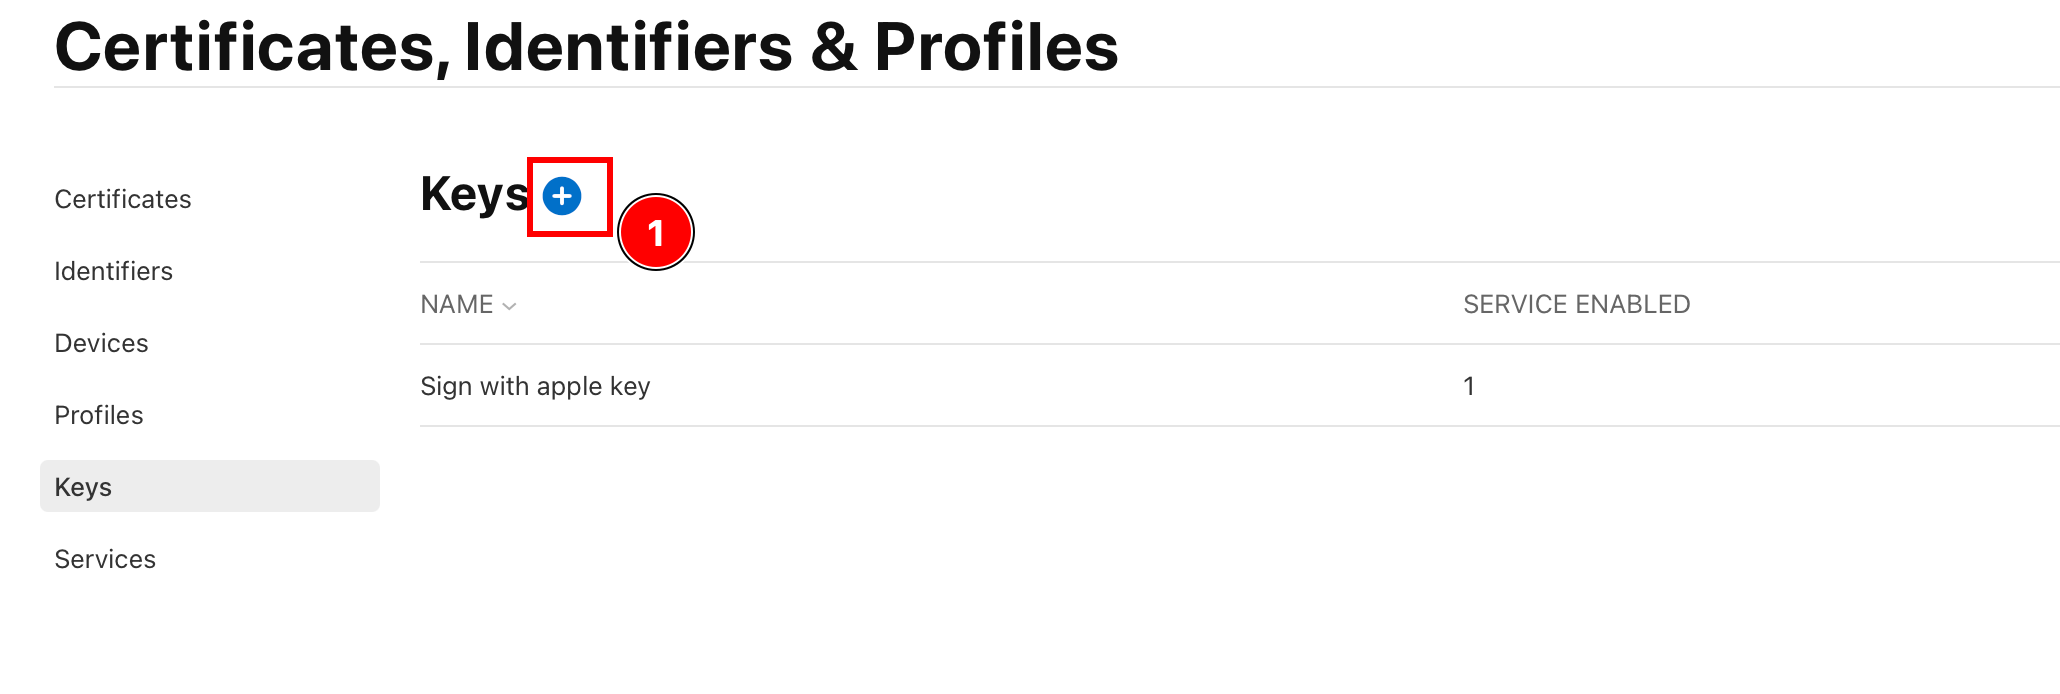
Schlüssel erstellen
Section titled “Schlüssel erstellen”-
Gehen Sie zurück zu „Alle Bezeichner“.
-
Klicken Sie auf
Keys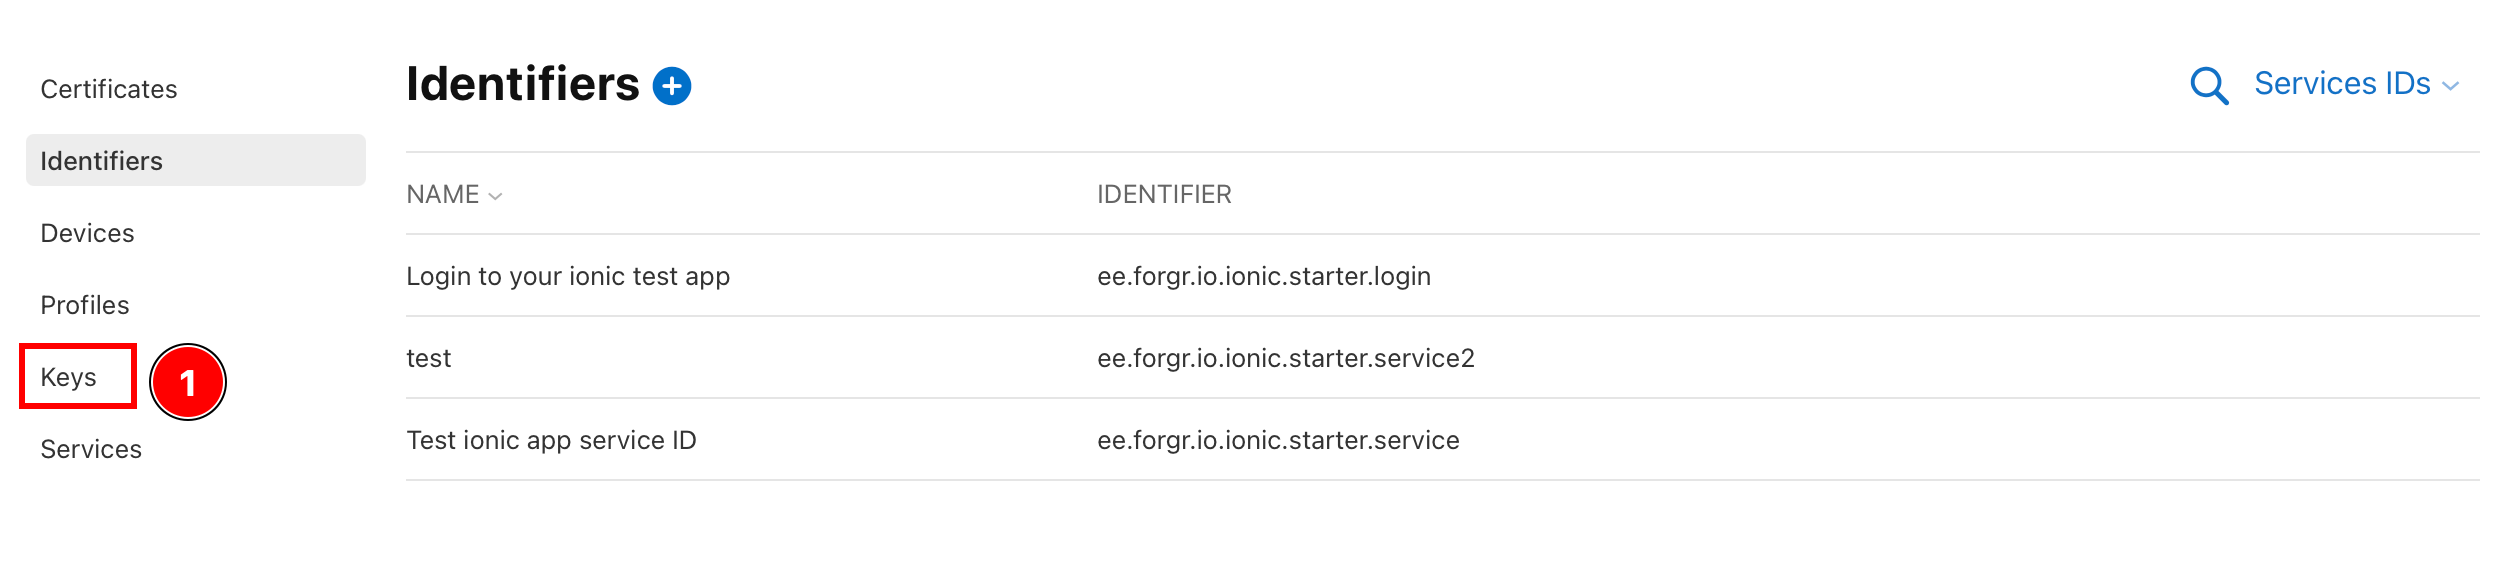
-
Klicken Sie auf das Plus-Symbol
-
Benennen Sie Ihren Schlüssel

Dieser Name ist nicht wichtig, Sie können alles eingeben.
-
Wählen Sie
Sign in with Appleund klicken Sie aufConfigure
-
Wählen Sie die primäre App-ID aus und drücken Sie
Save.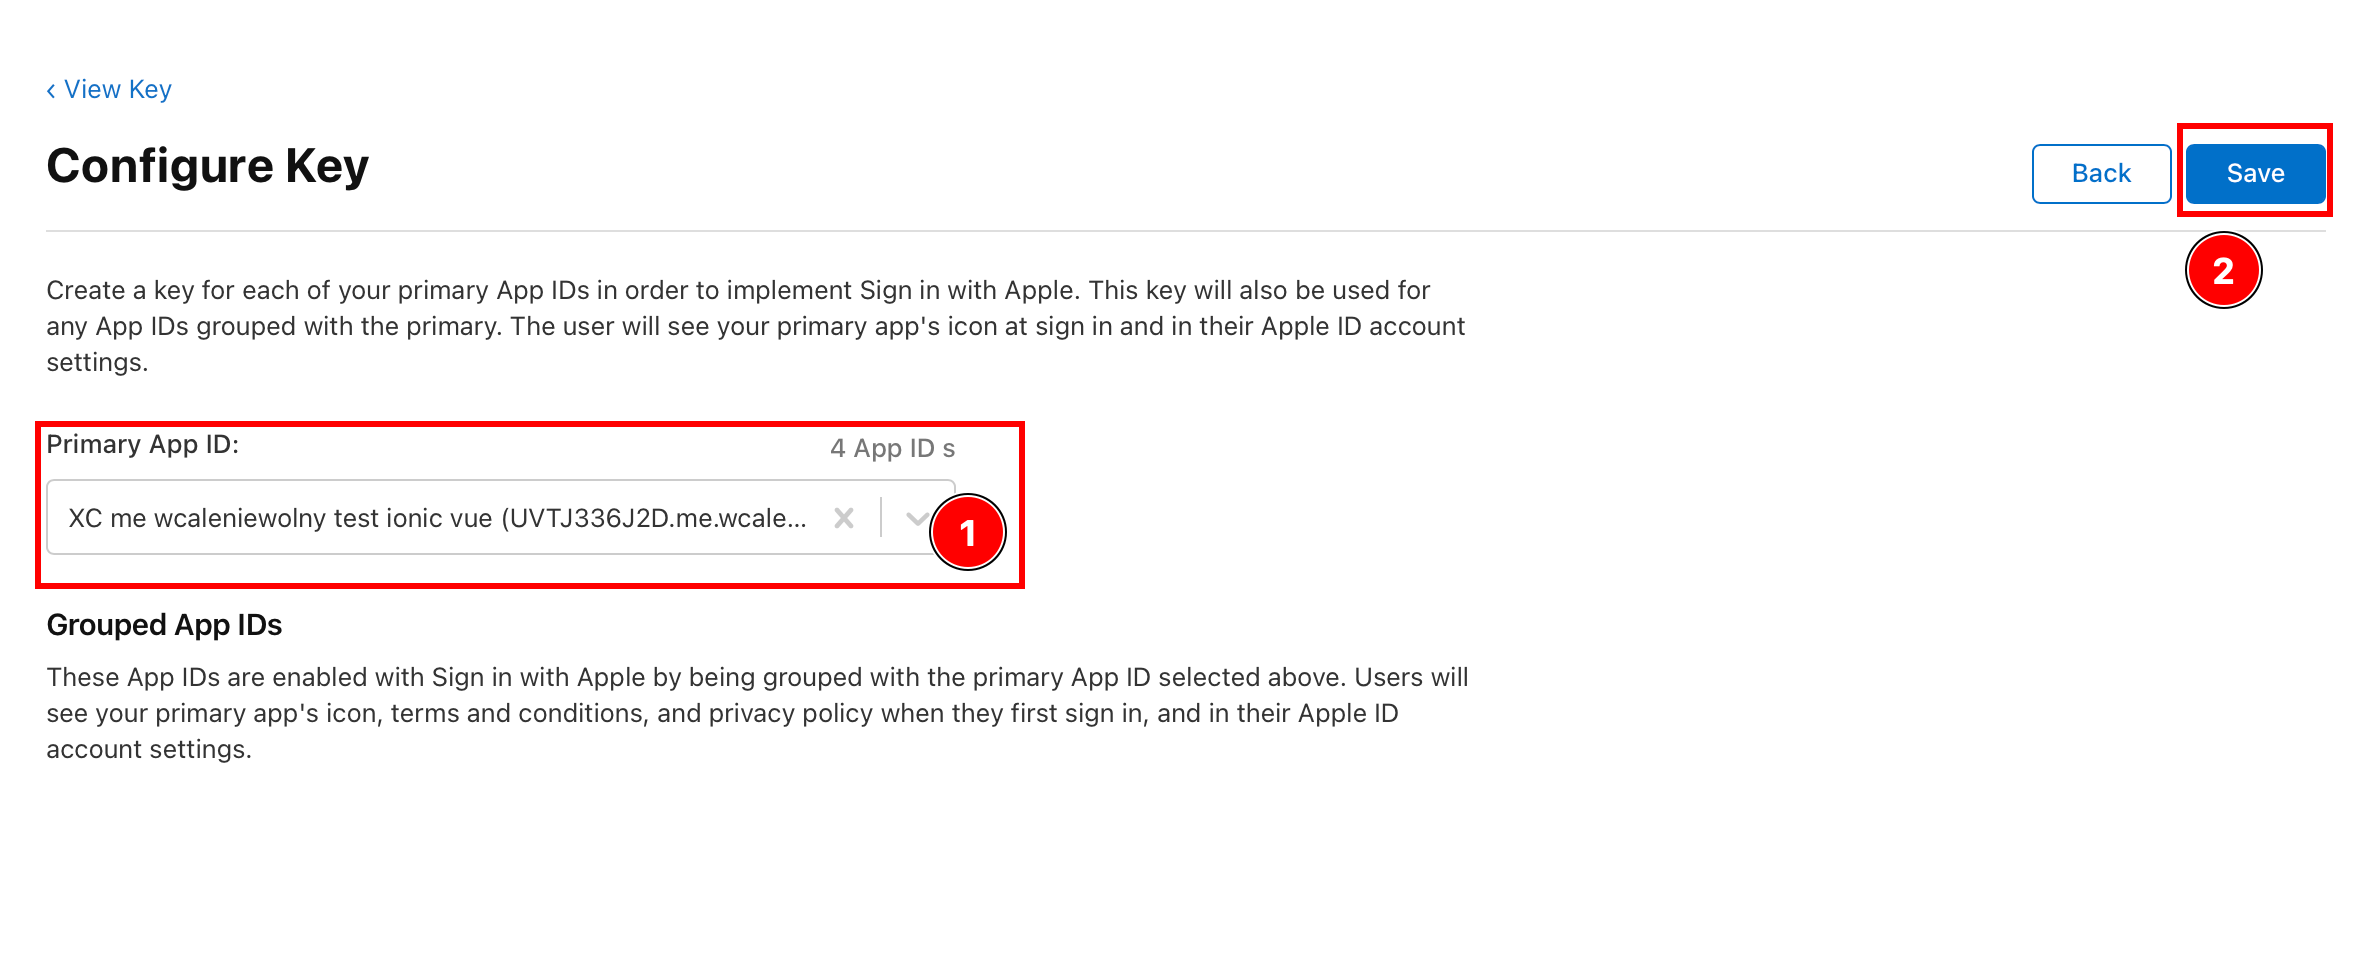
Dies muss dieselbe App-ID sein wie die ID in den vorherigen Schritten.
-
Klicken Sie auf
Continue
-
Klicken Sie auf
Register
-
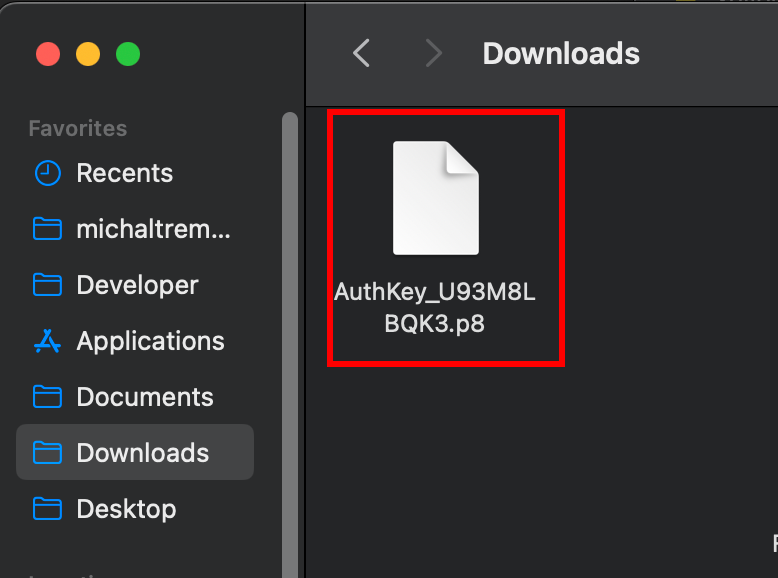
Kopieren Sie die Schlüssel-ID und laden Sie den Schlüssel herunter.
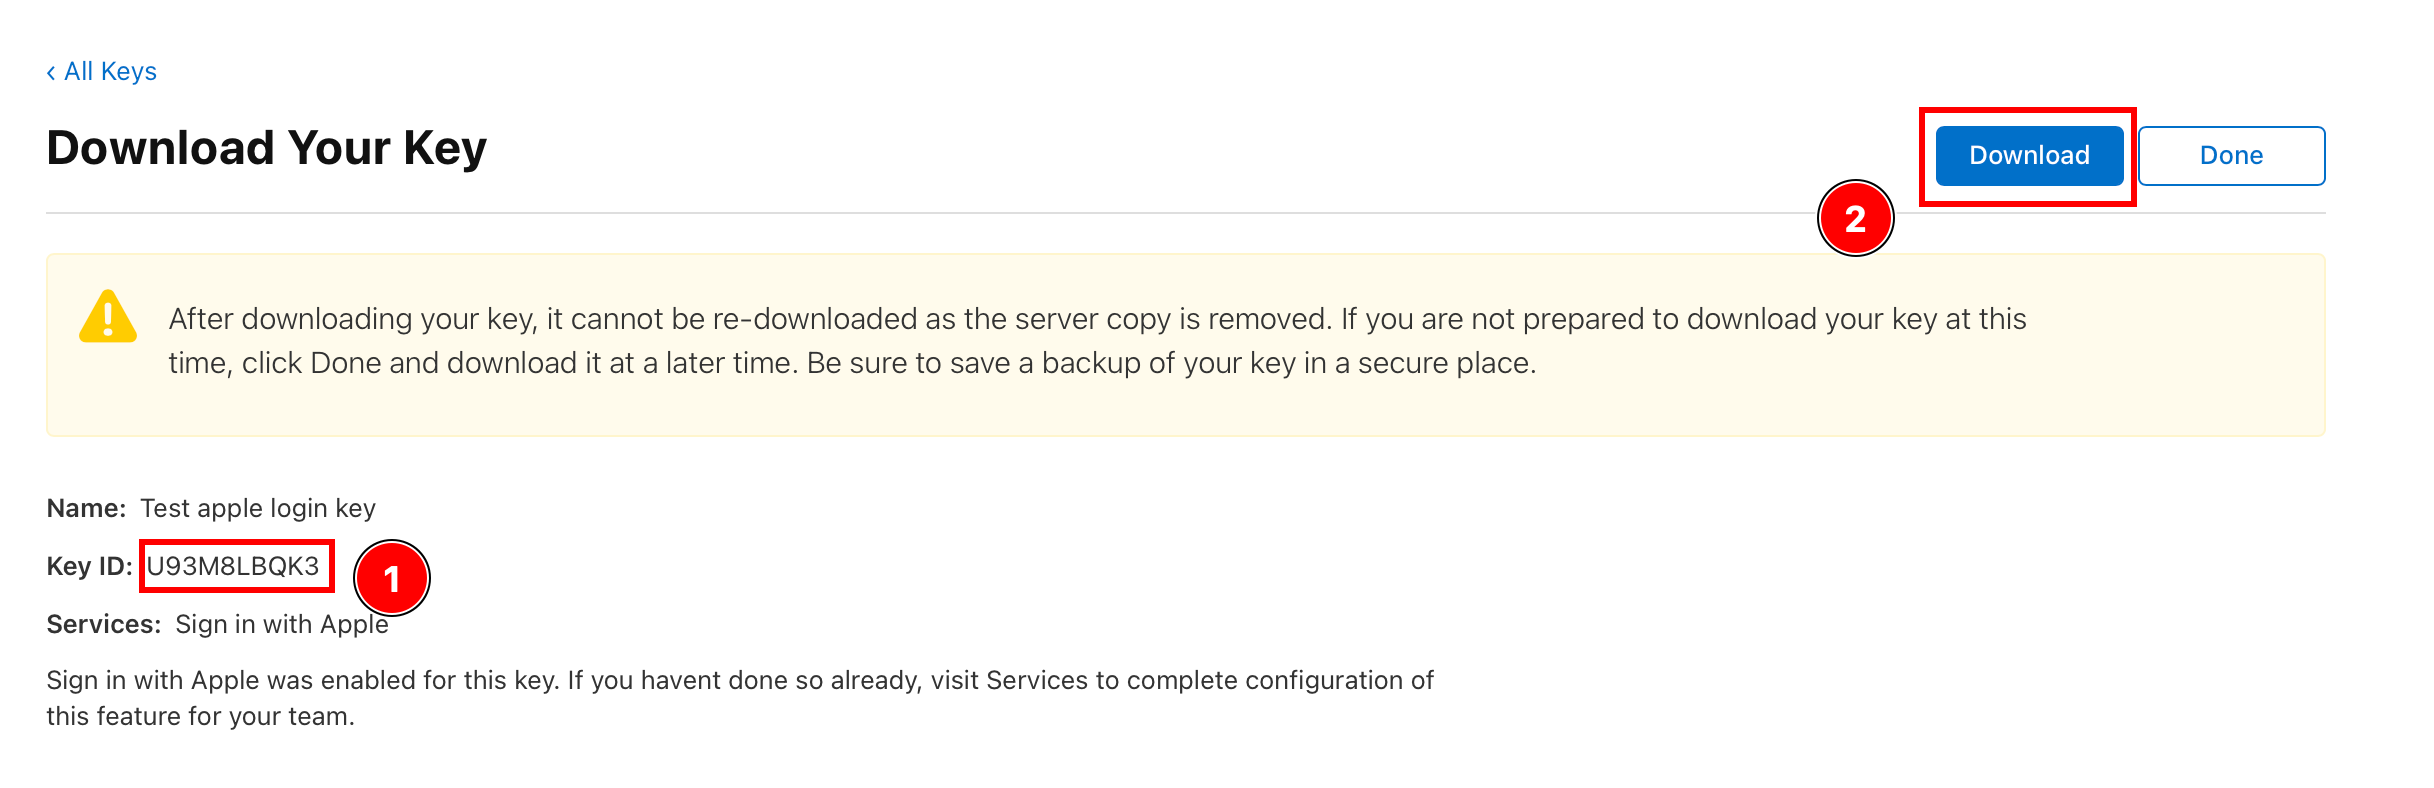
WICHTIG: Speichern Sie diese ID, im Backend heißt sie
KEY_ID. Laden Sie den Schlüssel herunter. Stellen Sie sicher, dass Sie diesen Schlüssel niemals weitergeben. -
Suchen Sie den heruntergeladenen Schlüssel und speichern Sie ihn im Backend-Ordner.
Abrufen der Team-ID
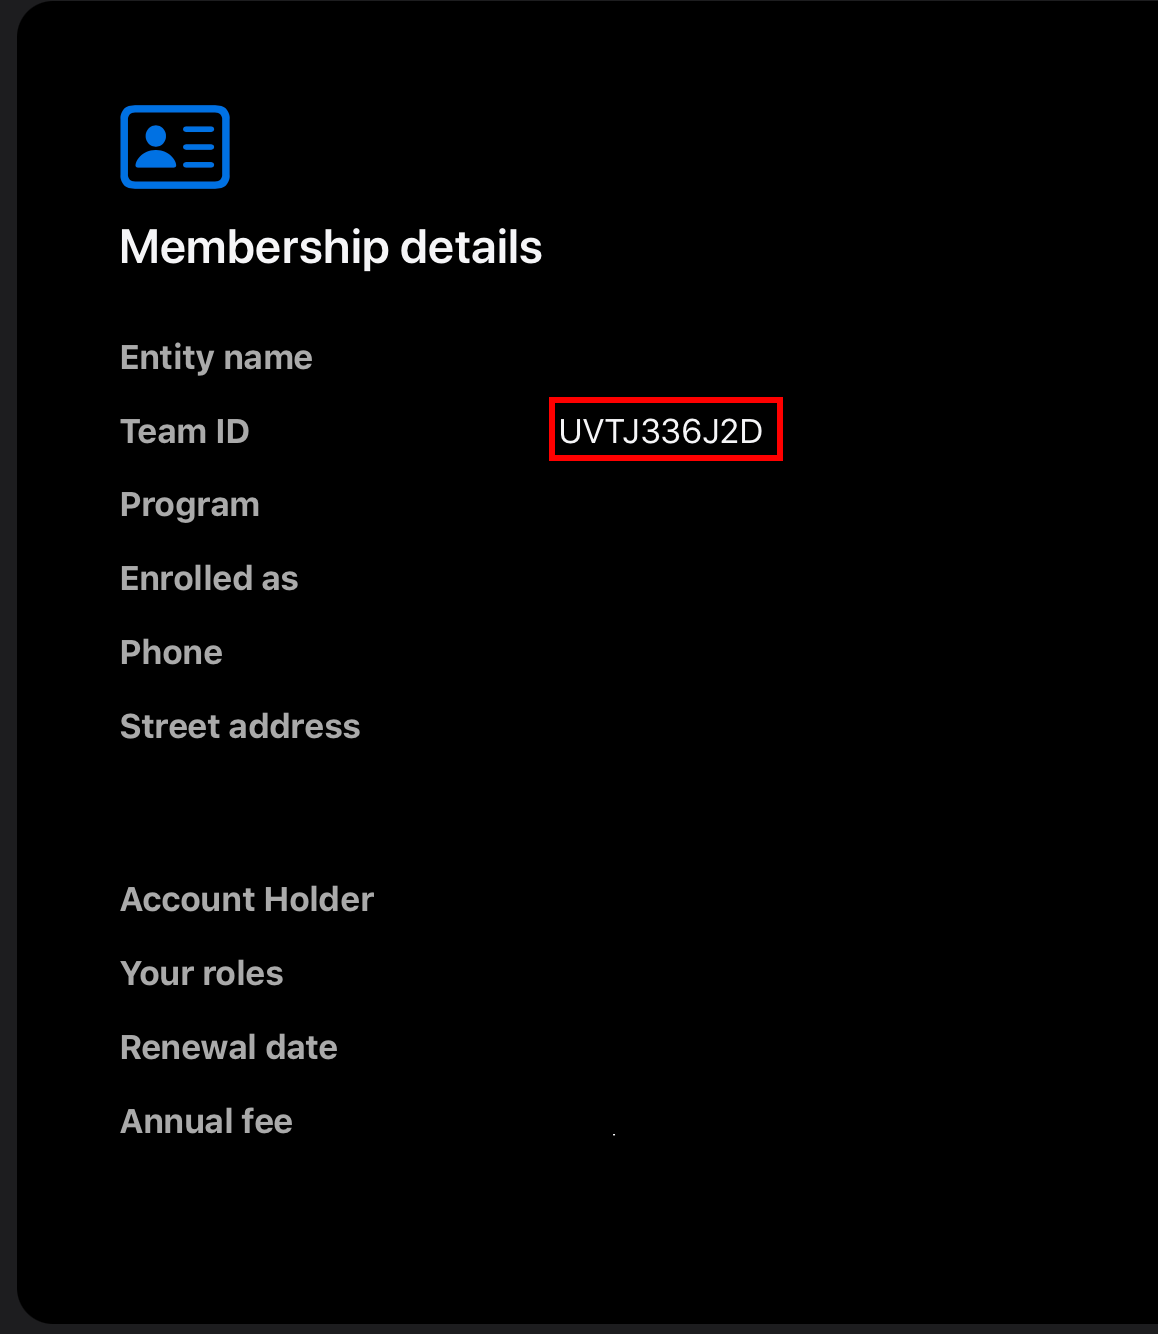
Section titled “Abrufen der Team-ID”Um Login with Apple auf Android verwenden zu können, benötigen Sie die „Team-ID“. Es wird im Backend verwendet.
-
Gehen Sie zu dieser Website und scrollen Sie nach unten
-
Suchen Sie die „Team-ID“.
Konfigurieren der App-Weiterleitung
Section titled “Konfigurieren der App-Weiterleitung”Wie Sie im Diagramm gesehen haben, führt das Backend einen Schritt namens „Zurück zur App umleiten“ aus. Dies erfordert manuelle Änderungen an Ihrer App.
- Ändern Sie
AndroidManifest.xml-
Öffnen Sie die Datei, ich verwende
AndroidStudio
-
Suchen Sie nach
MainActivityund fügen Sie den folgenden Intent-Filter hinzu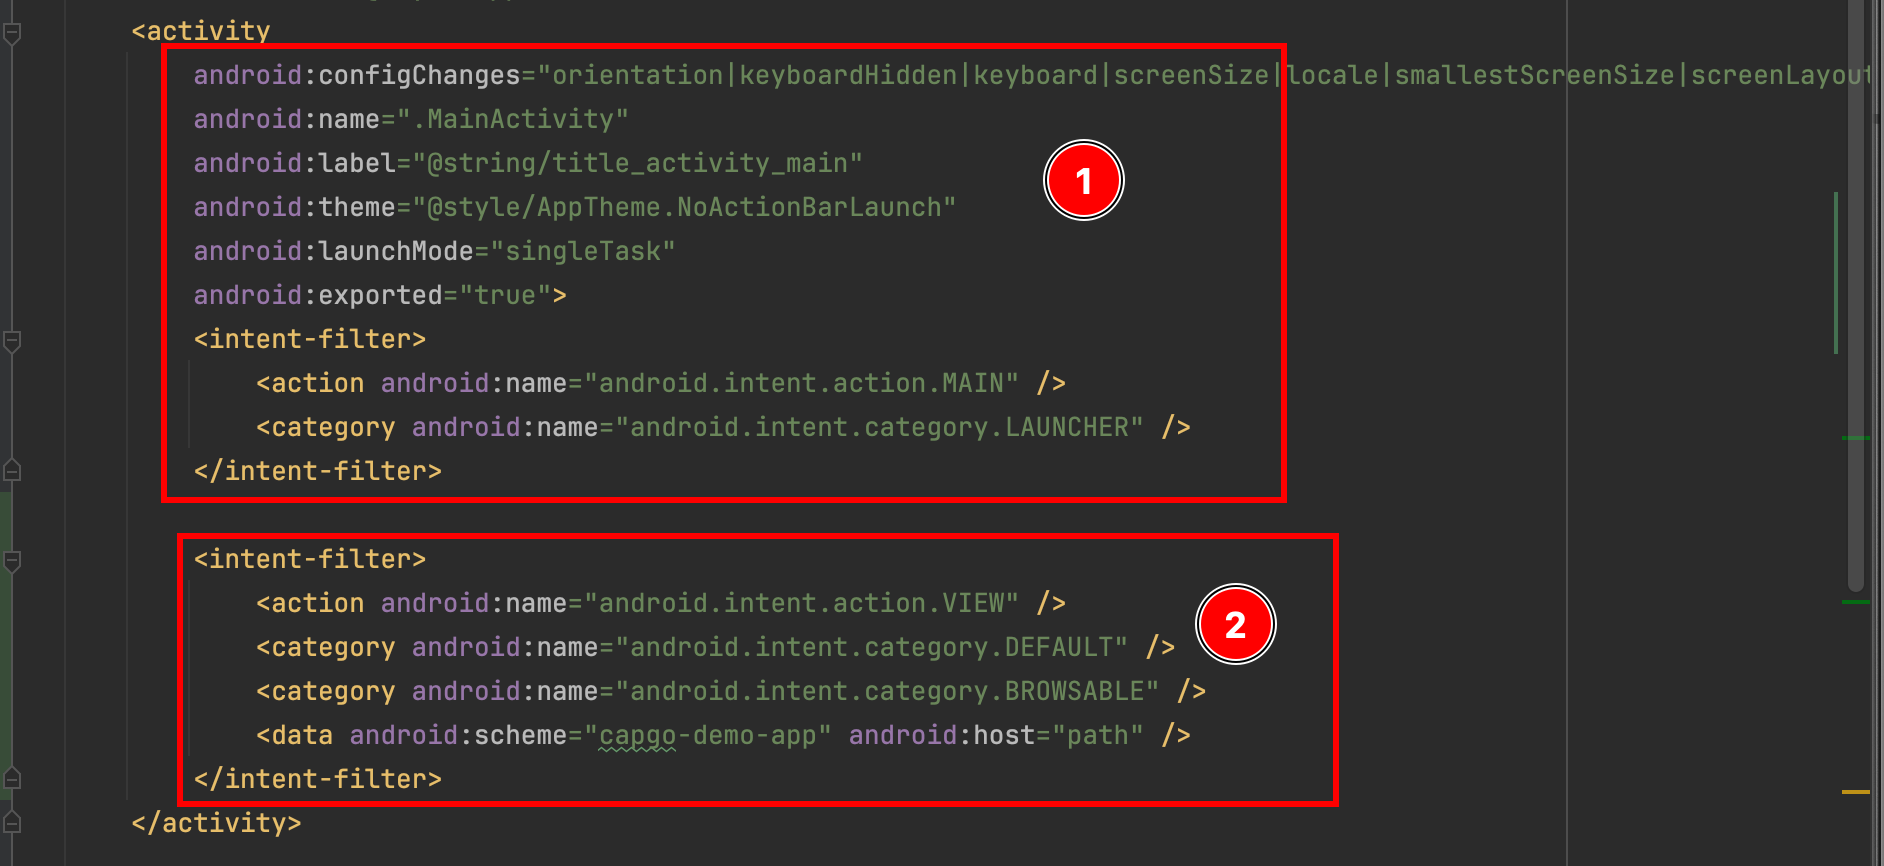 <intent-filter><action android:name="android.intent.action.VIEW" /><category android:name="android.intent.category.DEFAULT" /><category android:name="android.intent.category.BROWSABLE" /><data android:scheme="capgo-demo-app" android:host="path" /></intent-filter>
-
- Ändern Sie
MainActivity-
Bitte öffnen Sie das
MainActivity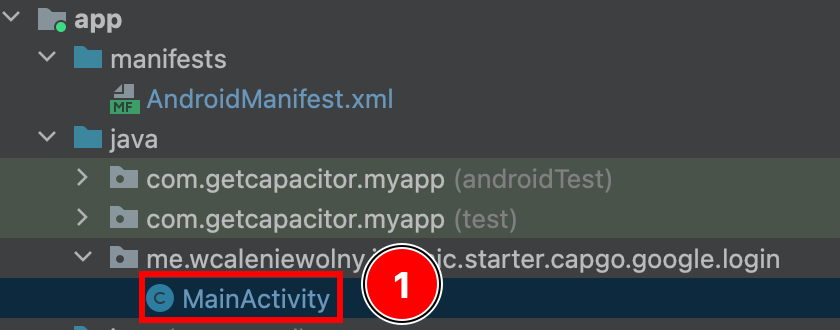
-
Fügen Sie den folgenden Code hinzu:
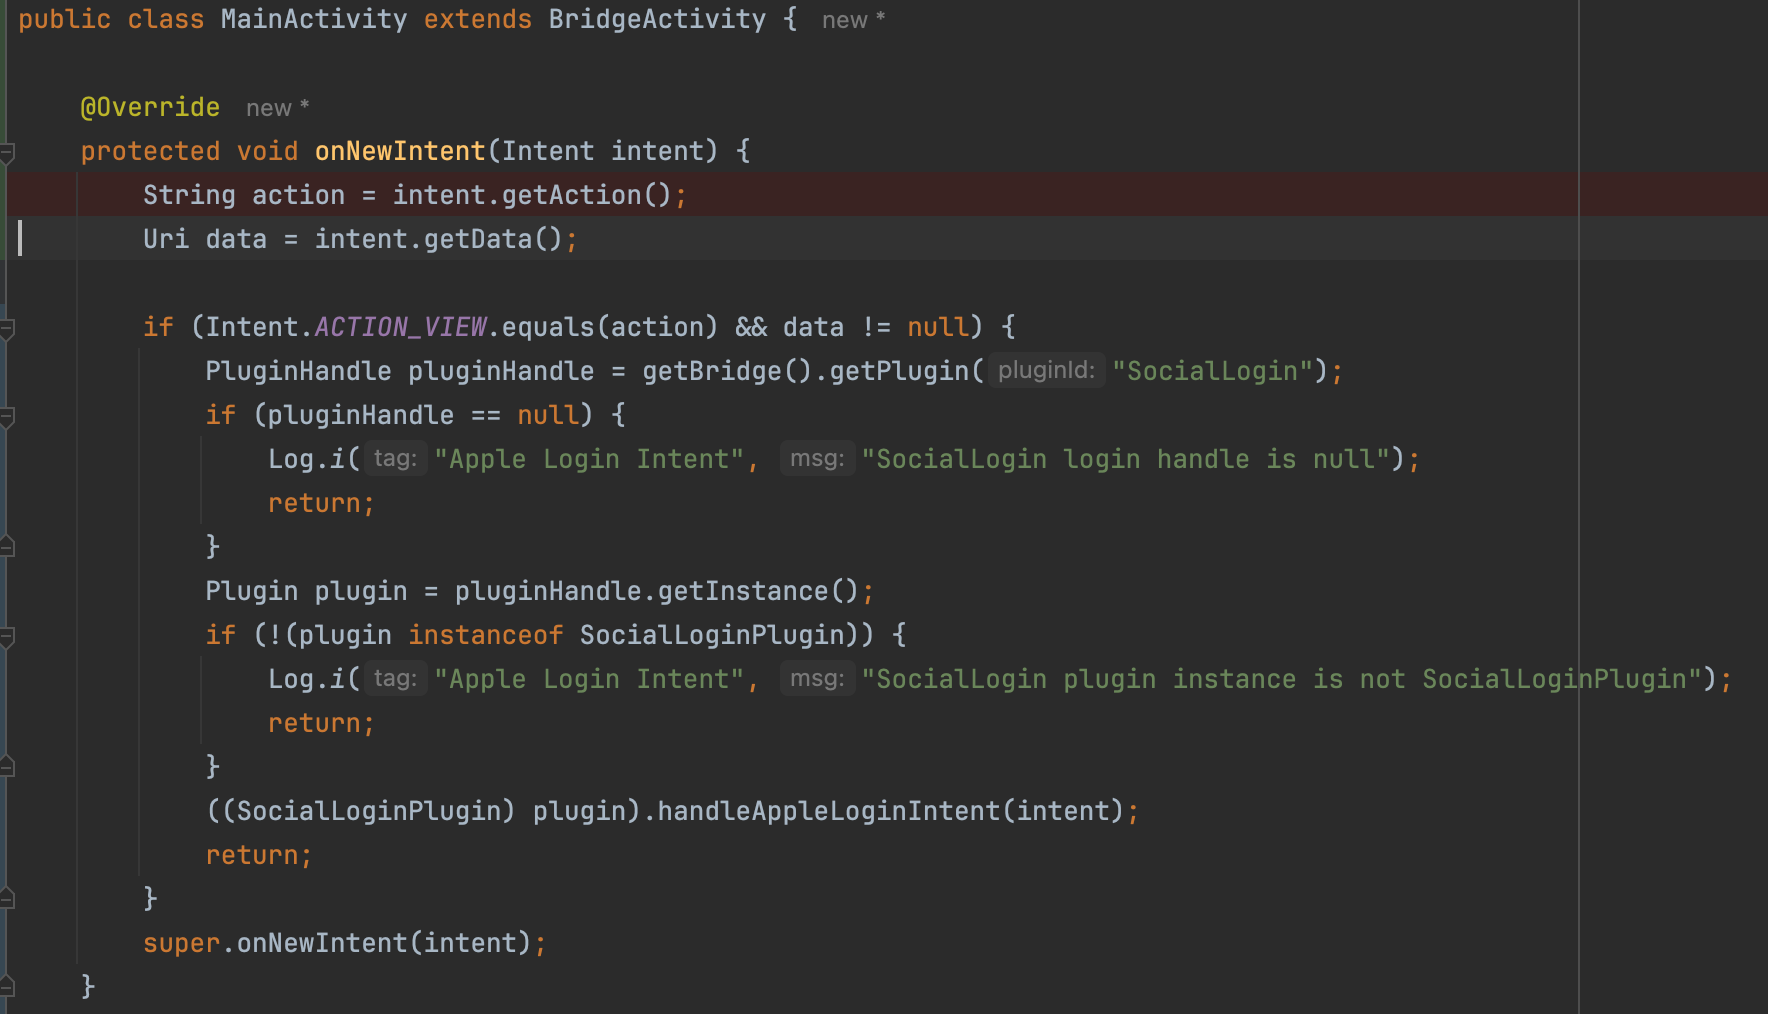 @Overrideprotected void onNewIntent(Intent intent) {String action = intent.getAction();Uri data = intent.getData();if (Intent.ACTION_VIEW.equals(action) && data != null) {PluginHandle pluginHandle = getBridge().getPlugin("SocialLogin");if (pluginHandle == null) {Log.i("Apple Login Intent", "SocialLogin login handle is null");return;}Plugin plugin = pluginHandle.getInstance();if (!(plugin instanceof SocialLoginPlugin)) {Log.i("Apple Login Intent", "SocialLogin plugin instance is not SocialLoginPlugin");return;}((SocialLoginPlugin) plugin).handleAppleLoginIntent(intent);return;}super.onNewIntent(intent);}
In diesem Beispiel wird davon ausgegangen, dass Sie keine Deep Links konfiguriert haben. Passen Sie in diesem Fall bitte den Code an
-
Backend-Konfiguration
Section titled “Backend-Konfiguration”Für Android ist ein Backend erforderlich, aber die Konfiguration eines Backends wirkt sich auch auf IOS aus. Ein Beispiel-Backend finden Sie hierDieses Beispiel bietet Folgendes:
- Eine einfache JSON-Datenbank – Eine Möglichkeit, JWT von den Servern von Apple anzufordern
- Eine einfache JWT-Verifizierung
Angesichts all dessen, was ich in diesem Tutorial gesagt habe, würde der Abschnitt env folgendermaßen aussehen:
ANDROID_SERVICE_ID= Dienst-IDIOS_SERVICE_ID= App-ID
env: { PRIVATE_KEY_FILE: "AuthKey_U93M8LBQK3.p8", KEY_ID: "U93M8LBQK3", TEAM_ID: "UVTJ336J2D", ANDROID_SERVICE_ID: "ee.forgr.io.ionic.starter.service2", IOS_SERVICE_ID: "me.wcaleniewolny.test.ionic.vue", PORT: 3000, REDIRECT_URI: "https://xyz.wcaleniewolny.me/login/callback", BASE_REDIRECT_URL: "capgo-demo-app://path"}Verwendung des Plugins
Section titled “Verwendung des Plugins”Die Verwendung der Funktion login ändert sich nicht, sie ist dieselbe wie bei IOS. Weitere Informationen finden Sie in diesem Abschnitt. Allerdings ändert sich die Methode initialize ein wenig.
await SocialLogin.initialize({ apple: { clientId: 'ee.forgr.io.ionic.starter.service2', redirectUrl: 'https://appleloginvps.wcaleniewolny.me/login/callback' }})Erstellen der App
Section titled “Erstellen der App”-
Wenn Sie noch keine App-ID haben, klicken Sie auf die Plus-Schaltfläche
-
Wählen Sie „App-IDs“ und klicken Sie auf „Weiter“.
-
Klicken Sie auf Typ
Appund klicken Sie aufContinue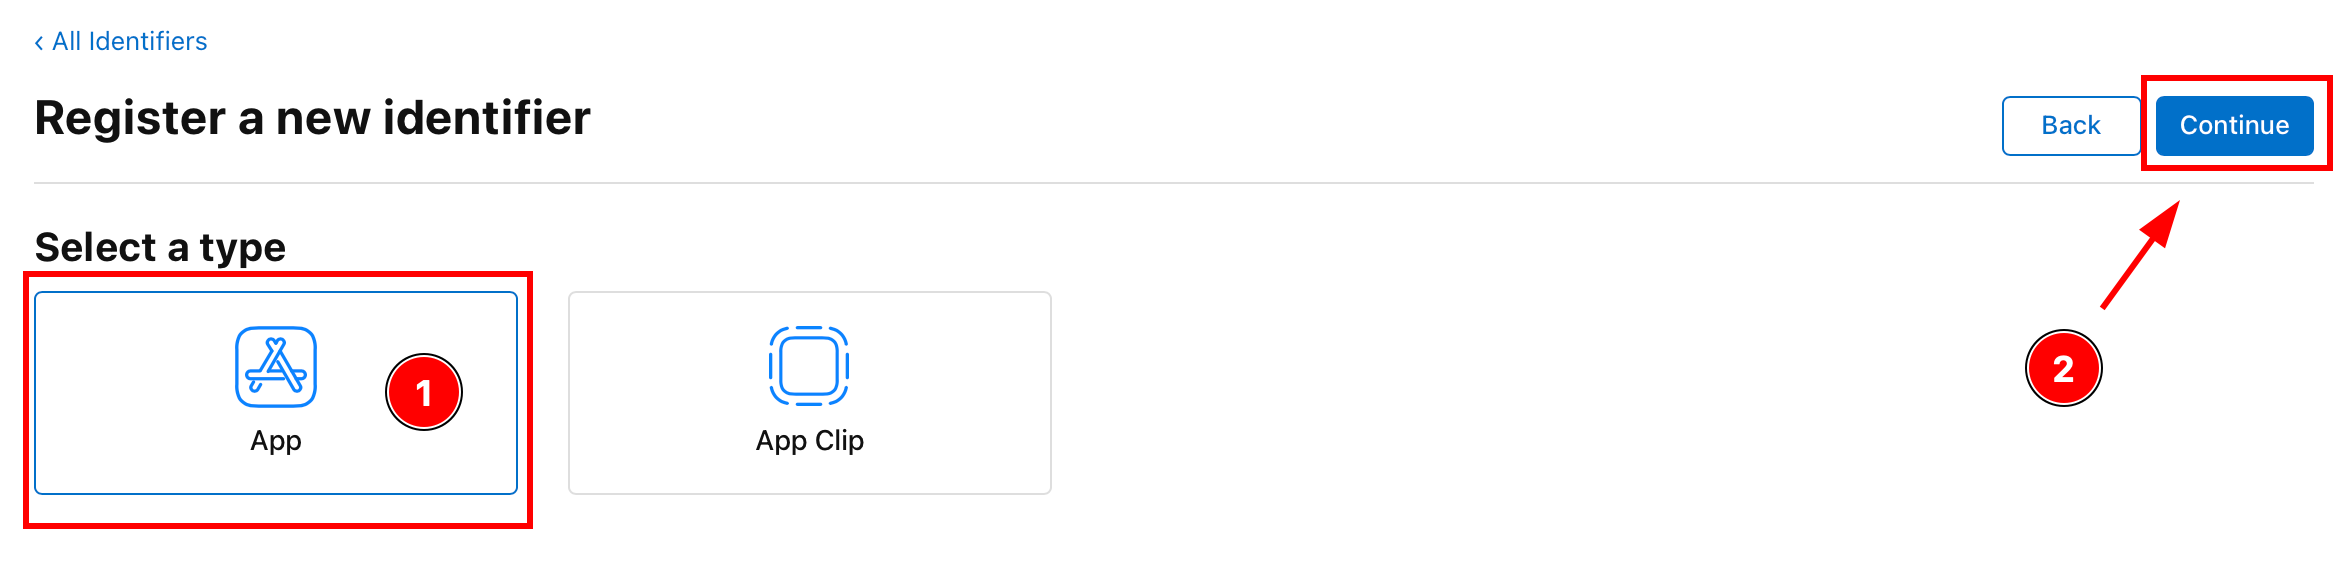
-
Geben Sie die Beschreibung und die App-ID ein
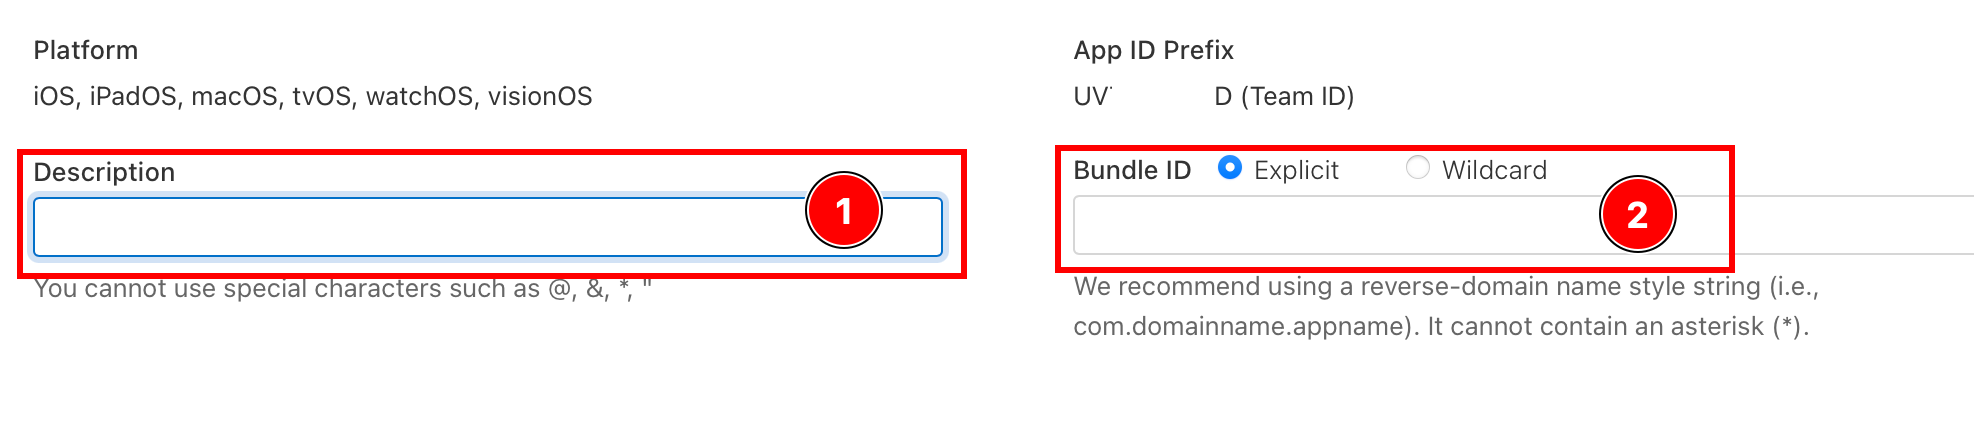
-
Aktivieren Sie die
Sign with Apple-Funktion
-
Klicken Sie auf
Continue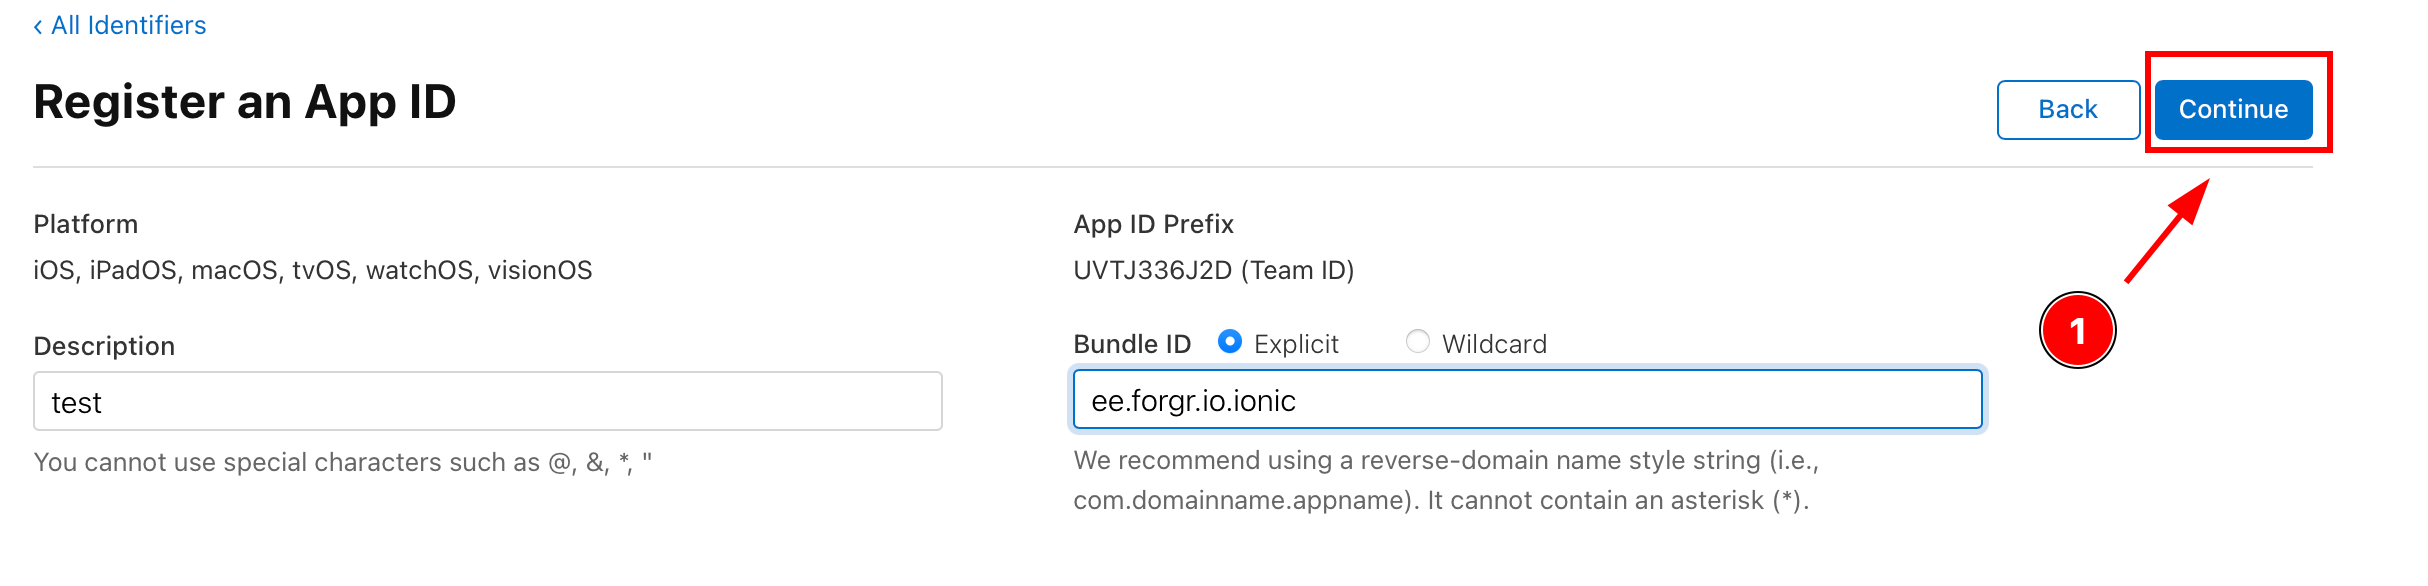
-
Bestätigen Sie die Details und klicken Sie auf
Register