Android 자동 갱신 구독 생성
자동 갱신 구독을 통해 앱의 콘텐츠, 서비스 또는 프리미엄 기능에 지속적으로 액세스할 수 있습니다. 이 가이드는 Google Play 콘솔에서 구독을 생성하고 구성하는 데 도움이 됩니다.
구독은 사용자가 취소할 때까지 각 결제 기간이 끝날 때 자동으로 갱신됩니다. 다음과 같은 경우에 이상적입니다.
- 프리미엄 콘텐츠 이용
- 광고 없는 경험
- 클라우드 스토리지
- 지속적인 서비스
구독 만들기
Section titled “구독 만들기”-
구독으로 이동
Google Play 콘솔에서 앱을 선택하고 왼쪽 메뉴에서 수익 창출 > 구독을 선택합니다.
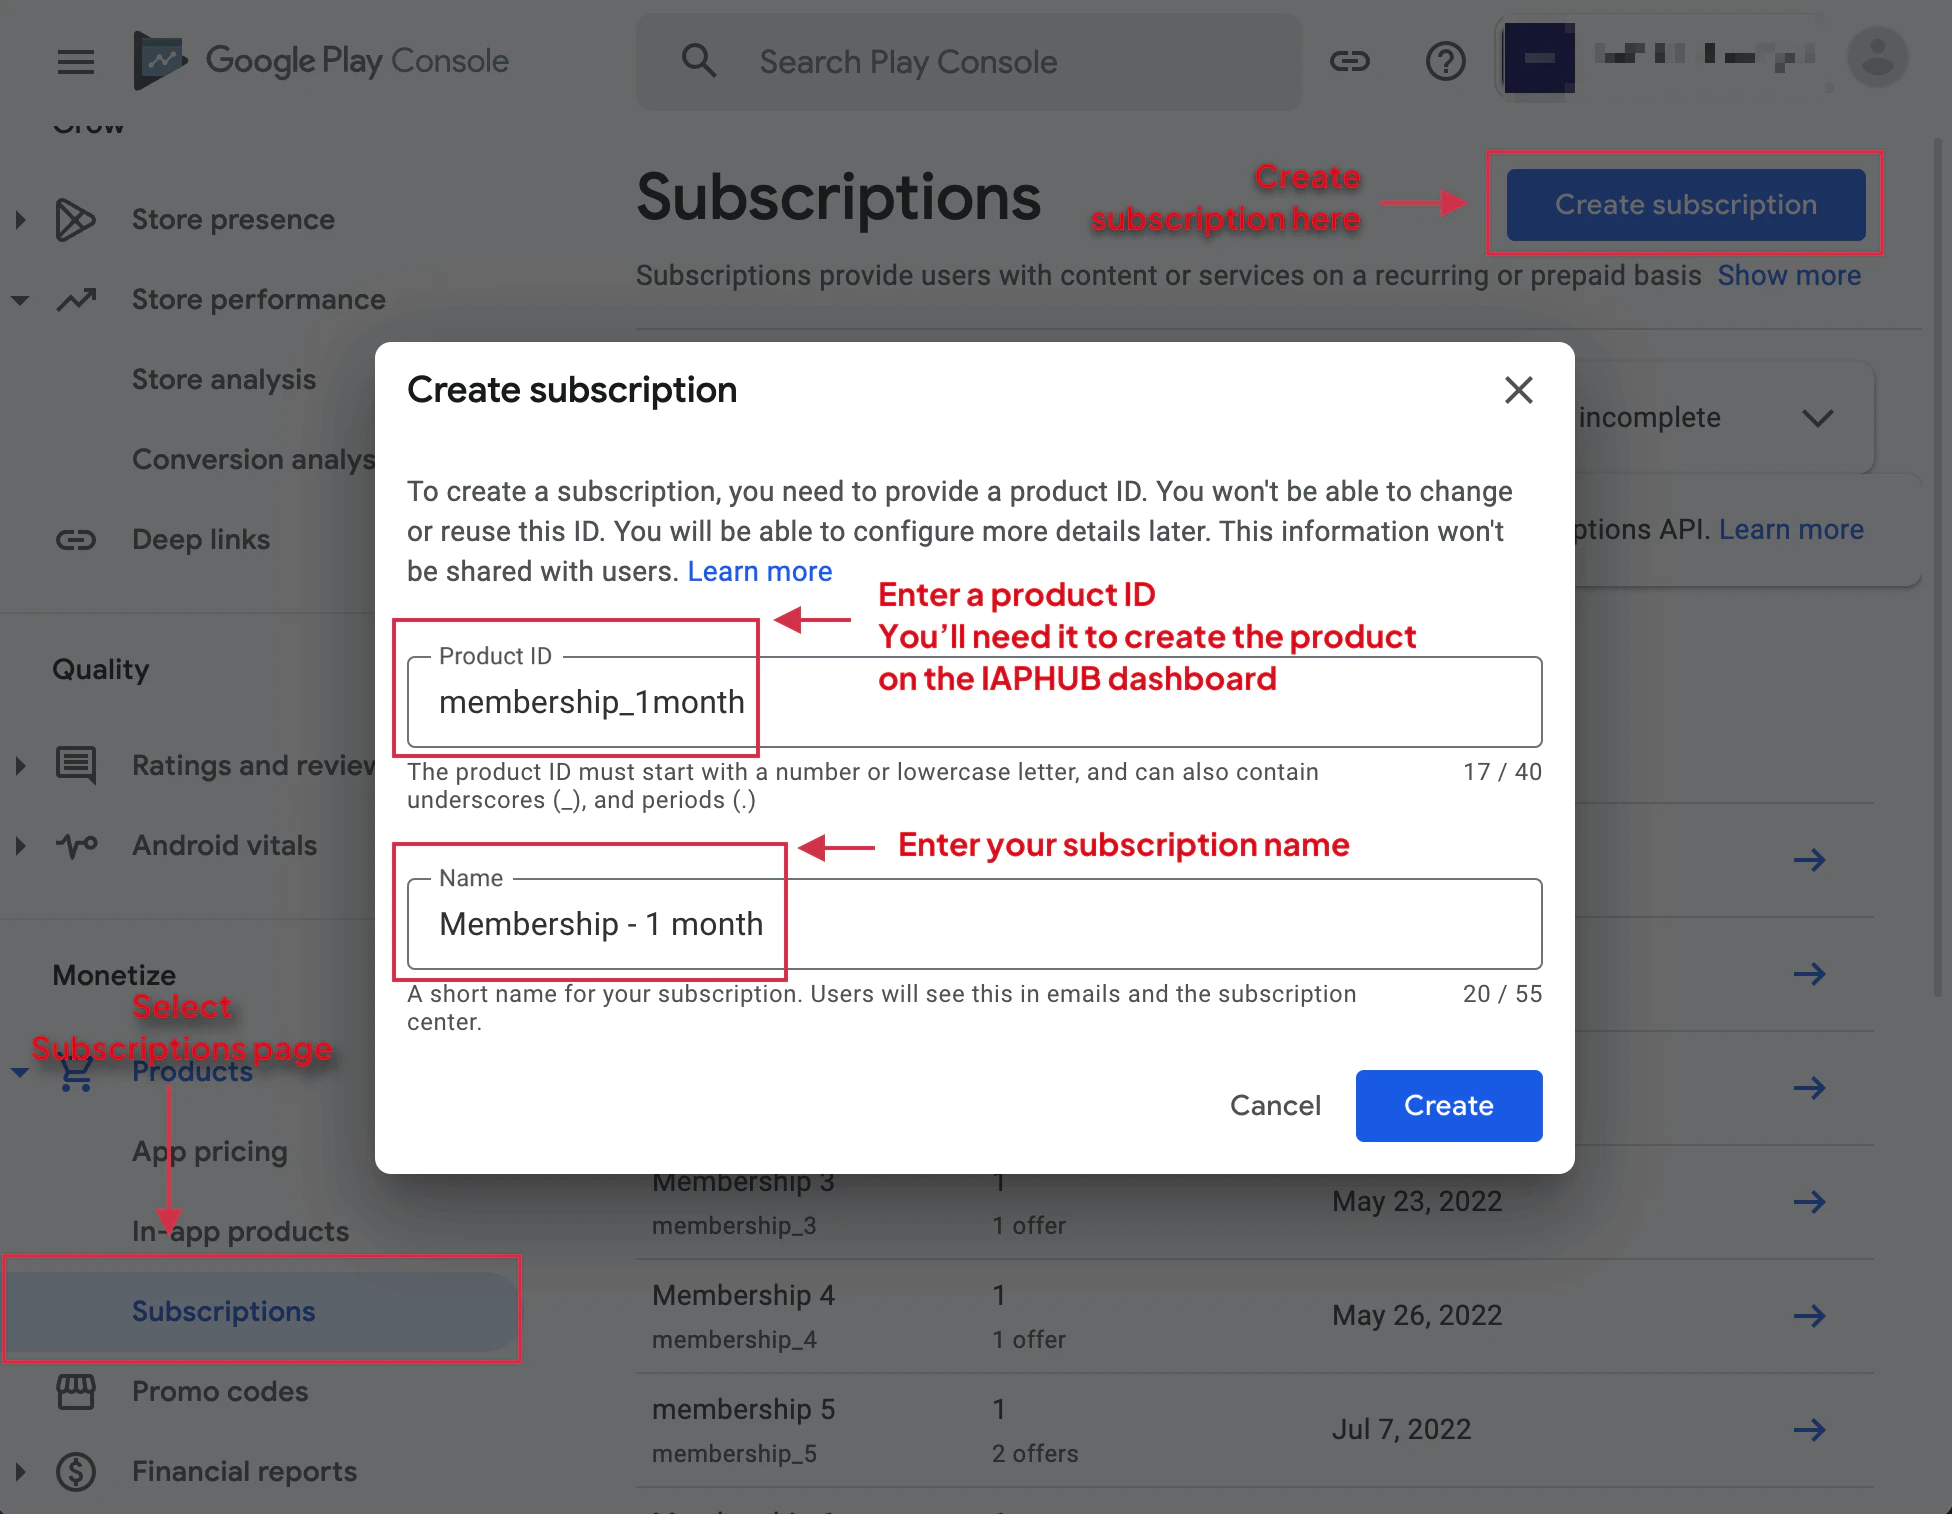
시작하려면 구독 만들기 버튼을 클릭하세요.
-
기본정보 입력
구독 이름과 제품 ID를 제공하세요. 제품 ID는 앱 구성에 필요하며 나중에 변경할 수 없습니다.
-
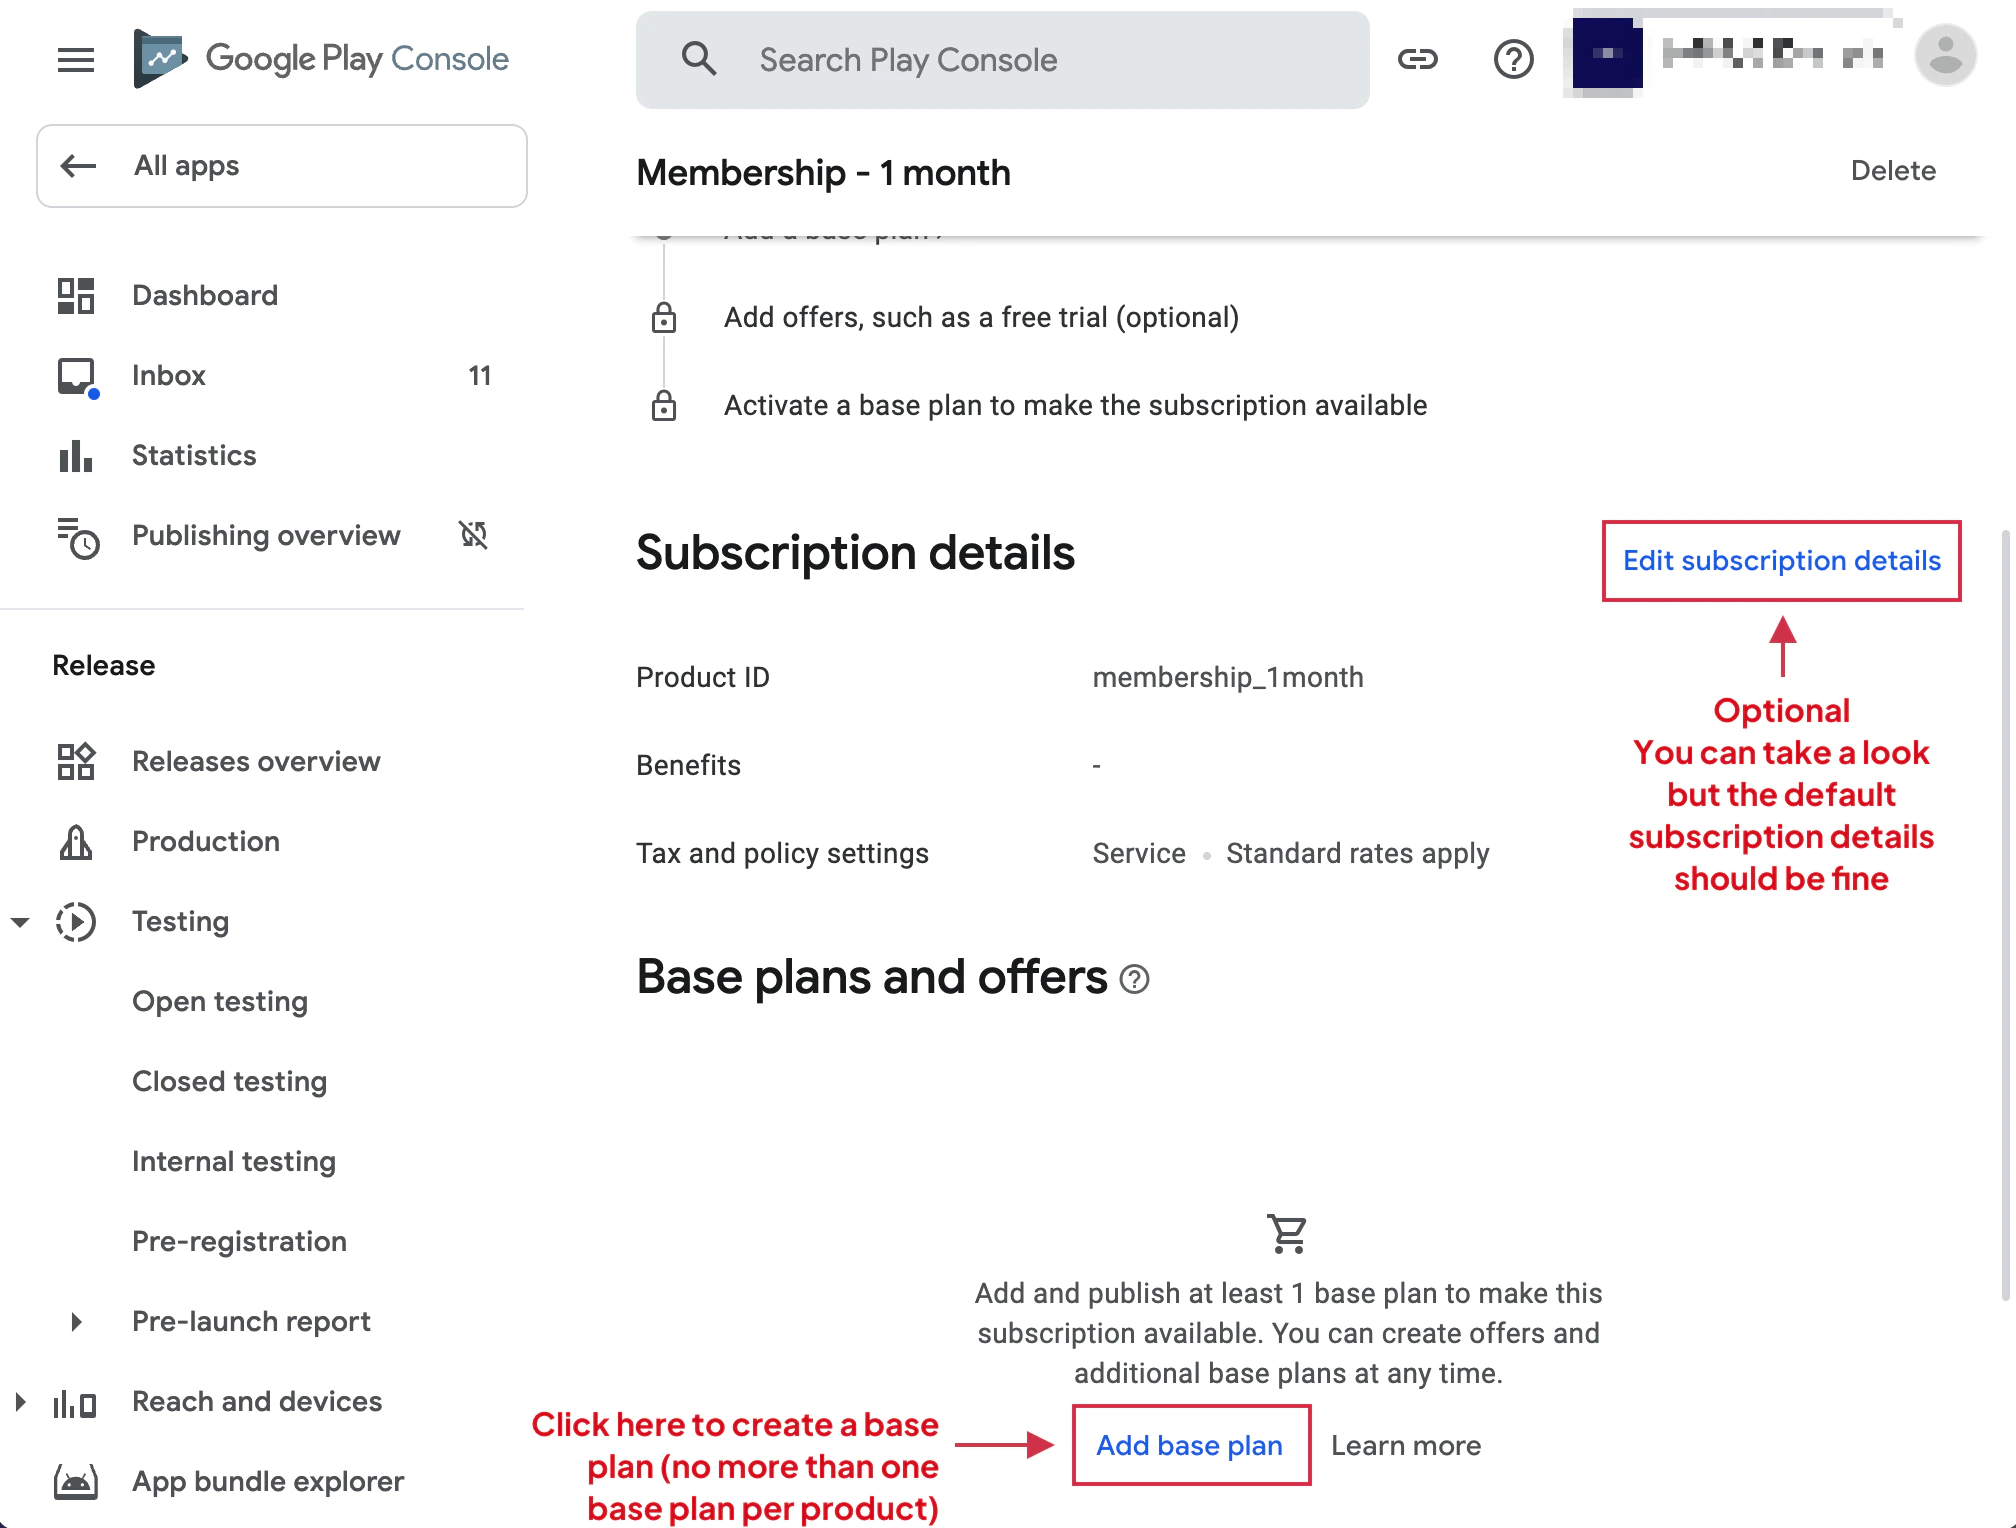
기본 계획 생성
Google Play에는 구독당 정확히 하나의 기본 요금제가 필요합니다. 기본 구매 플러그인은 iOS과의 호환성을 유지하기 위해 하나의 기본 계획만 지원합니다.
계속하려면 기본 요금제 추가를 클릭하세요.
-
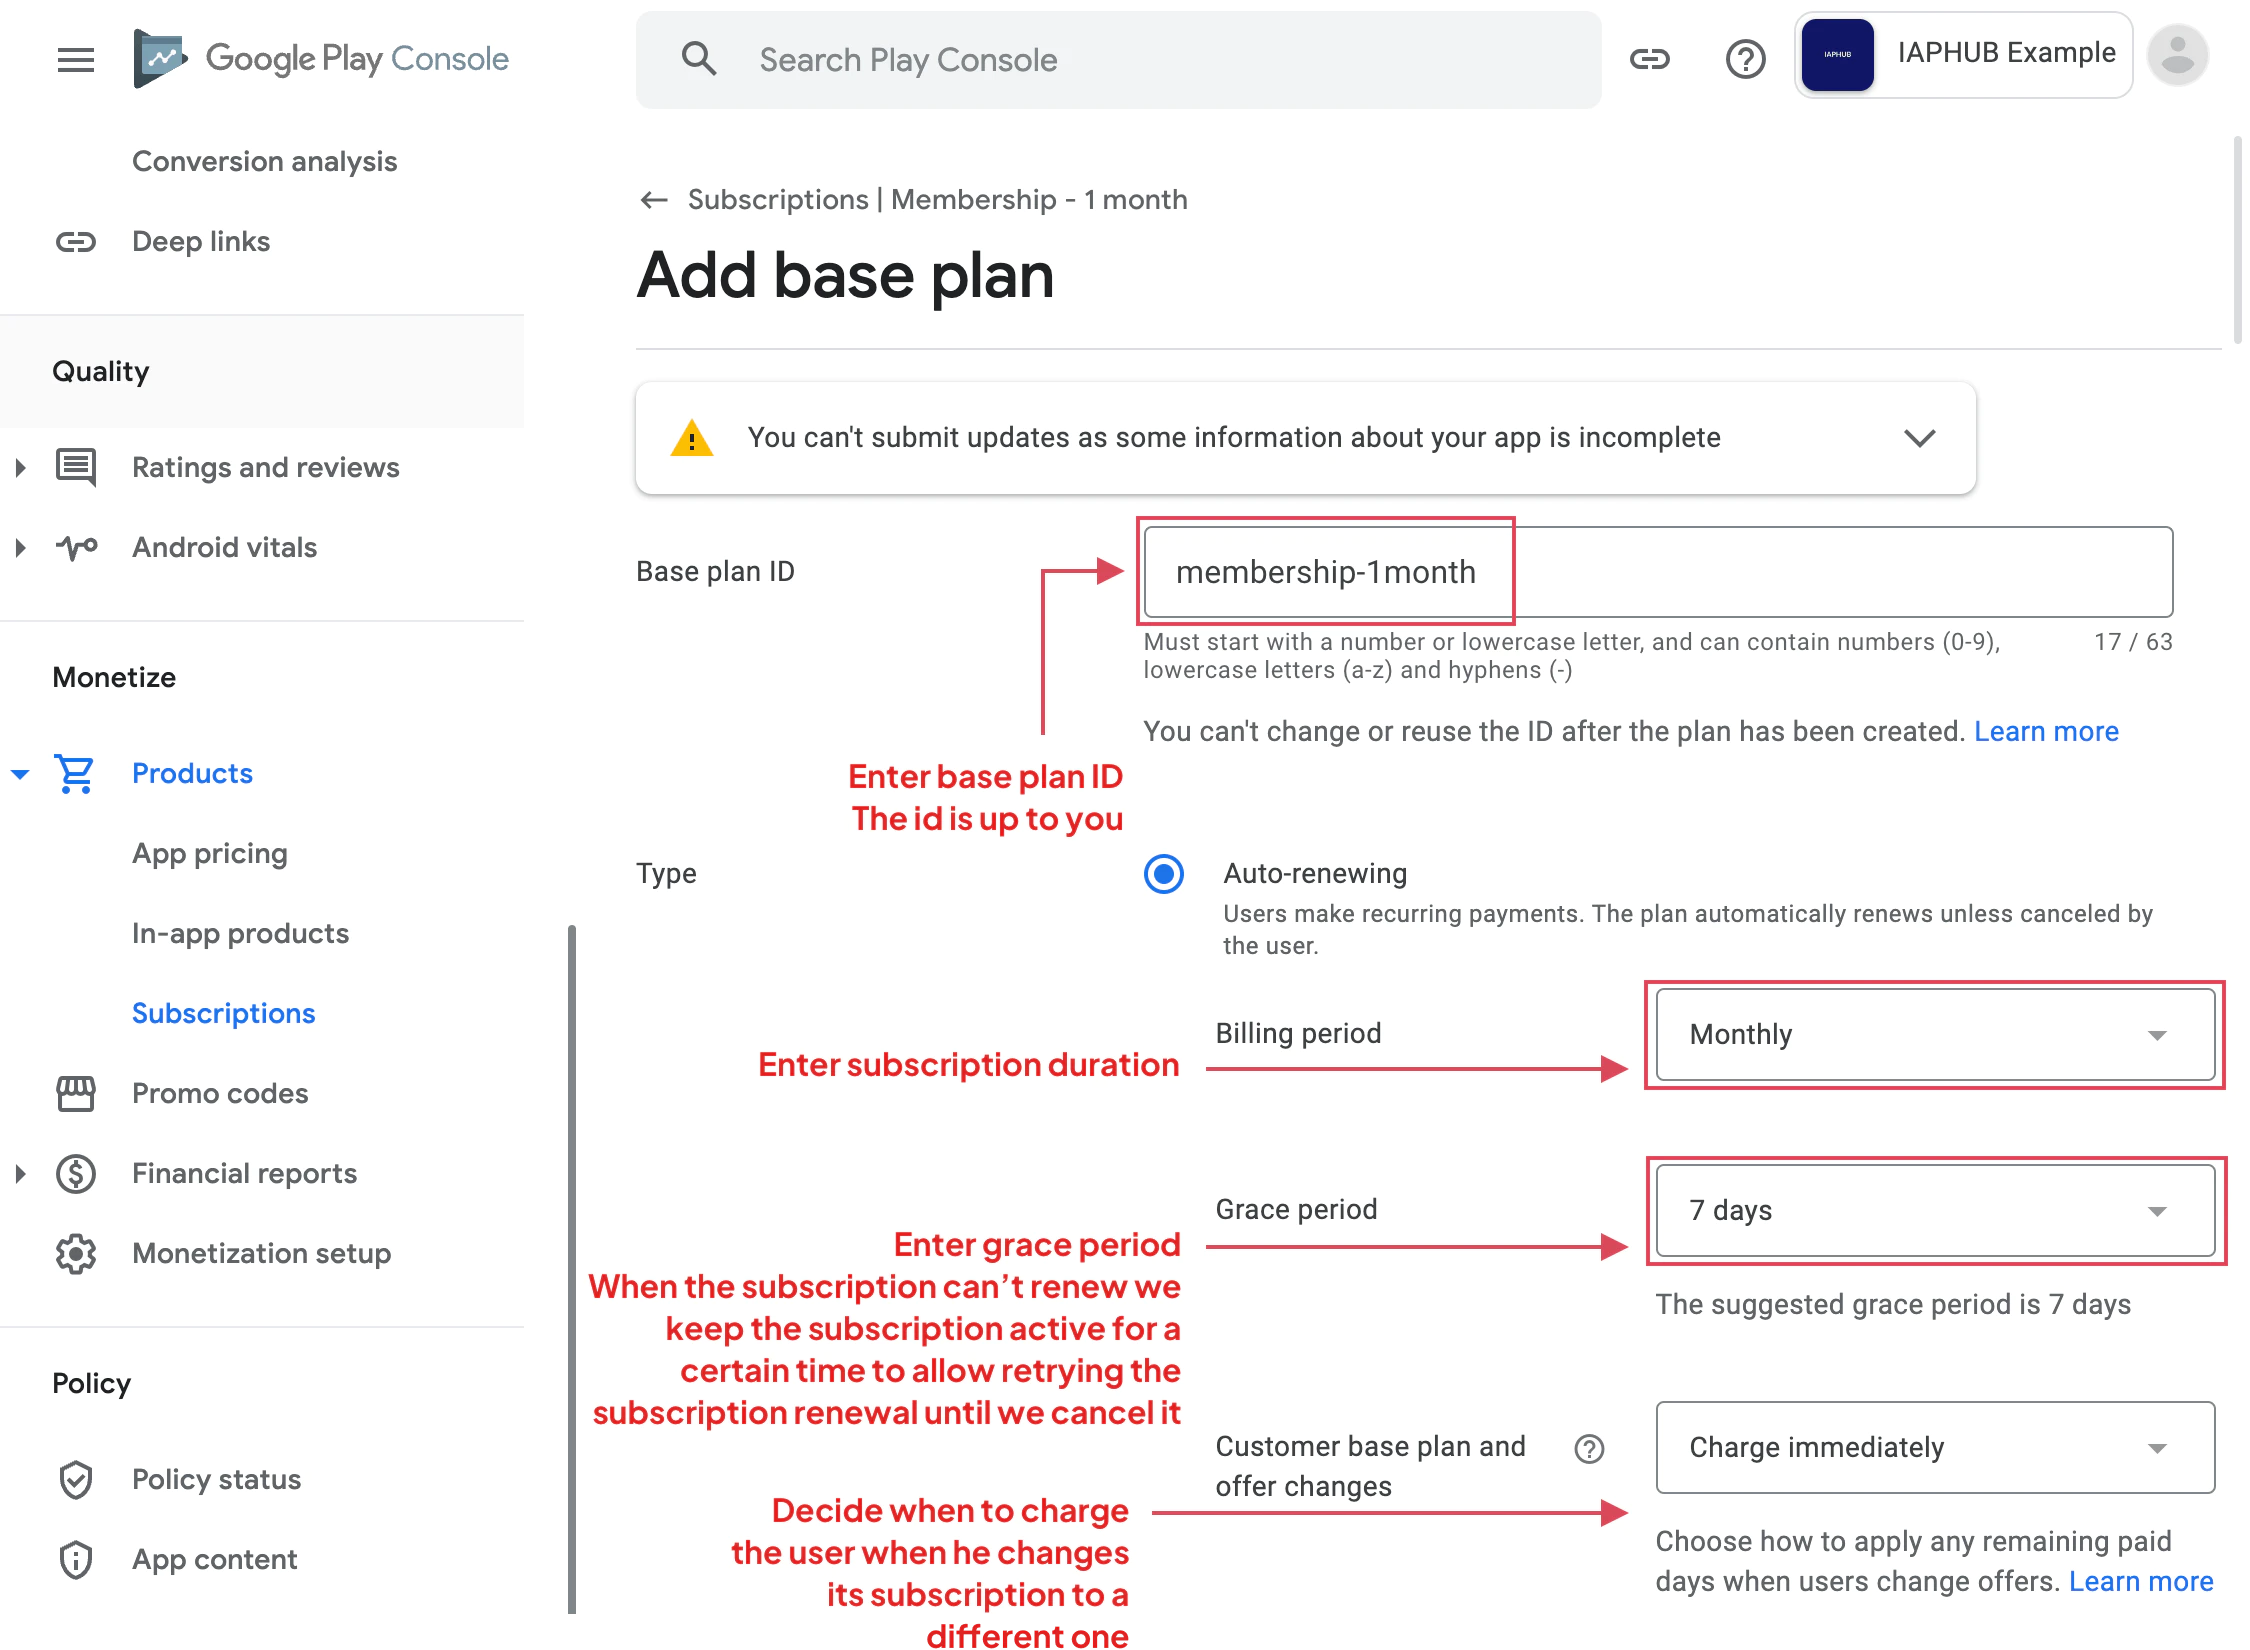
기본 요금제 세부정보 구성
입력:
- 기본 요금제 ID: 이 요금제의 고유 식별자
- 청구 기간: 사용자에게 청구되는 빈도(주간, 월간, 연간 등)
- 유예 기간: 취소 전 결제를 재시도하면서 Google이 구독을 유지하는 기간입니다.

-
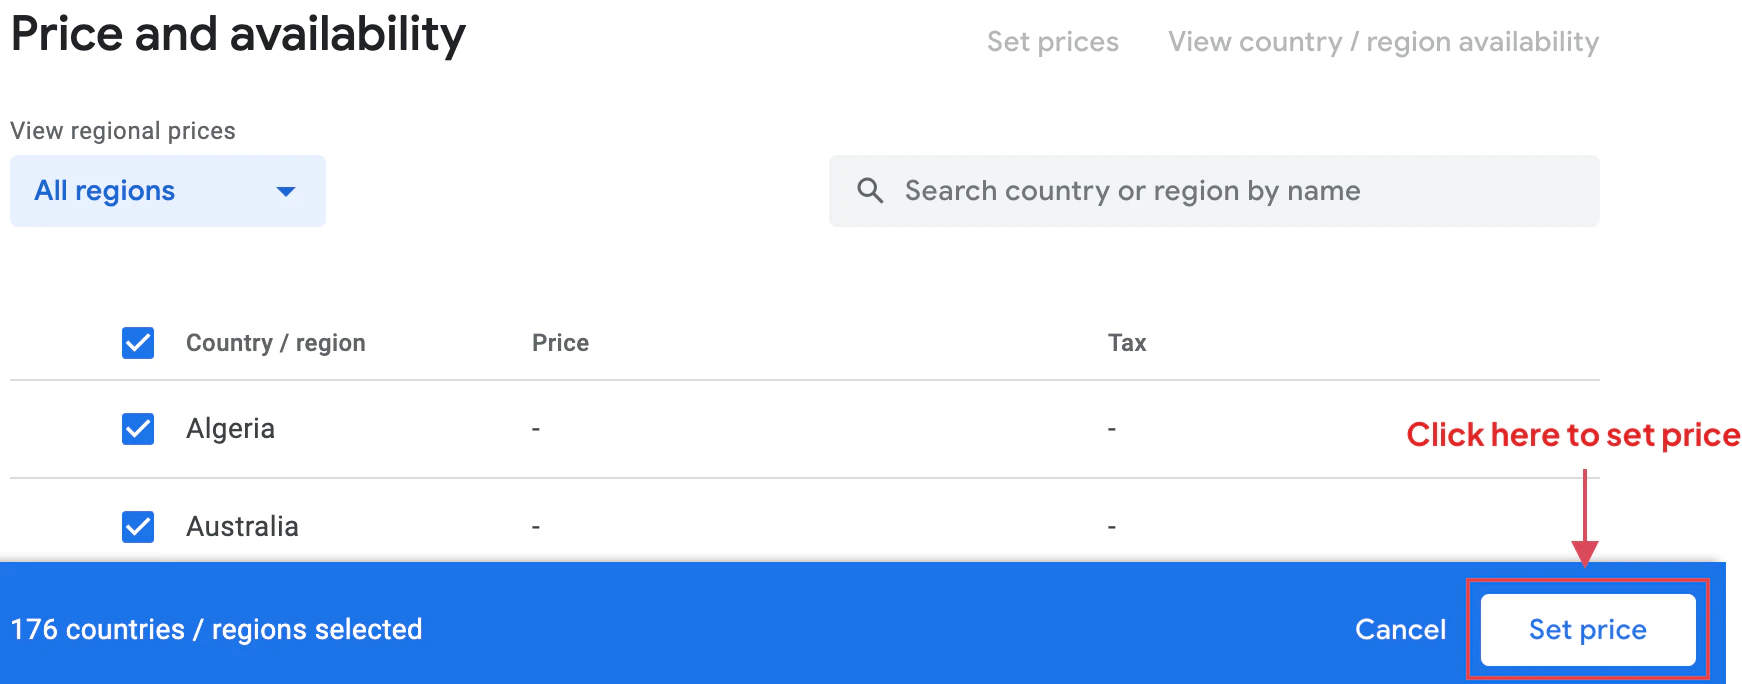
가격 설정
가격 섹션에 액세스하여 구독을 제공하려는 모든 국가/지역을 선택하세요.

-
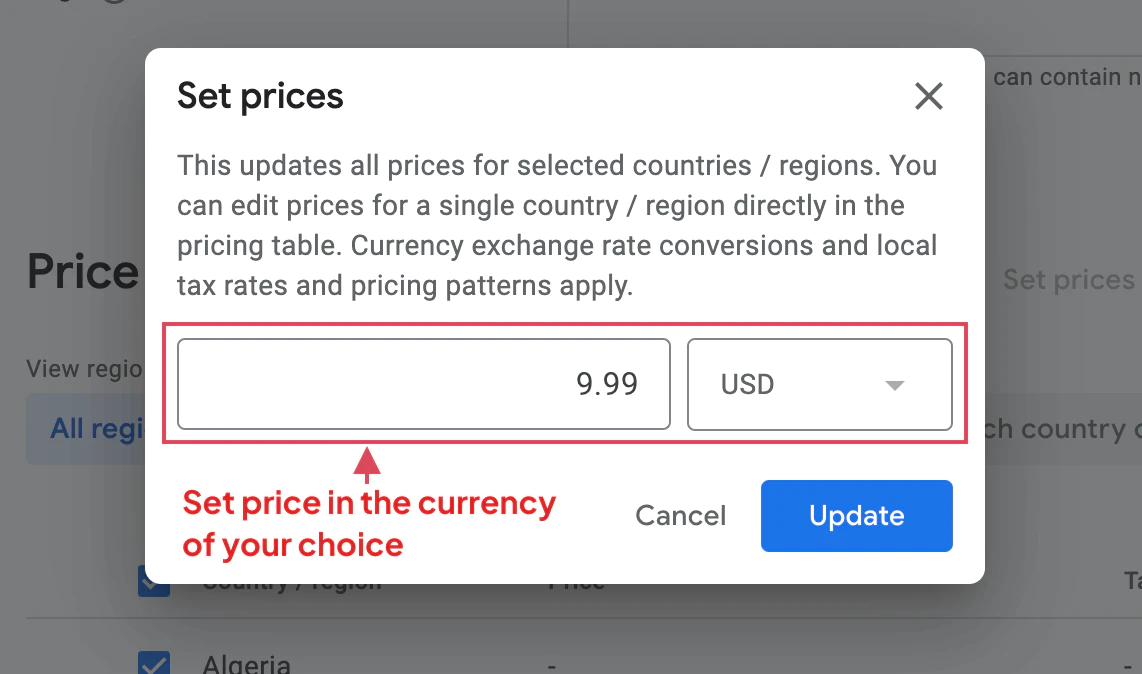
가격 구성
기본 통화로 기본 가격을 설정하세요. Google Play은(는) 이를 현지 통화로 자동 변환합니다.
-
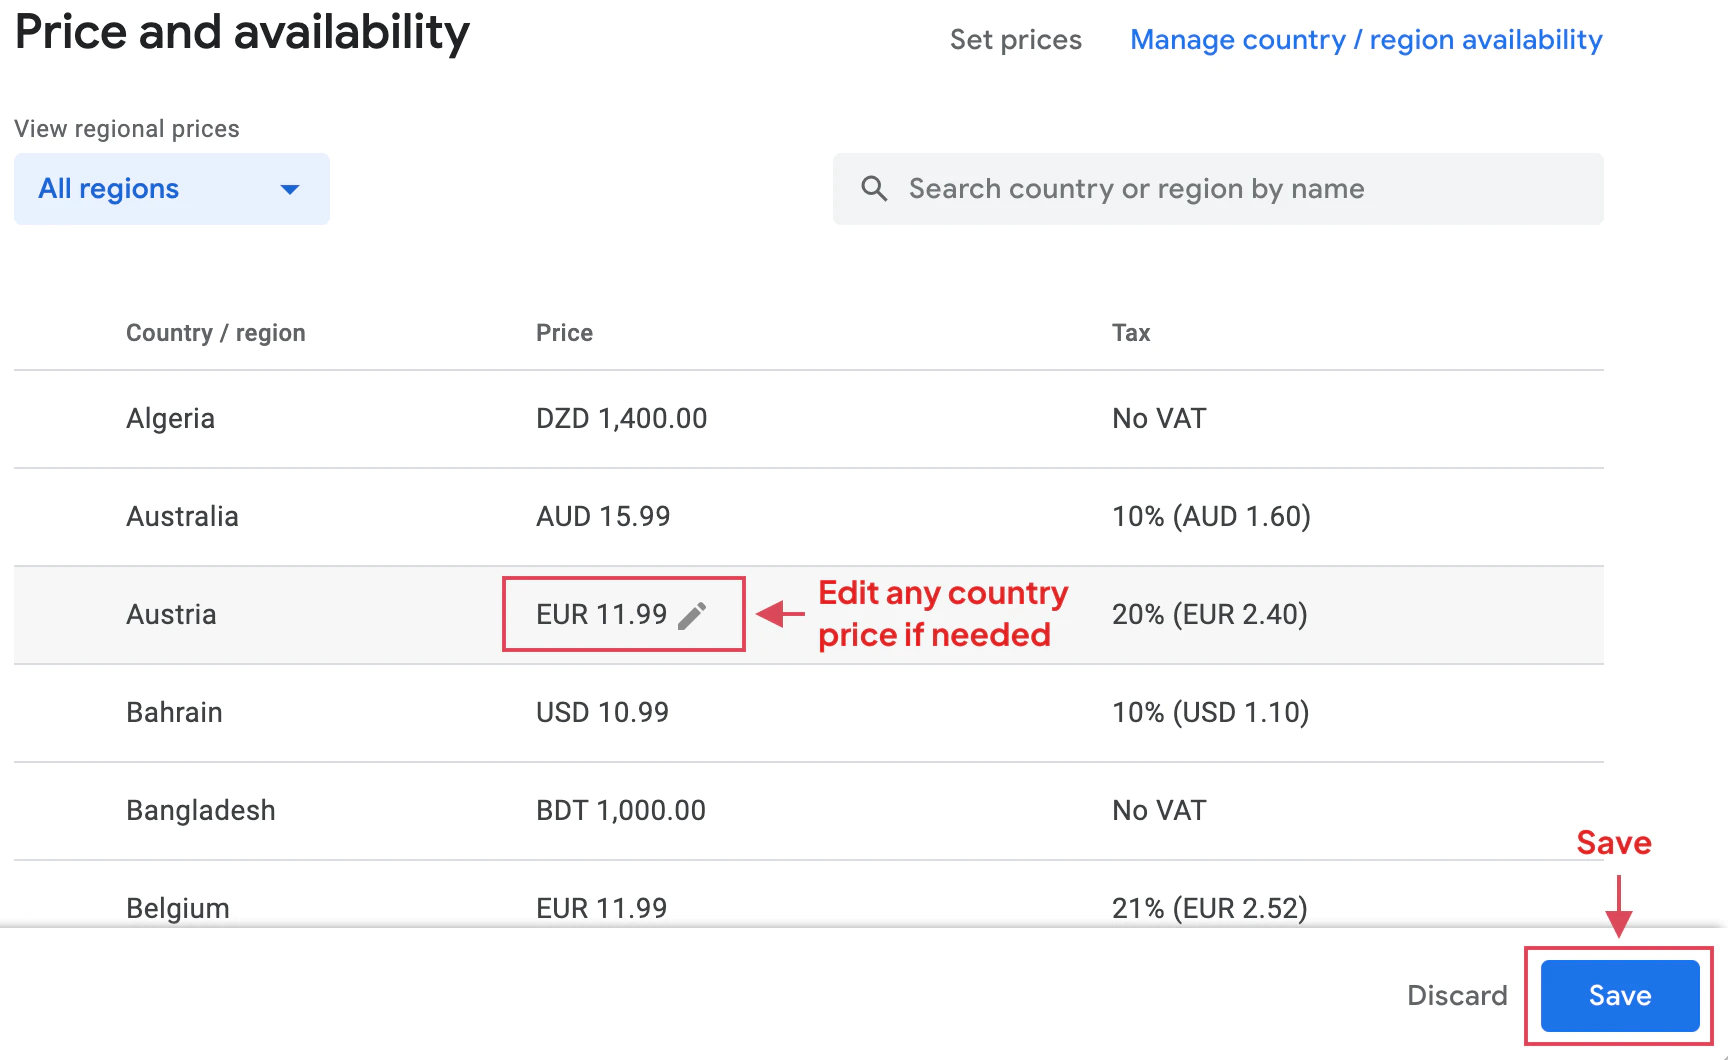
지역별 가격 검토
국가별로 자동 변환된 가격을 검토하세요. 필요한 경우 개별 가격을 조정할 수 있습니다.
-
구성 저장
가격 구성을 저장하세요.
-
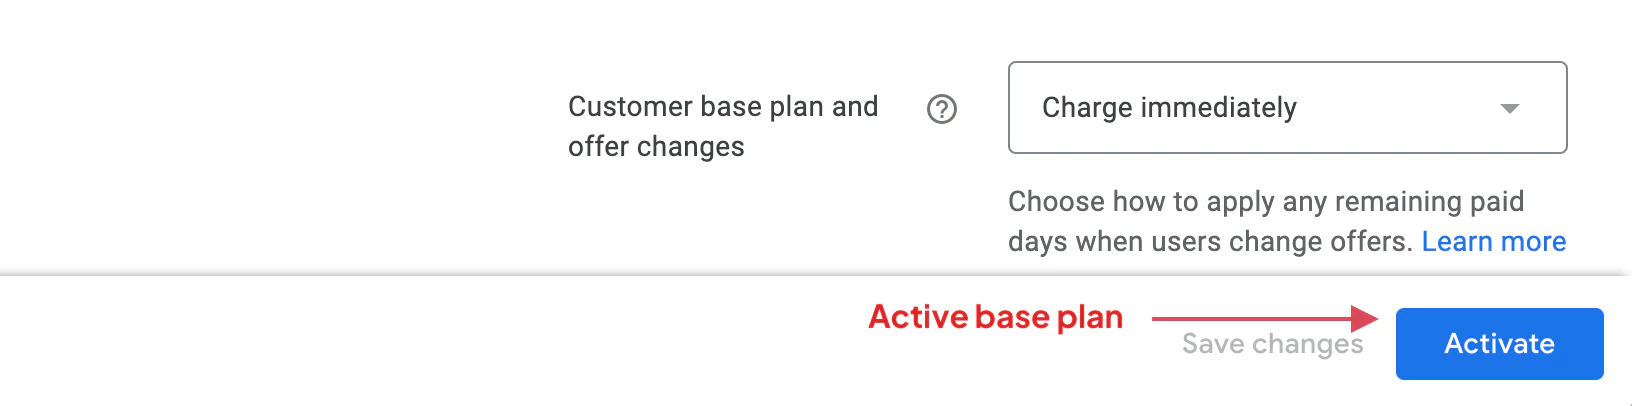
구독 활성화
구독 제품을 활성화하고 구매할 수 있게 하려면 활성화 버튼을 클릭하세요.
중요 고려사항
Section titled “중요 고려사항”기본 요금제 제한
Section titled “기본 요금제 제한”기본 구매 플러그인에는 iOS 구독 처리와의 일관성을 보장하기 위해 구독당 정확히 하나의 기본 계획이 필요합니다. 여러 기본 요금제는 지원되지 않습니다.
유예 기간을 통해 Google Play은 사용자의 구독 액세스를 유지하면서 실패한 결제를 다시 시도할 수 있습니다. 일반 유예 기간은 다음과 같습니다.
- 월간 구독의 경우 3일
- 장기 구독의 경우 7일
생성 후 구독은 활성화될 때까지 “초안” 상태로 유지됩니다. 샌드박스 모드에서 초안 구독을 테스트할 수 있습니다.
앱에서 사용하기
Section titled “앱에서 사용하기”구독이 생성되면 제품 ID를 사용하여 앱에서 구독을 참조하세요.
import { NativePurchases, PURCHASE_TYPE } from '@capgo/native-purchases';
// Load subscription infoconst { products } = await NativePurchases.getProducts({  productIdentifiers: ['com.example.premium.monthly'],  productType: PURCHASE_TYPE.SUBS,});
const product = products[0];console.log(`${product.title} — ${product.priceString}`);
// Purchase (planIdentifier = Base Plan ID from Google Play Console)const transaction = await NativePurchases.purchaseProduct({  productIdentifier: 'com.example.premium.monthly',  planIdentifier: 'monthly-plan', // REQUIRED on Android, ignored on iOS  productType: PURCHASE_TYPE.SUBS,});
console.log('Transaction ID', transaction.transactionId);
// Later, check purchase stateconst { purchases } = await NativePurchases.getPurchases({  productType: PURCHASE_TYPE.SUBS,});
const subscription = purchases.find(  (purchase) => purchase.productIdentifier === 'com.example.premium.monthly',);
if (subscription && subscription.purchaseState === 'PURCHASED' && subscription.isAcknowledged) {  console.log('Subscription active locally');  // For expiration/cancellation, validate purchaseToken through your backend}
다음 단계- 신규 구독자를 유치하기 위한 소개 제안 만들기
Section titled “다음 단계- 신규 구독자를 유치하기 위한 소개 제안 만들기”- 구독 테스트를 위한 샌드박스 테스트 구성
- 보안을 위해 백엔드 영수증 검증 설정
구독이 앱에 표시되지 않음:
- 상품ID가 정확히 일치하는지 확인하세요.
- 구독이 활성화되었는지 확인하세요.
- 앱의 패키지 이름이 올바른지 확인하세요.
- 변경사항이 적용되려면 활성화 후 2~3시간 정도 기다립니다.
기본 요금제 오류:
- 정확히 하나의 기본 계획이 있는지 확인하세요.
- 모든 필수 필드가 채워졌는지 확인하세요.
- 청구기간이 유효한지 확인하세요.
가격 문제:
- 국가가 하나 이상 선택되어 있는지 확인하세요.
- 기본 가격이 허용되는 최소 가격보다 높은지 확인하세요.
- 통화 환율이 허용되는지 확인하세요.