iOS Builds
Ce contenu n'est pas encore disponible dans votre langue.
Build and submit iOS apps to TestFlight and the App Store using Capgo’s dedicated Mac infrastructure.
What you will learn
Section titled “What you will learn”- You will learn how to upload your app via Capgo Native build
- You will learn how to configure the certificates for Capgo Native Build
Prerequisites
Section titled “Prerequisites”- A Capgo account with an active subscription
- Your app already registered in Capgo (run
npx @capgo/cli@latest app addif not) - A Mac computer with Xcode installed (it’s possible to setup the build on a linux/windows machine, but it’s not yet documented)
- Valid Apple Developer account ($99/year) (You must have admin or owner rights on the Apple Developer account)
- Your app must be able to build successfully via Xcode
- A Capacitor app
- A configured icon for the app. Apps without an icon cannot be uploaded to the App Store.
The first manual build
Section titled “The first manual build”Before we can start thinking about building the app with Capgo, we should first set it up, and do a first TestFlight build by hand. There are some advantages to doing a manual build first:
- You will setup the distribution certificate on your local machine
- You will create the App Store record if you haven’t done it yet
- You will be able to figure out any issues with the build process linked to your app code
Before we can begin, you must have the distribution certificate installed on your local machine. This is quite a bit complex, but I will explain it below.
Setting up the distribution certificate
Section titled “Setting up the distribution certificate”-
Open Xcode
-
Click on
Xcode->Settings...Alternatively, you can use the shortcutCmd + ,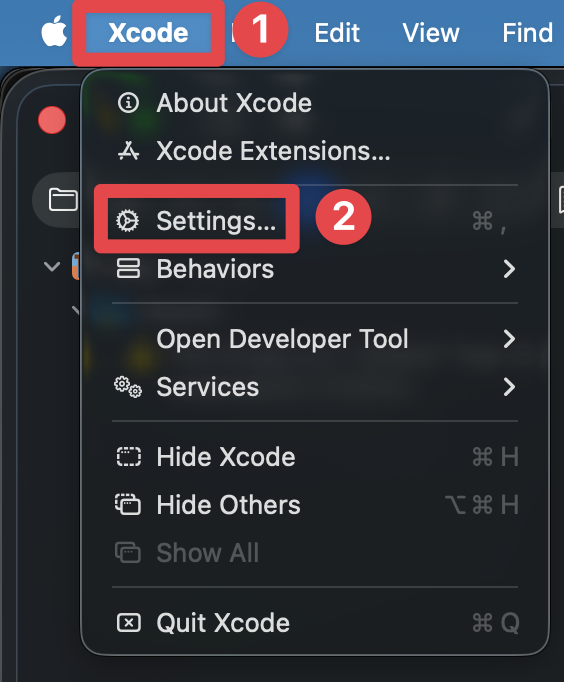
-
Go to
Accounts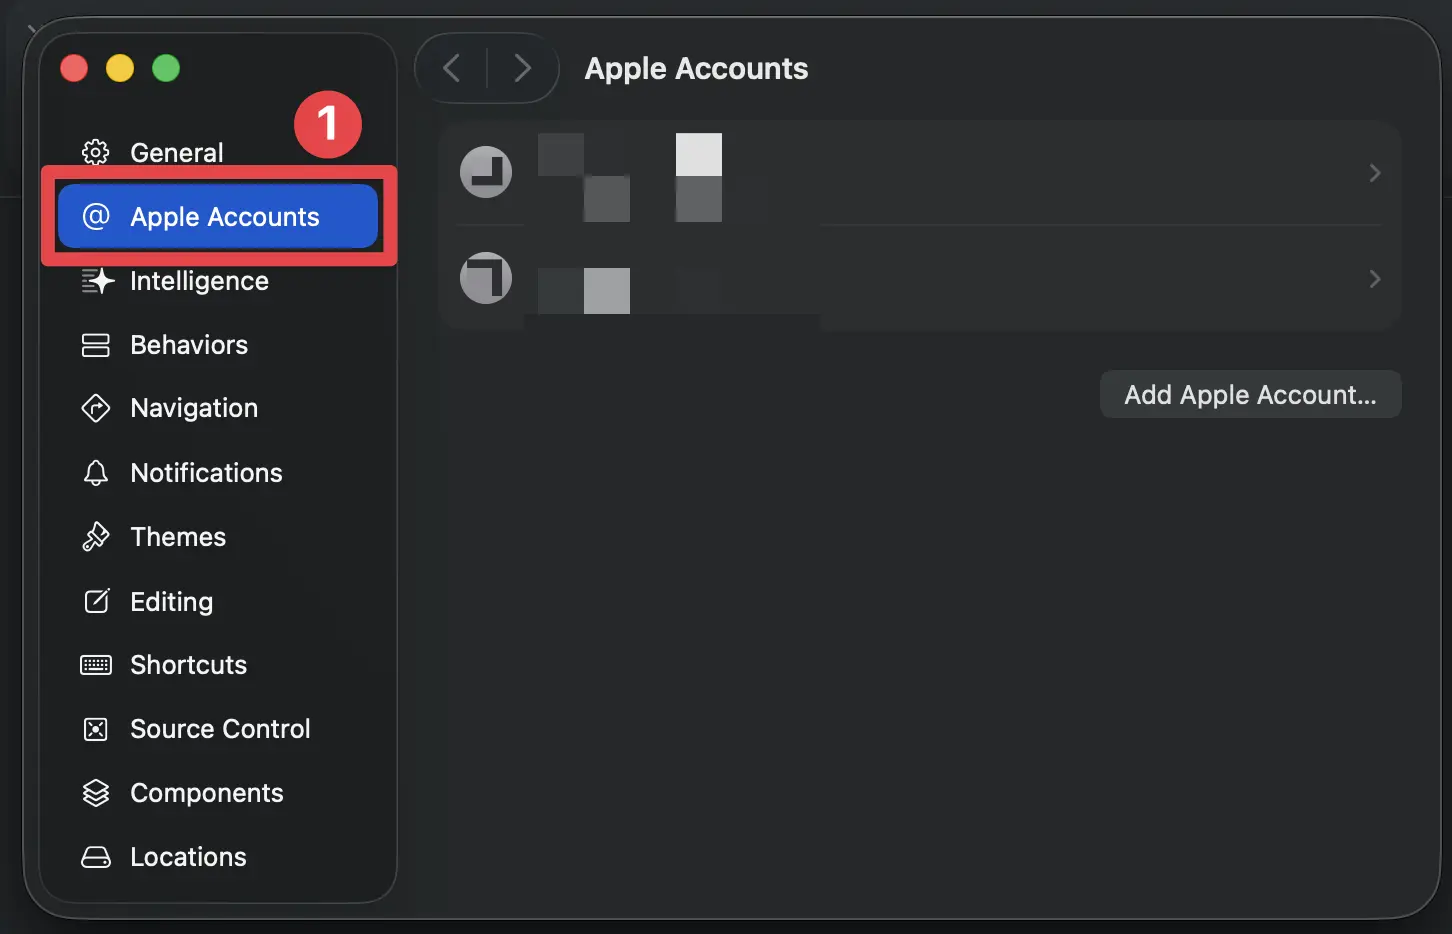
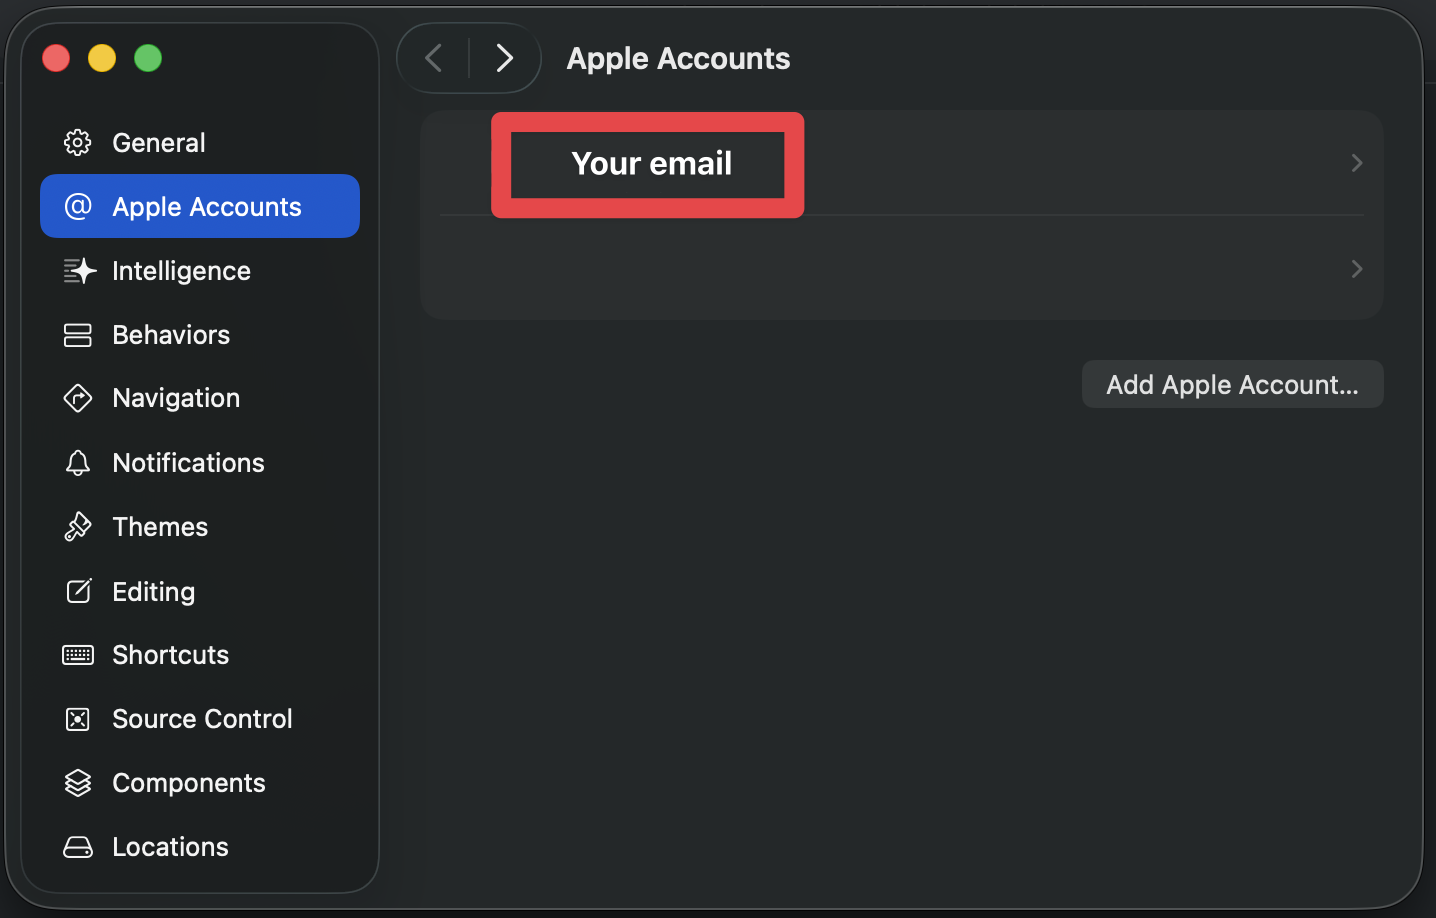
-
Find the Apple Account that is added to the Apple Developer Account
-
Find the team that you will use to deploy the app
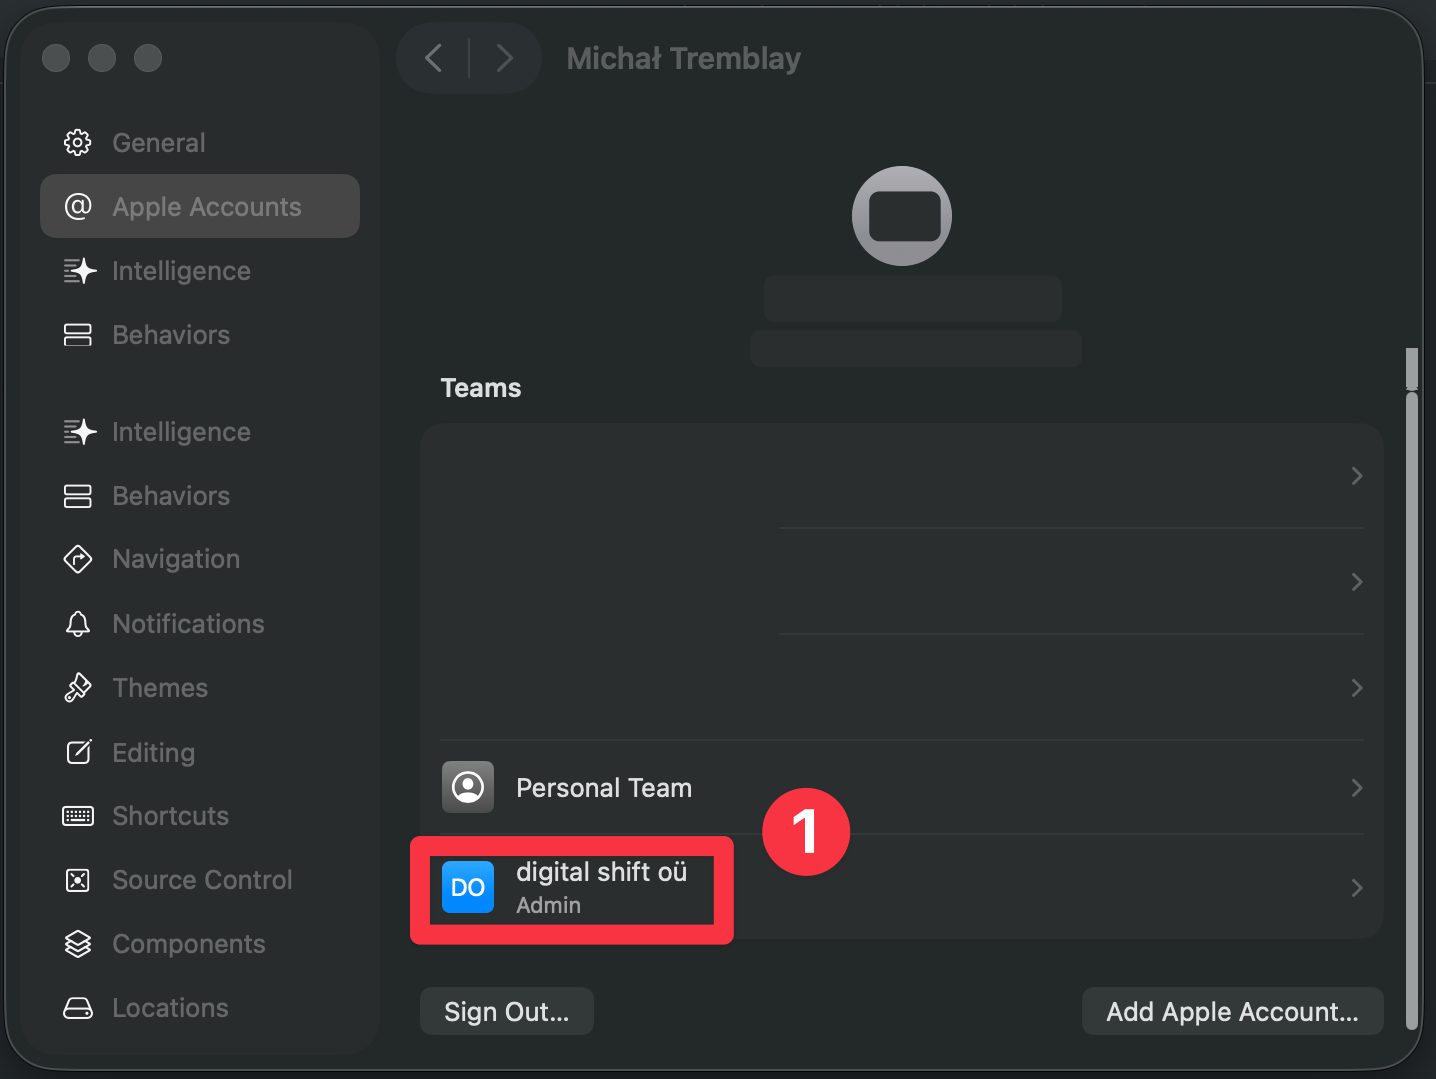
-
Click on the
Manage Certificates...button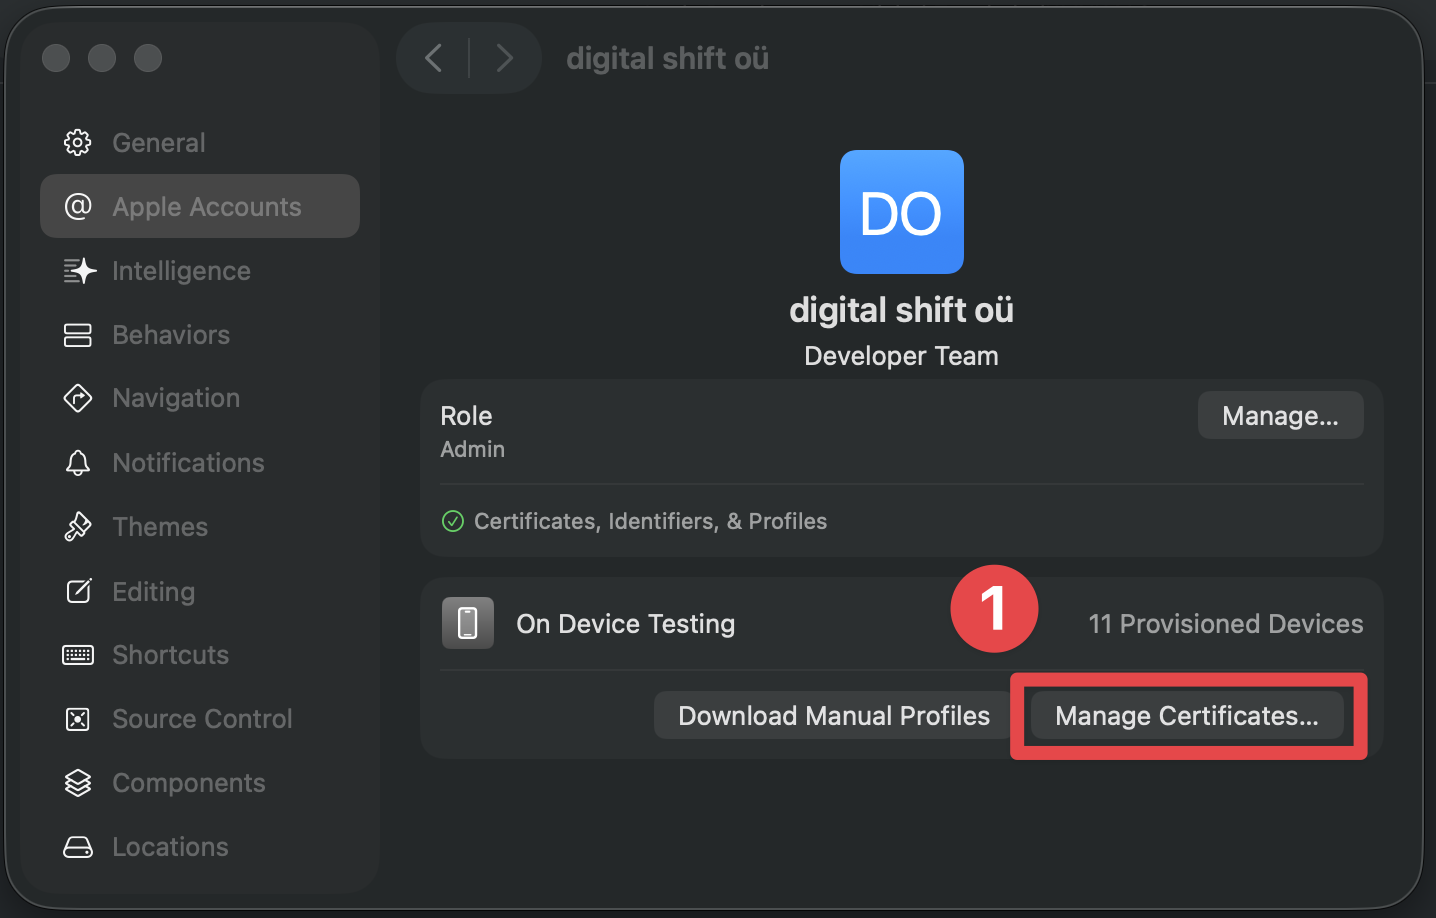
-
Make sure you can see the distribution certificate in the list
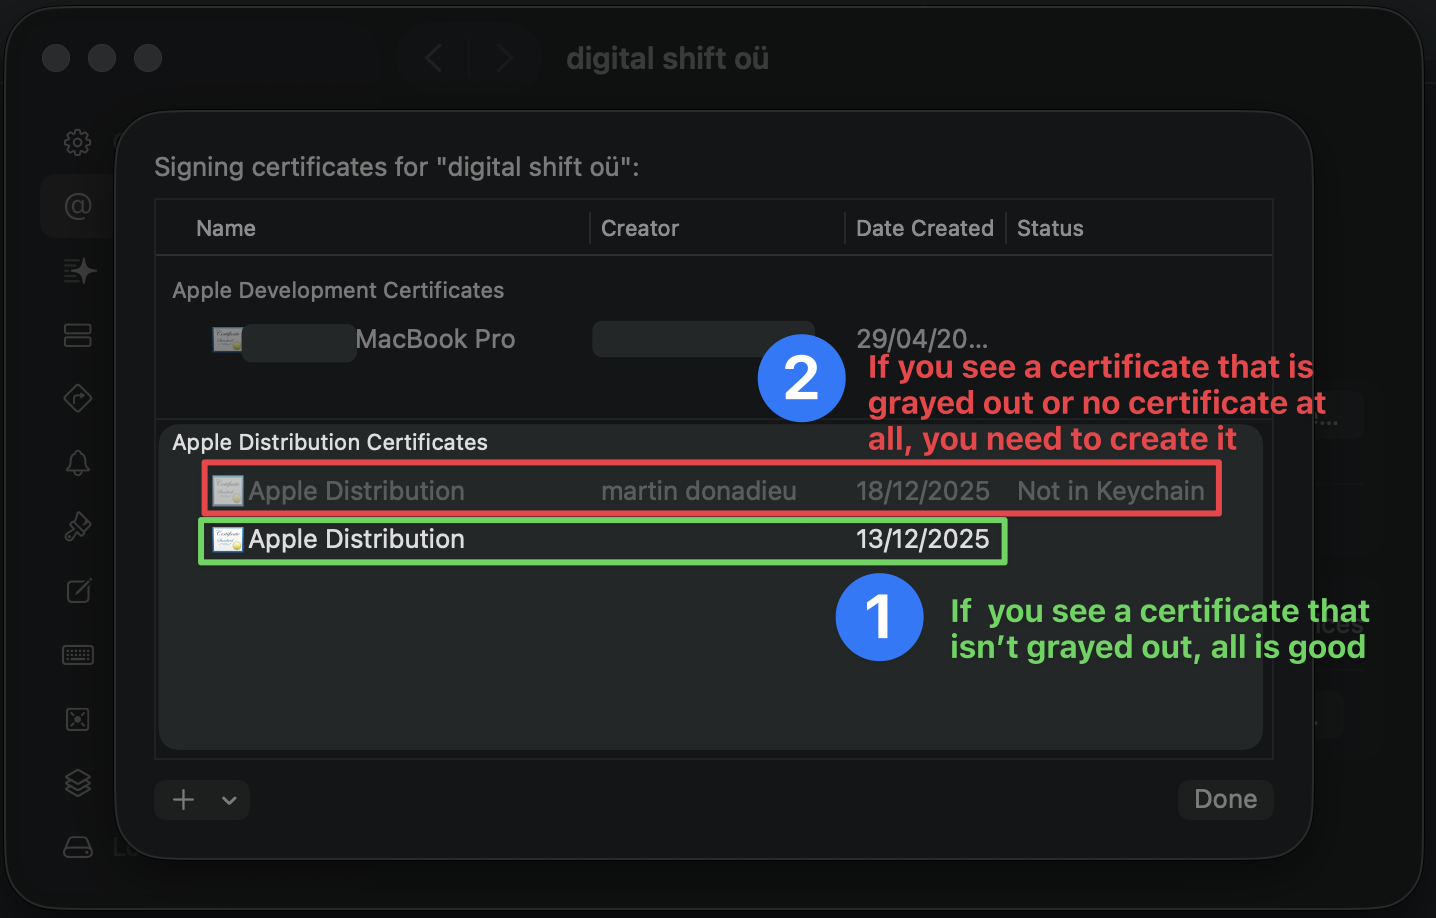
-
If you do not, you need to create a new certificate
- Click on the
+button and then onApple Distribution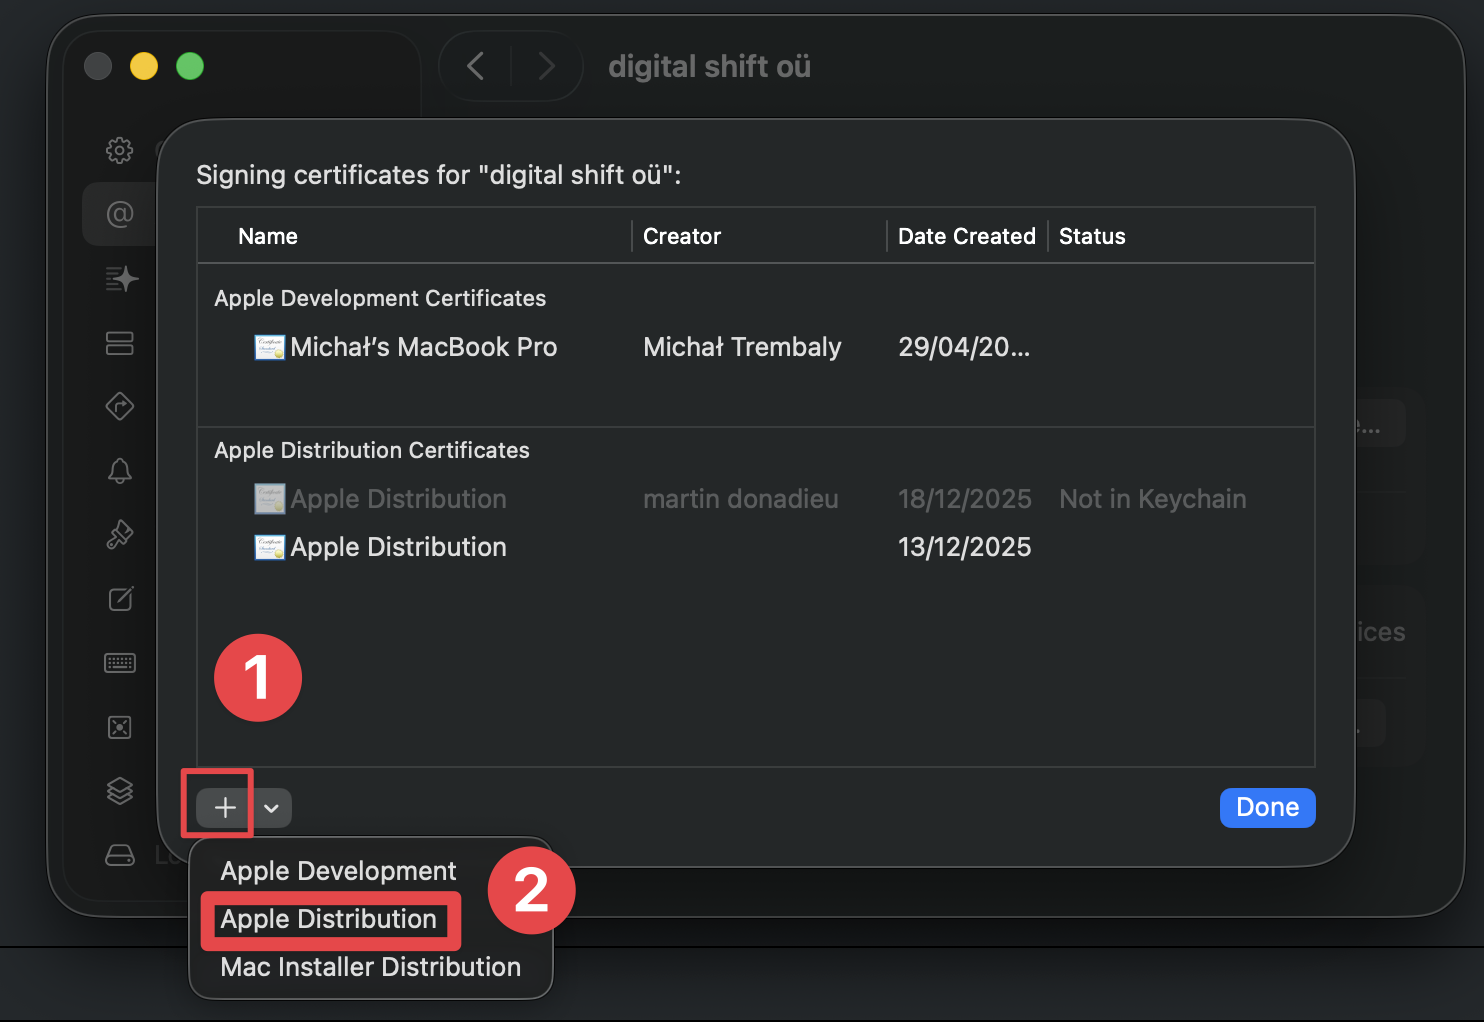
- The certificate will be created automatically. You can see it in the list. Look at the previous step to confirm that you see it.
- Click on the
Now that you have the distribution certificate installed, you can begin the build process.
Manual build to TestFlight
Section titled “Manual build to TestFlight”-
Open the app in Xcode
Run
npx cap open iosto open the app in Xcode. -
Find and click on the
archivebuttonIn the Xcode toolbar, find and click on the
product->archivebutton.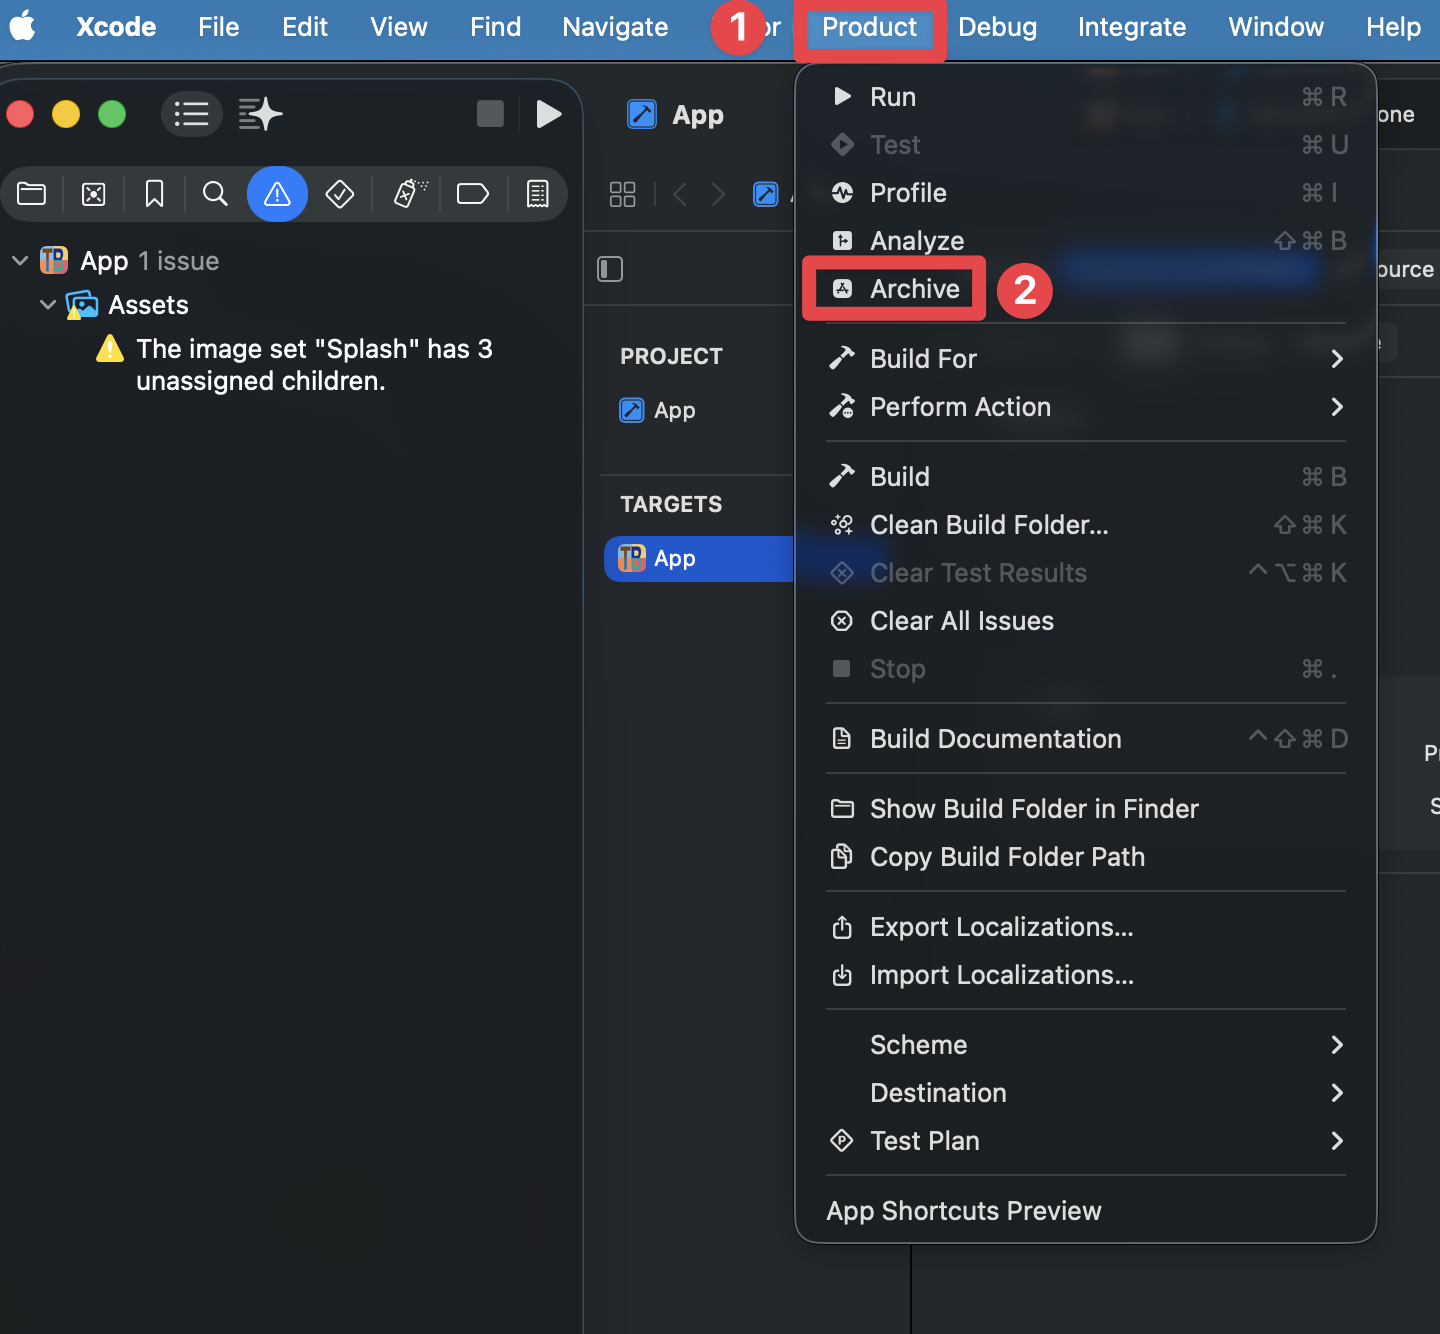
-
Wait for the build to complete
-
Click on the
Distribute Appbutton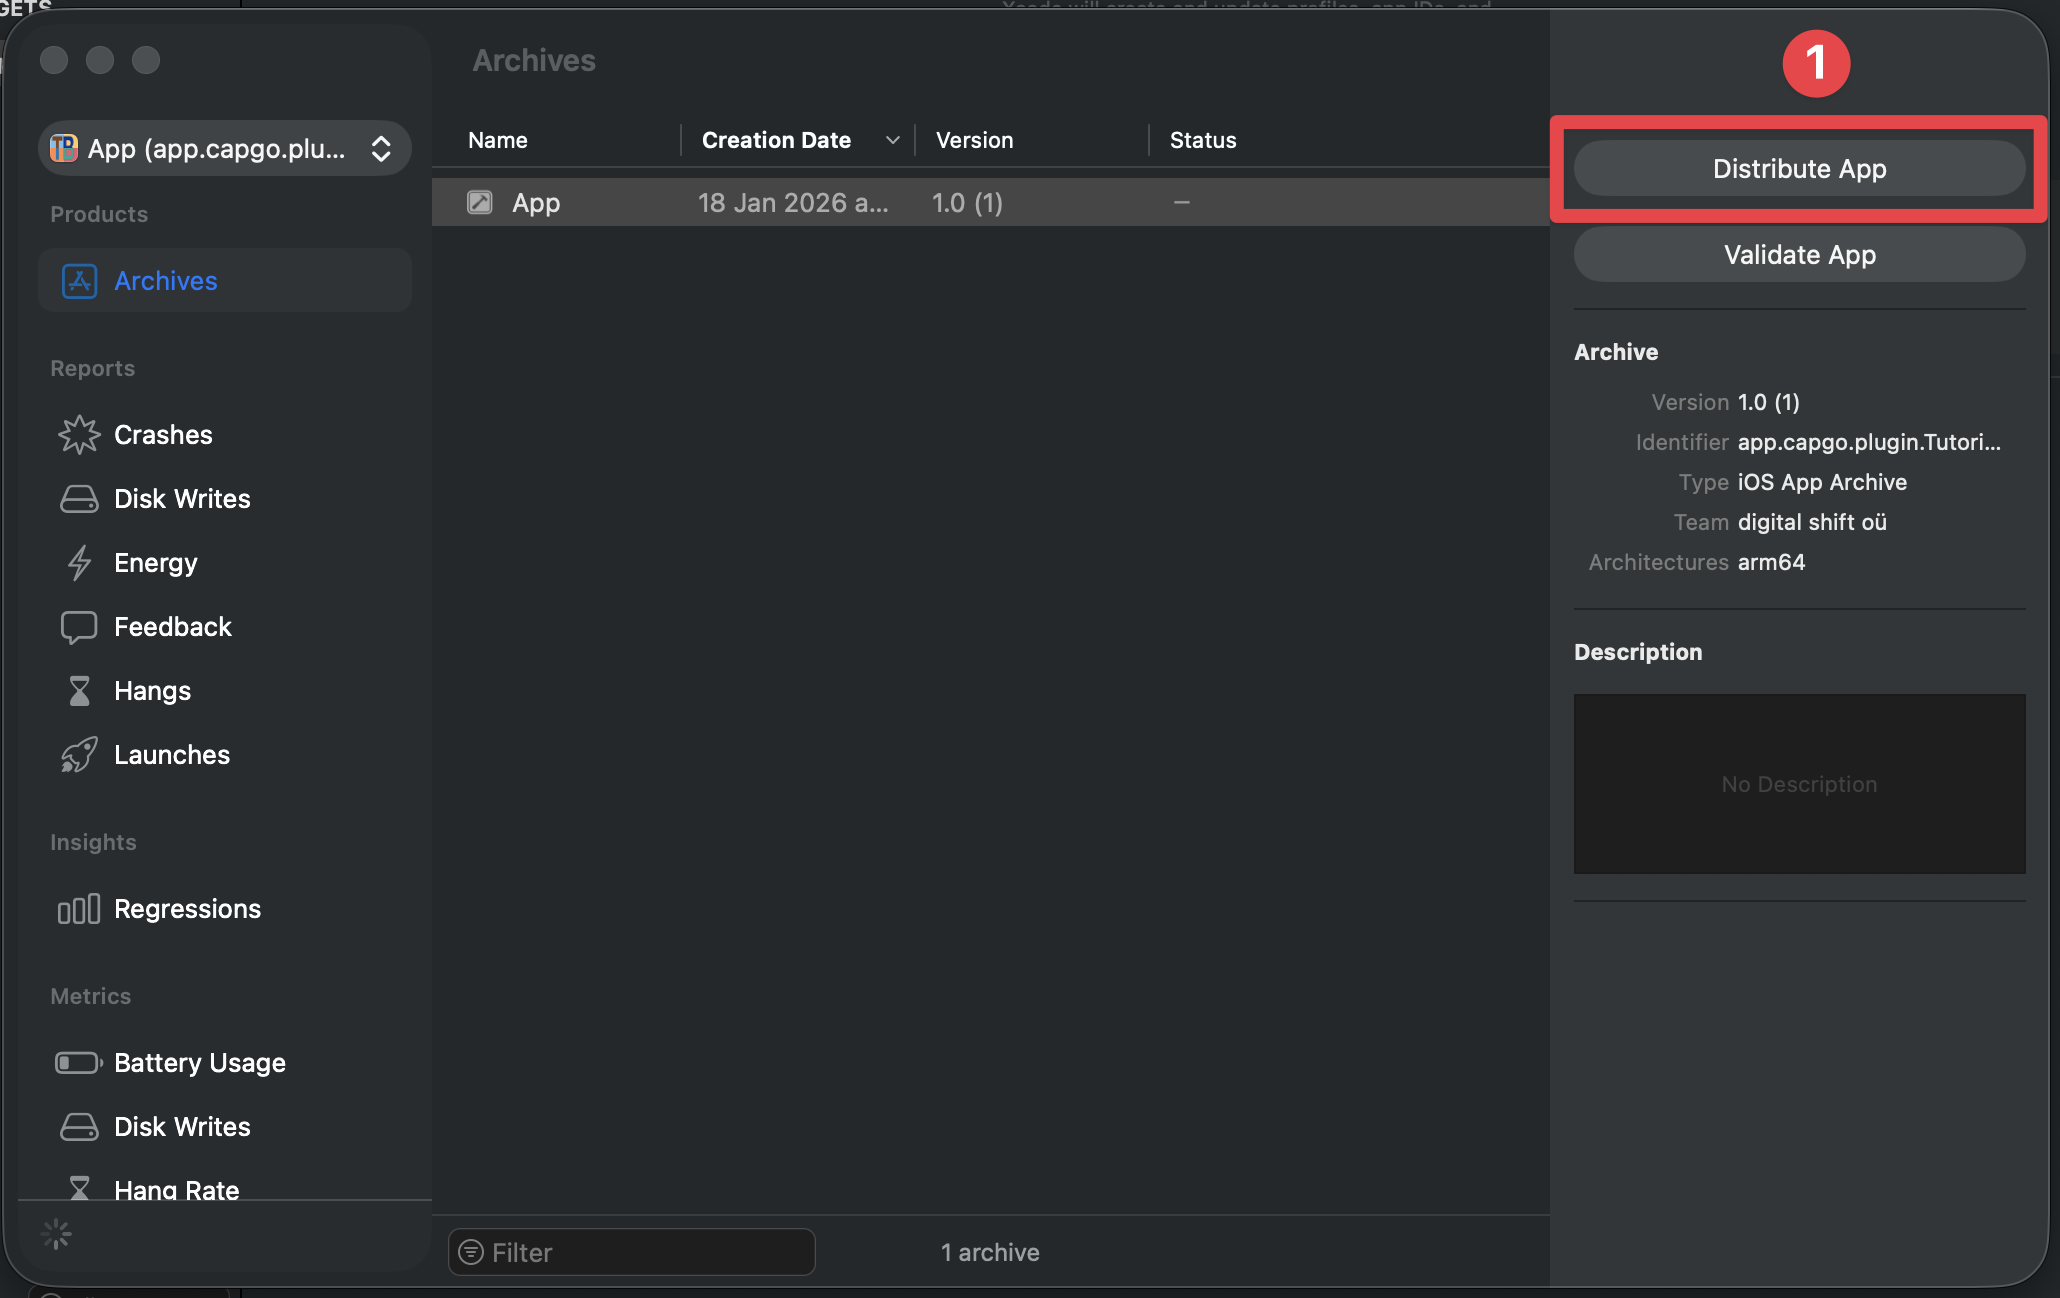
-
Select
TestFlight Internal Onlyas the distribution method and click onDistributebutton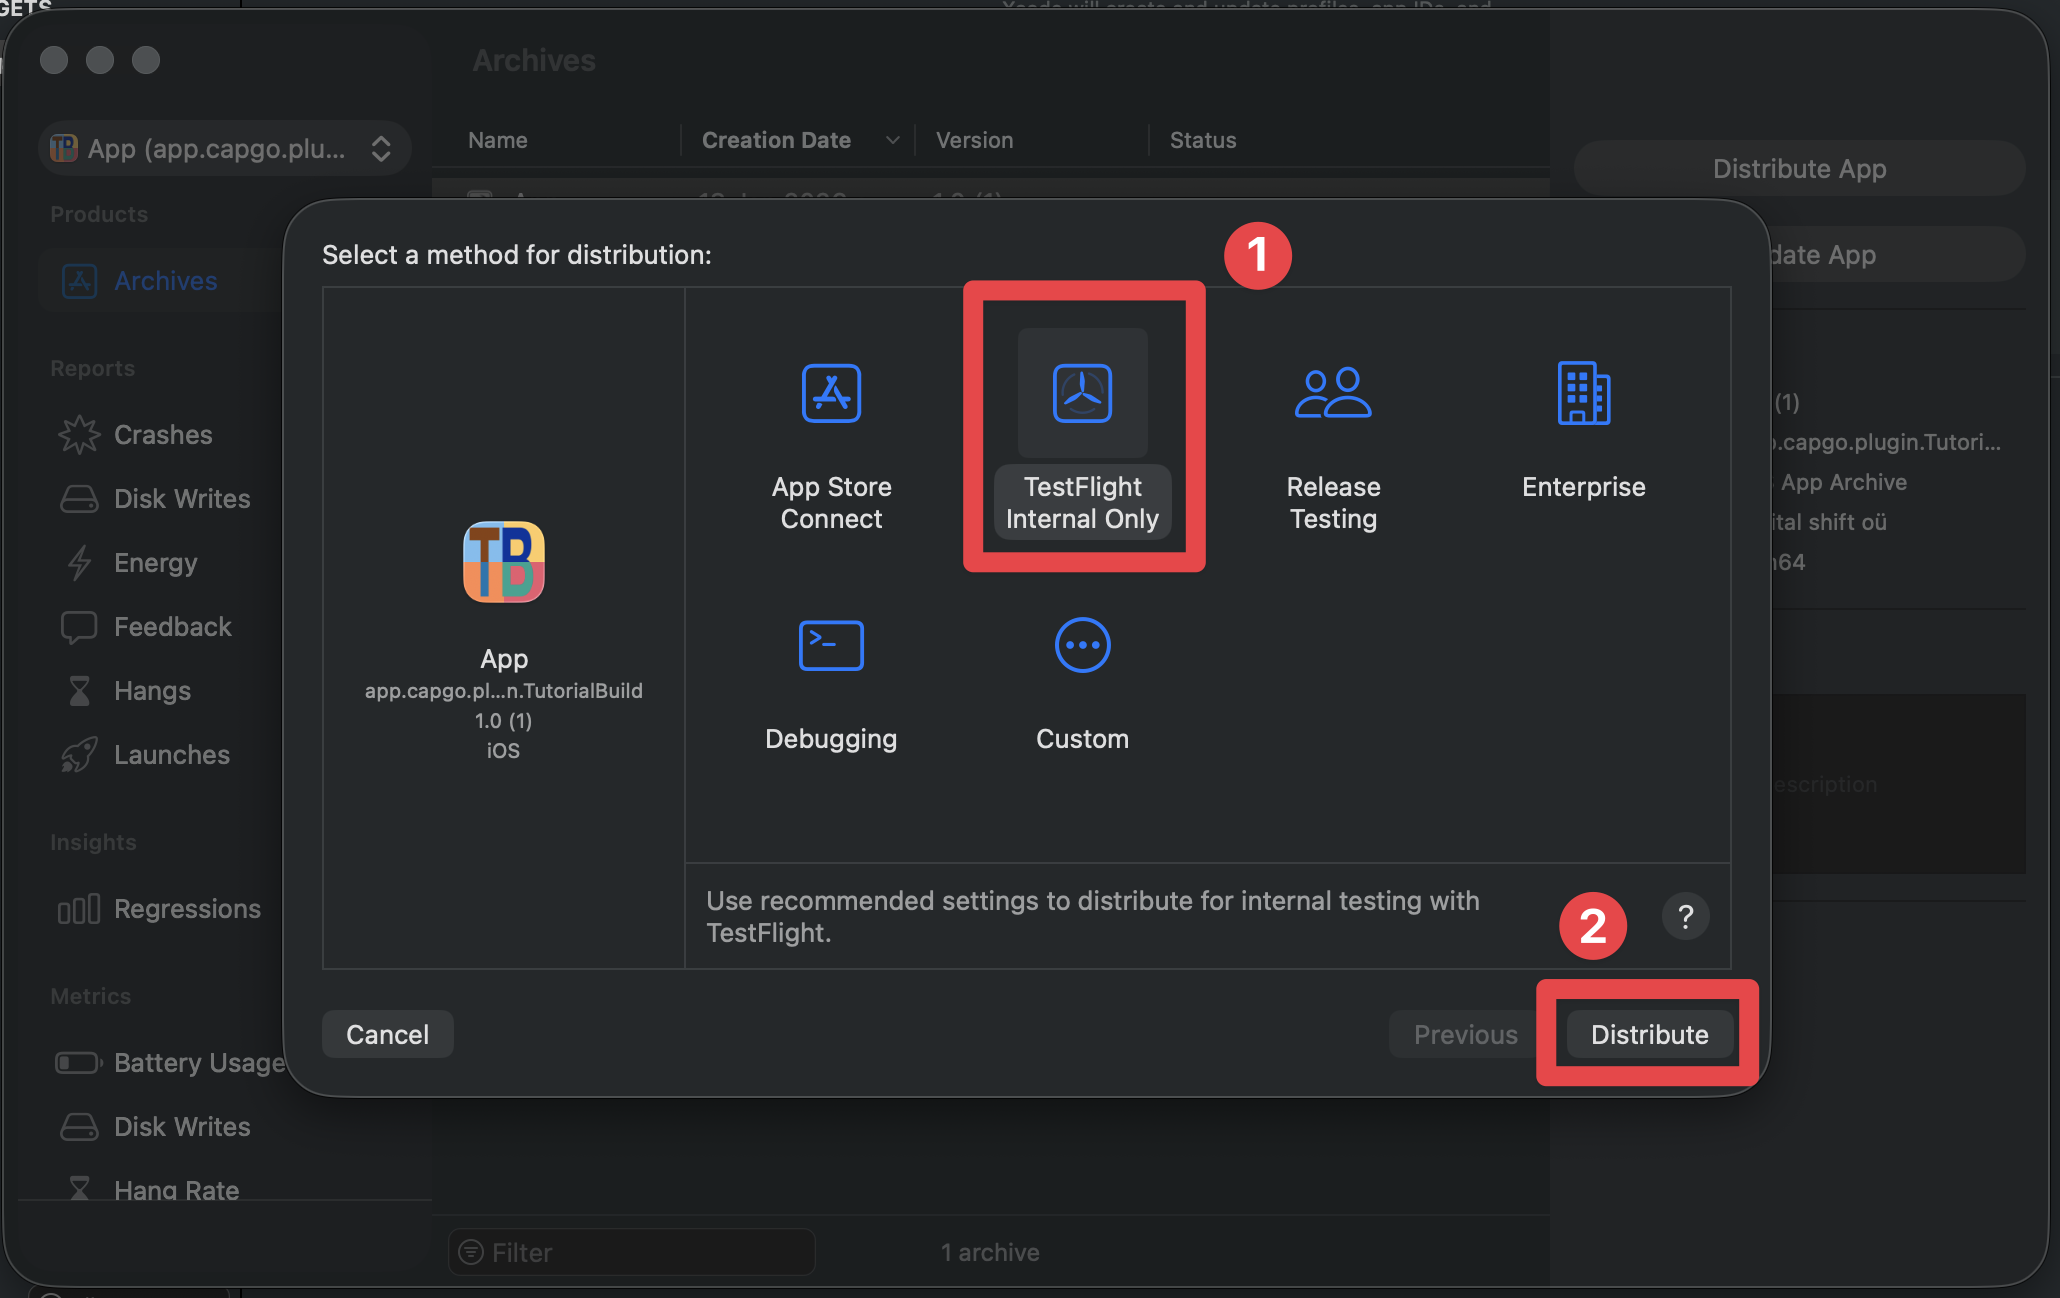
-
Configure the app record
Fill in the following fields:
- Name: The name of your app - visible in the App Store
- SKU - the SKU of your app - this is used to identify your app in the App Store
- The primary language - the primary language of your app
Then, click on the
nextbutton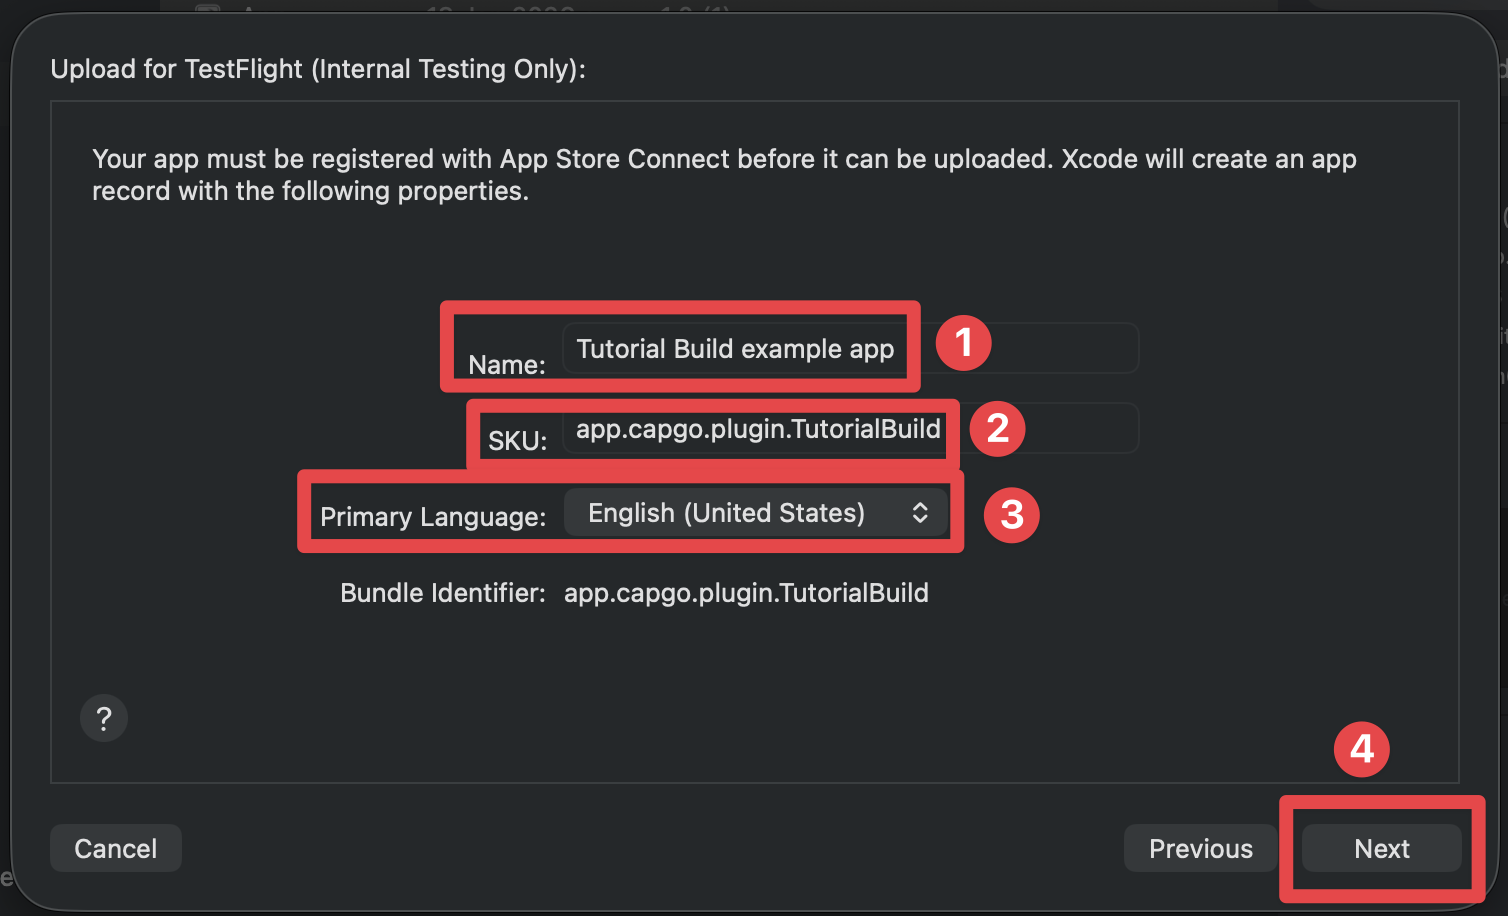
-
If the creation of the app record fails, try to close the window and try to archive the app again.
-
Wait for the upload to complete
-
If everything went well, you should see the following screen
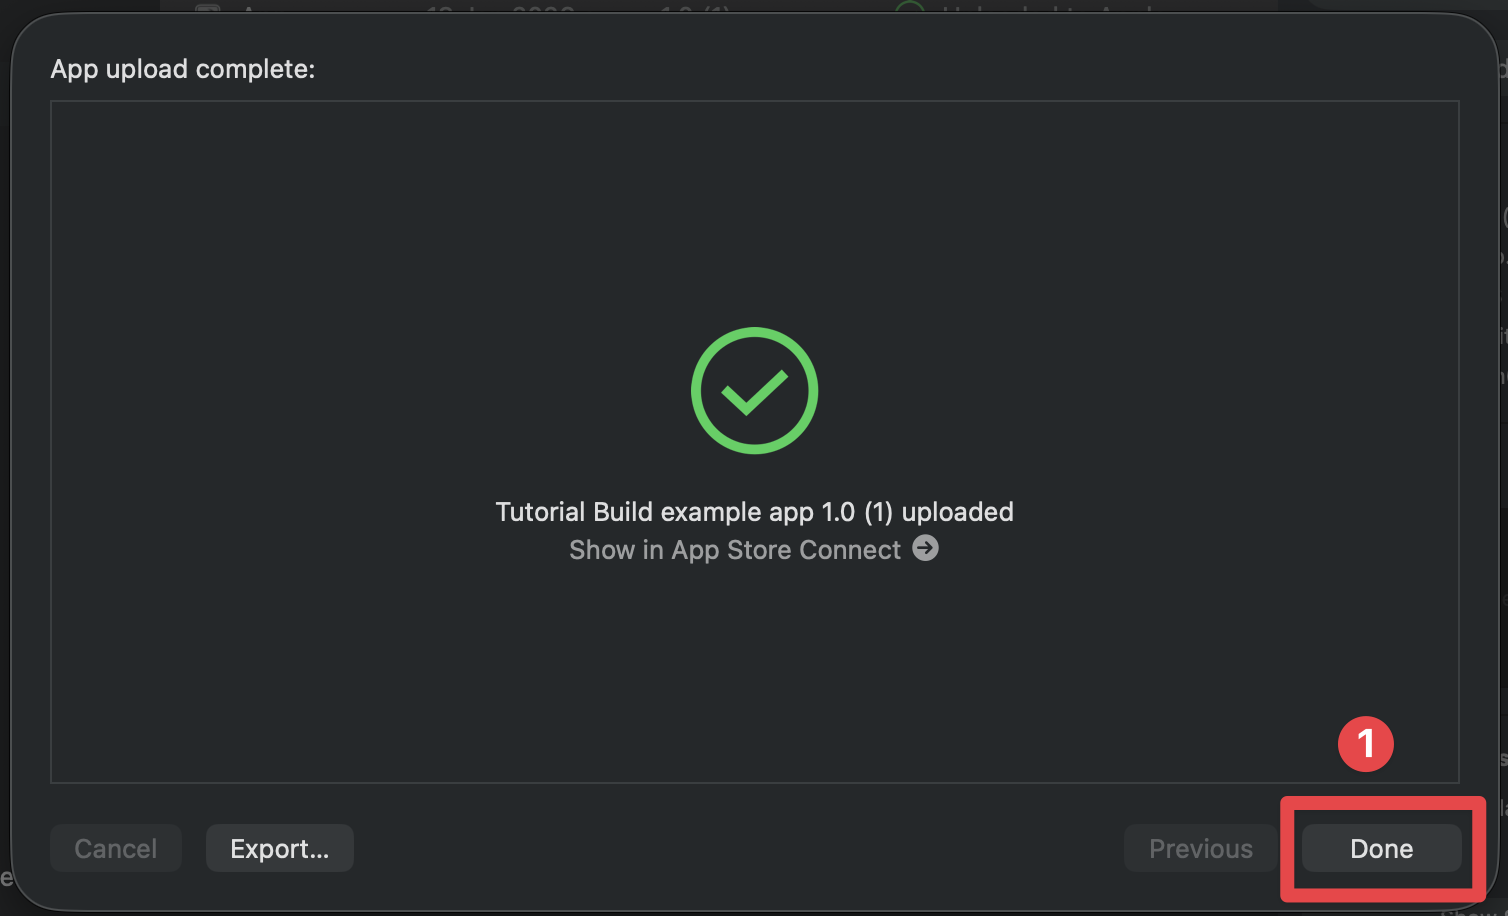
-
Click on the
Donebutton
You may instinctively think that all is good now and that you will be able to see your app in TestFlight now, but there are a few more things needed to be done before you can see your app in TestFlight:
- You need to add yourself to TestFlight
- You need to promise Apple that your app doesn’t use any non-standard (like a custom algorithm) encryption. If your app does use any non-standard encryption, I suggest reading the Apple documentation on how to handle this.
Let’s start with the first one:
Adding yourself to TestFlight
Section titled “Adding yourself to TestFlight”-
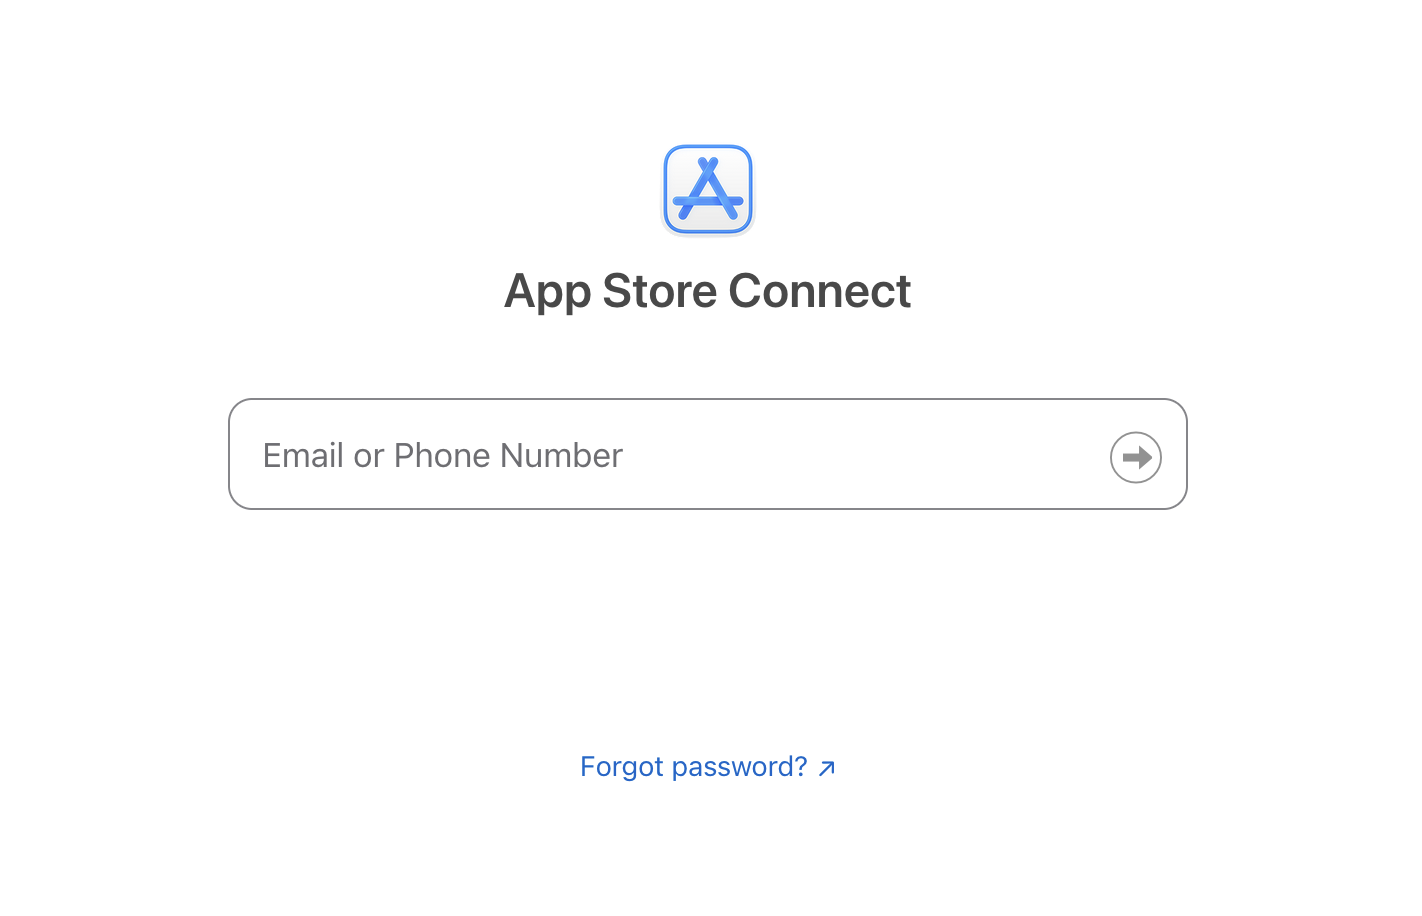
Go to the App Store Connect page
-
Sign in with your Apple Developer account
-
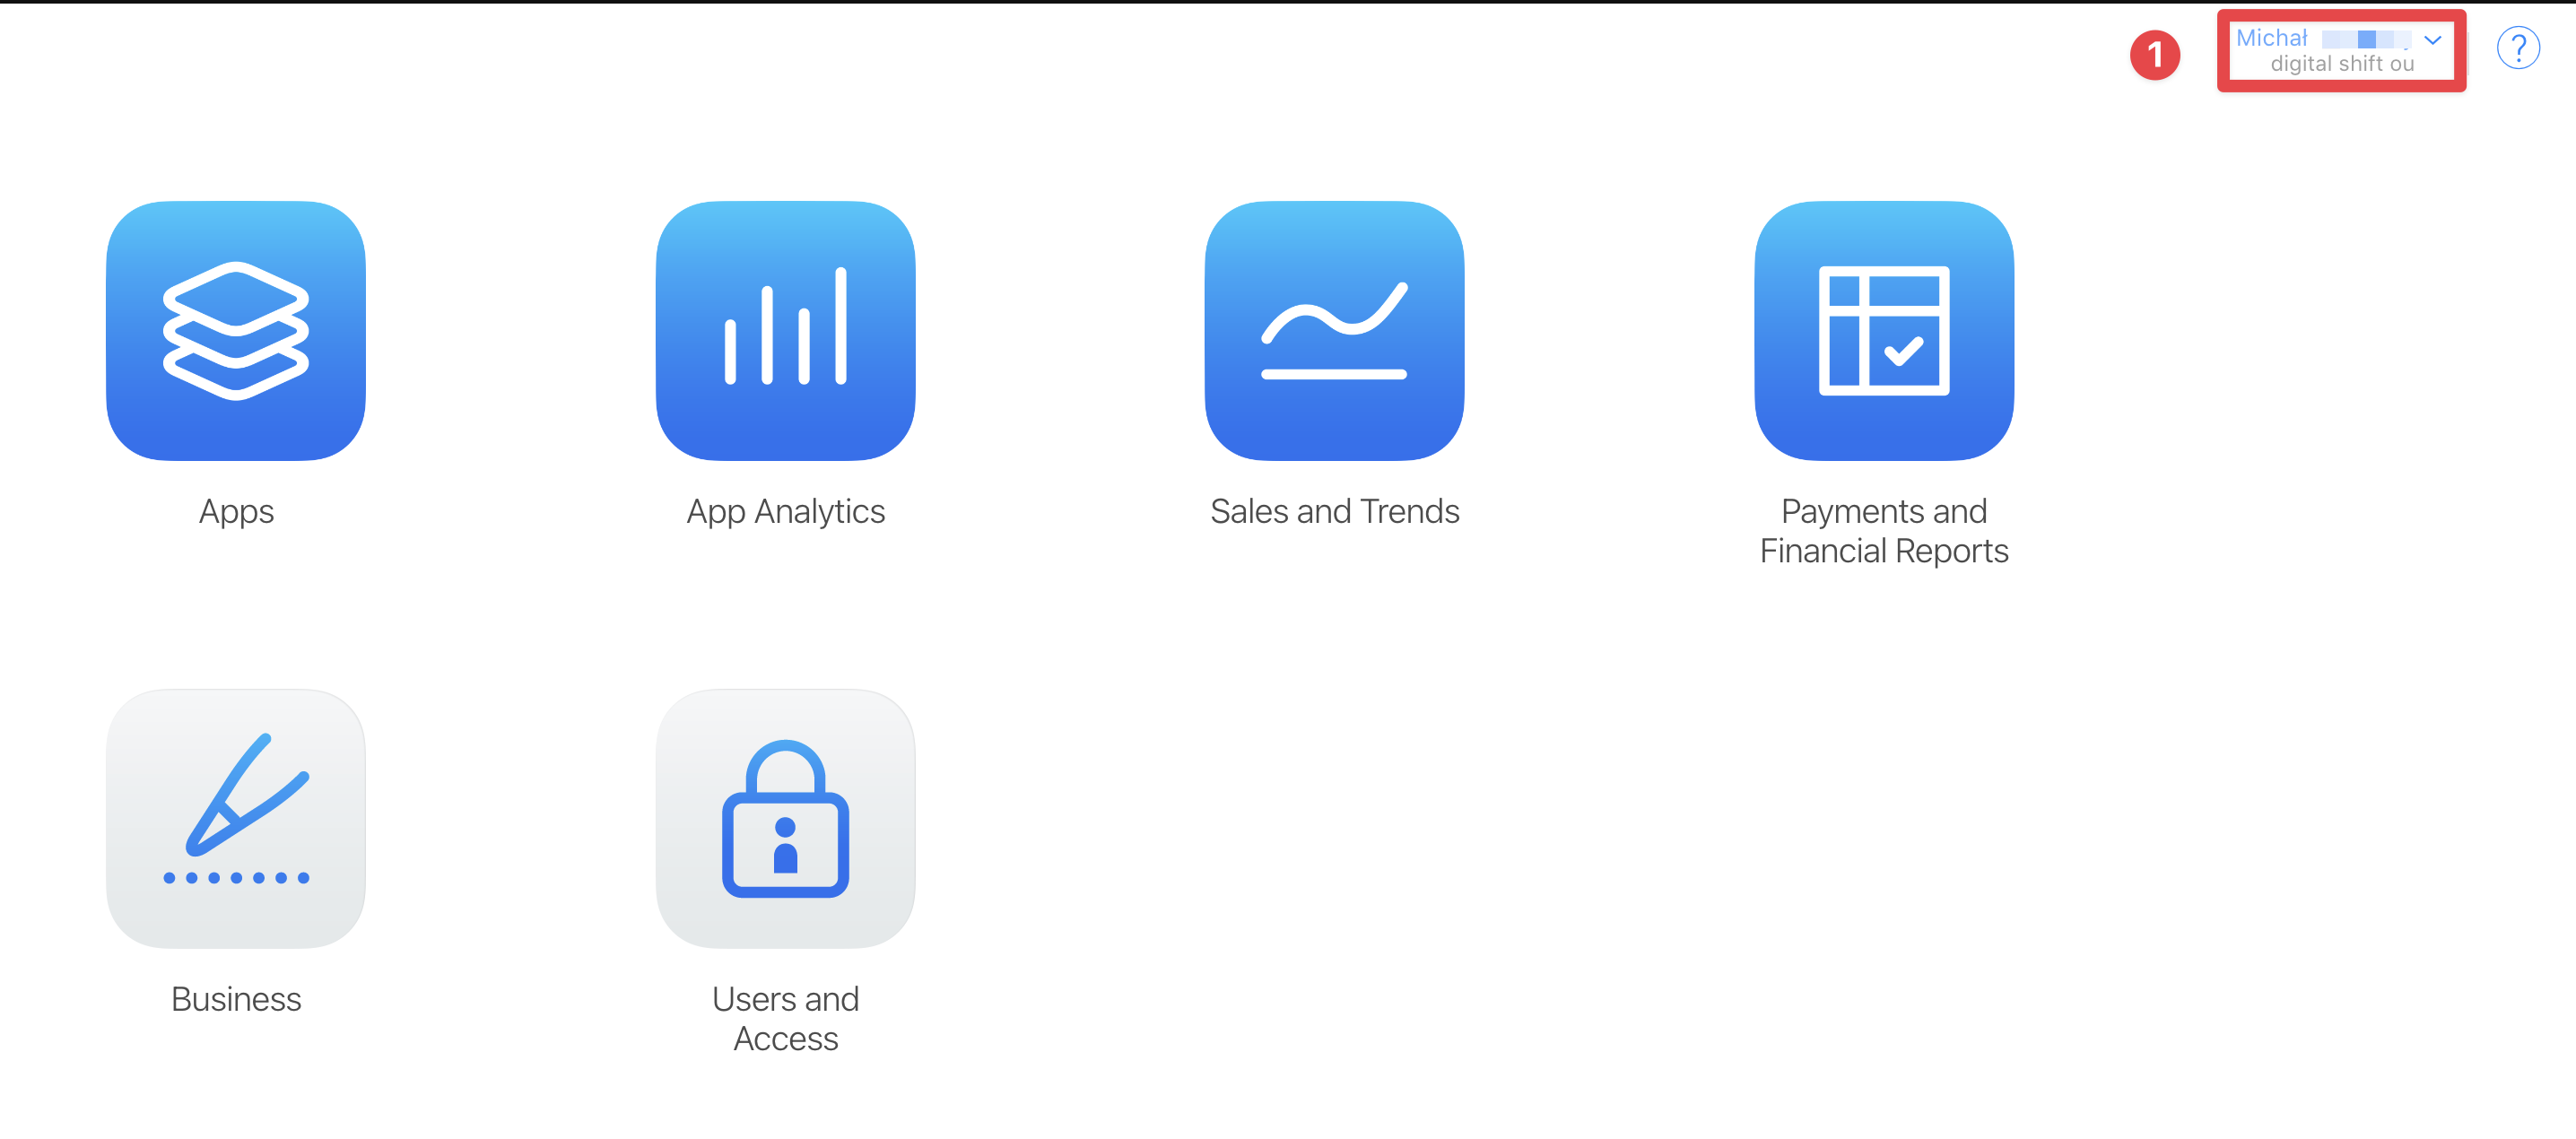
Select the team that you used when you created the app record. If you are only in one developer account, can skip this step.
-
Click on the
Appsbutton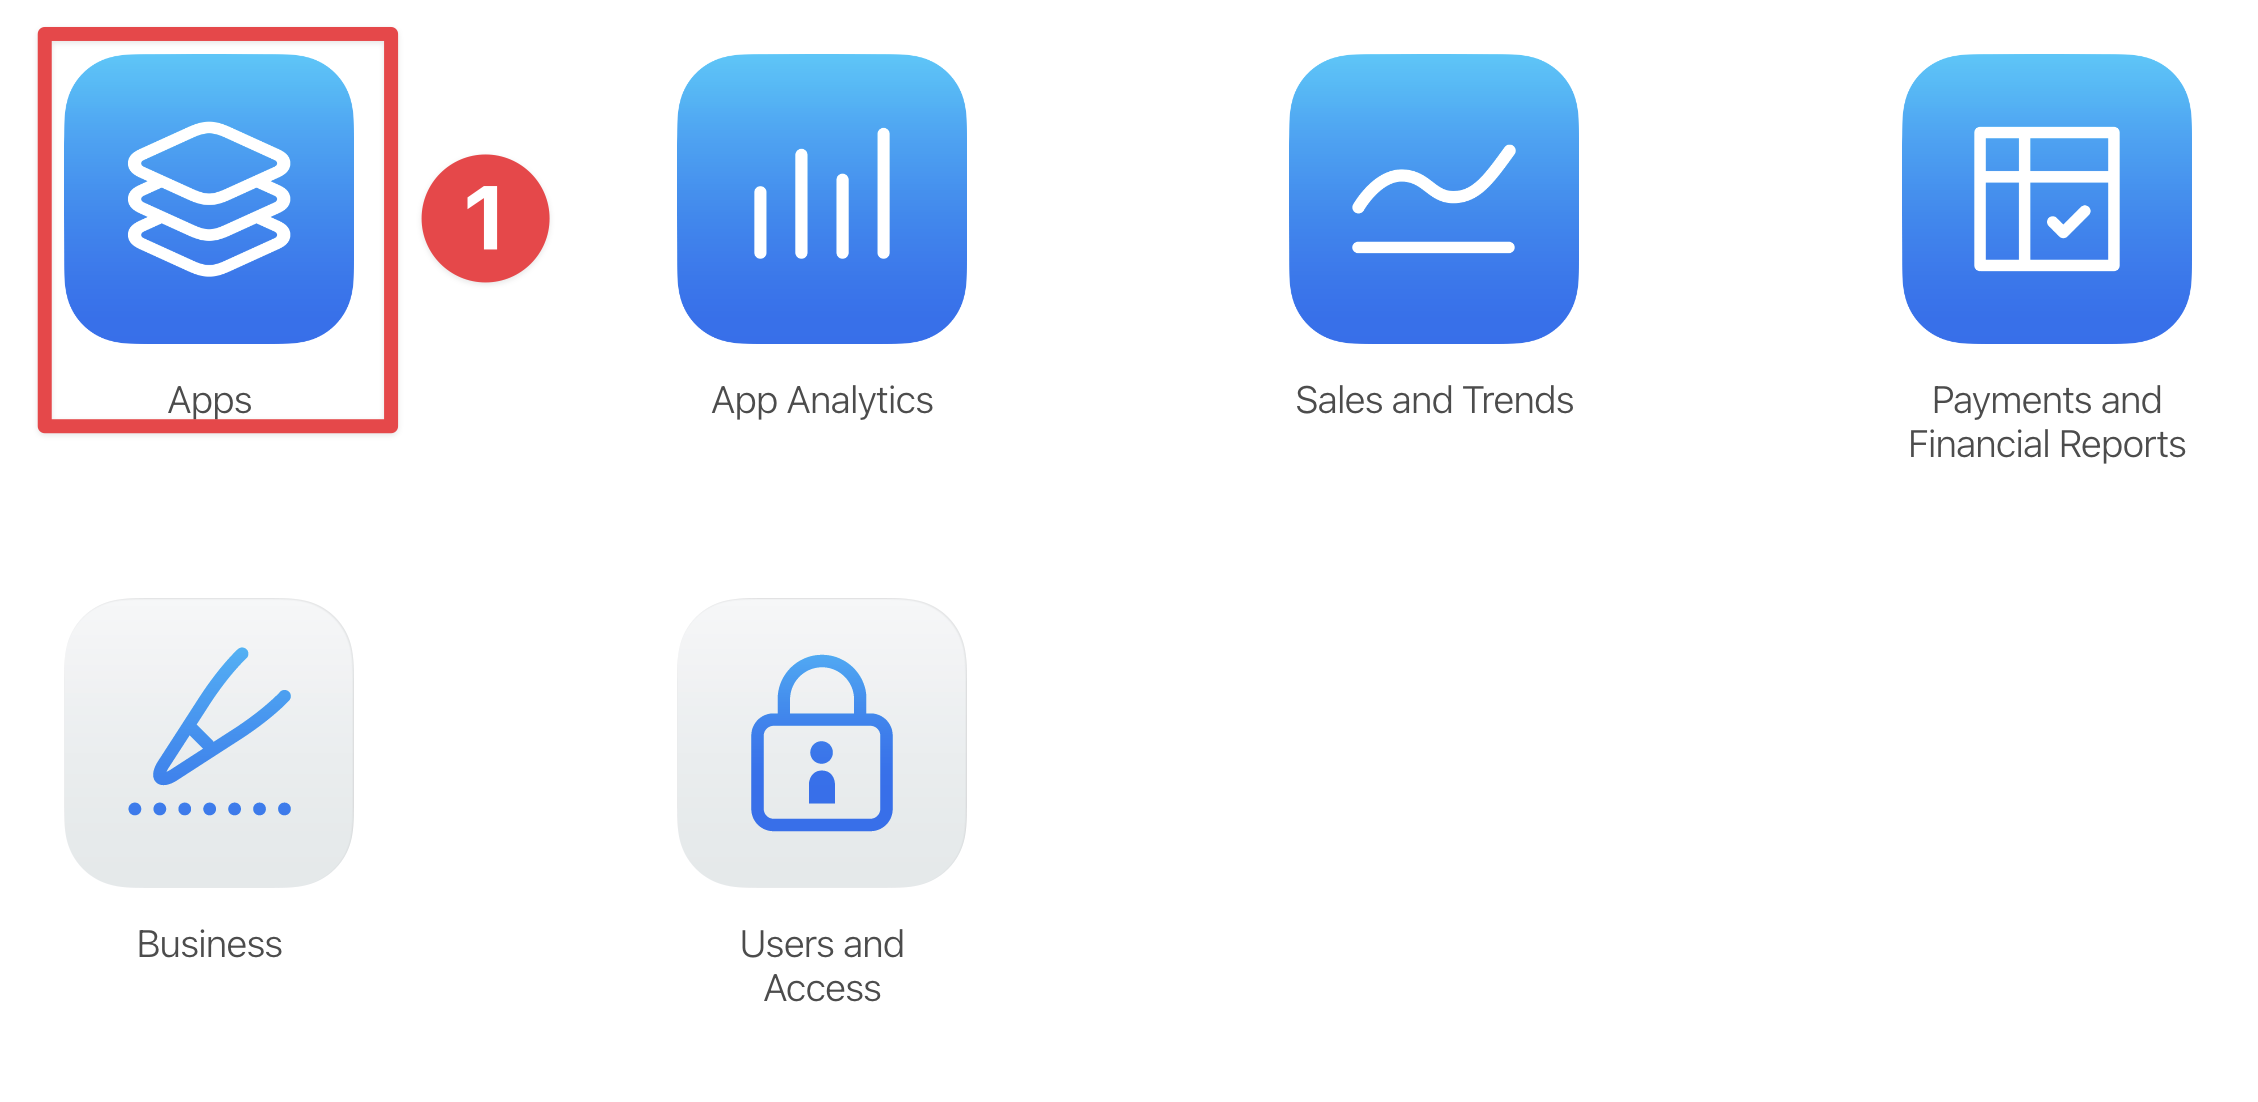
-
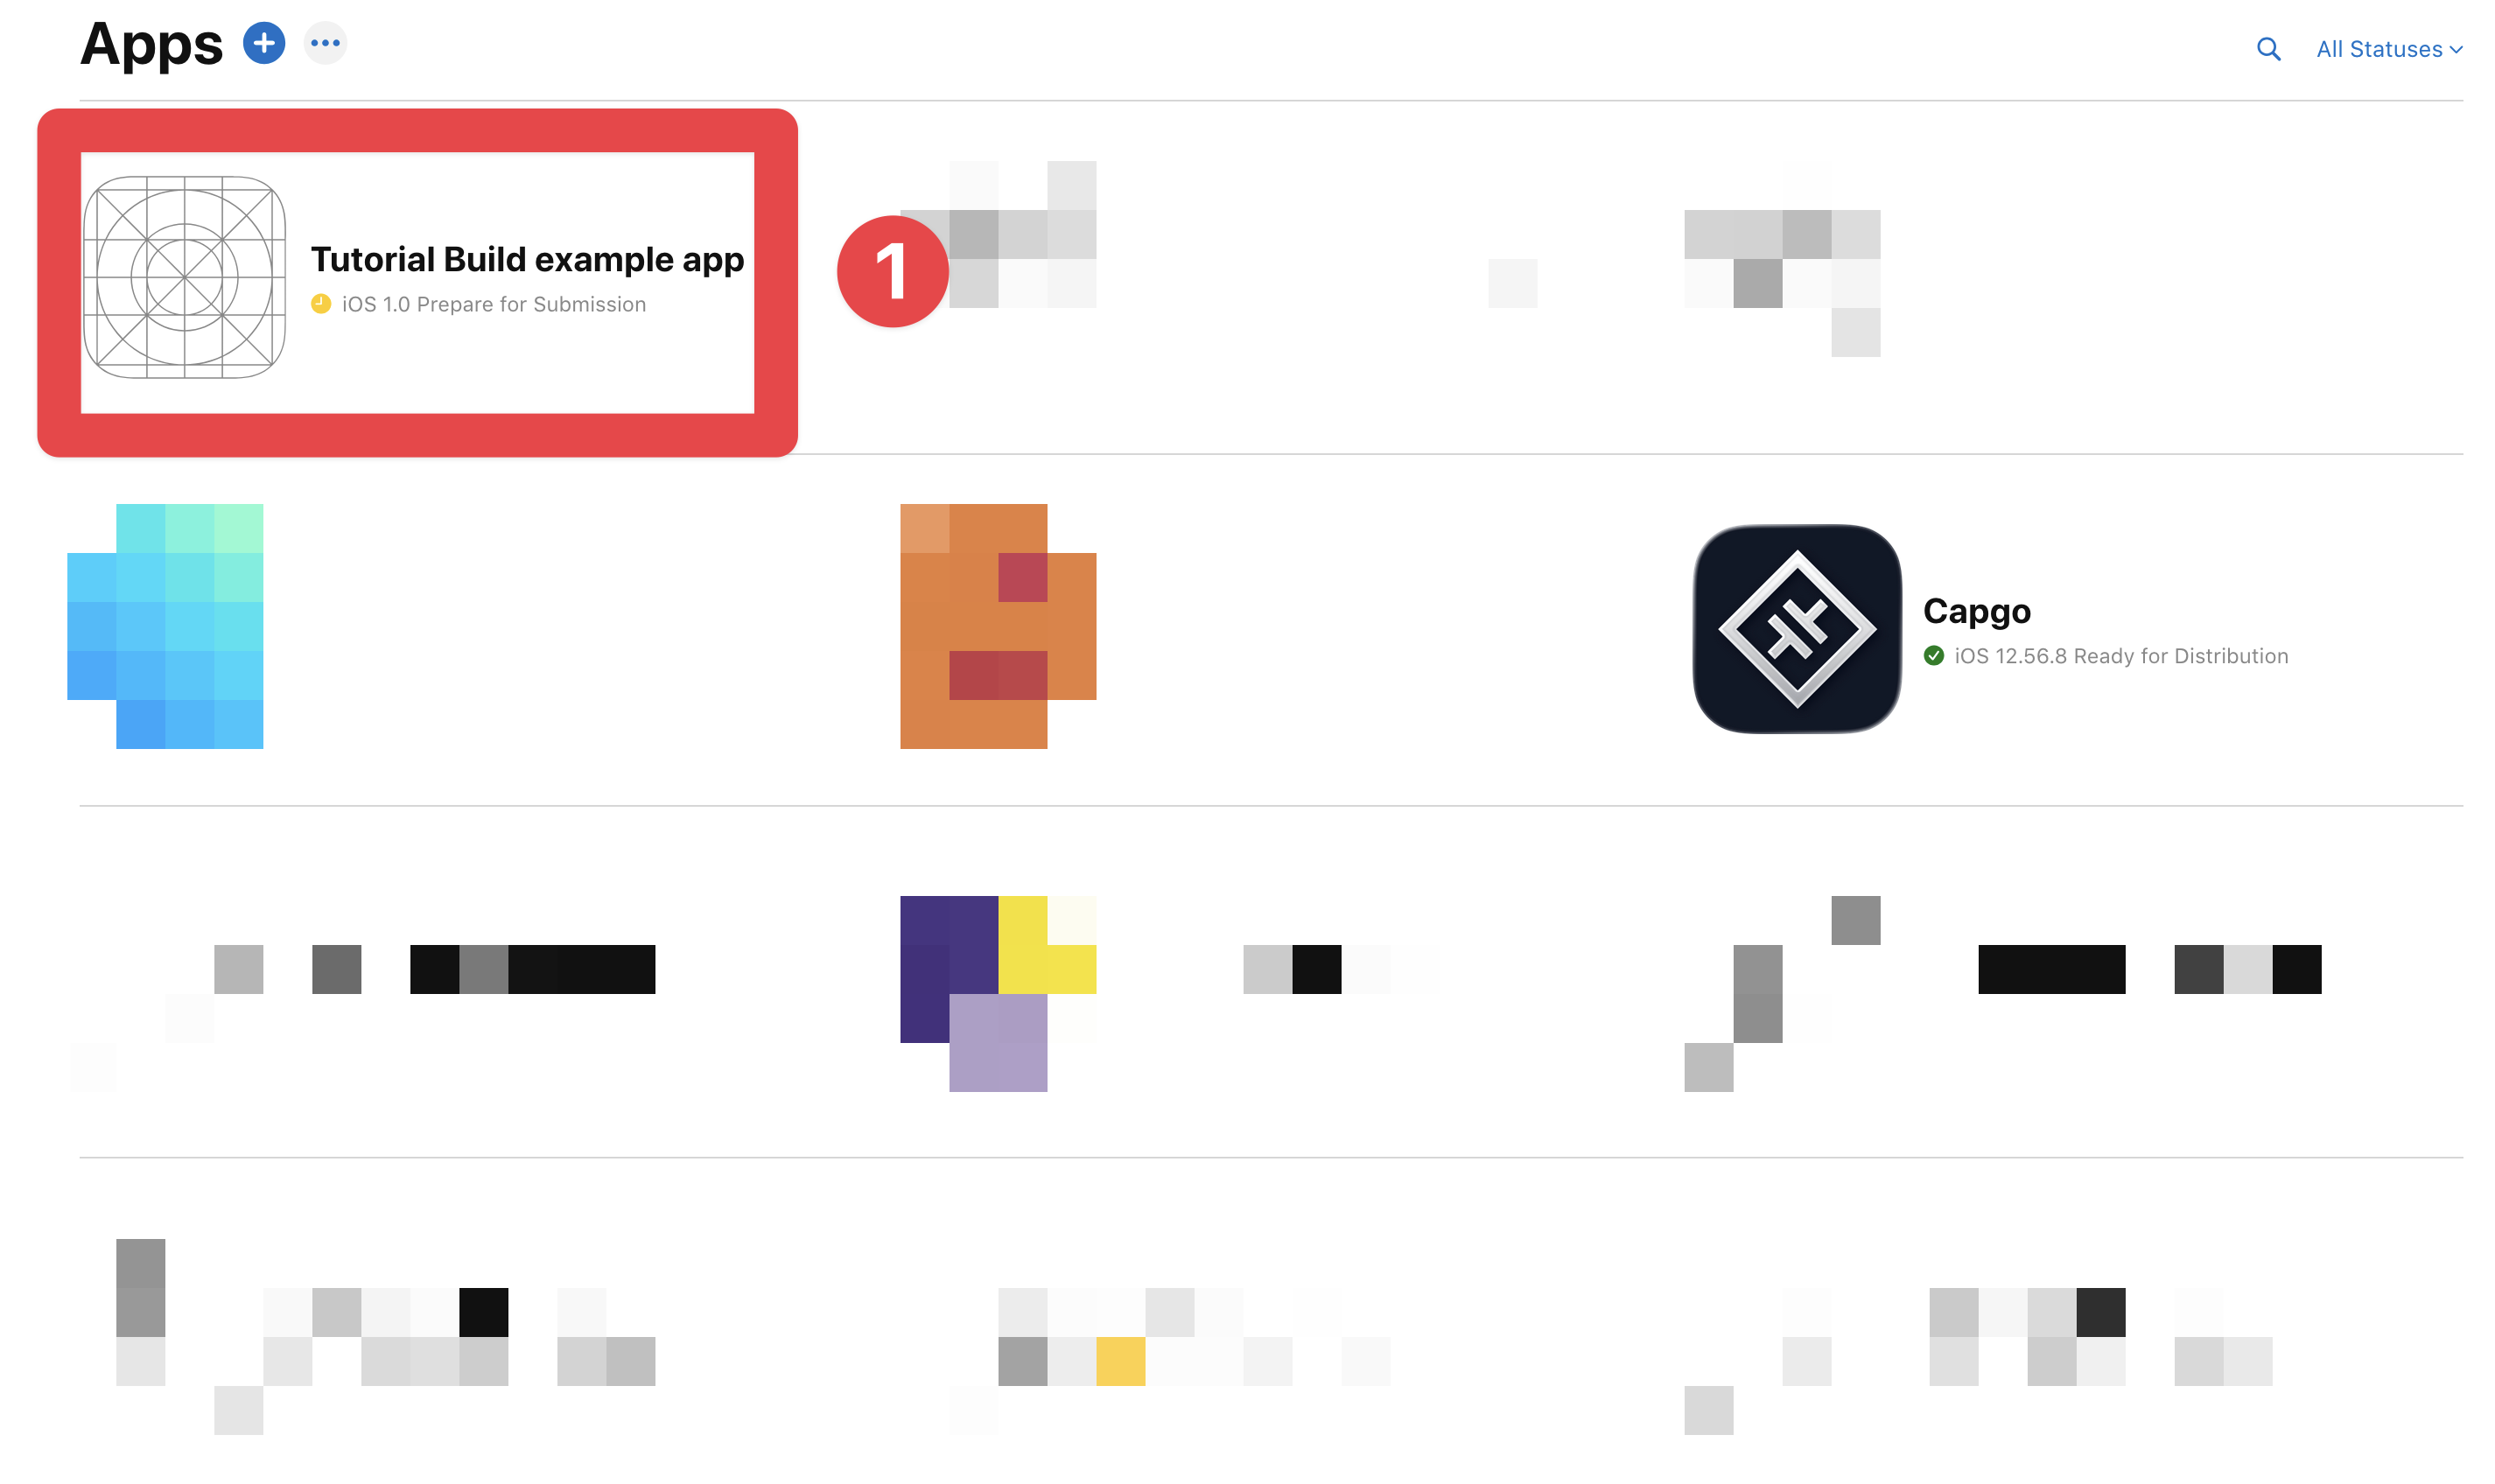
Find the app you created in the previous step and click on it
-
Click on the
TestFlightbutton
-
Click on the
Internal Testers plusbutton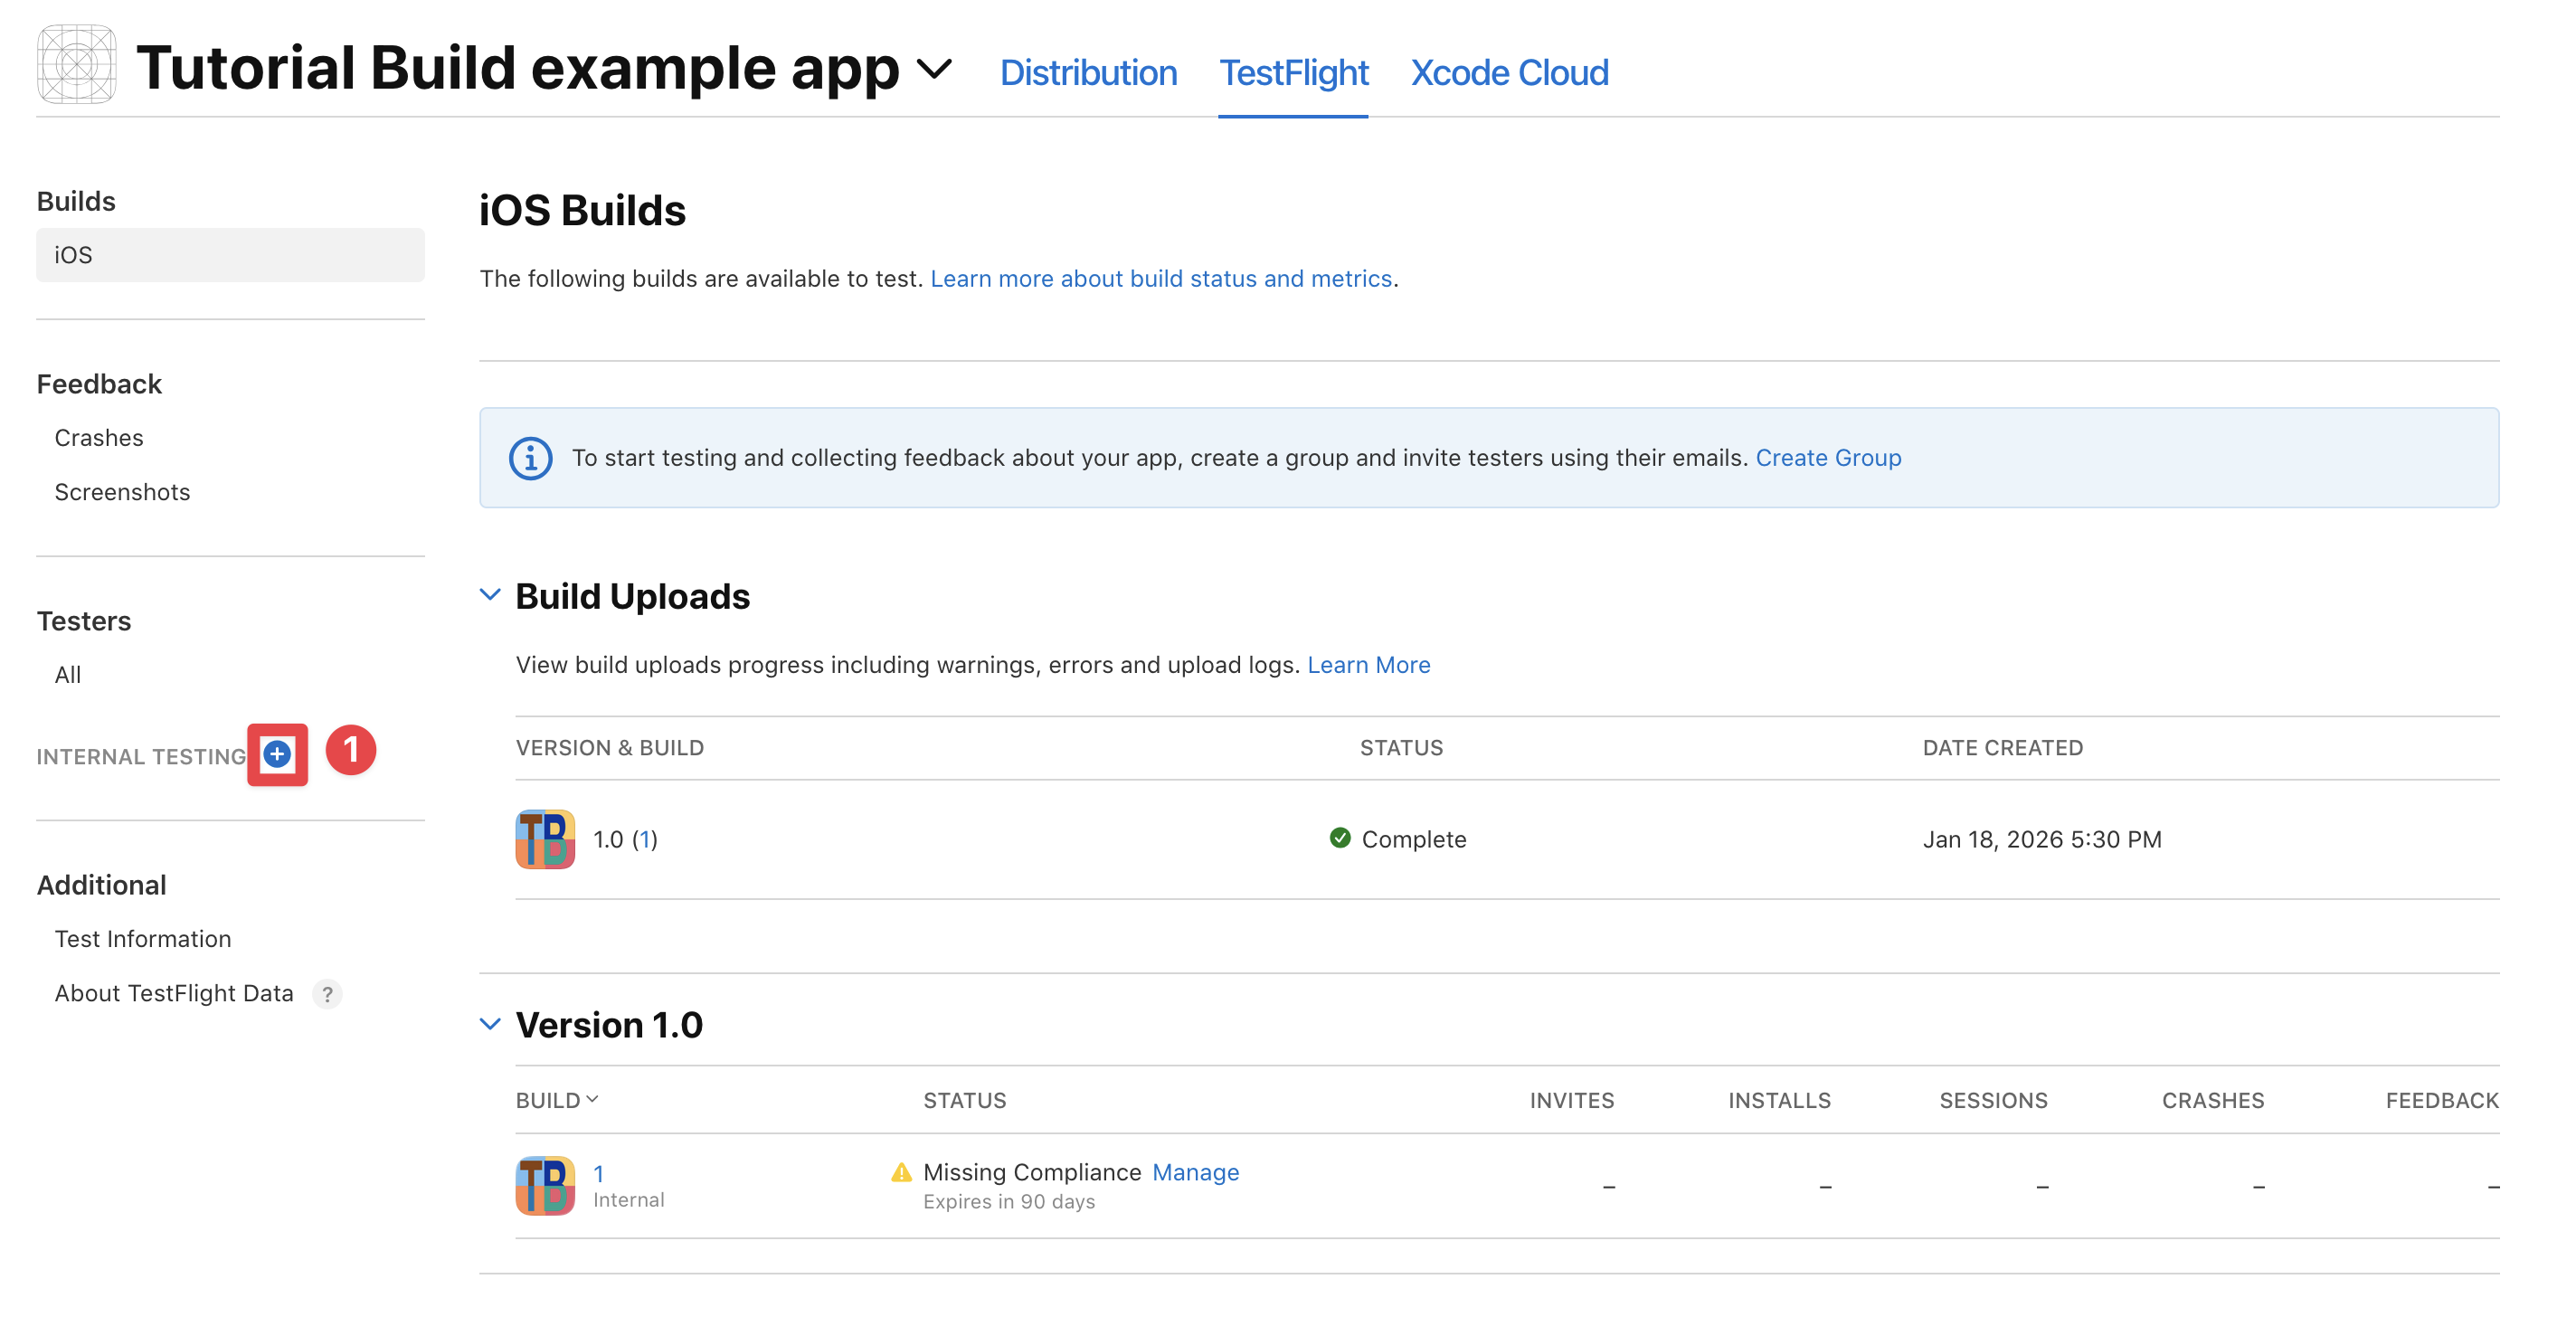
-
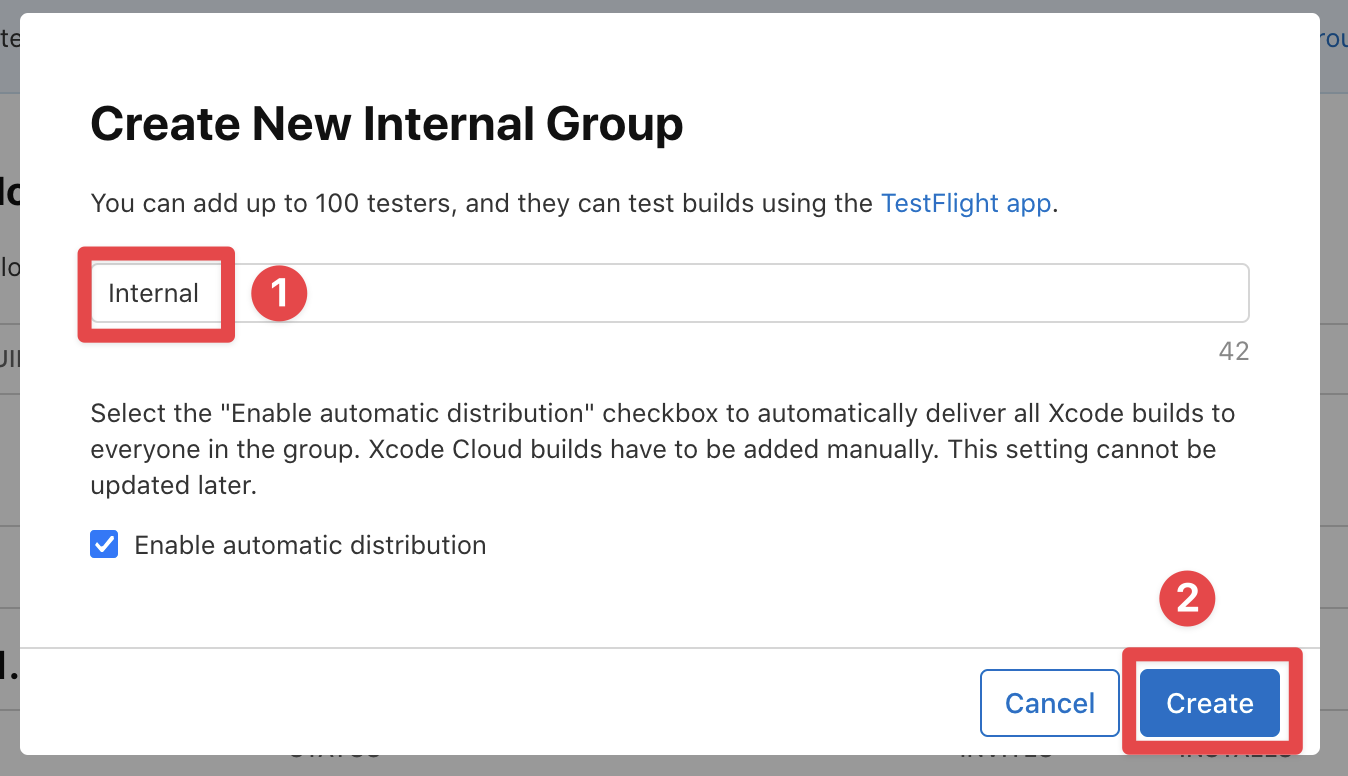
Create a new group
I like to name the group “internal”. You can name it whatever you want.
-
Click on
Invite testersbutton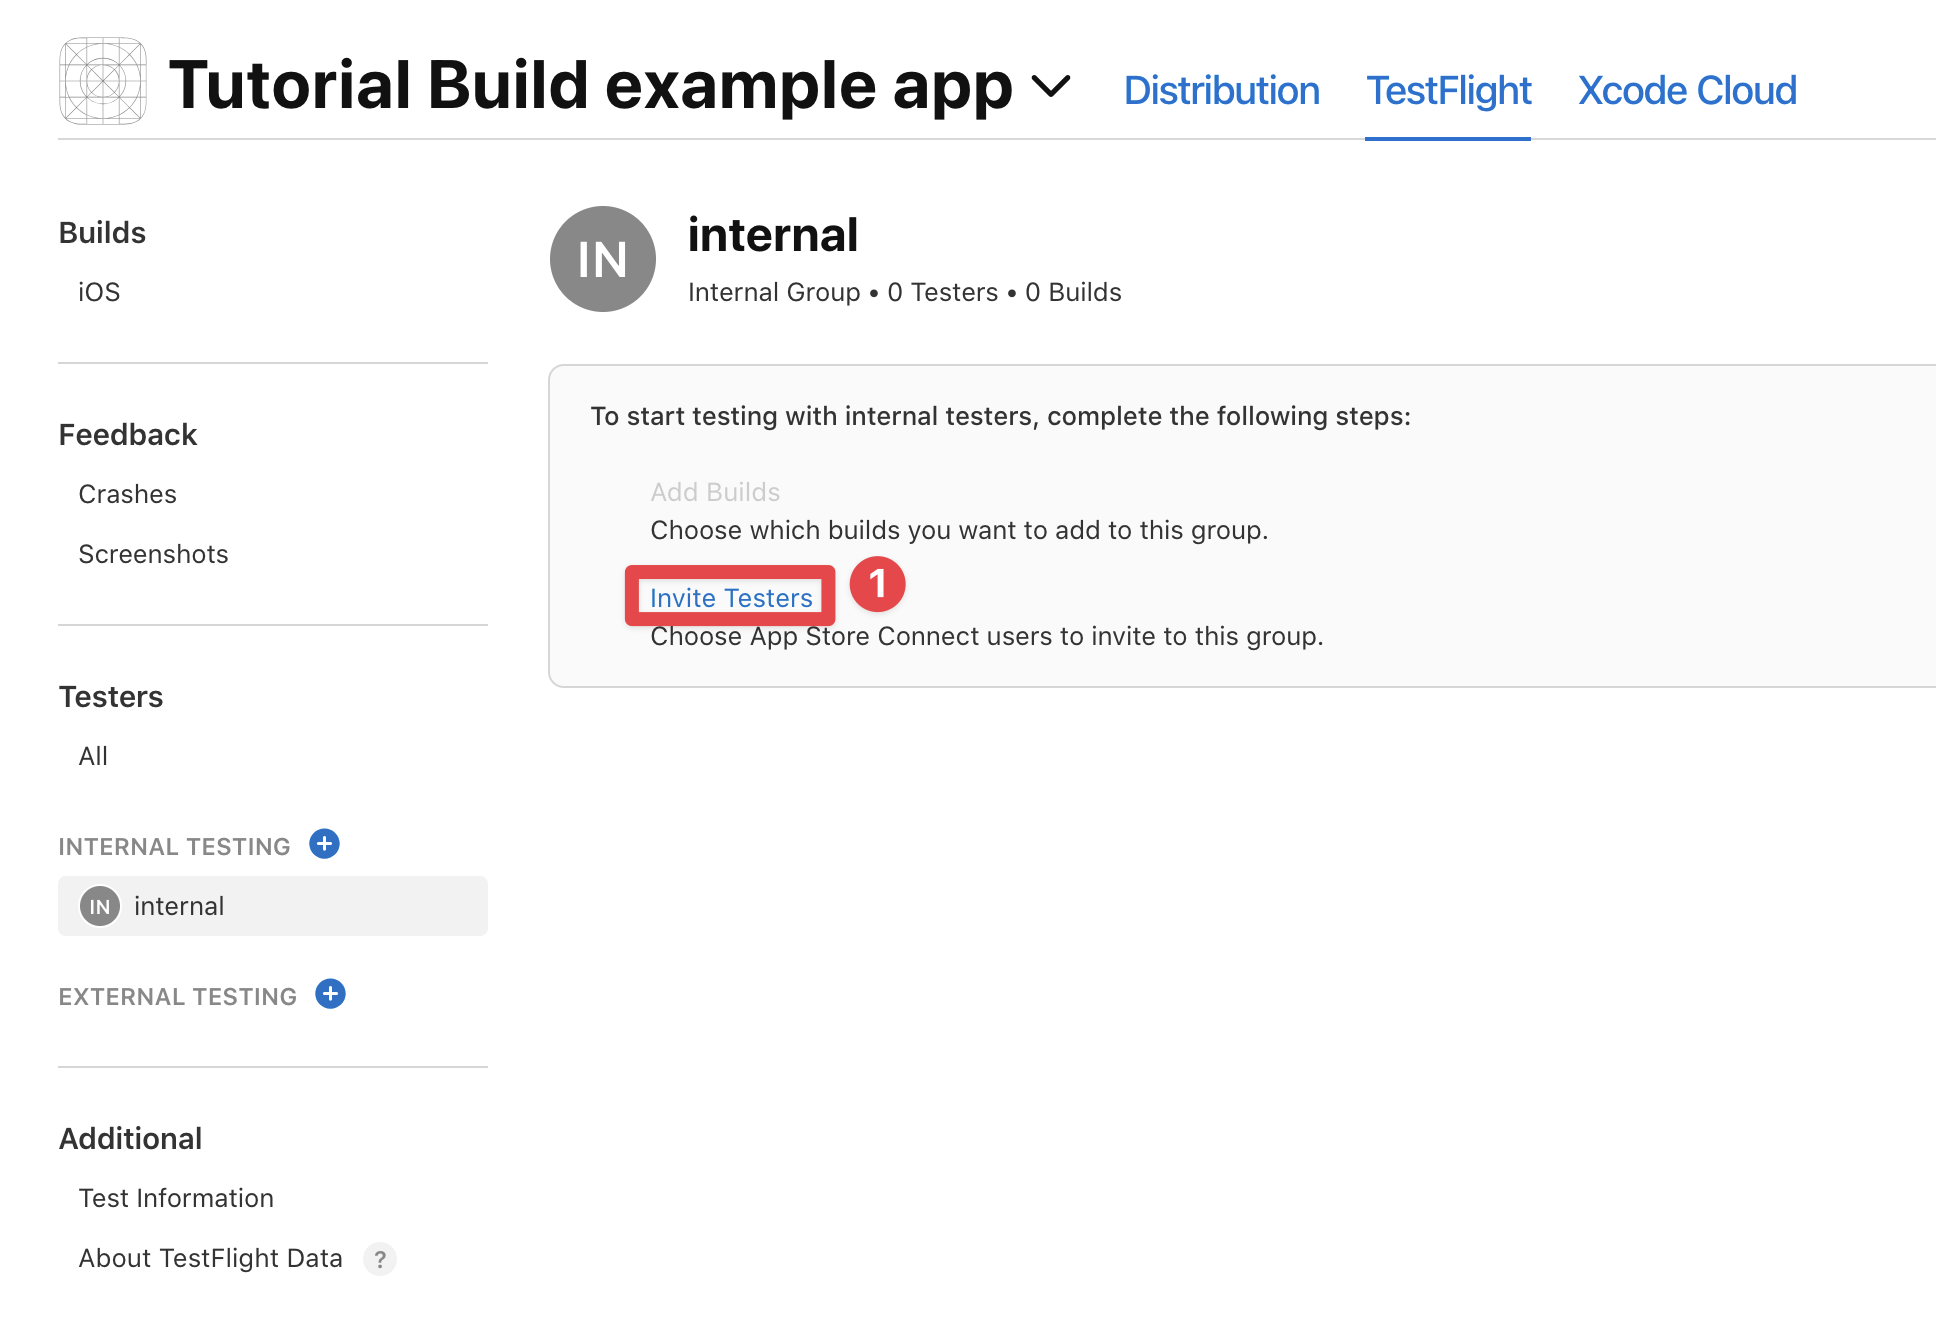
-
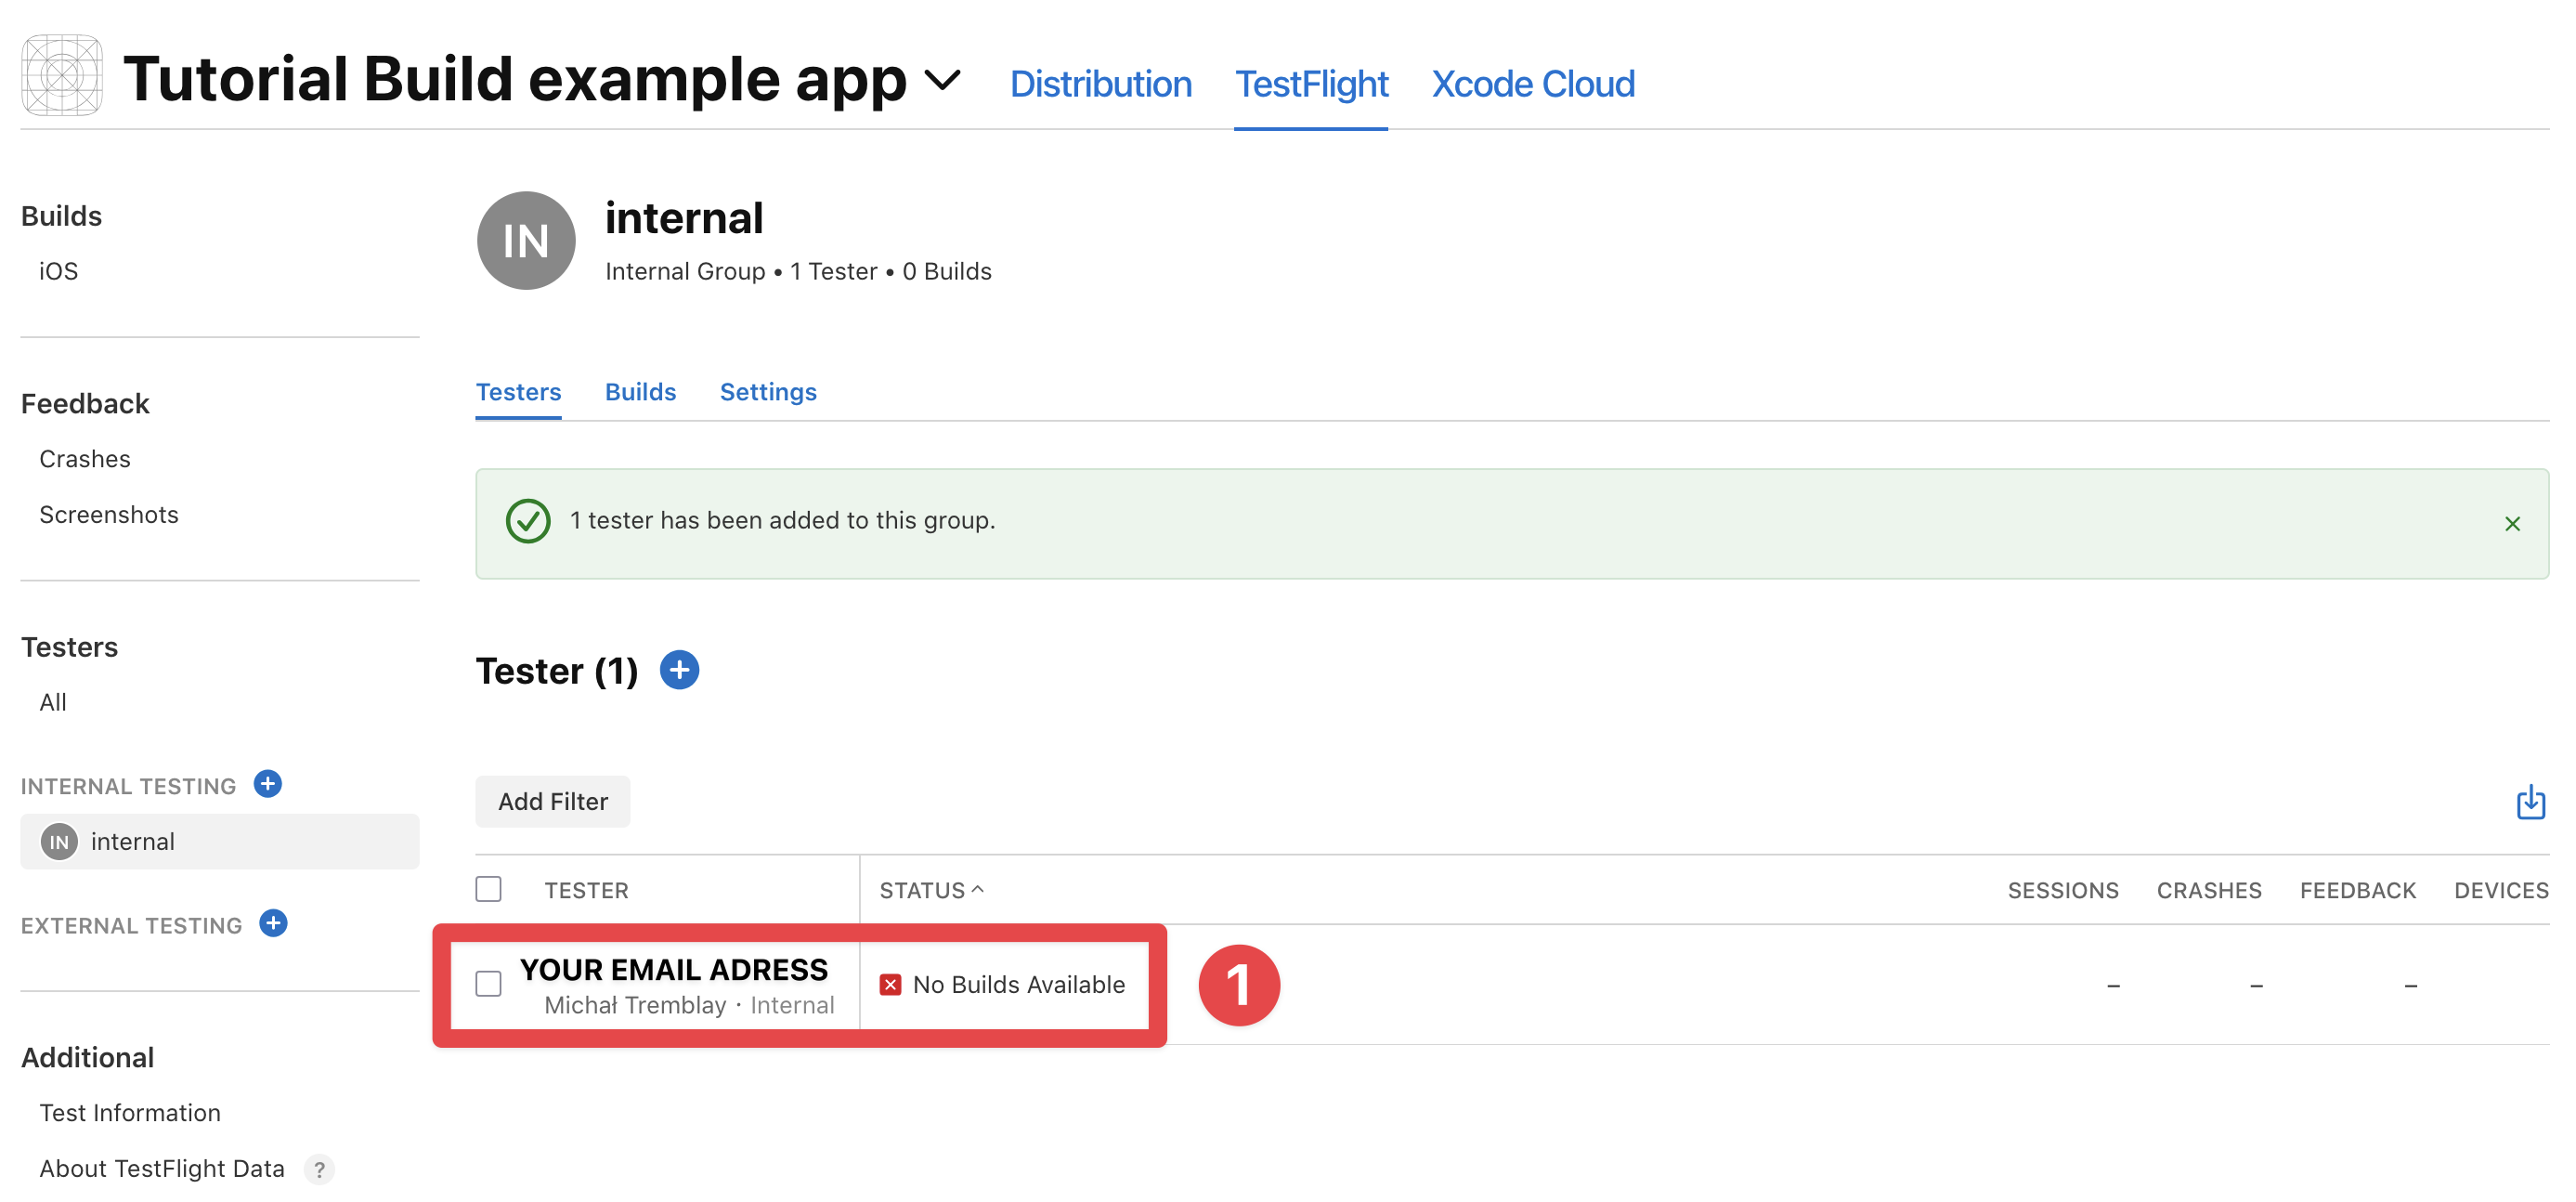
Add yourself to the group
Find yourself in the list and select the checkbox next to your name. (You may need to refresh the page to see yourself) Then, click on the
Addbutton.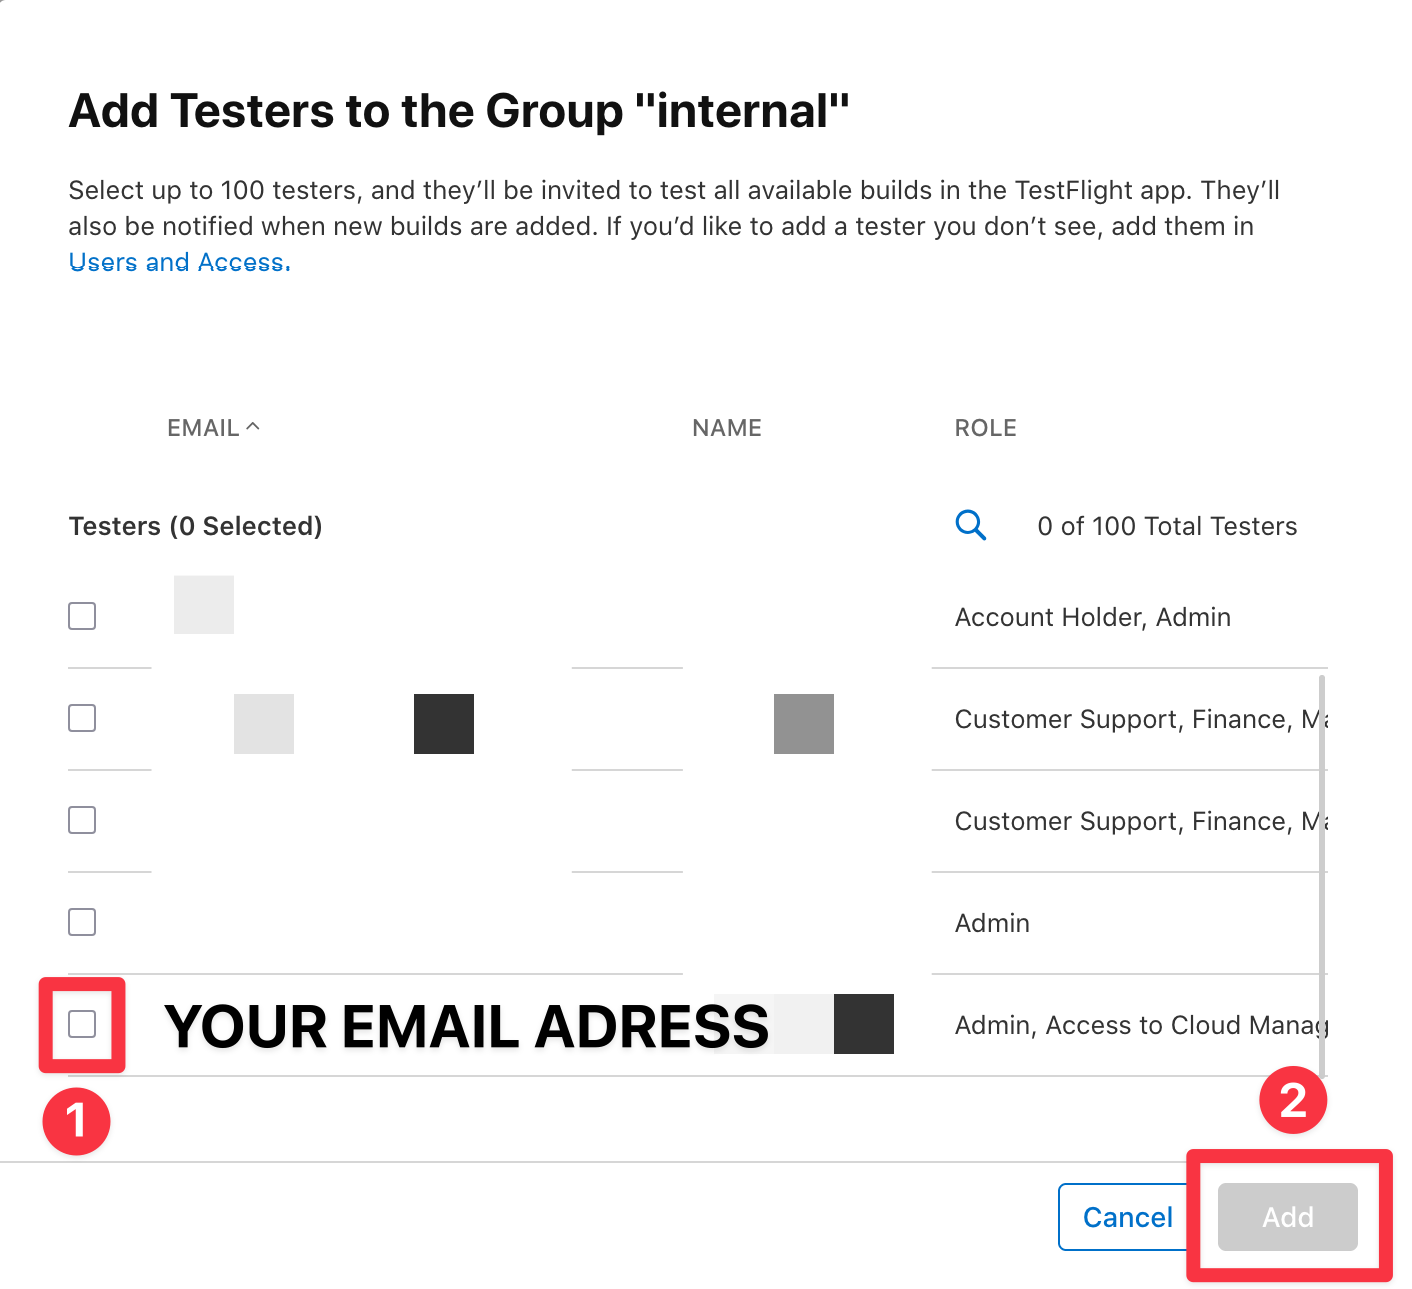
-
Verify that you are added to the group
Now, you should see yourself in the group.
Congratulations 🎉 You have added yourself to TestFlight. Now, there is just one more thing you need to do before you can configure Capgo Native Build.
Setting up the compliance information
Section titled “Setting up the compliance information”You now need to promise Apple that your app doesn’t use any non-standard (like a custom algorithm) encryption. If your app does use any non-standard encryption, I suggest reading the Apple documentation on how to handle this. There are two ways to do this:
- You can do this by hand every time you build your app.
- You can configure your plist file to automatically set this value to
false.
Let’s start with the first one:
-
Follow all the steps from the previous section to find the TestFlight section in App Store Connect
-
Click on
Builds -> iOS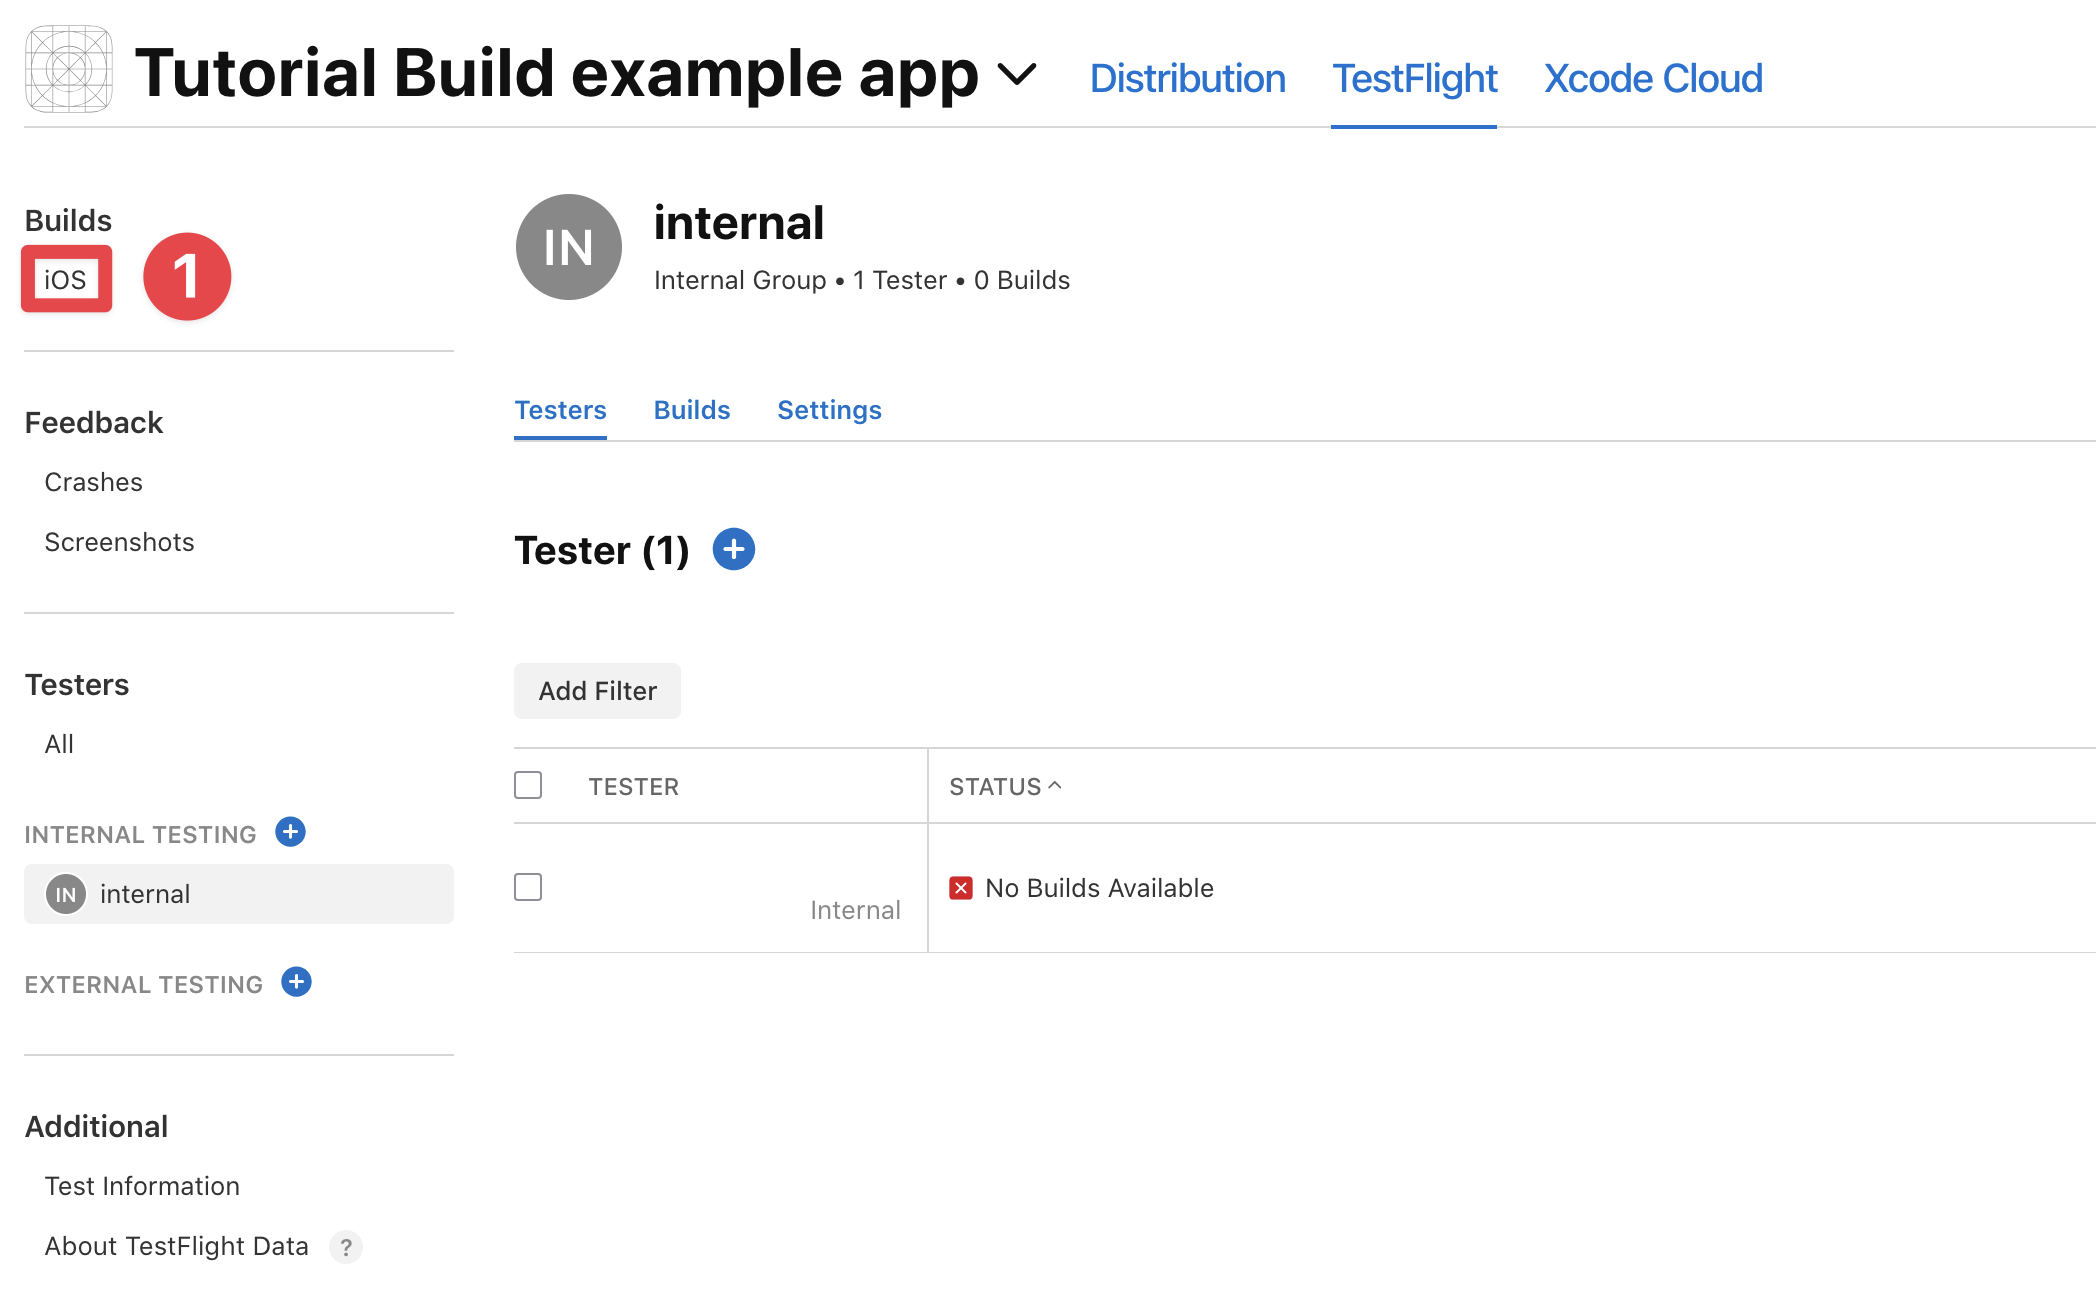
-
Find the build with missing compliance information and click on
Manage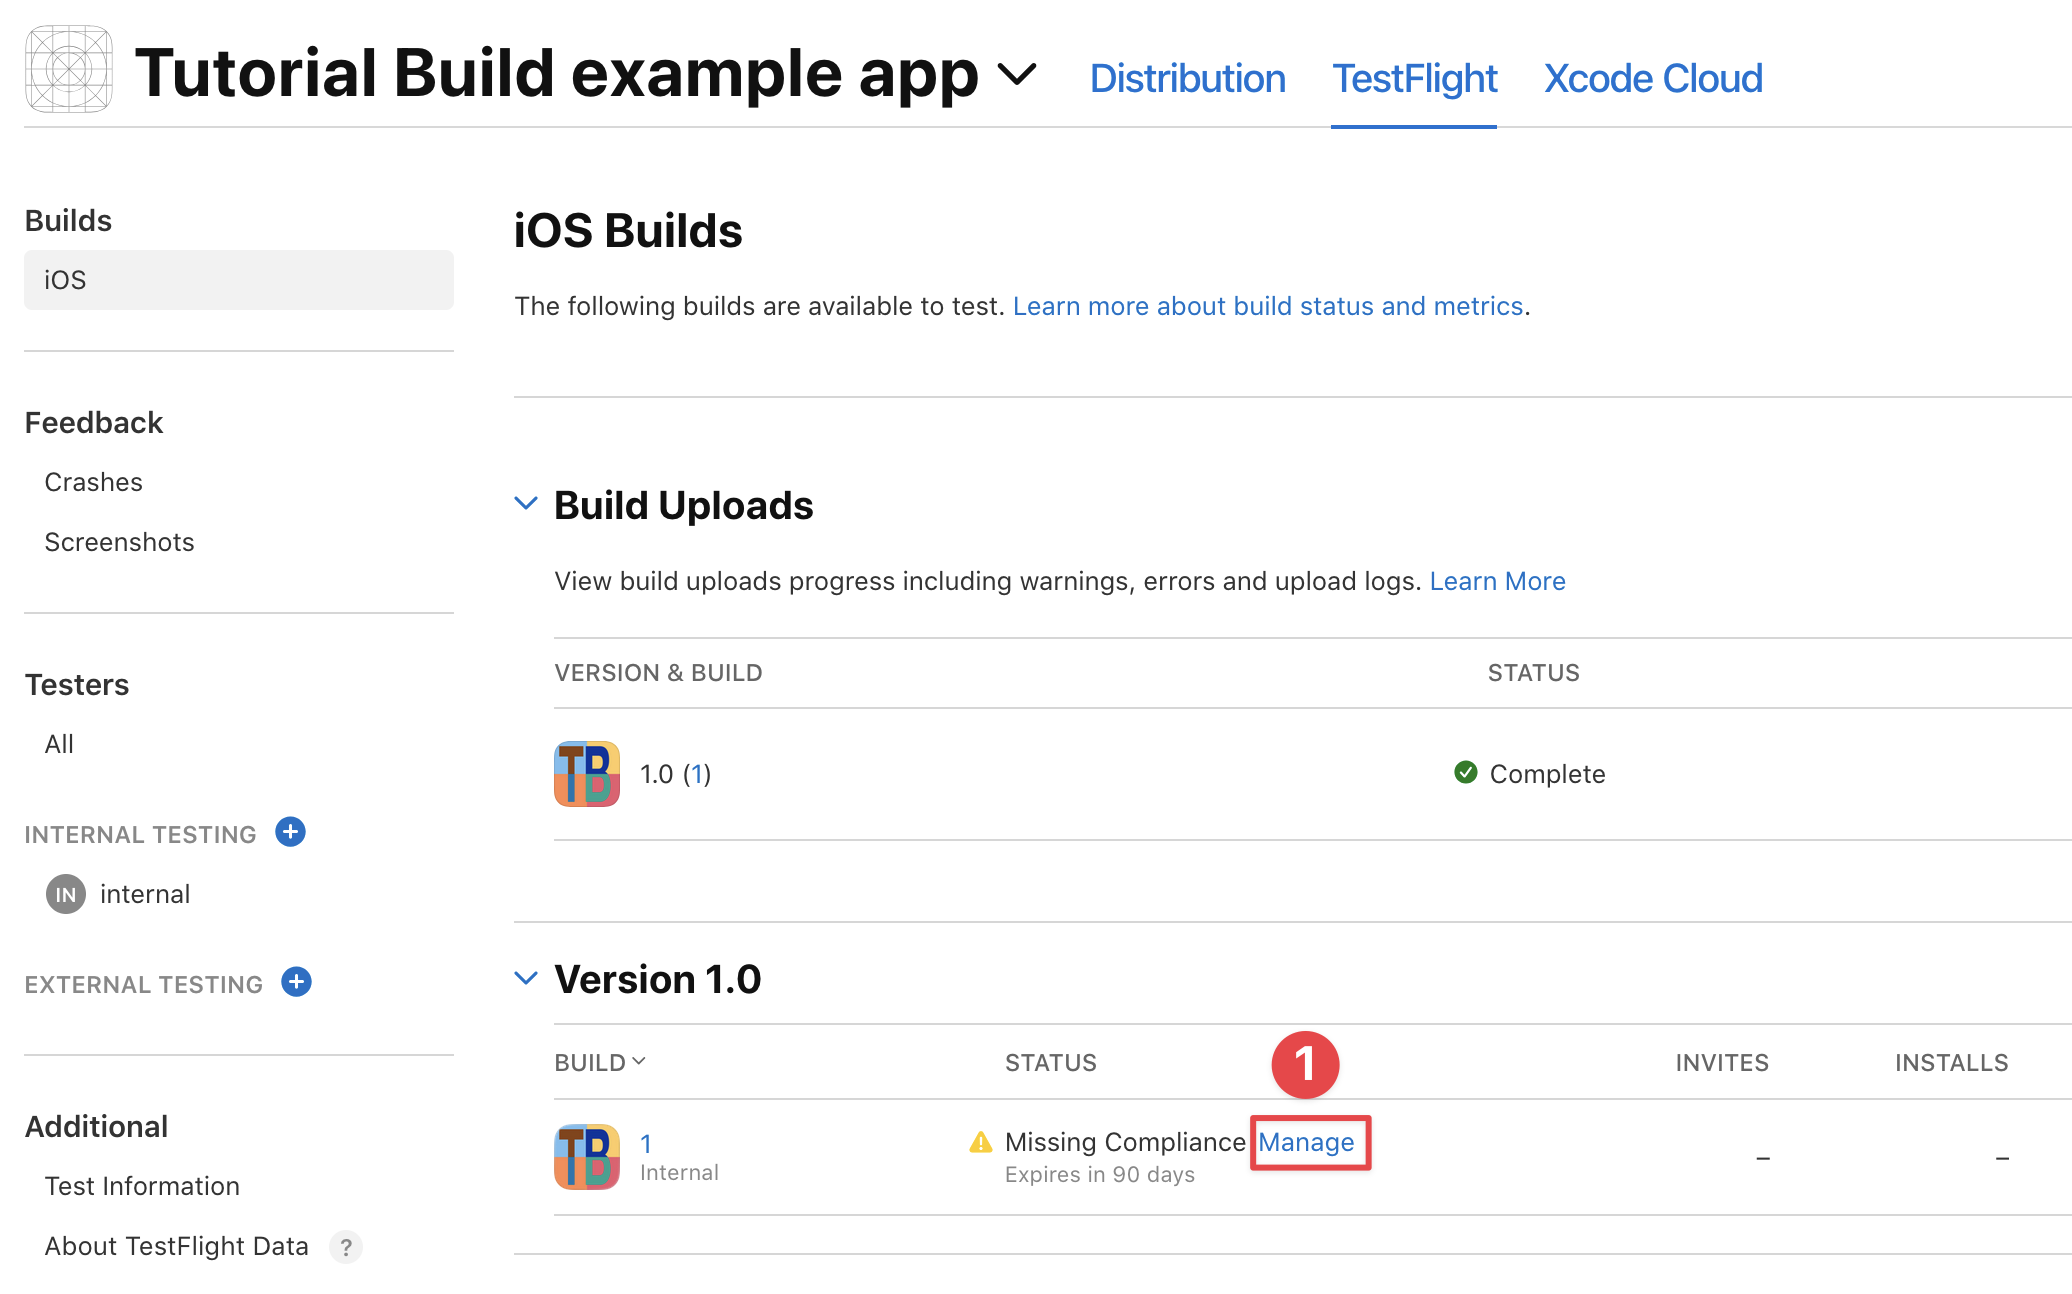
-
Select the option that best describes your app
For me, this is
none, but it might be different for you. After, click save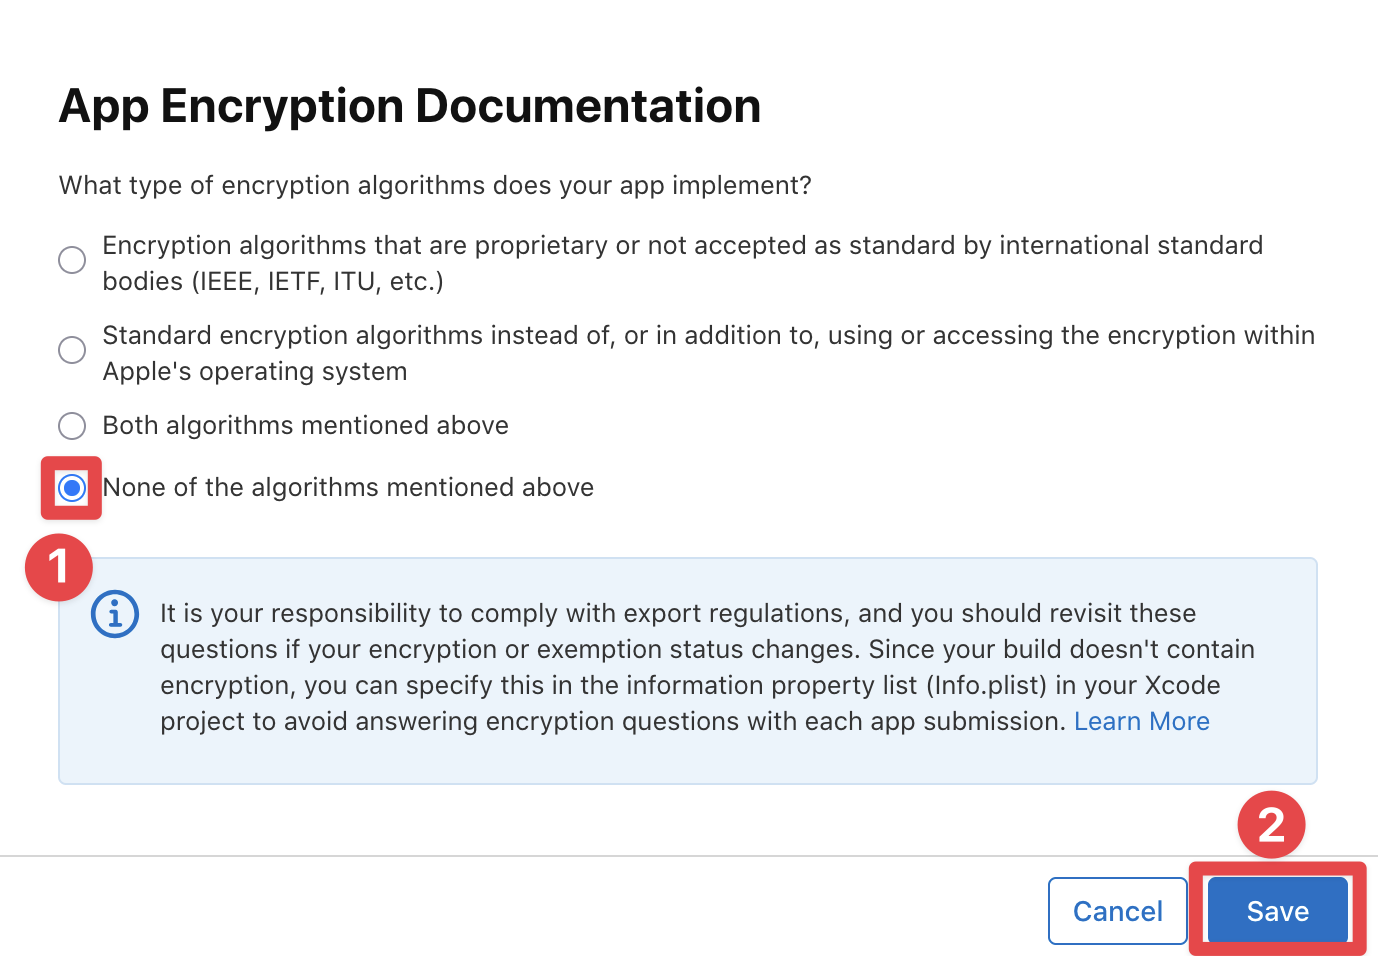
-
Your app should now say
ready to test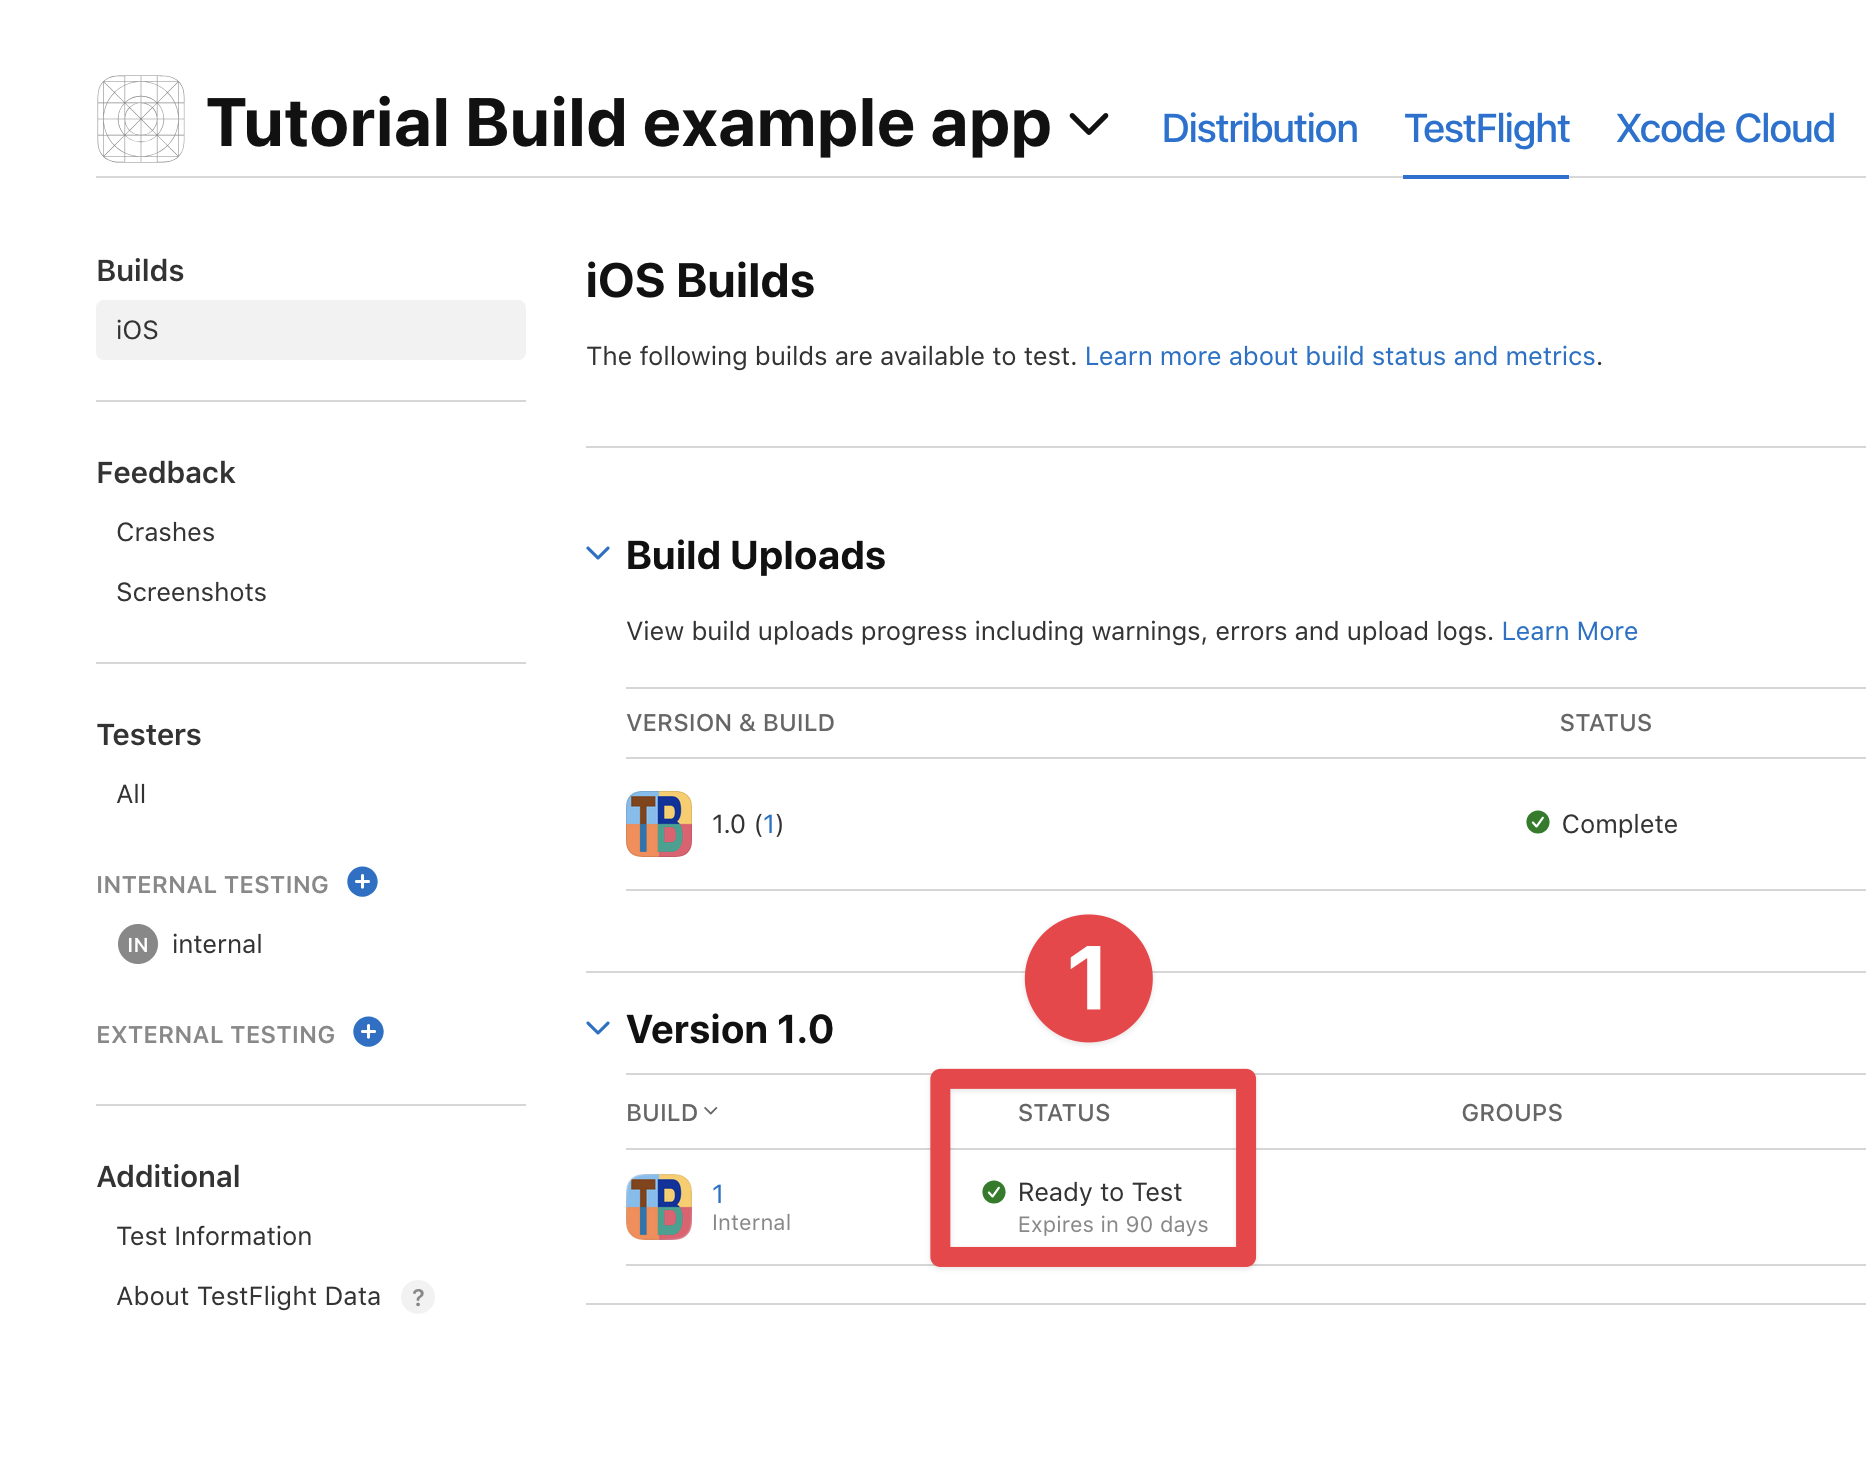
As for the second one, here are the steps:
-
Open the
Info.plistfile -
Add the following key:
<key>ITSAppUsesNonExemptEncryption</key><false/> -
Save the file
Installing the TestFlight app and accepting the invitation
Section titled “Installing the TestFlight app and accepting the invitation”Now, you are ALMOST ready to test your app in TestFlight. Before, you need to do the following things:
- Download the TestFlight app from the App Store on your iOS/iPadOS device
- Accept the invitation to test your app
I will skip the details of how to install the TestFlight app on your device. If you are not sure how to install an app, Google has some great guides on how to do it.
As for accepting the invitation, you will receive an email from Apple with a link to accept the invitation.
-
Open the email from Apple with the link to accept the invitation
-
Click on
View in TestFlightbutton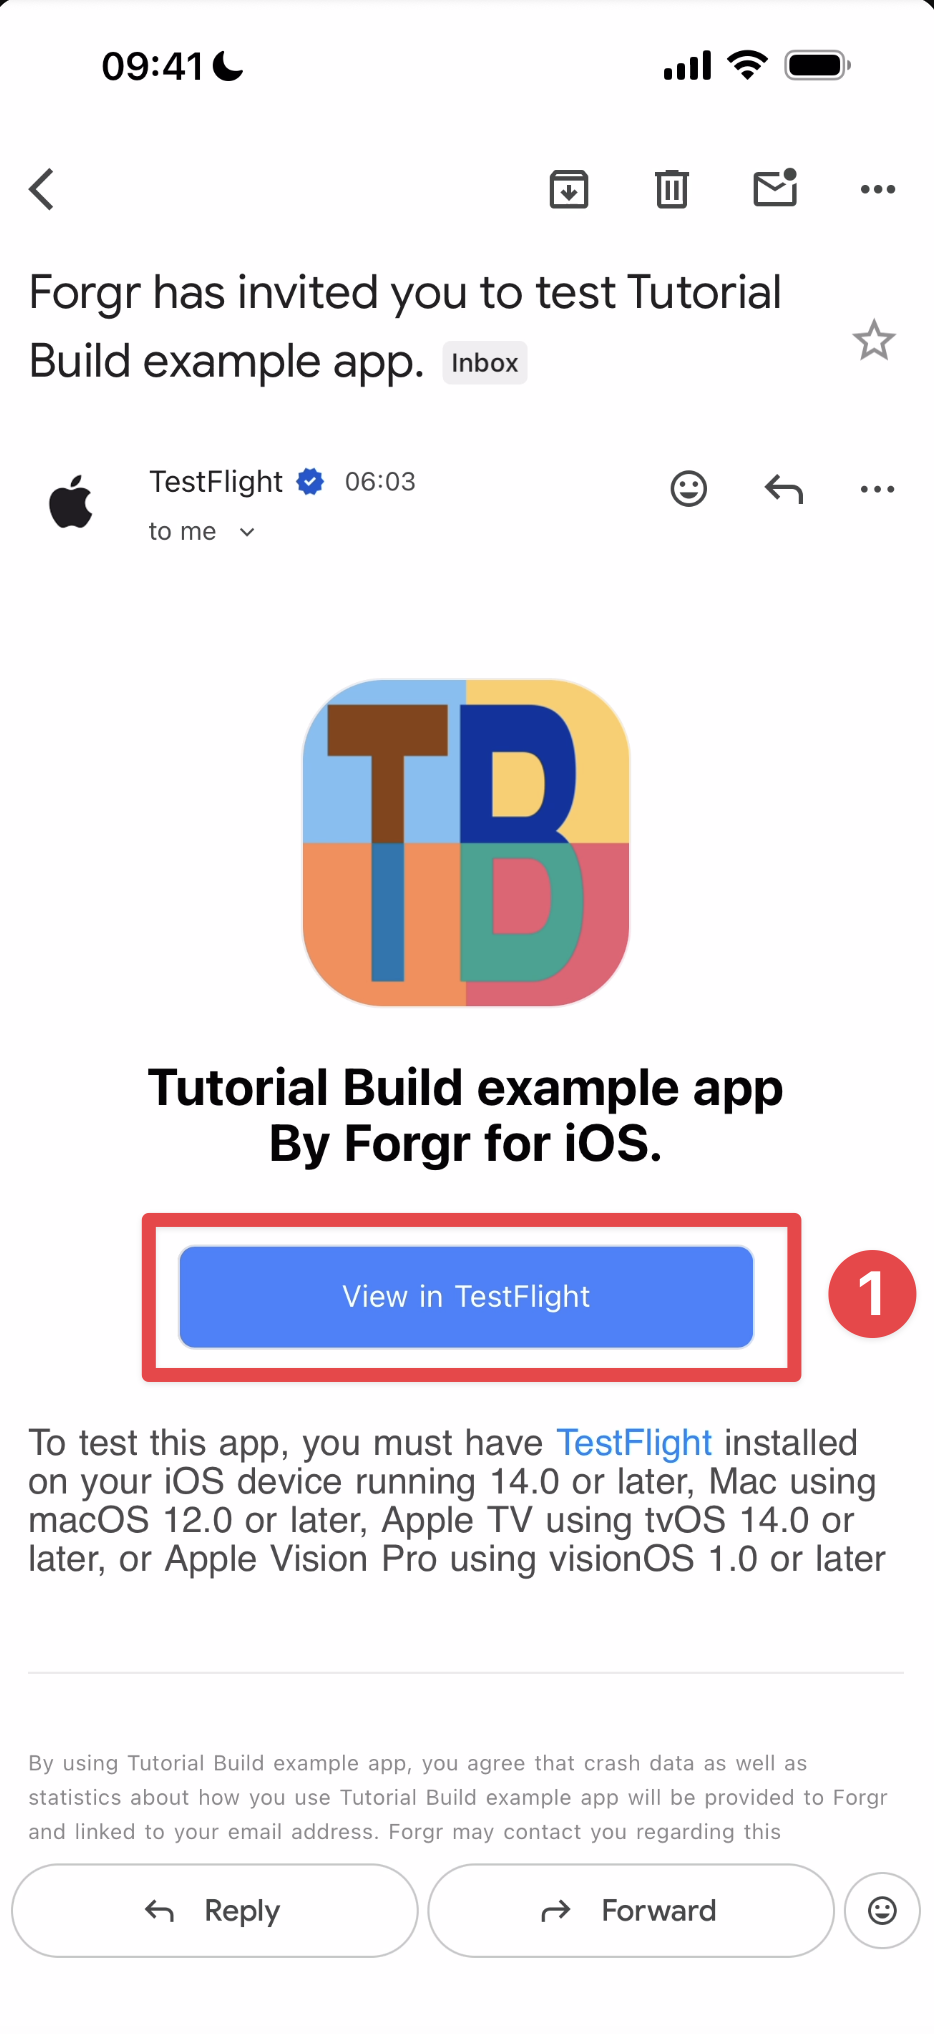
-
Click on the
Installbutton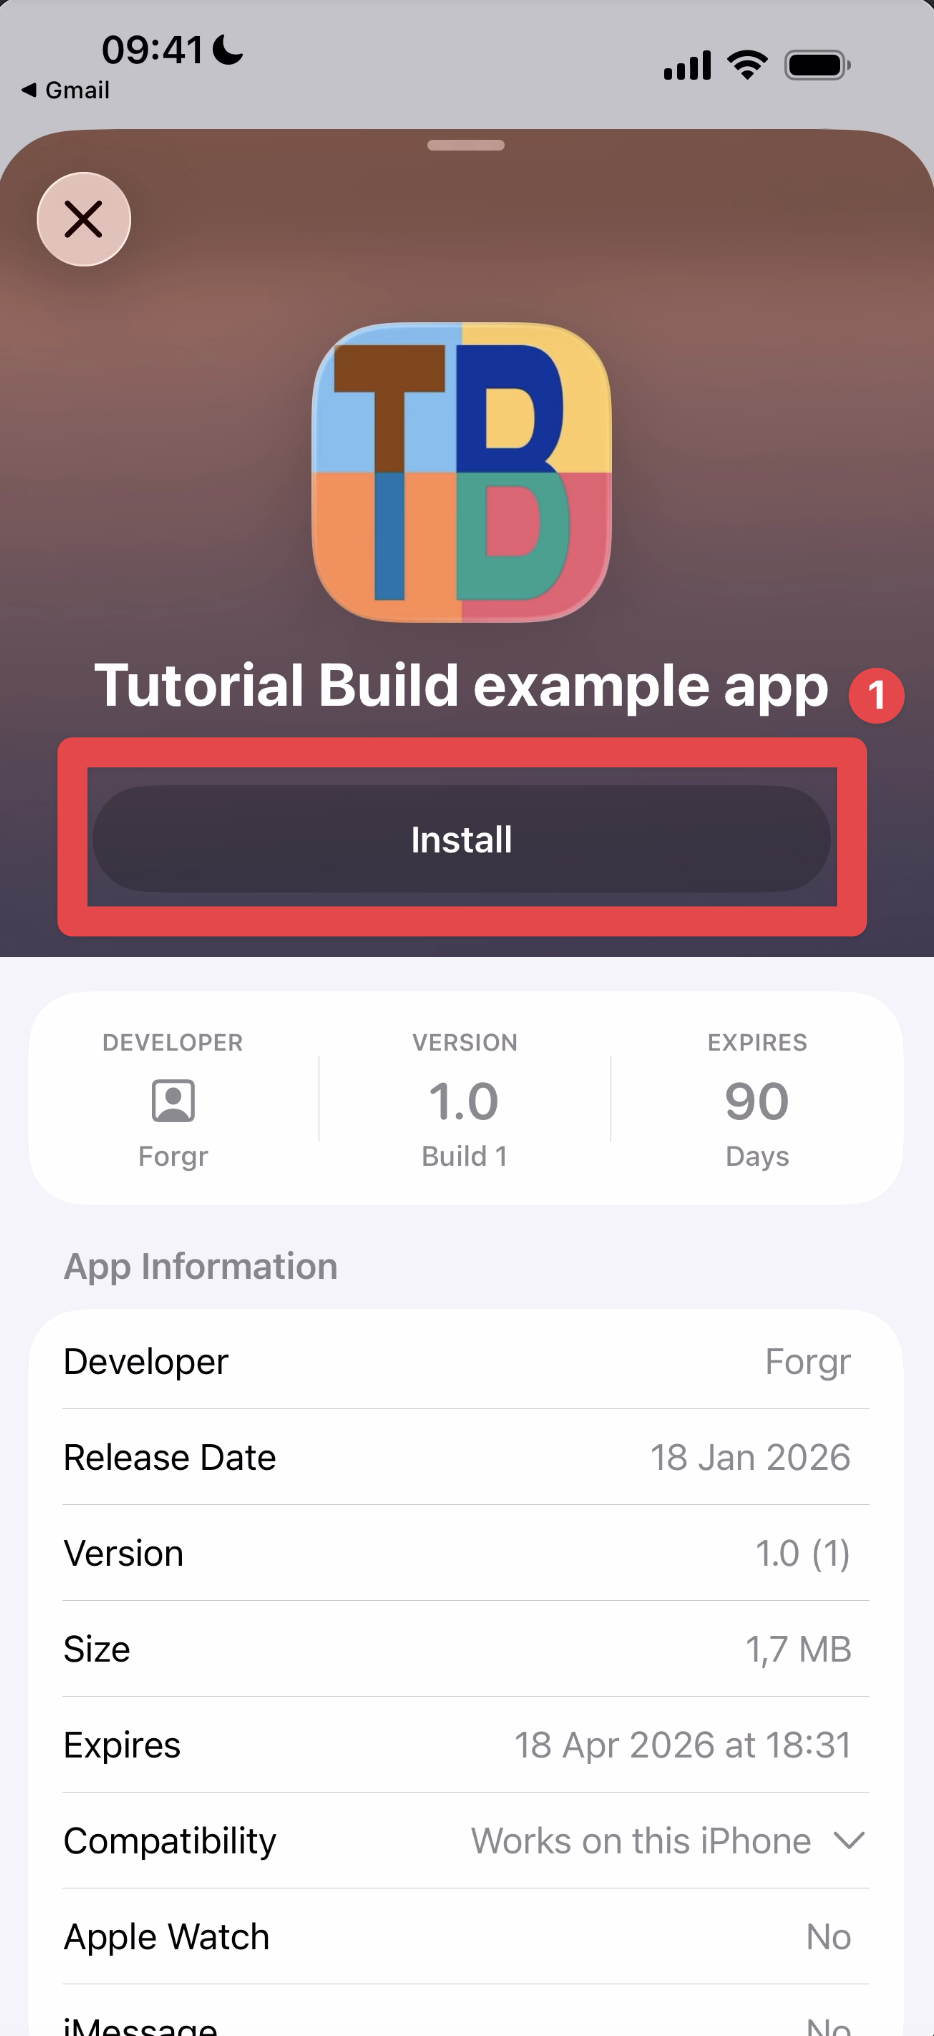
-
Install the app on your device
If you have installed the app previously using Xcode, you may see the following screen. Please click on the
installbutton.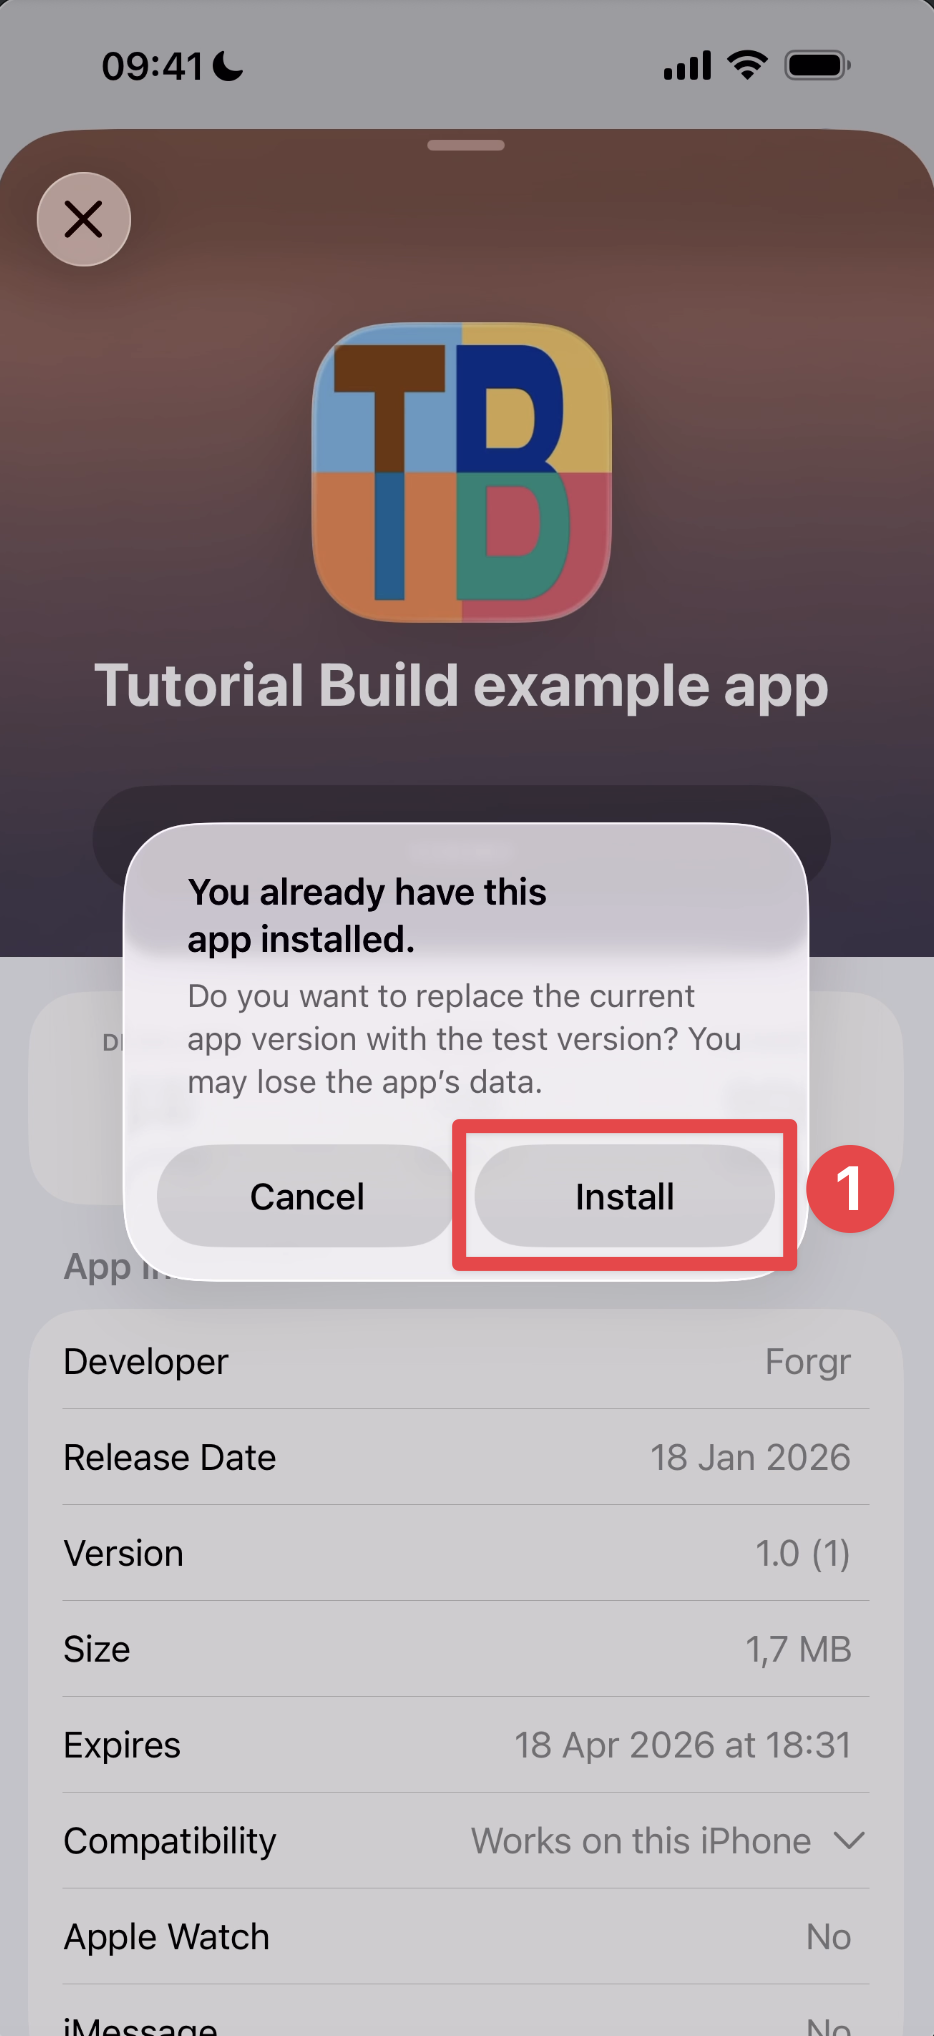
-
Wait for the app to install
-
Click on the
Openbutton and click it
Congratulations 🎉 You have accepted the invitation to test your app in TestFlight. Now, you can configure Capgo Native Build to build and submit your app to TestFlight.
Configuring Capgo Native Build
Section titled “Configuring Capgo Native Build”There are a few things you need to configure in Capgo Native Build to be able to build and submit your app to TestFlight. Here is a list of the things you will pass to the Capgo CLI:
| Parameter | Description |
|---|---|
--platform | The platform to build for (ios) |
--apple-team-id | Your Apple Developer Team ID (found in Apple Developer Portal) |
--apple-key | Path to your App Store Connect API Key file (.p8 file) |
--apple-key-id | The Key ID of your App Store Connect API Key |
--apple-issuer-id | Your App Store Connect Issuer ID |
--certificate | Path to your distribution certificate (.p12 file) |
--ios-provisioning-profile | Provisioning profile mapping (bundleId=path or just path for single profile) |
Example command:
npx @capgo/cli@latest build credentials save \ --platform ios \ --apple-team-id YOUR_TEAM_ID \ --apple-key '/path/to/AuthKey_XXXXX.p8' \ --apple-key-id YOUR_KEY_ID \ --apple-issuer-id YOUR_ISSUER_ID \ --certificate '/path/to/certificate.p12' \ --ios-provisioning-profile '/path/to/profile.mobileprovision'Team ID
Section titled “Team ID”Let’s start with the team ID. Finding it is quite easy.
-
Go to Apple Developer Account and scroll down
-
Find the
Team ID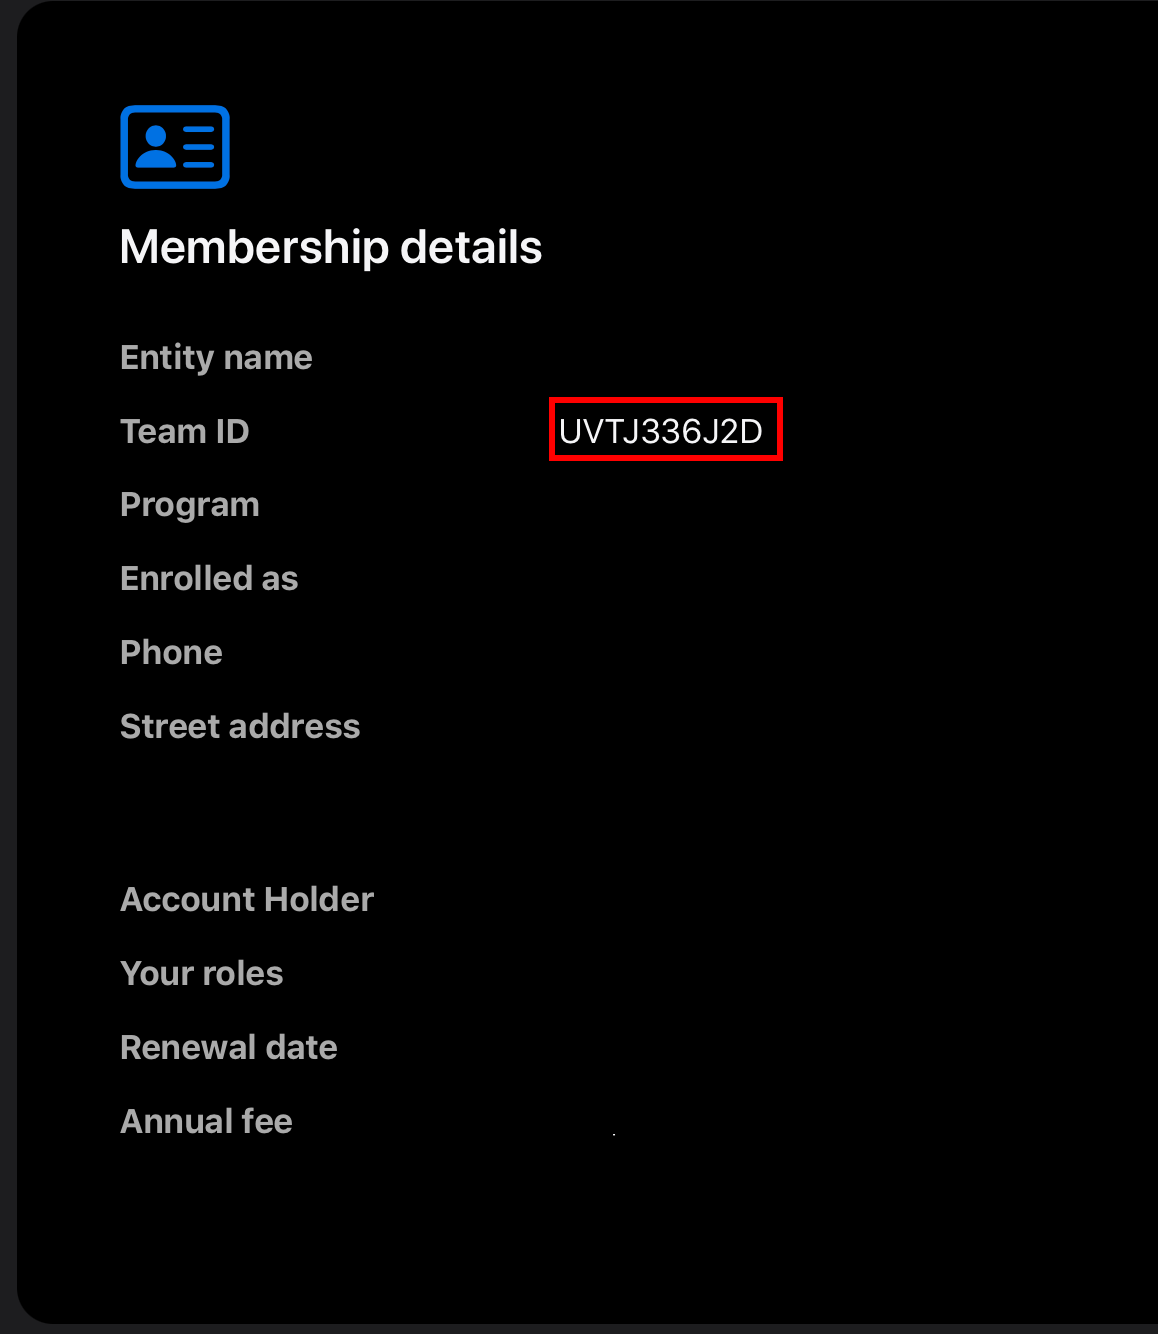
Apple key, Apple key ID and Apple issuer ID
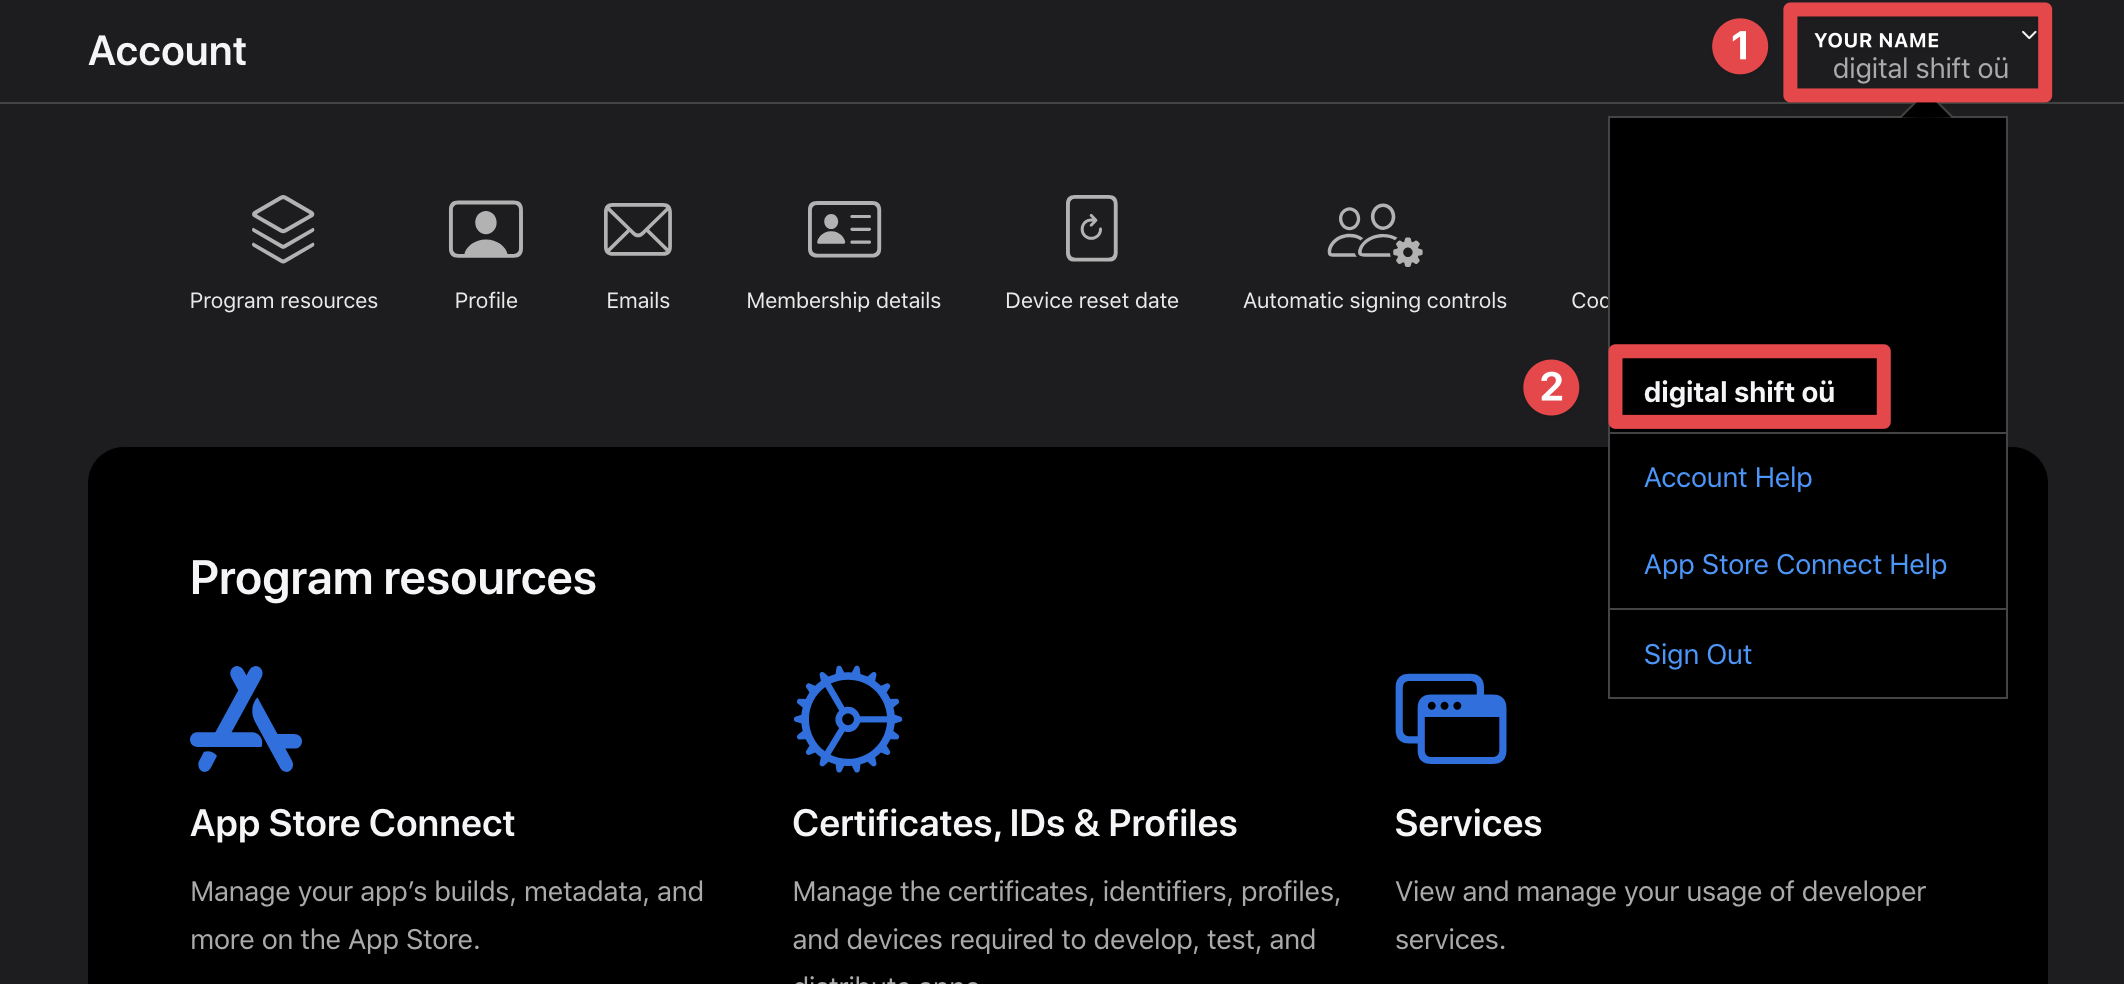
Section titled “Apple key, Apple key ID and Apple issuer ID”Now, let’s move on to the Apple key.
-
Select the correct team in the dropdown
- Click on your name in the top right corner
- Click on the team you want to use
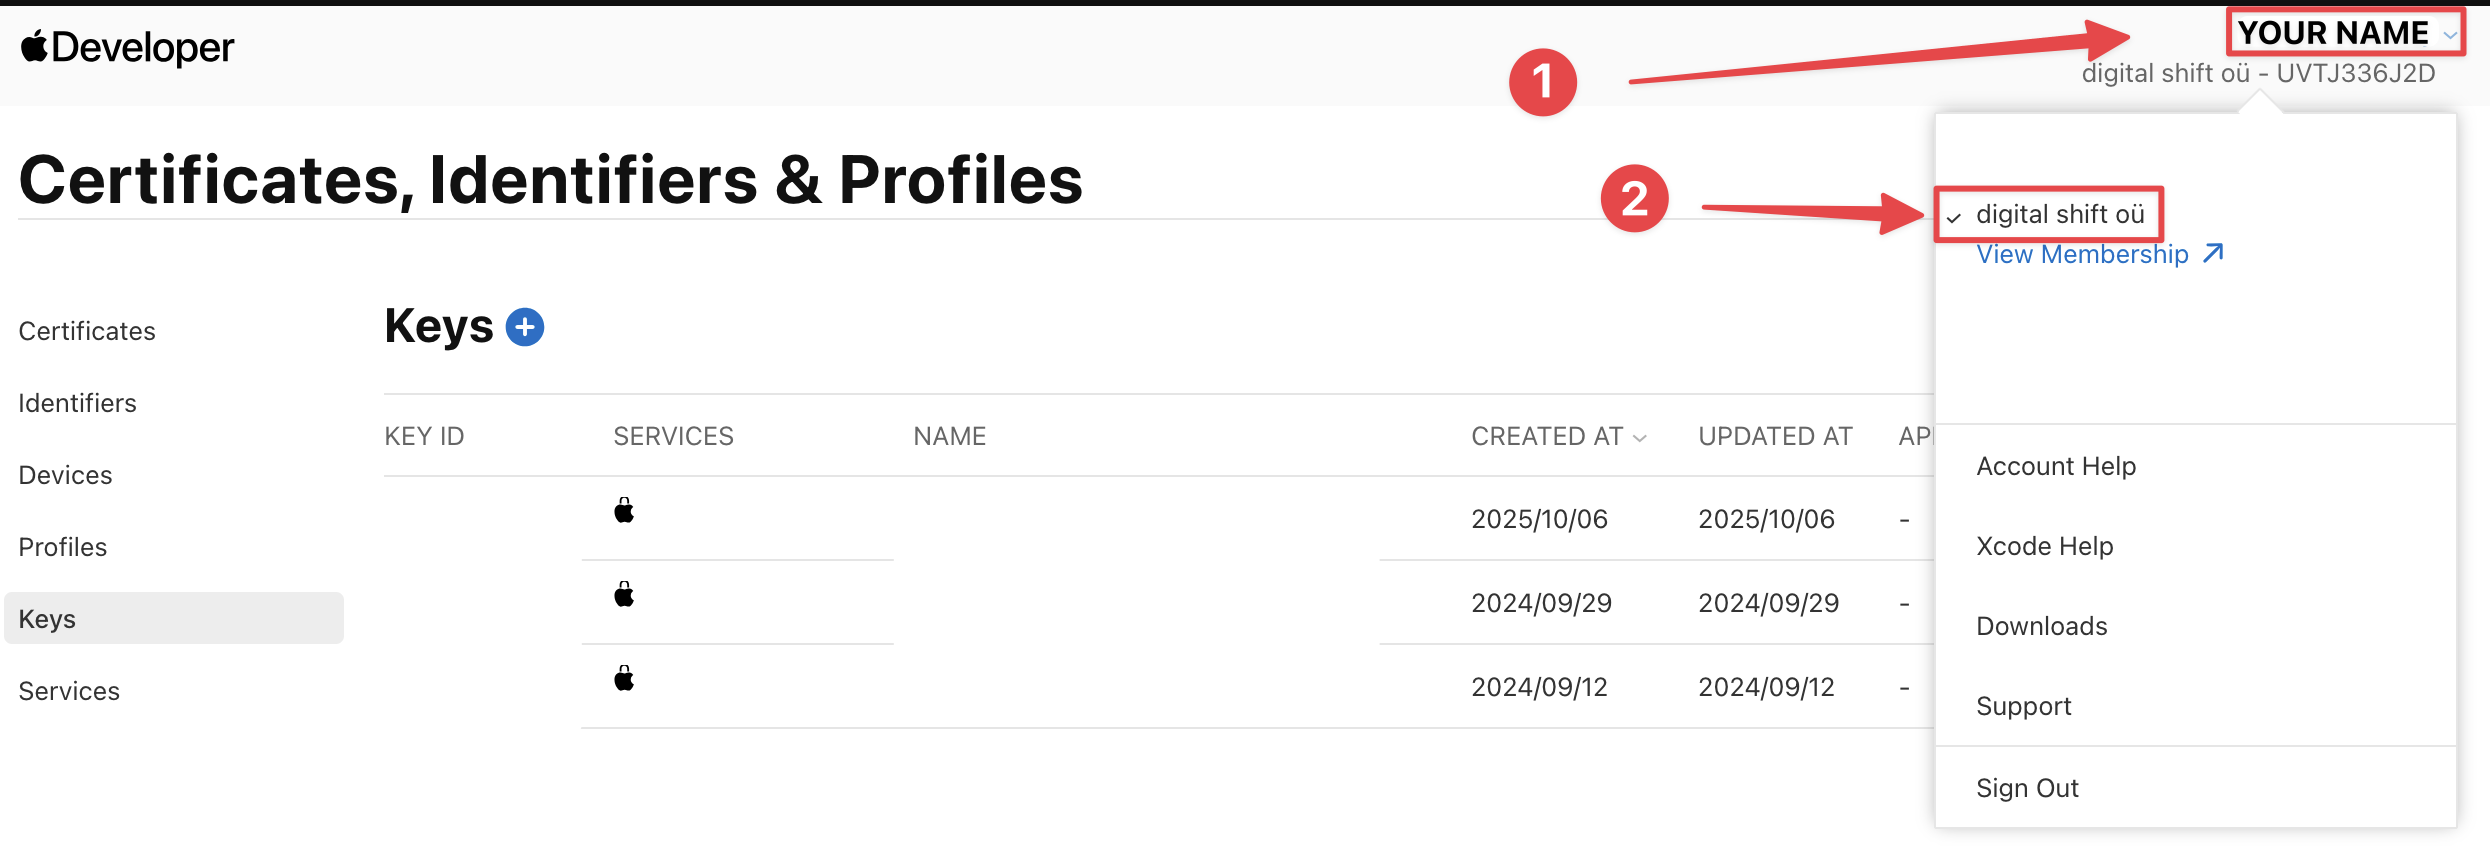
-
Click on the
Integrationsbutton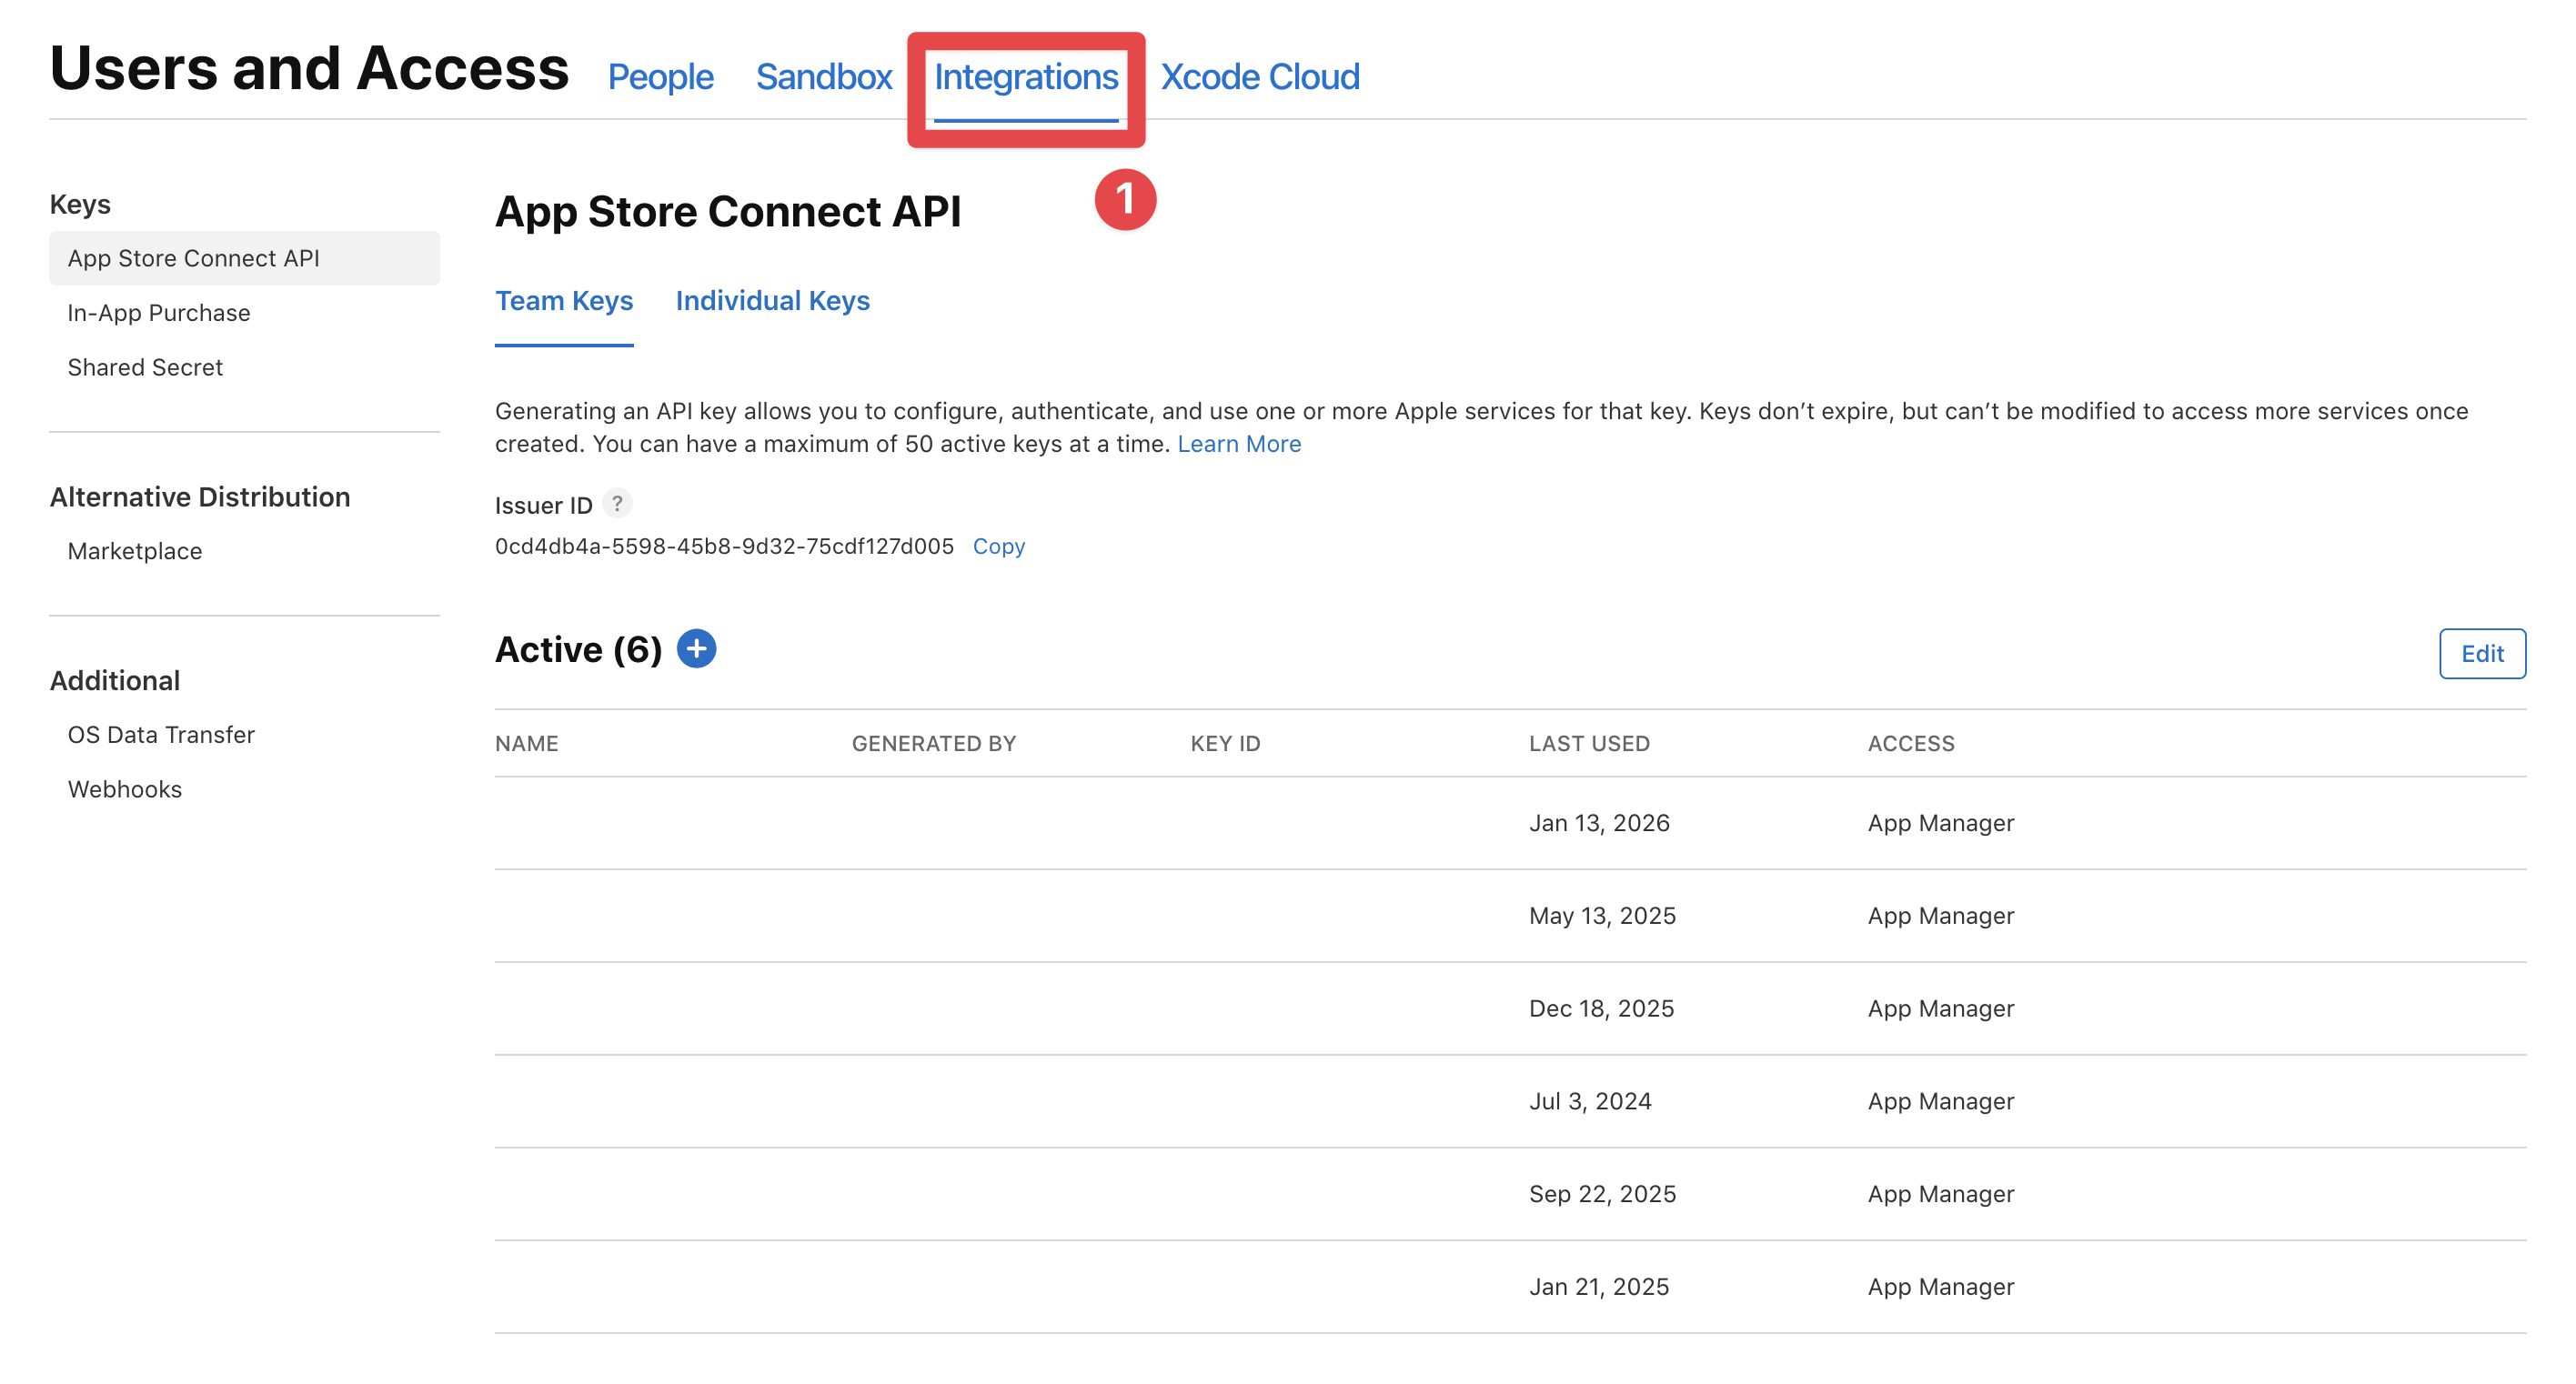
-
Find the
issuerClick on the
copybutton to copy the issuer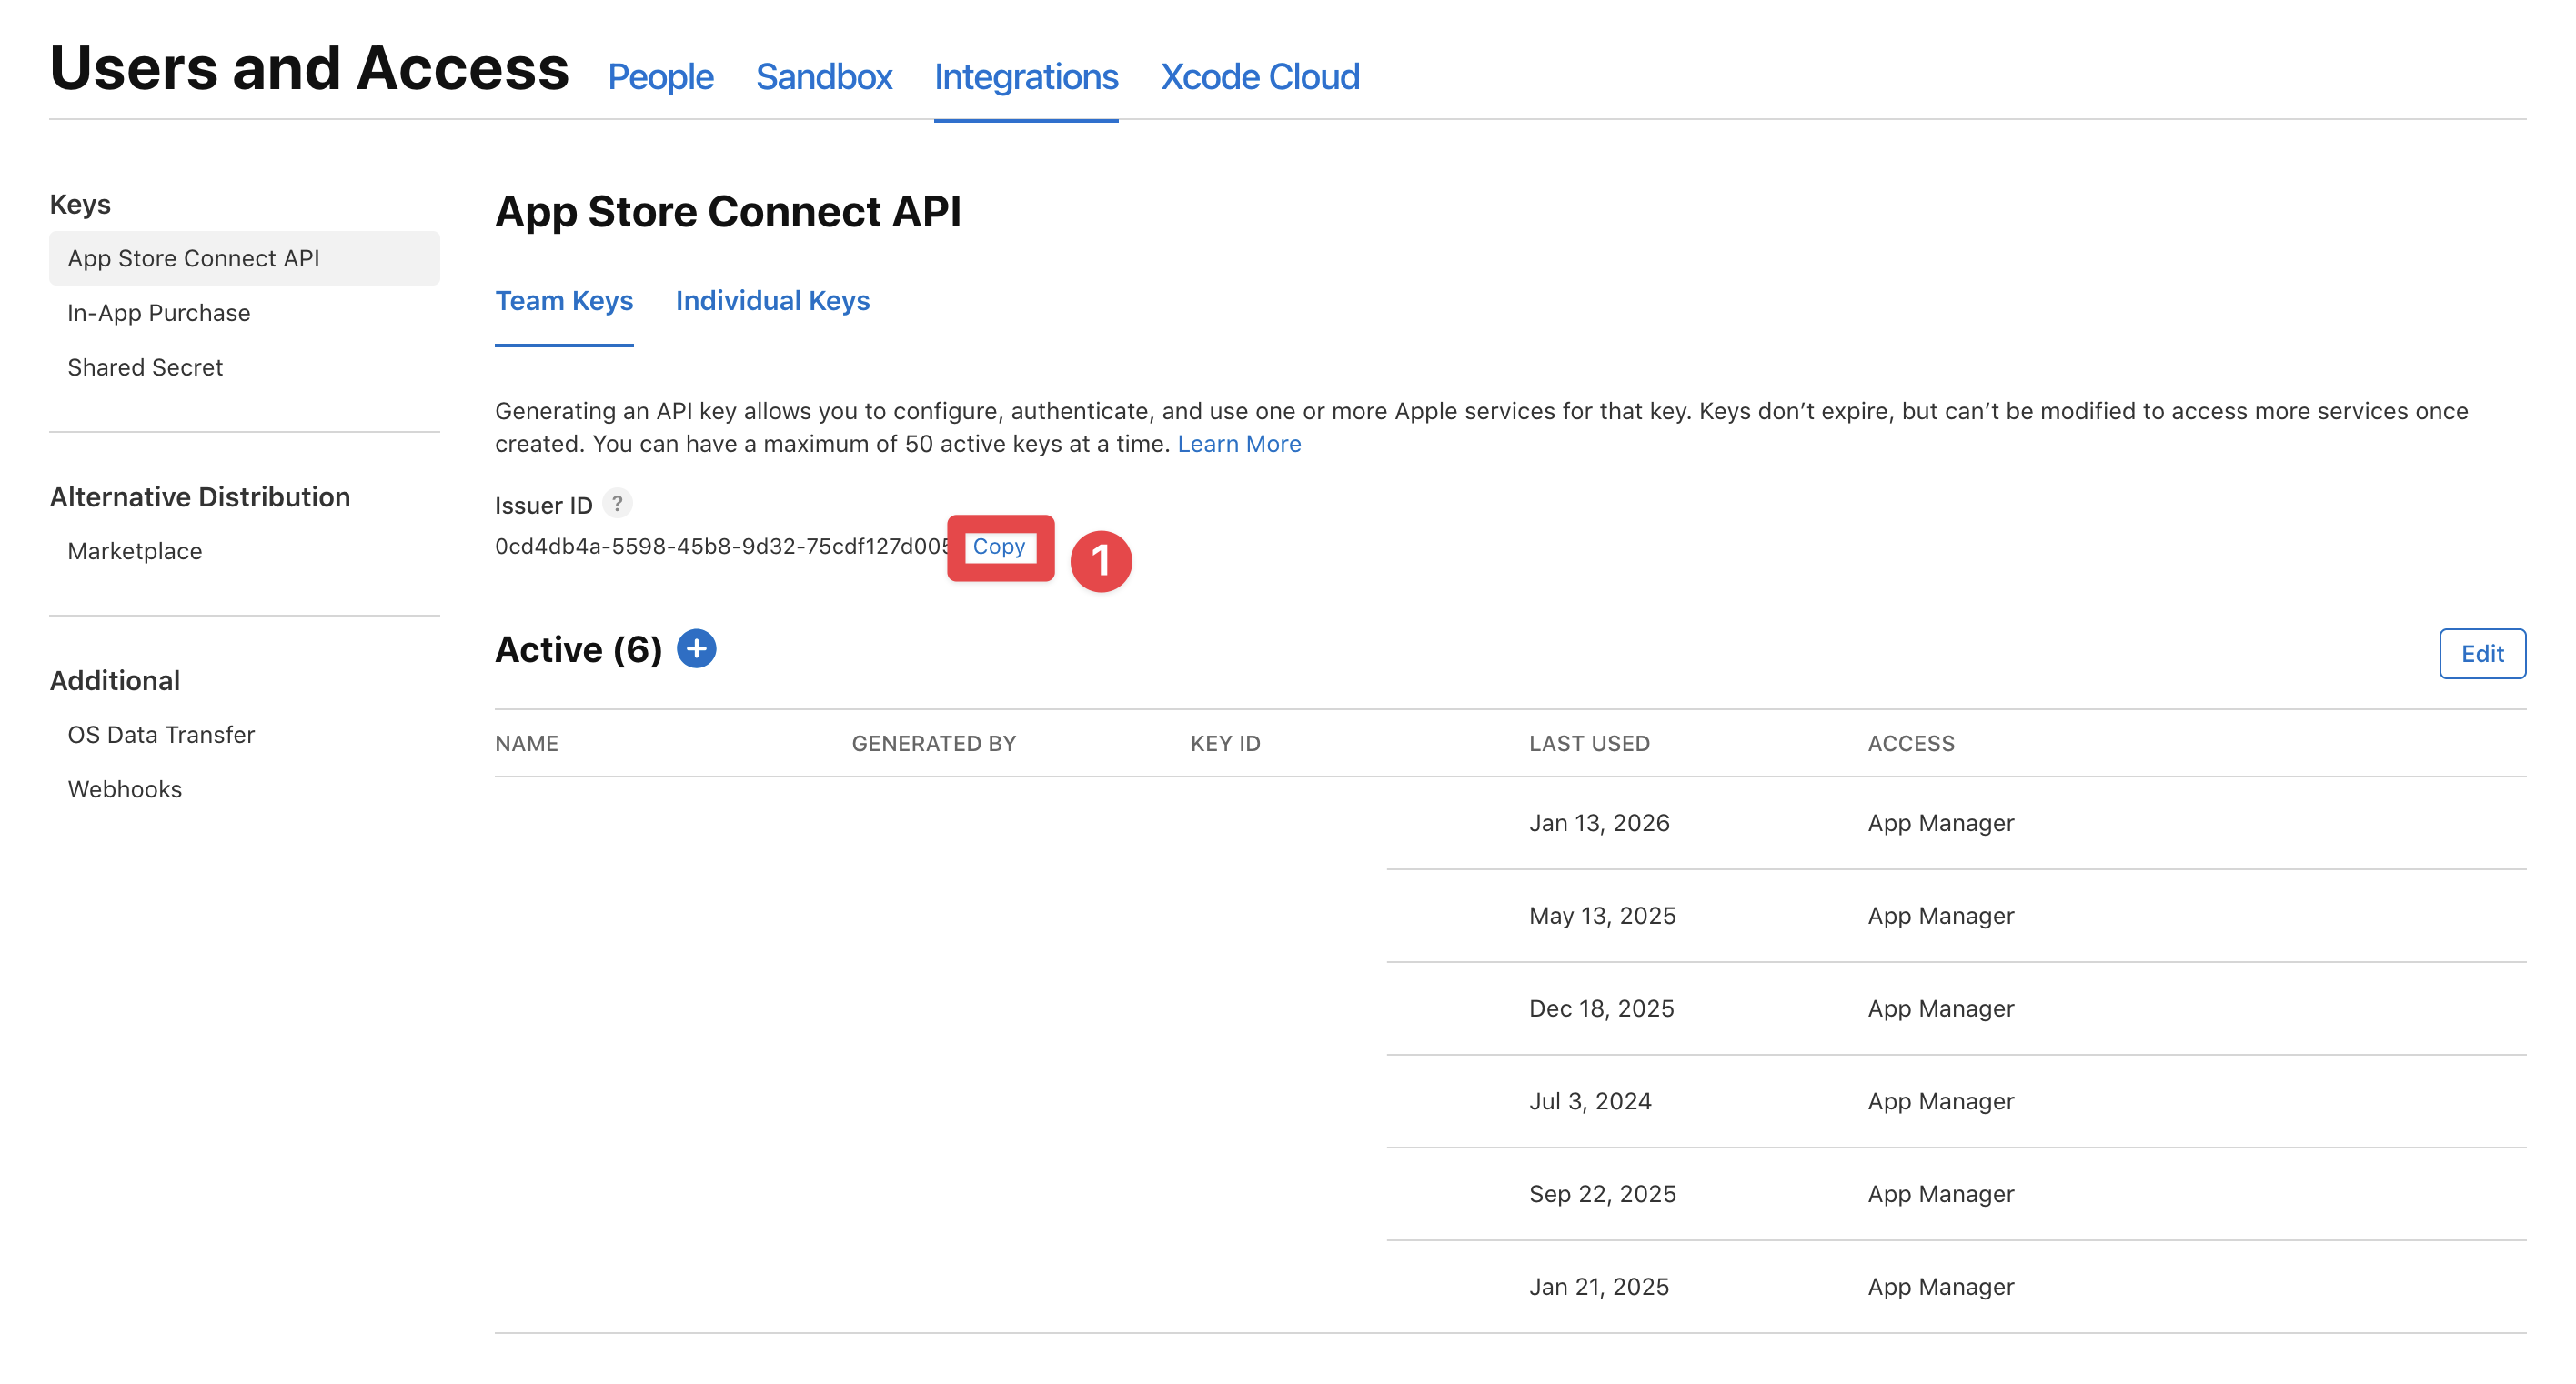
-
Click on the plus button
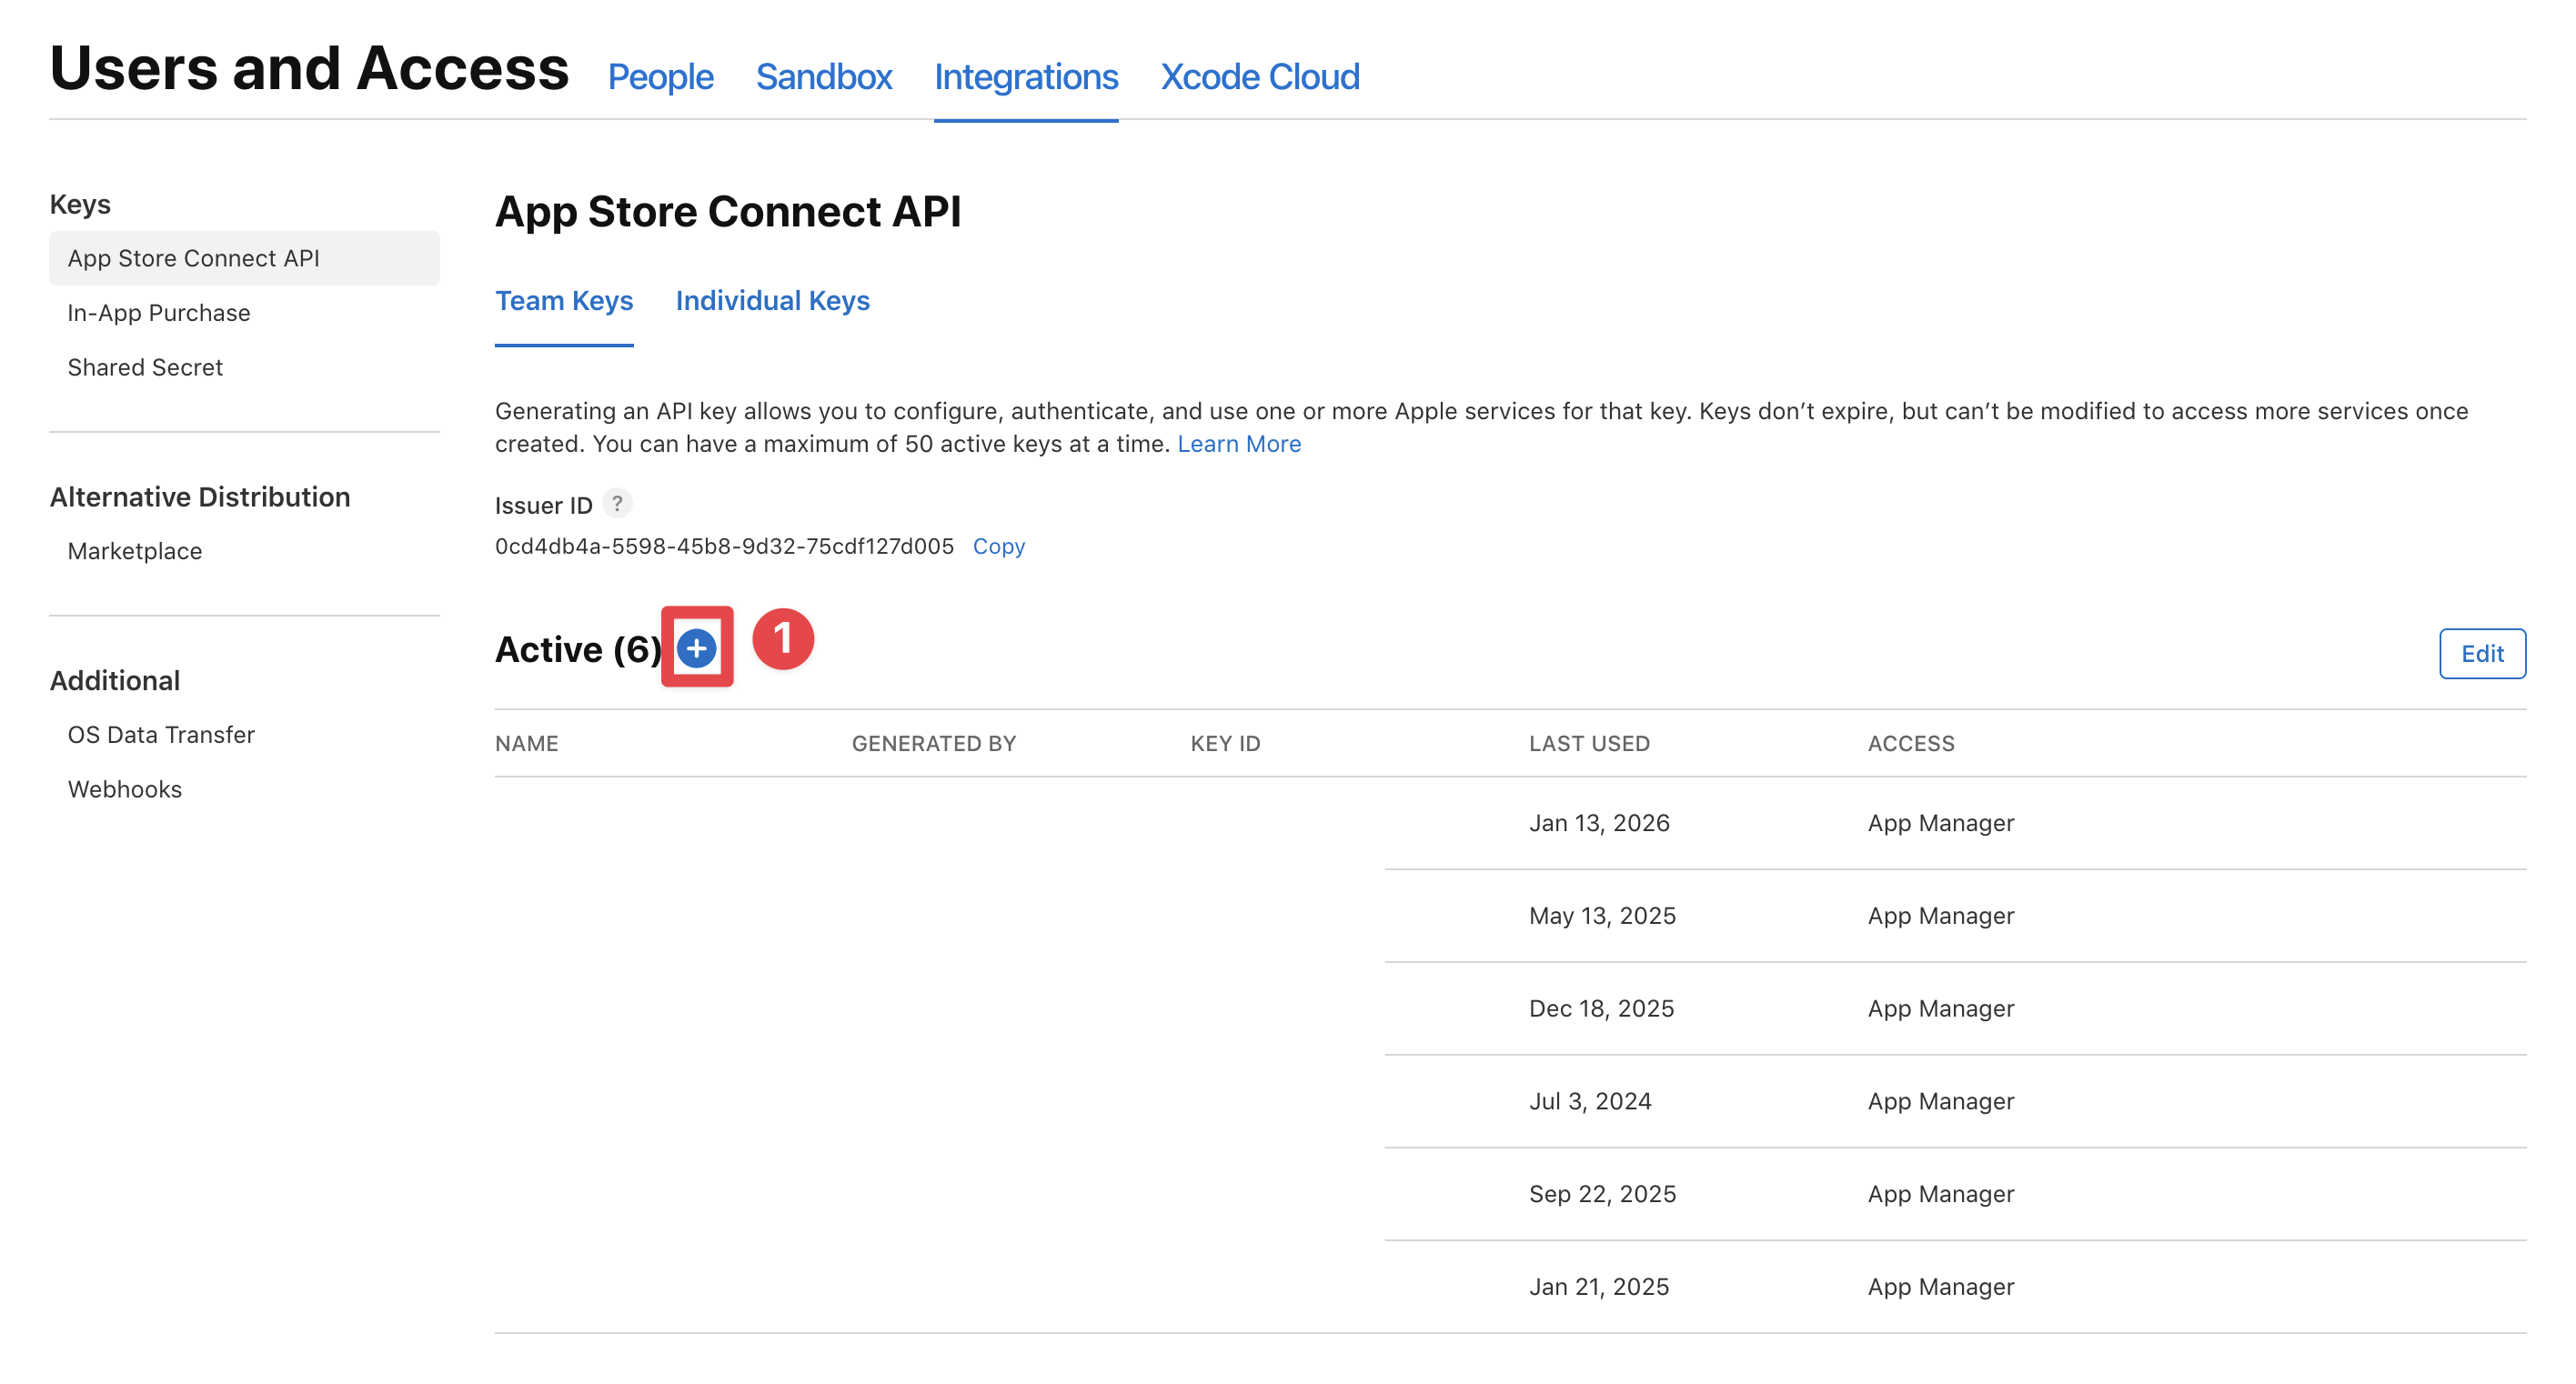
-
Set the name of the key and set the access to
App managerand click on theGeneratebutton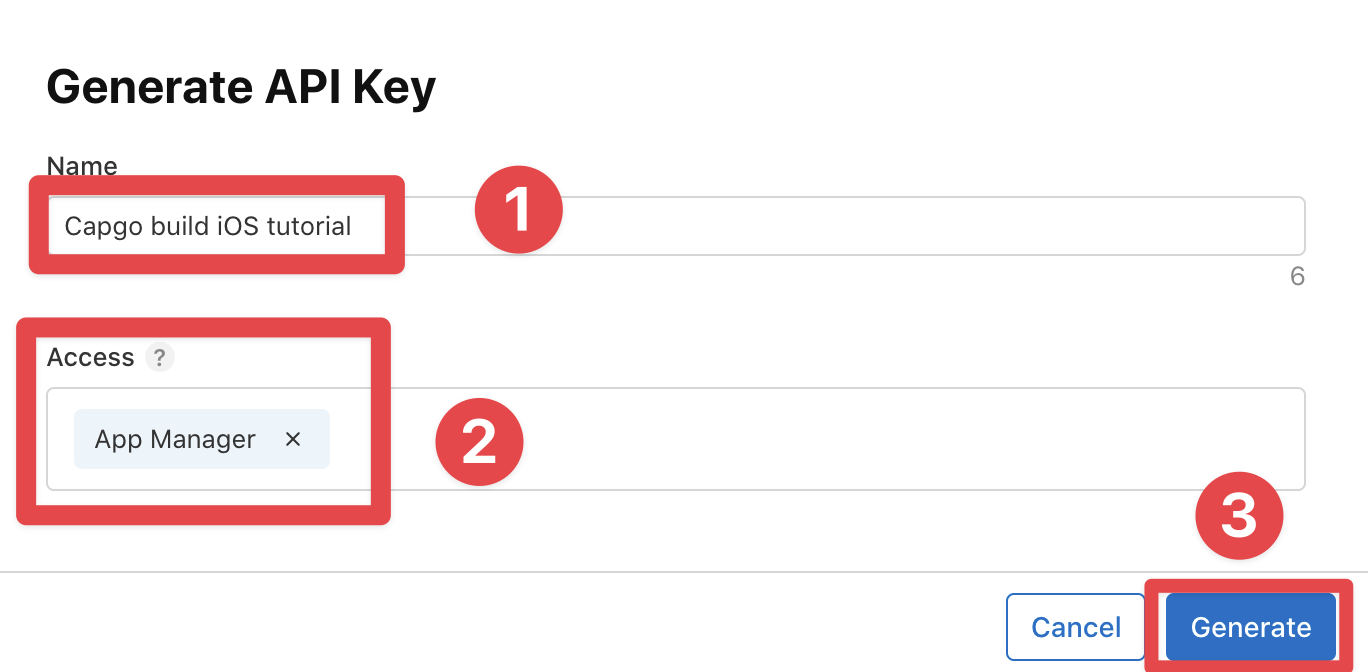
-
Save the key ID
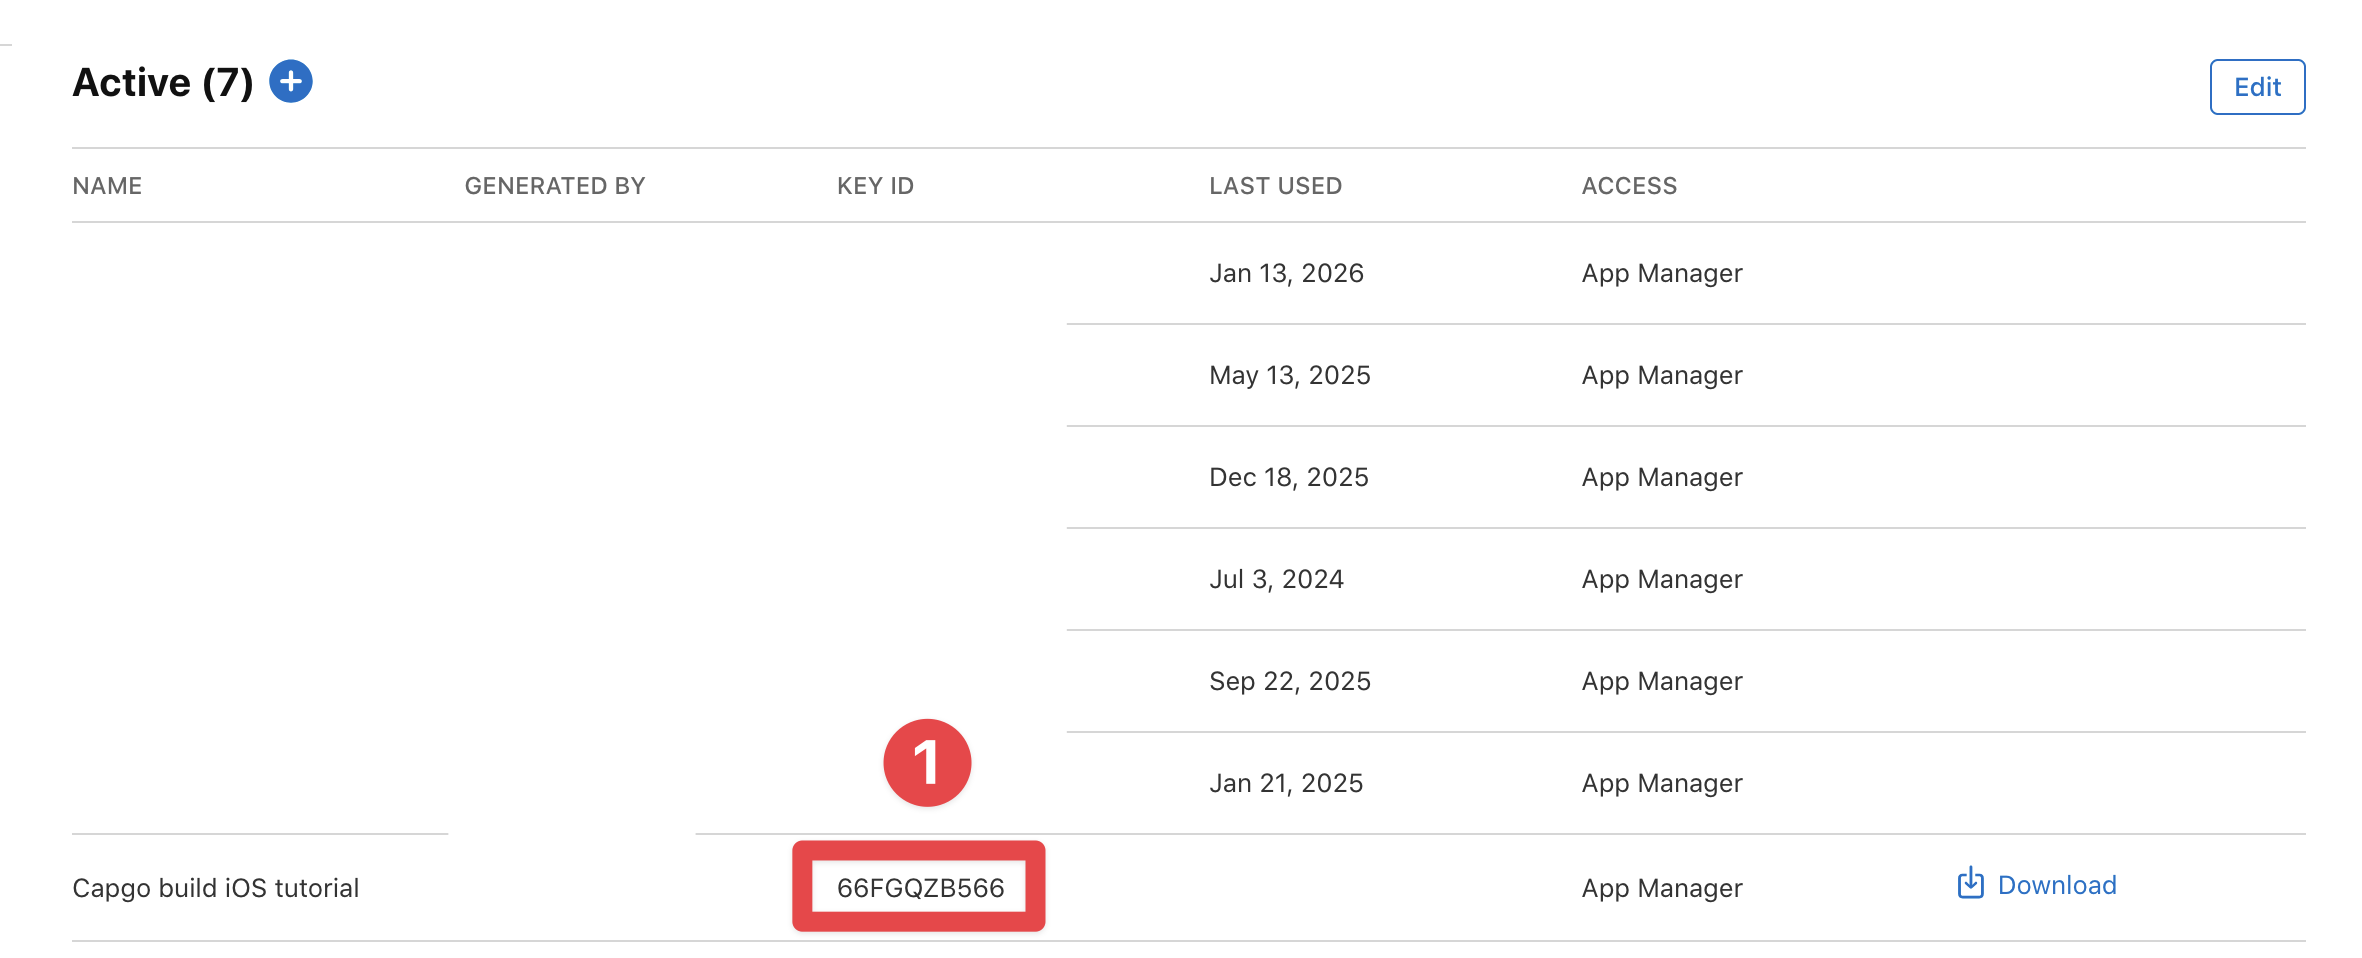
-
Download the key
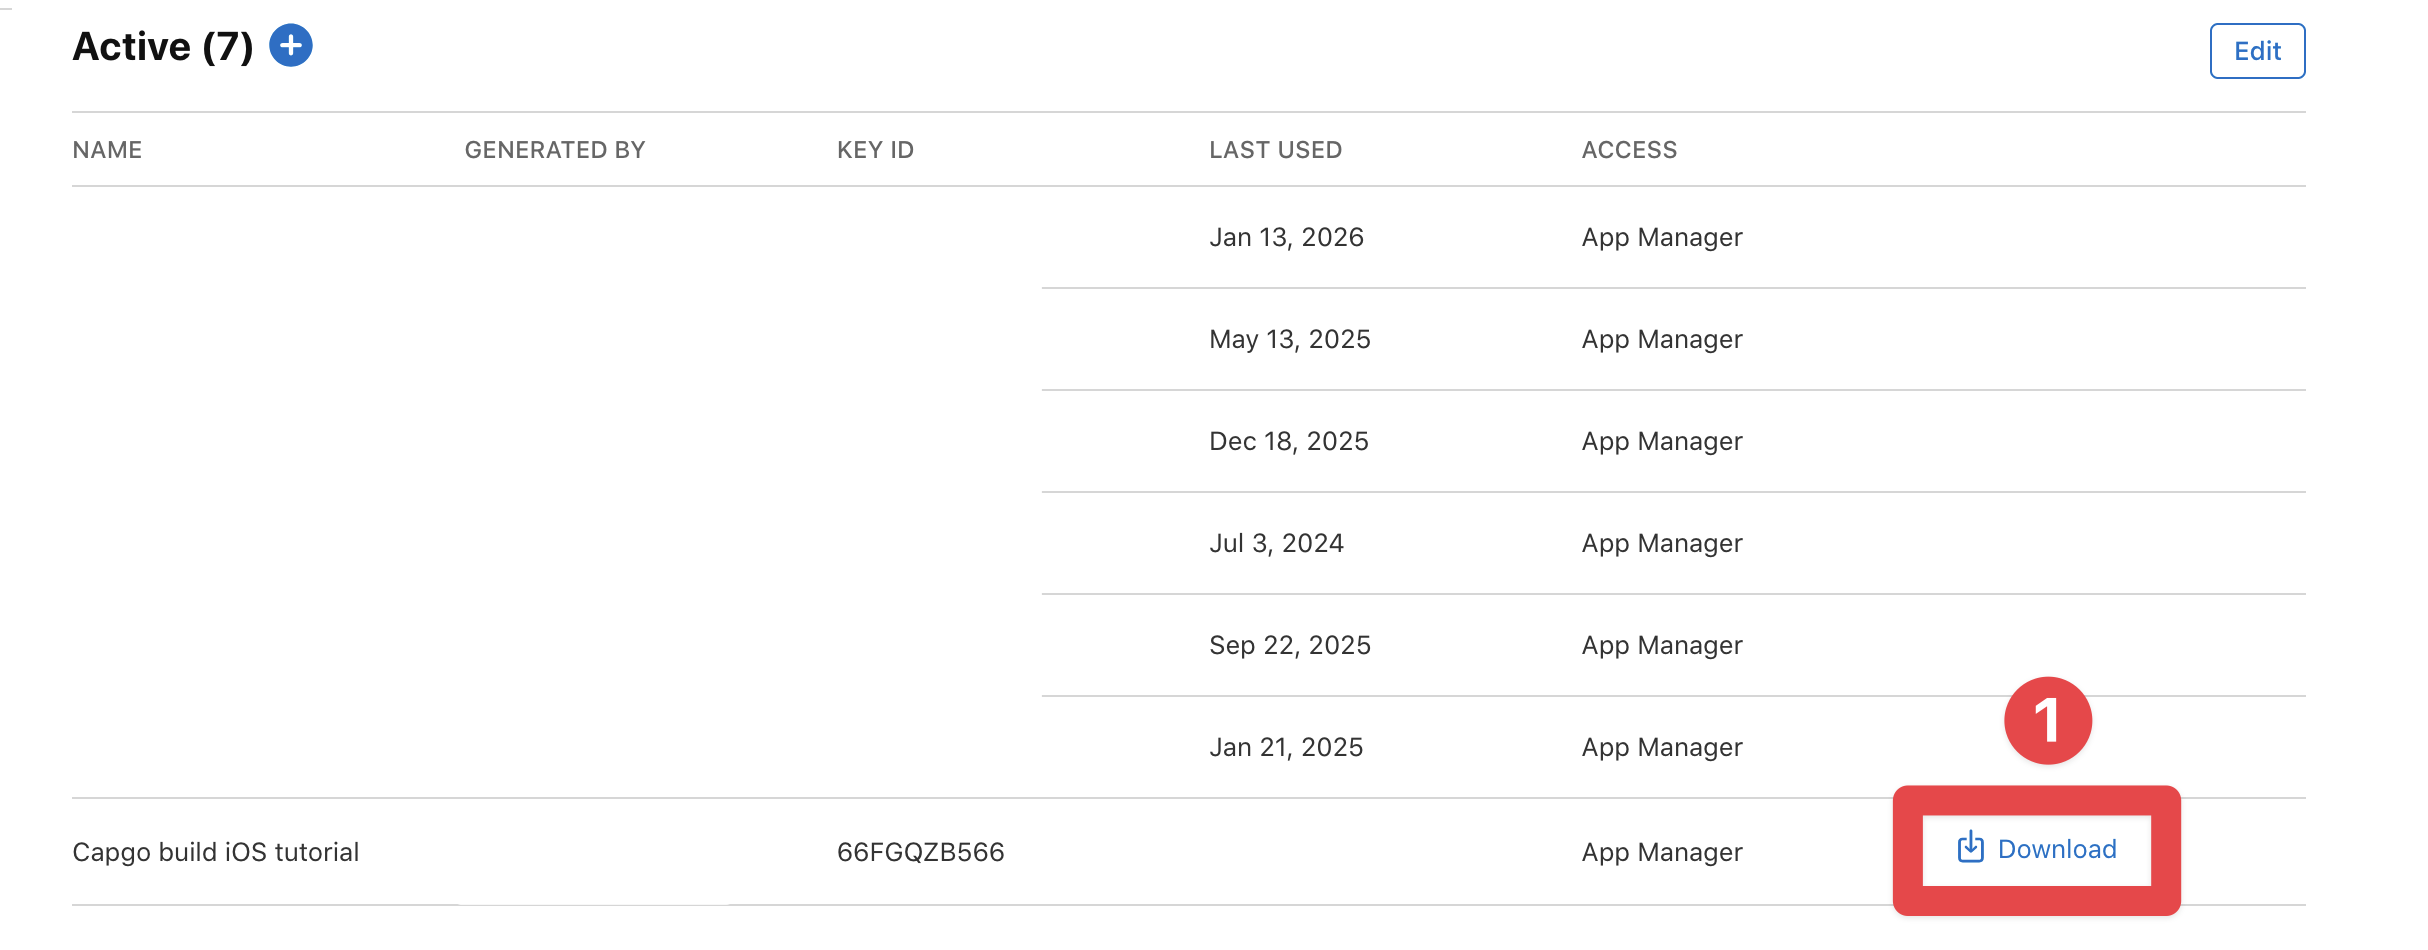
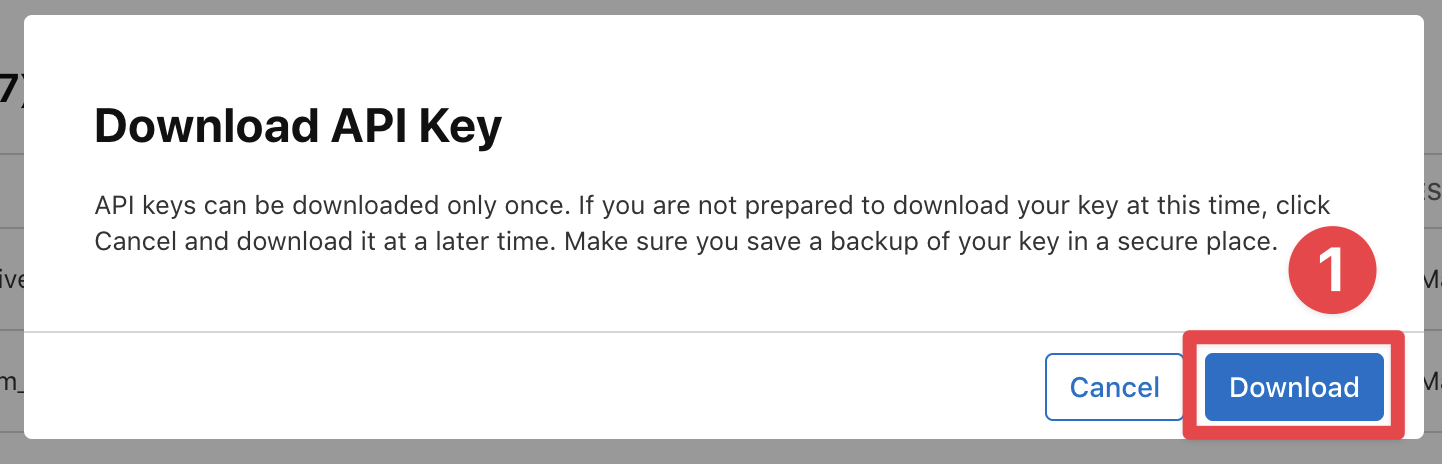
Congratulations 🎉 You have created the Apple key, Apple key ID and Apple issuer ID.
Certificate
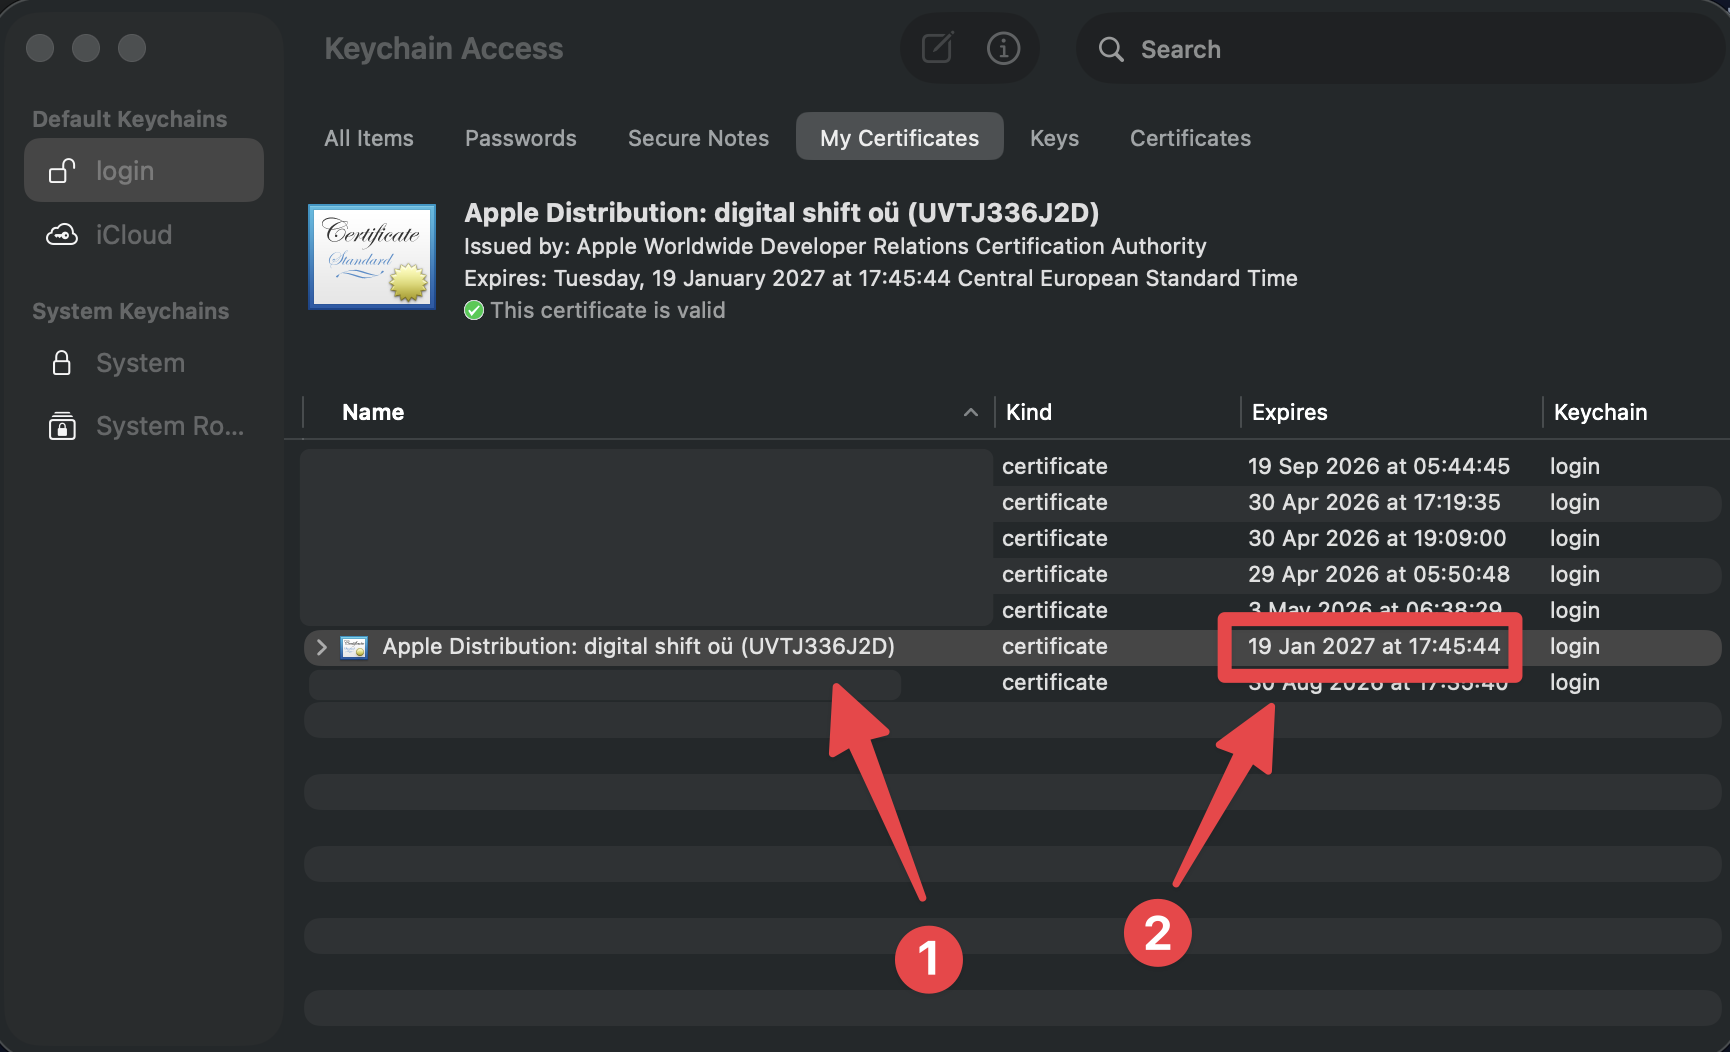
Section titled “Certificate”Now, you are ready to export the certificate. As you remember, one of the first steps of this guide was setting up the distribution certificate.
However, Apple in their infinite wisdom, decided that the way you export the certificate is quite different from the way you create them 🙃 Let’s get into setting it up:
-
Open Keychain Access
- Click
Command + Spaceto open the search bar - Search for
Keychain Access - Click on the
Keychain Accessapp
- Click
-
Select the
logincategory and click on theMy Certificatesbutton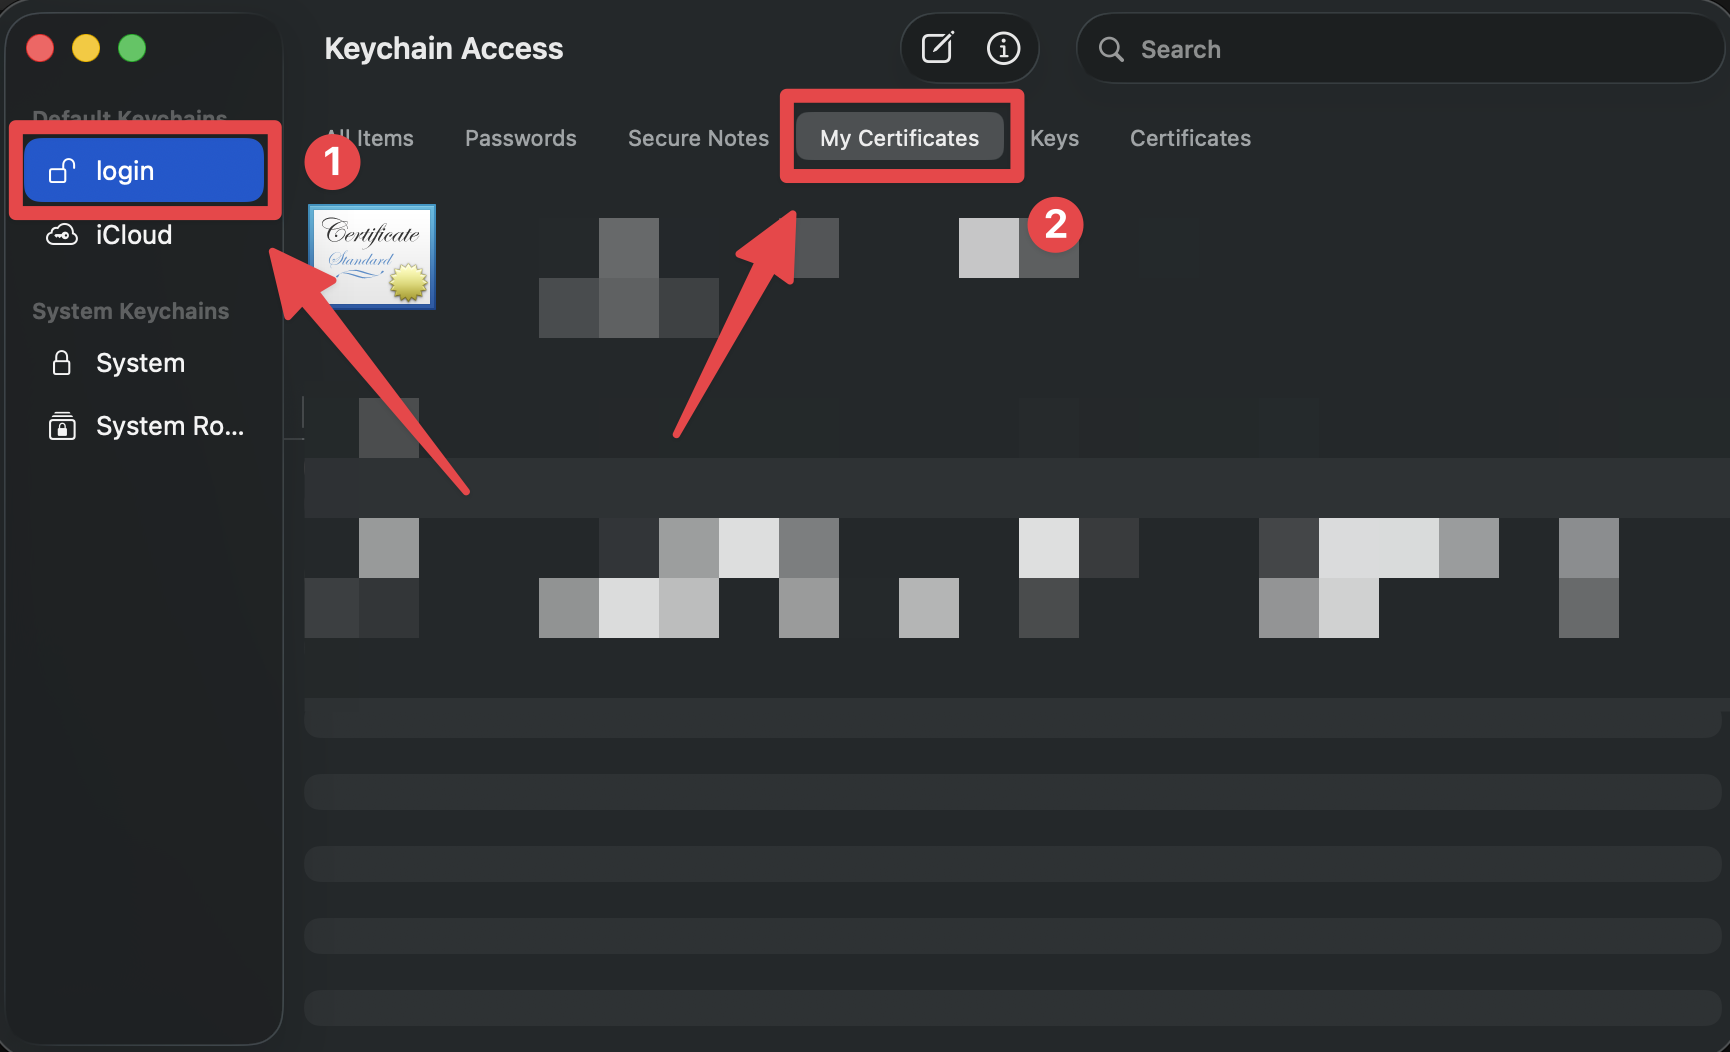
-
Find your certificate in the list
The certificate should be named
Apple Distribution: [Your Name/Company] (your team ID)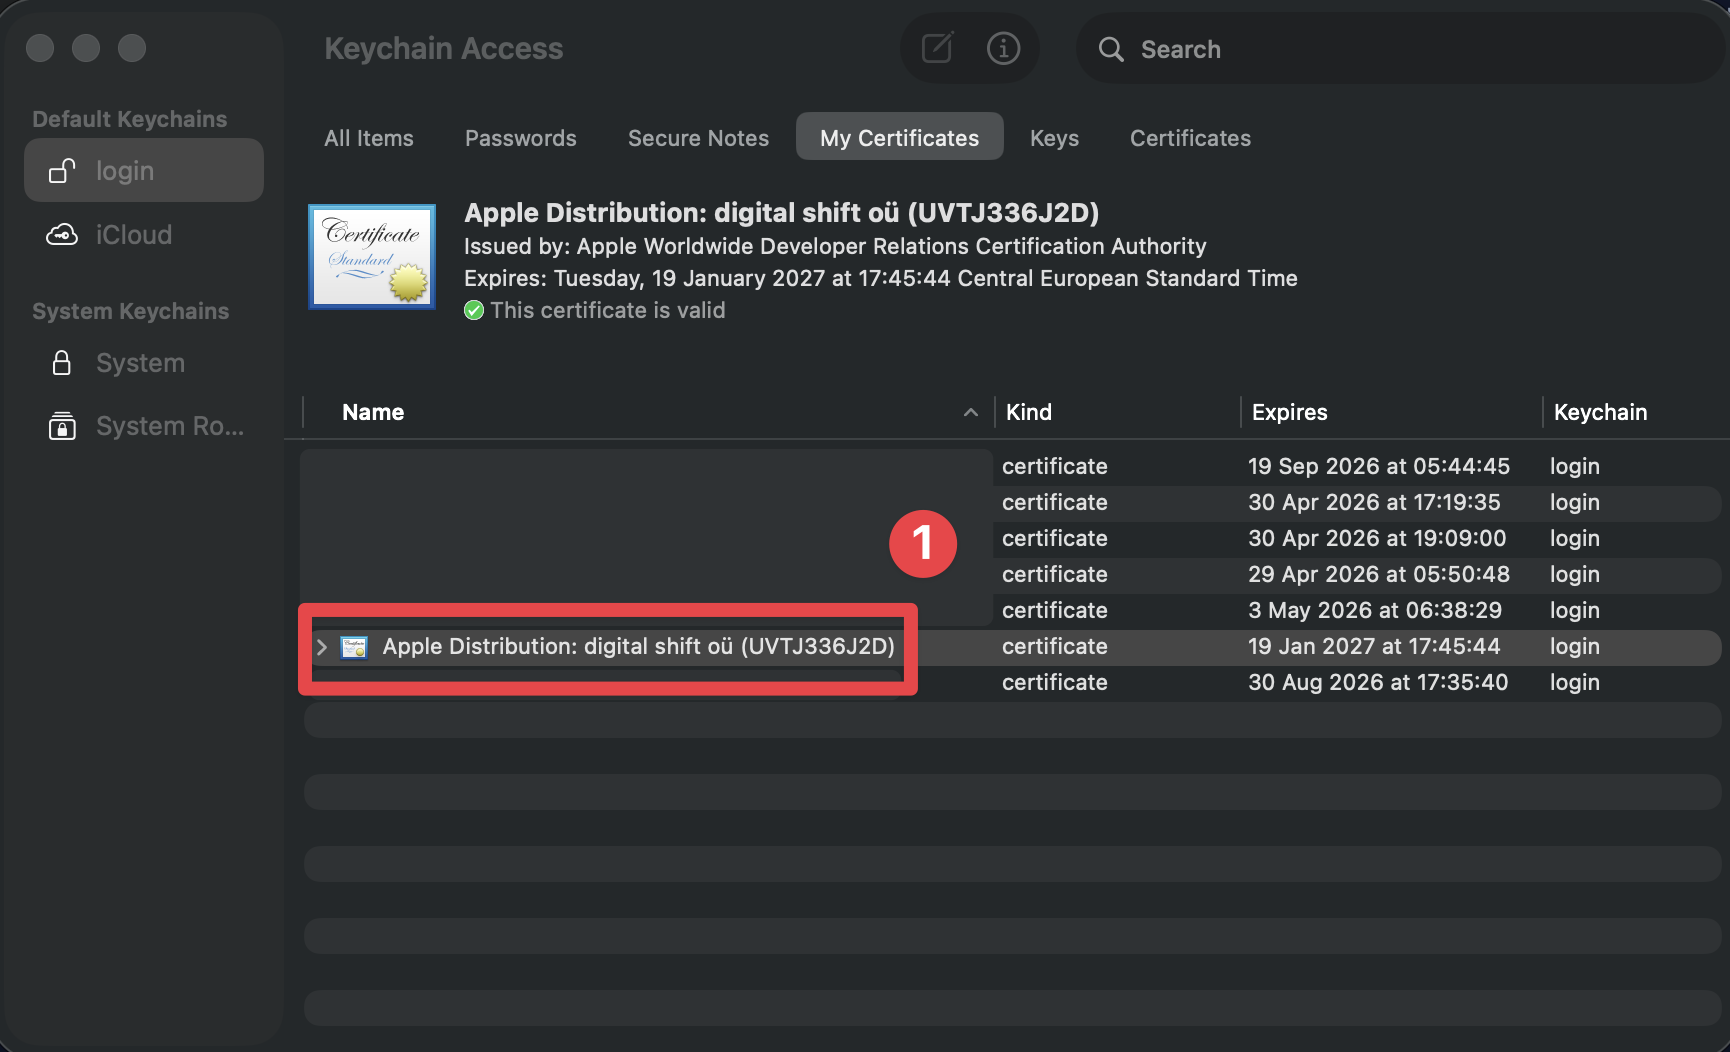
-
Right-click on the certificate and select
Export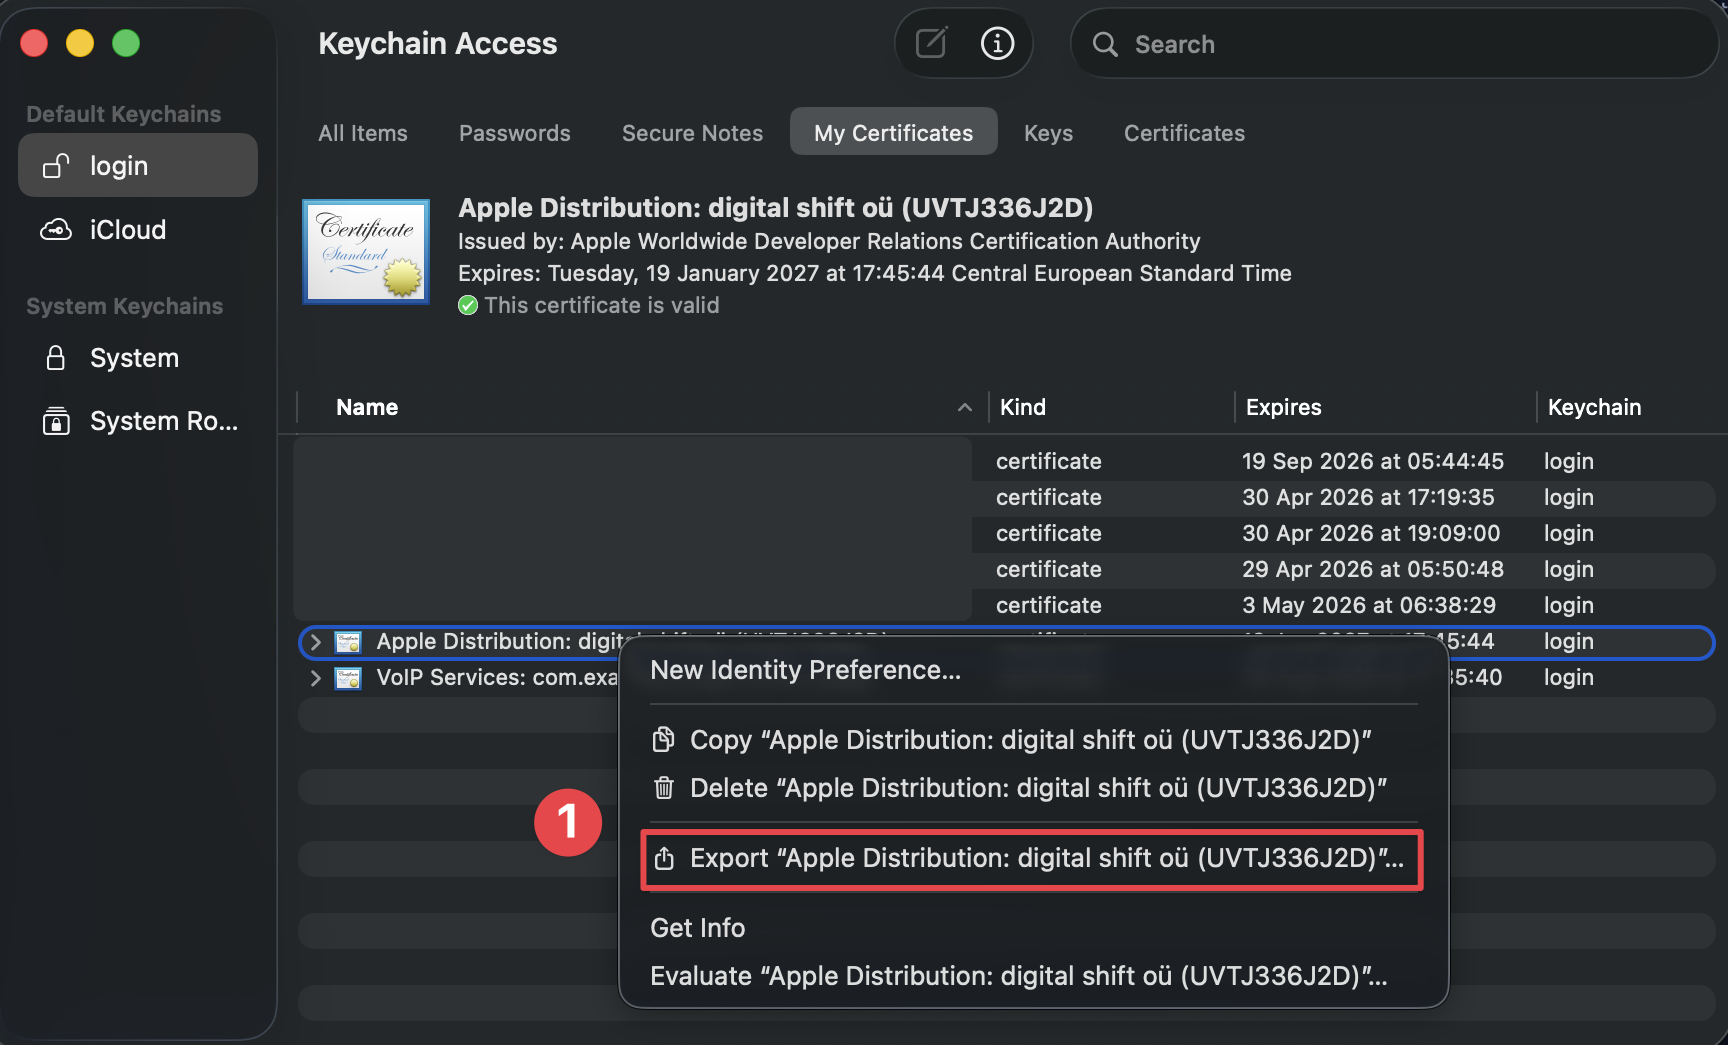
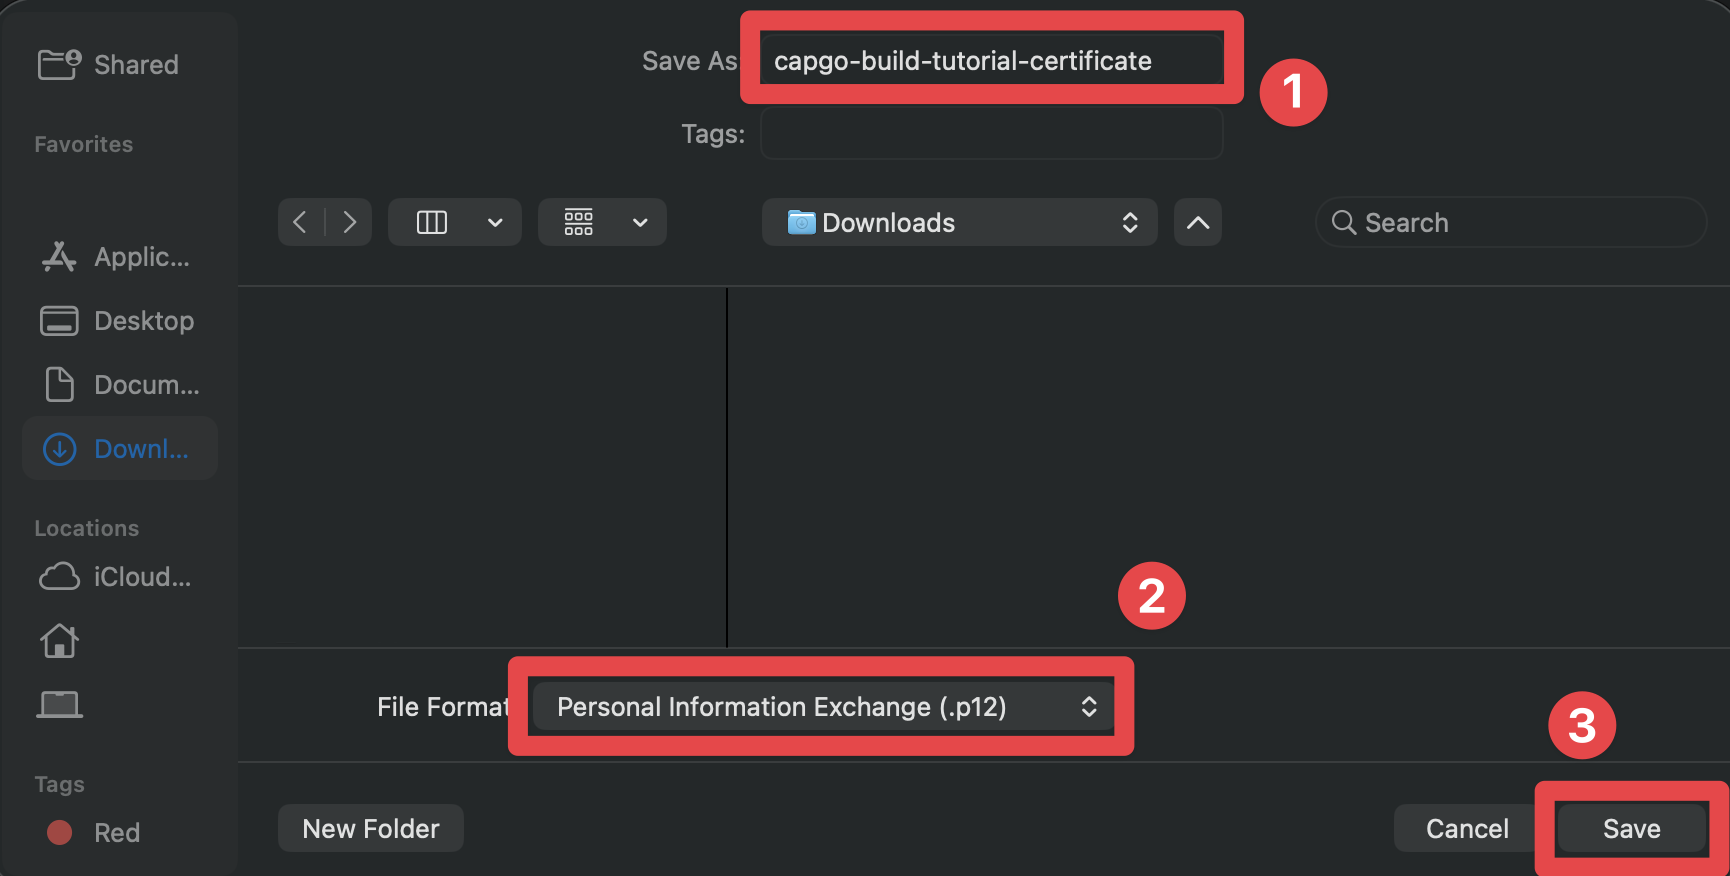
-
Save the certificate as a
.p12file- Make sure to select a good name for the certificate file
- Make sure the file format is set to
Personal Information Exchange (.p12) - Click on the
Savebutton
-
When asked for the password, you can either:
- Skip the password (recommended for simplicity): Click
OKwithout entering a password - Set a password: If you prefer to protect your certificate with a password, you can set one here. Password-protected
.p12files are fully supported by the Capgo CLI - just provide the password using the--p12-passwordoption when running configuration command.
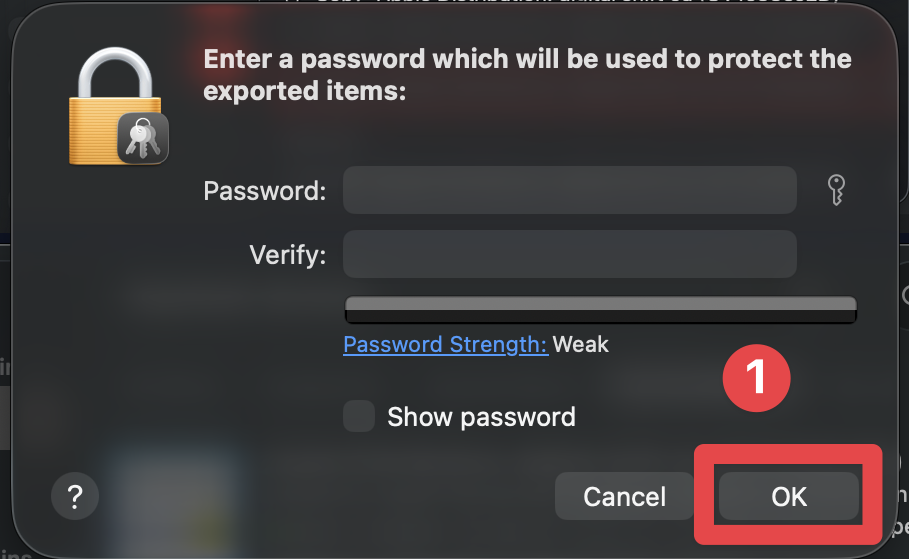
- Skip the password (recommended for simplicity): Click
-
When asked for the “login keychain password”, give the password you use to login to your Mac
Give the password you use to login to your Mac. Then, click on the
Allowbutton.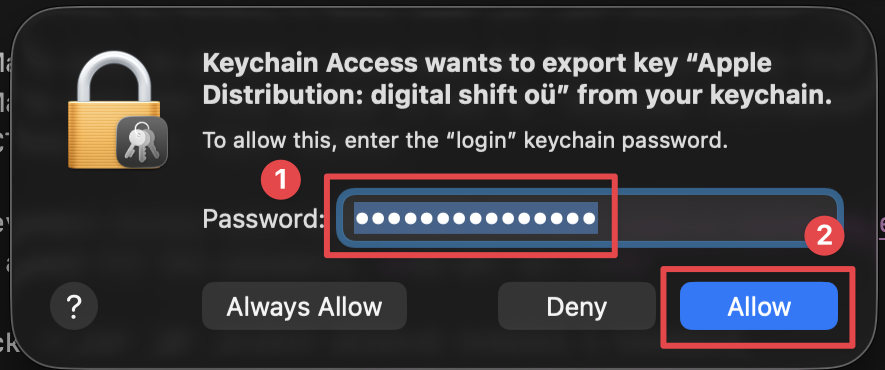
Congratulations 🎉 You have exported the certificate.
Provisioning profile
Section titled “Provisioning profile”Now, you are ready to export the provisioning profile. I promise, this is the last thing you will need to get from Apple.
-
Go to Apple Developer Profiles
-
Select the correct team in the dropdown
- Click on your name in the top right corner
- Click on the team you want to use
-
Make sure you are on the correct page It should look like this, if it doesn’t click on
profilesin the sidebar
-
Click on the
+button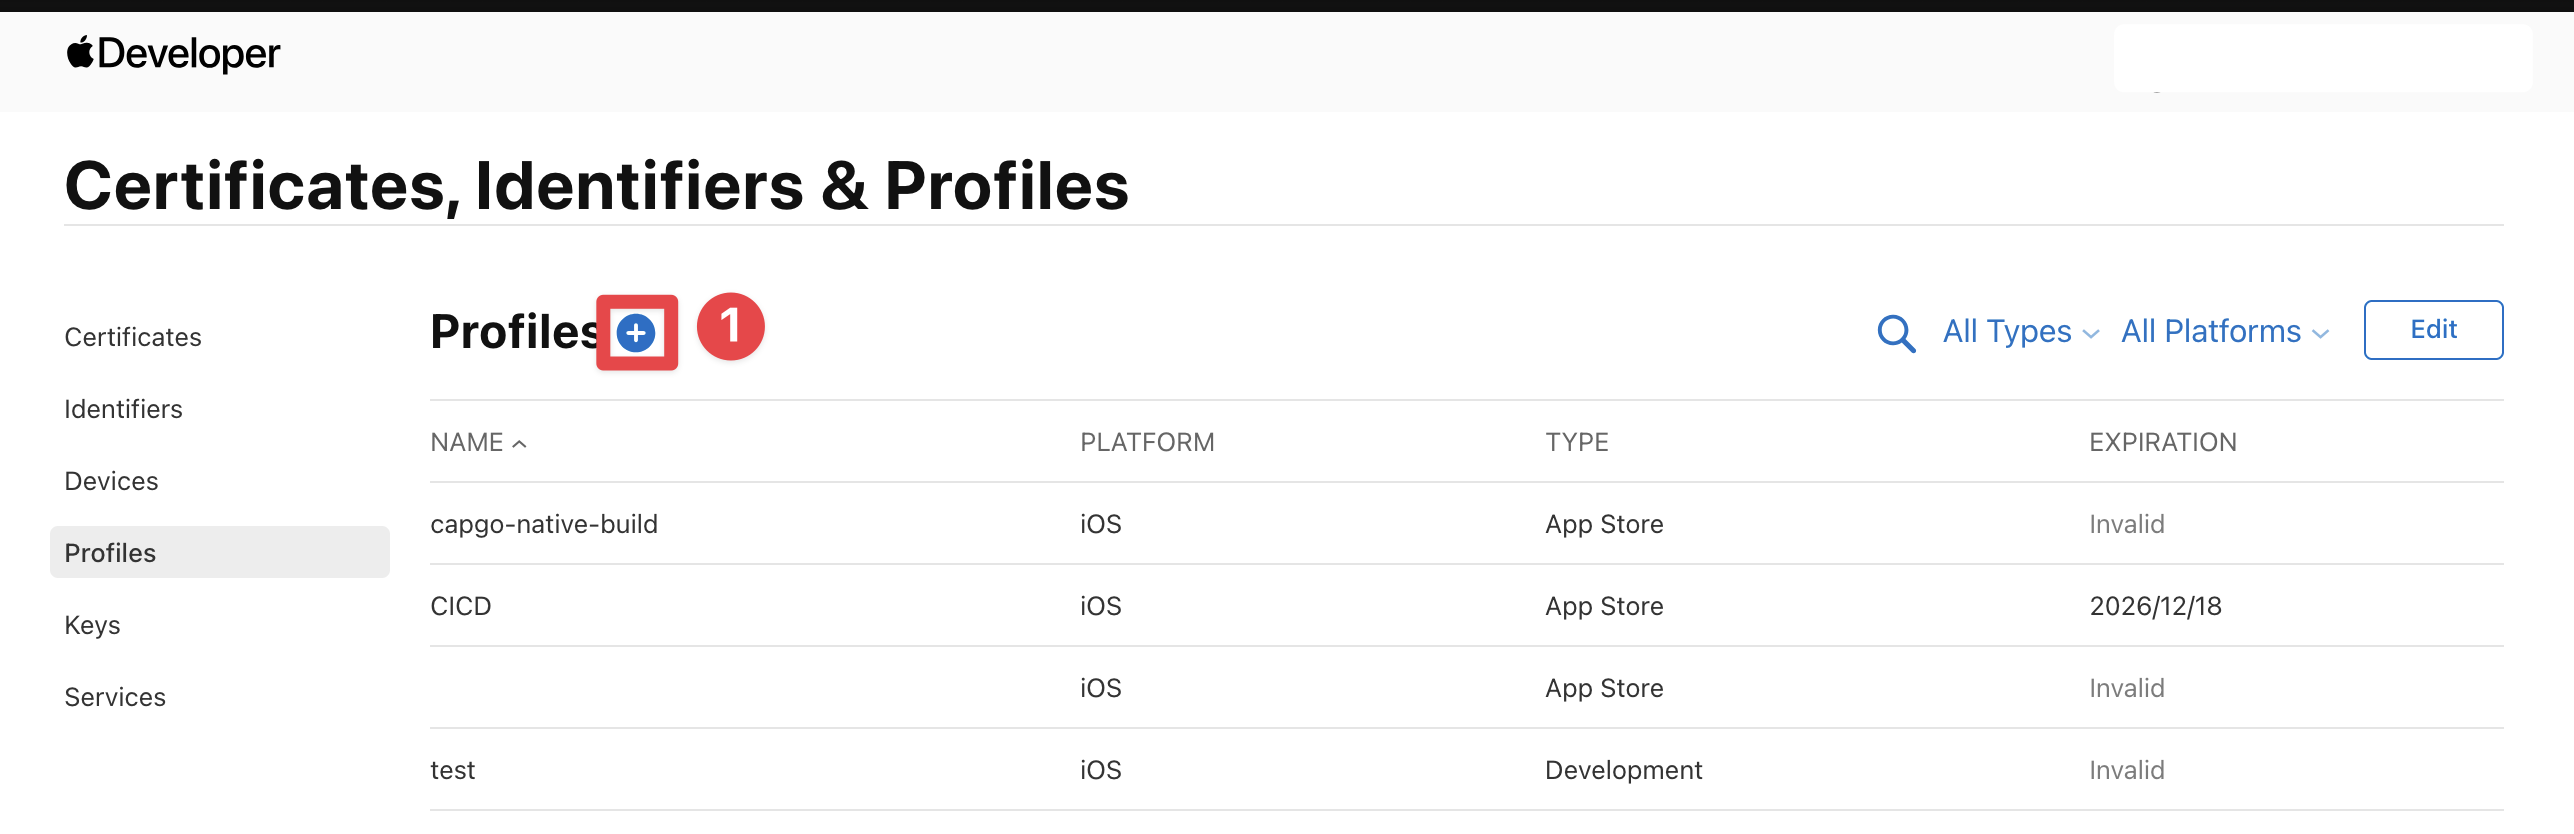
-
Select the profile type Select
App Store Connectand click on theContinuebutton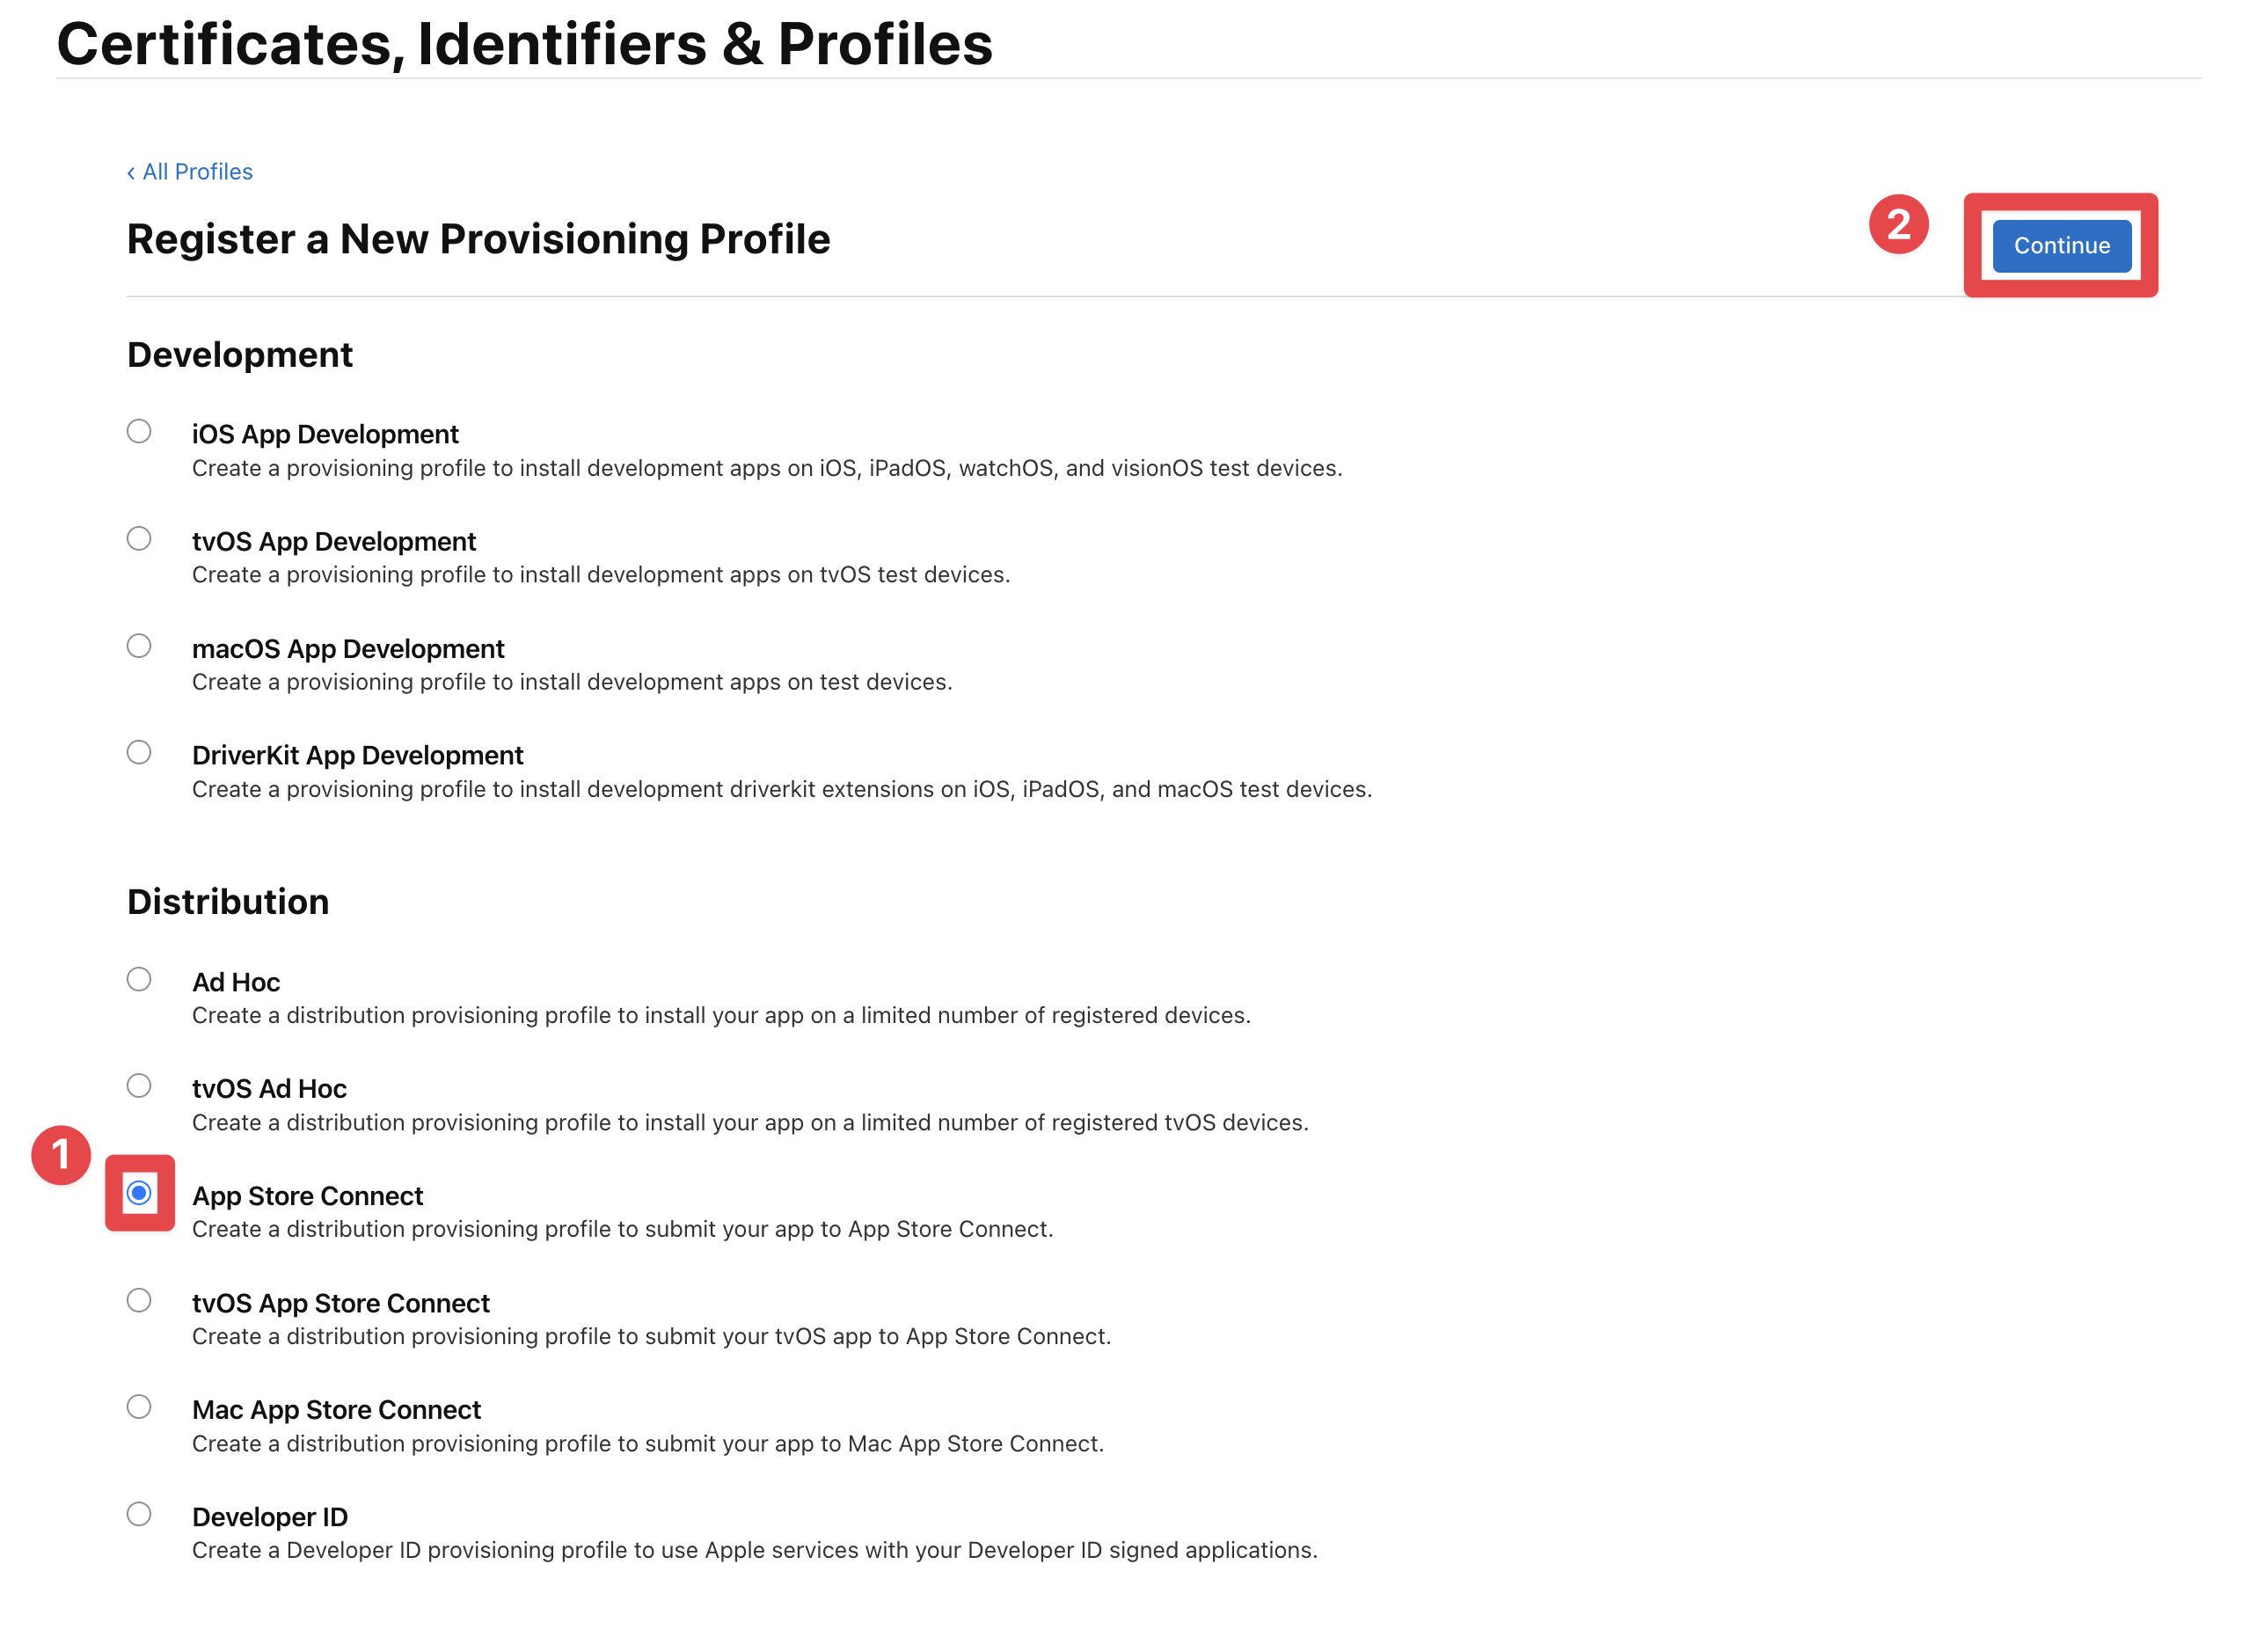
-
Select the app you want to build
Find your app in the dropdown and click on the
Continuebutton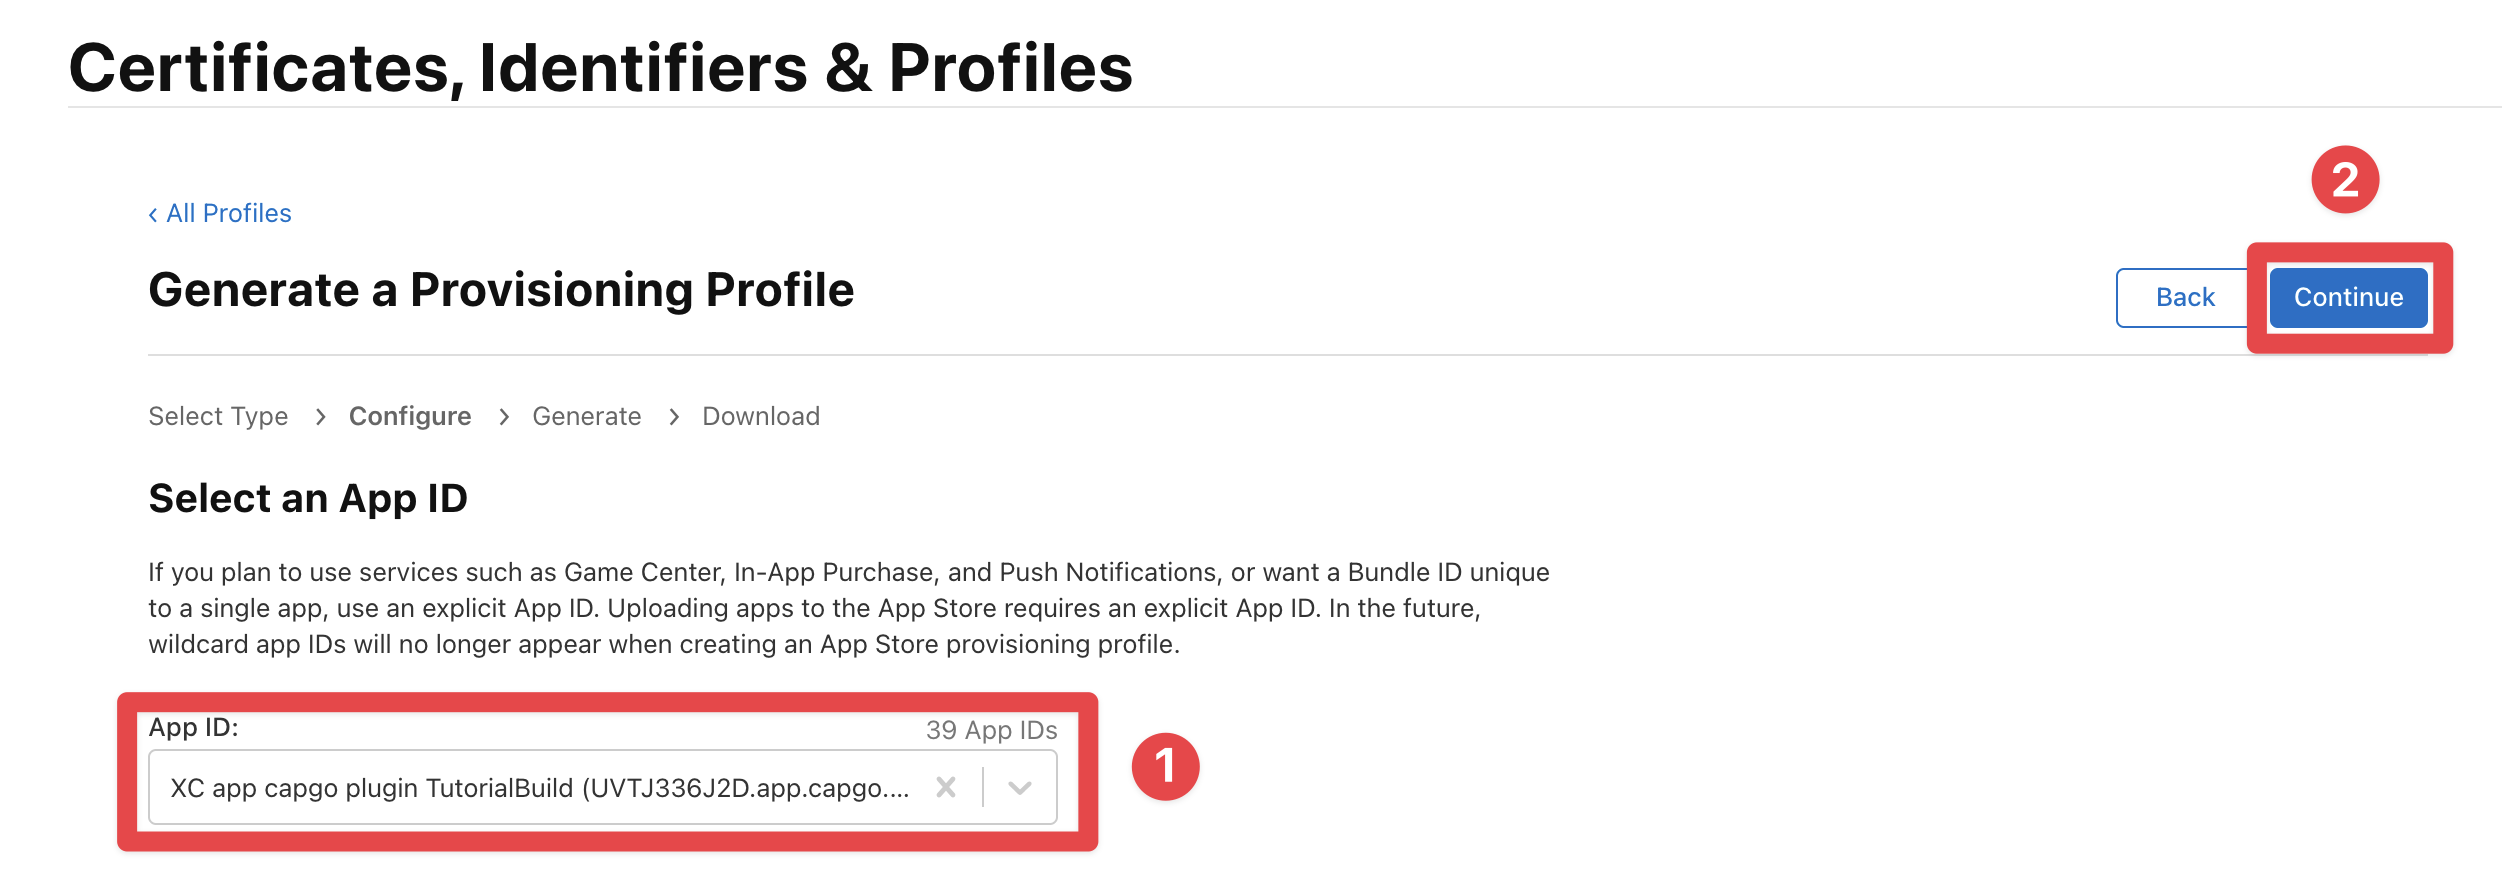
-
Select the correct distribution certificate
Select the certificate you exported in the previous step and click on the
Continuebutton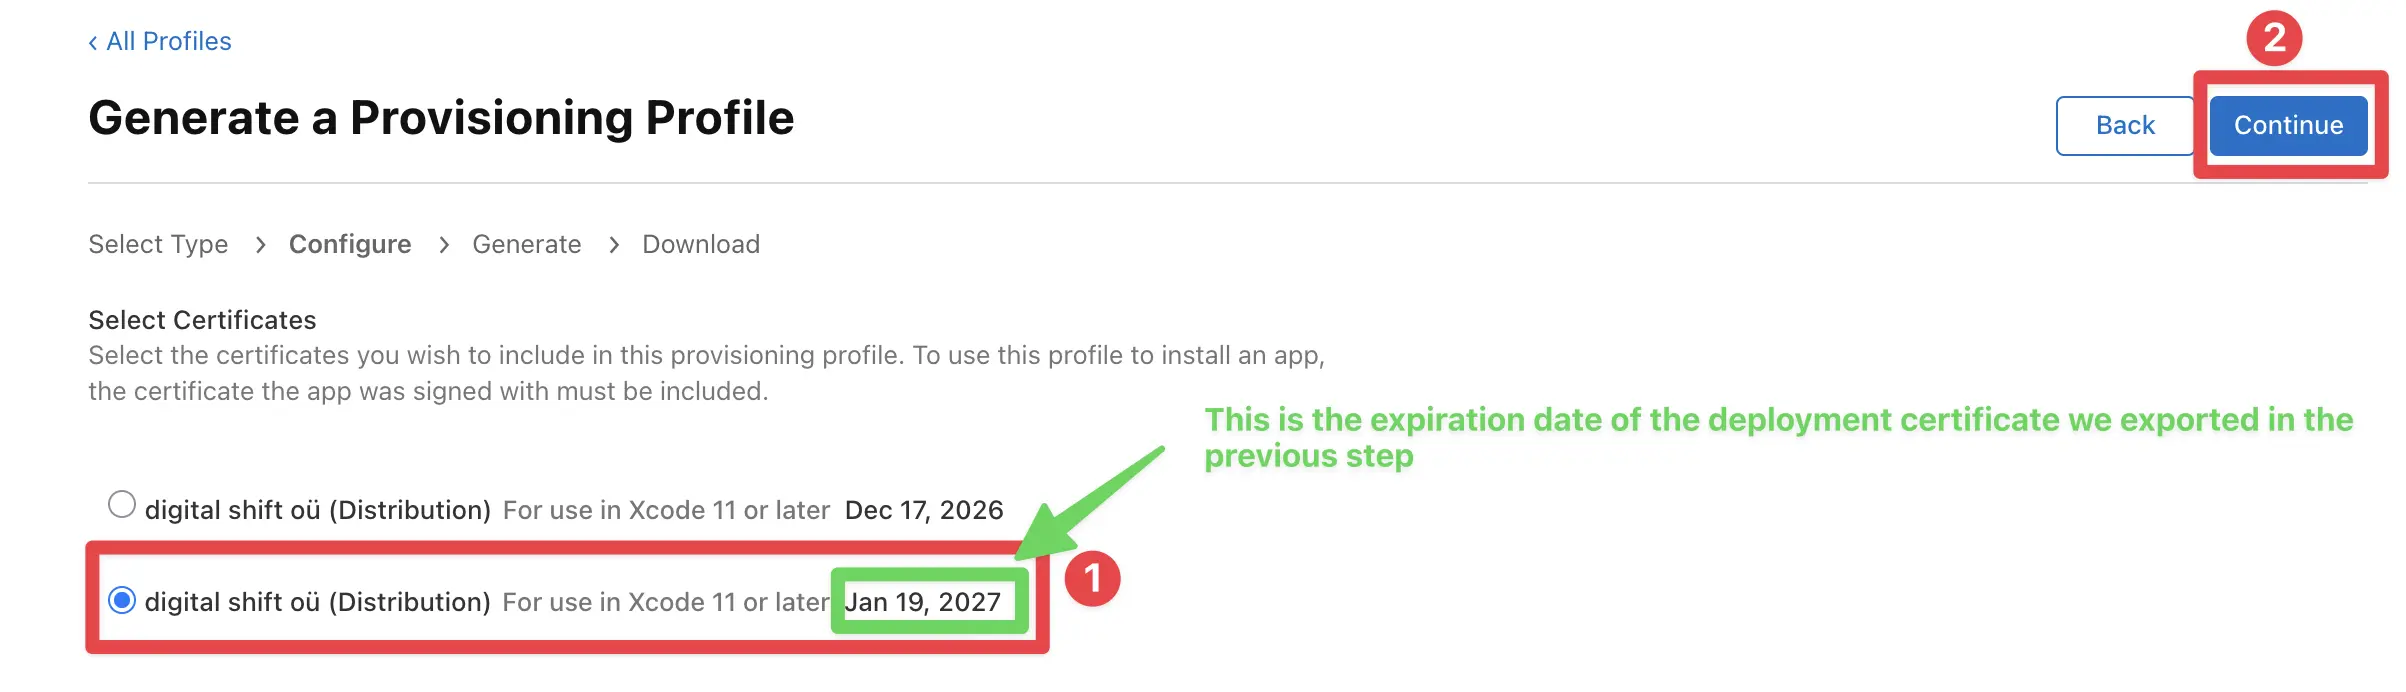
If you are unsure which certificate to select, come back to Keychain Access and find the certificate you exported. Then look at the expiration date.
-
Name the profile
Give the profile a name and click on the
Generatebutton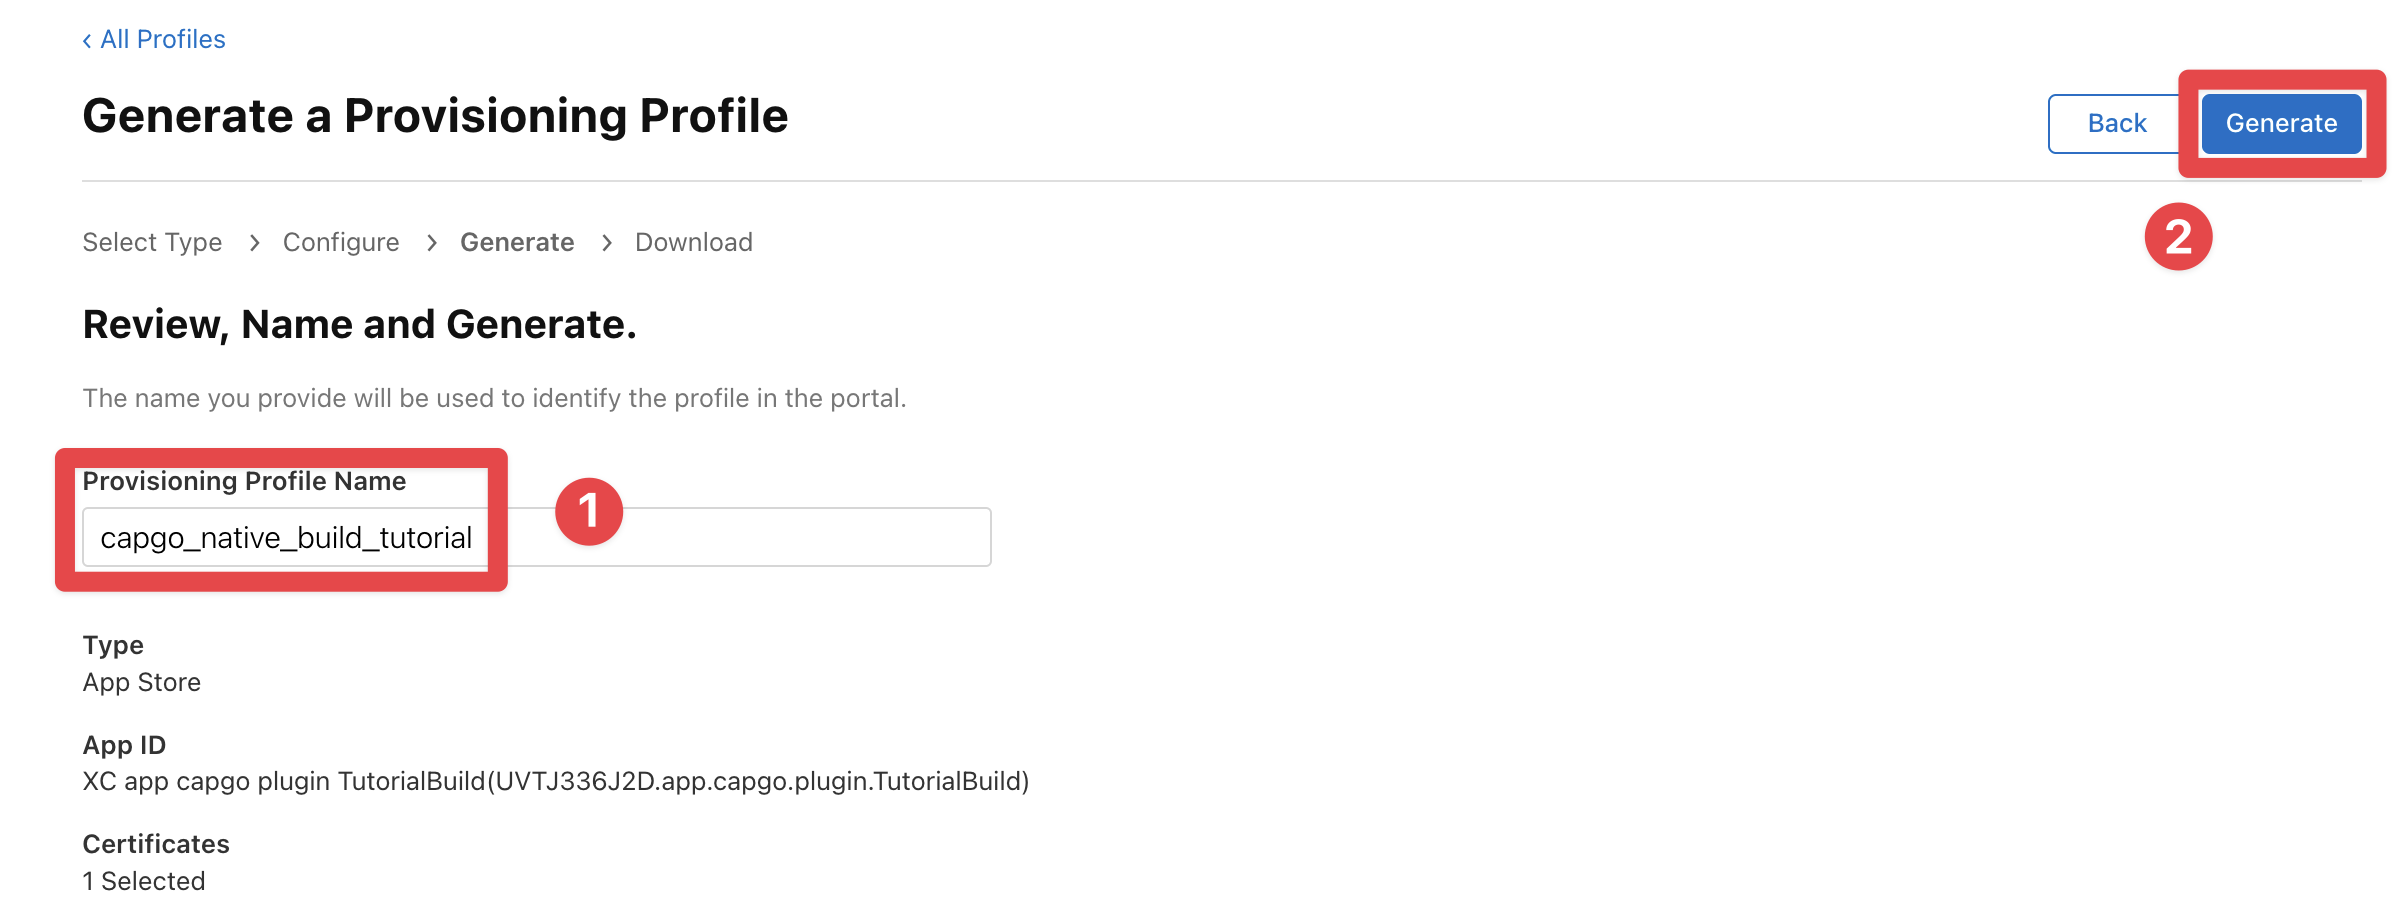
-
Download the profile
Click on the
Downloadbutton to download the profile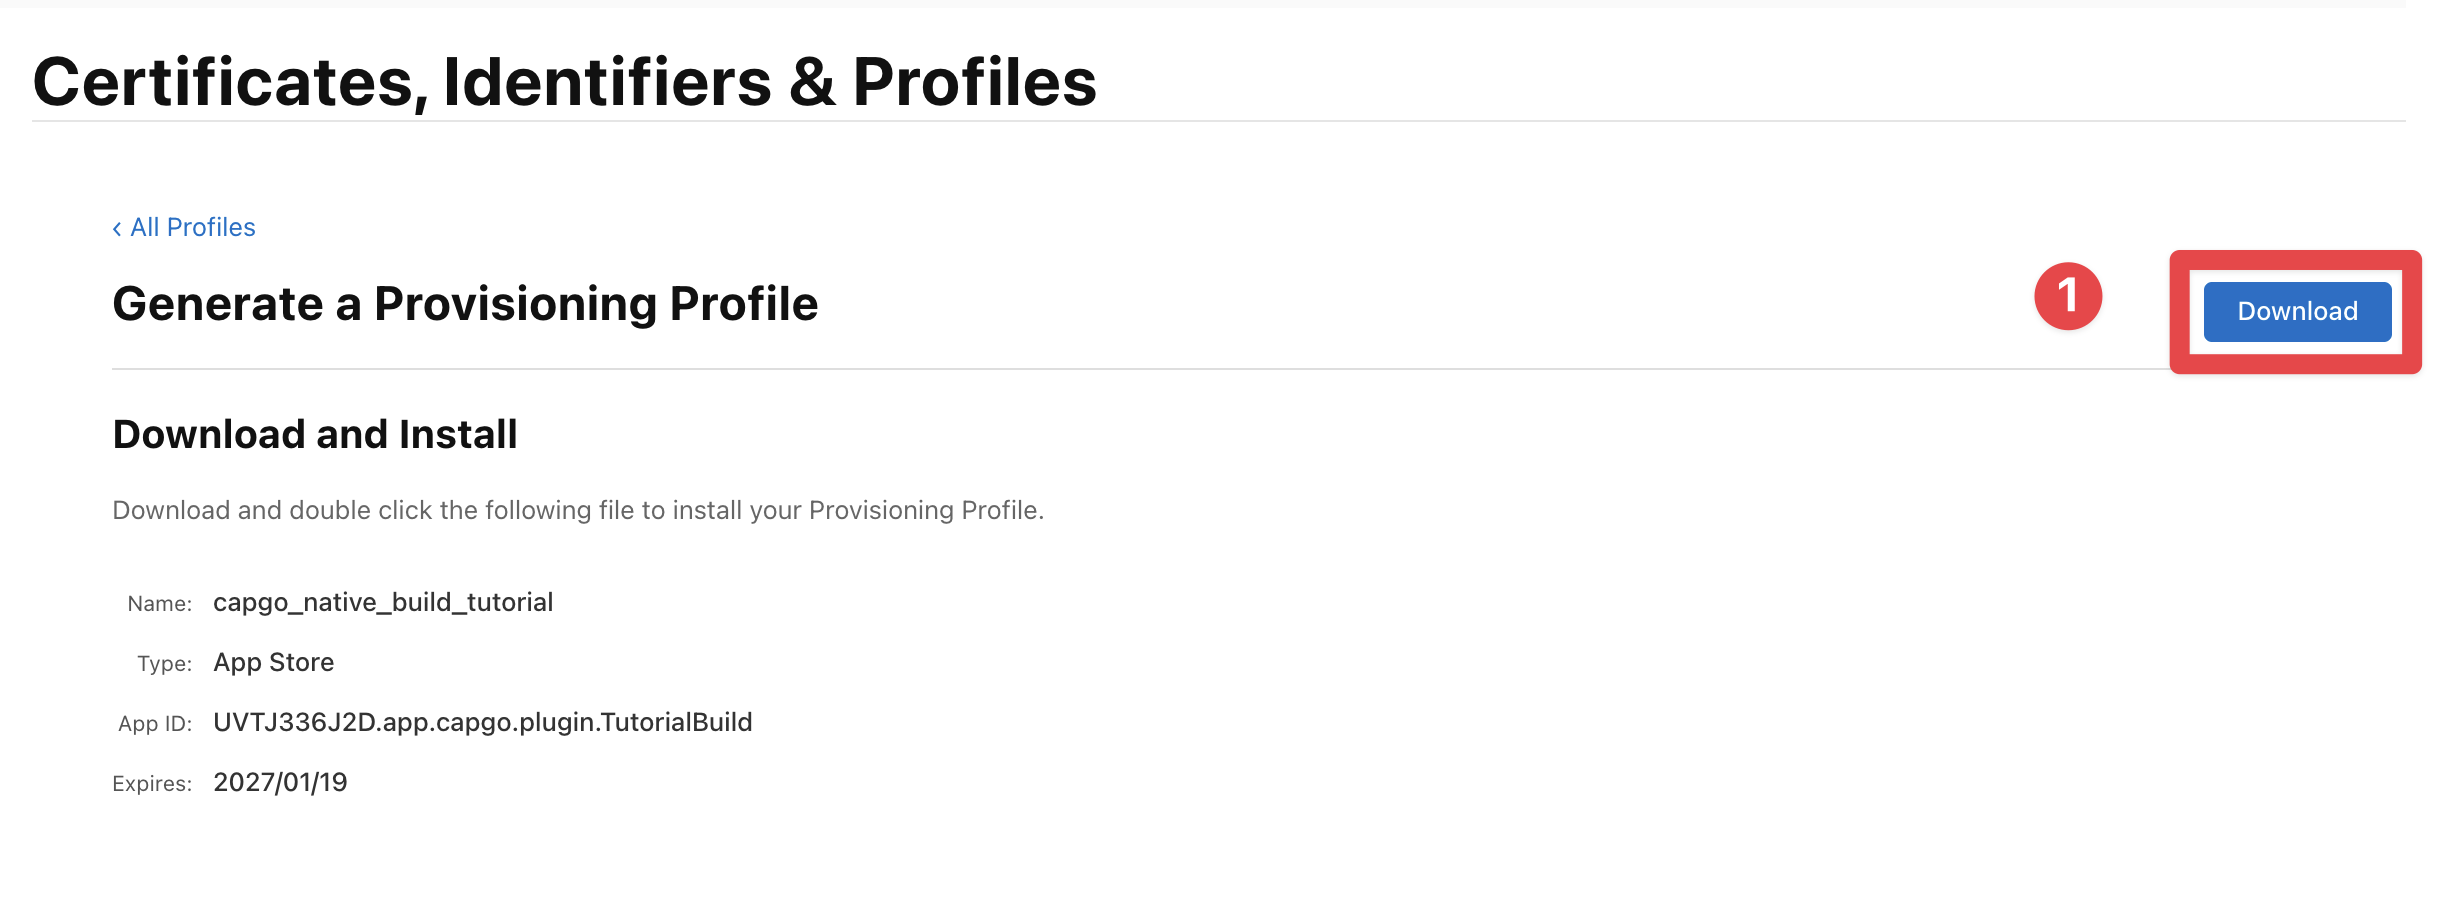
Congratulations 🎉 You have now got everything you need to configure Capgo Native Build.
Running the configuration command
Section titled “Running the configuration command”You have done it! You have now got everything you need to configure Capgo Native Build.
The command you will need to run is:
npx @capgo/cli@latest build credentials save \ --platform ios \ --apple-team-id UVTJ336J2D \ --apple-key ./capgo-tutorial/AuthKey_66FGQZB566.p8 \ --apple-key-id 66FGQZB566 \ --apple-issuer-id 0cd4db4a-5598-45b8-9d32-75cdf127d005 \ --certificate ./capgo-tutorial/capgo-build-tutorial-certificate.p12 \ --ios-provisioning-profile ./capgo-tutorial/capgo_native_build_tutorial.mobileprovisionIf all went well, you will see the following output:

CI/CD setup (GitHub Actions)
Section titled “CI/CD setup (GitHub Actions)”If you already completed Team ID, Apple key, Apple key ID and Apple issuer ID, Certificate, and Provisioning profile, you already have everything needed for CI/CD. This section only covers how to pass those values as GitHub Actions secrets and environment variables.
1) Convert credential files to single-line base64
Section titled “1) Convert credential files to single-line base64”# Distribution certificate (.p12)base64 -i ./capgo-tutorial/capgo-build-tutorial-certificate.p12 | tr -d '\n' > certificate_base64.txt
# Provisioning profile (.mobileprovision)base64 -i ./capgo-tutorial/capgo_native_build_tutorial.mobileprovision | tr -d '\n' > profile_base64.txt
# App Store Connect API key (.p8)base64 -i ./capgo-tutorial/AuthKey_66FGQZB566.p8 | tr -d '\n' > apple_key_base64.txt2) Create repository secrets
Section titled “2) Create repository secrets”In GitHub > Repository > Settings > Secrets and variables > Actions, add:
| Secret name | Value |
|---|---|
CAPGO_TOKEN | Your Capgo API token |
APP_STORE_CONNECT_TEAM_ID | Team ID from Team ID |
APPLE_KEY_ID | Key ID from Apple key, Apple key ID and Apple issuer ID |
APPLE_ISSUER_ID | Issuer ID from Apple key, Apple key ID and Apple issuer ID |
BUILD_CERTIFICATE_BASE64 | Content of certificate_base64.txt |
CAPGO_IOS_PROVISIONING_MAP | Generated by CLI — copy from .capgo-credentials file |
APPLE_KEY_CONTENT | Content of apple_key_base64.txt |
P12_PASSWORD (optional) | Your .p12 password if set during export |
3) Use env vars in your GitHub Actions workflow
Section titled “3) Use env vars in your GitHub Actions workflow”name: iOS Cloud Build
on: workflow_dispatch: push: branches: [main]
jobs: ios-build: runs-on: ubuntu-latest steps: - uses: actions/checkout@v4 - uses: oven-sh/setup-bun@v2 with: bun-version: latest - name: Request iOS build with Capgo run: bunx @capgo/cli@latest build request --platform ios env: CAPGO_TOKEN: ${{ secrets.CAPGO_TOKEN }} APP_STORE_CONNECT_TEAM_ID: ${{ secrets.APP_STORE_CONNECT_TEAM_ID }} APPLE_KEY_ID: ${{ secrets.APPLE_KEY_ID }} APPLE_ISSUER_ID: ${{ secrets.APPLE_ISSUER_ID }} BUILD_CERTIFICATE_BASE64: ${{ secrets.BUILD_CERTIFICATE_BASE64 }} CAPGO_IOS_PROVISIONING_MAP: ${{ secrets.CAPGO_IOS_PROVISIONING_MAP }} APPLE_KEY_CONTENT: ${{ secrets.APPLE_KEY_CONTENT }} P12_PASSWORD: ${{ secrets.P12_PASSWORD }}Running the build
Section titled “Running the build”Now, you are ready to run your first build.
Run the following command to build your app:
npx @capgo/cli@latest build request --platform iosCongratulations 🎉 At this point, you have successfully built your app and it is ready to be submitted to the App Store.
Ad-Hoc Distribution Mode
Section titled “Ad-Hoc Distribution Mode”By default, Capgo builds iOS apps for App Store distribution (TestFlight + App Store). If you need ad-hoc builds instead (for internal testing or CI artifact collection), you can use the --ios-distribution flag.
When to use ad-hoc mode
Section titled “When to use ad-hoc mode”- You want to distribute IPAs directly to registered devices (no TestFlight)
- You don’t have or don’t want to use an App Store Connect API key
- You want to collect build artifacts via
--output-uploadwithout submitting to the App Store
Requirements
Section titled “Requirements”Ad-hoc builds have fewer requirements than App Store builds:
| Credential | Required? |
|---|---|
Distribution certificate (.p12) | Yes |
Ad-hoc provisioning profile (.mobileprovision) | Yes |
Team ID (--apple-team-id) | Yes |
App Store Connect API key (.p8) | No |
| Apple Key ID / Issuer ID | No |
Creating an ad-hoc provisioning profile
Section titled “Creating an ad-hoc provisioning profile”Follow the same steps as Provisioning profile, but in step 5, select Ad Hoc instead of App Store:
- Go to Apple Developer Profiles
- Click the
+button - Select Ad Hoc and click Continue
- Select your app and distribution certificate
- Select the devices you want to register
- Name and download the profile
Saving ad-hoc credentials
Section titled “Saving ad-hoc credentials”npx @capgo/cli@latest build credentials save \ --platform ios \ --ios-distribution ad_hoc \ --apple-team-id YOUR_TEAM_ID \ --certificate './certificate.p12' \ --ios-provisioning-profile './adhoc_profile.mobileprovision'No --apple-key, --apple-key-id, or --apple-issuer-id needed.
Running an ad-hoc build
Section titled “Running an ad-hoc build”npx @capgo/cli@latest build request \ --platform ios \ --ios-distribution ad_hocTo collect the IPA as a build artifact, add --output-upload:
npx @capgo/cli@latest build request \ --platform ios \ --ios-distribution ad_hoc \ --output-uploadCI/CD with ad-hoc builds
Section titled “CI/CD with ad-hoc builds”For GitHub Actions, you need fewer secrets than App Store builds:
name: iOS Ad-Hoc Build
on:  workflow_dispatch:
jobs: ios-adhoc: runs-on: ubuntu-latest steps: - uses: actions/checkout@v4 - uses: oven-sh/setup-bun@v2 with: bun-version: latest - name: Request iOS ad-hoc build run: bunx @capgo/cli@latest build request --platform ios --ios-distribution ad_hoc --output-upload env: CAPGO_TOKEN: ${{ secrets.CAPGO_TOKEN }} APP_STORE_CONNECT_TEAM_ID: ${{ secrets.APP_STORE_CONNECT_TEAM_ID }} BUILD_CERTIFICATE_BASE64: ${{ secrets.BUILD_CERTIFICATE_BASE64 }} CAPGO_IOS_PROVISIONING_MAP: ${{ secrets.CAPGO_IOS_PROVISIONING_MAP_ADHOC }} CAPGO_IOS_DISTRIBUTION: ad_hocApps with Extensions (Multi-Target Signing)
Section titled “Apps with Extensions (Multi-Target Signing)”If your app includes extensions (share extensions, widgets, notification service extensions, etc.), each extension target needs its own provisioning profile. Capgo supports this via the repeatable --ios-provisioning-profile flag.
Example: App + Share Extension
Section titled “Example: App + Share Extension”npx @capgo/cli@latest build credentials save \ --platform ios \ --apple-team-id YOUR_TEAM_ID \ --apple-key '/path/to/AuthKey_XXXXX.p8' \ --apple-key-id YOUR_KEY_ID \ --apple-issuer-id YOUR_ISSUER_ID \ --certificate '/path/to/certificate.p12' \ --ios-provisioning-profile "com.example.app=./app_profile.mobileprovision" \ --ios-provisioning-profile "com.example.app.share-extension=./share_ext_profile.mobileprovision"Each --ios-provisioning-profile flag maps a bundle ID to its provisioning profile file. The CLI:
- Reads each mobileprovision file
- Auto-extracts the profile name from the embedded plist
- Base64-encodes the file
- Stores everything as a single
CAPGO_IOS_PROVISIONING_MAPcredential
Migration from Single Profile
Section titled “Migration from Single Profile”If you previously used BUILD_PROVISION_PROFILE_BASE64 (single profile), run:
npx @capgo/cli build credentials migrate --platform iosThis converts your existing single-profile credentials to the new CAPGO_IOS_PROVISIONING_MAP format and removes the legacy keys (BUILD_PROVISION_PROFILE_BASE64, APPLE_PROFILE_NAME).
After migration, add extension profiles with the update command (additive merge):
npx @capgo/cli build credentials update \ --platform ios \ --ios-provisioning-profile "com.example.app.share-extension=./share_ext_profile.mobileprovision"Troubleshooting
Section titled “Troubleshooting”Provisioning profile doesn’t include the XYZ capability.
Section titled “Provisioning profile doesn’t include the XYZ capability.”Sometimes, you might see the following error:
Provisioning profile "YOUR_PROVISIONING_PROFILE_NAME" doesn't include the XYZ capability. (in target 'App' from project 'App')"This happens because you have enabled a new capability after the provisioning profile was created. The old provisioning profile does not include the new capability yet.
To fix this, you need to regenerate the provisioning profile.
- Open Apple Developer Portal
- Select the correct team in the dropdown
- Click on the
Profilesbutton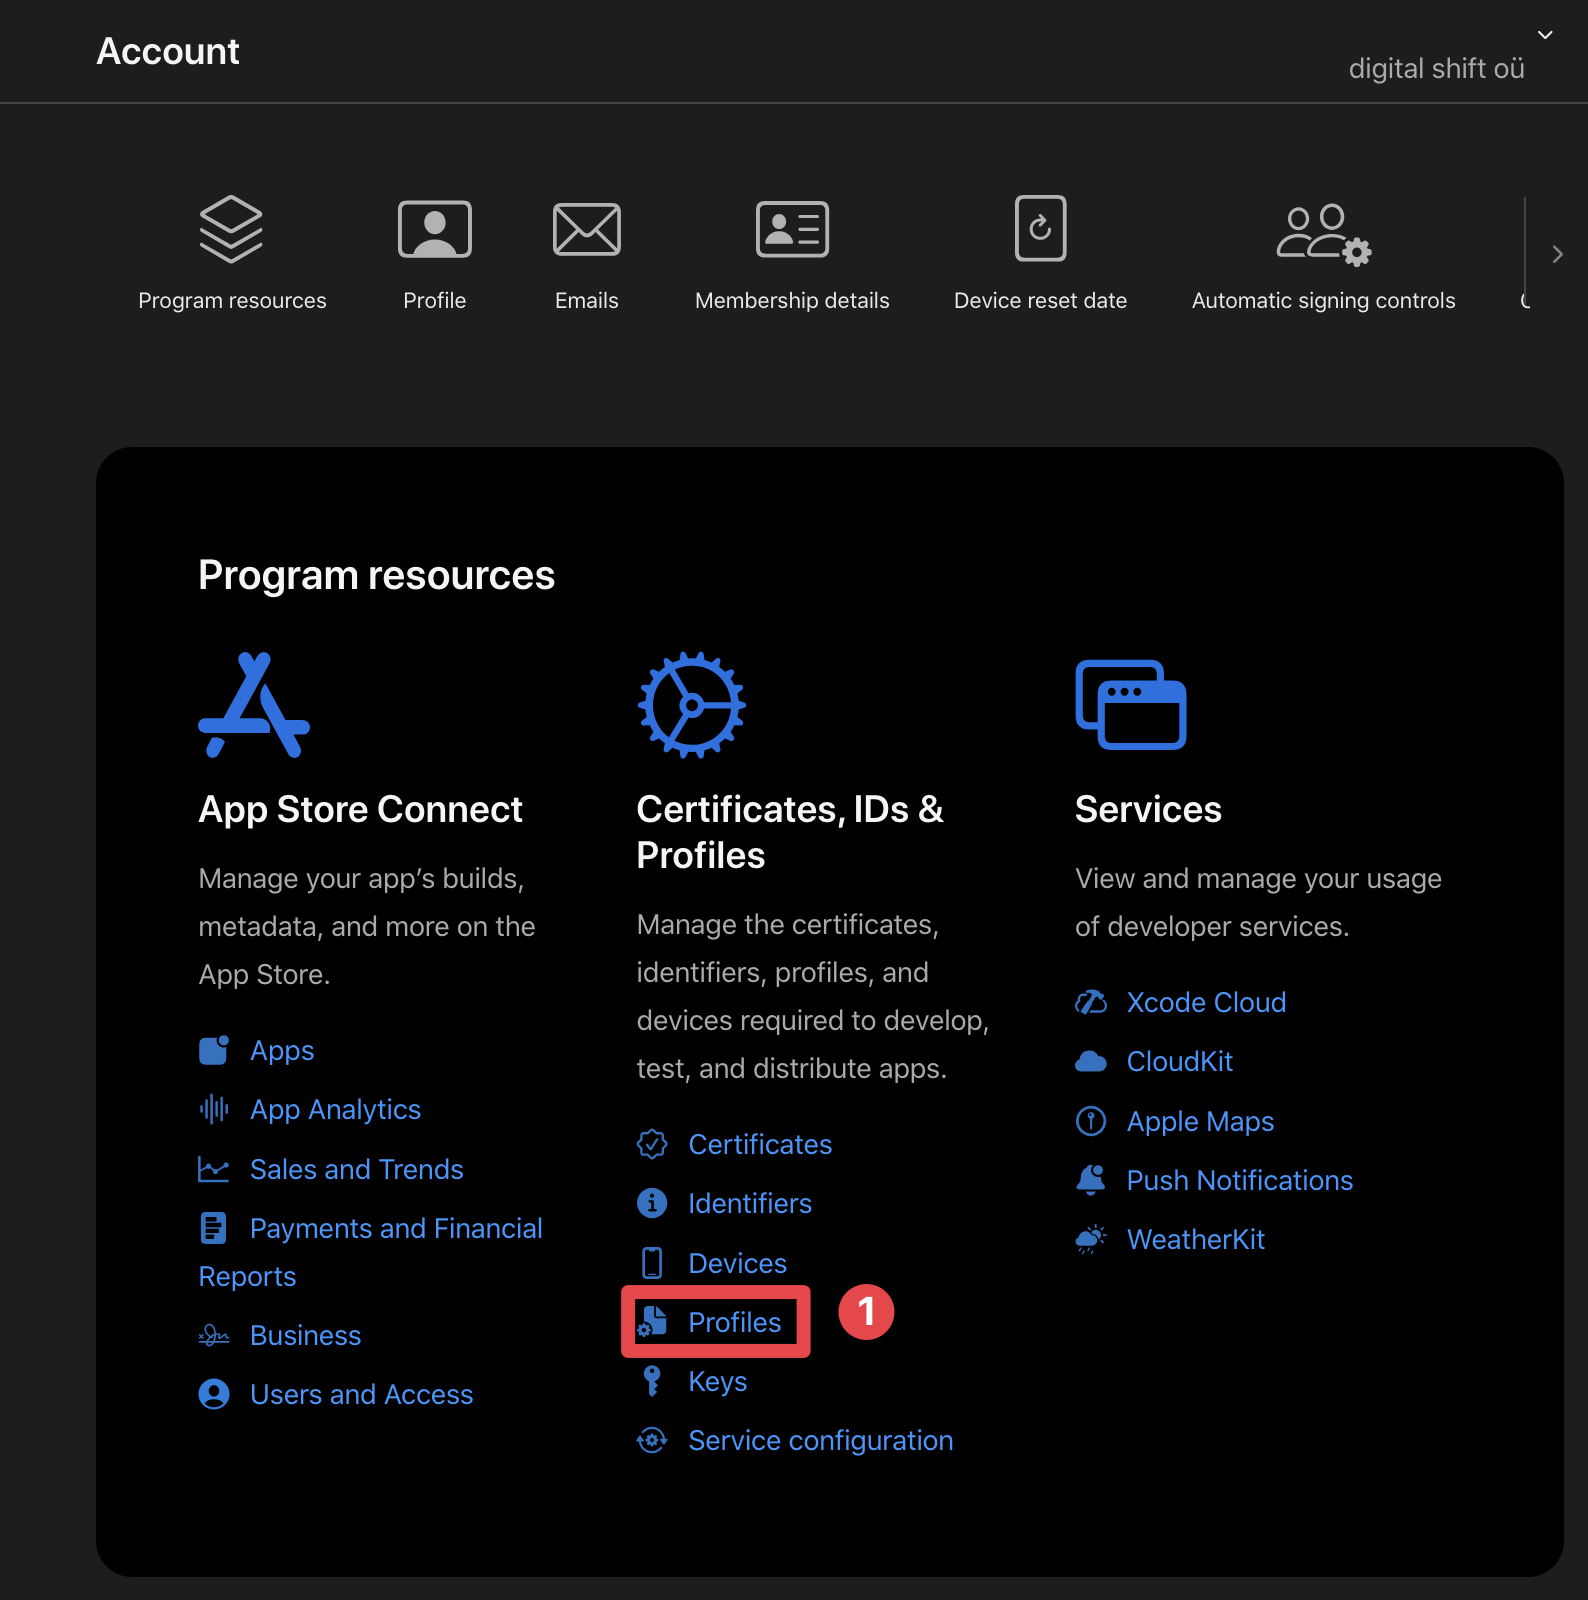
- Find the provisioning profile you want to regenerate
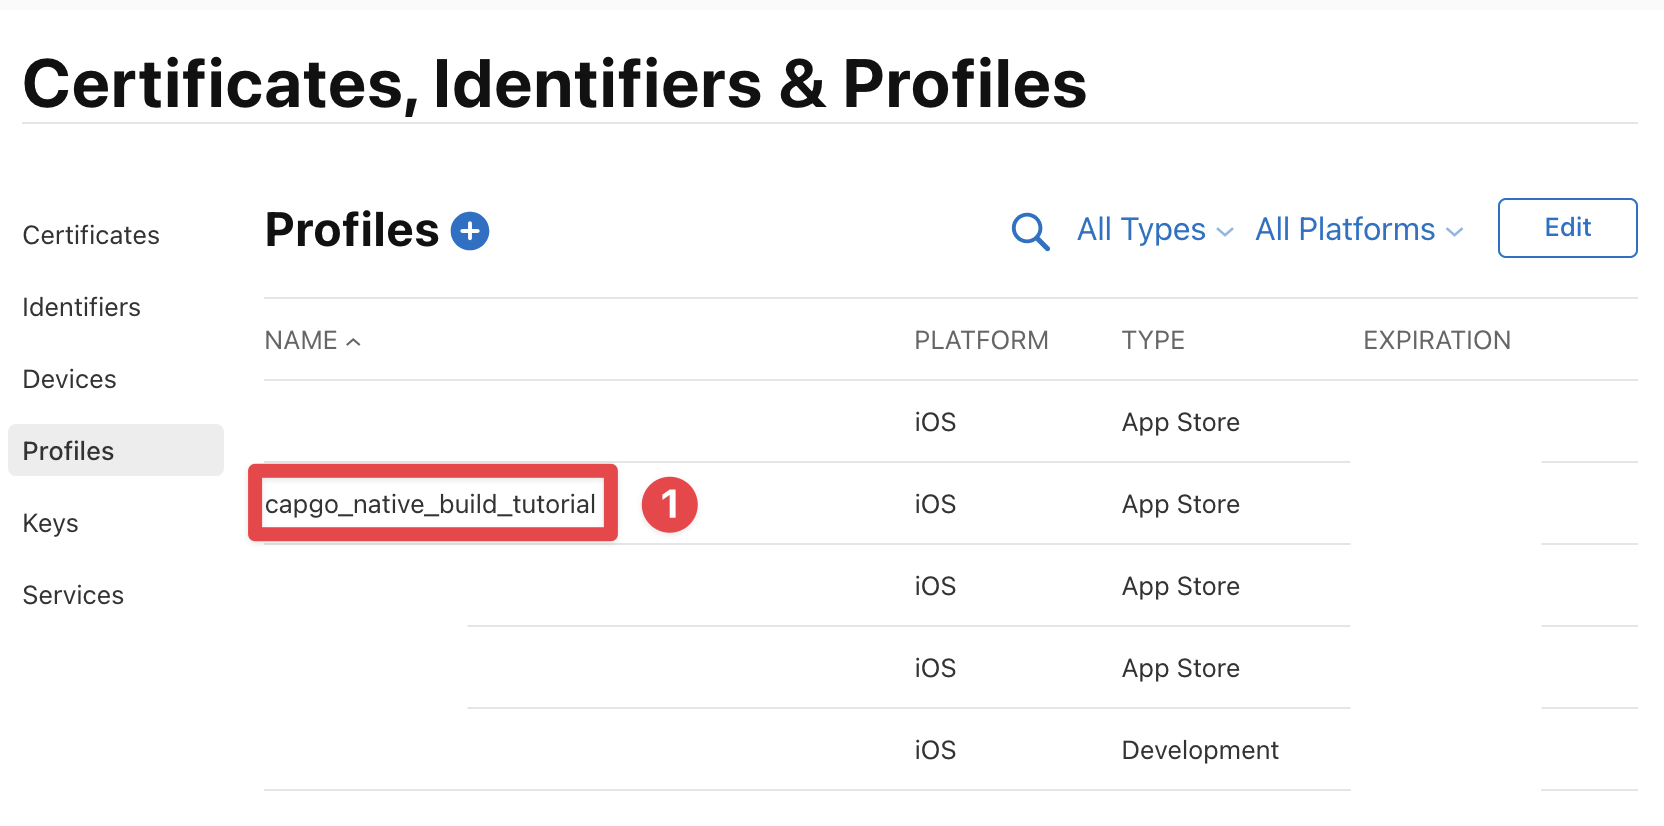
- Click on the
Editbutton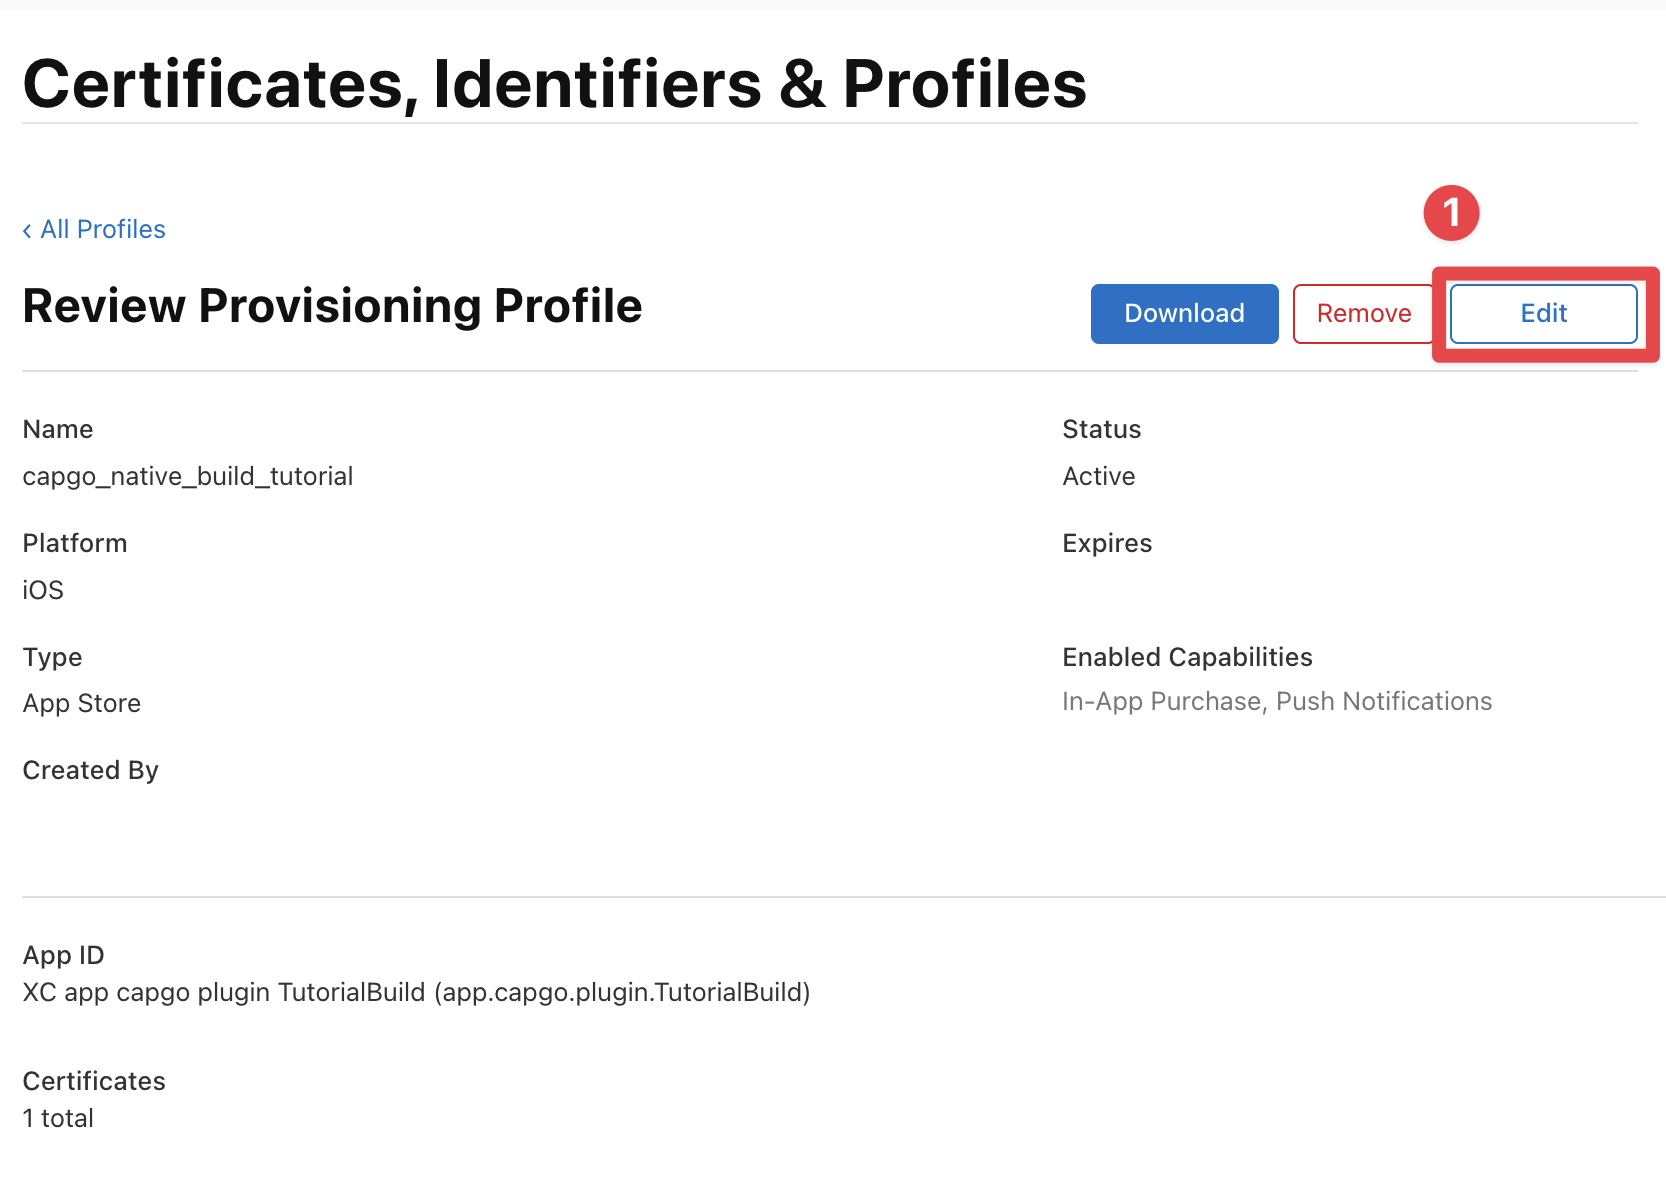
- Click on the
Savebutton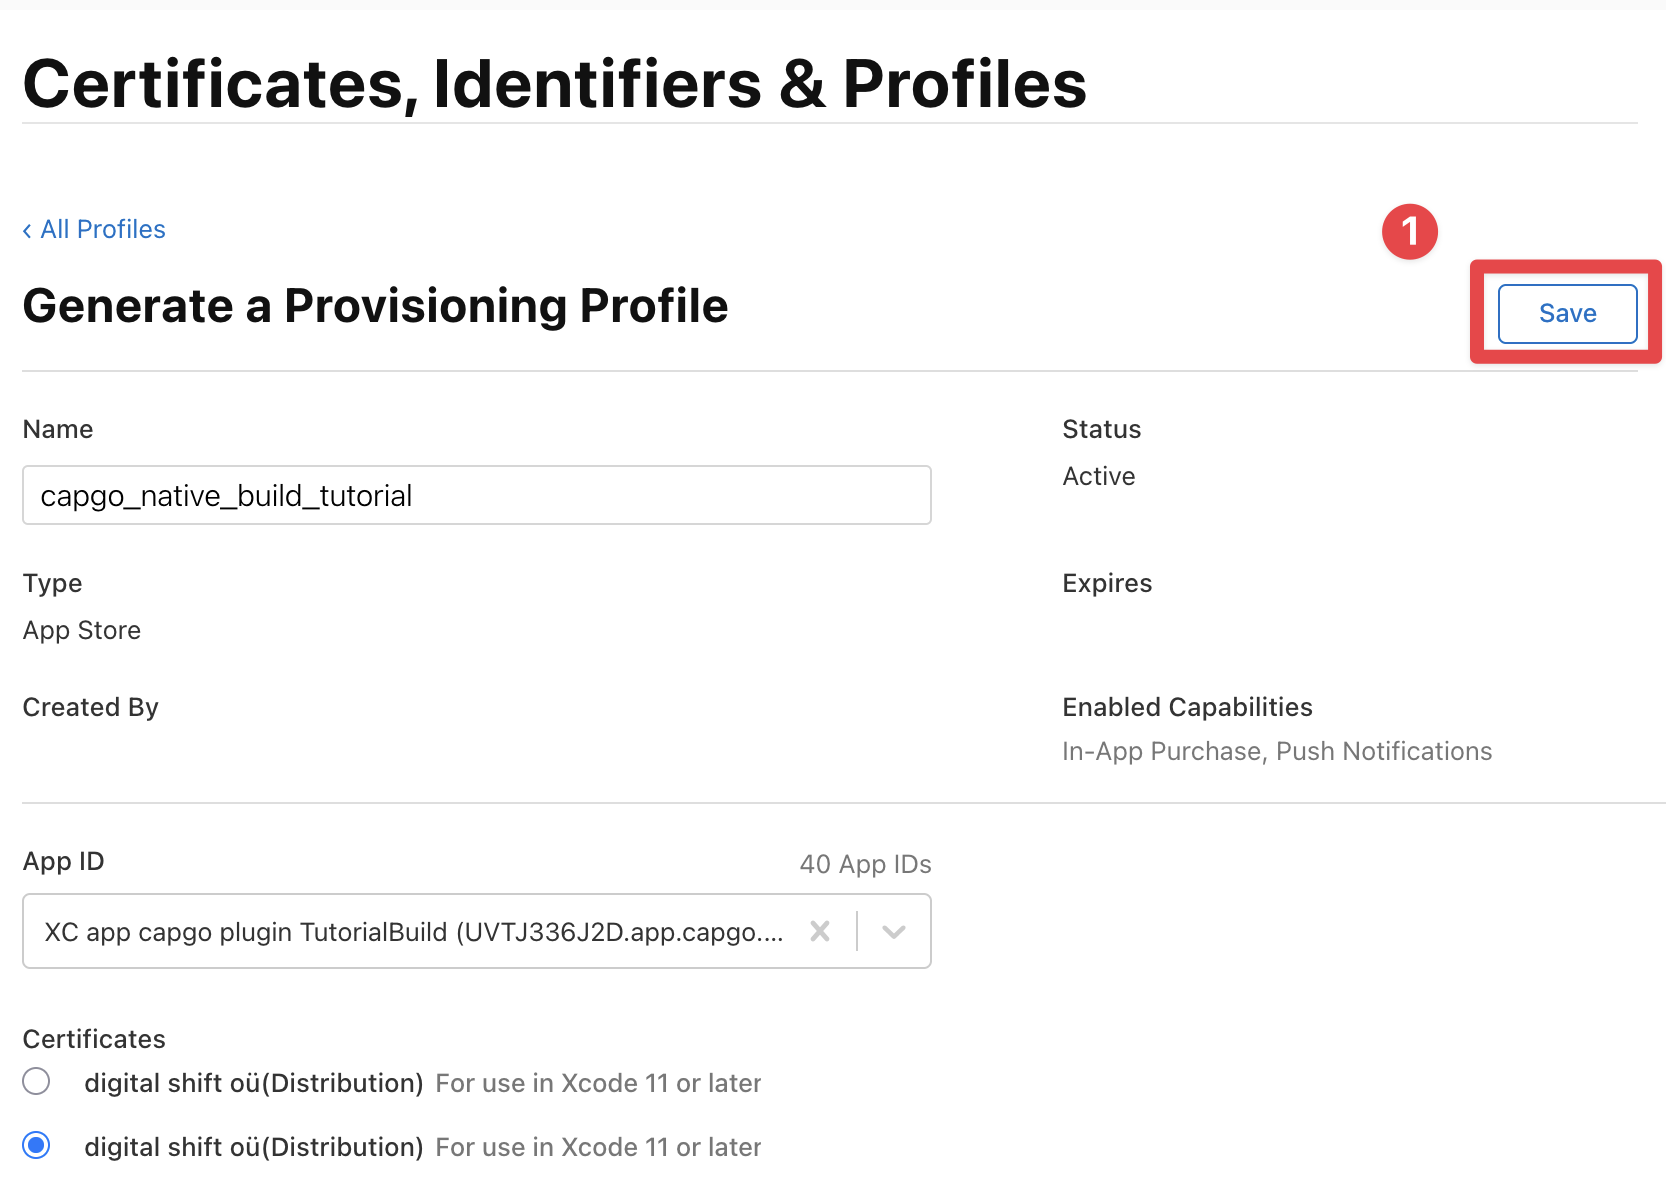
- Click on the
Downloadbutton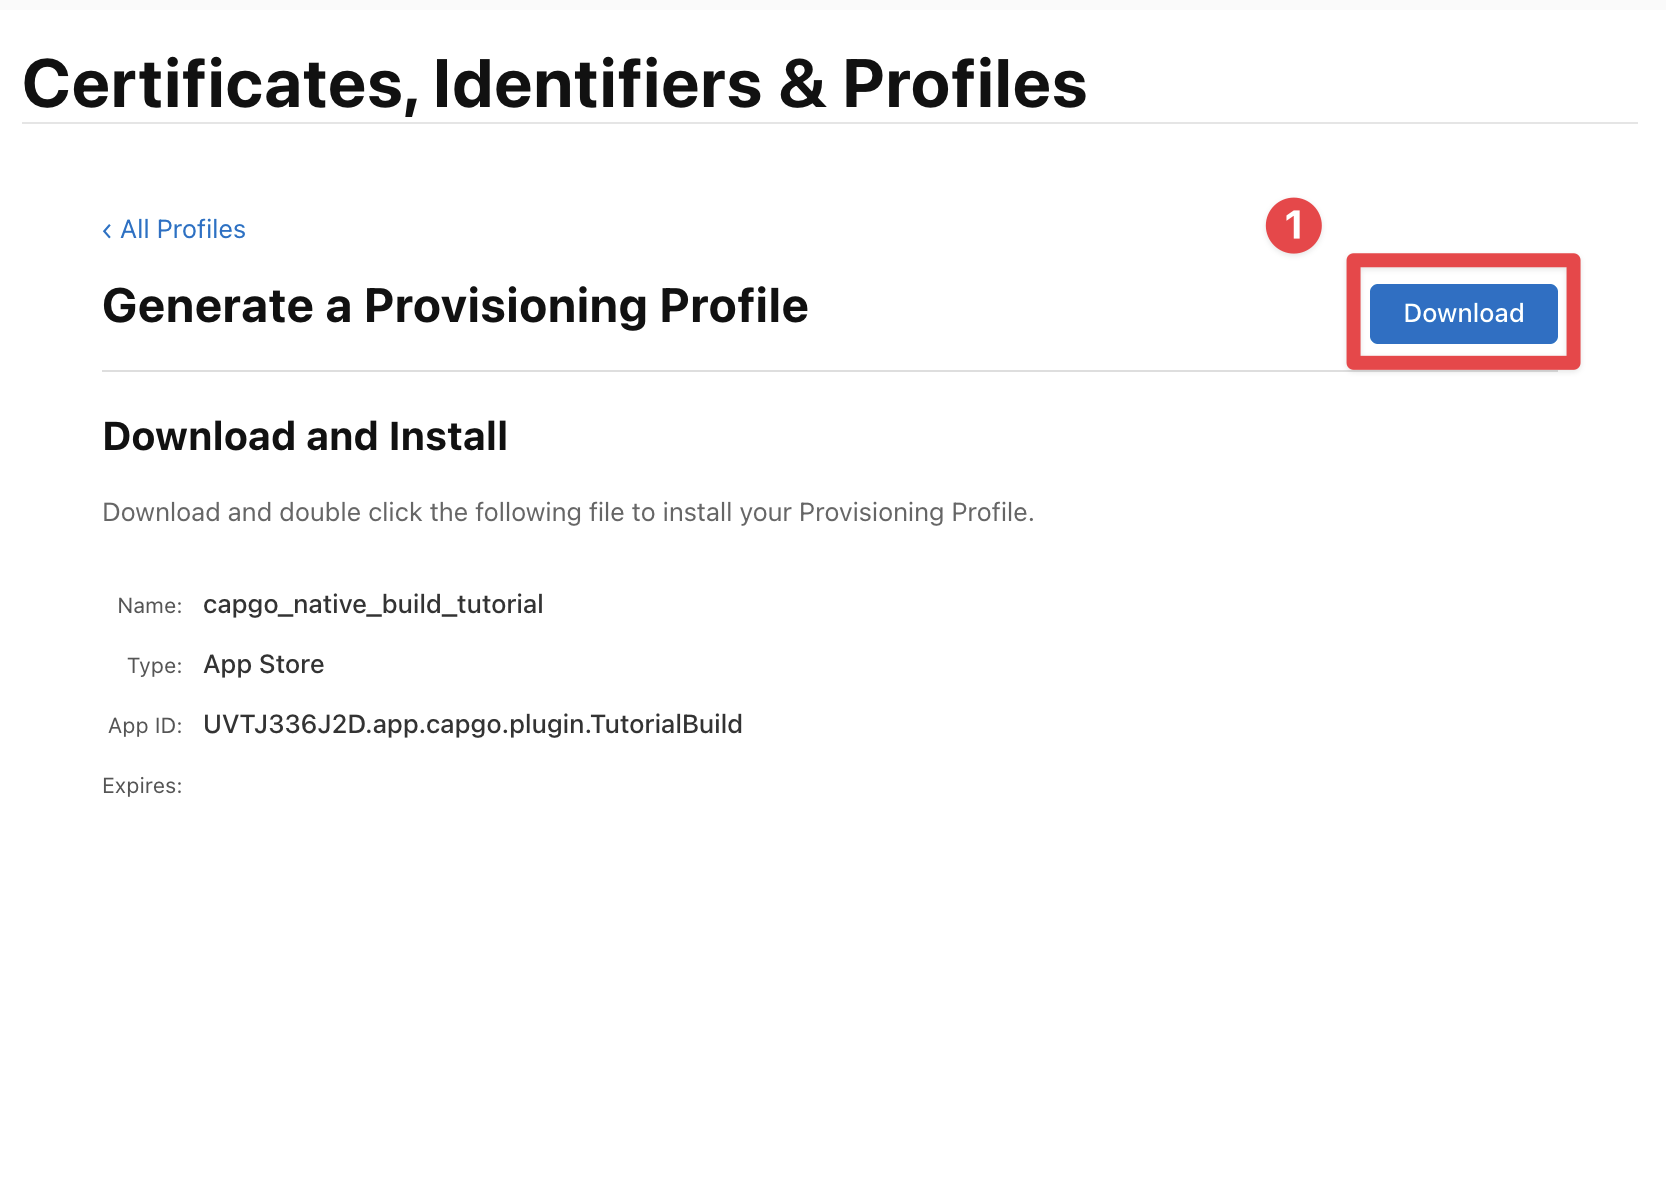
- Re-run the Capgo Native Build setup command with the newly downloaded profile.
This should fix the issue.
Other issues
Section titled “Other issues”If for whatever reason you are having issues either with Capgo Native Build, configuring the credentials or building the app, please don’t hesitate to reach via our support.