Facebook Connexion Configuration
Introduction
Section titled “Introduction”In this Guide, you will learn how to Configuration Facebook Connexion with Capgo Social Connexion. You will need the following:
- A Facebook Developer Compte
- Your Application’s package name/Bundle ID
- Access to a Terminal for generating key hashes (Android)
General Configuration
Section titled “General Configuration”If you don’t already have a Facebook Application created, follow these steps:
-
Créer a Facebook Application
Follow the Tutoriel to Créer an Application
-
Ajouter Facebook Connexion to your Application
In your Facebook Developer Tableau de bord, Ajouter the Facebook Connexion product to your Application
-
Before you can Libération your Application to the public, follow this Tutoriel to publish it
Important Information
Section titled “Important Information”Here’s where to find the key Information you’ll need for integration:
-
CLIENT_TOKEN: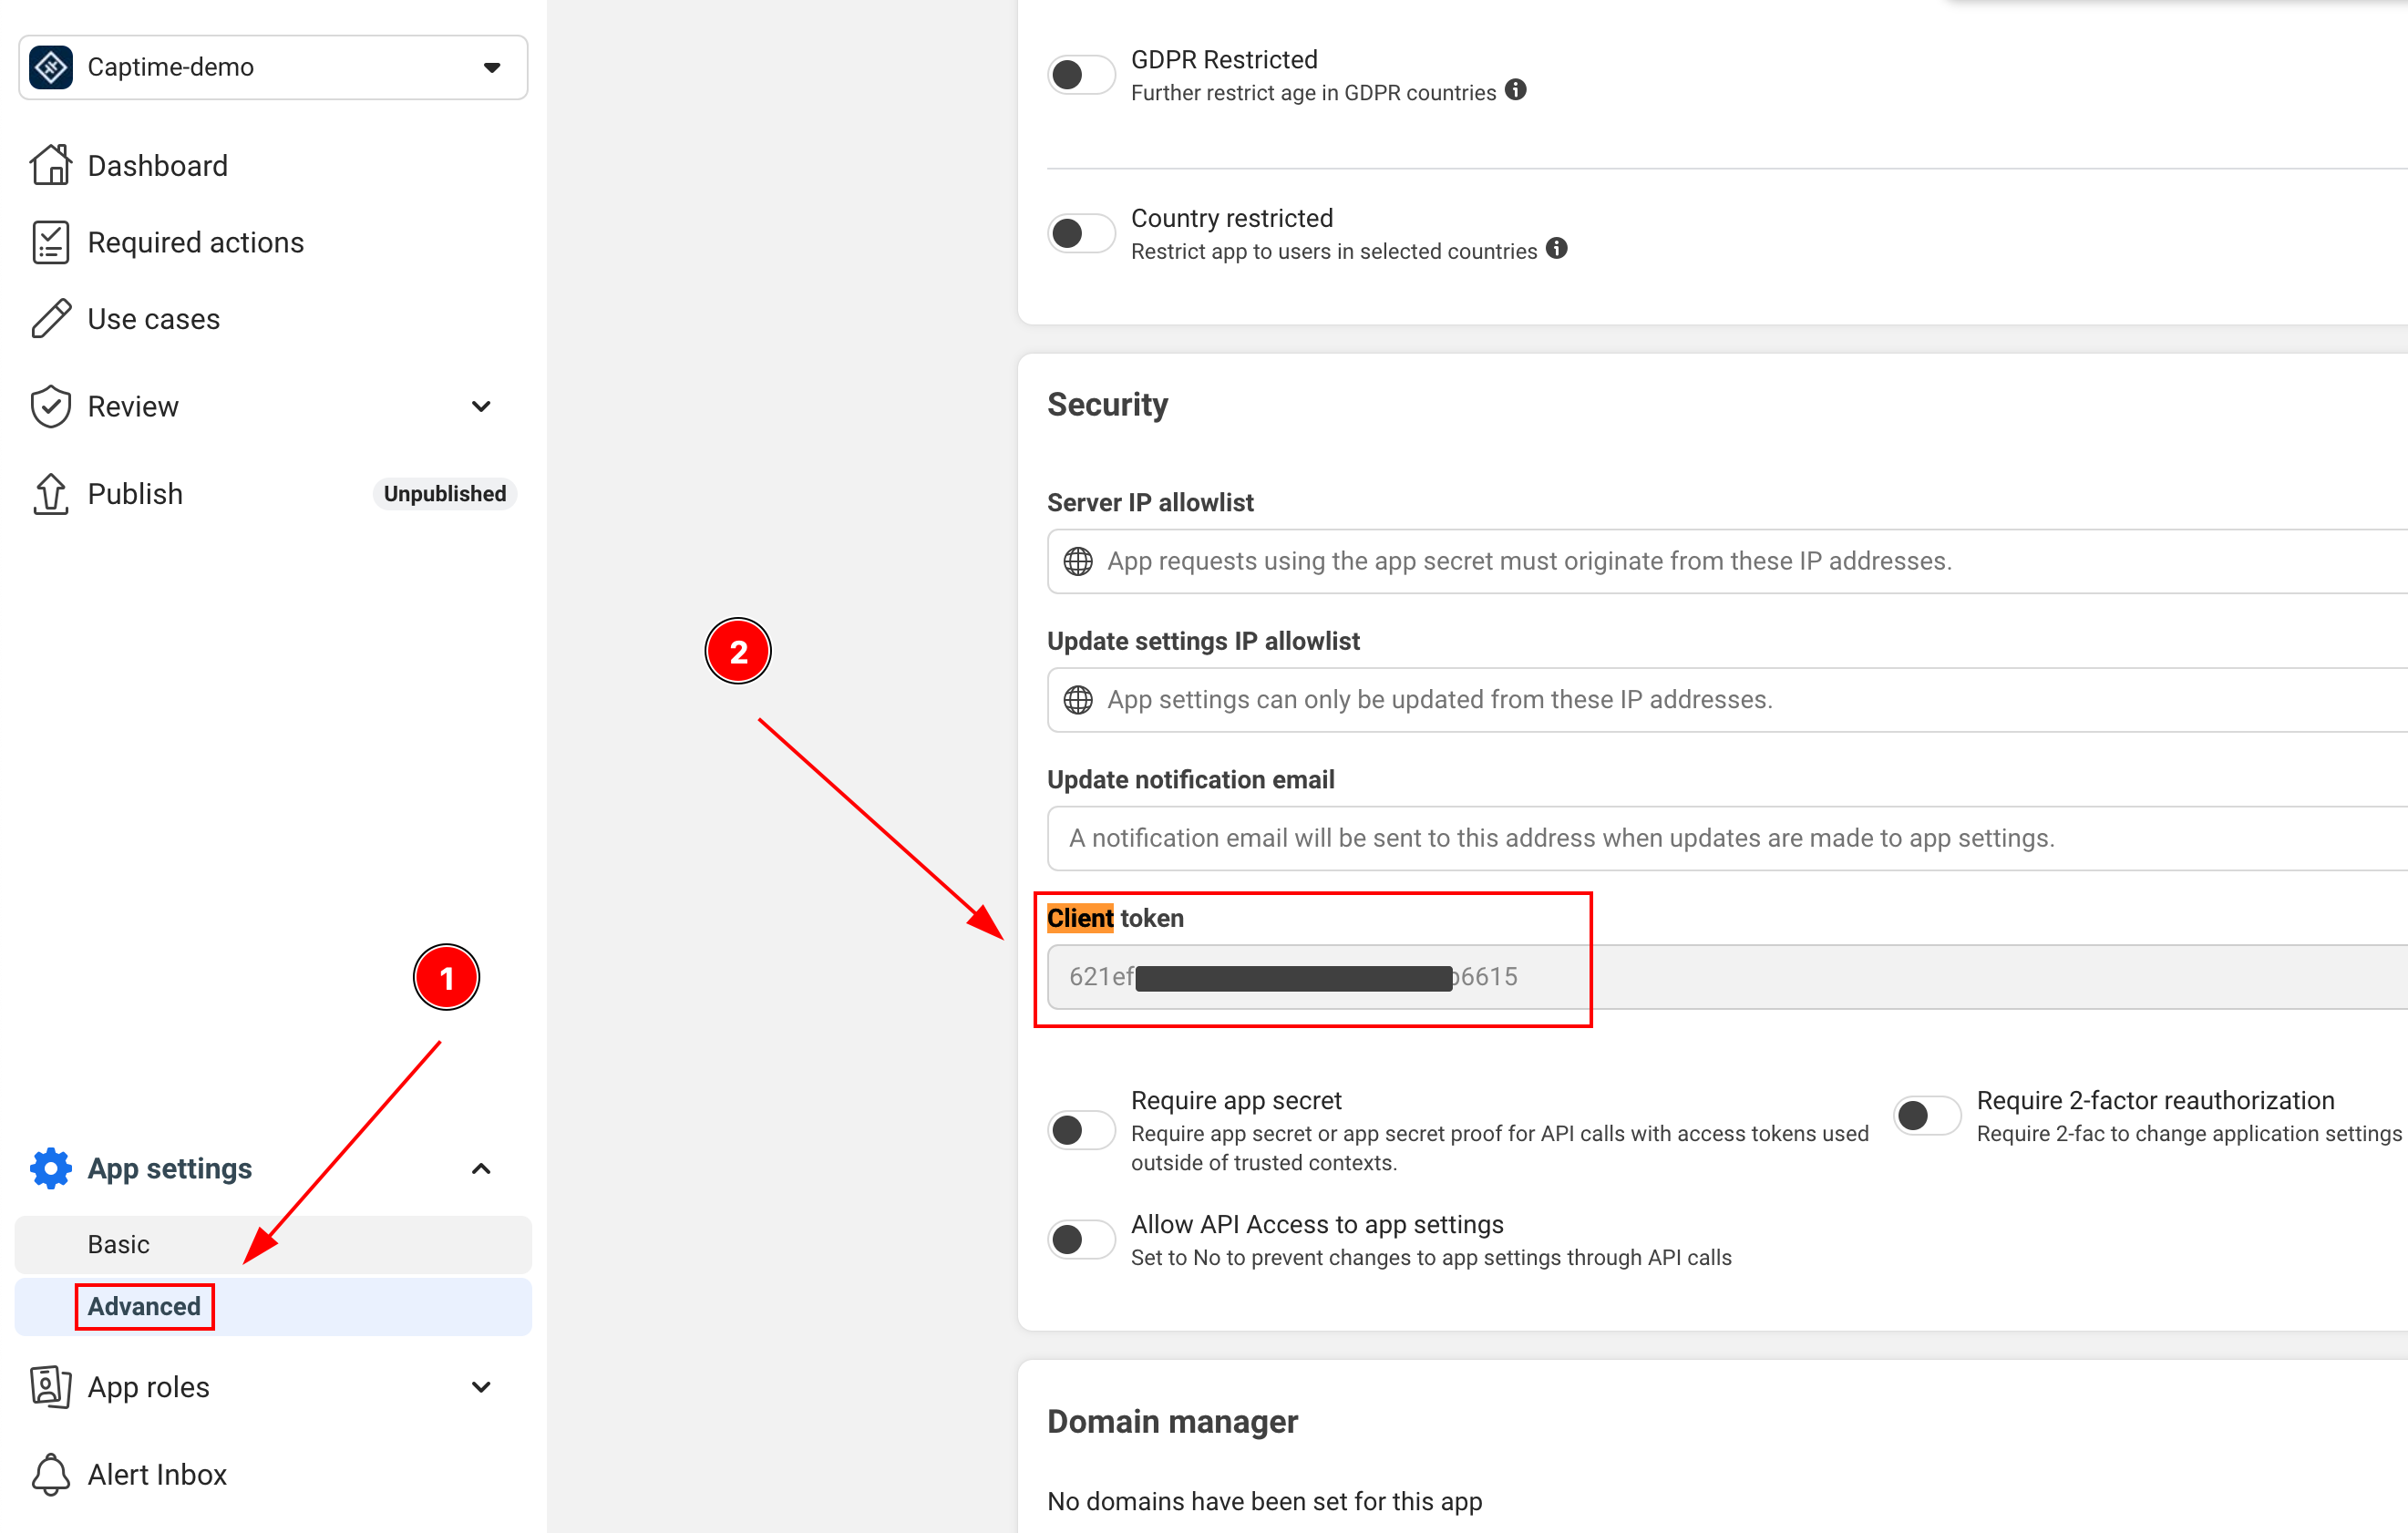
-
APP_ID: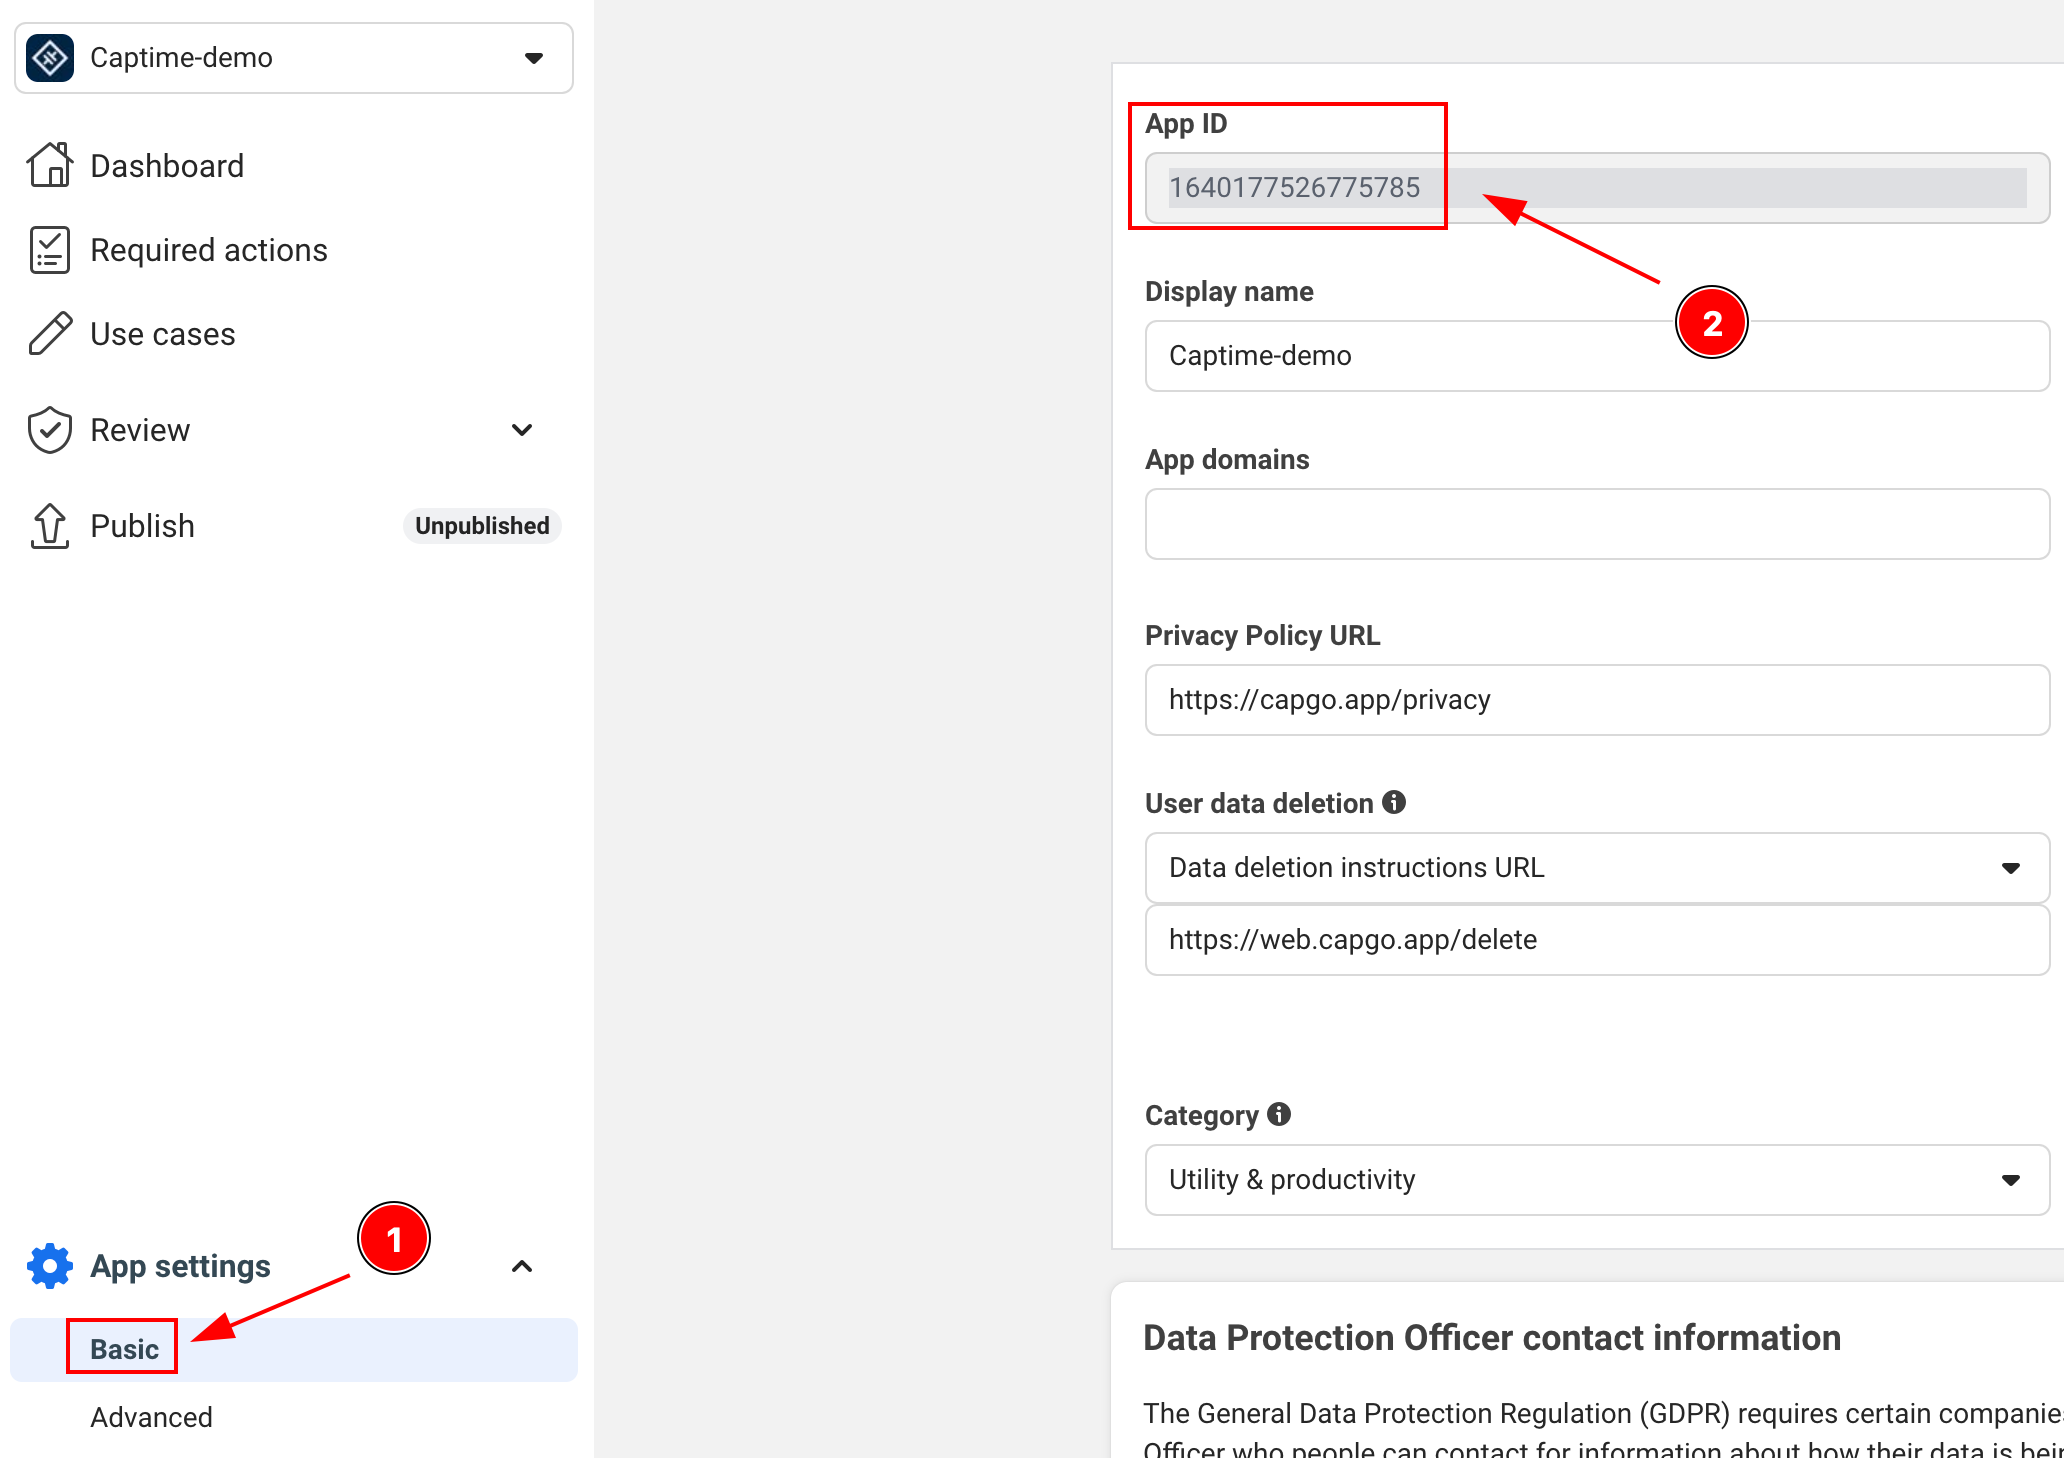
-
APP_NAME: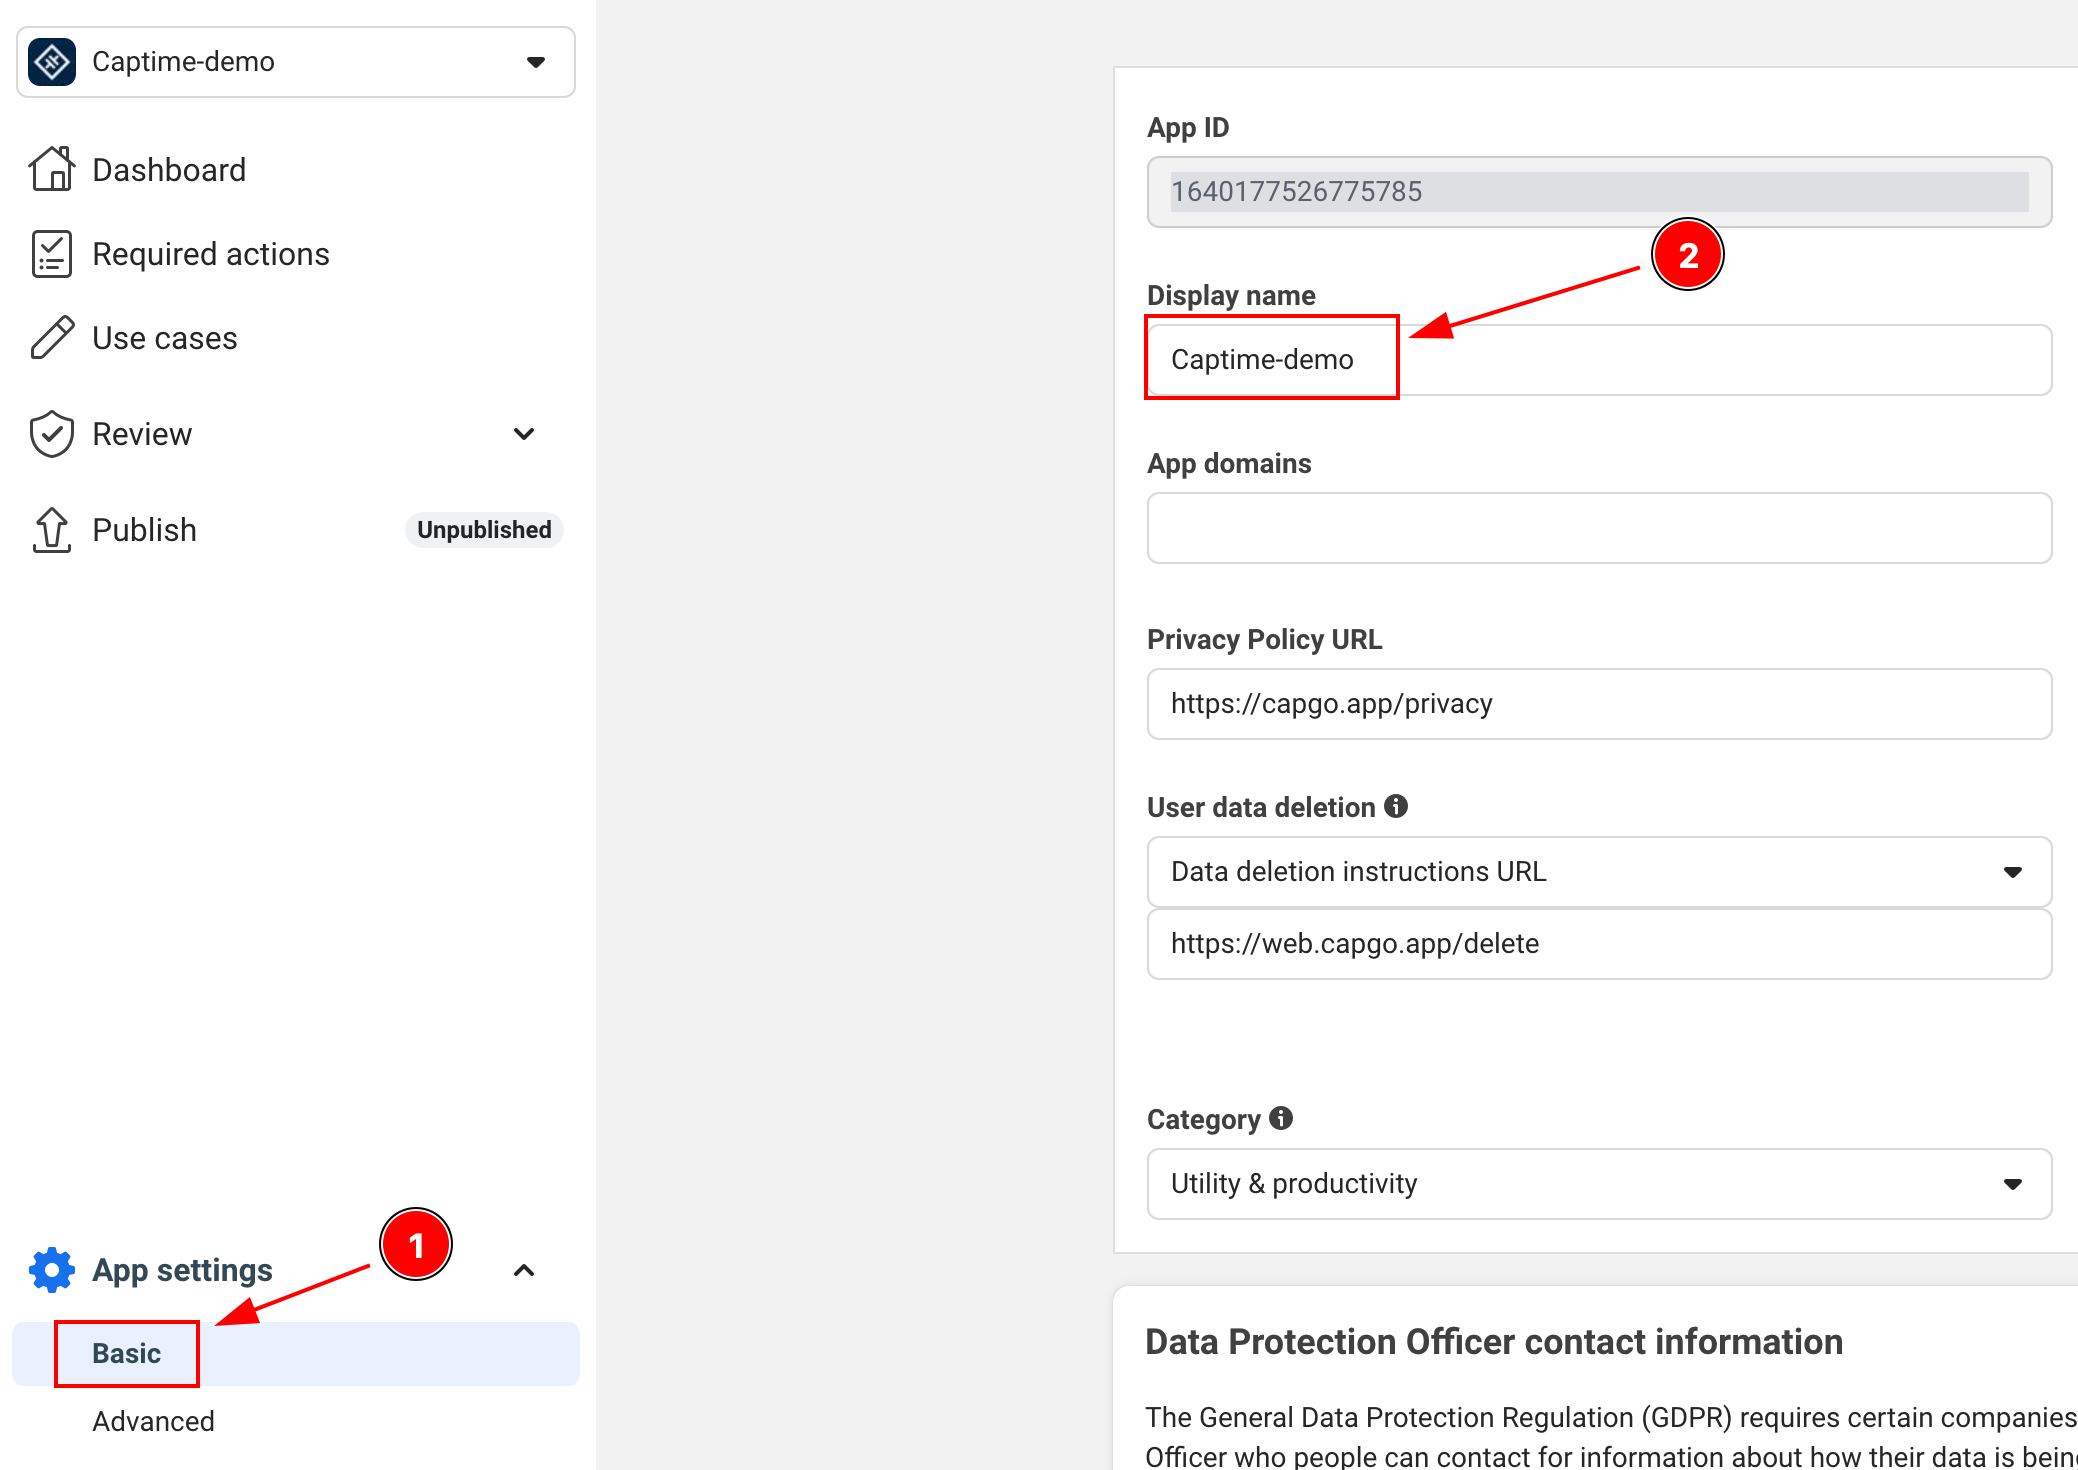
Android Configuration
Section titled “Android Configuration”-
Add internet permission to your
AndroidManifest.xmlEnsure this line is present:
<uses-permission android:name="android.permission.INTERNET"/> -
Generate your Android key hash
This is a crucial Sécurité step required by Facebook. Open your Terminal and run:
Terminal window keytool -exportcert -alias androiddebugkey -keystore ~/.android/debug.keystore | openssl sha1 -binary | openssl base64 -AWhen prompted for a password, use:
androidFor Libération builds, you’ll need to use your Libération keystore:
Terminal window keytool -exportcert -alias your-key-name -keystore your-keystore-path | openssl sha1 -binary | openssl base64 -A -
Ajouter the key hash to your Facebook Application
- Go to your Application’s Tableau de bord on Facebook Developers
- Navigate to Paramètres > Basic
- Scroll down to “Android” section
- Click “Ajouter Platform” if Android isn’t added yet and fill in the details
- Ajouter the key hash you generated
- For Production, Ajouter both Débogage and Libération key hashes
-
Update your
AndroidManifest.xmlto include:<application>...<activity android:name="com.facebook.FacebookActivity"android:configChanges="keyboard|keyboardHidden|screenLayout|screenSize|orientation"android:label="@string/app_name" /><activityandroid:name="com.facebook.CustomTabActivity"android:exported="true"><intent-filter><action android:name="android.intent.action.VIEW" /><category android:name="android.intent.category.DEFAULT" /><category android:name="android.intent.category.BROWSABLE" /><data android:scheme="FB[APP_ID]" /></intent-filter></activity></application>Make sure to replace
[APP_ID]with your actual Facebook app ID in theandroid:schemeattribute
iOS Configuration
Section titled “iOS Configuration”-
Ajouter the iOS platform in Facebook Developer Console
- Go to your Application’s Tableau de bord on Facebook Developers
- Navigate to Paramètres > Basic
- Scroll down to very bottom of the page and click “Ajouter Platform”
- Select iOS and fill in the required details
-
Open your Xcode project and navigate to Info.plist
-
Ajouter the following entries to your Info.plist:
<key>FacebookAppID</key><string>[APP-ID]</string><key>FacebookClientToken</key><string>[CLIENT-TOKEN]</string><key>FacebookDisplayName</key><string>[APP-NAME]</string><key>LSApplicationQueriesSchemes</key><array><string>fbapi</string><string>fb-messenger-share-api</string></array><key>CFBundleURLTypes</key><array><dict><key>CFBundleURLSchemes</key><array><string>fb[APP-ID]</string></array></dict></array>Replace the following values:
[APP-ID]with your Facebook app ID[CLIENT-TOKEN]with your client token[APP-NAME]with your app’s name
-
Modify the
AppDelegate.swiftimport FBSDKCoreKit@UIApplicationMainclass AppDelegate: UIResponder, UIApplicationDelegate {func application(_ application: UIApplication, didFinishLaunchingWithOptions launchOptions: [UIApplication.LaunchOptionsKey: Any]?) -> Bool {// Override point for customization after application launch.// Initialize Facebook SDKFBSDKCoreKit.ApplicationDelegate.shared.application(application,didFinishLaunchingWithOptions: launchOptions)return true}func application(_ app: UIApplication, open url: URL, options: [UIApplication.OpenURLOptionsKey: Any] = [:]) -> Bool {// Called when the app was launched with a url. Feel free to add additional processing here,// but if you want the App API to support tracking app url opens, make sure to keep this callif (FBSDKCoreKit.ApplicationDelegate.shared.application(app,open: url,sourceApplication: options[UIApplication.OpenURLOptionsKey.sourceApplication] as? String,annotation: options[UIApplication.OpenURLOptionsKey.annotation])) {return true;} else {return ApplicationDelegateProxy.shared.application(app, open: url, options: options)}}}
Using Facebook Connexion in Your Application
Section titled “Using Facebook Connexion in Your Application”Before You Start: Remember that with the new Facebook SDK, the token type you receive depends entirely on the user’s App Tracking choice, not on your code configuration. Always implement both access token and JWT token handling in your backend to ensure authentication works for all users.
-
Initialiser the Facebook Connexion in your Application
import { SocialLogin } from '@capgo/capacitor-social-login';// Initialize during app startupawait SocialLogin.initialize({facebook: {appId: 'APP_ID',clientToken: 'CLIENT_TOKEN',}}) -
Implement the Connexion function
async function loginWithFacebook() {try {const result = await SocialLogin.login({provider: 'facebook',options: {permissions: ['email', 'public_profile'],limitedLogin: false // See Limited Login section below for important details}});console.log('Facebook login result:', result);// Handle successful login} catch (error) {console.error('Facebook login error:', error);// Handle error}}Limited Login (iOS Only): Set
limitedLoginto true if you want to use Facebook’s Limited Login feature. This is an iOS-only feature that provides enhanced privacy by restricting the data shared during login.Important Limitations:
- iOS Only: Limited Connexion only affects iOS Appareils and has no impact on Android
- ATT Override: Even if you set
limitedLogin: false, Facebook will automatically force it totrueif the user hasn’t granted App Tracking Transparency (ATT) permission - Always Handle Both Cases: Your Application should always be prepared to handle both limited and full Connexion scenarios
Checking ATT Status:
// Check if user has granted tracking permissionconst trackingStatus = await SocialLogin.providerSpecificCall({call: 'facebook#requestTracking',options: {}});console.log('Tracking status:', trackingStatus.status); // 'authorized', 'denied', 'notDetermined', or 'restricted'Recommended Implementation if access_token is preferred:
async function loginWithFacebook() {try {// Check ATT status firstconst trackingStatus = await SocialLogin.providerSpecificCall({call: 'facebook#requestTracking',options: {}});const result = await SocialLogin.login({provider: 'facebook',options: {permissions: ['email', 'public_profile'],limitedLogin: trackingStatus.status === 'denied' // Auto-adjust based on ATT}});// Handle different response types based on limited loginif (result.result.accessToken) {// Your app logic should work with both limited and full loginconsole.log('Login successful:', result);}} catch (error) {console.error('Facebook login error:', error);}}What Happens in Limited Login:
- Reduced Data Access: Some Utilisateur data may not be Disponible
- Different Token Types: Access tokens may have different capabilities
- Privacy Compliance: Helps comply with iOS privacy requirements
Important: Always test your app with both limited and full login scenarios to ensure your app works correctly in both cases. You can learn more about Limited Login here.
-
Get Utilisateur Profil Data
After successful Connexion, you can retrieve additional Profil Information:
async function getFacebookProfile() {try {const profileResponse = await SocialLogin.providerSpecificCall({call: 'facebook#getProfile',options: {fields: ['id', 'name', 'email', 'first_name', 'last_name', 'picture']}});console.log('Facebook profile:', profileResponse.profile);return profileResponse.profile;} catch (error) {console.error('Failed to get Facebook profile:', error);return null;}}// Example usage after loginasync function loginAndGetProfile() {const loginResult = await loginWithFacebook();if (loginResult) {const profile = await getFacebookProfile();if (profile) {console.log('User ID:', profile.id);console.log('Name:', profile.name);console.log('Email:', profile.email);console.log('Profile Picture:', profile.picture?.data?.url);}}}Available Profile Fields: You can request any fields available in Facebook’s Graph API. Common fields include:
id,name,email,first_name,last_name,picture,birthday,gender,location,hometown. Note that some fields may require additional permissions.Token Type Limitation: The
getProfilecall only works when you have an access token (standard login with tracking allowed). If the user denied tracking or you’re using limited login (JWT token only), this call will fail. In that case, use the profile data provided in the initial login response.
⚠️ Critical: Backend Token Handling
Section titled “⚠️ Critical: Backend Token Handling”Your backend must handle two different token types because iOS Utilisateurs can receive either access tokens or JWT tokens depending on their Application Tracking Transparency choice, while Android Utilisateurs always receive access tokens.
Token Types by Platform
Section titled “Token Types by Platform”| Platform | limitedLogin Setting | Utilisateur ATT Choice | Result Token Type |
|---|---|---|---|
| iOS | true | Any | JWT Token |
| iOS | false | Allows tracking | Access Token |
| iOS | false | Denies tracking | JWT Token (auto-override) |
| Android | Any | N/A | Access Token (always) |
Backend Implementation
Section titled “Backend Implementation”-
Detect Token Type and Handle Accordingly
async function loginWithFacebook() {try {const loginResult = await SocialLogin.login({provider: 'facebook',options: {permissions: ['email', 'public_profile'],limitedLogin: false // iOS: depends on ATT, Android: ignored}});if (loginResult.accessToken) {// Access token (Android always, iOS when tracking allowed)return handleAccessToken(loginResult.accessToken.token);} else if (loginResult.idToken) {// JWT token (iOS only when tracking denied or limitedLogin: true)return handleJWTToken(loginResult.idToken);}} catch (error) {console.error('Facebook login error:', error);}} -
Firebase Integration Exemple
import { OAuthProvider, FacebookAuthProvider, signInWithCredential } from 'firebase/auth';async function handleAccessToken(accessToken: string, nonce: string) {// For access tokens, use OAuthProvider (new method)const fbOAuth = new OAuthProvider("facebook.com");const credential = fbOAuth.credential({idToken: accessToken,rawNonce: nonce});try {const userResponse = await signInWithCredential(auth, credential);return userResponse;} catch (error) {console.error('Firebase OAuth error:', error);return false;}}async function handleJWTToken(jwtToken: string) {// For JWT tokens, send to your backend for validationtry {const response = await fetch('/api/auth/facebook-jwt', {method: 'POST',headers: {'Content-Type': 'application/json',},body: JSON.stringify({ jwtToken })});const result = await response.json();return result;} catch (error) {console.error('JWT validation error:', error);return false;}} -
Backend JWT Validation
// Backend: Validate JWT token from Facebookimport jwt from 'jsonwebtoken';import { Request, Response } from 'express';app.post('/api/auth/facebook-jwt', async (req: Request, res: Response) => {const { jwtToken } = req.body;try {// Verify JWT token with Facebook's public key// See: https://developers.facebook.com/docs/facebook-login/limited-login/token/validating/#standard-claimsconst decoded = jwt.verify(jwtToken, getFacebookPublicKey(), {algorithms: ['RS256'],audience: process.env.FACEBOOK_APP_ID,issuer: 'https://www.facebook.com' // From: https://www.facebook.com/.well-known/openid-configuration/?_rdr});// Extract user info from JWTconst userInfo = {id: decoded.sub,email: decoded.email,name: decoded.name,isJWTAuth: true};// Create your app's session/tokenconst sessionToken = createUserSession(userInfo);res.json({success: true,token: sessionToken,user: userInfo});} catch (error) {console.error('JWT validation failed:', error);res.status(401).json({ success: false, error: 'Invalid token' });}}); -
Generic Backend Token Handler
// Handle both token types in your backendasync function authenticateFacebookUser(tokenData: any) {if (tokenData.accessToken) {// Handle access token - validate with Facebook Graph APIconst response = await fetch(`https://graph.facebook.com/me?access_token=${tokenData.accessToken}&fields=id,name,email`);const userInfo = await response.json();return {user: userInfo,tokenType: 'access_token',expiresIn: tokenData.expiresIn || 3600};} else if (tokenData.jwtToken) {// Handle JWT token - decode and validate// See: https://developers.facebook.com/docs/facebook-login/limited-login/token/validating/#standard-claimsconst decoded = jwt.verify(tokenData.jwtToken, getFacebookPublicKey());return {user: {id: decoded.sub,name: decoded.name,email: decoded.email},tokenType: 'jwt',expiresIn: decoded.exp - Math.floor(Date.now() / 1000)};} else {throw new Error('No valid token provided');}}
Key Considerations
Section titled “Key Considerations”Access Token (Standard Login):
- ✅ Android: Always Disponible (iOS-only restrictions don’t apply)
- ✅ iOS: Only when Utilisateur explicitly allows Application tracking
- ✅ Can be used to access Facebook Graph API
- ✅ Longer expiration times
- ✅ More Utilisateur data Disponible
- ❌ Becoming less common on iOS as Utilisateurs increasingly deny tracking
JWT Token (iOS-Only Privacy Mode):
- ❌ Android: Never occurs (not supported)
- ✅ iOS: When tracking denied or
limitedLogin: true - ✅ Respects iOS Utilisateur privacy preferences
- ❌ Contains basic Utilisateur Info only
- ❌ Shorter expiration times
- ❌ No access to Facebook Graph API
- ⚠️ Now the most common scenario for iOS Utilisateurs
Platform-Specific Behavior:
- iOS apps: Must handle both access tokens AND JWT tokens
- Android apps: Only need to handle access tokens
- Cross-platform apps: Must implement both token handling methods
Essential for iOS: You MUST implement both token handling methods. Many iOS developers assume they’ll always get access tokens and their apps break when users deny tracking.
Secure Context Requirements (Web/Capacitor)
Section titled “Secure Context Requirements (Web/Capacitor)”Crypto API Limitations
Section titled “Crypto API Limitations”The updated Facebook Connexion flow requires the Web Crypto API for nonce generation, which is only Disponible in secure contexts:
// This requires secure context (HTTPS or localhost)async function sha256(message: string) { const msgBuffer = new TextEncoder().encode(message); const hashBuffer = await crypto.subtle.digest("SHA-256", msgBuffer); // ❌ Fails in insecure context // ...}Développement Environment Issues
Section titled “Développement Environment Issues”Common Problem: ionic serve with HTTP URLs breaks Facebook authentication
| Environment | Crypto API Disponible | Facebook Connexion Works |
|---|---|---|
http://localhost:3000 | ✅ Yes | ✅ Yes |
http://127.0.0.1:3000 | ✅ Yes | ✅ Yes |
http://192.168.1.100:3000 | ❌ No | ❌ No |
https://any-domain.com | ✅ Yes | ✅ Yes |
Solutions for Capacitor Développement
Section titled “Solutions for Capacitor Développement”-
Use localhost for web Test
Terminal window # Instead of ionic serve --host=0.0.0.0ionic serve --host=localhost -
Activer HTTPS in Ionic
Terminal window ionic serve --ssl -
Test on actual Appareils
Terminal window # Capacitor apps run in secure context on devicesionic cap run iosionic cap run android -
Alternative nonce generation for Développement
async function generateNonce() {if (typeof crypto !== 'undefined' && crypto.subtle) {// Secure context - use crypto.subtlereturn await sha256(Math.random().toString(36).substring(2, 10));} else {// Fallback for development (not secure for production)console.warn('Using fallback nonce - not secure for production');return btoa(Math.random().toString(36).substring(2, 10));}}
Firebase Integration Remarque
Section titled “Firebase Integration Remarque”Recent Firebase documentation requires JWT tokens with nonces for Facebook authentication, regardless of login settings. This approach works with both limitedLogin: true and limitedLogin: false:
// Both modes can return JWT tokens depending on user choice const loginResult = await SocialLogin.login({ provider: 'facebook', options: { permissions: ['email', 'public_profile'], limitedLogin: false, // true = always JWT, false = depends on user tracking choice nonce: nonce } });Development Limitation: If you’re using ionic serve on a network IP (not localhost), Facebook login will fail due to crypto API restrictions. Use localhost or HTTPS for web testing.
Production Safety: Capacitor apps on iOS/Android always run in secure contexts, so this limitation only affects web development environments.
Dépannage
Section titled “Dépannage”Problèmes courants and Solutions
Section titled “Problèmes courants and Solutions”-
Key hash errors on Android
- Double Vérifier that you’ve added the correct key hash to the Facebook Tableau de bord
- For Libération builds, make sure you’ve added both Débogage and Libération key hashes
- Verify you’re using the correct keystore when generating the hash
-
Facebook Connexion button doesn’t appear
- Verify all manifest entries are correct
- Vérifier that your Facebook Application ID and Client Token are correct
- Ensure you’ve properly initialized the SDK
-
Common iOS issues
- Make sure all Info.plist entries are correct
- Verify URL schemes are properly configured
- Vérifier that your Bundle ID matches what’s registered in the Facebook Tableau de bord
-
Before Test, Ajouter Test Utilisateurs in the Facebook Developer Console
- Go to Roles > Test Utilisateurs
- Créer a Test Utilisateur
- Use these credentials for Test
-
Test both Débogage and Libération builds
- Débogage Construction with Débogage key hash
- Libération Construction with Libération key hash
- Test on both emulator and physical Appareils
Remember to Test the full Connexion flow, including:
- Successful Connexion
- Connexion cancellation
- Erreur handling
- Déconnexion functionality