Page de l'application
Copiez un prompt de configuration avec les étapes d'installation et la guide markdown complet pour ce plugin.
Qu'affiche la page de l'application ?
Section intitulée « Qu'affiche la page de l'application ? »Tout d'abord, examinons la page principale de l'application :
Dans Capgo, une application représente votre application mobile intégrée au système d'actualisation en temps réel de Capgo. Cela vous permet de gérer les mises à jour, les canaux et les appareils de manière fluide.
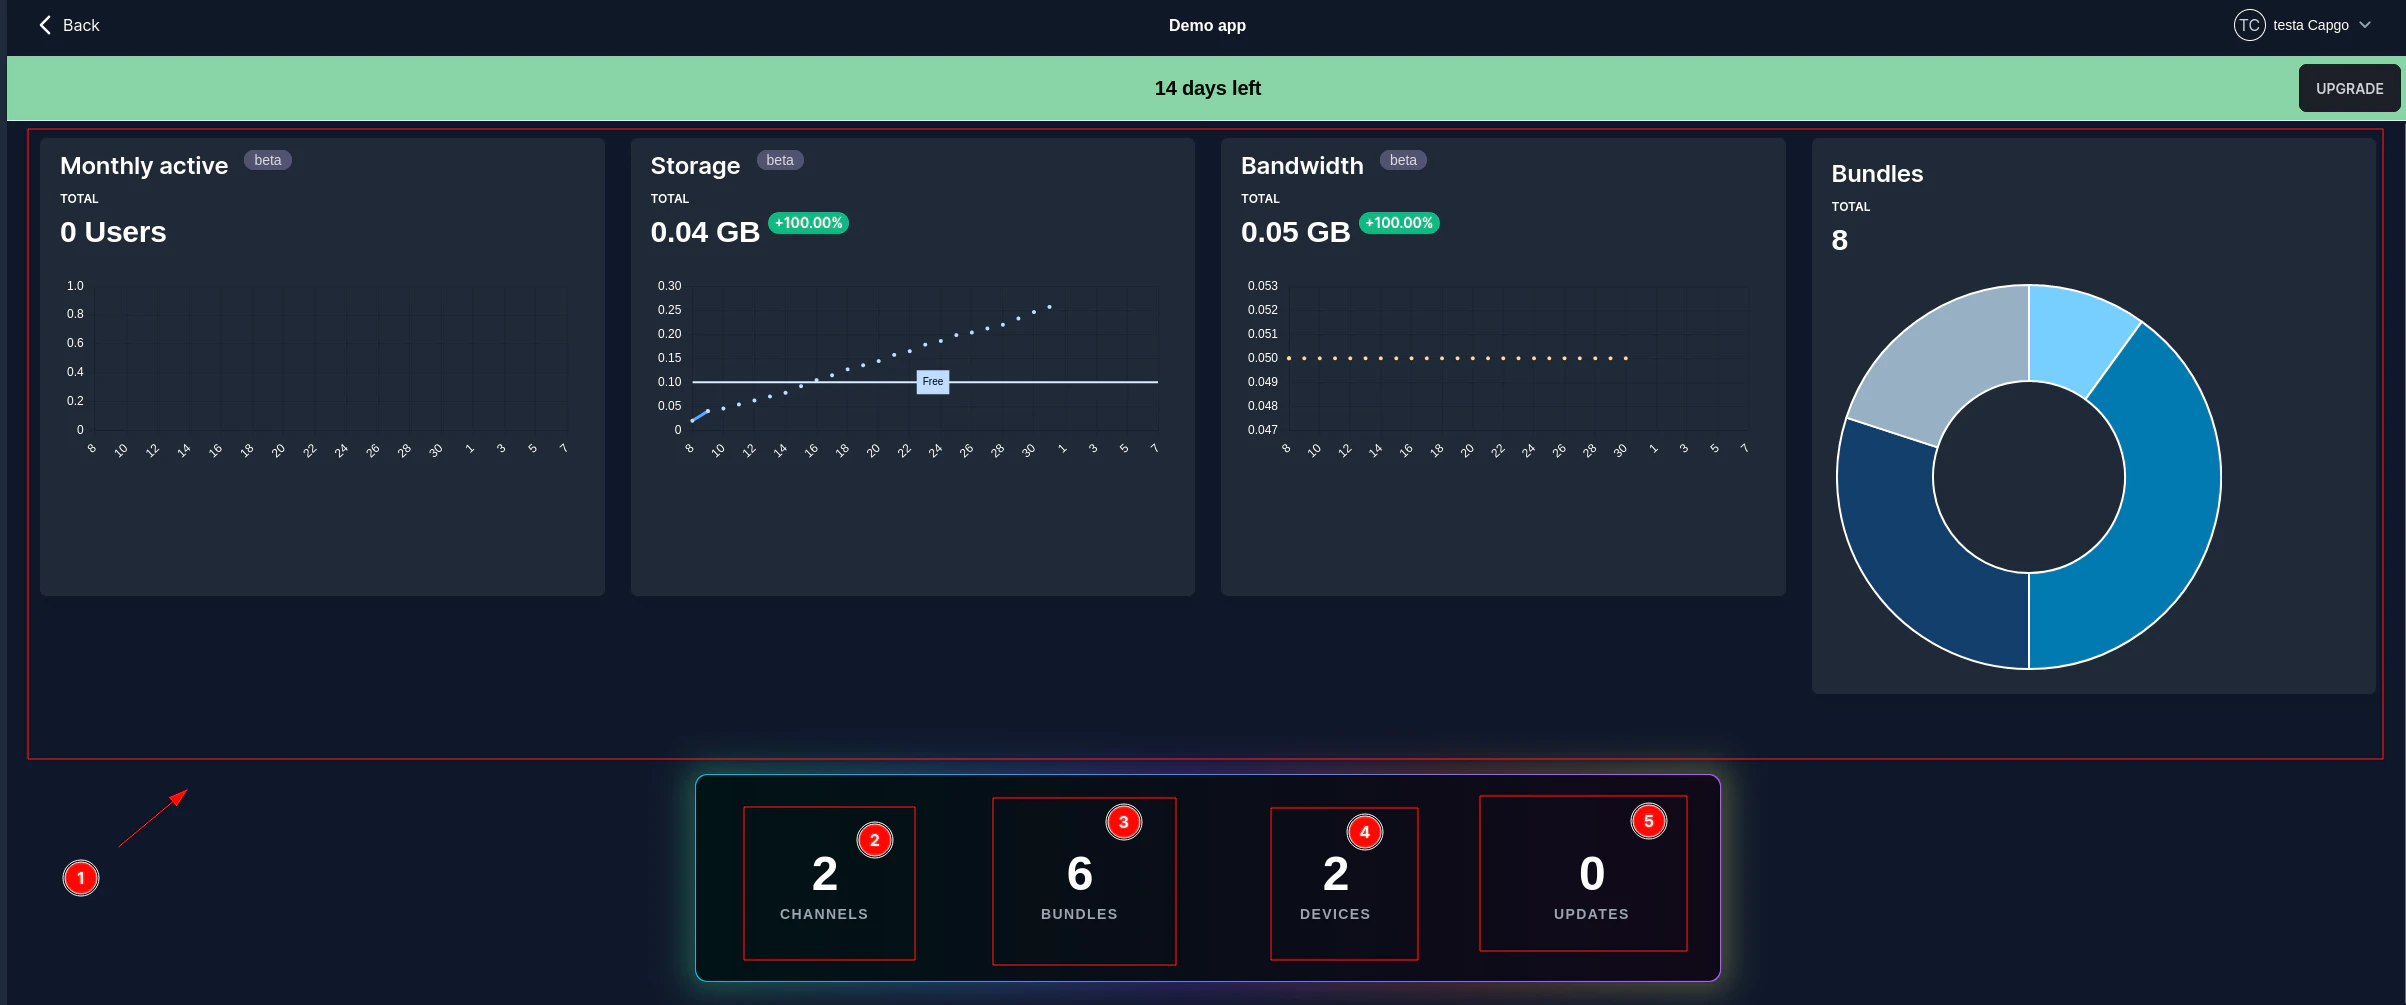
Prenez un peu de temps pour regarder cela. La page principale de l'application est divisée en plusieurs zones clés :
-
Barre de navigation supérieure : Fournit accès aux différentes sections de la gestion de votre application :
- Tableau de bord (1) : La vue actuelle, affichant des indicateurs clés et des résumés.
- Information (2) : Affiche les paramètres et les détails de votre application (voir la section « Information sur l'application » ci-dessous).
- Paquets (3) : Gérez les versions et les versions de votre application.
- Canaux (4) : Configurez et gérez différents canaux d'actualisation (par exemple, production, bêta).
- Appareils (5): Affichez et gérez les appareils enregistrés, y compris la définition d'overrides spécifiques.
- Journaux (6): Accédez aux journaux détaillés et aux rapports d'erreurs pour votre application.
- Constructions (7): Affichez et gérez vos constructions d'application.
-
Affichage des statistiques : Visualisez les métriques importantes pour la dernière période de facturation (les données reflètent l'utilisation de votre jour de facturation, et non du 1er du mois):
- Utilisateurs actifs du mois (8): Suivez le nombre d'utilisateurs uniques actifs au fil du temps.
- Stockage (9): Montre la consommation de stockage actuelle.
- Débit de bande (10): Affiche l'utilisation du débit de bande.
- Bundle Actif (11): Montre la répartition des appareils actifs sur différents bundles d'applications.
-
Cartes de Résumé : Propose un aperçu rapide des principaux comptes :
- Téléchargements de Bundles (12): Nombre total de bundles d'applications téléchargés.
- Statistiques des Mises à Jour (13): Nombre total de mises à jour effectuées, y compris les requêtes, les installations et les échecs.
- Statistiques de Déploiement (14): Nombre total de déploiements.
-
Options d'affichage (15-18): Contrôles pour filtrer et afficher les statistiques :
- Journalier (15): Afficher les statistiques sur une base journalière.
- Cumulatif (16): Afficher les statistiques cumulatives sur le temps.
- Période facturation (17): Afficher les statistiques pour la période facturation actuelle.
- Intervalle de dates (18): Sélectionnez une plage de dates personnalisée (par exemple, les 30 derniers jours).
Informations sur l'application
Section intitulée “Informations sur l'application”Cette section correspond à l'onglet « Information » (1) dans la barre de navigation supérieure. Vous pouvez y consulter et gérer les détails et les paramètres cruciaux de votre application.
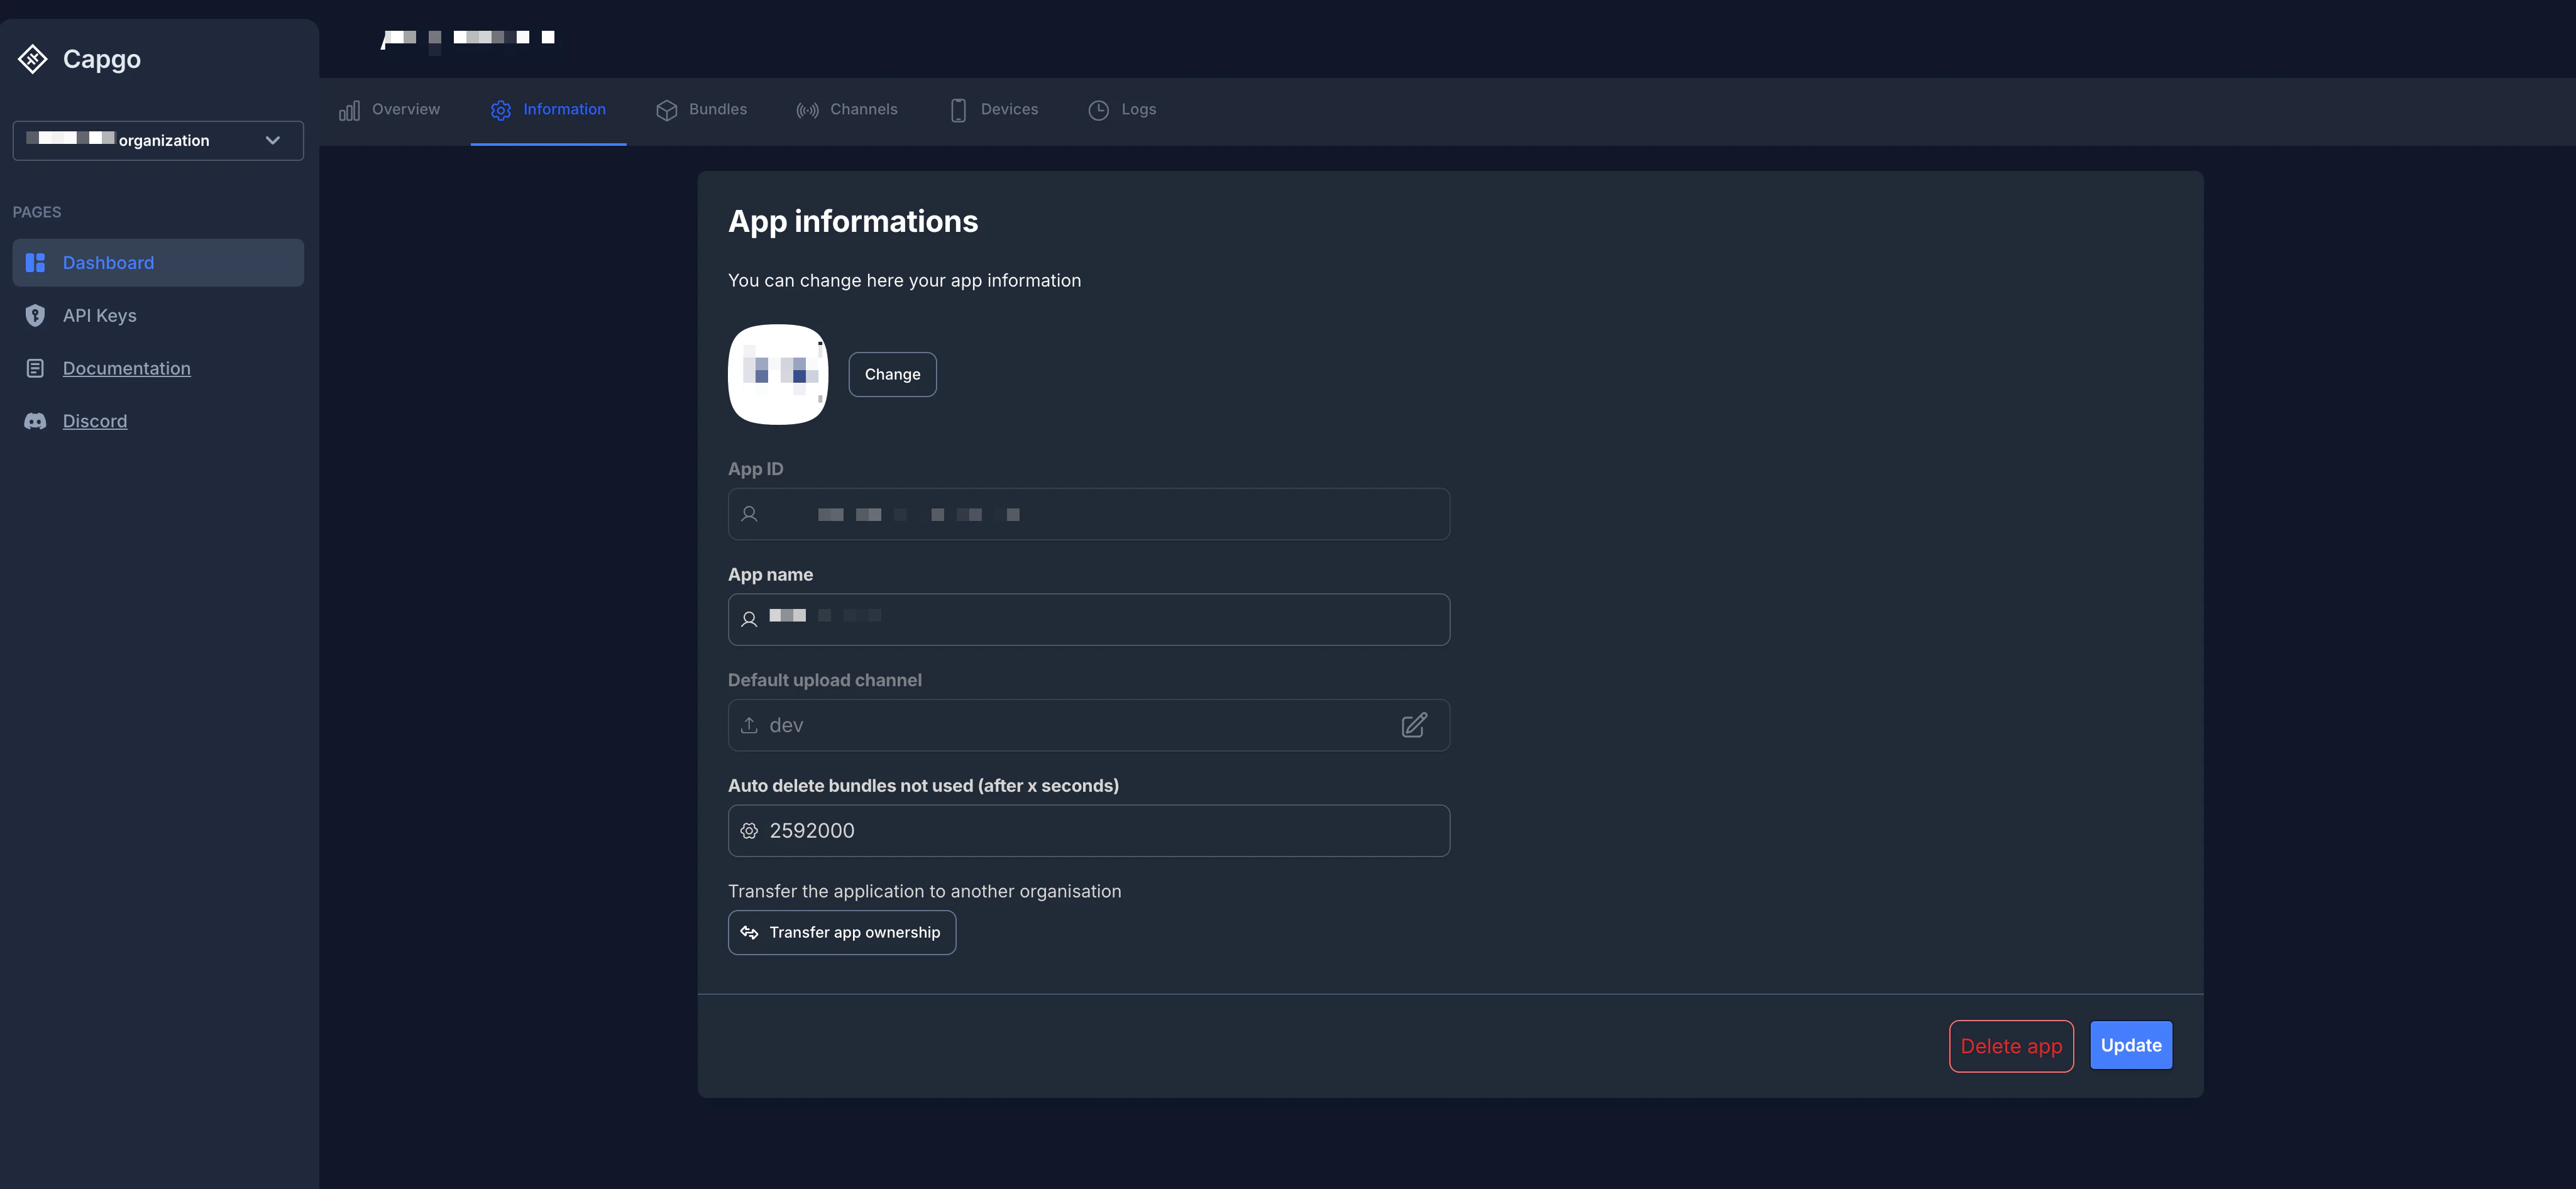
Voici une description détaillée des champs et des actions disponibles :
- Icône de l'application (2) : Affiche l'icône de votre application. Vous pouvez cliquer sur le bouton « Modifier » pour télécharger une nouvelle icône.
- ID de l'application (3) : Un identifiant unique pour votre application dans Capgo. Ce ID n'est pas modifiable.
- Nom de l'application (4) : Le nom affiché pour votre application. Vous pouvez le modifier si nécessaire.
- Canal de téléchargement par défaut (5) : Spécifie le canal par défaut auquel seront téléchargés les nouveaux bundles. Vous pouvez cliquer sur l'icône de modification pour sélectionner un canal de défaut différent.
- Canal de Téléchargement Par Défaut (6) : Spécifiez le canal par défaut à partir duquel les appareils téléchargeront les mises à jour. Vous pouvez cliquer sur l'icône de modification pour sélectionner un canal de téléchargement par défaut différent. Consultez la section « Configuration du Canal Par Défaut » ci-dessous pour plus d'informations. Supprimer automatiquement les Bundles non Utilisés (après x secondes) (7) : Cette configuration vous permet de supprimer automatiquement les anciens bundles qui n'ont pas été utilisés pendant une durée spécifiée (en secondes). Définissez sur pour désactiver la suppression automatique. Cela aide à gérer l'espace de stockage et à garder votre liste de bundles propre.
- Exposer les Métadonnées du Bundle au Plugin (8) : Lorsque cette option est activée, les champs de lien et de commentaire du bundle seront envoyés au plugin de mise à jour __CAPGO_KEEP_0__. Cette fonctionnalité nécessite une version du plugin supérieure ou égale à 7.35.0.
0Transfert de la Propriété de l'Application (9) : - Cette section fournit une option pour initier le transfert de votre application vers une organisation différente dont vous faites partie. When enabled, bundle link and comment fields will be sent to the Capacitor Updater plugin. This feature requires plugin version 7.35.0 or higher.
- Delete App Button Delete App Button
- Delete App Button Supprime définitivement votre application de Capgo. Cette action est irréversible et supprimera toutes les données associées, les ensembles, les canaux et les appareils.
- Mise à jour : Enregistre toutes les modifications que vous avez apportées aux champs éditables de cette page (par exemple, le nom de l'application, le canal de téléchargement par défaut, la configuration de suppression automatique des ensembles).
Configuration du canal par défaut
Sous-section intitulée « Configuration du canal par défaut »Le Le canal de téléchargement par défaut est l'une des configurations les plus importantes pour votre application. Il détermine quel canal les nouveaux appareils recevront des mises à jour lorsqu'ils se connectent pour la première fois à Capgo.
Comment fonctionnent les canaux par défaut
Sous-section intitulée « Comment fonctionnent les canaux par défaut »Lorsqu'un appareil demande une mise à jour à Capgo, le système détermine quel canal utiliser en fonction de la priorité suivante (priorité la plus élevée en premier) :
- Cartographie de l'appareil forcé: Si l'ID du dispositif est explicitement forcé à un canal dans les paramètres du canal, ce canal l'emporte toujours.
- Surcharge Cloud: Si le dispositif a été affecté à un canal via
setChannel()ou manuellement dans le tableau de bord, cette surcharge est utilisée. - Capacitor config
defaultChannel: Si défini dans votrecapacitor.config.*fichier, cela est utilisé pour les builds de test/bêta. - Canal de Téléchargement Par Défaut: La configuration définie ici—ce qui est utilisé par ~99% de vos utilisateurs de production.
Canaux Par Défaut Spécifiques à la Plateforme
Section intitulée « Canaux Par Défaut Spécifiques à la Plateforme »Vous pouvez configurer les canaux par défaut spécifiques à la plateforme—par exemple un pour iOS, un pour Android, et un pour Electron. Cela est utile lorsque :
- You want to roll out updates to one plateforme before the other
- You need different update strategies per plateforme
- You’re testing a new version on one plateforme while keeping the other stable
Pour configurer les paramètres par défaut par plateforme :
- Créez des canaux séparés pour chaque plateforme (par exemple
production-ios,production-android, etproduction-electron) - Dans les paramètres de chaque canal, activez uniquement la plateforme pertinente (iOS, Android ou Electron)
- Marquez les deux canaux comme « par défaut » - Capgo permet cela lorsque les canaux ciblent différentes plateformes
Lorsqu'un appareil demande une mise à jour :
- Les appareils iOS recevront des mises à jour du canal par défaut iOS activé
- Les appareils Android recevront des mises à jour du canal par défaut Android activé
Un canal par défaut unique (Recommandé pour la plupart des applications)
Section intitulée « Canal par défaut unique (Recommandé pour la plupart des applications) »Pour la plupart des applications, un canal par défaut unique qui prend en charge les trois principaux plateformes est l'approche la plus simple :
- Créez un canal (par exemple,
production) - Assurez-vous que les boutons iOS, Android et Electron soient activés
- Le marquez comme le canal par défaut
Cela garantit un comportement cohérent sur toutes les plateformes et simplifie votre flux de publication.
Changement du Canal par Défaut
Section intitulée « Changement du Canal par Défaut »Lorsque vous changez le canal par défaut :
- Les nouveaux appareils recevront immédiatement des mises à jour à partir du nouveau canal par défaut
- Les appareils existants ceux qui ont déjà une affectation de canal (via le surcroît ou la force) NE seront PAS automatiquement réassignés
- Pour déplacer les appareils existants, vous devez soit :
- Utiliser
setChannel()pour les surprendre programmationnellement - Les forcer au nouveau canal dans le tableau de bord
- Supprimer leurs entrées de appareil (ils se réinscriront avec le nouveau par défaut)
- Utiliser
Conseil: Testez toujours votre nouveau canal par défaut avec un petit groupe d'appareils forcés avant de le rendre par défaut pour tous les utilisateurs.
Continuez depuis la page d'application
Section intitulée “Continuez depuis la page d'application”Si vous utilisez Page d'application planer le tableau de bord et les opérations API, connectez-le avec API Vue d'ensemble pour les détails d'implémentation dans API Vue d'ensemble, Introduction pour les détails d'implémentation dans Introduction, API Clés pour les détails d'implémentation dans API Clés, Appareils pour les détails d'implémentation dans Appareils, et Bundles pour les détails d'implémentation dans Bundles.