Facebook ログインのセットアップ
インストール手順とこのプラグインの完全なマークダウンガイドを含むセットアップ用の質問をコピーする
このガイドでは、Capgo Social LoginでFacebookログインを設定する方法を学びます。必要なものは以下のとおりです。
- Facebook開発者アカウント
- アプリのパッケージ名/バンドルID
- Androidのキーハッシュ生成用にターミナルへのアクセス
基本設定
基本設定Facebookアプリが既に存在しない場合は、以下の手順に従ってください。
-
Facebookアプリを作成する
チュートリアルを参照してください アプリを作成する
-
Facebookログインをアプリに追加する
Facebook開発者ダッシュボードで、Facebookログイン製品をアプリに追加する
-
アプリを一般ユーザーに公開する前に、以下の手順に従ってください。 チュートリアルを参照してください アプリを公開する
重要な情報
重要情報ここでは、統合に必要なキーアイテムを探すことができます。
-
CLIENT_TOKEN: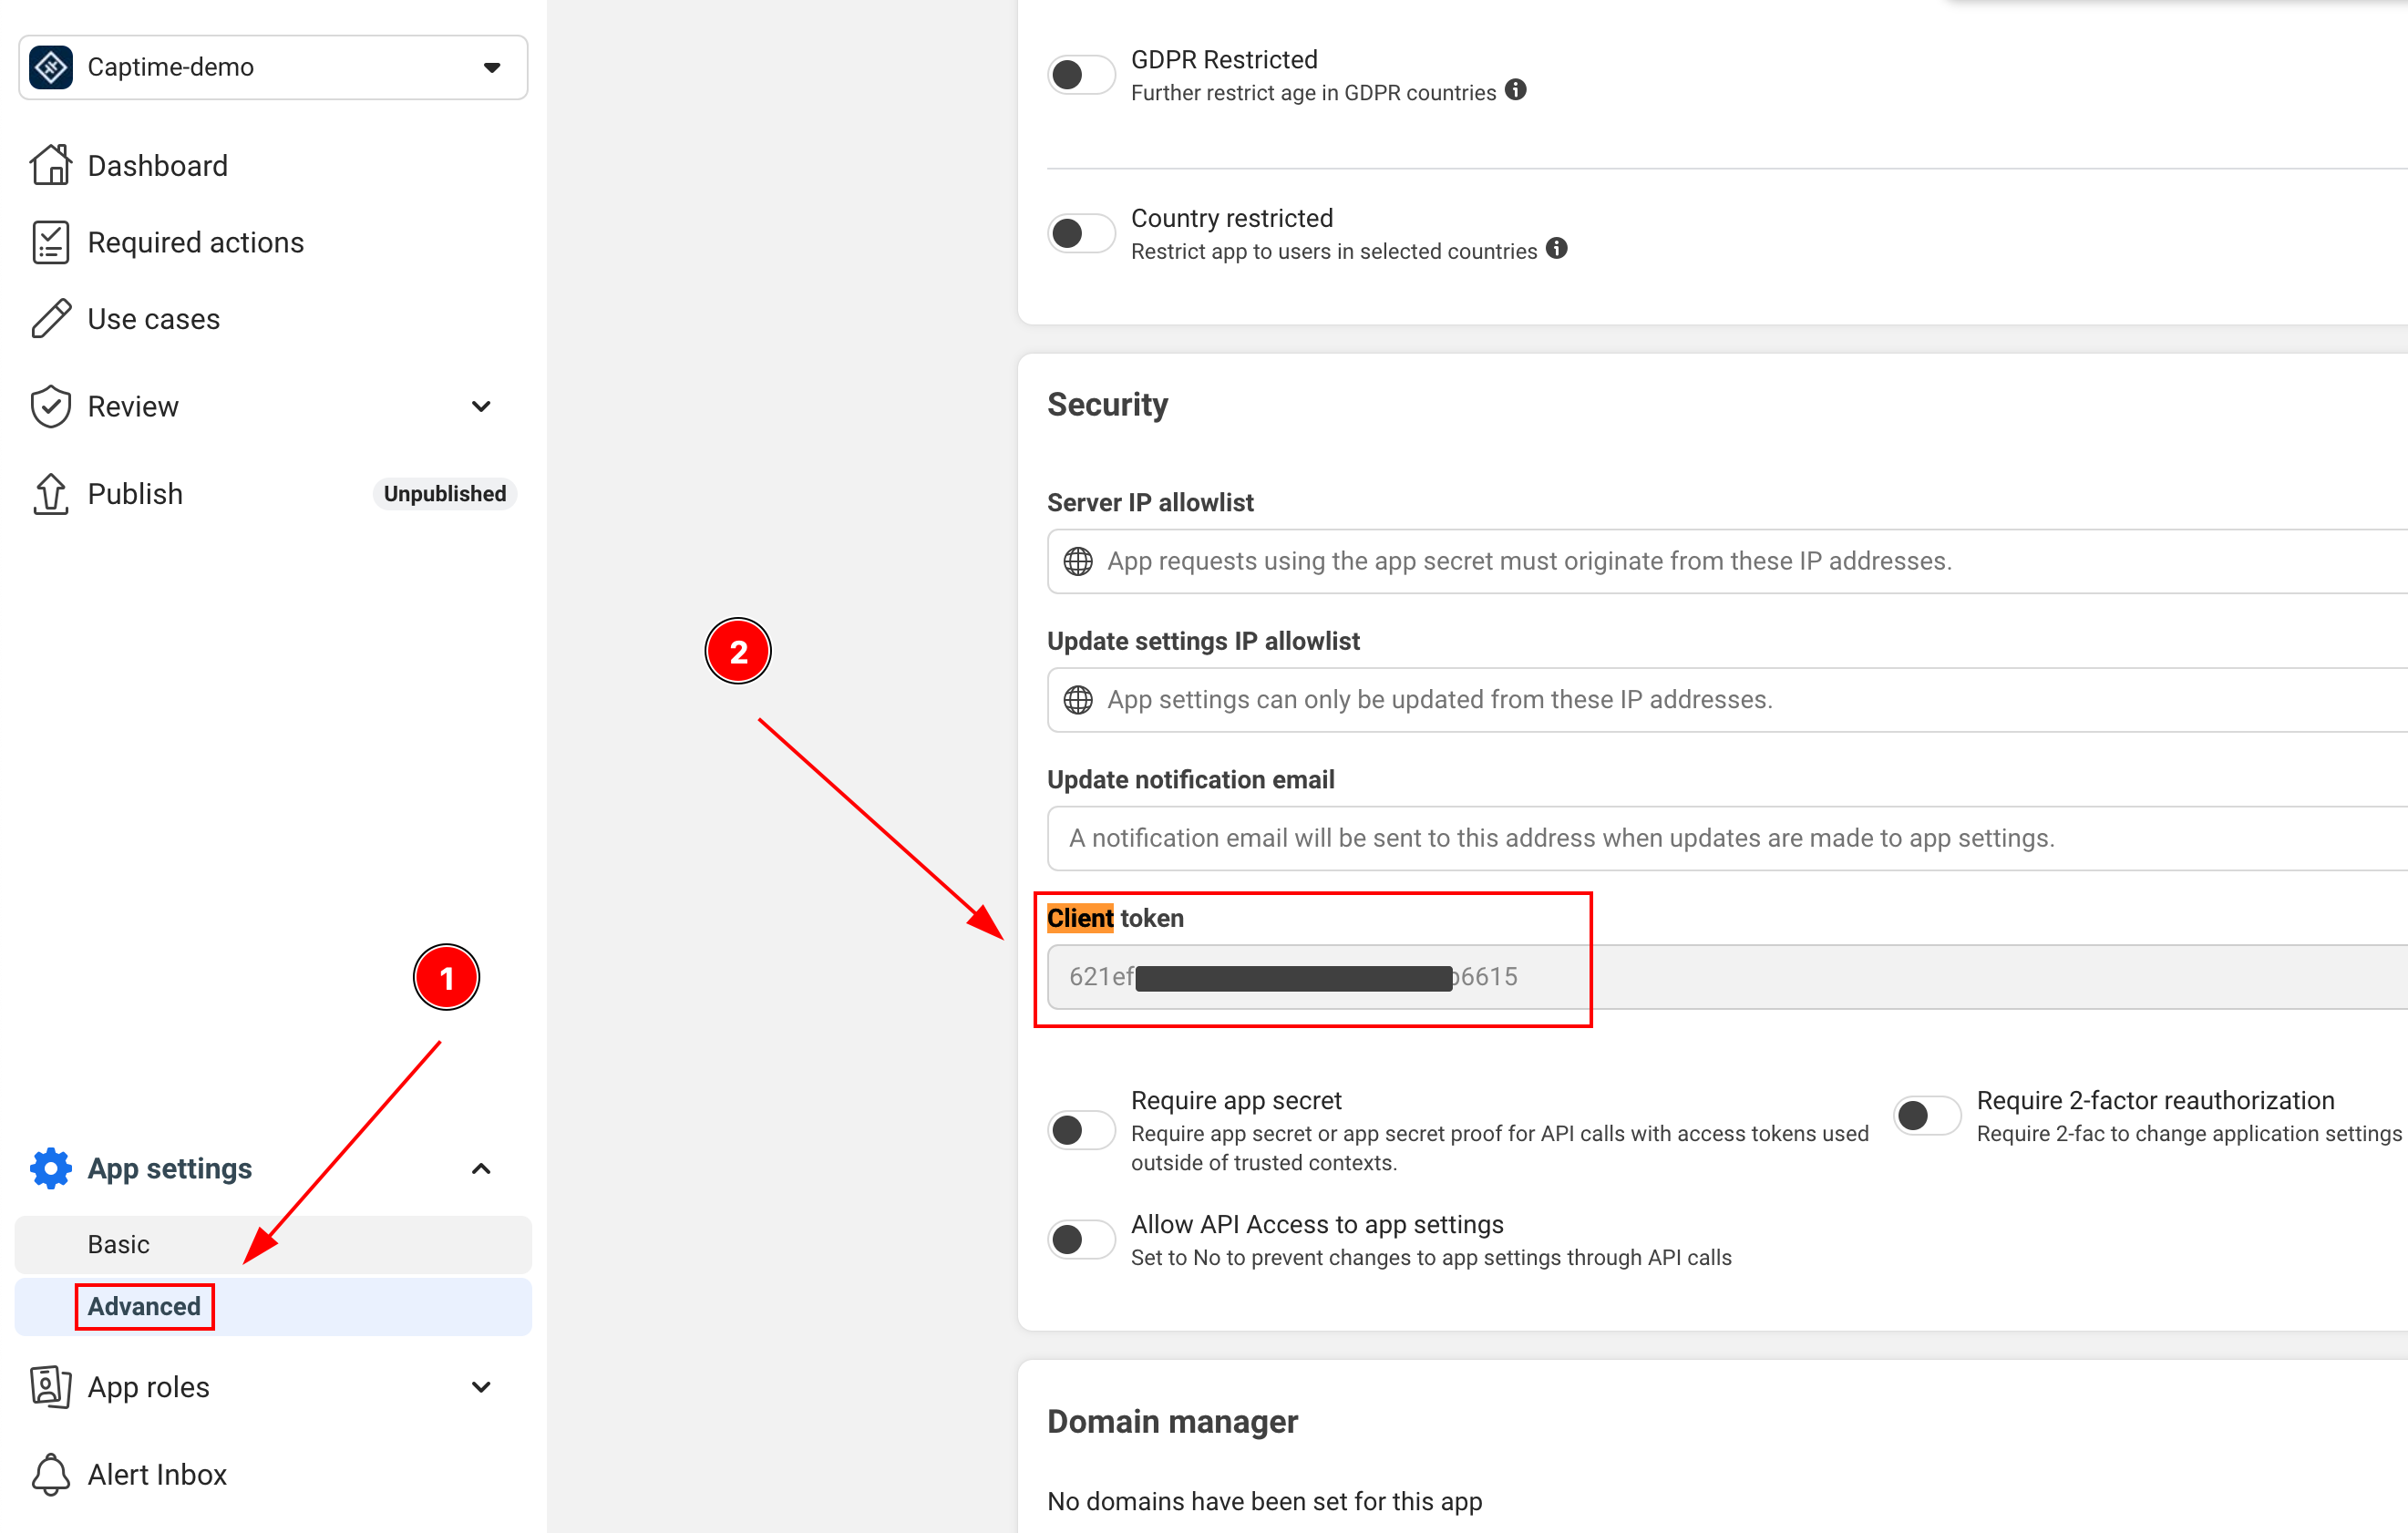
-
APP_ID: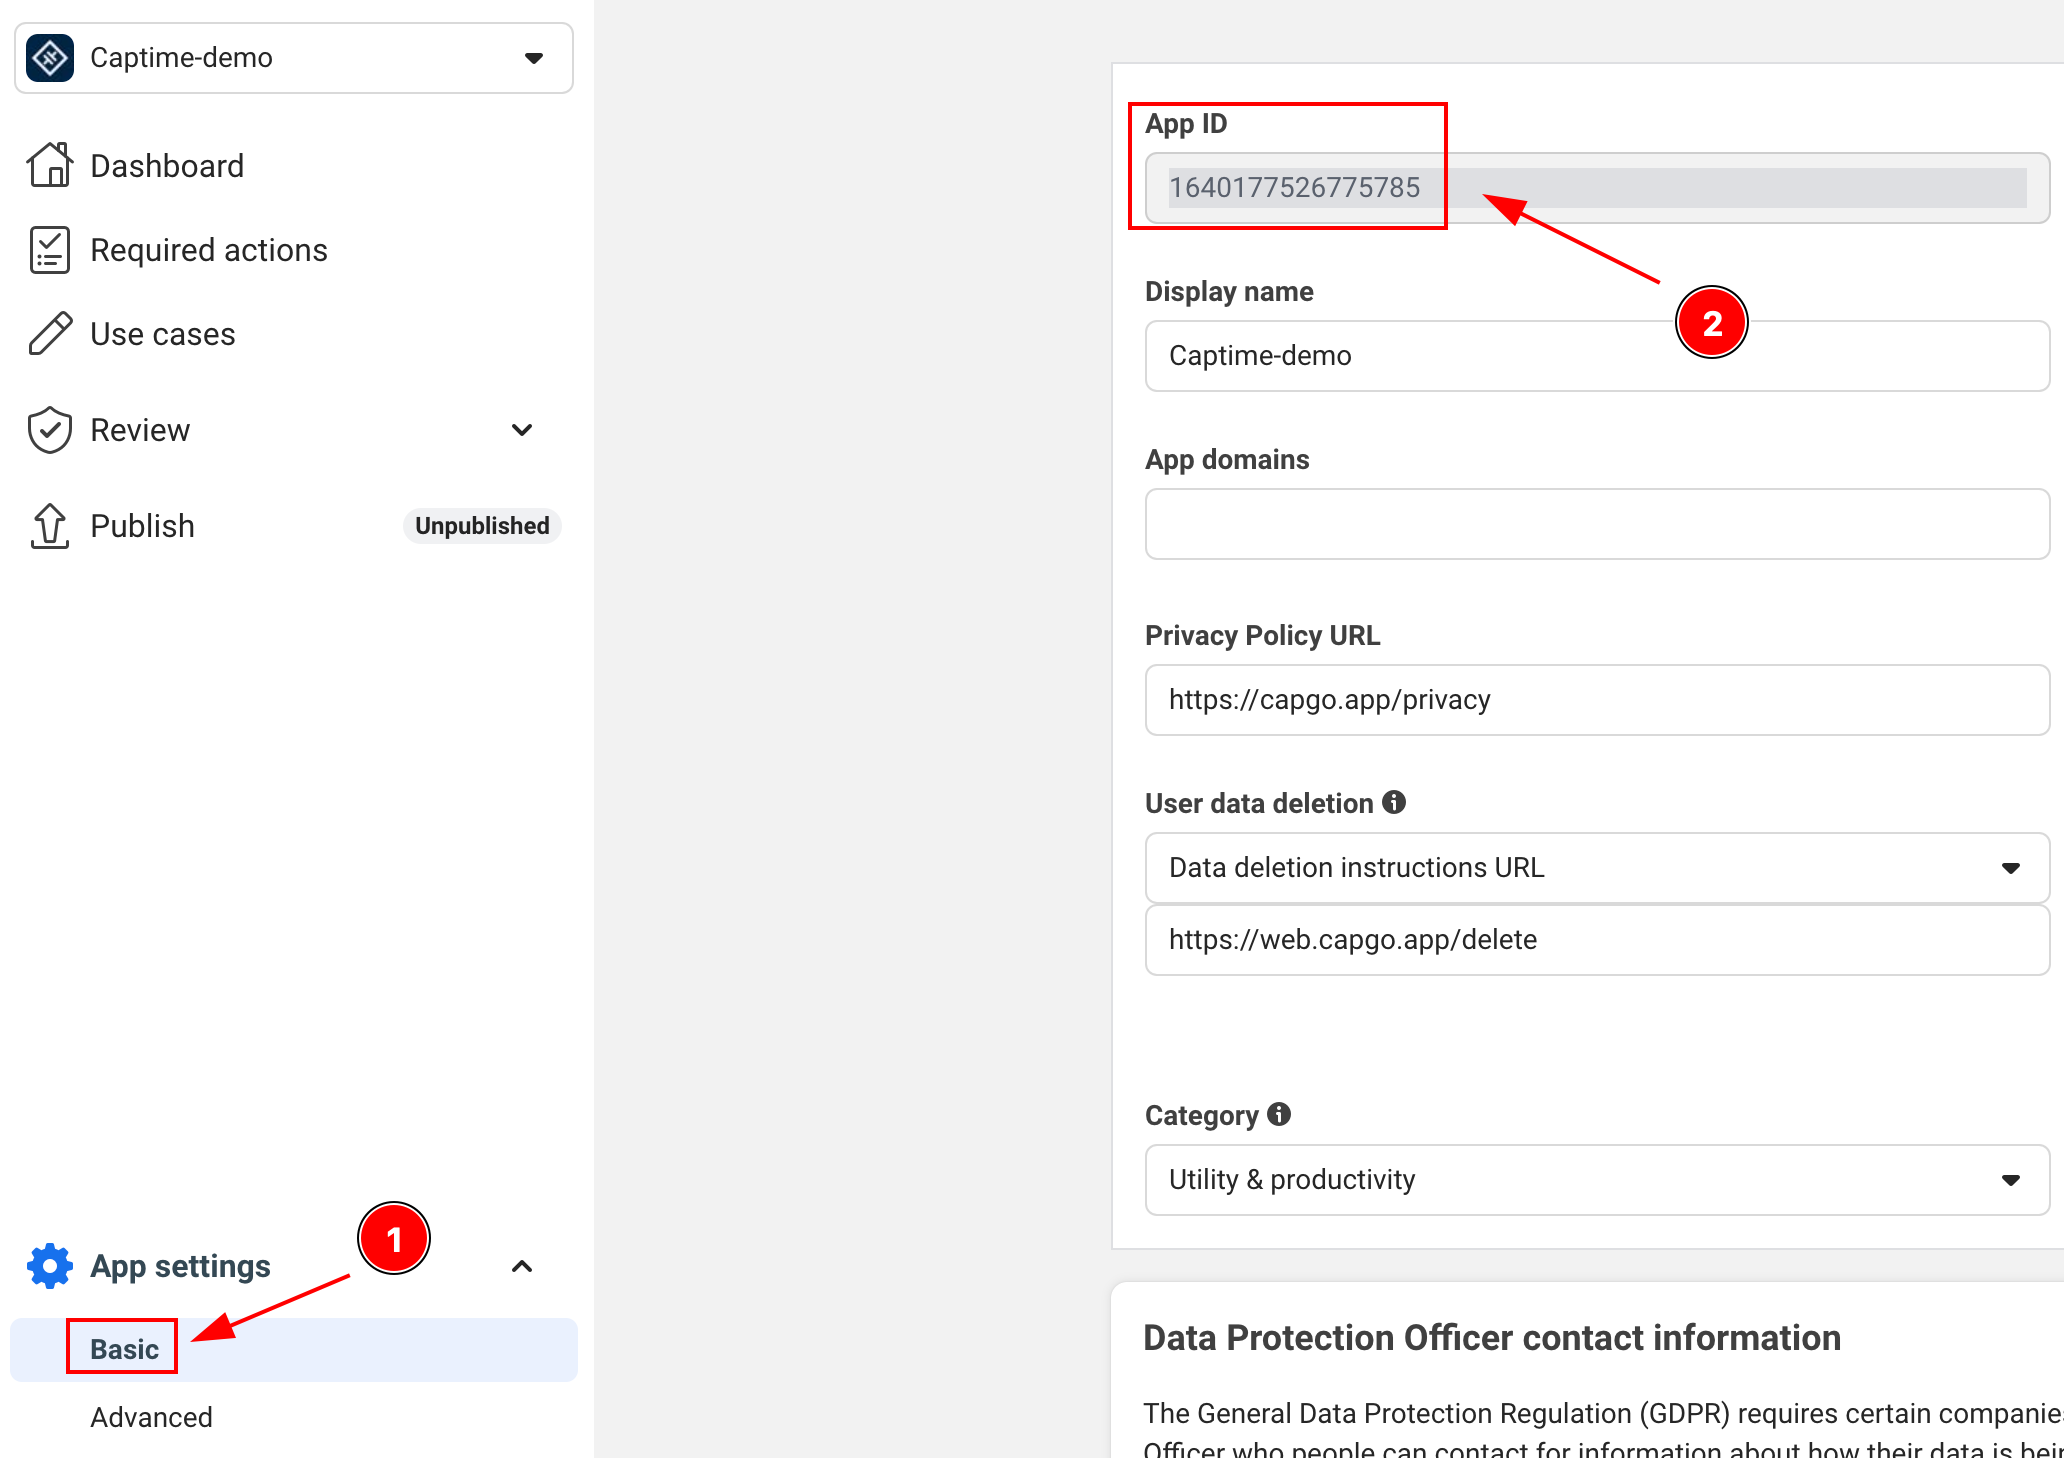
-
APP_NAME: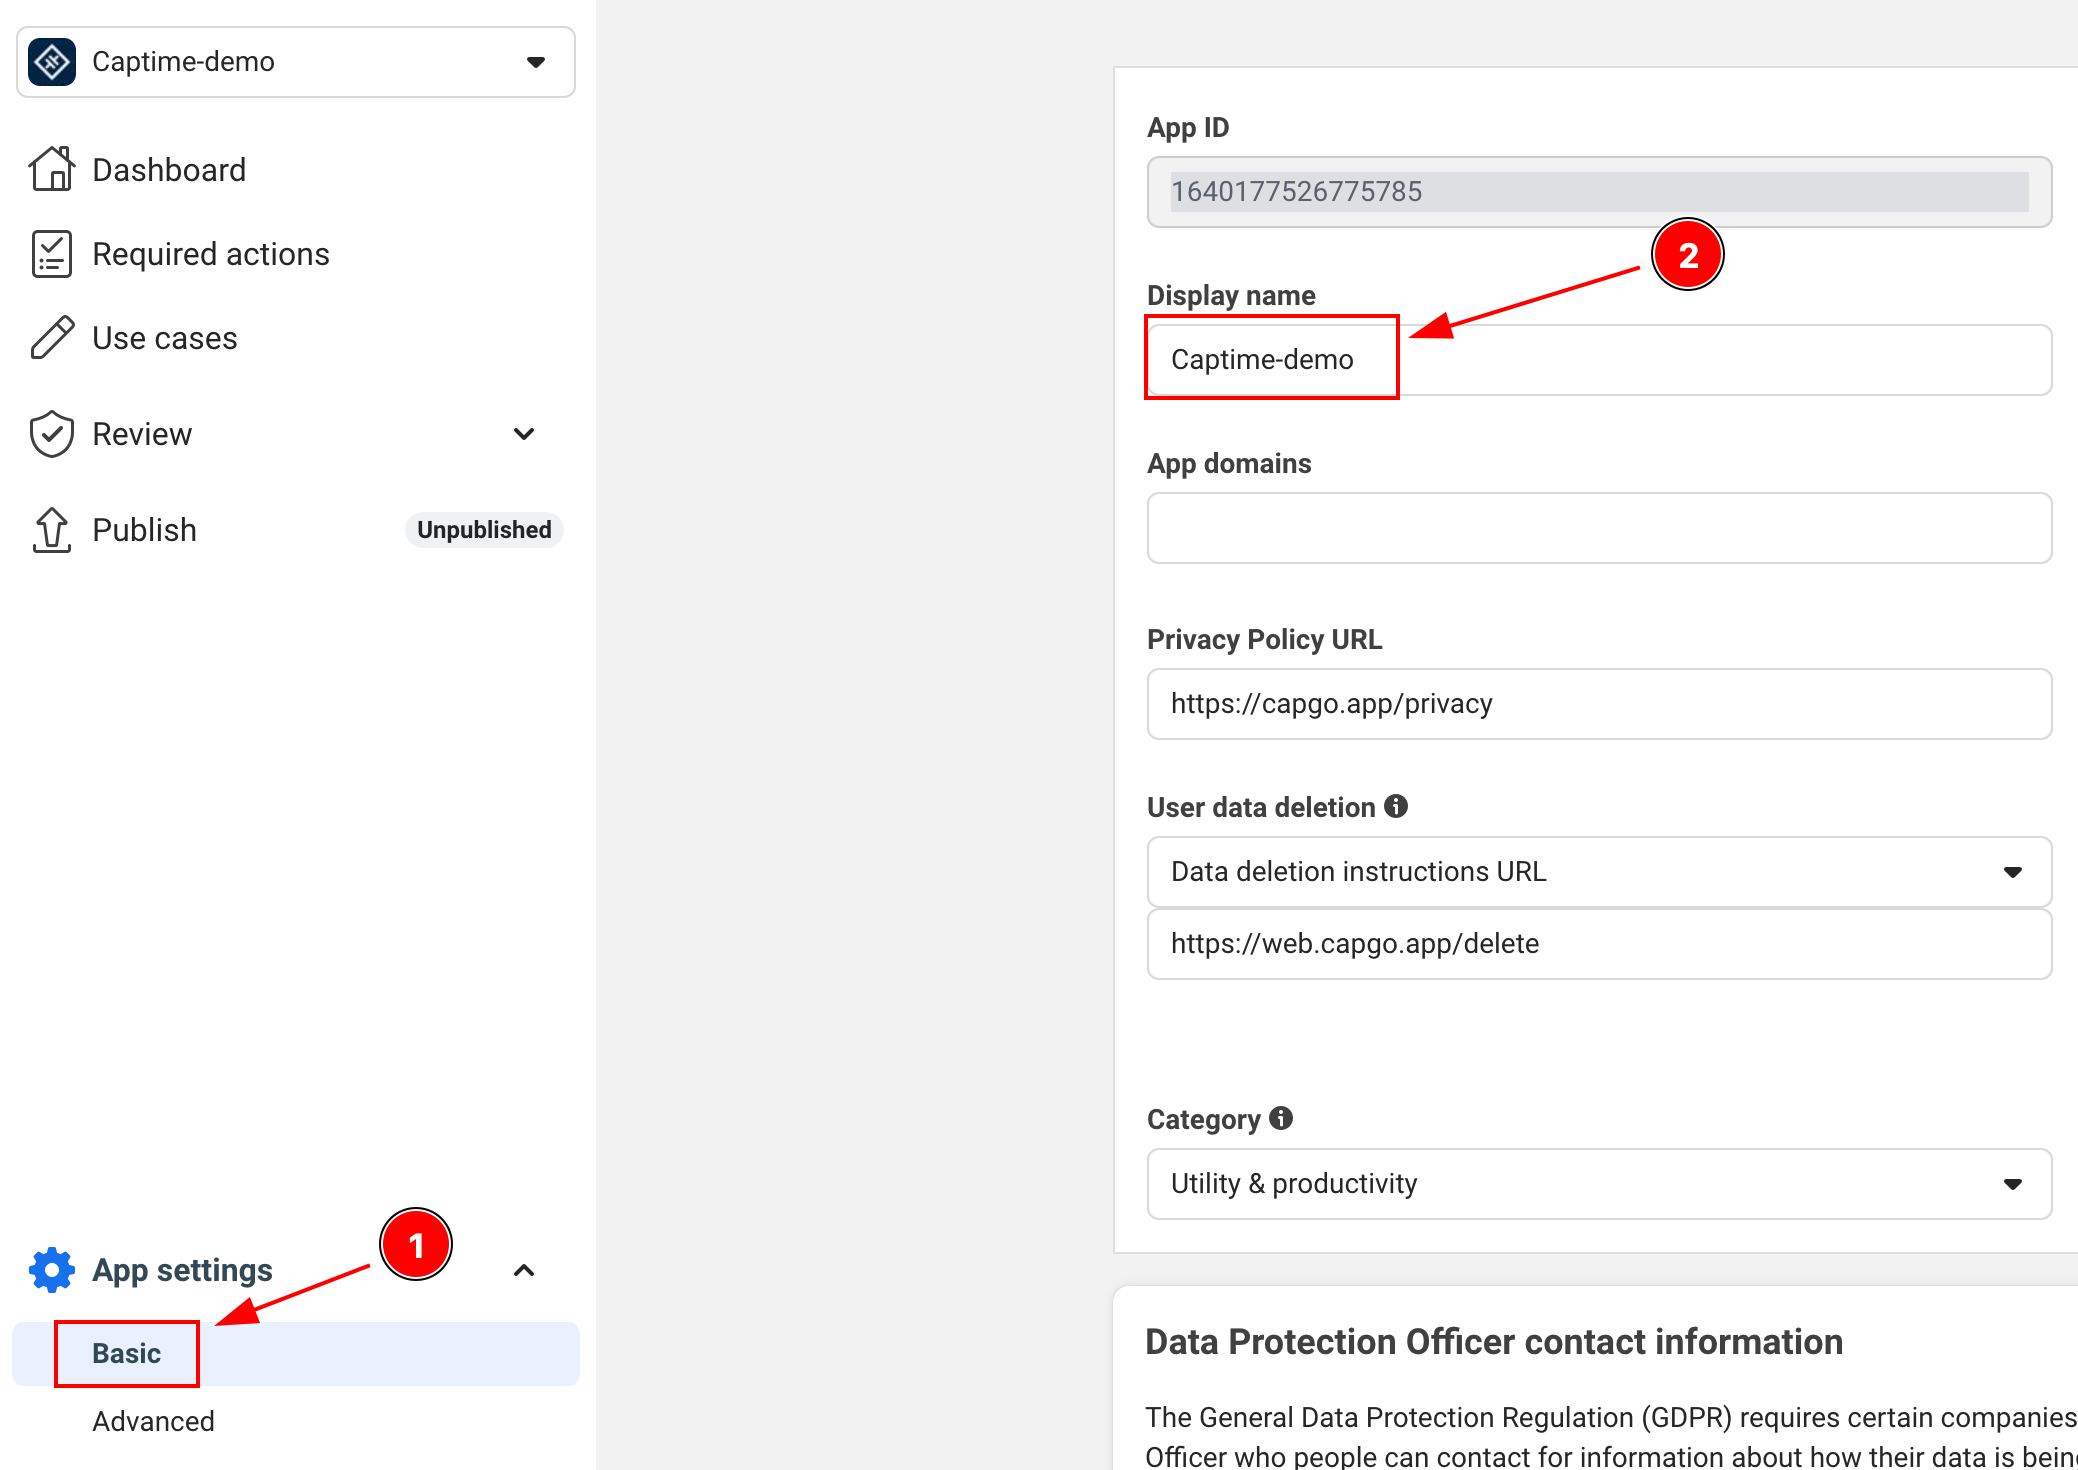
Androidの設定
重要情報-
インターネットのパーミッションを追加してください
AndroidManifest.xmlこの行が存在することを確認してください
<uses-permission android:name="android.permission.INTERNET"/> -
Androidのキーハッシュを生成してください
Facebookのセキュリティ上の要件です。このステップは不可欠です。ターミナルを開いて、以下のコマンドを実行してください:
ターミナルウィンドウ keytool -exportcert -alias androiddebugkey -keystore ~/.android/debug.keystore | openssl sha1 -binary | openssl base64 -Aパスワードの入力を求められたら、次の値を使用してください:
android -
Facebookアプリの設定にハッシュ値を追加する
- Facebook Developersのアプリのダッシュボードに移動する
- 設定 > 基本設定
- 「Android」セクションまで下にスクロールする
- Androidが追加されていない場合は、「Add Platform」をクリックし、詳細を入力してください
- 生成したキー ハッシュを追加してください
- 実稼働用には、デバッグとリリースの両方のキー ハッシュを追加してください
-
を更新してください
AndroidManifest.xmlに含めるようにしてください<application>...<activity android:name="com.facebook.FacebookActivity"android:configChanges="keyboard|keyboardHidden|screenLayout|screenSize|orientation"android:label="@string/app_name" /><activityandroid:name="com.facebook.CustomTabActivity"android:exported="true"><intent-filter><action android:name="android.intent.action.VIEW" /><category android:name="android.intent.category.DEFAULT" /><category android:name="android.intent.category.BROWSABLE" /><data android:scheme="FB[APP_ID]" /></intent-filter></activity></application>
iOSの設定
iOS セットアップ-
Facebook Developer Console に iOS プラットフォームを追加する
- Facebook Developers のアプリダッシュボードに移動する
- 設定 > 基本設定
- ページの下部までスクロールし、「Add Platform」をクリックする
- iOS を選択し、必要な情報を入力する
-
Xcode プロジェクトを開き、Info.plist に移動する
-
Info.plist に次のエントリを追加する:
<key>FacebookAppID</key><string>[APP-ID]</string><key>FacebookClientToken</key><string>[CLIENT-TOKEN]</string><key>FacebookDisplayName</key><string>[APP-NAME]</string><key>LSApplicationQueriesSchemes</key><array><string>fbapi</string><string>fb-messenger-share-api</string></array><key>CFBundleURLTypes</key><array><dict><key>CFBundleURLSchemes</key><array><string>fb[APP-ID]</string></array></dict></array> -
を変更する
AppDelegate.swiftimport FBSDKCoreKit@UIApplicationMainclass AppDelegate: UIResponder, UIApplicationDelegate {func application(_ application: UIApplication, didFinishLaunchingWithOptions launchOptions: [UIApplication.LaunchOptionsKey: Any]?) -> Bool {// Override point for customization after application launch.// Initialize Facebook SDKFBSDKCoreKit.ApplicationDelegate.shared.application(application,didFinishLaunchingWithOptions: launchOptions)return true}func application(_ app: UIApplication, open url: URL, options: [UIApplication.OpenURLOptionsKey: Any] = [:]) -> Bool {// Called when the app was launched with a url. Feel free to add additional processing here,// but if you want the App API to support tracking app url opens, make sure to keep this callif (FBSDKCoreKit.ApplicationDelegate.shared.application(app,open: url,sourceApplication: options[UIApplication.OpenURLOptionsKey.sourceApplication] as? String,annotation: options[UIApplication.OpenURLOptionsKey.annotation])) {return true;} else {return ApplicationDelegateProxy.shared.application(app, open: url, options: options)}}}
アプリ内で Facebook ログインを使用する
「アプリ内で Facebook ログインを使用する」というセクション-
アプリ内で Facebook ログインを初期化する
import { SocialLogin } from '@capgo/capacitor-social-login';// Initialize during app startupawait SocialLogin.initialize({facebook: {appId: 'APP_ID',clientToken: 'CLIENT_TOKEN',}}) -
__CAPGO_KEEP_0__を実装する
async function loginWithFacebook() {try {const result = await SocialLogin.login({provider: 'facebook',options: {permissions: ['email', 'public_profile'],limitedLogin: false // See Limited Login section below for important details}});console.log('Facebook login result:', result);// Handle successful login} catch (error) {console.error('Facebook login error:', error);// Handle error}} -
ログインが成功した後、追加のプロファイル情報を取得できます
クリップボードにコピー
async function getFacebookProfile() {try {const profileResponse = await SocialLogin.providerSpecificCall({call: 'facebook#getProfile',options: {fields: ['id', 'name', 'email', 'first_name', 'last_name', 'picture']}});console.log('Facebook profile:', profileResponse.profile);return profileResponse.profile;} catch (error) {console.error('Failed to get Facebook profile:', error);return null;}}// Example usage after loginasync function loginAndGetProfile() {const loginResult = await loginWithFacebook();if (loginResult) {const profile = await getFacebookProfile();if (profile) {console.log('User ID:', profile.id);console.log('Name:', profile.name);console.log('Email:', profile.email);console.log('Profile Picture:', profile.picture?.data?.url);}}}トークンタイプ制限: この呼び出しは、トラッキングが許可された標準ログイン時にのみ機能します。ユーザーがトラッキングを拒否した場合、またはJWTトークンのみを使用している場合、この呼び出しは失敗します。その場合、初期ログイン応答から提供されるプロファイルデータを使用してください。
getProfile⚠️ Critical: バックエンドトークンハンドリング 重要: バックエンドトークンハンドリング 危険
iOSユーザーはアクセストークンまたはJWTトークンを受け取ることができますが、Androidユーザーは常にアクセストークンを受け取ります。 iOSユーザーはアクセストークンまたはJWTトークンを受け取ることができますが、Androidユーザーは常にアクセストークンを受け取ります。 iOSユーザーはアクセストークンまたはJWTトークンを受け取ることができますが、Androidユーザーは常にアクセストークンを受け取ります。
iOSユーザーはアクセストークンまたはJWTトークンを受け取ることができますが、Androidユーザーは常にアクセストークンを受け取ります。
iOSユーザーはアクセストークンまたはJWTトークンを受け取ることができますが、Androidユーザーは常にアクセストークンを受け取ります。| iOSユーザーはアクセストークンまたはJWTトークンを受け取ることができますが、Androidユーザーは常にアクセストークンを受け取ります。 | iOSユーザーはアクセストークンまたはJWTトークンを受け取ることができますが、Androidユーザーは常にアクセストークンを受け取ります。 | iOSユーザーはアクセストークンまたはJWTトークンを受け取ることができますが、Androidユーザーは常にアクセストークンを受け取ります。 | iOSユーザーはアクセストークンまたはJWTトークンを受け取ることができますが、Androidユーザーは常にアクセストークンを受け取ります。 |
|---|---|---|---|
| iOSユーザーはアクセストークンまたはJWTトークンを受け取ることができますが、Androidユーザーは常にアクセストークンを受け取ります。 | true | 何でも | __CAPGO_KEEP_0__ |
| iOS | false | トラッキングを許可する | __CAPGO_KEEP_0__ |
| iOS | false | トラッキングを拒否する | __CAPGO_KEEP_0__ (自動オーバーライド) |
| Android | 何でも | N/A | __CAPGO_KEEP_0__ (常に) |
バックエンド実装
バックエンド実装セクション-
トークンタイプを検出して対応する
async function loginWithFacebook() {try {const loginResult = await SocialLogin.login({provider: 'facebook',options: {permissions: ['email', 'public_profile'],limitedLogin: false // iOS: depends on ATT, Android: ignored}});if (loginResult.accessToken) {// Access token (Android always, iOS when tracking allowed)return handleAccessToken(loginResult.accessToken.token);} else if (loginResult.idToken) {// JWT token (iOS only when tracking denied or limitedLogin: true)return handleJWTToken(loginResult.idToken);}} catch (error) {console.error('Facebook login error:', error);}} -
Firebase統合例
import { OAuthProvider, FacebookAuthProvider, signInWithCredential } from 'firebase/auth';async function handleAccessToken(accessToken: string, nonce: string) {// For access tokens, use OAuthProvider (new method)const fbOAuth = new OAuthProvider("facebook.com");const credential = fbOAuth.credential({idToken: accessToken,rawNonce: nonce});try {const userResponse = await signInWithCredential(auth, credential);return userResponse;} catch (error) {console.error('Firebase OAuth error:', error);return false;}}async function handleJWTToken(jwtToken: string) {// For JWT tokens, send to your backend for validationtry {const response = await fetch('/api/auth/facebook-jwt', {method: 'POST',headers: {'Content-Type': 'application/json',},body: JSON.stringify({ jwtToken })});const result = await response.json();return result;} catch (error) {console.error('JWT validation error:', error);return false;}} -
バックエンドJWT検証
// Backend: Validate JWT token from Facebookimport jwt from 'jsonwebtoken';import { Request, Response } from 'express';app.post('/api/auth/facebook-jwt', async (req: Request, res: Response) => {const { jwtToken } = req.body;try {// Verify JWT token with Facebook's public key// See: https://developers.facebook.com/docs/facebook-login/limited-login/token/validating/#standard-claimsconst decoded = jwt.verify(jwtToken, getFacebookPublicKey(), {algorithms: ['RS256'],audience: process.env.FACEBOOK_APP_ID,issuer: 'https://www.facebook.com' // From: https://www.facebook.com/.well-known/openid-configuration/?_rdr});// Extract user info from JWTconst userInfo = {id: decoded.sub,email: decoded.email,name: decoded.name,isJWTAuth: true};// Create your app's session/tokenconst sessionToken = createUserSession(userInfo);res.json({success: true,token: sessionToken,user: userInfo});} catch (error) {console.error('JWT validation failed:', error);res.status(401).json({ success: false, error: 'Invalid token' });}}); -
汎用バックエンドトークンハンドラー
// Handle both token types in your backendasync function authenticateFacebookUser(tokenData: any) {if (tokenData.accessToken) {// Handle access token - validate with Facebook Graph APIconst response = await fetch(`https://graph.facebook.com/me?access_token=${tokenData.accessToken}&fields=id,name,email`);const userInfo = await response.json();return {user: userInfo,tokenType: 'access_token',expiresIn: tokenData.expiresIn || 3600};} else if (tokenData.jwtToken) {// Handle JWT token - decode and validate// See: https://developers.facebook.com/docs/facebook-login/limited-login/token/validating/#standard-claimsconst decoded = jwt.verify(tokenData.jwtToken, getFacebookPublicKey());return {user: {id: decoded.sub,name: decoded.name,email: decoded.email},tokenType: 'jwt',expiresIn: decoded.exp - Math.floor(Date.now() / 1000)};} else {throw new Error('No valid token provided');}}
重要な考慮事項
重要な考慮事項セクション標準ログイン用アクセストークン:
- ✅ Android: iOS の制限が適用されないため、常に利用可能
- ✅ iOS: ユーザーがアプリのトラッキングを明示的に許可する場合にのみ発生
- ✅ Can be used to access Facebook Graph API
- ✅ iOS の期限切れ時間が長くなる
- ✅ ユーザーから得られるデータが増える
- ❌ iOS で iOS のトラッキング拒否率が増加するため、iOS で利用されることが減る Android
: iOS のプライバシー モードでは使用できないため、発生しない:
- ❌ iOS✅ Facebook Graph にアクセスできる__CAPGO_KEEP_0__
- ✅ ✅ iOS の期限切れ時間が長くなる: iOS のトラッキング拒否または
limitedLogin: true - ✅ iOS ユーザープライバシー設定を尊重
- ❌ 基本的なユーザー情報のみ
- ❌ 短い有効期限
- ❌ Facebook Graph にアクセスできません API
- ⚠️ iOS ユーザーの最も一般的なシナリオ
プラットフォーム固有の動作:
- iOS アプリ: アクセストークンと JWT トークン両方を処理する必要があります
- Android アプリ: アクセストークンだけを処理する必要があります
- クロスプラットフォーム アプリ: iOS アプリでは両方のトークン処理方法を実装する必要があります。
「Web セキュア コンテキスト要件 (Web/Capacitor)」というセクション
Crypto Capacitor の制限「Crypto API の制限」というセクション
Section titled “Crypto API Limitations”Web Crypto __CAPGO_KEEP_0__ Web Crypto API 両方のトークン処理方法を実装する必要があります。 安全なコンテキスト:
// This requires secure context (HTTPS or localhost)async function sha256(message: string) { const msgBuffer = new TextEncoder().encode(message); const hashBuffer = await crypto.subtle.digest("SHA-256", msgBuffer); // ❌ Fails in insecure context // ...}開発環境の問題
開発環境の問題一般的な問題: ionic serve HTTP URLの場合、Facebookの認証が機能しません
| 環境 | Crypto API利用可能 | Facebookログインが機能します |
|---|---|---|
http://localhost:3000 | ✅ はい | ✅ はい |
http://127.0.0.1:3000 | ✅ はい | ✅ はい |
http://192.168.1.100:3000 | ❌ いいえ | ❌ いいえ |
https://any-domain.com | ✅ はい | ✅ はい |
Capacitor 開発用のソリューション
Capacitor 開発用のソリューション-
localhost を使用して Web テスト
ターミナル画面 # Instead of ionic serve --host=0.0.0.0ionic serve --host=localhost -
Ionic で HTTPS を有効にする
ターミナル画面 ionic serve --ssl -
実機でテスト
ターミナル画面 # Capacitor apps run in secure context on devicesionic cap run iosionic cap run android -
開発用の代替の非接頭辞生成
async function generateNonce() {if (typeof crypto !== 'undefined' && crypto.subtle) {// Secure context - use crypto.subtlereturn await sha256(Math.random().toString(36).substring(2, 10));} else {// Fallback for development (not secure for production)console.warn('Using fallback nonce - not secure for production');return btoa(Math.random().toString(36).substring(2, 10));}}
Firebase統合注意事項
「Firebase統合注意事項」セクション最近のFirebaseドキュメントでは、Facebook認証のためにJWTトークンと非接頭辞が必要です。ログイン設定に関係なく、このアプローチは両方とも機能します。 limitedLogin: true クリップボードにコピー limitedLogin: false:
// Both modes can return JWT tokens depending on user choice const loginResult = await SocialLogin.login({ provider: 'facebook', options: { permissions: ['email', 'public_profile'], limitedLogin: false, // true = always JWT, false = depends on user tracking choice nonce: nonce } });__CAPGO_KEEP_0__: Facebookログインが機能しない場合、__CAPGO_KEEP_0__制限のため、ローカルホスト以外のネットワークIPで実行している場合です。ローカルホストまたはHTTPSでWebテストを実行してください。 ionic serve on a network IP (not localhost), Facebook login will fail due to crypto API restrictions. Use localhost or HTTPS for web testing.
トラブルシューティング
Section titled “Common Issues and Solutions”Section titled “Common Issues and Solutions”
AndroidでKey Hashエラー-
正しいKey HashをFacebookダッシュボードに追加していることを確認してください。
- Key hash errors on Android
- リリースビルドの場合、デバッグとリリースの両方のキー ハッシュを追加してください
- 正しいキーストアを使用していることを確認してください
-
Facebookログインボタンが表示されない
- すべてのmanifestエントリが正しいことを確認してください
- Facebook App IDとClient Tokenが正しいことを確認してください
- SDK を適切に初期化していることを確認してください
-
iOSの一般的な問題
- Info.plistのすべてのエントリが正しいことを確認してください
- URLスキームが適切に設定されていることを確認してください
- Facebookダッシュボードに登録されているbundle IDと一致していることを確認してください
テスト
「テスト」のセクション-
テストする前に、Facebook Developer Consoleでテストユーザーを追加してください
- ロール > テストユーザーに移動してください
- テストユーザーを作成してください
- テストに使用するクレデンシャルを使用してください
-
両方のデバッグとリリースビルドをテストしてください
- デバッグビルドにデバッグキー ハッシュを使用してください
- リリースビルドにリリースキー ハッシュを使用してください
- エミュレータと物理デバイス両方でテストしてください
成功したログイン、ログインのキャンセル、エラーハンドリングを含むフルログインフローをテストしてください
- __CAPGO_KEEP_0__
- __CAPGO_KEEP_0__
- __CAPGO_KEEP_0__
- ログアウト機能