
Supabase Googleログイン - 一般設定
このプラグインのセットアップコマンドとマークダウンガイドの全体をコピーできます。
このガイドでは、Capacitor Social Login プラグインを使用して、Supabase Authentication と Google Sign-In を統合する方法を説明します。このセットアップでは、モバイルプラットフォームでネイティブの Google Sign-In を使用し、バックエンドの認証に Supabase Auth を活用できます。
前提条件
「前提条件」開始する前に、以下を確認してください。
-
「 context read_the_style_guide
-
」を読みました。
SupabaseでGoogle OAuthプロバイダを有効にする
タイトル: SupabaseでGoogle OAuthプロバイダを有効にする-
あなたの Supabaseダッシュボード
-
あなたのプロジェクト
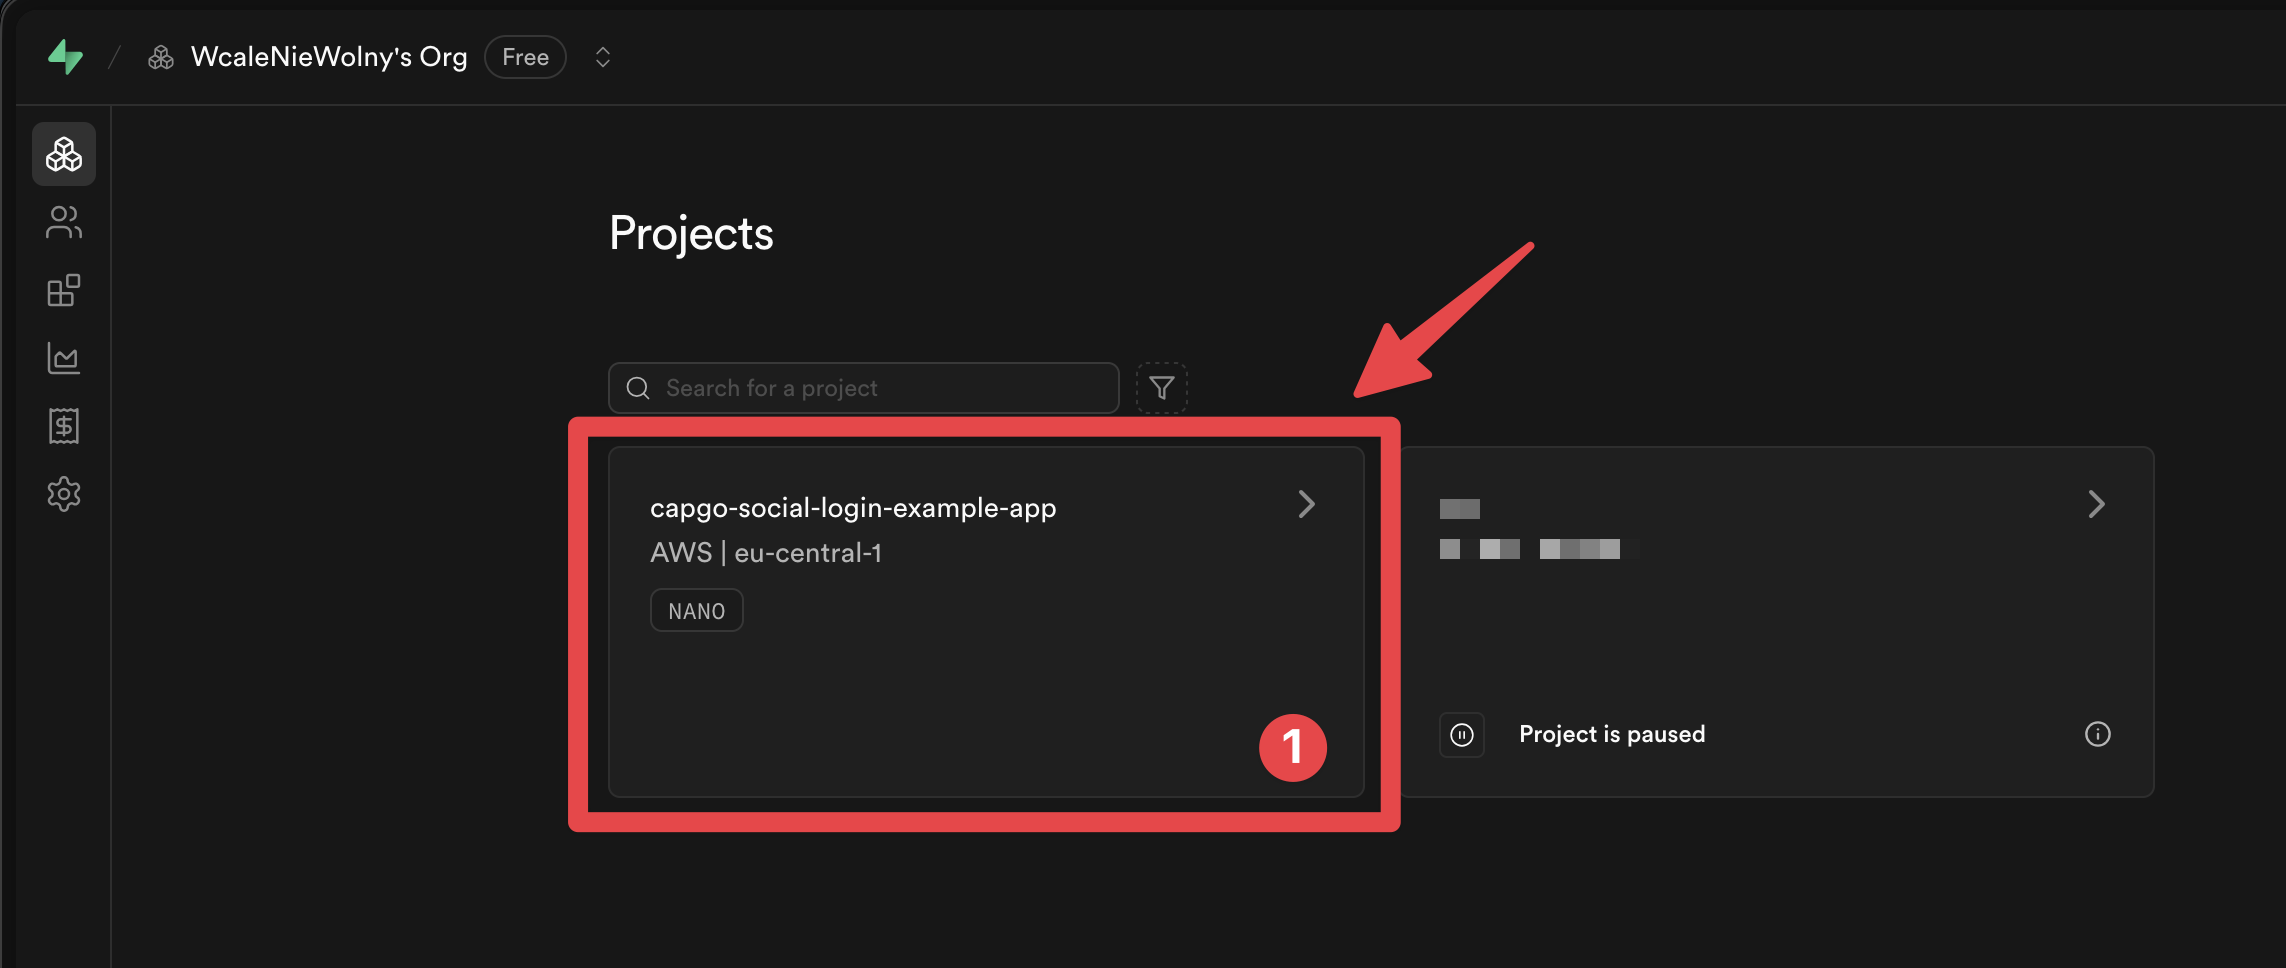
-
ここに移動してください
Authenticationメニュー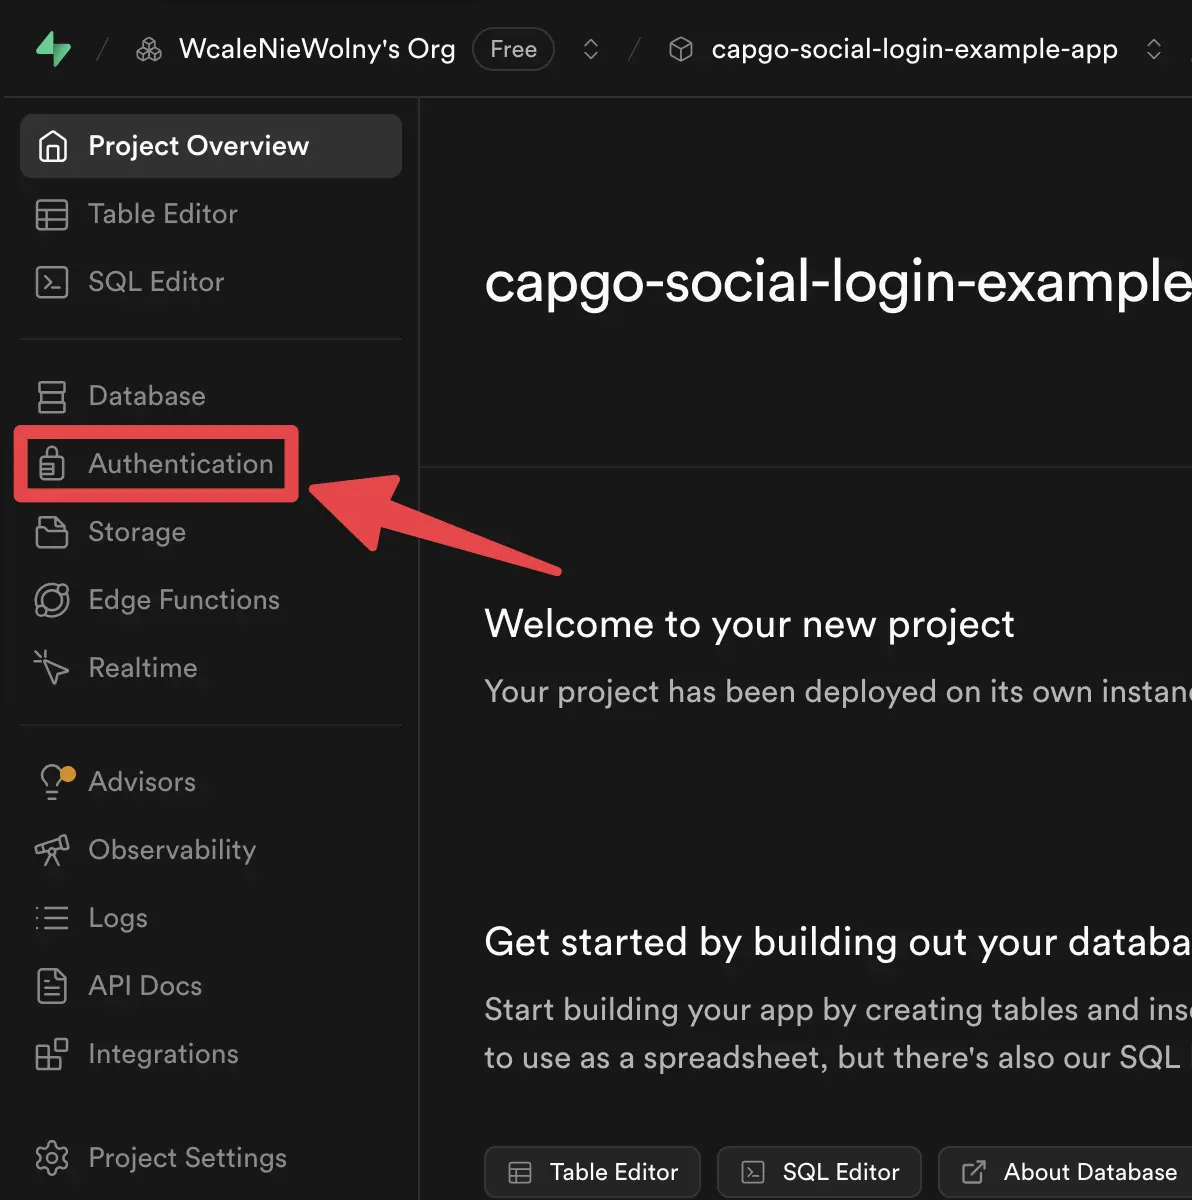
-
ここをクリックしてください
Providersタブ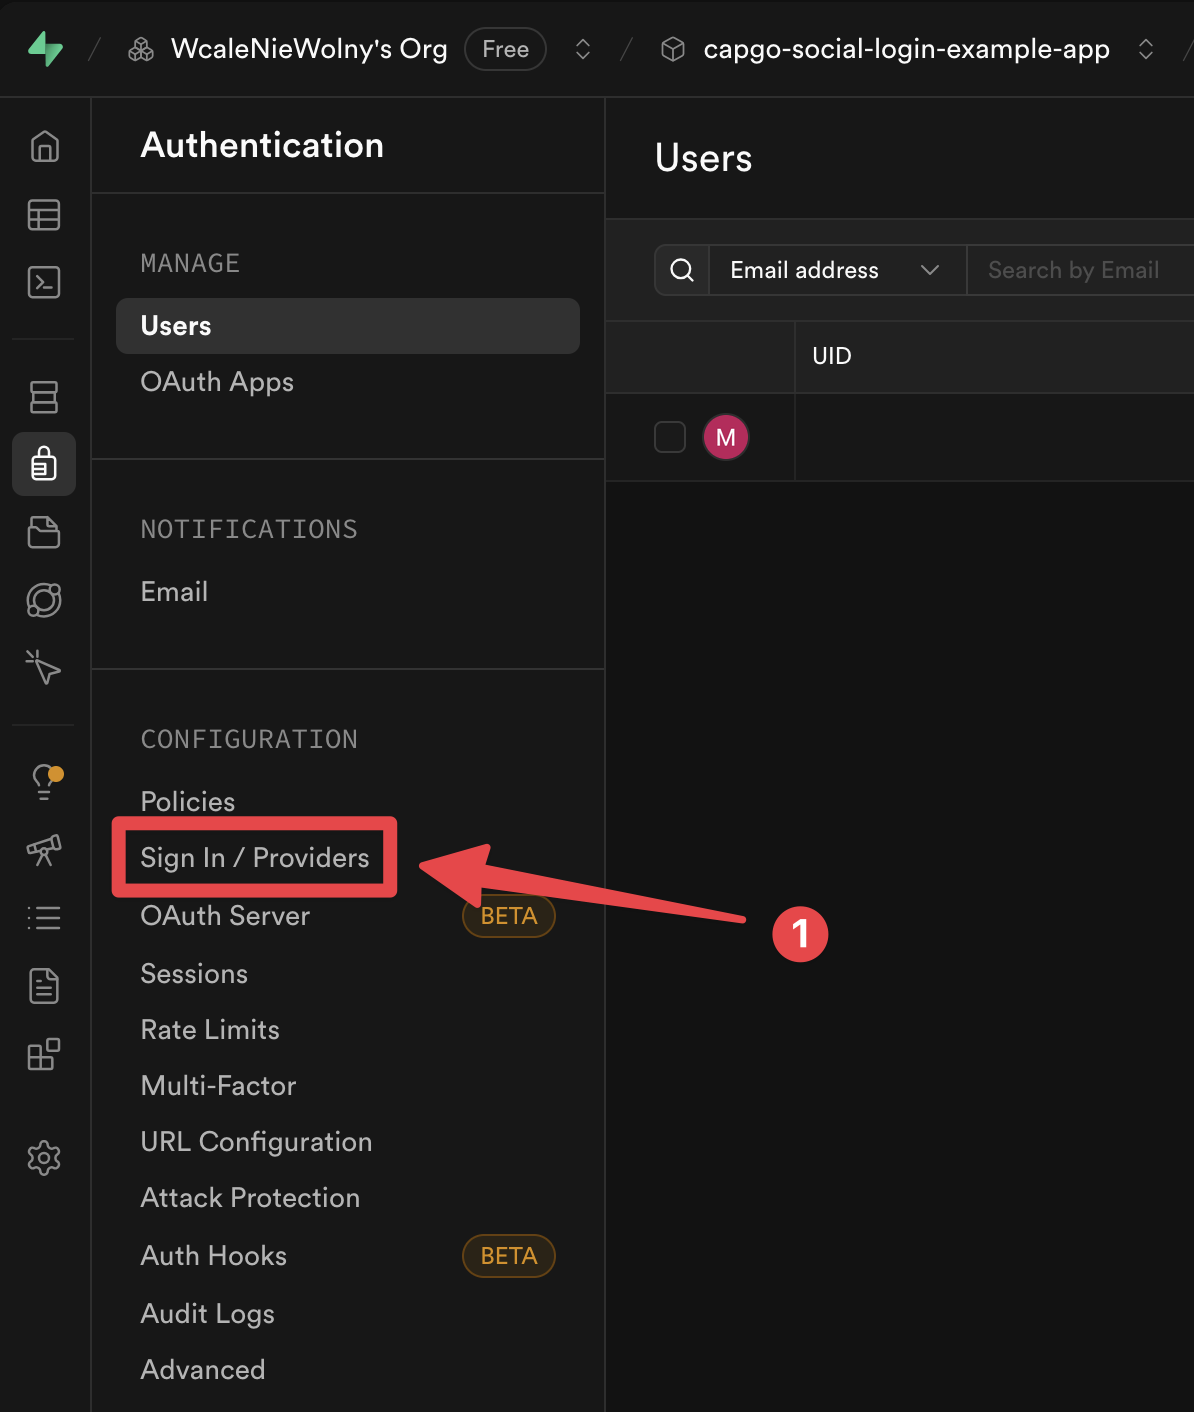
-
見つける
Googleプロバイダー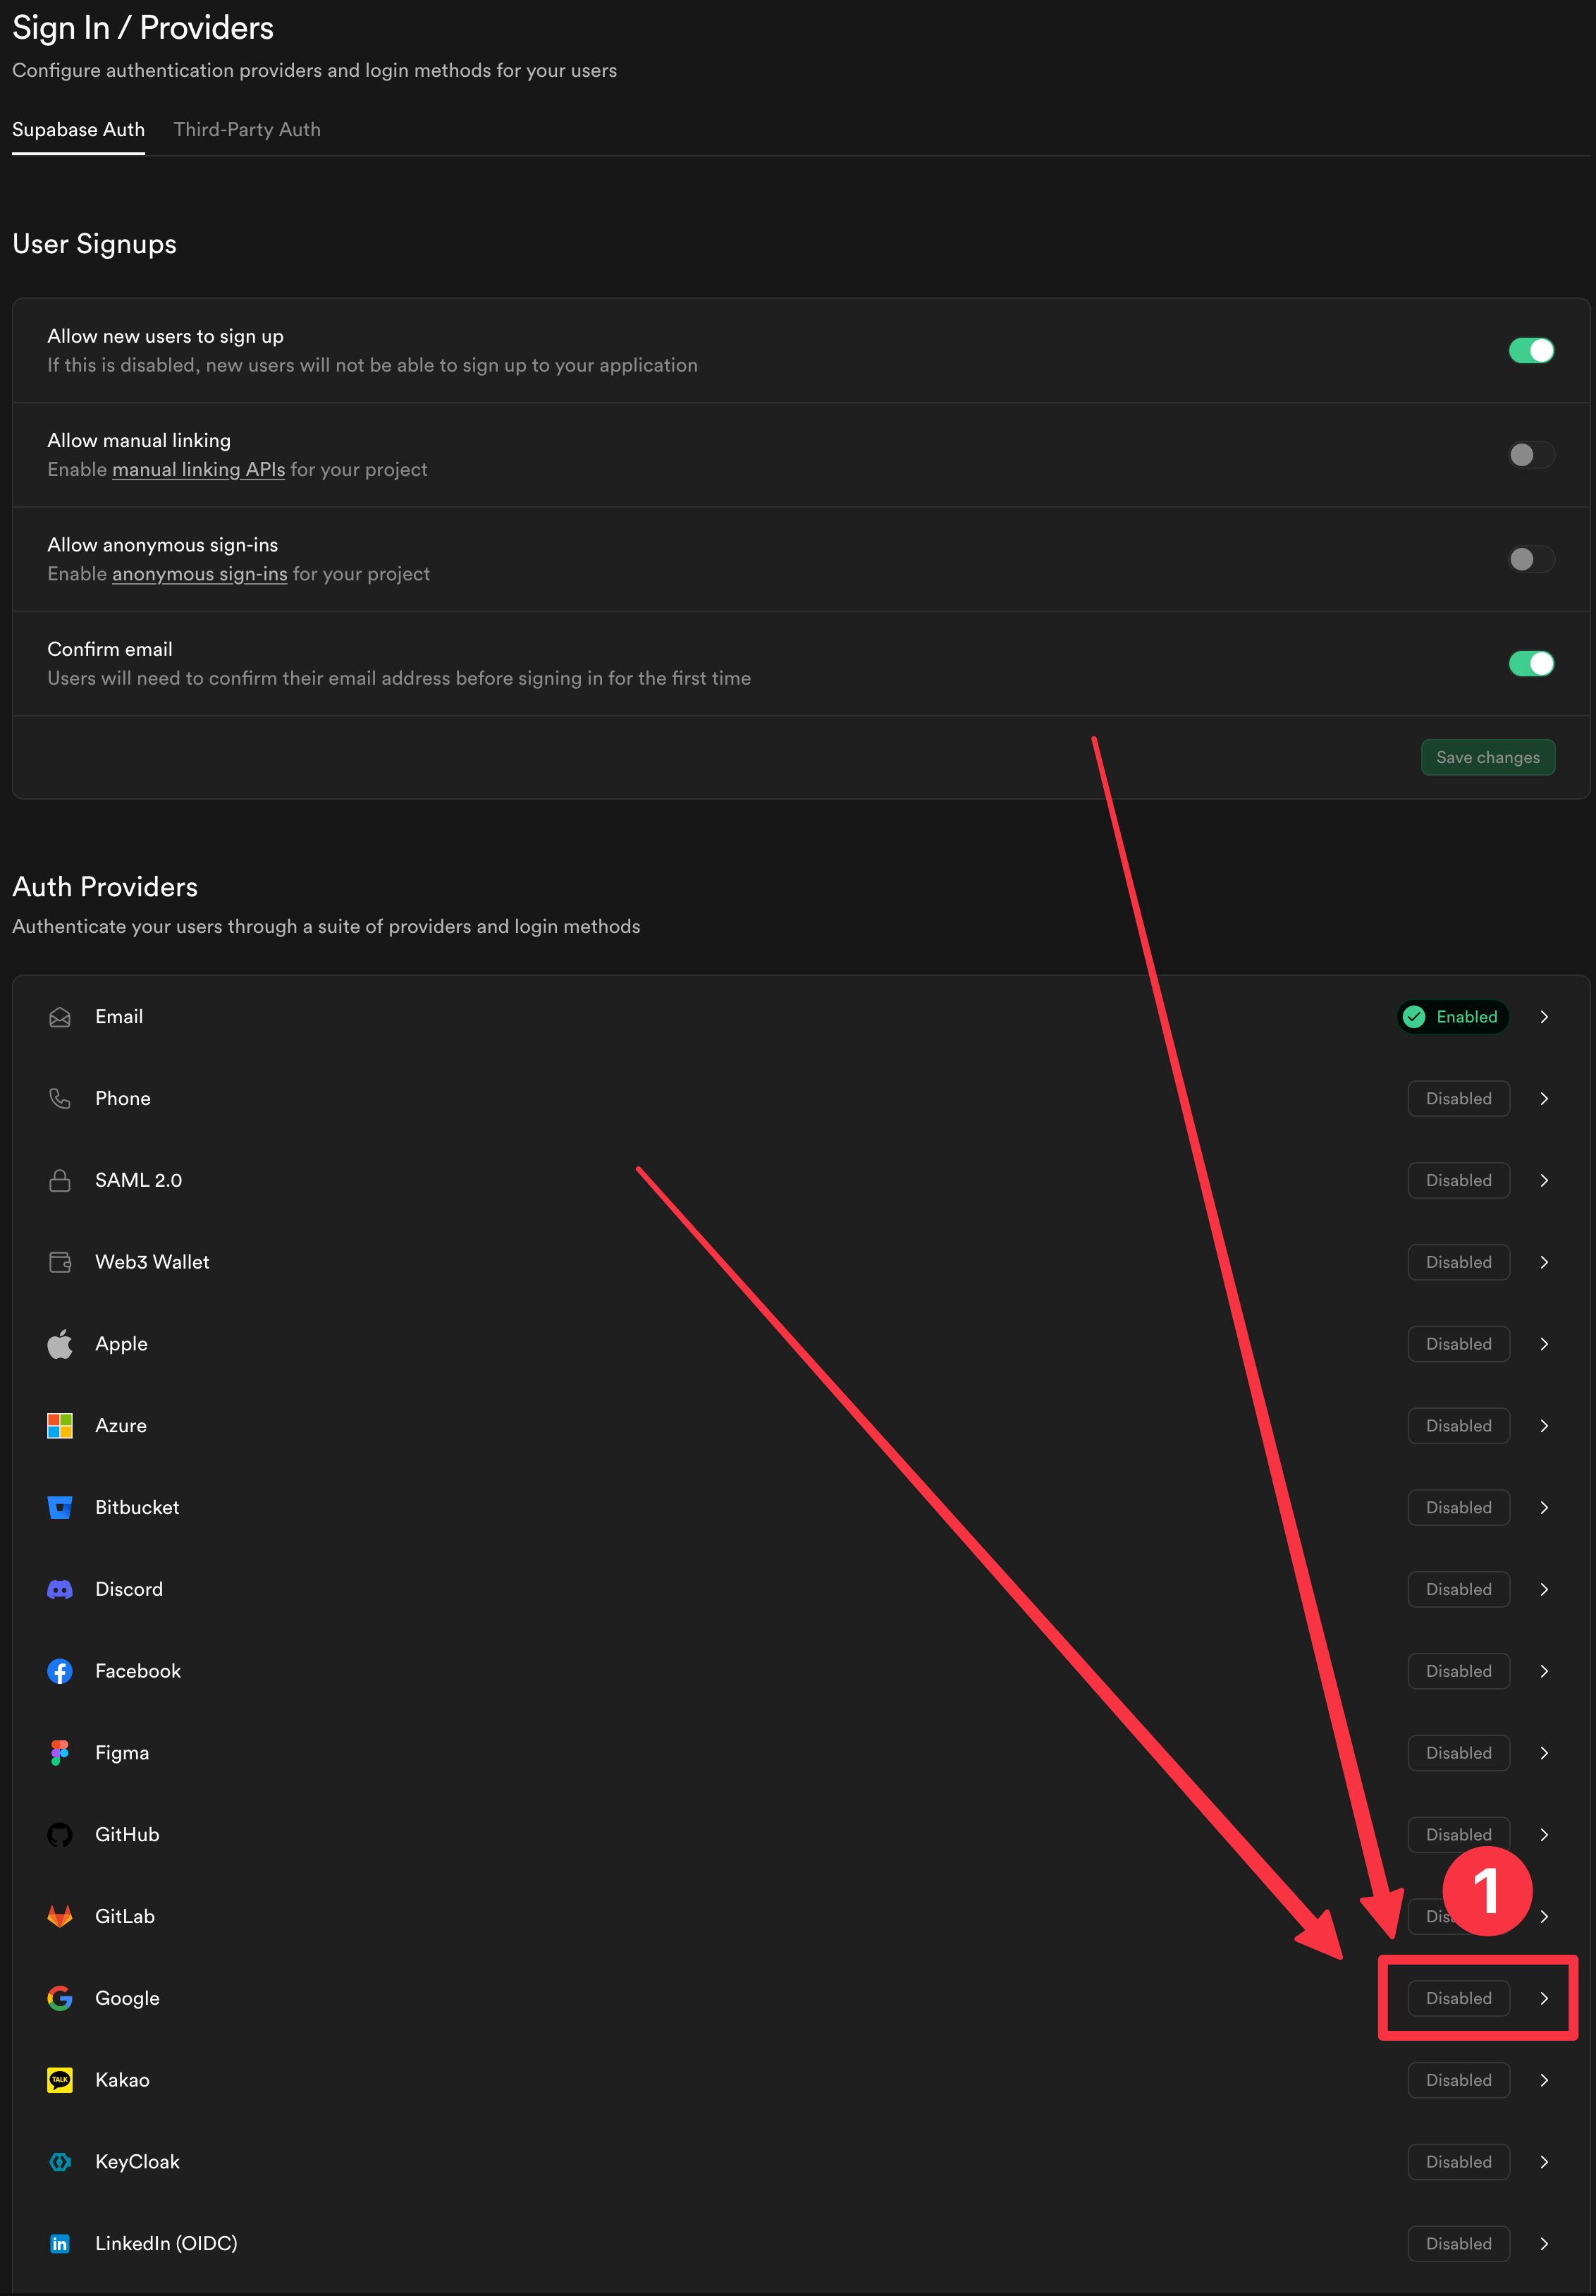
-
プロバイダーを有効化する
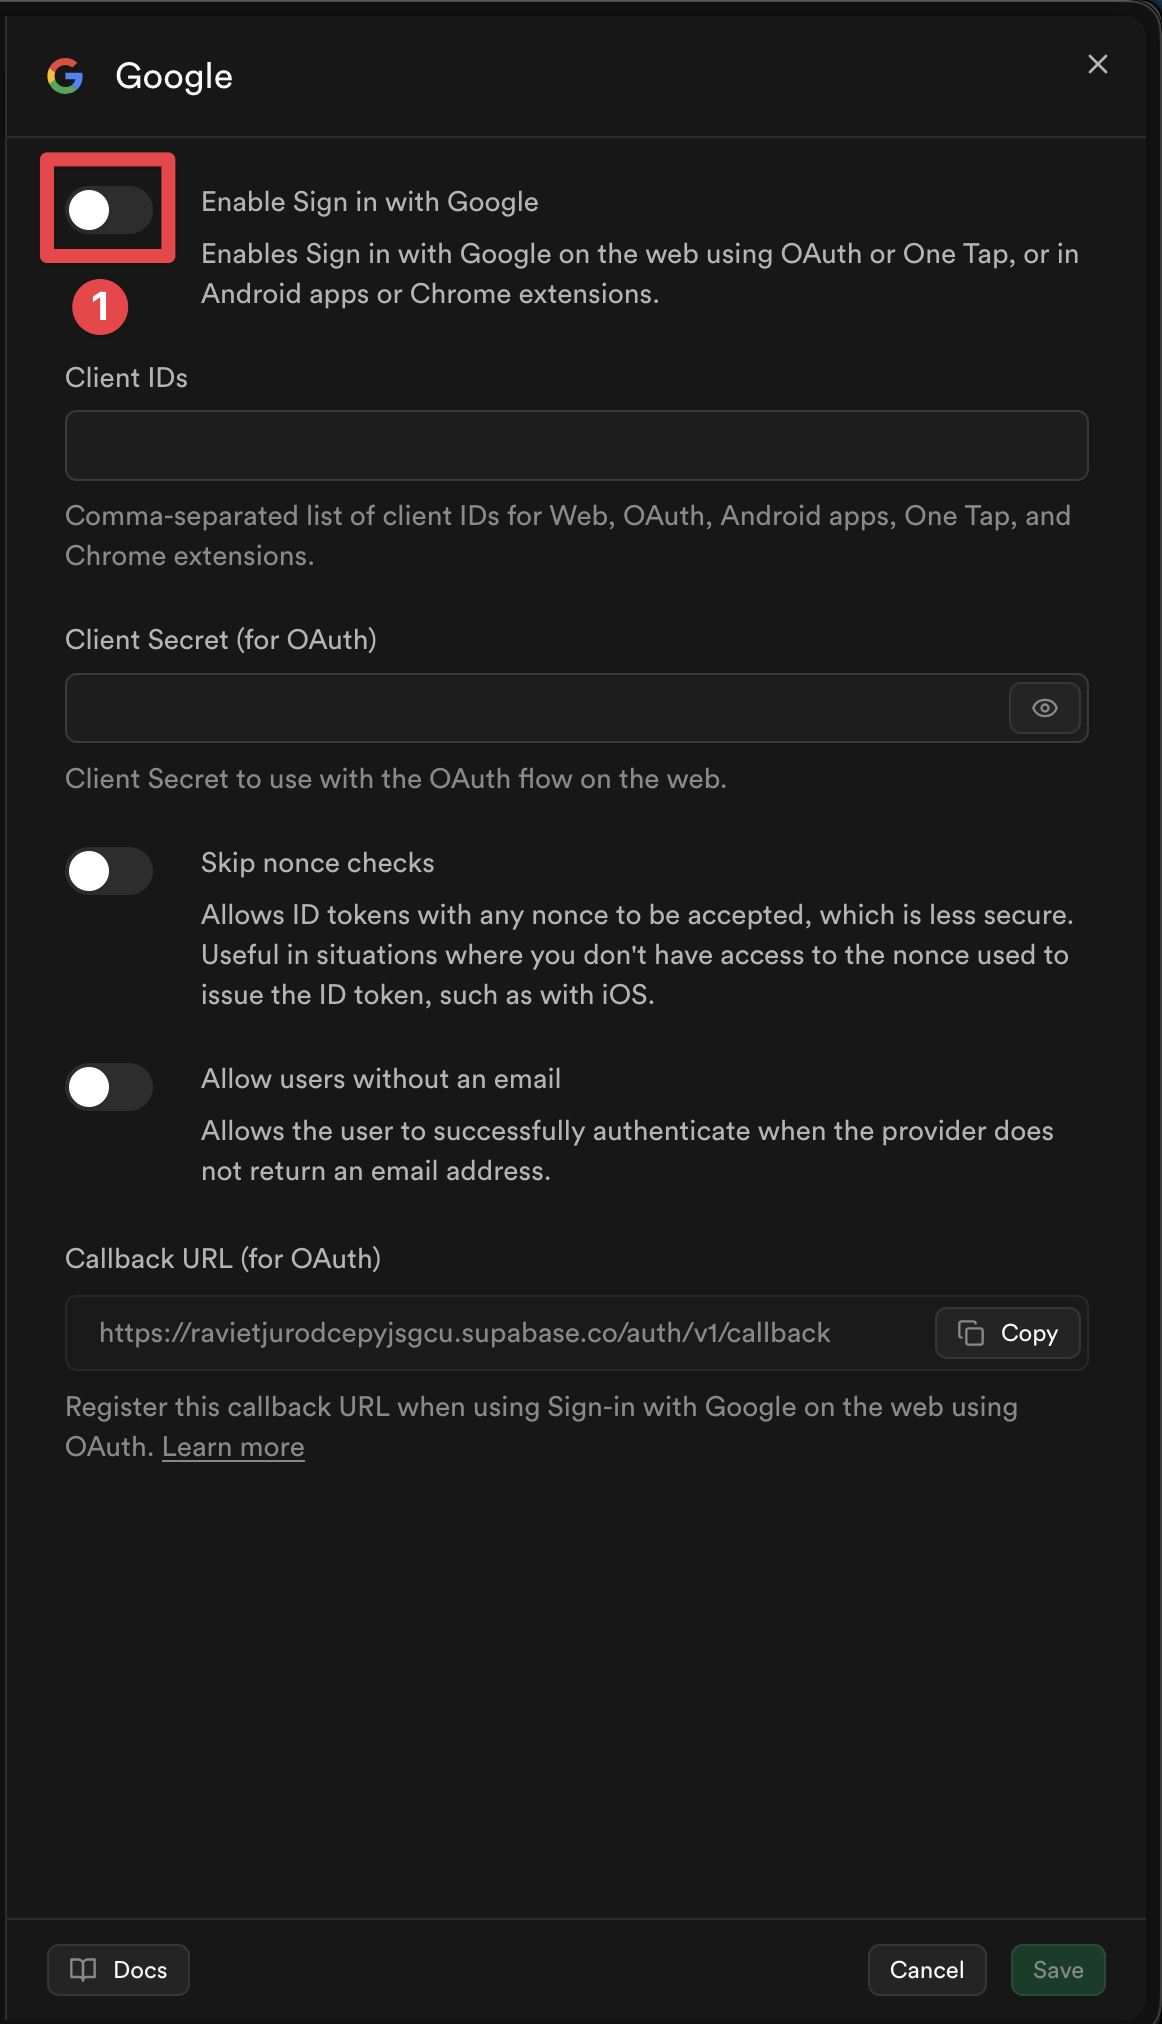
-
使用するプラットフォームのクライアントIDを追加する
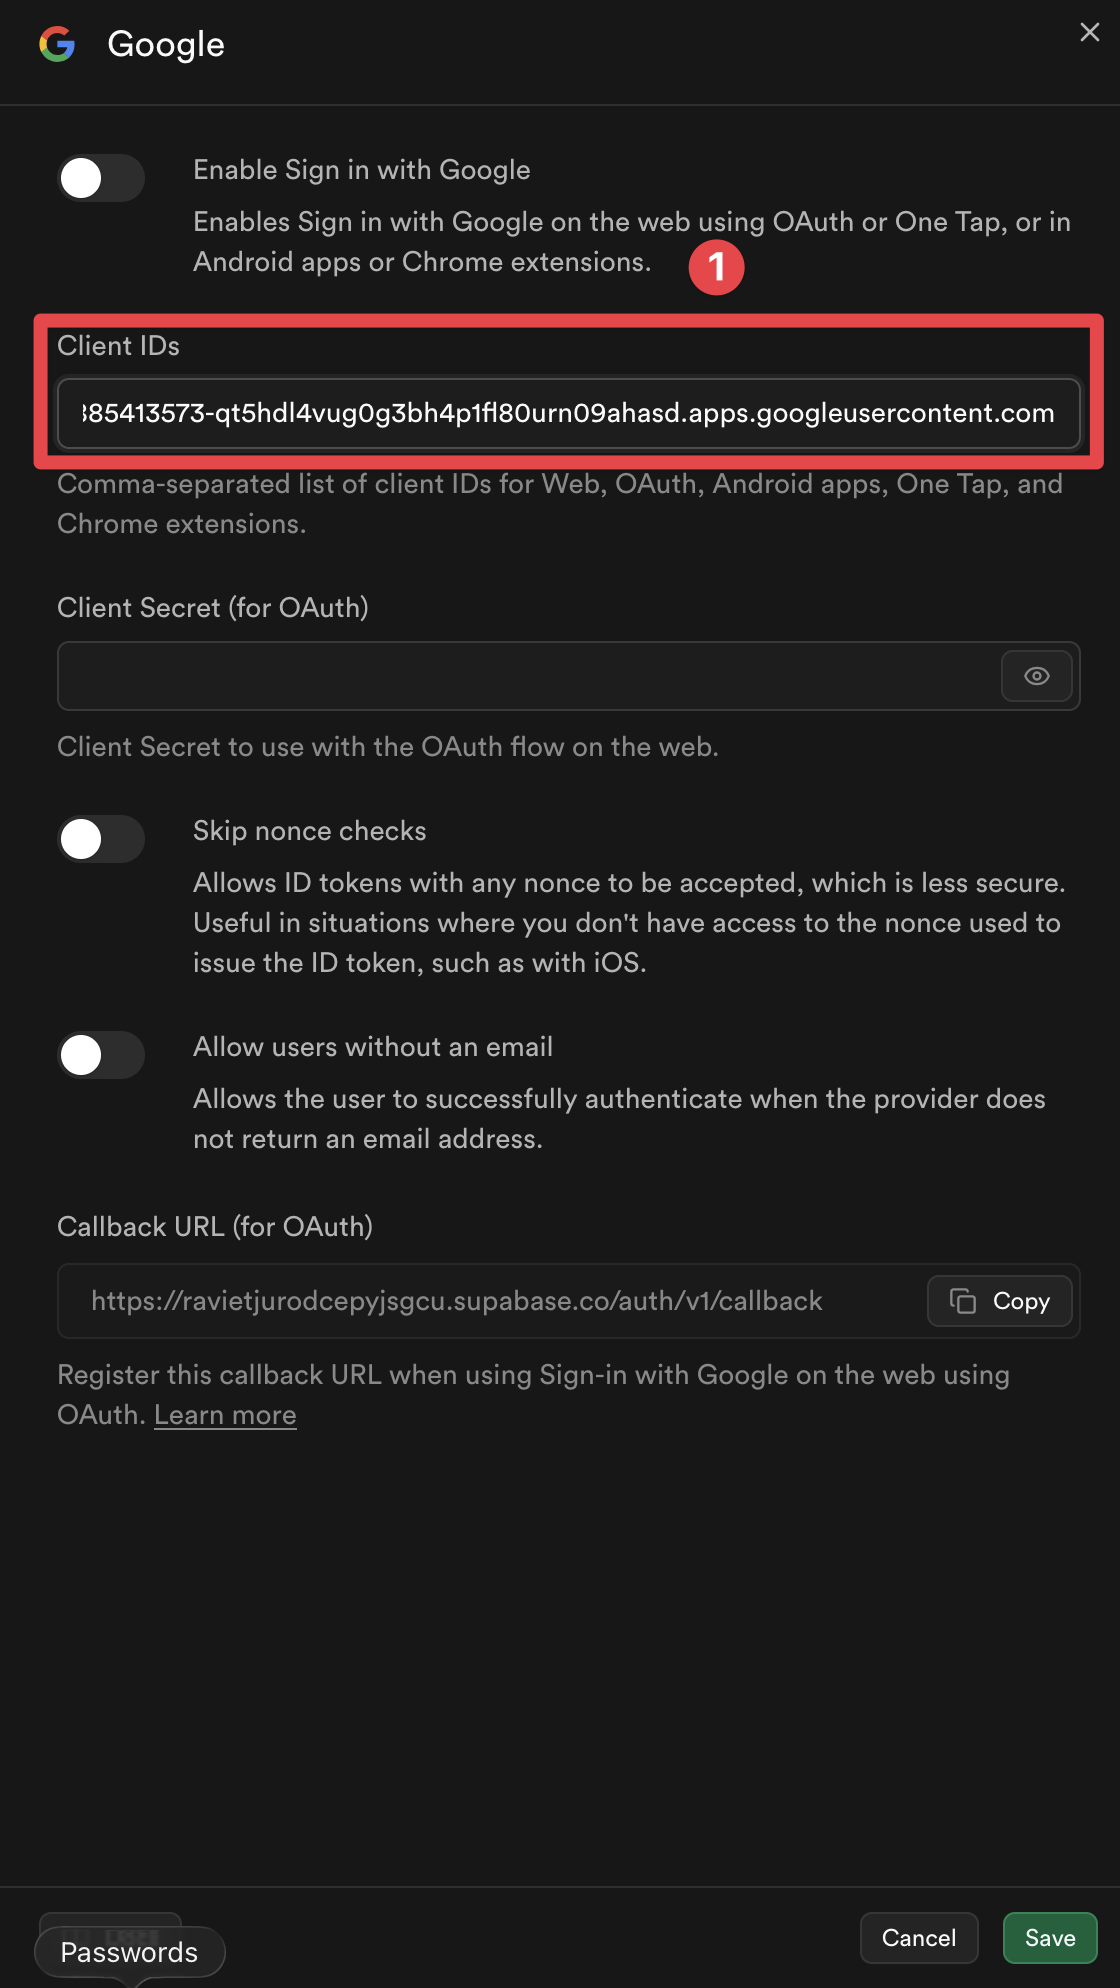
-
クリックしてください。
Saveボタン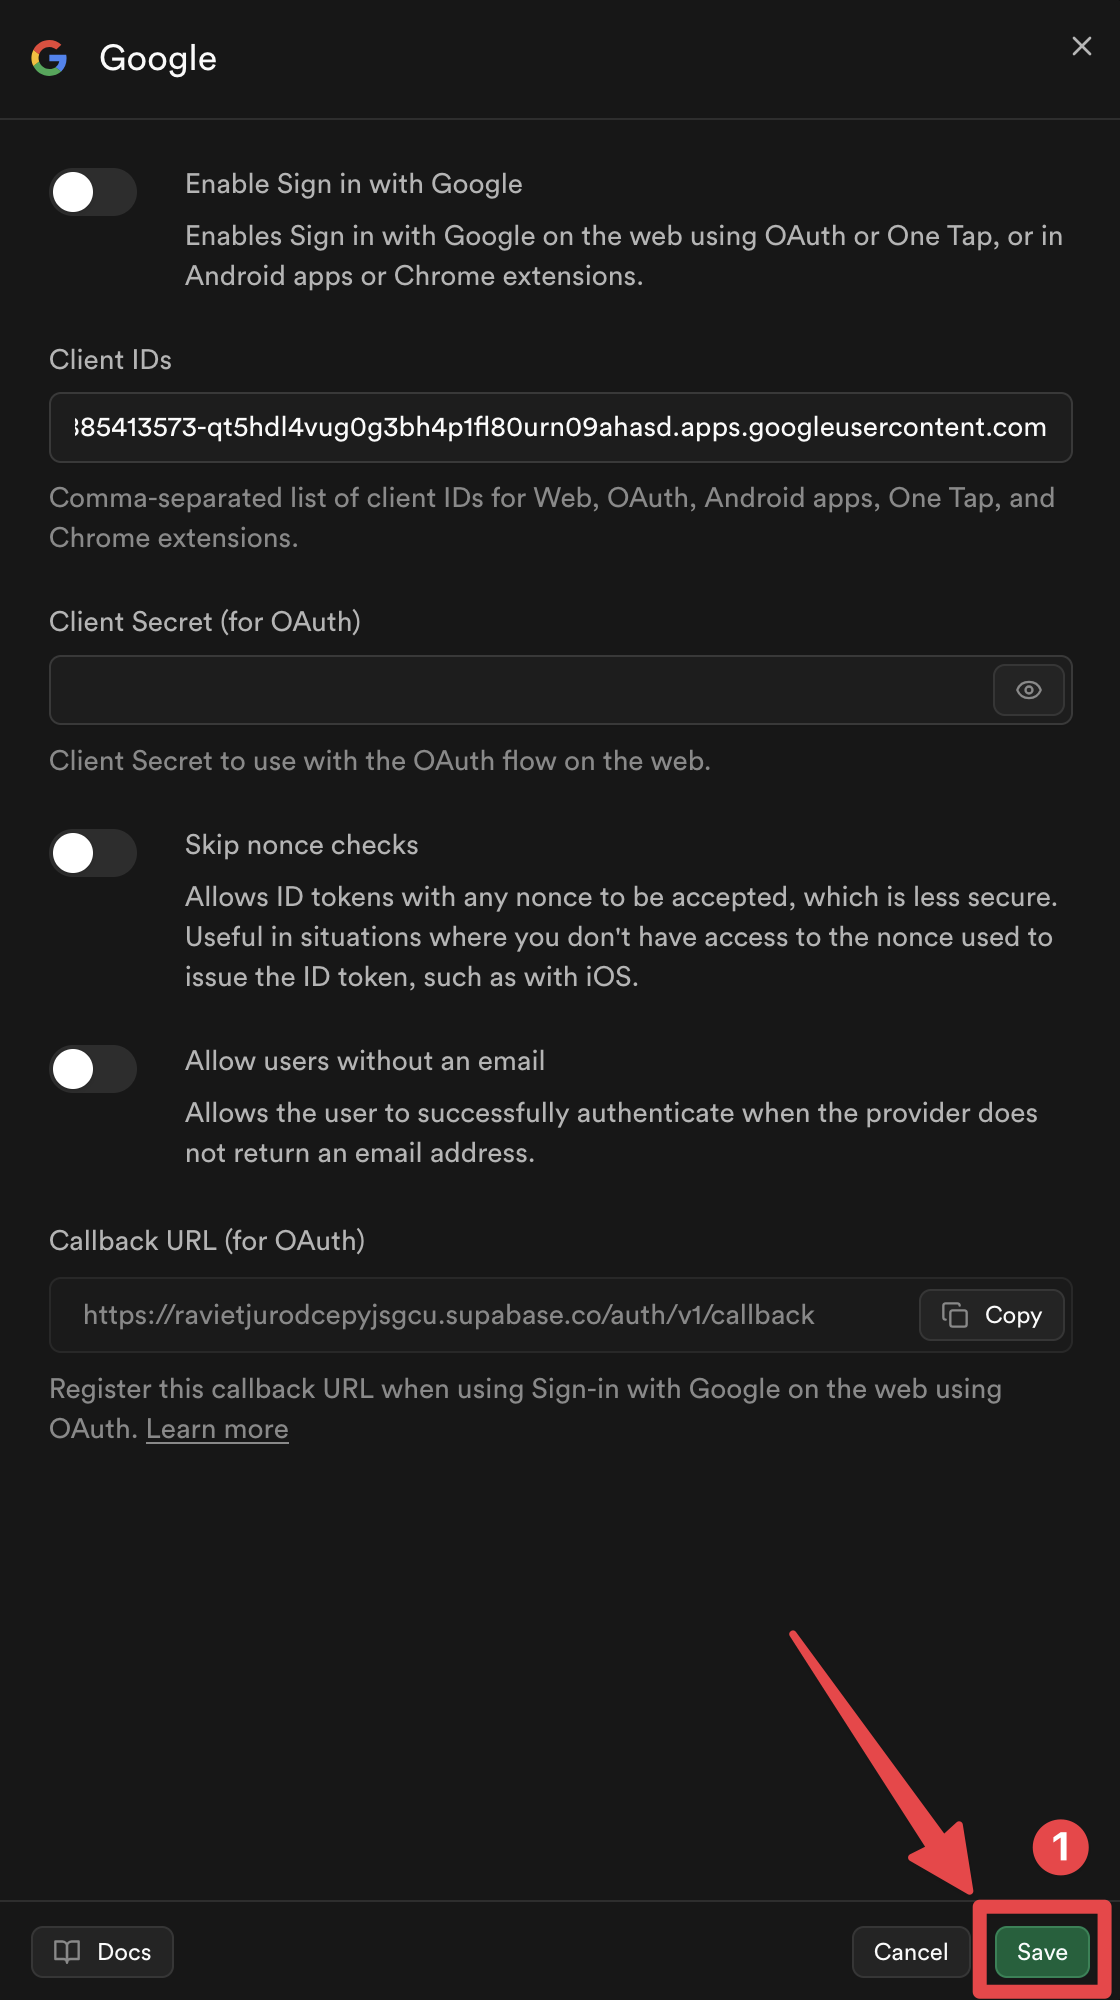
ボタン
Google Sign-InとSupabase認証ヘルパーの機能について
「Google Sign-InとSupabase認証ヘルパーの機能」このセクションでは、Google Sign-InとSupabaseの統合の内部動作を説明します。 このフローを理解することで、認証プロセスの実装とトラブルシューティングを支援できます。
1. Nonceの生成
「1. Nonceの生成」実装では、SupabaseのNonceの要件に従って安全なNonceのペアを生成します。 protectedTokens:
// Generate URL-safe random noncefunction getUrlSafeNonce(): string {  const array = new Uint8Array(32);  crypto.getRandomValues(array);  return Array.from(array, (byte) => byte.toString(16).padStart(2, '0')).join('');}
// Hash the nonce with SHA-256async function sha256Hash(message: string): Promise<string> {  const encoder = new TextEncoder();  const data = encoder.encode(message);  const hashBuffer = await crypto.subtle.digest('SHA-256', data);  const hashArray = Array.from(new Uint8Array(hashBuffer));  return hashArray.map((b) => b.toString(16).padStart(2, '0')).join('');}
// Generate nonce pairasync function getNonce(): Promise<{ rawNonce: string; nonceDigest: string }> {  const rawNonce = getUrlSafeNonce();  const nonceDigest = await sha256Hash(rawNonce);  return { rawNonce, nonceDigest };}
フロー:
rawNonce: URL安全のランダム文字列 (64 桁の 16 進数)nonceDigest: SHA-256 ハッシュのrawNonce: (16 進数エンコード)nonceDigestは Google Sign-In に渡されます → Google は ID トークンに非接続ダイジェストを含みますrawNonceは Supabase に渡されます → Supabase は非接続ダイジェストのハッシュ化とトークンの非接続ダイジェストと比較を行います
2. Google Sign-In
セクションのタイトル「2. Google Sign-In」関数はプラグインを初期化し、Google でサインインします:
await SocialLogin.initialize({  google: {    webClientId: 'YOUR_WEB_CLIENT_ID.apps.googleusercontent.com',    // iOS only:    iOSClientId: 'YOUR_IOS_CLIENT_ID.apps.googleusercontent.com',    mode: 'online', // Required to get idToken  },});
const response = await SocialLogin.login({  provider: 'google',  options: {    scopes: ['email', 'profile'],    nonce: nonceDigest, // Pass the SHA-256 hashed nonce  },});
3. JWT 検証
3. JWT検証セクションSupabaseにトークンを送信する前に、実装はJWTトークンを検証します:
function validateJWTToken(idToken: string, expectedNonceDigest: string): { valid: boolean; error?: string } {  const decodedToken = decodeJWT(idToken);
  // Check audience matches your Google Client IDs  const audience = decodedToken.aud;  if (!VALID_GOOGLE_CLIENT_IDS.includes(audience)) {    return { valid: false, error: 'Invalid audience' };  }
  // Check nonce matches  const tokenNonce = decodedToken.nonce;  if (tokenNonce && tokenNonce !== expectedNonceDigest) {    return { valid: false, error: 'Nonce mismatch' };  }
  return { valid: true };}
なぜSupabase前に検証する必要があるのですか?
Supabaseにトークンを送信する前にJWTトークンを検証することは、重要な目的を果たします:
-
無効な要求を防ぐ: トークンに不正な受信者またはnonceの不一致がある場合、Supabaseはトークンを却下します。検証することで、不必要なAPI呼び出しを回避し、明確なエラーメッセージを提供できます。
-
トークンキャッシュに関する問題: iOSなどのプラットフォーム (特にiOS) で、Google Sign-In SDK がトークンをキャッシュする場合、キャッシュされたトークンは、キャッシュされたトークンが生成されたnonce (またはnonceが存在しない場合) と異なるnonceを持つ可能性があります。これにより、Supabaseはトークンを「nonceの不一致」エラーで却下します。トークンをSupabaseに送信する前に検証することで、早期にこの問題を検出し、自動的に新しいトークンで再試行できます。
-
セキュリティ コンテキスト: Enterprise製品/価格ページ。役割: UIラベル。ページ: enterprise.astro。
-
(iOS): iOSでは、検証により、トークンが特定のGoogle Client IDに発行されたことを確認できます。これにより、他のアプリケーション用に意図されたトークンを使用することによる潜在的なセキュリティ上の問題を防ぐことができます。: iOS のキャッシュ問題を透明に処理するために、自動リトライロジックをサポートするため、Supabase で問題を検出することができます。
検証が失敗した場合、関数は自動的に:
- Google からログアウト (キャッシュされたトークンをクリア - iOS で重要)
- 再認証を 1 回実行 (正しい nonce を使用して新しいトークンを生成)
- 再試行も失敗した場合、エラーを返す
4. Supabase サインイン
セクション "4. Supabase Sign-In"検証されたトークンは、次に Supabase に送信されます:
const { data, error } = await supabase.auth.signInWithIdToken({ provider: 'google', token: googleResponse.idToken, nonce: rawNonce, // Pass the raw (unhashed) nonce});完全な Code リファレンス
セクション "完全な Code リファレンス"完全な実装は、 サンプルアプリの supabaseAuthUtils.ts ファイル、以下を含みます:
getUrlSafeNonce()- URL安全のランダムなnonceを生成するsha256Hash()- SHA-256で文字列をハッシュするgetNonce()- nonce pairを生成するdecodeJWT()- JWTトークンをデコードするvalidateJWTToken()- JWTの受信者とnonceを検証するauthenticateWithGoogleSupabase()- 自動リトライを含む主な認証関数
追加の例ファイル
「追加の例ファイル」のセクション- SupabasePage.tsx - リダイレクトハンドリングを含む例のコンポーネント (Web)
- Supabaseアカウント作成ページ.tsx - Googleアカウント作成ページの例
次のステップ
セクション「次のステップ」このプラットフォーム向けの設定ガイドに進んでください。
Supabase Google ログイン - 一般設定から続きます
セクション「Supabase Google ログイン - 一般設定から続きます」このプラットフォーム向けの設定ガイドに進んでください。 Supabase Google ログイン - 一般設定 認証とアカウントフローの計画に役立つため、接続してください。 Capgoで@capgo/capacitor-social-loginを使用します。 Using @capgo/capacitor-social-login Using @capgo/capacitor-social-login Using @capgo/capacitor-social-login Using @capgo/capacitor-passkey Using @capgo/capacitor-passkey Using @capgo/capacitor-native-biometric Using @capgo/capacitor-native-biometric 2要素認証 Two-factor authentication