はじめに
インストール手順とフルマークダウンガイドを含むセットアップコマンドをコピーしてください。
        Set up this Capacitor plugin in the project.

Use the package manager already used by the project.
Install these package(s): `@capgo/capacitor-updater`
Run the required Capacitor sync/update step after installation.
Read this markdown guide for the full setup steps: https://raw.githubusercontent.com/Cap-go/website/refs/heads/main/apps/docs/src/content/docs/docs/plugins/updater/local-dev/getting-started.mdx
Use that guide for platform-specific steps, native file edits, permissions, config changes, imports, and usage setup.
If that guide references other docs pages, read them too.
このチュートリアルで扱うこと
「このチュートリアルで扱うこと」スクラッチからSupabaseを開始し、エッジ関数を開始する方法を示します。
必要なもの
セクション「必要なもの」はじめるには
supabase startNext should see something like this:
Started supabase local development setup.
         API URL: http://localhost:54321     GraphQL URL: http://localhost:54321/graphql/v1          DB URL: postgresql://postgres:postgres@localhost:54322/postgres      Studio URL: http://localhost:54323    Inbucket URL: http://localhost:54324      JWT secret: [truncated]        anon key: supa_key_anonservice_role key: supa_key_admin
Next open configs.json と以下の値を設定
{ "base_domain": { "prod": "console.capgo.app", "development": "development.console.capgo.app", "local": "localhost:3332" }, "supa_anon": { "prod": "supa_key_anon", "development": "supa_key_anon", "local": "supa_key_anon" }, "supa_url": { "prod": "http://localhost:54321", "development": "http://localhost:54321", "local": "http://localhost:54321" }}は supa_key_anon は前のステップの値です。
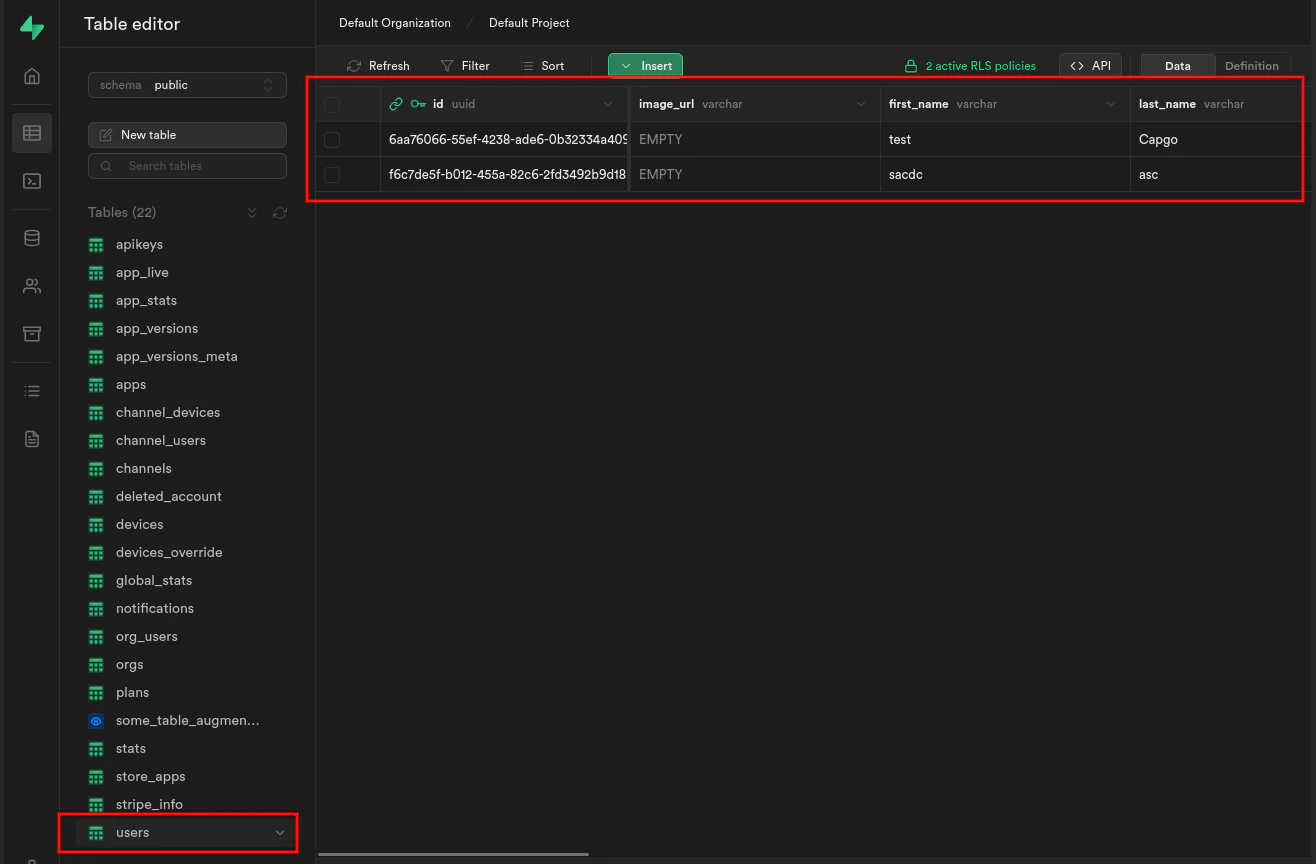
次に、localhost:54323にアクセスしてみてください と、テーブルが以下のように表示されることを確認してください ユーザー情報を表示するSupabaseダッシュボード users エッジ関数を開始するには、以下のコマンドを実行してください
コピー
supabase functions serve__CAPGO_KEEP_0__
bun run serveGetting startedから続ける
Getting startedから続けるセクションCapgoを使用している場合 Getting started nativeプラグインの作業を計画するには、Capacitorを接続します。 @capgo/capacitor-updaterを使用してnative capabilityを接続する @capgo/capacitor-updaterを使用してnative capabilityを接続する Capgo Plugin Directory Capgo Plugin Directoryを使用してproduct workflowを接続する Capacitor Plugins by Capgo Capacitor プラグインの実装詳細については、Capgo で確認してください。 プラグインの追加または更新 __CAPGO_KEEP_0__ プラグインの実装詳細については、プラグインの追加または更新、 Ionic Enterprise プラグインの代替 Ionic Enterprise プラグインの代替の製品ワークフローについては、